

Page 1
Quick Start Guide
TeleEye MX125E-HD Network Camera
This Quick Start Guide will guide you how to install and configure the TeleEye MX125E-HD Network
Camera for remote video monitoring.
1. Camera Installation
Step 1
Step 2
Step 3
Step 4
Start sureSIGHT or a web browser to start a remote video monitoring in order to adjust
the camera.
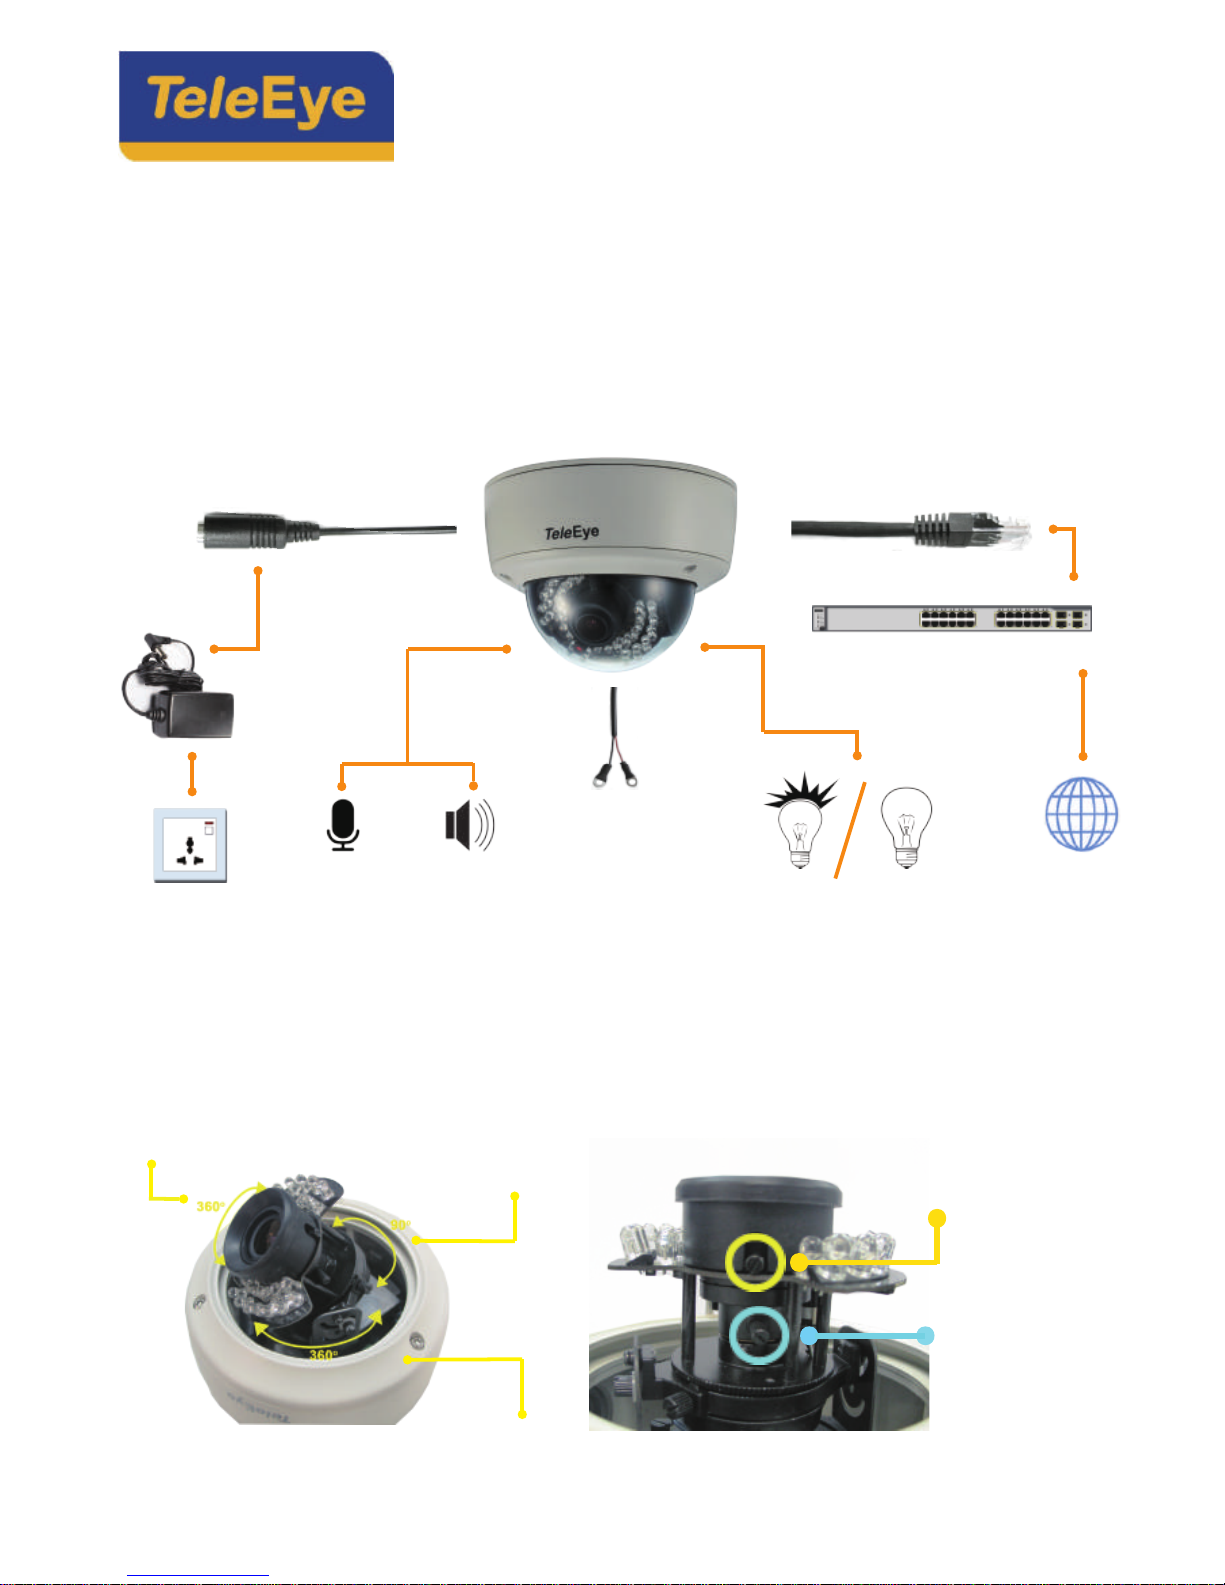
After mounting the camera on the wall or ceiling, connect the Ethernet cable to the
LAN adapter. If PoE is not available, connect the 12VDC power supply to the power cable.
[Reference] Please refer to the following sections to understand how to start video monitoring.
After removing the camera cover, loosen the screws to adjust the viewing angle of the
camera.
Tighten the screws to fix the direction of the camera module. Close the camera cover.
[Reference]
Please refer to the section 2 for connecting the cable to RJ45 plug.
1
Power Cable (12V DC) Ethernet Cable
Alarm Cable
12V DC
Power Adapter
(Optional)
Audio In Audio Out
Relay
Internet
Network Switch / Router
Adjust the zoom :
loosen the screw
and slide the stick
Adjust the focus :
slide the stick
Adjust the direction
Rotation
Tilt
Page 2
2. RJ45 Wiring
Step 1
Step 2
Step 3
Step 4
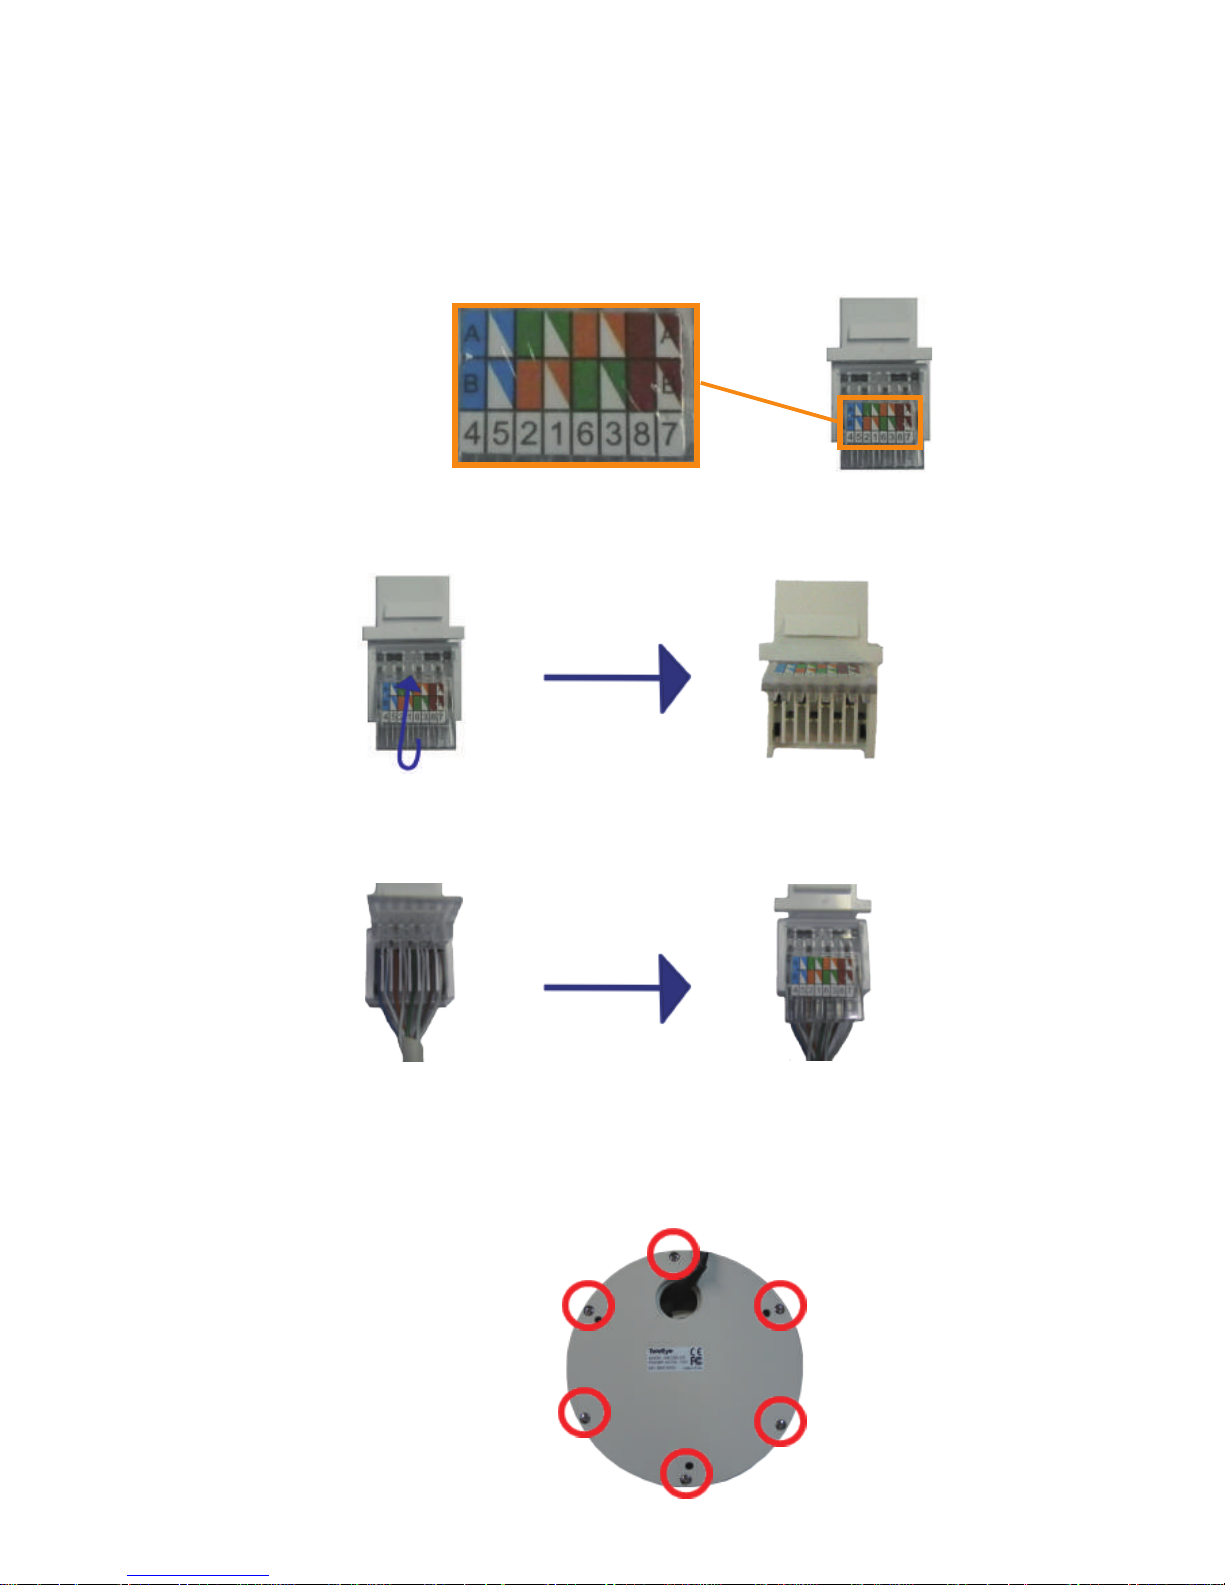
Make sure whether Type A or Type B wiring scheme is used for the Ethernet cable (Type
B is more common).
The two colour codes indicated on the plug represent the wiring scheme for Type A and
Type B cables.
Open the tab of the plug
Type A
Wiring Scheme
Type B
Wiring Scheme
According to the wiring scheme of the cable, follow the corresponding colour code on
the plug to arrange the 8 wires. Close the tab after inserting the 8 wires into the wire
holders.
Insert the 8 wires Close the tab
2
3. Audio and Relay Installation
Step 1 Loosen the 6 screws to open the up-cover.
6 Screws
Page 3
3
Step 2
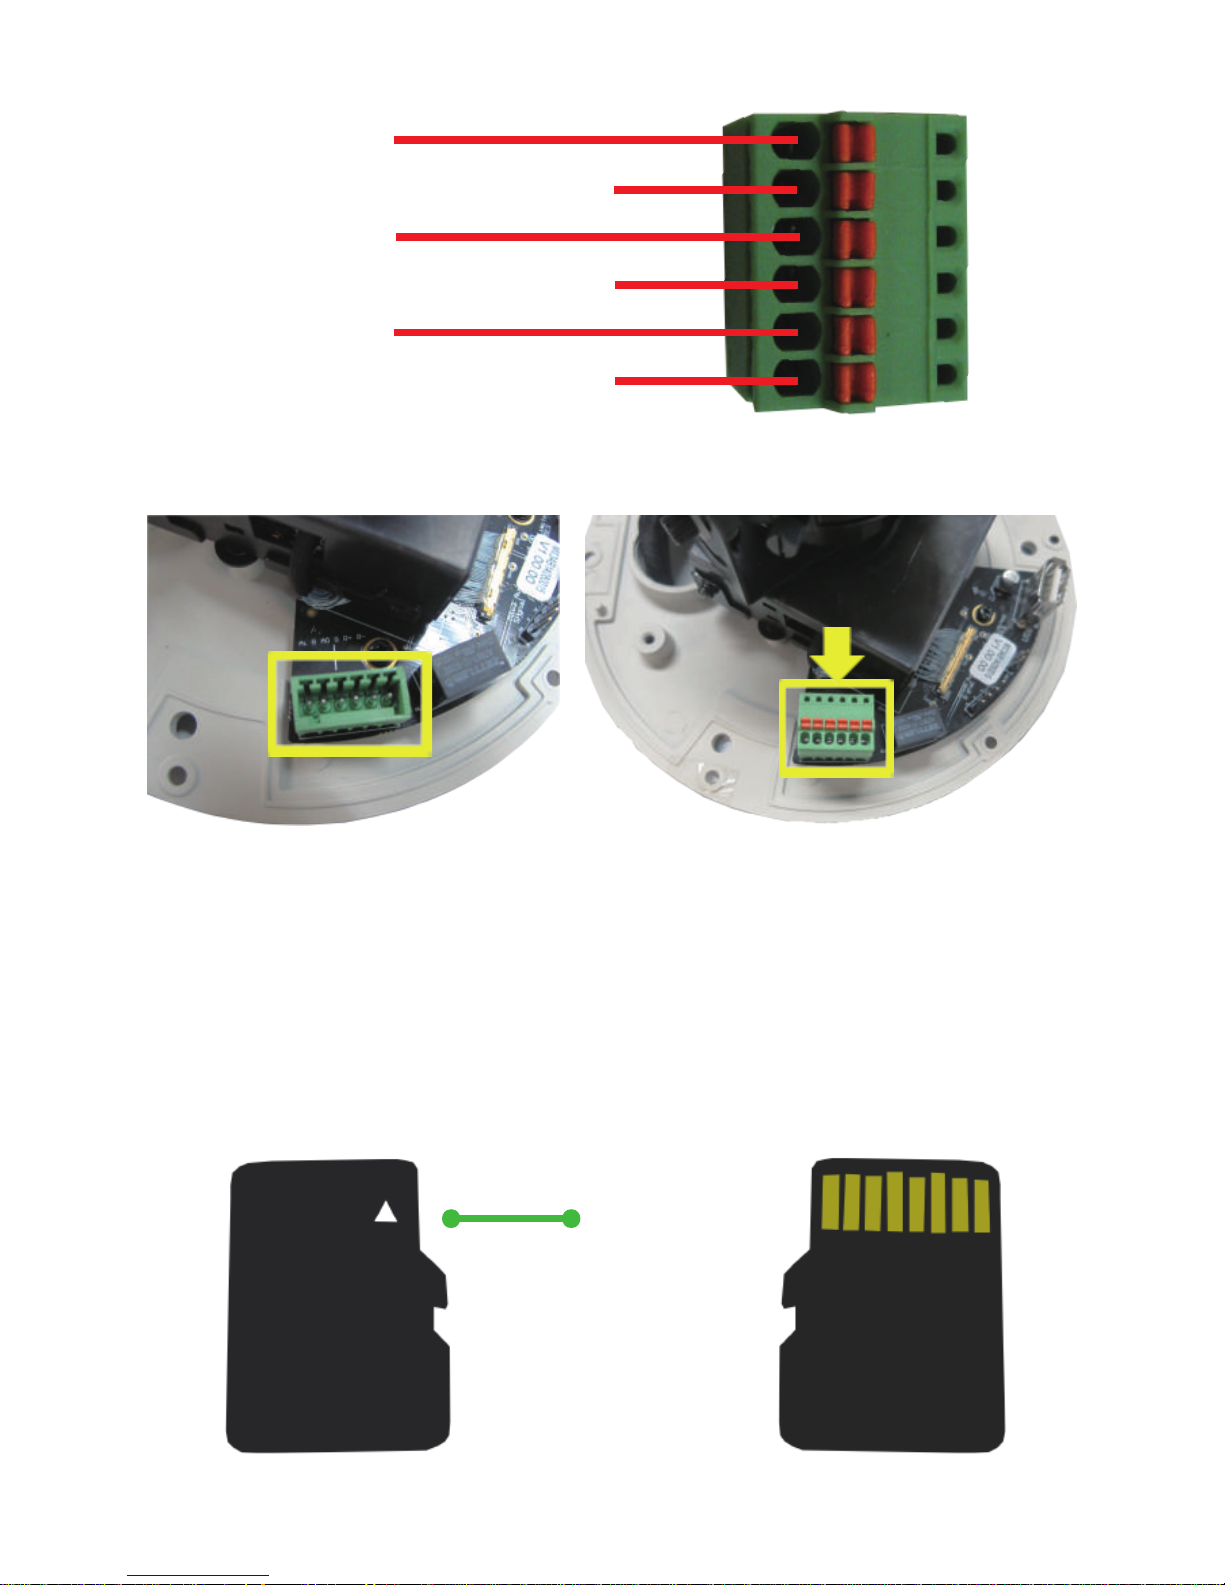
Audio Input
Audio Output
Audio Input Ground
Audio Output Ground
Relay Terminal 1
Relay Terminal 2
Step 3
Connect the corresponding wire to the terminal block plug.
Plug in terminal block plug to terminal block.
4. Micro SD Card Installation
Step 2
Step 1
Loosen the 6 screws to open the up-cover.
[Reference]
Please refer to section 3 step 1 for opening the up-cover.
Terminal Block Plug In
Ensure the arrow sign on the Micro SD card upwards.
Arrow Sign
Top Bottom
Page 4
6. IP Setup Utility
Step 1
Step 2
Step 3
Step 4
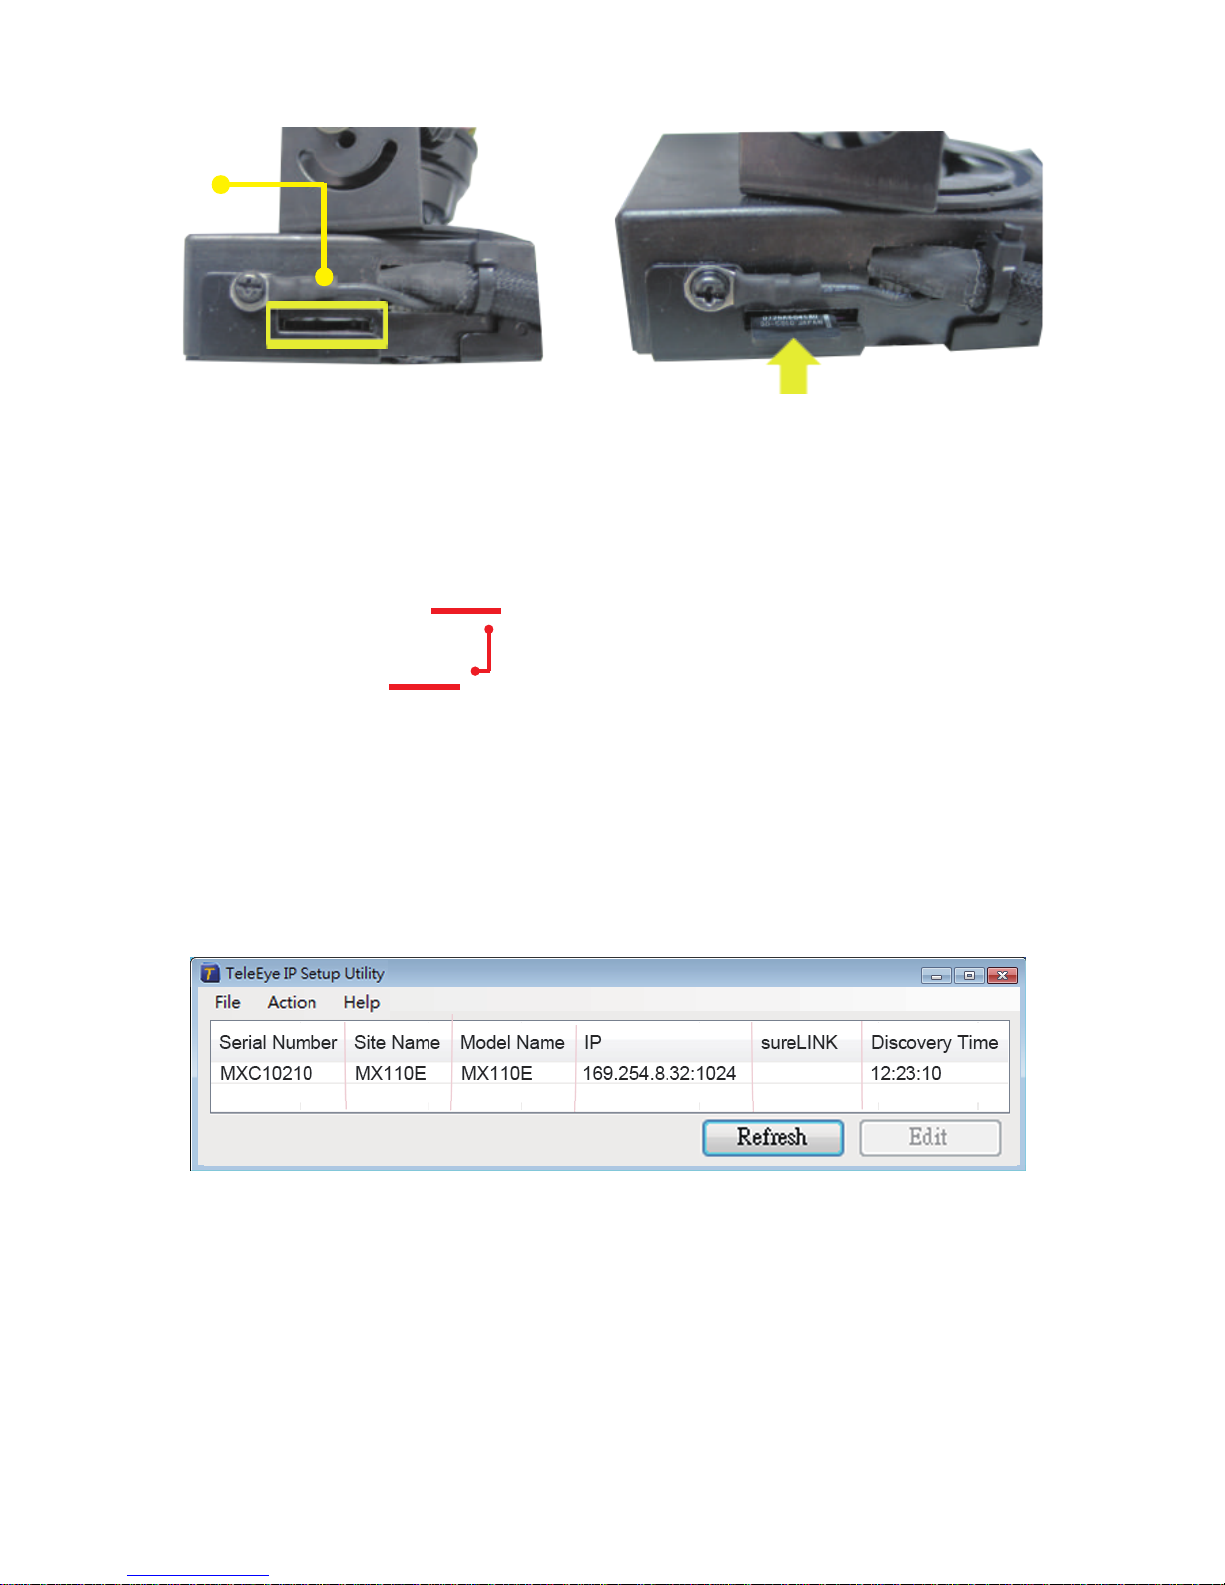
After installing sureSIGHT and turning on the network camera, select “Run TeleEye IP
Setup Utility” from the windows start menu.
Search the target camera by its serial number, highlight the corresponding row from the
list to select it. If the camera cannot be found, click the button.
[Refresh]
Press button to change the network settings of the camera, including IP, ports,
mask, etc.
[Edit]
Enter user name and password to save the information when prompted.
7. Live Monitoring with Web-Browser
Step 1
4
Type the IP address of the network camera in a web browser.
5. Default User Name and Password
Default user name is “admin” while default password is “0” + “digits of serial number”.
Here is an example:
Serial Number : MXC10210
User Name : admin
Password : 010210
[Reference]
Please refer to section 5 for the default user name and password.
Insert the Micro SD card to the Micro SD slot and push until “Click” sound.
Micro SD
Slot
Step 3
Page 5
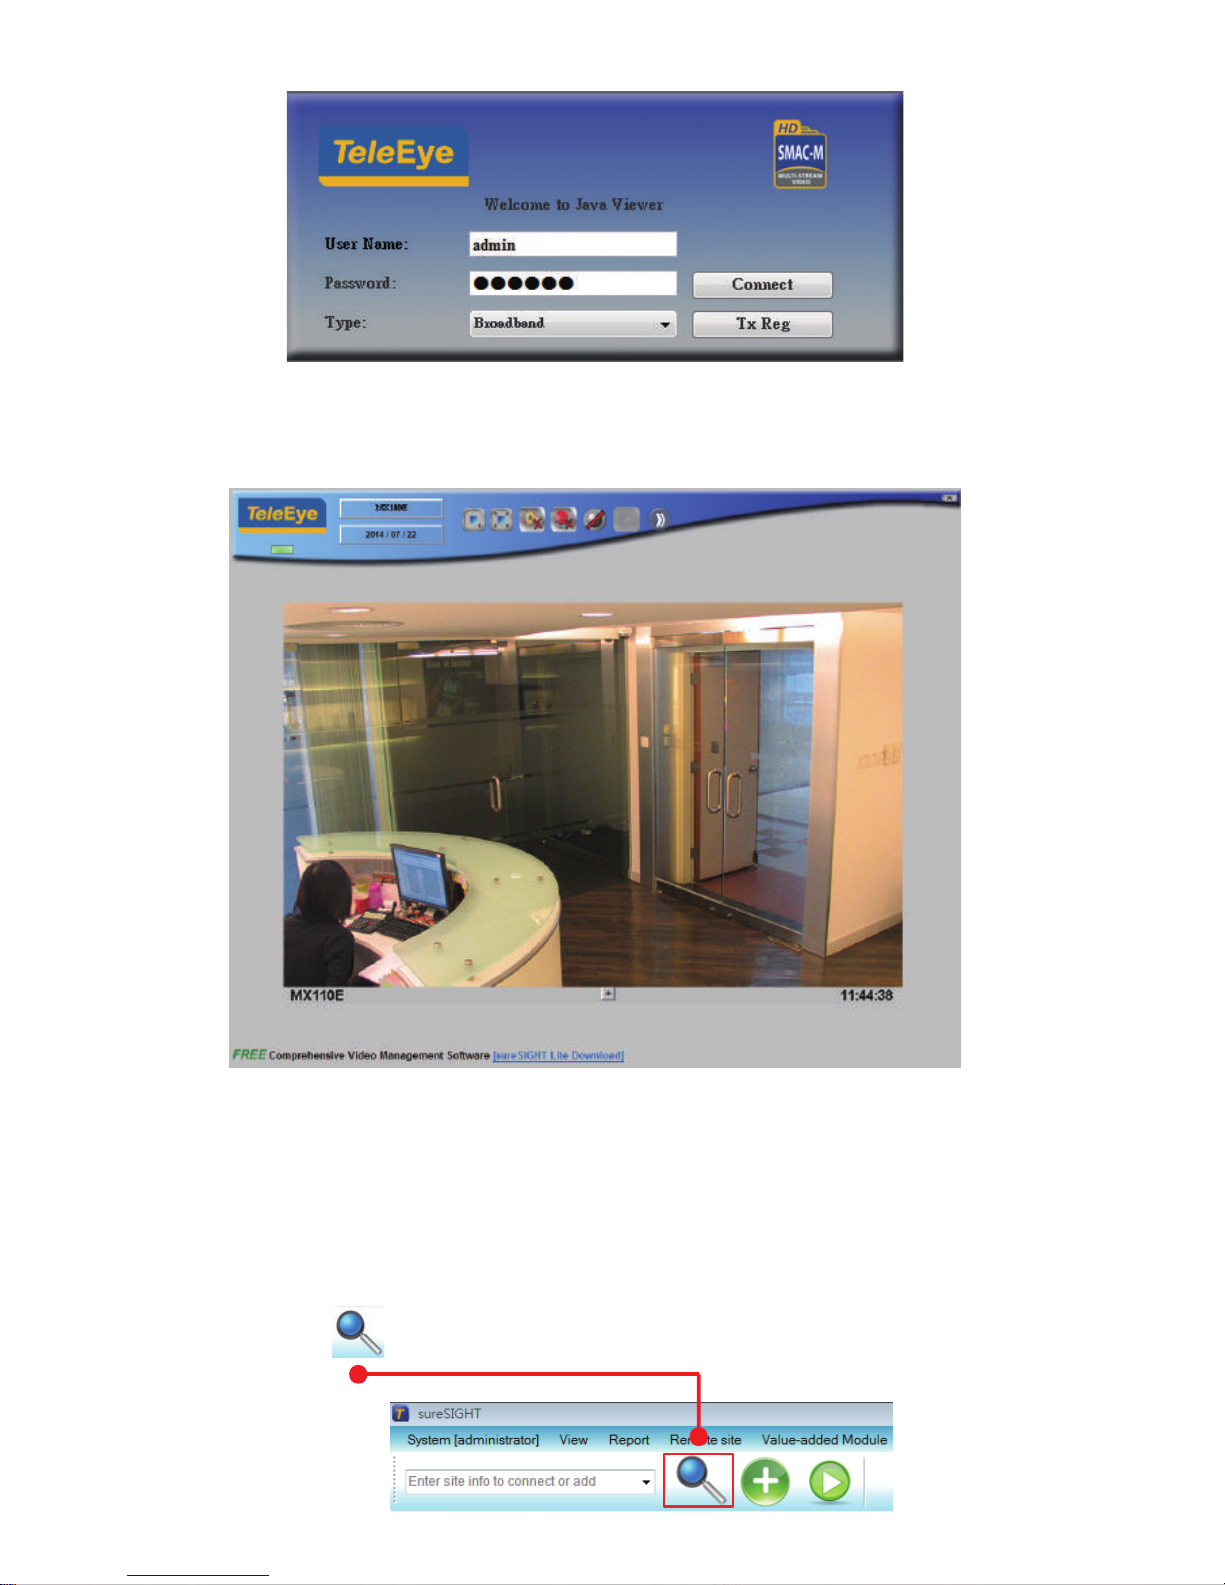
Step 2
Step 3
Input the user name and password.
Click the
[Connect] button to connect the selected video stream. Video will then be
displayed on the browser as follow.
8. Live Monitoring with sureSIGHT
Step 1
Step 2
After installing sureSIGHT and turning on the network camera, select “Run sureSIGHT
Lite” from the windows start menu. Input the user name and password to log-in to the
sureSIGHT.
Click the [ ] button on the top of the sureSIGHT.
5
[Reference]
Please refer to section 5 for the default user name and password.
[Reference]
Please refer to section 5 for the default user name and password.
Page 6
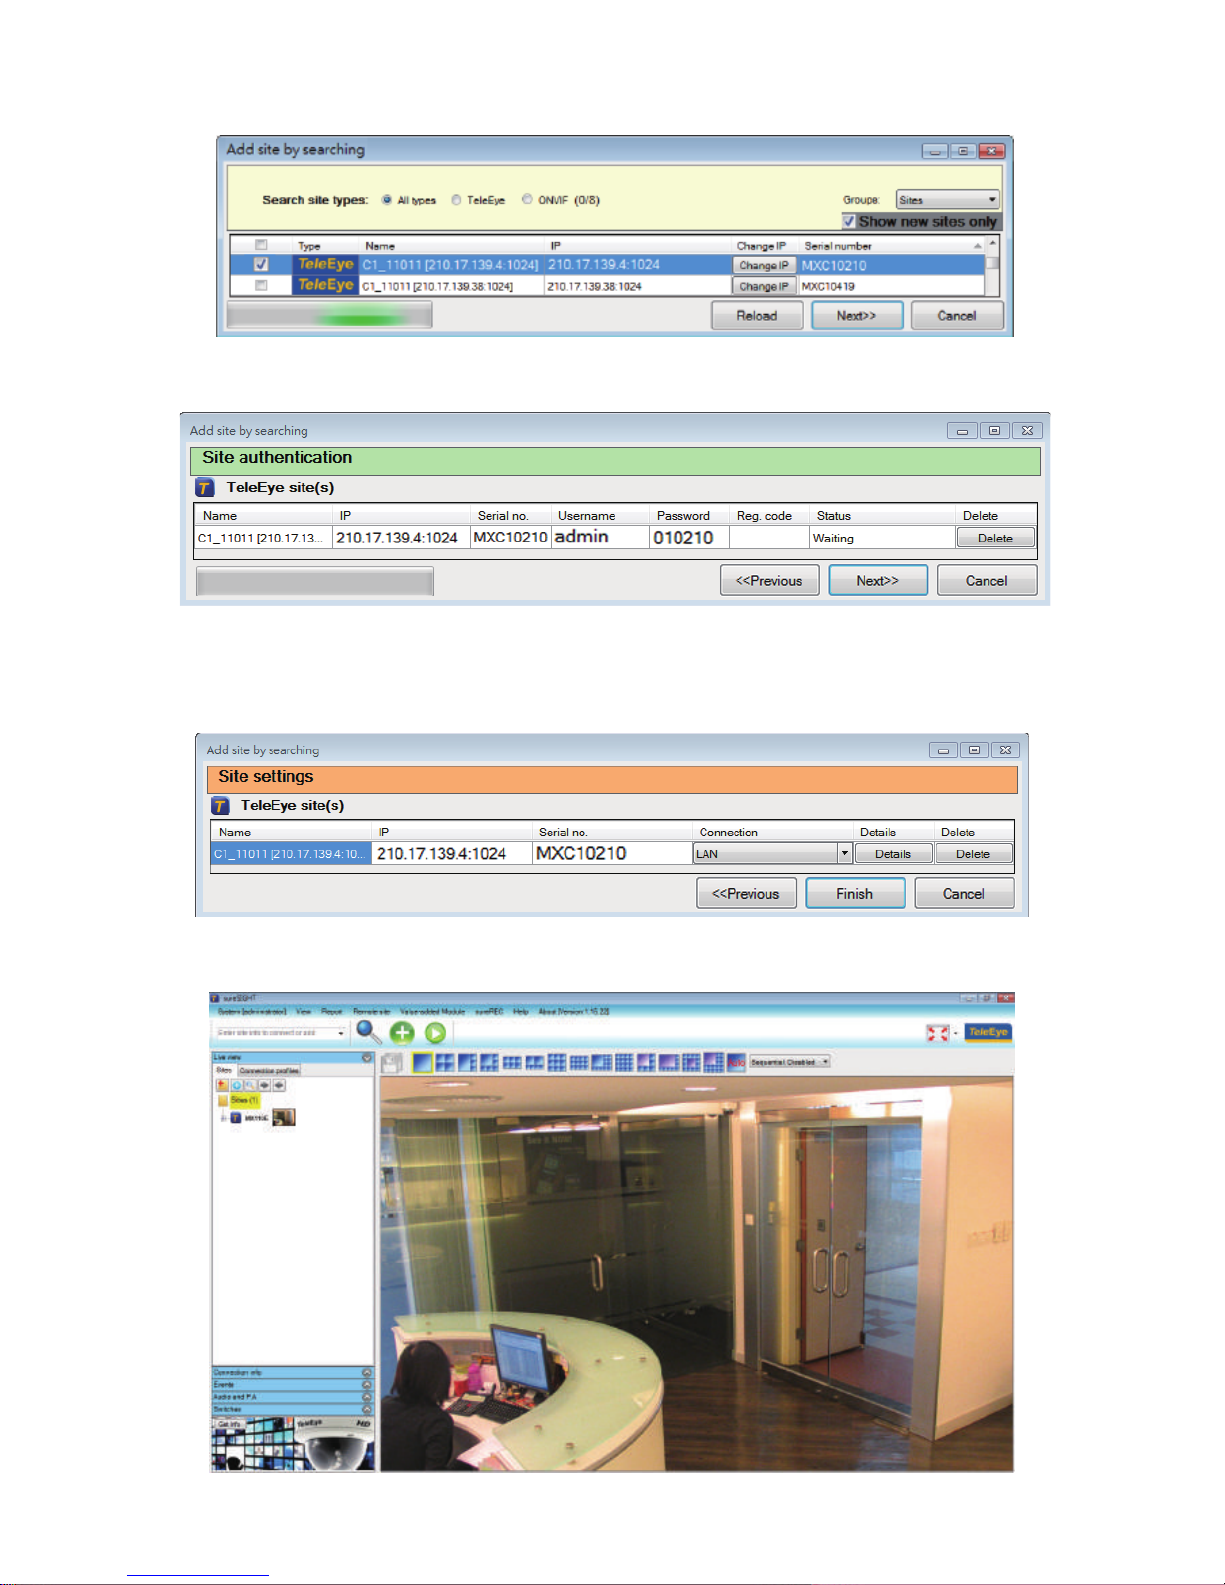
Step 3
Step 4
Search the target camera by its serial name and click its corresponding box on the left. you
may choose more than one camera. Click [Next] after selection.
Input the user name and the password. Then, click [Next].
[Reference] For detail operations, please refer to sureSIGHT user manual.
Step 5 You may click [Details] to change the site name and IP/sureLINK. After setting, click
[Finish].
Step 6 The video will be displayed on sureSIGHT by double clicking the site on the left panel.
[Reference]
Please refer to section 5 for the default user name and password.
6
 Loading...