

Page 1
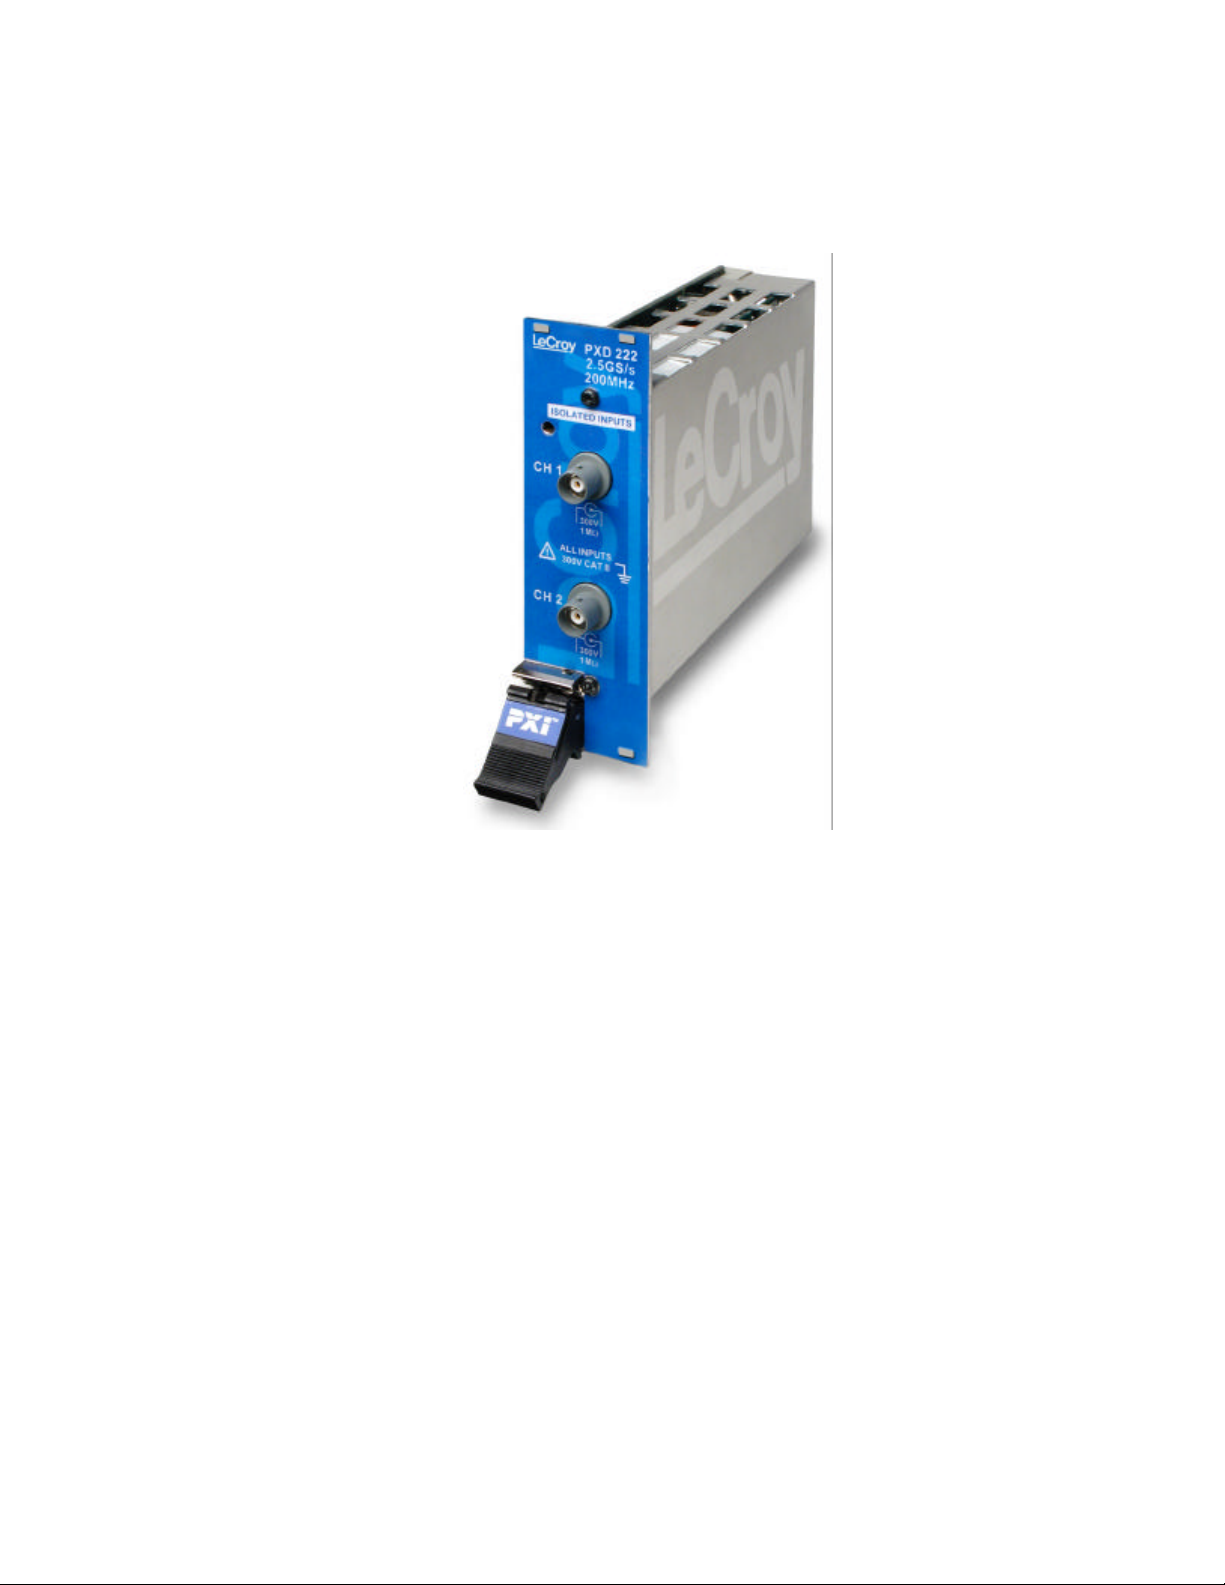
PXD 222 DIGITIZER
OPERATOR’S MANUAL
NOVEMBER 2001
Page 2

LeCroy Corporation
700 Chestnut Ridge Road
Chestnut Ridge, NY 10977-6499
Tel: (845) 578 6020, Fax: (845) 578 5985
Internet: www.lecroy.com
© 2001 by LeCroy Corporation. All rights reserved. Information in this publication supersedes all earlier
versions. Specifications subject to change.
LeCroy, ProBus and SMART Trigger are registered trademarks, and ActiveDSO, ScopeExplorer,
WaveAnalyzer and WavePro are trademarks, of LeCroy Corporation. Centronics is a registered trademark of
Data Computer Corp. Epson is a registered trademark of Epson America Inc. Mathcad is a registered
trademark of MATHSOFT Inc. MATLAB is a registered trademark of The MathWorks, Inc. Microsoft, MS and
Microsoft Access are registered trademarks, and Windows and NT trademarks, of Microsoft Corporation.
PowerPC is a registered trademark of IBM Microelectronics. DeskJet, ThinkJet, QuietJet, LaserJet, PaintJet,
HP 7470 and HP 7550 are registered trademarks of Hewlett-Packard Company.
PXD222-OM-E Rev A 1101
Page 3

Table of Contents
Table of Contents
First Things...First ................................................................................................1
WHEN YOUR DIGITIZER IS DELIVERED.................................................1
Check That You Have Everything .........................................................................1
Be Sure To Read This Warranty ...........................................................................1
Take Advantage Of Maintenance Agreements......................................................2
Obtain Assistance..................................................................................................2
Return a Product for Service or Repair..................................................................2
Stay Up-to-Date .....................................................................................................2
SAFETY INFORMATION ..................................................................3
Safety Symbols......................................................................................................3
Warnings ...............................................................................................................4
If Safety Features Are Impaired.............................................................................5
Care and Maintenance ..........................................................................................5
INSTALL AND POWER UP THE DIGITIZER.............................................6
Install NI Software Components ............................................................................6
Install LcPXD222 Instrument Driver.......................................................................7
Install the PXD 222 Digitizer..................................................................................9
Launch Measurement and Automation Explorer (MAX)......................................14
Install Quick-Start Application Software ...............................................................15
Copy Complementary Files onto Your Hard Drive (optional)...............................15
Install LcIVIScopeDemo (optional) ......................................................................16
Operation..............................................................................................................9
INTRODUCTION.......................................................................................17
A. Acquisition Modes...........................................................................................17
B. Run Modes ......................................................................................................20
C. Trigger Modes.................................................................................................20
D. PXD 222 Digitizer Waveform Measurements..................................................21
PXD 222 QUICK START APPLICATION SOFTWARE ............................22
Soft Front Panel ...................................................................................................22
USING THE PXD 222 DIGITIZER IVI INSTRUMENT DRIVERS .............26
PXD 222 Digitizer Specifications......................................................................27
VERTICAL SYSTEM.......................................................................27
PXD222-OM-E Rev A ISSUED: November 2001 iii
Page 4

PXD 222 Digitizer
HORIZONTAL SYSTEM...........................................................................27
TRIGGER..................................................................................................28
PHYSICAL DIMENSIONS ........................................................................30
POWER REQUIREMENTS......................................................................30
ENVIRONMENTAL CONDITIONS...........................................................30
SAFETY ..........................................................................................31
CERTIFICATIONS ..........................................................................33
iv ISSUED: November 2001 PXD222-OM-E Rev A
Page 5

First Things...First
AFirst Things...First
WHEN YOUR DIGITIZER IS DELIVERED
Check That You Have Everything
Verify that all items on the packing list or invoice copy have been shipped to you. (The items are
also listed below.) Contact your nearest LeCroy customer service center or national distributor if
anything is missing or damaged. If there is something missing or damaged, and you do not contact
us immediately, we cannot be responsible for replacement.
The following is shipped with the standard PXD 222 Digitizer:
• Performance or Calibration Certificate
• Quick Reference Guide
• CD ROM
NOTE: The warranty below
replaces all other warranties,
expressed or implied, including
but not limited to any implied
warranty of merchantability, fitness, or adequacy for any particular purpose or use. LeCroy
shall not be liable for any special, incidental, or consequential damages, whether in
contract or otherwise. The customer is responsible for the
transportation and insurance
charges for the return of products to the service facility.
LeCroy will return all products
under warranty with transport
prepaid.
Be Sure To Read This Warranty
The PXD 222 Digitizer is warranted for normal use and operation, within specifications, for
a period of one year from shipment. LeCroy will either repair or, at our option, replace any
product returned to one of our authorized service centers within this period. However, in
order to do this we must first examine the product and find that it is defective due to workmanship or materials and not due to misuse, neglect, accident, or abnormal conditions or
operation.
Spare and replacement parts, and repairs, all have a 90-day warranty.
The digitizer’s firmware has been thoroughly tested and is presumed to be functional. Neverthe-
less, it is supplied without warranty of any kind covering detailed performance. Products not made
by LeCroy are covered solely by the warranty of the original equipment manufacturer.
PXD222-OM-E Rev A ISSUED: November 2001 1
Page 6

PXD 222 Digitizer
Take Advantage Of Maintenance Agreements
We offer a variety of services under the heading of Maintenance Agreements. These give
extended warranty and allow you to budget maintenance costs after the initial one-year warranty
has expired. Installation, training, enhancements, and on-site repairs — among other services —
are available through special supplemental support agreements. Inquire at your LeCroy customer
service center or national distributor.
Obtain Assistance
Help with installation, calibration, and the use of your PXD 222 Digitizer scope in a range of applications is also available from your customer service center.
Return a Product for Service or Repair
If you do need to return a LeCroy product, identify it by its model
and serial numbers. Describe the defect or failure, and provide your
name and contact number.
For factory returns, use a Return Authorization Number (RAN),
obtainable from customer service. Attach it so that it can be clearly
seen on the outside of the shipping package to ensure rapid forwarding within LeCroy.
NOTE: If you need to return
your digitizer, use the original shipping carton. If this
is not possible, the carton
used should be rigid. The
digitizer should be packed
so that it is surrounded by a
minimum of four inches
(10cm) of shock absorbent
material.
Return those products requiring only maintenance to your customer
service center.
Within the warranty period, transportation charges to the factory will be your responsibility, while
products under warranty will be returned to you with transport prepaid by LeCroy. Outside the warranty period, you will have to provide us with a purchase order number before the work can be
done. You will be billed for parts and labor related to the repair work, as well as for shipping.
You should prepay return shipments. LeCroy cannot accept COD (Cash On Delivery) or Collect
Return shipments. We recommend using air freight.
Stay Up-to-Date
To maintain your PXD 222 Digitizer’s performance within specifications, have us calibrate it at
least once a year. LeCroy offers state-of-the-art technology by continually refining and improving
the instrument’s capabilities and operation. We frequently update both firmware and software during service, free of charge during warranty.
2 ISSUED: November 2001 PXD222-OM-E Rev A
Page 7

First Things...First
SAFETY INFORMATION
Safety Symbols
Where the following symbols appear on the PXD 222 Digitizer’s front or rear covers, or in this
manual, they alert you to important safety considerations.
WARNING Incorrect operation or failure to heed warnings may result in death or serious
injury. If a WARNING is indicated, do not proceed until its conditions are
understood and met.
CAUTION Incorrect operation or failure to heed cautions may result in injury or damage
to equipment. If a CAUTION is indicated, do not proceed until its conditions
are understood and met.
Refer to accompanying documents (for safety related information).
See elsewhere in this manual whenever this symbol is present, as indicated
in the Table of Contents.
Earth (Ground) Terminal
PXD222-OM-E Rev A ISSUED: November 2001 3
Page 8
PXD 222 Digitizer
Warnings
WARNING
To avoid electrical shock or fire if the digitizer input is connected to more that 42 V peak
(30 V rms) or on circuits of more than 4800 VA:
• Use only insulated voltage probes, test leads, and adapters.
• Before use, inspect voltage probes, test leads, and accessories for mechanical
damage and replace when damaged.
• Remove all probes, test leads, and accessories that are not in use.
• Do not connect the ground spring to voltages higher than 42 V peak (30 V rms) from
earth ground.
• When measuring in a CAT II environment, do not apply to any input voltages that differ
by more than 300 V from earth ground.
• When measuring in a CAT II environment, do not apply to the isolated inputs voltages
that differ by more than 300 V from each other.
• Do not apply input voltages above the rating of the instrument. Use caution when
using 1:1 test leads because the probe tip voltage will be directly transmitted to the
test tool.
• Do not use exposed metal BNC or banana plug connectors.
• Do not insert metal objects into connectors.
• Before connecting any input voltages, the unit must be properly installed in the PXI
rack.
• Disconnect the applied voltage(s) before disconnecting probes, BNC leads, test leads,
or accessories.
• Always use the digitizer only in the manner specified
Voltage ratings mentioned in the warnings are given as limits for "working voltage." They represent
VAC rms (50–60 Hz) for AC sine wave applications and as VDC for DC applications.
Overvoltage Category II refers to local distribution level, which is applicable to appliances and portable equipment.
The terms "isolated" and "electrically floating" are used in this manual to indicate a measurement
in which the digitizer input BNC or banana jack is connected to a voltage different from earth
ground.
The isolated input connectors have no exposed metal and are fully insulated to protect against
electrical shock.
4 ISSUED: November 2001 PXD222-OM-E Rev A
Page 9

First Things...First
The BNC connectors can be independently connected to a voltage above earth ground for isolated
(electrically floating) measurements and are rated up to 300 V rms (CAT II) above earth ground.
If Safety Features are Impaired
Whenever it is likely that safety has been impaired, the digitizer must be shut down, the PXI chassis disconnected from the line power, and the digitizer removed from the PXI chassis. The matter
should then be referred to qualified personnel. Safety is likely to be impaired if, for example, the
digitizer fails to perform the intended measurements or shows visible damage. Before use, inspect
the test leads for mechanical damage and replace damaged test leads!
WARNING
Use of the digitizer in a manner not specified may impair the protection provided by the
equipment.
Care and Maintenance
The exterior of the digitizer should be cleaned only with a soft cloth moistened with water or isopropyl alcohol.
The use of abrasive agents, strong detergents, or other solvents may damage the probe.
Ensure that the input receptacles are free of debris before inserting connection accessories.
All repair and maintenance should be referred to qualified service personnel.
Do not use the digitizer if any part is damaged.
PXD222-OM-E Rev A ISSUED: November 2001 5
Page 10

PXD 222 Digitizer
INSTALL AND POWER UP THE DIGITIZER
Prior to inserting the PXD 222 Digitizer into your chassis, you should install the necessary
software components on your system. To use the PXD 222 IVI driver, you will need to install the
following:
• IVI Engine (v1.65 or greater)
• NI-VISA (v2.5 Runtime version)
• PXD 222 IVI Instrument Driver
To run examples provided on the PXD 222 CDROM (including the Quick-Start demo and LabWindows™/CVI Getting Started Examples) you should also install:
• Measurement and Automation Explorer (included with NI-DAQ™ 6.8.1)
• LabWindows™/CVI Run-time Engine (included with the Quick-Start demo installation)
All of these components are included on the CDROM. Use the following instructions to install
these components on any Windows operating system in order to run the LeCroy Quick Start Demo
and Example programs.
Install NI Software Components
Install the following NI software components.1 For detailed information about installing this software, please visit the National Instruments Web site, http://www.ni.com and search for NI-DAQ™
6.8.1 in their Downloads section
1. Install NI-DAQ™ version 6.8.1
Installing this software will also install National Instrument’s Measurement and Automation
Explorer (MAX). We do not suggest using NI-DAQ™ 6.9.2 because it includes a bug that can
prevent recognition of the PXD 222 and other PXI instruments. After installation, confirm that
you have a MAX icon on your desktop. According to the “About Max…” dialog box, the MAX
version should be version 2.0.3.17.
2. Install NI-VISA Run-time version 2.5
Installing this software will also install the LabWindows™/CVI Run-Time Engine, which is a
necessary component.
3. Install IVI Engine 1.8.3
The IVI Engine software is necessary when you are using IVI drivers. Visit http://www.ni.com/
ivi and http://www.ivifoundation.org for more information about the IVI standard.
1. Each component is protected by copyright © 2001 by National Instruments Corporation, all rights reserved.
6 ISSUED: November 2001 PXD222-OM-E Rev A
Page 11

First Things...First
Install LcPXD222 Instrument Driver
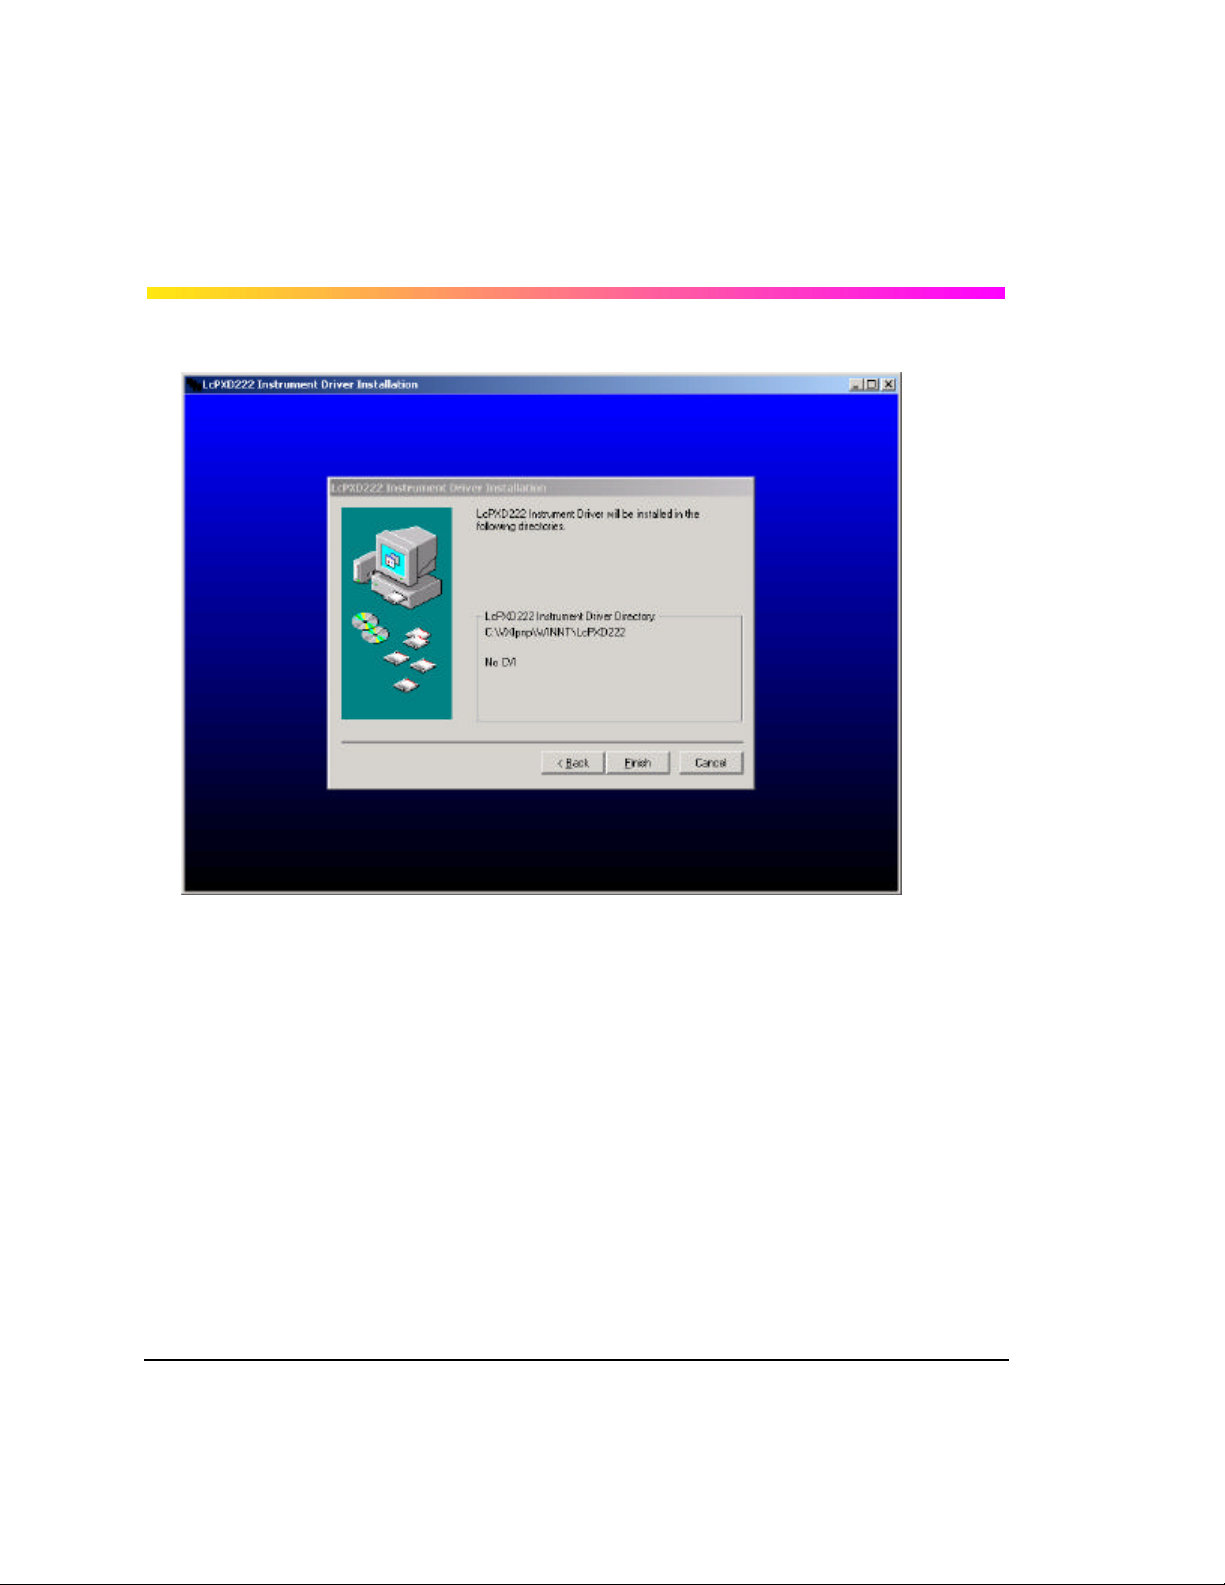
1. Run the setup.exe file from the PXD 222 Instrument Driver directory on the CDROM. The fol-
lowing screen appears:
PXD222-OM-E Rev A ISSUED: November 2001 7
Page 12
PXD 222 Digitizer
2. Full Installation is the suggested option. After you select OK, the following screen appears:
3. If Labwindows™/CVI is loaded on your computer, the installation program will put the driver
files within the standard CVI directory structure.
4. Click Finish to complete the Instrument Driver Installation. You are now ready to proceed with
the installation of the PXD 222 Digitizer.
8 ISSUED: November 2001 PXD222-OM-E Rev A
Page 13

First Things...First
Install the PXD 222 Digitizer
1. Shut down the instrument and install the digitizer in the PXI chassis slot by first inserting the
digitizer’s card edge into the front module guides (top and bottom). Slide the digitizer to the
rear of the mainframe with the injector/ejector handle pushed down.
2. When you begin to feel resistance, push up on the injector/ejector handle to fully seat the digitizer in the chassis.
3. Secure the digitizer to the front panel of the chassis with the mounting screws.
4. Cover any open slots in the PXI chassis to ensure proper air flow.
5. Power up the chassis. (If you are connecting to the chassis via an MXI-3 connection, power up
the computer after powering up the chassis.
CAUTION
Overheating will result if any slots in the PXI chassis remain open. Cover all open slots to
ensure proper air flow.
PXD222-OM-E Rev A ISSUED: November 2001 9
Page 14

PXD 222 Digitizer
6. Windows 9x, Win2000, and NT5.0 will recognize that you have a new PCI device installed,
and will prompt you for instructions on installing the device driver. (NT4.0 users should follow
the procedure described below). Choose to search manually for the device driver for your
operating system; it can be found on the CDROM, within a subfolder under “PXD 222 Device
Drivers.” When prompted, navigate to the folder for your operating system. Windows will install
the device driver, and the PXD 222 should at this point be visible in the Device Manager
screen for your operating system. For Windows9x users, you will see the following sequence
of dialog boxes.
10 ISSUED: November 2001 PXD222-OM-E Rev A
Page 15

First Things...First
PXD222-OM-E Rev A ISSUED: November 2001 11
Page 16

PXD 222 Digitizer
12 ISSUED: November 2001 PXD222-OM-E Rev A
Page 17

First Things...First
7. Windows 9x, NT5, and Win2000 users can confirm that the PXD 222 Digitizer is properly recognized by the OS by viewing the Device Manager. This can be found within the "System"
control panel option.
8. Windows NT4.0 Users: Copy the file “PXD222 Device Drivers\winNt4.0\LcPXD222_NT4.inf” to
the WinNT\inf directory. Right-click on the file, and select "Install” to install the driver.
PXD222-OM-E Rev A ISSUED: November 2001 13
Page 18

PXD 222 Digitizer
Launch Measurement and Automation Explorer (MAX)
1. Launch Measurement and Automation Explorer, and refresh the device list by pressing F5.
2. If the PXD 222 Digitizer is not found, or there is no “PXI System” list within the “Device and
Interfaces” folder, select “Update MAX driver support…” from the Tools menu.
3. Reboot when prompted, launch MAX, and refresh again by pressing F5. The PXD 222 Digitizer will now appear in the list.
Note: the string “PXI0::19::INSTR” in the illustration below is the VISA Resource Name MAX
has assigned to the PXD 222 Digitizer. The actual name assigned will vary based on the PCI
bus number and slot where the PXD 222 Digitizer is installed.
Measurement and Automation Explorer with PXD 222 Digitizer recognized
14 ISSUED: November 2001 PXD222-OM-E Rev A
Page 19

First Things...First
Install Quick-Start Application Software
This software is intended to be a tool for you to test operation of the module, and for simple triggering and viewing of signals. This application is described in the “Operation” section of this manual.
Copy Complementary Files onto Your Hard Drive (optional)
These files include the Getting Started LabWindows™/CVI example programs, and the driver help
files for CVI and VisualBasic.
PXD222-OM-E Rev A ISSUED: November 2001 15
Page 20

PXD 222 Digitizer
Install LcIVIScopeDemo (optional)
This LcIVIScopeDemo program illustrates the use of the Basic IVI Scope Class Drivers to control
the PXD 222 Digitizer. To use this demo, you will need to install the BICDSetup.exe installation
program provided on the CD-ROM (also currently available from National Instruments at no
charge). Then you will need to create a new “IVI Instruments” setup in MAX using the Logical
Names wizard. This process modifies the IVI.INI file; examples of the file for Win98 and Win2000
systems are provided on the CD-ROM. Make a backup of your existing IVI.INI file and copy the
example file into the VXIPNP/niivi directory. Perform a Refresh (F5) in MAX to see the new IVI
Instrument setup.
Prior to running the IVIScope demo program, make sure that the link to the PXD 222 DLL is correct. Open MAX, and right-click on the LcPXD 222 Digitizer selection under “IVI Instruments ?
Instrument Drivers.” This will open up the properties window for the driver. Verify that the “File”
selection is set to the LcPXD222_32.dll file. (The parser in MAX may not have read the directory
structure accurately.) Click “Browse” and navigate to the location of the DLL on your system. Most
installations will place this file within the VXIPNP/Win**/Bin directory path, where “**” is either “95”
or “NT”.
Once the set-up is correct, you can use the IVIScope demo program. This program is similar to the
Quick-Start Demo but uses the basic IVI class driver subroutine names. For more information
about the IVI architecture and IVI class drivers, visit http://www.ni.com/ivi.
§ § §
16 ISSUED: November 2001 PXD222-OM-E Rev A
Page 21

Operation
AOperation
INTRODUCTION
This section is intended to give you an understanding of the standard acquisition, triggering, and
measurement features of the PXD 222 Digitizer. Detailed descriptions of how to operate the
PXD222 Digitizer can be found in the Driver Help file.
A. Acquisition Modes
The PXD 222 Digitizer has two modes of operation NORMAL and MIN/MAX. These are defined as
follows:
NORMAL: In Normal mode, the PXD 222 Digitizer operates as a typical digitizer. The module will
digitize the input signals during a specified time window and create a data array with the digitized
data that can be read out by the controller. The user programs the number of points (maximum of
1000) as well as the time window to be digitized. The maximum sample rate is 2.5 GS/s, and will
vary depending on the time window setting. Table 1 gives the sample rates that are achieved.
MIN/MAX: There are two MIN/MAX modes, which are referred to as Glitch Capture and Scope
Record. In these modes, the PXD 222 Digitizer outputs two arrays; a MIN array with the minimum
values detected during each sample interval, and a MAX array with the maximum value detected
during each sample interval. Here’s how it works. In MIN/MAX mode, the time window is divided
into sampling intervals. During each interval, the digitizer oversamples the input at high speed (see
tables 2 and 3 on the following pages) and stores the MIN and MAX values in data arrays. This
technique allows you to detect and record glitches in the waveform that would not be found if only
1 sample were taken during each sampling interval. The Acquisition type is programmed by
means of the function LcPXD222_ConfigureAcquisitionType. (Note: This mode is sometimes
also referred to as a Peak Detect mode.)
When in Min/Max mode, and for time windows of 10 seconds or less, the digitizer is in Glitch Capture Mode, and will record MIN/MAX arrays of roughly 255 points. For time ranges of 11 seconds
and higher, the digitizer is in Scope Record Mode, and will store min-max arrays of roughly 27kpts.
Understanding the difference between Normal and MIN/MAX modes
Take an example where the time window is set to 1 ms. In Normal mode, the time between samples would be 1 µs (1 ms/1000 = 1 µs), corresponding to a sample rate of 1 MS/s because exactly
one sample is acquired per sample interval in this mode.
When setting the time window to 1 ms in MIN/MAX mode, the sampling interval is approximately
4 µs. This is roughly 4X longer than the corresponding value in Normal mode because 255 points
are stored instead of 1000. The PXD 222 Digitizer, however does not take only 1 sample in this 4
µs time interval, but instead samples at the higher speed of 20 MS/s. Of the 80 samples that are
taken (20MS/s * 4 µs = 80), the min and max points are retained. This is done for each of the 255
time intervals to create the Min and Max data arrays.
PXD222-OM-E Rev A ISSUED: November 2001 17
Page 22

PXD 222 Digitizer
Table 1: Normal Mode Time Windows, Intervals, and Sample Rates
Time Window Sampling Time
Interval for Each
Point
100 ns 400 ps 2.5 GS/s 250
200 ns 400 ps 2.5 GS/s 500
500 ns 2 ns 500 MS/s 250
1 µs 2 ns 500 MS/s 500
2 µs 2 ns 500 MS/s 1000
5 µs 10 ns 100 MS/s 500
10 µs 10 ns 100 MS/s 1000
20 µs 20 ns 50 MS/s 1000
50 µs 50 ns 20 MS/s 1000
100 µs 200 ns 5 MS/s 500
200 µs 200 ns 5 MS/s 1000
500 µs 500 ns 2 MS/s 1000
1 ms 1 µs 1 MS/s 1000
2 ms 2 µs 500 kS/s 1000
5 ms 5 µs 200 kS/s 1000
10 ms 10 µs 100 kS/s 1000
20 ms 20 µs 50 kS/s 1000
50 ms 50 µs 20 kS/s 1000
100 ms 100 µs 10 kS/s 1000
200 ms 200 µs 5 kS/s 1000
500 ms 500 µs 2 kS/s 1000
1 s 1 ms 1 kS/s 1000
2 s 2 ms 500 S/s 1000
5 s 5 ms 200 S/s 1000
10 s 10 ms 100 S/s 1000
Real Time
Sampling Rate
Nominal # of
Samples
a
a. # of points will vary slightly from the nominal value
18 ISSUED: November 2001 PXD222-OM-E Rev A
Page 23

Operation
Table 2: Glitch Capture Mode Time Windows, Intervals, and Sample Rates
Time Window Sampling Time
100 ns 400 ps 2.5 GS/s
200 ns 800 ps 2.5 GS/s
500 ns 2 ns 2.5 GS/s
1 µs 4 ns 2 GS/s
2 µs 8 ns 1 GS/s
5 µs 20 ns 200 MS/s
10 µs 40 ns 100 MS/s
20 µs 80 ns 50 MS/s
50 µs 200 ns 20 MS/s
100 µs 400 ns 20 MS/s
200 µs 800 ns 20 MS/s
500 µs 2 µs 20 MS/s
1 ms 4 µs 20 MS/s
2 ms 8 µs 20 MS/s
5 ms 20 µs 20 MS/s
10 ms 40 µs 20 MS/s
20 ms 80 µs 20 MS/s
50 ms 200 µs 20 MS/s
100 ms 400 µs 20 MS/s
200 ms 800 µs 20 MS/s
500 ms 2 ms 20 MS/s
1 s 4 ms 20 MS/s
2 s 8 ms 20 MS/s
5 s 20 ms 20 MS/s
10 s 40 ms 20 MS/s
Interval for Each
Point
Sampling Rate
Real Time
a
a. Waveform is oversampled at the real time sampling rate. Within
each time interval, the minimum and maximum values are
stored. A total of roughly 27 kpts are stored in the MIN and MAX
arrays.
PXD222-OM-E Rev A ISSUED: November 2001 19
Page 24

PXD 222 Digitizer
Table 3: Scope Record Mode Time Windows, Intervals, and Sample Rates
Time Window Sampling Time Interval
for Each Point
11 s 400 µs 20 MS/s
22 s 800 µs 20 MS/s
55 s 2 ms 20 MS/s
110 s 4 ms 20 MS/s
220 s 8 ms 20 MS/s
9 min 20 ms 20 MS/s
18 min 40 ms 20 MS/s
36 min 80 ms 20 MS/s
90 min 200 ms 20 MS/s
3 h 400 ms 20 MS/s
6 h 800 ms 20 MS/s
9 h 1200 ms 20 MS/s
18 h 2400 ms 20 MS/s
36 h 4800 ms 4 MS/s
a. Waveform is oversampled at the real time sampling rate. Within each time
interval, the minimum and maximum values are stored.
Real Time Sampling
Rate
a
B. Run Modes
The digitizer can be set to run in either Continuous or Single-shot mode. This is done through
the function LcPXD222_ConfigureInitiateContinuous.
C. Trigger Modes
The PXD 222 Digitizer supports the following trigger types: EDGE, GLITCH, WIDTH, TV, and
IMMEDIATE.
EDGE: An edge trigger occurs when the trigger signal crosses the specified trigger level with the
specified slope. The trigger level and slope are configured with the function
LcPXD222_ConfigureEdgeTriggerSource.
GLITCH: A glitch trigger occurs when the trigger signal has a pulse width that is less than the
glitch width. The trigger does not actually occur until the edge of the pulse that corresponds to the
specified glitch width and polarity crosses the trigger level. The trigger level is configured with the
function LcPXD222_ConfigureGlitchTriggerSource .
20 ISSUED: November 2001 PXD222-OM-E Rev A
Page 25

Operation
WIDTH: A width trigger occurs when the oscilloscope detects a positive or negative pulse width
between or, optionally, outside the width thresholds. The trigger does not actually occur until the
edge of a pulse that corresponds to the specified width thresholds and polarity crosses the trigger
level. The width thresholds, whether to trigger on pulse widths that are within or outside the width
thresholds, the polarity of the pulse, and the trigger level are configured with the function
LcPXD222_ConfigureWidthTriggerSource .
TV: The PXD 222 Digitizer can trigger on NTCS, PAL and SECAM video signals. The TV signal
type, the field and line number on which to trigger, and the signal polarity are configured with the
function LcPXD222_ConfigureTVTriggerSource .
IMMEDIATE: In this mode, the oscilloscope does not wait for trigger event and instead immediately begins the digitization process.
D. PXD 222 DIGITIZER WAVEFORM MEASUREMENTS
The PXD 222 Digitizer performs the following waveform measurements:
Mean Voltage LCPXD222_VAL_VOLTAGE_AVERAGE
RMS Voltage (AC) LCPXD222_VAL_VOLTAGE_RMS
True RMS Voltage (AC+DC) LCPXD222_VAL_VOLTAGE_TRUE_RMS
Peak to Peak voltage LCPXD222_VAL_VOLTAGE_PEAK_TO_PEAK
Maximum Peak voltage LCPXD222_VAL_VOLTAGE_MAX
Minimum Peak voltage LCPXD222_VAL_VOLTAGE_MIN
Neg Duty Cycle percentage LCPXD222_VAL_DUTY_CYCLE_NEG
Pos Duty Cycle percentage LCPXD222_VAL_DUTY_CYCLE_POS
Frequency LCPXD222_VAL_FREQUENCY
Neg Pulse Width LCPXD222_VAL_WIDTH_NEG
Pos Pulse Width LCPXD222_VAL_WIDTH_POS
Phase Difference LCPXD222_VAL_PHASE
To read out a waveform measurement, use the LcPXD222_ReadWaveformMeasurement func-
tion. To read back both the measurement and the waveform, call the function.
LcPXD222_FetchWaveform after calling LcPXD222_ReadWaveformMeasurement.
PXD222-OM-E Rev A ISSUED: November 2001 21
Page 26

PXD 222 Digitizer
PXD 222 DIGITIZER QUICK START APPLICATION SOFTWARE
Soft Front Panel
The PXD 222 Digitizer Quick Start Application software has the following features:
• Graphic Display with independent vertical axis for each digitizer input channel
• Acquisition section including autosetup and reset
• Channels section with independent control of probe attenuation, Volts/Div, Offset,
Bandwidth limit, and coupling
• Timebase section including Time/Div, Delay and acquisition type as well as indicators for
the number of points per acquisition and the sample rate
• Trigger section with source, coupling, slope, type, and level selectors
• Data Logger section
22 ISSUED: November 2001 PXD222-OM-E Rev A
Page 27

Operation
Acquisition: The "Acquisition" indicator is green when data is being acquired and red when the
acquisition is stopped.
AutoSetup: The AutoSetup feature lets the digitizer display complex, unknown signals automatically. This function optimizes the position, range, time base, and triggering.
Reset: The Reset feature will reset the PXD 222 Digitizer hardware and the software application
to a default state.
Hint: Typing values is easier that using the knob.
En CH1 and En CH2: The enable channel 1 and enable channel 2 buttons are used to turn on and
off channels 1 and 2 respectively. The color of the buttons matches the color of the trace.
CH1 and CH2 Probes: The BNC inputs to the digitizer do not include automatic probe sensing.
The CH1 and CH2 Probe switch should be set to 10 when a 10:1 probe is connected to the channel input, but it should be set to 1 when there is a direct connection.
V/Div. CH1 and CH2: Set the volts per division for each input independently by using the V/Div
knob or by typing a value in the V/Div control box. The V/Div knob will change color depending on
the channel selected: yellow when channel 1 is selected and red when channel 2 is selected.
These colors also match the trace colors in the graphic display.
PXD222-OM-E Rev A ISSUED: November 2001 23
Page 28

PXD 222 Digitizer
Offset CH1 and CH2: Set the Offset for each input independently using the Offset knob or by typing a value in the Offset control box. The Offset knob will change color depending on the channel
selected: yellow when channel 1 is selected and red when channel 2 is selected. These colors
also match the trace colors in the graphics display.
Bandwidth Limit CH1 and CH2: To suppress high frequency noise on waveforms, you can limit
the bandwidth of the digitizer by selecting a 10 kHz or 20 MHz filter. This function smooths the displayed waveform by blocking frequencies above the filter’s limit.
Coupling CH1 and CH2: Each channel of the digitizer is set to DC coupled by default so that AC
and DC voltages appear on the display. Select AC coupling when you wish to observe a small sig-
nal that rides on a DC signal. Clicking the switch control toggles the selection.
T/Div: The time per division is set by using the T/Div knob or by typing a value in the T/Div control
box. The digitizer automatically adapts itself to use the maximum sampling rate whenever the
timebase is changed.
Delay: Turn the Delay knob to adjust the horizontal position and the amount of pre-trigger, as
desired.
Acquisition Type: In NORMAL type, each acquisition is a fixed number of points depending on
the timebase; and the time between points is the inverse of the sample rate. In Mn-Max type an
oversampling technique is used to detect peaks. This acquisition type is useful for detecting
glitches on slow timebase settings. See the Operation chapter for more information.
Number of Points: This is an indicator that displays the number of points in each acquisition. This
will vary automatically depending on the T/Div and Acquisition type.
Sample Rate: This is an indicator that displays the sample rate for each acquisition. This will vary
automatically depending on the T/Div and Acquisition type.
24 ISSUED: November 2001 PXD222-OM-E Rev A
Page 29

Operation
Source: The trigger source for the digitizer may be either of the input channels or the PXI Trigger
and Star Trigger lines on the PXI backplane.
Coupling: This sets the trigger coupling for the input channels. DC is used when all the signal frequency components are coupled to the trigger circuit. When AC is selected the signal is capaci-
tively coupled, DC levels are rejected, and frequencies below 50 Hz are attenuated. NOISE Reject
is a filter that will help reduce jitter when triggering on noisy waveforms.
Level: Defines the source voltage at which the trigger circuit will generate an event.
Slope: Determines the direction of the trigger voltage transition used to generate a particular trig-
ger event.
Modifier: In NORM mode the digitizer will acquire while there is a valid trigger. In AUTO mode the
trace will automatically be displayed regardless of a valid trigger. When a valid trigger is present in
auto mode, the digitizer will behave as if in normal mode.
Type: Edge type requires a valid trigger edge. IMMEDIATE type will force a trigger even if the trig-
ger conditions are not met.
On/off: turns datalogging on and off.
Directory: Sets the directory for storying waveforms. Entering a period sets the current directory
of the Quick-Start Demo; entering another value (e.g., "Test 1") creates a new folder called "Test1"
referenced from the current directory.
Filename: Sets prefix for filename.
Index: An auto-incrementing index is appended to the above filename. When the datalogger is
turned on, and the program is in continuous Acquisition mode, each waveform will be stored.
PXD222-OM-E Rev A ISSUED: November 2001 25
Page 30

PXD 222 Digitizer
USING THE PXD 222 DIGITIZER IVI INSTRUMENT DRIVERS
Your CD-ROM includes several example programs written in LabWindows/CVI using the PXD 222
IVI driver. Even if you are not using CVI, the ".c" files provide practical examples that will help you
learn how to program the PXD 222 Digitizer.
§ § §
26 ISSUED: November 2001 PXD222-OM-E Rev A
Page 31

ASpecifications
PXD 222 DIGITIZER SPECIFICATIONS
NOTE: Specifications are subject to
change without notice.
VERTICAL SYSTEM
Bandwidth (DC coupled): 200 MHz (–3dB)
Lower Frequency Limit (AC coupled):
with 10:1 probe ...........................< 2 Hz (–3dB)
direct (1:1)..................................< 5 Hz (–3dB)
Rise Time: 1.7 ns
Analog Bandwidth Limiters: 20 MHz and 10 kHz
Input Coupling: AC, DC
Full Scale ranges:
direct (1-2-5 sequence)..............40 mV to 800 V
with 10:1 probe ...........................400 mV to 8000 V
Positioning (% of full range): 100%
Input Impedance on BNC:
DC Coupled ................................1 M?ohms (±1%) // 15 pF (±2 pF)
Max. Input Voltage
with 10:1 probe ...........................1000 V CAT II
direct (1:1)..................................300 V CAT II
(For detailed specifications, see “SAFETY”)
Vertical Accuracy: ±2% of full range
Digitizer Resolution: 8 bits, separate digitizer
Specifications
HORIZONTAL SYSTEM
Maximum Time Base Speed: 400 ps/sample
Minimum Time Base Speed: 4.8 s/sample (scope record mode)
Real Time Sampling Rate (for both inputs simultaneously):
400 ps to 80 ns/S.......................up to 2.5 GS/s
PXD222-OM-E Rev A ISSUED: November 2001 27
Page 32

PXD 222 Digitizer
40 ns to 2.4 s/S ..........................20 MS/s
4.8 s/S ........................................4 MS/s
(See the chapter on Operation for more information.)
Acquisition Modes: Real Time, Single Sweep
Normal Acquisition Mode:
Record size................................up to 1000 samples/ch
Record time span.......................100 ns to 10 s
Glitch Capture Mode:
Record size................................250 points (Min. and Max data arrays returned)
Recorded time span...................50 µs to 10 s; detects glitches as fast as 50 ns by
oversampling waveform
Sample rate................................up to 2.5 GS/s
Scope Record Size:
Record size................................27 points (Min. and Max data arrays returned)
Sample rate................................up to 20 MS/s
TRIGGER
Trigger Modes: Automatic, Edge, Video, Pulse Width
Trigger Delay: up to +25000 samples
Pre Trigger View: 2500 samples
Max. Delay: 10 s
Edge Trigger:
Mode ..........................................On Trigger, Single Shot
Source........................................Ch1, Ch2, PXI_TRIG[0,1,2…7],PXI_STAR[0,1,2…7]
Slope..........................................Positive, Negative
Trigger Level Control Range:
Input Ch1, Ch2...........................100% of full range
PXI_TRIG[0,1,2…7]...................fixed C-mos Cpci-level
PXI_STAR[0,1,2…7] ..................fixed C-mos Cpci-level
28 ISSUED: November 2001 PXD222-OM-E Rev A
Page 33

Specifications
Trigger Sensitivity Ch1 and Ch2:
DC to 5 MHz ...............................5 mV or 6.25% of full range
@ 200 MHz ...............................12.5% of full range
@ 250 MHz ...............................25.0% of full range
Video Trigger:
Standards ...................................PAL, PAL+, NTSC, SECAM
Modes ........................................Lines, Line Select, Field 1, or Field 2
Source........................................Ch 2
Polarity.......................................Positive, Negative
Sensitivity (sync level)................8.75% of full range
Pulse Width Trigger:
Screen Update ...........................On Trigger, Single Shot
Trigger Conditions......................< T, > T, approximately equal to T (±10%), not equal to T
(±10%)
Source........................................Ch2
Polarity.......................................Positive or negative pulse
Pulse Time Adj. Range..............0.25 to 10 samples with a maximum resolution of 50 ns
Auto Set/ Range:
Autoranging attenuators and timebase; automatic triggering with automatic source selection. The
autorange must be switched on or off.
If autorange is on, all auto functions are active until an autorange off command is executed.
Modes:
Normal........................................15 Hz to max. bandwidth
Low Frequency ...........................1 Hz to max. bandwidth
Minimum Amplitude Ch 1, Ch 2
DC to 1 MHz ...............................20 mV
1 MHz to max. bandwidth...........40 mV
PXD222-OM-E Rev A ISSUED: November 2001 29
Page 34

PXD 222 Digitizer
PHYSICAL DIMENSIONS
Height.........................................3 U (13.3 cm, 5.25 in.)
Width..........................................2 slots (3.9 cm, 1.56 in.)
Weight ........................................0.77 kg (1.7 lb.)
POWER REQUIREMENTS
Input voltage at cPCI connector....... 5 V ±10%
Input current ..................................... 1.6 A
ENVIRONMENTAL CONDITIONS
Temperature
Operating...................................0 °C to 50 °C (32 °F to 122 °F) with specified cooling of PXI
rack (indoor use only)
Non-Operating ...........................–40 °C to +71 °C
Humidity
Operating...................................5% to 95% max. RH (non-condensing) up to 30 °C; upper
limit derates to 45% RH (non-condensing) at 40 °C (104 °F)
Non-operating............................5% to 95% max. RH (non-condensing) up to 30 °C; upper
limit derates to 45% RH (non-condensing) at 60 °C (140 °F)
Altitude
Operating...................................4600 m (15,092 ft.)
Non-operating............................12,000 m (39,377 ft.)
Altitude
Conforms to MIL-PRF-28800 Class 3
30 ISSUED: November 2001 PXD222-OM-E Rev A
Page 35

Specifications
SAFETY
CAUTION
Safety specifications are only valid if
the unit is properly grounded, as
described in the Installation procedure.
The LeCroy PXD 222 Digitizer is designed for measurements on 300 V Category II Installations,
Pollution Degree 2, per:
EN 61010-1:1993 + A2:1995
CAN/CSA-C22.2 No.1010.1-92
UL3111-1
Max. Input Voltages:
Input Ch 1 and Ch 2 directly....................300 V CAT II
Input Ch 1 and Ch 2 via 10:1 probe........1000 V CAT II
Max. Floating Voltage:
From any terminal to ground ...................300 V CAT II
Between any terminal..............................300 V CAT II
Voltage ratings are given as “working voltage.” They should be read as VAC rms (50–60 Hz) for
AC sine wave applications and as VDC for DC applications.
PXD222-OM-E Rev A ISSUED: November 2001 31
Page 36

PXD 222 Digitizer
Input 2 &1
Max. Input Voltage v.s. Frequency
Safe Handling: Max. Input Voltage between Scope References 1and 2 and between Scope
References and safety ground
32 ISSUED: November 2001 PXD222-OM-E Rev A
Page 37

Specifications
CERTIFICATIONS
CE approved, UL & cUL recognized
CE Declaration of Conformity: The PXD 222 Digitizer meets requirements of the EMC Directive 89/336/
EEC for Electromagnetic Compatibility and Low Voltage Directive 73/23/EEC for Product Safety.
EMC Directive:
Electromagnetic Emissions: EN55022:1998, Class B Radiated emissions
Electromagnetic Immunity:
* Meets Performance Criteria “B” limits – during the disturbance, product undergoes a temporary degrada-
tion or loss of function of performance which is self recoverable.
EN 61326-1:1997 +A1:1998
EMC requirements for electrical equipment for measurement, control, and
laboratory use.
EN 61000-4-2:1995 +A1:1998* Electrostatic Discharge
EN 61000-4-3:1996 +A1:1998* RF Radiated Electromagnetic Field
EN 61000-4-4:1995* Electrical Fast Transient/Burst
EN 61000-4-5:1995* Surges
EN 61000-4-6:1996* RF Conducted Electromagnetic Field
CAUTION
EMC specifications are only valid if the unit is properly installed in a CE compliant PXI
chassis, as described in the Installation procedure.
PXD222-OM-E Rev A ISSUED: November 2001 33
Page 38

PXD 222 Digitizer
Low Voltage Directive: EN 61010-1:1993 +A2:1995
Safety requirements for electrical equipment for measurement, control, and laboratory use.
The PXD 222 Digitizer has been qualified to the following
EN61010-1 category:
300 V Installation (Overvoltage) Category II
Pollution Degree 2
Protection Class I
UL and cUL Recognized: UL Standard: UL 3111-1
Canadian Standard: CSA-C22.2 No. 1010.1-92
§ § §
34 ISSUED: November 2001 PXD222-OM-E Rev A
 Loading...