

TELEDYNE
RD INSTRUMENTS
Getting Started with the Pioneer DVL
P/N 95B-6134-00 (April 2018)
Install the Software and Documentation
The Documentaon and Soware CD includes:
• TRDI Toolz and RDI Tools soware
• Pioneer DVL Guide PDF
• Pioneer Geng Started PDF
• Pioneer Integraon Guide PDF
1
Step
2
Step
3
Step
4
Step
Verify all parts are present
The standard DVL includes:
•
Pioneer DVL with Dummy Plugs
• Power/Comm Cable and Pigtail cable
• Shipping case
• Spare Parts Kit
• Software and Documentation CD
• Printed copy of Getting Started and Integration Guide
• Check packing slip for additional options
Read the Integration Guide
Included with the system is a printed
copy of the Integration Guide.
Communication and Power Setup
See the reverse side of this guide for detailed
instructions.
PRODUCT FEATURES:
• Bottom-tracking capability for deep water operations:
1000-4500 meter depth rating for tracking ranges
100-275 m
• Compact DVLs that can be packaged into small portable
UUVs of 7.5 inches (<19 cm) in diameter
• Flexible triggering with both trigger in and trigger out
• Multiple communications channels, allowing for
optimum connectivity with external sensors
• Upgradeable to include ADCP capabilty
• Real-time current proling option provides additional
critical data parameters from a single instrument
Informaon included herein is controlled by the Export Administraon Regulaons (EAR) and may require an export license,
license excepon or other approval from the appropriate U.S. Government agency before being exported from the United
States or provided to any foreign person. Diversion contrary to U.S. law is prohibited.
• Self-contained or remote-head options available
• Advanced AHRS IMU for accurate vehicle attitude
correction in static and dynamic environments
• Leak detection and monitoring for peace of mind in the
most critically demanding deep missions
• Transducer and system health monitoring for real-time
health monitoring of your critical navigation asset
• Time of validity output for highly accurate coupling with
an Inertial Navigation System (INS), further improving
the resulting DVL-aided-INS position accuracy
TELEDYNE
RD INSTRUMENTS
P/N 95B-6134-00 (April 2018)
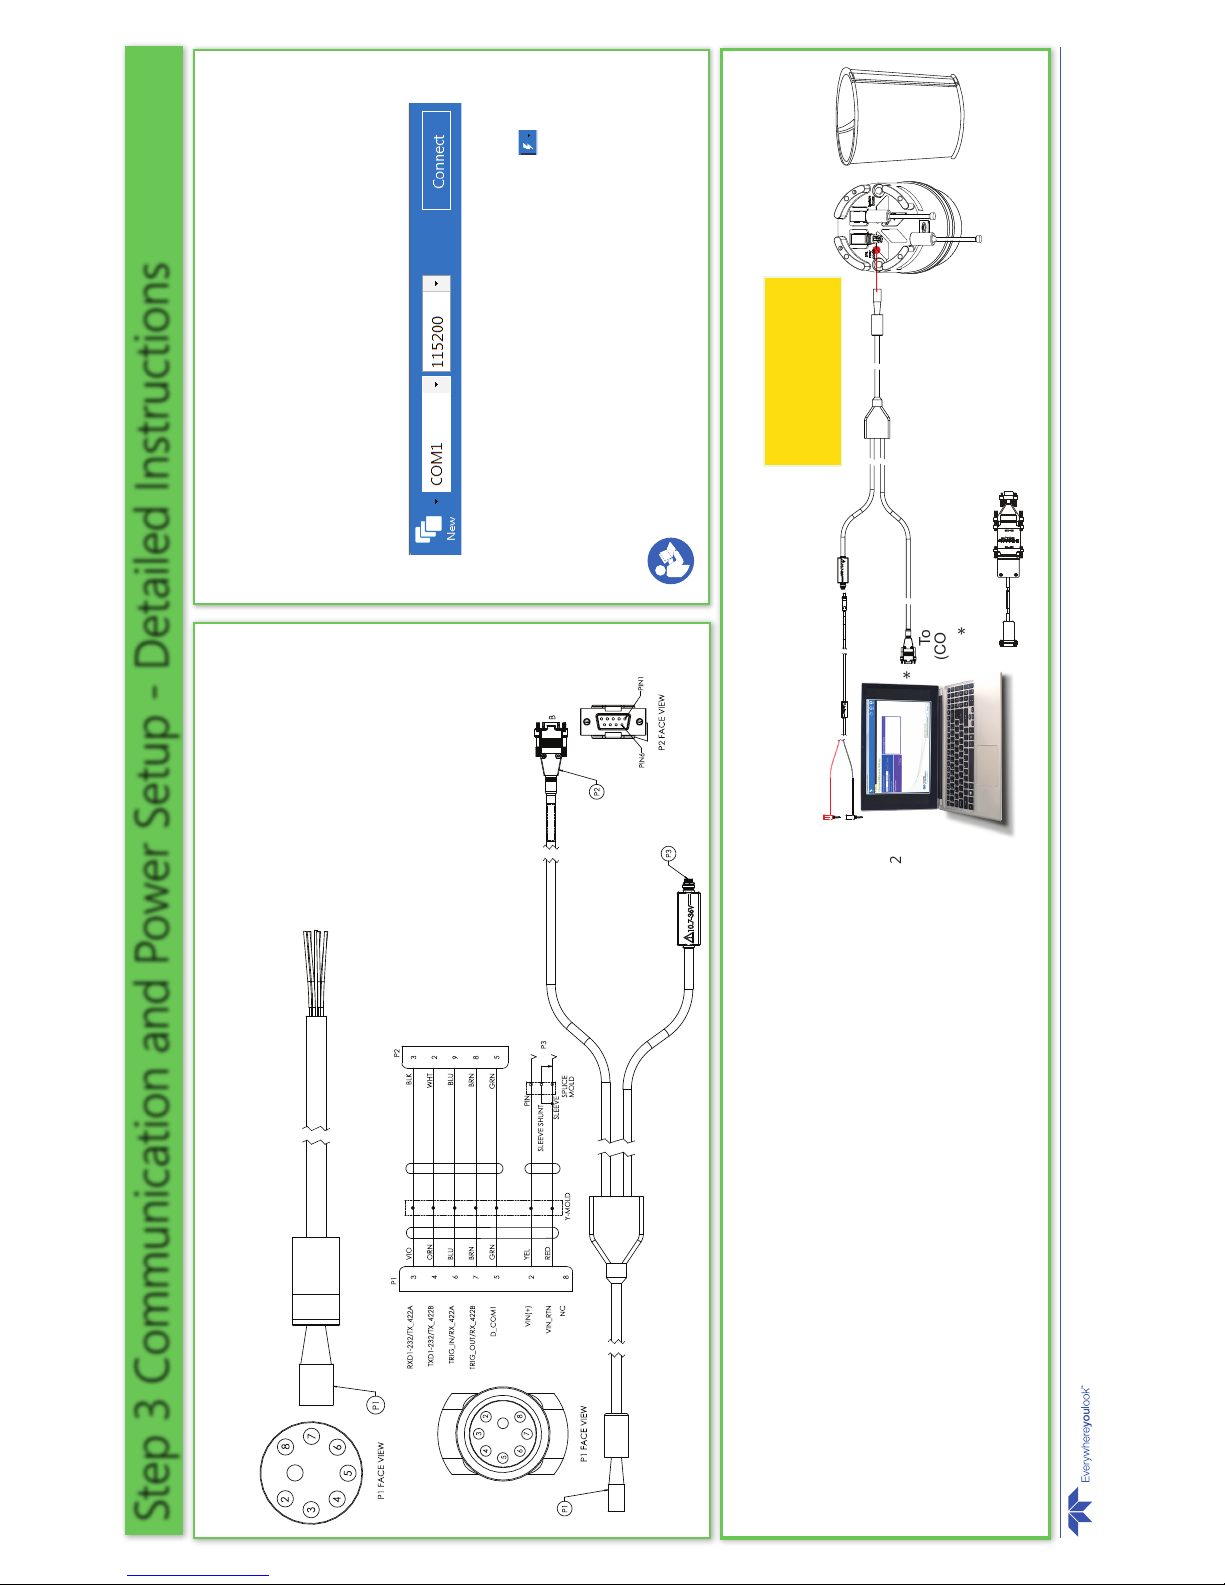
Step 3 B Connecting the Power/Comm Cable
Step 3 C Setting Up the Communications
1. Place the Pioneer on its transducer face on a soft surface.
2. Remove the Power/Comm protective cap and lubricate the connector.
3. Push the cable straight onto the Power/COMM connector ensuring the pins are properly
aligned. While keeping a slight inward pressure on the cable connector and ensuring that
the connector is straight, thread the locking sleeve onto the receptacle to complete the
connection.
4. Attach the Power/Comm cable to the computer’s serial communication port. Use an RS-422
to RS-232 adapter if the DVL is configured with port 1 as RS-422.
5. Connect the power adapter cable to the DVL/Power/Comm cable power connector by
pushing it all the way in until it “clicks”. Connect +10.7 to 36 VDC power. The power supply
should be able to source at least 4 Amps.
6. Place the Pioneer system in water (at least a few inches to cover the transducer face).
7. Establish communications with the Pioneer.
Step 3 Communication and Power Setup - Detailed Instructions
Step 3 A Wiring the Standard Power/Comm Pigtail Cable
Wire the pigtail cable or use the Power/Comm Test Cable.
To establish communications with the Pioneer:
1. Connect and power the system as shown in Steps 3A and 3B.
2. Start the TRDI Toolz software (installed in Step 2).
3. Select New Serial Connection.
4. Enter the Pioneer’s communication settings.
For Serial comms select the COM Port the cable connected to and set
the Baud Rate to 115200.
5. Click the Connect button. Once connected, the button will change to
Disconnect.
6. Click inside the terminal window and then click the Break ( ) button
located at the bottom left of the terminal window. The wakeup banner
below will be displayed.
Pioneer DVL
Teledyne RD Instruments (c) 2015
All rights reserved.
Firmware Version: 57.xx
Refer to the Integration Guide for further information.
EAR-Controlled Technology Subject to Restrictions Contained on the Cover Page.
1
1
1
To Serial Port
(COM1 or COM2)
DVL/Power/Comm Cable
73B-3004-005
RS-232 or use
RS-422 to RS-232 Adapter
*
*
Prior to each connection:
Lubricate mating surfaces with
3M Silicone Spray or equivalent.
DO NOT grease!
10.7 to 36 VDC
(32 VDC typical)
4 AMP
Bucket of Water
Pioneer DVL
Power Adapter Cable
73B-6046-00
TRDI Toolz
 Loading...