

2102 Wireless
Communication Module
Installation and Operation Guide
Part #60-2003-146 of Assembly #60-2003-145
Copyright © 2003. All rights reserved, Teledyne Isco, Inc.
Revision G, March 25, 2007


Foreword
This instruction manual is designed to help you gain a thorough understanding of the
operation of the equipment. Teledyne Isco recommends that you read this manual
completely before placing the equipment in service.
Although Teledyne Isco designs reliability into all equipment, there is always the possibility of a malfunction. This manual may help in diagnosing and repairing the malfunction.
If the problem persists, call or e-mail the Teledyne Isco Technical Service Department
for assistance. Simple difficulties can often be diagnosed over the phone.
If it is necessary to return the equipment to the factory for service, please follow the
shipping instructions provided by the Customer Service Department, including the
use of the Return Authorization Number specified. Be sure to include a note
describing the malfunction. This will aid in the prompt repair and return of the
equipment.
Teledyne Isco welcomes suggestions that would improve the information presented in
this manual or enhance the operation of the equipment itself.
Teledyne Isco is continually improving its products and reserves the right to
change product specifications, replacement parts, schematics, and instructions without notice.
Customer Service
Phone: (800) 228-4373 (USA, Canada, Mexico)
Fax: (402) 465-3022
Email: IscoCSR@teledyne.com
Technical Service
Phone: (800) 775-2965 (Analytical)
Email: IscoService@teledyne.com
Return equipment to: 4700 Superior Street, Lincoln, NE 68504-1398
Other Correspondence
Mail to: P.O. Box 82531, Lincoln, NE 68501-2531
Email: IscoInfo@teledyne.com
Web site: www.isco.com
Contact Information
(402) 464-0231 (Outside North America)
(800) 228-4373 (Samplers and Flow Meters)
Revised September 15, 2005


2102 Wireless Communication Module
Table of Contents
Section 1 Quick Start Guide
1.1 Getting Started . . . . . . . . . . . . . . . . . . . . . . . . . . . . . . . . . . . . . . . . . . . . . . . . . . . . . 1-1
1.2 Wireless Module . . . . . . . . . . . . . . . . . . . . . . . . . . . . . . . . . . . . . . . . . . . . . . . . . . . . 1-2
1.2.1 Identifying Module Components . . . . . . . . . . . . . . . . . . . . . . . . . . . . . . . . . . 1-2
1.2.2 Communication Connectors . . . . . . . . . . . . . . . . . . . . . . . . . . . . . . . . . . . . . 1-3
1.3 System Connections . . . . . . . . . . . . . . . . . . . . . . . . . . . . . . . . . . . . . . . . . . . . . . . . . 1-5
1.3.1 Base Module Connections . . . . . . . . . . . . . . . . . . . . . . . . . . . . . . . . . . . . . . . 1-5
1.3.2 Remote 2100 Site Connections . . . . . . . . . . . . . . . . . . . . . . . . . . . . . . . . . . . 1-5
1.3.3 Remote 4100/4200/6700 Site Connections . . . . . . . . . . . . . . . . . . . . . . . . . . 1-5
Section 2 Introduction
2.1 Product Description. . . . . . . . . . . . . . . . . . . . . . . . . . . . . . . . . . . . . . . . . . . . . . . . . . 2-1
2.1.1 Wireless Module Overview . . . . . . . . . . . . . . . . . . . . . . . . . . . . . . . . . . . . . . 2-1
2.2 Applications. . . . . . . . . . . . . . . . . . . . . . . . . . . . . . . . . . . . . . . . . . . . . . . . . . . . . . . . 2-2
2.3 Controls, Connectors, and Indicators. . . . . . . . . . . . . . . . . . . . . . . . . . . . . . . . . . . . 2-2
2.4 Technical Specifications . . . . . . . . . . . . . . . . . . . . . . . . . . . . . . . . . . . . . . . . . . . . . . 2-4
Section 3 Preparation and Installation
3.1 Unpacking Instructions . . . . . . . . . . . . . . . . . . . . . . . . . . . . . . . . . . . . . . . . . . . . . . 3-1
3.2 Preparing for Installation. . . . . . . . . . . . . . . . . . . . . . . . . . . . . . . . . . . . . . . . . . . . . 3-1
3.2.1 Safety . . . . . . . . . . . . . . . . . . . . . . . . . . . . . . . . . . . . . . . . . . . . . . . . . . . . . . . 3-1
Site Considerations 1
3.3 Installation . . . . . . . . . . . . . . . . . . . . . . . . . . . . . . . . . . . . . . . . . . . . . . . . . . . . . . . . 3-2
3.3.1 Install the modules . . . . . . . . . . . . . . . . . . . . . . . . . . . . . . . . . . . . . . . . . . . . 3-4
3.3.2 Testing Installation . . . . . . . . . . . . . . . . . . . . . . . . . . . . . . . . . . . . . . . . . . . . 3-5
Section 4 Programming
4.1 Section Overview. . . . . . . . . . . . . . . . . . . . . . . . . . . . . . . . . . . . . . . . . . . . . . . . . . . . 4-1
4.2 Flowlink Connections . . . . . . . . . . . . . . . . . . . . . . . . . . . . . . . . . . . . . . . . . . . . . . . . 4-1
4.2.1 Communication Resolution (2100 only) . . . . . . . . . . . . . . . . . . . . . . . . . . . . 4-3
Section 5 Maintenance
5.1 Maintenance Overview . . . . . . . . . . . . . . . . . . . . . . . . . . . . . . . . . . . . . . . . . . . . . . . 5-1
5.1.1 Cleaning . . . . . . . . . . . . . . . . . . . . . . . . . . . . . . . . . . . . . . . . . . . . . . . . . . . . . 5-1
5.2 How to Obtain Service . . . . . . . . . . . . . . . . . . . . . . . . . . . . . . . . . . . . . . . . . . . . . . . 5-1
Appendix A Replacement Parts
A.1 Replacement Parts Diagrams and Listings . . . . . . . . . . . . . . . . . . . . . . . . . . . . . . A-1
iii

2102 Wireless Communication Module
Table of Contents
List of Figures
1-1 2102 Components - Top View . . . . . . . . . . . . . . . . . . . . . . . . . . . . . . . . . . . . . . . . . 1-2
1-2 2102 Components - Bottom View . . . . . . . . . . . . . . . . . . . . . . . . . . . . . . . . . . . . . . 1-3
1-3 Upper Connector - Capped . . . . . . . . . . . . . . . . . . . . . . . . . . . . . . . . . . . . . . . . . . . . 1-4
1-4 Upper Connector - Uncapped . . . . . . . . . . . . . . . . . . . . . . . . . . . . . . . . . . . . . . . . . . 1-4
1-5 Lower Connector - Capped . . . . . . . . . . . . . . . . . . . . . . . . . . . . . . . . . . . . . . . . . . . . 1-4
1-6 Lower Connector - Uncapped . . . . . . . . . . . . . . . . . . . . . . . . . . . . . . . . . . . . . . . . . . 1-4
1-7 Connections . . . . . . . . . . . . . . . . . . . . . . . . . . . . . . . . . . . . . . . . . . . . . . . . . . . . . . . 1-6
2-1 2102 Controls, Connectors, and Indicators . . . . . . . . . . . . . . . . . . . . . . . . . . . . . . . 2-3
2-2 2102 Connector Pins . . . . . . . . . . . . . . . . . . . . . . . . . . . . . . . . . . . . . . . . . . . . . . . . 2-6
3-2 Assembling a Basic System . . . . . . . . . . . . . . . . . . . . . . . . . . . . . . . . . . . . . . . . . . . 3-2
4-1 Connections . . . . . . . . . . . . . . . . . . . . . . . . . . . . . . . . . . . . . . . . . . . . . . . . . . . . . . . 4-2
A-1 Replacement Parts Diagram – 2102 Wireless Communication Module . . . . . . . . A-2
List of Tables
1-1 Wireless Module Components - Top View . . . . . . . . . . . . . . . . . . . . . . . . . . . . . . . . 1-2
1-2 Wireless Module Components - Bottom View . . . . . . . . . . . . . . . . . . . . . . . . . . . . . 1-3
2-1 Controls, Connectors, and Indicators – 2102 Module . . . . . . . . . . . . . . . . . . . . . . 2-4
2-2 Technical Specifications – 2102 Module . . . . . . . . . . . . . . . . . . . . . . . . . . . . . . . . . 2-4
2-3 Technical Specifications – Spread Spectrum Radio . . . . . . . . . . . . . . . . . . . . . . . . 2-5
2-4 Technical Specifications - 2191 Battery Module . . . . . . . . . . . . . . . . . . . . . . . . . . . 2-5
2-5 Wireless Module Connector Pins . . . . . . . . . . . . . . . . . . . . . . . . . . . . . . . . . . . . . . . 2-6
4-1 Base Module Connect Cables . . . . . . . . . . . . . . . . . . . . . . . . . . . . . . . . . . . . . . . . . . 4-3
A-1 Replacement Parts Listing –
2102 Wireless Communication Module . . . . . . . . . . . . . . . . . . . . . . . . . . . . . . . . . A-3
Flowlink is a registered trademark of Isco, Inc. All other brand and product names are
trademarks or registered trademarks of their respective holders.
iv

2102 Wireless Communication Module
Section 1 Quick Start Guide
1.1 Getting Started This Quick Start Guide provides a basic introduction to the 2102
Wireless Communication Module.
In this section we discuss:
• Identifying key components of the Wireless Module
• Module connectors and caps
• System connections
The intent of this section is only to familiarize you with the basics.
Detailed information about the installation and operation of this
system can be found in the following sections and appendices:
• Section 2, Introduction
• Section 3, Preparation and Installation
• Section 4, Programming
• Section 5, Maintenance
• Appendix A, Replacement Parts
1-1
2102 Wireless Communication Module
Section 1 Quick Start Guide
1.2 Wireless Module
1.2.1 Identifying Module
Components
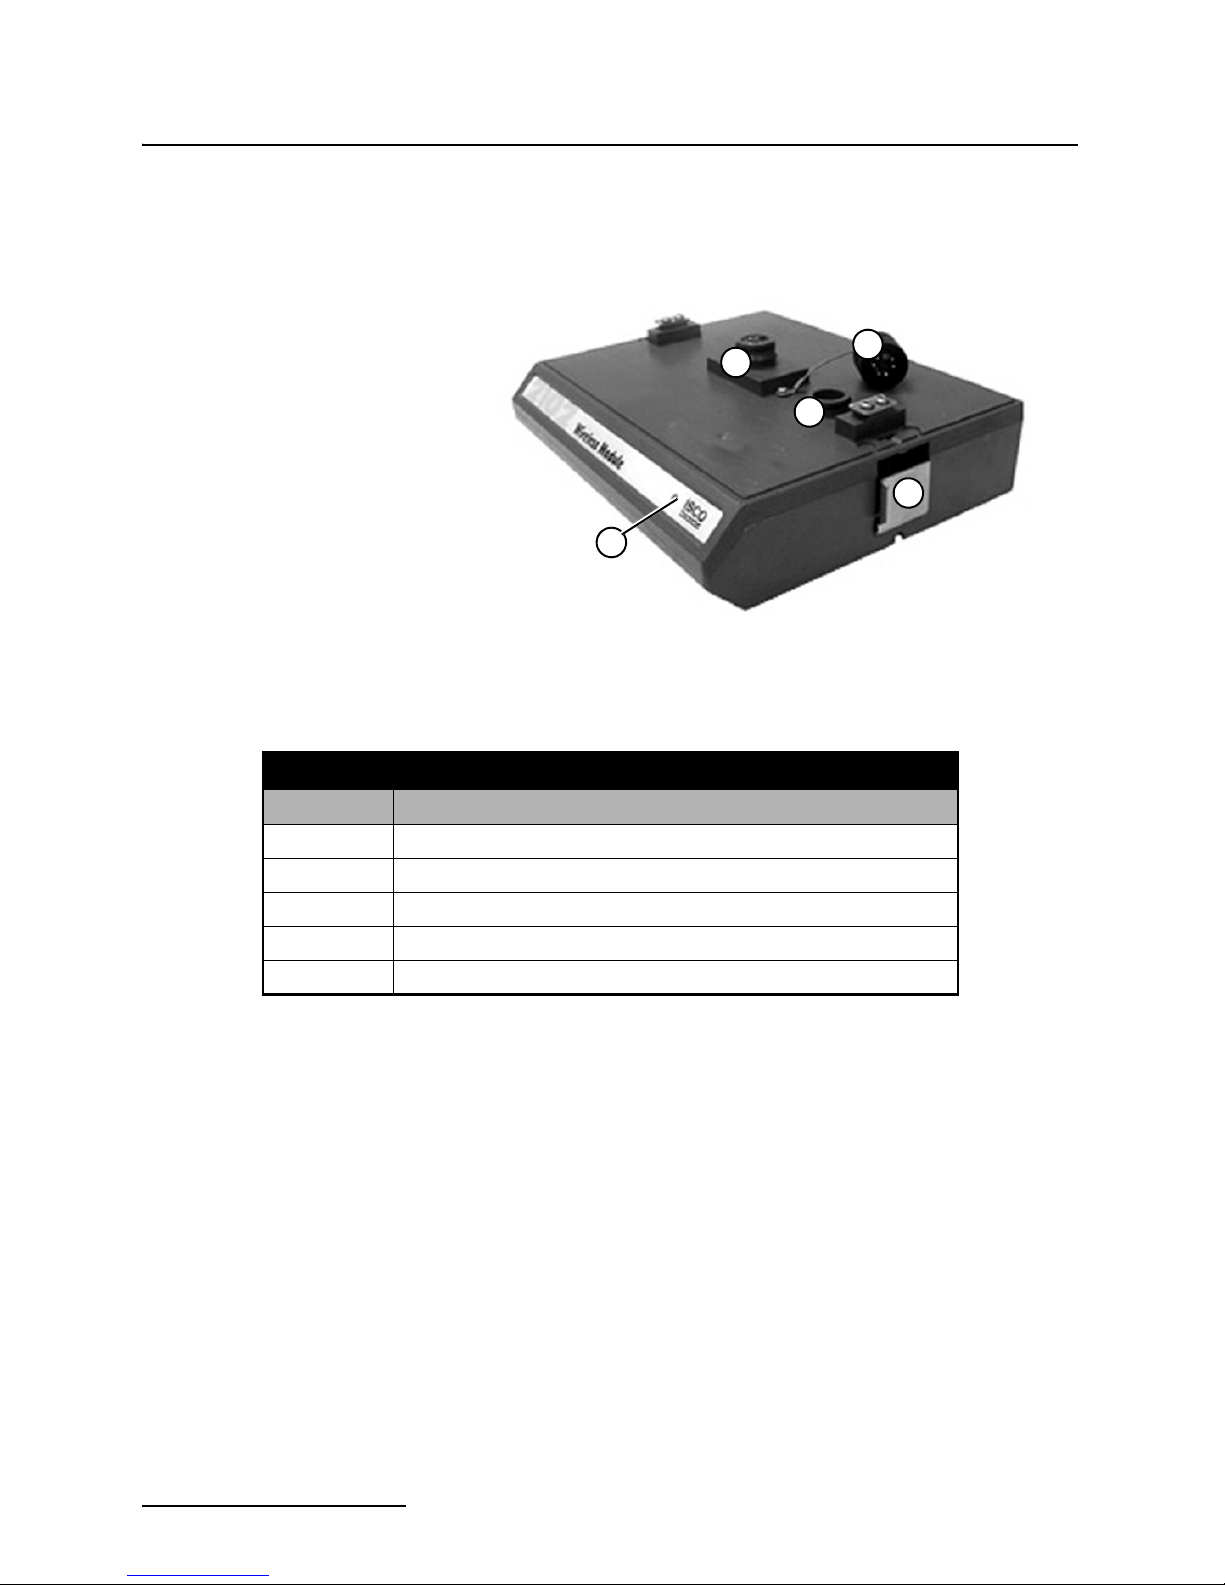
Figure 1-1 2102 Components - Top View
Figures 1-1 and 1-2 identify key components of the 2102.
Table 1-1 Wireless Module Components - Top View
Item No. Description
1
2
3
4
5
1 Communication Connector
2Cap
3 Cap Holder
4 Latch Release
5 Communication Indicator
1-2
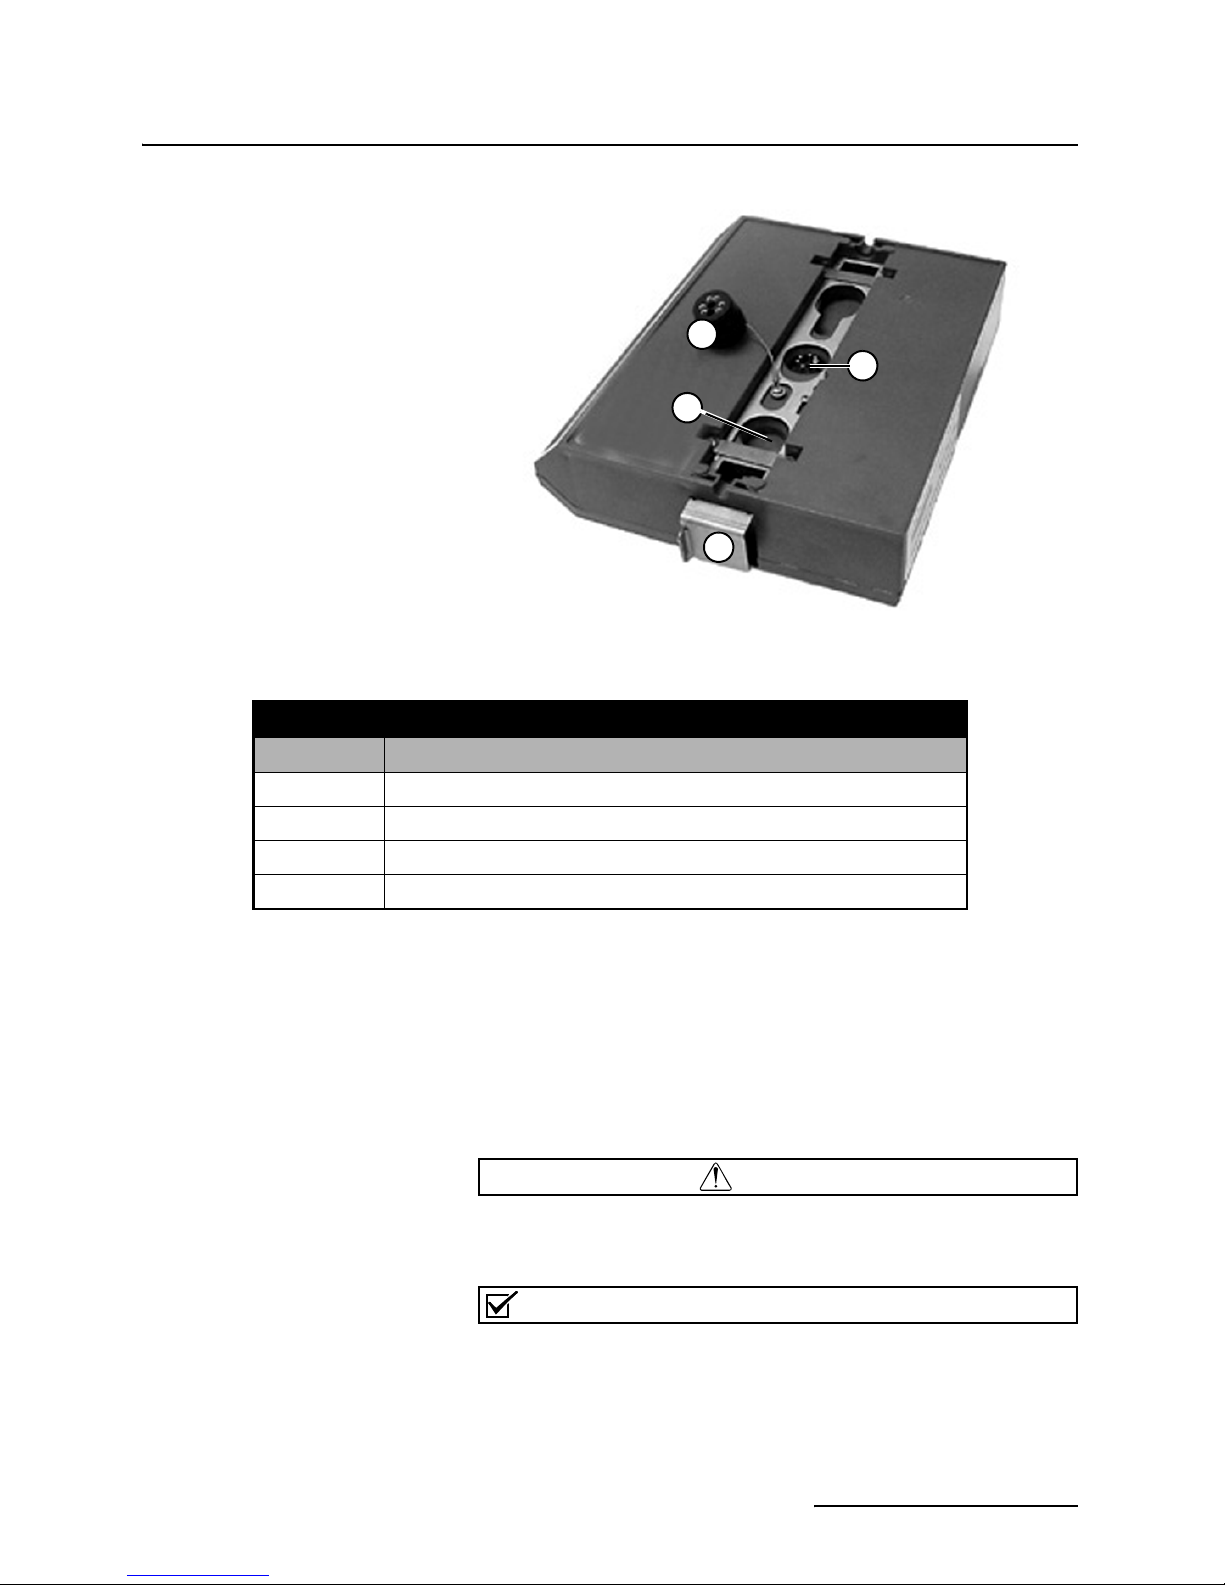
Figure 1-2 2102 Components - Bottom View
2102 Wireless Communication Module
Section 1 Quick Start Guide
2
1
3
4
Table 1-2 Wireless Module Components - Bottom View
Item No. Description
1 Communication Connector
2Cap
3 Cap Holder
4 Latch
1.2.2 Communication
Connectors
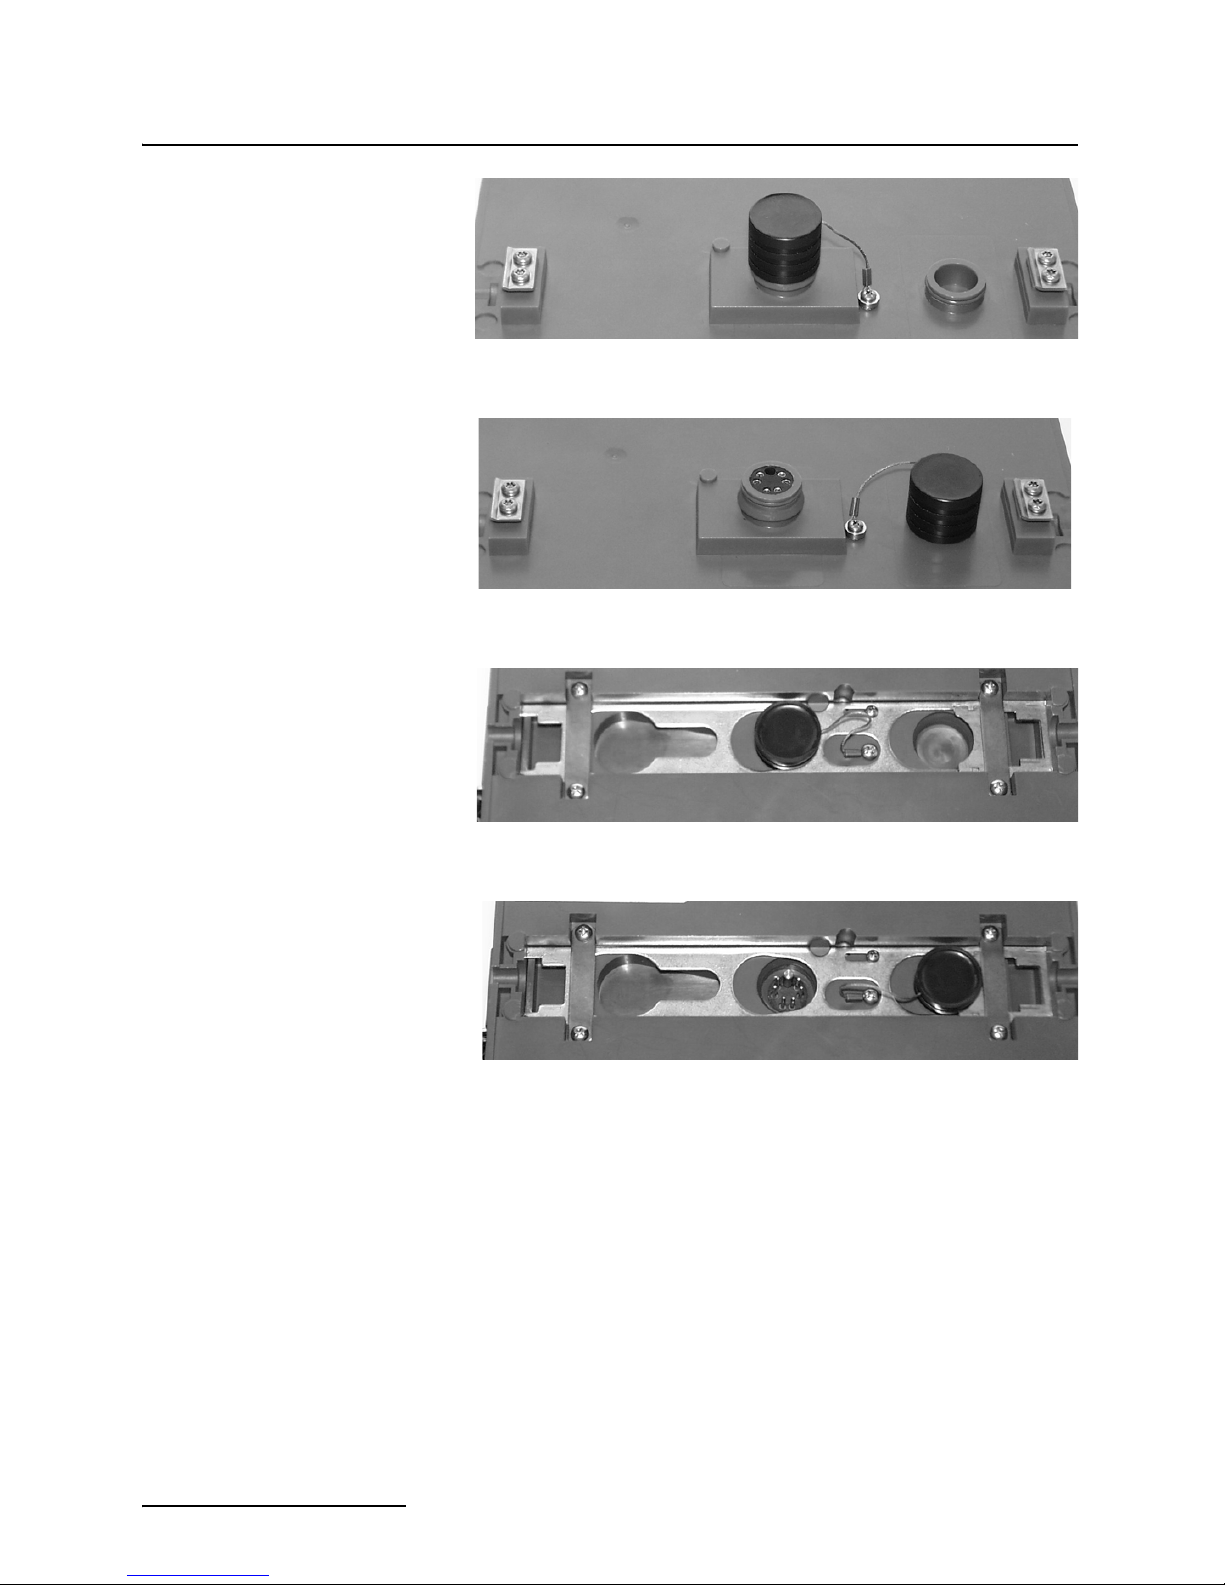
When a communication connector is not in use, the connector must always be capped (Figures 1-3 and 1-5). The cap
will seal the connector to prevent corrosion, prevent moisture
from entering the unit, and improve communications.
When a communication connector is in use, store the cap on the
holder next to the connector (Figures 1-4 and 1-6). The communication connector will be sealed by its mating connector.
CAUTION
Caps PUSH ON and PULL OFF. Do not rotate the caps to
remove them from the connectors.
Note
For modules to correctly stack and lock together, protective
caps between the modules must be stored on the holders.
1-3
2102 Wireless Communication Module
Section 1 Quick Start Guide
Figure 1-3 Upper Connector - Capped
Figure 1-4 Upper Connector - Uncapped
Figure 1-5 Lower Connector - Capped
Figure 1-6 Lower Connector - Uncapped
1-4

2102 Wireless Communication Module
Section 1 Quick Start Guide
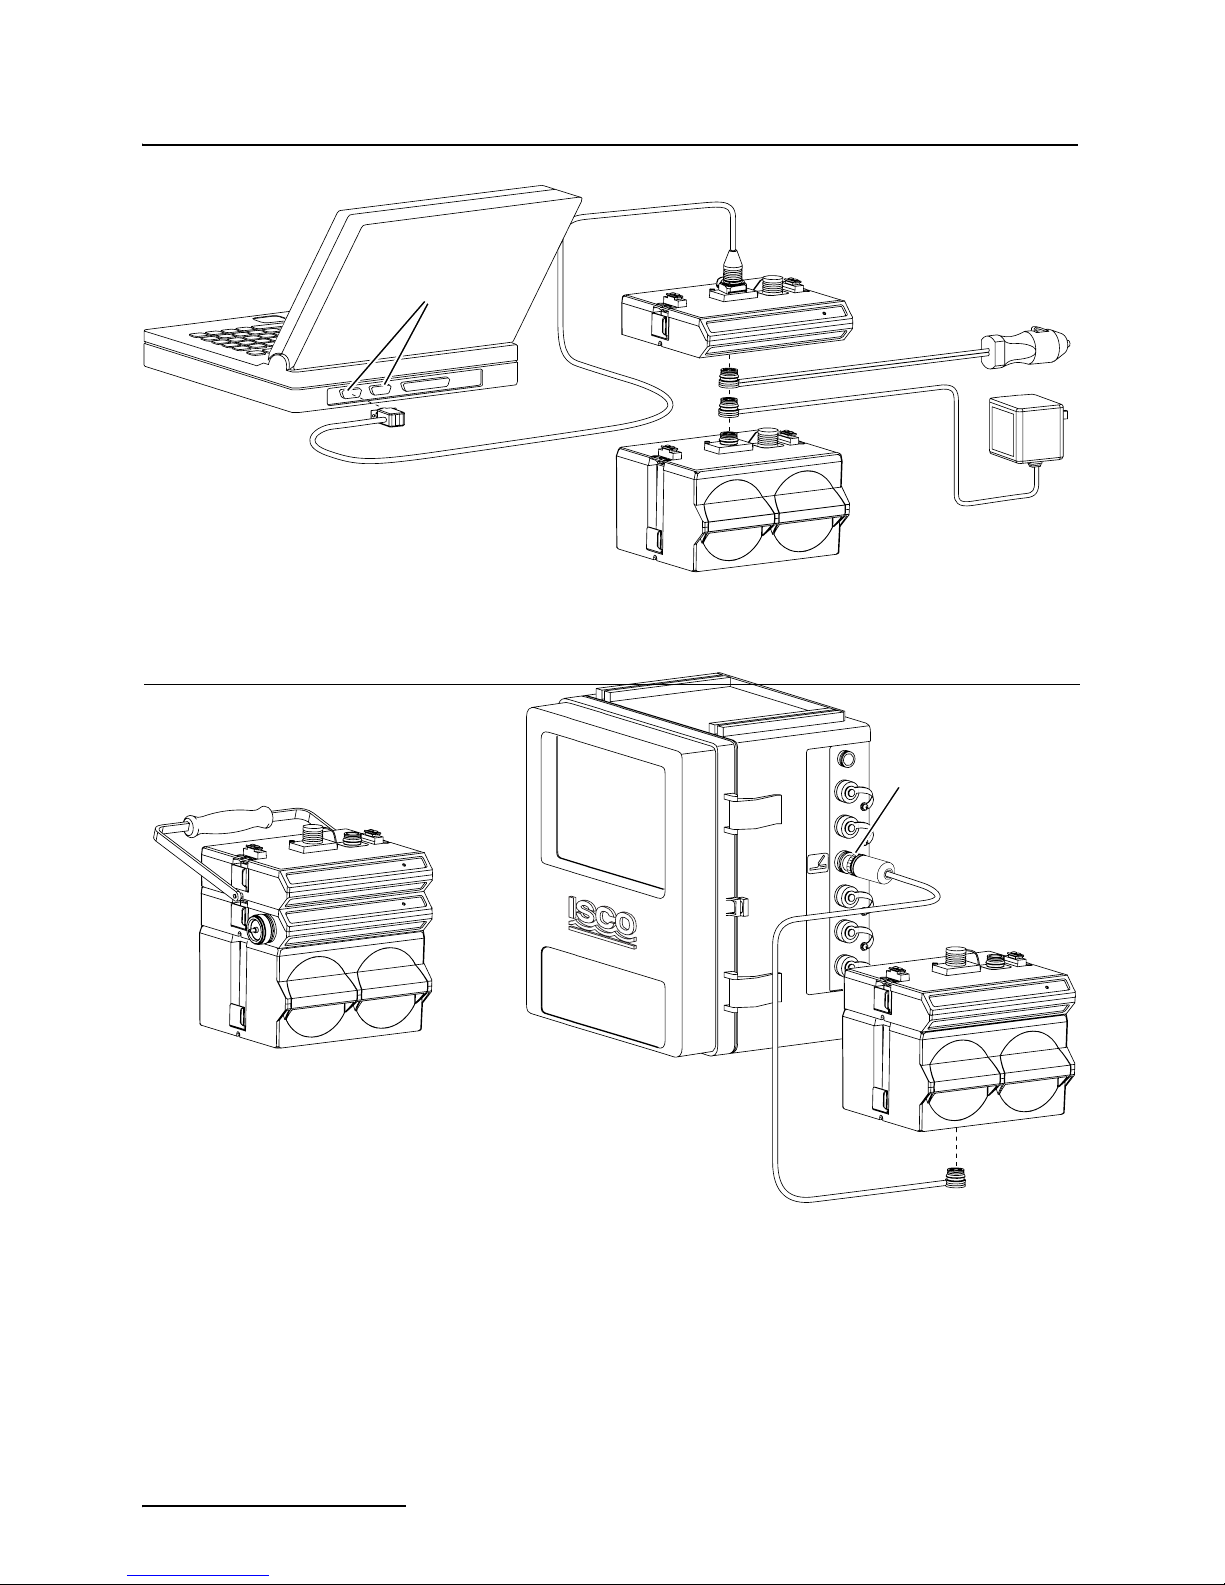
1.3 System Connections Connections for the 2102 Wireless modules are described as a
base module and remote module. The base wireless module
allows a personal computer running Flowlink for Windows (v4.11
or later) to communicate with a remote site that is also using a
wireless module. Although base and remote modules function differently, they are identical. Designed to be “plug-and-play,” the
modules automatically configure themselves according to the
device they are connected to.
Typical system connections are shown in Figure 1-7.
1.3.1 Base Module
Connections
1.3.2 Remote 2100 Site
Connections
The base Wireless Module connects to the computer’s COM port
with a communication cable (Isco Part Number 60-2004-046 or
60-5314-849).
The base module will also require 12 VDC power. The application
will determine which of the three power options you select. For a
more permanent installation using a desktop PC, an AC to DC
power converter (60-2004-057) would the the most practical
choice. Mobile data collection from a vehicle would require the 12
VDC cigarette lighter adapter (60-2004-050). For applications
where an external power source is not available, use the Model
2191 Battery Module (60-2004-006).
To configure the 2100 site with a Wireless Communication
Module, simply attach the module to the stack. The Wireless
Communication Module will draw power from the Battery
Module. If battery life is a concern, a second Battery Module
should be added to the stack.
Make sure the 2150 Firmware version is 1.04 or higher. Prior to
version 1.04, the unit cycled every two minutes. To change this,
the unit must be reconfigured. This is done by holding down the
Shift key and connecting through the Quick Connect dialog.
1.3.3 Remote
4100/4200/6700 Site
Connections
CAUTION
Reconfiguration will cause all settings and previously collected
data to be lost on the unit.
The 2102 may also be used with Teledyne Teledyne Isco’s 4100
series Flow Loggers, 4200 series Flow Meters, and 6700 series
Samplers.
Software versions for the 4200, 4100, and 6700 series instruments are:
4100 - 1.49 or higher
4200 - 2.21 or higher
6700 - 3.22 or higher
1-5
2102 Wireless Communication Module
Section 1 Quick Start Guide
RS-232 Serial Ports
COM1 or COM2
Communication Cable
Base unit cable configurations
Note: Always install the
Model 2102 ON TOP of
the other modules.
2102
Power Option 1
12 VDC Cigarette Adapter
Power Option 2
AC Adapter
Power Option 3
2191 Battery Module
Interrogator Port
4200
2102
21xx
2191
Remote unit cable configurations
Note: Maximum distance between flow meter
and Wireless Module is 50 feet (15.2m).
Figure 1-7 Connections
4100/4200/6712
Connect Cable
2102
2191
1-6

2102 Wireless Communication Module
Section 2 Introduction
2.1 Product Description The 2102 Wireless Communication Module is part of Teledyne
Teledyne Isco’s 2100 Series system. The 2100 Series system measures parameters of open channel flow streams.
The 2100 Series system is designed to be modular so that you can
expand the system to meet your data collection needs. By
stacking the 2100 Series modules, a single site can measure multiple flow channels, collect redundant data, or add other
available measurement capabilities. A site can include remote
measurement points, as distant as 3300 feet, by connecting
modules with cables. Even with several remote modules con-
A 3-module site
figured as a site, you can still retrieve all of the measurement
data from a single connection.
The 2100 Series System is supported by Teledyne Teledyne Isco’s
Flowlink for Windows software. With this full-featured application, you can quickly set up modules, retrieve measurement
data, manage the sites and analyze the data.
The rugged 2100 series components are rated NEMA 4X, 6P
(IP68). The permanently sealed enclosures are designed to meet
the environmental demands of many sewer flow monitoring
applications. All connections between modules, sensors, and communication cables “lock” in place. Each locking mechanism
strongly secures the components and ensures a watertight seal.
2.1.1 Wireless Module
Overview
The 2102 Modules extend the flexibility of the 2100 system. No
longer is flow stream monitoring limited to hard-wired connections or dependent on telephone service. Wireless Modules simplify site selection and data collection.
• No need to open manhole
•“Drive-by”
• safety and comfort
• Teledyne Isco 2102 Wireless Module stacks with 21xx
Area-Velocity Flow Modules
• Powerful Spread Spectrum Digital radio retrieves flow
data without manhole entry
• Two-way communication from your vehicle
2-1

2102 Wireless Communication Module
Section 2 Introduction
2102 Wireless Module Features
• No cell phone hassles
• no monthly fees
• no FCC licensing
• no exposed antennas
•Long range
• Long battery life on two 6-volt alkaline batteries
2.2 Applications Typical applications for the 2102 include:
• Sewer Flow
• Inflow and Infiltration (I&I) studies
• Storm Water Runoff Monitoring
• Combined Sewer Overflow (CSO) Monitoring.
2.3 Controls, Connectors,
and Indicators
The controls, connectors, and indicators on the 2102 are shown in
Figures 2-1. Items referenced in the figure are briefly discussed
in Table 2-1.
LED Operation for the Remote Unit: When the remote is
seeking a connection, the LED will blink. When the connection is
made, the LED will light continuously. The remote will also
detect when a user direct-connects to the top of the unit. the
remote will turn off the radio section and go into standby mode
waiting for the connection to be completed. Once the connection
is completed (the RS-232 line must be quiet for about 60
seconds), the remote unit will update and normal operation will
continue. While in this mode, the LED will blink at a slower
two-second interval.
LED Operation for the Base Unit: The LED will light continuously when the radio inside the module is on. Users should not
leave the unit plugged into the cigarette lighter after finishing
the survey. Standby current in this mode is approximately 40
mA, and will eventually run down a car battery.
2-2

Top/Right View
5
2102 Wireless Communication Module
Section 2 Introduction
1
2
3
4
2
Bottom/Left View
Figure 2-1 2102 Controls, Connectors, and Indicators
7
6
2-3

2102 Wireless Communication Module
Section 2 Introduction
2.4 Technical
Specifications
This section lists technical information about the 2102 Module.
• Table 2-2 lists the technical specifications of the 2102.
• Table 2-3 lists the technical specifications of the Spread
Spectrum Radio.
• Table 2-4 lists the technical specifications of the 2191
Battery Module which must be used with the Model
2102.
• Figure 2-2 and Table 2-5 list information about the 2102
Module’s communication connector.
Table 2-1 Controls, Connectors, and Indicators – 2102 Module
Item No.
Fig. 2-1
1 Communication
2 Connector Caps Insert into unused communication connectors to terminate the network and
3 Communication
4 Latch Release Push in to release the module from a stack.
5 Latch Push in to lock the module in a stack.
Name Description
Upper communication port. The connection transfers data and 12 VDC power
Connector
Indicator
to other modules. The port may also be used to connect attached modules to
a PC running Flowlink software.
protect them from moisture damage. When communication connectors are in
use, the caps must be stowed as shown in Figure 2-1 to protect the terminating components inside the caps.
Illuminates when the module is active.
6 Serial Number Label In back - lists product ID and unit serial numbers.
7 Communication
Connector
Lower communication port. The connector transfers data and 12 VDC power
to other modules.
Table 2-2 Technical Specifications – 2102 Module
Size (H×W×D) 2.9 × 11.3 × 7.5 in. 7.4 × 28.7 × 19.1 cm
Weight 2.0 lbs 0.9 kg
Material High-impact molded polystyrene
Enclosure (self-certified) NEMA 4X, 6P IP 68
Power 10.2 to 16.6 VDC, 100 mA typical at 12 VDC, 1 mA standby
Typical Battery Life (one module)
Carrier Detect Cycle Time 4 minutes
Average Connection Time 2 minutes
Operating Temperature 0° to 140°F -18° to 60°C
Storage Temperature -40° to 140°F -40° to 60°C
Typical: 50 days (when using two alkaline batteries)
2-4

Table 2-3 Technical Specifications – Spread Spectrum Radio
Frequency 902 to 928 MHz
Transmitter
Output Power
Typical Range
line of sight
from inside manhole
Modulation, GFSK
Occupied bandwidth
Receiver
Sensitivity
Selectivity
Data Transmission
Error Detection
Data Encryption
Link Throughput
1 W
0.5 miles (0.8 km)
100 feet (30 m)
120 kBs - 170 kBs
230 kHz
-108dBm at 10-6 raw BER (bit error rate)
40 dB at fc ±230 kHz
60 dB at fc ±460 kHz
32 Bit CRC, resend on error
Substitution, dynamic key
115 kBaud
2102 Wireless Communication Module
Section 2 Introduction
FCC Identifier KNY-205-108213
DOC (Canada) Identifier 2239 102 336A
Table 2-4 Technical Specifications - 2191 Battery Module
Size (H×W×D) 6.0 × 9.6 × 7.6 in. 15.2 × 24.4 × 19.3 cm
Weight (without batteries) 3.2 lbs 1.4 kg
Material High-impact molded polystyrene
Enclosure (self-certified) NEMA 4X, 6P IP 68
Batteries 6V alkaline lantern or lead-acid lantern, Quantity 2
Capacity
Alkaline Lantern Batteries
Lead-Acid Batteries
Setup and Data Retrieval Serial connection to IBM PC or compatible computer with Teledyne Isco Flowlink
Baud Rate 19,200
25 Ampere-hours
5 Ampere-hours
for Windows Software Version 4.11 or above.
Operating Temperature 0° to 140°F -18° to 60°C
Storage Temperature -40° to 140°F -40° to 60°C
2-5

2102 Wireless Communication Module
Section 2 Introduction
G
F
E
D
Communications Port
(upper connector shown)
Figure 2-2 2102 Connector Pins
A
B
C
Table 2-5 Wireless Module Connector Pins
Pin Name Description
A LONA Neuron differential transceiver Data A
B LONB Neuron differential transceiver Data B
C VIN+ Positive power supply voltage input (+12 VDC nominal)
D VIN– Negative power supply voltage input (0 VDC nominal)
E RCVUP PC data receiver RS-232 level input
F XMTUP PC data transmit RS-232 level output
G Key Aligns connector pins
2-6

2102 Wireless Communication Module
Section 3 Preparation and Installation
3.1 Unpacking
Instructions
Teledyne Isco, Inc.
Customer Service Dept.
P.O. Box 82531
Lincoln, NE 68501 USA
Phone: (800) 228-4373
Outside USA & Canada call:
(402) 464-0231
FAX: (402) 465-3022
E-mail:
info@Isco.com
3.2 Preparing for
Installation
3.2.1 Safety
When the Wireless Module arrives, inspect the outside packing
for any damage. Then carefully inspect the contents for damage.
If there is damage, contact the delivery company and Teledyne
Isco (or its agent) immediately.
WARNING
If there is any evidence that any items may have been
damaged in shipping, do not attempt to install the unit.
Please contact Teledyne Isco (or its agent) for advice.
When you unpack the module, check the items against the
packing list. If any parts are missing, contact the delivery
company and Teledyne Teledyne Isco’s Customer Service
Department. When you report missing part(s), please indicate
them by part number. In addition to the main packing list, there
may be other packing lists for various sub-components.
It is recommended that you retain the shipping cartons as they
can be used to ship the unit in the event that it is necessary to
transport the system.
Please complete the registration card and return it to Teledyne
Isco, Inc.
WARNING
The installation and use of this product may subject you
to hazardous working conditions that can cause you
serious or fatal injuries. Take any necessary precautions
before entering a worksite. Install and operate this product
in accordance with all applicable safety and health
regulations, and local ordinances.
The 2100 Series components are often installed in confined
spaces. Some examples of confined spaces include manholes,
pipelines, digesters, and storage tanks. These spaces may become
hazardous environments that can prove fatal for those unprepared. These spaces are governed by OSHA 1910.146 and require
a permit before entering.
3.2.1.1 Site Considerations Ideal sites are easily accessible for service and data collection,
while still providing protection for the 2100 Series devices. The
2100 Series devices are rated NEMA 4X, 6P, and constructed of
3-1

2102 Wireless Communication Module
Section 3 Preparation and Installation
materials that can withstand harsh environments. However, continual exposure to UV light, or periodic submersion should be
avoided to extend the life of the components.
Communication between the base and remote modules are rated
for distances as great as
However, obstructions such as buildings and industrial
equipment between the modules may reduce the effective distance.
Typically, the modules are suspended inside a manhole. Suspending the module near the opening will protect it from the elements, minimize the chance of submersion, and allow it to be
easily retrieved without entering the manhole. In most instances,
this location near the opening will allow for successful wireless
communication.
Typical communication distances possible using internal
antennas are:
1
/2 mile (800 meters), line of sight.
• Line-of-sight:
1
/2 mile (0.8 km)
• Inside closed manhole: 100 feet (30m)
3.3 Installation
Note that the Wireless
Module must be on
top of the stack.
Carrying Handle
Figure 3-2 Assembling a Basic System
2102 Wireless Module
21XX Parameter Module
2191 Battery Module
Connecting the Modules To connect the 2100 Parameter and Battery modules, refer to the
3-2
following instructions and Figure 3-2.
1. On the top of the Battery Module, remove the cap and stow
it on the holder. This exposes the communication connector
on the Battery Module.

2102 Wireless Communication Module
Section 3 Preparation and Installation
2. Prepare the Battery Module’s communication connector:
a. Inspect the connector. It should be clean and dry. Dam-
aged O-rings must be replaced. Spare O-rings (Teledyne Isco P/N 202-1006-69) are supplied in the
maintenance kit (60-2099-001).
b. Spray the O-ring’s sealing surface with a silicone lubri-
cant.
Note
Do not use petroleum-based lubricants. Petroleum-based
lubricants will cause the O-ring to swell and eventually deteriorate. Aerosol silicone lubricant sprays often use petroleum
based propellants. If you are using an aerosol spray, allow a
few minutes for the propellant to evaporate before proceeding.
3. Place the carrying handle on the Battery Module. (If you
are stacking several modules, it is recommended that you
position the handle between the top two modules.)
4. Unlock the Parameter Module’s latch by pressing in on the
latch release (right side).
5. Underneath the Parameter Module, remove the cap from
the lower communication connector and stow it in the
holder.
6. Lock the latch. Locking the latch correctly seats and aligns
the lower cap in its holder.
7. Position the Parameter Module over the Battery Module.
Align the connectors and lower the Parameter Module
onto the Battery Module.
8. Unlock the Parameter Module’s latch by pressing in on the
latch release (right side).
9. Firmly press the modules together and lock the Parameter
Module’s latch (left side).
The Communications indicator will blink during the start-up
routine to indicate the Parameter Module is operating.
Note
Unused communication ports on the top and bottom of the
stack must be capped. The connector caps terminate the communication lines and protect the pins.
Note
The 2100 System requires Flowlink 4.1or later. Earlier versions
do not support 2100 System instruments.
10. To install the 2102 Module, repeat the previous steps used
to install the Parameter Module on the battery container.
3-3

2102 Wireless Communication Module
Section 3 Preparation and Installation
Note
Always install the Wireless Communication Module on top of
the other units.
3.3.1 Install the modules The modules should be secured at the site. This prevents damage
caused by accidental falls and from being swept away if the
channel is flooded. In manholes, the modules are often secured to
a ladder rung, or suspended from a spreader bar. Teledyne
Teledyne Isco’s Customer Service Department or your local representative can assist you with installation options.
Guidelines for the best possibility of successful communications
are:
• Locate the remote unit as high up inside the manhole as
practically possible. The greater the depth of the remote
inside the manhole, the shorter the effective radiating
distance. Also bear in mind that inside a manhole, even
in best-case situations, the unit will still always be
below the surface of the ground and under an iron cover
as well.
• Locate the vehicle that contains the base unit as close to
the manhole as is safe and reasonable. If possible, for
safety reasons, park along the curb, or off-street in a
parking lot. Try to park so that there is a clear line of
sight through the windshield of the vehicle to the
manhole containing the remote unit. Any obstruction
between the manhole and the receiver reduces the
chances for successful communications.
• Place the base unit on the dashboard of the vehicle. The
radiated energy from the remote unit passes more
readily through glass than through the body of a vehicle.
• Suspend the remote unit inside the manhole so the front
of the unit faces the center of the manhole; again this
optimizes radiation patterns.
3-4
As you complete the installation, the following should be checked
before leaving the site unattended:
• Make sure the module is on the top rung of the manhole
or as close as possible to the surface. Signal transmission will be impaired substantially the deeper the
module is mounted in the manhole.
• Make sure the manhole cover is fully replaced and
secure.

3.3.2 Testing Installation
2102 Wireless Communication Module
Section 3 Preparation and Installation
Note
The remote wireless module must be connected to a 2100
Series measurement module below it (or other compatible
equipment) to function properly. By itself, it cannot measure
anything; it is merely a radio frequency transmitter of data generated by the connected measurement module.
When first powered up or after completing a connection, the
remote will attempt to connect for 30 seconds. This is a good way
to ensure that the unit is operating correctly. If the light does not
blink for 30 seconds shortly after applying power, the unit is not
operating properly.
CAUTION
User should not attempt to operate two base units within the
same area. Crosstalk will result and prevent proper operation.
This is not the case for the remotes, however. As many
remotes as are necessary for the application may be installed.
The remote module program is updated when one of the following conditions occurs:
• Power is recycled.
• After a successful connection with a base unit.
• After a direct connection.
3-5

2102 Wireless Communication Module
Section 3 Preparation and Installation
3-6

2102 Wireless Communication Module
Section 4 Programming
4.1 Section Overview This section describes how to set up the operation of a 2100
Parameter Module using Teledyne Teledyne Isco’s Flowlink for
Windows software.
Note
The 2100 System requires Flowlink 4.1 or later. Earlier versions do not support 2100 System instruments.
Flowlink Help Detailed Flowlink instructions are beyond the scope of this
manual. Flowlink’s operating instructions are available in a
Windows Help format. You can access the help topics for an
active window by clicking on its Help button or by pressing F1 on
your computer’s keyboard. You can also access Help topics from a
Contents and Index window (H
the Flowlink menu).
ELP>CONTENTS AND INDEX from
4.2 Flowlink Connections Make the necessary wiring connections to allow your computer to
communicate with the site. Figure 4-1 shows a connection using
Teledyne Teledyne Isco’s Communication Cable, P/N 60-2004-046
(or 60-5314-849 for custom length).
There are two ways to connect to a site using a wireless base unit
and Flowlink:
• Quick-Connect method - From the Quick-Connect dialog,
select Wireless and then press the correct button to
select the appropriate type of unit. Note that when using
this connection method, you should select the button
containing the type of equipment to which the remote is
connected. A list of all the sites will appear. You have the
option of selecting the site or entering the site name and
connecting. You need to know only the site name when
connecting to a remote.
• Open Existing Site method - Assuming the site already
exists, you may simply open the site and connect or
right-click on the site and connect. If a problem occurs,
you should confirm that the Site Info tab has Wireless
selected for the type of communication.
4-1

2102 Wireless Communication Module
Section 4 Programming
RS-232 Serial Ports
COM1 or COM2
Communication Cable
Base Unit Configuration
Note that the wireless
module must be on top
of the stack.
2102
Power Option 1
12 VDC Cigarette Adapter
Power Option 2
AC Adapter
Power Option 3
2191 Battery Module
Interrogator Port
4200
2102
21xx
2191
Remote Unit Configuration
Figure 4-1 Connections
4100/4200/6712
Connect Cable
2102
2191
4-2

Cable or
Power Option
(Refer to Fig. 4-1)
2102 Wireless Communication Module
Table 4-1 Base Module Connect Cables
Part Number
Description
Section 4 Programming
Communication Cable 60-2004-046
or
60-5314-849
Power Option 1 60-2004-050 12 VDC Cigarette Lighter Adapter for “drive-by” data collection.
Power Option 2 60-2004-057 AC to 12 VDC Power Converter for more permanent installa-
Power Option 3 60-2004-006 2191 Battery Module with 2 alkaline lantern batteries to power
4.2.1 Communication
Resolution (2100 only)
During the connection process, Flowlink checks the stability of
the site’s communications. If communication is found to be
Links the upper communications port of the 2102 (and other
2100 Series Modules) to a PC’s 9-pin serial communication
port.
tions. (120 VAC only.)
the 2102 Wireless module when 12 VDC or 120 VAC power is
not available.
unstable, Flowlink presents the Communication Resolution
window.
There are two common causes of unstable communications. One
cause is a Module Name conflict, which may occur when two or
more modules at a site use the same module name. The second
cause is a Site Name conflict, which occurs when a module added
to the site indicates that it belongs to a different site.
The Communications Resolution window lets you choose how the
modules should be reconfigured and which Site Name should be
retained. To resolve the communications, select the sites and
modules that should be reconfigured and click the OK button. Be
aware that reconfiguring a module removes the Site Name,
Module Name, program settings, and any stored data. The
module is then restarted with the stable Site’s Name, a default
Module Name, and default program settings, and the data
storage is ready to accept new data.
4-3

2102 Wireless Communication Module
Section 4 Programming
4-4

2102 Wireless Communication Module
Section 5 Maintenance
5.1 Maintenance
Overview
5.1.1 Cleaning The Wireless Communication Module case may be cleaned with
The 2100 Series system is designed to perform reliably in
adverse conditions with a minimal amount of routine service
requirements.
Maintenance intervals are affected by many variables. The
number of modules powered by a Battery Module, the Data
Storage Rate, and type of sensor will all affect the battery life.
Humidity levels obviously affect the service life of the desiccant,
and the amount of debris in the stream can drastically alter the
channel conditions.
mild detergent and warm water. Before cleaning the module,
make sure that all protective connector caps are in place.
5.2 How to Obtain Service The internal components of the module are not user-serviceable.
The case is completely sealed to protect the internal components.
To repair the unit, the case must be broken open and replaced. If
you think your module requires repair, contact Teledyne
Teledyne Isco’s Technical Service Department.
Teledyne Isco, Inc.
Technical Service Dept.
P.O. Box 82531
Lincoln, NE 68501 USA
Phone: (800) 228-4373
(402) 464-0231
FAX: (402) 465-3085
Corresponding with a Teledyne Isco Technical Service Representative can often resolve the problem without the need to return
the item. If the difficulty cannot be resolved you will be issued a
Return Authorization Number (RAN) and information on
returning it to the factory.
E-mail:
IscoService@teledyne.com
5-1

2102 Wireless Communication Module
Section 5 Maintenance
5-2

2102 Wireless Communication Module
Appendix A Replacement Parts
A.1 Replacement Parts
Diagrams and Listings
Replacement parts are called out in Figure A-1. Reference the
call-out in the adjacent table to determine the part number for
the item.
Replacement parts can be purchased by contacting Teledyne
Teledyne Isco’s Customer Service Department.
Teledyne Isco, Inc.
Customer Service Department
P.O. Box 82531
Lincoln, NE 68501 USA
Phone: (800) 228-4373
(402) 464-0231
FAX: (402) 465-3022
E-mail: IscoInfo@teledyne.com
A-1

2102 Wireless Communication Module
Appendix A Replacement Parts
1
2
3
4
5
4
6
24
25
26
30
31
Figure A-1 Replacement Parts Diagram – 2102 Wireless Communication Module
A-2
22
4
23
27
2829
25

2102 Wireless Communication Module
Appendix A Replacement Parts
Table A-1 Replacement Parts Listing –
2102 Wireless Communication Module
Item No.
Fig. A-1
1 231310106 SCREW, SELF TAPPING, #4
2 602003087 CLAMP SPACER
3 602004012 CAP ASSEMBLY, MALE CONNECTOR
4 202100669 O RING, .650 ID, .079 CROSS SECTION. SILICONE
5 231514920 SCREW, SELF TAPPING, 6-19 X 5/8
6 602003019 NODE CLIP
7
8
9
10
11
12
13
14
15
16
17
Part Number Description
18
19
20
21
22 231014322 SCREW, MACHINE, 4-40 X 3/8, PAN, PHILLIPS, STAINLESS STEEL
23 602004013 PLUG ASSY FEM CONN (Includes item 4)
24 602003088 CABLE SPACER
25 231311206 SCREW, SELF TAPPING, #6 X 3/8, PAN, PHILLIPS, STAINLESS STEEL
26 692003079 SMALL LATCH
27 692003078 LARGE LATCH
28 231014306 SCREW, MACHINE, 4-40 X 3/8, PAN, PHILLIPS, STAINLESS STEEL
29 602003022 LATCH HOLD
30 201900102 BALL, .125 DIAMETER, STAINLESS STEEL
31 203011602 COMPRESSION SPRING, .022 DIAMETER WIRE, .31 FREE LENGTH
A-3

2102 Wireless Communication Module
Appendix A Replacement Parts
A-4

Warran ty
ℶ❐₼㦘㹡㦘⹂䓸德㒥⏒侯䤓⚜䱿♙⚺摞
Name and amount of Hazardous Substances or Elements in the product
᳝↦᳝ᆇ⠽䋼ܗ㋴
捷ↅ⚜䱿
Component Name
兎恾㨎
䪙
(Pb)
∲
(Hg)
X O O O O O
Hazardous Substances or Elements
䬝
(Cd)
݁Ӌ䫀
(Cr(VI))
⒈㘨㣃
(PBB)
⒈Ѡ㘨㣃
(PBDE)
Circuit Boards
ℶ❐₼㦘㹡㦘⹂䓸德㒥⏒侯䤓⚜䱿♙⚺摞᧶Name and amount of Hazardous Substances or Elements in
the product
O: 嫷䯉年㦘㹡㦘⹂䓸德⦷年捷ↅ㓏㦘⧖德㧟㠨₼䤓⚺摞⧖⦷ST/ 㪖屓⸩䤓棟摞尐㻑ⅴₚᇭ
O: Represent the concentration of the hazardous substance in this component’s any homogeneous pieces is
lower than the ST/ standard limitation.
X᧶嫷䯉年㦘㹡㦘⹂䓸德咂⺠⦷年捷ↅ䤓㩟⧖德㧟㠨₼䤓⚺摞怔⒉ST/ 㪖屓⸩䤓棟摞尐㻑ᇭ
(←₩♾⦷㷳⮓᧨㫈㗽⸭棔㍔⑄⺈ₙ嫷₼㓢“X” 䤓㔏㦾☮⥯扪嫛扪㷴広㢝ᇭ)
X: Represent the concentration of the hazardous substance in this component’s at least one homogeneous
piece is higher than the ST/ standard limitation.
(Manufacturer may give technical reasons to the “X”marks)
䘾≬∎䞷㦮䟀兞洛䫽⸩ᇭ
The Environmentally Friendly Use Period (EFUP) was determined through experience.
䞮ℶ㡴㦮嬺冥䪐⦷侊⒦⚆䪐₼ᇭⓜₘ⇜㟿ⷦ䞮ℶ(207 ⅲ嫷 2007 ) ᇭ椞⚝䤓₹ⷦ㹜ⅲ嫷㦗᧶
A 㦗᧨B ℛ㦗᧨䷘䷘ᇭ
The date of Manufacture is in code within the serial number. The first three numbers are the year of
manufacture (207 is year 2007) followed by a letter for the month. "A" is January, "B" is February and so on.
Table Hazmat 2100 Nodes 60-2003-550 Rev.


Teledyne Isco One Year
Limited Factory Service Warranty *
Teledyne Isco warrants covered products
against failure due to faulty parts or
workmanship for a period of one year (365
days) from their shipping date, or from the
date of installation by an authorized Teledyne
Isco Service Engineer, as may be appropriate.
replacements, and labor shall be provided at
no charge. Teledyne Isco’s liability is strictly
limited to repair and/or replacement, at
Teledyne Isco’s sole discretion.
Failure of expendable items (e.g., charts,
ribbon, tubing, lamps, glassware, seals,
filters, fittings, and wetted parts of valves), or
from normal wear, accident, misuse,
corrosion, or lack of proper maintenance, is
not covered. Teledyne Isco assumes no
liability for any consequential damages.
* This warranty applies to the USA and countries where Teledyne Isco Inc. does not have an authorized dealer. Customers in countries outside
the USA, where Teledyne Isco has an authorized dealer, should contact their Teledyne Isco dealer for warranty service.
This warranty does not cover loss, damage,
or defects resulting from transportation
between the customer’s facility and the repair
facility.
Teledyne Isco specifically disclaims any
warranty of merchantability or fitness for a
particular purpose.During the warranty period, repairs,
This warranty applies only to products sold
under the Teledyne Isco trademark and is
made in lieu of any other warranty, written or
expressed.
No items may be returned for warranty
service without a return authorization number
issued from Teledyne Isco.
The warrantor is Teledyne Isco, Inc.
4700 Superior, Lincoln, NE 68504, U.S.A.
In the event of instrument problems, always contact the Teledyne Isco Service Department, as problems can
often be diagnosed and corrected without requiring an on-site visit. In the U.S.A., contact Teledyne Isco Service
at the numbers listed below. International customers should contact their local Teledyne Isco agent or Teledyne
Isco International Customer Service.
Return Authorization
A return authorization number must be issued prior to shipping. Following authorization,
Teledyne Isco will pay for surface transportation (excluding packing/crating) both ways for 30
days from the beginning of the warranty period. After 30 days, expense for warranty shipments
will be the responsibility of the customer.
Shipping Address: Teledyne Isco, Inc. - Attention Repair Service
4700 Superior Street
Lincoln NE 68504 USA
Mailing address: Teledyne Isco, Inc.
PO Box 82531
Lincoln NE 68501 USA
Phone: Repair service: (800)775-2965
(800)228-4373
Sales & General Information (800)228-4373
(lab instruments)
(samplers & flow meters)
(USA & Canada)
Fax: (402) 465-3001
Email: iscoservice@teledyne.com Web site: www.isco.com
February 1, 2006 P/N 60-1002-040 Rev C

 Loading...