

Page 1

2403 Walsh Avenue, Santa Clara, CA 95051-1302 Tel: +1/408.727.6600 Fax: +1/408.727.6622
CATC BTTrainer
Bluetooth Exerciser
User’s Manual
Software Version 2.20
Document Revision 1.20
6 November, 2003
Page 2

CATC BTTRAINER 2.20
User’s Manual
CATC BTTrainer 2.20 Bluetooth Exerciser User’s
Manual, Document Revision 1.20
Product Part Number: 730-0046-00
Document Disclaimer
The information contained in this document has been carefully checked and is believed to
be reliable. However, no responsibility can be assumed for inaccuracies that may not have
been detected.
CATC reserves the right to revise the information presented in this document without notice
or penalty.
Trademarks and Servicemarks
CATC, BTTracer, BTTrainer, Merlin, and Merlin Mobile are trademarks of Computer
Access Technology Corporation.
Bluetooth is a trademark owned by Bluetooth SIG, Inc. and is used by Computer Access
Technology Corporation under license.
Microsoft, Windows, Windows 98, Windows NT, Windows 2000, Windows ME, and
Windows XP are either registered trademarks or trademarks of Microsoft Corporation in the
United States and/or other countries.
RadioShack is a registered trademark of RadioShack Corporation.
GN Netcom is a registered trademark of GN Netcom, Inc.
Motorola is a registered trademark of Motorola, Inc.
Belkin is a registered trademark of Belkin Components.
Coby is a registered trademark of Coby Electronics Corporation.
Plantronics is a registered trademark of Plantronics, Inc.
Intel, Pentium, and Celeron are trademarks or registered trademarks of Intel Corporation or
its subsidiaries in the United States and other countries.
AMD, Athlon, Duron, and AMD-K6 are trademarks of Advanced Micro Devices, Inc.
All other trademarks are property of their respective companies.
Copyright
Copyright 2003, Computer Access Technology Corporation (CATC). All rights reserved.
This document may be printed and reproduced without additional permission, but all copies
should contain this copyright notice.
ii
Page 3

CATC BTTRAINER 2.20
User’s Manual
CONFORMANCE STATEMENTS
FCC Conformance Statement
This equipment has been tested and found to comply with the limits for both a Class A and
Class B digital device, pursuant to Part 15 of the FCC Rules. These limits are designed to
provide reasonable protection against harmful interference when the equipment is operated
in a commercial or residential environment. This equipment generates, uses, and can radiate
radio frequency energy, and, if not installed and used in accordance with the instruction
manual, may cause harmful interference to radio communications. The end user of this
product should be aware that any changes or modifications made to this equipment without
the approval of CATC could result in the product not meeting the Class A or Class B limits,
in which case the FCC could void the user's authority to operate the equipment.
Important Notice
This equipment complies to FCC ID KH7BT004APA-X. To comply with FCC RF exposure
requirements (sections 1.1307 and 1.310 of the Rules) only the antenna supplied by CATC
must be used for this device. The antenna must be located at least 20 centimeters away from
all persons.
EU Conformance Statement
This equipment complies with the R&TT Directive 1999/5/EC. It has been tested and
found to comply with EN55022:1998 Class B (EN61000-3-2:1998, EN61000-3-3:1995),
EN55024:1998 (EN61000-4-2:1995, EN61000-4-3:1995, EN61000-4-4:1995,
EN61000-4-5:1995, EN61000-4-6:1995, EN61000-4-11:1994), and EN60950:1999. The
transmitter module was tested and found to comply with ETS 300 328 (1997).
iii
Page 4

CATC BTTRAINER 2.20
User’s Manual
iv
Page 5

CATC BTTRAINER 2.20
User’s Manual Table of Contents
TABLE OF CONTENTS
Conformance Statements . . . . . . . . . . . . . . . . . . . . . . . . . . . . . . . . . . . . . . .iii
FCC Conformance Statement . . . . . . . . . . . . . . . . . . . . . . . . . . . . . . . . . . . . . . . . . . . iii
EU Conformance Statement. . . . . . . . . . . . . . . . . . . . . . . . . . . . . . . . . . . . . . . . . . . . . iii
Chapter 1 Overview. . . . . . . . . . . . . . . . . . . . . . . . . . . . . . . . . . . . . . . . . 1
Applications . . . . . . . . . . . . . . . . . . . . . . . . . . . . . . . . . . . . . . . . . . . . . . . . . . . . . . . . . . 1
BTTrainer User Interface . . . . . . . . . . . . . . . . . . . . . . . . . . . . . . . . . . . . . . . . . . . . . . . . 1
Key Features . . . . . . . . . . . . . . . . . . . . . . . . . . . . . . . . . . . . . . . . . . . . . . . . . . . . . . . . . 2
Audio Connections. . . . . . . . . . . . . . . . . . . . . . . . . . . . . . . . . . . . . . . . . . . . . . . . . . . . . 2
Specifications . . . . . . . . . . . . . . . . . . . . . . . . . . . . . . . . . . . . . . . . . . . . . . . . . . . . . . . . . 3
Package . . . . . . . . . . . . . . . . . . . . . . . . . . . . . . . . . . . . . . . . . . . . . . . . . . . . . . . . . . 3
Environmental Conditions . . . . . . . . . . . . . . . . . . . . . . . . . . . . . . . . . . . . . . . . . . . . 3
Host Compatibility. . . . . . . . . . . . . . . . . . . . . . . . . . . . . . . . . . . . . . . . . . . . . . . . . . 3
Hardware Interfaces . . . . . . . . . . . . . . . . . . . . . . . . . . . . . . . . . . . . . . . . . . . . . . . . . 3
Product Warranty . . . . . . . . . . . . . . . . . . . . . . . . . . . . . . . . . . . . . . . . . . . . . . . . . . . . . . 3
Chapter 2 Getting Started . . . . . . . . . . . . . . . . . . . . . . . . . . . . . . . . . . . 5
System Requirements. . . . . . . . . . . . . . . . . . . . . . . . . . . . . . . . . . . . . . . . . . . . . . . . . . . 5
Installing the Software and Starting the Program . . . . . . . . . . . . . . . . . . . . . . . . . . . . . 5
Start the program . . . . . . . . . . . . . . . . . . . . . . . . . . . . . . . . . . . . . . . . . . . . . . . . . . . 5
Displaying the On-Screen Help . . . . . . . . . . . . . . . . . . . . . . . . . . . . . . . . . . . . . . . . . . . 5
Application Layout . . . . . . . . . . . . . . . . . . . . . . . . . . . . . . . . . . . . . . . . . . . . . . . . . . . . 6
Menus. . . . . . . . . . . . . . . . . . . . . . . . . . . . . . . . . . . . . . . . . . . . . . . . . . . . . . . . . . . . . . . 7
Toolbars . . . . . . . . . . . . . . . . . . . . . . . . . . . . . . . . . . . . . . . . . . . . . . . . . . . . . . . . . . . . . 9
BTTrainer Toolbar . . . . . . . . . . . . . . . . . . . . . . . . . . . . . . . . . . . . . . . . . . . . . . . . . 9
BTTrainer Bluetooth Analyzer Toolbar . . . . . . . . . . . . . . . . . . . . . . . . . . . . . . . . . 9
Tool Tips . . . . . . . . . . . . . . . . . . . . . . . . . . . . . . . . . . . . . . . . . . . . . . . . . . . . . . . . . . . . 9
BTTrainer Keyboard Shortcuts . . . . . . . . . . . . . . . . . . . . . . . . . . . . . . . . . . . . . . . . . . 10
License Information . . . . . . . . . . . . . . . . . . . . . . . . . . . . . . . . . . . . . . . . . . . . . . . . . . . 10
Chapter 3 Local Device Manager. . . . . . . . . . . . . . . . . . . . . . . . . . . . . 11
General Settings . . . . . . . . . . . . . . . . . . . . . . . . . . . . . . . . . . . . . . . . . . . . . . . . . . . . . . 11
Device Name . . . . . . . . . . . . . . . . . . . . . . . . . . . . . . . . . . . . . . . . . . . . . . . . . . . . . 11
Class of Device . . . . . . . . . . . . . . . . . . . . . . . . . . . . . . . . . . . . . . . . . . . . . . . . . . . 12
Select as one value . . . . . . . . . . . . . . . . . . . . . . . . . . . . . . . . . . . . . . . . . . . . . . 12
Select components . . . . . . . . . . . . . . . . . . . . . . . . . . . . . . . . . . . . . . . . . . . . . . 12
Accessibility Mode . . . . . . . . . . . . . . . . . . . . . . . . . . . . . . . . . . . . . . . . . . . . . . . . 12
Connectable . . . . . . . . . . . . . . . . . . . . . . . . . . . . . . . . . . . . . . . . . . . . . . . . . . . 12
Discoverable. . . . . . . . . . . . . . . . . . . . . . . . . . . . . . . . . . . . . . . . . . . . . . . . . . . 13
v
Page 6

CATC BTTRAINER 2.20
User’s Manual
Pairable . . . . . . . . . . . . . . . . . . . . . . . . . . . . . . . . . . . . . . . . . . . . . . . . . . . . . . .13
Inquiry Access Codes . . . . . . . . . . . . . . . . . . . . . . . . . . . . . . . . . . . . . . . . . . . . . . .13
Add an IAC. . . . . . . . . . . . . . . . . . . . . . . . . . . . . . . . . . . . . . . . . . . . . . . . . . . .13
Modify an IAC . . . . . . . . . . . . . . . . . . . . . . . . . . . . . . . . . . . . . . . . . . . . . . . . .13
Delete an IAC . . . . . . . . . . . . . . . . . . . . . . . . . . . . . . . . . . . . . . . . . . . . . . . . . .14
Security Settings . . . . . . . . . . . . . . . . . . . . . . . . . . . . . . . . . . . . . . . . . . . . . . . . . . . . . .14
Security Mode. . . . . . . . . . . . . . . . . . . . . . . . . . . . . . . . . . . . . . . . . . . . . . . . . . . . .15
Bonding Mode . . . . . . . . . . . . . . . . . . . . . . . . . . . . . . . . . . . . . . . . . . . . . . . . . . . .15
PIN Codes . . . . . . . . . . . . . . . . . . . . . . . . . . . . . . . . . . . . . . . . . . . . . . . . . . . . . . . .15
Add a PIN Code . . . . . . . . . . . . . . . . . . . . . . . . . . . . . . . . . . . . . . . . . . . . . . . .15
Modify a PIN Code. . . . . . . . . . . . . . . . . . . . . . . . . . . . . . . . . . . . . . . . . . . . . .16
Delete a PIN Code . . . . . . . . . . . . . . . . . . . . . . . . . . . . . . . . . . . . . . . . . . . . . .16
Link Keys . . . . . . . . . . . . . . . . . . . . . . . . . . . . . . . . . . . . . . . . . . . . . . . . . . . . . . . .16
Device Information . . . . . . . . . . . . . . . . . . . . . . . . . . . . . . . . . . . . . . . . . . . . . . . . . . . .17
Chapter 4 Profile Wizard. . . . . . . . . . . . . . . . . . . . . . . . . . . . . . . . . . . .21
Starting Profile Wizard . . . . . . . . . . . . . . . . . . . . . . . . . . . . . . . . . . . . . . . . . . . . . . . . .21
Connecting to Devices . . . . . . . . . . . . . . . . . . . . . . . . . . . . . . . . . . . . . . . . . . . . . . . . .21
Connect to Device: Dial-Up Gateway . . . . . . . . . . . . . . . . . . . . . . . . . . . . . . . . . .23
Connect to Device: Fax Gateway . . . . . . . . . . . . . . . . . . . . . . . . . . . . . . . . . . . . . .24
Connect to Device: File Transfer . . . . . . . . . . . . . . . . . . . . . . . . . . . . . . . . . . . . . .25
Connect to Device: HCRP Server. . . . . . . . . . . . . . . . . . . . . . . . . . . . . . . . . . . . . .26
Connect to Device: Headset . . . . . . . . . . . . . . . . . . . . . . . . . . . . . . . . . . . . . . . . . .26
Connect to Device: Headset Audio Gateway . . . . . . . . . . . . . . . . . . . . . . . . . . . . .27
Connect to Device: LAN . . . . . . . . . . . . . . . . . . . . . . . . . . . . . . . . . . . . . . . . . . . .28
Connect to Device: Object Push . . . . . . . . . . . . . . . . . . . . . . . . . . . . . . . . . . . . . . .28
Connect to Device: PAN–GN. . . . . . . . . . . . . . . . . . . . . . . . . . . . . . . . . . . . . . . . .29
Connect to Device: PAN–NAP. . . . . . . . . . . . . . . . . . . . . . . . . . . . . . . . . . . . . . . .30
Connect to Device: Serial Port . . . . . . . . . . . . . . . . . . . . . . . . . . . . . . . . . . . . . . . .31
Emulating Devices . . . . . . . . . . . . . . . . . . . . . . . . . . . . . . . . . . . . . . . . . . . . . . . . . . . .32
Emulate Device: Dial-Up Gateway . . . . . . . . . . . . . . . . . . . . . . . . . . . . . . . . . . . .33
Emulate Device: Fax Gateway . . . . . . . . . . . . . . . . . . . . . . . . . . . . . . . . . . . . . . . .34
Emulate Device: File Transfer . . . . . . . . . . . . . . . . . . . . . . . . . . . . . . . . . . . . . . . .34
Emulate Device: HCRP Server. . . . . . . . . . . . . . . . . . . . . . . . . . . . . . . . . . . . . . . .35
Emulate Device: Headset . . . . . . . . . . . . . . . . . . . . . . . . . . . . . . . . . . . . . . . . . . . .35
Emulate Device: Headset Audio Gateway . . . . . . . . . . . . . . . . . . . . . . . . . . . . . . .36
Emulate Device: LAN . . . . . . . . . . . . . . . . . . . . . . . . . . . . . . . . . . . . . . . . . . . . . .36
Emulate Device: Object Push . . . . . . . . . . . . . . . . . . . . . . . . . . . . . . . . . . . . . . . .37
Emulate Device: PAN - GN . . . . . . . . . . . . . . . . . . . . . . . . . . . . . . . . . . . . . . . . . .37
Emulate Device: PAN - NAP . . . . . . . . . . . . . . . . . . . . . . . . . . . . . . . . . . . . . . . . .38
Emulate Device: Serial Port . . . . . . . . . . . . . . . . . . . . . . . . . . . . . . . . . . . . . . . . . .39
Restarting the Wizard . . . . . . . . . . . . . . . . . . . . . . . . . . . . . . . . . . . . . . . . . . . . . . . . . .39
Installing the Virtual COM Port Driver . . . . . . . . . . . . . . . . . . . . . . . . . . . . . . . . . . . .39
vi
Page 7

CATC BTTRAINER 2.20
User’s Manual Table of Contents
On Windows 2000 . . . . . . . . . . . . . . . . . . . . . . . . . . . . . . . . . . . . . . . . . . . . . . . . . 39
Ascertain the COM Port Number. . . . . . . . . . . . . . . . . . . . . . . . . . . . . . . . . . . 40
Install a Modem Driver on the Virtual COM Port . . . . . . . . . . . . . . . . . . . . . . . . . . . . 40
Installation of Network Driver . . . . . . . . . . . . . . . . . . . . . . . . . . . . . . . . . . . . . . . . . . . 41
Verifying the Driver’s Installation. . . . . . . . . . . . . . . . . . . . . . . . . . . . . . . . . . . . . 42
Configuration of Virtual NIC. . . . . . . . . . . . . . . . . . . . . . . . . . . . . . . . . . . . . . . . . 42
Chapter 5 Command Generator . . . . . . . . . . . . . . . . . . . . . . . . . . . . . 43
Command Generator Interface . . . . . . . . . . . . . . . . . . . . . . . . . . . . . . . . . . . . . . . . . . 43
Using Command Generator . . . . . . . . . . . . . . . . . . . . . . . . . . . . . . . . . . . . . . . . . . . . . 44
Customizing the List of HCI Commands. . . . . . . . . . . . . . . . . . . . . . . . . . . . . . . . 45
Commands Available in Command Generator . . . . . . . . . . . . . . . . . . . . . . . . . . . . . . 46
HCI Commands . . . . . . . . . . . . . . . . . . . . . . . . . . . . . . . . . . . . . . . . . . . . . . . . . . . 46
Link Control Commands . . . . . . . . . . . . . . . . . . . . . . . . . . . . . . . . . . . . . . . . . 46
Link Policy Commands . . . . . . . . . . . . . . . . . . . . . . . . . . . . . . . . . . . . . . . . . . 47
Host Controller & Baseband Commands . . . . . . . . . . . . . . . . . . . . . . . . . . . . 48
Informational Commands . . . . . . . . . . . . . . . . . . . . . . . . . . . . . . . . . . . . . . . . 49
Status Commands . . . . . . . . . . . . . . . . . . . . . . . . . . . . . . . . . . . . . . . . . . . . . . 50
Testing Commands . . . . . . . . . . . . . . . . . . . . . . . . . . . . . . . . . . . . . . . . . . . . . 50
CATC-Specific Commands . . . . . . . . . . . . . . . . . . . . . . . . . . . . . . . . . . . . . . . 50
L2CAP Commands . . . . . . . . . . . . . . . . . . . . . . . . . . . . . . . . . . . . . . . . . . . . . . . . 52
SDP Commands . . . . . . . . . . . . . . . . . . . . . . . . . . . . . . . . . . . . . . . . . . . . . . . . . . . 53
RFCOMM Commands. . . . . . . . . . . . . . . . . . . . . . . . . . . . . . . . . . . . . . . . . . . . . . 53
TCS Commands . . . . . . . . . . . . . . . . . . . . . . . . . . . . . . . . . . . . . . . . . . . . . . . . . . . 54
OBEX Commands . . . . . . . . . . . . . . . . . . . . . . . . . . . . . . . . . . . . . . . . . . . . . . . . . 54
BNEP Commands in Command Generator . . . . . . . . . . . . . . . . . . . . . . . . . . . . . . 55
TCI Commands in Command Generator . . . . . . . . . . . . . . . . . . . . . . . . . . . . . . . . 55
Chapter 6 Script Manager . . . . . . . . . . . . . . . . . . . . . . . . . . . . . . . . . . 57
Script Manager Interface . . . . . . . . . . . . . . . . . . . . . . . . . . . . . . . . . . . . . . . . . . . . . . . 57
Script Manager Pop-up Menu . . . . . . . . . . . . . . . . . . . . . . . . . . . . . . . . . . . . . . . . 58
Running Scripts . . . . . . . . . . . . . . . . . . . . . . . . . . . . . . . . . . . . . . . . . . . . . . . . . . . . . . 58
Writing Scripts . . . . . . . . . . . . . . . . . . . . . . . . . . . . . . . . . . . . . . . . . . . . . . . . . . . . . . . 59
Sample Scripts . . . . . . . . . . . . . . . . . . . . . . . . . . . . . . . . . . . . . . . . . . . . . . . . . . . . . . . 60
Chapter 7 Device Search and Device List Pop-Up Menu . . . . . . . . . 61
Device Search . . . . . . . . . . . . . . . . . . . . . . . . . . . . . . . . . . . . . . . . . . . . . . . . . . . . . . . 61
Device List Pop-Up Menu . . . . . . . . . . . . . . . . . . . . . . . . . . . . . . . . . . . . . . . . . . . . . . 62
Create an ACL Connection . . . . . . . . . . . . . . . . . . . . . . . . . . . . . . . . . . . . . . . . . . 62
Establish an Audio Connection . . . . . . . . . . . . . . . . . . . . . . . . . . . . . . . . . . . . . . . 62
Display Device Information. . . . . . . . . . . . . . . . . . . . . . . . . . . . . . . . . . . . . . . . . . 63
Delete a Device . . . . . . . . . . . . . . . . . . . . . . . . . . . . . . . . . . . . . . . . . . . . . . . . . . . 63
vii
Page 8

CATC BTTRAINER 2.20
User’s Manual
Disconnect All . . . . . . . . . . . . . . . . . . . . . . . . . . . . . . . . . . . . . . . . . . . . . . . . . . . .64
Chapter 8 Contact and Warranty Information . . . . . . . . . . . . . . . . . .65
Contact Information . . . . . . . . . . . . . . . . . . . . . . . . . . . . . . . . . . . . . . . . . . . . . . . . . . .65
Limited Hardware Warranty . . . . . . . . . . . . . . . . . . . . . . . . . . . . . . . . . . . . . . . . . . . . .65
Appendix A Command Generator Command Descriptions . . . . . . . . .69
HCI Link Control Commands . . . . . . . . . . . . . . . . . . . . . . . . . . . . . . . . . . . . . . . . . . .69
Accept_Connection_Request . . . . . . . . . . . . . . . . . . . . . . . . . . . . . . . . . . . . . . . . 69
Add_SCO_Connection . . . . . . . . . . . . . . . . . . . . . . . . . . . . . . . . . . . . . . . . . . . . . 69
Authentication_Requested . . . . . . . . . . . . . . . . . . . . . . . . . . . . . . . . . . . . . . . . . . 69
Change_Connection_Link_Key . . . . . . . . . . . . . . . . . . . . . . . . . . . . . . . . . . . . . . 70
Change_Connection_Packet_Type. . . . . . . . . . . . . . . . . . . . . . . . . . . . . . . . . . . . 70
Create_Connection . . . . . . . . . . . . . . . . . . . . . . . . . . . . . . . . . . . . . . . . . . . . . . . . 70
Disconnect . . . . . . . . . . . . . . . . . . . . . . . . . . . . . . . . . . . . . . . . . . . . . . . . . . . . . . 71
Exit_Periodic_Inquiry_Mode . . . . . . . . . . . . . . . . . . . . . . . . . . . . . . . . . . . . . . . . 71
GetSCOConnections. . . . . . . . . . . . . . . . . . . . . . . . . . . . . . . . . . . . . . . . . . . . . . . 71
Inquiry. . . . . . . . . . . . . . . . . . . . . . . . . . . . . . . . . . . . . . . . . . . . . . . . . . . . . . . . . . 72
Inquiry_Cancel . . . . . . . . . . . . . . . . . . . . . . . . . . . . . . . . . . . . . . . . . . . . . . . . . . . 72
Periodic_Inquiry_Mode . . . . . . . . . . . . . . . . . . . . . . . . . . . . . . . . . . . . . . . . . . . . 72
PIN_Code_Request_Negative_Reply. . . . . . . . . . . . . . . . . . . . . . . . . . . . . . . . . . 73
PIN_Code_Request_Reply . . . . . . . . . . . . . . . . . . . . . . . . . . . . . . . . . . . . . . . . . . 73
Read_Clock_Offset. . . . . . . . . . . . . . . . . . . . . . . . . . . . . . . . . . . . . . . . . . . . . . . . 74
Read_Remote_Supported_Features . . . . . . . . . . . . . . . . . . . . . . . . . . . . . . . . . . . 74
Read_Remote_Version_Information . . . . . . . . . . . . . . . . . . . . . . . . . . . . . . . . . . 74
Reject_Connection_Request. . . . . . . . . . . . . . . . . . . . . . . . . . . . . . . . . . . . . . . . . 74
Remote_Name_Request . . . . . . . . . . . . . . . . . . . . . . . . . . . . . . . . . . . . . . . . . . . . 75
Set_Connection_Encryption . . . . . . . . . . . . . . . . . . . . . . . . . . . . . . . . . . . . . . . . . 76
HCI Link Policy Commands . . . . . . . . . . . . . . . . . . . . . . . . . . . . . . . . . . . . . . . . . . . .76
Get_Park_Mode . . . . . . . . . . . . . . . . . . . . . . . . . . . . . . . . . . . . . . . . . . . . . . . . . . 76
Exit_Sniff_Mode . . . . . . . . . . . . . . . . . . . . . . . . . . . . . . . . . . . . . . . . . . . . . . . . . 76
Hold_Mode . . . . . . . . . . . . . . . . . . . . . . . . . . . . . . . . . . . . . . . . . . . . . . . . . . . . . . 76
Set_Park_Mode. . . . . . . . . . . . . . . . . . . . . . . . . . . . . . . . . . . . . . . . . . . . . . . . . . . 77
QoS_Setup . . . . . . . . . . . . . . . . . . . . . . . . . . . . . . . . . . . . . . . . . . . . . . . . . . . . . . 77
Read_Link_Policy_Settings . . . . . . . . . . . . . . . . . . . . . . . . . . . . . . . . . . . . . . . . . 78
Role_Discovery . . . . . . . . . . . . . . . . . . . . . . . . . . . . . . . . . . . . . . . . . . . . . . . . . . 78
Sniff_Mode . . . . . . . . . . . . . . . . . . . . . . . . . . . . . . . . . . . . . . . . . . . . . . . . . . . . . . 78
Switch_Role . . . . . . . . . . . . . . . . . . . . . . . . . . . . . . . . . . . . . . . . . . . . . . . . . . . . . 79
Write_Link_Policy_Settings. . . . . . . . . . . . . . . . . . . . . . . . . . . . . . . . . . . . . . . . . 79
HCI Host Controller & Baseband Commands . . . . . . . . . . . . . . . . . . . . . . . . . . . . . . .79
Change_Local_Name . . . . . . . . . . . . . . . . . . . . . . . . . . . . . . . . . . . . . . . . . . . . . . 79
Create_New_Unit_Key. . . . . . . . . . . . . . . . . . . . . . . . . . . . . . . . . . . . . . . . . . . . . 80
Delete_Stored_Link_Key . . . . . . . . . . . . . . . . . . . . . . . . . . . . . . . . . . . . . . . . . . . 80
viii
Page 9

CATC BTTRAINER 2.20
User’s Manual Table of Contents
Flush. . . . . . . . . . . . . . . . . . . . . . . . . . . . . . . . . . . . . . . . . . . . . . . . . . . . . . . . . . . . 80
Host_Buffer_Size. . . . . . . . . . . . . . . . . . . . . . . . . . . . . . . . . . . . . . . . . . . . . . . . . . 80
Read_Authentication_Enable. . . . . . . . . . . . . . . . . . . . . . . . . . . . . . . . . . . . . . . . . 81
Read_Automatic_Flush_Timeout . . . . . . . . . . . . . . . . . . . . . . . . . . . . . . . . . . . . . 81
Read_Class_of_Device . . . . . . . . . . . . . . . . . . . . . . . . . . . . . . . . . . . . . . . . . . . . . 81
Read_Connection_Accept_Timeout . . . . . . . . . . . . . . . . . . . . . . . . . . . . . . . . . . . 81
Read_Current_IAC_LAP. . . . . . . . . . . . . . . . . . . . . . . . . . . . . . . . . . . . . . . . . . . . 82
Read_Encryption_Mode . . . . . . . . . . . . . . . . . . . . . . . . . . . . . . . . . . . . . . . . . . . . 82
Read_Hold_Mode_Activity . . . . . . . . . . . . . . . . . . . . . . . . . . . . . . . . . . . . . . . . . . 82
Read_Inquire_Scan_Activity . . . . . . . . . . . . . . . . . . . . . . . . . . . . . . . . . . . . . . . . . 82
Read_Link_Supervision_Timeout . . . . . . . . . . . . . . . . . . . . . . . . . . . . . . . . . . . . . 82
Read_Local_Name. . . . . . . . . . . . . . . . . . . . . . . . . . . . . . . . . . . . . . . . . . . . . . . . . 83
Read_Num_Broadcast_Retransmission. . . . . . . . . . . . . . . . . . . . . . . . . . . . . . . . . 83
Read_Number_Of_Supported_IAC. . . . . . . . . . . . . . . . . . . . . . . . . . . . . . . . . . . . 83
Read_Page_Scan_Activity. . . . . . . . . . . . . . . . . . . . . . . . . . . . . . . . . . . . . . . . . . . 84
Read_Page_Scan_Mode. . . . . . . . . . . . . . . . . . . . . . . . . . . . . . . . . . . . . . . . . . . . . 84
Read_Page_Scan_Period_Mode . . . . . . . . . . . . . . . . . . . . . . . . . . . . . . . . . . . . . . 84
Read_Page_Timeout . . . . . . . . . . . . . . . . . . . . . . . . . . . . . . . . . . . . . . . . . . . . . . . 84
Read_PIN_Type. . . . . . . . . . . . . . . . . . . . . . . . . . . . . . . . . . . . . . . . . . . . . . . . . . . 85
Read_Scan_Enable. . . . . . . . . . . . . . . . . . . . . . . . . . . . . . . . . . . . . . . . . . . . . . . . . 85
Read_SCO_Flow_Control_Enable . . . . . . . . . . . . . . . . . . . . . . . . . . . . . . . . . . . . 85
Read_Transmit_Power_Level . . . . . . . . . . . . . . . . . . . . . . . . . . . . . . . . . . . . . . . . 86
Read_Stored_Link_Key. . . . . . . . . . . . . . . . . . . . . . . . . . . . . . . . . . . . . . . . . . . . . 86
Read_Voice_Setting. . . . . . . . . . . . . . . . . . . . . . . . . . . . . . . . . . . . . . . . . . . . . . . . 86
Reset. . . . . . . . . . . . . . . . . . . . . . . . . . . . . . . . . . . . . . . . . . . . . . . . . . . . . . . . . . . . 86
Set_Event_Filter. . . . . . . . . . . . . . . . . . . . . . . . . . . . . . . . . . . . . . . . . . . . . . . . . . . 87
Set_Event_Mask . . . . . . . . . . . . . . . . . . . . . . . . . . . . . . . . . . . . . . . . . . . . . . . . . . 88
Write_Authentication_Enable . . . . . . . . . . . . . . . . . . . . . . . . . . . . . . . . . . . . . . . . 88
Write_Automatic_Flush_Timeout . . . . . . . . . . . . . . . . . . . . . . . . . . . . . . . . . . . . . 89
Write_Class_of_Device . . . . . . . . . . . . . . . . . . . . . . . . . . . . . . . . . . . . . . . . . . . . . 89
Write_Connection_Accept_Timeout . . . . . . . . . . . . . . . . . . . . . . . . . . . . . . . . . . . 89
Write_Current_IAC_LAP . . . . . . . . . . . . . . . . . . . . . . . . . . . . . . . . . . . . . . . . . . . 90
Write_Encryption_Mode . . . . . . . . . . . . . . . . . . . . . . . . . . . . . . . . . . . . . . . . . . . . 90
Write_Hold_Mode_Activity . . . . . . . . . . . . . . . . . . . . . . . . . . . . . . . . . . . . . . . . . 91
Write_Inquiry_Scan_Activity . . . . . . . . . . . . . . . . . . . . . . . . . . . . . . . . . . . . . . . . 91
Write_Link_Supervision_Timeout . . . . . . . . . . . . . . . . . . . . . . . . . . . . . . . . . . . . 91
Write_Num_Broadcast_Retransmissions . . . . . . . . . . . . . . . . . . . . . . . . . . . . . . . 92
Write_Page_Scan_Activity . . . . . . . . . . . . . . . . . . . . . . . . . . . . . . . . . . . . . . . . . . 92
Write_Page_Scan_Mode . . . . . . . . . . . . . . . . . . . . . . . . . . . . . . . . . . . . . . . . . . . . 92
Write_Page_Scan_Period_Mode . . . . . . . . . . . . . . . . . . . . . . . . . . . . . . . . . . . . . . 92
Write_Page_Timeout . . . . . . . . . . . . . . . . . . . . . . . . . . . . . . . . . . . . . . . . . . . . . . . 92
Write_PIN_Type . . . . . . . . . . . . . . . . . . . . . . . . . . . . . . . . . . . . . . . . . . . . . . . . . . 93
Write_Scan_Enable . . . . . . . . . . . . . . . . . . . . . . . . . . . . . . . . . . . . . . . . . . . . . . . . 93
ix
Page 10

CATC BTTRAINER 2.20
User’s Manual
Write_Stored_Link_Key. . . . . . . . . . . . . . . . . . . . . . . . . . . . . . . . . . . . . . . . . . . . 93
Write_Voice_Setting . . . . . . . . . . . . . . . . . . . . . . . . . . . . . . . . . . . . . . . . . . . . . . 94
HCI Informational Commands . . . . . . . . . . . . . . . . . . . . . . . . . . . . . . . . . . . . . . . . . .94
Read_BD_ADDR . . . . . . . . . . . . . . . . . . . . . . . . . . . . . . . . . . . . . . . . . . . . . . . . . 94
Read_Buffer_Size. . . . . . . . . . . . . . . . . . . . . . . . . . . . . . . . . . . . . . . . . . . . . . . . . 94
Read_Country_Code. . . . . . . . . . . . . . . . . . . . . . . . . . . . . . . . . . . . . . . . . . . . . . . 95
Read_Local_Supported_Features . . . . . . . . . . . . . . . . . . . . . . . . . . . . . . . . . . . . . 95
Read_Local_Version_Information . . . . . . . . . . . . . . . . . . . . . . . . . . . . . . . . . . . . 95
Status Commands . . . . . . . . . . . . . . . . . . . . . . . . . . . . . . . . . . . . . . . . . . . . . . . . . . . .96
Read_Failed_Contact_Counter. . . . . . . . . . . . . . . . . . . . . . . . . . . . . . . . . . . . . . . 96
Reset_Failed_Contact_Counter . . . . . . . . . . . . . . . . . . . . . . . . . . . . . . . . . . . . . . 96
HCI Testing Commands . . . . . . . . . . . . . . . . . . . . . . . . . . . . . . . . . . . . . . . . . . . . . . .96
Enable_Device_Under_Test_Mode . . . . . . . . . . . . . . . . . . . . . . . . . . . . . . . . . . . 96
Read_Loopback_Mode. . . . . . . . . . . . . . . . . . . . . . . . . . . . . . . . . . . . . . . . . . . . . 96
Write_Loopback_Mode . . . . . . . . . . . . . . . . . . . . . . . . . . . . . . . . . . . . . . . . . . . . 97
CATC-Specific HCI Commands . . . . . . . . . . . . . . . . . . . . . . . . . . . . . . . . . . . . . . . . .97
CATC_Change_Headset_Gain . . . . . . . . . . . . . . . . . . . . . . . . . . . . . . . . . . . . . . . 97
CATC_Decrease_Power_Request . . . . . . . . . . . . . . . . . . . . . . . . . . . . . . . . . . . . 97
CATC_Disconnect . . . . . . . . . . . . . . . . . . . . . . . . . . . . . . . . . . . . . . . . . . . . . . . . 98
CATC_Get_Park_Mode . . . . . . . . . . . . . . . . . . . . . . . . . . . . . . . . . . . . . . . . . . . . 98
CATC_Get_Selected_Sco_Connection . . . . . . . . . . . . . . . . . . . . . . . . . . . . . . . . 99
CATC_Increase_Power_Request . . . . . . . . . . . . . . . . . . . . . . . . . . . . . . . . . . . . . 99
CATC_MaxSlot . . . . . . . . . . . . . . . . . . . . . . . . . . . . . . . . . . . . . . . . . . . . . . . . . 100
CATC_MaxSlot_Response. . . . . . . . . . . . . . . . . . . . . . . . . . . . . . . . . . . . . . . . . 100
CATC_Modify_Beacon . . . . . . . . . . . . . . . . . . . . . . . . . . . . . . . . . . . . . . . . . . . 101
CATC_Override_Remote_Features_Check . . . . . . . . . . . . . . . . . . . . . . . . . . . . 101
CATC_Page_Mode_Request . . . . . . . . . . . . . . . . . . . . . . . . . . . . . . . . . . . . . . . 101
CATC_Page_Scan_Mode_Request . . . . . . . . . . . . . . . . . . . . . . . . . . . . . . . . . . 102
CATC_Qos . . . . . . . . . . . . . . . . . . . . . . . . . . . . . . . . . . . . . . . . . . . . . . . . . . . . . 102
CATC_QoS_Response . . . . . . . . . . . . . . . . . . . . . . . . . . . . . . . . . . . . . . . . . . . . .103
CATC_Read_Encryption_Key_Size . . . . . . . . . . . . . . . . . . . . . . . . . . . . . . . . . 103
CATC_Read_Headset_Gain . . . . . . . . . . . . . . . . . . . . . . . . . . . . . . . . . . . . . . . . 104
CATC_Read_Link_Key_Type . . . . . . . . . . . . . . . . . . . . . . . . . . . . . . . . . . . . . . 104
CATC_Read_PIN_Response_Enable. . . . . . . . . . . . . . . . . . . . . . . . . . . . . . . . . 104
CATC_Read_Revision_Information . . . . . . . . . . . . . . . . . . . . . . . . . . . . . . . . . 104
CATC_Sco_Parameter_Change_Response . . . . . . . . . . . . . . . . . . . . . . . . . . . . 105
CATC_Select_SCO_Connection . . . . . . . . . . . . . . . . . . . . . . . . . . . . . . . . . . . . 105
CATC_Self_Test . . . . . . . . . . . . . . . . . . . . . . . . . . . . . . . . . . . . . . . . . . . . . . . . 106
CATC_Set_Broadcast_Scan_Window . . . . . . . . . . . . . . . . . . . . . . . . . . . . . . . . 107
CATC_Set_Default_PIN_Code . . . . . . . . . . . . . . . . . . . . . . . . . . . . . . . . . . . . . 107
CATC_Set_Park_Mode . . . . . . . . . . . . . . . . . . . . . . . . . . . . . . . . . . . . . . . . . . . 107
CATC_Timing_Accuracy_Request . . . . . . . . . . . . . . . . . . . . . . . . . . . . . . . . . . 108
CATC_Write_Encryption_Key_Size . . . . . . . . . . . . . . . . . . . . . . . . . . . . . . . . . 108
x
Page 11

CATC BTTRAINER 2.20
User’s Manual Table of Contents
CATC_Write_Link_Key_Type . . . . . . . . . . . . . . . . . . . . . . . . . . . . . . . . . . . . . . 108
CATC_Write_Local_Supported_Features. . . . . . . . . . . . . . . . . . . . . . . . . . . . . . 109
CATC_Write_PIN_Response_Enable . . . . . . . . . . . . . . . . . . . . . . . . . . . . . . . . . 109
L2CAP Command Descriptions . . . . . . . . . . . . . . . . . . . . . . . . . . . . . . . . . . . . . . . . 109
ConfigurationResponse . . . . . . . . . . . . . . . . . . . . . . . . . . . . . . . . . . . . . . . . . . . . 109
GroupRegister . . . . . . . . . . . . . . . . . . . . . . . . . . . . . . . . . . . . . . . . . . . . . . . . . . . 110
GroupDestroy. . . . . . . . . . . . . . . . . . . . . . . . . . . . . . . . . . . . . . . . . . . . . . . . . . . . 110
GetRegisteredGroups . . . . . . . . . . . . . . . . . . . . . . . . . . . . . . . . . . . . . . . . . . . . . . 110
ConfigurationSetup . . . . . . . . . . . . . . . . . . . . . . . . . . . . . . . . . . . . . . . . . . . . . . . 110
ConnectRequest . . . . . . . . . . . . . . . . . . . . . . . . . . . . . . . . . . . . . . . . . . . . . . . . . . 111
ConnectResponse . . . . . . . . . . . . . . . . . . . . . . . . . . . . . . . . . . . . . . . . . . . . . . . . . 111
DeregisterPsm . . . . . . . . . . . . . . . . . . . . . . . . . . . . . . . . . . . . . . . . . . . . . . . . . . . 111
DisconnectRequest. . . . . . . . . . . . . . . . . . . . . . . . . . . . . . . . . . . . . . . . . . . . . . . . 112
EchoRequest. . . . . . . . . . . . . . . . . . . . . . . . . . . . . . . . . . . . . . . . . . . . . . . . . . . . . 112
InfoRequest . . . . . . . . . . . . . . . . . . . . . . . . . . . . . . . . . . . . . . . . . . . . . . . . . . . . . 112
RegisterPsm . . . . . . . . . . . . . . . . . . . . . . . . . . . . . . . . . . . . . . . . . . . . . . . . . . . . . 112
SendData . . . . . . . . . . . . . . . . . . . . . . . . . . . . . . . . . . . . . . . . . . . . . . . . . . . . . . . 113
Other L2CAP Events . . . . . . . . . . . . . . . . . . . . . . . . . . . . . . . . . . . . . . . . . . . . . . . . 114
SDP Command Descriptions . . . . . . . . . . . . . . . . . . . . . . . . . . . . . . . . . . . . . . . . . . 114
AddProfileServiceRecord . . . . . . . . . . . . . . . . . . . . . . . . . . . . . . . . . . . . . . . . . . 114
AddServiceRecord . . . . . . . . . . . . . . . . . . . . . . . . . . . . . . . . . . . . . . . . . . . . . . . . 115
ProfileServiceSearch . . . . . . . . . . . . . . . . . . . . . . . . . . . . . . . . . . . . . . . . . . . . . . 115
RequestServiceAttribute . . . . . . . . . . . . . . . . . . . . . . . . . . . . . . . . . . . . . . . . . . . 116
RequestServiceSearch . . . . . . . . . . . . . . . . . . . . . . . . . . . . . . . . . . . . . . . . . . . . . 116
RequestServiceSearchAttribute . . . . . . . . . . . . . . . . . . . . . . . . . . . . . . . . . . . . . . 117
ResetDatabase . . . . . . . . . . . . . . . . . . . . . . . . . . . . . . . . . . . . . . . . . . . . . . . . . . . 117
RFCOMM Command Descriptions . . . . . . . . . . . . . . . . . . . . . . . . . . . . . . . . . . . . . 117
AcceptChannel . . . . . . . . . . . . . . . . . . . . . . . . . . . . . . . . . . . . . . . . . . . . . . . . . . . 117
AcceptPortSettings. . . . . . . . . . . . . . . . . . . . . . . . . . . . . . . . . . . . . . . . . . . . . . . . 118
AdvanceCredit . . . . . . . . . . . . . . . . . . . . . . . . . . . . . . . . . . . . . . . . . . . . . . . . . . . 118
CloseClientChannel . . . . . . . . . . . . . . . . . . . . . . . . . . . . . . . . . . . . . . . . . . . . . . . 118
CreditFlowEnabled . . . . . . . . . . . . . . . . . . . . . . . . . . . . . . . . . . . . . . . . . . . . . . . 119
DeregisterServerChannel . . . . . . . . . . . . . . . . . . . . . . . . . . . . . . . . . . . . . . . . . . . 119
OpenClientChannel . . . . . . . . . . . . . . . . . . . . . . . . . . . . . . . . . . . . . . . . . . . . . . . 119
RegisterServerChannel. . . . . . . . . . . . . . . . . . . . . . . . . . . . . . . . . . . . . . . . . . . . . 120
RequestPortSettings . . . . . . . . . . . . . . . . . . . . . . . . . . . . . . . . . . . . . . . . . . . . . . . 120
RequestPortStatus . . . . . . . . . . . . . . . . . . . . . . . . . . . . . . . . . . . . . . . . . . . . . . . . 121
SendData . . . . . . . . . . . . . . . . . . . . . . . . . . . . . . . . . . . . . . . . . . . . . . . . . . . . . . . 121
SendTest. . . . . . . . . . . . . . . . . . . . . . . . . . . . . . . . . . . . . . . . . . . . . . . . . . . . . . . . 121
SetLineStatus . . . . . . . . . . . . . . . . . . . . . . . . . . . . . . . . . . . . . . . . . . . . . . . . . . . . 121
SetModemStatus . . . . . . . . . . . . . . . . . . . . . . . . . . . . . . . . . . . . . . . . . . . . . . . . . 122
SendATCommand . . . . . . . . . . . . . . . . . . . . . . . . . . . . . . . . . . . . . . . . . . . . . . . . 123
Other RFCOMM Events . . . . . . . . . . . . . . . . . . . . . . . . . . . . . . . . . . . . . . . . . . . . . 124
xi
Page 12

CATC BTTRAINER 2.20
User’s Manual
TCS Command Descriptions . . . . . . . . . . . . . . . . . . . . . . . . . . . . . . . . . . . . . . . . . . .124
RegisterIntercomProfile . . . . . . . . . . . . . . . . . . . . . . . . . . . . . . . . . . . . . . . . . . . 124
Open_TCS_Channel . . . . . . . . . . . . . . . . . . . . . . . . . . . . . . . . . . . . . . . . . . . . . . 124
Start_TCS_Call. . . . . . . . . . . . . . . . . . . . . . . . . . . . . . . . . . . . . . . . . . . . . . . . . . 125
Disconnect_TCS_Call . . . . . . . . . . . . . . . . . . . . . . . . . . . . . . . . . . . . . . . . . . . . 125
Send_Info_Message . . . . . . . . . . . . . . . . . . . . . . . . . . . . . . . . . . . . . . . . . . . . . . 125
OBEX Command Descriptions . . . . . . . . . . . . . . . . . . . . . . . . . . . . . . . . . . . . . . . . .126
ClientAbort . . . . . . . . . . . . . . . . . . . . . . . . . . . . . . . . . . . . . . . . . . . . . . . . . . . . . 126
ClientConnect . . . . . . . . . . . . . . . . . . . . . . . . . . . . . . . . . . . . . . . . . . . . . . . . . . . 126
ClientDisconnect. . . . . . . . . . . . . . . . . . . . . . . . . . . . . . . . . . . . . . . . . . . . . . . . . 126
ClientGet. . . . . . . . . . . . . . . . . . . . . . . . . . . . . . . . . . . . . . . . . . . . . . . . . . . . . . . 126
ClientPut . . . . . . . . . . . . . . . . . . . . . . . . . . . . . . . . . . . . . . . . . . . . . . . . . . . . . . . 127
ClientSetPath . . . . . . . . . . . . . . . . . . . . . . . . . . . . . . . . . . . . . . . . . . . . . . . . . . . 127
ServerDeinit . . . . . . . . . . . . . . . . . . . . . . . . . . . . . . . . . . . . . . . . . . . . . . . . . . . . 127
ServerInit . . . . . . . . . . . . . . . . . . . . . . . . . . . . . . . . . . . . . . . . . . . . . . . . . . . . . . 128
ServerSetPath . . . . . . . . . . . . . . . . . . . . . . . . . . . . . . . . . . . . . . . . . . . . . . . . . . . 128
BNEP Commands . . . . . . . . . . . . . . . . . . . . . . . . . . . . . . . . . . . . . . . . . . . . . . . . . . .129
Accept . . . . . . . . . . . . . . . . . . . . . . . . . . . . . . . . . . . . . . . . . . . . . . . . . . . . . . . . . 129
Open . . . . . . . . . . . . . . . . . . . . . . . . . . . . . . . . . . . . . . . . . . . . . . . . . . . . . . . . . . 129
Close . . . . . . . . . . . . . . . . . . . . . . . . . . . . . . . . . . . . . . . . . . . . . . . . . . . . . . . . . . 129
SetUpConnectionReq . . . . . . . . . . . . . . . . . . . . . . . . . . . . . . . . . . . . . . . . . . . . . 129
SentPKT . . . . . . . . . . . . . . . . . . . . . . . . . . . . . . . . . . . . . . . . . . . . . . . . . . . . . . . 129
SendControlPKT. . . . . . . . . . . . . . . . . . . . . . . . . . . . . . . . . . . . . . . . . . . . . . . . . 129
RegisterBNEP. . . . . . . . . . . . . . . . . . . . . . . . . . . . . . . . . . . . . . . . . . . . . . . . . . . 130
DeregisterBNEP . . . . . . . . . . . . . . . . . . . . . . . . . . . . . . . . . . . . . . . . . . . . . . . . . 130
SetControlTimeout . . . . . . . . . . . . . . . . . . . . . . . . . . . . . . . . . . . . . . . . . . . . . . . 130
TCI Commands . . . . . . . . . . . . . . . . . . . . . . . . . . . . . . . . . . . . . . . . . . . . . . . . . . . . .130
CATC_EnterTestMode. . . . . . . . . . . . . . . . . . . . . . . . . . . . . . . . . . . . . . . . . . . . 130
CATC_TestControlMaster . . . . . . . . . . . . . . . . . . . . . . . . . . . . . . . . . . . . . . . . . 130
CATC_CreateConnectionExt . . . . . . . . . . . . . . . . . . . . . . . . . . . . . . . . . . . . . . . 132
CATC_AcceptConnectionExt . . . . . . . . . . . . . . . . . . . . . . . . . . . . . . . . . . . . . . 133
CATC_SetClock . . . . . . . . . . . . . . . . . . . . . . . . . . . . . . . . . . . . . . . . . . . . . . . . 135
CATC_SetBdAddr . . . . . . . . . . . . . . . . . . . . . . . . . . . . . . . . . . . . . . . . . . . . . . . 135
CATC_Page . . . . . . . . . . . . . . . . . . . . . . . . . . . . . . . . . . . . . . . . . . . . . . . . . . . . 135
CATC_PageScan . . . . . . . . . . . . . . . . . . . . . . . . . . . . . . . . . . . . . . . . . . . . . . . . 136
CATC_Inquiry . . . . . . . . . . . . . . . . . . . . . . . . . . . . . . . . . . . . . . . . . . . . . . . . . . 136
CATC_InquiryScan . . . . . . . . . . . . . . . . . . . . . . . . . . . . . . . . . . . . . . . . . . . . . . 136
Appendix B BTTrainer Scripting Commands . . . . . . . . . . . . . . . . . . .137
Bluetooth Addresses . . . . . . . . . . . . . . . . . . . . . . . . . . . . . . . . . . . . . . . . . . . . . . . . . . . .137
Basic Commands . . . . . . . . . . . . . . . . . . . . . . . . . . . . . . . . . . . . . . . . . . . . . . . . . . . . . . .137
Main . . . . . . . . . . . . . . . . . . . . . . . . . . . . . . . . . . . . . . . . . . . . . . . . . . . . . . . . . . .137
Clock. . . . . . . . . . . . . . . . . . . . . . . . . . . . . . . . . . . . . . . . . . . . . . . . . . . . . . . . . . .138
xii
Page 13

CATC BTTRAINER 2.20
User’s Manual Table of Contents
Connect . . . . . . . . . . . . . . . . . . . . . . . . . . . . . . . . . . . . . . . . . . . . . . . . . . . . . . . . 138
Disconnect . . . . . . . . . . . . . . . . . . . . . . . . . . . . . . . . . . . . . . . . . . . . . . . . . . . . . . 139
DoInquiry . . . . . . . . . . . . . . . . . . . . . . . . . . . . . . . . . . . . . . . . . . . . . . . . . . . . . . . 139
GetDeviceClass . . . . . . . . . . . . . . . . . . . . . . . . . . . . . . . . . . . . . . . . . . . . . . . . . . 140
GetRemoteDeviceName. . . . . . . . . . . . . . . . . . . . . . . . . . . . . . . . . . . . . . . . . . . . 140
MessageBox . . . . . . . . . . . . . . . . . . . . . . . . . . . . . . . . . . . . . . . . . . . . . . . . . . . . . 141
SetDeviceClass. . . . . . . . . . . . . . . . . . . . . . . . . . . . . . . . . . . . . . . . . . . . . . . . . . . 141
Sleep. . . . . . . . . . . . . . . . . . . . . . . . . . . . . . . . . . . . . . . . . . . . . . . . . . . . . . . . . . . 142
Pipe Commands . . . . . . . . . . . . . . . . . . . . . . . . . . . . . . . . . . . . . . . . . . . . . . . . . . . . . . . 142
ClosePipe . . . . . . . . . . . . . . . . . . . . . . . . . . . . . . . . . . . . . . . . . . . . . . . . . . . . . . . 142
DeletePipe . . . . . . . . . . . . . . . . . . . . . . . . . . . . . . . . . . . . . . . . . . . . . . . . . . . . . . 143
OpenPipe . . . . . . . . . . . . . . . . . . . . . . . . . . . . . . . . . . . . . . . . . . . . . . . . . . . . . . . 143
ReadPipe . . . . . . . . . . . . . . . . . . . . . . . . . . . . . . . . . . . . . . . . . . . . . . . . . . . . . . . 144
WritePipe . . . . . . . . . . . . . . . . . . . . . . . . . . . . . . . . . . . . . . . . . . . . . . . . . . . . . . . 145
HCI Commands . . . . . . . . . . . . . . . . . . . . . . . . . . . . . . . . . . . . . . . . . . . . . . . . . . . . . . . . 146
HCIAcceptConnectionRequest . . . . . . . . . . . . . . . . . . . . . . . . . . . . . . . . . . . . . . 146
HCIAddSCOConnection . . . . . . . . . . . . . . . . . . . . . . . . . . . . . . . . . . . . . . . . . . . 146
HCIAuthenticationRequested . . . . . . . . . . . . . . . . . . . . . . . . . . . . . . . . . . . . . . . 147
HCICatcChangeHeadsetGain. . . . . . . . . . . . . . . . . . . . . . . . . . . . . . . . . . . . . . . . 147
HCICatcDecreasePowerRequest . . . . . . . . . . . . . . . . . . . . . . . . . . . . . . . . . . . . . 149
HCICatcDisconnect . . . . . . . . . . . . . . . . . . . . . . . . . . . . . . . . . . . . . . . . . . . . . . . 149
HCICatcGetParkMode . . . . . . . . . . . . . . . . . . . . . . . . . . . . . . . . . . . . . . . . . . . . . 150
HCICATCGetSelectedSCOConnection. . . . . . . . . . . . . . . . . . . . . . . . . . . . . . . . 151
HCICATCIncreasePowerRequest . . . . . . . . . . . . . . . . . . . . . . . . . . . . . . . . . . . . 151
HCICATCModifyBeacon . . . . . . . . . . . . . . . . . . . . . . . . . . . . . . . . . . . . . . . . . . 152
HCICATCMaxSlot . . . . . . . . . . . . . . . . . . . . . . . . . . . . . . . . . . . . . . . . . . . . . . . 153
HCICATCMaxSlotResponse . . . . . . . . . . . . . . . . . . . . . . . . . . . . . . . . . . . . . . . . 154
HCICATCOverrideRemoteFeatureCheck . . . . . . . . . . . . . . . . . . . . . . . . . . . . . . 155
HCICATCPageModeRequest . . . . . . . . . . . . . . . . . . . . . . . . . . . . . . . . . . . . . . . 155
HCICATCPageScanModeRequest . . . . . . . . . . . . . . . . . . . . . . . . . . . . . . . . . . . 156
HCICATCPageScanModeResponse . . . . . . . . . . . . . . . . . . . . . . . . . . . . . . . . . . 157
HCICatcQos . . . . . . . . . . . . . . . . . . . . . . . . . . . . . . . . . . . . . . . . . . . . . . . . . . . . . 157
HCICATCQoSResponse . . . . . . . . . . . . . . . . . . . . . . . . . . . . . . . . . . . . . . . . . . . 158
HCICatcReadHeadsetGain. . . . . . . . . . . . . . . . . . . . . . . . . . . . . . . . . . . . . . . . . . 159
HCICatcReadEncryptionKeySize . . . . . . . . . . . . . . . . . . . . . . . . . . . . . . . . . . . . 159
HCICatcReadRevisionInformation . . . . . . . . . . . . . . . . . . . . . . . . . . . . . . . . . . . 160
HCICatcScoErrorInjection. . . . . . . . . . . . . . . . . . . . . . . . . . . . . . . . . . . . . . . . . . 160
HCICATCSCOParameterChangeResponse. . . . . . . . . . . . . . . . . . . . . . . . . . . . . 161
HCICATCSelectSCOConnection . . . . . . . . . . . . . . . . . . . . . . . . . . . . . . . . . . . . 162
HCICatcSelfTest . . . . . . . . . . . . . . . . . . . . . . . . . . . . . . . . . . . . . . . . . . . . . . . . . 162
HCICATCSetBroadcastScanWindow . . . . . . . . . . . . . . . . . . . . . . . . . . . . . . . . . 163
HCICatcSetDefaultPINCode . . . . . . . . . . . . . . . . . . . . . . . . . . . . . . . . . . . . . . . . 163
HCICatcSetParkMode . . . . . . . . . . . . . . . . . . . . . . . . . . . . . . . . . . . . . . . . . . . . . 164
xiii
Page 14

CATC BTTRAINER 2.20
User’s Manual
HCICatcWriteEncryptionKeySize . . . . . . . . . . . . . . . . . . . . . . . . . . . . . . . . . . . .166
HCICatcWriteLinkKeyType. . . . . . . . . . . . . . . . . . . . . . . . . . . . . . . . . . . . . . . . .166
HCICATCWriteLocalSupportedFeatures. . . . . . . . . . . . . . . . . . . . . . . . . . . . . . .167
HCICatcWritePinResponseEnable . . . . . . . . . . . . . . . . . . . . . . . . . . . . . . . . . . . .168
HCIChangeConnectionLinkKey. . . . . . . . . . . . . . . . . . . . . . . . . . . . . . . . . . . . . .168
HCIChangeConnectionPacketType . . . . . . . . . . . . . . . . . . . . . . . . . . . . . . . . . . .169
HCIChangeLocalName. . . . . . . . . . . . . . . . . . . . . . . . . . . . . . . . . . . . . . . . . . . . .170
HCICreateNewUnitKey . . . . . . . . . . . . . . . . . . . . . . . . . . . . . . . . . . . . . . . . . . . .170
HCIDeleteStoredLinkKey . . . . . . . . . . . . . . . . . . . . . . . . . . . . . . . . . . . . . . . . . .171
HCIEnableDeviceUnderTestMode . . . . . . . . . . . . . . . . . . . . . . . . . . . . . . . . . . . .172
HCIExitParkMode . . . . . . . . . . . . . . . . . . . . . . . . . . . . . . . . . . . . . . . . . . . . . . . .172
HCIExitSniffMode . . . . . . . . . . . . . . . . . . . . . . . . . . . . . . . . . . . . . . . . . . . . . . . .173
HCIFlush. . . . . . . . . . . . . . . . . . . . . . . . . . . . . . . . . . . . . . . . . . . . . . . . . . . . . . . .173
HCIGetSCOConnections . . . . . . . . . . . . . . . . . . . . . . . . . . . . . . . . . . . . . . . . . . .174
HCIHoldMode . . . . . . . . . . . . . . . . . . . . . . . . . . . . . . . . . . . . . . . . . . . . . . . . . . .174
HCIMasterLinkKey . . . . . . . . . . . . . . . . . . . . . . . . . . . . . . . . . . . . . . . . . . . . . . .175
HCIParkMode. . . . . . . . . . . . . . . . . . . . . . . . . . . . . . . . . . . . . . . . . . . . . . . . . . . .176
HCIPINCodeRequestNegativeReply . . . . . . . . . . . . . . . . . . . . . . . . . . . . . . . . . .177
HCIPINCodeRequestReply . . . . . . . . . . . . . . . . . . . . . . . . . . . . . . . . . . . . . . . . .177
HCIQoSSetup . . . . . . . . . . . . . . . . . . . . . . . . . . . . . . . . . . . . . . . . . . . . . . . . . . . .178
HCIReadAuthenticationEnable . . . . . . . . . . . . . . . . . . . . . . . . . . . . . . . . . . . . . .179
HCIReadAutomaticFlushTimeout . . . . . . . . . . . . . . . . . . . . . . . . . . . . . . . . . . . .180
HCIReadBDADDR . . . . . . . . . . . . . . . . . . . . . . . . . . . . . . . . . . . . . . . . . . . . . . .181
HCIReadBufferSize . . . . . . . . . . . . . . . . . . . . . . . . . . . . . . . . . . . . . . . . . . . . . . .181
HCIReadClockOffset . . . . . . . . . . . . . . . . . . . . . . . . . . . . . . . . . . . . . . . . . . . . . .182
HCIReadConnectionAcceptTimeout . . . . . . . . . . . . . . . . . . . . . . . . . . . . . . . . . .183
HCIReadCountryCode . . . . . . . . . . . . . . . . . . . . . . . . . . . . . . . . . . . . . . . . . . . . .184
HCIReadCurrentIACLAP. . . . . . . . . . . . . . . . . . . . . . . . . . . . . . . . . . . . . . . . . . .184
HCIReadEncryptionMode . . . . . . . . . . . . . . . . . . . . . . . . . . . . . . . . . . . . . . . . . .185
HCIReadFailedContactCounter . . . . . . . . . . . . . . . . . . . . . . . . . . . . . . . . . . . . . .186
HCIReadHoldModeActivity. . . . . . . . . . . . . . . . . . . . . . . . . . . . . . . . . . . . . . . . .186
HCIReadInquiryScanActivity. . . . . . . . . . . . . . . . . . . . . . . . . . . . . . . . . . . . . . . .187
HCIReadLinkPolicySettings. . . . . . . . . . . . . . . . . . . . . . . . . . . . . . . . . . . . . . . . .188
HCIReadLinkSupervisionTimeout . . . . . . . . . . . . . . . . . . . . . . . . . . . . . . . . . . . .189
HCIReadLocalName. . . . . . . . . . . . . . . . . . . . . . . . . . . . . . . . . . . . . . . . . . . . . . .189
HCIReadLocalSupportedFeatures . . . . . . . . . . . . . . . . . . . . . . . . . . . . . . . . . . . .190
HCIReadLocalVersionInformation . . . . . . . . . . . . . . . . . . . . . . . . . . . . . . . . . . .191
HCIReadLoopbackMode . . . . . . . . . . . . . . . . . . . . . . . . . . . . . . . . . . . . . . . . . . .192
HCIReadNumberOfSupportedIAC. . . . . . . . . . . . . . . . . . . . . . . . . . . . . . . . . . . .192
HCIReadNumBroadcastRetransmissions . . . . . . . . . . . . . . . . . . . . . . . . . . . . . . .193
HCIReadPageScanActivity. . . . . . . . . . . . . . . . . . . . . . . . . . . . . . . . . . . . . . . . . .194
HCIReadPageScanMode . . . . . . . . . . . . . . . . . . . . . . . . . . . . . . . . . . . . . . . . . . .194
HCIReadPageScanPeriodMode . . . . . . . . . . . . . . . . . . . . . . . . . . . . . . . . . . . . . .195
xiv
Page 15

CATC BTTRAINER 2.20
User’s Manual Table of Contents
HCIReadPageTimeout . . . . . . . . . . . . . . . . . . . . . . . . . . . . . . . . . . . . . . . . . . . . . 196
HCIReadPINType . . . . . . . . . . . . . . . . . . . . . . . . . . . . . . . . . . . . . . . . . . . . . . . . 197
HCIReadRemoteSupportedFeatures . . . . . . . . . . . . . . . . . . . . . . . . . . . . . . . . . . 197
HCIReadRemoteVersionInformation . . . . . . . . . . . . . . . . . . . . . . . . . . . . . . . . . 198
HCIReadScanEnable . . . . . . . . . . . . . . . . . . . . . . . . . . . . . . . . . . . . . . . . . . . . . . 199
HCIReadSCOFlowControlEnable . . . . . . . . . . . . . . . . . . . . . . . . . . . . . . . . . . . . 200
HCIReadStoredLinkKey . . . . . . . . . . . . . . . . . . . . . . . . . . . . . . . . . . . . . . . . . . . 200
HCIReadVoiceSetting . . . . . . . . . . . . . . . . . . . . . . . . . . . . . . . . . . . . . . . . . . . . . 202
HCIRejectConnectionRequest . . . . . . . . . . . . . . . . . . . . . . . . . . . . . . . . . . . . . . . 202
HCIRemoveSCOConnection . . . . . . . . . . . . . . . . . . . . . . . . . . . . . . . . . . . . . . . . 203
HCIReset . . . . . . . . . . . . . . . . . . . . . . . . . . . . . . . . . . . . . . . . . . . . . . . . . . . . . . . 203
HCIResetFailedContactCounter. . . . . . . . . . . . . . . . . . . . . . . . . . . . . . . . . . . . . . 204
HCIRoleDiscovery. . . . . . . . . . . . . . . . . . . . . . . . . . . . . . . . . . . . . . . . . . . . . . . . 204
HCISetConnectionEncryption . . . . . . . . . . . . . . . . . . . . . . . . . . . . . . . . . . . . . . . 205
HCISetEventFilter . . . . . . . . . . . . . . . . . . . . . . . . . . . . . . . . . . . . . . . . . . . . . . . . 206
HCISniffMode . . . . . . . . . . . . . . . . . . . . . . . . . . . . . . . . . . . . . . . . . . . . . . . . . . . 207
HCISwitchRole . . . . . . . . . . . . . . . . . . . . . . . . . . . . . . . . . . . . . . . . . . . . . . . . . . 208
HCIWaitForMaxSlotRequest. . . . . . . . . . . . . . . . . . . . . . . . . . . . . . . . . . . . . . . . 208
HCIWriteAuthenticationEnable. . . . . . . . . . . . . . . . . . . . . . . . . . . . . . . . . . . . . . 209
HCIWriteAutomaticFlushTimeout . . . . . . . . . . . . . . . . . . . . . . . . . . . . . . . . . . . 209
HCIWriteConnectionAcceptTimeout . . . . . . . . . . . . . . . . . . . . . . . . . . . . . . . . . 210
HCIWriteCurrentIACLAP . . . . . . . . . . . . . . . . . . . . . . . . . . . . . . . . . . . . . . . . . . 211
HCIWriteEncryptionMode. . . . . . . . . . . . . . . . . . . . . . . . . . . . . . . . . . . . . . . . . . 212
HCIWriteLinkPolicySettings . . . . . . . . . . . . . . . . . . . . . . . . . . . . . . . . . . . . . . . . 212
HCIWriteLinkSupervisionTimeout . . . . . . . . . . . . . . . . . . . . . . . . . . . . . . . . . . . 213
HCIWriteLoopbackMode . . . . . . . . . . . . . . . . . . . . . . . . . . . . . . . . . . . . . . . . . . 214
HCIWritePageScanActivity . . . . . . . . . . . . . . . . . . . . . . . . . . . . . . . . . . . . . . . . . 214
HCIWritePageScanMode. . . . . . . . . . . . . . . . . . . . . . . . . . . . . . . . . . . . . . . . . . . 215
HCIWritePageScanPeriodMode . . . . . . . . . . . . . . . . . . . . . . . . . . . . . . . . . . . . . 216
HCIWritePageTimeout . . . . . . . . . . . . . . . . . . . . . . . . . . . . . . . . . . . . . . . . . . . . 216
HCIWritePINType . . . . . . . . . . . . . . . . . . . . . . . . . . . . . . . . . . . . . . . . . . . . . . . . 217
HCIWriteScanEnable. . . . . . . . . . . . . . . . . . . . . . . . . . . . . . . . . . . . . . . . . . . . . . 217
HCIWriteStoredLinkKey . . . . . . . . . . . . . . . . . . . . . . . . . . . . . . . . . . . . . . . . . . . 218
HCIWriteVoiceSettings . . . . . . . . . . . . . . . . . . . . . . . . . . . . . . . . . . . . . . . . . . . . 218
OBEX Commands . . . . . . . . . . . . . . . . . . . . . . . . . . . . . . . . . . . . . . . . . . . . . . . . . . . . . . 219
OBEXClientConnect . . . . . . . . . . . . . . . . . . . . . . . . . . . . . . . . . . . . . . . . . . . . . . 219
OBEXClientDeinit . . . . . . . . . . . . . . . . . . . . . . . . . . . . . . . . . . . . . . . . . . . . . . . . 220
OBEXClientDisconnect . . . . . . . . . . . . . . . . . . . . . . . . . . . . . . . . . . . . . . . . . . . . 220
OBEXClientGet . . . . . . . . . . . . . . . . . . . . . . . . . . . . . . . . . . . . . . . . . . . . . . . . . . 221
OBEXClientInit . . . . . . . . . . . . . . . . . . . . . . . . . . . . . . . . . . . . . . . . . . . . . . . . . . 222
OBEXClientPut . . . . . . . . . . . . . . . . . . . . . . . . . . . . . . . . . . . . . . . . . . . . . . . . . . 222
OBEXClientSetPath. . . . . . . . . . . . . . . . . . . . . . . . . . . . . . . . . . . . . . . . . . . . . . . 224
OBEXServerDeinit . . . . . . . . . . . . . . . . . . . . . . . . . . . . . . . . . . . . . . . . . . . . . . . 225
xv
Page 16

CATC BTTRAINER 2.20
User’s Manual
OBEXServerInit . . . . . . . . . . . . . . . . . . . . . . . . . . . . . . . . . . . . . . . . . . . . . . . . . .225
OBEXServerSetPath(Path) . . . . . . . . . . . . . . . . . . . . . . . . . . . . . . . . . . . . . . . . . .226
RFCOMM Commands . . . . . . . . . . . . . . . . . . . . . . . . . . . . . . . . . . . . . . . . . . . . . . . . . . .227
RFCloseClientChannel . . . . . . . . . . . . . . . . . . . . . . . . . . . . . . . . . . . . . . . . . . . . .227
RFOpenClientChannel . . . . . . . . . . . . . . . . . . . . . . . . . . . . . . . . . . . . . . . . . . . . .227
RFRegisterServerChannel . . . . . . . . . . . . . . . . . . . . . . . . . . . . . . . . . . . . . . . . . .228
RFSendData . . . . . . . . . . . . . . . . . . . . . . . . . . . . . . . . . . . . . . . . . . . . . . . . . . . . .229
RFSendDataFromPipe . . . . . . . . . . . . . . . . . . . . . . . . . . . . . . . . . . . . . . . . . . . . .229
RFReceiveData . . . . . . . . . . . . . . . . . . . . . . . . . . . . . . . . . . . . . . . . . . . . . . . . . . .230
RFWaitForConnection . . . . . . . . . . . . . . . . . . . . . . . . . . . . . . . . . . . . . . . . . . . . .231
RFSendATCommand . . . . . . . . . . . . . . . . . . . . . . . . . . . . . . . . . . . . . . . . . . . . . .232
RFDeregisterServerChannel . . . . . . . . . . . . . . . . . . . . . . . . . . . . . . . . . . . . . . . . .233
RFAcceptChannel . . . . . . . . . . . . . . . . . . . . . . . . . . . . . . . . . . . . . . . . . . . . . . . . .233
RFAcceptPortSettings. . . . . . . . . . . . . . . . . . . . . . . . . . . . . . . . . . . . . . . . . . . . . .234
RFCreditFlowEnabled . . . . . . . . . . . . . . . . . . . . . . . . . . . . . . . . . . . . . . . . . . . . .234
RFRequestPortSettings . . . . . . . . . . . . . . . . . . . . . . . . . . . . . . . . . . . . . . . . . . . . .235
RFRequestPortStatus . . . . . . . . . . . . . . . . . . . . . . . . . . . . . . . . . . . . . . . . . . . . . .236
RFSendTest() . . . . . . . . . . . . . . . . . . . . . . . . . . . . . . . . . . . . . . . . . . . . . . . . . . . .238
RFSetLineStatus . . . . . . . . . . . . . . . . . . . . . . . . . . . . . . . . . . . . . . . . . . . . . . . . . .238
RFSetCreditFlowControlEnable. . . . . . . . . . . . . . . . . . . . . . . . . . . . . . . . . . . . . .239
RFSetModemStatus . . . . . . . . . . . . . . . . . . . . . . . . . . . . . . . . . . . . . . . . . . . . . . .240
RFSendTest. . . . . . . . . . . . . . . . . . . . . . . . . . . . . . . . . . . . . . . . . . . . . . . . . . . . . .241
RFAdvanceCredit . . . . . . . . . . . . . . . . . . . . . . . . . . . . . . . . . . . . . . . . . . . . . . . . .241
TCS Commands . . . . . . . . . . . . . . . . . . . . . . . . . . . . . . . . . . . . . . . . . . . . . . . . . . . . . . . .242
TCSRegisterProfile. . . . . . . . . . . . . . . . . . . . . . . . . . . . . . . . . . . . . . . . . . . . . . . .242
TCSOpenChannel . . . . . . . . . . . . . . . . . . . . . . . . . . . . . . . . . . . . . . . . . . . . . . . . .243
TCSStartCall. . . . . . . . . . . . . . . . . . . . . . . . . . . . . . . . . . . . . . . . . . . . . . . . . . . . .243
TCSDisconnectCall . . . . . . . . . . . . . . . . . . . . . . . . . . . . . . . . . . . . . . . . . . . . . . .244
TCSSendInfoMessage . . . . . . . . . . . . . . . . . . . . . . . . . . . . . . . . . . . . . . . . . . . . .244
BNEP Commands . . . . . . . . . . . . . . . . . . . . . . . . . . . . . . . . . . . . . . . . . . . . . . . . . . . . . .246
BNEPAccept() . . . . . . . . . . . . . . . . . . . . . . . . . . . . . . . . . . . . . . . . . . . . . . . . . . .246
BNEPClose() . . . . . . . . . . . . . . . . . . . . . . . . . . . . . . . . . . . . . . . . . . . . . . . . . . . .247
BNEPDeregister . . . . . . . . . . . . . . . . . . . . . . . . . . . . . . . . . . . . . . . . . . . . . . . . . .247
BNEPOpen(). . . . . . . . . . . . . . . . . . . . . . . . . . . . . . . . . . . . . . . . . . . . . . . . . . . . .248
BNEPRegister() . . . . . . . . . . . . . . . . . . . . . . . . . . . . . . . . . . . . . . . . . . . . . . . . . .248
BNEPSendControlPkt() . . . . . . . . . . . . . . . . . . . . . . . . . . . . . . . . . . . . . . . . . . . .249
BNEPSendPkt() . . . . . . . . . . . . . . . . . . . . . . . . . . . . . . . . . . . . . . . . . . . . . . . . . .249
BNEPSendPktGeneral() . . . . . . . . . . . . . . . . . . . . . . . . . . . . . . . . . . . . . . . . . . . .250
BNEPSetUpConnectionReq(). . . . . . . . . . . . . . . . . . . . . . . . . . . . . . . . . . . . . . . .251
BNEPSetControlTimeout(). . . . . . . . . . . . . . . . . . . . . . . . . . . . . . . . . . . . . . . . . .252
L2CAP Commands . . . . . . . . . . . . . . . . . . . . . . . . . . . . . . . . . . . . . . . . . . . . . . . . . . . . .253
L2CAPConfigurationRequest. . . . . . . . . . . . . . . . . . . . . . . . . . . . . . . . . . . . . . . .253
L2CAPConfigurationResponse . . . . . . . . . . . . . . . . . . . . . . . . . . . . . . . . . . . . . .254
xvi
Page 17

CATC BTTRAINER 2.20
User’s Manual Table of Contents
L2CAPConnectRequest . . . . . . . . . . . . . . . . . . . . . . . . . . . . . . . . . . . . . . . . . . . . 255
L2CAPConnectResponse. . . . . . . . . . . . . . . . . . . . . . . . . . . . . . . . . . . . . . . . . . . 256
L2CAPDeregisterAllPsm. . . . . . . . . . . . . . . . . . . . . . . . . . . . . . . . . . . . . . . . . . . 256
L2CAPDisconnectRequest() . . . . . . . . . . . . . . . . . . . . . . . . . . . . . . . . . . . . . . . . 257
L2CAPEchoRequest . . . . . . . . . . . . . . . . . . . . . . . . . . . . . . . . . . . . . . . . . . . . . . 257
L2CAPGroupRegister . . . . . . . . . . . . . . . . . . . . . . . . . . . . . . . . . . . . . . . . . . . . . 258
L2CAPGetRegisteredGroups. . . . . . . . . . . . . . . . . . . . . . . . . . . . . . . . . . . . . . . . 258
L2CAPGroupDestroy. . . . . . . . . . . . . . . . . . . . . . . . . . . . . . . . . . . . . . . . . . . . . . 259
L2CAPInfoRequest . . . . . . . . . . . . . . . . . . . . . . . . . . . . . . . . . . . . . . . . . . . . . . . 260
L2CAPRegisterPsm . . . . . . . . . . . . . . . . . . . . . . . . . . . . . . . . . . . . . . . . . . . . . . . 260
L2CAPSendData . . . . . . . . . . . . . . . . . . . . . . . . . . . . . . . . . . . . . . . . . . . . . . . . . 261
L2CAPSendDataFromPipe . . . . . . . . . . . . . . . . . . . . . . . . . . . . . . . . . . . . . . . . . 262
L2CAPWaitForConnection . . . . . . . . . . . . . . . . . . . . . . . . . . . . . . . . . . . . . . . . . 262
SDP Commands . . . . . . . . . . . . . . . . . . . . . . . . . . . . . . . . . . . . . . . . . . . . . . . . . . . . . . . 263
SDPAddProfileServiceRecord . . . . . . . . . . . . . . . . . . . . . . . . . . . . . . . . . . . . . . . 263
SDPAddServiceRecord . . . . . . . . . . . . . . . . . . . . . . . . . . . . . . . . . . . . . . . . . . . . 264
SDPGenericQuery . . . . . . . . . . . . . . . . . . . . . . . . . . . . . . . . . . . . . . . . . . . . . . . . 264
SDPQueryProfile . . . . . . . . . . . . . . . . . . . . . . . . . . . . . . . . . . . . . . . . . . . . . . . . . 266
SDPRequestServiceSearch. . . . . . . . . . . . . . . . . . . . . . . . . . . . . . . . . . . . . . . . . . 266
SDPRequestServiceAttribute . . . . . . . . . . . . . . . . . . . . . . . . . . . . . . . . . . . . . . . . 267
SDPRequestServiceSearchAttribute . . . . . . . . . . . . . . . . . . . . . . . . . . . . . . . . . . 269
SDPResetDatabase. . . . . . . . . . . . . . . . . . . . . . . . . . . . . . . . . . . . . . . . . . . . . . . . 269
TCI Commands . . . . . . . . . . . . . . . . . . . . . . . . . . . . . . . . . . . . . . . . . . . . . . . . . . . . . . . . 270
HCICatcAcceptConnectionExt . . . . . . . . . . . . . . . . . . . . . . . . . . . . . . . . . . . . . . 270
HCICatcCreateConnectionExt . . . . . . . . . . . . . . . . . . . . . . . . . . . . . . . . . . . . . . . 273
HCICatcSetClock. . . . . . . . . . . . . . . . . . . . . . . . . . . . . . . . . . . . . . . . . . . . . . . . . 276
HCICatcSetBdAddr . . . . . . . . . . . . . . . . . . . . . . . . . . . . . . . . . . . . . . . . . . . . . . . 277
HCICatcEnterTestMode. . . . . . . . . . . . . . . . . . . . . . . . . . . . . . . . . . . . . . . . . . . . 277
HCICatcInquiry . . . . . . . . . . . . . . . . . . . . . . . . . . . . . . . . . . . . . . . . . . . . . . . . . . 278
HCICatcInquiryScan . . . . . . . . . . . . . . . . . . . . . . . . . . . . . . . . . . . . . . . . . . . . . . 279
HCICatcPage . . . . . . . . . . . . . . . . . . . . . . . . . . . . . . . . . . . . . . . . . . . . . . . . . . . . 280
HCICatcPageScan . . . . . . . . . . . . . . . . . . . . . . . . . . . . . . . . . . . . . . . . . . . . . . . . 281
HCICatcTestControlMaster . . . . . . . . . . . . . . . . . . . . . . . . . . . . . . . . . . . . . . . . . 282
HCICatcEnterTestMode. . . . . . . . . . . . . . . . . . . . . . . . . . . . . . . . . . . . . . . . . . . . 289
BTTracer Commands . . . . . . . . . . . . . . . . . . . . . . . . . . . . . . . . . . . . . . . . . . . . . . . . . . . 290
BTTracerStartRecording . . . . . . . . . . . . . . . . . . . . . . . . . . . . . . . . . . . . . . . . . . . 290
BTTracerStopRecording . . . . . . . . . . . . . . . . . . . . . . . . . . . . . . . . . . . . . . . . . . . 290
Appendix C CATC Scripting Language . . . . . . . . . . . . . . . . . . . . . . . . 291
Values . . . . . . . . . . . . . . . . . . . . . . . . . . . . . . . . . . . . . . . . . . . . . . . . . . . . . . . . . . . . . . . 291
Literals . . . . . . . . . . . . . . . . . . . . . . . . . . . . . . . . . . . . . . . . . . . . . . . . . . . . . . . . . . . . . . 291
Integers . . . . . . . . . . . . . . . . . . . . . . . . . . . . . . . . . . . . . . . . . . . . . . . . . . . . . . . . . . . . . . 291
Strings . . . . . . . . . . . . . . . . . . . . . . . . . . . . . . . . . . . . . . . . . . . . . . . . . . . . . . . . . . . . . . . 292
xvii
Page 18

CATC BTTRAINER 2.20
User’s Manual
Lists . . . . . . . . . . . . . . . . . . . . . . . . . . . . . . . . . . . . . . . . . . . . . . . . . . . . . . . . . . . . . . . . .293
Raw Bytes . . . . . . . . . . . . . . . . . . . . . . . . . . . . . . . . . . . . . . . . . . . . . . . . . . . . . . . . . . . .293
Null . . . . . . . . . . . . . . . . . . . . . . . . . . . . . . . . . . . . . . . . . . . . . . . . . . . . . . . . . . . . . . . . .293
Variables . . . . . . . . . . . . . . . . . . . . . . . . . . . . . . . . . . . . . . . . . . . . . . . . . . . . . . . . . . . . .293
Global Variables . . . . . . . . . . . . . . . . . . . . . . . . . . . . . . . . . . . . . . . . . . . . . . . . . . . . . . .294
Local Variables . . . . . . . . . . . . . . . . . . . . . . . . . . . . . . . . . . . . . . . . . . . . . . . . . . . . . . . .294
Constants . . . . . . . . . . . . . . . . . . . . . . . . . . . . . . . . . . . . . . . . . . . . . . . . . . . . . . . . . . . . .295
Expressions . . . . . . . . . . . . . . . . . . . . . . . . . . . . . . . . . . . . . . . . . . . . . . . . . . . . . . . . . . .295
select expression . . . . . . . . . . . . . . . . . . . . . . . . . . . . . . . . . . . . . . . . . . . . . . . . . . . . .296
Operators . . . . . . . . . . . . . . . . . . . . . . . . . . . . . . . . . . . . . . . . . . . . . . . . . . . . . . . . . . . . .297
Comments . . . . . . . . . . . . . . . . . . . . . . . . . . . . . . . . . . . . . . . . . . . . . . . . . . . . . . . . . . . .304
Keywords . . . . . . . . . . . . . . . . . . . . . . . . . . . . . . . . . . . . . . . . . . . . . . . . . . . . . . . . . . . . .304
Statements . . . . . . . . . . . . . . . . . . . . . . . . . . . . . . . . . . . . . . . . . . . . . . . . . . . . . . . . . . . .305
Expression Statements . . . . . . . . . . . . . . . . . . . . . . . . . . . . . . . . . . . . . . . . . . . . . . . . . . .305
if Statements . . . . . . . . . . . . . . . . . . . . . . . . . . . . . . . . . . . . . . . . . . . . . . . . . . . . . . . . . .306
if-else Statements . . . . . . . . . . . . . . . . . . . . . . . . . . . . . . . . . . . . . . . . . . . . . . . . . . . .306
while Statements . . . . . . . . . . . . . . . . . . . . . . . . . . . . . . . . . . . . . . . . . . . . . . . . . . . . . .306
for Statements . . . . . . . . . . . . . . . . . . . . . . . . . . . . . . . . . . . . . . . . . . . . . . . . . . . . . . . .307
return Statements . . . . . . . . . . . . . . . . . . . . . . . . . . . . . . . . . . . . . . . . . . . . . . . . . . . . .308
Compound Statements . . . . . . . . . . . . . . . . . . . . . . . . . . . . . . . . . . . . . . . . . . . . . . . . . . .309
Preprocessing . . . . . . . . . . . . . . . . . . . . . . . . . . . . . . . . . . . . . . . . . . . . . . . . . . . . . . . . . .310
Functions . . . . . . . . . . . . . . . . . . . . . . . . . . . . . . . . . . . . . . . . . . . . . . . . . . . . . . . . . . . . .311
Primitives . . . . . . . . . . . . . . . . . . . . . . . . . . . . . . . . . . . . . . . . . . . . . . . . . . . . . . . . . . . . .312
Call() . . . . . . . . . . . . . . . . . . . . . . . . . . . . . . . . . . . . . . . . . . . . . . . . . . . . . . . . . . . . . . . .313
Format() . . . . . . . . . . . . . . . . . . . . . . . . . . . . . . . . . . . . . . . . . . . . . . . . . . . . . . . . . . . . . .313
GetNBits() . . . . . . . . . . . . . . . . . . . . . . . . . . . . . . . . . . . . . . . . . . . . . . . . . . . . . . . . . . . .315
NextNBits() . . . . . . . . . . . . . . . . . . . . . . . . . . . . . . . . . . . . . . . . . . . . . . . . . . . . . . . . . . .316
Resolve() . . . . . . . . . . . . . . . . . . . . . . . . . . . . . . . . . . . . . . . . . . . . . . . . . . . . . . . . . . . . .316
Trace() . . . . . . . . . . . . . . . . . . . . . . . . . . . . . . . . . . . . . . . . . . . . . . . . . . . . . . . . . . . . . . .317
xviii
Page 19

CATC BTTRAINER 2.20 CHAPTER 1
User’s Manual Overview
CHAPTER 1: OVERVIEW
The CATC BTTrainer™ Bluetooth™ Exerciser is a member of CATC's industry-leading
line of high performance, serial communication protocol analysis tools and test equipment.
Preceded by CATC's BTTracer™, a Bluetooth Protocol Analyzer, BTTrainer has been
designed as an intelligent Bluetooth wireless technology device that can be used as a
verification and validation tester or as an engineering debug and analysis tool. Through its
software interface, designers and test technicians will be able to quickly and easily issue
protocol commands and test sequences to analyze or validate designs to ensure compliance
to the Bluetooth specification. BTTrainer can be used in conjunction with the BTTracer
protocol analyzer, allowing for real-time captures of test sequence results, as is required by
the Bluetooth SIG to provide evidence of product compliance to the specification.
1.1 Applications
BTTrainer is a combination of hardware and Microsoft® Windows®-based application
software. The hardware/software combination is capable of acting as a standard Bluetooth
master or slave device within a piconet. By allowing this capability, BTTrainer can be used
to establish or participate in a piconet and to send or receive data within the piconet.
Through BTTrainer’s Profile Wizard, users can quickly and easily manage Bluetooth
wireless traffic generation. Additionally, via its Command Generator, BTTrainer can issue
individual Bluetooth commands to a device under test, allowing a designer to focus his or
her effort on a specific function or group of functions related to the device. Furthermore,
users can quickly create test sequences with Script Manager, thus eliminating the difficulties
normally associated with the creation of complex test sequences.
1.2 BTTrainer User Interface
The BTTrainer user interface consists of the Main window, the Logs window at the bottom
of the screen, and the Device Status window on the left side of the screen.
The application’s primary tools are run within the Main window: Profile Wizard, Command
Generator, and Script Manager.
Each tool offers a different means of generating traffic.
Note: Only one tool can be run at a time.
• Profile Wizard is a point-and-click tool for creating connections and transferring data
between BTTrainer and other Bluetooth devices. This tool requires little Bluetooth
wireless technology experience and allows you to generate Bluetooth traffic without
having to execute specific Bluetooth commands.
• Command Generator is a tool that presents a menu of protocol commands that can be
selected and executed in virtually any sequence. Command Generator thus offers maxi-
1
Page 20

CATC BTTRAINER 2.20 CHAPTER 1
User’s Manual Overview
mum control over the traffic generation process, but also requires familiarity with the
Bluetooth commands.
• Script Manager is a tool that provides an editor for writing and/or executing scripts
that will generate Bluetooth wireless traffic. With Script Manager, new scripts can be
written and saved, or existing scripts may be opened, edited, and run.
1.3 Key Features
• Plug-and-play USB connection between test system and test module
• External antenna can be removed to create wired piconet
• Audio connector for connecting audio devices, such as headsets
• Can operate as either a master or slave device in a piconet
• Graphical interface allows for easy selection of command parameters
• Wizard provided to reduce learning curve and memorization of command sequences
• Test modes provide for these Bluetooth wireless technology protocols: HCI, L2CAP,
SDP, RFCOMM, TCS, OBEX, BNEP, and TCI
• Scripting capability for establishment of predefined test sequences
• Support for LMP, Baseband, L2CAP, RFCOMM, SDP, BNEP test cases
• System information report provides details regarding device under test
• Works in tandem with the BTTracer analyzer to conveniently record entire session.
• Power-on self-diagnostics
• One year warranty and online customer support
Please refer to the Bluetooth Specification, version 1.1 for details on the Bluetooth wireless
technology protocol. The Bluetooth specification is available from the Bluetooth SIG at its
web site www.Bluetooth.org
1.4 Audio Connections
BTTrainer has a 2.5 mm audio stereo jack for plugging in headsets.
Headsets need to have a 2.5 mm plug with the following pinout:
1. Microphone (signal from headset; bias power of 2.5 V and maximum 1 mA provided
by BTTrainer on the same pin)
2. Speaker (signal to headset; speaker impedance needs to be >16 Ohm)
3. Ground
2
Page 21

CATC BTTRAINER 2.20 CHAPTER 1
User’s Manual Overview
The following headsets have been successfully tested with BTTrainer:
• RadioShack® 43-1957 Super Lightweight Hands-Free Headset
• GN Netcom® GNX Mobile M200
• Motorola® Retractable Hands-Free Headset Model # 98196G
• Belkin® Universal 2.5 mm Personal Hands-Free Kit F8V920-PL
• Coby® CV-M20 Earphone with Built-In Microphone
• Plantronics® CHS122N Hands-Free Headset
• Plantronics M110 Headset for Cordless and Mobile Phones
1.5 Specifications
The following specifications describe a BTTrainer system.
1.5.1 Package
Connectors: Host connection (USB, type ‘B’)
Audio connection (2.5 millimeter audio stereo jack)
1.5.2 Environmental Conditions
Operating Range: 0 to 55 °C (32 to 131 °F)
Storage Range: -20 to 80 °C (-4 to 176 °F)
Humidity: 10 to 90%, non-condensing
1.5.3 Host Compatibility
Works with any PC equipped with a functioning USB port and a Microsoft Windows 98 SE,
Windows Me, Windows 2000, or Windows XP operating system.
1.5.4 Hardware Interfaces
• Standard USB Interface — connects to the host computer
• 2.4 GHz (ISM band) External Antenna.
• 2.5 mm audio stereo jack
1.6 Product Warranty
CATC offers a one-year limited warranty on its products.
3
Page 22

CATC BTTRAINER 2.20 CHAPTER 1
User’s Manual Overview
4
Page 23

CATC BTTRAINER 2.20 CHAPTER 2
User’s Manual Getting Started
CHAPTER 2: GETTING STARTED
This chapter describes how to install BTTrainer and its software. Both install easily in just
a few minutes. The BTTrainer software can be installed on most Windows-based personal
computer systems.
2.1 System Requirements
Please consult the readme document on the installation CD for the latest information on
system requirements.
2.2 Installing the Software and Starting the Program
The BTTrainer software can be installed from the BTTracer Suite installation CD-ROM or
from installation files downloaded from the CATC website.
2.2.1 Start the program
The BTTrainer can be started only if the BTTracer application is active and the hardware is
connected and turned on.
2.3 Displaying the On-Screen Help
Access the on-screen Help included with the BTTrainer application by selecting Help >
Help... from the menu bar.
5
Page 24
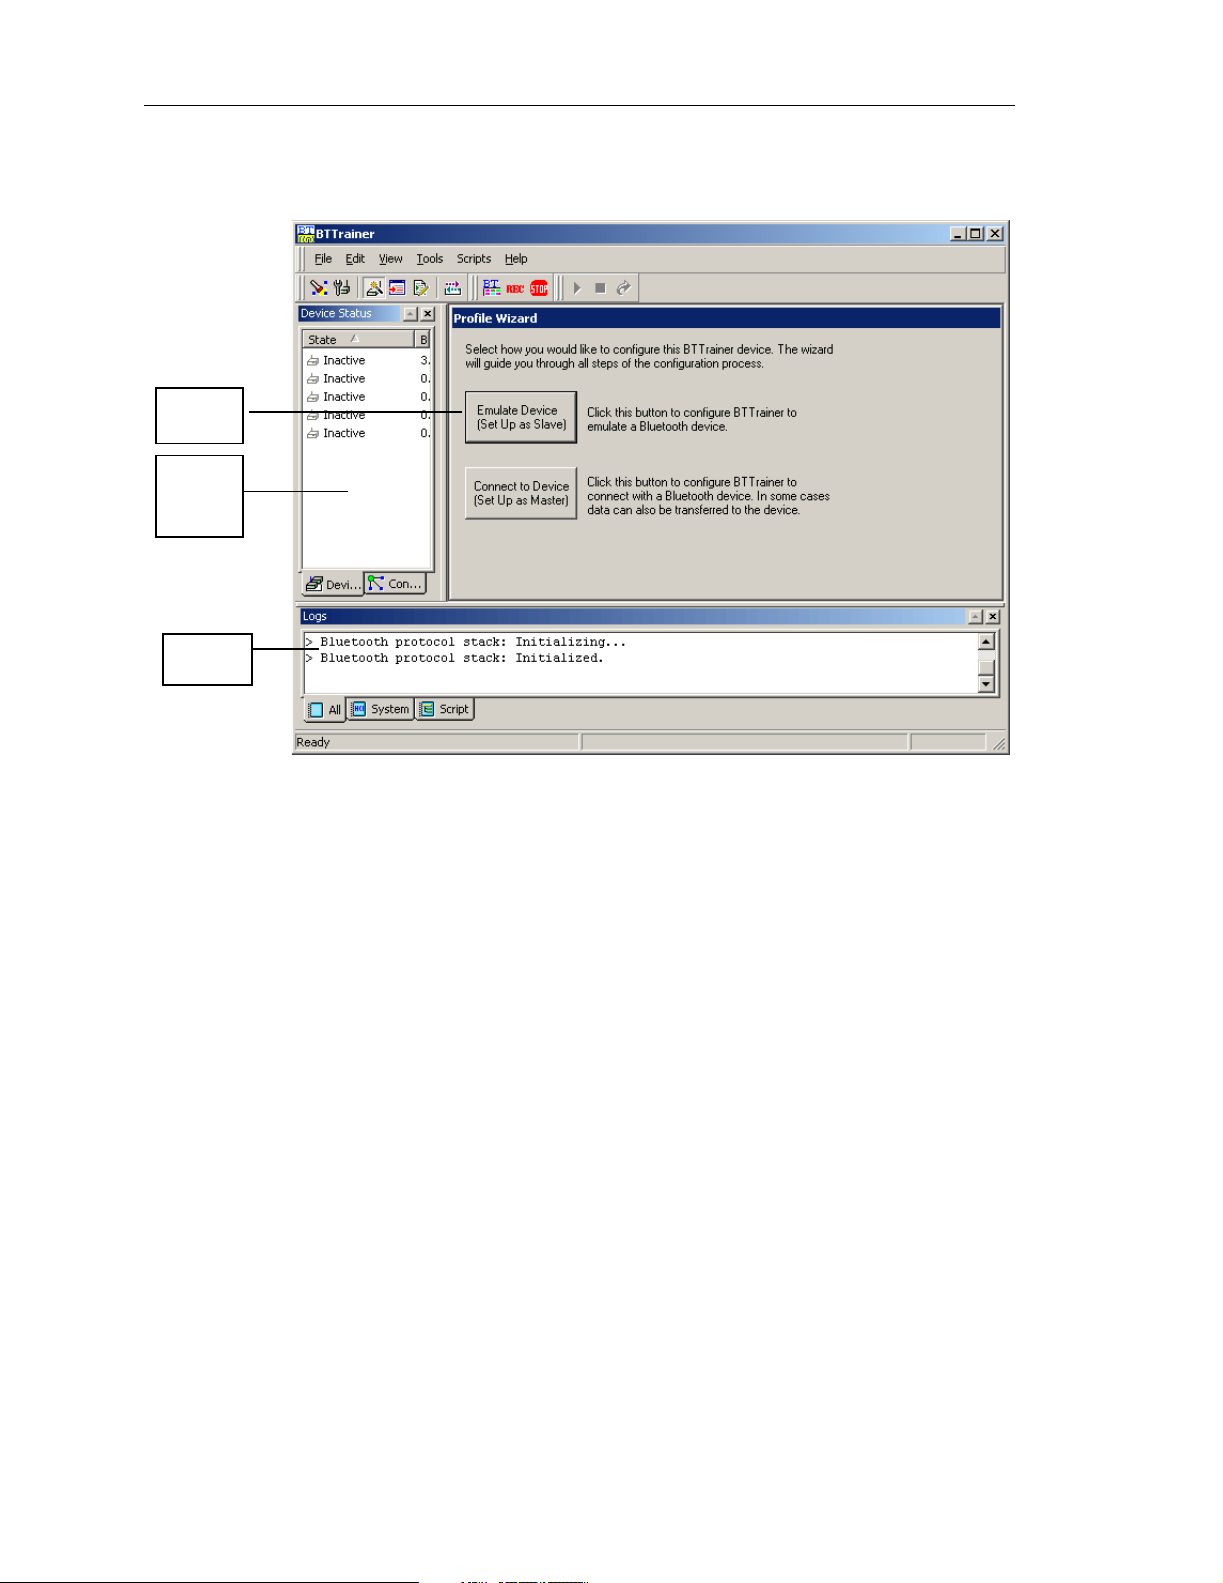
CATC BTTRAINER 2.20 CHAPTER 2
User’s Manual Getting Started
2.4 Application Layout
Main
Window
Device
Status
Window
Log
Window
The BTTrainer window is made up of the following:
• The Main window, where the primary tools are run: Profile Wizard, Command Generator, and Script Manager.
• Profile Wizard -- A simple, easy-to-use tool that guides you through the process of
establishing connections and generating traffic between BTTrainer and other
Bluetooth wireless technology devices.
• Command Generator -- A tool that allows Bluetooth commands to be issued in
any chosen sequence.
• Script Manager -- A notepad-like tool for writing and launching scripts that cause
BTTrainer to generate traffic.
Note: When switching between Profile Wizard, Command Generator and Script Manager, all connections
that have been established between BTTrainer and another Bluetooth device should be closed.
However, expert users may choose to leave the connections open. If a connection is left open and you
attempt to switch tools, BTTrainer will prompt you to close the connections. Choosing Disconnect All
will close the connections. Choosing Cancel will leave the connections open, but some commands
might not work properly in the other tool. When switching to Profile Wizard, any open connections
must be closed.
• The Device Status window is on the left side of the interface. It contains two tabs:
Device List, and Connections.
• Device List - Displays a list of devices that BTTrainer has discovered. It also
contains information about the devices found, such as the Bluetooth address, the
6
Page 25

CATC BTTRAINER 2.20 CHAPTER 2
User’s Manual Getting Started
state, the role, the class, and the device’s local name. This window is open by
default. These symbols in the list indicate a device’s state: C = Connected; i = In
Range. Right-clicking on a listed device opens the Device List Pop-Up Menu. The
menu presents the following options: Connect, Add Audio Connection, Get Device
Information, Delete, and Disconnect All. For details on using the Pop-Up Menu, see
Chapter 6., Device Search and Device List Pop-Up Menu, on page 55.
• Connections - Displays a hierarchical list of all connections between BTTrainer and
other devices. At the top of the list is the address of the connected device; below it
are the various channels established between BTTrainer and the device. Symbols: C
= Connection; H = HCI ACL; S = HCI SCO; L = L2CAP; R = RFCOMM; O =
OBEX.
• At the bottom of the interface is the Logs window, which contains tabs for the System
Log and the Script Log:
• System Log - Maintains a log of the commands issued by BTTrainer and the events
that ensue, such as a reply by another device.
• Script Log - Maintains a record of the commands issued by Script Manager and the
events resulting from these commands. If line numbers are referenced in the Script
Log, double-clicking on the line number will move the cursor to that line in the
Script Manager window.
• All Log - Maintains a record of all commands and events.
2.5 Menus
The menu bar at the top of the application window contains the following menus of
pull-down commands:
Table 2-1: File Menu Commands
Command Function
New Script Creates a new script file
Open Script... Opens a script file
Close Script Closes a script file
Save Script Saves a script file
Save Script As... Saves a script file with a specified name
Print Setup... Sets up the current or a new printer
Print Script... Prints a script file
Exit Exits the BTTrainer application
Table 2-2: Edit Menu Commands
Command Function
Undo Undoes last change
Cut Cuts text
Copy Copies text
7
Page 26

CATC BTTRAINER 2.20 CHAPTER 2
User’s Manual Getting Started
Table 2-2: Edit Menu Commands
Command Function
Paste Pastes copied or cut text
Select All Selects all text
Find... Finds specified string
Find Next Repeats last find action
Replace... Searches for a string and replaces it with a new string
Table 2-3: View Menu Commands
Command Function
BTTrainer Toolbar Shows or hides the BTTrainer toolbar
BTTracer Analyzer Toolbar Shows or hides the BTTracer Analyzer toolbar
Device Status Shows or hides the Device Status window
Logs Shows or hides the Logs window
Status Bar Shows or hides the status bar
Table 2-4: Log Menu Commands
Command Function
Copy Selected Log Text Copies selected log text to the clipboard
Select All Log Text Selects all log text in the open log window
Clear Log Window Clears all text from the open log window
Save Log As... Saves log file to new name and/or directory
Print Log... Prints all text from the open log window
Table 2-5: Tools Menu Commands
Command Function
Device Search Opens the Device Search dialog box
Profile Wizard Opens Profile Wizard
Command Generator Opens Command Generator
Script Manager Opens Script Manager
Data Transfer Manager Opens Data Transfer Manager
Table 2-6: Help Menu Commands
Command Function
Help... Displays online Help
Update License... Opens the Update License dialog, which is used to install License
Keys. License Keys must be obtained from CATC.
Display License Information... Displays maintenance expiration and features data for BTTrainer.
About BTTrainer Displays version information about BTTrainer.
8
Page 27
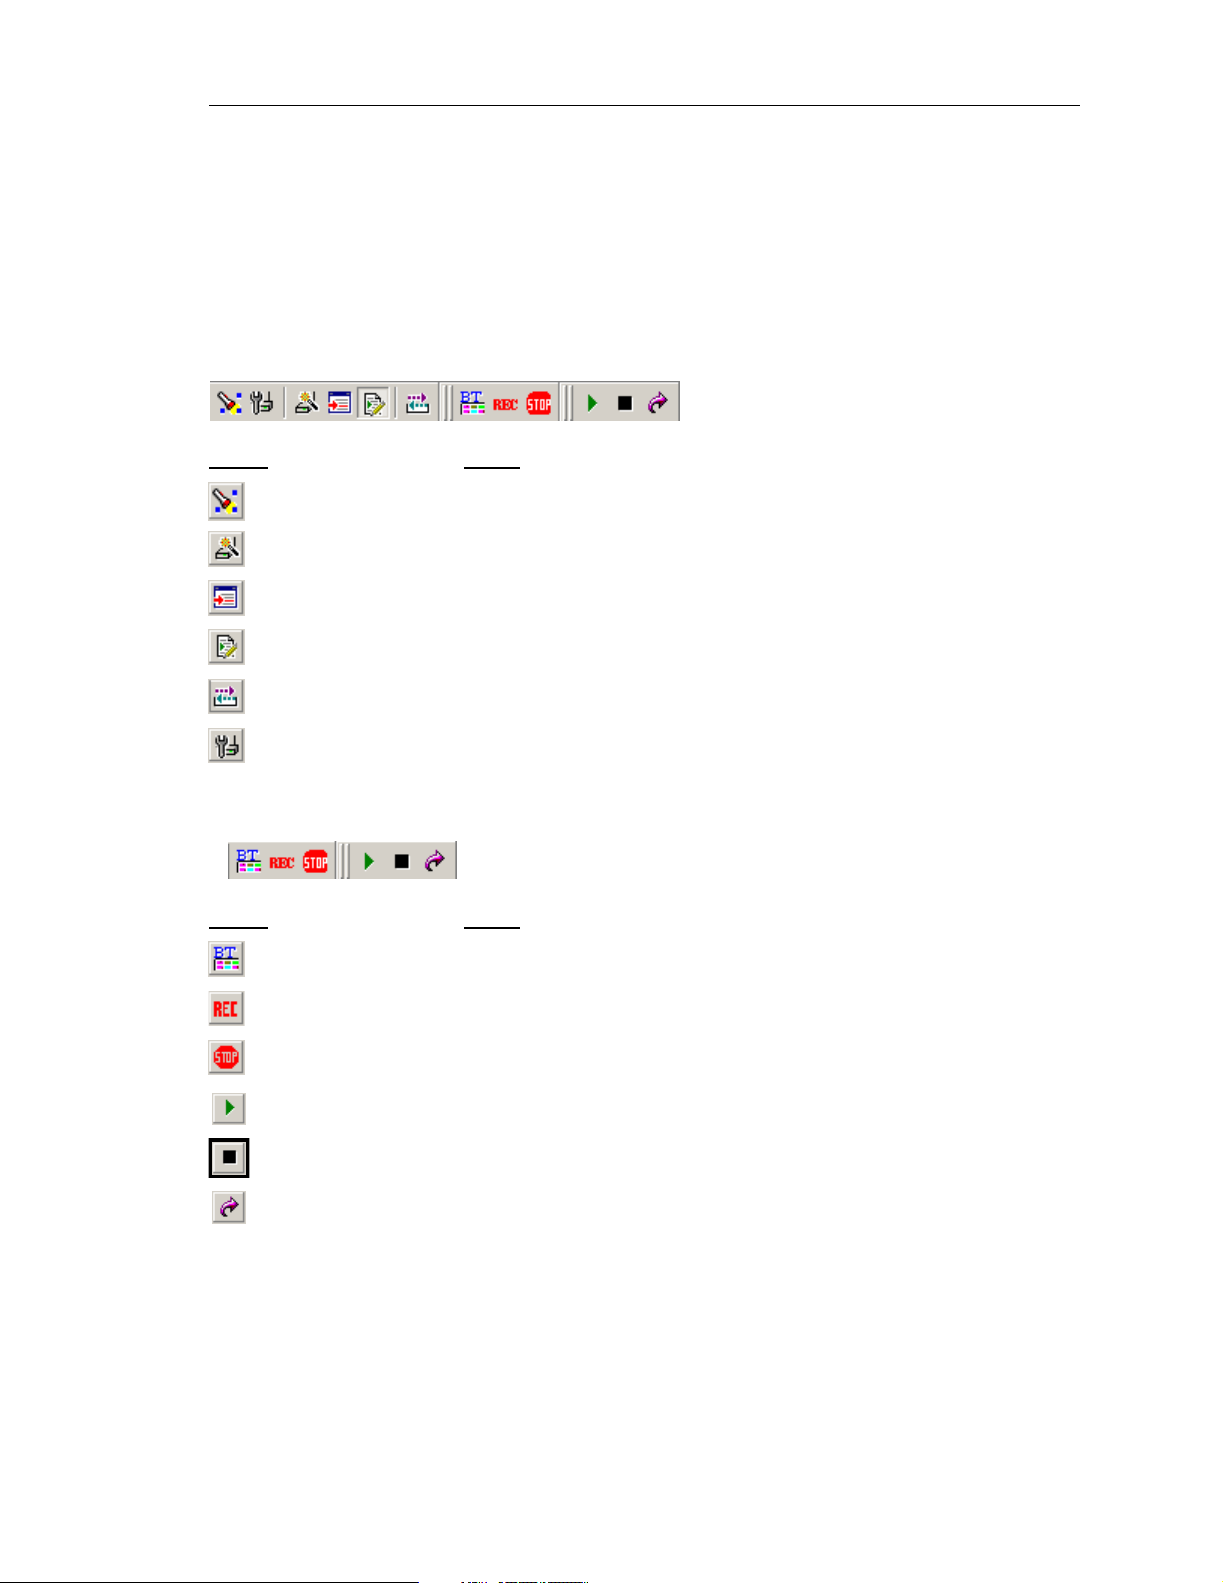
CATC BTTRAINER 2.20 CHAPTER 2
User’s Manual Getting Started
2.6 Toolbars
There are two toolbars in the BTTrainer user interface: BTTrainer toolbar and BTTracer
Analyzer toolbar. The Toolbar buttons provide access to frequently-used program functions.
Tool tips describe icon functionality as the mouse pointer is moved over an item.
2.6.1 BTTrainer Toolbar
Button Action
Opens the Device Search dialog
Opens ProfileWizard
Opens Command Generator
Opens Script Manager
Opens the Data Transfer Manager dialog
Opens the Local Device Manager dialog
2.6.2 BTTrainer Bluetooth Analyzer Toolbar
Button Action
Displays BTTracer application
Starts a BTTracer recording session
Stops a BTTracer recording session
Start Script execution
Stop Script execution
Goto - Opens a Goto dialog box for navigating to specific lines within the
script
2.7 Tool Tips
For most of the buttons and menus, tool tips provide useful information.
9
Page 28

CATC BTTRAINER 2.20 CHAPTER 2
User’s Manual Getting Started
To display a tool tip, position the mouse pointer over an item. If a tooltip exists for the item,
it will pop up in a moment.
2.8 BTTrainer Keyboard Shortcuts
Several frequently-used operations are bound to keyboard shortcuts.
Table 2-7: Keyboard Shorcuts
Key Combination Operation Key Combination Operation
Ctrl + A Select all Ctrl + V Paste
Ctrl + C Copy Ctrl + W Close script
Ctrl + F Find Ctrl + X Cut
Ctrl + G Go to Ctrl + Z Undo
Ctrl + H Replace Home Jump to first character of line
Ctrl + I Indent End Jump to last character of line
Ctrl + N New script Ctrl + Home Jump to first character of file
Ctrl + O Open script Ctrl + End Jump to last character of file
Ctrl + P Print script... Ctrl + Backspace Delete previous word
Ctrl + R Run script F3 Find next
Ctrl + S Save script Alt + F4 Exit the application
2.9 License Information
Licensing information for BTTrainer may be viewed by selecting Help > Display License
Information... from the menu bar. The License Information window will open, displaying
the maintenance expiration and features data for BTTrainer.
10
Page 29
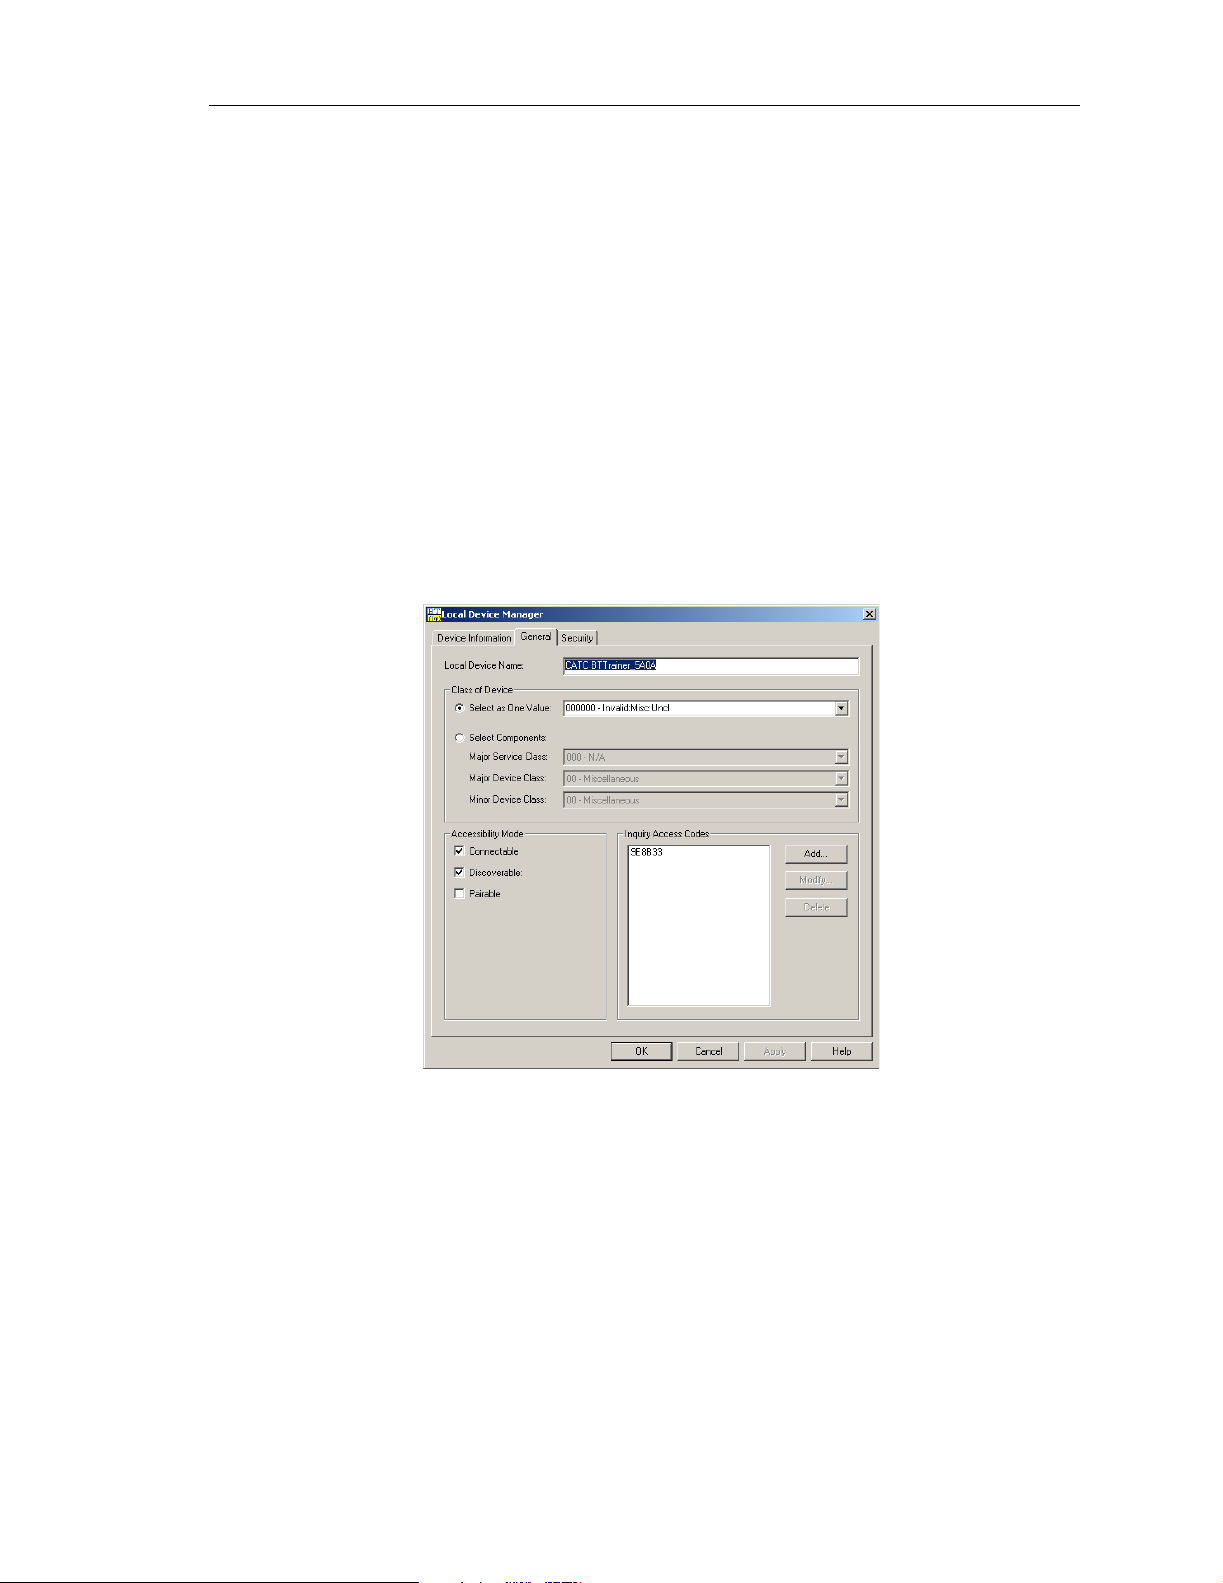
CATC BTTRAINER 2.20 CHAPTER 3
User’s Manual Local Device Manager
CHAPTER 3: LOCAL DEVICE MANAGER
The Local Device Manager is a tool for viewing and configuring generic access profile
settings for BTTrainer. Use the the Local Device Manager to control settings such as the
Local Device Name, Class of Device, Accessibility Mode, and Security aspects.
The Local Device Manager contains three tabs: General, Security, and Device Information.
The General tab is used to set the Device Name, Class of Device, Accessibility Mode, and
Inquiry Access Codes. The Security tab is used to configure security settings. The Device
Information tab displays details about many of the general access profile parameter settings
for BTTrainer.
3.1 General Settings
The General tab contains options for generic access profile settings.
Figure 3-1: General tab of the Local Device Manager
3.1.1 Device Name
The device name is the user-friendly name by which BTTrainer identifies itself. By default,
it uses the name BTTrainer.
To change BTTrainer’s Bluetooth device name, type a new name into the text box.
11
Page 30

CATC BTTRAINER 2.20 CHAPTER 3
User’s Manual Local Device Manager
3.1.2 Class of Device
The Class of Device (COD) settings define the Bluetooth Device Class and Bluetooth
Service Type with which BTTrainer will identify itself in response to inquiries from other
Bluetooth devices.
Select as one value
Use “Select as one value” to choose a pre-configured set of COD parameters.
To select COD settings as one value:
Step 1 Select the radio button marked “Select as one value.”
Step 2 Choose a set of COD parameters from the drop-down list or type in a COD
parameter value.
Step 3 Click Apply to apply the settings, or click OK to apply the settings and close
the Local Device Manager.
Select components
Use “Select components” to choose the Major Service Class, Major Device Class, and
Minor Device Class paramaters individually.
To select COD settings as individual component values:
Step 1 Select the radio button marked “Select components.”
Step 2 Choose a parameter from the Major Service Class drop-down list.
Step 3 Choose a parameter from the Major Device Class drop-down list.
Step 4 Choose a parameter from the Minor Service Class drop-down list.
Step 5 Click Apply to apply the settings, or click OK to apply the settings and close
the Local Device Manager.
3.1.3 Accessibility Mode
Accissibility Mode is used to set the Connectable, Discoverable, and Pairable Modes for
BTTrainer.
Connectable
BTTrainer can be put into connectable or non-connectable mode.
• Put BTTrainer in connectable mode by checking the Connectable checkbox and clicking
Apply to apply the settings, or OK to apply the settings and close the Local Device
Manager.
This causes BTTrainer to respond to paging from other Bluetooth devices.
• Put BTTrainer in non-connectable mode by unchecking the Connectable checkbox and
clicking Apply to apply the settings, or OK to apply the settings and close the Local
Device Manager.
12
Page 31

CATC BTTRAINER 2.20 CHAPTER 3
User’s Manual Local Device Manager
This prevents BTTrainer from responding to paging from other Bluetooth devices.
Discoverable
BTTrainer can be placed in discoverable or non-discoverable mode.
• Place BTTrainer in discoverable mode by checking the Discoverable checkbox, and
clicking Apply to apply the settings, or OK to apply the settings and close the Local
Device Manager.
• Place BTTrainer in non-discoverable mode by unchecking the Discoverable checkbox
and clicking Apply to apply the settings, or OK to apply the settings and close the Local
Device Manager.
BTTrainer will not respond to inquiries from other devices while in non-discoverable
mode.
Pairable
BTTrainer can put in pairable or non-pairable mode.
• Put BTTrainer in pairable mode by checking the Pairable checkbox, and clicking Apply
to apply the settings, or OK to apply the settings and close the Local Device Manager.
BTTrainer will accept pairing, or bonding, initiated by a remote device while in pairable
mode.
3.1.4 Inquiry Access Codes
The Inquiry Access Codes section is used to define the Inquiry Access Codes (IACs) that
BTTrainer will scan for when performing an inquiry.
Add an IAC
Step 1 Click Add.
The Add IAC dialog will open.
Step 2 Enter an IAC in the text box.
Values must be entered in hex, and they must be between 9E8B00–9E8B3F.
Step 3 Click OK.
The new value will be added to the list of IACs in the Local Device Manager.
Step 4 Click Apply to apply the settings, or click OK to apply the settings and close
the Local Device Manager.
Modify an IAC
Step 1 Select the IAC that you want to modify.
Note: You cannot modify the GIAC (0x9E8B33).
Step 2 Click Modify.
The Modify IAC dialog will open.
13
Page 32

CATC BTTRAINER 2.20 CHAPTER 3
User’s Manual Local Device Manager
Step 3 Edit the IAC in the text box.
Values must be entered in hex, and they must be between 9E8B00–9E8B3F.
Step 4 Click OK.
The new value will be displayed in the list of IACs in the Local Device
Manager.
Step 5 Click Apply to apply the settings, or click OK to apply the settings and close
the Local Device Manager.
Delete an IAC
Step 1 Select the IAC that you want to delete.
Note: You cannot delete the GIAC (0x9E8B33).
Step 2 Click Delete.
The value will be removed from the list of IACs in the Local Device
Manager.
Step 3 Click Apply to apply the settings, or click OK to apply the settings and close
the Local Device Manager.
3.2 Security Settings
The Security tab contains options for security settings.
Figure 3-2: Security tab of the Local Device Manager
14
Page 33

CATC BTTRAINER 2.20 CHAPTER 3
User’s Manual Local Device Manager
3.2.1 Security Mode
There are three Bluetooth security modes: security mode 1, security mode 2, and security
mode 3. Another option is not to use a security mode at all.
• Security mode 1 is the non-secure mode. When in this mode, devices do not initiate
security procedures.
• Security mode 2 is service-level enforced security. Devices in this mode initiate security
procedures after L2CAP channel establishment has ocurred.
• Security mode 3 is link-level enforced security. A device in this mode will initiate security procedures before L2CAP channel establishment has ocurred.
To set the security mode that BTTrainer will use:
Step 1 Select a security mode from the drop-down list.
Note: Security mode 2 is not currently supported in BTTrainer.
Step 2 (Optional) Check or uncheck “Use encryption” to configure whether
BTTrainer will implement encryption when communicating with other
devices.
Step 3 Click Apply to apply the settings, or click OK to apply the settings and close
the Local Device Manager.
3.2.2 Bonding Mode
Bluetooth bonding causes two devices to create, exchange, and store a common link key.
The devices store the link key and use it for authentication during future connections.
BTTrainer supports only the general bonding mode. BTTrainer sets the bonding mode based
on the security mode that has been selected.
Bonding is applied only if security mode 3 has been selected in the Local Device Manager.
3.2.3 PIN Codes
You may define the PIN codes that BTTrainer should use for specific devices.
Add a PIN Code
Note: PIN codes may also be added by specifying them when using Profile Wizard to connect to a device.
See Section 4.2, “Connecting to Devices” on page 21 for more information.
Step 1 Click Add.
The Add PIN Code dialog will open.
Step 2 Enter the Bluetooth device address (BD_ADDR) in the first text box. It must
be entered in hexadecimal, containing from 1-12 digits.
Note: To enter a default PIN code, enter the word “Default” instead of a
BD_ADDR.
15
Page 34

CATC BTTRAINER 2.20 CHAPTER 3
User’s Manual Local Device Manager
Step 3 Enter a PIN code in the second text box. Values must contain from 1-16
characters.
Step 4 Click OK.
The new address and PIN code will be added to the list in the Local Device
Manager.
Step 5 Click Apply to apply the settings, or click OK to apply the settings and close
the Local Device Manager.
Modify a PIN Code
Step 1 Click Modify.
The Modify PIN Code dialog will open.
Step 2 Edit the PIN code in the text box. Values must contain from 1-16 characters.
Step 3 Click OK.
The new value will be displayed in the list in the Local Device Manager.
Step 4 Click Apply to apply the settings, or click OK to apply the settings and close
the Local Device Manager.
Delete a PIN Code
Note: The default PIN code cannot be deleted while BTTrainer is using security mode 3.
Step 1 Select the PIN code that you want to delete.
Step 2 Click Delete.
The value will be removed from the list of PIN codes in the Local Device
Manager.
Step 3 Click Apply to apply the settings, or click OK to apply the settings and close
the Local Device Manager.
3.2.4 Link Keys
If BTTrainer has stored any link keys, you may delete them via the Local Device Manager.
To delete stored link keys:
Step 1 Click the Delete All Stored Link Keys button.
Step 2 Click OK in the pop-up message box to confirm the deletion.
16
Page 35

CATC BTTRAINER 2.20 CHAPTER 3
User’s Manual Local Device Manager
3.3 Device Information
The Device Information tab displays general access profile settings for BTTrainer.
Figure 3-3: Device Information tab of the Local
Device Manager
These parameter values are displayed on the Device Information tab of the Local Device
Manger:
• Local_BD_ADDR — The Bluetooth device address for BTTrainer. Every device has a
48-bit address (BD_ADDR) that uniquely identifies it.
• Local_Name — The user-friendly name for BTTrainer.
• Class_of_Device — This parameter indicates the Bluetooth Device Class and Bluetooth
Service Type with which BTTrainer will identify itself in response to inquiries from
other Bluetooth devices. The Major Service Class, Major Device Class, and Minor
Device Class are all included in this parameter.
• Accessibility_Mode — This value defines the discoverability and connectability modes
for BTTrainer.
• Local_Version_Information — The values of the verison information for BTTrainer.
• HCI Version: Indicates the Bluetooth HCI Specification used by BTTrainer. Can be
0x00 (Bluetooth HCI Specification 1.0B), 0x01 (Bluetooth HCI Specification 1.1),
or 0x02-0xfFF (reserved for future use).
• HCI Revision: The Current HCI revision in the BTTrainer hardware.
17
Page 36

CATC BTTRAINER 2.20 CHAPTER 3
User’s Manual Local Device Manager
• LMP Version: The Current Link Manager Protocol version (VersNr) in the
BTTrainer hardware. Can be 0 (Bluetooth LMP 1.0), 1 (Bluetooth LMP 1.1), or
2-255 (reserved for future use)
• Manufacturer Name: The name of the company (CompID) that created the LMP
Subversion.
• LMP Subversion: The Current Link Manager Protocol subversion in the BTTrainer
hardware.
• Connection_Accept_Timeout —The value of the Connection_Accept_Timeout parameter, which specifies the amount of time that BTTrainer will wait to to accept a connection after sending a connection request.
• Page_Timeout — The value of the Page_Reply_Timeout parameter, which specifies the
amount of time that BTTrainer will wait for a response to a connection request before
returning a connection failure.
• Page_Scan_Period_Mode — The value of the mandatory Page_Scan_Period_Mode
parameter, which specifies the value for the T_mandatory_pscan timer. Possible values:
• 0x00: PO
• 0x01: P1
• 0x02: P2
• 0x03–0xFF: Reserved
• Page_Scan_Mode — The value of the Page_Scan_Mode parameter, which is the default
page scan mode for BTTrainer. Possible values:
• 0x00: Mandatory Page Scan Mode
• 0x01: Optional Page Scan Mode I
• 0x02: Optional Page Scan Mode II
• 0x03: Optional Page Scan Mode III
• 0x04–0xFF: Reserved
• PIN_Type — The PIN type specified in the BTTrainer host controller. Possible values:
• 0x00: Variable PIN
• 0x01: Fixed PIN
• Authentication_Enable — The value of the Authentication_Enable parameter, which
specifies whether BTTrainer will try to authenticate a remote device at connection
setup. Possible values:
• 0x00: Authentication disabled
• 0x01: Authentication enabled for all connections
• 0x02–0xFF: Reserved
• Encryption_Mode — The value of the Encryption_Mode parameter, which specifies
whether BTTrainer requires encryption for connections with remote devices. Possible
values:
18
Page 37

CATC BTTRAINER 2.20 CHAPTER 3
User’s Manual Local Device Manager
• 0x00: Encryption disabled
• 0x01: Encryption only for point-to-point packets
• 0x02: Encryption for both point-to-point and broadcast packets
• 0x03–0xFF: Reserved
• PIN_Response_Enable — Specifies whether BTTrainer will supply PINs when
requested during authentication. Possible values:
• 0x00: Device will not supply PINs when requested during authentication.
• 0x01: Device will supply PINs when requested during authentication.
• Num_Supported_IACs — The number of Inquiry Access Codes (IACs) that BTTrainer
can listen for at the same time during an Inquiry Scan.
• CBuffer_Size — The maximum size of HCI SCO and ACL data packets supported by
the BTTrainer Host Controller, as well the the maximum number of such packets that
BTTrainer can store in its data buffer. Included parameters:
• HC_ACL_Data_Packet_Length: The maximum length, in bytes, of HCI ACL data
that BTTrainer can accept in one packet.
• HC_SCO_Data_Packet_Length: The maximum length, in bytes, of HCI SCO data
that BTTrainer can accept in one packet.
• HC_Total_Num_ACL_Data_Packets: The maximum number of HCI ACL data
packets that the BTTrainer Host Controller can store in its data buffer.
• HC_Total_Num_SCO_Data_Packets: The maximum number of HCI SCO data
packets that the BTTrainer Host Controller can store in its data buffer.
• Local_Supported_Features — A list of the supported features for BTTrainer.
19
Page 38

CATC BTTRAINER 2.20 CHAPTER 3
User’s Manual Local Device Manager
20
Page 39

CATC BTTRAINER 2.20 CHAPTER 4
User’s Manual Profile Wizard
CHAPTER 4: PROFILE WIZARD
Once BTTrainer is installed and running, it is ready to generate traffic.
The easiest way to generate traffic is to use Profile Wizard, a point-and-click tool for
creating connections and transferring data between BTTrainer and other Bluetooth wireless
technology devices. This tool requires little Bluetooth experience and allows you to
generate Bluetooth traffic without having to execute specific Bluetooth commands. Profile
Wizard manages the entire traffic generation process. Just follow the on-screen instructions
and BTTrainer will execute the Bluetooth commands needed to make the connection.
Profile Wizard allows you to configure BTTrainer to connect to or emulate several
Bluetooth devices. Profile Wizard provides options for devices that use these profiles:
• Dial-Up Gateway
•Fax Gateway
• File Transfer
• Hardcopy Cable Replacement Profile (HCRP) Server
• Headset, Headset Audio Gateway
• Local Area Network Access (LAN)
• Object Push
• Personal Area Networking–Group Ad-Hoc Network (PAN–GN)
• Personal Area Networking–Network Access Point Profile (PAN–NAP)
• Serial Port
4.1 Starting Profile Wizard
Click the Profile Wizard icon or select Tools > Profile Wizard from the menu bar.
Profile Wizard’s opening screen will be displayed in the main window.
4.2 Connecting to Devices
Choosing the “Connect to Device” option on the opening screen of Profile Wizard allows
you to configure BTTrainer to seek out other Bluetooth devices, connect to one of them, and
possibly exchange data with it. This option causes BTTrainer to act as the master device.
Note: To connect to a device that uses the Dial-Up Gateway, Fax Gateway, LAN, or Serial Port profile, you
will need to install the virtual COM port driver that is included with the BTTrainer installation. For
instructions, see “Installing the Virtual COM Port Driver” on page 39.
Step 1 Turn on the target device.
Step 2 Open Profile Wizard and click the Connect to Device button.
BTTrainer will perform a General Inquiry to collect information on local
devices, then list the devices that are found on the Select Device screen.
21
Page 40

CATC BTTRAINER 2.20 CHAPTER 4
User’s Manual Profile Wizard
(Optional) Uncheck “Skip Name Search” so that BTTrainer will not try to
discover the devices’ user-friendly names. This will speed up the search.
Note: If no devices are found, you can click Search to have BTTrainer repeat the
General Inquiry.
Step 3 Select device from list
From the list, select the device address to which you want BTTrainer to
connect.
Add address
Click the Add Address button in order to use an address that does not appear
in the list.
The Add Address dialog appears.
Enter the device address in 12-digit hexadecimal format. To enter a pin code
to use with the device, check the option “For connections with this device,
use the following PIN code” and then enter the code.
Click OK to close the dialog.
Add PIN code
To use a PIN code with a device that you selected from the list, click the
Enter PIN button to open the Enter PIN dialog.
Enter the PIN for the device, then click OK to close the dialog.
Step 4 Click Next.
You will advance to the Configure Security screen.
Step 5 Select the security option that you want to apply for the device.
• Do not apply authentication and encryption.
Authentication and encryption will not be used.
• Apply authentication and encryption.
The default authentication and encryption settings will be used.
• Use current authentication/encryption settings.
The authentication and encryption settings that are currently set in the
Local Device manager will be used.
• Display the Local Device Manager so I can configure security and verify
PIN codes myself.
This option allows you to access the Local Device Manager to manually
enter the security settings. If you choose this option, press Next to open
the Local Device Manager. When you close the dialog, 6 will be
performed automatically.
Step 6 Press Next.
BTTrainer will query the selected device to determine its profile. When the
query is complete, the Select Profile screen opens and displays a list of
profiles found.
22
Page 41

CATC BTTRAINER 2.20 CHAPTER 4
User’s Manual Profile Wizard
You can now refer to the section that describes the setup for the particular
profile that the target device uses:
• Section 4.2.1, “Connect to Device: Dial-Up Gateway” on page 23
• Section 4.2.2, “Connect to Device: Fax Gateway” on page 24
• Section 4.2.3, “Connect to Device: File Transfer” on page 25
• Section 4.2.4, “Connect to Device: HCRP Server” on page 26
• Section 4.2.5, “Connect to Device: Headset” on page 26
• Section 4.2.6, “Connect to Device: Headset Audio Gateway” on page 27
• Section 4.2.7, “Connect to Device: LAN” on page 28
• Section 4.2.8, “Connect to Device: Object Push” on page 28
• Section 4.2.9, “Connect to Device: PAN–GN” on page 29
• Section 4.2.10, “Connect to Device: PAN–NAP” on page 30
• Section 4.2.11, “Connect to Device: Serial Port” on page 31
4.2.1 Connect to Device: Dial-Up Gateway
Follow these steps to configure BTTrainer to connect to a Bluetooth device that uses the
Dial-Up Gateway profile.
Note: To connect to a device that uses the Dial-Up Gateway profile, you must install the virtual COM port
driver that is included with the BTTrainer installation. For instructions, see “Installing the Virtual COM
Port Driver” on page 39.
Step 1 Complete steps 1-6 in Section 4.2, “Connecting to Devices” on page 21.
Step 2 Select Dial-up Gateway from the list on the Select Profile screen.
(Optional) Select the Allow Role Switch option on the screen to enable
BTTrainer to switch roles during the connection.
Step 3 Click Next.
BTTrainer will establish a connection to the specified device.
Step 4 You can now send individual commands to the Dial-Up Gateway device via
the Profile Wizard interface or send data by using an external communication
application.
To send individual commands:
Use the Command combo box to manually enter a command or select one
from the drop-down list. You can also select a command from the Command
List and click Add in order to append the command to the current selection
in the combo box.
Press Send Cmd. The selected command will be sent to the remote device.
Each new command or combination of commands that you send during the
current session will be added to the drop-down list in the Command combo
box.
23
Page 42

CATC BTTRAINER 2.20 CHAPTER 4
User’s Manual Profile Wizard
To send data:
Note: A modem driver must be installed on the virtual COM port in order to use an
external application to send data through BTTrainer. See “Install a Modem
Driver on the Virtual COM Port” on page 40 to find out how to install the
driver. Once the driver is installed, you must configure the external
application to use that driver.
Note: An external dial-up communications application (such as Windows Dial-Up
Networking) must be installed on the host computer in order to perform this
operation.
Open the application and send the data. It will use the modem driver on the
virtual COM port to send the data to the Dial-Up Gateway device through
BTTrainer.
Enable or disable event logging:
You can configure BTTrainer to write incoming or outgoing data to the Event
Log by checking or unchecking the “Log Incoming Data” and “Log
Outgoing Data” options.
4.2.2 Connect to Device: Fax Gateway
The Fax Gateway option allows you to use a fax application to send to data to BTTrainer via
a virtual COM port. BTTrainer then uses Bluetooth to send the data to a device that uses the
Fax Gateway profile to send data over a fax modem.
Before attempting this, you must install the virtual COM port driver that is included with the
BTTrainer installation. For instructions, see “Installing the Virtual COM Port Driver” on
page 39.
Step 1 Complete steps 1-6 in Section 4.2, “Connecting to Devices” on page 21.
Step 2 Select Fax Gateway from the list on the Select Profile screen.
(Optional) Select the Allow Role Switch option on the screen to enable
BTTrainer to switch roles during the connection.
Step 3 Click Next.
BTTrainer will establish a connection to the specified device.
Step 4 You can now send individual commands to the Fax Gateway device or use
an external fax application to send data over the virtual COM port.
To send individual commands:
Enter a command in the combo box and press the Send Cmd button. Each
command that you enter during the current session will be added to the
drop-down list in the combo box.
To send fax data:
24
Page 43

CATC BTTRAINER 2.20 CHAPTER 4
User’s Manual Profile Wizard
Note: A modem driver must be installed on the virtual COM port in order to use a
fax application to send data through BTTrainer. See“Install a Modem Driver
on the Virtual COM Port” on page 40 to find out how to install the driver.
Once the driver is installed, you must create a fax printer and configure it to
use the driver that you have installed.
Note: A fax application must be installed on the host computer in order to perform
this operation.
Open the fax application and send a fax. It will use the modem driver on the
virtual COM port to send the data to the Fax Gateway device through
BTTrainer.
Enable or disable event logging:
You can configure BTTrainer to write incoming or outgoing data to the Event
Log by checking or unchecking the “Log Incoming Data” and “Log
Outgoing Data” options.
4.2.3 Connect to Device: File Transfer
These steps show how to configure BTTrainer to connect to and transfer data with a
Bluetooth device that uses the File Transfer profile. This allows you to browse the
directories on the device, transfer files to or from the device, and delete files or create new
folders in the device’s file system.
Step 1 Complete steps 1-6 in Section 4.2, “Connecting to Devices” on page 21.
Step 2 Select File Transfer from the list on the Select Profile screen.
(Optional) Select the Allow Role Switch option on the screen to enable
BTTrainer to switch roles during the connection.
Step 3 Click Next.
BTTrainer will establish an OBEX connection with the device, and the
Wizard will advance to the File Transfer screen.
Step 4 You can now perform the following on either the remote device or the local
device (BTTrainer):
• Create a new folder — To create a new folder in either device’s file
directory, right-click on the directory level in which you wish to place the
new folder, then choose “Create new folder” from the menu that pops up.
The Enter Folder Name dialog will appear. Type in a name for the new
folder, then click OK. The new folder will appear in the chosen directory.
• Get or Put a file — To create a new folder in either device’s file directory,
right-click on the directory level in which you wish to place the new
folder, then choose “Create new folder” from the menu that pops up.
The Enter Folder Name dialog will appear. Type in a name for the new
folder, then click OK. The new folder will appear in the chosen directory.
25
Page 44

CATC BTTRAINER 2.20 CHAPTER 4
User’s Manual Profile Wizard
• Delete a file — To create a new folder in either device’s file directory,
right-click on the directory level in which you wish to place the new
folder, then choose “Create new folder” from the menu that pops up.
The Enter Folder Name dialog will appear. Type in a name for the new
folder, then click OK. The new folder will appear in the chosen directory.
4.2.4 Connect to Device: HCRP Server
This section explains how to use Profile Wizard to configure BTTrainer to connect to a
Hardcopy Cable Replacement Profile server, send commands to it, and send a file to print.
Step 1 Complete steps 1-6 in Section 4.2, “Connecting to Devices” on page 21.
Step 2 Select HCRP Server from the list on the Select Profile screen.
(Optional) Select the Allow Role Switch option on the screen to enable
BTTrainer to switch roles during the connection.
Step 3 Press Next.
BTTrainer will establish an L2CAP connection with the device, and the
Wizard will advance to the HCRP client screen.
Step 4 You can send individual commands to the HCRP server, or specify a file to
transfer to the server for printing.
Send an individual command:
(a) Select a command from the drop-down list.
(b) Click Send Cmd.
Select a file to transfer:
(a) Click Browse.
The Open dialog will come up.
(b) Use the Open dialog to browse the file that you want to transfer, then click Open.
The file’s name and directory path will be shown in the Select File to Transfer for
Printing box.
(c) Click Start Transfer to send the selected file to the server.
4.2.5 Connect to Device: Headset
The following steps show how to configure BTTrainer to connect to and transfer audio with
a Bluetooth headset that uses the Headset profile.
Note: In order to verify that BTTrainer and a Bluetooth audio device are successfully connected, a headset
will need to be plugged into the audio port on BTTrainer. Be sure that the headset is plugged in before
starting configuration and initializing the connection between BTTrainer and the headset. To learn
about attaching a headset to BTTrainer, please see “Audio Connections” on page 2.
Step 1 Complete steps 1-6 in Section 4.2, “Connecting to Devices” on page 21.
Step 2 Select Headset from the list on the Select Profile screen.
26
Page 45

CATC BTTRAINER 2.20 CHAPTER 4
User’s Manual Profile Wizard
(Optional) Select the Allow Role Switch option on the screen to enable
BTTrainer to switch roles during the connection.
Step 3 Click Next.
The Wizard will advance to the Connection Status screen, and BTTrainer
will attempt to establish an RFCOMM connection to the device.
If the connection attempt is successful, the Connection Status screen will
show that BTTrainer has established an RFCOMM connection with the
device. BTTrainer will automatically ring the target device and wait for an
answer. Pressing the Ring button will cause BTTrainer to ring the device
again.
When the target device answers, BTTrainer will establish an SCO
connection with it.
Note: If you cannot establish a connection, you can re-attempt the connection by
either pressing Back and re-running the previous two steps, or by pressing the
Connect button again.
Note: The Speaker and Microphone Volume levels can be adjusted by moving the
sliders up or down. The level is indicated by a number, from 0 to 15, to the
left of each slider.
Step 4 (Optional) Click the Disconnect button on the Connection Status screen to
close the connection.
The connection between BTTrainer and the device will terminate, and the
Connect button will again be available. Selecting Connect will reestablish
the connection.
4.2.6 Connect to Device: Headset Audio Gateway
The following steps show how to configure BTTrainer to connect to and transfer audio with
a Bluetooth headset that uses the Headset Audio Gateway profile.
Note: In order to verify that BTTrainer and a Bluetooth audio device are successfully connected, a headset
will need to be plugged into the audio port on BTTrainer. Be sure that the headset is plugged in before
starting configuration and initializing the connection between BTTrainer and the headset. To learn
about attaching a headset to BTTrainer, please see “Audio Connections” on page 2.
Step 1 Complete steps 1-6 in Section 4.2, “Connecting to Devices” on page 21.
Step 2 Select Headset Audio Gateway from the list on the Select Profile screen.
(Optional) Select the Allow Role Switch option on the screen to enable
BTTrainer to switch roles during the connection.
Step 3 Click Next.
The Wizard will advance to the Connection Status screen, and BTTrainer
will attempt to establish a connection to the device.
If the connection attempt is successful, the Connection Status screen will
show that BTTrainer has established a connection with the device.
27
Page 46

CATC BTTRAINER 2.20 CHAPTER 4
User’s Manual Profile Wizard
Note: If you cannot establish a connection, you can re-attempt the connection by
either pressing Back and re-running the previous two steps, or by pressing the
Connect button again.
Note: The Speaker and Microphone Volume levels can be adjusted by moving the
sliders up or down. The level is indicated by a number, from 0 to 15, to the
left of each slider.
Step 4 To verify that BTTrainer and the Bluetooth device are successfully
connected, speak into the microphone on one device and listen for audio on
the other.
At this point, the audio signal should transfer to the headset. Listen to the
headset to see if the data transfer is successful.
Step 5 (Optional) Click the Disconnect button on the Connection Status screen to
close the connection.
The connection between BTTrainer and the device will terminate, and the
Connect button will again be available. Selecting Connect will reestablish
the connection.
4.2.7 Connect to Device: LAN
This section explains how to configure BTTrainer to establish an RFCOMM connection to
a device that uses the Local Area Network Access profile.
Note: To connect to a device that uses the LAN profile, you will need to install the virtual COM port driver
that is included with the BTTrainer installation. For instructions, See “Installing the Virtual COM Port
Driver” on page 39.
Step 1 Complete steps 1-6 in Section 4.2, “Connecting to Devices” on page 21.
Step 2 Select LAN from the list on the Select Profile screen.
(Optional) Select the Allow Role Switch option on the screen to enable
BTTrainer to switch roles during the connection.
Step 3 Click Next.
The Wizard will advance to the Connection Status screen.
4.2.8 Connect to Device: Object Push
BTTrainer can be configured to transfer files to a Bluetooth wireless device that complies
with the Object Push profile. This section shows how to configure BTTrainer to connect and
transfer files to a Bluetooth device that supports Object Push.
Step 1 Complete steps 1-6 in Section 4.2, “Connecting to Devices” on page 21.
Step 2 Select Object Push from the list on the Select Profile screen.
(Optional) Select the Allow Role Switch option on the screen to enable
BTTrainer to switch roles during the connection.
Step 3 Press Next.
The Select Data for Transfer screen will open:
28
Page 47

CATC BTTRAINER 2.20 CHAPTER 4
User’s Manual Profile Wizard
Step 4 On the Select Data for Transfer screen, there are options to transfer a file or
to transfer text.
• To transfer a file: Select the radio button next to “Transfer this file.” Type
in a filename or locate the file by clicking the Browse button to access
the Open dialog. By default, the filename in the “Send data to the
following file on the receiving device” box matches the name of the file
to be transferred. If desired, enter a different filename in that box. When
the desired file and target file's name have been entered, proceed to Step 7.
• To transfer text: Select the radio button next to “Transfer this text.” Enter
text in the text box. By default, the filename in the “Send data to the
following file on the receiving device” box is “mw001.txt.” If desired,
enter a different target filename. When the desired text and target file's
name have been entered, proceed to Step 7.
Step 5 Click Next.
The Transferring File screen will appear. First, a connection with the remote
device will be established, and then data will begin transferring. A progress
bar will show what percentage of the transfer has gone through. Click Stop
Transfer to abort a transfer at any time.
When the transfer is complete, BTTrainer will disconnect from the target
device:
At this point, you can click Back to transfer another file, or click Restart to
start a new Profile Wizard session.
4.2.9 Connect to Device: PAN–GN
These steps explain how to use Profile Wizard to configure BTTrainer to connect to a
Bluetooth device that supports the Personal Area Network–Group Ad-Hoc Network profile.
Note: To connect to a device that uses the PAN profile, you must install the virtual network driver that is
included with the BTTrainer installation. For instructions, see Section 4.7, “Installation of Network
Driver,” on page 41.
Step 1 Complete steps 1-6 in Section 4.2, “Connecting to Devices” on page 21.
Step 2 Select PAN - GN from the list on the Select Profile screen.
(Optional) Select the Allow Role Switch option on the screen to enable
BTTrainer to switch roles during the connection.
Step 3 Click Next.
The Wizard will advance to the Connection Status screen. BTTrainer will
attempt to establish an ACL connection to the remote device, and then open
a BNEP connection to it. BTTrainer will then send a Setup Connection
Request Message. When BTTrainer receives the Setup Connection
Response Message from the remote device, network services may be
accessed.
29
Page 48

CATC BTTRAINER 2.20 CHAPTER 4
User’s Manual Profile Wizard
Step 4 You can now perform the following operations:
• Send Control Packet: Use this to select a filter control message to send
to the remote device. You may send either a Filter Network Protocol Type
message or a Filter Multicast Address Type message control packet to the
remote device.
Start Range and End Range: Start Range defines the beginning of the
range, and End Range defines the end of the range. Only the protocol
types or multicast addresses that fall within the range will be sent by the
remote device; all other types or addresses will be filtered out.
For Filter Network Type Set Message, the Start and End Ranges may be
in the format nnnn or 0xnnnn. For the Filter Multicast Address Set
Message, the Start and End Ranges can be in the format nnnnnnnnnnnn
or 0xnnnnnnnnnnnn.
• Send Packet: Use this to send an ethernet packet to the remote device.
The types of ethernet packets that can be sent are General, Compressed,
Compressed Source Only and Compressed Destination Only.
Note: Depending on your network settings for ‘CATC Bluetooth Trainer PAN Virtual NIC’ Local
Connection, Windows may create additional network traffic over this connection. Check your
network properties for ‘CATC Bluetooth Trainer PAN virtual NIC.’
4.2.10 Connect to Device: PAN–NAP
Follow these steps to configure BTTrainer to connect to a Bluetooth device that
supports the Personal Area Network–Network Access Point profile.
Note: To connect to a device that uses the PAN profile, you must install the virtual network driver that is
included with the BTTrainer installation. For instructions, see Section 4.7, “Installation of Network
Driver,” on page 41.
Step 1 Complete steps 1-6 in Section 4.2, “Connecting to Devices” on page 21.
Step 2 Select PAN - NAP from the list on the Select Profile screen.
(Optional) Select the Allow Role Switch option on the screen to enable
BTTrainer to switch roles during the connection.
Step 3 Click Next.
The Wizard will advance to the Connection Status screen. BTTrainer will
attempt to establish an ACL connection to the remote device, and then open
a BNEP connection to it. BTTrainer will then send a Setup Connection
Request Message. When BTTrainer receives the Setup Connection
Response Message from the remote device, network services may be
accessed.
Step 4 You can now perform the following operations:
30
Page 49

CATC BTTRAINER 2.20 CHAPTER 4
User’s Manual Profile Wizard
• Send Control Packet: Use this to select a filter control message to send
to the remote device. You may send either a Filter Network Protocol Type
message or a Filter Multicast Address Type message control packet to the
remote device. The only types of network filtering allowed are ARP
(0806) and IPv4 (0800).
Start Range and End Range: Start Range defines the beginning of the
range, and End Range defines the end of the range. Only the protocol
types or multicast addresses that fall within the range will be sent by the
remote device; all other types or addresses will be filtered out.
For Filter Network Type Set Message, the Start and End Ranges may be
in the format nnnn or 0xnnnn. For the Filter Multicast Address Set
Message, the Start and End Ranges can be in the format nnnnnnnnnnnn
or 0xnnnnnnnnnnnn.
• Send Packet: Use this to send an ethernet packet to the remote device.
The types of ethernet packets that can be sent are General, Compressed,
Compressed Source Only and Compressed Destination Only.
Note: Depending on your network settings for ‘CATC Bluetooth Trainer PAN Virtual NIC’ Local
Connection, Windows may create additional network traffic over this connection. Check your
network properties for ‘CATC Bluetooth Trainer PAN virtual NIC.’
4.2.11 Connect to Device: Serial Port
These steps describe how to use Profile Wizard to configure BTTrainer to connect to a
device that uses the Serial Port profile for serial port emulation.
Note: To connect to a device that uses the Serial Port profile, you will need to install the virtual COM port
driver that is included with the BTTrainer installation. For instructions, see “Installing the Virtual COM
Port Driver” on page 39.
Step 1 Complete steps 1-6 in Section 4.2, “Connecting to Devices” on page 21.
Step 2 Select Serial Port from the list on the Select Profile screen.
(Optional) Select the Allow Role Switch option on the screen to enable
BTTrainer to switch roles during the connection.
Step 3 Click Next.
The Wizard will advance to the Connection Status screen, and BTTrainer
will attempt to establish a connection to the device.
If the connection attempt is successful, the Connection Status screen will
show that BTTrainer has established a connection with the device.
Note: If you cannot establish a connection, you can re-attempt the connection by
either pressing Back and re-running the previous two steps, or by pressing the
Connect button on the Connection Status screen.
Step 4 Use an external application to send data to the remote device.
31
Page 50

CATC BTTRAINER 2.20 CHAPTER 4
User’s Manual Profile Wizard
Note: A modem driver must be installed on the virtual COM port in order to use an
external application to send data through BTTrainer. See “Install a Modem
Driver on the Virtual COM Port” on page 40 to find out how to install the
driver. Once the driver is installed, you must configure the external
application to use that driver.
Open the application and send the data. It will use the modem driver on the
virtual COM port to send the data to the Serial Port device through
BTTrainer.
4.3 Emulating Devices
Choosing the “Emulate Device” option on the opening screen of Profile Wizard allows you
to configure BTTrainer to emulate a Bluetooth wireless device. This option causes
BTTrainer to act as a slave device.
Step 1 Open Profile Wizard and click the Emulate Device button.
The Select Profile screen will open.
Step 2 Select a profile from the list and click Next.
You will advance to the Configure Security screen.
Step 3 Select the security option that you would like to apply for the device.
• Do not apply authentication and encryption.
Authentication and encryption will not be used.
• Apply authentication and encryption.
The default authentication and encryption settings will be used.
• Use current authentication/encryption settings.
The authentication and encryption settings that are currently set in the
Local Device manager will be used.
• Display the Local Device Manager so I can configure security and verify
PIN codes myself.
This option allows you to access the Local Device Manager to manually
enter the security settings. If you choose this option, press Next to open
the Local Device Manager. When you close the dialog, Step 4 will be
performed automatically.
Step 4 Press Next.
At this point, please refer to the section that describes the setup for the
particular profile that the target device uses:
• Section 4.3.1, “Emulate Device: Dial-Up Gateway” on page 33
• Section 4.3.2, “Emulate Device: Fax Gateway” on page 34
• Section 4.3.3, “Emulate Device: File Transfer” on page 34
• Section 4.3.4, “Emulate Device: HCRP Server” on page 35
• Section 4.3.5, “Emulate Device: Headset” on page 35
32
Page 51

CATC BTTRAINER 2.20 CHAPTER 4
User’s Manual Profile Wizard
• Section 4.3.6, “Emulate Device: Headset Audio Gateway” on page 36
• Section 4.3.7, “Emulate Device: LAN” on page 36
• Section 4.3.8, “Emulate Device: Object Push” on page 37
• Section 4.3.9, “Emulate Device: PAN - GN” on page 37
• Section 4.3.10, “Emulate Device: PAN - NAP” on page 38
• Section 4.3.11, “Emulate Device: Serial Port” on page 39
4.3.1 Emulate Device: Dial-Up Gateway
These steps show how to use Profile Wizard to configure BTTrainer to emulate a dial-up
gateway device.
Step 1 Complete Steps 1-4 in Section 4.3, “Emulating Devices” on page 32.
The Select Dial-Up Emulation screen will open.
Step 2 You may choose to configure BTTrainer to emulate a dial-up gateway device
while connected to or emulating a modem or while connected to a virtual
COM port.
To connect to a modem:
(a) Select “Connect to modem” and choose a modem from the list.
(b) Press Next.
At this point, initialize a connection to BTTrainer from a Bluetooth device that uses the
Dial-Up Gateway profile. When the connection has been established, the modem status
can be observed via the status lights.
(c) (Optional) Enable or disable event logging:
You can configure BTTrainer to write incoming or outgoing data to the Event Log by
checking or unchecking the “Log Incoming Data” and “Log Outgoing Data” options.
To emulate a modem:
(a) Select “Emulate modem.”
(b) Press Next.
At this point, initialize a connection to BTTrainer from a Bluetooth device that uses the
Dial-Up Gateway profile. When the connection has been established, the modem status
can be observed via the status lights.
(c) Use the Response combo box to manually send modem responses to the device. You can
choose a response from the drop-down list or enter them manually. Check
“Automatically send response when cmd is received” so that the currently highlighted
response will be sent automatically.
To connect to virtual COM port:
Note: To connect to a virtual COM port, you will need to install the virtual COM
port driver that is included with the BTTrainer installation. For instructions,
see “Installing the Virtual COM Port Driver” on page 39.
(a) Select “Connect to virtual COM port.”
33
Page 52

CATC BTTRAINER 2.20 CHAPTER 4
User’s Manual Profile Wizard
(b) Press Next.
At this point, initialize a connection to BTTrainer from a Bluetooth device that uses the
Dial-Up Gateway profile. When the connection has been established, you can use an
external application to communicate with the device via BTTrainer.
4.3.2 Emulate Device: Fax Gateway
The following steps show how to configure BTTrainer to emulate a fax gateway device.
Step 1 Complete Steps 1-4 in Section 4.3, “Emulating Devices” on page 32.
The select Fax Emulation screen will open.
Step 2 You may choose between configuring BTTrainer to emulate a fax gateway
device while connected to a modem or while connected to a virtual COM
port.
To connect to a modem:
(a) Select “Connect to modem” and choose a modem from the list.
(b) Press Next.
At this point, initialize a connection to BTTrainer from a Bluetooth device that uses the
Fax Gateway profile. When the connection has been established, the modem status can
be observed via the status lights.
(c) (Optional) Enable or disable event logging:
You can configure BTTrainer to write incoming or outgoing data to the Event Log by
checking or unchecking the “Log Incoming Data” and “Log Outgoing Data” options.
To connect to virtual COM port:
Note: To connect to a virtual COM port, you will need to install the virtual COM
port driver that is included with the BTTrainer installation. For instructions,
see “Installing the Virtual COM Port Driver” on page 39.
(a) Select “Connect to virtual COM port” and choose the fax classes that BTTrainer will
support during emulation.
(b) Press Next.
At this point, initialize a connection to BTTrainer from a Bluetooth device that uses the
Fax Gateway profile. When the connection has been established, you can use an external
application to communicate with the device via BTTrainer.
4.3.3 Emulate Device: File Transfer
Follow these steps to configure BTTrainer to emulate a Bluetooth device that supports the
File Transfer profile.
Step 1 Complete Steps 1-4 in Section 4.3, “Emulating Devices” on page 32.
The File Transfer Emulation screen will open.
Step 2 (Optional) Use the Change... button to change the root folder that the remote
device will access.
Step 3 Direct the remote device to connect to BTTrainer.
An OBEX connection will be established between the device and BTTrainer.
34
Page 53

CATC BTTRAINER 2.20 CHAPTER 4
User’s Manual Profile Wizard
Step 4 At this point, you may transfer files to the root folder from the remote device.
4.3.4 Emulate Device: HCRP Server
This section explains how to use Profile Wizard to set up BTTrainer to emulate an HCRP
server.
Step 1 Complete Steps 1-4 in Section 4.3, “Emulating Devices” on page 32.
The Printer Emulation screen will open.
Step 2 You can now do any of the following:
• Change the folder in which transferred files are stored: Click the
Change... button to open the Browse for Folder dialog. Select the folder
in which you want transferred files to be stored. Click OK to confirm the
change.
• Change the maximum size for data credits: Click the Change maximum
size... button to open the Change Data Credit Maximum Size dialog. Type
in a new credit size, in bytes. Click OK to confirm the change.
• Set the LPT status bits: Check or uncheck the status bits to change their
settings.
Paper empty: Checked = 1 = Paper empty; Unchecked = 0 = Paper not
empty
Selected: Checked = 1 = Selected; Unchecked = 0 = Not selected
Error: Checked = 0 = Error; Unchecked = 1 = No error
• Change or add a printer ID string: Click Change printer ID string... to
open the Change Printer ID String dialog. Enter strings as KEY:VALUE
pairs or vendor-specific pairs. Individual strings must be separated by
semicolons. Click OK to confirm changes.
• Send a file to the printer: Click the Print... button to access the Open
dialog. By default, the file that was most recently transferred to the HCRP
server will be selected; however, you may browse to a different file, if you
wish. Click Open to print the file.
4.3.5 Emulate Device: Headset
BTTrainer can be configured to emulate a wireless device that conforms to the Bluetooth
Headset profile. The following steps show how to set up BTTrainer as a Headset device and
connect to it with a remote Bluetooth headset.
Step 1 Complete Steps 1-4 in Section 4.3, “Emulating Devices” on page 32.
The Headset Emulation screen will open, indicating that BTTrainer has been
configured to emulate a device that supports the Headset profile and is
awaiting connection from a device.
35
Page 54

CATC BTTRAINER 2.20 CHAPTER 4
User’s Manual Profile Wizard
Note: The Speaker and Microphone Volume levels shown in the previous
screenshot reflect the volume settings on the Master device. If you adjust the
levels on the remote device, the displayed volume levels will change
accordingly.
Step 2 Direct a remote Bluetooth device to connect to BTTrainer.
Once the connection is established, the Emulation Status screen will indicate
that BTTrainer has an RFCOMM connection to the device.
Step 3 Click the Answer button to make an SCO connection with the remote
device.
If the connection attempt is succesful, the screen will change to indicate that
an SCO connection has been established.
Step 4 (Optional) Click the Hang Up button to close the connection. The
connection between BTTrainer and the device will terminate.
4.3.6 Emulate Device: Headset Audio Gateway
BTTrainer can be configured to emulate a wireless device that conforms to the Bluetooth
Headset Audio Gateway profile. The following steps show how to set up BTTrainer as a
Headset Audio Gateway device and connect to it with a remote Bluetooth headset.
Step 1 Complete Steps 1-4 in Section 4.3, “Emulating Devices” on page 32.
The Headset AG Emulation screen will open, indicating that BTTrainer has
been configured to emulate a device that supports the Headset Audio
Gateway profile and is awaiting connection from a device.
Note: The Speaker and Microphone Volume levels shown in the previous
screenshot reflect the volume settings on the Master device. If you adjust the
levels on the remote device, the displayed volume levels will change
accordingly.
Step 2 Direct a remote Bluetooth device to connect to BTTrainer.
Once the connection is established, the Emulation Status screen will indicate
that BTTrainer is currently connected to the device.
Step 3 To verify that BTTrainer and the remote device are successfully connected,
speak into the microphone on one device and listen for audio on the other.
4.3.7 Emulate Device: LAN
Step 1 Complete Steps 1-4 in Section 4.3, “Emulating Devices” on page 32.
Step 2 In the Emulate Device dialog, select LAN.
The LAN screen will open, indicating that BTTrainer has been configured to
emulate a device that supports the LAN profile and is awaiting connection
from a device.
36
Page 55

CATC BTTRAINER 2.20 CHAPTER 4
User’s Manual Profile Wizard
4.3.8 Emulate Device: Object Push
BTTrainer can emulate the file transfer capabilities of wireless devices that support the
Object Push profile through the Object Push option. Object Push emulation allows other
devices to transfer files to BTTrainer.
Step 1 Complete Steps 1-4 in Section 4.3, “Emulating Devices” on page 32.
The Emulation Status screen will open, indicating that BTTrainer has been
configured to emulate a Bluetooth device that supports the Object Push
profile and is awaiting connection from a device. It is now ready to receive
files.
Step 2 If desired, the folder in which transferred files are stored can be changed. To
change it, click the Change button and select a new directory in the Browse
for Folder dialog.
Step 3 Initiate file transfer from the Bluetooth device.
The Emulation Status screen will show the file transfer progress:
When the transfer is complete, the Emulation Status screen will show that
BTTrainer is waiting for a connection after having successfully received the
file.
4.3.9 Emulate Device: PAN - GN
Profile Wizard allows you to emulate devices that use the Personal Area Network (PAN)General Networking (GN) profile.
Note: To connect to a device that uses the PAN profile, you must install the virtual network driver that is
included with the BTTrainer installation. For instructions, see Section 4.7, “Installation of Network
Driver,” on page 41.
Step 1 Complete Steps 1-4 in Section 4.3, “Emulating Devices” on page 32.
Step 2 In the Select Profile screen, select PAN-GN, and click Next.
The Emulation Status screen will open, indicating that BTTrainer has been
configured to emulate a Bluetooth device that supports the PAN-GN profile
and is awaiting connection from a device. It is now ready to receive files.
Step 3 Click Next.
Step 4 Select the appropriate security options, and click Next.
• Send Control Packet: Use this to select a filter control message to send
to the remote device. You may send either a Filter Network Protocol Type
message or a Filter Multicast Address Type message control packet to the
remote device.
Start Range and End Range: Start Range defines the beginning of the
range, and End Range defines the end of the range. Only the protocol
types or multicast addresses that fall within the range will be sent by the
remote device; all other types or addresses will be filtered out.
37
Page 56

CATC BTTRAINER 2.20 CHAPTER 4
User’s Manual Profile Wizard
For Filter Network Type Set Message, the Start and End Ranges may be
in the format nnnn or 0xnnnn. For the Filter Multicast Address Set
Message, the Start and End Ranges can be in the format nnnnnnnnnnnn
or 0xnnnnnnnnnnnn.
• Send Packet: Use this to send an ethernet packet to the remote device.
The types of ethernet packets that can be sent are General, Compressed,
Compressed Source Only and Compressed Destination Only.
Note: Depending on your network settings for ‘CATC Bluetooth Trainer PAN Virtual NIC’ Local
Connection, Windows may create additional network traffic over this connection. Check your
network properties for ‘CATC Bluetooth Trainer PAN virtual NIC.’
4.3.10 Emulate Device: PAN - NAP
Note: To connect to a device that uses the PAN profile, you must install the virtual network driver that is
included with the BTTrainer installation. For instructions, see Section 4.7, “Installation of Network
Driver,” on page 41.
Step 1 Complete Steps 1-4 in Section 4.3, “Emulating Devices” on page 32.
Step 2 In the Select Profile screen, select PAN-NAP, and click Next.
The Emulation Status screen will open, indicating that BTTrainer has been
configured to emulate a Bluetooth device that supports the PAN-NAP profile
and is awaiting connection from a device. It is now ready to receive files.
Step 3 Click Next.
• Send Control Packet: Use this to select a filter control message to send
to the remote device. You may send either a Filter Network Protocol Type
message or a Filter Multicast Address Type message control packet to the
remote device.
Start Range and End Range: Start Range defines the beginning of the
range, and End Range defines the end of the range. Only the protocol
types or multicast addresses that fall within the range will be sent by the
remote device; all other types or addresses will be filtered out.
For Filter Network Type Set Message, the Start and End Ranges may be
in the format nnnn or 0xnnnn. For the Filter Multicast Address Set
Message, the Start and End Ranges can be in the format nnnnnnnnnnnn
or 0xnnnnnnnnnnnn.
• Send Packet: Use this to send an ethernet packet to the remote device.
The types of ethernet packets that can be sent are General, Compressed,
Compressed Source Only and Compressed Destination Only.
Note: Depending on your network settings for ‘CATC Bluetooth Trainer PAN Virtual NIC’ Local
Connection, Windows may create additional network traffic over this connection. Check your
network properties for ‘CATC Bluetooth Trainer PAN virtual NIC.’
38
Page 57

CATC BTTRAINER 2.20 CHAPTER 4
User’s Manual Profile Wizard
4.3.11 Emulate Device: Serial Port
These steps describe how to use Profile Wizard to configure BTTrainer to emulate a device
that uses the Serial Port profile.
Note: To emulate a device that uses the Serial Port profile, you will need to install the virtual COM port driver
that is included with the BTTrainer installation. For instructions, see “Installing the Virtual COM Port
Driver” on page 39.
Step 1 Complete Steps 1-4 in Section 4.3, “Emulating Devices” on page 32.
The Serial Port Emulation screen will open.
Step 2 Use an external application to send data to the remote device.
Note: A modem driver must be installed on the virtual COM port in order to use an
external application to send data through BTTrainer. See “Install a Modem
Driver on the Virtual COM Port” on page 40 to find out how to install the
driver. Once the driver is installed, you must configure the external
application to use that driver.
Open the application and send the data. It will use the modem driver on the
virtual COM port to send the data to the Serial Port device through
BTTrainer.
4.4 Restarting the Wizard
When working within Profile Wizard, a new session may be started at any time.
Click the Restart Wizard button on any screen.
• If BTTrainer is currently emulating a connected device, the connection will be broken,
and Profile Wizard will return to the default Profile Wizard screen.
• If BTTrainer is currently connected to a device, a dialog box will ask if the connection
should be terminated. Clicking the Yes button will cause the connection to be broken,
and Profile Wizard will return to the default Profile Wizard screen. Clicking the No button will cancel the Restart Wizard request.
4.5 Installing the Virtual COM Port Driver
To connect to a device that uses the Dial-Up Gateway, Fax Gateway, LAN, or Serial Port
profile, you will need to install the virtual COM port driver that is included with the
BTTrainer installation.
4.5.1 On Windows 2000
Step 1 Select Start > Settings > Control Panel from the desktop taskbar, then
double-click on Add/Remove Hardware in the Control Panel window.
The Add/Remove Hardware Wizard will open.
Step 2 Click Next.
39
Page 58

CATC BTTRAINER 2.20 CHAPTER 4
User’s Manual Profile Wizard
Step 3 Select “Add/Troubleshoot a device” and click Next.
The Wizard will look for Plug and Play hardware, then it will display a list
of all the hardware it finds on the computer.
Step 4 Select “Add a new device” from the list and click Next.
Step 5 Select “No, I want to select the hardware from a list” and click Next.
Step 6 Select “Ports (COM and LPT)” from the list and click Next.
Step 7 Click the Have Disk button.
Step 8 Click the Browse button so that you can browse to the driver file, which you
should be able to find either on the installation CD-ROM or in the directory
in which BTTrainer is installed.
When you have located the file, click Open.
Step 9 Click OK to use the file you have selected.
Step 10 Select “CATC Bluetooth Serial Port” and click OK.
Step 11 Click Next to install the driver.
Step 12 Click Finish to complete the installation.
Ascertain the COM Port Number
Step 1 Select Start > Settings > Control Panel from the desktop taskbar, then
double-click on System in the Control Panel window.
The System Properties dialog will open.
Step 2 Select the Hardware tab and click the Device Manager button.
The Device Manager will open.
Step 3 Expand the Ports (COM & LPT) level and locate the CATC Bluetooth Serial
Port.
Step 4 Note the port number for the CATC Bluetooth Serial Port. You will need to
know the number in order to install things such as the fax modem driver that
is necessary to connect to a fax device.
4.6 Install a Modem Driver on the Virtual COM Port
In order to perform dial-up networking or use a fax application to send fax data through
BTTrainer, you need to install a modem driver on the virtual COM port.
On Windows 2000:
Step 1 Complete steps 1-3 in Section 4.2.1, “Connect to Device: Dial-Up Gateway”
on page 23 or in Section 4.2.2 on page 24.
BTTrainer must be connected to the Dial-Up or Fax Gateway device before
installing the modem driver.
40
Page 59

CATC BTTRAINER 2.20 CHAPTER 4
User’s Manual Profile Wizard
Step 2 Select Start > Settings > Control Panel from the desktop taskbar, then
double-click on Add/Remove Hardware in the Control Panel window.
The Add/Remove Hardware Wizard will open.
Step 3 Click Next.
Step 4 Select “Add/Troubleshoot a device” and click Next.
The Wizard will look for Plug and Play hardware, then it will display a list
of all the hardware it finds on the computer.
Step 5 Select “Add a new device” from the list and click Next.
Step 6 Select “No, I want to select the hardware from a list” and click Next.
Step 7 Select “Modems” from the list and click Next.
Step 8 Check “Don’t detect my modem; I will select it from a list.” and click Next.
Step 9 Select the manufacturer and model of your modem and click Next.
Step 10 Select the virtual COM port from the list and click Next.
Note: To find out the number of the virtual COM port, refer to “Ascertain the COM
Port Number” on page 40.
Step 11 Click the Finish button to complete the installation.
4.7 Installation of Network Driver
BTTNet.sys driver + INF
Step 1 Open ‘Control Panel’
Step 2 Select ‘Add/Remove Hardware’ icon.
Step 3 Select the ‘Add/Troubleshoot a device’ radio button. Pressing Next would
make the system try to search for new HW devices.
Step 4 In the Device List, select “Add a new device” entry. Press Next button.
Step 5 Select the “No, I want to select the hardware from a list” radio button. Press
Next.
Step 6 Select “Network Adapters” entry. Press Next.
Step 7 In the ‘Select Network Adapter’ page, press “Have Disk ...” button.
Step 8 Browse for the BTTNet.INF file and select it by pressing the “Open” and
“OK” buttons. The list of network adapters should include the driver “CATC
Bluetooth Trainer PAN virtual NIC.”
Step 9 Press Next.
Step 10 In the “Start Hardware Installation” page, press the Next button. At this time,
Windows installs the driver and plots a proper text in the installation wizard.
Step 11 Press Finish.
41
Page 60

CATC BTTRAINER 2.20 CHAPTER 4
User’s Manual Profile Wizard
4.7.1 Verifying the Driver’s Installation
To verify that the drivers installed properly, go to the “Device Manager” utility, and display
the properties for the “CATC Bluetooth Trainer PAN virtual NIC” driver under “Network
Adapters.”
Note: The MAC address of the NIC driver is based on the BD address of BTTrainer. The MAC addr will
be rewritten every time the BNEP_Register is executed.
4.7.2 Configuration of Virtual NIC
To configure the network properties of the “CATC Bluetooth Trainer PAN Virtual NIC,”
do the following:
Step 1 Select Start > Settings > Control Panel from the desktop taskbar, then
double-click on “Network and Dial-up Connections” in the Control Panel
window.
Step 2 Locate the “CATC Bluetooth Trainer PAN virtual NIC” Local Area
Connection.
Step 3 Select File > Properties. Now you can change the network settings for your
Bluetooth network connection.
42
Page 61

CATC BTTRAINER 2.20 CHAPTER 5
User’s Manual Command Generator
CHAPTER 5: COMMAND GENERATOR
The Command Generator is a tool in BTTrainer that presents a menu of protocol commands
so that you can select and execute any command in virtually any sequence. Command
Generator thus gives maximum control over the traffic generation process.
Command Generator requires that you build connections from the Baseband level on up.
This means that to establish an OBEX connection, for example, you will need to first start
with Baseband and work your way up the protocol stack. You cannot simply start at a higher
protocol.
The utility displays a window with tabs for these protocols: HCI (which includes Baseband,
LMP and Module-Specific Commands), L2CAP, SDP, RFCOMM, TCS, BNEP, OBEX and
TCI. Clicking a tab or a name in the protocol stack graphic opens a window and presents a
menu of commands for that protocol.
5.1 Command Generator Interface
The Command Generator utility is composed of the following:
• Tabs — There are eight tabs: HCI, L2CAP, SDP, RFCOMM, TCS, BNEP, OBEX, and
TCI. Clicking a tab displays the Command Menu for the chosen protocol.
• Command Menus — A list of commands is provided for each protocol.
• Parameters Combo Boxes — Parameters can be entered via the six combo boxes. One
or more of the boxes may be activated, depending on which command is currently
43
Page 62

CATC BTTRAINER 2.20 CHAPTER 5
User’s Manual Command Generator
selected in the Command Menu. Parameters may either be typed into the box or chosen
from a pull-down list within the box.
• Execute — Pressing the Execute button will cause BTTrainer to run the selected command.
• Command Generator Tips — Detailed tips for each command are accessible by positioning the mouse over the question mark icon. A pop-up window that contains detailed
information about the selected command will appear.
• Command Description Box — A short description will display in the Command
Description Box when a command is selected from a Command Menu.
• Protocol Stack Graphic — At the bottom of Command Generator is the Protocol Stack
Graphic, which illustrates the layers that make up the Bluetooth protocol stack. The protocols in the graphic are also clickable buttons that can be used to access the command
menus for each protocol.
• HCI Customized List Button — The HCI tab has an additional button to the left of the
Execute button. It provides access to an interface that allows the user to customize the
list of commands displayed in the HCI command menu.
5.2 Using Command Generator
Note: If Command Generator isn’t enabled on your BTTrainer system, you will need to obtain a License Key
from CATC before you can use it. See “License Keys” on page 16 for details.
To execute commands with Command Generator:
Step 1 Click the Command Generator button on the toolbar or select the command
Tools > Command Generator from the menu bar.
The Command Generator utility will open.
Step 2 Choose a protocol to work with by clicking one of the five tabs or a layer in
the Protocol Stack Graphic.
The list of available commands for the chosen protocol will display in the
Command Menu.
Note: The HCI tab is displayed by default.
Step 3 Select a command from the Command Menu.
A description of the command will display in the Command Description
Box. If the selected command is not supported, the message in the Command
Description Box will read “Not supported.”
Step 4 Enter parameters, if required, in the Parameters Combo Boxes. Parameter
boxes will be activated as appropriate for the command, with the parameter
name(s) appearing to the right of the box(es). Data can be typed directly into
the Parameters Combo Boxes, and some of the boxes may offer drop-down
lists from which to select the appropriate parameter.
Note: Numeric values should be entered as hexadecimal unless otherwise specified.
44
Page 63

CATC BTTRAINER 2.20 CHAPTER 5
User’s Manual Command Generator
Step 5 Click the Execute button to run the command.
Note: While Command Generator offers maximum control over BTTrainer, there
are times when command choices may be limited. Some lower-level
connections may prevent access to commands for higher-level protocols. For
example, if an L2CAP connection has been established between BTTrainer
and a device, it is not possible to work with OBEX commands in Command
Generator. BTTrainer will display a message to indicate that L2CAP
connections must be closed before working with OBEX commands. Once the
L2CAP connection is closed, the OBEX commands will be accessible.
5.2.1 Customizing the List of HCI Commands
The list of commands in the HCI command menu in Command Generator may be
customized to display only certain commands. Since there are over 100 commands available
in the HCI menu, this feature is a handy way to eliminate scrolling through a lengthy list to
find commands.
Clicking the HCI Customized List button , which is located to the left of the Execute button
in Command Generator, will open the Command Group interface.
To remove commands from the customized HCI command list, select the radio button
beside one of the groups listed in the “Command groups” section of the interface, then press
the Remove button . The selected command(s) will move into the “Other HCI commands”
list.
To add commands to the customized list, select the radio button next to the group of
commands that should be moved, then press the Add button . The selected command(s) will
be moved from “Other HCI commands” to the customized HCI command list.
45
Page 64

CATC BTTRAINER 2.20 CHAPTER 5
User’s Manual Command Generator
5.3 Commands Available in Command Generator
The following tables summarize the commands in Command Generator.
For detailed descriptions of the commands, see Appendix A: Command Generator
Command Descriptions, on page 83.
Note: “N/A” means Not Applicable. This indicates that the specified command does not have a parameter.
5.3.1 HCI Commands
Link Control Commands
Two sections of Link Control Commands are presented. The first section lists commands
that are supported by BTTrainer. The second section presents commands that are not
supported.
Table 5-1: Supported HCI Link Control commands
Commands Parameters
Accept_Connection_Request Request_Role_Switch
Add_SCO_Connection HCI_Handle
Packet Type
Authentication_Requested HCI_Handle
Change_Connection_Link_Key HCI_Handle
Change_Connection_Packet_Type HCI_Handle
Packet_Type
Create_Connection BD_ADDR
Packet_Type
Page_Scan_Rep_Mode
Page_Scan_Mode
Clock_Offset
Allow_Role_Switch
Disconnect HCI_Handle
Exit_Periodic_Inquiry_Mode N/A
GetSCOConnection N/A
Inquiry Inquiry_Length
Num_Responses
LAP
Inquiry_Cancel N/A
Master_link_Key Key_Flag
Periodic_Inquiry_Mode Max Period Length
Min Period Length
Inquiry Length
Num of Responses
LAP
PIN_Code_Request_Negative_Reply BD_ADDR
46
Page 65

CATC BTTRAINER 2.20 CHAPTER 5
User’s Manual Command Generator
Table 5-1: Supported HCI Link Control commands (Continued)
Commands Parameters
PIN_Code_Request_Reply PIN Code
BD_ADDR
Read_Clock_Offset HCI_Handle
Read_Remote_Supported_Features HCI_Handle
Read_Remote_Version_Information HCI_Handle
Reject_Connection_Request N/A
Remote_Name_Request BD ADDR
Page Scan Rep Mode
Page Scan Mode
Clock Offset
Set_Connection_Encryption HCI_Handle
Encryption_Enable
Table 5-2: Unsupported HCI Link Control commands
Commands
Link_Key_Request_Negative_Reply
Link_Key_Request_Reply
Link Policy Commands
Table 5-3: Supported HCI Link Policy commands
Commands Parameters
Exit_Park_Mode HCI_Handle
Exit_Sniff_Mode HCI_Handle
Hold_Mode HCI_Handle
Max_Interval
Min_Interval
Park_Mode HCI_Handle
Beacon_Max_Interval
Beacon_Min_Interval
QoS_Setup HCI_Handle
ServiceType
TokenRate
PeakBandwidth
Latency
DelayVariation
Read_Link_Policy_Settings HCI_Handle
Role_Discovery HCI_Handle
Sniff_Mode HCI_Handle
Max_Interval
Min_Interval
Attempt
Timeout
47
Page 66

CATC BTTRAINER 2.20 CHAPTER 5
User’s Manual Command Generator
Table 5-3: Supported HCI Link Policy commands (Continued)
Commands Parameters
Switch_Role BD_ADDR
Write_Link_Policy_Settings HCI_Handle
Link_Policy_Settings
Table 5-4: Unsupported HCI Link Policy commands
Commands
All Link Policy commands are supported in Command Generator.
Host Controller & Baseband Commands
Table 5-5: Supported HCI Host Controller & Baseband commands
Commands Parameters
Change_Local_Name Name
Create_New_Unit_Key N/A
Delete_Stored_Link_Key BD_ADDR
Delete_All_Flag
Flush HCI_Handle
Host_Buffer_Size ACL_Data_Length
SCO_Data_Length
Total_Num_ACL
Total_Num_SCO
Read_Authentication_Enable N/A
Read_Automatic_Flush_Timeout HCI_Handle
Read_Class_of_Device N/A
Read_Connection_Accept_Timeout N/A
Read_Current_IAC_LAP N/A
Read_Encryption_Mode N/A
Read_Hold_Mode_Activity N/A
Read_Inquiry_Scan_Activity N/A
Read_Link_Supervision_Timeout HCI_Handle
Read_Local_Name N/A
Read_Num_Broadcast_Retransmissions N/A
Read_Number_Of_Supported_IAC N/A
Read_Page_Scan_Activity N/A
Read_Page_Scan_Mode N/A
Read_Page_Scan_Period_Mode N/A
Read_Page_Timeout N/A
Read_PIN_Type N/A
Read_Scan_Enable N/A
Read_SCO_Flow_Control_Enable N/A
Read_Transmit_Power_Level HCI_Handle
48
Page 67

CATC BTTRAINER 2.20 CHAPTER 5
User’s Manual Command Generator
Table 5-5: Supported HCI Host Controller & Baseband commands (Continued)
Commands Parameters
Read_Stored_Link_Key BD_ADDR
Read_All_Flag
Read_Voice_Setting N/A
Reset N/A
Set_Event_Filter FilterType
FilterConditionType
Condition
Set_Event_Mask Event_Mask
Write_Authentication_Enable Authentication_Enable
Write_Class_of_Device CoD
Write_Connection_Accept_Timeout Timeout
Write_Current_IAC_LAP IAC_LAP
Write_Encryption_Mode Encryption Mode
Write_Link_Supervision_Timeout HCI_Handle
Timeout
Write_Num_Broadcast_Retransmissions Retransmissions
Write_Page_Activity Page_Scan_Interval
Page_Scan_Window
Write_Page_Scan_Mode Page_Scan_Mode
Write_Page_Scan_Period_Mode Page_Scan_Period_Mode
Write_Page_Timeout Timeout
Write_PIN_Type PIN_Type
Write_Scan_Enable Scan_Enable
Write_Stored_Link_Key BD_ADDR
Link_Key
Write_Voice_Settings HCI_Handle
Voice_Setting
Table 5-6: Unsupported HCI Host Controller & Baseband commands
Commands
Host_Number_Of_Completed_Packets
Read_Transmit_Power_Level
Set_Host_Controller_To_Host_Flow_Control
Write_SCO_Flow_Control_Enable
Informational Commands
Table 5-7: Supported HCI Informational commands
Commands Parameters
Read_BD_ADDR N/A
Read_Buffer_Size N/A
Read_Country_Code N/A
49
Page 68

CATC BTTRAINER 2.20 CHAPTER 5
User’s Manual Command Generator
Table 5-7: Supported HCI Informational commands (Continued)
Commands Parameters
Read_Local_Supported_Features N/A
Read_Local_Version_Information N/A
Table 5-8: Unsupported HCI Informational commands
Commands
All Informational commands are supported in Command Generator.
Status Commands
Table 5-9: Supported HCI Status commands
Commands
Read_Failed_Contact_Counter
Reset_Failed_Contact_Counter
Table 5-10: Unsupported HCI Status commands
Commands
Get_Link_Quality
Read_RSSI
Testing Commands
Table 5-11: Supported HCI Testing commands
Commands Parameters
Enable_Device_Under_Test_Mode N/A
Read_Loopback_Mode N/A
Write_Loopback_Mode Loopback_Mode
Note: The Supported HCI Testing commands shown above are part of the “TCI” dialog.
Table 5-12: Unsupported HCI Testing commands
Commands
All Testing commands are supported in Command Generator.
CATC-Specific Commands
Table 5-13: Supported CATC-Specific HCI commands
Commands Parameters
CATC_Change_Headset_Gain Device
Gain
CATC_Decrease_Power_Request HCI_Handle
50
Page 69

CATC BTTRAINER 2.20 CHAPTER 5
User’s Manual Command Generator
Table 5-13: Supported CATC-Specific HCI commands (Continued)
Commands Parameters
CATC_Disconnect HCI_Handle
TestMode
Timeout
CATC_Get_ParkMode N/A
CATC_Get_Selected_SCO_Connection N/A
CATC_Increase_Power_Request HCI_Handle
CATC_Max_Slot_Response HCI_Handle
Action
Event
CATC_Modify_Beacon HCI_Handle
MaxBeaconInterval
MinBeaconInterval
CATC_Max_Slot HCI_Handle
Max_Slot
CATC_Override_Remote_Features HCI_Handle
CATC_Page_Mode_Request HCI_Handle
PageScheme
PageSchemeSetting
CATC_Page_Scan_Mode_Request HCI_Handle
PageScheme
PageSchemeSetting
CATC_Qos HCI_Handle
PollInterval
Nbc
CATC_QoS_Response Mode
CATC_Read_Encryption_Key_Size N/A
CATC_Read_Headset_Gain Device
CATC_Read_Link_Key_Type N/A
CATC_Read_PIN_Response_Enable N/A
CATC_Read_Revision_Information N/A
CATC_Sco_Parameter_Change_Response Mode
CATC_Select_Sco_Connection HCI_Handle
Data_Path
Data
CATC_Self_Test N/A
CATC_Set_Broadcast_Scan_Window HCI_Handle
BroadcastScanWindow
CATC_Set_Default_PIN_Code Pin_Code
CATC_Set_Park_Mode Park_Mode
CATC_Timing_Accuracy_Request HCI_Handle
51
Page 70

CATC BTTRAINER 2.20 CHAPTER 5
User’s Manual Command Generator
Table 5-13: Supported CATC-Specific HCI commands (Continued)
Commands Parameters
CATC_Write_Encryption_Key_Size Key_Size
CATC_Write_Link_Key_Type Key_Type
CATC_Write_Local_Supported_Features LMP_Features
CATC_Write_PIN_Response_Enable PIN-Response_Enable
5.3.2 L2CAP Commands
Table 5-14: Supported L2CAP commands
Commands Parameters
ConfigurationResponse Reason
TokenRate
TokenBucketSize
PeakBandWidth
Latency
DelayVariation
ConfigurationRequest Reason
TokenRate
TokenBucketSize
PeakBandWidth
Latency
DelayVariation
ConnectRequest HCI_Handle
PSM
Receive MTU
ConnectResponse Response
DeregisterPsm PSM
DisconnectRequest CID
EchoRequest HCI_Handle
Data
GroupRegister PSM
List of Bluetooth addresses
InfoRequest HCI_Handle
RegisterPsm PSM
Receive MTU
SendData CID
Data Pipe
52
Page 71

CATC BTTRAINER 2.20 CHAPTER 5
User’s Manual Command Generator
5.3.3 SDP Commands
Table 5-15: Supported SDP commands
Commands Parameters
AddProfileServiceRecord Profile
ServerChannel
AddServiceRecord Filename
Record Name
Server Channel
ProfileServiceSearch HCI_Handle
Profile
RequestServiceAttribute HCI_Handle
ServiceRecordHandle
AttributeID
AttributeID
AttributeID
RequestServiceSearch HCI_Handle
ServiceClassID
ServiceClassID
ServiceClassID
RequestServiceSearchAttribute HCI_Handle
ServiceClassID
ServiceClassID
ServiceClassID
ResetDatabase N/A
5.3.4 RFCOMM Commands
Table 5-16: Supported RFCOMM commands
Commands Parameters
AcceptChannel Accept
AcceptPortSettings Accept
AdvanceCredit (HCI/DLCI)
Credit
CloseClientChannel (HCI/DLCI)
CreditFlowEnabled (HCI/DLCI)
DeregisterServerChannel ServerChannel
OpenClientChannel HCI_Handle
ServerChannel
MaxFrameSize
Credit
AttachTo
RegisterServerChannel AttachTo
RequestPortSettings (HCI/DLCI)
BaudRate
DataFormat
FlowControl
Xon
Xoff
53
Page 72

CATC BTTRAINER 2.20 CHAPTER 5
User’s Manual Command Generator
Table 5-16: Supported RFCOMM commands (Continued)
Commands Parameters
RequestPortStatus (HCI/DLCI)
SendATCommand (HCI/DLCI)
AT_Command
SendData (HCI/DLCI)
Data Pipe
SendTest (HCI/DLCI)
SetLineStatus (HCI/DLCI)
LineStatus
SetModemStatus (HCI/DLCI)
ModemSignals
Break Length
5.3.5 TCS Commands
Table 5-17: Supported TCS commands
Commands Parameters
Register_Intercom_Profile N/A
Open_TCS_Channel HCI_Handle
Start_TCS_Call N/A
Disconnect_TCS_Call N/A
Send_Info_Message Phone_Number
5.3.6 OBEX Commands
Table 5-18: Supported OBEX commands
Commands Parameters
ClientConnect BD_ADDR
ClientDisconnect N/A
ClientGet Object
ClientPut Filename
ClientSetPath Path
Flags
ServerDeinit N/A
ServerInit N/A
ServerSetPath Path
ClientAbort N/A
54
Page 73

CATC BTTRAINER 2.20 CHAPTER 5
User’s Manual Command Generator
5.3.7 BNEP Commands in Command Generator
Table 5-19: BNEP Commands in Command Generator
Commands Parameters
Accept AcceptConnection
Open BD_ADDR
Close BNEP_ADDR
SetUpConnectionReq BNEP_ADDR
Destination UUID
Source UUID
SendPkt BNEP_ADDR
SendControlPkt BNEP_ADDR
Control Packet Type
Range Start
Range End
RegisterBNEP N/A
DeregisterBNEP N/A
SendPktGeneral BNEP_ADDR
data_to_send
SetControlTimeout BNEP_ADDR
Timeout
5.3.8 TCI Commands in Command Generator
Table 5-20: TCI Commands in Command Generator
Commands Parameters
CATC_EnterTestMode N/A
TestControlMaster TestScenario
Other parameters in SetErrors dialog
BD_ADDR
CATC_CreateConnectionExt
CATC_AcceptConnectionExt
CATC_SetClock BluetoothClock
CATC_SetBdAddr BD_ADDR
CATC_Page BD_ADDR
Other parameters in SetErrors dialog
TestScenario
Other parameters in SetErrors dialog
Number of Times
TestScenario
55
Page 74

CATC BTTRAINER 2.20 CHAPTER 5
User’s Manual Command Generator
Commands Parameters
CATC_PageScan TestScenario
ClockOffset
CATC_Inquiry TestScenario
Number Of Times
CATC_InquiryScan TestScenario
ClockOffset
Ninquiry
EnableDeviceUnderTestMode N/A
ReadLoopbackMode N/A
WriteLoopbackMode LoopbackMode
56
Page 75

CATC BTTRAINER 2.20 CHAPTER 6
User’s Manual Script Manager
CHAPTER 6: SCRIPT MANAGER
Script Manager is a tool within BTTrainer that presents a text editor window for writing and
executing scripts. Scripts can be used to automate Bluetooth command sequences, making
the testing process more efficient.
This chapter introduces the Script Manager interface. There are a number of commands
available to you for writing scripts in BTTrainer. You can open a menu of these commands
by clicking in the Script Manager window and then pressing <Control><Spacebar>.
Command descriptions can be found in Appendix C: BTTrainer Scripting Commands.
6.1 Script Manager Interface
The Script Manager utility is composed of the following:
• Work Area -- The Work Area is a text editor for writing new scripts or displaying and
editing opened scripts.
• Run Button -- Clicking the Run button saves (if needed) and executes the script that is
currently displayed in the Work Area. While the script is running, the label on this button changes to Stop.
• New Button -- Clicking the New button brings up a new script template in the Work
Area, so that a new script may be composed. If a modified script is open when the New
button is clicked, Script Manager will ask if it should be saved.
• Open Button -- Clicking the Open button brings up the Open dialog, so that a script can
be loaded into the Work Area. If a modified script is open when the Open button is
clicked, Script Manager will ask if it should be saved.
57
Page 76

CATC BTTRAINER 2.20 CHAPTER 6
User’s Manual Script Manager
• Save Button -- Clicking the Save button saves the script that is currently open in the
Work Area.
• Go To Button -- Clicking the Go To button opens the Go To dialog box. Here, users may
enter a line number to go to a specific part of an open script. Line numbers are displayed
on the bottom right of the BTTrainer application, on the status bar.
• Script Name and Path -- The name and path of the script that is currently open in the
Work Area are displayed along the top of the Script Manager screen.
• Script Manager Menu -- Right-clicking within the Work Area brings up the Script Manager menu. All filing and editing commands that can be performed in Script Manager
can be accessed via this menu.
6.1.1 Script Manager Pop-up Menu
As mentioned above, you can open a pop-up menu of commands by pressing
<Control><Spacebar>. The pop-up menu provides you with a convenient means of
remembering and entering commands supported by Script Manager.
To enter a command from the menu into the Script Manager window, select it, then press
<Enter>.
6.2 Running Scripts
Note: If Script Manager isn’t enabled on your BTTrainer system, you will need to obtain a License Key from
CATC before you can use it. See “License Keys” on page 16 for details.
Step 1 Open Script Manager by clicking the Script Manager icon on the toolbar or
by selecting Tools > Script Manager from the menu bar.
Script Manager will open.
58
Page 77

CATC BTTRAINER 2.20 CHAPTER 6
User’s Manual Script Manager
Step 2 Open the script by clicking the Open button in the Script Manager window
or by selecting File > Open Script… from the menu bar.
The Open dialog will appear.
Step 3 Navigate to the desired file and click Open.
The script will display in Script Manager's Work Area.
Step 4 Click Run.
Script execution will begin, and the label of the Run button will change to
Stop. Pressing the Stop button terminates execution of the script.
The script's output can be viewed in the Script Log. If line numbers are
referenced in the Script Log, double-clicking on the line number will move
the cursor to that line in Script Manager.
When the script has finished, the Stop button label will change back to Run.
6.3 Writing Scripts
Customized scripts can be written directly in Script Manager using BTTrainer Scripting
Commands. This allows for automating sequences of commands. There are over 150
commands available for writing custom test sequences, including basic commands and
commands for: pipes, HCI, L2CAP, SDP, RFCOMM, OBEX, and BTTracer. Detailed
descriptions of the commands can be found in Appendix C: BTTrainer Scripting
Commands, on page 147.
Step 1 Open Script Manager by clicking the Script Manager icon on the toolbar or
by selecting Tools > Script Manager from the menu bar.
By default, Script Manager opens an “untitled” script template in the Work
Area for composing a new script. If Script Manager were already open, the
Work Area could be cleared by pressing the New button in Script Manager
or by selecting File > New Script from the menu bar.
Step 2 Write the script in Script Manager's Work Area.
Note: A convenient method of entering commands is to press <Control><Spacebar> while in the Script
Manager window and select a command from the resulting pop-up menu.
Step 3 Save the script via the Save Script As… command on the File menu or by
clicking the Save button.
The Save As dialog will open. Enter a name for the script and save it as a
BTTrainer Script file (*.script).
Step 4 If desired, close the script by selecting File > Close Script from the menu bar.
59
Page 78

CATC BTTRAINER 2.20 CHAPTER 6
User’s Manual Script Manager
6.4 Sample Scripts
Sample scripts are provided with BTTrainer to demonstrate how Script Manager works.
These scripts are subject to change and hence are not described here. Running sample.script
will cause BTTrainer to attempt to connect to another device. The default location of the
scripts is the directory where the application is installed, which is usually C:\Program
Files\CATC\BTTrainer.
60
Page 79

CATC BTTRAINER 2.20 CHAPTER 7
User’s Manual Device Search and Device List Pop-Up Menu
CHAPTER 7: DEVICE SEARCH AND
D
EVICE LIST POP-UP MENU
The Device Search and Device List Pop-Up Menu tools offer shortcut methods for steps that
are commonly performed at the beginning of the connection process. They can be used for
some commands that would otherwise need to be done in Command Generator.
The Device List in BTTracer shares the same data with the Device List in BTTrainer.
Performing a Device Search in BTTracer will also update the Device List in BTTrainer.
Modifying existing device’s data or adding new devices manually is possible through the
BTTracer’s list.
7.1 Device Search
BTTrainer can perform an inquiry to find local Bluetooth wireless technology devices via
the Device Search tool. Information about the devices that are found are then shown in the
Device List.
To perform a Device Search:
Step 1 Open the Device Search dialog by clicking the Device Search icon on the
toolbar or by selecting Tools > Device Search from the menu bar.
The Device Search dialog will open.
Device Search presents the following search options:
• Search Time -- Sets the duration of the inquiry, in seconds. The default
search time is five seconds.
• Number of Responses -- Sets the maximum number of responses for
which data should be collected. The default number of responses is ten.
• Read Remote Device Name -- Selecting this option will cause BTTrainer
to collect name information from the remote devices it finds. This option
is not selected by default.
Note: The reading of names occurs after the search has finished; therefore,
processing the entire search will take longer if this option is selected. For
example, if the Search Time is set to 5 seconds, and 30 devices are found
within 5 seconds, the entire search process will take much longer than 5
seconds because each device will be contacted individually and asked for its
name. This could add considerable time to the search, especially if some of
the devices found in the search have gone out of range or been turned off.
Step 2 (Optional) Set the values for Search Time, Number of Responses and Read
Remote Device Name.
Step 3 Click Do Inquiry.
BTTrainer will search for devices.
61
Page 80

CATC BTTRAINER 2.20 CHAPTER 7
User’s Manual Device Search and Device List Pop-Up Menu
Step 4 To see the results of the search, click the Device List tab in the Device Status
window. To see the commands and responses from the Inquiry, view the
Event Log in the Logs window.
7.2 Device List Pop-Up Menu
The Device List Pop-Up Menu presents options for setting up ACL and audio (SCO)
connections, displaying remote device information, and terminating connections. The
Pop-Up Menu can be accessed by right-clicking on one or more devices in the Device List.
It can be used as an alternative to Profile Wizard, Command Generator, and Script Manager
for performing some commands.
Note: The Device List Pop-Up Menu is not accessible while the Profile Wizard is running.
7.2.1 Create an ACL Connection
An HCI ACL connection to a remote device can be established via the Device List Pop-Up
Menu.
Note: The following instructions assume that a Device Search has been performed and devices are displayed
in the Device List. For information about performing a device search, please see Section 6.1, “Device
Search,” on page 55.
Step 1 Open the Pop-Up Menu by right-clicking on the target device in the Device
List.
The Device List Pop-Up Menu will open.
Step 2 Choose Connect from the menu.
The status of the target device should change from In Range to Connected in
the Device List. The Piconet tab should now indicate that BTTrainer has an
ACL connection to the target device.
7.2.2 Establish an Audio Connection
An HCI SCO connection to a device that supports audio connections can be established via
the Device List Pop-Up menu.
Note: In order to verify that BTTrainer and a Bluetooth wireless audio device are successfully connected, a
headset will need to be plugged into the audio port on BTTrainer. Be sure that the headset is plugged
in before initializing the connection between BTTrainer and a Bluetooth device.
Note: The following instructions assume that a Device Search has been performed and devices are displayed
in the Device List. For information about performing a device search, please see Section 6.1, “Device
Search,” on page 55.
Step 1 Open the Pop-Up Menu by right-clicking on the target device in the Device
List.
The Device List Pop-Up Menu will open.
Step 2 Choose Connect from the menu.
62
Page 81

CATC BTTRAINER 2.20 CHAPTER 7
User’s Manual Device Search and Device List Pop-Up Menu
The status of the target device should change from In Range to Connected in
the Device List. The Piconet tab should now indicate that BTTrainer has an
ACL connection to the target device.
Step 3 Reopen the Pop-Up Menu by right-clicking on the target device in the
Device List.
The Device List Pop-Up Menu will open. If the remote device supports audio
connections and BTTrainer is connected to it, then the Add Audio
Connection command should be available.
Step 4 Select Add Audio Connection from the menu.
The status of the target device will not change in the Device List; however,
the Piconet tab should indicate that BTTrainer has an SCO connection to the
device.
Step 5 To verify that BTTrainer and the Bluetooth device are successfully
connected, speak into the microphone on one device and listen for audio on
the other.
7.2.3 Display Device Information
Note: The following instructions assume that BTTrainer is currently connected to a remote device.
Step 1 Open the Pop-Up Menu by right-clicking on the target device in the Device
List.
The Device List Pop-Up Menu will open.
Step 2 Select Get Device Information.
The Supported Services and Protocols window will open. The Service Name,
Supported Protocols, and Value for the target device will be displayed in the
window.
7.2.4 Delete a Device
Devices that are not connected may be removed from the Device List via the Device List
Pop-Up Menu. This is useful when there are many devices displayed in the Device List —
non-target devices can be deleted from the list, making it easier to navigate. This option can
also be used to remove devices that are no longer in range, but are still displayed in the list.
Step 1 Open the Pop-Up Menu by right-clicking on one or more devices.
The Device List Pop-Up Menu will open.
To delete more than one device at a time, either
• Select non-consecutive devices by Ctrl + clicking on each device to be
deleted, or
• Select consecutive devices by Shift + clicking on the first and last devices
to be deleted,
then right-click on one of the selected devices.
63
Page 82

CATC BTTRAINER 2.20 CHAPTER 7
User’s Manual Device Search and Device List Pop-Up Menu
Step 2 Select Delete.
The device(s) will be removed from the Device List.
7.2.5 Disconnect All
A fast and easy way to terminate all connections that BTTrainer has established with remote
devices is to use the Disconnect All… command on the Device List Pop-Up Menu.
Step 1 Open the Pop-Up Menu by right-clicking on a device.
Step 2 Select Disconnect All…
The Existing Connections dialog will open, displaying all pending
connections.
Step 3 Click the Disconnect All button in the Existing Connections dialog to close
the connections, or click Cancel to leave them open.
Note: When switching between Profile Wizard, Command Generator and Script
Manager, all connections that have been established between BTTrainer and
another Bluetooth device should be closed. However, expert users may
choose to leave the connections open. If a connection is left open and you
attempt to switch tools, BTTrainer will prompt you to close the connections.
Choosing Disconnect All will close the connections. Choosing Cancel will
leave the connections open, but some commands might not work properly in
the other tool. When switching to Profile Wizard, any open connections must
be closed.
64
Page 83

CATC BTTRAINER 2.20 CHAPTER 8
User’s Manual Contact and Warranty Information
CHAPTER 8: CONTACT AND WARRANTY
I
NFORMATION
8.1 Contact Information
Mailing address
Computer Access Technology Corporation
Customer Support
2403 Walsh Avenue
Santa Clara, CA 95051-1302
USA
Online support
http://www.catc.com/
E-mail address
support@catc.com
Telephone support
+1/800.909.2282 (USA and Canada)
+1/408.727.6600 (worldwide)
Fax
+1/408.727.6622 (worldwide)
Sales information
sales@catc.com
CATC Bluetooth Newsgroup
http://bluenews.catc.com
8.2 Limited Hardware Warranty
So long as you or your authorized representative ("you" or "your"), fully complete and
return the registration card provided with the applicable hardware product or peripheral
hardware products (each a "Product") within fifteen days of the date of receipt from
Computer Access Technology Corporation ("CATC") or one of its authorized
representatives, CATC warrants that the Product will be free from defects in materials and
workmanship for a period of three years (the "Warranty Period"). You may also complete
your registration form via the internet by visiting http://www.catc.com/support/register/.
The Warranty Period commences on the earlier of the date of delivery by CATC of a
Product to a common carrier for shipment to you or to CATC's authorized representative
from whom you purchase the Product.
65
Page 84

CATC BTTRAINER 2.20 CHAPTER 8
User’s Manual Contact and Warranty Information
What this Warranty Does Not Cover
This warranty does not cover damage due to external causes including accident, damage
during shipment after delivery to a common carrier by CATC, abuse, misuse, problems with
electrical power, including power surges and outages, servicing not authorized by CATC,
usage or operation not in accordance with Product instructions, failure to perform required
preventive maintenance, software related problems (whether or not provided by CATC),
problems caused by use of accessories, parts or components not supplied by CATC,
Products that have been modified or altered by someone other than CATC, Products with
missing or altered service tags or serial numbers, and Products for which CATC has not
received payment in full.
Coverage During Warranty Period
During the Warranty Period, CATC or its authorized representatives will repair or replace
Products, at CATC's sole discretion, covered under this limited warranty that are returned
directly to CATC's facility or through CATC's authorized representatives.
How to Obtain Warranty Service
To request warranty service, you must complete and return the registration card or register
via the internet within the fifteen day period described above and report your covered
warranty claim by contacting CATC Technical Support or its authorized representative.
CATC Technical Support can be reached at 800-909-7112 or via email at
support@catc.com. You may also refer to CATC's website at http://www.catc.com for
more information on how to contact an authorized representative in your region. If warranty
service is required, CATC or its authorized representative will issue a Return Material
Authorization Number. You must ship the Product back to CATC or its authorized
representative, in its original or equivalent packaging, prepay shipping charges, and insure
the shipment or accept the risk of loss or damage during shipment. CATC must receive the
Product prior to expiration of the Warranty Period for the repair(s) to be covered. CATC or
its authorized representative will thereafter ship the repaired or replacement Product to you
freight prepaid by CATC if you are located in the continental United States. Shipments
made outside the continental United States will be sent freight collect.
Please remove any peripheral accessories or parts before you ship the Product. CATC does
not accept liability for lost or damaged peripheral accessories, data or software.
CATC owns all parts removed from Products it repairs. CATC may use new and/or
reconditioned parts, at its sole discretion, made by various manufacturers in performing
warranty repairs. If CATC repairs or replaces a Product, the Warranty Period for the Product
is not extended.
66
Page 85

CATC BTTRAINER 2.20 CHAPTER 8
User’s Manual Contact and Warranty Information
If CATC evaluates and determines there is "no trouble found" in any Product returned or
that the returned Product is not eligible for warranty coverage, CATC will inform you of its
determination. If you thereafter request CATC to repair the Product, such labor and service
shall be performed under the terms and conditions of CATC's then current repair policy. If
you chose not to have the Product repaired by CATC, you agree to pay CATC for the cost
to return the Product to you and that CATC may require payment in advance of shipment.
General Provisions
THIS LIMITED WARRANTY GIVES YOU SPECIFIC LEGAL RIGHTS. YOU MAY
HAVE ADDITIONAL RIGHTS THAT VARY BY JURISDICTION. CATC'S
RESPONSIBILITY FOR DEFECTS IN MATERIALS AND WORKMANSHIP IS
LIMITED TO REPAIR AND REPLACEMENT AS SET FORTH IN THIS LIMITED
WARRANTY STATEMENT. EXCEPT AS EXPRESSLY STATED IN THIS
WARRANTY STATEMENT, CATC DISCLAIMS ALL EXPRESS AND IMPLIED
WARRANTIES FOR ANY PRODUCT INCLUDING, BUT NOT LIMITED TO, ANY
IMPLIED WARRANTIES OF AND CONDITIONS OF MERCHANTABILITY AND
FITNESS FOR A PARTICULAR PURPOSE, AND ANY WARRANTIES THAT MAY
ARISE FROM ANY COURSE OF DEALING, COURSE OF PERFORMANCE OR
TRADE USAGE. SOME JURISDICTIONS MAY NOT ALLOW LIMITATIONS ON
HOW LONG AN IMPLIED WARRANTY LASTS, SO THE PRECEDING LIMITATION
MAY NOT APPLY TO YOU.
CATC DOES NOT ACCEPT LIABILITY BEYOND THE REMEDIES SET FORTH IN
THIS LIMITED WARRANTY STATEMENT OR FOR INCIDENTAL OR
CONSEQUENTIAL DAMAGES INCLUDING, WITHOUT LIMITATION, ANY
LIABILITY FOR THIRD PARTY CLAIMS AGAINST YOU FOR DAMAGES,
PRODUCTS NOT BEING AVAILABLE FOR USE, OR FOR LOST DATA OR
SOFTWARE. CATC'S LIABILITY TO YOU MAY NOT EXCEED THE AMOUNT
YOU PAID FOR THE PRODUCT THAT IS THE SUBJECT OF A CLAIM. SOME
JURISDICTIONS DO NOT ALLOW THE EXCLUSION OR LIMITATION OF
INCIDENTAL OR CONSEQUENTIAL DAMAGES, SO THE PRECEDING
EXCLUSION OR LIMITATION MAY NOT APPLY TO YOU.
The limited warranty on a Product may be transferred for the remaining term if the then
current owner transfers ownership of the Product and notifies CATC of the transfer. You
may notify CATC of the transfer by writing to Technical Support at Computer Access
Technology Corporation, 2403 Walsh Avenue, Santa Clara, CA 95051-1302 USA or by
email at: support@catc.com. Please include the transferring owner's name and address, the
name and address of the new owner, the date of transfer, and the Product serial number.
67
Page 86

CATC BTTRAINER 2.20 CHAPTER 8
User’s Manual Contact and Warranty Information
68
Page 87

CATC BTTRAINER 2.20 APPENDIX A
User’s Manual
APPENDIX A: COMMAND GENERATOR
C
OMMAND DESCRIPTIONS
Note: “N/A” means Not Applicable. This indicates that the specified command does not have a parameter.
A.1 HCI Link Control Commands
A.1.1 Accept_Connection_Request
Used to accept a new incoming connection request. Execute this command before
connection request from another device. By default, all connection requests are accepted.
Command Parameters Examples Comments
N/A
Return Events
Accept_Connection_Request_Complete
A.1.2 Add_SCO_Connection
Will cause the link manager to create an SCO connection in addition to the existing ACL
connection.
Command Parameters Examples Comments
HCI_Handle 0x0001
Packet Type 0x0080 Possible packet types:
HV1=0x0020
HV2=0x0040
HV3=0x0080
Return Events
Add_SCO_Connection_Complete
Add_SCO_Connection_Error
A.1.3 Authentication_Requested
Used to initiate authentication between the two devices associated with the specified
HCI_Handle.
Command Parameters Examples Comments
HCI_Handle 0x0001
69
Page 88

CATC BTTRAINER 2.20 APPENDIX A
User’s Manual
Return Events
Authentication_Error
Authentication_Complete
A.1.4 Change_Connection_Link_Key
Used to force both connected devices to generate a new link key.
Command Parameters Examples Comments
HCI_Handle 0x0001 Range: 0x0000-0x0EFF
Return Events
Change_Connection_Link_Key_Error
Change_Connection_Link_Key_Complete
A.1.5 Change_Connection_Packet_Type
Used to change which packet types can be used for a connection that is currently established.
Command Parameters Examples Comments
HCI_Handle 0x0001
Packet_Type 0x0008 Range: 0x0000-0x0EFF
0x0008 = DM1
0x0010 = DH1
0x0400 = DM3
0x0800 = DH3
0x4000 = DM5
0x8000 = DH5
Return Events
Change_Connection_Packet_Type_Error
Change_Connection_Packet_Type_Complete
A.1.6 Create_Connection
Create_Connection will cause the link manager to create an ACL connection to the
Bluetooth wireless device with the BD_ADDR specified by the command parameters.
Command Parameters Examples Comments
BD_ADDR 010203040506 Enter in HEX as shown.
Packet_Type
Page_Scan_Rep_Mode
Page_Scan_Mode
70
Page 89

CATC BTTRAINER 2.20 APPENDIX A
User’s Manual
Command Parameters Examples Comments
Clock_Offset
Allow_Role_Switch
Return Events
Create_Connection_Complete
Create_Connection_Error
A.1.7 Disconnect
Disconnect is used to terminate an existing connection.
Command Parameters Examples Comments
HCI_Handle 0x0001
Return Events
Disconnection_Complete
Disconnection_Failed
A.1.8 Exit_Periodic_Inquiry_Mode
Exit_Periodic_Inquiry_Mode is used to end the Periodic Inquiry mode when BTTrainer is
in Periodic Inquiry mode.
Command Parameters Examples Comments
N/A
Return Events
Exit_Periodic_Inquiry_Mode_Complete
Exit_Periodic_Inquiry_Mode_Error
A.1.9 GetSCOConnections
Returns the handles of any active SCO connections to this device.
Command Parameters Examples Comments
HCI_Handle 0x0001
71
Page 90

CATC BTTRAINER 2.20 APPENDIX A
User’s Manual
Return Events
Success
Failure: Device not found
Failure
A.1.10 Inquiry
Inquiry will cause BTTrainer to enter Inquiry mode and discover other nearby Bluetooth
devices.
Command Parameters Examples Comments
LAP
Inquiry_Length 8
Num_Responses 10
Return Events
Inquiry_Complete
Inquiry_Result
Inquiry_Error
A.1.11 Inquiry_Cancel
Inquiry_Cancel will cause BTTrainer to stop the current Inquiry if the Bluetooth device is
in Inquiry mode.
Command Parameters Examples Comments
N/A
Return Events
Inquiry_Canceled
Inquiry_Error
A.1.12 Periodic_Inquiry_Mode
Periodic_Inquiry_Mode is used to configure BTTrainer to perform a periodic Inquiry based
on a specified period range.
Note: Max_Period_Length > Min_Period_Length > Inquiry Length.
Command Parameters Examples Comments
Max Period Length 10 Range: 0x03 – 0xFFFF
Min Period Length 9 Range: 0x02 – 0xFFFE
72
Page 91

CATC BTTRAINER 2.20 APPENDIX A
User’s Manual
Command Parameters Examples Comments
Inquiry Length 8 Range: 0x01 – 0x30
Num of Responses 10 Range: 0-255 (0=Unlimited
number of responses)
Return Events
Periodic_Inquiry_Mode_Complete
Periodic_Inquiry_Mode_Error
A.1.13 PIN_Code_Request_Negative_Reply
PIN_Code_Request_Negative_Reply is used to reply to a PIN Code Request event from the
Host Controller when the Host cannot specify a PIN code to use for a connection. This
command should be executed before PIN_Code_Request event is received. By default, the
PIN_Code_Request event is rejected.
Command Parameters Examples Comments
BD_ADDR 0x010203040506
Return Events
Command_Complete
A.1.14 PIN_Code_Request_Reply
PIN_Code_Request_Reply is used to reply to a PIN Code Request event from the Host
Controller and specifies the PIN code to use for a connection. This command should be
executed before Pin_Code Request event is received. By default, the Pin_Code Request
event is rejected.
Command Parameters Examples Comments
PIN_Code (binary or ASCII) 1234 PIN_Code is a string character
that can be up to 128 bits in
length
BD_ADDR 0x010203040506
Return Events
Command_Complete
73
Page 92

CATC BTTRAINER 2.20 APPENDIX A
User’s Manual
A.1.15 Read_Clock_Offset
Read_Clock_Offset allows the Host to read the clock offset of remote devices.
Command Parameters Examples Comments
HCI_Handle 0x0001
Return Events
Read_Clock_Offset_Complete
Read_Clock_Offset_Error
A.1.16 Read_Remote_Supported_Features
Read_Remote_Supported_Features requests a list of the supported features of a remote
device.
Command Parameters Examples Comments
HCI_Handle 0x0001
Return Events
Read_Remote_Supported_Features_Complete
Read_Remote_Supported_Features_Error
A.1.17 Read_Remote_Version_Information
Read_Remote_Version_Information command will read the values for the version
information for the remote Bluetooth device.
Command Parameters Examples Comments
HCI_Handle 0x0001
Return Events
Read_Remote_Version_Information_Complete
Read_Remote_Version_Information_Error
A.1.18 Reject_Connection_Request
Reject_Connection_Request is used to decline a new incoming connection request. Execute
this command before connection request from another device. By default, all connection
requests are accepted.
Command Parameters Examples Comments
N/A
74
Page 93

CATC BTTRAINER 2.20 APPENDIX A
User’s Manual
Return Events
Reject_Connection_Request_Complete
A.1.19 Remote_Name_Request
Remote_Name_Request is used to obtain the user-friendly name of another Bluetooth
device.
The BD_ADDR command parameter is used to identify the device for which the
user-friendly name is to be obtained. The Page_Scan_Repetition_Mode and
Page_Scan_Mode command parameters specify the page scan modes supported by the
remote device with the BD_ADDR. This is the information that was acquired during the
inquiry process. The Clock_Offset parameter is the difference between its own clock and
the clock of the remote device with BD_ADDR. Only bits 2 through 16 of the difference are
used and they are mapped to this parameter as bits 0 through 14 respectively. A
Clock_Offset_Valid_Flag, located in bit 15 of the Clock_Offset command parameter, is
used to indicate if the Clock Offset is valid or not.
Command Parameters Examples Comments
BD ADDR 0x010203040506
Page Scan Rep Mode 0x0 0x00=R0; 0x01=R1; 0x02=R2
Page Scan Mode 0x0 0x00=Mandatory Page Scan
Mode
0x01=Optional Page Scan Mode
I
0x02=Optional Page Scan Mode
II
0x03=Optional Page Scan Mode
III
Clock Offset 0x0 Bit Format:
Bit 14.0 = Bit 16.2 of
CLKslave CLKmaster.
Bit 15 = Clock_Offset_
Valid_Flag where
0= Invalid Clock Offset
1=Valid Clock Offset
Return Events
Remote_Name_Request_Complete
Remote_Name_Request_Error
75
Page 94

CATC BTTRAINER 2.20 APPENDIX A
User’s Manual
A.1.20 Set_Connection_Encryption
Set_Connection_Encryption is used to enable and disable the link-level encryption.
Command Parameters Examples Comments
HCI_Handle 0x0001
Encryption_Enable 1 Range: 0 or 1
Return Events
Set_Connection_Encryption_Complete
Set_Connection_Encryption_Error
A.2 HCI Link Policy Commands
A.2.1 Get_Park_Mode
Stops park mode and enters active mode for the specified ACL link.
Command Parameters Examples Comments
HCI_Handle 0x0001
Return Events
Mode_Change
Exit_Park_Mode_Error
A.2.2 Exit_Sniff_Mode
Stops Sniff mode and enters active mode for the specified ACL link.
Command Parameters Examples Comments
HCI_Handle 0x0001
Return Events
Mode_Change
Exit_Sniff_Mode_Error
A.2.3 Hold_Mode
Places the specified ACL link into Hold Mode.
Command Parameters Examples Comments
HCI_Handle 0x0001
76
Page 95

CATC BTTRAINER 2.20 APPENDIX A
User’s Manual
Command Parameters Examples Comments
Max_Interval 0xFFFF 0x0001 - 0xFFFF
Min_Interval 0x01 0x0001 - 0xFFFF
Return Events
Mode_Change
Hold_Mode_Error
A.2.4 Set_Park_Mode
Places the specified ACL link into Park mode.
Command Parameters Examples Comments
HCI_Handle 0x0001
Beacon_Max_Interval 0xFFFF 0x0001 - 0xFFFF
Beacon_Min_Interval 0x01 0x0001 - 0xFFFF
Return Events
Mode_Change
Park_Mode_Error
A.2.5 QoS_Setup
Used to specify Quality of Service parameters for a connection handle.
Command Parameters Examples Comments
HCI_Handle 0x0001
ServiceType 0x01 0=No traffic;
1=Best effort;
2=Guaranteed
TokenRate 0 Token rate in Bytes/second
PeakBandwidth 0 Bytes per second
Latency 0xFFFFFFFF In microseconds
DelayVariation 0xFFFFFFFF In microseconds
Return Events
Quality_of_Service_Setup_Complete
Quality_of_Service_Setup_Error
77
Page 96

CATC BTTRAINER 2.20 APPENDIX A
User’s Manual
A.2.6 Read_Link_Policy_Settings
Reads Link Policy setting for the specified ACL link.
Command Parameters Examples Comments
HCI_Handle 0x0001
Return Events
Read_Link_Policy_Settings_Complete
Read_Link_Policy_Settings_Error
A.2.7 Role_Discovery
Role_Discovery is used for a Bluetooth device to determine which role the device is
performing (Master or Slave) for a particular connection.
Command Parameters Examples Comments
HCI_Handle 0x0001
Return Events
Role_Discovery_Complete
Role_Discovery_Error
A.2.8 Sniff_Mode
Places the specified ACL link into Sniff mode.
Command Parameters Examples Comments
HCI_Handle 0x0001
Max_Interval 0xFFFF 0x0001 - 0xFFFF
Min_Interval 0x01 0x0001 - 0xFFFF
Attempt 0x3FF6 0x0001 - 0x7FFF
Timeout 0x7FFF 0x0000 - 0x7FFF
Return Events
Mode_Change
Sniff_Mode_Error
78
Page 97

CATC BTTRAINER 2.20 APPENDIX A
User’s Manual
A.2.9 Switch_Role
Switches the current role (master/slave) of the calling device with the role of the device
specified.
Command Parameters Examples Comments
BD_ADDR 0x010203040506
Return Events
Role_Change_Complete
Role_Change_Error
A.2.10 Write_Link_Policy_Settings
Writes link policy settings for the specified ACL link.
Command Parameters Examples Comments
HCI_Handle 0x0001
Link_Policy_Settings 0xF 0x0000: Disable all LM modes
0x0001: Enable master/slave
switch
0x0002: Enable Hold Mode
0x0004: Enable Sniff Mode
0x0008: Enable Park Mode
0xF: Enable all (Default)
Return Events
Write_Link_Policy_Settings_Complete
Write_Link_Policy_Settings_Error
A.3 HCI Host Controller & Baseband Commands
A.3.1 Change_Local_Name
Change_Local_Name allows the user-friendly name to be modified for the BTTrainer.
Command Parameters Examples Comments
Name BTTrainer Maximum string length =32
characters
Return Events
Change_Local_Name_Complete
Change_Local_Name_Error
79
Page 98

CATC BTTRAINER 2.20 APPENDIX A
User’s Manual
A.3.2 Create_New_Unit_Key.
Command Parameters Examples Comments
NA
A.3.3 Delete_Stored_Link_Key
Change_Local_Name allows the user-friendly name to be modified for the BTTrainer.
Command Parameters Examples Comments
Name BTTrainer Maximum string length =32
characters
Return Events
Change_Local_Name_Complete
Change_Local_Name_Error
A.3.4 Flush
Change_Local_Name allows the user-friendly name to be modified for the BTTrainer.
Command Parameters Examples Comments
HCI Handle s
A.3.5 Host_Buffer_Size
Used by the BTTrainer to notify the BTTrainer Host Controller about its buffer sizes for
ACL and SCO data. The BTTrainer Host Controller will segment the data to be transmitted
from the Host Controller to BTTrainer, so that data contained in HCI Data Packets will not
exceed these sizes.
Command Parameters Examples Comments
ACL_Data_Length 0x2A0 Only ACL is valid
SCO_Data_Length 0xFF The value of the
Host_SCO_Data_Packet_
Length must be > 399
Total_Num_ACL 10
Total_Num_SCO 0xFF
Return Events
Host_Buffer_Size_Complete
Host_Buffer_Size_Error
80
Page 99

CATC BTTRAINER 2.20 APPENDIX A
User’s Manual
A.3.6 Read_Authentication_Enable
Read_Authentication_Enable will read the value for the Authentication_Enable parameter,
which controls whether BTTrainer will require authentication for each connection with
other Bluetooth devices.
Command Parameters Examples Comments
N/A
Return Events
Read_Authentication_Enable_Complete
Read_Authentication_Enable_Error
A.3.7 Read_Automatic_Flush_Timeout
Command Parameters Examples Comments
HCI_Handle
A.3.8 Read_Class_of_Device
Read_Class_of_Device will read the value for the Class_of_Device parameter for
BTTrainer, which is used to indicate its capabilities to other devices.
Command Parameters Examples Comments
N/A
Return Events
Read_Class_of_Device_Complete
Read_Class_of_Device_Error
A.3.9 Read_Connection_Accept_Timeout
Read_Connection_Accept_Timeout will read the value for the
Connection_Accept_Timeout parameter so that BTTrainer can automatically deny a
connection request after a specified period has occurred, and to refuse a new connection.
Command Parameters Examples Comments
N/A
Return Events
Read_Connection_Accept_Timeout_Complete
Read_Connection_Accept_Timeout_Error
81
Page 100

CATC BTTRAINER 2.20 APPENDIX A
User’s Manual
A.3.10 Read_Current_IAC_LAP
Read_Current_IAC_LAP will read the LAP(s) used to create the Inquiry Access Codes
(IAC) that BTTrainer is simultaneously scanning for during Inquiry Scans.
Command Parameters Examples Comments
N/A
Return Events
Read_Current_IAC_LAP_Complete
Read_Current_IAC_LAP_Error
A.3.11 Read_Encryption_Mode
Read_Encryption_Mode will read the value for the Encryption_Mode parameter, which
controls whether BTTrainer will require encryption for each connection with other
Bluetooth devices.
Command Parameters Examples Comments
N/A
Return Events
Read_Encryption_Mode_Complete
Read_Encryption_Mode_Error
A.3.12 Read_Hold_Mode_Activity
Command Parameters Examples Comments
NA
A.3.13 Read_Inquire_Scan_Activity
Command Parameters Examples Comments
NA
A.3.14 Read_Link_Supervision_Timeout
Reads link supervision timeout setting for the specified ACL link.
Command Parameters Examples Comments
HCI_Handle 0x0001
82
 Loading...