

Page 1
Teledex iPhone Cordless
RediDock User Guide
Contacting Teledex
Worldwide Headquarters
6311 San Ignacio Ave
San Jose, CA 95119
Telephone
Main: +1.408.363.3100
Toll Free (US) +1.800.794.8353
Fax: +1.408.363.3136
Internet
www.teledex.com
Email
sales@teledex.com
Introduction
Your Teledex iPhone RediDock handset and
charging base is designed to be used with a
full Teledex iPhone DECT or Teledex iPhone
SIP cordless telephone. It will not function
without a cordless base station with which
to mate.
For operational instructions pertaining to
the cordless handset, please refer to the
user guide for the Teledex iPhone DECT
or Teledex iPhone SIP cordless phone with
which this RediDock is mated.
What’s in Your Package
• Cordless Charging Base
• Cordless Handset
• AC Adapter (for cordless RediDock only)
• Handset battery
• Battery compartment retaining
screw and rubber screw cover
Battery Installation
(APPLICABLE TO NON-TETHERED VERSION ONLY)
1. Prepare to install the battery into the
cordless handset by removing the battery
cover and sliding it off. If the cover is
secured with a screw, remove the
screw first.
2. Insert the battery connector into the
handset’s connector. The connector is
“keyed” so it only goes in one way.
Do not force the connection.
3. Replace the battery compartment cover
and the retaining screw.
4. Insert the rubber screw cover into the hole
in which the screw is installed.
5. Place the handset on the charging base
and ensure that the CHARGE LED lights,
indicating the handset is receiving
charging current. To obtain optimal
performance of the telephone, be sure
to charge the battery for 10 to 12 hours.
AC Adapter Installation
(APPLICABLE TO CORDLESS REDIDOCK ONLY)
1. Place the AC adapter into an unswitched
electrical outlet.
2. Plug the connecting cable from the AC
adapter into the jack on the bottom of
the phone. Route this cable through
the cable channel out to the edge of
the base.
3. Place the charging base in the
desired location.
Base Registration Procedure
1. Please handset to the base with which this
RediDock handset is mated. A beep sound
will be produced when the registration is
successfully done.
2. (For tethered version only) Plug the coil
cord into the RediDock.
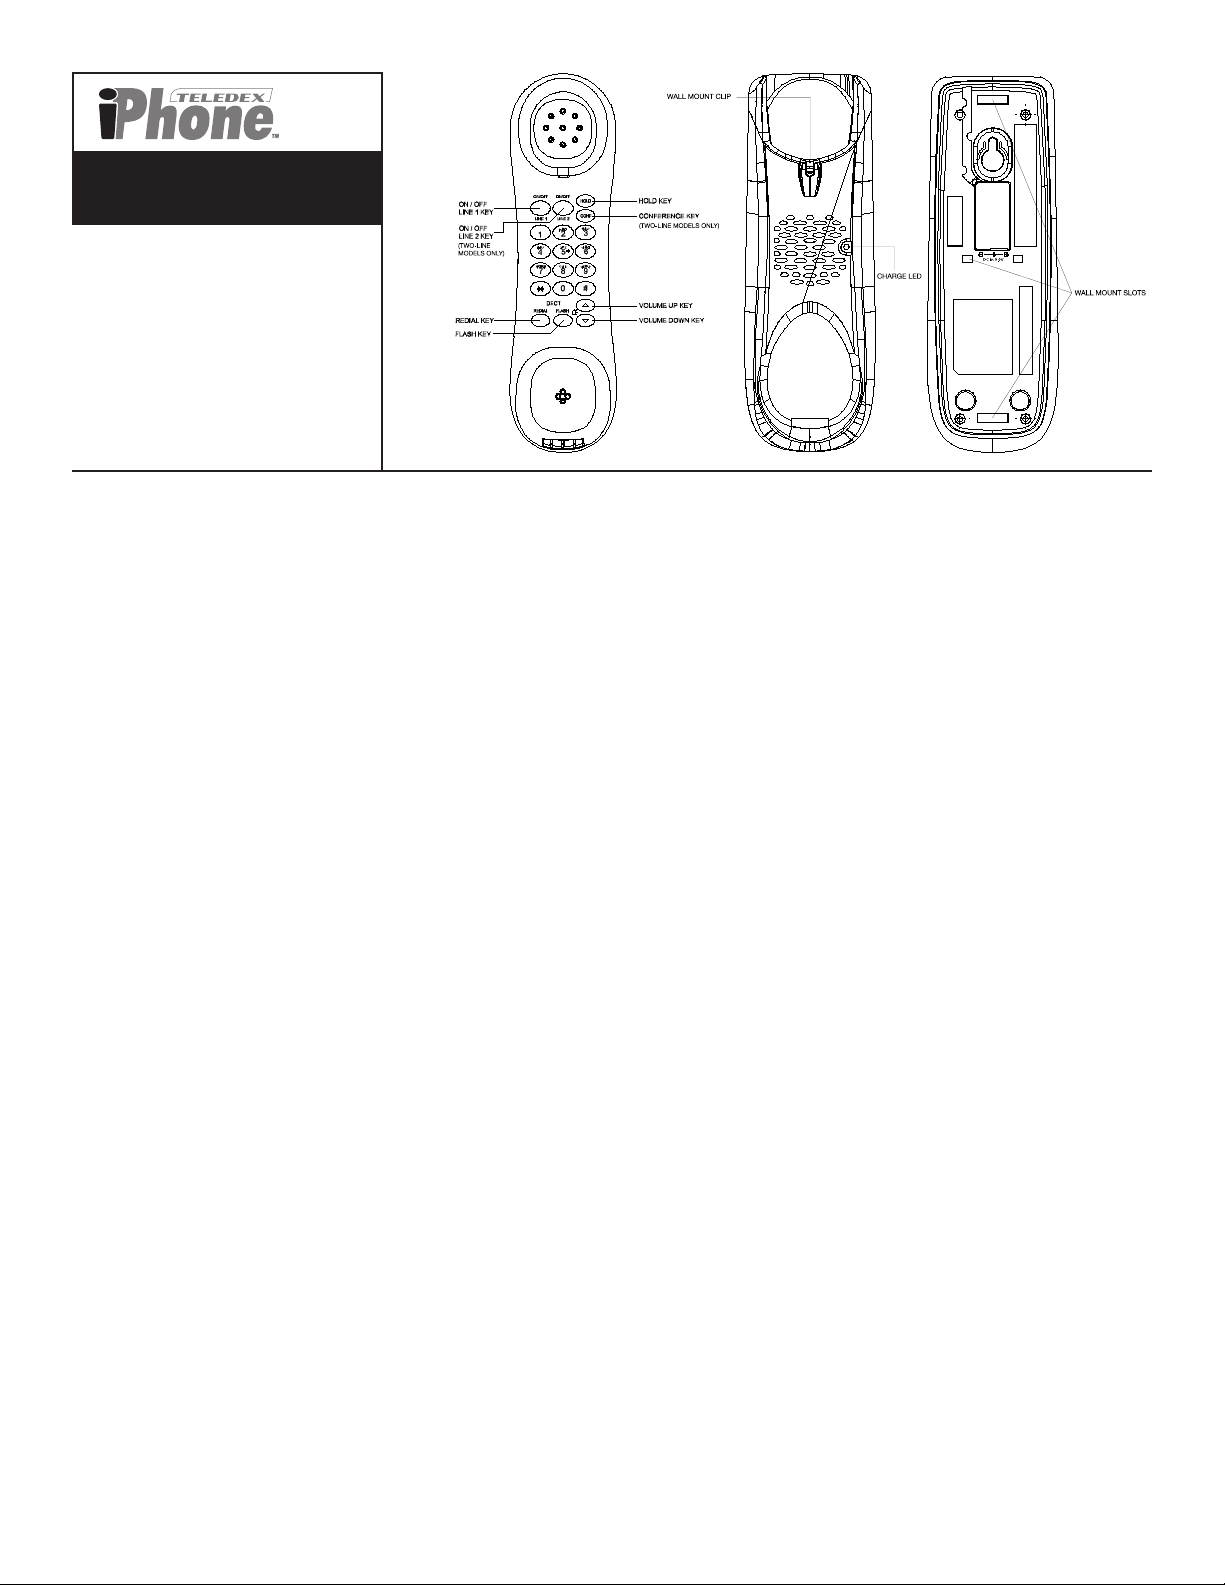
Wall Mounting Instructions
To mount your RediDock charging base on a
wall, follow these steps:
1. Turn the base over and remove the wall
mount stand by depressing the tab at
the top of the stand and withdrawing
the stand from the base.
2. Rotate the wall mount stand 180 degrees
vertically and insert the two tabs on the
stand into the matching holes in the
middle of the base. Then snap the tab
into the slot at the bottom of the base.
3. Remove the wall mount clip from
the handset well. Rotate it 180 degrees
vertically and reinsert it into its slot.
This will help to retain the handset
on the base when charging.
Technical Specifications
Dimensions
2.75” x 8.17”
Weight
With handset: 12 oz.
Without handset: 7 oz.
Power Adapter
9 VDC 300 mA adapter
48VDC PoE Class 1 (For SIP Cordless RediDock)
Output rating at charger pin: 4.2V/.18A
IMPORTANT SAFETY INSTRUCTIONS
WHEN USING YOUR TELEPHONE EQUIPMENT, BASIC
SAFETY PRECAUTIONS SHOULD ALWAYS BE FOLLOWED
TO REDUCE THE RISK OF FIRE, ELECTRIC SHOCK AND
INJURY TO PERSONS, INCLUDING THE FOLLOWING:
1. READ AND UNDERSTAND ALL INSTRUCTIONS.
2. FOLLOW ALL WARNINGS AND INSTRUCTIONS MARKED
ON THE PRODUCT.
3. UNPLUG THE PRODUCT FROM THE WALL OUTLET
BEFORE CLEANING. DO NOT USE LIQUID CLEANER
OR AEROSOL CLEANERS.
USE A DAMP CLOTH FOR CLEANING.
4. DO NOT USE THIS PRODUCT NEAR WATER, FOR
EXAMPLE, NEAR A BATHTUB, WASH BOWL, KITCHEN
SINK OR LAUNDRY TUB, IN A WET BASEMENT, OR
NEAR A SWIMMING POOL.
5. DO NOT PLACE THIS PRODUCT ON AN UNSTABLE
CART, STAND OR TABLE. THE PRODUCT MAY FALL,
CAUSING SERIOUS DAMAGE TO THE PRODUCT.
6. SLOTS AND OPENINGS IN THE CABINET AND THE
BACK OF BOTTOM ARE PROVIDED FOR VENTILATION,
TO PROTECT IT FROM OVERHEATING. THESE
OPENINGS MUST NOT BE BLOCKED OR COVERED. THE
OPENINGS SHOULD NEVER BE BLOCKED BY PLACING
THE PRODUCT ON THE BED, SOFA, RUG OR ANY
OTHER SIMILAR SURFACE. THIS PRODUCT SHOULD
NEVER BE PLACED NEAR OR OVER A RADIATOR OR
HEAT REGISTER. THIS PRODUCT SHOULD NOT BE
PLACED IN A BUILT-IN INSTALLATION UNLESS
PROPER VENTILATION IS PROVIDED.
7. NEVER PUSH OBJECTS OF ANY KIND INTO THIS
PRODUCT THROUGH CABINET SLOTS AS THEY MAY
TOUCH DANGEROUS VOLTAGE POINTS OR SHORT
OUT PARTS THAT COULD RESULT IN A RISK OF FIRE OR
ELECTRIC SHOCK. NEVER SPILL LIQUID OF ANY KIND
ON THE PRODUCT.
8. TO REDUCE THE RISK OF ELECTRIC SHOCK DO NOT
DISASSEMBLE THIS PRODUCT. BUT TAKE IT TO A
QUALIFIED SERVICE FACILITY IF SERVICE OR REPAIR
WORK IS REQUIRED. OPENING OR REMOVING COVERS
MAY EXPOSE YOU TO DANGEROUS VOLTAGES OR
OTHER RISKS. INCORRECT REASSEMBLY CAN CAUSE
ELECTRIC SHOCK WHEN THE APPLIANCE IS
SUBSEQUENTLY USED.
9. UNPLUG THIS PRODUCT FROM THE WALL OUTLET
AND REFER SERVICING TO QUALIFIED SERVICE
PERSONNEL UNDER THE FOLLOWING CONDITIONS:
– WHEN THE POWER SUPPLY CORD OR PLUG IS
DAMAGED OR FRAYED.
– IF LIQUID HAS BEEN SPILLED INTO THE PRODUCT.
– IF THE PRODUCT HAS BEEN EXPOSED TO RAIN
OR WATER.
– IF THE PRODUCT DOES NOT OPERATE NORMALLY
BY FOLLOWING THE OPERATING INSTRUCTIONS.
ADJUST ONLY THOSE CONTROLS THAT ARE
COVERED BY THE OPERATING INSTRUCTIONS, AS
IMPROPER ADJUSTMENT OF OTHER CONTROLS
MAY RESULT IN DAMAGE,AND MAY REQUIRE
EXTENSIVE WORK BY A QUALIFIED TECHNICIAN TO
RESTORE THE PRODUCT TO NORMAL OPERATION.
– IF THE PRODUCT HAS BEEN DROPPED OR THE
CABINET HAS BEEN DAMAGED.
– IF THE PRODUCT EXHIBIT A DISTINCT CHANGE
IN PERFORMANCE.
10. AVOID USING A TELEPHONE (OTHER THAN A
CORDLESS TYPE) DURING AN ELECTRICAL STORM.
THERE MAY BE A REMOTE RISK OF ELECTRIC SHOCK
FROM LIGHTNING.
11. DO NOT USE THE TELEPHONE TO REPORT A GAS LEAK
IN THE VICINITY OF THE LEAK.
12. [CAUTION] RISK OF EXPLOSION IF BATTERY IS
REPLACED BY AN INCORRECT TYPE. DISPOSE OF USED
BATTERIES ACCORDING TO THE INSTRUCTIONS.
PLEASE SAVE THESE INSTRUCTIONS
 Loading...