

Page 1
1
3G Desk Phone
www.gsmdeskphone.co.uk
0800 928 8011
3G PHONE
Fixed Wireless Phone
Installation & User Guide
Version 01 – August 2012
Page 2

3G Phone
2
3G Desk Phone
www.gsmdeskphone.co.uk
0800 928 8011
User Manual
1. Contents
1. Contents ..................................................................................................... 2
2. Notices ....................................................................................................... 3
3. Recommendations ........................................................................................ 3
4. Regulatory Information ................................................................................. 4
5. Introduction................................................................................................. 5
6. Getting Started ............................................................................................ 7
6.1. Setting Up the Phone ................................................................................. 7
6.2. Powering Up the 3G Phone for the First Time ................................................ 9
6.3. Battery Backup ......................................................................................... 9
7. Calling .......................................................................................................10
7.1. Starting a phone call .................................................................................10
7.2. Receiving a phone call ..............................................................................10
7.3. Volume Control and Mute ..........................................................................10
7.4. Ending a phone call ..................................................................................10
8. Menu .........................................................................................................11
8.1. Phone Book Menu .....................................................................................12
8.1.1. Preview .............................................................................................12
8.1.2. Search ..............................................................................................13
8.1.3. Add ..................................................................................................13
8.1.4. Delete All ..........................................................................................13
8.1.5. Copy All ............................................................................................14
8.1.6. Save Position .....................................................................................14
8.1.7. Memory Status ..................................................................................14
8.2. Message Menu .........................................................................................15
8.2.1. SMS .................................................................................................15
8.2.2. Voice Mail..........................................................................................18
8.2.3. Setting .............................................................................................18
8.3. Call Log Menu ..........................................................................................19
8.3.1. Missed Calls .......................................................................................19
8.3.2. Received Calls ...................................................................................19
8.3.3. Dialled Calls ......................................................................................20
8.3.4. Delete Records ..................................................................................20
8.4. Settings Menu ..........................................................................................21
8.4.1. Quick Dial .........................................................................................21
8.4.2. Phone Setup ......................................................................................22
8.4.3. Display .............................................................................................22
8.4.4. Call Settings ......................................................................................22
8.4.5. Tone Setting ......................................................................................23
8.4.6. Network Setup ...................................................................................24
8.4.7. Security Setup ...................................................................................24
8.4.8. Tools ................................................................................................25
8.4.9. Reset ................................................................................................25
9. Troubleshooting ..........................................................................................26
10. Hardware Specification .................................................................................27
Page 3

3G Phone
3
Date
Doc
Version
Change
August 2012
1
1st release of document
3G Desk Phone
www.gsmdeskphone.co.uk
0800 928 8011
User Manual
Document Control
2. Notices
Emergency Calls
This 3G phone operates using wireless signalling which cannot guarantee
connection in all conditions. Therefore, you should never rely solely on the
terminal equipment for essential communications such as medical or emergency
services.
No responsibility is assumed by TFM for the use or reliability of the 3G phone when used
in a situation or with other equipment not supplied or specified by TFM.
TelecomFM shall accept no liability for any error, loss, or damages of any kind resulting
from the use of this document or the equipment it relates to.
The 3G Phone is supplied with a 1 year return to base warranty which covers any defects
in design or manufacture. No other warranties whatsoever are given.
The wording in this document may change from time to time. Please refer to the
TelecomFM web site www.telecomfm.co.uk for the latest release.
3. Recommendations
Do Not clean the 3G phone whilst powered up. Use a Damp cloth for cleaning. Do not
use liquid or aerosol cleaners that could damage the 3G phone.
Do Not put obstructions in the way of the 3G phone that may cause the signal to fade.
Do Not put the 3G phone too close to other electronic devices that may cause
interference when in use
Do Not place the 3G phone in direct sunlight or by any heat source
Do Not disassemble the batteries and always seek professional advice when disposing of
batteries
Page 4
3G Phone
4
Declaration of Conformity
Applicant: TelecomFM Ltd.
Address: 895 Plymouth Road, Slough,
Berkshire, SL1 4LP, U.K.
Product: 3G Phone
This equipment complies with the European R&TTE
Directive no. 1999/5/EC on radio and telecommunication
terminal equipment.
TelecomFM
June 2012
3G Desk Phone
www.gsmdeskphone.co.uk
0800 928 8011
User Manual
4. Regulatory Information
Page 5
3G Phone
5
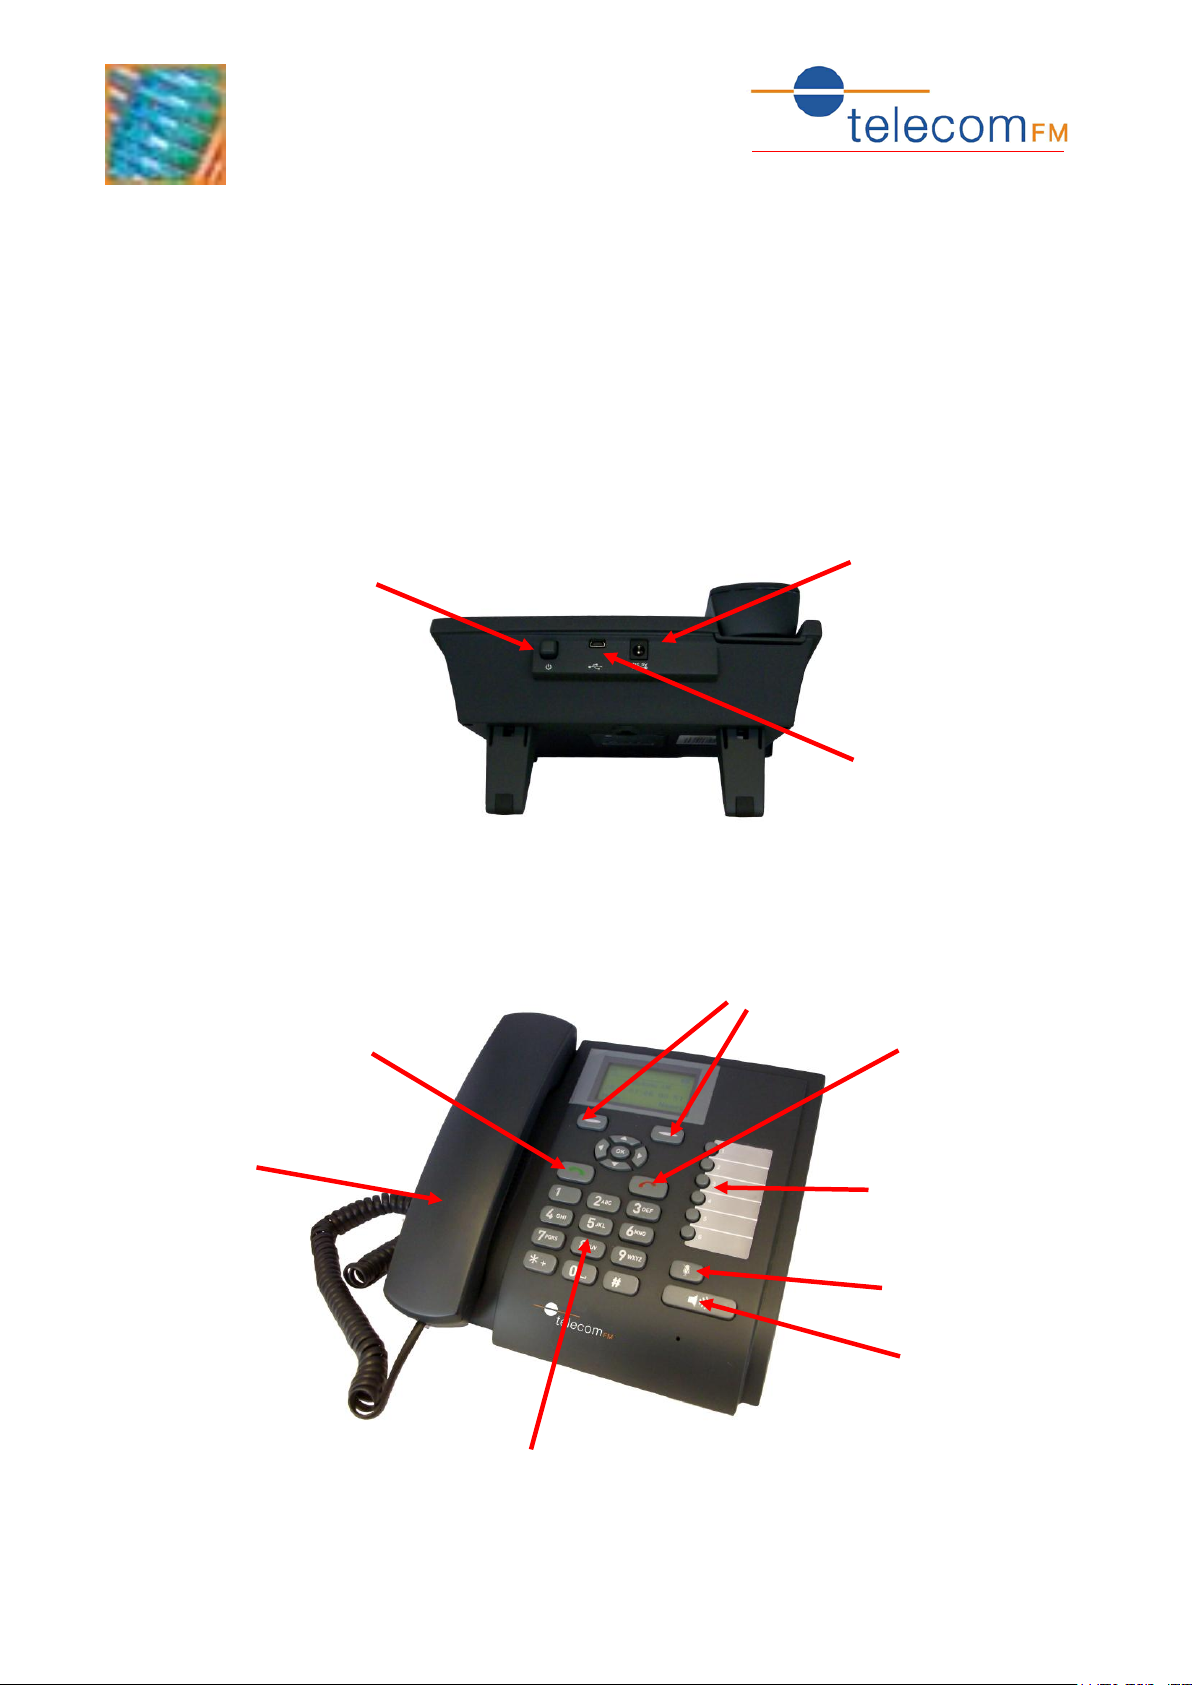
Power (On/Off) button
Power Adapter connection
Micro-USB connection
Dial Key
Programmable Keys
Mute (secrecy) Key
Handsfree Key
Function Keys
Hangup Key
Handset
Numeric Keys
3G Desk Phone
www.gsmdeskphone.co.uk
0800 928 8011
User Manual
5. Introduction
Thank you for purchasing the 3G phone.
The 3G Phone can be used to make and receive phone calls, send and receive SMS
messages and connect to the internet at locations where a fixed telephone line is not
available.
The 3G Phone incorporates:
Rear View:
Top View:
Page 6
6
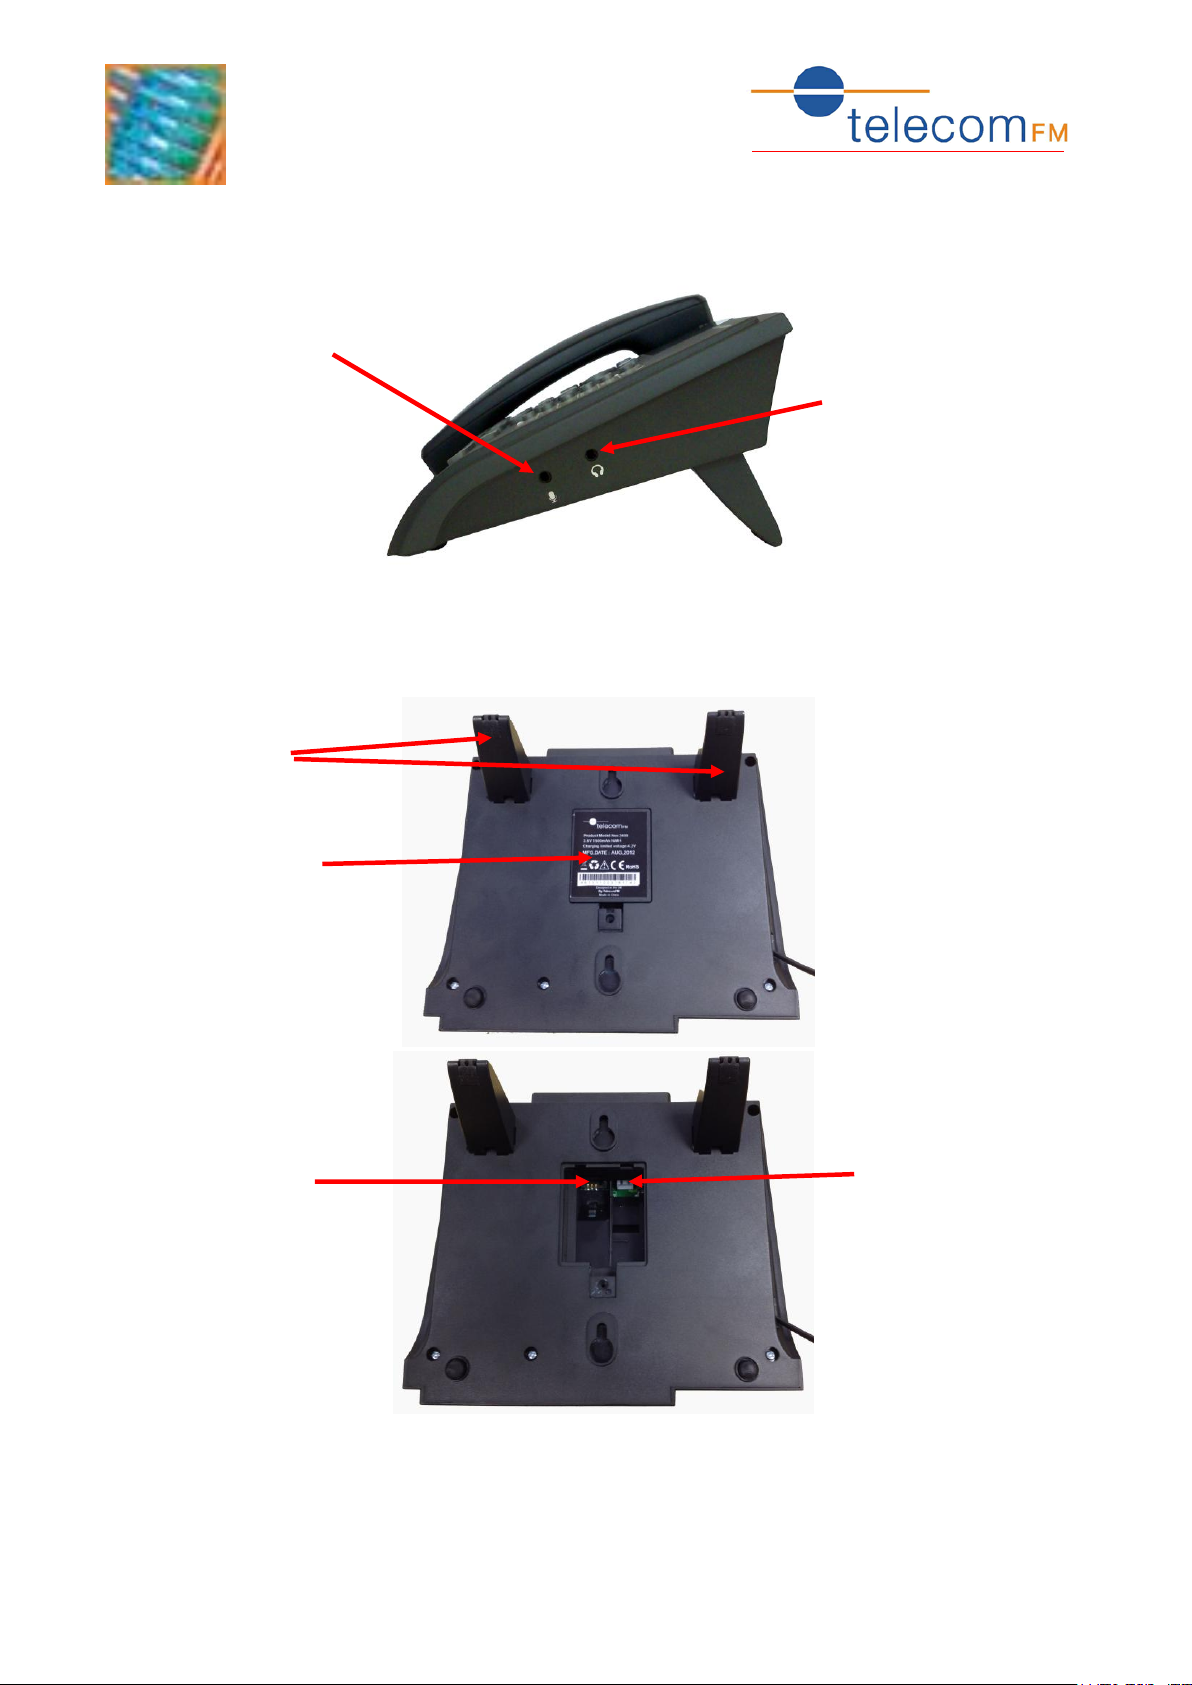
Side View:
Microphone Connection
Headphone Connection
Feet
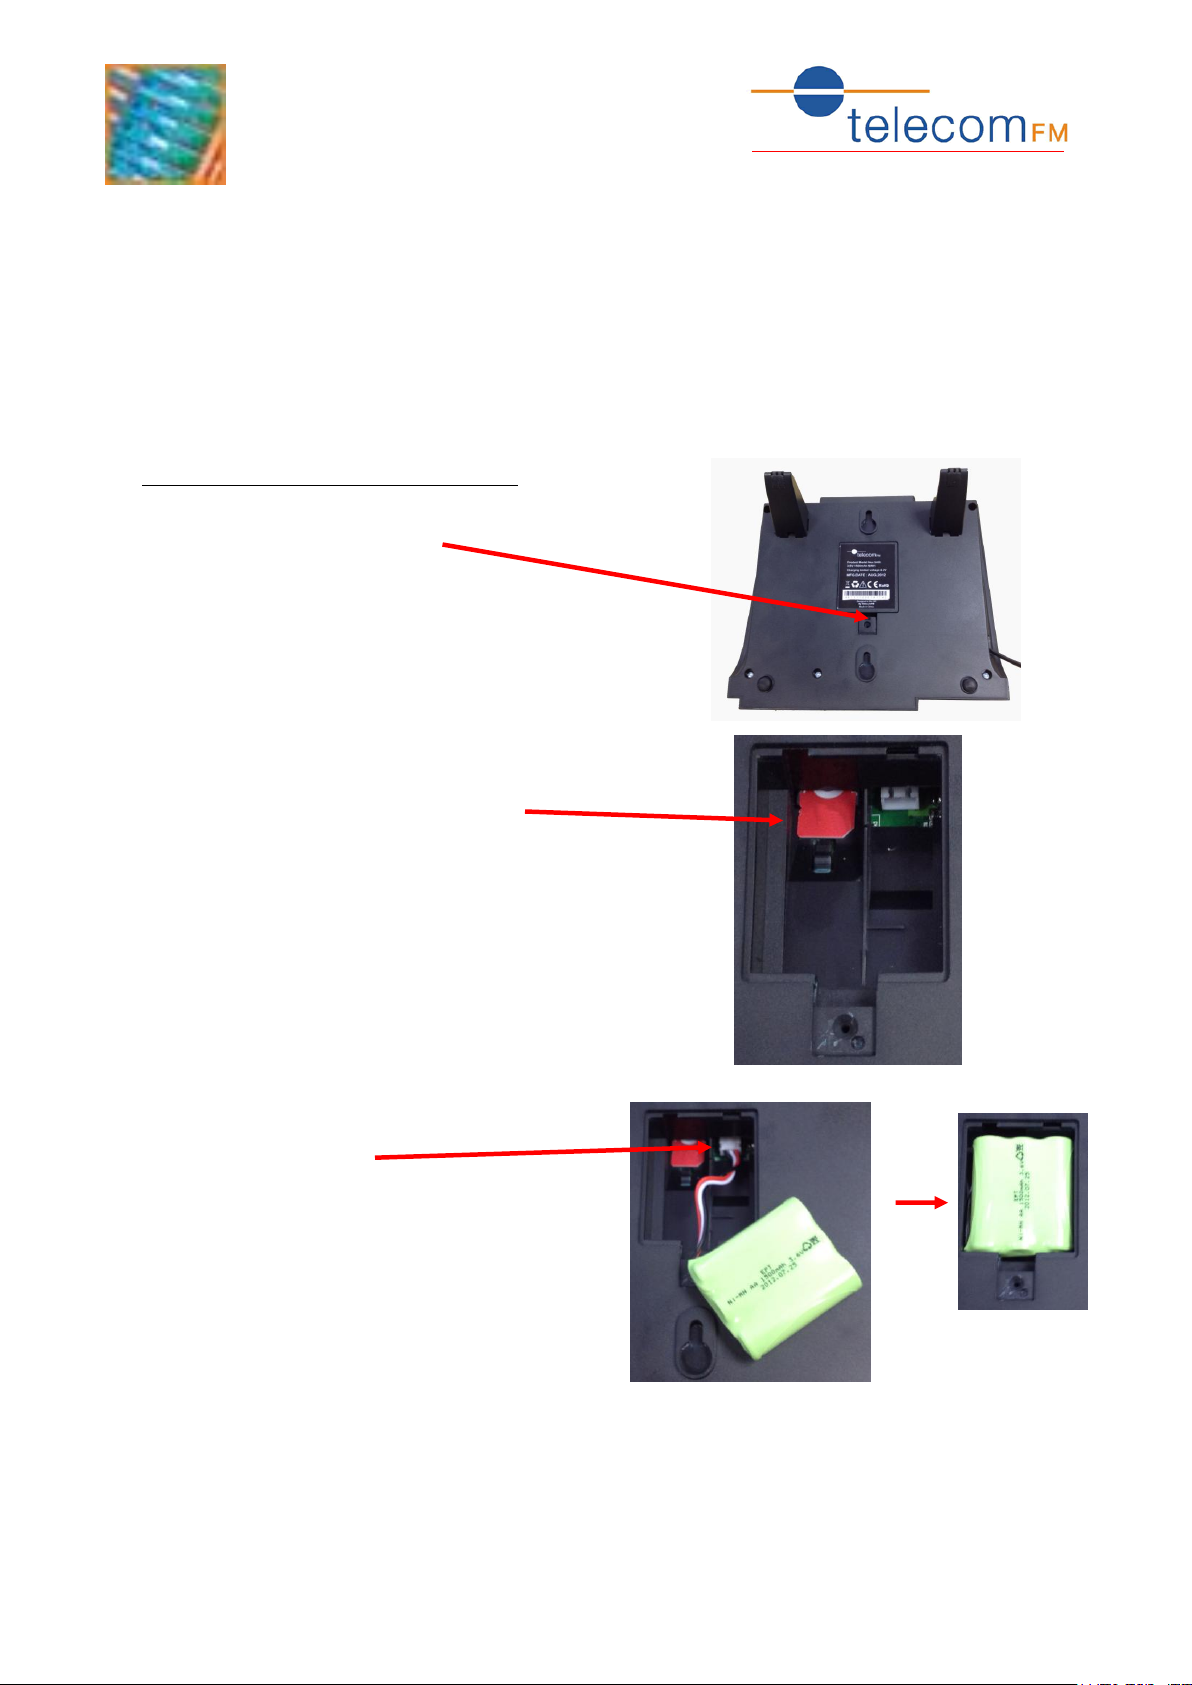
Battery Cover
SIM Card slot
Battery connector
3G Desk Phone
www.gsmdeskphone.co.uk
0800 928 8011
Bottom View:
3G Phone
User Manual
Page 7
3G Phone
7
3G Desk Phone
www.gsmdeskphone.co.uk
0800 928 8011
User Manual
6. Getting Started
Remove the 3G Phone from the packaging, and proceed as follows:
Warning! To avoid damage do not connect power until you have inserted the SIM
and battery pack
6.1. Setting Up the Phone
Install the SIM card and battery pack
Unscrew the battery cover screw and remove the
battery cover.
Slide the SIM card into position making sure that the
gold pins make contact
Connect the battery pack into its connector
and position in place
Replace the battery cover and screw.
Page 8
3G Phone
8
3G Desk Phone
www.gsmdeskphone.co.uk
0800 928 8011
User Manual
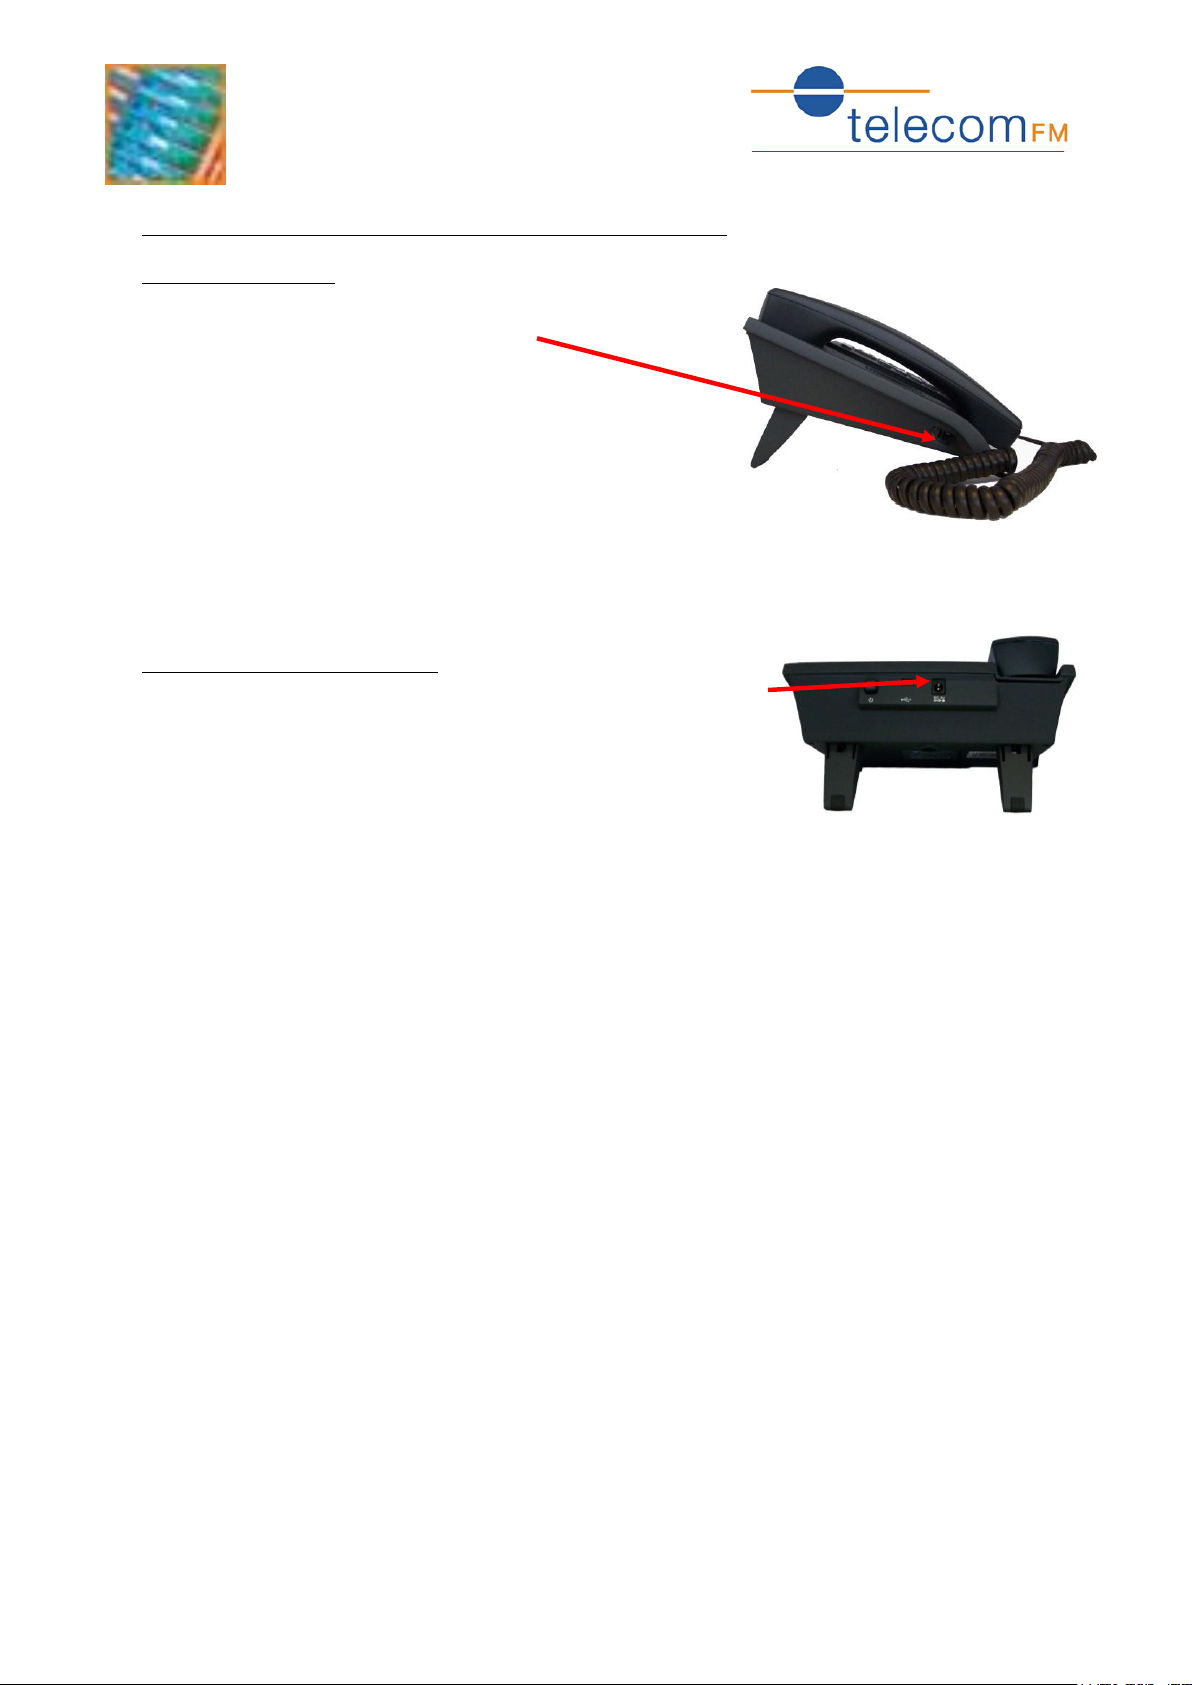
(Optional) Attach the 2 feet to the underside of the phone
Attach the Handset
Plug one end of the handset cord into the bottom of
the handset and the other end to the RJ11 connector
found on the side of the 3G Phone
Connecting the power Supply
Connect the power supply unit to the mains AC outlet and to
the power supply connector on the phone (marked DC 5v)
Page 9
3G Phone
9
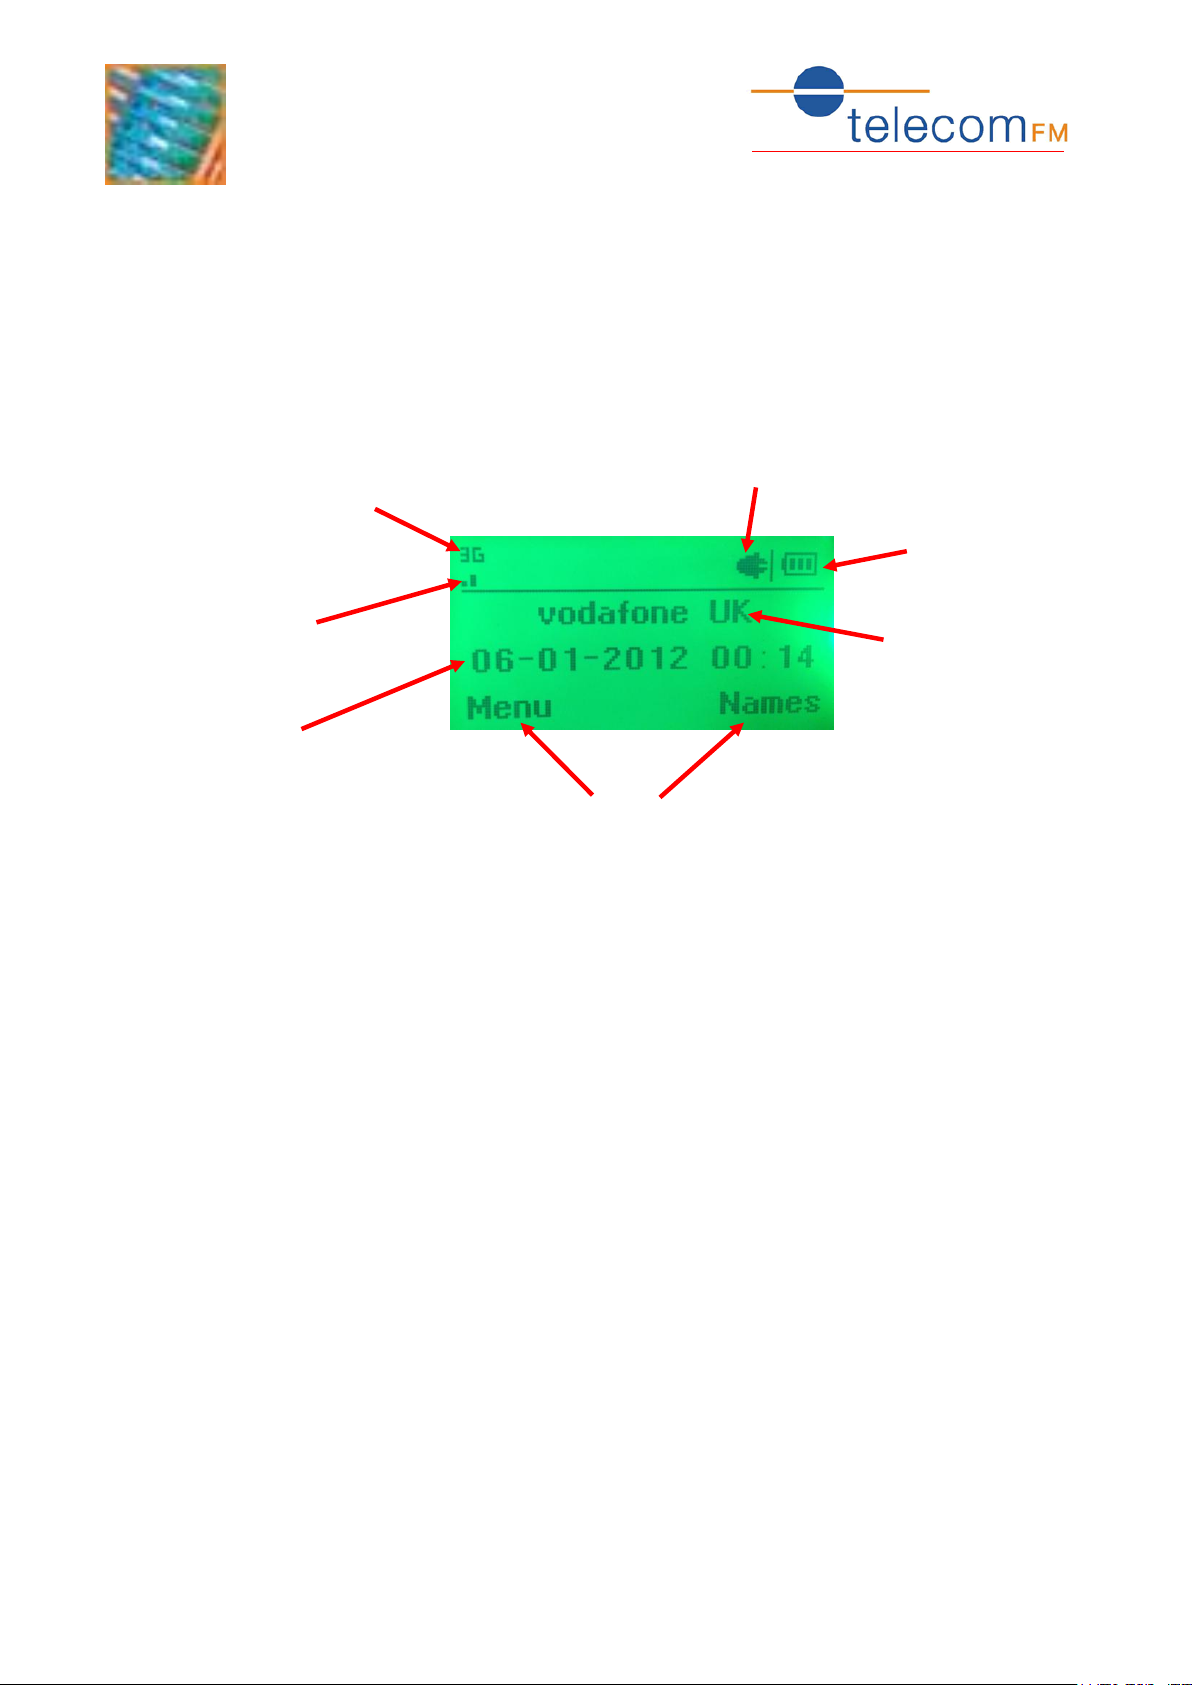
2G/3G indicator
(displays “G” when connected
to 2G network and “3G” when
connected to 3G network)
Signal Strength
Mains Power indicator
Battery Level
Network
Name
Date and Time
Function key operations
3G Desk Phone
www.gsmdeskphone.co.uk
0800 928 8011
User Manual
6.2. Powering Up the 3G Phone for the First Time
Press the power button on the back of the unit and wait for the display to light up and
for the 3G phone to initialise.
The 3G Phone will now carry out an auto test and log onto your chosen network. If
successful the following will be displayed on the LCD screen:
6.3. Battery Backup
Note: To optimize battery life and performance it is recommended that once powered up
for the first time you leave the mains power connected for a minimum of 5 hours before
operating the phone from battery power.
If there is a power outage the AC power symbol will go out and the 3G phone
will automatically switch to battery backup mode and show the battery symbol
charge status.
When in battery mode the battery provides approximately 100 hours standby
time and approximately 2 hours talk time (subject to network signal and
environmental conditions).
Page 10
3G Phone
10
3G Desk Phone
www.gsmdeskphone.co.uk
0800 928 8011
User Manual
7. Calling
7.1. Starting a phone call
Either lift the handset or press the Handsfree key . After hearing dial tone,
dial the required number followed by either the Green Dial key or the OK key
. The call will then be connected.
7.2. Receiving a phone call
When an incoming call is received the caller’s number (if available) will be displayed on
the phone display and the ring tone will be heard. To answer the call either lift the
handset, press the Handsfree key or press the Green key .
7.3. Volume Control and Mute
To reduce the speaker volume during a phone call press the Left arrow key .
To increase the speaker volume during a phone call press the Right arrow key .
To mute the microphone during a phone call (secrecy function) press the Mute key
. Press the Mute key a second time to un-mute the microphone.
7.4. Ending a phone call
A call may be ended at any time by pressing the Red Hangup key .
If the Handset is in use a call may also be ended by replacing the handset.
If the phone is in Handsfree (speakerphone) mode a call may also be ended by pressing
the Handsfree button .
Page 11
3G Phone
11
Phonebook
Messages
Call Log
Settings
1 Preview
2 Search
3 Add
4 Delete All
5 Copy All
6 Group
7 Save Position
8 Memory Status
1 SMS
2 Voice Mail
3 Settings
1 Missed Calls
2 Received Calls
3 Dialled Calls
4 Delete Records
1 Quick Dial
2 Phone Setup
3 Display
4 Call Settings
5 Tone Settings
6 Network Setup
7 Security Setup
8 Tools
9 Reset
3G Desk Phone
www.gsmdeskphone.co.uk
0800 928 8011
User Manual
8. Menu
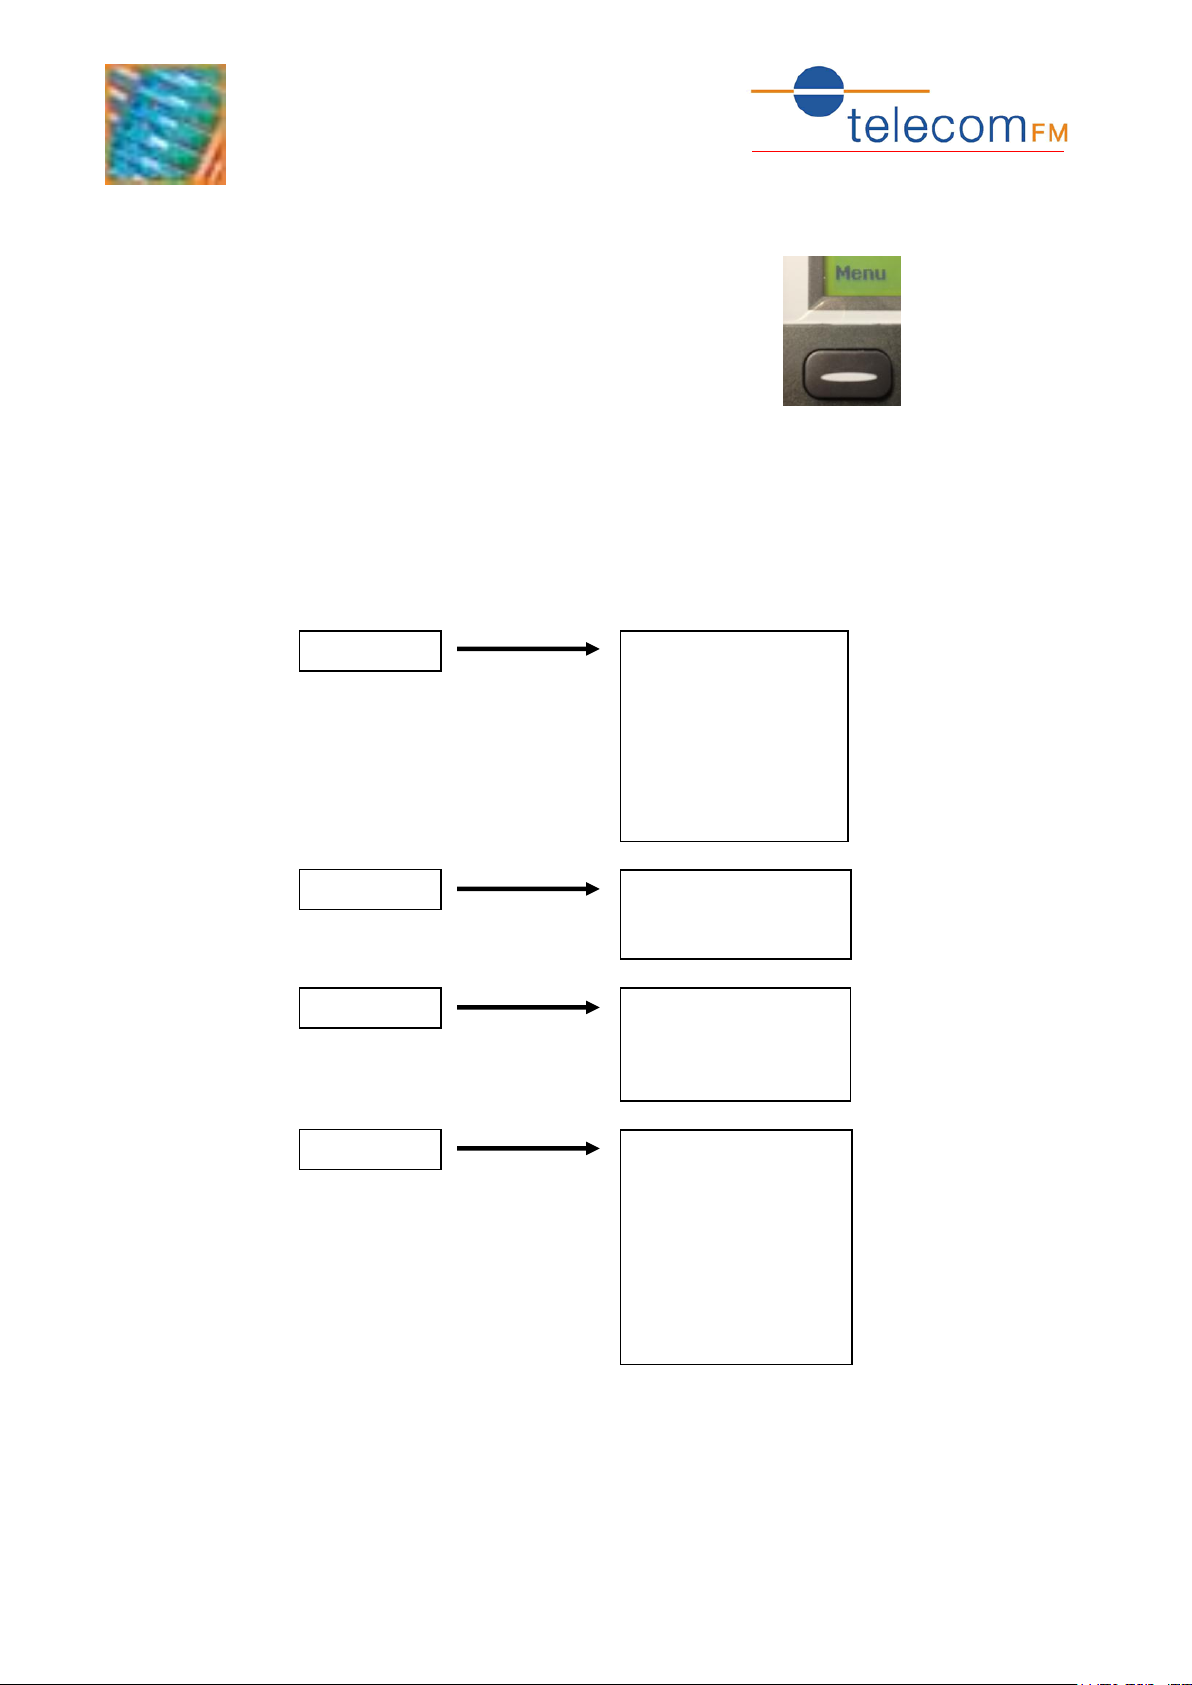
The phones menu system can be accessed by pressing the
Left function key whenever “Menu” is displayed on the
screen:
There are 4 menus available – use the Left and Right arrow keys to select the required
menu and then press the OK key.
After entering one of the 4 menus use the Up and Down arrow keys to select between
the options and sub-menus and press the OK key to select.
The menu structure is as follows:
These menus are described in detail in the following pages.
Page 12

3G Phone
12
3G Desk Phone
www.gsmdeskphone.co.uk
0800 928 8011
User Manual
8.1. Phone Book Menu
The phone book allows the storage of names and numbers for commonly used contacts.
Up to 1000 contacts can be stored on the telephone. Additional contacts can be stored on
the SIM card.
8.1.1. Preview
Displays a list of all of the current contacts in the phone book.
Use the Up and Down arrow keys to move through the list of contacts.
Press the OK key to select a contact and display a new menu of options:
1 New Message
2 Voice Call
3 Preview
4 Edit
5 Delete
6 Copy
7 Move
8 Add to Blacklist
9 Send V/Card
1. New Message:
Send an SMS message to the selected contact.
2. Voice Call:
Start a new voice call to the selected contact
3. Preview:
View the selected contact name and telephone number
4. Edit:
Edit the selected contact details
5. Delete:
Delete the selected contact.
6. Copy:
Copy the selected contact from the Phone memory to the SIM card or from the
SIM card to the Phone memory
7. Move:
Move the selected contact from the Phone memory to the SIM card or from the
SIM card to the Phone memory
8. Add to Blacklist:
Add the selected contact to a Blacklist that will block inbound calls from the
contact number
9. Send Vcard:
Send the contact details as a Vcard to another device. Enter the number for the
other device or choose “Search” to select from the phone book.
Page 13

3G Phone
13
3G Desk Phone
www.gsmdeskphone.co.uk
0800 928 8011
User Manual
8.1.2. Search
Search for a contact in the phone book.
Enter the first character(s) of the contacts name and then press the OK key to view a list
of contacts which match.
Use the Up and Down arrow keys to move through the list of matched contacts.
Press the OK key to select a contact and display a new menu of options:
1 New Message
2 Voice Call
3 Preview
4 Add to Blacklist
5 Send V/Card
1. New Message:
Send an SMS message to the contact.
2. Voice Call:
Start a new voice call to the contact
3. Preview:
View the contact name and telephone number
4. Add to Blacklist:
Add the contact to a Blacklist that will block inbound calls from the contact
number
5. Send Vcard:
Send the contact details as a Vcard to another device. Enter the number for the
other device or choose “Search” to select from the phone book.
8.1.3. Add
Add a new contact to the Phonebook
Press the OK key to enter the contact’s name. Use the phone keypad to enter the name
and then press OK.
Press the Down Arrow key to select the number entry (indicated by either a phone or SIM
card icon depending on which memory is in use) and then press OK to enter the contact’s
phone number. Use the phone keypad to enter the number and then press OK.
Press the “Done” (Right) function key when the name and number have been entered.
Press the OK key to save the contact or the “Cancel” (Right) function key to exit without
saving the contact.
8.1.4. Delete All
Delete all contacts from the Phonebook.
Press the OK key to confirm or the “Cancel” (Right) function key to return to the menu
without deleting.
Page 14

3G Phone
14
3G Desk Phone
www.gsmdeskphone.co.uk
0800 928 8011
User Manual
8.1.5. Copy All
Copy all of the contacts from the phone memory to the SIM card or from the SIM card to
the phone memory.
Choose whether contacts should be copied from “SIM to Phone” or from “Phone to SIM”
and press OK to begin the copy.
8.1.6. Save Position
Select whether new contacts should be saved to the phone memory or the SIM card.
Choose between “Mobile” (for the phone memory) and SIM card and press the OK button
to confirm.
8.1.7. Memory Status
Display the number of contacts saved and total number of available contacts for the
phone memory and SIM card.
Page 15

3G Phone
15
3G Desk Phone
www.gsmdeskphone.co.uk
0800 928 8011
User Manual
8.2. Message Menu
The Message menu allow access to text message (SMS) and Voicemail services.
8.2.1. SMS
Access the SMS menu which has the following options:
1. Write MSG
Send an SMS message.
Use the phone keypad to type the message. The following keys have special functions:
0 insert a space
* insert a symbol
# switch between uppercase letters, lowercase letters and numbers
Once a message has been written press the OK key for the following options:
Send To:
Sends the SMS message.
Enter the destination phone number using the phone keypad and press the OK
key to send the message. Multiple recipients can be entered by pressing the down
arrow key to move to the next line.
Alternatively, press the OK key without entering a number to display the
phonebook. Select the name(s) of recipients and then press the “Finish” (Right)
function key. Press the OK key again to send the message.
Insert Template:
Choose from a list of common messages. The text will be inserted automatically
into the message.
Save:
Save the message to the “Draftbox” for use later.
Exit:
Return to the main screen.
Page 16

3G Phone
16
3G Desk Phone
www.gsmdeskphone.co.uk
0800 928 8011
User Manual
2. Inbox
Display a list of received SMS messages.
Select a message and press the OK key to display the following menu:
1 Preview
2 Reply
3 Forward
4 Voice Call
5 Save Number
6 Deleted
7 Delete All
8 Exit
Preview:
Display the content of the selected SMS message
Reply:
Reply to the original sender of the SMS message.
Forward:
Forward the selected SMS message to a new recipient.
Voice Call:
Make a voice call to the original sender of the SMS message.
Save Number:
Create a new contact in the phonebook for the original sender of the SMS
message.
Delete:
Delete the selected SMS message. Press OK to confirm or the “Cancel” (Right)
function key to return to the menu.
Delete All:
Delete all SMS messages from the Inbox. Press OK to confirm or the “Cancel”
(Right) function key to return to the menu.
Exit:
Return to the main screen
3. Outbox
Display a list of sent SMS messages.
Select a message and press the OK key to display the following menu:
1 Preview
2 Send Again
3 Delete
4 Delete All
5 Exit
Page 17

3G Phone
17
3G Desk Phone
www.gsmdeskphone.co.uk
0800 928 8011
User Manual
Preview:
Display the content of the SMS message
Send Again:
Send this SMS message again. The message and/or recipients can be edited
before sending the message.
Delete:
Delete the SMS message. Press OK to confirm or the “Cancel” (Right) function key
to return to the menu.
Delete All:
Delete all SMS messages from the Outbox. Press OK to confirm or the “Cancel”
(Right) function key to return to the menu.
Exit:
Return to the main screen
4. Draftbox
Display a list of previously saved SMS messages.
Select a message and press the OK key to display the following menu:
1 Edit
2 Delete
3 Delete All
4 Exit
Edit:
Display the SMS message. The message can be edited and then sent or saved
again.
Delete:
Delete the SMS message. Press OK to confirm or the “Cancel” (Right) function key
to return to the menu.
Delete All:
Delete all SMS messages from the Draftbox. Press OK to confirm or the “Cancel”
(Right) function key to return to the menu.
Exit:
Return to the main screen
5. Templates
Manage pre-defined message templates.
The following options are available:
1 Edit
2 Add
3 Delete
4 New Message
Page 18

3G Phone
18
3G Desk Phone
www.gsmdeskphone.co.uk
0800 928 8011
User Manual
Edit:
Edit the selected template.
After editing the template press the OK key to save and return to the list of
templates.
Add:
Add a new template. Enter the template and press the OK key to save.
Delete:
Delete the template. Press the OK key to confirm or press the “Cancel” (Right)
function key to return to the list of templates.
New Message:
Start a new message using the selected template.
8.2.2. Voice Mail
Call
Call the network provider’s voicemail service (subject to network support).
Voice No.
Edit the voicemail service phone number. Enter the new number and press the OK key to
Save. The voicemail number is provided by the network service provider.
8.2.3. Setting
Edit settings relating to the message services. Options are:
Send and Save:
Select whether sent SMS messages should be saved in the Outbox.
Info Centre:
Edit the SMS Service centre number. Enter the new number and click the OK key
to Save.
Memory Location:
Select whether received messages should be stored in the phones memory
(“Mobile First”) or on the SIM Card (“Sim Card First”). When the selected memory
is full any new messages will be automatically stored in the alternate memory (if
space is available).
Storage Status:
View the number of stored messages and total amount of message storage for the
phone and SIM card.
Page 19

3G Phone
19
3G Desk Phone
www.gsmdeskphone.co.uk
0800 928 8011
User Manual
8.3. Call Log Menu
Review Missed calls, Dialled calls and Received calls.
Call Log Sub-Menus
1 Missed Calls
2 Received Calls
3 Dialled Calls
4 Delete Records
8.3.1. Missed Calls
View a list of recent unanswered calls.
Select an entry on the list and press the OK key to view details including the name (if
available), the phone number and the time/date of the call.
Press the “Options” (Left) function key to display a menu and choose from the following
options:
Voice Call
Start a new call to the selected number
New Message
Start a new SMS message to the selected number
Preview
View call details including the name (if available), the phone number and the
time/date of the call
Add to Blacklist
Add the number to a blacklist to stop inbound calls being received from that
number
Save Number
Create a new contact in the phonebook for the selected the number
Delete
Delete the entry from the list. Press the OK key to confirm or the “Cancel” (Right)
function key to return to the menu without deleting the entry.
8.3.2. Received Calls
View a list of recent received calls.
Select an entry on the list and press the OK key to view details including the name (if
available), the phone number and the time/date of the call.
Press the “Options” (Left) function key to display a menu and choose from the following
options:
Voice Call
Start a new call to the selected number
New Message
Start a new SMS message to the selected number
Page 20

3G Phone
20
3G Desk Phone
www.gsmdeskphone.co.uk
0800 928 8011
User Manual
Preview
View call details including the name (if available), the phone number and the
time/date of the call
Add to Blacklist
Add the number to a blacklist to stop inbound calls being received from that
number
Save Number
Create a new contact in the phonebook for the selected the number
Delete
Delete the entry from the list. Press the OK key to confirm or the “Cancel” (Right)
function key to return to the menu without deleting the entry.
8.3.3. Dialled Calls
View a list of recent dialled calls.
Select an entry on the list and press the OK key to view details including the name (if
available), the phone number and the time/date of the call.
Press the “Options” (Left) function key to display a menu and choose from the following
options:
Voice Call
Start a new call to the selected number
New Message
Start a new SMS message to the selected number
Preview
View call details including the name (if available), the phone number and the
time/date of the call
Add to Blacklist
Add the number to a blacklist to stop inbound calls being received from that
number
Save Number
Create a new contact in the phonebook for the selected the number
Delete
Delete the entry from the list. Press the OK key to confirm or the “Cancel” (Right)
function key to return to the menu without deleting the entry.
8.3.4. Delete Records
Erase one or all of the call record lists.
Select whether to erase “All Records”, “Missed Records”, “Received Records” or “Dialled
Records” and press the OK key. Press the OK key again to confirm or press the “Cancel”
(Right) function key to return to the menu without deleting the records.
Page 21

3G Phone
21
3G Desk Phone
www.gsmdeskphone.co.uk
0800 928 8011
User Manual
8.4. Settings Menu
Make changes to the way the 3G Phone works.
The following settings are available:
1. Quick Dial
2. Phone Setup
3. Display
4. Call Setting
5. Tone Setting
6. Network Setup
7. Security Setup
8. Tools
9. Reset
8.4.1. Quick Dial
Assign numbers to the 6 programmable keys to allow them to be dialled quickly by
pressing a single key.
Select one of the 6 entries and press the OK key:
Get from Phone Book
Choose a entry from the phonebook to assign to the key. Select the entry from
the phonebook and press the OK key to assign it to the programmable key.
Edit
Enter a number manually and press the OK key to assign it to the programmable
key.
Delete
Delete the number that is currently assigned to the programmable key.
Once a number has been assigned to a key that number can be dialled by simply
pressing the required programmable key.
Page 22

3G Phone
22
3G Desk Phone
www.gsmdeskphone.co.uk
0800 928 8011
User Manual
8.4.2. Phone Setup
Provides the following options:
Language
Choose between “English” and “Spanish” to select the language used for the
phone’s menu
Date and Time
Set the current date/time and adjust it’s format:
Time Setting – enter the current date and time then press the OK key to save.
Format Setting – select the display format for the date (yy-mm-dd, mm-dd-yy or
dd-mm-yy) and time (12 or 24 hour)
Owner Number
Set the phone number for the SIM that is in use. Enter the number and press the
OK key to save.
8.4.3. Display
Adjust the contrast for the phone display. Choose a level from 1 to 5 and press the OK
key to Save. The default level is level 2.
8.4.4. Call Settings
Change settings for the following call services (note that available services can vary
between network providers and SIM type):
Call Waiting
When on an active call, the call waiting service provides an audible alert when a new
incoming call is being received. Select “Activate” to turn the service on, “Deactivate” to
turn the service off or “Query Status” to check whether the service is currently on or off.
Call Forwarding
Allows the forwarding of calls to a specified number. Select the type of call forwarding
required and then select “Activate” to turn the service on, “Deactivate” to turn the
service off or “Query Status” to check whether the service is currently on or off.
Available types of forward are:
Unconditional – forward all calls
Mobile Busy – forward calls when the phone is in use
No Reply – forward calls when they are unanswered
Not Reachable – forward calls when the phone is off or has no network signal
All Conditional – sets the “Mobile Busy”, “No Reply” and “Not Reachable” forwards
Page 23

3G Phone
23
3G Desk Phone
www.gsmdeskphone.co.uk
0800 928 8011
User Manual
Call Barring
Prevent calls from being either dialled from or received on the inserted SIM. Select “Bar
In” to stop calls from being received or “Bar Out” to stop calls from being dialled. Select
“Activate” to turn the service on, “Deactivate” to turn the service off or “Query Status” to
check whether the service is currently on or off.
Minute Alert
Provides an audible alert every minute during a call so that the user can keep track of
the length of a call. Select “On” and press the OK key to turn the service on or “Off”
followed by the OK key to turn the service off.
Hotline
Allows a telephone number to be automatically dialled when the user lifts the handset or
presses the handsfree button. The following options are available:
On – turn on the Hotline feature
Off – turn off the Hotline feature
Input Number – enter the number that should be automatically dialled
Timer Value – set an optional value for the number of seconds that the phone
will wait when the handset is lifted (or handsfree button pressed) before dialling
the hotline number. During this period the user may dial an alternative number.
Setting this number to 0 will cause the hotline number to be dialled immediately
when the handset is lifted (or handsfree button pressed) and it will not be
possible to dial an alternative number.
8.4.5. Tone Setting
Adjust the phone’s audio settings. The following options are available:
Ring Type
Select the ringtone that will be played when an incoming call is received. There are ten
ringtones available.
Message Alert
Select the message alert that will be played when an SMS message is received. There are
three message alerts available.
Ring Volume
Set the volume that the ringtone will be played at when an incoming call is received. Use
the Left and Right arrow keys to set the level and then press the OK key to save.
Message Volume
Set the volume that the message alert will be played at when an SMS message is
received. Use the Left and Right arrow keys to set the level and then press the OK key to
save.
Key Tone
Turn the key tone on or off. When the key tone is on an audible tone will be heard every
time one of the phone’s keys is pressed.
Power On Alert
Turn the power on alert on or off. When the power on alert is on a melody will be played
when the phone is turned on.
Page 24

3G Phone
24
3G Desk Phone
www.gsmdeskphone.co.uk
0800 928 8011
User Manual
8.4.6. Network Setup
Adjust settings for the network provider. The following settings are available:
Mode Switch:
UMTS – only connect to UMTS (3G) networks
GSM – only connect to GSM (2G) networks
Automatic – connect to GSM and UMTS networks
Select Network:
Automatic – select the network to connect to automatically
Manual – manually select the network to connect to. The phone will search for
available networks and display a list
8.4.7. Security Setup
Adjust settings for security.
A password is required to access this menu, the default password is 0000.
Enter the password and press the OK key to display the following settings:
Pin Lock:
Require the SIM PIN to be entered every time the phone is turned on.
Select on or off to enable or disable the pin lock – the current SIM pin must then be
entered to confirm.
Phone Lock:
Lock the phone to the current inserted SIM. Select on or off to enable or disable the
phone lock. After the phone lock is turned on the phone will not operate if a different SIM
card is inserted.
Black list:
View the numbers that are currently stored in the blacklist – incoming calls from these
numbers will not be accepted. To remove a number from the list select the number and
press the OK key. Press the OK key a second time to confirm or press the “Cancel”
(Right) function key to return to the list without deleting the number.
Numbers can be added to the blacklist from the phonebook or the call log.
Change Password:
Change the password that is used to access the security menu.
Enter the new password followed by the OK key. Enter the new password again followed
by the OK key to confirm.
Change Pin:
Change the SIM PIN.
Enter the Old SIM Pin followed by the OK key.
Enter the New SIM Pin followed by the OK key.
Enter the New SIM Pin again followed by the OK key to confirm.
FDN:
Fixed Dialling Number feature – used to limit the numbers that can be dialled from the
SIM (requires network service provider support).
Page 25

3G Phone
25
3G Desk Phone
www.gsmdeskphone.co.uk
0800 928 8011
User Manual
8.4.8. Tools
The following tools are available:
Alarm:
Use the phone as an alarm clock.
On – Off – Turn the Alarm clock on or off
Time – set the time that the alarm should sound
Repeat – choose whether the alarm should sound Once, Every Day, Every Work
Day or at Weekends
Ring – select the ringtone to play as the alarm sound
Calendar:
View a basic calendar.
Use the Up and Down arrow keys to change the day.
Use the Left and Right arrow keys to change the month.
Press the OK key for the following options:
Jump to Date – manually enter a date to display
Go to Today – display today’s date
Calculator:
A basic calculator. Use the numeric keypad to enter numbers and the following special
keys:
Up arrow multiply
Down arrow divide
Left Arrow plus
Right arrow minus
OK equals
* decimal point
Left function clear
Right function return to menu
Time Zone:
Change the timezone used by the phone. Select the current timezone and press the OK
key to save. Press the OK key a second time to confirm.
8.4.9. Reset
Reset the phone to factory default settings. Press the OK key to confirm or the “Cancel”
(Right) function key to return to the menu without changing the settings.
Page 26

3G Phone
26
3G Desk Phone
www.gsmdeskphone.co.uk
0800 928 8011
User Manual
9. Troubleshooting
If you encounter any problems while using the 3G Phone they may be easily resolved by
checking the list below, or by contacting your service provider
No Power:
Check mains supply is connected
Will not operate on Battery back up:
Check batteries have been fully charged. It is recommended that you leave the 3G
Phone to fully charge before use.
Cannot make any calls:
Make sure the SIM is live on the Network
Make sure there is sufficient credit on the SIM if using a Pre-paid SIM card
If in doubt insert the SIM into another mobile device and check it works
Cannot receive calls:
Make sure there is no call forwarding set on the SIM card
If in doubt insert the SIM into another mobile device and check it works
No SIM card message displayed:
There is no SIM card inserted, or SIM not correctly fitted
Input Pin displayed:
Requires SIM Pin number to be entered
Wrong PIN displayed:
The PIN entered is the wrong PIN number
Invalid network SIM
The SIM is not recognised by the Network provider. Contact your network operator.
No service:
There is no Network, or you are not within range of the received signal
Interference when making calls:
Make sure that you are not too close to other electronic devices. Try moving the 3G
Phone to another location.
Cannot access certain USSD Functions:
The service may be dependent on your chosen network provider. An example of this
could be “SS” (Supplementary Services) for Call Barring.
If in doubt check with the Network Provider
Page 27

3G Phone
27
3G Desk Phone
www.gsmdeskphone.co.uk
0800 928 8011
User Manual
10. Hardware Specification
Bands UMTS 900 / 2100 MHz
GSM 850 / 900 / 1800 / 1900 MHz
Max. Data Rates HSDPA 3.6Mbps
UMTS 384kbps
EDGE 237kbps
GPRS 85.6kbps
Antenna Internal
Battery NiMH Rechargeable
Data Port USB Micro-B Socket
Headset Port Twin 3.5mm Jack Sockets for microphone and headphone
connection
Handset Port RJ10 4P4C Socket
Features Specification
* USB Driver for Microsoft Windows 2000/XP/Vista/7 * Alarm Clock
* High Speed data via USB * Mute
* Firmware update via USB * Redial
* TCP/IP * Cell lock
* LCD * Pin lock
* Caller ID Presentation & Restriction * Network lock
* Outlook contact synchronisation * Hotline
* SMS * Call Barring
* Speed dial
* Call Transfer
* Call Waiting
* Call Hold and Multiparty
* Call Forwarding
 Loading...