

Page 1

1
SmartGPS Mini Tracker
USER MANUAL
Thank you for purchasing SmartGPS Mini Tracker. This
manual shows how to operate the device smoothly and
correctly. Make sure to read this manual carefully before
using this product. Please note that specification and
information are subject to changes withour prior notice
in this manual. Any change will be integrated in the
latest release. The manufacturer assumes no
responsibility for any errors and omissions in this
document.
Page 2

2
Contents
1 GENERAL INFORMATION...........................................5
1.1 HARDWARE DESCRIPTION ............................................5
1.2 LED LIGHT DEFINITION...................................................9
2 GETTING STARTED ...................................................10
2.1 FUNCTIONS...................................................................... 10
2.2 GSM CARD INSTALLATION......................................... 11
2.3 BATTERY AND CHARGER ............................................ 12
3 STARTUP ...................................................................12
4 SERVER AND APP APPLICATION.............................14
4.1 WEB BROWSER AND SETTING................................... 14
4.1.1 REGISTRATION AND LOGIN.................................... 14
4.1.1.1 REGISTRATION......................................................... 15
4.1.1.2 LOGIN ......................................................................... 16
Page 3

3
4.1.2 TRACKER MANAGEMENT........................................ 18
4.1.2.1 SET UP......................................................................... 19
4.1.2.2 TRACKING PERSON................................................ 21
4.1.2.3 GEOFENCE................................................................. 23
4.1.3 REAL-TIME TRACKING .............................................. 24
4.1.4 HISTORY ........................................................................ 26
4.1.5 MEMBER CENTER ....................................................... 27
4.1.5.1 MY ACCOUNT .......................................................... 27
4.1.5.2 CHANGE PASSWORD ............................................ 28
4.1.5.3 CHANGE EMAIL ....................................................... 29
4.2 APP ..................................................................................... 30
4.2.1 REGISTRATION AND LOG IN................................... 30
4.2.2 ADD NEW TRACKERS................................................ 35
4.2.3 OVERVIEW OF TRACKER .......................................... 38
4.2.3.1 STATUS....................................................................... 39
4.2.3.2 BASIC........................................................................... 41
Page 4

4
4.2.3.3 TRACKING PEOPLE................................................. 44
4.2.3.4 GEOFENCE................................................................. 48
4.2.4 HISTORY ........................................................................ 49
5 SAFETY INFORMATION............................................52
6 CARE AND MAINTENANCE ......................................55
Page 5
5
1 General Information
Working based on existing GSM/GPRS network and
satellites, this product can locate and monitor any remote
targets by SMS or GPRS.
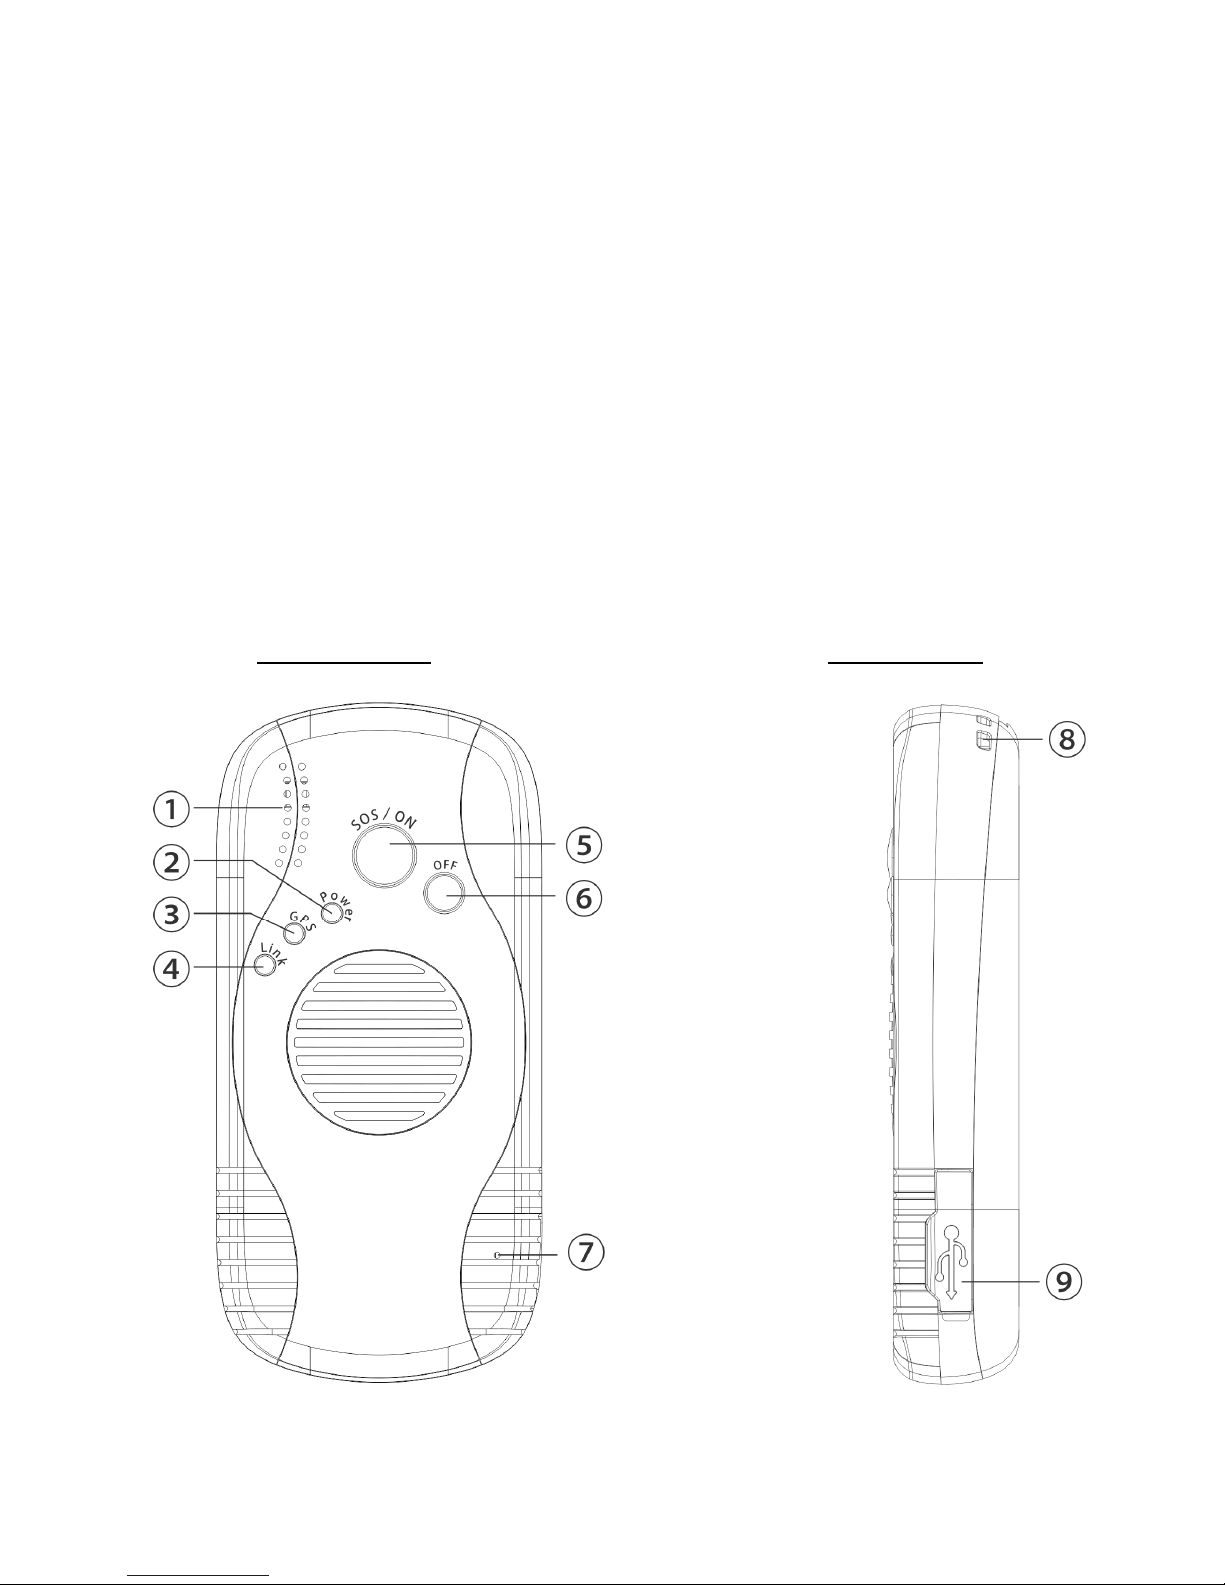
1.1 Hardware Description
Front Face Side Face
Page 6

6
1. Speaker
2. Power LED Light (Red)
3. GPS LED Light (Green)
4. Link LED Light (Blue)
5. SOS/ON Button
6. OFF Button
7. Microphone
8. Carrying (Hand) Strap Hole
9. USB port
Button Description
1. SOS/ON
Button
- Power On: Press 3 seconds to Power On
the device (The LED light “Red”, “Green”
and “Blue” will flash one by one twice)
- SOS : Under Power Off status
, long Press
the button 6 seconds or above to switch
on SOS mode (The “Red”, “Green” and
Page 7

7
“Blue” LED light will flash till the tracker
send out the SOS Warning.
Under Power On status
, long press the
button 3 seconds, all three LED light will
flash till the tracker send out the SOS
Warning.
- Dial SOS Call: Press SOS/ON button 3
times to call out the phone to main control
number. (Please refer to section 4.1.1.1 or
4.2.1 to register in web browser or APP
respectively.)
Page 8
8
Button Description
2.Off Button
- Hang up SOS Call: Press OFF button 1
time to hang up or cancel the SOS call.
- Terminate SOS message: Press OFF
button to stop sending message and the
tracker will return to normal operation.
- Power OFF: Long Press the button to
turn off the tracker.
Page 9
9
1.2 LED Light Definition
LED Light Status definition
1. Link LED
Light (Blue)
Link status:
- SIM Card Error or No SIM Card
: light
flash 3 times and “OFF” in 2 seconds.
- Network Searching
: light “ON” in 0.5
seconds and “OFF” in 2 seconds.
- Network Linked:
Light “ON” 2 second
and “OFF” in 10 seconds.
- Dialing or Incoming Call
: light Flash in
every 0.5 seconds
- SMS message:
Keep on lighting till
message send out.
- Be Monitored
: Light “ON” in 2 seconds
and “OFF” in 10 seconds.
- On the Phone
: Light keep “ON”
Page 10
10
2. GPS LED
Light (Green)
GPS status:
- Searching GPS Satellites
: light “ON” in
0.5 seconds and “OFF” in 2 seconds.
- Positioning Succeed
: Light will “ON” in
5 seconds after succeed and keep Light
flash in 2 seconds and “OFF” in 10
seconds.
- GPS Closed/Fail
: Light keep “OFF”
3. Power LED
Light (Red)
Battery status:
- Low Battery:
Light “ON” in 2 seconds
and “OFF” in 10 second
- Charging:
Light keep flashing in every
1 second.
- Fully Charged:
Light keep “ON”.
2 Getting started
2.1 Functions
Multiple tracker monitored and controlled at the
Page 11

11
same time, same interface.
Periodic report or real time tracking trigger from web
or APP.
History to check the record in the past.
SOS report or call out to member at emergency.
2 groups of Geofence
Moniter function by member to call in the tracker
quietly.
Tracking persons function to share the tracker status
with other members or non-members.
2.2 GSM card Installation
Turn off the tracker and remove the back cover and pick up
the battery. Insert the SIM card with the gold-colored
contact surface facing down into the holder. The beveled
corner is facing the top of the device.
To remove the SIM/UIM card, put out the SIM/UIM card
lightly.
NOTE: Please be aware of operations on SIM card. It’s easily
damaged by scratches or bending, so be careful when
handling, inserting or removing the card.
Page 12

12
2.3 Battery and Charger
Do charge the battery to capacity in 8-12 hours for first use.
Please use the battery and charger provided by the
manufacturer. In low battery, power LED light (Red) will
light on light “ON” in 0.5s and “OFF” in 5s
NOTE:
- For its Li-ion battery, which contains harmful chemicals
and may burst, please don’t bump, puncture it violently
and keep it off fire.
- Please charge the battery in time to keep it working
normally.
- Always switch the device off and disconnect the charger
before removing the battery.
3 Startup
Put the SIM card and battery in place.
Page 13

13
Press “SOS/ON” button.
In 10 – 40 seconds, the tracker will begin to work
and acquire the GSM signal as well as the GPS
signals (Please refer to 1.2 for detail).
When the tracker receives GPS signals normally,
you can use it and do all following settings.
Page 14

14
4 Server and APP application
Before using the tracker, you can choose to use
Web browser or Android APP to do registration.
4.1 Web Browser and Setting
We have to register to GPS Guardian for start working,
webpage as follow:
http://gps-guardian.mobilmax.com.tw/
4.1.1 Registration and Login
Page 15
15
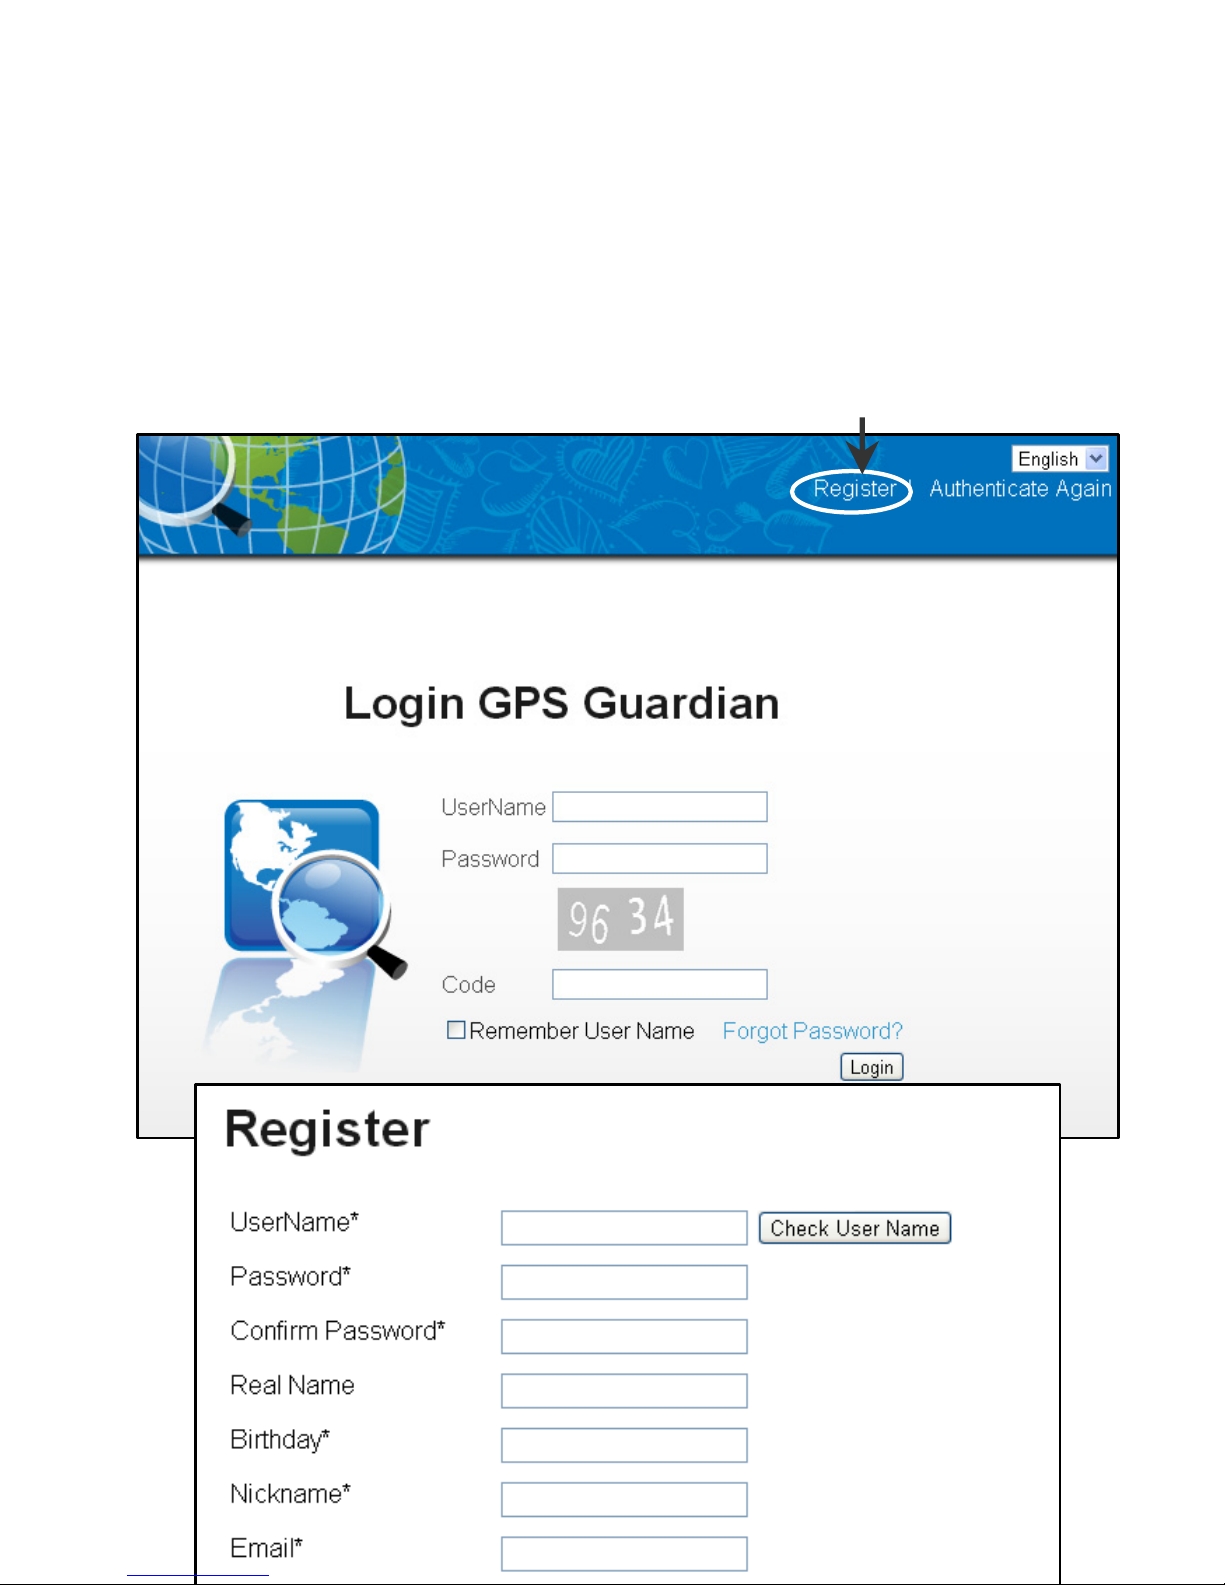
4.1.1.1 Registration
Please click “Register” to do registration after login.
Register
Page 16
16
- Press “Check Account” to check the availability of the
User Name
- Mobile Phone: Please fill in the Main control Smart
phone number in order to control the tracker.
- Must fill in all the column with “*”
- You will receive the confirmation letter in your
registered email after registration.
4.1.1.2 Login
Validation your account
- Check your email and click on the web address in
the “GPS Guardian Confirmation mail”.
Page 17
17
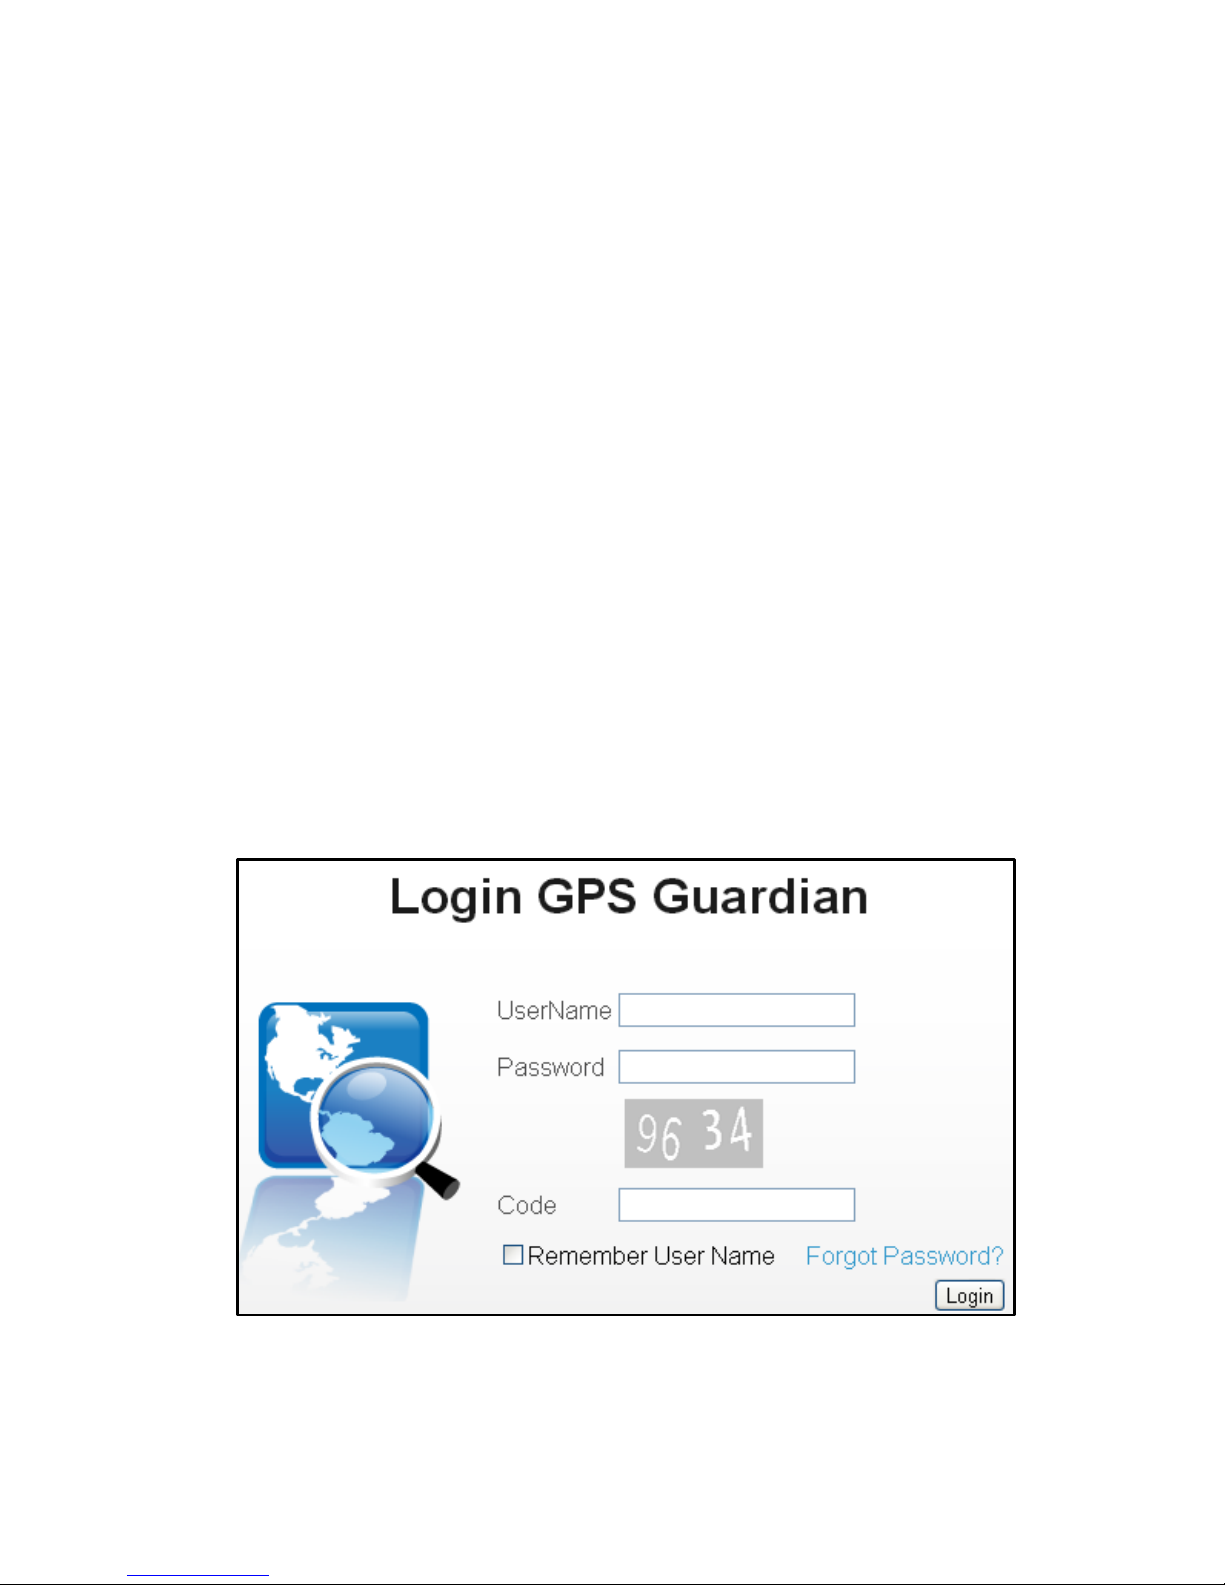
Login
- Please fill in the User name and password then
press “Login” button.
- If you didn’t verification your account, the message
“This account is not verified yet. Please verify it in
your mailbox” will appear. Please press
“Authentication again” to finish the verification.
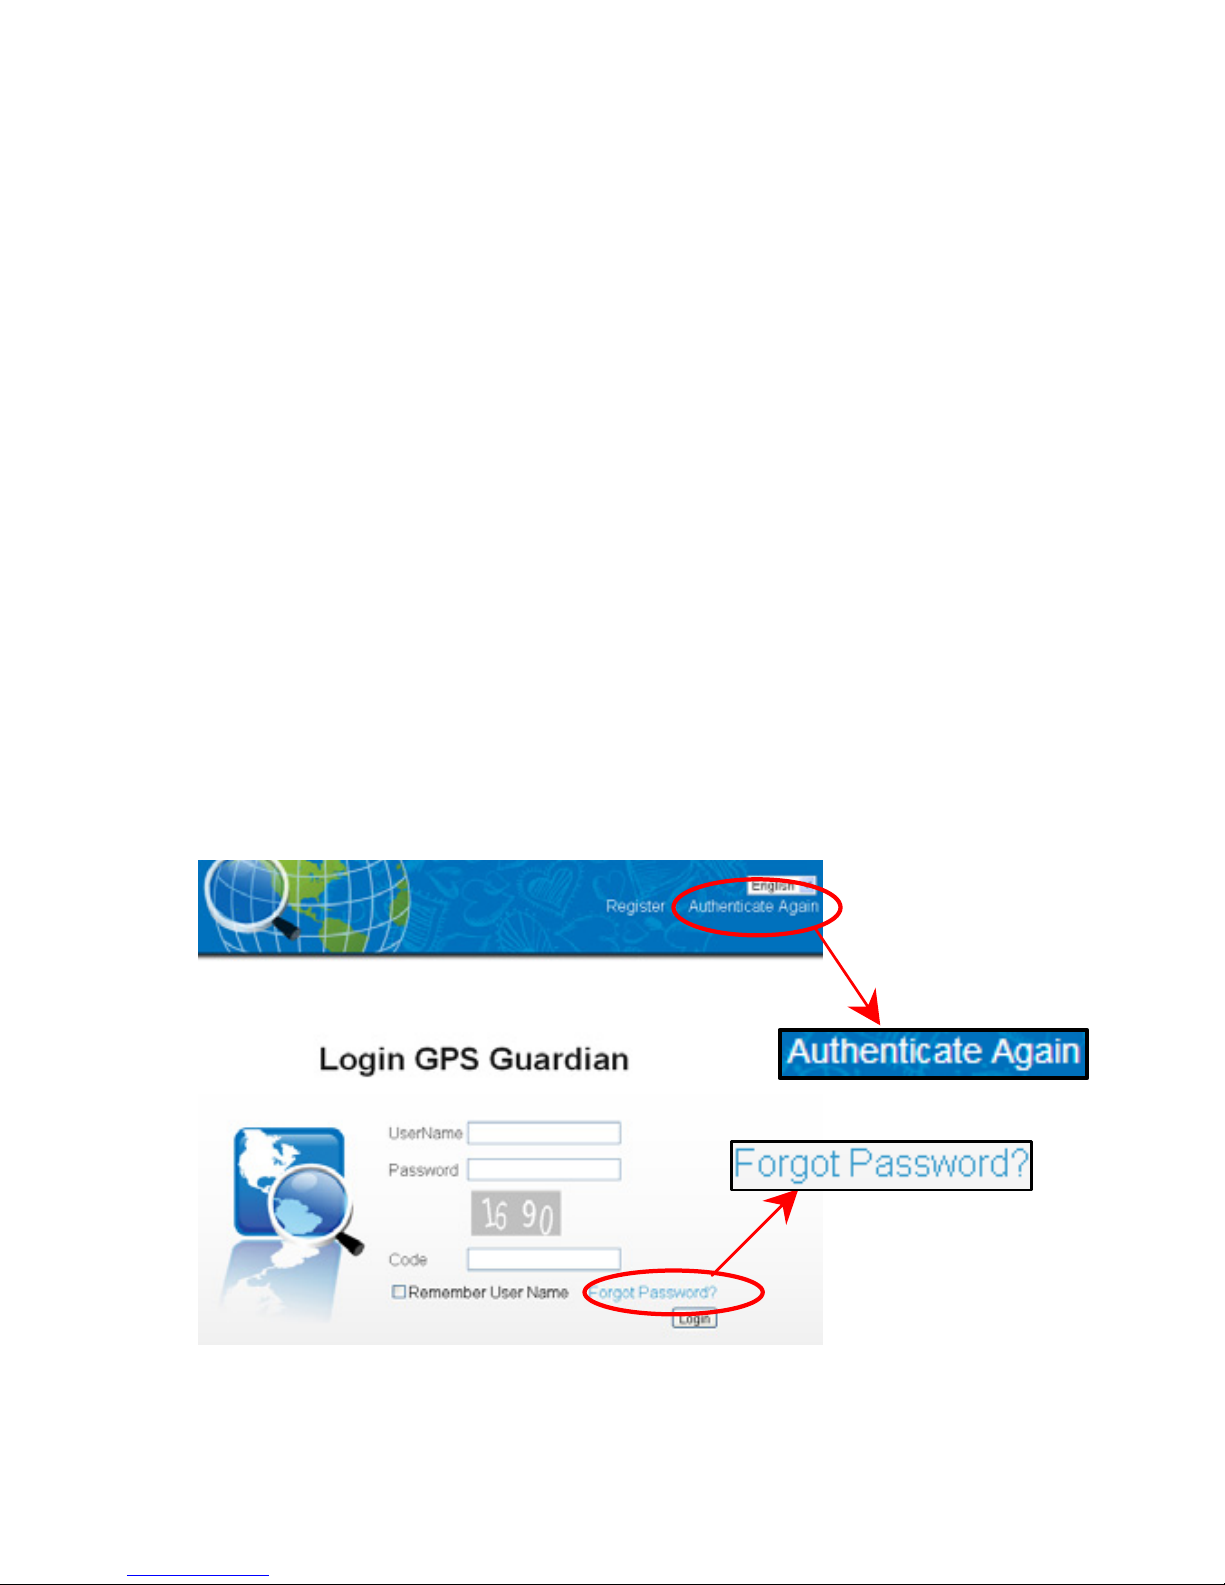
Authentication again
- If you didn’t receive the confirmation mail, click on
the “Authentication Again” on the upper right
corner.
Page 18
18
Forgot Password
- Press “Forget Password?” and enter your user name
and email address to obtain your password.
- “The password was sent out.” will appear and
please go to check you email.
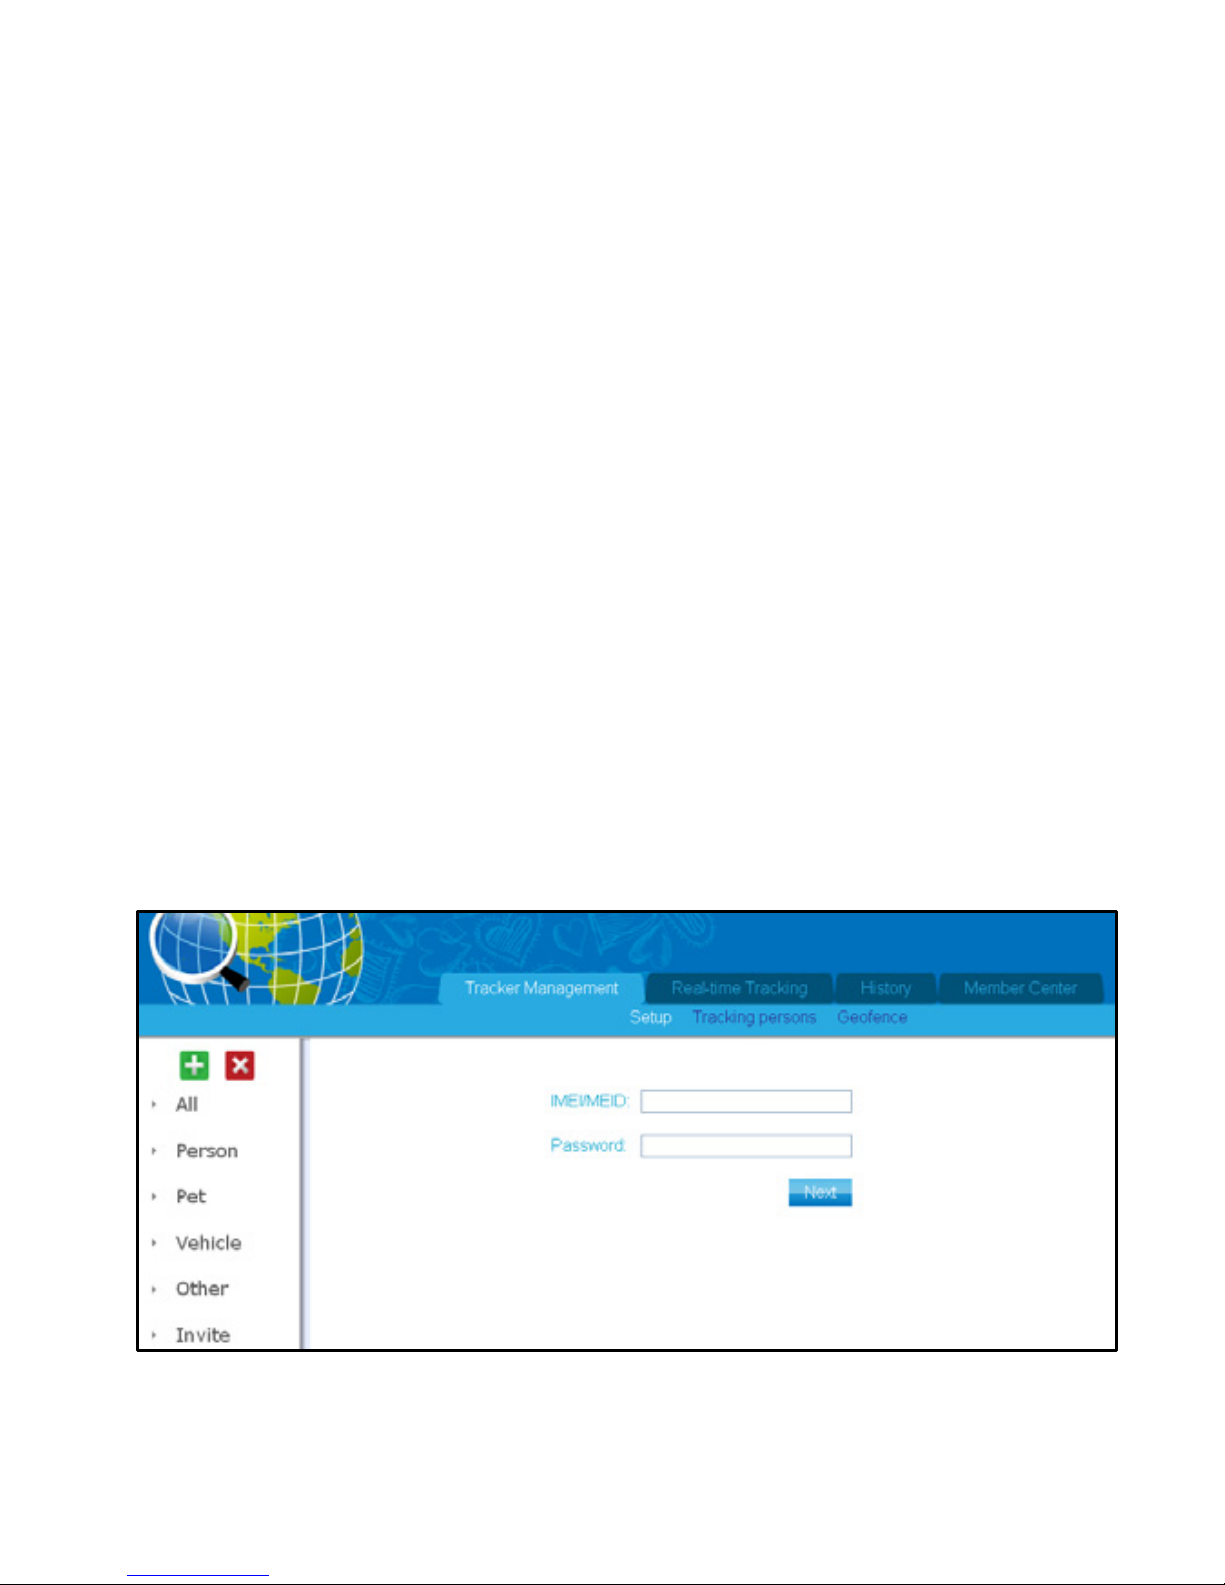
4.1.2 Tracker Management
There are 4 types of tracker you can manage, which is
Person, Pet, Vehicle, Others and Invite. You also can invite
or be invited by others member.
Page 19

19
4.1.2.1 Set Up
- Enter “IMEI/MEID” number. Please open the back
cover and pick up the battery, you can find the IMEI /
MEID number on the products label. IMEI number has
14 digits and MEID number has 15 digits. You also can
find it on gift box label.
- Password: The default password is “12345”
- Press “Next” button.
NOTES:
If the IMEI/MEID number or password is incorrect, the
message of “Wrong IMEI/MEID number or password,
please double check.” will appear.
Page 20

20
XXXXXXXXXXXX
+886XXXXXXXXX
+886XXXXXXXXX
XXXXXXXXXXXX
+886XXXXXXXXX
+886XXXXXXXXX
- Continue to fill in the information and choosing what
options you want then press “Renew” to save the
information.
- Message “Success” will appear
- For adding new tracker, you can press button to add
Page 21

21
new tracker and press button to delete the tracker.
4.1.2.2 Tracking Person
Member refers to the person who joins and has an
account in the GPS Guardian.
- Please press button, enter the member’s user name
and press “Check User Name” button, the message
“available” or “unavailable” will appear to check an
availability of the user.
Page 22

22
- Press “Invited” button.
- “INVITING” will be showed near the column
Non-member refers to the person who doesn’t have
an account in GPS Guardian.
- Please press button, enter the Smart Phone number
and Real Name then press “Invited” button.
- The message “Success” will appear.
- The phone number will be added on the Non-member
User Name
User Name
Page 23

23
column as below:
- If the format of the phone number is wrong, the
message will show as below:
- For both member and non-member setting, you can
press
button to delete the member or
non-member you have invited.
4.1.2.3 Geofence
You can use the two shapes, rectangle and circle, to set up
the range you would like to monitor. You can setting up 2
GeoFence record.
XXXXXXXXX
Wrong phone. enter 10~15 numbers. For example:
+886984123588...
Page 24

24
4.1.3 Real-Time Tracking
NOTES:
- If the tracker moves out of both areas assign, the first
area will be reported with higher priority.
- Please make sure “Out of Range” option has been
selected. The warming message will be sent to the
main control number and other non-member.
4.1.3 Real-time Tracking
Please click the tracker that you want to trace; you can
check the latest location record of the tracker.
Page 25

25
Page 26

26
You can also click on the corresponding button, as
indicated in the red circle in the following figure, to trigger
the tracker to report its status right away.
4.1.4 History
Please click and choose the tracker from the tracking list,
you can see the tracker’s history record as well as the
warning history at the date you have selected at the below
calendar.
Page 27

27
Locate by GPS
Locate by Base Station
4.1.5 Member Center
4.1.5.1 My Account
You can edit the “Nickname”, “Mobile Phone”, and
“Address” in this page.
Page 28

28
Press “Renew” button to save the record.
4.1.5.2 Change Password
You can edit your password in this page then press
“Renew” button to save the record. The message “Success”
will appear.
Tracker01
Barack Obama
obama@gmail.com
Tracker01
+886XXXXXXXXX
XXXXXXX
Tracker01
Barack Obama
obama@gmail.com
Tracker01
+886XXXXXXXXX
XXXXXXX
Page 29

29
4.1.5.3 Change Email
You can edit your new email in this page then press
“Renew” button to save the record. The message “Success”
will appear.
Page 30

30
4.2 APP
Use your Android Phone and go to
“Google play” to download and install the
APP “
GPS-Guardian”.
Execute the “GPS-Guardian” APP, you can do the same
thing as you did in web browser.
4.2.1 Registration and Log In
If you are first using the APP, Please do the following step
to do registration.
Page 31

31
Step 1: Tap the “Register Button”
NOTES:
- If the login
information is not
correct, the
messages of
“Account Not
Matched” will
appear.
Page 32

32
Step 2: Enter the Main Control number and information
into the following screen (Smartphone number)
Case-insensitive
Case-insensitive
Save Button
Page 33

33
- User Name: Only accepts English characters and
number.
- Birthday: click the “cake” icon to input your date of
birth
- Country Code: Press on the “earth” icon to choose the
country code of which you locate.
- Mobile Phone Number: input your smart phone
number.
NOTES:
- Please fill in all columns with “*”.
- After registration, you will receive the confirmation
letter in your registered E-mail.
- Please activate your account through the confirmation
letter. If not, the message “E-mail is not activated” will
appear.
- Please fill in the information carefully, the member’s
information can’t not be amend once confirm.
Page 34

34
Step 3: View member information
- Tap
button to view the member information.
Member Info
Button
XXXXXXX
XXXXXXX
XXXX
XXXX@XXXXXX
XXXXXXX
XXXXXXX
Page 35

35
4.2.2 Add New Trackers
New Message
Log Out Button
Add New Tracker
Save / Update Button
You can view the following screen after you log in to the
APP.
Page 36

36
Step 1: Add New Trackers
- Tap
button to add new tracker.
- IMEI/MEID: Open the back cover and pick up the
battery, you can find the IMEI / MEID number on the
Page 37

37
products label. IMEI number has 14 digits and MEID
number has 15 digits. You also can find it on gift box
label.
- Password: default password “12345”
- Tracker Type: Personal / Pet / Vehicle / Other
- Real Name: Optional
- Nickname: The name of your tracker. E.g. Tracker 1
- Country Code: Press the “earth” icon and choose the
country code of which the server locates.
- Tracker Phone number: SIM/UIM card number of the
tracker.
- Tap
to save the information.
NOTES:
- Please fill in all columns with “*”
Step 2: To view tracker you own
Your can view how many tracker you have added in your
record. The color dot indicates the on/off status of the
tracker: green mean power on and sync, red means out of
sync and don’t know the status and red, power off.
Page 38

38
Tracker1
Tracker2
Tracker3
Tracker4
Tracker1
Tracker2
Tracker3
Tracker4
4.2.3 Overview of Tracker
Tap the tracker that you have added in the APP, you can
view the basic information of the tracker, tracker status,
record and as below:
Page 39

39
4.2.3.1 Status
You can view your recent location here. If you didn’t start
your GPS trackers, there will not have any record and
column are empty.
Page 40

40
You can also press on the icon to trigger the tracker
report its status right away.
Page 41

41
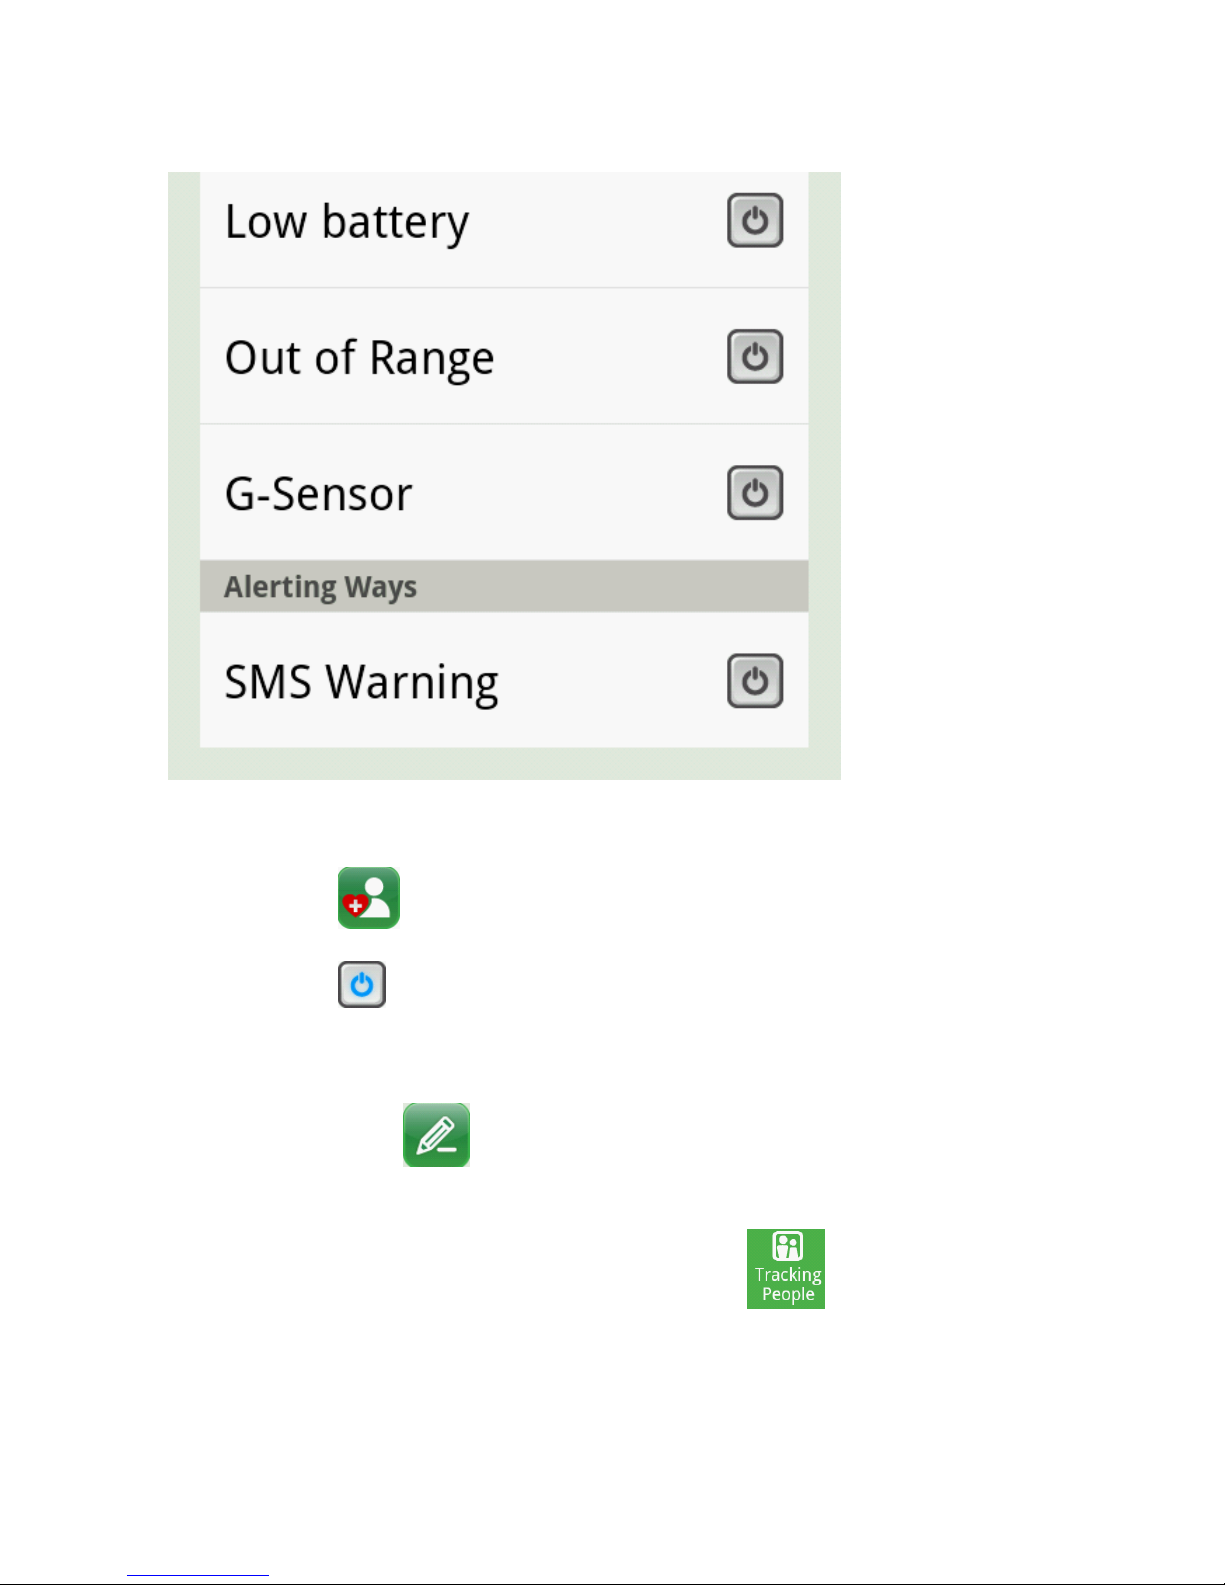
4.2.3.2 Basic
You can view your basic information and setting the
functions here:
XXXXXXXXXX
XXXXXXXXXX
XXXXXXXXXX
XXXXXXXXXX
IMEI/MEID
Join date
Page 42

42
Page 43

43
Tap
button to activate the function.
You can also tap the
button to wake up the
Page 44

44
tracker remotely.
4.2.3.3 Tracking People
Member refers to the person who joins and has an
account in the GPS Guardian.
Non-member refers to the person who doesn’t have
an account in GPS Guardian.
Non-Member1
Member1
Member2
Page 45

45
Add Member
- Tap
to add member
- Tap
button to select the function.
- Enter the User name and tap
button.
- The member will be added and showed in
“Tracking People”
and in “inviting” status.
Page 46
46
Add Non-Member
- Tap
to add non-member
- Tap
button to select the function.
- Enter the Mobile Phone Number and User name
and tap
button.
- The user has been added in the Non-member
Colume at “Tracking People”
.
Page 47

47
Page 48

48
4.2.3.4 Geofence
You can set the range by tapping or button
Page 49

49
4.2.4 History
- Tap the tracker that you would like to view the tracking
route history.
T
racker1
T
racker2
Tracker3
Page 50

50
- You can check the tracing history by tapping the date
marked with circle
- The tracking history will be showed in the map.
- Press icons to check the previous and next record
correspondingly in the map.
Page 51

51
T
racker1
Tracker1
Page 52

52
5 Safety information
Battery information
Your device is powered by a rechargeable battery.
The battery can be charged and discharged
hundreds of times but it will eventually wear out.
When the talk and standby times are noticeably
shorter than normal, please buy a new battery.
Use only the approved batteries, and recharge your
battery only with approved chargers designated for
this device.
Unplug the charger from the electrical plug and the
device when not in use. Do not leave the battery
connected to a charger. Overcharging may shorten
its lifetime. If left unused, a fully charged battery
will lose its charge over time.
Page 53

53
Operating Environment
Remember to follow special regulations in any area
and always switch off your device when its use is
prohibited or when it may cause interference or
danger. Use the device only in its normal operating
positions. Do not keep the device near credit cards
and other magnetism medium, some accessories
can bring magnetism that may be delete the data.
Pacemaker manufacturers recommend that a
minimum separation of 6in (20cm) should be
maintained between a wireless phone and a
pacemaker to avoid potential interference' with the
pacemaker. These recommendations are consistent
with the independent research by and
recommendations of Wireless Technology Research.
To minimize the potential interference, persons
with pacemakers should do as below:
Always keep the device more than 6 in (20 cm) from
Page 54

54
their pacemaker when the device is switched on.
Not carry the device in a breast pocket. Hold the
device to the ear opposite the pacemaker
If you have any reason to suspect that interference
is taking place, switch off your device immediately.
Hearing aids
Some digital wireless devices may interfere with
some hearing
Small children
Your device and its enhancements may contain small parts.
Keep them out of the reach of small children.
Other medical devices
Operation of any radio transmitting equipment,
including wireless phones, may interfere with the
functionality of inadequately protected medical
Page 55

55
devices. Switch off your phone in health care
facilities when any regulations are posted in these
areas instructing you to
6 Care and maintenance
Your device is a product of superior design and
craftsmanship and should be treated with care. The
following suggestions will help you protect your
warranty coverage.
Keep the device dry. Precipitation, humidity, and all
types of liquids or moisture can contain minerals
that will corrode electronic circuits. If your device
does get wet, remove the battery, and allow the
device to dry completely before replacing it.
Do not use or store the device in dusty, dirty areas.
Its moving parts and electronic components can be
damaged.
Page 56

56
Do not store the device in hot areas. High
temperatures can shorten the life of electronic
devices, damage batteries, and warp or melt certain
plastics.
Do not store the device in cold areas. When the
device returns to its normal temperature, moisture
can form inside the device and damage electronic
circuit boards.
Do not attempt to open the device other than as
instructed in this guide.
Do not drop, knock, or shake the device. Rough
handling can break internal circuit boards and fine
mechanics.
Do not use harsh chemicals, cleaning solvents, or
strong detergents to clean the device.
Do not paint the device. Paint can clog the moving
parts and prevent proper operation.
Use a soft, clean, dry cloth to clean any lenses, such
Page 57

57
as camera, proximity sensor, and light sensor
lenses.
Use only the supplied or an approved replacement
antenna. Unauthorized antennas, modifications, or
attachments could damage the device and may
violate regulations governing radio devices.
Use chargers indoors.
Always create a backup of data you want to keep,
such as contacts and calendar notes.
To reset the device from time to time for optimum
performance, power off the device and remove the
battery.
 Loading...