


3
Connection and start into the digital world of television:
Instructions for the digital HD receiver.
These instructions will help you connect your new HD receiver and put it into operation.
In just a few steps you can now enjoy the digital TV by LTV.
Discover great ways to enjoy your new device.
Your Tele Columbus
Preface

5
This document may be without the prior written permission of Kaon /LTV, neither
in whole nor in part reproduced, translated or otherwise used, except where the
copyright owners had authorized this, or the copyright allows it.
Liability
The warranty does not extend to parts where a defect has occurred due to improper application of the information contained in this guide.
Our warranty does not cover the following points:
a) Outside effects on the device for example by lightning, water and fire.
b) Damage caused by improper use, improper installation, improper repair, and
are generally caused due to a breach of the user manual and instructions.
Through a prolonged display of immobile pictures from the computer, video
game, photo, text, station logos, etc. a burning can be caused in any picture
format. For the display in the 4:3 format a burning (of the left and right margins
of the picture) is also possible.
c) Adaptations and/or changes in the unit to current national technical and/or
safety requirements of a country for which the unit was not originally designed
and manufactured.
d) Other uses than in an ordinary household (e.g. professional use).
Brands
Manufactured under license from Dolby Laboratories. Dolby and the double-D
symbol are trademarks of Dolby Laboratories.
Copyright protection
This product incorporates copyright protection technology that is protected by
U.S. patents and other rights to intellectual property. The use of this copyright protection technology must be authorized by Macrovision, and is intended for home
and other limited viewing uses only, unless otherwise authorized by Macrovision.
Reverse engineering or disassembly are prohibited.
Warranty
6 7
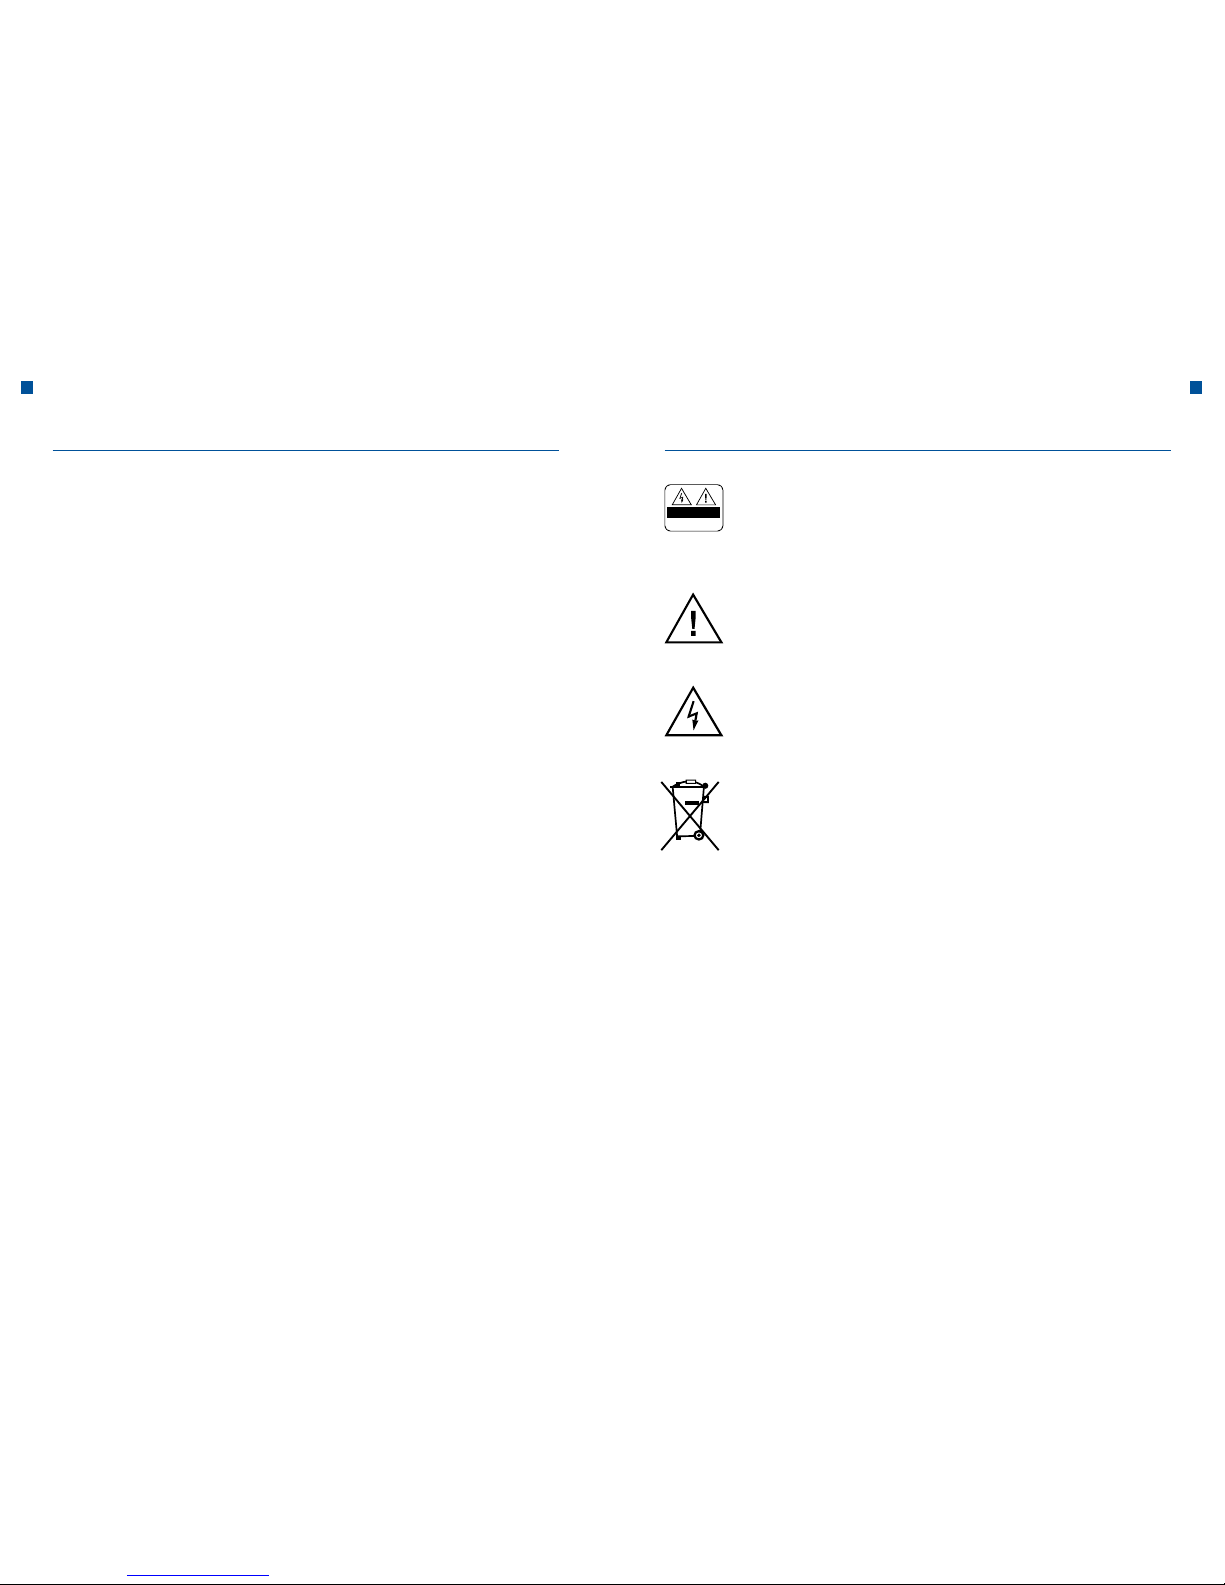
To avoid an electric shock, do not remove by no means the top cover
(or the back panel). It does not contain parts that can be serviced by the
user. Maintenance work must only be performed by qualified personnel.
This symbol indicates dangerous voltage inside the device. There is a
risk of electric shock and injury.
This symbol indicates important instructions accompanying the product.
Notes on the “WEEE” symbol
This product should not be disposed of in the trash at the end of its life.
Please separate it from other waste and allow its recycling, so that the
material resources can be reused. This protects the environment and
health against potential damage that could be caused by uncontrolled
waste disposal.
Private user
Inquiries on details about the collection points and the possible environmentally friendly recycling process should be addressed to the local
authorities.
Professional User
Refer to your suppliers and read the terms and conditions underlying
the sales contract. This product should not be disposed of together with
other commercial waste.
Look in this guide especially for these symbols.
They indicate risks and hazardous situations.
Warning
Indicates a hazardous situation that could lead to serious injury.
Attention
Indicates a situation that could damage the device or other apparatus.
Note
Provides additional information to alert the user on possible problems and provide
him/her with important information to better understand, use and maintain the
installation.
Meaning of SymbolsWarnings and Notes
H
CAUTION
RISK OF ELECTRIC SHOCK.
DO NOT OPEN.

8 9
Contents

10 11
I. General Safety Instructions
a. Precautions
1. Electrical power supply
90–250 V alternating current voltage, 50/60 Hz
Operate this unit only to a power source that supplies the voltage indicated on
the label. If you are not sure which power supply is available to you, contact your
power company.
Unplug the device from the electrical system before performing maintenance or
installation.
2. Overload
Avoid overloading of electrical outlets, extension cords and adapters, as this may
cause a fire or electric shock.
3. Liquids
The device must not come into contact with liquids. Additionally, objects filled with
liquids should not be placed on the device.
4. Cleaning
Unplug the unit before cleaning the appliance.
Clean only with a damp cloth. Do not use solvents.
5. Ventilation
Make sure that the vents at the top of the unit are not covered, so that a sufficient
ventilation of the unit can be ensured.
Do not place the unit on soft furnishings or carpets. Do not put other devices on
the HD Receiver.
6. Accessories
Connect to the device only the devices provided explicitly for this purpose.
Otherwise it may be hazardous or cause damage to the device.
7. Connection to the cable TV signal
First connect all the components before plugging the cord into the outlet.
Turn off the device, the TV and all other components before you connect or disconnect cables.
8. Connection to a TV
Unplug the appliance from the power supply before connecting or disconnecting
the cable to or from your TV. Otherwise the TV may be damaged.
9. Installation site
Use the product indoors to protect it from lightning, rain and sunlight.
Do not install near a radiator or a fan blowing warm air.
Make sure that the distance between the receiver and the devices that can be
disrupted by electromagnetic radiation (such as TVs or VCRs), is at least 10 cm.
Do not cover the ventilation slots or place the unit on bed, sofa, rug or a similar
surface.
If you place the device in a rack or the like, ensure adequate ventilation.
Do not place the appliance on an unstable cart, stand, tripod, bracket, or table
where it could fall down.
If it falls down, the device could cause serious injuries to a child or an adult and be
heavily damaged as well.
General Safety Instructions General Safety Instructions
12 13
10. Thunderstorms and shutdowns
During a thunderstorm or when the unit is not in use, unplug the HD receiver from
the wall outlet and disconnect the antenna cable. In that way damages on the
device which could be caused by lightning or voltage spikes, can be avoided.
11. Sharp objects
Do not insert objects in the device through the openings, because they could
touch dangerous current-carrying parts or damage structural components.
12. Spare Parts
Make sure that only the manufacturer’s recommended replacement parts or components shall be used, the type of which is the same as the original parts.
The use of spare parts that are not appropriate may result in further damage to
the device.
By connecting the power supply cable into an outlet that does not meet the specifications, there is danger of fire or electric shock.
Do not place heavy objects, including the device itself, on the power supply cable.
By damaging the power supply cable there is danger of fire or of electric shock.
Do not put and do not place any metal object on the device. In case that a metallic
object falls in the device there is danger of fire or of electric shock.
Never repair, dismantle or modify the appliance yourself.
By infringement there is danger of fire or of electric shock. If tests inside the unit,
or maintenance work, are required, please contact the customer service or sales
department.
The ventilation openings should not be blocked or covered!
In case of overheating there is a threat of fire danger.
In case of a thunderstorm you must switch-off the device as quickly as possible and
pull out the power supply cable from the outlet. Otherwise, there is danger of fire or
of electric shock.
Do not drop the appliance (and do not place it in a manner that it could fall) and
protect it from shocks and vibrations.
Otherwise, the device may be damaged. In case that it is damaged, you must
switch the device off as quickly as possible and pull out the power supply cable
from the outlet. Otherwise, there is danger of fire or of electric shock.
Do not touch the power supply cable with wet hands. Otherwise, there is danger of
electric shock.
General Safety Instructions General Safety Instructions
Attention
Electric shock hazard! Never take the cover off the device.
In order to avoid an electric shock, never take the cover off the device. There
are no parts inside that could be repaired or serviced by the user. Refer all
servicing to qualified service personnel.
Read this manual carefully before using the device. The described precautions contain important safety instructions, divided into the following categories: Danger, Warnings and Notes. The manufacturer assumes no liability for
accidents or damage due to improper use.
Danger
Failure to observe the security measures mentioned herein constitutes
a danger to life or may produce a serious injury.
Connect the power supply cable only to those sockets, as described in the
user guide and technical data.

14 15
Note
Failure to observe the security measures mentioned herein consti-
tutes a danger of minor injuries.
Clean the fouling from the device carefully with a soft cloth. Never use
chemical solvents such as benzene, paint thinner, nail polish remover
and other solvents.
The surface of the device may change color and the varnish can be
peeled off.
Do not place or store the device under the below mentioned conditions.
Otherwise problems may occur:
• in too warm or cold places
• in places with high humidity
• in places with extreme temperature values, for example, in front of airconditioning or fan heaters
• in places where a lot of dust or grime arise
• in built-in cabinets, from which the heat cannot escape
• in locations exposed to direct sunlight
In case the device will not be used for a long time, turn it off or unplug it.
Do not put and do not place any heavy objects on the device.
Otherwise, it may cause malfunction or damage.
If the unit is so badly damaged that it can not be repaired, or does not
work, send it back to LTV.
General Safety Instructions General Safety Instructions
Warning
Failure to observe the security measures mentioned herein constitutes
a danger to life or may produce a serious or lighter injury. There is also
the risk of damage to the user’s property.
The device should not be exposed to water or other liquids. In case that the
device is exposed to dripping or splashing water, this can cause a serious
problem.
Never repair, dismantle or modify the device yourself. The device can be
seriously damaged - possibly beyond any repair.
In case of a thunderstorm you must switch-off the device and pull out the
power supply cable from the outlet as quickly as possible. Otherwise the
device may be damaged.
16 17
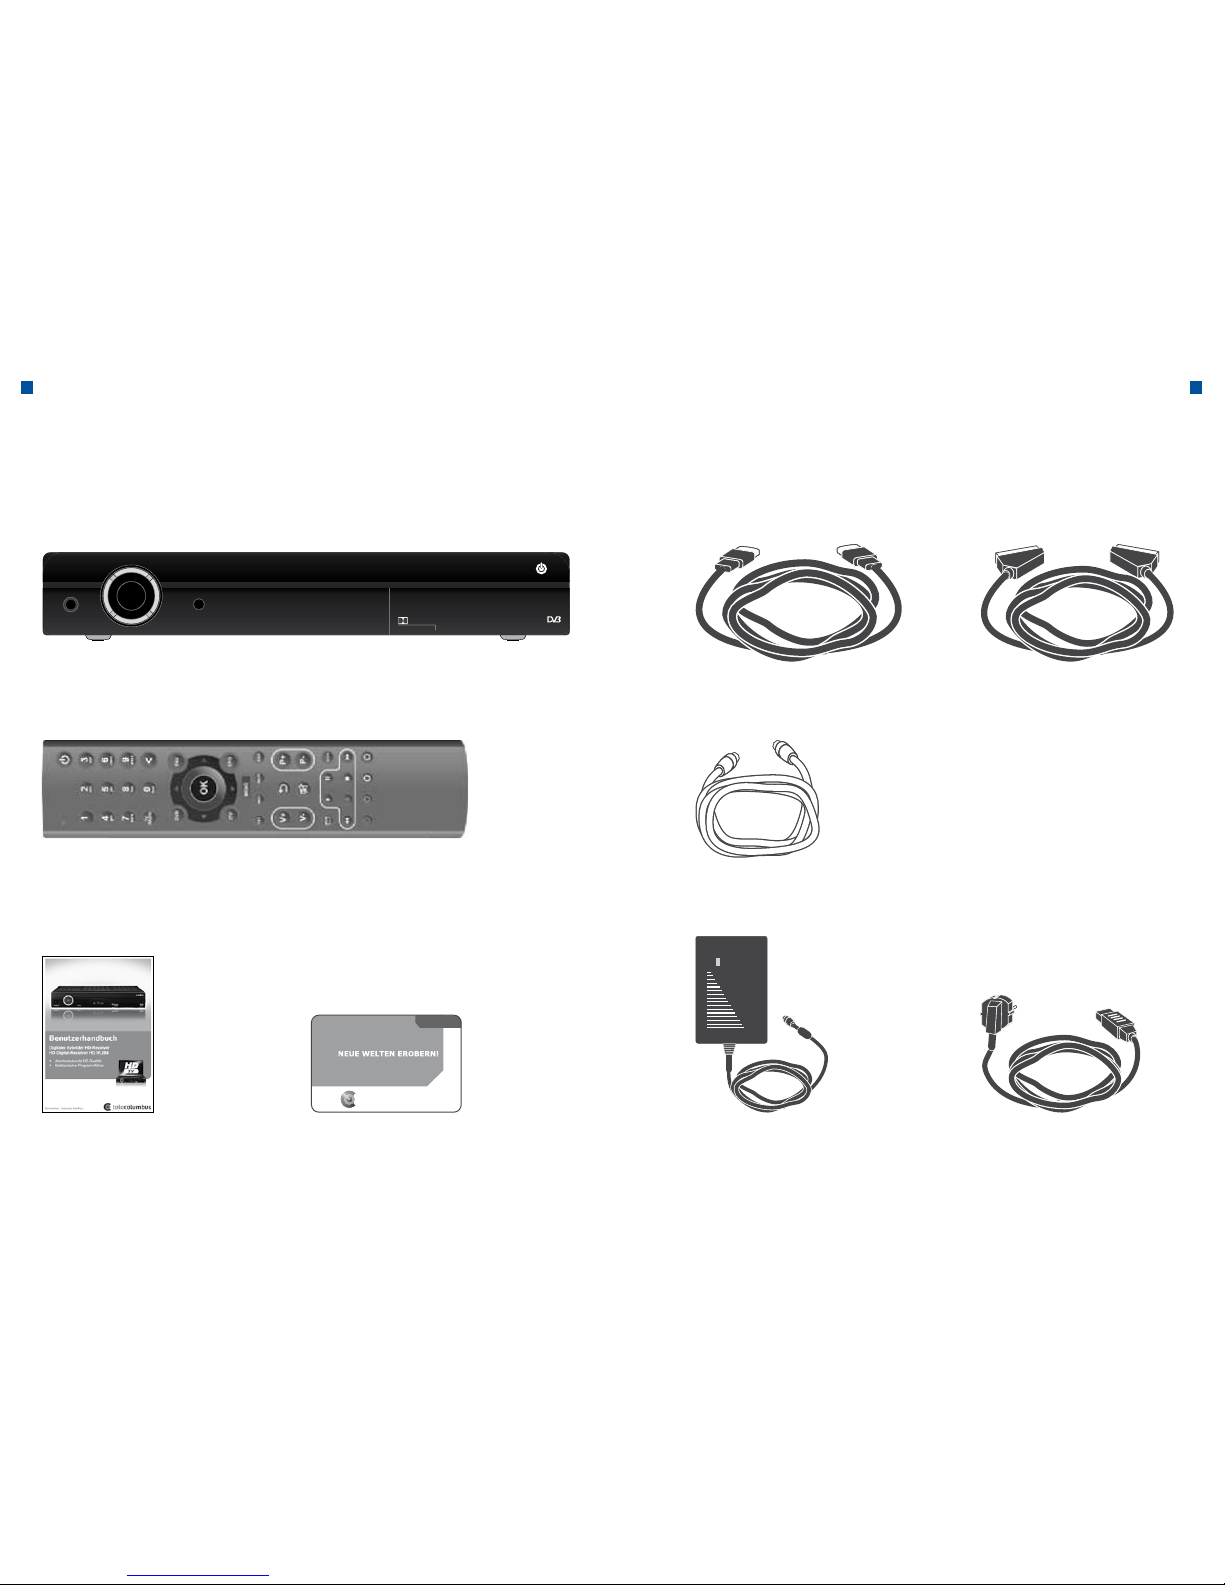
Delivery Delivery
b. Delivery
Check that the delivery is complete before putting the device in operation. If some
components are missing, call the customer service immediately.
16 17LieferumfangLieferumfang
b. Lieferum fang
Überprüfen Sie die Lieferung auf Vollständigkeit, bevor Sie das Gerät in Betrieb
nehmen. Wenn einzelne Bestandteile fehlen, bitte sofort den Kundenservice anrufen.
Fernbedienung inkl. 2 Batterien (Lithium-Knopfzellen CR2025)
HD Receiver Kaon
Antennen-Anschlusskabel
Netzkabel (nur bei externem
Netzteil im Lieferumfang)
HDMI-Kabel
Netzteil (nur bei externem
Netzteil im Lieferumfang)
Bedienungsanleitung SmartCard mit persönlicher Jugend-
schutz- und Sicherheits-PIN-Nummer
SmartCard
fernsehen,internet, telefon.
tele
columbus
SCART-Kabel
STANDBY MENU
POWER TV RADIO/B-MAIL
OK
K A N
DOLBY
DIGITAL
DigitalVideo
Broadcasting
HD Receiver Kaon
HDMI Cable
Antenna Connection Cable
Transformer (only external
power supply upon delivery)
Power supply (only external
power supply upon delivery)
SCART Cable
Remote control with 2 batteries (Lithium Button Cells CR2025)
Instruction manual SmartCard with personal protection
of minors and PIN number security
18 19
Functions and Installation Functions and Installation
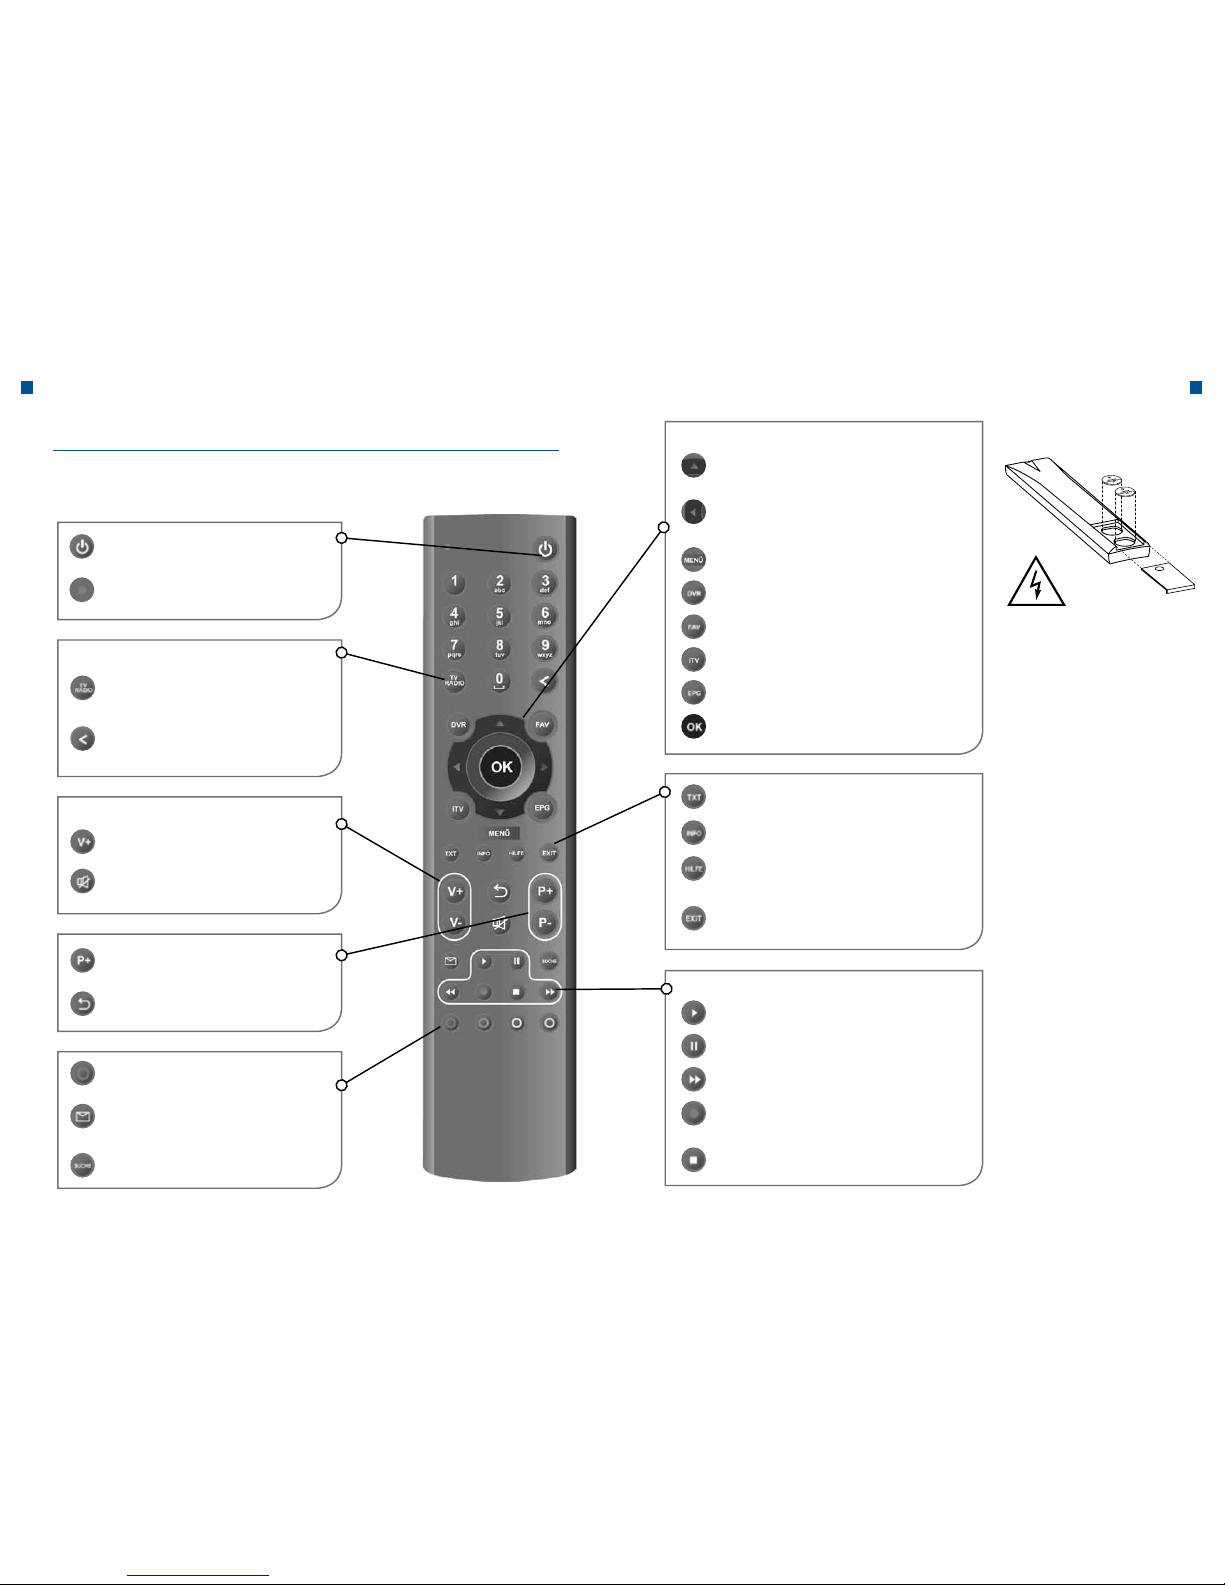
II. Functions and Installation
a. Remote control
Power
On / off or in standby mode
Illuminated display
Illuminated as a confirmation of a button
Arrow- keys up / down
Moves cursor up / down, brings info bar to the screen
Arrow- keys left / right
Moves cursor left / right, info bar mode:
switches between Programs / Favourites
Menu
Calls up the Top menu
DVR = Recording (depending on the device)
Calls up the digital video recorder
Fav = Favourites
Calls up the Favourites list
iTV = Interactive function
TV key for interactive functions
EPG = At-a-glance program
Opens the electronic at-a-glance program
OK
Confirms the selection
Play
Plays the recording
Pause
Stops playing
Spool
Rewinds fast forward or backward
Recording
Enables the reception of a broadcast,
even of a future one
Stop
End playback
TXT = Teletext
Calls up the Videotext
INFO
Retrieves information about the current program
HELP
In graphics mode, it gets, the help-portal /
in TV mode the language selection.
EXIT
End of Menus
TV / Radio
Switches between radio and TV mode
Delete
Clears last entry
V+ / V- Volume
Adjusts the sound volume
Mute
Sets the sound off and on again
P + / P- program change
One channel up or down
Arrow-key, “Back“
Changes to the previous setting
Color keys
Function keys: red, green, yellow, blue
Inbox “B-Mail” (currently not enabled)
Open the message inbox (“B-mail” inbox)
Search
Search functions
Input
Navigation
Play buttons (depending on the device)
Volume
Note
If the remote control reimains
without batteries for a long
time, errors may occur. Always
leave the batteries in the remote control. Put the batteries
into the remote control with the
“+” symbol facing up. Please
note that, when inserting button batteries, these must first
be placed under the plastic
edge and the button batterires
must then be pushed towards
the contacts.

20 21
b. Operating mode of the receiver (front) b. Operating mode of the receiver (back)
Functions and Installation Functions and Installation
20 21Funktionen und InstallationFunktionen und Installation
b. Funktionsweise des Receivers (Rückseite)
b. Funktionsweise des Receivers (Vorderseite)
Frontansicht
STANDBY MENU
POWER TV RADIO/B-MAIL
OK
K A N
DOLBY
DIGITAL
DigitalVideo
Broadcasting
1
2
3 4 5 6
7
CA U TI O N
ANT IN
VIDEO
LOOP OUT
HDMI
RISKOF ELECTRICSHOCK
DONOT OPEN
Manufacturedunder licensefrom DolbyLaboratories
Dolbyand double-Dsymbol aretrademarks of
DolbyLaboratories.
U.S.Patent Nos.5,31,448,5,583, 936;6,381, 747,
6,501,842;6,836,549 and7,050,698
AC90-250V -50/60Hz30W MAX
MADEBY KAONMEDIA
VCR
TV
S/PDIF
RJ45
USB
L
R
AUDIO
1 2 4 53
6 7 8 9 10 11
12
Front view
1. Stand-by (ON / OFF) To turn the receiver on or off
2. OK To select a program, a selected line or a
parameter value
3. MENU / EPG Opens the Electronic Prgramme Guide
4. LED indication Electrical power supply
5. LED indication TV operation
6. LED indication Radio / B-Mail
7. SmartCard Slot for SmartCard
1. Antenna CATV-ANT-IN jack (input jack for the cable TV signal)
to connect a cable TV line
2. Scart VCR To connect the DVD/Video recorder via the VCR Scart cable
3. AUDIO Analog audio output (RCA)
4. ANALOGUE VIDEO By selecting from Y / Pb / Pr you can connect your receiver
through a composite video signal to a TV set or to a VCR,
that can process the video output signals (can be deacti-
vated from the user)
5. ETHERNET To connect the LAN cable
6. RF LOOP OUT To transmit an RF signal from the set-top box either to the
RF input socket on the TV or to the video / DVD recorder
7. Scart TV To connect the TV via the Scart cable
8. AUDIO Analog audio output (RCA)
9. S / PDIF To connect a digital audio amplifier (optical signal)
10. HDMI For the highest picture quality, this jack is connected with
the HDMI cable to the HDMI jack on the TV
11. USB USB port (currently inactive)
12. Electrical DC 12V IN (only in case of an external power supply)
FBAS
power supply
22 23
d. SmartCard e. Connection and Installation
Functions and Installation Functions and Installation
22 Funktionen und InstallationFunktionen und Installation
d. SmartCard e. Anschluss und Installation
Verbindung des Receivers mit der Breitbanddose und dem TV-Gerät
Es gibt mehrere Möglichkeiten zur Verbindung des Receivers mit Fernseh -
geräten, DVD-/Videorekordern und/oder HiFi-Anlagen. Wenden Sie sich an
Ihren örtlichen Händler, um sich zur optimalen Einrichtung Ihres Systems an
Ihre Bedürfnisse beraten zu lassen.
Kabelverbindungen
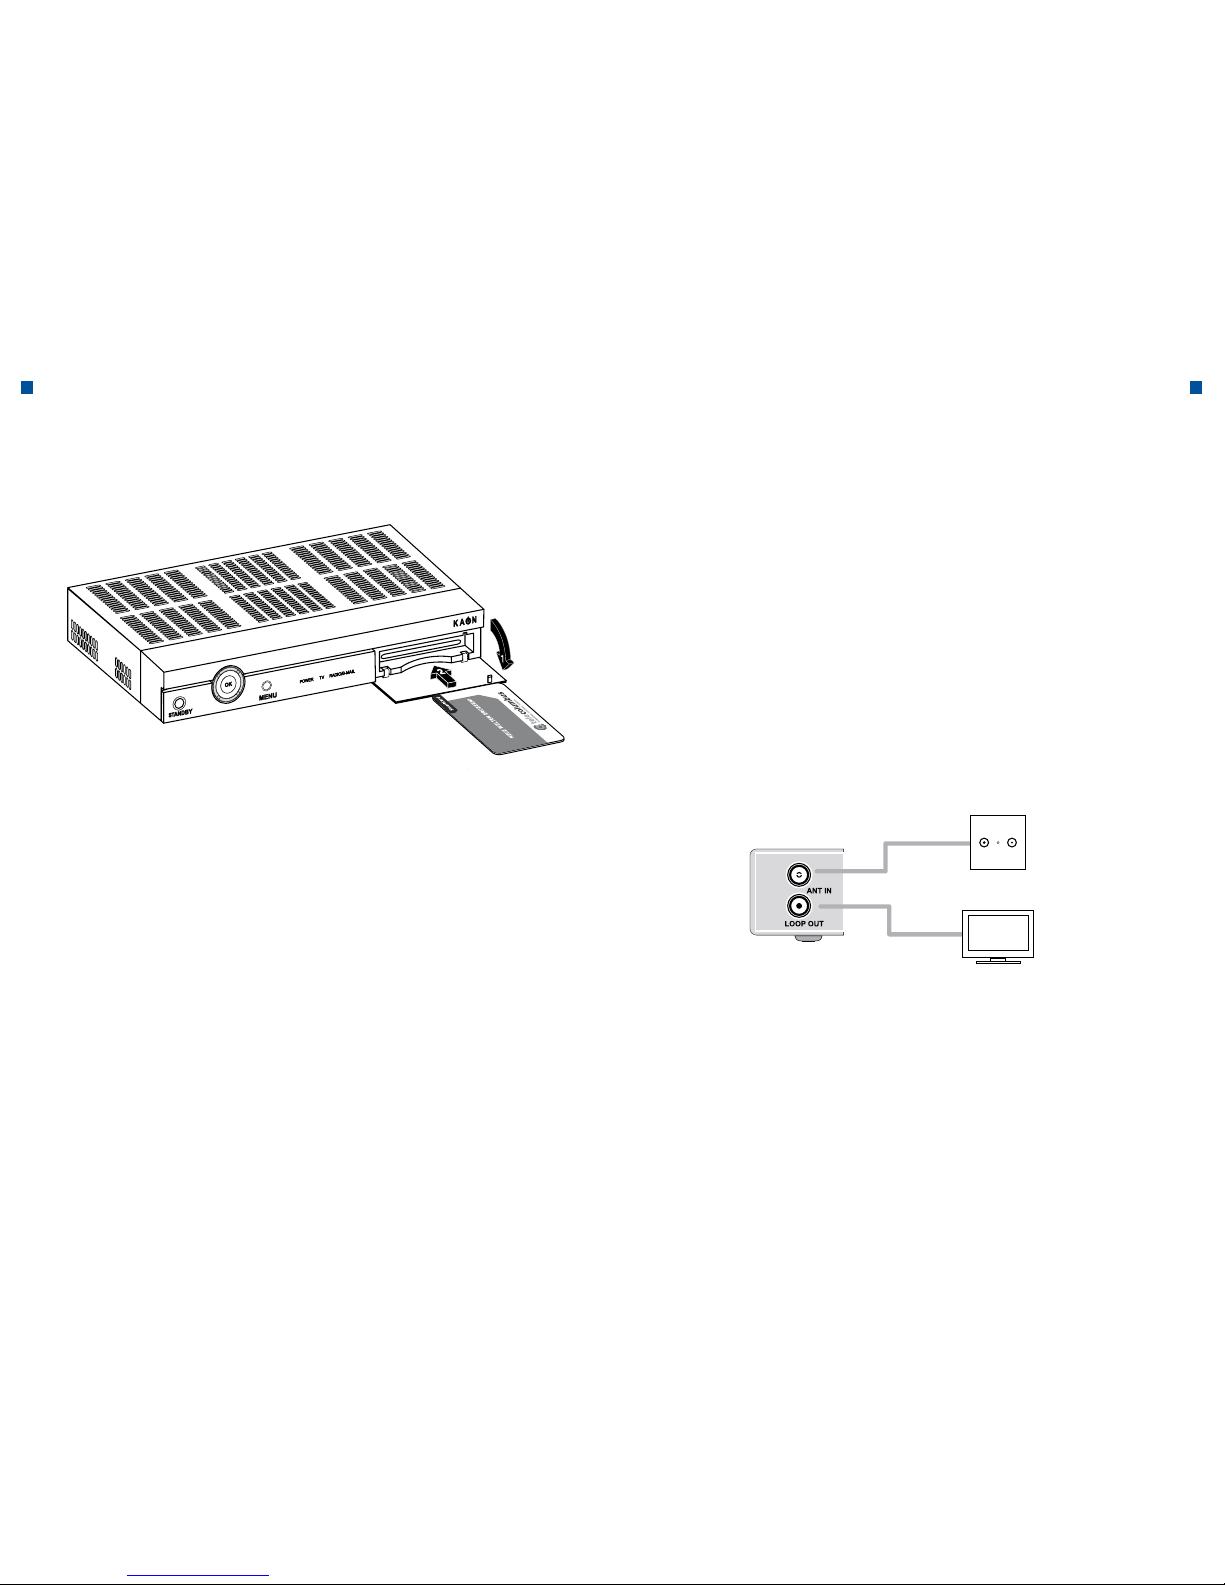
Schließen Sie das eine Ende des RF-Kabels an die ANT-IN-Buchse auf der
Rückseite des Receivers und das andere Ende an die Kabelfernseh- oder
Antennenbuchse (Wandanschluss) an.
Smartcard
Chipmit dem auf der
Unterseite in den Receiver
geben.
Insert the Smartcard
with the Chip facing
downwards
TV-Set
Insert a SmartCard
The Smart Card looks similar to a credit card. It entitles the user to see and
listen to all subscribed channels. The slot on the receiver can be exclusively
used for smart cards.
1. Before inserting the SmartCard, please check whether the SmartCard has
been freed of all adhesive residues.
2. Open the cover. The smart card shaft is located at the front of the receiver.
3. Hold the Smart Card horizontally with the electronic chip
(small gold-colored square) facing downwards.
4. Insert the smart card with the chip forth in the slot.
Connection of the receiver to the broadband box and the TV
There are several possibilities in order to connect the receiver to a TV, a DVD/
Video recorder and / or to Hi-Fi system. Check with your local dealer in order
to take an advice for the optimum set up of your system to suit your needs.
Cable connections
Connect one end of the RF cable to the ANT-IN jack at the back of the receiver
and the other end to the cable TV or antenna jack (wall connection).
TV
Radio
Receiver - Rear
Broadband box
Coaxial Cable
24 25
Functions and Installation Functions and Installation
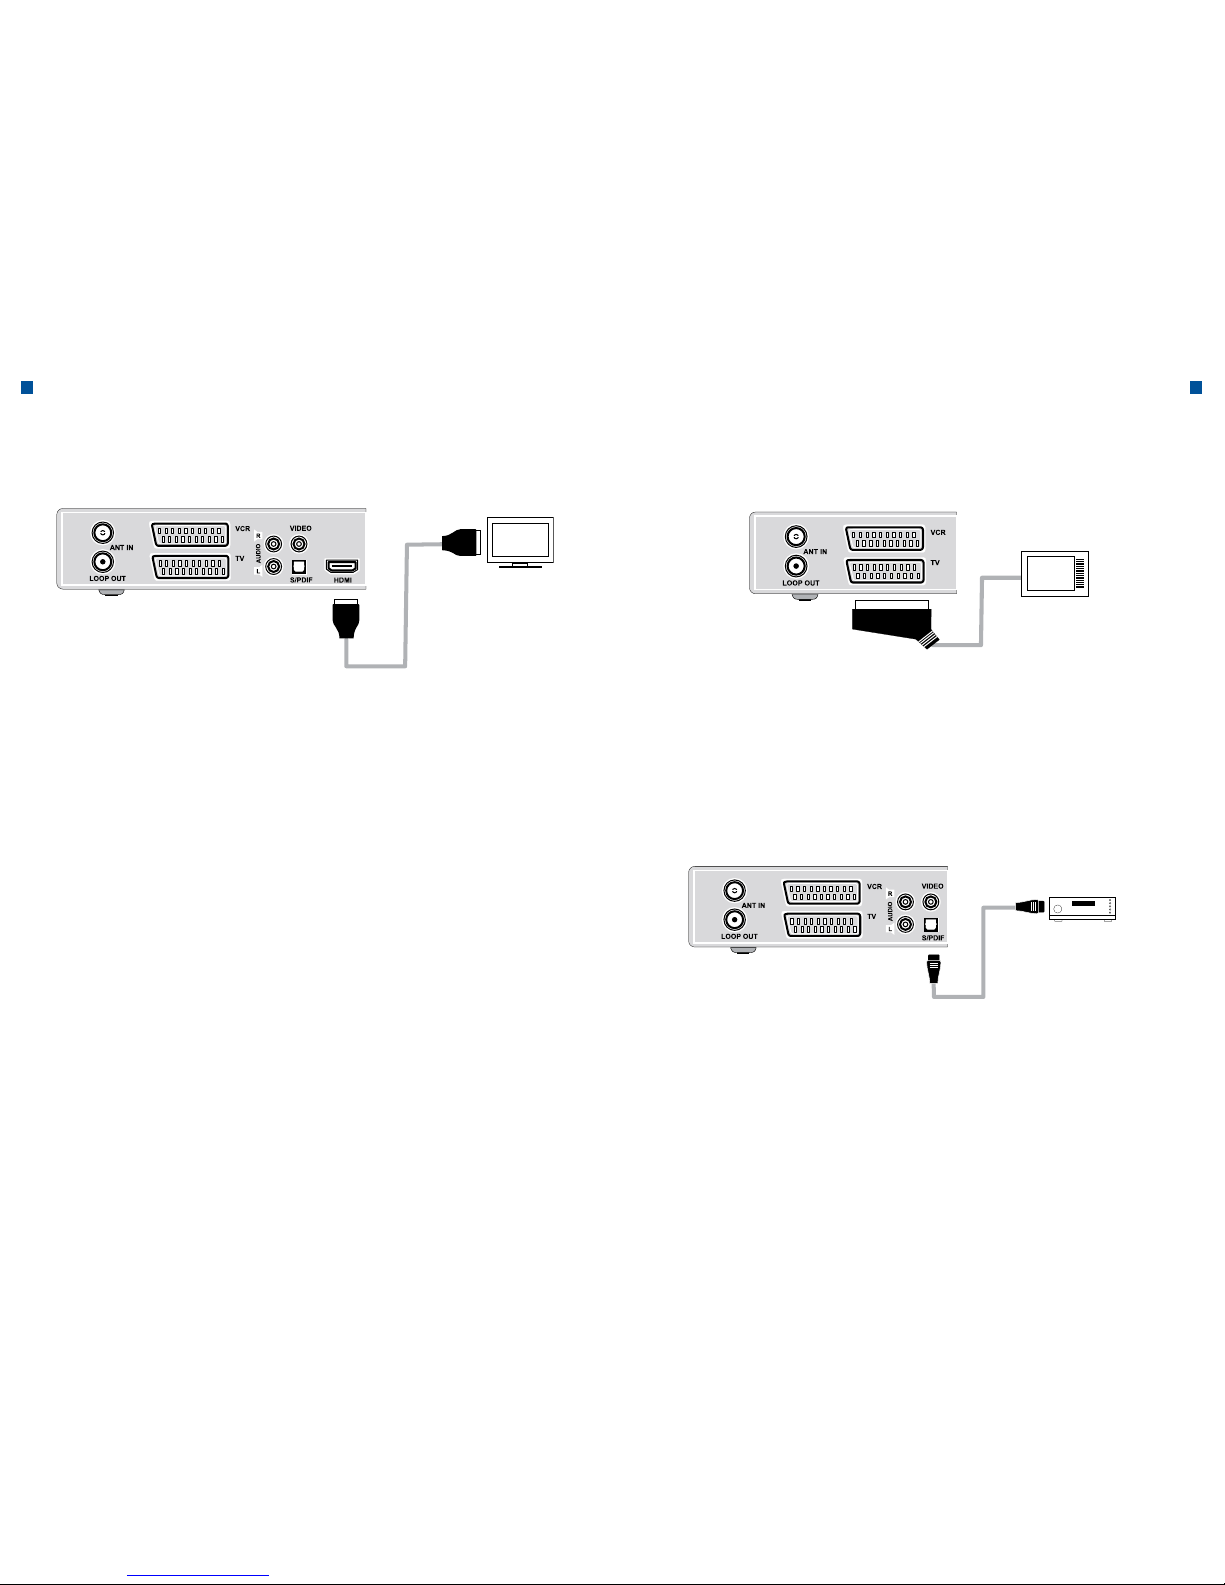
1. Connecting the set-top box to a TV-Set (HDMI)
The HDMI (abbreviation for High-Definition Multimedia Interface) is a next generation port, which allows the transmission of digital audio and video signals over a
single cable without any compression. The name “Multimedia interface” is actually
the better designation, since this combination allows the transmission of several
digital audio channels (5.1-channel sound). When connecting via HDMI you do not
have to connect an audio cable. Audio cables are only necessary when you connect via HDMI/DVI.
2. Connecting the receiver to a TV-Set (analog)
Connect the receiver with the SCART cable to your TV, if your TV has a SCART
connector. Alternatively, you can use the AV connector, the TV output (UHF) or the
component video.
The HD receiver is designed for the playback of digital programs. Therefore, a connection via an HDMI cable is recommended. In case of an analog SCART connection, a deterioration of the picture may occur during the playback.
This also applies for the connection of additional equipment through the SCART
interface.
3. Connecting the receiver to a digital audio system
If you have a DA-converter with an S/PDIF coax input, you can connect the
receiver in order to enjoy a higher quality of sound.
Connect the S/PDIF coaxial cable, for example, to a digital surround amplifier.
4. Loop Through
If you have another analogue or digital set-top box and want to use the same
cable line, you can connect another device to loop through. Connect one end
of the coaxial cable to the loop-out port on the first set-top box and the other
end to the CATV ANT-IN jack (cable TV input) on the second set-top box.
HDMI Cable
SCART Cable
TV-Set
TV-Set
Audio System
TOSLINK - Cable
(Not included
in the delivery.)
Receiver - Rear Receiver - Rear
Receiver - Rear
26 27
Commissioning Commissioning
III. Commissioning
a. First installation
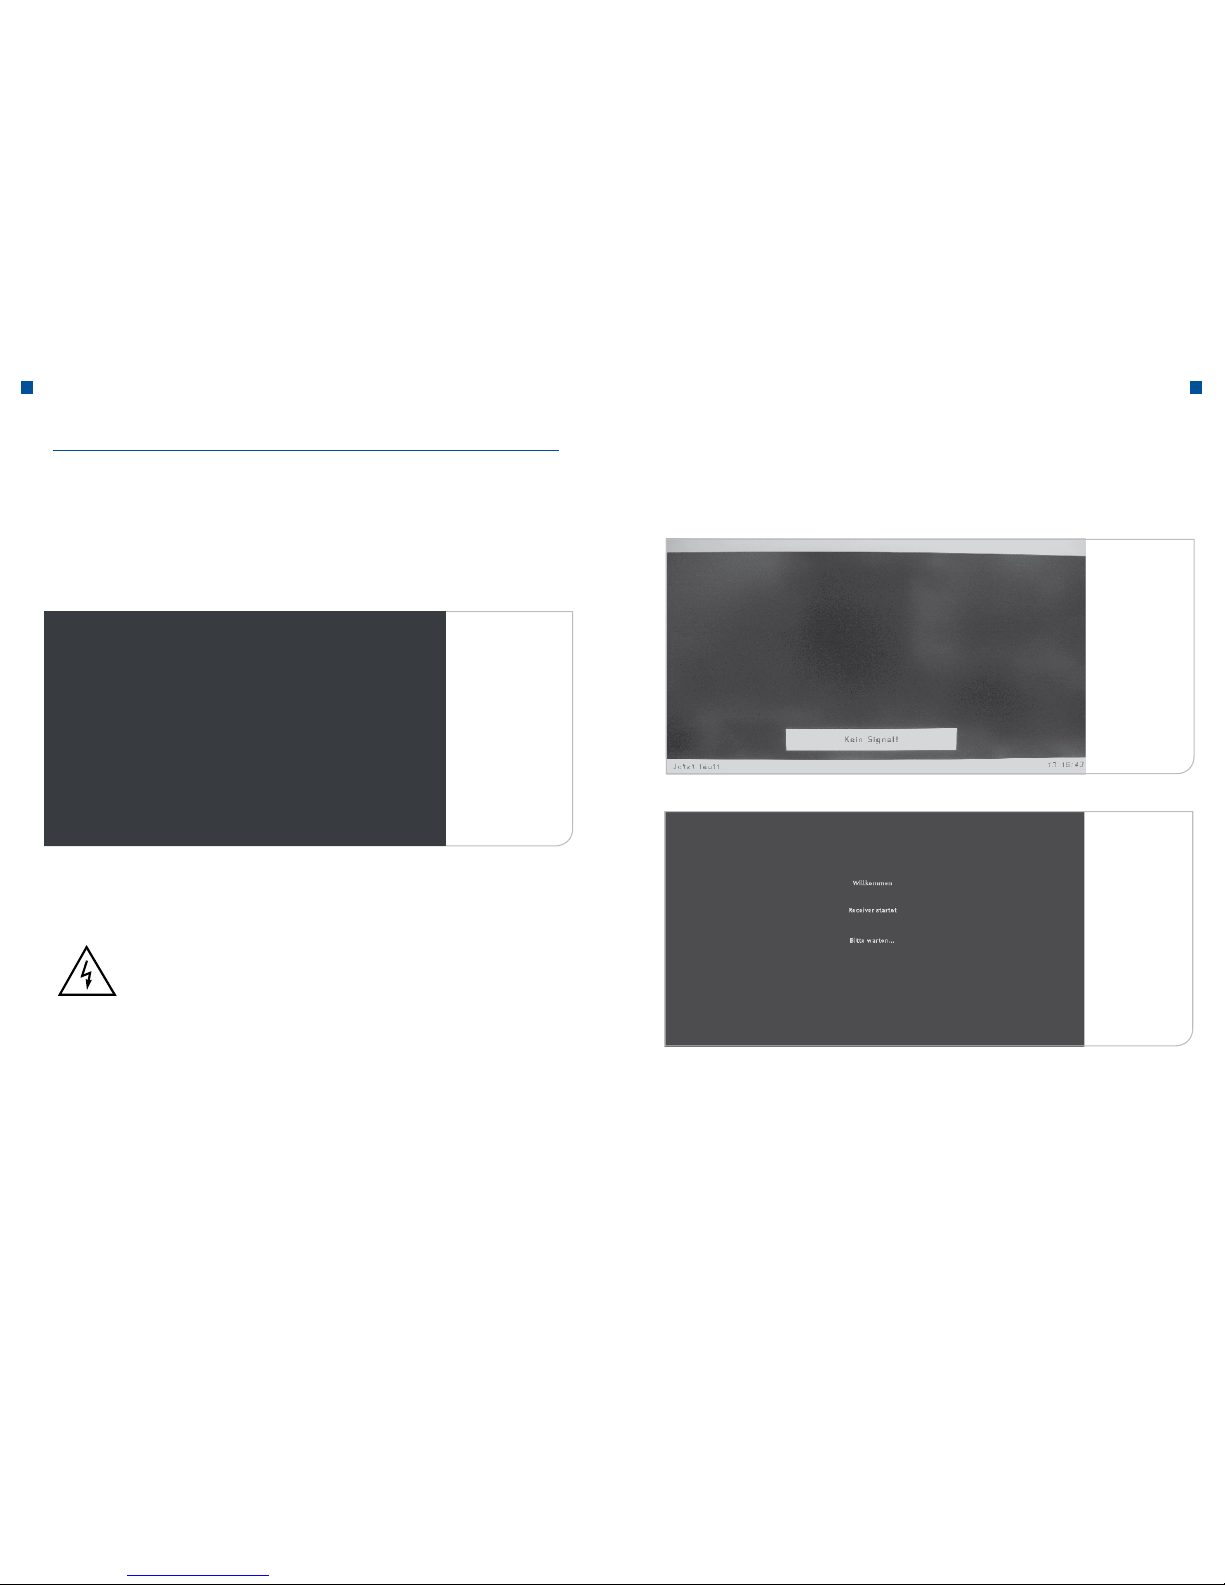
Connect the device to the antenna cable and to electricity.
About two minutes later, the picture of initial installation will appear:
About 3-4 minutes after this picture is displayed, the receiver switches to the startup mode.
Important Note
Both indications can be interrupted by screen indications, signifying
that there is no TV signal (“No Signal”). During the transitions between
the initialization phases, the device interrupts the signal transmission.
Please do not react here.
After a few minutes, an indication of the device is displayed once more
on the screen.
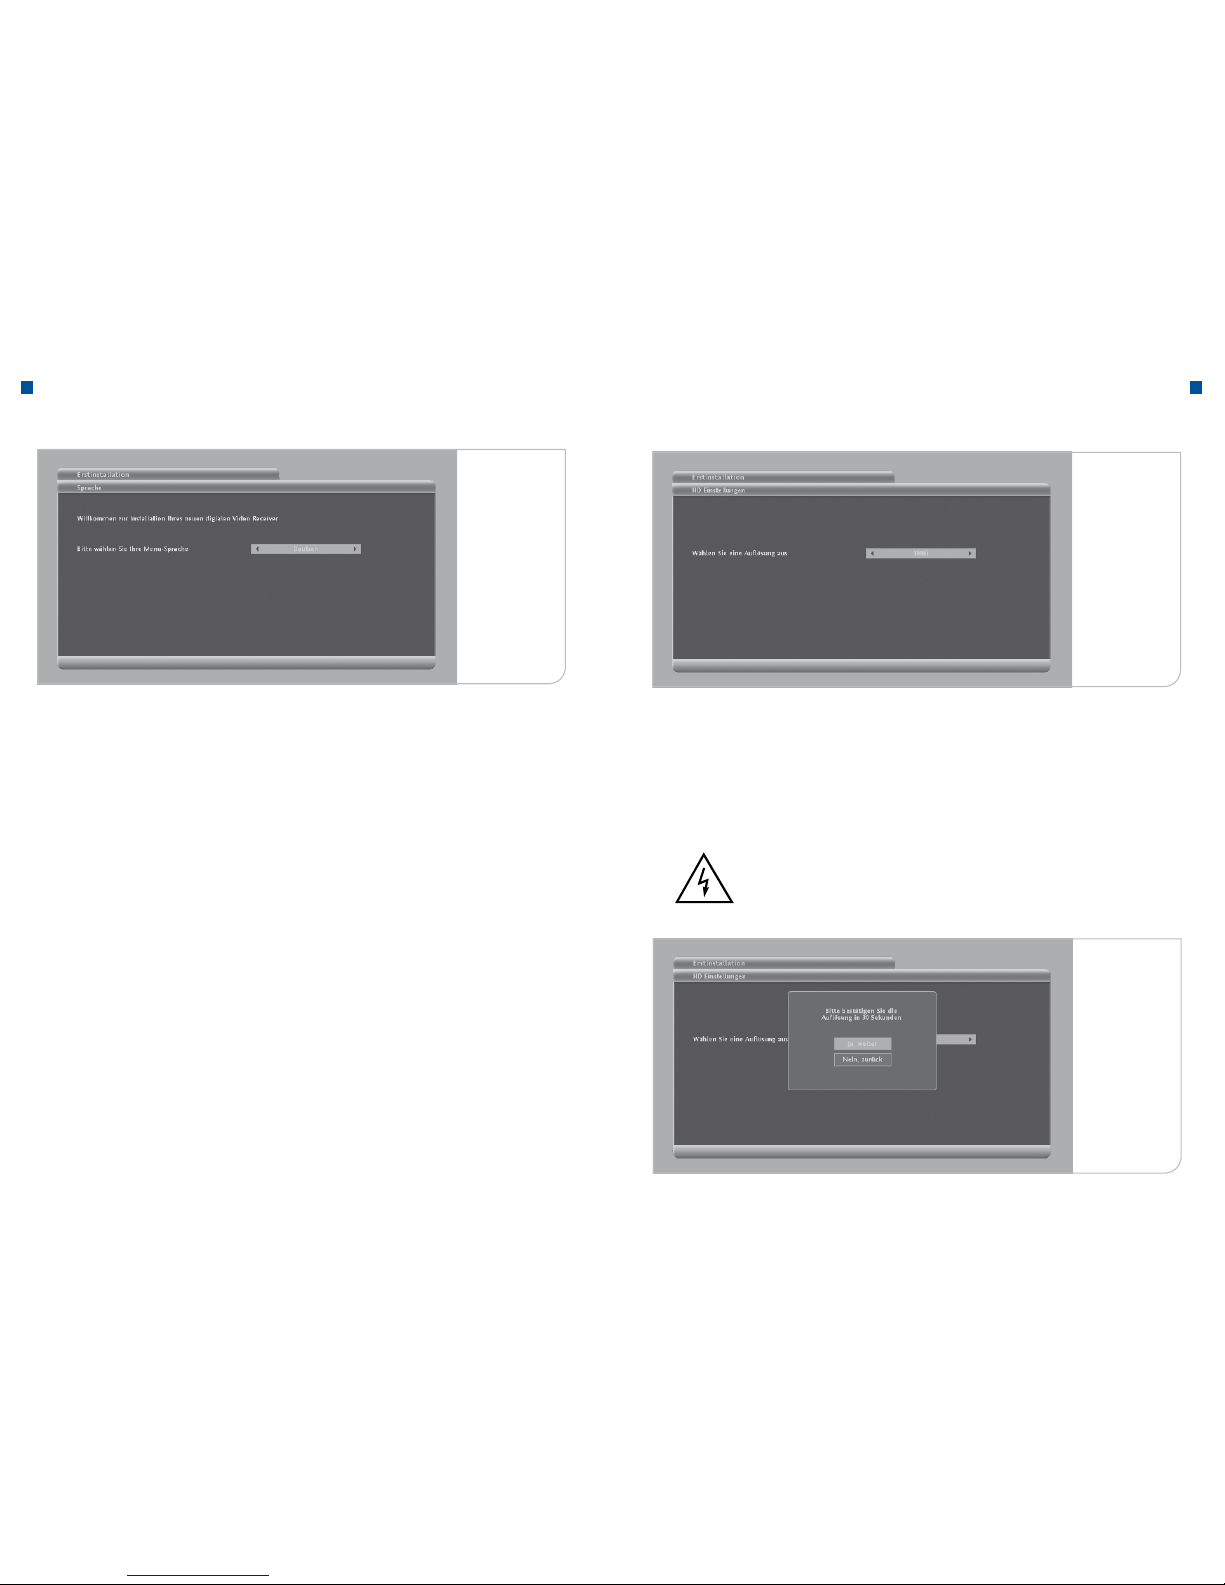
You will be asked to select your language for the user interface.
You can choose between German and English through the <Left> and <Right>
arrow keys. Press the <OK> key to confirm the selection.
Initialization
No signal
The receiver
is starting
28 29
Commissioning Commissioning
The receiver inquires about the resolution of your TV. For the technical performance parameters, please refer to the manual of your TV set. Generally one
can say that, for CRT monitors a resolution of 576p is necessary. For flat panel
monitors, it should be distinguished between HD ready monitors with a resolution of 720p and full HD monitors with a resolution of 1080i.
If you have used a SCART connector for your Cathode Ray Tube (CRT)
screen, the device will automatically determine the device resolution. In case
of an HDMI connector for your flat screen monitor, the device needs the information concerning the resolution, in which e.g. the user interface, should be
displayed for flat screen monitors.
You can choose between 720p,
1080i and
576p
through the <Left> and <Right> keys. Press the <OK> key to confirm the
selection. Finally, please confirm your input through the <OK> button in the
window that opens.
Normal HD flat screen monitors often support only a resolution of up to 720p, while
Full HD flat screen monitors have a resolution of 1080i.
After selecting the default resolution, you must confirm with <OK> the information
within 30 seconds, otherwise the default resolution chosen will be 720p.
Subsequently, the automatic channel search will be initiated from the device.
Note
During this phase, attention should be paid, so that neither the
SmartCard nor the already connected antenna cable is removed.
Language user
interface
TV resolution
Confirmation
30 31
Commissioning Commissioning
Depending on the software version that is already stored in the device, the download of a new software may be necessary. If the menu referred to below is shown
on the TV screen, the device must initiate a download.
If no live television picture is displayed and a “Caution” sign appears instead,
the scan was performed without a SmartCard.
Please insert the SmartCard into the receiver.
Program Guide
Production
Software
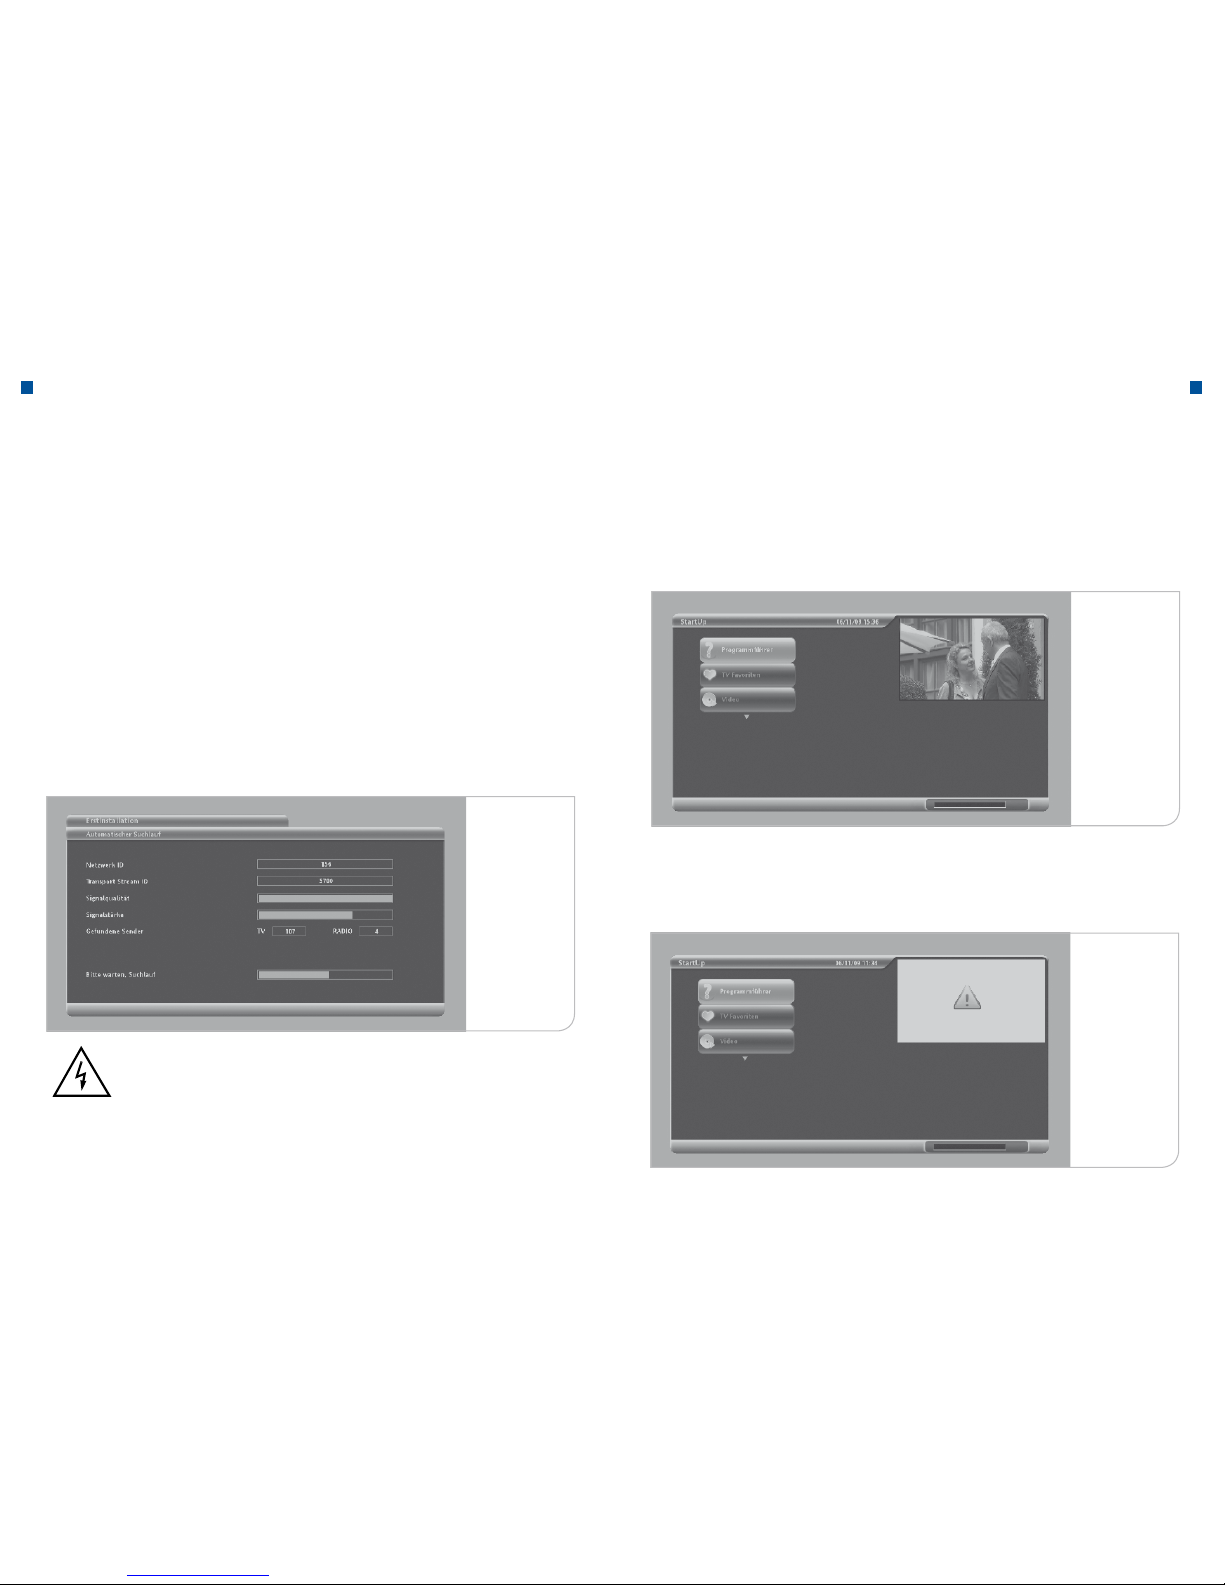
b. Automatic Search
During initialization, the receiver performs a full automatic program search and - as
the case may be - if the user chooses so via the user setup sub menu, adds a new
program in the programs list.
This process requires about 20 minutes.
Once a new broadcast station is found, the signal quality and the signal strength
are given. The signal quality and the signal strength are always fluctuant and vary
depending on the station that has just been found. If neither the signal quality nor
the signal strength are displayed, and no values are given in the network ID and the
transport stream ID, please check the cable and, if necessary, restart the unit.
The indication of the number of TV and radio stations found, appears continuously
during the channel scan.
Note
In the event that, after a few minutes, the device still indicates that
no TV or radio programs were found, it is necessary to verify that the
antenna cable and the SmartCard are plugged-in correctly.
The search is successfully completed, if the main menu is displayed on the screen
and a live TV picture is displayed in the window.
Automatic
Search
32 33
Commissioning Commissioning
The first main menu home page displayed, shows on the upper left side the functional surfaces that you can select through the <Up> and <Down> arrow keys and
the <OK> key. The live television picture is shown on the upper right side and an
information banner appears beneath it. At a later point in time, this is where you can
select the interactive applications.
Important Note on Software Update: If you have already downloaded an updated
software, you will arrive directly and without an additional software download, to
the above-mentioned main menu. Nevertheless, it is possible that new software
updates are necessary. The device then uses the inactive stand-by-phases to perform a download.
Important Note on Activations: The activation signals of the individual programs
are delivered through the program signals. It should be noted that the public channels and the encrypted private programs are immediately activated and visible.
The activations of the pay-TV services require a little longer. If the initializations
have already been carried out, the activations of the pay-TV services will arrive within 5-10 minutes and make the program visible. However, delays of up to 24 hours
may occur.
To ensure the first activation, please switch to an encrypted channel, such as LTV,
but not on a public program.
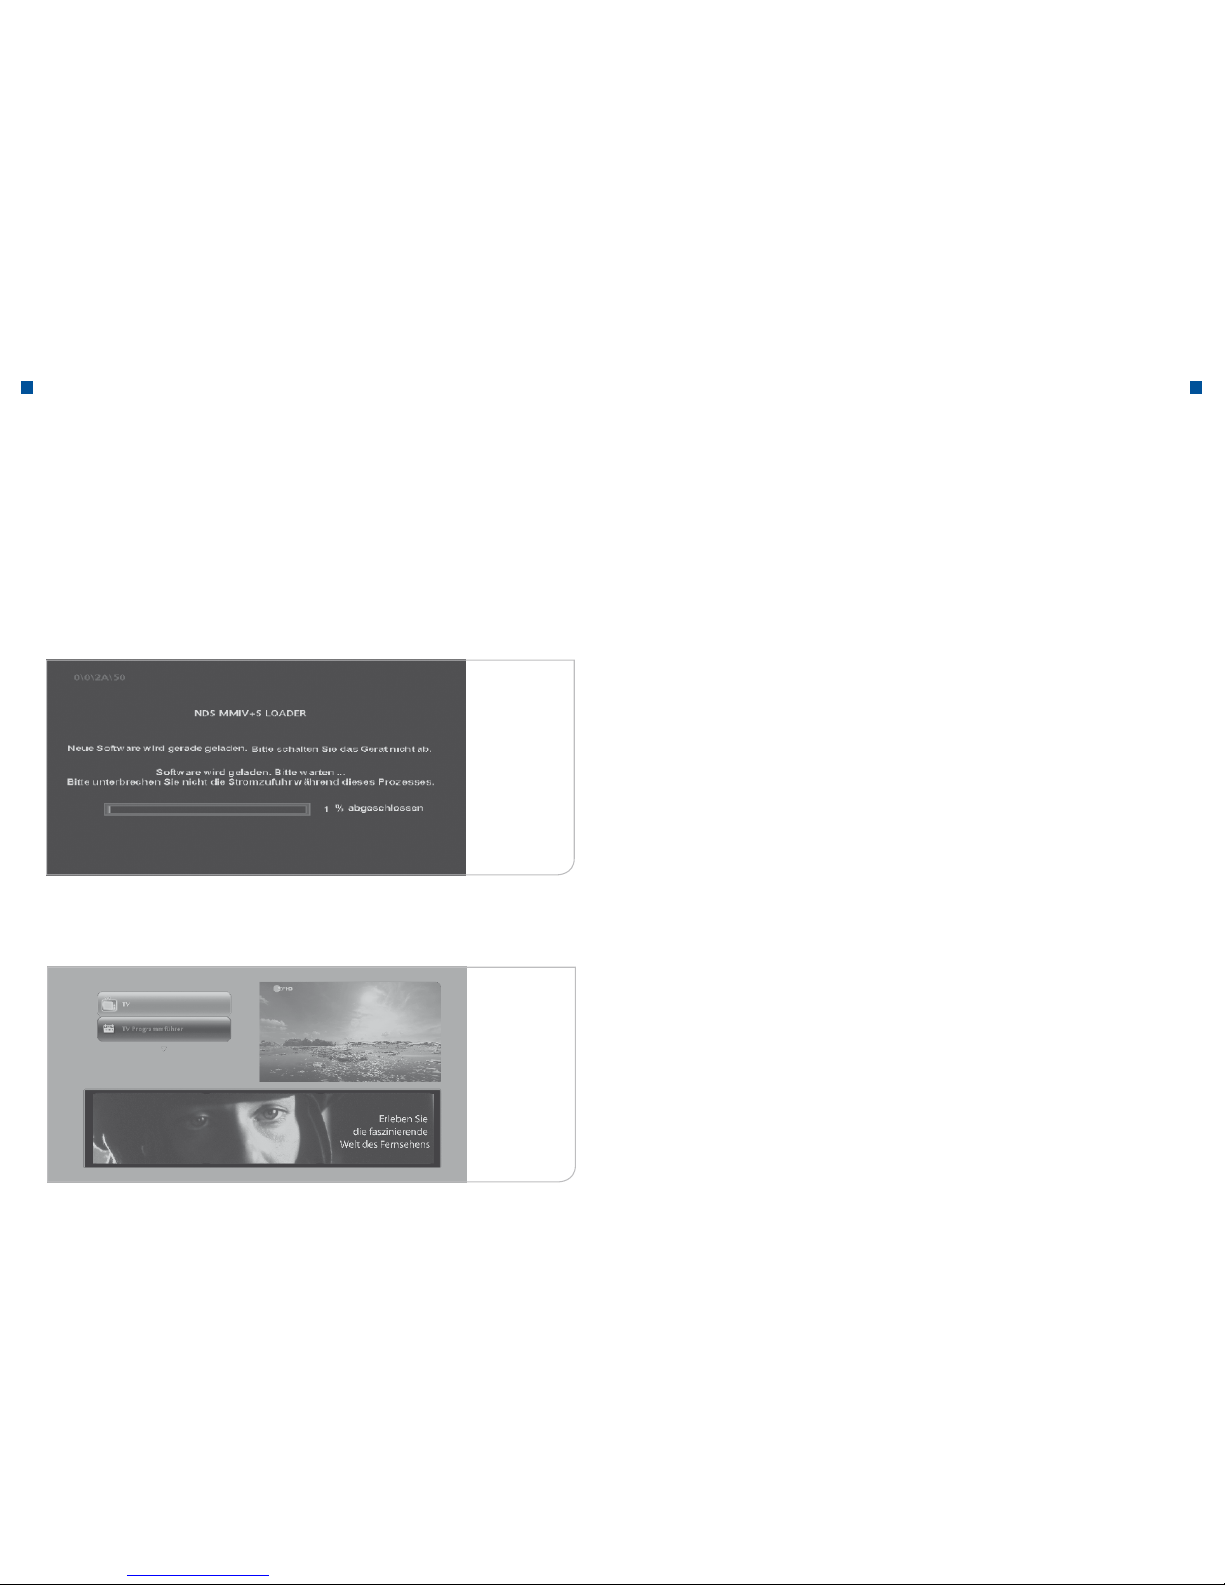
The device automatically checks whether the corresponding software version is
up-to-date, and automatically loads the latest update, if this is necessary. This
process is repeatedly interrupted by “No Signal” indications. Once again, please
do not react.
Between the different download phases, the broadcasting signal is briefly interrupted for a period of up to 4 minutes.
The software download may take 5-10 minutes. Thereafter, the device is automatically re-initialized before the main menu is displayed.
New Software
Main menu
home page
34 35
Commissioning Functions
We recommend not to switch off the HD receiver overnight, but to set it to a standby mode by pressing the <Power> key on the front panel or through the <Power>
key on the remote control. Thus, the receiver continues to receive regularly the
new information accompanying the channel (EPG data) and at the same time, the
starting process will be performed much faster than after a complete switch off of
the set-top box through the main power switch on the rear panel.
After resetting the receiver, a black screen appears for a few seconds and then the
main menu. The main menu home page is displayed only when the receiver is powered up after the “Reboot” or the “Stand-by”.
This function is expected to become available in February 2010.
To explain the many different logos and information displays within the user interface, you can press the Help button on the remote control, to “call up” a simple
portal. This portal will explain the logos on the screens and the remote control.
Therefore, press the <Help> key on the remote control to access the portal.
Currently, the Help button is used only for activating the audio channel options (language of broadcast or subtitles) in a running program. It is not intended to display
information on the current program.
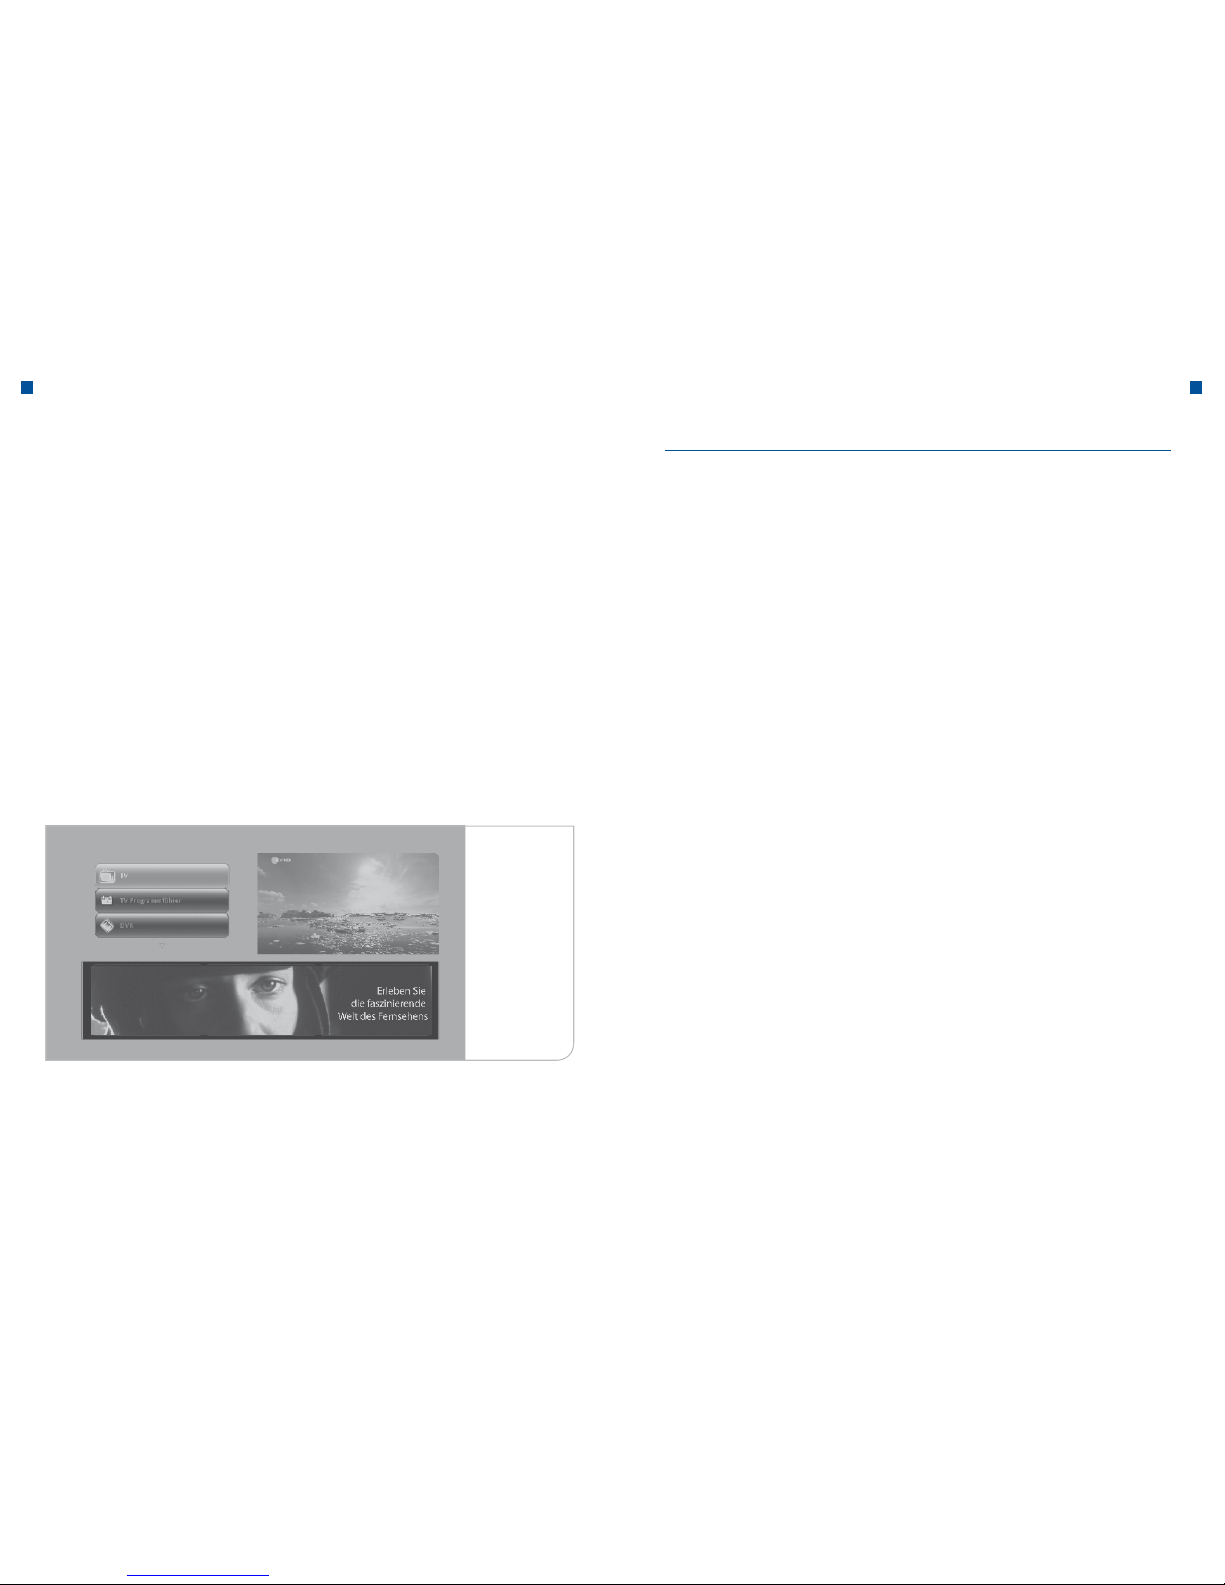
b. Main menu
After the automatic search and the initial setup of the receiver, you arrive to the
main menu (see picture on page 34). Next to/In addition to the live TV screen in the
appearing window, on the left side you can select the important menu points of the
HD receiver, by using the arrow keys of your remote control.
The following selection options are available:
• TV (Television): TV Live-Picture
• TV Program Guide: Overview of the current and following TV broadcasts in
their respective TV programs
• TV Favourites: Choice of your favourite TV stations
• Radio Favourites: Choice of your favourite radio stations
Main menu
home page
c. Stand-by a. Help-Function
IV. Functions

36 37
TV live-picture and program information bar TV live-picture and program information bar
Through the main menu, if you press the <TV> key in the user interface, you will
arrive to the live-TV program. The first program of the programs list as well as the
program information bar displaying the program information appear.
Program information is displayed every time you switch to the live-picture. By default, the time this will be shown is limited to 10 seconds, but it can be adjusted in
the system settings. To change the banner’s display duration: in the Live-menu,
under User Setup in the sub menu “Display Duration”, you must use the <Right>
and <Left> keys to select the display duration.
The information bar discloses the station name and the program numbers as well
as the title of the broadcast, along with information on the broadcast duration
(progress bar), the audio status and the quality of transmission of the broadcast. In
addition, you will also find the time and date for orientation purposes. By pressing
the button <Info> the extended brief description is called up, in which the individual
channel provides its own description and notes about the selected broadcast.
By pressing the button <OK>, you can retrieve the entire program information. The
titles of the subsequent programs, if any, will be listed in the information bar. Using
the <Up> and <Down> arrow keys, it is possible to view the following broadcasts
in the bar window and by pressing the <Info> key or, as the case may be, the
<OK> key, to retrieve the broadcast information.
The information bar also facilitates calling up the channel lists, as you can view the
current and subsequent broadcasts by using the <Right> and <Left> arrow keys.
The device will not switch to the new station before you press the <OK> key.
By pressing the colored <Red> key you can record the selected channel to your
list of favourites. The favourites list will be displayed if you press the button <FAV>
and it is identified by a blue star in the info-bar.
At the bottom right hand side, there is a display (progress bar), which indicates the
duration of the current program.
Main menu
Info Bar
a. Program information (Info Bar)
V. TV live-picture and program information bar

38 39
TV live-picture and program information bar TV live-picture and program information bar
You can go directly to another station, by entering the program number that is
known to you. For this purpose you will use the number keys of the remote control.
The programs have up to three-digit program numbers. If entered correctly, the
receiver switches to the new station. In case of an incorrect entry, a relevant note
appears.
Note
Alternatively you can, of course, go step by step from one station to
another by pressing the <P+> and <P-> keys.
Important Note on Program Change and Protection of Minors: Many programs
are protected against access from minors through a PIN. These settings are dependent on the transfer of the corresponding data accompanying the broadcast
program, which define the protection of minors in the channel transmission. The
regulation of media institutions requires that a station without corresponding data
must, in principle, be designated as a station of particular sensitivity and must
therefore, require a PIN number. A delay may occur when changing channels, if the
data concerning the protection of minors is not found on time. As long as no data
is available, it is required to enter the PIN number.
If you want to select a different audio language for the program - if any -, press
the <Help> key in the Live-picture. Here you can define the desired configuration
at any given time by pressing the <Right> and <Left> arrow keys, as long as the
broadcast supports it.
Note
Selecting “None”, will only disable the subtitles for the current program. If you wish to eliminate the subtitles permanently, you must
configure this in the “User Setup” under the “Language Settings”
sub menu.
Selection
of audio and
subtitles
b. Program change c. Selection of audio language and subtitles

40 41
TV live-picture and program information bar Live Menu
The volume can be adjusted with the <V+> and <V-> keys. When changing the volume, a bar appears on the upper right hand side of the screen, which displays the
status of the current volume.
With the <Switch to Mute> key the sound can be turned off. In case that the receiver is switched to “mute”, the “mute symbol” appears on the upper right hand
side of the screen.
The <Back> key on the remote control and on the front panel allows you to go
back, out of the current situation into the previous user situation, at all times. This
will be the case both in terms of the broadcast station and the respective user
guides.
On the other hand, the <Exit> key allows to go from the respective menu item,
back to the TV live broadcast or live radio broadcast , without going through the
various intermediate steps.
The live menu in the TV or radio mode appears transparently over the display
screen, as a feature selection. Here, you can choose between the following functions:
• TV Program Guide: Overview of the current and subsequent TV broad-
casts in their respective TV programs
• TV Favourites: Selection of favourite channels. Setting up the favour-
ite channel selection
• Pre-entries: Overview of assigned programs (reminder function)
• Radio: Switching to the live radio program or to the radio
favourites
• “B-Mail”: Switching to an overview of the user information and
notes sent to the receiver (currently inactive)
• User Setup: User-specific settings through the sub menu
• System Setup: System settings
Live Menu
d. Volume control and mute key
e. Back key and Exit key
VI. Live Menu

42 43
TV Program Guide (EPG) TV Program Guide (EPG)
The TV program guide (EPG = Electronic Program Guide) allows you to change
to the program you wish, by giving you an overview of the channel and program
information.
You will reach the TV program guide through the main menu or through the Live
menu as well as through the <EPG> key on the remote control. The live picture
displayed in the window corresponds to the TV or radio broadcast selected most
recently.
The list starts with the program numbers defined in the program list. The order can
not be individually adjusted and it changes depending on the actual viewing interest, and it is determined by LTV. Your own settings under TV favourites p. 46
By pressing the arrow keys, you can scroll through the list of channels and programs (marked by the orange color bars). The corresponding broadcast information will be automatically displayed in the box on the upper right hand side.
In the middle you will find the date and the corresponding time period of the scheduled broadcasts. The extent of the information accompanying the broadcast varies from program to program. In an average, information should be available on
the programs of 3 to 7 days. As far as the device is in live operation or in standby
mode, the data is automatically renewed, so that the information on the TV program is as complete and as accurate as possible.
By pressing the <OK> button, you can view all the broadcast and program information.
Live Menu
TV Program
Guide
TV Program
Guide
VII. TV Program Guide (EPG)

44 45
TV Program Guide (EPG) Pre-entries
The colored function keys found at the bottom of the EPG frame, enable you to
process the selected broadcasts faster or, as the case may be, to move faster in
the time line of the station matrix.
Using the arrow keys, move the coloured bars on a channel name and press the
<OK> key. This way, the current and the subsequent broadcasts of the selected
program will appear in sections.
Using the arrow keys, move the coloured bars on a channel name and press the
<OK> key. This way, the current and the subsequent broadcasts of the selected
program will appear in sections.
Once you select a current broadcast that runs on the program, press <OK> to
confirm. Then, the device changes to the live picture in the pop-Live window. If you
press the <OK> key once again, you will arrive to the full screen with the information bar.
Both in the info bar and in the EPG you have the option to receive reminders of upcoming broadcasts, even on other channels. By pressing the function key denoted
“mark”, the desired program is stored in the “pre-entries” category. By pressing
the <Back> key, you go back to the program. You will be “reminded” five minutes
before the start of the marked broadcast and you can confirm the selection (green)
or delete it (red). If you confirm or do nothing, the receiver switches to the desired
broadcast automatically. In the User Setup you can determine how many minutes
before the broadcast you wish to be reminded.
Program
information
Order of the
stations
VIII. Pre-entries

46 47
TV Favourites TV Favourites
Besides the comprehensive channel presentation, from the EPG you can also restrict the list of channels that you actually want to see. You can select the TV favourites from the main menu and the live menu and then, either choose one of your
favourite stations directly from the sub-menu, or use the favourite list to process
the broadcast station as in case of the EPG list.
The list of favourites will be defined by you. For this purpose, you should go to the
live menu of “Edit Favourites”. You can select your favourite station by pressing the
<OK> key. Up to 100 favourite stations will be accepted.
The favourites sub-menu displays the first 30 favourite channels. In case you want
to change the order of display in the sub-menu, you must call up the list of up to
30 favourite stations in the menu “Edit Favourites” by pressing the <Yellow> func-
tion key. By pressing the <OK> key, you can then select the channel and move it to
another location. The new position must be again confirmed with <OK>.
In addition, you can include a channel in the favourites list directly from the infobar, or the EPG.
You can switch from the standard TV mode to the favourites mode, at anytime. To
do this, press the <FAV> key and go to the favourites view. Once you are in the
favourites mode, the only channels displayed are your favourite ones. Even the
navigation through the info banner occurs amongst the favourite channels. You can
return to the standard TV mode at any time, by pressing the <FAV> key once more.
Important Note
The settings for the favourites list may be deleted through an automatic station search, if an erroneous program list was loaded or, as
the case may be, if such an erroneous program is reloaded during the
search. It is therefore advisable to carry out the automatic channel
search only if a new station was activated.
IX. TV Favourites
TV Favourites
TV Favourites
edit

48 49
Radio and Radio Favourites Radio and Radio Favourites
The HD receiver treats Radio stations just like the TV stations. You can access your
radio station via remote control by means of the <TV / Radio> key or via the main
menu and the Live menu. From the main menu, you get direct access to the overview of all radio stations in the determined station order.
As far as the radio stations communicates them, the broadcast titles and subsequent broadcasts are also displayed in their order of transmission. Often, only the
items of the specific day are available.
If you press the <OK> key once more, the device will exit the channel overview and
it will switch to the radio full screen, while displaying the info banner as well as the
specific broadcasting information.
X. Radio and Radio Favourites
Live - Menu
Radio
All radio
stations
Radio
Fullscreen
In case you want to switch to Radio mode from the TV mode through the Live
menu, the live window shows theTV broadcast selected most recently in the form
of an overview. The unit switches to the radio mode solely following a confirmation
of the desired station, via the <OK> button.

50 51
Radio and Radio Favourites Radio and Radio Favourites
Radio Favourites: As with the television channels, you can also choose your favourite radio station. You select the sub-menu “Edit Radio Favourites” and when
you press the <OK> button, you will reach the Favourites selection list. You define
the desired radio station through the <OK> key. Please do not forget to save the
selection by pressing the <Green> function key.
Live - Menu
Radio Favourites edit
Favourites
edit
Radio Favourites
The selected station will be added to the radio favourites list and you can tune in
through the sub-menu “Radio Favourites”.

52 53
My “B-Mail” My “B-Mail”
Messages of LTV may be sent to each customer individually, through “B-mail”.
These messages may refer to possible maintenance works and disorders that
certain stations may suffer because of them, or they may suggest new products
for you. Through this, you could also have information concerning your current account statement sent to you.
In order to check whether you have received messages, press <OK> to select
“B-Mail” on the Live menu and then press <OK> again to select “News” on the
sub-menu. This way, you will access the news portal containing the individual messages, which you can control by using the directional arrow keys.
“B - Mail” Menu
“B - Mail”
XI. My “B-Mail”

54 55
User Setup User Setup
In user setup, you can modify all the important user-specific settings. The settings
of the functional properties are linked therewith. You can access the User Setup
from the Live menu.
The respective sub-menus belong to the User Setup:
• Language setting
• Audio Settings
• Automatic Search
• Diagnostics Overview
• Screen saver
Menu User
Setup
Language
Settings
Audio Menu Settings
XII. User Setup
Language settings concern the determination of the menu language, the potential
audio languages, and display of subtitles.
The settings for the audio languages depend, of course, on which languages are
actually transmitted. Accordingly, it is possible to display subtitles only if they are
offered.
The audio settings refer to the standard quality of the audio transmission that is
supported by your TV set. You can select between “Dolby” and “PCM”.
The selection may be carried out by using the <Left> and <Right> arrow keys.
Do not forget to confirm the new selection by pressing the <Green> colored button.
a. Language settings
b. Audio Settings

56 57
User Setup User Setup
Do not forget to confirm the new selection by pressing the <Green> colored button.
As regards the programmed insertion of the user instructions, you can define their
display duration and the device’s standard responses.
By pressing this menu item, an automatic scan is started, which updates the existing channel list, if necessary. Since the channel search may result to the overwriting of the favourites list that was already created, it is recommended to activate
this search only if e.g. a new station was launched.
Banner Display Duration: By default, the info banner will be displayed for “10
seconds” every time you switch to a new channel. If you want a longer display time
duration, you can select different duration options from 0 to 60 seconds through
the <Left> and <Right> arrow keys.
Automatic switch over: If you have bookmarked a particular broadcast in the
memory, you will then automatically be informed by the system. You can then
choose whether to automatically switch to the desired broadcast. You can choose
between the different options through the <Left> and <Right> arrow keys.
Reminder functions: Choose between various reminder notification times before
the scheduled beginning of the desired broadcast.
You can choose amongst the different options through the <Left> and <Right> arrow keys.
c. Display Duration
d. Automatic Search
Audio Settings
Menu Display
Options of the
listing duration

58 59
User Setup User Setup
The diagnosis overview is the compilation of the main user data. Our account managers will ask for this data in the event of a device malfunction, and in an effort to
determine the possible source of error.
Here is just a brief description of individual pieces of data information:
• SmartCard-Number: The SmartCard number displayed must match the number
of the SmartCard inserted in the device. The device works only when the correct
SmartCard is inserted. In the event that the SmartCard is changed, this must be
adjusted accordingly by the Customer Service of LTV.
• NDS-Serial-Number: The serial number is identical to the unit’s serial number.
Also, it is required for the purpose of activating encrypted channels.
• Release Number: The release number indicates the software version that has
been loaded to the device. If, for example, the device was switched off for a long
time or has been turned off overnight, it is possible that a software update with
new applications could not be downloaded yet. An outdated software version
can cause malfunction of the device.
• Bouquet-ID: The bouquet-ID defines the version of program listings and thus the
order, in which the programs are displayed. In case of insertion of new programs,
the bouquet will be adjusted and will be automatically loaded into the device. An
older version of the bouquet ID may result in new programs not being visible.
In the event that no broadcast is sent to the screen, but only a graphical representation appears, a “screen saver” must be displayed on the TV picture, so that that
the flat screen does not “burn” the picture it is showing. You can set the period, as
of which a screen saver will appear, by using the <Left>and <Right> arrow keys.
The screen saver is pre-set to 10 minutes. The period may be adjusted between
one and 60 minutes.
• Network ID: Original network ID of the selected transponder.
• Transport-Stream ID: determines the transport stream that the main program
and software data transmits.
• Signal strength: illustrates in the form of percentage the current signal level of
the selected transport stream.
• Signal quality: represents in percentage the current signal quality of the selected
transport stream.
• Symbol rate: represents the transmission bandwidth. This is normally 6900
Mbps.
e. Diagnostics Overview
f. Screen Saver Setup
Menu
Diagnostics
Diagnostics

60 61
System Setup System Setup
Menu
TV Settings
TV Settings
TV Function
Settings
XIII. System Setup
In order to set up the HD receiver with the correct technical TV settings, you can
set the TV type, the TV format and the picture display to 4:3 video.
• TV Type: As regards the TV type, a differentiation may apply between HDTV
(LCD, plasma flat screen TV) and analog TV (tube TV).
• TV-Format: The TV format can be selected according to the TV type. The 16:9
format is available for HDTV and a selection between 16:9 and 4:3 may be made
for an analog TV.
• Presentation in another video format: These settings are dependent on the
selection of the two points mentioned above:
• HDTV-Type with 16:9 format: Here you can choose between “Pillar Box”
(vertical screen division) and “Adapt On Screen”.
• Analogue Type with 4:3 format: The display of broadcasts in 16:9 format can
be set as a Letter Box or it can be adapted to the screen.
• Analogue Type with 16:9 format: The presentation of broadcasts with 4:3
format can be set as Pillar Box or it can be adapted to the screen.
Please do not forget to save the new settings by pressing the <Green> function key.
a. TV settings

62 63
System Setup System Setup
Menu
Protection
Block Channel
Menu
Protection
Settings
List of Block
Channel
Through the menu “System Setup”, you can also adjust the settings concerning the
protection of minors (“FSK” protection, i.e. German “Voluntary Self-Regulation of
the Film Industry”). The device’s settings for the protection of minors determine the
FSK status, beyond which it will be required to enter a PIN. To change the default
setting FSK 16, (i.e. all programs enabled are suitable for the age of 16 and above)
you must enter a PIN.
This PIN will be provided with the SmartCard and the limit may be changed for
ages under 16+ as well. If you press the <OK> key, you can change the protection
of minors to FSK 12 FSK and 6. This prevents family members from watching certain programs unguarded.
You can have channels blocked, so that the broadcast station can not be enabled
if the PIN is not entered.
In order to block a channel, you must select “Block Channel” on the sub-menu of
the system setup. To initiate the blockings, you must enter the access PIN number.
In the “ Block Channel “ list, you can select the channels that should be PIN-protected by pressing the <OK> key. You can scroll through the list by using the <Up>
and <Down> arrow keys.
b. Protection of Minors c. Block a channel

64 65
System Setup System Setup
Change PIN
Blocked
Sender
Old PIN and
new PIN
Please do not forget to save the modifications by pressing the <Green> function
key.
Subsequently, if you navigate to a blocked channel, you must enter the PIN
number to unblock the station.
If you notice that other people have had unauthorized access to your PIN, you
should immediately change the current PIN to a new PIN-combination of numbers.
You will reach the “ Change PIN “ function on the sub-menu of the System Setup
by pressing the <OK> key.
d. Change PIN

66 67
System Setup System Setup
Incorrect PIN
Menu Settings
Confirmation
Settings
On the “Change PIN” page you will be asked to enter, first the old and then the
new PIN twice, as a four-digit code. You should not match the new code with the
old one, since, if you do so, the new PIN code will not be accepted.
If you want to bring your receiver back to the default settings, you must select
“Factory Settings” from the sub-menu of the system setup.
e. Restore factory settings
Confirm the new PIN by pressing the <Green> function key. Please use the number
keys of your remote control in order to enter the PIN code.
In case you enter an insecure PIN (for example, four times the same number) a notification will draw your attention to the error. If you enter an incorrect PIN, a respective notification will appear as well. If entered correctly, the notification indicates
that your new PIN was successfully changed. For the purpose of protecting minors,
the query for the PIN concerning minor protection cannot be disabled.
You will then be asked if you want to restore the factory settings.
Please confirm by pressing the <OK> key on “Yes, continue”.
If you do not wish to reset, select “No, back.” Alternatively, you can restore the factory settings by pressing simultaneously the <EPG> and <OK> keys on the front
panel.

68 69
System Setup System Setup
Menu Manual
Search
Settings of
Manual Search
Scan
f. Manual Search
In the event that the automatic station search fails and the programs are not visible,
a manual search is required. You can reach the manual search through the submenu of the System Setup in the Live menu.
By default, the start and end frequencies are set from 113 MHz to 858 MHz, where
the digital programs are found. The values can be deleted with the <Back> key and
they can be re-entered by using the number keypad.
The increment determines the default frequency steps, the symbol rate should not
be modified. The QAM-setting should be set at QAM 64 or QAM 256.
If you wish to start the search, you must press the <OK> key. The scanning process
takes about 20 minutes.

70 71
System Setup System Setup
HD Settings
Menu HD Setup
g. HD Settings
In the HD setup, you can set the resolution of the user interface and the display of
the HD receiver. You can switch between resolutions of 576p, 720p and 1080i by
pressing the arrow keys. Please note that these details must be as consistent as
possible with the details specified in the TV setup.
You arrive to the menu point “HD Settings” through the system setup and you press
the <OK> key. In the “HD settings” select the desired resolution.
Please do not forget to save the selection by pressing the <Green> function key.

72 73
System Setup Troubleshooting
SCART Setup
Menu
h. SCART Setup
In the SCART setup, you can fix the settings for the analog output from the HD receiver for tube TV and non HDMI-capable TV sets.
You reach the SCART setup page through the system setup sub-menu by pressing the <OK> key. Determine the configuration of the SCART output in the various
fields by using the arrow keys. In case of
• TV SCART output, you can choose between RGB and Composite, and in case of
• VCR SCART Version, you can choose between “S-VHS“ and “Composite“ .
XIV. Troubleshooting

74 75
Troubleshooting Troubleshooting
a. Important information concerning Connection and Installation
a.1. Initialization of the device takes a long time
When starting the receiver, an initial message may appear on the
screen for about 5 minutes, since the first initializations are taking
place. Please do not interrupt this process by switching off the
device or disconnecting it from the electricity and cable television
network.
Device will be
initialized/Receiver is starting

76 77
Troubleshooting Troubleshooting
a.3. SmartCard decoding is not activateda.2. Incorrect installation of the Smart Card
Your SmartCard has not yet been activated for the decryption of
this broadcasting station. If this is the first time you put the device
in operation, you should wait a few minutes until the activation
signal is transmitted.
Instructions for troubleshooting:
In the event that the activation is not effected even after approximately 20 minutes, please contact our Customer Service, state the
customer number, the serial number and the SmartCard number.
This will enable us to proceed with an anew activation. To ensure
that the first activation will take place in a quick and easy manner,
switch to, e.g. the LTV channel (not to public service channels).
Instructions for troubleshooting:
Enter the smart card into the receiver with the golden chip facing
downwards and slide the card inwards as far as it will go.
Important Note:
Please make sure that you remove any adhesive residue from the
bottom of the card first. To ensure that the first activation takes
place in a quick and easy manner, switch to, e.g. the LTV channel
(not to public service channels).
Note 809: Your
SmartCard has
not been activated or it is expired.
The SmartCard has
not been activated
yet.
Smart card is
inserted incorrectly
Note 804: Your
SmartCard cannot be read
Insert the SmartCard into the receiver.
Insert the Smartcard into
the receiver, with the Chip
facing downwards.
Correct insertion of the Smart Card

78 79
Troubleshooting Troubleshooting
a.5. No OSD menu when connected via 2 TV setsa.4. Black screen due to a defective HDMI port
Background:
When connecting two TV sets to the HD receiver, the device with
the lowest possible resolution determines the maximum image
display of both TVs. The reason for this is that the HD receiver
can output to both devices only one picture signal with the same
resolution. Therefore, if, besides the connection of one HDTV-flat
screen, a tube device is also connected via Scart at a higher HD
resolution, the CRT monitor shows no OSD menu through the
Scart connector.
Instructions for troubleshooting:
• A resolution of “576p” must be chosen for CRT monitors,
through System Setup and HD settings.
However, this also means that the HDTV flat screen does not resolve in HD
Recommendation:
It is generally recommended to connect a CRT TV to an HDTV set
via Scart, after the completion of the initial installation (initialization)!
Instructions for troubleshooting:
• Firstly, you should check if the two devices have been connected properly, as per the instructions given in the quick reference
guide
• If no TV picture appears, even though both devices are properly
connected, the TV should be put in “Stand by” mode and then
switched-on again
• Additionally, a remedy can be achieved if you “Reboot” the
device, by switching it off and back on again, using the power
button at the back of the device (see graphic)
• If no picture appears still, the factory settings can be restored
by using the Hot Key
• Additionally, a remedy can be achieved if you “Reboot” the device, by switching it off and back on again (take off and reinsert
the power supply connector).
No OSD menu on
the TV set (Tube
TV)
OSD Menu
HDTV screen is
black - no
video
display
Restore
factory
settings?
Briefly press the OK and
MENU keys simultaneously.
Restore receiver factory settings
Werkseinstellung
wiederherstellen?
Ja, weiter
Nein,z urück

80 81
Troubleshooting Troubleshooting
a.7. Error Diagnosisa.6. Problems by program search
The diagnostics overview includes important information for many
problematic situations. You can find the diagnosis overview under
Diagnostics Overview in User Setup of Live menu.
Background:
It could happen that the HD receiver hangs up during the program
search, and a so-called scanning loop is put into effect, i.e. it
starts again and again.
Query options of
important system
information
Error on initial or
manual
program search
Program search
Instructions for troubleshooting:
• Restart the program search via System Setup and Manual
Search
• The connection settings for the Scart or the HDMI connector,
as well as for the antenna cable, should not be changed during
the program search.
• The SmartCard must also remain plugged in the device
throughout the whole duration of the program search
• Please check whether the receiver is connected to the antenna
socket and the TV set.
• If the problem persists, please contact the customer service.
Below is a brief description for each system information:
(1) SmartCard Number
The displayed SmartCard number must match the SmartCard
number, which may be found in the device. The device only
works with the customer management system stored in the
SmartCard. When the SmartCard is changed, this must be adjusted accordingly by the Customer Service of the cable operator.
(2) NDS-Serial-Number:
The serial number stored in the customer management system
must also comply with the serial number of the HD receiver,
which is given herein, and it is equally mandatory for the activation of encrypted channels, as is the SmartCard.

82 83
Troubleshooting Troubleshooting
(3) Release Number
The release number indicates the software version that is currently loaded to the device. If, for example, the device was switched
off for a long time or has been turned off overnight, it is possible
that a software update with new applications could not be downloaded yet.
(4) Bouquet ID
The bouquet-ID defines the version of program listings (BAT) and
thus, the order, in which the programs are displayed. In case of
insertion of new programs, the bouquet will be adjusted and will
be automatically loaded into the device.
(5) Frequency
The transport stream frequency of the currently selected channel.
(6) Network ID
Original network ID of the selected transponder.
(7) Transport Stream ID
Determines the transport stream that the main program and the
software data transmit.
(8) Signal strength
Represents in the form of a percentage the current signal level of
the selected transport stream.
(9) Signal quality
Represents the current signal quality of the selected transport
stream. A fluctuation of the signal level during the initial installation, up to zero, is not a sign of a disorder or malfunction.
(10) Symbol rate
Represents the transmission bandwidth of the digital transmission. Usually, this is 6900 Mbps.
(11) Modulation
The modulation can be either QAM 64 or QAM 256.
Diagnostics Overview

84 85
Troubleshooting Troubleshooting
After pressing the keys on the remote control, the device shows
no response on the screen.
Instructions for troubleshooting:
• Check whether the batteries are inserted correctly into the
remote control (orientation + the battery’s plus must face upwards)
Background:
In principle, all broadcasts transmitted should display information
on their programs in the electronic program guide (EPG). In the
event that no program information is shown, a standard text message will appear: “No information available”
The HD receiver
no longer responds to input
commands
No channel information
b. Information on usage
b.1. No response to command inputs in general
b.2. Missing EPG data
Instructions for troubleshooting:
• Make sure that the selected program is not too far in the future.
This could be the reason, why the program information has not
been loaded yet.
• Change the program and press the <OK> button twice. Within
about five seconds, the program information will be loaded.
Important Note:
This problem appears particularly in international foreign - language packages. Many of the broadcasting stations included
therein, do not provide information accompanying the broadcast.

86 87
Troubleshooting Troubleshooting
A distorted picture of the user interface indicates an incorrect
resolution setting for HD screens:
• Check that the HD settings in System Setup - HD settings are
set to “720p” or “1080i”
• Set the screen resolution on the TV and test (e.g. under the
screen settings Auto format = On or picture format = Auto)
• If the fixed resolution value is different from the values referred
above, the TV can not assume the optimal image format of the
box automatically.
If the wrong setting for HD resolutions is selected inadvertently
under System Setup - HD settings, it is possible that a flat
screen will not reproduce the resolution and it will display a picture or an image erroneously (e.g. coarse-grained resolution).
Note:
In rare cases, this failure may also appear if a PC monitor or an
older plasma TV are connected with an HDMI-DVI adapter. No image can be displayed with this combination. The customer should
use other connections.
Instructions to remedy the defective HD-setting:
• Wait 30 seconds and press the <Back> key
• In no case should you press the <OK> key, since it will confirm
the incorrect entry and the receiver will have to be restarted.
If, notwithstanding the above, the <OK> has been pressed, the
device must be rebooted:
• Switch off the device
• Connect the receiver to the TV screen with the Scart plug and
disconnect the HDMI connection
• Restore the device by switching it off and, a few seconds later,
back on again
• Restore the factory settings through the Menu or the Hot key
(see graphic)
• Disconnect the scart cable and connect the HD screen with the
HDMI cable again
• Choose a resolution of 720p or 1080i
Graphics and
EPG information
is distorted on
the HDTV screen
(amorphous)
Choose a resolution
HDTV screen
stays black - or
the display is erroneous
c. Notes on Picture Settings
c.1. Distorted Picture
c.2. Incorrect screen resolution or black screen through HDMI
connection

88 89
Troubleshooting Troubleshooting
There is no live
TV picture to see,
but the EPG and
the menu can be
called up
Werkseinstellung
wiederherstellen?
Ja, weiter
Nein,z urück
Press shortly the OK and
MENU keys simultaneously.
Insertion of the SmartCard into the receiver.
Restore receiver factory settings
c.3. Live TV is not shown on the TV set connection
Under certain circumstances no live picture is displayed on the TV
set, even though the response of the receiver is otherwise normal.
Instructions for troubleshooting:
• Check the wiring between the HD receiver and the TV set
• Plug out the smart card and plug it in back into the device
(see graphic)
Insert the Smartcard into
the receiver, with the Chip
facing downwards.
• If still no picture is available, it is necessary to “reboot” (off
and on again through the power plug).
• Check the diagnostic screen under User Setup and diagnos-
tic overview (items 8 and 9) - see also chapter a.7.
• If the problem persists: Contact the customer service hotline.

90 91
Troubleshooting Troubleshooting
Image interferences on any or all
programs
There is no sound
after having connected the HD
receiver to an
external audio
system.
b. Notes on sound reproduction
d.1. No sound through an external audio system
e. Notes concerning reception
e.1. Image interferences by artifacts, blocking or, as the case may be,
freeze effects
Background:
Image interferences may appear in the form of artifacts (formation
of blocks, i.e. “blocking”) or freeze-effects (the picture “freezes”).
The reason for this can be station-specific problems, or a very low
signal strength and / or problems in the home network.
A poor signal quality of analog programs can, among others,
produce an image with white noise or make Moire effects noticeable. Teletext interferences (TT pages will appear incomplete) may
occur as well, but, technically, the picture can be seen.
As regards the digital programs, there is a threshold for the minimum signal strength. If this value is below target, you will experience the problems mentioned above.
Instructions for troubleshooting:
• Are several programs affected?
• Do you use a very long cable between the antenna socket, the
receiver and the TV set (> 1,5 m)?
• Do you use a cable distributor (known as T- pieces)?
Troubleshooting:
• If you are using a very long cable or a cable distributor, the quality of the signals sent will be affected. Trim excess cable or remove cable distributor and re-examine the transmitted signal.
• Check the diagnostic screen under User Setup and diagnostic
overview (points 8 and 9) - see also chapter a.7.
• If the error can not be resolved, please contact the customer
service.
Instructions for troubleshooting:
• Check the audio connectors to the audio system (RCA connector or optical fiber cable)
• Check the settings of the audio system (mute switch, volume,
audio input are selected correctly)

92 93
Troubleshooting Troubleshooting
The list of programs in EPG
shows programs
listed from place
1000 and above.
Transmission
disturbance
Note 813:
Nothing is transmitted on this
channel
e.2. The channel has a transmission disturbance e.3. Erroneous display of the program list
Background:
If, during the programed scan, the device does not receive the
correct BAT program list, this can lead to an erroneous program
allocation. Therefore, they are allocated to the program places
>1000. The programs on the first Basic TV transponders include
the BAT program list in the transport streams in a very brief repetition rhythm. LTV is the first broadcast station on the first Basic TV
transponder.
The channel has a transmission failure, which is conditional upon
the broadcasting station, or it even leads back to a satellite transmission failure and to the cable network. In general, the problem
is resolved within a maximum of 30 minutes.
If you still see this message after this period has elapsed, we
would request that you contact our customer service.
Instructions for troubleshooting:
• Verify that the antenna cable is properly inserted.
• Press the <EPG> key and select LTV with the <P+> key
• Switch on the device to the “standby” mode using the remote
control or through the key on the front of the panel
• Turn on the HD receiver again after 1 minute
Background:
When switching it on and when in stand-by mode, the unit is
searching in the transport streams for the right BAT program list,
which is assigned to the SmartCard and it sorts the programs
accordingly.

94 95
Troubleshooting Troubleshooting
Loss of the favourites’ settings and
of the settings for
the blocked channels
Teletext use possible only when
using the HD
receiver’s remote
control
e.2. The channel has a transmission disturbance e.4. Loss of the favourites list
e.5. Restriction of the teletext functions
Background:
The favourites list may be lost if, during the program search, the
BAT-program list used is other than the one used for the favourites list, in which the channel Ids were set differently.
Instructions for troubleshooting:
• Verification that the antenna cable is properly inserted.
• Switch to the LTV broadcast station
• Switch on the device in the “standby” mode by using the remote control or the key on the front of the panel
• Turn on the HD receiver again after 1 minute
• Check, whether the favourites settings were restored
In rare cases, the favourites must be recreated.
In principle, the teletext is provided to the TV set by pressing the
<TXT> key on the HD receiver.
When connected with an HDMI cable, the Teletext cannot be
used through the TV set’s remote control, as TXT information is
not transferred through HDMI.
From time to time, it may happen that the teletext functions that
can be used on the TV, are currently not available through the HD
receiver.
• Use Teletext through the <TXT> button of the HD receiver’s
remote control.
• If the restrictions persist, please contact our Customer Service
Hotline
If the problem persists:
• Activate through System Setup in sub menu Manual Search.
The program list will be found through the search program. In
rare cases, it can lead to loss of favourite settings, which must
then be re-defined by the customer.
• If the problem persists: Contact the customer service hotline.

96 97
Troubleshooting Troubleshooting
FSK-classification
for the PIN code
query concerning protection of
minors
Deviating times
when changing
channels
The PIN for the
protection of minors is requested
after switching
from a protected
program to a
non-protected
program
Note 203:
This channel is
blocked.
e.6. PIN code query in non-protected channels e.7. d. PIN code change
e.8. Deviating times when changing channels
The default setting for the protection of minors is 16+. This means
that, for all broadcasts with an FSK age rating of 16 and 18, a PIN
code query will follow.
If required, a change can be made, for example to 12+. Consequently, a PIN code entry would be required for all broadcasts
appropriate for over FSK 12. Similarly, this applies to 6+, which
would require a PIN code query for all broadcasts with FSK 6.
However, for the purpose of protecting minors, it is not possible
to disable the parental query completely.
Changing programs between various package offers or channels,
may result to deviations in station-specific times, ranging from 1
to 2 minutes. The respective feed lines of the channel are responsible for this. This is not a device malfunction and it is not due to
the operation of the cable network.
Background:
The user switches from a PIN-protected program to an unlocked
program (e.g. arte), which usually does not require a PIN code.
Under certain circumstances, the HD receiver does not change
the program automatically. Instead, and after about six seconds,
it displays the input mask for the PIN code. The reason for this, is
that the program information containing the corresponding EPG
data for the program, (including the information on protection of
minors) was not loaded yet and the search for the data has exceeded the said 6 seconds.
Instructions for troubleshooting:
• The device responds as per the directives, according to the
legal, regulatory requirements. The user should either wait for
the program information to be loaded, which will also turn off
the PIN entry, or they should insert a PIN code.

98 99
Troubleshooting Troubleshooting
Obtain software
download
After switching
to radio mode no
EPG data is available
Limited period
available for the
provision of EPG
data
e.12. The software is not automatically updatede.9. EPG data availability on the radio function
e.10. Deviating availability of EPG data
e.11. DVB subtitles not available
Background:
The HD receiver receives automatically its software downloads in
the stand-by mode. Therefore, if the device has been disconnected from the network, e.g. by separation from the power supply, it
may happen that the software could not be updated.
Instructions for troubleshooting:
• Switch the HD receiver to “standby”, wait approximately 10-15
minutes, and then switch it back on.
Alternatively, the HD receiver finds the latest software while being
in the Stand-by mode and downloads it, or the device starts the
download after it is switched on, during the loading of the new
software (see chart).
The customer is switching over to a prior TV signal on radio
operation and receives no EPG data.
Instructions for troubleshooting:
• The EPG data will be updated after you press the OK button
twice.
The EPG data for the public channels is provided by these public broadcasting services themselves. All other data, if available,
as well as additional information will be provided by LTV.
Therefore, there may be various periods for the available EPG
data. In general, these cover for the upcoming 4 to 5 days.
DVB-subtitles are currently offered only by public broadcasters.
In isolated cases, there may be problems with the display of
DVB subtitles.

100 101
Troubleshooting Troubleshooting
Note 803:
Please insert
the smart card
in the slot, so
that the golden
chip is facing
downwards.
Note 809:
Your SmartCard
has not been
activated yet or
it is expired.
Note 804:
Your SmartCard
is not inserted
properly or it
can not be read.
f. Troubleshooting OSD notes
HDR Note HDR NotePossible Errors Possible ErrorsSolutions Solutions
1. The SmartCard has been
removed or it is not properly
insertet.
2. The electrical connection to
the Smart Card Reader was
interrupted.
The SmartCard is not activated.Installation, see chart in the
Quick Install Guide.
Repetition of the activation.
Note 810:
For this
channel,
you need
a special
activation.
Note 801:
Please check
your cable connection. If you
wish to play
a recording,
please use the
same SmartCard that you
have used to
record it.
Note 824:
Your SmartCard
cannot be read
1. The Smart card is incorrectly
inserted or it is damaged.
2. Erroneous SmartCard.
The broadcast is not activated.
The channel is blocked. Activation has expired or it is not authorized.
Activation for package / program
is expired.
1. The SmartCard used for
recording was other than the
one used for playback
2. Cable connection errors
The SmartCard does not fit
to your Receiver.
The SmartCard cannot
communicate with the
device.
We will change an old
SmartCard with a new
SmartCard.
SmartCard from LTV?
SmartCard not correctly
inserted?
Adhesive residue on the
SmartCard?
Please contact the customer
service hotline.
Initialization of a new activation
Check the Serial number
and the SmartCard Number.
Initialization of a new activation.
Activation renewal.
Make sure that the SmartCard
used for the recording of the
broadcast is the same as the
one used for the playback.
Please contact the customer
service hotline.
Please contact the customer
service hotline.
SmartCard from LTV?
Please contact the customer
service hotline.
Note 835:
Because of
licensing rights,
you are not allowed to watch
this broadcast.
Note 815:
For this channel, you need
a special
activation.
Note 826:
Your SmartCard
is assigned to
another receiver.
Please contact
the customer
service.
Note 821:
The inserted
SmartCard is not
valid anymore.
If you have not
received a new
SmartCard,
please call the
customer service.

102 103
Troubleshooting Troubleshooting
Note 822:
The inserted
SmartCard is
not valid.
g. Legend symbols / logos
HDR Note Possible Errors Solutions
The inserted SmartCard is not
from Tele Columbus.
The film will be sent in High Definition screen resolution.
The selected station is included in the list of Favourites.
Screen ratio of the current channel.
Sound in Dolby Digital quality available.
Color-function buttons in red, green, yellow and blue on
the remote control.
Progress bar (gray bar)
FSK Age Rating
Check the SmartCard.
Please contact the customer
service hotline.
The inserted SmartCard is not
from Tele Columbus.
Please contact the customer
service hotline.
Note
881/882/833/834:
Please contact
the customer
service.
Info Bars and TV Program Guide

104 105
Troubleshooting Technical Data
Sound is off.
Stop / Back key on the Remote Control
OK key on the Remote Control
Radio Mode.
Subtitles available
B-Mail
The channel is under parental control (protection of minors).
No input signal available.
B-Mail
Type DVB-C
HF input DIN box (IEC60169-2)
Frequency range 50-860 MHz
Demodulation QAM (DVB-C ITU J.83 Annex A)
Constellation 64 QAM, 128 QAM, 256 QAM
Tuner sensitivity 40 dBμV-80 dBμV
Video output, audio digital 1x HDMI
1x S / PDIF, TOSLINK
Video output, audio analog 2x SCART
1x RCA Video
1x RCA Audio, left
1x RCA Audio, right
Data 1x RJ45
1x USB 2.0
Cart reader 1x SmartCard reader
Video H.264 / AVC main and high profile to level 4.1
VC-1 advanced profile @ level3
VC-1 simple and main profile
HD MPEG-2 and SD MPEG2
AVC / VC-1 / MPEG-2 still-picture
Video resolution 1920 x 1080i, 1280 x 720p, 720 x 576i
Picture format 4:3, 16:9 & Letter Box
Input data rate Max. 100 Mbit / s
Audio AAC LC, AAC LC+SBR, AAC Level 4, AAC-HE
Dolby AC-3, Dolby Digital, Dolby
Digital+, MPEG-1 layers 1, 2 and 3
(MP3), WMA, WMA pro5.1
Other symbols
TUNER
INTERFACES
MPEG-TRANSPORT STREAM AUDIO / VIDEO DECODING
Program guide and start menu
XV. Technical Data

106 107
Technical Data Remarks
Central Processing Unit BCM7325
Flash memory 128 MB
Program DRAM 256 MB
EEPROM 32 MB
Type Internal Power Supply
Input Voltage AC 90-250 V 50/60 Hz
Power consumption max. 18 W
Power consumption in stand by mode max. 15 W
Type External Power Supply
Input voltage 100 to 240 V
Power consumption max. 15 W
Power consumption in stand by mode max. 12.5 W
Dimensions 250 x 45 x 180 mm
Ambient temperature during operation 0 °C to +50 °C
Ambient temperature when stored -20 °C to +60 °C
SYSTEM RESOURCES
ELECTRICAL POWER SUPPLY
ELECTRICAL POWER SUPPLY
GENERAL
XVI. Remarks
1) Please check the completeness of the delivered items as shown in the Quick
Start Guide. If some components are missing, please contact the customer service.
2) In order to bring the remote control into operation, the button batteries must
be placed under the plastic form and then, they should be pressed down slightly.
3) Difference between flat screen and CRT TVs:
a. When using a flat panel screen, please make sure to use the HDMI cable pro-
vided.
b. The flat panel screen does not need a SCART cable when an HDMI cable is
used.
4) Placement of the device:
a. The device should not be placed in closed cabinets. Instead, it should be
placed in a room with adequate ventilation.
b. For the purpose of saving power and reducing noise, the unit is not equipped
with a fan. Therefore, it is necessary to ensure that the hot air can escape
freely. For this reason, please avoid:
• covering the casing and the ventilation slots
• closed cabinets
• immediate vicinity (above and below) to other heat-generating electronic
devices
5) Please protect the device against any liquids or moisture.
6) The device must be operated in a temperate climate only. Therefore, please
avoid direct sunlight.
7) Please protect the device from exposed light-sources, such as candles or
ray beams. Please do not place them directly next to the device or on it.
8) Let our specialists open the unit in a professional manner. Therefore, please
never open the unit.

108 109
Remarks Remarks
9) Please never leave unsupervised children alone with the device.
10) Please unplug the power cord from the power,
a. before cleaning the device or carrying out connection work. Simply switching
off the device does not necessarily remove supply voltage from all components.
b. if you are not able to supervise the device for a longer time. For example, to
prevent a fire danger when you are on vacation.
c. Take notice of note 14 as well.
11) When a storm winds up, pull out both the power supply plug and the anten-
na input cable of the receiver as well. Thus, the devices are secured against
damage in the event of a lightning strike.
12) In cases that the device will not be used for a short period (e.g. overnight),
please avoid as far as possible the complete separation of the HD receiver from the power supply, for example by activating the main switch of the
device or by pulling out the plug. The following actions will fail:
a. Scheduled recordings will not be started.
b. The device will not able to load software updates that start automatically.
c. Program-related information will not be updated automatically and it will have
to be reloaded after switching on the HD receiver.
13) Protection of minors
In order to provide protection of minors, the channel sends accompanying
information that rate a program in FSK-classifications. In the absence of this
data, the device decides independently that the PIN entry is required, in order
to protect the user.
Note
After switching on from the standby mode or when switching over, it
may happen that the relevant information could not be loaded yet and
the device may require the PIN number.
For your notes:

110
Remarks
For your notes:
 Loading...