

Operating Instructions
Telex
®
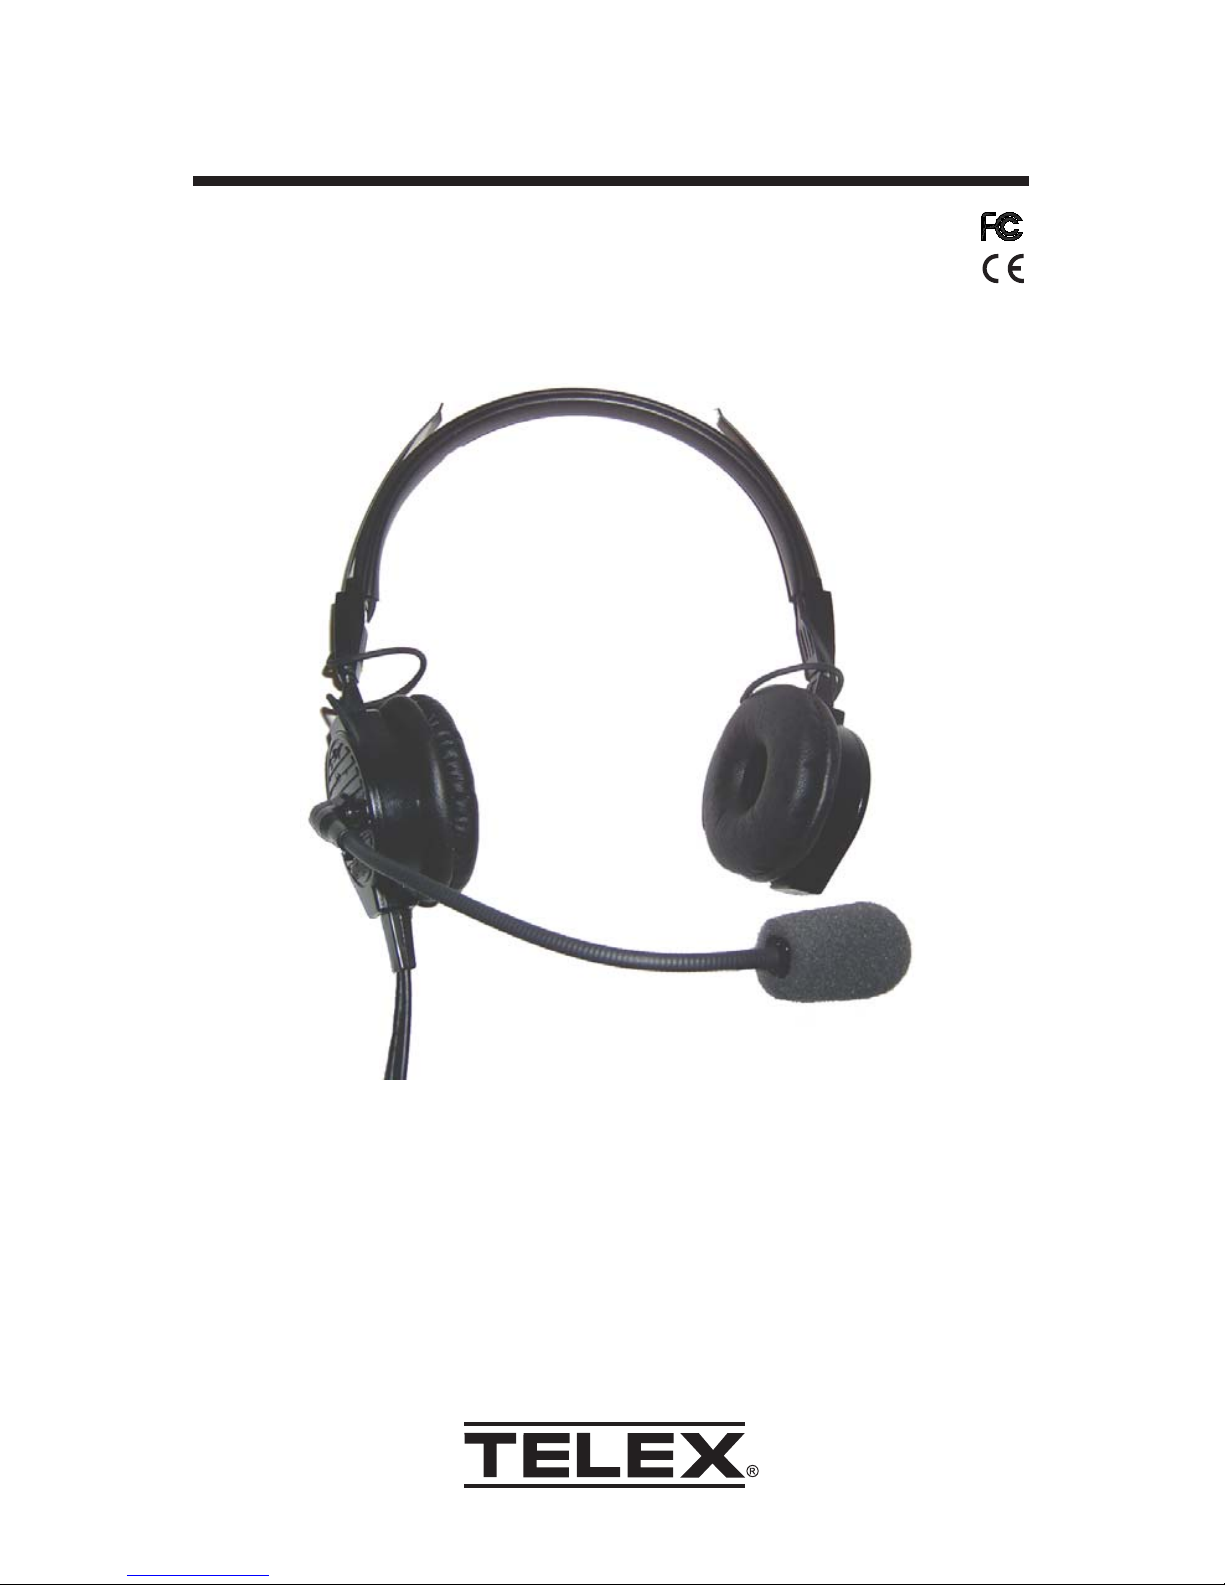
Dispatch Headset DH3200 (Shown)
DH3000

General Description
The Telex DH3000 Series Headset is designed for use in dispatch
applications with low noise levels. Ambient noise levels may be
considered harmful when exposed to for long periods of time. In addition,
these ambient noise levels require users to increase communications
volume level for clear understandable communications.
The Telex DH3000 Series Headset is ideally suited to this environment.
Soft, pliable cushions provide passive attenuation of unwanted
background noise. The advanced active noise reduction system removes
even more noise in the communications frequency range. This
combination gives the Telex DH3000 Series Headset a unique
improvement in communications clarity and intelligibility. With ambient
noise reduced, communications levels can also be reduced, providing
less fatigue and an overall improvement in comfort.
Complimenting these noise reduction features is a durable, lightweight
design with adjustable sliders increasing long-term fit and comfort. A
boom mounted microphone utilizes an electret noise-canceling element
for improved noise rejection. Extended response drivers improve sound
reproduction. The result is a comfortable, lightweight, headset that
provides the ultimate in clear, underst andable communications with no
batteries or complicated controls to get in the way .
The DH3200 is a dual-sided headset while the DH3000 is equipped with a
single earphone accompanied by a comfortable temple pad on the
opposite end on the headband.
This device complies with part 15 of the FCC
Rules, Operation is subject to the following two
conditions: (1) This device may not cause harmful interference, and (2) this device must accept
any interference received, including interference
that may cause undesired operation.
Page 1
Page 2
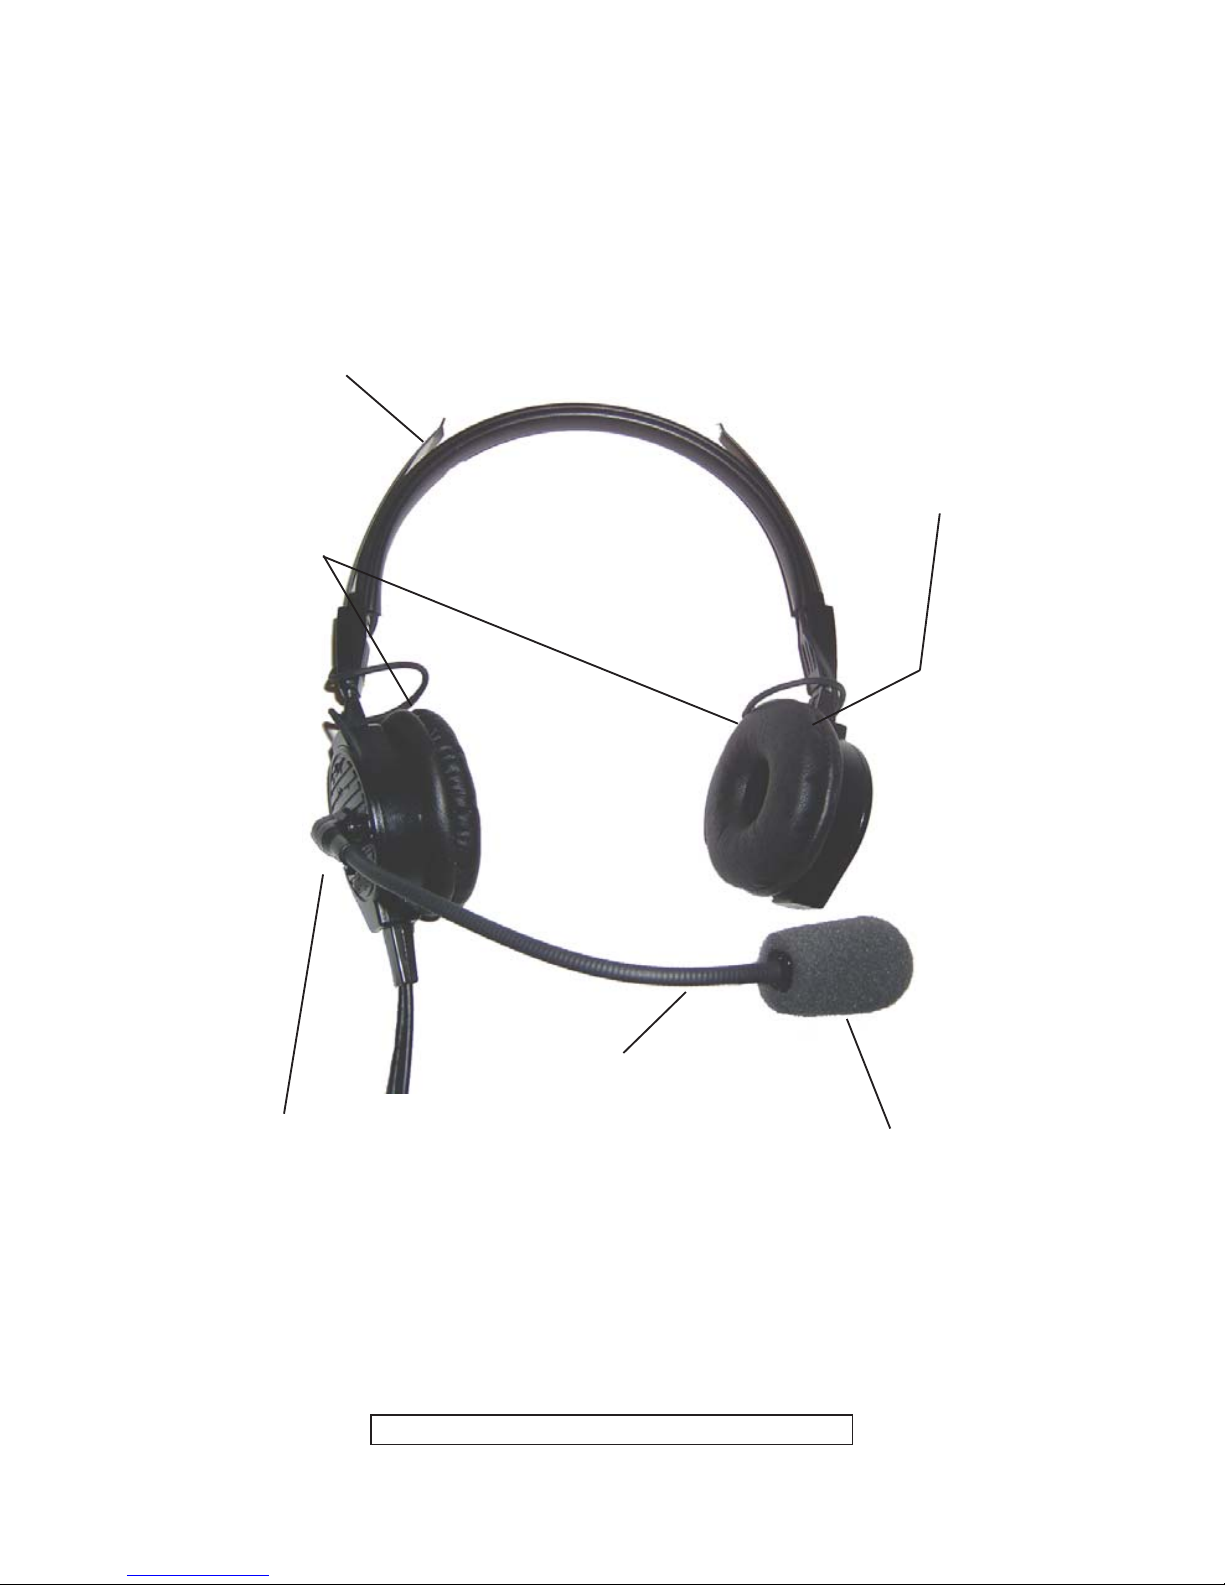
Flexible Boom Permits
Precise Mic Placement
Earcups Rotate
to Conform to
Wearer
Boom Rotates Overhead for
Mic Placement on Either
Side of Head
Figure 1
DH3200 Reference Vie w
(Dual-Sided Model Shown)
Noise Canceling
Electret Microphone
Sliders Adjust to
Any Size Head
Note: See Page 7 for Available Replacement Parts
Replaceable
Ear Cushions

Page 3
Design Features (See Figure 1)
Fit and Comfort
An adjustable headband gives the wearer two inches (51mm) of up and down
earphone adjustment per side, while the gimbal mounting improves the
headset’s side-to-side comfort.
Boom Microphone
The DH3000 Series Headset features a miniature, amplified, noise canceling
electret microphone that provides superior ambient noise rejection. The
microphone is mounted on a flexible gooseneck boom that permits precise
microphone placement. The boom rotates 320° to allow the microphone to
be worn on either side of the head. For best results, the microphone should
be placed as close to the mouth as possible. The microphone includes a
replaceable windscreen to minimize popping, hissing, and breathing sounds
when speaking.
Controls
The DH3000 Series Headset contains an On/Off switch to control ANR power
and a Hi/Low switch for controlling receiver volume.
Cordage and Plugs
The microphone cordage is protected inside the boom. A strain relief on the
cord provides maximum durability. Shielded wire throughout the headset
protects against RFI (Radio Frequency Interference) and EMI (Electro
Magnetic Interference).

Page 4
Figure 2
Headset Connections
The DH3000 Series Dispatch Headset is designed to be used with the
following Telex PTT/Lower Cord Assemblies:
• LC1500 15 Foot Extended Cord Length ........(TELEX PN 302068000)
• LC2500 25 Foot Extended Cord Length ........(TELEX PN 302068001)
The DH3000 Series Headset in conjunction with the LC1500/2500 PTT
Assembly , is designed to function properly with the VEGA
HB-3 Plus
Nexus
and it successors. When connecting the LC1500/2500 PTT
Assembly to the VEGA
HB-3 Plus Nexus
, POLARITY MARKINGS on the
PJ-7 connector and MUST BE OBSERVED for proper operation.
Reversing the connector will not cause equipment damage, however , the
headset will not function properly .

Headset Operation
1. Connect the headsets quick disconnect to the quick disconnect on
the LC1500/2500 PTT Assembly.
2. Rotate the entire boom overhead to wear the microphone on either
the right or left side of the head (Note the two stops below the boom
housing).
3. With the headset resting securely on top of the head, check that
the earphone housings are centered over the ears. Maximum
performance depends on the proper fit of the headset.
4. For best noise cancellation, position the microphone as close to the
mouth as possible and speak in a normal voice.
5. To activate the Active Noise Reduction feature, move the “On/Off”
switch to the “On” position (See Figure 3). The active noise reduction
feature of this headset uses power obtained from the VEGA
HB-3
Plus Nexus
through the boom microphone connection. Active noise
reduction will only function when power is received from the
microphone connection.
6. When required, the user may increase headphone volume level by
moving the volume “HI/LOW” switch to the “HI” position (See
Figure 3). The “low” position is considered normal.
Page 5
Volume
Control
Figure 3
Volume Adjustment/ANR Switch
ANR
Switch

Page 6
Microphone Gain Adjustment
The microphone gain has been factory-adjusted to the nominal level required
for normal radio operation. Under normal circumstances microphone gain
does not require adjustment. If needed, adjustment by a qualified technician
is recommended. To access the microphone gain, insert a 1.5mm flat head
screwdriver through the access hole in the microphone housing (See Figure
4). Clockwise rotation increases the microphone gain.
Figure 4
Microphone Gain Adjustment
Note: There is a hole on both
sides of the microphone
housing. One is blocked by
foam. Do not use the side
blocked by foam.
Gain
Adjustment
Ordering Information
DH3000 Single-Sided Headset .................... Catalog no. PRD000021-100
DH3200 Dual-Sided Headset ...................... Catalog no. PRD000021-000
Replacement Ear Cushions (Pair) .......................Catalog no. 800456-020
Replacement Windscreen ...................................Catalog no. 800456-019

Page 7
LIMITED W ARRANTY
TELEX Communications, Inc. (“Telex”) warrants to the user, who originally purchased the
product delivered with this card, that the product will be free from defects in material and
workmanship for the following periods after such date of purchase: Material 24 months,
workmanship 24 months. Telex will, at its option, repair or replace, free of charge, such
defective products subject to the following conditions:
1. Delivery of the product or parts postage prepaid to the Telex dealer, authorized service
facility or factory.
2. Determination by Telex that a defect exist s and is covered by the limited warranty. Defects
due to alteration, repair by an unauthorized person, insertion of non-Telex parts, misuse,
accidental damage, use of the equipment for purposes other than those for which it was
designed, and the like, are not covered by this limited warranty and repairs thereof will
be subject to normal service charges.
3. Repairs and replacement parts are covered under this limited warranty only for the
unexpired term of the original limited warranty.
4. Products purchased from unauthorized dealers are not warranted.
THIS LIMITED WARRANTY IS EXPRESSLY IN LIEU OF ANY EXPRESS OR IMPLIED
WARRANTY, INCLUDING ANY IMPLIED WARRANTY OF MERCHANT ABILITY OR FITNESS
FOR A PARTICULAR PURPOSE WHICH EXTENDS BEYOND THE TERM HEREOF. THE
REMEDIES PROVIDED BY THIS LIMITED WARRANTY ARE THE ONLY REMEDIES
AVAILABLE TO ANY PERSON. NO PERSON HAS ANY AUTHORITY TO BIND TELEX TO
ANY REPRESENTATION OR WARRANTY OTHER THAN THOSE PROVIDED BY THIS
LIMITED WARRANTY. TELEX SHALL NOT BE LIABLE FOR ANY INCIDENTAL OR
CONSEQUENTIAL DAMAGES CAUSED BY F AILURE OR OTHERWISE OF THE PRODUCT .
Some states do not allow exclusions or limitations of incidental or consequential damages or
limitations on how long an implied warranty lasts, so the limitations or exclusions herein may
not apply to you. This warranty gives you specific legal rights, and you may also have other
rights which vary from state to state.

Page 8
CUSTOMER SERVICE
For information or technical assistance, call or write to Telex at:
Customer Service Department
Telex Communications, Inc.
12000 Portland Ave. So.
Burnsville, MN 55337 U.S.A.
(952) 884-4051 or (877) 863-4168
When returning equipment for repair , please enclose an explanation of
the problem. If the equipment is covered under warranty, please enclose
a copy of your proof of purchase. The equipment must be accompanied
by documentation stating your name, return address, and telephone
number .
Return equipment for factory repair to:
Customer Service Department
Telex Communications, Inc.
1720 East 14th St.
Glencoe, MN 55336 U.S.A.
(320) 864-3177 or (800) 218-2410
Warranty Repairs - If in warranty, no charge will be made for the repairs.
Equipment being returned for warranty repair must be sent prepaid and
will be returned prepaid.
Non-Warranty Repairs - Equipment that is not under warranty must be
sent prepaid to Telex. If requested, an estimate of repair costs will be
issued prior to service. Once your approval for repair , and repair of
equipment is completed, the equipment will be returned on a collect
basis. Collect charges may be avoided by sending a signed check for
payment in full along with your signed estimate approval form (the
estimate includes the shipping charge).

Page 9
Notes

Page 10
Notes

LIT000052 Rev A 06/2006
 Loading...