

Page 1
INSTALLATION GUIDE
AND USER MANUAL
UK
Page 2

Information
Congratulations on your purchase! Voyager G3 is among the most technologically advanced
products in the field of satellite TV reception. This handbook has been prepared to provide
information on how to install, use, maintain and technical specifications your Voyager G3.
For additional information, please contact your local dealer or directly the manufacturers:
TELECO s.p.a.
Via E. Majorana 49
48022 LUGO (RA)
Web site: www.telecogroup.com
Technical attendance: 899.899.856
TELECO .p.a. declines all responsibility for any errors contained in this manual. All the
contained information are up to the dates of printing and of the above-mentioned software
revisions. TELECO .p.a. reserves the right to introduce any modification made necessary by
the development of its products.
TELECO WARRANTY
Teleco guarantees its satellite dishes and terrestrial antennas against any
material and/or construction fault and defect. The warranty offered by
TELECO is limited to the free-of-charge replacement or repairing of any
parts that are deemed faulty by TELECO. The warranty is applicable for a
period of 3 YEARS starting from the product purchase date; however, it will
only be considered valid if the Customer is able to produce a written document
(invoice or tax receipt) showing the purchase date.
The following is excluded from the TELECO warranty:
a. Damages caused by incorrect installation and/or use and/or maintenance
b. Damages resulting from product alterations not authorised by Teleco
c. Damages resulting from the use of spare parts different from original
Teleco parts
d. Damages resulting from repairs carried out by personnel not
authorised by Teleco
e. Normal part wear;
f. Expenses incurred for spare parts transport between the Customer's
and the service centre
g. Damages that may occur during transport:
the Customer shall always be responsible for transport risks.
Page 3
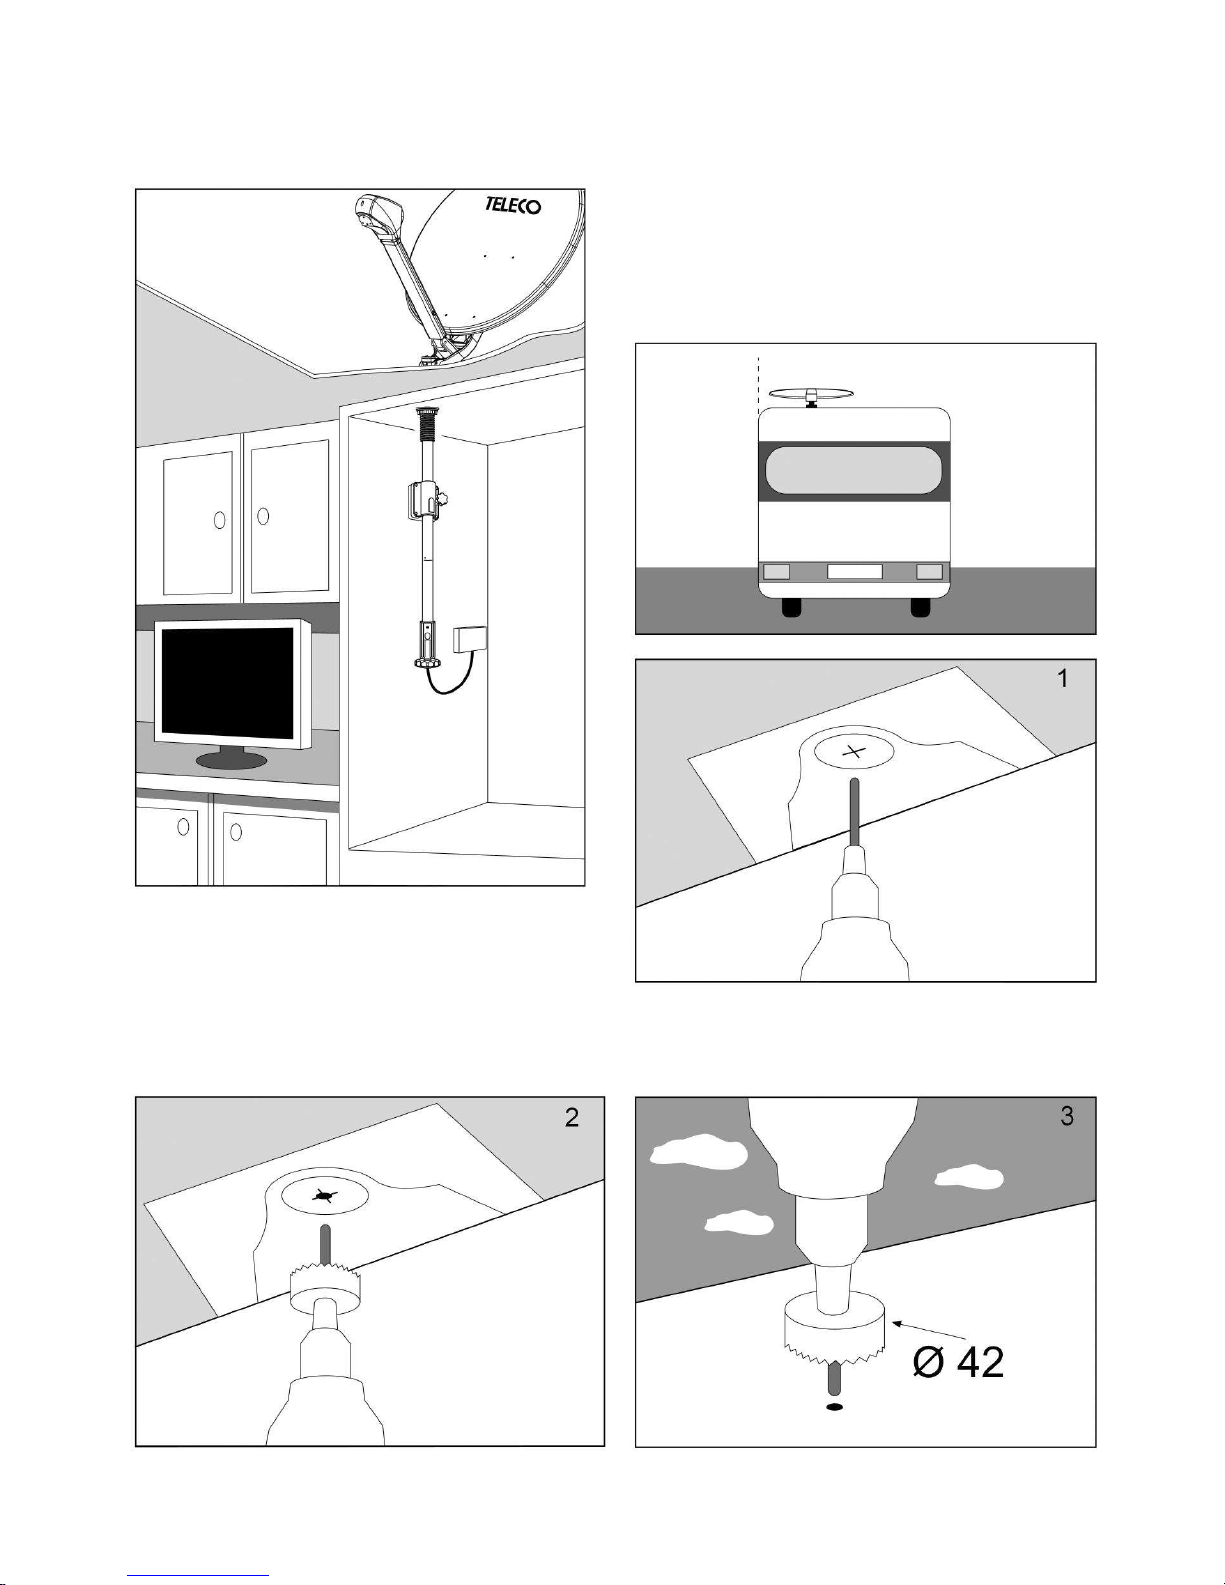
…and then drill the outside wall.
Set the drilling jig in place. Drill in the
middle of the jig (page 14)
Using a dia. 42 cutter, drill the inside
wall first…
Caution:
Mount the antenna away from the vehicle
roof edge to avoid overhanding the roof
line when travelling.
The Voyager G3 antenna must be
installed near a vertical wall where the
wall outlet can be fitted
Installation instructions
2
Page 4
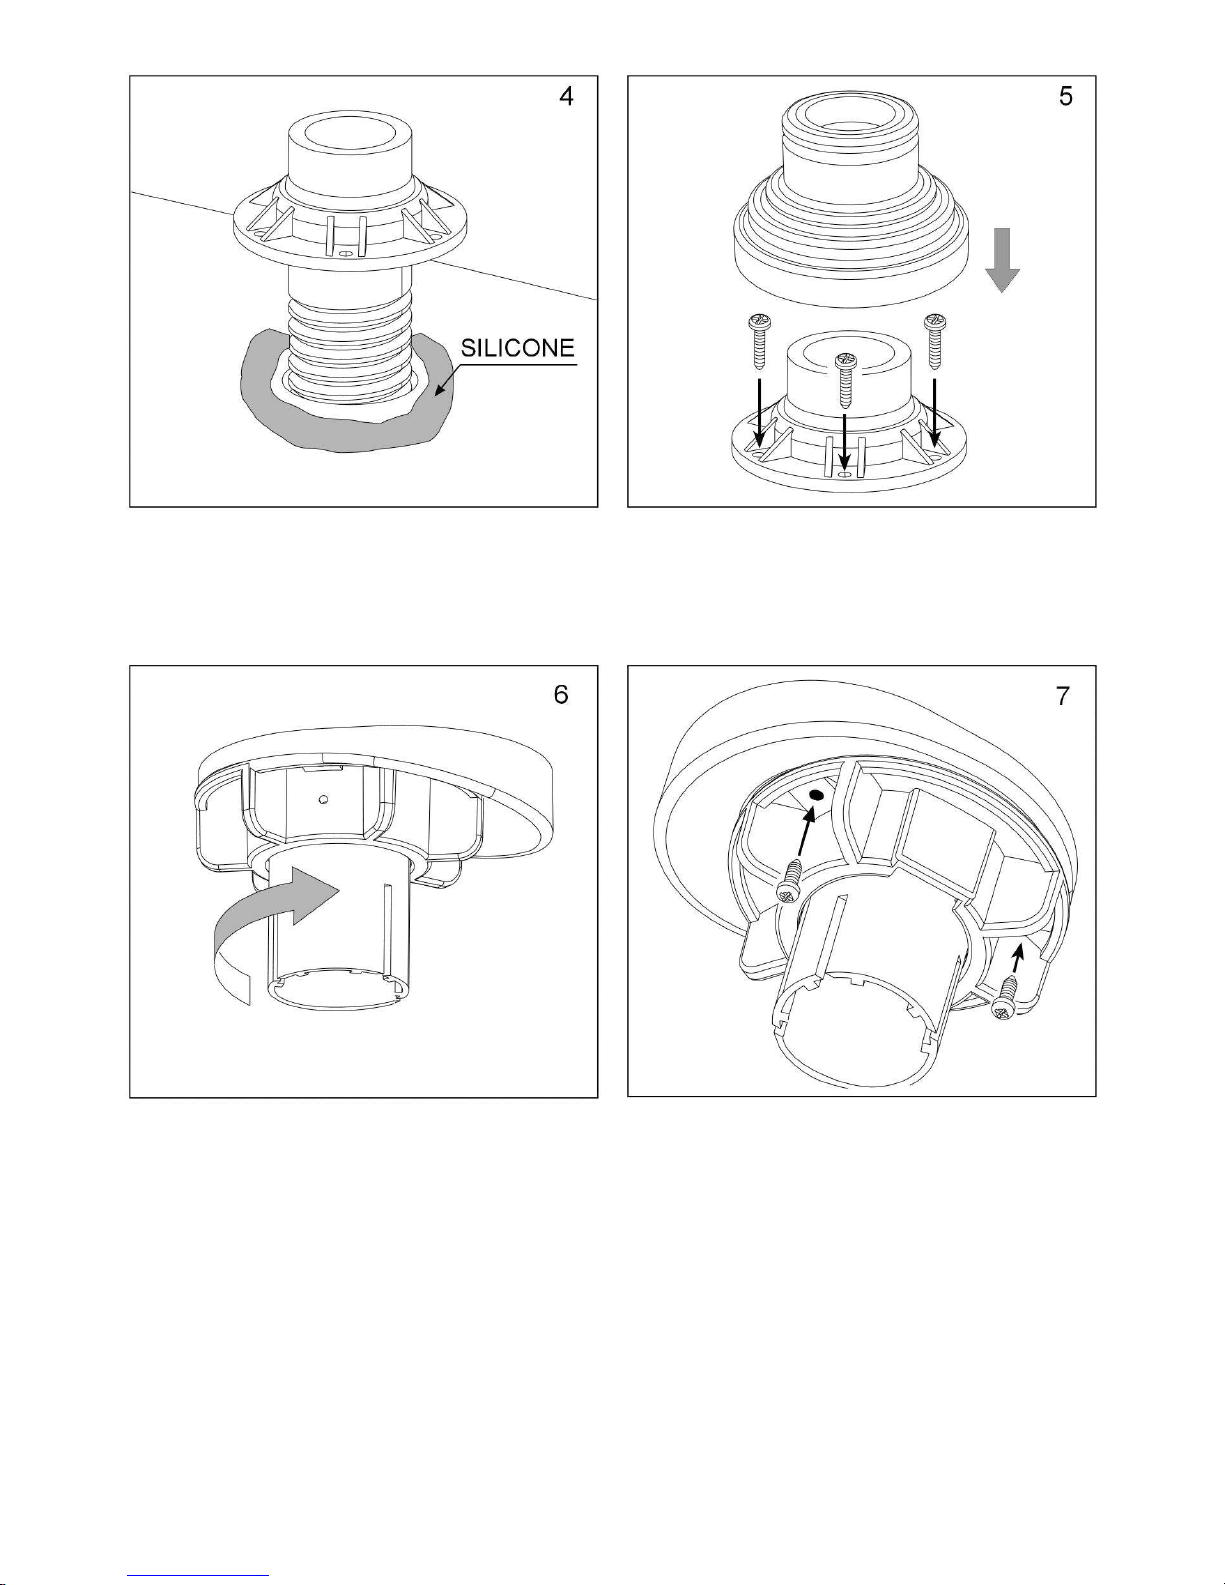
Insert the mast roof mounting bracket in
the dia. 42 hole bored in the roof, making
sure you apply a layer of silicone under
the ring nut.
Fasten the ring nut using self-tapping
screws. Place the rubber gasket over the
ring nut. ( Screws not supplied )
Secure the pipe lead to the roof using
the ring nut and its wedge-shaped spacer .
Caution: the antenna must be in
horizontal position. The wedge-shaped
spacer is used to set the antenna in the
horizontal position even if the roof is
inclined.
Lock the collar on the wedge spacer
by applying the 2 screws (not supplied).
3
Page 5
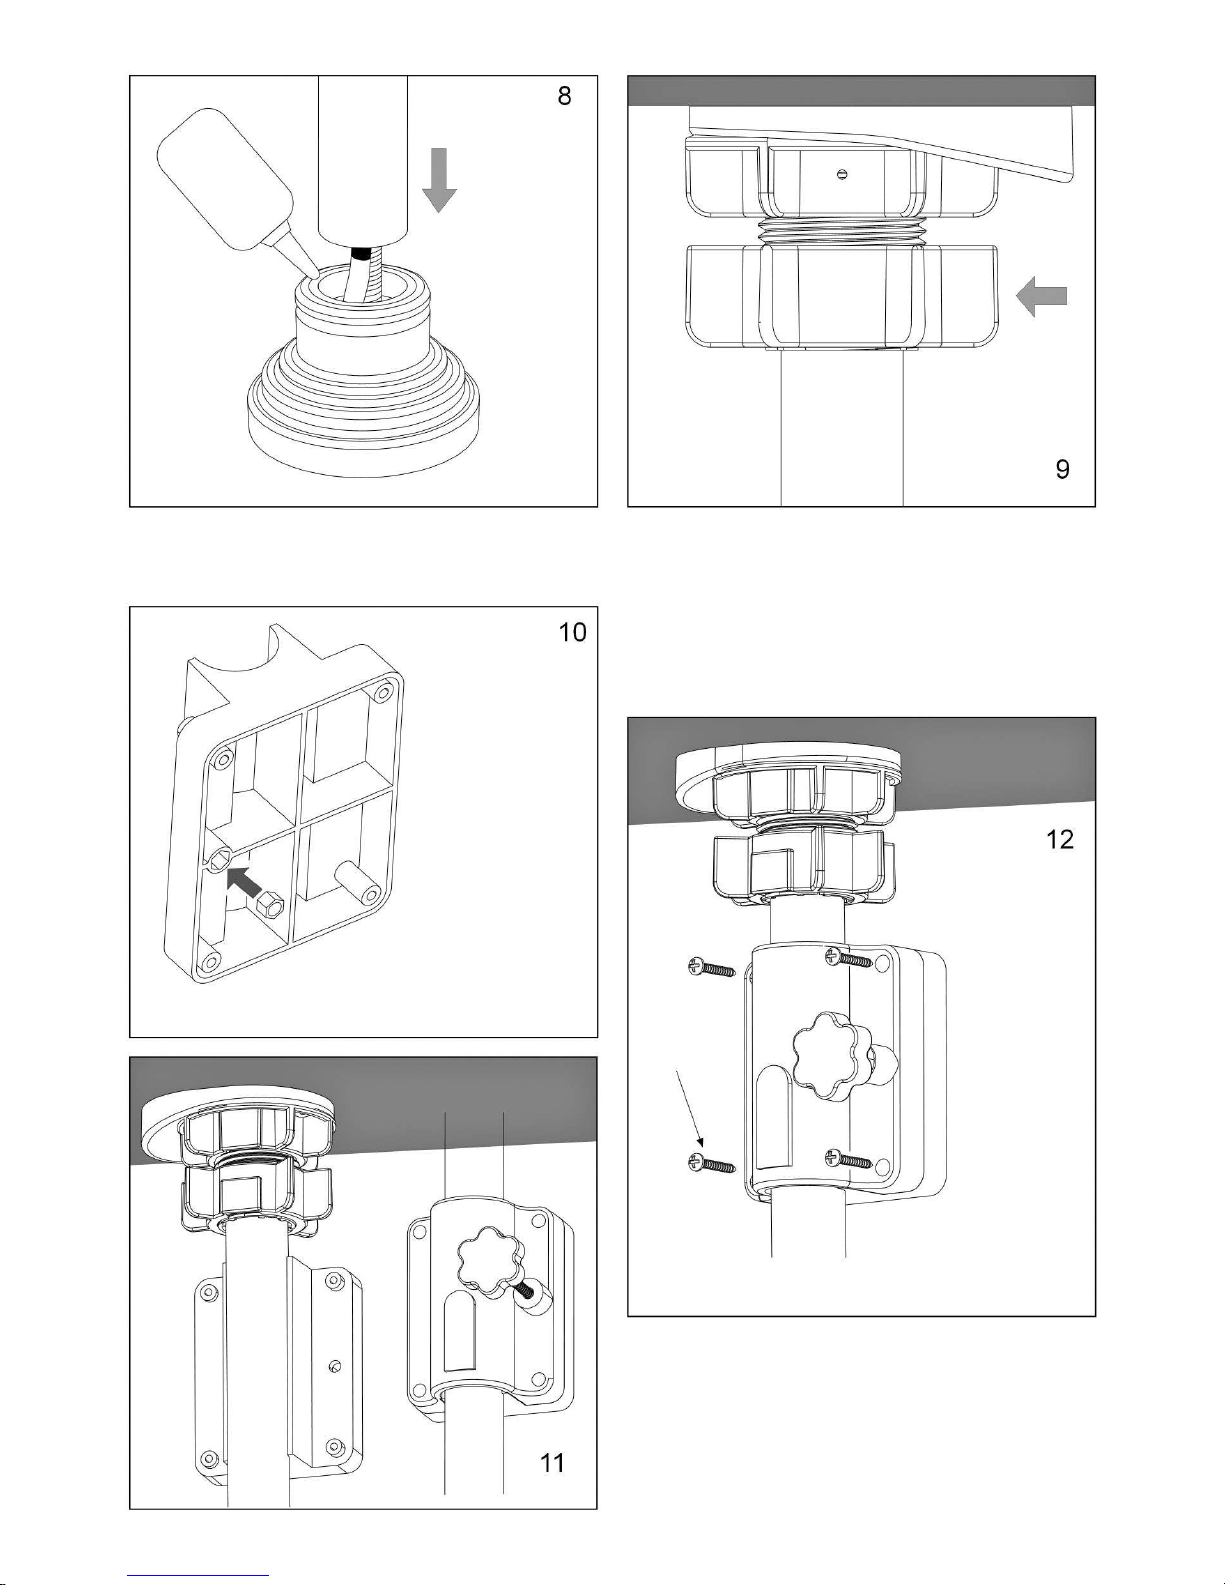
3,5x30
Introduce the
nut in its seat
on the back of
the wall outlet
Tight the locking ring nut
This mast locking device must be
screwed tight every time you wish to
secure the antenna in the desired position.
To turn or lift the mast, loosen this ring
nut.
Spread a thin film of Vaseline inside the
seal and introduce the mast
Fit the upper part of the wall outlet without
tightening all the way
Fix the outlet unit to the wall
4
Page 6

Caution: Extend the dish mast
all the way as shown in the
figure
Tighten the indicator screw hard, to the
end of the thread as shown in the figure.
Insert the cable in the plastic handle hole
5
Page 7

3.9X13
Screw with
pointed end
4X10
Screw
without
pointed end
Before fitting the plastic handle in the
tube, make sure that the holes A and C
are aligned with the reference mark B
Force the
flexible tongues
of the pointer
into the two slots
inside the
handle, then
push until they
come out of the
slots
Make sure that the cable runs in front
of the pointer reference mark B
Using the
screw, fasten
the plastic
handle to the
mast. Do not
turn the
handle while
carrying out
this operation
because the
tongues
might come
out of the
slots.
Insert the
crank in the
shaft square
seat and
tighten using
the special
bolt
Fasten the antenna to the
arm as shown in the figure.
6
Page 8

Lower the dish until the right travelling position
is reached. Fix the steel plate to the roof with
cement or both-sides adhesive tape under the
LNB spacer
Make sure that
the antenna is
exactly in its
stowed
position. Place
the sticker on
the mast in
such a way
that you can
quickly lock the
antenna in the
right position
before every
start.
Connect the cable
coming out of the
mast handle to the
Satellite receiver.
1) The antenna must be absolutely installed
according to fig. 23, i.e., the disc must be bent
to the rear of the vehicle. Before starting the
vehicle, the antenna must be compulsorily
lowered and positioned properly according to
fig. 25.
Failure to comply with these conditions may
result in product degradation which the
manufacturer cannot be held responsible
for.
2) It is recommended not to use the antenna
under strong wind conditions (80 km/h). Failure
to comply with this condition may result in
product degradation which the manufacturer
cannot be held responsible for.
3) The manufacturer declines any liability for
all degradations suffered by the product owing
to misuse.
7
Page 9

1) Prepare your satellite receiver and television for reception by following the relevant
manufacturers’ instructions.
2) It is critical to make sure that there are no obstacles (e.g. houses, trees etc.) between the
antenna and the satellite southwards.
3) Check in the table supplied the elevation relative to the town closest to the place where
you are located.
4) Turn the mast crank until the pointer is brought to the required elevation value.
N.B.: The values shown on the graduated scale are provided for reference only and they
should only be considered as a guide to facilitate antenna pointing.
5) Slowly turn the mast towards the right or the left until TV signals appear on the screen.
6) In order to optimize reception, execute fine adjustment of both the elevation angle
(crank) and the azimuth (mast).
INSTRUCTIONS FOR USE
USEFUL TIPS FOR BETTER SATELLITE SEARCH
Should you be unable to find the signal by following the procedure explained under items 1
through 6, we recommend to:
1) Turn the crank until the pointer is brought to the mark above the previously selected
mark (item 4), then turn the mast.
2) If no signal is displayed on the screen, turn the crank in the opposite direction, to bring
the pointer to the mark below the mark selected according to the instructions under
item 4, then turn the mast again.
3) Repeat the above operations by alternately positioning the pointer on the 2nd mark
above the reference mark first, then on the 2nd mark below the reference mark, and
so on, until you receive the signal.
Before starting the
vehicle, make sure you
have brought down the
antenna to its standby
position and tightened
the knob hard (fig. 25).
8
Page 10

LNB rotation for ideal reception in Europe’s extreme
(South-West or South-East) areas
Remember that the outside converter (a.k.a. LNB) has its own assembly position which must
be complied with. Otherwise you will not receive any signal. The pre-set mounting position
for the LNB is along the centre line of the disk (fig. A). With this configuration, the Voyager
G3 system works correctly in most European countries. However, if you are in areas very
far from the satellite orbital position, it might be necessary to adjust the converter angle. In
particular, if you wish to receive transmissions from the satellites Astra 19E, Astra 28E or
HotBird 13E, while you find yourself in Portugal or Morocco, your converter angle should be
adjusted as shown in (fig. B), while if you are in Turkey, to receive the same satellites you
should set your converter to the position (fig. C).
Place Position HotBird 13E Astra 19E Astra 28E
Lisbona B 25° 28° 37°
Casablanca B 27° 34° 41°
Ankara C 22° 15° 5°
1) Remove the LNB protective cover by screwing out the 3 screws
2) Loosen the screws on the LNB locking U-bolt
3) Turn in the Clockwise (West) or Anti-clockwise (South-East) direction
4) Lock the LNB again by screwing down the screws
5) Close back the LNB protective cover and screw down the 3 screws
9
Page 11

Dish Elevation Angle Charts
To obtain dish pointing to your
required satellite, it is essentially
important to incline the dish to the
correct angle.
Check your position on the map,
then set your dish elevation angle
to the value in degrees read on the
map for your required satellite.
The grey sections in the various
maps identify geographical areas
in which LNB adjustment is
required.
10
Page 12

Voyager elevation to locate satellites in Europe
Country Town HHOT BIRD ASTRA ATLANTIC TURKSAT ARABSAT
13° EST 19° EST BIRD 3 - 5° WEST 42° EST 26° EST
AUSTRIA Innsbruck 36 35 33 28 34
Salzburg 35 35 32 28 34
Vienna 35 35 31 29 34
BELGIUM Antwerp 31 30 31 22 28
Brussels 31 30 31 22 28
Gand 31 30 31 21 28
Liege 31 30 31 23 29
DENMARK Copenhagen 27 27 25 21 26
FINLAND Helsinki 21 22 17 20 22
FRANCE Lyon 36 35 36 26 33
Marsille 39 37 38 28 36
Paris 36 35 36 26 33
Toulouse 38 37 39 26 34
GERMANY Berlin 30 30 28 24 29
Cologne 31 31 31 23 29
Hamburg 30 28 28 22 27
Munich 35 34 33 27 33
Stuttgart 34 34 33 26 32
HUNGARY Budapest 35 35 31 31 35
Pecs 37 37 32 32 36
ITALY Brindisi 43 43 37 37 42
Cagliari 44 43 42 33 41
Firenze 39 39 37 31 37
Milano 37 37 36 28 35
Napoli 43 43 39 35 41
Palermo 46 45 42 37 44
Roma 42 41 38 33 40
Venezia 38 37 35 30 36
MAROCCO Casablanca 45 41 51 24 37
Fes 46 43 50 27 39
Marrakech 46 42 53 25 38
Tangiers 44 41 48 25 37
NETHERLANDS Amsterdam 30 29 29 21 27
Eindhoven 31 30 30 22 28
Rotterdam 30 29 30 21 27
NORWAY Oslo 22 22 21 17 21
trondheim 19 19 18 15 18
POLAND Cracow 32 33 28 29 32
Gdansk 28 28 24 24 28
Warsaw 29 30 25 27 30
Wroclaw 31 32 28 27 31
PORTUGAL Lisbon 40 36 45 21 32
Porto 37 35 42 20 31
SPAIN Barcelona 41 39 42 27 36
Bilbao 40 37 42 24 34
Carthagene 44 42 46 28 38
Madrid 40 38 43 24 34
Seville 42 39 47 24 35
SWEDEN Goteborg 25 24 23 20 24
Stockholm 23 23 20 20 23
SWITZERLAND Berne 36 35 35 26 33
Geneve 36 35 36 26 33
Zurich 35 35 34 27 33
UNITED Belfast 28 27 27 20 25
KINDOM Cardiff 31 29 31 21 27
Dublin 29 28 29 21 27
Glasgow 26 25 26 18 24
Inverness 24 23 24 17 22
Limerick 30 29 29 23 28
London 30 29 31 19 26
Manchester 27 26 29 17 24
Newcastel 26 25 27 17 23
Plymouth 32 31 32 22 29
11
Page 13

Pos. Code Description Q.ty
12 12986 F50 F connector 1,0
13 15718 LNB Stark S1 1,0
14 10283 LNB PLASTIC CLAMP 1,0
15 10548 LNB PLASTIC TOP 1,0
16 10547 LNB PLASTIC BOTTOM 1,0
17 06132 Arm rest 1,0
18 10782 Self-tapping screw 3,9 x 25 2,0
19 10408 Self-tapping screw 3,9 x 22 ( 65 ) 3,0
19 10408 Self-tapping screw 3,9 x 22 ( 85 ) 4,0
20 11087 Screw 4 x 16 2,0
21 06076 Nylon bush 2,0
22 10783 Self-tapping screw 3,9 x 13 1,0
23 15617 Flat washer D 6 4,0
Pos. Code Description Q.ty
1 03676 Parabolic antenna D=650 mm 1,0
1 07364 Parabolic antenna D=850 mm 1,0
2 10910 Screw M6X12 UNI 7687 4,0
3 03684 Self-locking nut M6 UNI 7474 4,0
4 10998 Support dish arm 1,0
5 10979 Screw M6x55 UNI 5737 1,0
6 03684 Self-locking nut M6 UNI 7474 1,0
7 11508 VOYAGER G3 65 arm plastic top for LNB 1,0
7 11510 VOYAGER G3 85 arm plastic top for LNB 1,0
8 11509 VOYAGER G3 65 arm plastic bottom for LNB 1,0
8 11511 VOYAGER G3 85 arm plastic bottom for LNB 1,0
9 11428 VOYAGER G3 65 LNB – tube holding 1,0
9 11429 Voyager G3 85 LNB - tube holding 1,0
10 13159 Coaxial Cable mt.7
12
Page 14

Pos. Code Description Q.ty
1 05799 Arm locking dowel 2,0
2 07446 Arm locking screw 2,0
3 11200 Reduction gear 1,0
4 11805 Trilobed screws 5X12 3,0
5 03244 OR Gasket XPG 9 1,0
6 07956 Fairlead skintop PG9 1,0
7 11524 Mast gasket 1,0
8 11523 Mast inclinable flange
for pass tube 1,0
9 11526 Mast conic inclination adapter 1,0
10 11525 Mast pass tube 1,0
11 11528 Mast conic ring nut 1,0
12 11527 Mast locking ring nut 1,0
13 10983 Adjustment shaft 1,0
Pos. Code Description Q.ty
14 03605 Tear rivet 1,0
15 10968 Supporting tube 1,0
16 02125 Nut- M6x1,5 UNI 5588 1,0
17 02354 Fastening bracket 1,0
18 02018 Lock UNIT KNOB 1,0
19 02083 Self-tapping screws 4,0
20 06391 Index Plastic screw 1,0
21 06390 Index 1,0
22 03647 Handle 1,0
23 02075 Self-tapping screw 4x10 1,0
24 12986 F50 F connector 1,0
25 10110 Black knob 1,0
26 02087 Self-tapping screw 3,9x13 1,0
27 06495 Elevation sticker 1,0
28 12030 Rubber gasket spring 1,0
13
Page 15

Mounting wall
42 mm
Recycling: with a view to reducing
disposal of waste electrical and
electronic equipment as much as
possible, do not throw out this end of
life appliance together with other
unsorted municipal waste, but make
use of a recycling centre.
CONFORMITY CERTIFICATE
The manifacturer Teleco Spa
Via Majorana nr. 49, 48022 Lugo ( RA )
Declares under its own responsibility that the following products:
VOYAGER G3 50
which are the subject of this certificate, conform to the following norms:
EN 60065: 2002 - EN 55013: 2001 + A1: 2003 - EN 61000 – 3 - 2: 2000 + A2: 2005
EN 61000 – 3 – 3: 1995 + A1: 2001 + A2: 2005 - EN 55020: 2002 + A2: 2005
according to the terms of the European directive 2006/95/EC
Low Voltage ( modified by 93/68/CEE ) and 2004/108/CEE of Electromagnetic
Compatibility (modified by 92/31/CEE e 93/68/CEE )
of the European Parliament.
Lugo 30 / 08 / 2014
THE PRESIDENT
Ing. Raul Fabbri
Dampen and
locate on the
mounting position
Cut-out drawing
in 1:1 scale
14
Page 16

26/09/2014
 Loading...