

Teleco ForceHDCL+ User Manual
USER’S MANUAL
HD Sat Receiver with CI +
HIGH/DEFINITION MULTIMEDIA INTERFACE


1
SAFETY INSTRUCTIONS ......................................................................................... 2
1. INSTALLATION OF STB .................................................................................. 4
1.1 FRONT PANEL ................................................................................................. 4
1.2 REAR PANEL ................................................................................................... 4
1.3 CONNECTIONS ................................................................................................ 5
1.4 REMOTE .......................................................................................................... 7
2. MAIN MENU ....................................................................................................... 8
3. EDIT CHANNEL ................................................................................................ 8
3.1 TV CHANNEL LIST........................................................................................... 8
3.2 DELETE ALL................................................................................................... 10
4. INSTALLATION ................................................................................................ 10
4.1 ANTENNA CONNECTION ................................................................................ 10
4.2 SATELLITE LIST ............................................................................................. 10
4.3 ANTENNA SETUP ........................................................................................... 11
4.4 SINGLE SATELLITE SEARCH ......................................................................... 11
4.5 MULTI SATELLITE SEARCH ........................................................................... 11
4.6 TP LIST ......................................................................................................... 12
4.7 OTHER ........................................................................................................... 13
5. SYSTEM SETUP ............................................................................................. 13
5.1 LANGUAGE .................................................................................................... 13
5.2 TV SYSTEM ................................................................................................... 13
5.3 DISPLAY SETTING ......................................................................................... 14
5.4 LOCAL TIME SETTING ................................................................................... 14
5.5 TIMER SETTING ............................................................................................. 14
5.5 PARENTAL LOCK ............................................................................................ 15
5.6 OSD SETTING .............................................................................................. 15
5.7 FAVORITE....................................................................................................... 15
6. TOOLS .............................................................................................................. 15
6.1 INFORMATION ................................................................................................ 16
6.2 FACTORY SETTING ........................................................................................ 16
6.3 SW UPDATE BY OTA .................................................................................... 16
6.4 UPDATE BY USB ........................................................................................... 16
6.5 MEDIA PLAYER .............................................................................................. 17
6.6 REMOVE USB DEVICE SAFELY ..................................................................... 17
7. GAME ................................................................................................................ 17
8. OTHER FUNCTIONS INTRODUCTION..................................................... 17
8.1 PROGRAM INFORMATION .............................................................................. 17
8.2 FAVORITE LIST .............................................................................................. 18
8.3 PROGRAM GUIDE .......................................................................................... 18
8.4 VOLUME CONTROL ....................................................................................... 18
9. TECHNICAL SPECIFICATIONS .................................................................. 19
10. TROUBLESHOOTING ................................................................................. 21

2
SAFETY CAUTION
˖
Safety Instructions
DO NOT INSTALL YOUR RECEIVER:
x In a closed or poorly ventilated cabinet;
x Directly on top of or under any another equipment;
x On a surface which might obstruct the ventilation slots.
DO NOT EXPOSE THE RECEIVER OR ITS ACCESSORIES:
x To direct sunlight or heat generated by any other nearby equipment;
x To rain or intense moisture;
x To any shock which may cause permanent damage to your receiver;
x To any magnetic objects, such as loudspeakers, transformers, etc.;
x To intense vibration;
x Never open the cover. It is dangerous to touch the inside of the receiver due to high
voltage currents and possible electrical hazards. Your warranty will be void if the receiver
has been opened.
x When the receiver is not used for a long period of time, you should unplug the power cord
from the wall socket.
x Do not use a damaged power cord. It may cause a fire or an electrical shock.
x Do not touch a power cord with wet hands. It may cause an electric shock.
x Place the receiver in a well-ventilated environment.
x When you are connecting the cables, be sure that the receiver is disconnected from the
mains supply voltage.
x Do not use your receiver in a humid environment.
Make sure you read this user manual before installing your receiver.

3
Main features:
Supports MPEG-2, MPEG-4(H.264) and fully DVB-S2 compliant
Supports Common Interface, and Common Interface Plus
DiSEqC 1.0, 1.1, 1.2 and USALS(DiSEqC 1.3)
Fast channel filtering by first letter of channel name
Digital sound through coaxial output (S/PDIF)
Display showing 4 digit channel number or time
Max. 4,000 channels memory capacity
8 Favourite lists for TV-and Radio programmes
Quick and easy installation & user-friendly menu
Excellent Audio & Video quality
Displayable Video Formats min. 576i,576p, 720p, 1080i
Parental lock function for menu selectable per channel
Teletext via OSD & VBI
Electronic Programme Guide (EPG) for present/following event information and up to
7 days for on screen programme information
Full multi-lingual DVB subtitling and audio track support
Multi-lingual support on screen menu (OSD): English, German, French, Italian, Dutch,
etc.
Edit functions for TV or Radio programme name
Signal strength bar for digital transponders
Automatic and manual channel scan options
Power on with last viewed channel
8 Timers for on and off or sleep-timer with 3 modes (daily, weekly, once)
User-friendly remote control with coloured function buttons
Low power consumption in standby
Automatically Standby mode setting after 3 hours without user activity/operation,
(before going to Standby mode, there is an about 2 minutes’ warning).
Connections: LNB IN, LNB OUT, 1 Scart TV (CVBS, RGB), HDMI (HDCP),
S/PDIF(Coaxial), USB2.0, CVBS+Audio L/R (Composite Audio/ Video).
7 segment 4 digit LED Display
USB interface for MP3/ JPG playback and S/W update function
S/W update through satellite supported
4
1. Installation of STB
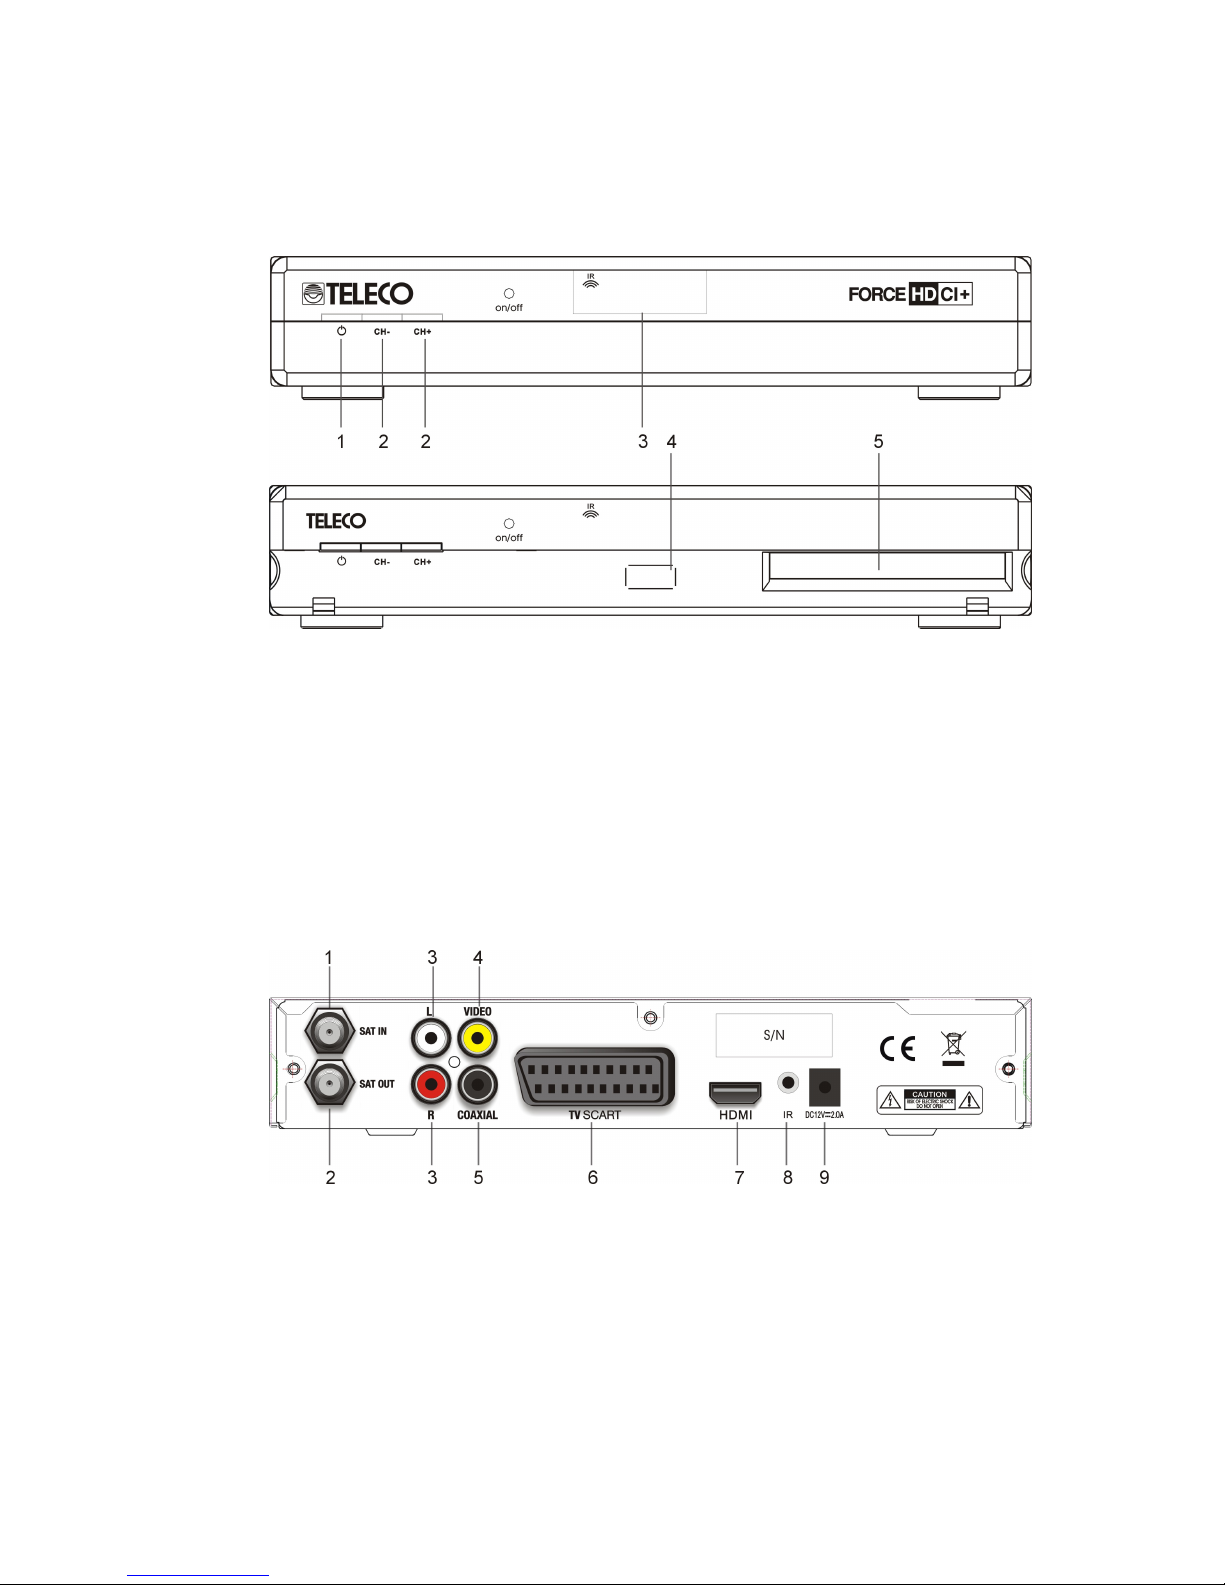
1.1 Front Panel
1. Standby: Used to switch the set top box to on or standby.
2. CH+/CH- Button: Changes the current channel.
Moves the cursor up/down in Menu state. Changes the current program to the
previous/next program in No-menu state.
3. LED Display: Used to display channel information.
4. USB Port: Used to connect an external USB 2.0 Device.
5. CI+ Slot: Used to attach a CI+ Module.
1.2 Rear Panel
1. SAT IN
Connect the Satellite Dish LNB.
2. SAT OUT
Output loop-through LNB signal.
3. AUDIO Right and Left
These connectors can be used to connect the audio signal to an external amplifier, or the
audio input of your TV.
5
4. VIDEO
This connector has a constant video signal for additional VCR-connections.
5. COAXIAL
Use this coaxial output to connect your receiver to the input of your digital audio amplifier.
6. TV SCART Connector
Use this connector to connect your receiver to your TV set using a SCART cable.
7. HDMI
Connecting to the HDMI input on the TV set.
8. IR
9. DC12V, 2.0A
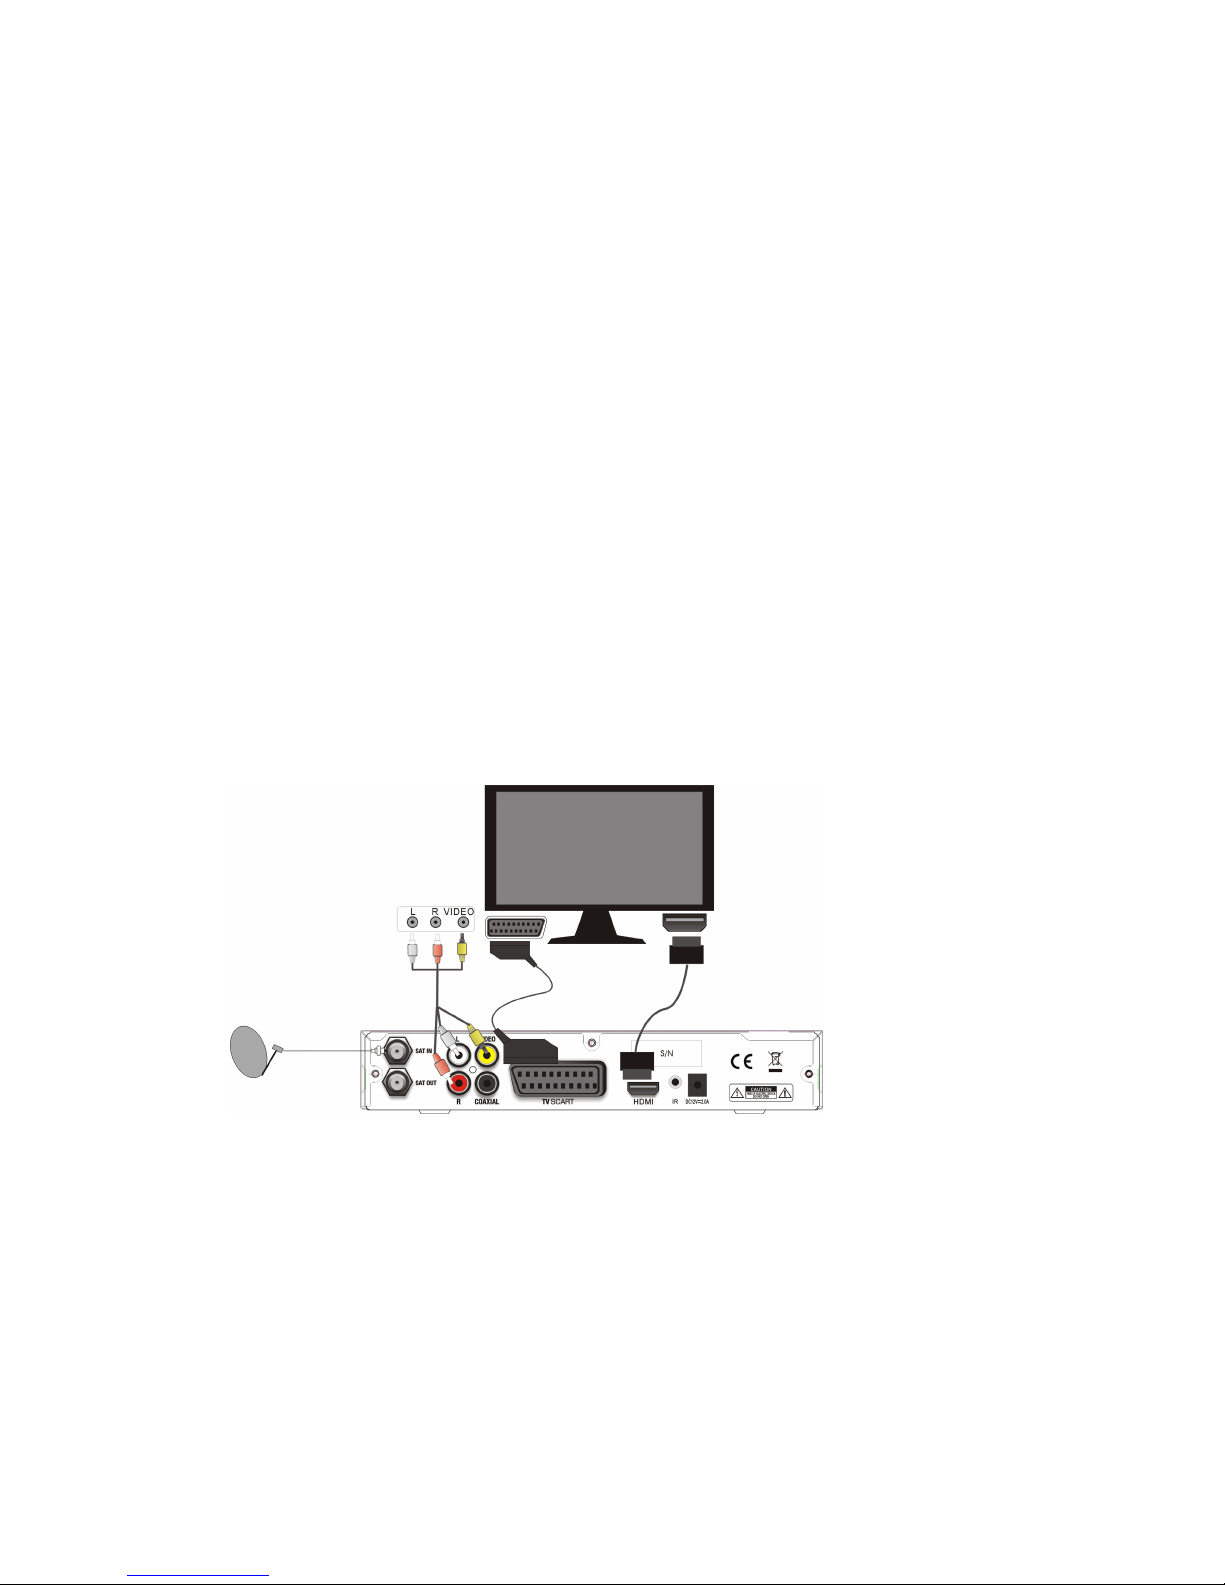
1.3 Connections
Note: Before connecting this STB to other devices, power off all the devices.
z Connecting to TV
1. Connect the satellite signal from the LNB to the SAT IN connector.
AND
2. Connect the TV using an AV cable.
OR
3. Connect the TV using an HDMI cable.
OR
4. Connect the TV using a SCART cable
.
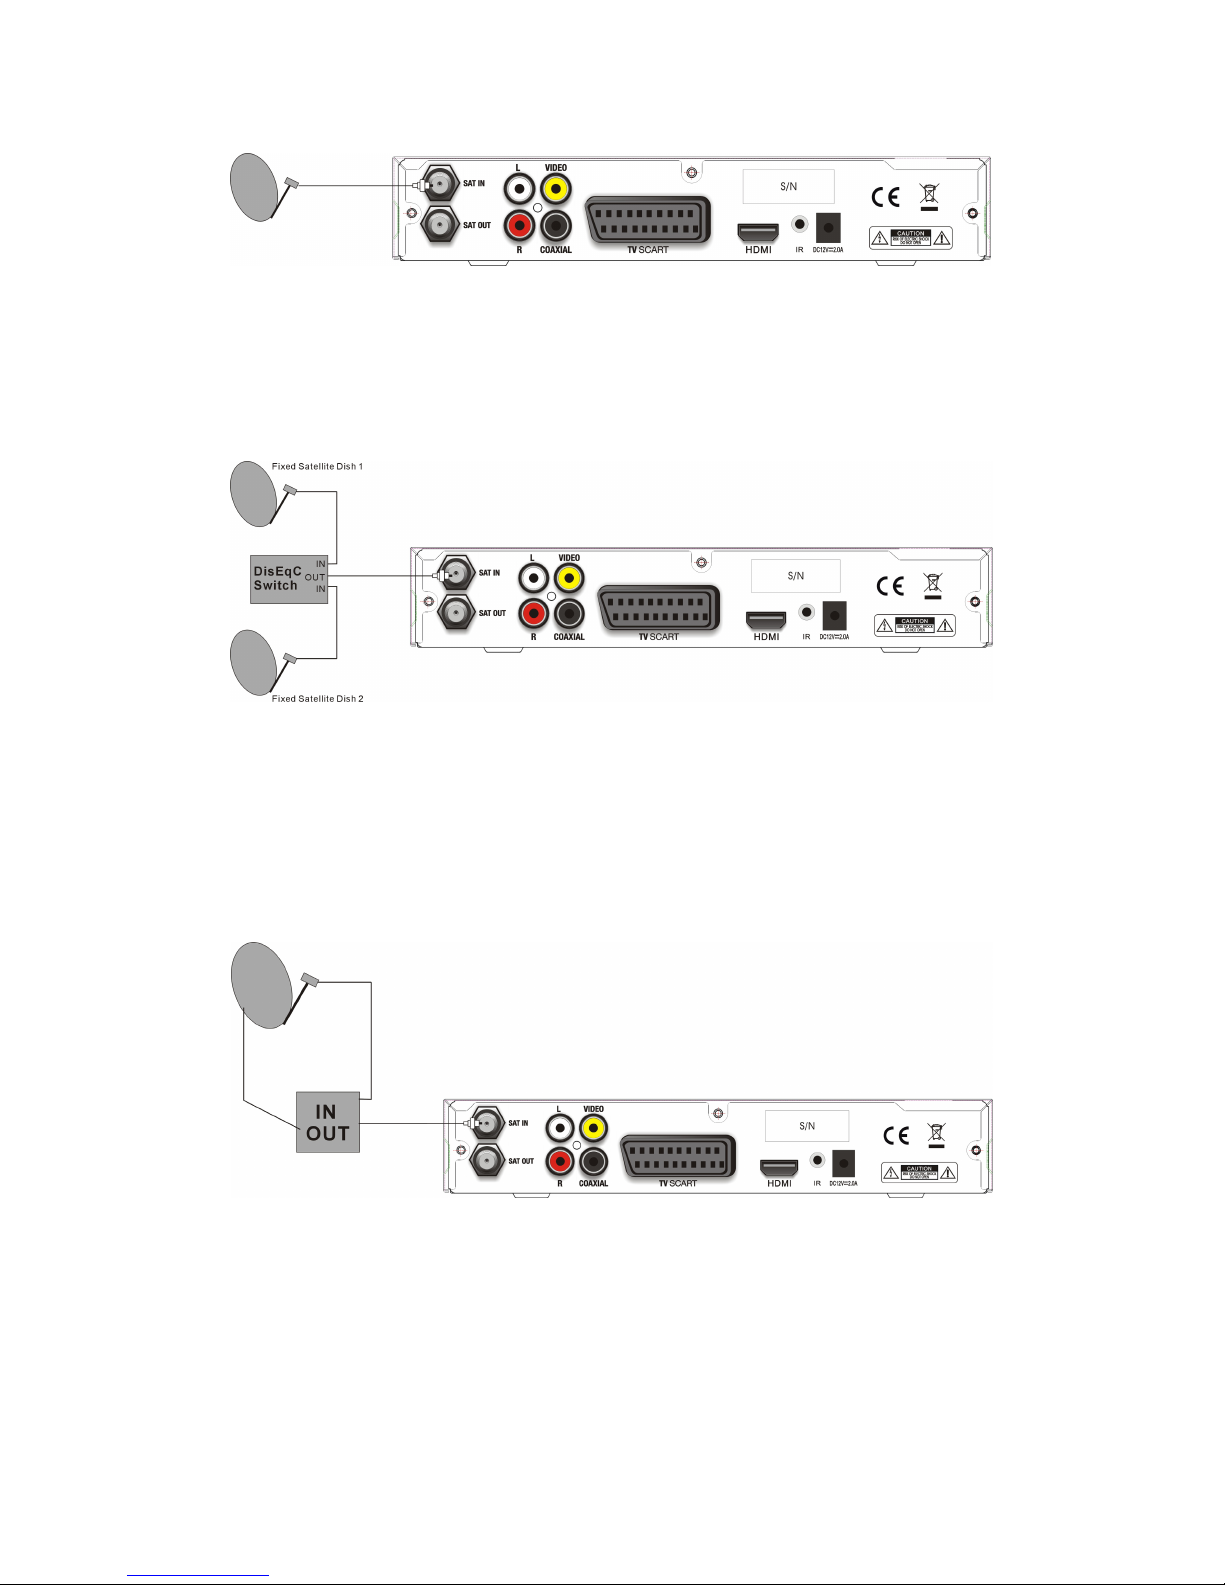
z Connecting to Dish
Aiming a satellite dish and LNB to the correct longitude and Azimuth (angle of elevation)
of a satellite is a specialist job, and can best be done by an official dealer.
<Connecting a fixed satellite dish to your receiver>
Make your choice of which satellite you want to receive your signals from, and have your
dealer aim your dish at the requested satellite.
Connect a coax cable to your LNB and the other end directly to the LNB IN connector of
your receiver.
6
<Connecting multiple fixed dishes to your receiver using a DiSEqC 1.0 switch>
If you want to watch programs from several satellites (For instance from Astra and from
Hot Bird) it is advisable to use fixed dishes and a DiSEqC 1.0 switch. Have your Dealer
aim the dishes at the requested satellites and connect the LNBs with coax cables to the
IN connectors of the DiSEqC 1.0 switch. Connect the OUT connector of the DiSEqC 1.0
switch to the LNB IN connector at the back of your receiver.
<Connecting a dish on a motorized positioner to your receiver>
Another possibility to watch programs from multiple satellites is mounting
a dish on to a motorized DiSEqC 1.2 positioner.
Have your dealer mount the dish on the positioner, set the correct azimuth (angle of
elevation) and set the center point for your positioner.
Connect the LNB with a coax cable to the LNB IN connector of the positioner, and
connect the OUT connector of the positioner to the LNB IN connector at the back of your
receiver.
z Connect the terrestrial signal from the LNB to the LNB IN connector.
z Connect the SCART lead between the main SCART socket on the TV and the TV
SCART socket on the receiver or Connect the TV using an AV cable.
z Connect to VCR with a SCART cable.
z Connect the S/PDIF connector at the back of your receiver to the suitable input of
your Digital Audio
z Turn on the TV. Set TV to AV mode.
 Loading...