

Page 1

GRAVITY X55L
Guidebook
For Android™
Mobile technology
Platform 6.0
Page 2

TABLE DE CONTENIDO
GET STARTED .................................. 4
SET UP AND USE YOUR DEVICE ........ 4
CONNECT TO WI-FI NETWORKS ... 10
BROWSE AND ORGANIZE YOUR
HOME SCREENS
.............................. 12
MAKE & RECEIVE PHONE CALLS .. 14
MANAGE YOUR CONTACTS AND
CALL LOG
....................................... 17
SEND & RECEIVE TEXT MESSAGES 19
TYPE TEXT BY SPEAKING .............. 22
RELAX WITH GOOGLE PLAY ........ 23
CHANGE THE WALLPAPER ............ 25
WIRELESS & NETWORK SETTINGS 26
DEVICE SETTINGS .......................... 32
SECURITY SETTINGS ...................... 36
ACCOUNT AND LOCATION SETTINGS
........................................................ 38
FACTORY RESET ............................ 41
SAFETY INFORMATION .................. 42
1
Page 3
2
Page 4
3
Page 5
M
u
e
M
t
m
a
i
A
Y
f
o
n
d
i
k
V
t
o
M
d
y
t
GET ST
RTED
SET UP
• Install SI
Important: T
removing th
SIM cards. T
removing SI
to static elec
of reach of s
You can inst
Android dev
AND USE
cards
rn your device o
SIM cards. Do n
ake care when ha
cards, and avoi
ricity, water, or d
all children.
ll up to 2 micro S
ce. You can chec
OUR DE
f before installing
t bend or scratch
dling, installing,
exposing the SI
rt. Keep SIM car
IM cards in your
to see how man
4
ICE
or
he
r
cards
s out
micro
Page 6

SIM cards ar
e
r
M
e
m
h
t
2
d
-
p
t
a
c
d
y
r
c
e
t
c
n
m
M
i
c
m
e
O
e
o
h
u
a
M
m
y
t
a
a
d
v
a
l
i
b
c
d
s
k
e
e
d
u
k
u
them on you
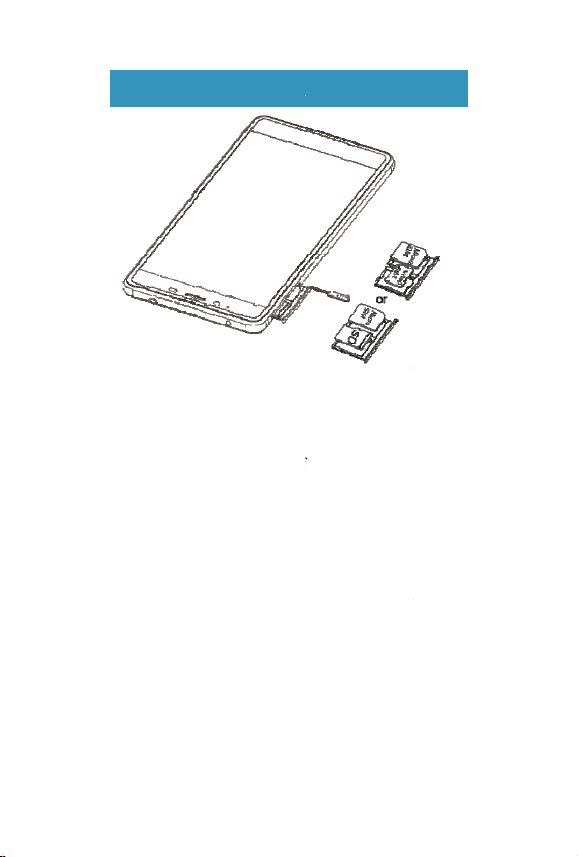
To install SI
these steps
• Installing
In your phon
can only use
SIM card or
1- Use t
2- Insert
3- Push
Notice: Sim
memory car
Notice: Built
After you ins
the activities
hone calls,
• Check wh
You can che
your Androi
steps:
installed and ass
device.
cards in your A
SIM card or Me
there are two SI
SIM card, while s
emory card.
e pin to open the
the SIM card or
he SIM card to th
card slot CAN N
at the same tim
in battery is not r
tall a SIM card, y
you want to use t
ext messages, or
t SIM cards are
k to see what SI
device at any ti
ign activities to e
droid device, fol
ory card
card slots; Sim
m 2 slot can use
ard slot.
emory card corre
correct position.
T insert SIM car
.
emovable.
u'll be asked to a
e SIM card for, li
sing data.
installed
cards are install
e by following th
ch of
ow
1 slot
oth
tly.
and
sign
e
d in
se
1- Open
2- Unde
3- The s
"SIM cards".
reen shows the c
numb
r for each SIM c
our device’s Set
ings menu .
rrier data and pho
rd installed in the
ne
device.
• Assign ac
After you’ve
device, you
ivities for a SIM
installed SIM car
an assign the acti
5
card
s in your Androi
ities you want to
se
Page 7

each SIM ca
r
n
y
r
a
m
p
p
e
m
(
y
p
r
g
o
o
u
y
r
o
a
n
i
.
c
y
t
a
o
a
w
e
a
e
o
o
a
o
m
t
u
S
y
t
a
t
u
e
t
n
c
n
a
n
n
t
t
h
S
D
c
c
text messagi
To assign an
d for. These activ
g, and using data
activity to a SIM
ties include phon
ard, follow these
calls,
steps:
1- Open
2- Unde
3- You c
SMS
For some ap
complete ap
app to compl
• Install a
A micro SD
can insert in
For some ap
micro SD ca
• Mount or
To start usin
it, you need t
remove the S
order to rem
To mount or
steps:
1- Open
2- Unde
3- To m
To unmount
card and the
our device’s Set
"SIM cards".
n assign a SIM t
essaging.
s, you'll need to
activities. Follo
te the process.
icro SD card
Secure Digital) c
our phone to ext
s or features on y
d.
unmount a micr
your micro SD c
make sure it's
D card, you need
ve it safely.
nmount a micro
our device’s Set
"Storage&USB,"
unt a micro SD c
micro SD card,
touch OK. If yo
6
ings menu .
an activity, such
ssign a SIM card
the instructions i
rd is a small devi
nd its storage cap
ur phone, you'll
SD card
rd after you've i
ounted. If you wa
o unmount it firs
D card, follow t
ings menu .
touch SD card.
rd, touch Mount
ouch Unmount S
unmount the SD
as
o
the
e you
acity.
eed a
serted
t to
in
ese
D card.
ard,
Page 8

some of you
r
S
i
i
y
r
e
o
A
s
c
e
e
e
s
t
b
u
c
g
u
r
i
o
y
t
a
c
A
o
a
w
o
c
m
m
o
t
s
a
U
y
a
p
p
y
o
o
m
r
c
r
h
l
l
remount the
• Erase a m
To erase a m
apps may not wo
D card.
cro SD card
cro SD card, foll
k properly until
w these steps:
ou
1- Open
2- Unde
3- To ej
• Charge y
Your battery
unpack your
the battery a
To charge yo
1- Using
conne
charg
2- Conn
3- Conn
Important: U
that came wi
adapter or ca
Charging yo
another devi
than chargin
• Set up yo
our device’s Set
"Storage&USB,"
cted amicro SD c
ur Android devi
will not be fully c
ndroid. It’s a go
soon as you get
ur Android, follo
the adapter that c
t one end of the
r port at the botto
ct the other end t
ct the travel adap
e only the travel
h your Android.
le may damage
r phone through
e, such as a lapto
with a travel ada
r Gravity X55L
7
ings menu .
touch SD card.
rd, touch .
e
harged when you
d idea to fully ch
chance.
these steps:
mes with the ph
icro USB cable t
of the phone.
the travel adapte
er to a power outl
dapter and USB
sing a different t
our phone.
USB cable attac
computer, takes
ter.
first
arge
ne,
the
.
et.
able
avel
ed to
onger
Page 9

The first time you turn on your Gravity X55L, it'll walk
you through the steps to get it set up. You'll be
prompted to do the following:
1- Choose the language you want your phone to use
2- Connect to a Wi-Fi network or your cellular data
network
3- Sign in with your Google Account
If you use Gmail, you have a Google Account. Just use
the same email address and password to sign in here. By
signing in, all of your email, contacts, calendar events,
and other data associated with that account will be
synced to your phone.
If you don't have a Google Account, you can create one
during the setup process. You can also skip this step and
create one later.
If you have more than one Google Account, you can
add other ones later.
To make sure your phone doesn't lose power during
setup, it's recommended that you keep it plugged in
until setup is complete.
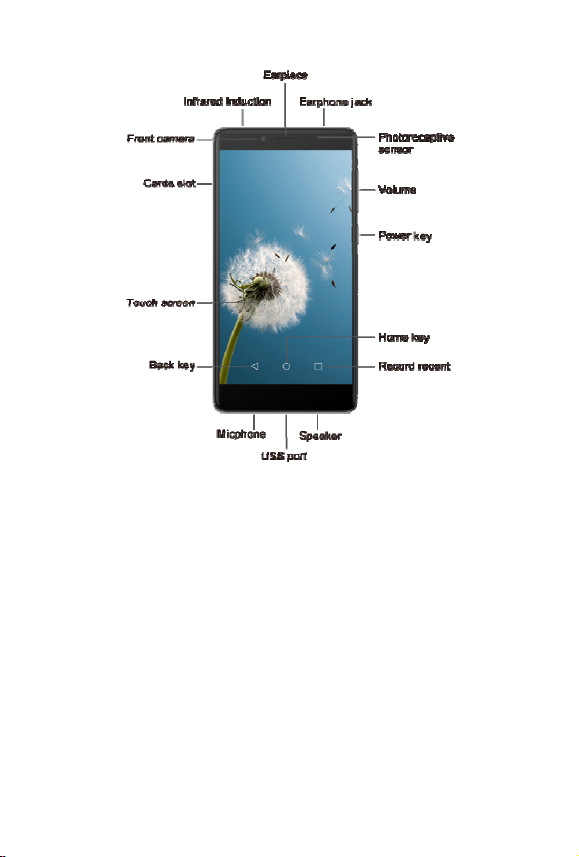
• Gravity X55L Basics
Here are some tips to get you familiar with your
X55L
device. They'll help you with the basic features
Gravity
you're likely to use often.
• Navigation buttons
At the bottom of every screen, no matter what you're
doing, you'll always find these three navigation buttons:
8
Page 10

a
b
a
e
n
y
r
n
o
n
e
u
f
q
b
n
g
e
g
o
m
s
s
r
a
s
g
m
o
a
t
f
o
n
h
r
t
y
u
p
w
h
a
s
n
t
e
r
t
1- Back:
you b
ack
2- Home
on a l
centra
3-
Rece
apps
it. To
left or
• Settings a
To change y
network, sou
Settings scre
1- In yo
Apps
Takes you back t
ck up to the Ho
ny further.
: Takes you to the
ft or right Home
l Home screen.
t apps: Opens a li
ou’ve used recent
emove a thumbn
right.
d Quick Setting
ur device's settin
d, account, and
n:
r Favorites tray, t
icon.
your previous sc
e screen, you can'
Home screen. If
creen, it takes yo
t of thumbnail im
ly. To open an ap
il from the list, s
s, including your
any others, go to
uch the All
een. If
go
ou're
to the
ages of
, touch
ipe it
the
2- Look
3- Select
or the Settings
the setting you w
icon and touc
nt to change
it.
You can get
rightness, a
Quick Settin
uick access to se
d others you use
s
tings like Wi-Fi,
requently by goi
creen
g to
1- Swip
2- In the
down from the t
finger
to pull down the
top-right, touch t
s icon.
Settin
p of the screen wi
otifications shad
e Quick
h one
.
9
Page 11

Help with yo
u
s
o
n
a
C
O
n
e
a
d
t
W
y
r
h
n
e
r
d
d
a
w
m10u
n
p
a
w
o
c
r
w
t
t
y
t
w
d
a
r
o
m
n
a
W
n
t
h
e
w
t
i
F
w
o
n
y
t
w
Many screen
Menu ic
often includi
information
CONNE
NETW
You can con
well as add n
you don't us
settings for s
Keep in min
you connect
• Turn on
r device
in apps and Setti
n. Touch it to ex
g a Help item th
bout that screen.
T TO WI-
RKS
ect to Wi-Fi net
etworks you use
any longer. You
ved Wi-Fi netwo
that your device
o and connect au
i-Fi and connec
gs include a
lore additional op
t provides more
FI
orks with your de
ften or remove ne
an also change t
ks on your devic
ill remember ne
omatically when
to a network
tions,
vice, as
works
e
.
works
n range.
1- Open
2- Unde
3- Touc
4- You'll
5- Secur
6- Your
7- You c
our device’s Set
"Wireless & net
the Wi-Fi switch
the O
position.
see a list of save
d networks displ
ask fo
a password to c
evice will reme
to an
automatically co
range.
n forget a saved
don't
ant your device t
auto
atically.
ings menu .
orks," touch Wi-
to turn it to
and available net
y a lock icon
nnect.
ber networks it c
nect to them whe
i-Fi network if
o connect to it
i.
orks.
and
nnects
in
ou
Page 12

8- Touc
h
r
c
n
o
r
y
r
h
F
w
o
y
r
e
h
m
C
S
f
r
t
e
n
n
o
o
c
y
t
w
w
r
s
F
l
y
t
w
y
e
a
t
n
o
m
e
F
p
m
w
s
F
y
netwo
9- Once
"Con
• Remove a
You can forg
your device t
Wi-Fi netwo
a network name
ks to connect to i
onnected, your d
ected" under the
Wi-Fi network
et a saved Wi-Fi
connect to it aut
k from your devi
rom the list of av
.
vice will say
etwork name.
etwork if you do
matically. To re
e, follow these st
ilable
't want
ove a
ps:
1- Open
2- Unde
3- Make
4- In the
saved
5- Touc
• View Wi-
settings
You can vie
change netw
1- Open
2- Unde
3- Conn
for.
4- Touc
infor
i. -
ii. -
our device’s Set
"Wireless & net
sure the Wi-Fi s
Wi-Fi settings sc
network.
Forget.
i network detail
your saved Wirk settings by fol
our device’s Set
"Wireless & net
ct to the network
the network nam
ation about:
onnection status
ignal strength
11
ings menu .
orks," touch Wiitch is in the On
een, touch the na
and change net
i networks' detail
owing these steps
ings menu .
orks," touch Wi-
ou want to view
. You can see
i.
osition.
e of a
ork
and
:
i.
details
Page 13
iii. -
L
F
S
a
r
F
)
S
o
s
l
o
m
o
p
m
h
e
w
h
n
.
r
k
w
G
s
l
Y
e
o
i
t
p
m
y
n
t
n
.
l
O
Y
m
w
t
w
e
n
iv. -
v. -
5- To ch
netwo
i. -
BROWS
HOME
• Browse H
Your Home
turn on or un
time when y
• Add apps
You can add
app’s most i
screens so y
To add an ap
Go to the Ho
or widget.
1- Touc
2- Swip
you
3- Touc
scree
finger
ink speed
requency
ecurity
nge network setti
k name. You can
orget the networ
a
-Modify the net
E AND OR
CREENS
me screens
creens are the fir
ock your device.
u touch the Hom
and widgets to y
apps and widgets
portant informat
u can easily find
or widget to a H
e screen where
the All Apps ico
up, if necessary,
ant.
and hold the app
appears, slide it i
ngs, touch and ho
choose to:
ork
ANIZE Y
t ones you see wh
ou can find the
button.
ur Home screen
("at-a-glance" vie
on) to your Home
hem.
ome screen:
ou want to place
.
o find the app or
or widget until th
to place, and lift
12
d the
UR
en you
at any
of an
he app
idget
Home
your
Page 14

a
e
h
y
e
o
g
o
c
n
n
s
h
i
r
o
o
h
t
n
n
n
n
w
e
g
n
o
v
e
k
c
a
b
w
n
o
o
To move an
a Home scre
1- Touc
2- Slide
anoth
To m
the ed
3- Lift y
4- The i
• Remove a
To remove a
follow these
1- Touc
2- Drag
the sc
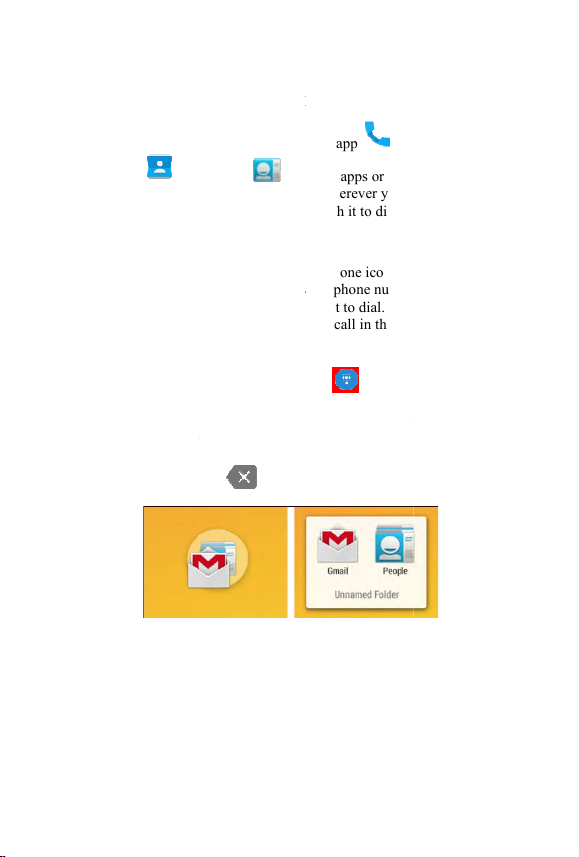
• Create a f
To create a f
1- Touc
2- Slide
3- To re
pp or widget ico
n:
and hold the ico
our finger to the
r icon out of the
ve between Hom
e of the screen.
ur finger.
on drops into its
app or widget
app or widget fr
teps:
and hold the app
t up to the Remo
een.
lder for apps
lder, follow thes
and hold the app.
he app icon quic
ame a folder, tou
to a different loc
.
ew position. To
ay, slide slowly i
screens, slide to
ew position.
m a Home scree
or widget.
e icon at the t
steps:
ly over the other.
h its name.
tion on
ump
nto it.
ard
,
p of
13
Page 15
&
e
o
c
p
e
h
P
e
y
e
a
t
p
e
y
b
p
E
e
h
h
o
n
y
t
e
s
h
l
t
e
e
e
e
h
o
g
e
u
l
e
n
u
a
MAKE
CALLS
• Make, rec
RECEIV
ive, and block p
PHONE
one calls
You can plac
app , Pe
that display
hone numb
• Make a p
To open the
mobile devic
your screen,
use the Phon
ways:
1- Dialp
want
hone
Phon
you t
acks
e calls from the P
ple app , or
ontact informatio
r, you can usuall
one call
hone app, touch
. Wherever you
ou can usually to
app to make a p
d: Touch the Dia
o use the keypad
number. Type th
icon below the k
pe a wrong numb
ace to eras
14
one app , C
other apps or wid
. Wherever you s
touch it to dial.
he Phone icon on
ee a phone numb
uch it to dial. Yo
one call in the fo
pad whenev
o manually type i
number, then to
ypad to make a c
r, touch
digits one by one
ntacts
ets
ee a
your
r on
can
lowing
r you
a
ch the
ll. If
. To
Page 16

end a
c
b
m
e
h
n
c
t
c
n
c
e
a
t
o
g
n
a
w
i
o
n
oo Aan15c
o
S
a
c
c
t
c
o
t
c
n
a
,
.
c
t
n
s
c
a
w
t
m
o
p
n
h
r
e
h
t
a
e
e
,
i
a
Y
n
n
c
m
o
i
i
e
i
otto
2- Speed
touch
call fr
and t
3- Rece
call lo
recent
4- Conta
the lis
conta
• Manage i
When you re
that you hav
existing cont
may see addi
can choose t
a text messa
You can ma
1- You c
from
touch
2- For m
it, the
over
all in progress, t
of the screen.
dial: Touch the "
dialing for your f
quently. Just tou
e call will start.
ts: Touch the "Re
g and select a con
ly called.
ts: Touch the "C
of all your conta
t, touch their pho
coming phone c
eive a phone call
an incoming call
ct in your Conta
ional informatio
answer or dismi
e to the caller.
age an incoming
n choose to ans
ithin the notifica
ng Answer or Dis
re options, touch
touch the white
ne of the followi
nswer call: Touc
swer the call and
uch end call
peed dial" tab fo
vorites and numb
h the contact in t
ents" tab to view
act or number th
ntacts" tab to sel
ts. Once you sele
e number to plac
lls
you'll get a notif
If the caller is an
ts app or People
about the caller.
s the phone call a
all in the followi
er or dismiss the
ion simply by
iss.
the notification t
hone icon, and sl
g icons:
the green phone
start talking to th
at the
one-
rs you
e list
your
t you
ct from
ct a
a call.
cation
pp, you
ou
d send
g way:
all
open
de
con to
caller.
Page 17
o
c
m
mshyoimfr
m
a
h
c
h
k
u
h
h
e
h
e
a
e
t
s
o
c
o
n
Q
e
w
B
e
o
s
o
m
h
o
c
e
u
t
u
w
c
n
n
s
d
a
e
i
o
c
e
o
c
i
o
To block a c
1- Open
2- Touc
conta
3- Touc
4- Chec
• Options d
During a call
Phone app:
1- Touc
2- Touc
a Blu
as a t
the sp
S
end to voicemail:
on to direct the c
i
essage.
S
end a text messag
essage icon
ort text response
ur own message
mediately. You
om within the Ph
enu icon the
S
ettings and then
ll, follow these st
the Contacts app
the contact you
t.
the menu icon
the box next to "
ring a call
, you can touch th
to switch t
to turn the
tooth headset is c
ree-way switch a
akerphone, and t
Touch the red ph
ller to leave a voi
to the caller: To
o open a list of q
or the option to
and send it to the
an edit text respo
ne app by touchi
selecting Setting
uick responses.
ps:
.
ant to block or a
.
lock incoming c
following icons
the dial keypad.
peakerphone on
nnected, this fun
ong the built-in
e headset. The ic
ne
email
ch the
ick
rite
aller
ses
g the
, Other
d that
lls"
n the
r off. If
tions
arpiece,
n
16
Page 18

chang
e
o
h
h
h
h
r
r
n
t
r
G
A
o
t
O
d
o
g
e
c
m
u
t
o
e
h
a
c
r
l
d
n
p
l
m
u
t
.
i
l
r
s
f
u
n
n
t
p
e
a
.
s
n
hold t
3- Touc
4- Touc
5- Touc
s to indicate the
see a three-way
to mute yo
to put the o
to switch t
urrent output. To
enu.
r microphone.
her party on hold
another call in pr
ch and
ogress.
6- Touc
confe
• Answer o
To answer a
a call, touch
respond with
voicemail.
If you answe
respond with
to the first ca
MANA
AND C
• Manage y
Favorite con
you star will
Phone app.
your mobile
To go to a co
your list of c
the followin
to merge s
ence call.
respond to anot
other incoming c
he white phone i
a text message, o
, the first call wil
a message or sen
ll.
E YOUR C
LL LOG
ur contacts
acts, contacts you
show on the scree
pen your Phone a
evice.
ntact's card, simp
ntacts. You can
ways:
17
parate calls as a s
er incoming cal
ll while you're al
on and slide to an
send the call to
be put on hold. I
to voicemail, yo
ONTACTS
call often, and co
when you open
p by touching
y touch their nam
anage your cont
ngle
eady in
wer,
you
return
tacts
he
on
from
cts in
Page 19
h
a
c
l
a
i
o
u
e
n
n
n
T
:
n
c
v
r
a
m
w
y
a
g
n
t
w
w
n
o
a
a
n
a
h
t
c
v
a
e
l
e
m
e
n
y
o
u
a
i
p
n
o
a
H
o
n
e
o
i
1- Searc
you c
in the
2- Add a
icon
conta
Goog
your
3- Favor
star ic
show
Phon
4- Orga
scree
holdi
5- Edit:
icon
6- Share
scree
conta
7- Remo
the sc
• Use the ca
You can see
received, or
It's an easy
a number to
To use the c
: If you're lookin
n search your co
Search bar at the
contact: To add a
, then touch Ne
t's information. If
e Account, the ne
ccount.
te: To make a co
n on a cont
p in the speed di
app.
ize: You can orga
in your speed di
g them to move t
o edit a contact,
on a contact's
To share a conta
for easier access,
ts list, then touch
e: Touch and dr
een to remove th
ll log
list of all the cal
issed in the Rec
ay to redial a nu
our contacts.
ll log, follow thes
18
for a specific co
tacts or for nearb
op of the screen.
contact touch the
contact and add
you're signed in t
contact will syn
tact a favorite, to
ct's card and it w
l tab when you o
ize the contacts
l list by touching
em around.
ouch the edit
card.
t or place it on a
select it from the
the menu icon
g contacts to the t
m from the grid.
s you’ve placed,
nts tab in the Pho
ber, return a call,
steps:
tact,
places
menu
the
a
c with
ch the
ll
en the
n your
nd
ome
.
p of
e app.
or add
Page 20
t
h
r
h
w
m
d
v
o
h
h
m
h
h
c
h
e
&
G
s
e
n
e
t
b
n
s
a
i
d
a
a
n
s
e
w
n
o
c
e
s
o
l
n
e
s
a
SEND
MESSA
1- Open
2- Touc
most
3- Touc
Arro
and
4- Misse
5- Recei
6- Outg
7- You
8- Touc
infor
9- Touc
10- Touc
your
11- Touc
numb
he Phone app
the "Recents" ta
ecent incoming a
View full call hi
icons beside a c
ultiple arrows ind
incoming call
ed incoming call
ing call
ave the following
a number or cont
ation about the c
"Call back" to di
the trash icon
all log.
the the menu ico
to make change
RECEIVE
ES
on your device.
. You'll see a list
d outgoing calls.
tory to see more
ll indicate the typ
cate multiple call
options for recent
act then Details f
ll.
l the number.
to delete the cal
, then Edit
s to the call back
TEXT
f your
alls.
of call,
:
calls:
r more
from
umber.
• Open mes
From a Hom
icon .
The Messagi
new messag
aging
or All Apps scre
g screen opens,
or open an ongoi
19
n, touch the Mes
here you can cre
g conversation.
aging
te a
Page 21

To read the
m
t
s
t
a
c
e
d
e
o
a
h
r
e
r
h
Tto
h
s
m
o
t
s
m
p
a
l
d
r
a
e
r
t
g
a
T
y
l
r
e
o
a
a
e
the conversa
& hold a me
1- Copy
2- Forw
conta
3- Lock.
you r
4- View
messa
5- Delet
• Delete a c
1- While
hold
2- Touc
conve
To delete all
screen and to
• Search M
To search fo
following:
1- Touc
i.
2- Use t
terms.
essages in an exi
ion. A list of its
sage to take any
ext. Copy the me
rd. Forward the
ts or another reci
Prevent the mess
ach your storage
etails. View info
ge and the sender.
. Delete the mess
nversation
viewing the list o
conversation to s
the Trash icon
sation.
conversations, go
uch Menu > Dele
ssaging
a specific word o
the Search icon
he Search Messa
p of the screen.
e onscreen keybo
20
ting conversation
essages appears.
f these actions:
sage text.
essage to one of
ient.
ge from being de
imits.
mation about the
ge from the conv
f conversations, t
lect it.
to delete the
to the main Mess
e all threads.
r contact do the
.
ing field appears
rd to type your s
, touch
ouch
our
eted if
rsation.
uch &
ging
t the
arch
Page 22

• Premium Text message warnings
Apps may sometimes send text messages using
premium services that cost you money. To alert you to
such charges, Android detects any attempt by an app to
send a message on your behalf. If it looks like the
message may cause you additional charges, you'll see a
dialog indicating the name of the app, the address to
which the text message is being sent, and a warning.
When this happens, you can choose to cancel the
message or send it anyway.
From a Home or All Apps screen, go to Messaging >
Menu > Settings.
• Storage settings
1- Delete old messages. Check to delete older
messages in a conversation when limits are
reached. Uncheck to keep all messages.
2- Text message limit. Touch to set the number of
text messages to save per conversation. When the
limit is reached, older text messages are deleted
if Delete old messages is checked.
3- Multimedia message limit. Touch to set the
number of multimedia messages to save per
conversation. When the limit is reached, older
multimedia messages are deleted if Delete old
messages is checked.
• Text message (SMS) settings
1- Delivery reports. Check to receive a delivery
report for each text message you send.
2- Manage SIM card messages. Manage text
messages stored on your SIM card.
21
Page 23

• Multimed
i
e
r
o
r
m
i
v
o
c
d
c
t
a
E
a
t
h
d
h
w
,
x
S
d
o
r
h
i
C
s
u
a
y
P
m
y
l
t
k
o
t
t
i
e
e
i
n
r
C
i
i
e
o
u
s
a
a
t
p
e
e
n
s
a
1- Deliv
report
2- Read
that y
3- Auto-
multi
4- Roam
retrie
• Notificati
1- Notifi
notifi
2- Soun
notifi
3- Vibra
mess
TYPE T
You can spe
enter text wi
1. Touc
alrea
a message (MM
ry reports. Check
for each multime
eports. Request t
ur message was
etrieve. Check to
edia messages t
ng auto-retrieve.
e multimedia me
n settings
cations. Check to
ations in the stat
. Touch to select
ations.
e. Touch to have
ges are received.
XT BY S
k to enter text in
h the onscreen ke
a text field, or a
y entered in a tex
) settings
to receive a deliv
ia message you s
receive notificat
ead by the recipie
automatically ret
at you receive.
heck to automat
sages while roam
display message
s bar.
ringtone for mes
our phone vibrat
EAKING
ost places that y
board.
ocation in text yo
field.
ry
nd.
ons
t.
ieve
cally
ng.
sage
when
u can
’ve
2. Touc
3. When
Say “comma
mark,” or “e
punctuation.
the Microphone
keybo
ard.
you see the micr
ant to type.
you
” “period,” “ques
clamation point”
(Spoken punctuat
ey on the on
phone image, spe
ion mark,” “excl
o enter
on is currently su
22
creen
k what
mation
ported
Page 24

in English, French, German, Italian, Russian, and
Spanish.)
When you pause, what you spoke is transcribed by the
speech-recognition service and entered in the text field,
underlined. You can touch the Delete key to erase the
underlined text. If you start typing or entering more text
by speaking, the underline disappears.
To improve processing of your voice input, Google may
record a few seconds of ambient background noise in
temporary memory at any time. This recording remains
on the device only fleetingly and is not sent to Google.
RELAX WITH GOOGLE PLAY
Google Play brings together all your favorite content in
one place – movies, TV shows, books, music,
magazines, and more – so you can reach it from any of
your devices.
If you purchased content on Google Play in the past,
you'll automatically have access to this content on other
Android devices - just make sure you're signed in to the
same account you used to purchase it.
• Use Google play widgets
These widgets are available for your Home screens:
1- My Library: Displays your most recently used
music, books, and so on. Touch any of the
images to see your content.
23
Page 25
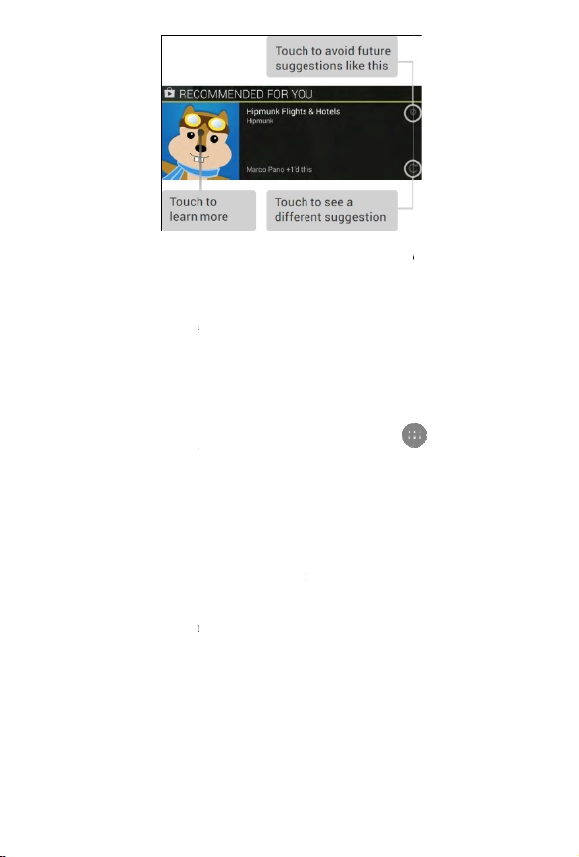
2- Reco
m
t
g
m
d
m
w
.
i
h
h
H
G
G
m
y
m
m
g
m
e
c
n
l
u
h
i
s
r
G
m
m
o
h
c
l
r
h
o
l
a
r
a
o
r
l
and o
the su
3- Reco
can a
reco
To resize a
the blue dots
the Remove
To add anot
Apps icon, t
until you see
let go in the
• Shop on
To open the
icon on a Ho
Most things
from your co
mended on Play:
her content that
gestion to learn
mended apps: R
d to your Home s
mendation to lear
idget, touch & ho
To remove it, to
con at the top of t
er Google Play w
en Widgets, and
the one you want.
ome screen locat
oogle Play
oogle Play Store
e or All Apps sc
ou purchase on
puter as well as
24
Suggests music,
ay interest you. T
ore about it.
commends apps t
reen. Touch the
more about it.
d, then let go and
ch & hold, then d
e screen.
dget, touch the
wipe from right t
Then touch & ho
ion you want.
app, touch the Pl
een.
oogle Play are av
from any of your
ovies,
uch
at you
drag
ag it to
All
left
d, and
y Store
ilable
Page 26

Android mobile devices. (Android apps are one
exception – they run only on Android devices.)
Sign in to play.google.com to get your entertainment
from anywhere
• Google Play Support
For more detailed information about Google Play,
including phone and email support options, visit:
Support.google.com/googleplay
CHANGE THE WALLPAPER
To change the wallpaper that's displayed on your Home
screens:
1- Touch & hold anywhere on a Home screen that's
not occupied. A list of options appears.
2- Touch a wallpaper source, such as Live
Wallpapers. You can download additional
wallpapers on Google Play.
3- To set a wallpaper, touch Set wallpaper or, for
other images, drag the blue dots to determine the
cropping and touchOK.
To change your device's wallpaper in Settings,
touch Settings > Device > Display > Wallpaper.
25
Page 27

WIREL
E
d
s
o
a
y
o
h
i
d
p
s
y
R
u
a
l
d
o
a
s
r
W
t
e
c
a
u
n
a
o
r
v
i
a
h
o
d
S
s
o
W
e
n
c
s
a
e
u
a
r
s
t
t
y
h
e
e
i
v
u
t
SETTIN
• Optimize
Data usage i
uploads or d
your data us
can see how
make sure y
Important: T
Settings app
could count
lan’s data u
fees. Check
supports GP
You can turn
If it's off, yo
and many fe
work correct
connected to
Keep in min
your device t
assign cellul
usage setting
To turn mobi
SS & NET
GS
ata usage
the amount of da
wnloads in a giv
ge in the Settings
ou use data and
u’re not using dat
e data usage you
s measured by yo
ata usage differe
age limit, your c
our plan to see y
S.
mobile data on o
can’t use data o
tures of your dev
y. You’ll still be
a Wi-Fi network.
that you need to
see the mobile
r data usage to a
.
le data usage on o
ORK
a that your devic
n period. You ca
app on your devi
hange the setting
unnecessarily.
see in your devic
r device - your c
tly. If you go ove
rrier could charge
ur data limits.The
off in the Setting
er your mobile ne
ce and apps migh
ble to use data if
ave a SIM insert
ata option. You n
IM before adjust
r off, follow these
check
e. You
to
’s
rrier
your
you
device
app.
work
not
ou’re
d in
ed to
ng data
steps:
1- Open
2- Unde
the Settings menu
Wireless & netw
26
on your de
rks, touch Data
ice.
sage.
Page 28

3- Move
i
g
u
w
s
t
r
s
b
b
e
e
p
o
a
a
k
t
w
k
p
d
c
g
o
g
O
y
t
o
s
o
e
h
a
e
a
w
g
m
l
n
d
c
d
m
m
r
f
e
v
o
h
o
n
w
u
e
l
e
t
v
e
"Mob
turnin
• Check yo
To check ho
follow these
the switch next t
le data" to the On
data off, touch
r data usage
you much data
teps:
"Cellular data" o
or Off position. I
K.
ou use on your d
you're
vice,
1- Open
2- Unde
- In the
you u
netwo
the ta
etwe
- To se
the to
next t
the m
much
3- You c
- Chec
the da
cycle.
in tha
the t
- Chec
erio
graph
Then
durin
he Settings menu
Wireless & netw
Mobile tab, you c
e on your carrier'
rks. If more than
s at the top of the
n them.
Wi-Fi usage, tou
right corner of t
"Show Wi-Fi us
in screen, your d
data you use over
n check the follo
current data usa
te range of your
You can see how
time period simp
o vertical white li
data usage from
s: Move the verti
to the time perio
heck to see how
that period of ti
27
on your de
rks, touch Data u
an see how much
data network or
ne is displayed, t
screen to switch
ch the menu icon
e screen. Check t
ge." In the Wi-Fi
vice will show h
Wi-Fi connectio
ing settings :
e: By default, yo
ost recent data us
much data you’v
y by looking in b
es on the graph.
ifferent time
al white lines on
that you want to
uch data you us
e.
ice.
sage:
data
uch
in
e box
tab on
w
s.
’ll see
age
used
tween
he
iew.
d
Page 29

- Chec
k
a
k
a
a
v
s
a
n
o
r
y
e
v
s
a
W
o
c
i
Y
p
p
a
s
a
s
y
T
o
a
o
o
y
h
e
n
s
u
s
n
y
f
w
Y
o
b
w
s
a
v
y
v
u
y
d
u
y
u
i
i
n
i
data u
the gr
- Chec
data e
Apps
they’
• Set data u
You can set
uses a certai
available if y
To set a data
total data usage:
sage for the time
ph.
data usage by ap
ch of your apps i
re listed in order
e used.
age Warning
warning to alert
amount of data.
u have mobile d
usage warning, f
ou can see the t
eriod you select
: You can see ho
using below the
of how much dat
ou when your de
his feature is onl
ta.
llow these steps:
tal
elow
much
graph.
ice
1- Open
2- Unde
3- In the
4- When
the Settings menu
Wireless & netw
graph that shows
its right side to t
line b
to rec
ive a warning.
your data usage r
recei
e a notification o
on your de
rks, touch Data
our data usage,
e level where yo
aches this level,
your device.
ice.
sage.
rag the
want
ou'll
• Set data u
You can set
device uses.
mobile data
and you'll re
device might
This feature
age limit on you
limit to the amo
hen your data u
n your device wil
eive a notificatio
not work correctl
s only available i
r device
nt of data that yo
age reaches that l
l turn off automat
. Many features o
when data is tur
you have mobile
r
mit,
cally
n your
ed off.
data.
To set a data
usage limit, follo
these steps:
28
Page 30

1- Open
r
o
d
o
t
o
n
o
r
o
o
u
O
y
s
o
n
W
o
a
r
p
o
n
e
n
l
o
o
o
o
O
t
e
s
a
n
y
i
n
e
v
u
b
i
p
e
m
c
v
u
i
s
n
u
y
s
i
u
i
c
u
2- Unde
3- Turn
limit
4- When
and t
5- Drag
side t
6- When
data o
and y
To turn mobi
the Settings menu
Wireless & netw
n Set cellular dat
epending on you
the dialog box ap
uch OK.
he line at the top
the limit you wa
your data usage r
your device wil
u'll receive a noti
le data back on, f
on your de
rks, touch Data
limit or Set mo
version of Andro
ears, read the m
f the graph by its
t to set.
aches this level,
turn off automati
fication.
llow these steps:
ice.
sage.
ile data
d.
ssage,
right
obile
ally
1- Open
2- Unde
3- Move
or "M
the Settings menu
Wireless & netw
the switch next t
bile data" to the
on your de
rks, touch Data
"Cellular data"
n position.
ice.
sage.
• Change y
You can adj
data that you
using them.
if you’re not
data usage b
u data usage set
st your data usag
use. Some apps u
ther apps use dat
actually using the
changing how a
ings
settings to optim
e data only when
in the backgrou
app. You can con
d when apps you
ze the
you’re
d, even
serve
se
access data
You can con
data while y
this, you wo
network, but
connect to a
erve data usage b
u’re on your mob
’t be able to get a
you’ll still be abl
i-Fi network.
turning off acce
le network. If yo
y data over your
to use data when
29
s to
do
mobile
you
Page 31

a
s
t
r
h
t
r
h
m
g
w
o
a
u
e
r
c
B
e
o
F
o
y
u
t
o
C
k
n
c
a
n
g
p
n
p
g
e
W
m
o
y
u
k
v
C
k
e
n. c
e
a
n
S
r
s
e
e
To turn off d
follow these
ta access over yo
teps:
r mobile networ
,
1- Open
2- Unde
3- Use t
data"
4- To tu
switc
• Data Roa
Data roamin
carriers’ net
covered by y
conserve dat
in mind that
connect to th
• Tethering
You can sha
another devi
tethering or
mobile devic
its Internet c
once.
You can turn
portable Wias a laptop c
1- Open
he Settings menu
Wireless & netw
e switch next to "
o turn it off, then
n mobile data bac
to the On positio
ing
allows your devi
orks when you le
ur own carrier’s
usage by turning
sing data roamin
Internet in some
& portable hots
e your device’s I
e, such as a lapto
luetooth tetherin
into a portable
nnection with up
your phone with
i hotspot for up t
mputer.
our device’s
30
on your de
rks, touch Data u
ellular data" or "
touch OK.
on, simply mov
e to send data ov
ve an area that is
etworks. You ca
off data roaming.
may be the only
places.
ot
ternet connection
computer, via U
. You can also tu
i-Fi hotspot and
to 10 other devic
obile data into a
10 other devices
Settings menu.
ice.
sage.
Mobile
the
r other
Keep
way to
with
B
n your
hare
s at
, such
Page 32

2- Under “Wireless & networks,”
touch More > Tethering & portable hotspot.
3- Check the box next to “Portable Wi-Fi hotspot.”
When the option is turned on, you’ll see one of the
following notifications:
- Portable Wi-Fi hotspot active
Touch the notification, then follow these steps:
1- Touch Set up Wi-Fi hotspot.
2- You can choose a new name for the hotspot in
the “Network SSID” field if you prefer. If you
want a different password, enter a new one in the
“Password” field. If you don’t want security,
choose None under “Security.”
3- Touch Save.
4- Use the other device and find the new network
name in the list of Wi-Fi options.
5- Select the network and enter the password.
To stop sharing your data connection, uncheck the box
next to “Portable Wi-Fi hotspot.”
• USB tethering
USB tethering isn’t available on computers running
Mac OS.
To share your phone’s Internet connection with another
device using USB tethering, follow these steps:
1- Connect your phone to another device using a
USB cable.
2- You’ll see a USB icon and a
notification Connected as a media
31
Page 33
devic
e
p
y
r
k
n
t
n
d
E
h
n
y
r
h
h
t
o
o
a
d
y
w
U
y
p
h
n
B
n
a
y
i
A
e
o
u
p
a
t
e
o
h
k
U
n
e
o
e
n
p
t
h
or Connected as
top of
the screen. For th
the ty
e of connection
camera appear a
e purposes of teth
oesn't matter.
the
ring,
3- Open
4- Unde
touch
5- Chec
When the co
following no
-
To stop shari
tethering or
DEVIC
• Set and c
You can cha
ringtones for
1- Open
2- Unde
3- Touc
4- Touc
5- Selec
Assign ringt
1- Open
Andr
our device’s
“Wireless & net
More > Tethering
the box next to “
nection is made,
ifications:
ortable
USB or
g your data conn
isconnect the US
SETTING
ange ringtones
ge your default ri
different people,
our device's Sett
"Device," touch
Settings for the s
“voice call ringt
a ringtone and to
ne to contact:
the Contacts app
id 4.4 or lower, o
32
Settings menu.
orks,”
& portable hotsp
SB tethering.”
ou’ll see one of t
otspot active
ection, unchec
cable.
S
gtone, have diff
nd get new ringt
ngs menu .
udio profiles.
lected profile.
ne”.
ch OK to save.
. If you're ru
en the People ap
t.
e
SB
rent
nes.
ning
.
Page 34

2- Touc
h
h
h
t
n
p
n
e
U
u
h
r
f
b
t
c
l
y
r
a
n
h
n
m
y
b
l
s
o
u
p
n
r
m
m
t
h
e
e
y
t
y
t
B
a
w
t
s
o
d
o
o
g
h
e
i
e
s
w
o
g
n
t
u
3- Touc
4- Touc
5- Selec
Tip: You ca
hone calls a
unlocked, th
feel the phon
the Volume
• Check yo
You can see
at the battery
check the pe
swipe down
attery icon
You can che
since last ful
1- Open
2- Unde
3- You c
4- Perce
5- Lengt
6- Use a
• Manage
You typicall
eyond insta
may be time
a contact, then t
Set ringtone.
Phone ringtone.
a ringtone and to
quickly set your
d texts. Make su
n press the Volu
e vibrate. To resu
p key
r remaining bat
ow much battery
level icon at the t
centage of your r
rom the top of th
o go to the batter
k your remaining
charge in the Set
our device’s Set
"Device," touch
n check the follo
t of battery life
of time your bat
d usages details
emory usage
don’t need to w
ling, opening, an
when you want t
33
uch Menu .
ch OK to save.
hone to vibrate f
e your screen is
e Down key until
e normal ringin
ery life
you have left by l
e top of your scr
maining battery l
screen. Touch th
setting menu.
battery life and u
ings menu:
ings menu .
attery.
ing settings:
ery is estimated t
ince last full char
rry about managi
using them. But
know more abo
r
you
, press
ooking
en. To
fe,
age
last
e
g apps
here
t
Page 35

what's happe
n
n
p
t
r
y
p
r
f
v
o
t
u
v
f
e
t
o
y
r
l
y
n
o
n
n
r
o
m
u
o
e
m
t
o
l
y
v
m
t
o
o
y
i
A
y
a
r
e
s
a
s
a
i
v
o
e
F
p
e
e
n
l
s
l
manage your
Important: A
ortion of in
most data fo
may contain
to view this
connect your
The other po
downloaded
for your con
You're able t
- Unins
- Deleti
- Copyi
comp
- Remo
for of
mobil
You can use
the way your
settings, foll
ing behind the sc
storage.
droid manages a
ernal storage whe
those apps are st
our private infor
ortion of internal
device to a comp
tion of internal st
iles, and so on ar
enience.
optimize your
alling apps you d
ng downloaded fi
ng files between
ter via USB.
ing content from
line use and strea
network.
he Apps screen t
device uses mem
w these steps:
enes in order to b
d carefully guard
e the system, app
red, because this
ation. It's not po
storage when you
ter with a USB c
rage, where mus
stored, remains
emory usage by:
n't use.
es or files you cr
our device and a
Google Play that'
ing it via a Wi-
adjust several as
ry. To view thes
tter
s the
, and
rea
sible
ble.
c,
isible
ated.
s saved
i or
ects of
1- Open
2- Unde
3- You'l
displa
- Dow
on G
our device's Sett
"Device," touch
see three tabs at t
ing a list of apps
loaded. Displays
ogle Play or othe
34
ngs menu .
pps.
he top of the scre
or their compone
pps you’ve down
sources.
n, each
ts.
oaded
Page 36

- Runn
i
d
i
t
D
s
e
d
i
h
y
n
h
c
d
t
n
l
b
o
m
t
d
p
l
o
i
h
o
u
i
r
f
s
h
a
d
t
n
s
c
e
v
s
m
d
l
h
o
y
h
r
r
P
n
t
r
r
e
o
n
a
e
s
v
f
m
u
h
h
r
n
servic
cache
are us
the to
- All.
and al
other
ng. Displays all a
es that are current
processes, and h
ng. The graph on
al memory in use
isplays all apps t
l apps you downl
ources.
ps, processes, an
y running or that
w much memor
the Running tab s
and the amount f
at came with And
aded on Google
ave
they
ows
ee.
oid
lay or
To switch th
the Downloa
name or Sort
To view deta
any tab, touc
available var
commonly i
- Force
misbe
servic
corre
after
- Unins
data a
- Disab
ut d
for so
unins
- Clear
other
- Clear
area o
order of the lists
ed or All tabs, to
by size.
ls about an app o
its name. The in
among different
clude:
stop button. Stop
aving. Stopping
e may cause your
tly. You may nee
oing this.
all button. Delete
d settings.
e button. Prevent
es not uninstall it.
e apps and servi
alled.
data button. Delet
ata without remo
cache. If the app
f the device's me
35
displayed in
ch Menu > S
other item listed
ormation and co
types of apps, bu
an app that is
n app, process, o
device to stop wo
to restart your d
s the app and all
the app from run
This option is av
es that can't be
an app’s setting
ing the app itsel
tores data in a te
ory, lists how m
ort by
under
trols
king
vice
f its
ing,
ilable
and
.
porary
ch
Page 37

infor
m
n
c
n
t
d
I
e
n
S
s
n
p
c
e
w
o
e
e
n
e
e
e
n
a
m
n
o
p
i
e
N
e
h
e
p
w
e
M
p
l
r
a
l
n
n
i
a
u
o
d
u
n
o
e
o
n
c
p
f
l
r
m
l
u
u
n
e
cleari
- Laun
to lau
clear
- Permi
your
SECUR
• Manage s
You can ma
ation is stored, a
g it.
h by default. If y
ch certain file ty
hat setting here.
ssions. Lists the k
evice and data th
TY SETTI
curity settings
age the security s
d includes a butt
u have configure
es by default, yo
nds of informatio
app has access t
GS
ttings for your de
n for
an app
can
about
.
vice by
opening the
Here are the
- Scree
Encry
- SIM
devic
- Pass
you t
and s
- Devic
admi
sourc
verify
sourc
sourc
- Crede
certifi
- Trust
like S
ettings menu
ettings you can c
security: Manag
tion: Encrypt the
ard lock: Set up a
's SIM card.
ords: Make pass
enter a password
cure.
administration:
istrators, allow a
s other than the P
apps from all sou
s: Manage install
s other than the P
tial storage: Ma
cates on your dev
gents: Manage tr
art Lock
and touching S
ange:
screen lock opti
data on your pho
PIN to lock your
ords visible, whi
that is more com
anage device
ps to be installed
ay Store, and cho
ces. Unknown
tion of apps fro
ay Store.
age, install, or cle
ces.
st agents for feat
36
curity.
ns.
e.
h helps
lex
rom
ose to
ar
res
Page 38

Tip: Touch S
a
u
u
l
c
y
r
r
e
p
n
e
h
w
a
o
d
b
e
P
n
p
a
w
r
e
l
v
c
o
y
i
h
e
k
r
o
t
o
y
d
n
r
e
u
e
d
o
P
n
e
e
c
n
c
o
n
t
Y
m
e
f
m
e
u
m
e
n
c
Y
u
enter inform
This can be
You can sec
Each time yo
screen, you’l
• Set up or
ettings > S
tion that's display
seful in case you
re your phone by
u turn on your de
be asked to unlo
hange a screen l
curity > Owner i
ed on the lock scr
ose your device.
setting a screen lo
ice or wake up th
k your device.
ck:
fo to
en.
ck.
1- Open
2- Unde
3- Unde
you’v
atter
a diff
4- Touc
follo
Some applic
can choose t
Internet in or
eing install
The Google
from being i
otentially h
sources, you
the apps you
need to allo
sources othe
our device's Sett
"Personal," touc
"Screen security,
already set a loc
, PIN, or passwo
rent lock.
the screen lock y
the on screen ins
tions can harm y
verify apps that
er to help preve
d on your device.
lay Store helps p
stalled on your d
rmful apps. If yo
can turn on app v
install are scanne
your device to d
than the Google
37
ngs menu .
Security.
" touch Screen lo
, you’ll need to e
d before you can
u’d like to use a
ructions.
u or your device.
ou download fro
t harmful softwar
event harmful so
vice by blocking
install apps fro
rification to mak
for malware. Yo
wnload apps fro
lay Store.
. If
ter the
hoose
d
ou
the
from
tware
other
sure
'll also
Page 39

ACCOU
N
o
h
g
r
h
b
g
s
u
u
t
m
s
m
u
w
n
o
N
O
n
y
e
G
e
h
u
r
u
n
c
d
i
m
h
s
t
e
a
d
c
h
d
e
d
n
o
O
h
t
y
t
SETTIN
You can add
with that acc
You need to
you want to
• Add an ac
T AND L
GS
accounts so that i
unt automaticall
ave an account s
et apps from the
count on your d
CATION
formation associ
syncs with your
t up on your devi
oogle Play store.
vice
ted
evice.
e if
1- Open
2- Unde
3- Touc
may
"Goo
- Choo
Acco
Acco
and o
auto
- Choo
your
or Th
to the
4- Follo
accou
Whenever y
accounts you
1- Open
the Settings menu
"Accounts," touc
the type of acco
e able to choose f
le," "IMAP," or "
e "Google" if yo
nt. When you sig
nt, all the email,
her data associate
atically synced w
e "IMAP" or "PO
ail with a progra
nderbird, even w
Internet.
the on-screen in
t.
u need to change
added, follow th
the Settings menu
38
on your de
Add account.
nt you want to ad
om choices like
POP3."
want to add your
in with a Googl
ontacts, Calendar
with that accou
th your device.
P3" if you want t
like Microsoft
en you aren't con
tructions to add t
he settings of an
se steps to get to
on your de
vice.
. You
Google
events,
t are
access
utlook
nected
e
of the
hem:
vice.
Page 40

2- Unde
r
a
n
o
o
u
e
n
r
n
t
u
t
n
h
h
o
d
n
c
,
o
u
a
u
h
m
e
t
n
c
d
.
e
d
w
r
n
d
o
u
r
w
u
t
h
g
d
n
e
c
o
W
s
using
your
• Remove a
You can rem
When you d
account, incl
also be delet
To remove a
steps:
"Accounts," sele
a Google account
ccount.
account from y
ve an account yo
so, everything as
ding email, cont
d.
account from yo
t your account. If
touch Google an
ur device
've added to you
sociated with that
cts, and settings,
r device, follow
you’re
then
device.
ill
hese
1- Open
2- Unde
accou
3- If you
touch
mind
Acco
and o
no lo
4- Touc
of the
5- Touc
the Settings menu
"Accounts," touc
t you want to re
’re using a Googl
Google and then
hat when you sig
nt, all the email,
her data associate
ger automatically
the Menu icon
screen.
Remove account
on your de
the name of the
ove.
account,
he account. Keep
out of your Goo
ontacts, Calendar
with that accou
sync with your d
in the top right
vice.
in
le
events,
t will
vice.
orner
• Change y
You can use
for your devi
and cellular
ur location mod
ifferent modes
ce. These modes
etwork options i
hen you turn on l
eplace the GPS,
previous version
cation
i-Fi,
of
Android.
39
Page 41

Each mode u
t
u
h
h
y
r
d
u
o
p
f
i
a
g
G
o
r
o
o
a
e
o
c
t
w
n
m
m
y
i
h
t
n
d
r
i
h
d
c
s
c
o
s
o
s
e
e
l
y
u
w
u
f
e
s
y
a
s
n
r
o
r
v
m
m
a
e
r
o
n
m
a
device’s loca
information t
the ability to
nearby resta
To control w
use, follow t
ses different sour
ion. You can allo
o provide locatio
check in, view co
rants.
at location infor
ese steps:
es to estimate yo
apps to use this
-based services, s
mute traffic, or
ation your devic
r
ch as
ind
can
1- Open
2- Unde
- When
your
Important: T
turns it off f
means that a
many useful
When the sw
select one of
- High
Wi-Fi
the hi
uses
your l
- Batte
your l
locati
netwo
help e
accur
- Devic
locati
our device's Sett
“Personal,” touc
the switch at the
evice location isn
rning off locatio
r Google apps an
ps can’t use your
eatures will be tu
tch at the top of t
the following mo
ccuracy. High ac
, cellular network
hest-accuracy lo
oogle's location s
cation faster and
y saving. Battery
cation using low
n sources, such a
rks. It uses Googl
stimate your locat
tely.
only. Device on
n using GPS onl
40
ngs menu .
Location.
op of the screen i
’t shared with an
for your device
non-Google app
device location, a
ned off.
e screen is On, y
es:
uracy mode uses
, and other senso
ation for your de
ervice to help esti
more accurately.
aving mode esti
battery-intensive
Wi-Fi and cellul
's location servic
ion faster and mo
y mode estimates
. It doesn’t use G
Off,
apps.
lso
. That
d
u can
GPS,
s to get
ice. It
ate
ates
r
to
e
your
ogle's
Page 42

locati
o
m
r
e
e
s
e
u
R
o
w
y
r
h
a
n
n
a
b
r
i
r
r
a
e
u
u
e
e
y
i
h
e
a
e
n
u
h
a
c
m
n
r
r
a
d
G
t
y
u
s
n
e
u
c
r
t
u
r
This
longe
You’ll see th
when your d
any app. Thi
activity: it m
determine yo
FACTO
If you want t
device, follo
1- Open
2- Unde
3- Touc
n service to prov
ode may use mo
to determine you
location icon
vice’s precise loc
icon doesn’t nec
ans that a mode
r location is turn
Y RESET
erase all your p
these steps:
our device's Sett
"Personal," touc
Factory data res
de location infor
e battery power a
location.
at the top of you
tion is being use
ssarily indicate
sing more power
d on.
rsonal data from
ngs menu.
Backup & reset.
t.
ation.
d take
screen
by
PS
o
our
All of your d
your Google
and app setti
After resetti
same inform
you've been
an option du
it.
ta is erased from
Account, any oth
gs, and any dow
g your device, yo
tion requested w
acking up your d
ing the setup pro
41
your device, incl
r accounts, your
loaded applicatio
'll need to re-ent
en you first set it
ta to a Google A
ess allows you to
ding
ystem
s.
r the
p. If
count,
estore
Page 43

SAFETY INFORMATION
To reduce the risk of fire or electric shock, do not
expose the battery charger to rain or moisture. Do not
expose the charger to dripping or splashing of liquids.
z The battery charger must be used indoors. It is
neither designed nor tested for use outdoors, in
recreation vehicles, or on boats.
z Charge the battery only on a charger approved by
Figo. Do not continue charging the battery if it
does not reach full charge within the specified
charging time. Doing so may cause the battery to
become hot, rupture, or ignite. If you see any
heat deformation or leakage, properly dispose of
the battery.
z Do not expose the battery to temperatures greater
than 212°F (100°C). If exposed to excessive heat,
the battery can catch fire and explode.
z Do not place the battery in direct sunlight, or use
or store it inside cars in hot weather where it can
be exposed to temperatures in excess of 140°F
(60°C). Doing so may cause the battery to
generate heat, rupture, or ignite. Using the
battery in this manner also may result in a loss of
performance and a shortened life expectancy.
z Do not short circuit the battery. Avoid placing it
around metal objects such as keys, pocket change,
paper clips, and jewelry.
z Do not hit the battery with a hammer, step on,
throw or drop it to expose it to a strong shock.
Do not pierce the battery with a sharp object
such as a nail. Do not crush, dent, or deform the
battery in any way. If the battery becomes
deformed, properly dispose of it.
42
Page 44

z The battery used in this device may present a risk
of fire or chemical burn if mistreated. Do not
disassemble, heat above 212°F (100°C), or
incinerate. Replace battery with an approved
Figo battery only. Use of another battery may
present a risk of fire or explosion.
43
Page 45

FCC Caution:
Any Changes or modifications not expressly approved
by the party responsible for compliance could void the
user's authority to operate the equipment.
This device complies with part 15 of the FCC Rules.
Operation is subject to the following two conditions:
(1) This device may not cause harmful interference, and
(2) This device must accept any interference received,
including interference that may cause undesired
operation.
IMPORTANT NOTE:
Note: This equipment has been tested and found to
comply with the limits for a Class B digital device,
pursuant to part 15 of the FCC Rules. These limits are
designed to provide reasonable protection against
harmful interference in a residential installation. This
equipment generates, uses and can radiate radio
frequency energy and, if not installed and used in
accordance with the instructions, may cause harmful
interference to radio communications. However, there is
no guarantee that interference will not occur in a
particular installation. If this equipment does cause
harmful interference to radio or television reception,
which can be determined by turning the equipment off
and on, the user is encouraged to try to correct the
interference by one or more of the following measures:
—Reorient or relocate the receiving antenna.
—Increase the separation between the equipment and
receiver.
44
Page 46

—Connect the equipment into an outlet on a circuit
different from that to which the receiver is connected.
—Consult the dealer or an experienced radio/TV
technician for help.
Specific Absorption Rate (SAR) information
SAR tests are conducted using standard operating
positions accepted by the FCC with the phone
transmitting at its highest certified power level in all
tested frequency bands, although the SAR is determined
at the highest certified power level, the actual SAR level
of the phone while operating can be well below the
maximum value.
Before a new model phone is a available for sale to the
public, it must be tested and certified to the FCC that it
does not exceed the exposure limit established by the
FCC, Tests for each phone are performed in positions
and locations (e.g. at the ear and worn on the body) as
required by the FCC.
For body worn operation, this model phone has been
tested and meets the FCC RF exposure guidelines when
used with an accessory designated for this product or
when used with an accessory that contains no metal and
that positions the handset a minimum of 5 mm from the
body.
Non-compliance with the above restrictions may result
in violation of RF exposure guidelines.
45
 Loading...