

Page 1
Page 2

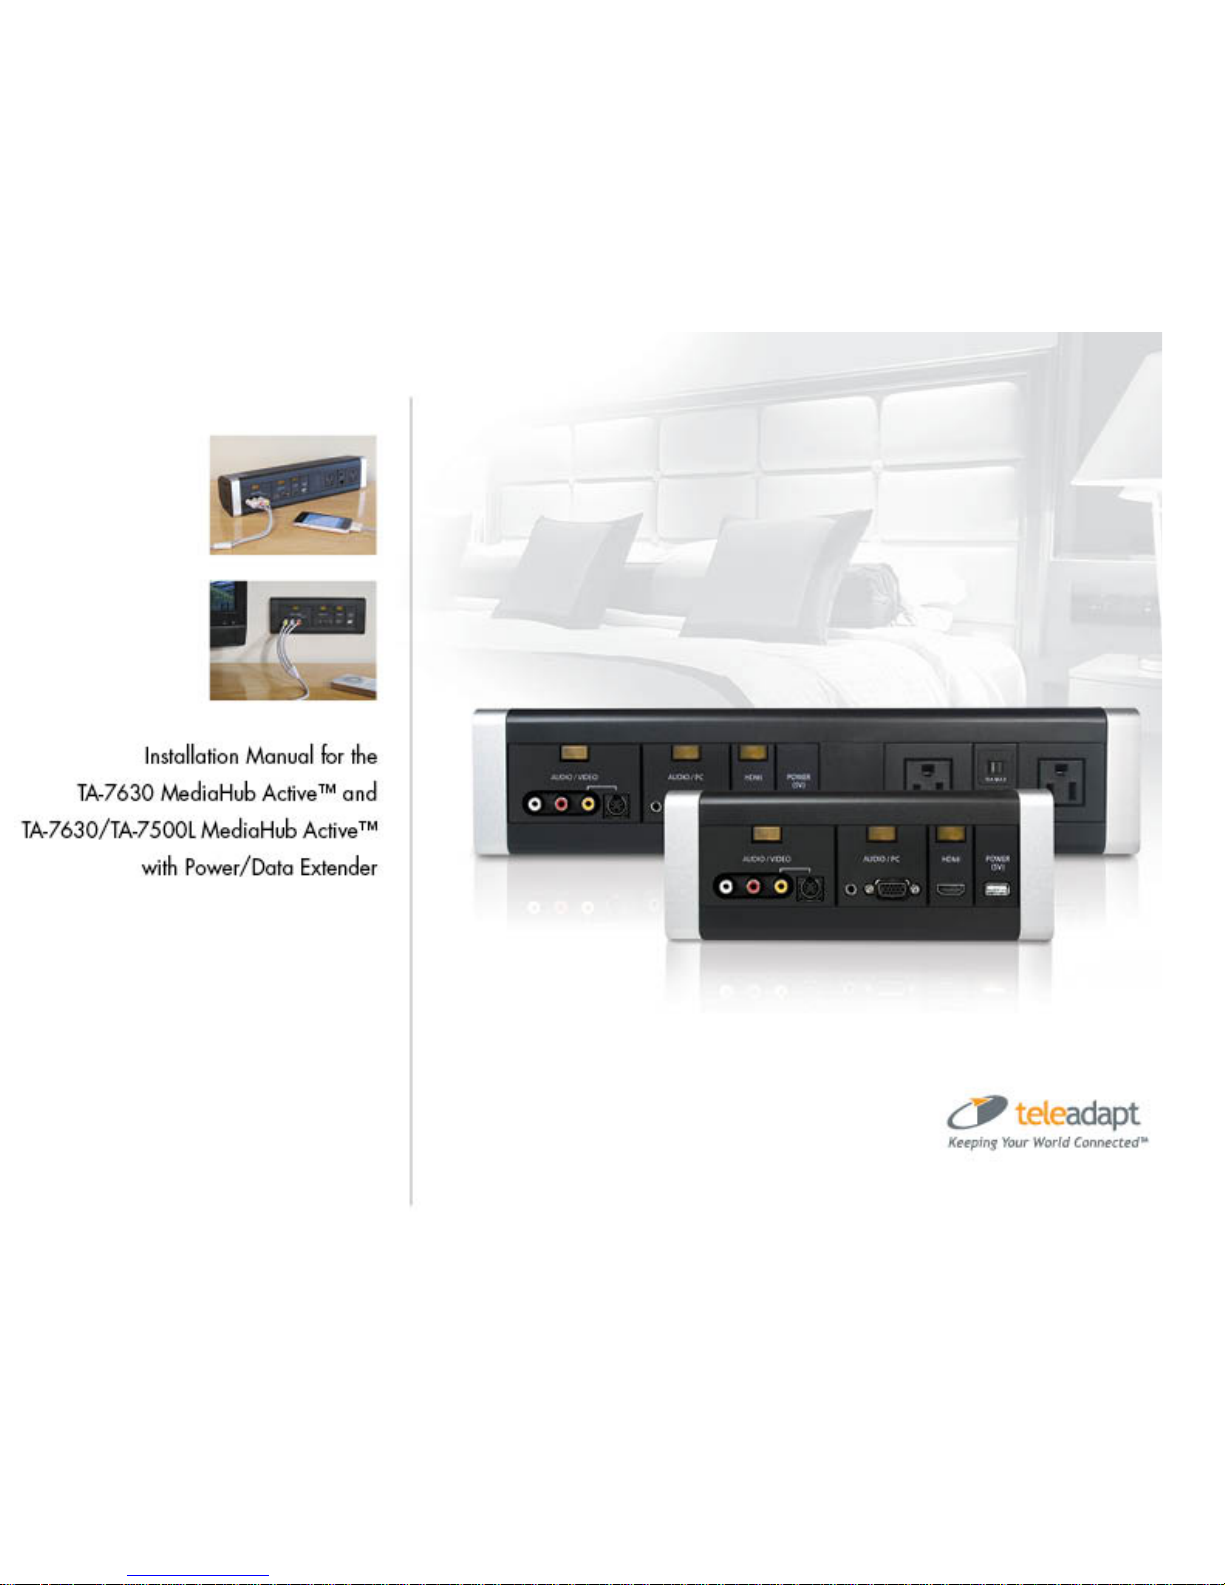
TA-7630 and TA-7730 Installation Manual
Last Revised: 9/30/11 10:47 AM
2
Table of Contents
Product Introduction .................................................................. 3
Safety Precaution Information.................................................... 4
Definitions .................................................................................. 6
Electrical Requirements............................................................. 7
Care and Maintenance .............................................................. 7
Features and Usage ..................................................................8
Standard Auto-Sensing/Toggle Feature .....................................8
Using MediaHub Active..............................................................8
Packing List(s) ..........................................................................10
Installation Instructions ............................................................ 12
LodgeNet PPV System … .........................................................13
Enseo Set Top Box ...................................................................14
Samsung North America...........................................................16
Panasonic North America .........................................................18
Philips North America ...............................................................20
LG North America .....................................................................22
Manual Switch Mode – With ANY Hospitality TV ......................24
Troubleshooting....................................................................... 26
MediaHub Active Troubleshooting ….......................................26
Protocol Converter Dongle Troubleshooting ............................27
Flush-Mount Cut Measurements
............................................... 28
Assemble Flush Mount MediaHub Active with Power/Data..29
Assemble Deskto p Ho usin g (DTH-S01, DTH-R01, DTH-EXT)30
Technical Support..............................................................32
Page 3

TA-7630 and TA-7730 Installation Manual
Last Revised: 9/30/11 10:47 AM
3
Product Introduction
Thank you for choosing the TeleAdapt MediaHub for your in-roo m e nt ert ain me nt o r
conference room connectivity needs. MediaHub allows business and leisu re
travellers to use the in-roo m TV display as t he ir person al en tertain ment or
projec tion screen for enjoying the ir person al standa rd- and high-definition (HD)
video games, music playlists, movies, TV shows, ph otos, business presentations
and more from th eir portable e lectro nic de vic es.
The Me diaHu b Active™ entertainment pan el fea tures true au to-sensing
technology. Hotel gue sts ca n plug in their personal media devices such as a game
console, camera, laptop, etc. and the MediaHub will automatically detect their
device and change the TV input cha nnel to play their perso nal audio/video
selec tions through the in-roo m T V an d s peake rs, wit ho ut h aving to use the in-roo m
remot e co nt rol. Guests may also plug in multiple devices at once and toggle
among them using t he a mber but tons abo ve th e ports. Th is a ut oma tic plu g a nd
play c onnec tivity is unique to Te leAdapt MediaHub.
Please review this Installation Manual carefully, taking note of important safety,
installation and usage information.
This full User and Installation Manual is available for download at www.teleadapt.com.
Page 4
TA-7630 and TA-7730 Installation Manual
Last Revised: 9/30/11 10:47 AM
4
Safety Precaution Information
When used in the directed manner, this unit has been designed and manufactured
to ensure your personal safety. However, improper use can result in potential
electrical shock or fire hazards. Please read all safety and operating instructions
carefully before installation and use. Be sure to keep these instructions handy for
future reference. Take special note of all warnings listed in these instructions and
on the unit.
The lightning flash with arrowhead symbol within an equilateral is intended to alert
the user to the presence of un-insula te d da ngerous volt age wit hin the produc t
enclosure that may be of sufficient magnitude to constitute a risk of electric shock
to persons.
The exclamation point within an equilateral triangle is intended to alert the user to
the presence of important operating and maintenance (servicing) instructions in
the literature accompanying the appliance.
Important Safety Instructions
1 | Read these instructions.
2 | Keep these instructions.
3 | Heed all warnings.
4 | Follow all instructions.
5 | Do not use this apparatus near water.
6 | Clean on ly with dry clot h.
7 | Do no t block an y ve ntilatio n openings. In sta ll in ac cordance with the
man ufac tu rer’s ins tructio n s.
8 | Do no t in sta ll ne ar any he at source s su ch as radiators, heat registers,
sto ves o r other apparatus (including amplifiers) that produce heat.
9 | Do no t defe at the safe ty purpose o f the pola rized or gro unding-type plug. A
polarized plug h as two blades with one wider than th e o the r. A grounding type
Page 5

TA-7630 and TA-7730 Installation Manual
Last Revised: 9/30/11 10:47 AM
5
plug h as two blade s and a third gro un din g pron g. The wide blade or th e third
prong are provided fo r you r safety. If th e provided plug does
not fit into you r outlet, co nsult an e lectrician for replac ement of the
obsolete outlet.
10 | Protect the power cord from being walke d on or pin ched particularly
at plugs, convenience receptacles and the point where they exit
from the apparatus.
11 | Only use attachments/accessories specified by the manufacturer.
12 | Use only with the ca rt, stand, tripod, bracket or table specified by the
ma nu fa cture r, o r so ld with th e appa ratus. When a cart is used, use caution
when movin g the ca rt/apparatus co mbination to avoid injury from tip-over.
13 | Unplug this appa ratu s du ring ligh tning storms or when un used for
lo ng perio ds of time.
14 | Refer all servicing to qualified service personal. Servicing is required when the
apparatus has been damaged in any way, such as power-supply cord or plug
is damaged, liqu id h as been spille d o r o bjec ts ha ve fa llen in to the appara tu s,
the apparatus has been exposed to rain or moisture, does not
operate normally, or has been dropped.
15 | The apparatus shall not be exposed to dripping or splashing and no objects
filled with liquids, su ch as vase s, sha ll be placed on the apparatus.
16 | The mains plug used as disc onnec t device shall remain readily operable.
17 | To reduce the risk of fire or electric shock, do not expose this apparatus
to rain or moisture.
Page 6
TA-7630 and TA-7730 Installation Manual
Last Revised: 9/30/11 10:47 AM
6
Definitions
Auto-sensing – the automatic detection of a device plugged into an audio/video port
of the MediaHub. For example, MediaHub will auto-sense a Composite AV source
whe n a de vice is connect ed to the 3RCA ports an d be gin playing the Co mposite AV
Out content. When a laptop is plugged into the PC socket, MediaHub will detect a PC
Video sou rce a nd begin to play the laptop video.
Auto-switching – the automatic switching of the TV input away from regular
tuner mode (TV Mode) to MediaHub content (MediaHub Mode).
Control Cable –
MediaHub Active uses serial or game control protocol for implementing
the TV auito-switching feature. Most hospitality TVs support control protocols through the
following ports:
RS232 Serial Port (DB9)
Serial Control Jack (3.5mm)
Ex-Link Serial Control Jack (3.5mm)
RJP (RJ45 LG Remote Jack Pack)
GAME/DATA (RJ12 on TV or STB)
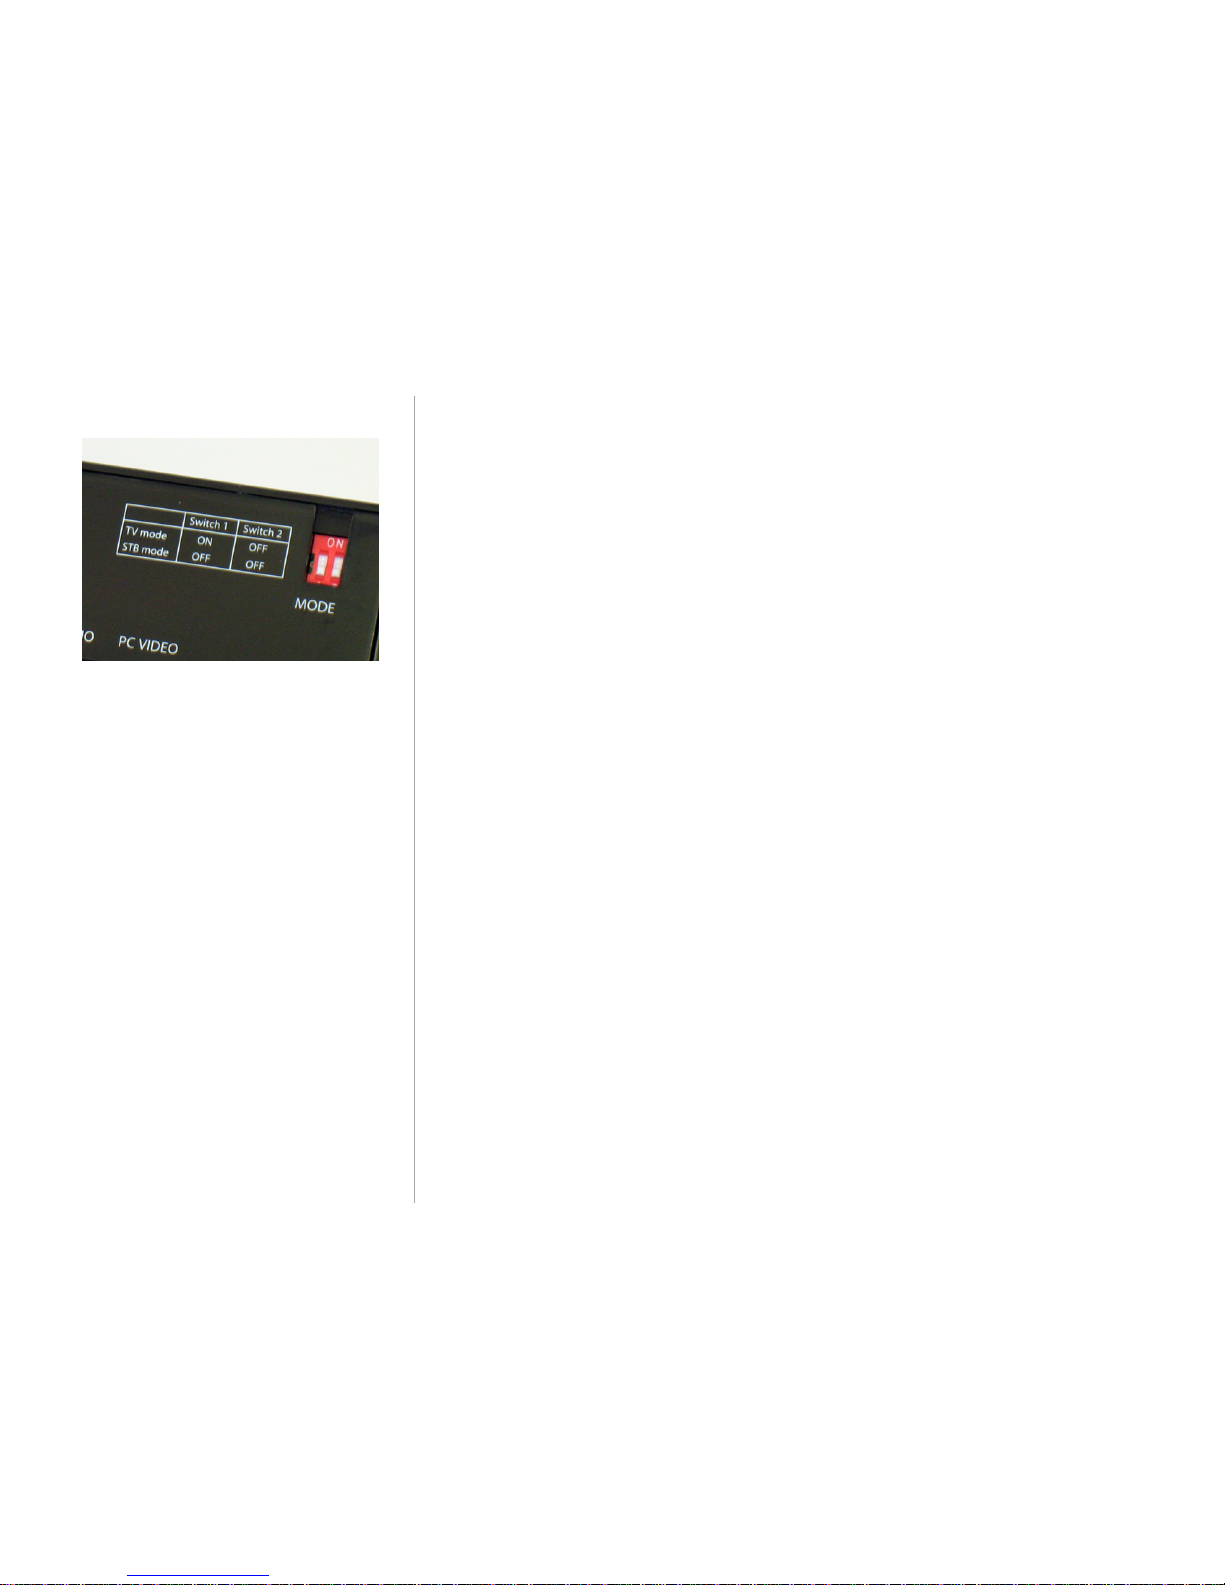
DIP Switches – MediaHub Active has two DIP Switches locate d on the rear
of the unit. (See figure 1.) These switches must be configured accordingly to
allow appropriate communication between MediaHub and TV/STB. See the Installation
Instructions section.
RS232 –
MediaHub Active uses an RS232 serial control protocol for implementing the TV
auto-switching feature. Most hospitality TVs support RS232 protocol through their RS232
Serial Port (circular port with nine pins) or through their 3.5mm Serial Control port.
Figure 1: Dip switches located on the
rear of the MediaHub Active
Page 7

TA-7630 and TA-7730 Installation Manual
Last Revised: 9/30/11 10:47 AM
7
Electrical Requirements
A 120-volt, 60Hz, 15 -Amp electrical supply is re quired f or the T A-7630. A standard
duplex (2) 120-volt, 60Hz, 1 5-Amp electrical supply is required for the TA-7630 plus
TA-7500L.
Care and Maintenance
Though TeleAdapt MediaHubs are designed for durability, they still remain complex
electronic devices. As such, care needs to be taken with how they are handled. The
following are tips to care for your system:
If the MediaHub has visible smudges, fingerprints, or other foreign material, you
can clean it by using a soft clean cloth such as a lens or eyeglass cleaning
cloth.
Slightly da mpen a corner of the cloth with water an d wipe off the unit housing to
loo sen any dirt or foreign ma terial. Using a dry portion of the sa me clo th, wipe t he
housing to dry.
Do not use harsh c hemicals, cleaning solvents, or strong detergen ts to clean the
Med iaHu b.
Your TeleAdapt MediaHub should n eve r be po sitioned or installed an ywhere
whe re it co uld get hit, dropped, or ba nge d a round.
Do not drop, kn oc k, o r sh ake th e devic e. Ro ugh handling c an ha rm int ernal
operations.
Your MediaHub should be dry. Liqu ids or moisture can ca use damage to internal
electronic circuits. If your unit gets wet, immediately remove power allowing the
unit to dry before re-applying power.
Do not store the MediaHub in hot areas. High te mperatures can sho rten the life of
electronic components and warp or melt certain plastics.
Do not attempt to o pen th e MediaHub ga inin g access to the intern al
inf rast ruc ture. Please n otify TeleAdapt se rvice a nd su pport pe rsonn el rega rding
ret urn mat eria ls au th orization policy.
Page 8
TA-7630 and TA-7730 Installation Manual
Last Revised: 9/30/11 10:47 AM
8
Disposal
The crossed-out wheeled-bin symbol on your product, literature, or packa ging
reminds yo u th at in the Euro pean Unio n a ll e lect rica l an d e lectron ic pro ducts mu st
be taken to separate co llection a t the end of their working life. Do not dispose of
these products as unsorted municipal waste.
Return the products to collection to prevent possible harm to the environment or
human health from uncontrolled waste disposal and to promote the sustainable
reu se o f ma te rial reso u rce s.
Features and Usage
Standard Auto-Sensing / Toggle Feature
MediaHu b Active ha s been engine ered with a built -in a u to-sensing au dio/video
function. Multiple devices may be connected to the MediaHub Active at once. The
connectivity panel will recognize and automatically play content from the most
rec ent ly popula te d AV so cket. T o switc h ba ck (toggle) to a previously use d device,
press the LED/button abo ve the desired AV socket.
Using MediaHub Active
When in use, MediaHub Active’s LED/buttons located above the sockets will light
up notifying you of which port is in use.
To change devices, plug in a new device using a new socket. TV will automatically
play c ontent from the most recently po pulated so cket. When co nnecting multiple
devices, guests may toggle between device s by pressing th e L ED/buttons located
above the sockets.
3.3”
(84.0 mm)
2.7”
(68.0 mm)
POWER
(5V)
10A MAX
A
B FEDC G IH
Page 9

TA-7630 and TA-7730 Installation Manual
Last Revised: 9/30/11 10:47 AM
9
A Composite Audio/Video (3RCA): Using a composite cable, provides audio and video
playback through the in-room TV. Compatible with any electric device that can use a
composite connection including iDevices, MP3 player, DVD player, game console, or
digital cameras.
B S-Video: Using an S-Video cable, provides video-only playback through the in-room TV.
Some Super Video-enabled video cameras, laptops, digital cameras and laptops. May
also couple the 2RCA stereo ports (red and white) of the Composite AV to provide paired
audio playback through the in-room TV speakers.
C Mini-Stereo Jack: This 3.5mm stereo jack will provide audio playback through the in room TV speakers. Compatible with any electronic media player with a headphone jack.
Use a male-to-male audio cable.
D VGA (RGB): Using a VGA cable, converts the in-room TV into a secondary or mirror
display option for laptop computers.
E HDMI: Using an HDMI cable, provides high definition video and audio playback through
the in-room TV. Compatible with newer generation laptops, smartphones, or digital
video cameras that have an HDMI-out, mini-HDMI out or micro-HDMI out. Also compatible
with non-HDMI devices using an HDMI converter cable such as VGA-to-HDMI or
MDP-to-HDMI.
F USB (5V): Using a USB cable, offers a charging outlet for USB-powered electronics such
as iDevices, smartphones, digital cameras, and more. Note, iPad® product will charge
using 5V power when in sleep mode only.
MediaHub Active with PowerHub Extender also features:
G
Power Outlet: Two AC power outlets are on the MediaHub Active Extender model
for convenient power charging. Voltage and frequency varies by regional model and
for based on North American and European standards. For example, US outlets
are 120V/60Hz.
H
RJ45 Internet Jack: The MediaHub Active Extender model includes wired Internet access
point. Using a CAT5 cable, guest can connect their computers to the Internet. If this port
will remain inactive, you may purchase an optional cover piece (Part # COV-RJ45S01).
Page 10
TA-7630 and TA-7730 Installation Manual
Last Revised: 9/30/11 10:47 AM
10
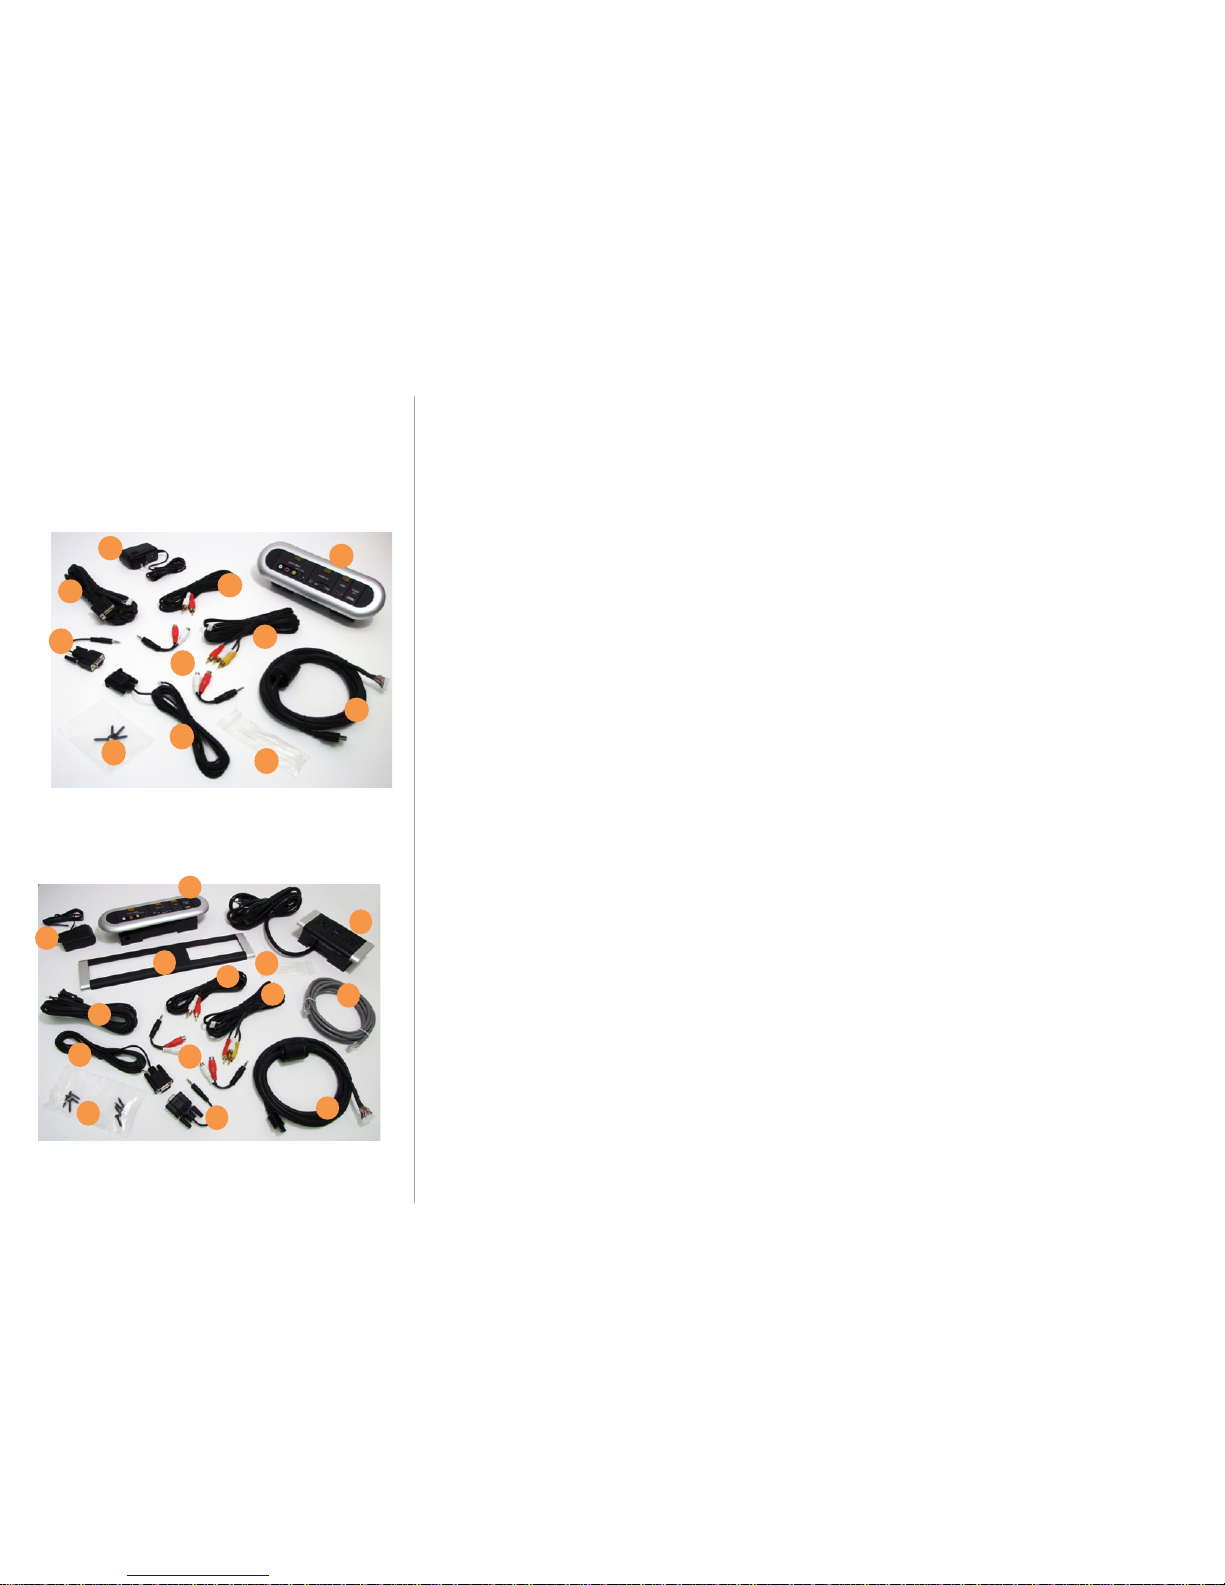
Packing List(s)
* Note: To ensu re pro per in sta llatio n, you will a lso ne ed the TV/STB remote
control.
TA-7630x-xx-x03
A MediaHub Active Connectivity Panel
B Power Supply with Cable
Med iaHu b A ct ive Cable K it (3m cables)
C
Mini Con nec tor - HDMI cable CAB-40543D5
D Mini Con nec tor - PC Audio cable CAB-40633D5
E Min i Co nn ec to r - PC Video cable CAB-40623D5
F Mini Con ne ct or - CVBS cable (for composite AV and S-Video)
CA B-40503D5A
G Mini Con n ec to r - RS-232 serial cable CAB-40583D5
Not Pictured:
Min i Co nn ec to r - SmartPort cable (for select Philips TVs)
Min i Co nn ec to r - Serial for Enseo HD2000 (for Enseo HD20 00 STB )
H
DB9 -3.5mm Adapter CAB-4067D16 (optional for TVs with 3.5 mm control)
I
Flat-Head Mo untin g Sc rews
J
Cable Ties
K
Optional 2RCA to 3.5mm Y-Adapter CAB-4066D12
TA-7500L-US-x03 (PowerHub Extender) also includes:
L
TA-7500 PowerHub unit (Powe r/Data Pan el) with connected Power Supply
Cable
M
Extender Trim
N
Ca t5 Eth erne t Ca ble
I
Additional Flat-Head Mou nting Sc rews x4
A
C
B E F G D
J
H
I
K
A C B E F M D L H G N K I
J
Page 11
TA-7630 and TA-7730 Installation Manual
Last Revised: 9/30/11 10:47 AM
11
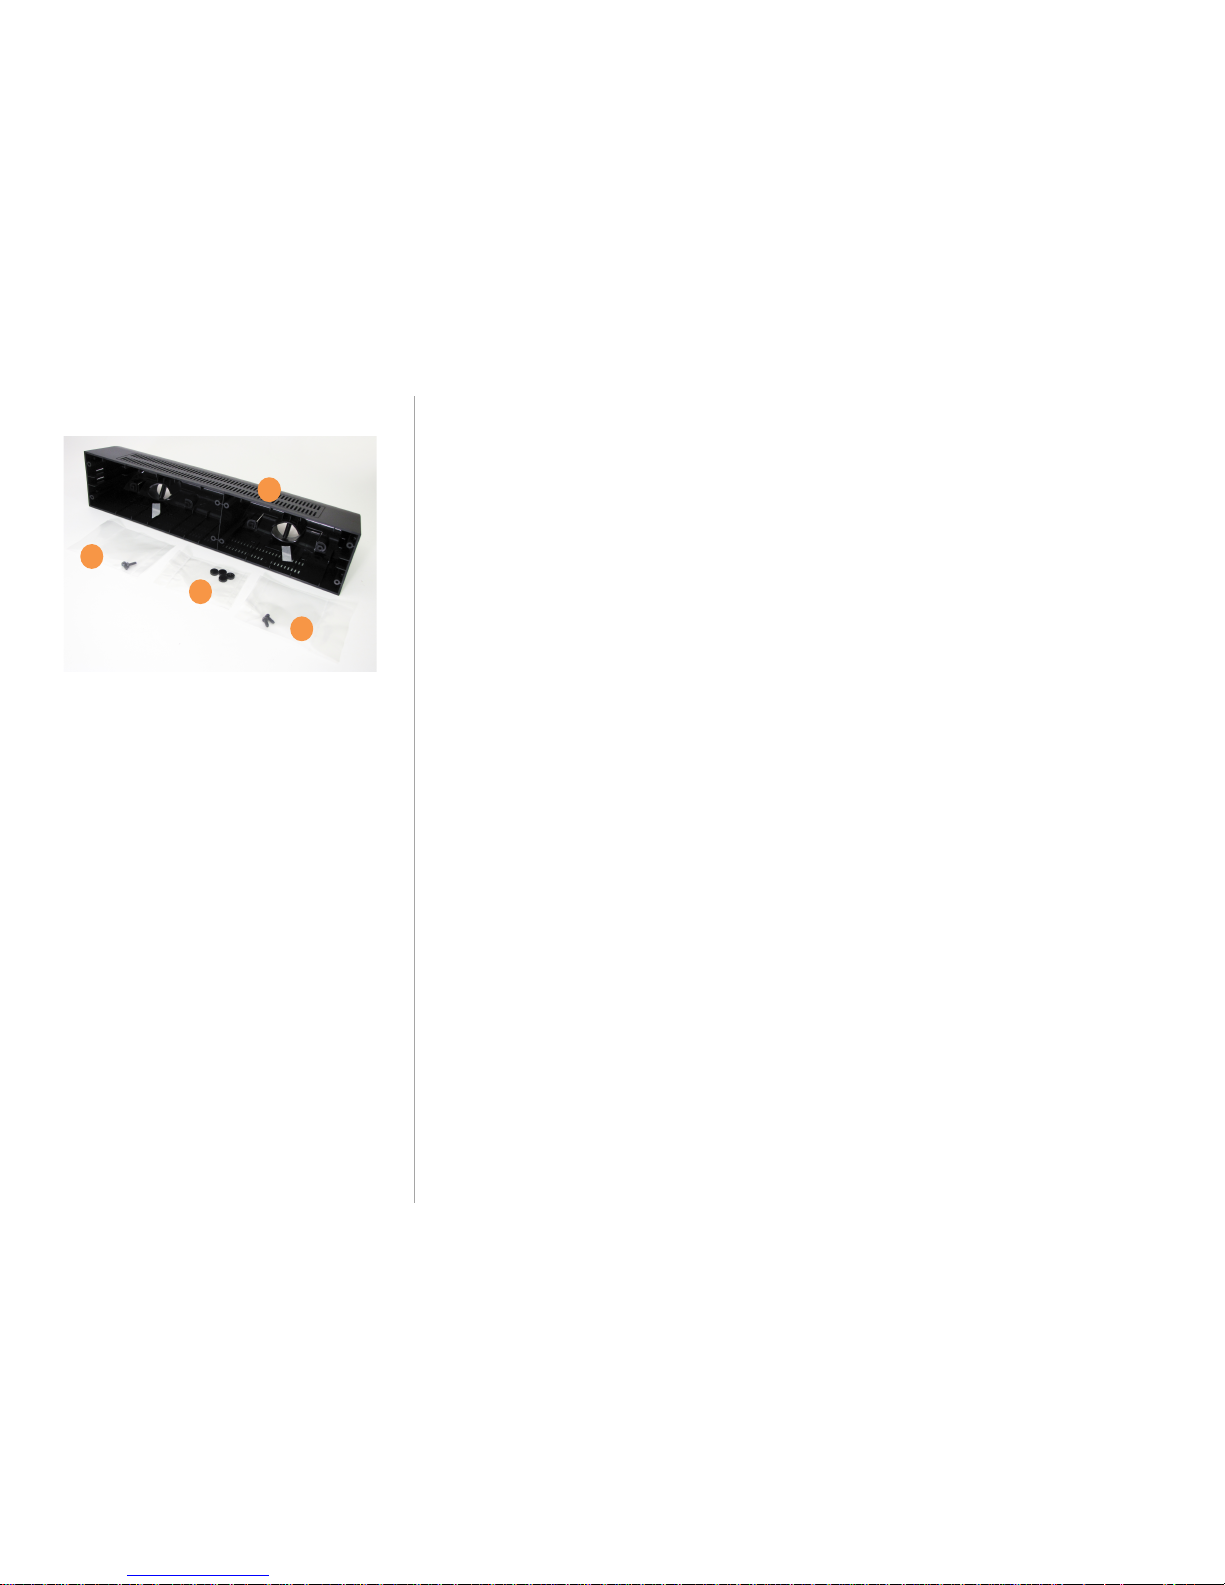
DTH-xxx Desktop Mount Kit also includes:
A
Desktop Housing
DTH-S01 fo r Oval MediaHub Trim
DTH-R01 for Rectangle MediaHub Trim
DTH-EXT for Rectangle MediaHub plus PowerHub Extender
B
Rear Door Screws
C
Rubber Tabs
See
Assemble Desktop Housing
section for assembly instructions
A B B
C
Page 12

TA-7630 and TA-7730 Installation Manual
Last Revised: 9/30/11 10:47 AM
12
Installation Instructions
The following pages outline instructions for installing MediaHub Active with
specific brands of TV and STB that support se rial control auto-switching
communication. For all noted TV model numbers, “nn” denotes the screen size.
For hotel room environments that are integrating a TV plus a VOD STB, MediaHub
may have direct serial control integration with both the TV serial port and the STB
serial or data port. Please use the following list of priority connections when
determining which connection you should use to install MediaHub.
#1 Priority – Connect to Lodgenet Game/Data Port
#2 Priority – Connect to RJP port (on most LG TVs)
#3 Priority – Connect to VOD STB Serial Control port (such as Enseo)
#4 Priority – Connect to TV Serial Control port
Page 13
TA-7630 and TA-7730 Installation Manual
Last Revised: 9/30/11 10:47 AM
13
LodgeNet PPV Systems (with ANY TV)
Installing MediaHub Active to auto-switch a T V in a LodgeNet environment requires
a TeleAdapt Protocol Converter Dongle (PCD), part number TA-8700-A01.
What You Will Need:
- TA-7630 or TA-7630/TA-7500L
Med iaHu b Active Connectivity Pane l
Mini Con nec tor - HDMI c able CAB-40543D5
Mini Con nec tor - PC Au dio c able CAB-40633D5
Mini Con nec tor - PC Video ca ble CAB-40623D5
Mini Con nec tor - CVBS cable (for composite/S-Video) CAB-40503D5A
Mini Con nec tor - RS-232 serial cable CAB-40583D5
Mini Con nec tor - Powe r Supply (Note: MediaHub with Power/Data Extender model
requires TWO power supplies – one for media panel and one for power panel)
- PCD TA-8700-A01
Protocol Converter Dongle
Game/Data Cable (RJ11-RJ11) CAB-0505D60
MediaHub Cable (DB9-RJ11) CAB-0502D60
- Hospitality TV with remote control and LodgeNet STB wth remote control
For Hospitality Displays Connected to a LodgeNet PPV/VOD System*
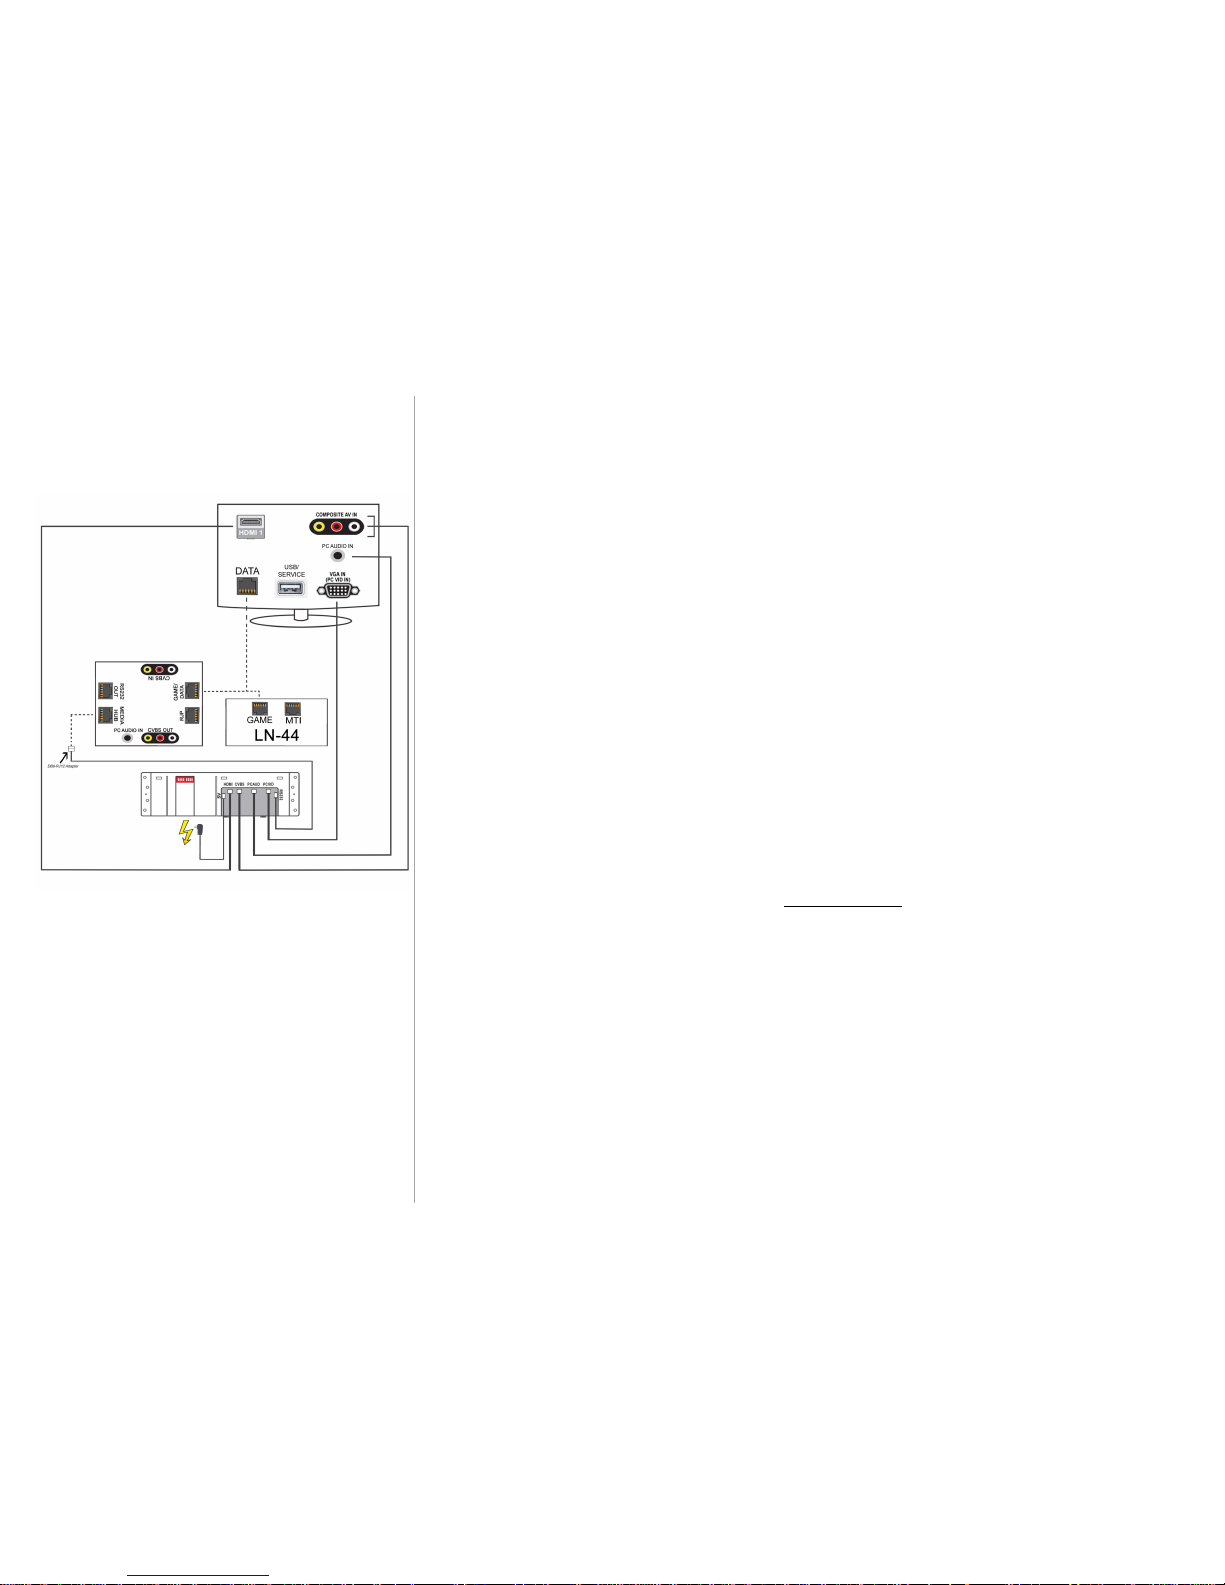
Follow the cable connection diagram to the left. Make sure the HDMI connec tion is
in the Media Hub’s HDMI Mini Con ne ction , NOT HDMI(VGA). If your hospitality TV
has a built-in Lodge Net terminal (inte rna l terminal card), plug the G ame /Da ta cable
int o the T V’s DAT A port.
Med iaHu b DI P Mo de 00 : DOWN-DO WN
PCD DIP Mode: DO WN-DOWN
Con figure TV as recommended by your VOD pro vider.
*Note: PCD does not support legacy OnCommand (OCV) STB.
Figure 1: Cable connection diagram for installing
MediaHub Active with to a LodgeNet STB.
If the TV has a built-in LodgeNet terminal card,
connect the GAME/DATA cable to the TV’s
DATA port.
Note: Dotted cables in diagram are packaged
with PCD, solid black cables are packaged
with MediaHub.
Page 14
TA-7630 and TA-7730 Installation Manual
Last Revised: 9/30/11 10:47 AM
14
Enseo Set Top Box (with ANY TV)
What You Will Need:
- TA-7630 or TA-7630/TA-7500L
Med iaHu b Active Connectivity Pane l
Mini Connector - HDMI c able CAB-40543D5
Mini Con nec tor - PC Au dio c able CAB-40633D5
Mini Con nec tor - PC Video ca ble CAB-40623D5
Mini Con nec tor - CVBS cable (for composite AV a nd S-Video) CAB-40503D5A
Mini Con nec tor - RS-232 serial cable CAB-40583D5
Mini Con nec tor - SmartPort cable (only used for legacy mode ls)
Mini Con nec tor - Powe r Supply Cable (Note: MediaHub with Power/Data
Extender model requ ires TWO power supplies – one for media panel and one
for power panel)
- DB9 -3.5mm Adapter CAB-4067D16
- Mini Connector - Serial for Enseo HD2000 (CAB-40583D5H, only used for HD2000
STB)
- Enseo STB and TV Re mote Control
For HD3000 STB firmware v.2.12.04+ / HD2000 STB firmware v.2.10.29.17+
Special no te: Ense o HD2000 installatio n requires the TeleAdapt CAB-40583D58
Control Cable
MediaHub Active DIP Mode 01: DWN-UP
MediaHub Active Firmware Version: EN0. 2T4
Configure Enseo STB: Press <Channel Up>, <Right Arrow>, <Left Arrow>,
<MUTE> to enter set-up screen. Go to Control Options and AUX panel.
Set BAUD R ate to 96 00.
See mode l-specific connections and T V configuration requirements according to the
TV make/model below.
Panasonic North America Series 20/12 + Enseo HD2000/3000
Configure TV: Go into HOTEL MODE (<MENU>, <G>, <Y>, <0>), set MODE=ON, TA
Con trol= EXTERNAL , BUTTON LOCK is OFF.
Philips North America, LG North America, Sharp North America +
Enseo HD2000/3000
No TV c on figuration n ee ded.
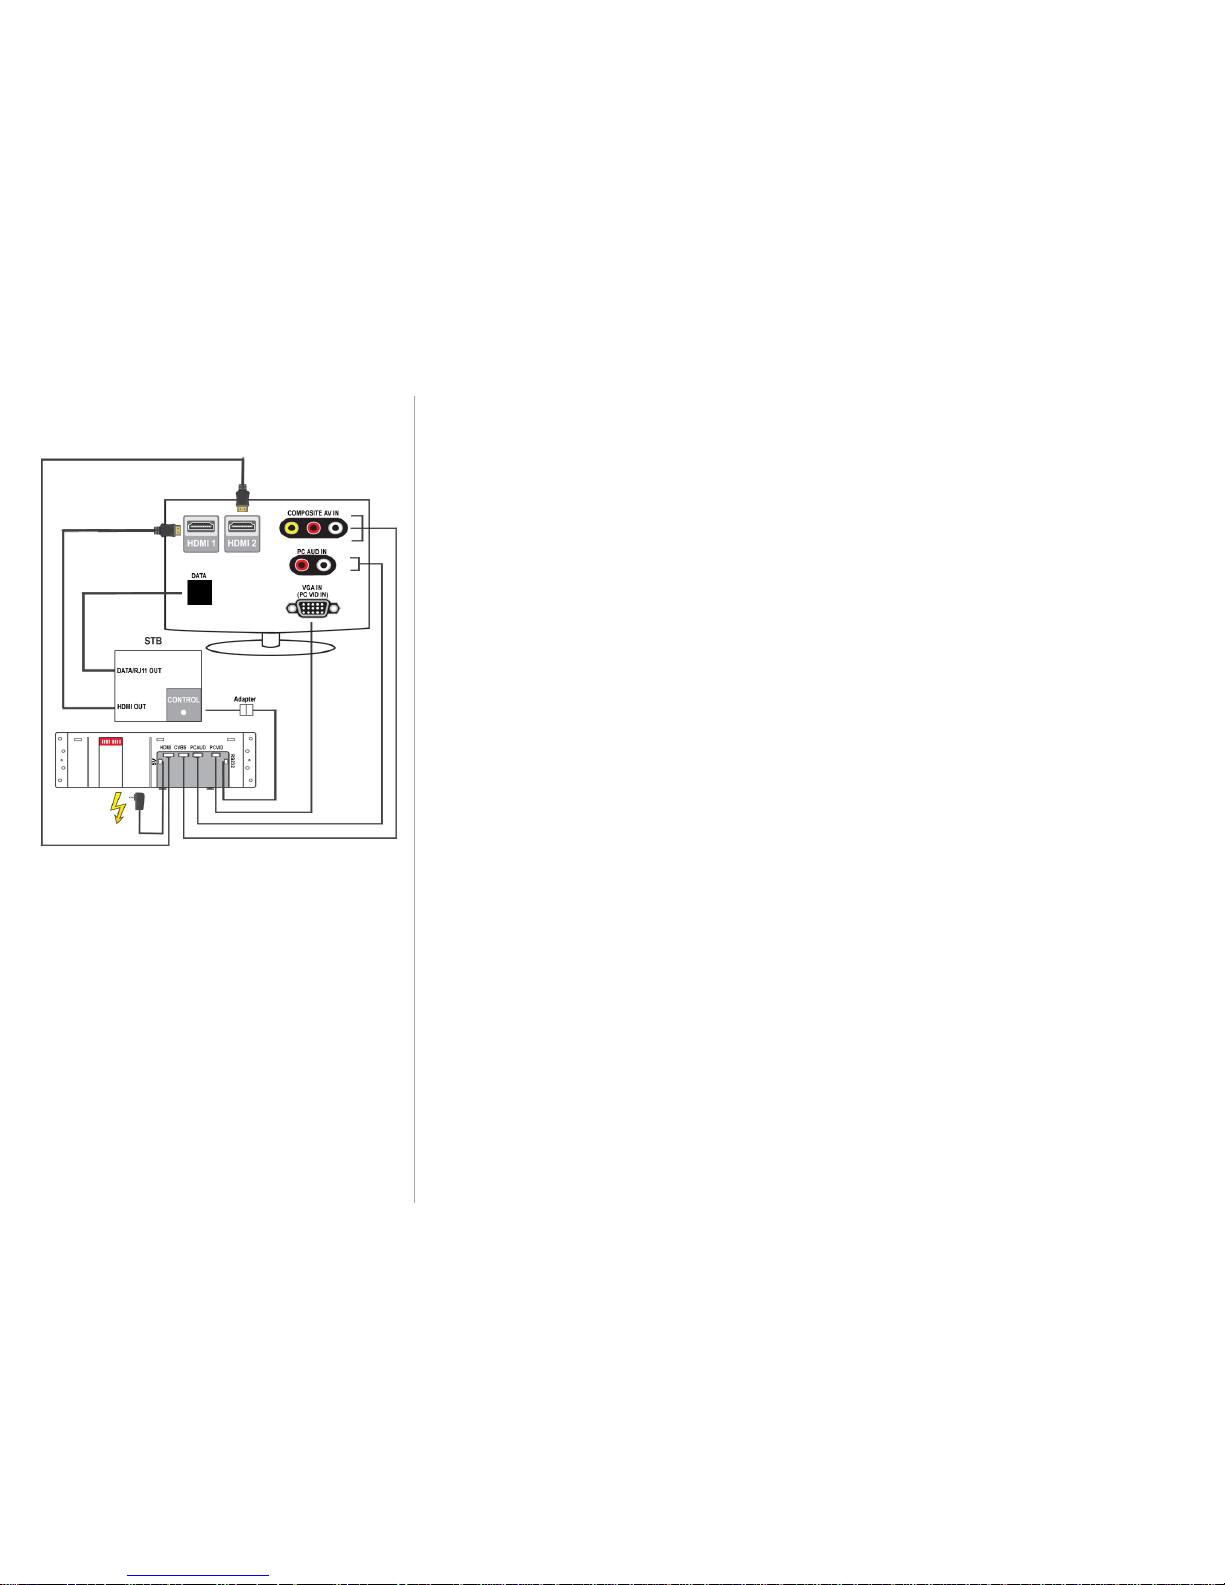
Figure 1: Cable connection diagram for
installing MediaHub Active with Hospitality TV
and Enseo STB.
Page 15

TA-7630 and TA-7730 Installation Manual
Last Revised: 9/30/11 10:47 AM
15
Any Samsung North America Model + Enseo HD2000/3000
Con ne ct STB RJ11 to TV’s DAT A po rt u sing Samsu ng’s BN3 900865B
RJ11 cable.
Configure TV: Turn power ON. With Samsung remote control,
enter the men u by pressing < INFO>, <MENU>, < 0>, <1 >,
<EXIT>. Ensure th e following is selec ted:
Hot el Mo de is ON
Music Mode (AV) is ON
Music Mode (PC) is ON
RJP Priority AV, PC and HDMI is 1, 2, and 3, respec tively
RJP AV Option is AV1
RJP HDMI Option is HDMI2
Set SI Vendor t o ENSEO
Page 16
TA-7630 and TA-7730 Installation Manual
Last Revised: 9/30/11 10:47 AM
16
Samsung North America
What You Will Need:
- TA-7630 or TA-7630/TA-7500L
Med iaHu b Active Connectivity Pane l
Mini Con nec tor - HDMI c able CAB-40543D5
Mini Con nec tor - PC Au dio c able CAB-40633D5
Mini Con nec tor - PC Video ca ble CAB-40623D5
Mini Con nec tor - CVBS cable (for composite AV a nd S-Video) CAB-40503D5A
Mini Con nec tor - RS-232 serial cable CAB-40583D5
Mini Con nec tor - SmartPort cable (only used for legacy models)
Mini Con nec tor - Powe r Supply Cable (Note: MediaHub with Power/Data
Extender model requ ires TWO power supplies – one for media panel and one
for power panel)
- DB9 -3.5mm Adapter CAB-4067D16
- Samsung TV and Samsung Remote Control
Samsung Direct-to-TV Installation Instructions
1 | Ensu re th e DIP Switches Settings are in the appropriate positions according
to the model-specific requirements below.
2 | Con ne ct the cables to the MediaHub Active back-end Mini-Conn ec tors .
Make sure HDMI conne ction is alwa ys in the HDMI Min i Connection,
NOT HDMI(VGA )
3 |
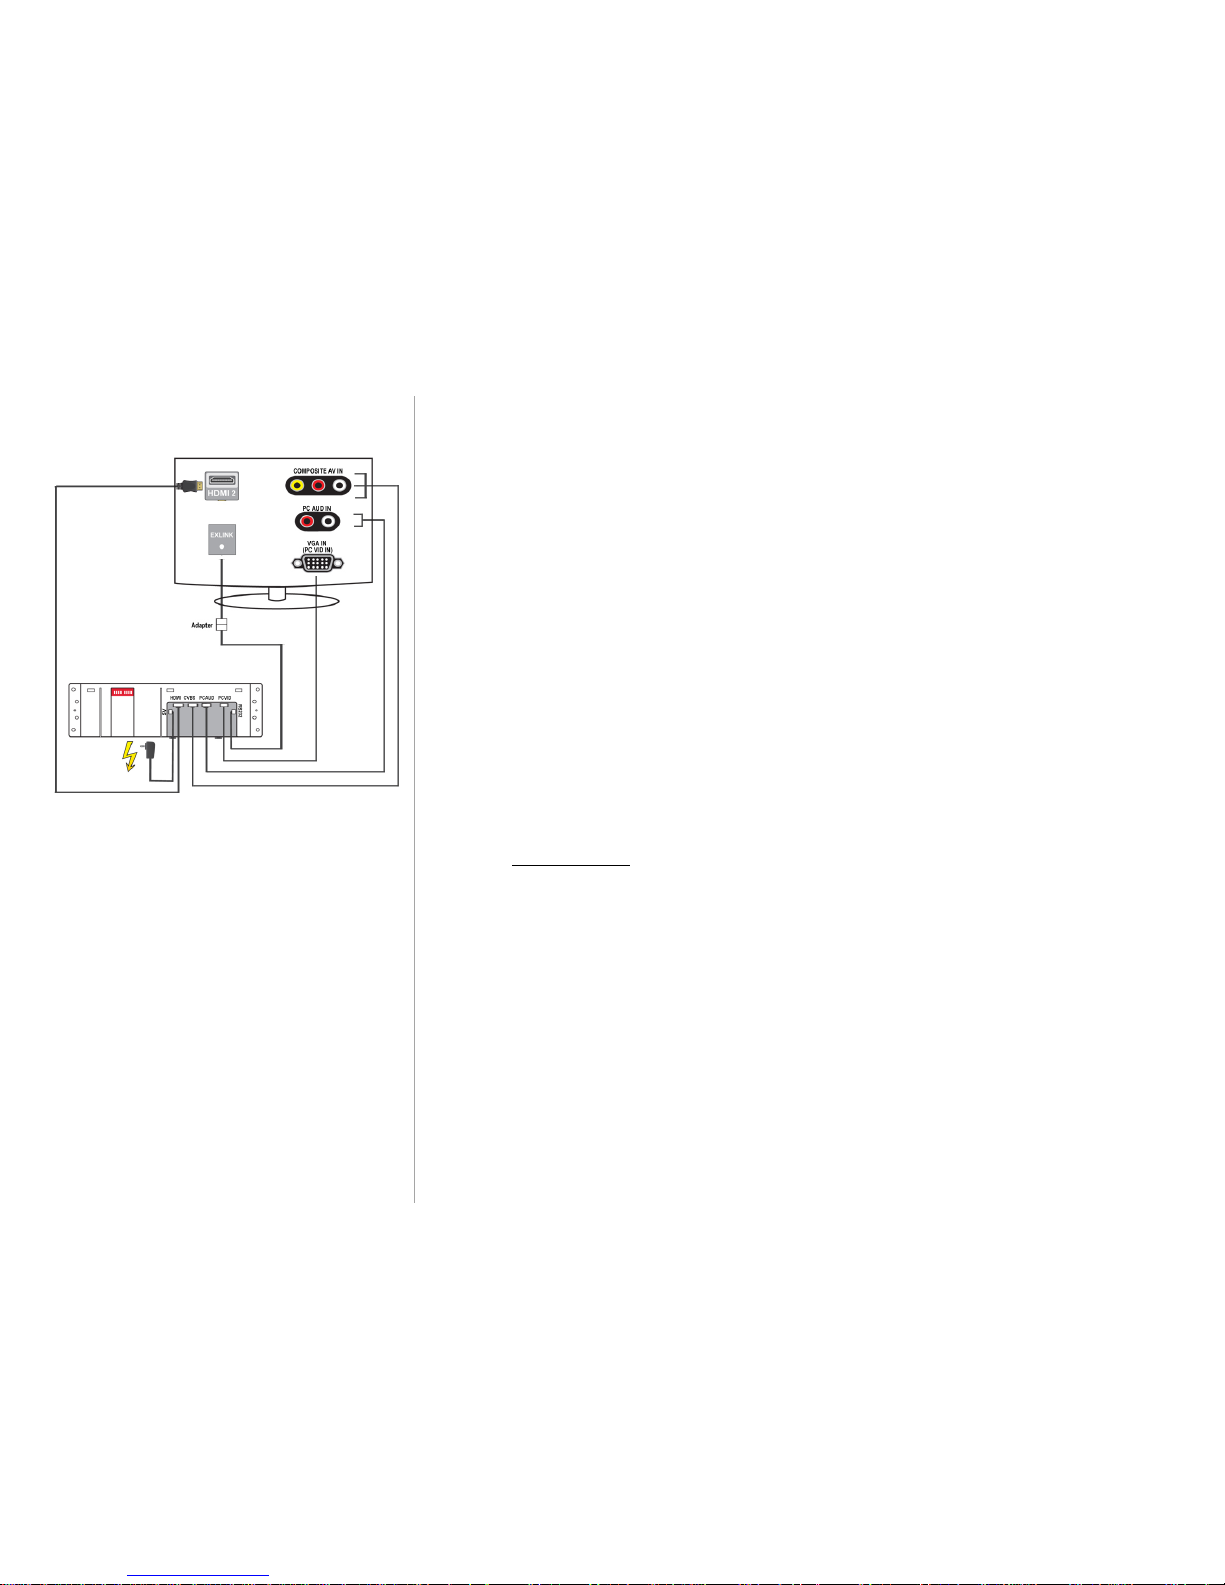
Using the DB9-3.5mm Adapter, connect the RS-232 Cable to the TV’s EXLINK port.
4 |
Connect the AV cables to the TV: HDMI2, PC Audio IN, PC Video IN, 3RCA
Composite AV (2008 models Composite AV is located on the side)
5 |
Plug the power supply into a wall power socket.
6 | Powe r ON th e T V an d
configure the TV settings according to the
model-specific requirements below
For Samsung 2009-2011 North America Models
For Samsung 2011 LED and LCD Hospitality Series displays with EXLINK serial port
(fa ct ory-leve l firmwa re). For Sa msung 2009 Series 4 LNnnB450C4H and
LNnnB457C6H models with EXLINK serial port (TV firmware v.1011.1+).
For Samsung 2009 Series 5 LNnnB550K1H models with EXLINK serial port
(TV firmware v. 1 007 +). For Samsung 2010 LED Series 4, LED Series 5, LCD Series 3,
LED Series 4, LED Series 5 mo dels with EXLI NK serial po rt (fa ctory-leve l firmware)
Figure 1: Cable connection diagram for installing
MediaHub Active with Samsung TVs.
Page 17

TA-7630 and TA-7730 Installation Manual
Last Revised: 9/30/11 10:47 AM
17
Samsung 2009-2011 Continued:
MediaHub Active DIP Mode 00: DWN-DWN
MediaHub Active Firmware Version: 1.74B+
Configure TV: Turn power ON. With Samsung remote control, enter the
men u by pressing <MUT E>, < 1> , <1>, <9 >, < ENTER> in order.
Ensu re th e following is selec ted:
Hot el Mo de is ON
Music Mode (AV) is ON
Music Mode (PC) is ON
RJP Priority AV, PC and HDMI is 1, 2, and 3, respectively
RJP AV Option is AV1
RJP HDMI Option is HDMI2
For Samsung 2008 North America Models and Older
For Samsung Series 4 LNnnA450C1H and Series 6 LNnnA650A1H models
with EXLI NK serial port (T V firmware v.1003.8+).
Special note: Samsung 2008 displays have an audio-only limitation – TV will not
play audio/music through any MediaHub Active socket when video is not present.
MediaHub Active DIP Mode 00: DWN-DWN
MediaHub Active Firmware Version: 1.74B
Configure TV: Turn power ON. With Samsung re mo te control,
enter the men u by pressing < MUTE>, <1 >, <1> , <9>, <ENTER> in order
Ensu re the following is selec ted: Ho tel Mo de is ON.
For Samsung North America Models with an External PPV STB
Follow Direct-to-TV installation instructions according to the year/model number of your
Samsung display. Connect the PPV STB AV Out to TV’s HDMI1 po rt. If using an Enseo
STB, follow the Enseo Installation In struc tion s.
For Samsung North America Models and an External Enseo STB
Follow instructions for Direct-to-TV installation according to the year/model number of your
Samsung display. OR, you may install MediaHub Active’s serial control c onnection to the
Ense o ST B. See instru ction s be low fo r installing the serial co ntrol connection to the
Ense o HD3 000 and En seo HD200 0 ST B mo dels.
Page 18
TA-7630 and TA-7730 Installation Manual
Last Revised: 9/30/11 10:47 AM
18
Panasonic North America
What You Will Need:
- TA-7630 or TA-7630/TA-7500L
Med iaHu b Active Connectivity Pane l
Mini Con nec tor - HDMI c able CAB-40543D5
Mini Con nec tor - PC Au dio ca ble CAB-40633D5
Mini Con nec tor - PC Video ca ble CAB-40623D5
Mini Con nec tor - CVBS cable (for composite AV a nd S-Video) CAB-40503D5A
Mini Con nec tor - RS-232 serial cable CAB-40583D5
Mini Con nec tor - SmartPort cable (only used for legacy models)
Mini Con nec tor - Powe r Supply Cable (Note: MediaHub with Power/Data Extender
model re quires TWO power su pplies – one for media panel and one for power panel)
- DB9 -3.5mm Adapter CAB-4067D16
- Panasonic TV an d Panason ic Remote Control
Panasonic North America Direct-to-TV Installation (Series 20)
1 | Ensu re th e DIP Switches Settings are in the appropriate positions
according to the model-specific requirements below.
2 | Con ne ct the cables to the MediaHub Active back-end Mini-connectors.
(Make sure HDMI co nn ectio n is a lways in t he HDMI Min i Connection, NOT HDMI(VGA)
3 |
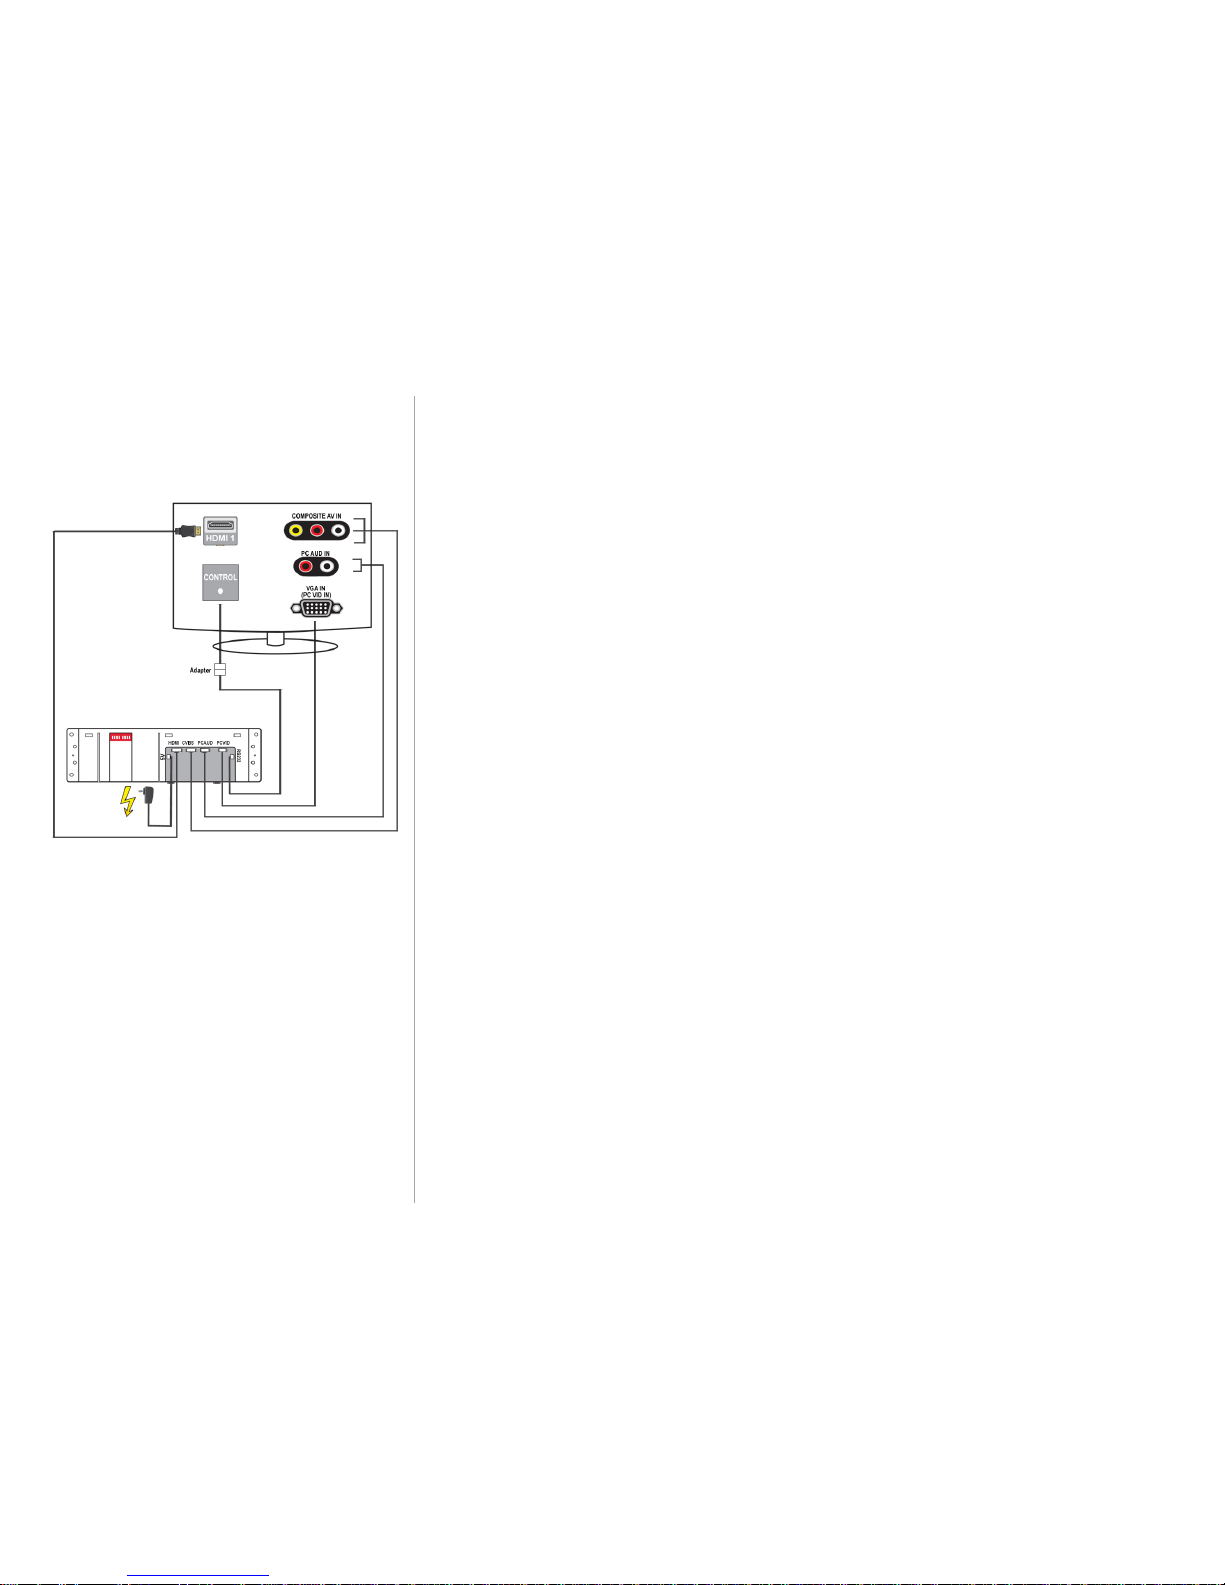
Connect the AV cables to the TV HDMI1, AV IN1 (for PC Audio), PC IN, AV IN2 (on side) and
serial control.
4 |
Plug the power supply into a wall power socket.
5 | Powe r ON th e T V an d
configure the TV settings according to the model-specific
requirements below.
Panasonic North America Series 20/30 Models
For TH-nnLRU20 and TH-nnLF20U models with serial control (factory-leve l firmwa re)
MediaHub Active DIP Mode 10: UP-DWN
MediaHub Active Firmware Version: EN0.2 T7
Configure TV: Go into HOTEL MODE (<MENU>, < G>, <Y> , <0>). Set MODE=ON,
BUTTON LOCK is OFF, TA CONTROL=OFF. For Series 30, also set CP MODE=YES.
Note: For Panasonic Series 20 displays + Legacy OnCommand (OCV) STB system, TV requires firmware
version 1.09. Follow instructions above but set TAControl=External.
Figure 1: Direct-to-TV cable connection diagram for
installing MediaHub Active with Panasonic TVs.
Page 19
TA-7630 and TA-7730 Installation Manual
Last Revised: 9/30/11 10:47 AM
19
Panasonic Series 20 using Internal Terminal Adapter
This installation requires Panasonic Series 20 firmware version 1.080. Follow
ins truc tio ns above f or S erie s 2 0 installation.
MediaHub Active DIP Mode 10: UP-DWN
MediaHub Active Firmware Version: EN0. 2T7
Configure TV: Go into HOTEL MODE (<MENU>, < G>, <Y> , <0>). Set
MODE= ON, B UTT ON LO CK is OFF , TA CONTROL=INTERNAL.
Panasonic Series 10/11/12 with IMP-/DTB- Tuner Card
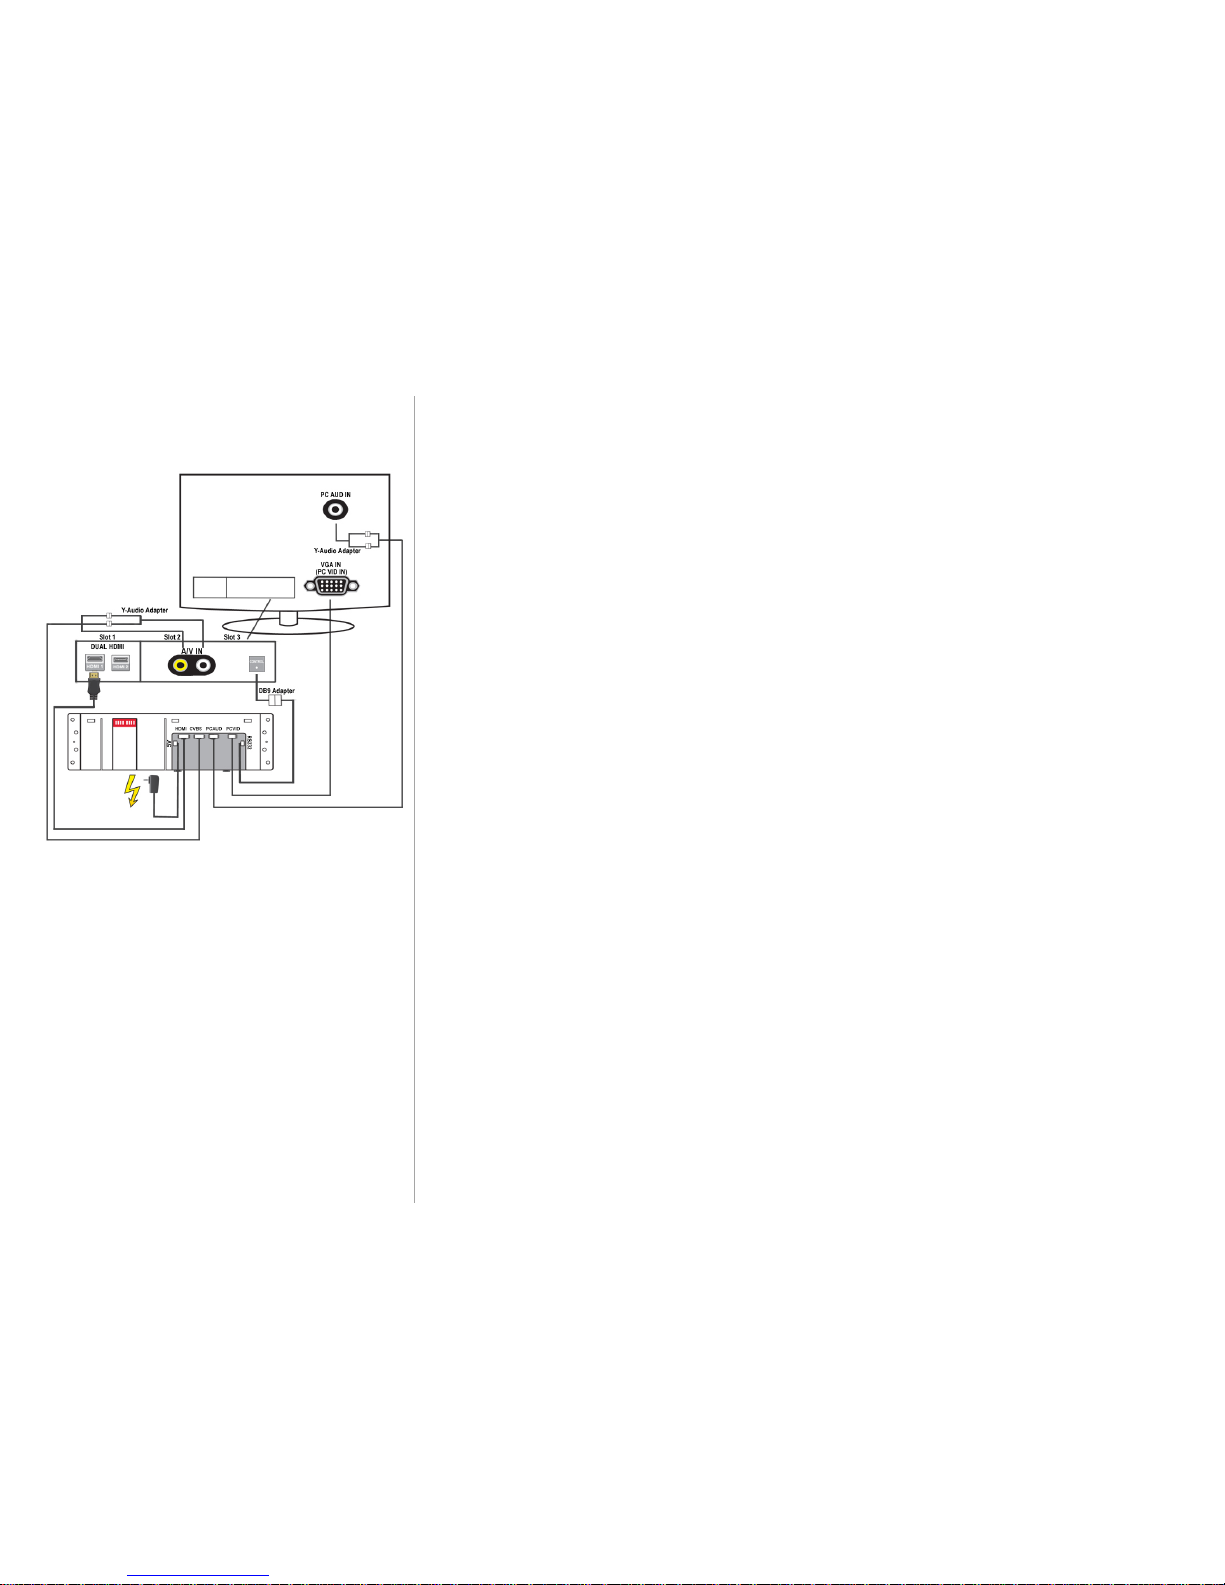
See Figure 1 on left - This installation requires an IMP-/DTB- Tuner Card in Slot 2/3
and the Panasonic TY-FB10HMD Dual HDMI Terminal Card in Slot 1. Audio Y-
Adapters CAB-4066D12 also required for this application (2RCA to 3.5mm).
MediaHub Active DIP Mode 01: DWN-UP
MediaHub Active Firmware Version: EN0. 2T4
Configure TV: Go into HOTEL MODE (<MENU>, <G>, <Y>, <0>),
set MODE=ON, BUTT ON LOCK is OFF.
Con figure IMP-/DTB- Tuner Card: Press <Channel Up>, <Right Arrow>,
<Left Arrow>, <MUTE> to enter set-up screen. Go to Control Options and
AUX panel. Set BAUD Rate to 9600. Go to Service Options, verify the HDMI
Terminal Card is assigned to Slot 1.
Figure 1: Cable connection diagram for installing
MediaHub Active with Panasonic TV and an IMP
tuner card.
Page 20
TA-7630 and TA-7730 Installation Manual
Last Revised: 9/30/11 10:47 AM
20
Philips North America
What You Will Need:
- TA-7630 or TA-7630/TA-7500L
Med iaHu b Active Connectivity Pane l
Mini Con nec tor - HDMI c able CAB-40543D5
Mini Con nec tor - PC Au dio c able CAB-40633D5
Mini Con nec tor - PC Video ca ble CAB-40623D5
Mini Con nec tor - CVBS cable (for composite AV a nd S-Video) CAB-40503D5A
Mini Con nec tor - RS-232 serial cable CAB-40583D5
Mini Con nec tor - SmartPort cable (only used for legacy models)
Powe r Supply Cable (Note: MediaHub with Power/Data Extender model
require s TWO power supplies – one for media panel and one for power panel)
- Philips TV and Philips Remote Control
1 | Ensu re th e DIP Switches Settings are in the appropriate positions according
to the model-specific requirements below.
2 | Con ne ct the cables to the MediaHub Active back-end Mini-connectors.
(Make sure HDMI connection is always in the HDMI Mini Connection, NOT HDMI(VGA)
3 |
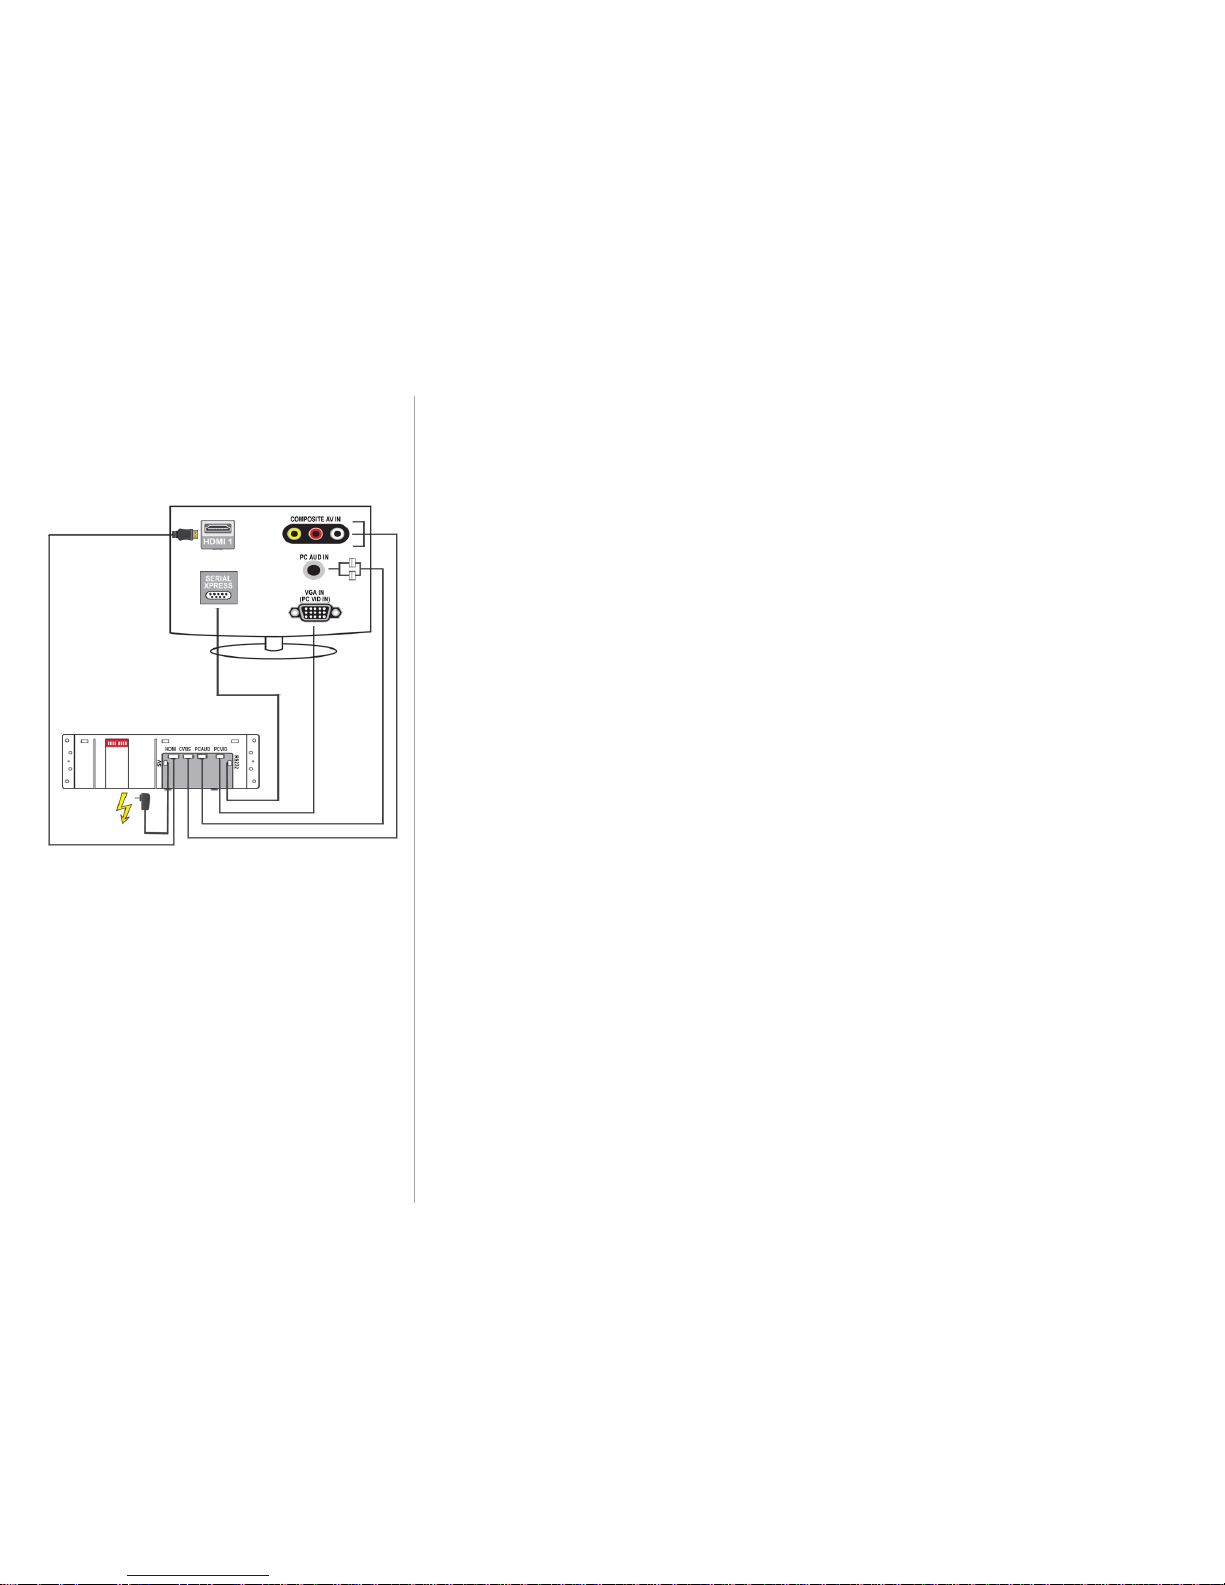
Connect the RS232 Cable to the TV’s RS232 Serial port.
4 |
Connect the AV cables to the TV: HDMI1, PC Audio IN, PC Video IN, 3RCA Composite AV
5 |
Plug the power supply into a wall power socket.
6 | Powe r ON th e T V an d
configure the TV settings according to the model-specific
requirements below
Philips HFL 2011 Models
For nnHFLL,/F7, nnHFLD/F7, nnHFLF/F7, and nnHFLH/F7 models. This installation requires Philips
TV firmware version 1.13.
MediaHub Active DIP Mode 10: UP-DWN
Med iaHub Active Firmware Version : XP0 .3NA
Be sure to connect cables accordingly:
- MediaHub HDMI cable to TV’s REAR HDMI1 port
- CVBS to TV’s REAR AVIN ports
- PC Video to TV’s SIDE VGA
- PC Audio to TV’s SIDE PC Audio 3.5mm jack (using adapter)
Configure TV: Using guest remote control, enter the set-up menu by pressing
<3>, <1>, <9>, <7>, <5>, <3>, <MUTE>. Ensure following is set:
- Unde r PPV/VOD, set SerialXpress = YES
- Under GUEST SETTINGS, set VGA = NO
Figure 1: Direct-to-TV cable connection diagram for
installing MediaHub Active with Philips Hospitality TV
Page 21

TA-7630 and TA-7730 Installation Manual
Last Revised: 9/30/11 10:47 AM
21
Philips HFL 2009/2010 Models
For nnHFLD/27, nnHFLV/27 and nnHFLL/27 models
MediaHub Active DIP Mode 10: UP-DWN
Med iaHu b Active Firmware Version : XP0 .3NA
Configure TV: Using guest remote control, enter the set-up menu by pressing
<3>, <1>, <9>, <7>, <5>, <3>, <MUTE>. Under Communications, set
SP-SP1 to RS232 Serial port. Select SAVE and Baud Rate will default to 9600.
Philips HF Legacy Models (that support SmartPort)
Special no te: MediaHu b Ac tive auto-switching o nly supported if SmartPort is available.
This installation replaces the RS232 cable connection with the Mini Co nne ctor - SmartPort
cable, plugged into TV’s SmartPort (RJ11).
MediaHub Active DIP Mode 10: UP-DWN
MediaHub Active Firmware Version: XP0.3NA
Configure TV: Using guest remote control, enter the set-up menu by pressing
<3>, <1>, <9>, <7>, <5>, <3>, <MUTE>. Under Communications, make sure
SP-SP1 is se t. Selec t SAVE and Bau d Ra te will def ault to 960 0.
Philips HFL/HF Models with an External PPV STB
Follow Direct-to-TV installation instructions according for Philips HFL/HF models above .
Con ne ct the PPV STB AV Out to T V’s HDMI1 po rt. Co nn ec t Me diaHu b HD’s HDMI to TV’s
HDMI2 .
2008 and Other Legacy Philips HFL/HF Models (using Philips CP Cable Set)
Con ne ct Philips CP Cable Kit Se t to Me diaHu b and Philips T V as fo llows:
HDMI c able : MediaHu b HDMI to T V HDMI 1
3.5mm PC Audio ca ble: MediaHub PCAudio port to TV PCAudio
VGA PC Video cable: MediaHub PCVideo port to TV VGA
3.5mm CVBS c able : MediaHub CVBS port to TV AV1
DB9 RS-232 serial cable: MediaHub RS232 to TV RS232
RJ11 SmartPort c able (only used for legacy mode ls)
Switches Se ttings are in the a ppropriate positions a ccording to below:
For nnHFLD/27, nnHFLV/27 and nnHFLL/27 models
MediaHub Active DIP Mode 10: UP-DWN
Med iaHu b Active Firmware Version : XP0 .3NA
Configure TV: Using guest remo te c on trol, e nt er th e se t-up menu by pressing
<3>, <1>, <9>, <7>, <5>, <3>, <MUTE>. Under Communications, set SP-SP1 to
RS232 Serial port. Select SAVE and Baud Rate will default to 9600.
Page 22
TA-7630 and TA-7730 Installation Manual
Last Revised: 9/30/11 10:47 AM
22
LG North America
Direc t-to-TV installations with LG displays requires a TeleAdapt Protocol Converter
Don gle (PCD), part nu mber COT-MHDO NGL E01 .
What You Will Need:
- TA-7630 or TA-7630/TA-7500L
MediaHub Active Connectivity Panel
Mini Connector - HDMI cable CAB-40543D5
Mini Connector - PC Audio cable CAB-40633D5
Mini Connector - PC Video cable CAB-40623D5
Mini Connector - CVBS cable (for composite AV and S-Video) CAB-40503D5A
Mini Connector - RS-232 serial cable CAB-40583D5
Mini Connector - SmartPort cable (only used for legacy models)
Power Supply Cable (Note: MediaHub with Power/Data Extender model requires TWO
power supplies – one for media panel and one for power panel)
- TA-8700-A01 Protocol Converter Dongle
Protocol Converter Dongle
MediaHub Cable (DB9-RJ11) CAB-0502D60
RJP Cable (RJ45-RJ45) CAB-0504D60 (for installations using RJP)
Composite Cable (3RCA-3RCA) CAB-0506D60 (for installations using RJP)
RS232 Cable (DB9-RJ11) CAB-0502D60 (for installations using RS232)
USB Cable (RJ45-USB) CAB-CAB-0507XDX (for installations using RS232)
- LG TV and Remote Control
1 |
Ensure the DIP Switches Settings on MediaHub Active and PCD are in the appropriate
positions according to the model-specific requirements below.
2 | Connect the cables to the MediaHub Active, PCD and LG display according to schematics
hown. (Make sure HDMI connection is always in the HDMI Mini Connection, NOT HDMI(VGA)
3 |
Plug the power supply into a wall power socket.
4 | Powe r ON th e T V an d
configure the TV settings according to the
model-specific requirements below
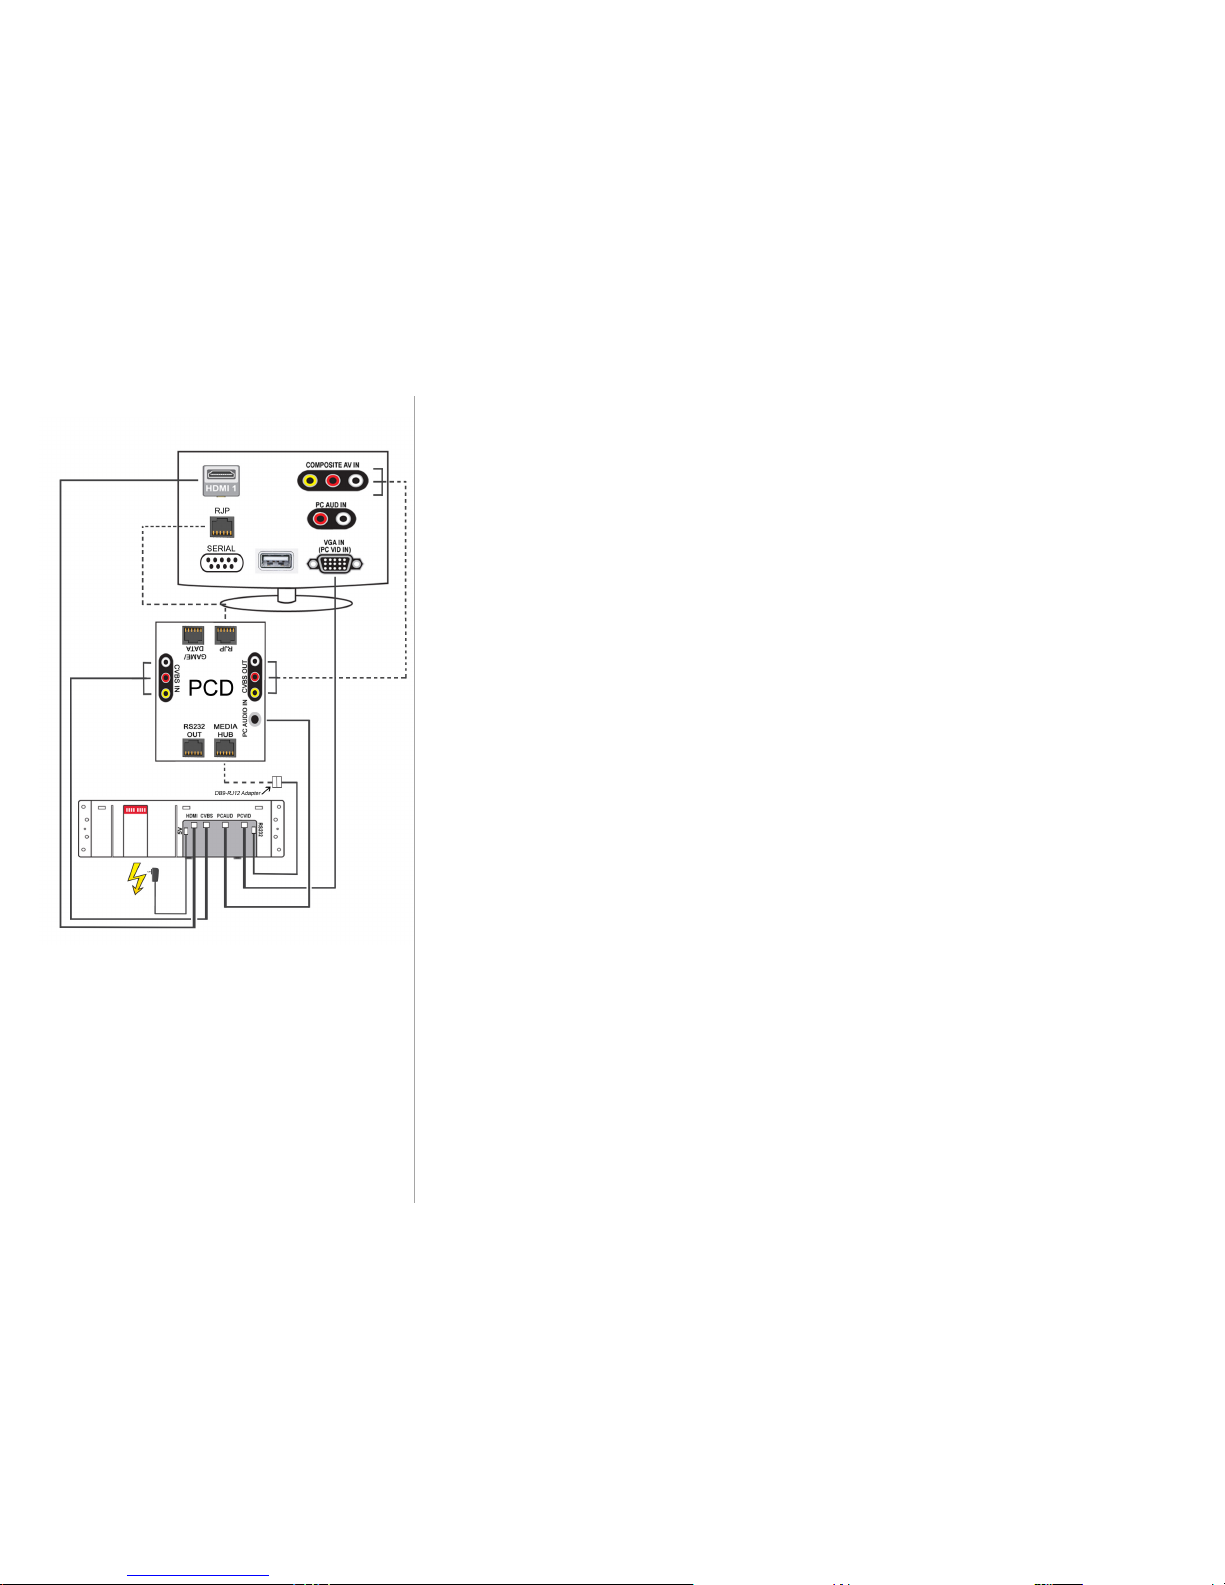
For LG hospitality displays implementing legacy RJP protocol (recommended)
To install MediaHub and PCD using the LG RJP interface, follow the cable connection
diagram in Figure 1 to the left. LG TV must support LG’s RJP-101x/110x/120x.
MediaHub DIP Mode 00: DWN-DWN
PCD DIP 1 Set to OFF (DWN)
Figure 1: Cable connection diagram for installing
MediaHub Active to LG RJP port using the PCD.
Note: Dotted cables in diagram are packaged
with the PCD, solid black cables are packaged
with the MediaHub Active.
Page 23
TA-7630 and TA-7730 Installation Manual
Last Revised: 9/30/11 10:47 AM
23
LG using RJP continued:
Configure TV: With LG remote control, enter the men u by pressing
<PWR > at least five times, until TV no longer responds, then press
<9 >, <8>, <7>, <6>, <ENTER>. En sure th e following is selected:
Item 040 CAMPORT = 00
Item 093 RJP AVAIL = 1
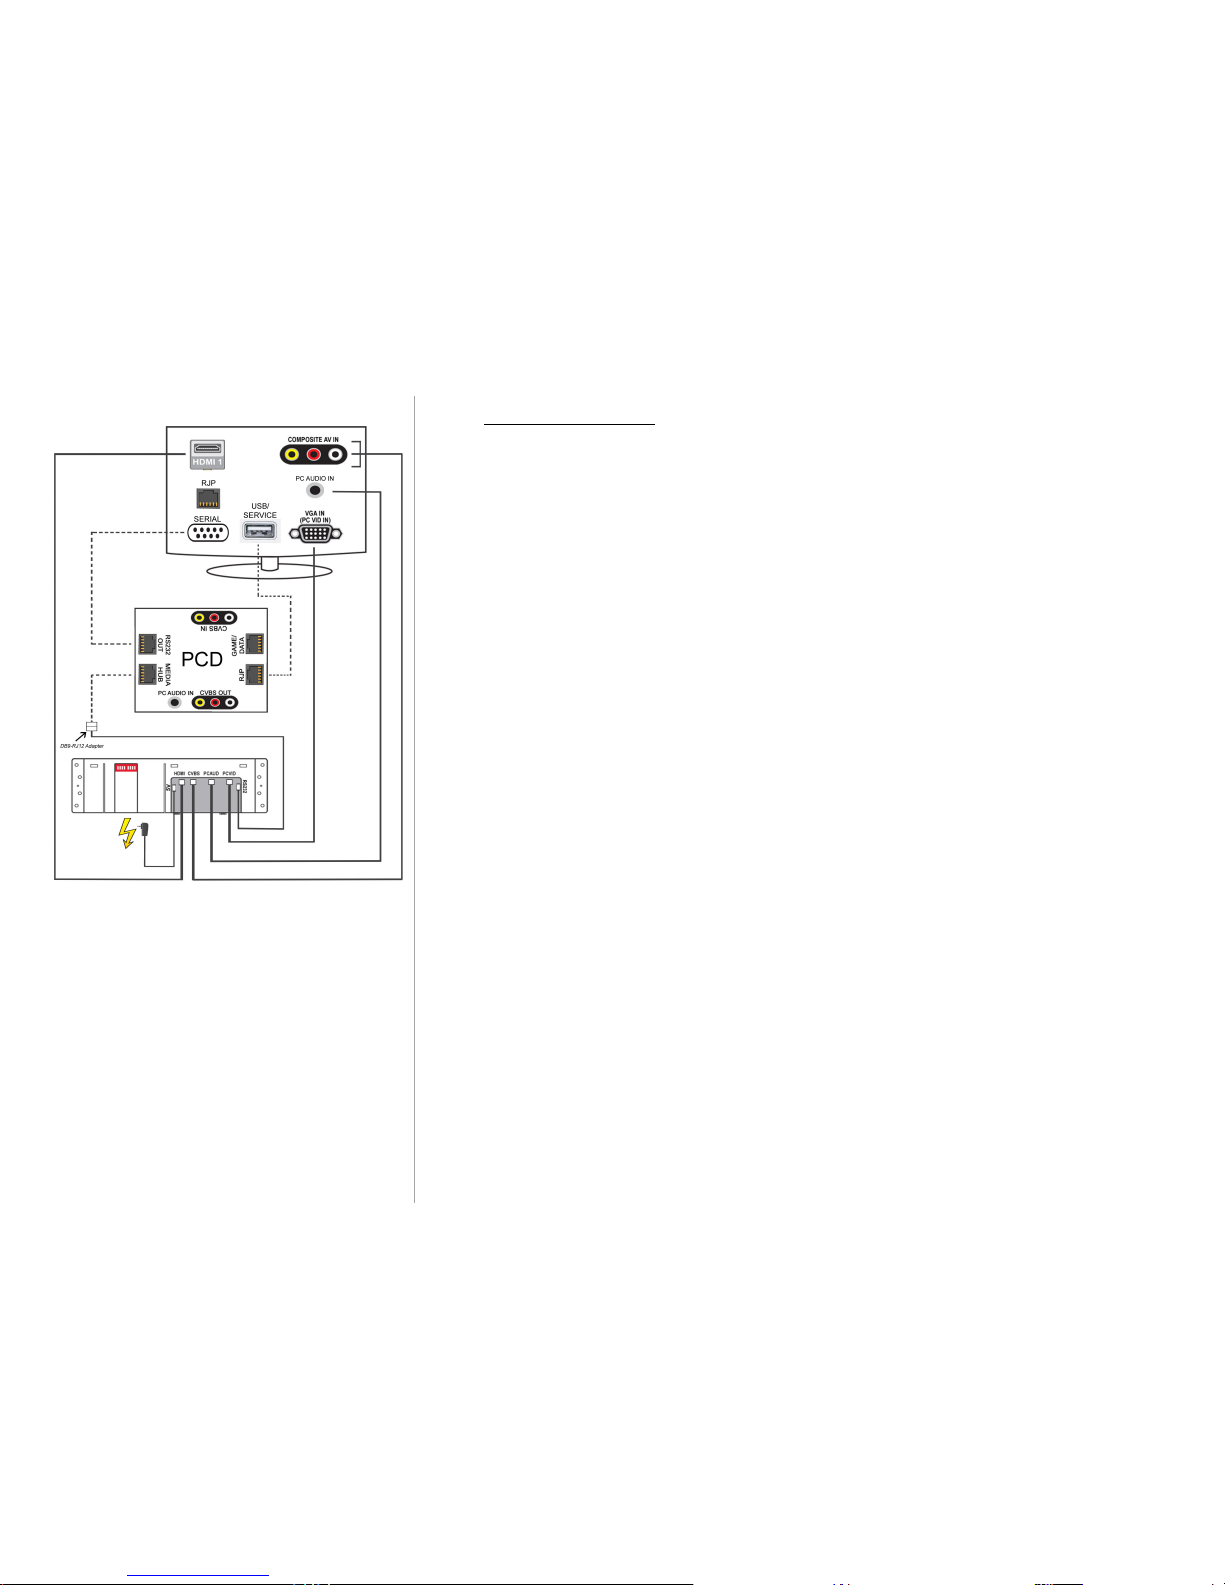
For LG hospitality displays using the LG Serial Control Port*
To install MediaHub and PCD using the Serial Control interface, follow the cable
connection diagram in Figure 1 to the left.
MediaHub DIP Mode 00: DWN-DWN
PCD DIP Mode: DWN- UP
Configure TV: With LG remote control, enter the men u by pressing
<PWR > at least five times, until TV no longer responds, then press
<9 >, <8>, <7>, <6>, <ENTER>. En sure th e following is selected:
Item 040 CAMPORT = 00
Item 093 RJP AVAIL = 00
Figure 1: Cable connection diagram for installing
MediaHub Active to LG Serial Control using the PCD.
Note: Dotted cables in diagram are packaged with the
PCD, solid black cables are packaged with the
MediaHub Active.
Page 24
TA-7630 and TA-7730 Installation Manual
Last Revised: 9/30/11 10:47 AM
24
Manual Switching Mode – With ANY TV Brand
*Note: The following installation instructions will install the MediaHub Active as a
passive panel. Auto-switching, auto-sensing, toggle feature and LED lights are
inactive in this mode.
What You Will Need:
TA-7630 or TA-7630/TA-7500L
Med iaHu b Active Connectivity Pane l
Mini Con nec tor - HDMI c able CAB-40543D5
Mini Con nec tor - PC Au dio c able CAB-40633D5
Mini Con nec tor - PC Video ca ble CAB-40623D5
Mini Con nec tor - CVBS cable (for composite AV a nd S-Video) CAB-40503D5A
Powe r Supply Cable (Note: MediaHub with Power/Data Extender requires TWO
power supplies – one for media panel and one for power panel)
TV with HDMI, Composite RCA, PC Video and PC Audio IN ports
Installation Instructions
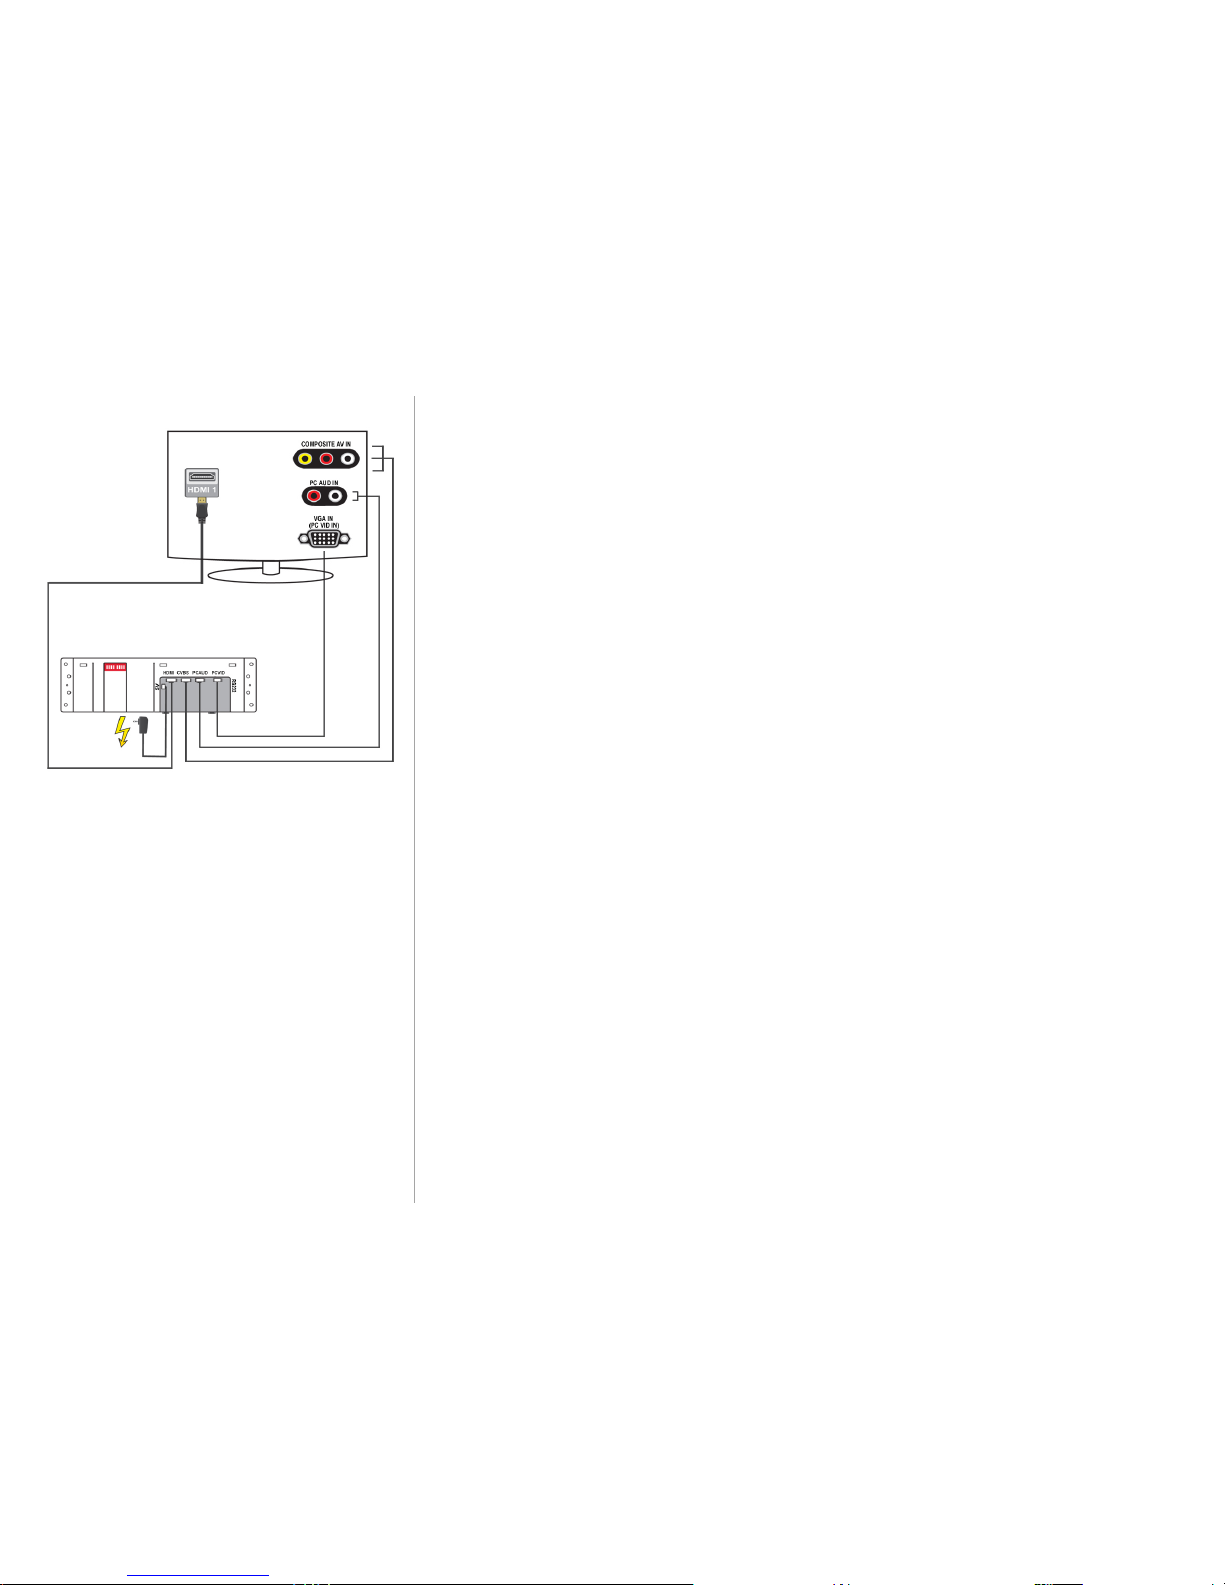
1 | C
onnect the AV Cables and Power Supply to rear of the MediaHub as shown in Figure 1.
For the HDMI
Mini
Connection, use the port marked “HDMI”, do not use “HDMI (VGA)”.
2 |
Connect the AV Cables to the corresponding TV’s AV ports, see Figure 1.
3 | Plug th e Media Hub
Power Supply into a wall power socket.
4 | To fully install the MediaHub Active Extender, connect the Cat5 Ethernet
cable to the rear of the PowerHub portion and plug other end into an existing
wall Ethe rnet jack. Plug the Po werHub powe r su pply into a wa ll power socket.
Configure the Guest-Access Technique
Similar to installing a DVD playe r or other third-party c ompon ent into a hospitality
in-ro om en tertain ment syste m, allowin g gue sts to acc es s t he MediaHu b Active in
a passive installation can be don e through one of three c ommon gue st-access
techn iques.
Option 1: “Channel map” the TV’s AV AUX ports used to connect MediaHub
Active (e.g., HDMI1 , COMP1, PC/AUDIO) to th ree
corresponding numbers in the VOD/PPV/FTG channel roste r. Usin g t he
guest remote c on trol, guests simply change the channel to the number
assigned to the MediaHub’s AV port they wish to use.
Figure 1: Cable connection diagram for installing
MediaHub Active with any TV, in passive mode.
Page 25

TA-7630 and TA-7730 Installation Manual
Last Revised: 9/30/11 10:47 AM
25
Option 2: Program the guest rem ot e control to ma ke the in -roo m T V’s AV AUX
ports available to the guest via the INPUT button. Using the guest
rem ot e co nt rol, gue sts simply press th e INPUT bu tton to cycle
through the corresponding AV AUV inputs and play co ntent from the
HDMI, Composite AV o r PC/Paired Audio in puts of th e Media Hub
panel.
Option 3: Program the PPV/VOD GUI to offer the in -roo m TV’s AV AUX
ports through an on-scree n prompt. Using the gu est remo te co ntrol,
guests simply fo llow the on-screen prompts to play conte nt from the
HDMI, Composite AV o r PC/Paired Audio in puts of th e Media Hub
panel.
Page 26

TA-7630 and TA-7730 Installation Manual
Last Revised: 9/30/11 10:47 AM
26
Troubleshooting
MediaHub Active Troubleshooting
If MediaHub Active does not seem to be working properly, lights are not
illumin ating an d TV is not auto -switching, try the following troubleshooting tips.
1 En sure cables are connected to the proper Mini Connectors on rear of
Med iaHu b and HDMI cable is placed in the correct TV HDMI slot .
DO NOT USE HDMI(VGA) port
2 Fully remove AC power to the TV. Power cycle the Media Hub Active, then
re-apply power to the TV and use the remote control to turn the TV on.
Wait 30 seco nds before activating a ny input sou rce into the MediaHub
Active.
3 Ensure the proper DIP Switch Mode Settin gs are correct on the
Me diaHub Active according to the brand of your TV.
4 Ensure the proper T V co nfiguration was set between the MediaHub
Active and TV/STB (baud rate, co ntrol settings, e tc.)
5 Ensure the proper firmware version s and video driver ve rsions are
tho se that are integrated with your TV brand. Contact TeleAdapt
technical support.
Page 27

TA-7630 and TA-7730 Installation Manual
Last Revised: 9/30/11 10:47 AM
27
Protocol Converter Dongle Troubleshooting
If the MediaHub Active was installed using a Protocol Converter Dongle and it does not seem to be
working properly, lights are illuminating but TV is not auto-switching, try these troubleshooting
procedures:
A Fully remove AC power to the TV. Then re-apply power to the TV and use the remote
control to turn the TV on. Wait 30 seconds before activating any input source into the
MediaHub HD.
B If using a Serial Control connection to the TV, ensure the USB cable is plugged into the
USB port on the TV. This connection provides power to the converter.
C Ensure the proper DIP Switch Mode Settings are correct on the Protocol Converter
Dongle, according to the installation instructions.
Switch One Switch Two
ON/UP TA-7650 RS232
OFF/DWN TA-7630 LodgeNet
D Ensure the proper DIP Switch Mode settings are correct on the MediaHub Active
according to the installation instructions: DWN-DWN
If problem persists, please contact one of our regional technical support teams:
For North and South American 24/7 Technical Support
Toll-Free 1 877 835 3232 x319 (in US and Canada)
Main 1 7 75 2 32 5 04 4
Email ric .jo ne [email protected] leada pt .c om
For EMEA Technical Support
Main + 44 1 92 3 81 0 23 5
Email in fo@t e leadapt.c om
For APAC Technical Support
Main + 82 1 0 85 66 0 80 9
Email [email protected]
Page 28
TA-7630 and TA-7730 Installation Manual
Last Revised: 9/30/11 10:47 AM
28
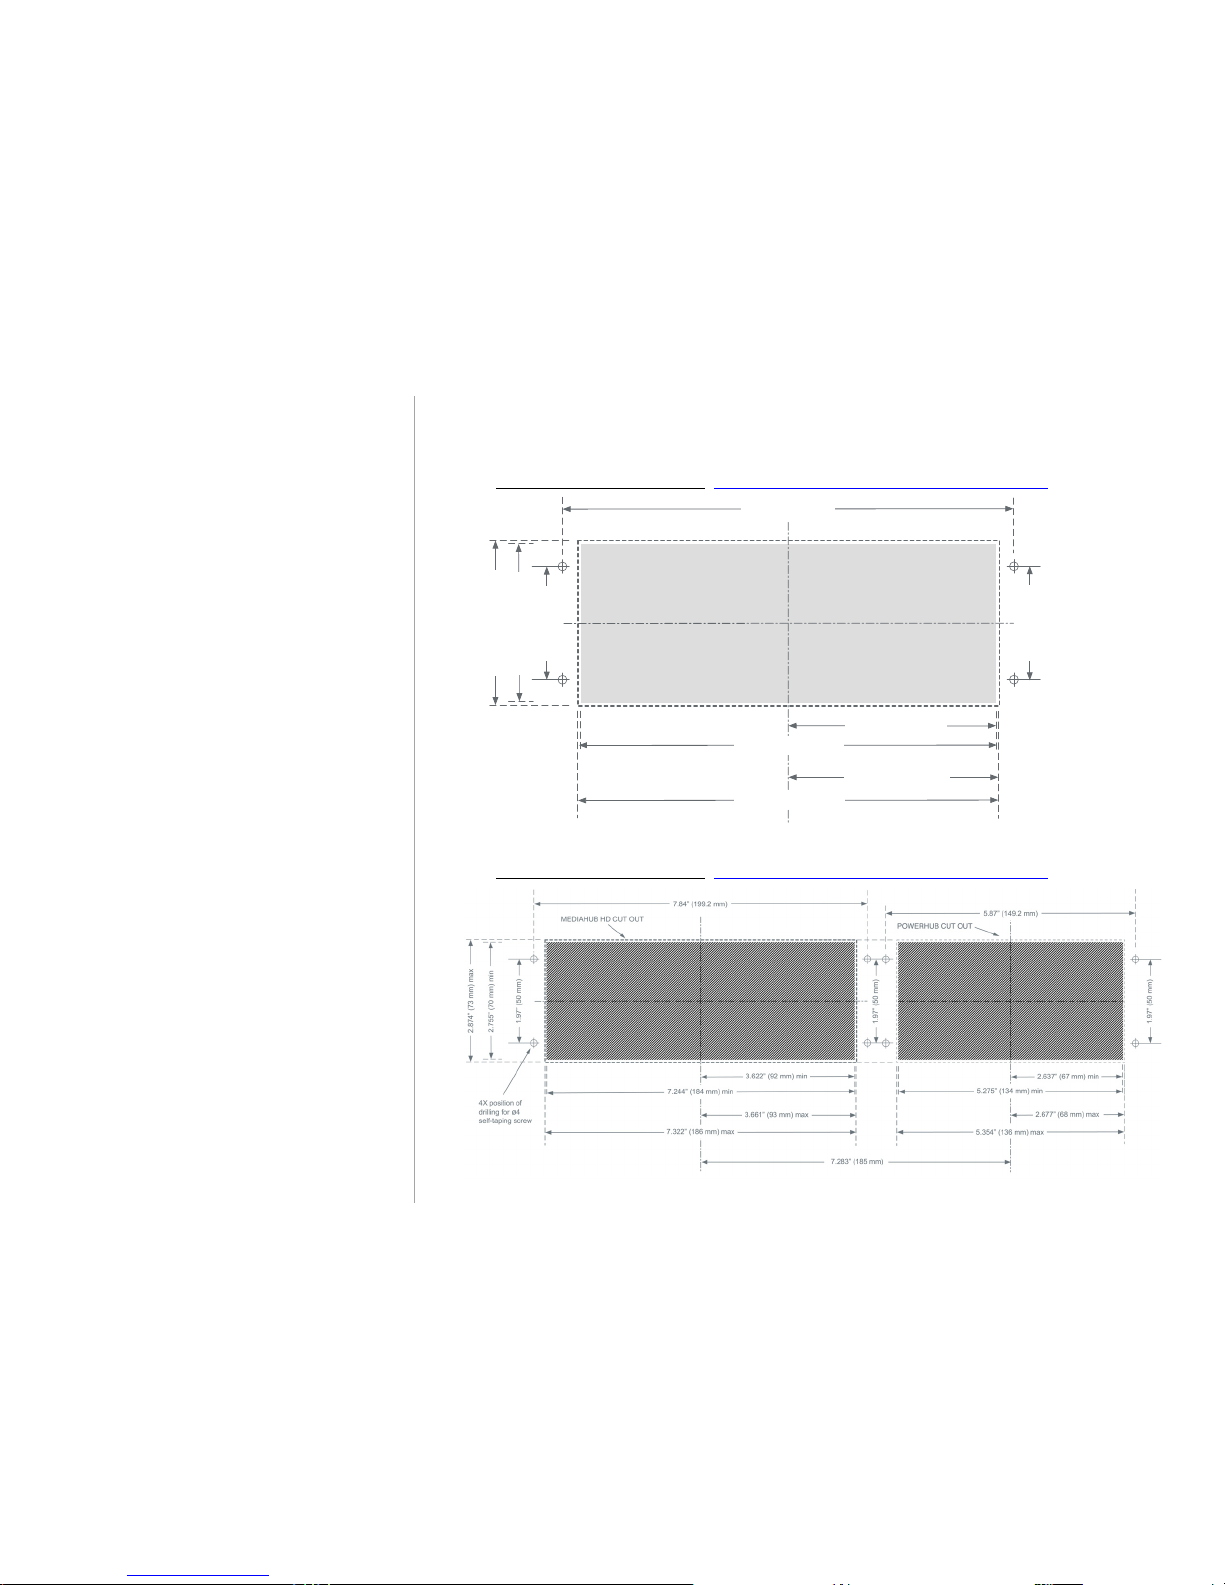
3.622” (92 mm) min
7.244” (184 mm) min
3.661” (93 mm) max
7.322” (186 mm) max
7.84” (199.2 mm)
2.874” (73 mm) max
2.755” (70 mm) min
1.97” (50 mm)
1.97” (50 mm)
Flush-Mount Cut Measurements
TA-7630 | MediaHub Active
Drawing belo w is not to scale. Click here to do wnlo ad 1 00 % sc ale cut sh eet s.
TA-7630 + TA-7500L | MediaHub Active with PowerHub Extender
Drawing belo w is not to scale. Click here to do wnlo ad 1 00 % sc ale cut sh eet s.
Page 29
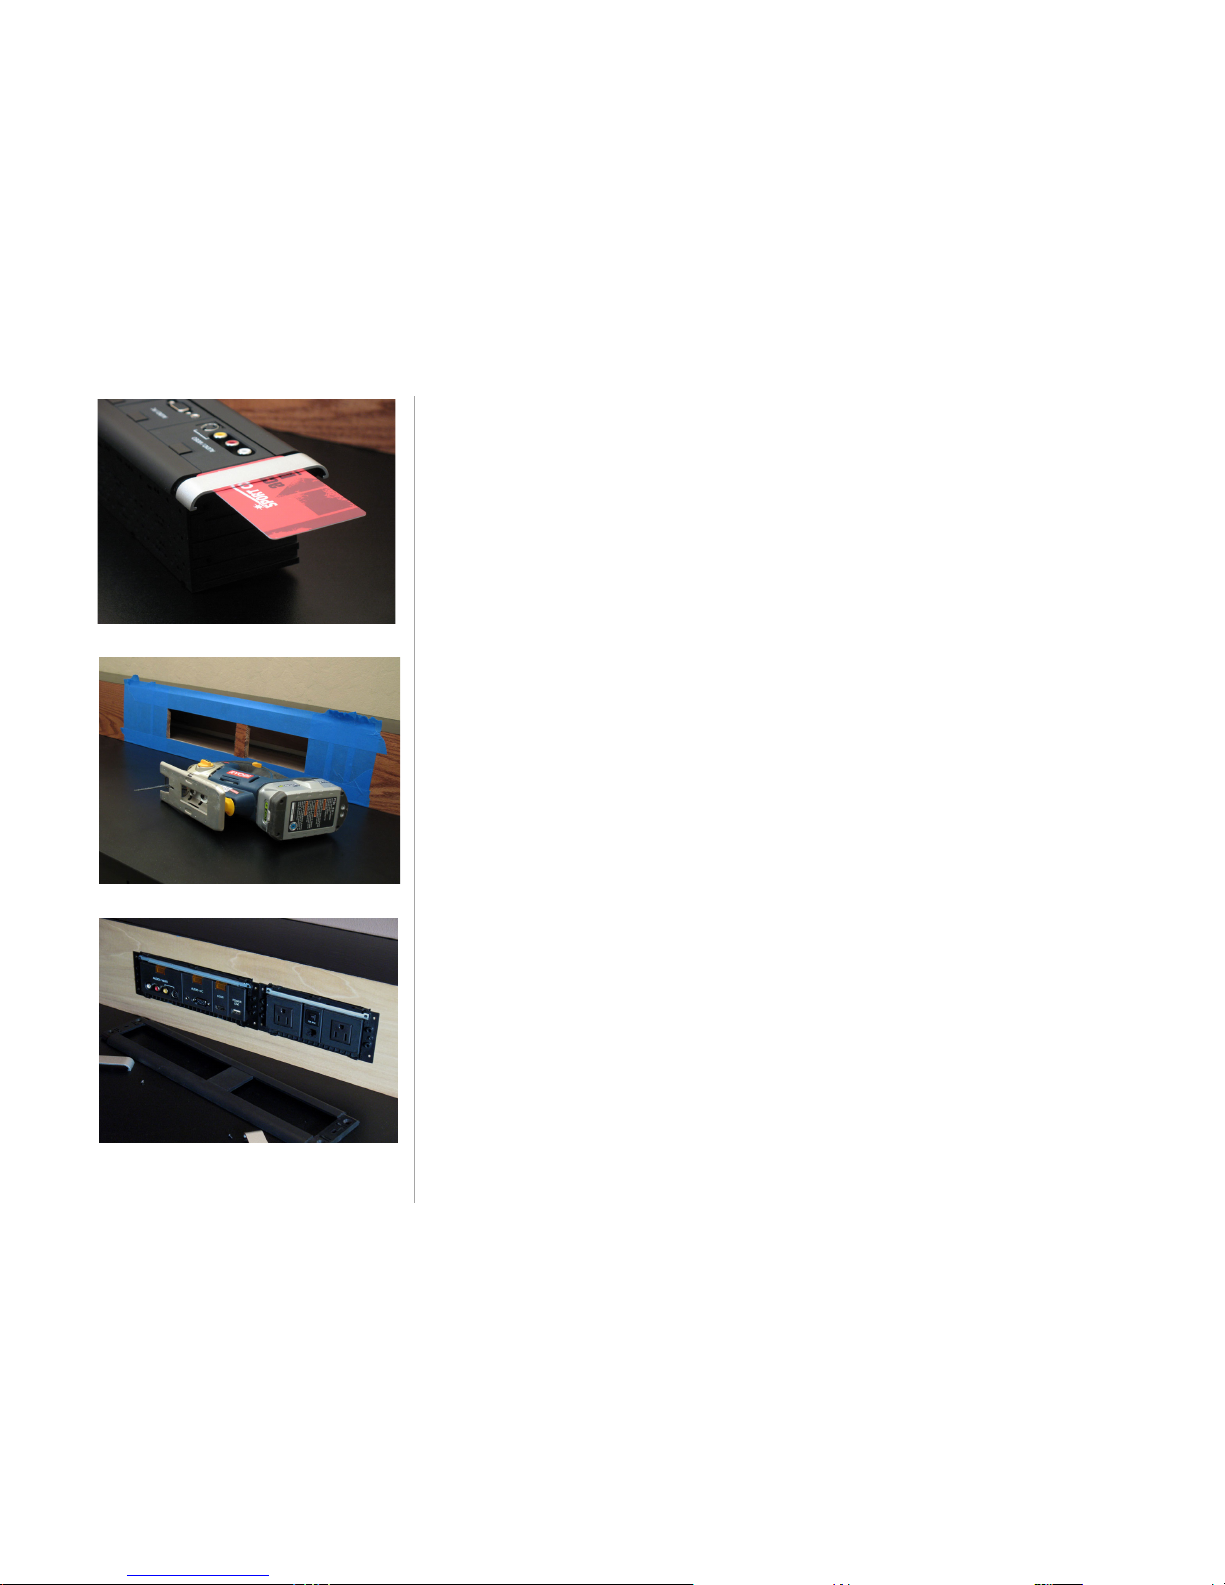
TA-7630 and TA-7730 Installation Manual
Last Revised: 9/30/11 10:47 AM
29
Figure 1: Prepare panels by removing the trims.
Figure 2: Flush-mount requires two hole cut-outs.
Figure 3: Secure panels with four CENTER screws
first, then snap on trim and secure outer screws.
Assemble Flush-Mount MediaHub Active with
PowerHub Extender
If you are assembling a MediaHub Active in a Desktop Housing, refer to the Assemble
Desktop Housing section of this manual. DO NOT follow instructions below.
1 | Ensu re DIP switche s on back of MediaHub are set ac cording to your MediaHub
installa tio n instruc tio ns an d cables are in pla ce with mini c onnectors positioned
toward the MediaHub panel.
2 | Prepare MediaHu b pan el a nd Po werHub pa nel by removing their trims. Use a flat
piece of plastic, similar to a busine ss c ard, between the end caps and the trim
base , then removing trim bezel.
3 | Attach Media Hub ca ble s a nd Cat 5 Eth ern et c able t o the re ar of MediaHu b a nd
PowerHub pan el.
4 | Slide Media Hub panel and PowerHub panel into th e c ase good cut-outs. See
Flush-Cut Me asureme nts se ctio n for c ut -out dimensions.
5 | Secure MediaHub and PowerHub panels to the casegoods by first securing the
CENTER sc rews in pla ce (two screws o n the right side of th e MediaHu b pa ne l as
well a s the two screws o n the left side o f the Powe rHub).
6 | Snap the Extender Trim on to the MediaHu b an d Powe rHub pan els.
7 | Se cu re four oute r screws.
8 | Slide end caps on to MediaHub Exten der
Page 30
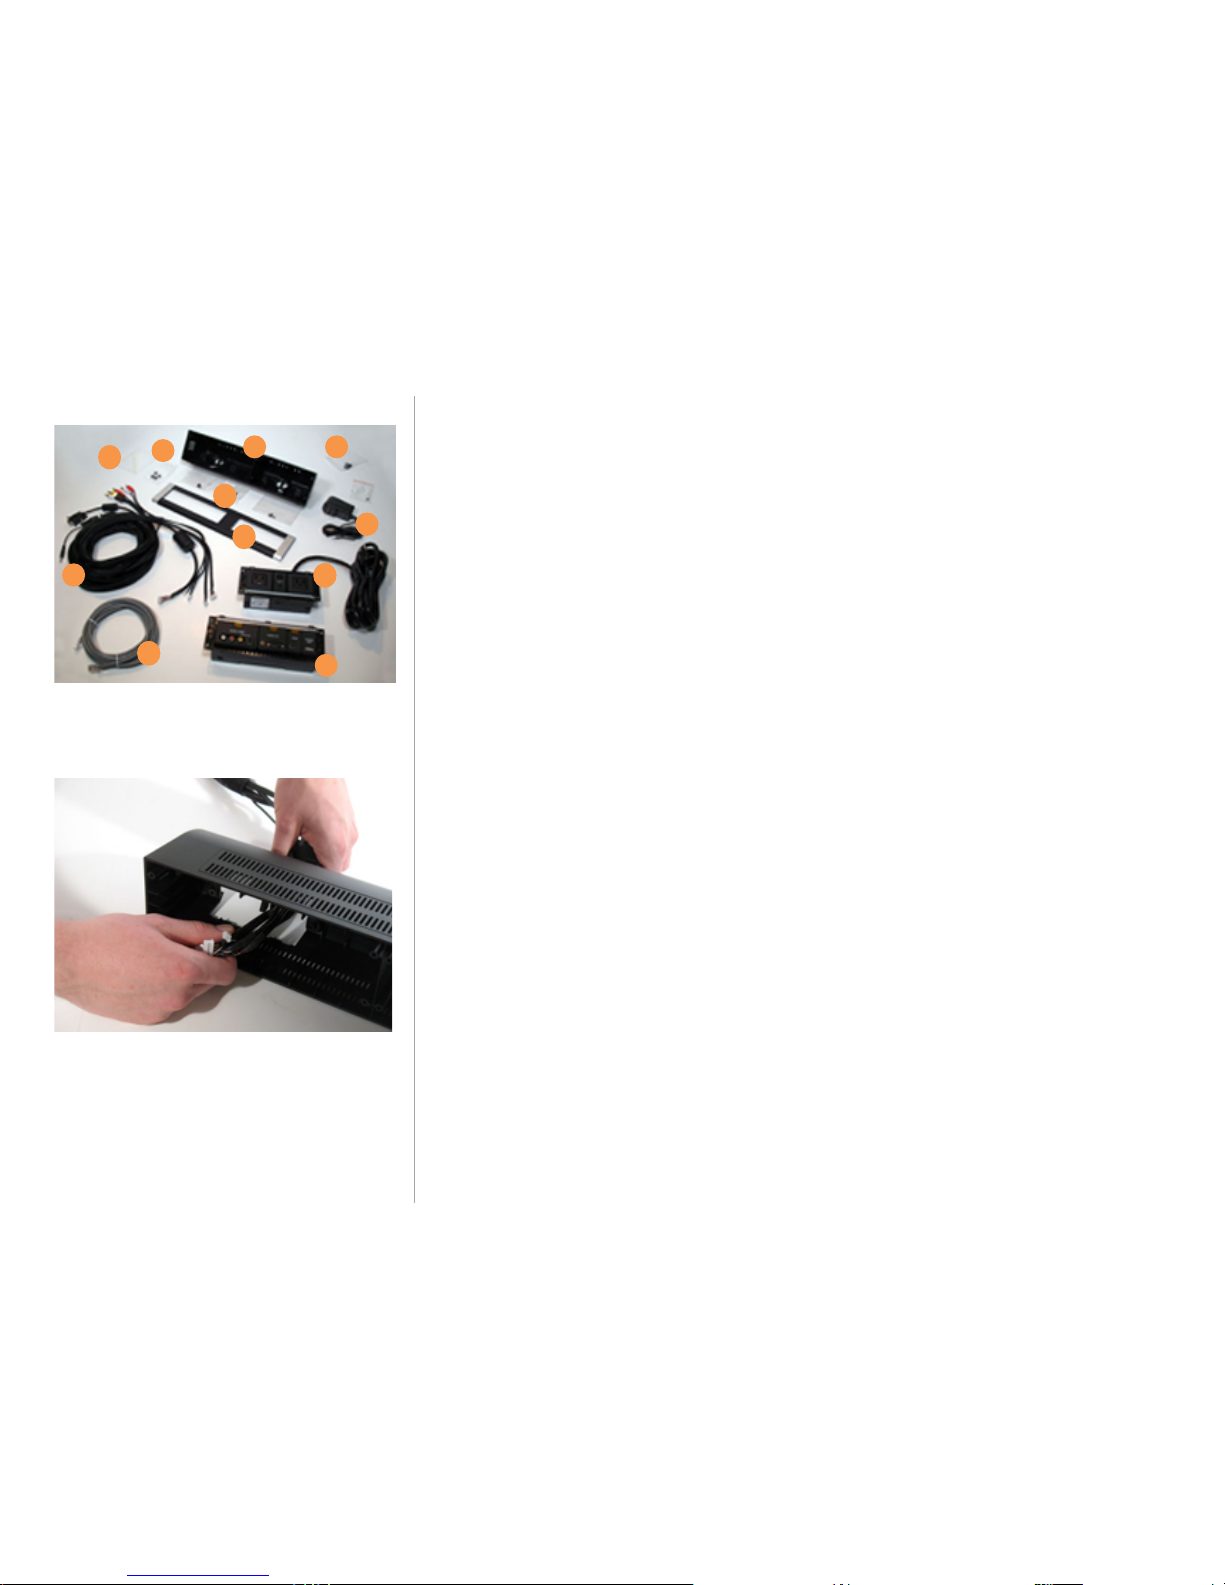
TA-7630 and TA-7730 Installation Manual
Last Revised: 9/30/11 10:47 AM
30
Figure 1: To appropriately assemble the desktop
housing, pull mini-connector ends through the rear
opening of the desktop housing and connect cables
to rear of MediaHub Active.
A C B E F
G D H
J K I
Assemble Desktop Housing
What You Will Need:
TA-7630 Destop Housing Kit: Add for MediaHub + PowerHub Desktop Kit:
A TA-7630 I TA -7500 with power supply
B MediaHub Power Supply J Extender Trim
C Media Hu b Ca ble Kit K Cat5 Ethernet Cable
D Desktop Housing
E Housing rear door screws
F 4 Rubber Tabs
G Mo un tin g Screws (4 TA-7630, 8 TA-7630/TA-7500L)
H Cable Ties
1 | Ensu re DIP Switche s on bac k o f Media Hub Active are set according to your
ins talla tio n ins truc tio ns .
2 | Prepare MediaHu b pan el by removing trim from MediaHub. Slide a flat piece of
plastic, similar to a c redit c ard, be twee n the end caps and the trim base, then
removin g trim bezel. Also, remove rear door of MediaHub panel.
If assembling MediaHub Active with PowerHub Extender in desktop housing, also
remove e nd c aps a nd be zel from Po werHub po rtio n.
3 | Remove the rea r door(s) of the Desktop Housing.
4 | Pull the cable ends that will connect to the MediaHub Active (min i c onn ec to r
ends) through the left rear opening of the Desktop Housing from the back (as
shows in Figure 1).
For MediaHub Active with PowerHub Extender, also pull the PowerHub power
supply th rough th e h ousing’s right side rea r opening, FRO M THE F RONT .
5 | Connect cables to rear of MediaHub Active panel according to your installation
ins truc tio ns .
7 | Se cu re re ar do or on to Me dia Hu b.
8 | Slide Media Hub Active pan el int o deskto p housing, secure with trim using
mou nting screws in co rne rs. Tight en e venly.
Page 31
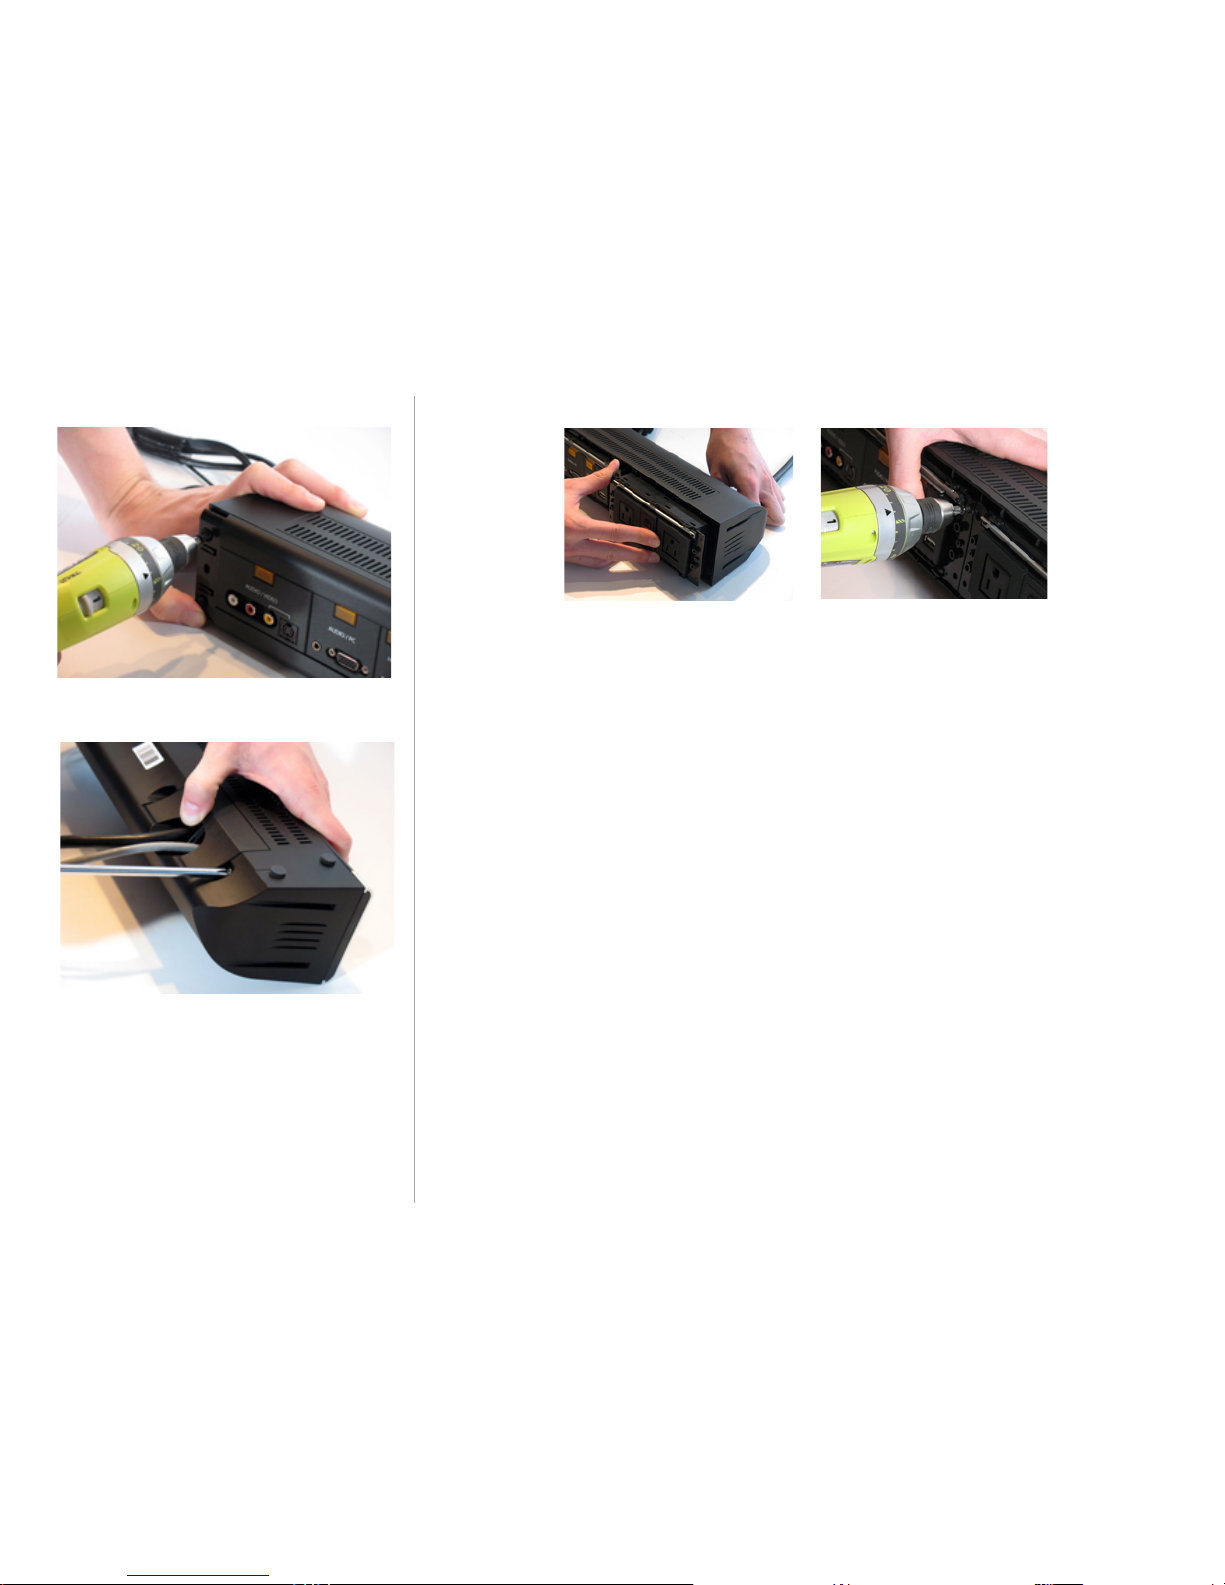
TA-7630 and TA-7730 Installation Manual
Last Revised: 9/30/11 10:47 AM
31
Figure 1: Secure panel into housing, see note for
Extender units.
Figure 2: Secure rear housing doors.
Not e: Fo r Media Hub Act ive with Powe rHub Extender, slide power/data panel into the
righ t side o f ho using, sec ure pan els in to the ho using using the f ou r c enter screw
holes first. Then attach extender trim, securing with screws in four corners. Tighten
evenly.
MediaHu b Active uses four (4 ) sc re ws. Med iaHu b Ac tiv e with P owe rHu b E xte nd er
uses eight (8).
9 | Se cure Desktop Ho using rea r door(s) with screws provided.
10 | Slide end caps back o nto trim.
Page 32

TA-7630 and TA-7730 Installation Manual
Last Revised: 9/30/11 10:47 AM
32
Technical Support
For North and South American 24/7 Technical Support
Toll-Free : 1 877 835 3232 x319 (in US and Canada)
Main : 1 775 232 5044
Email: ric.jone s@u s. te lea da pt.com
For EMEA Technical Support
Main : +44 1923 810235
Email: inf o@teleadapt.com
For APAC Technical Support
Main : +82 10 8566 0809
Email: dg.ho ng@telea dapt.com
 Loading...