

Page 1

PowerHub USB
™
TA-7530/TA-7533
|
Visit our website at: www.teleadapt.com
PowerHub USB Installation Guide_10/2013_REV-0
Page 2

Table of Contents
2 Products Covered By This Installation Guide
6 Important Safety Instructions
6 Approval Information
8 What Is Included In The Box
9 Preparation For Installation
9 Installation
12 Additional Information
12 Warranty
1
Installation Guide
|
™
13 Contact Details
TeleAdapt PowerHub USB
Page 3
TeleAdapt PowerHub USB
™
|
Installation Guide
TeleAdapt PowerHub USB
™
|
Installation Guide
2
3
Products Covered By This Installation Guide
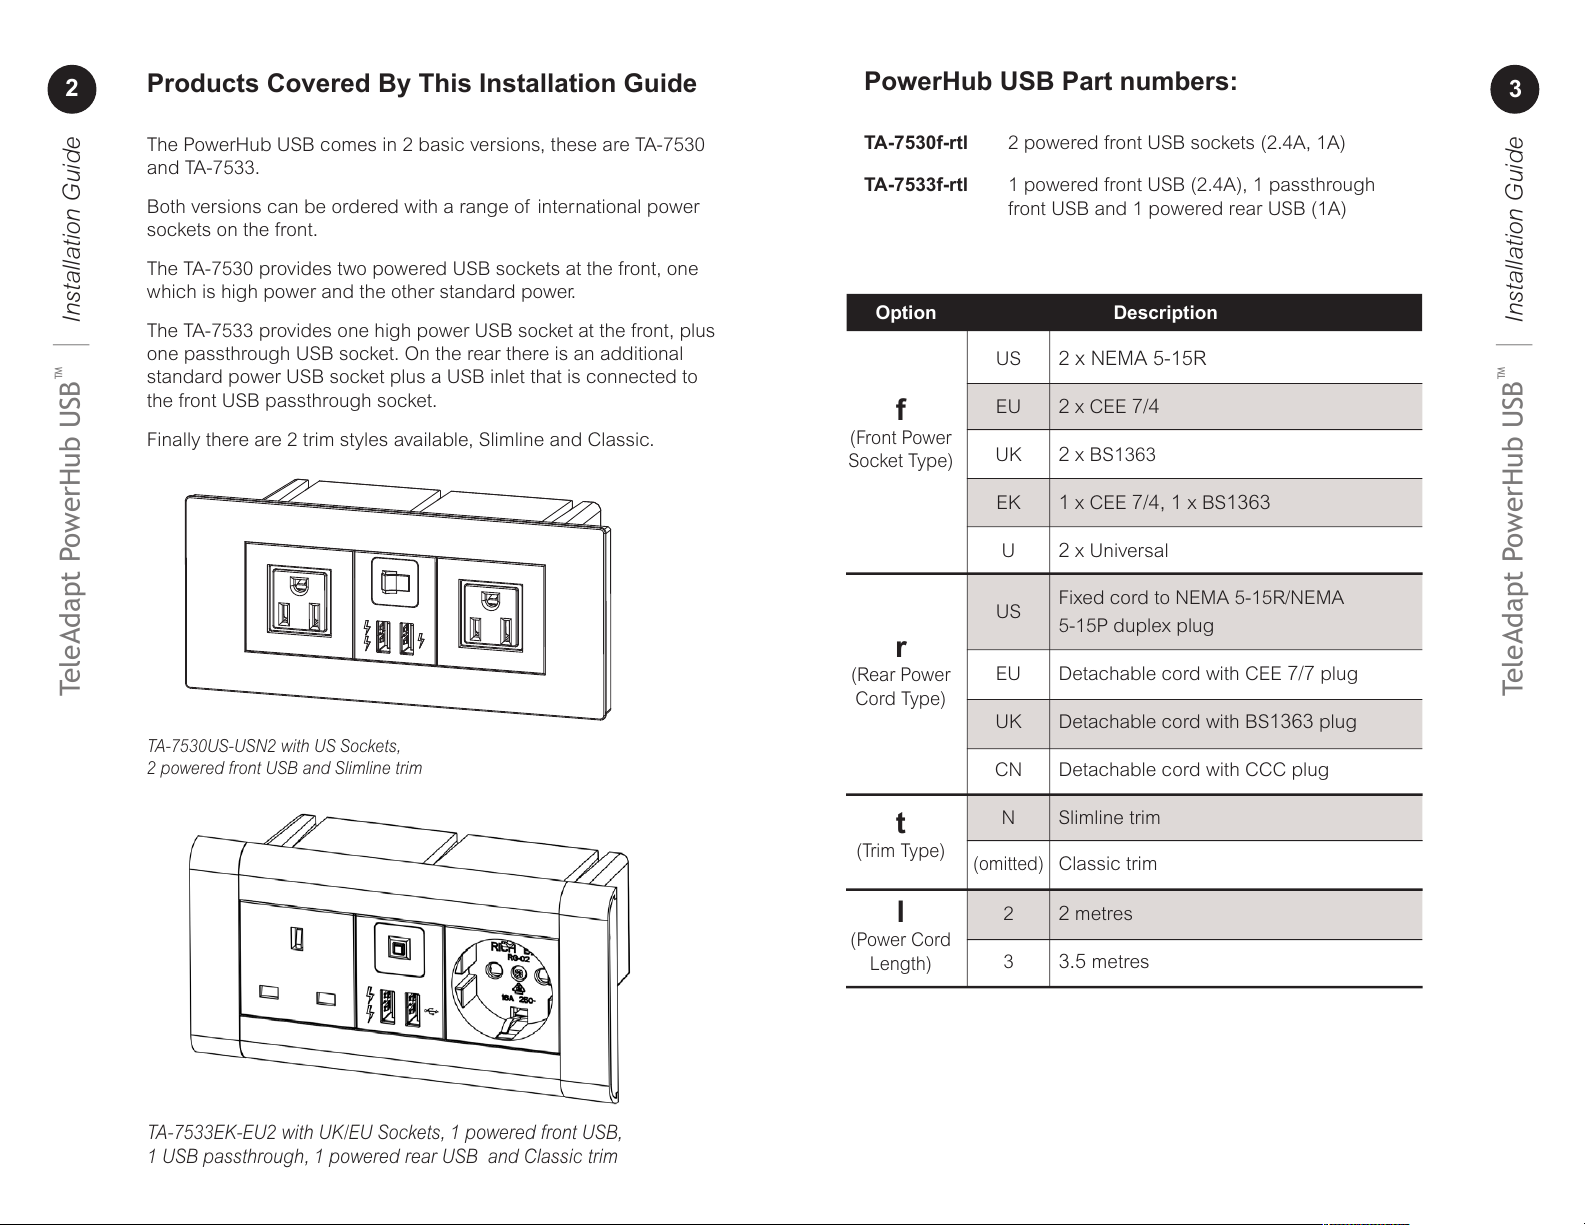
The PowerHub USB comes in 2 basic versions, these are TA-7530
and TA-7533.
Both versions can be ordered with a range of international power
sockets on the front.
The TA-7530 provides two powered USB sockets at the front, one
which is high power and the other standard power.
The TA-7533 provides one high power USB socket at the front, plus
one passthrough USB socket. On the rear there is an additional
standard power USB socket plus a USB inlet that is connected to
the front USB passthrough socket.
Finally there are 2 trim styles available, Slimline and Classic.
TA-7530US-USN2 with US Sockets,
2 powered front USB and Slimline trim
TA-7533EK-EU2 with UK/EU Sockets, 1 powered front USB,
1 USB passthrough, 1 powered rear USB and Classic trim
PowerHub USB Part numbers:
TA-7530f-rtl 2 powered front USB sockets (2.4A, 1A)
TA-7533f-rtl 1 powered front USB (2.4A), 1 passthrough
front USB and 1 powered rear USB (1A)
Option Description
f
(Front Power
Socket Type)
r
(Rear Power
Cord Type)
t
(Trim Type)
l
(Power Cord
Length)
US 2 x NEMA 5-15R
EU
2 x CEE 7/4
UK
2 x BS1363
EK
1 x CEE 7/4, 1 x BS1363
U
2 x Universal
US
Fixed cord to NEMA 5-15R/NEMA
5-15P duplex plug
EU Detachable cord with CEE
7/7 plug
UK Detachable cord with BS
1363 plug
CN Detachable cord with CCC plug
N Slimline trim
(omitted)
Classic trim
2
2 metres
3
3.5 metres
Page 4
4
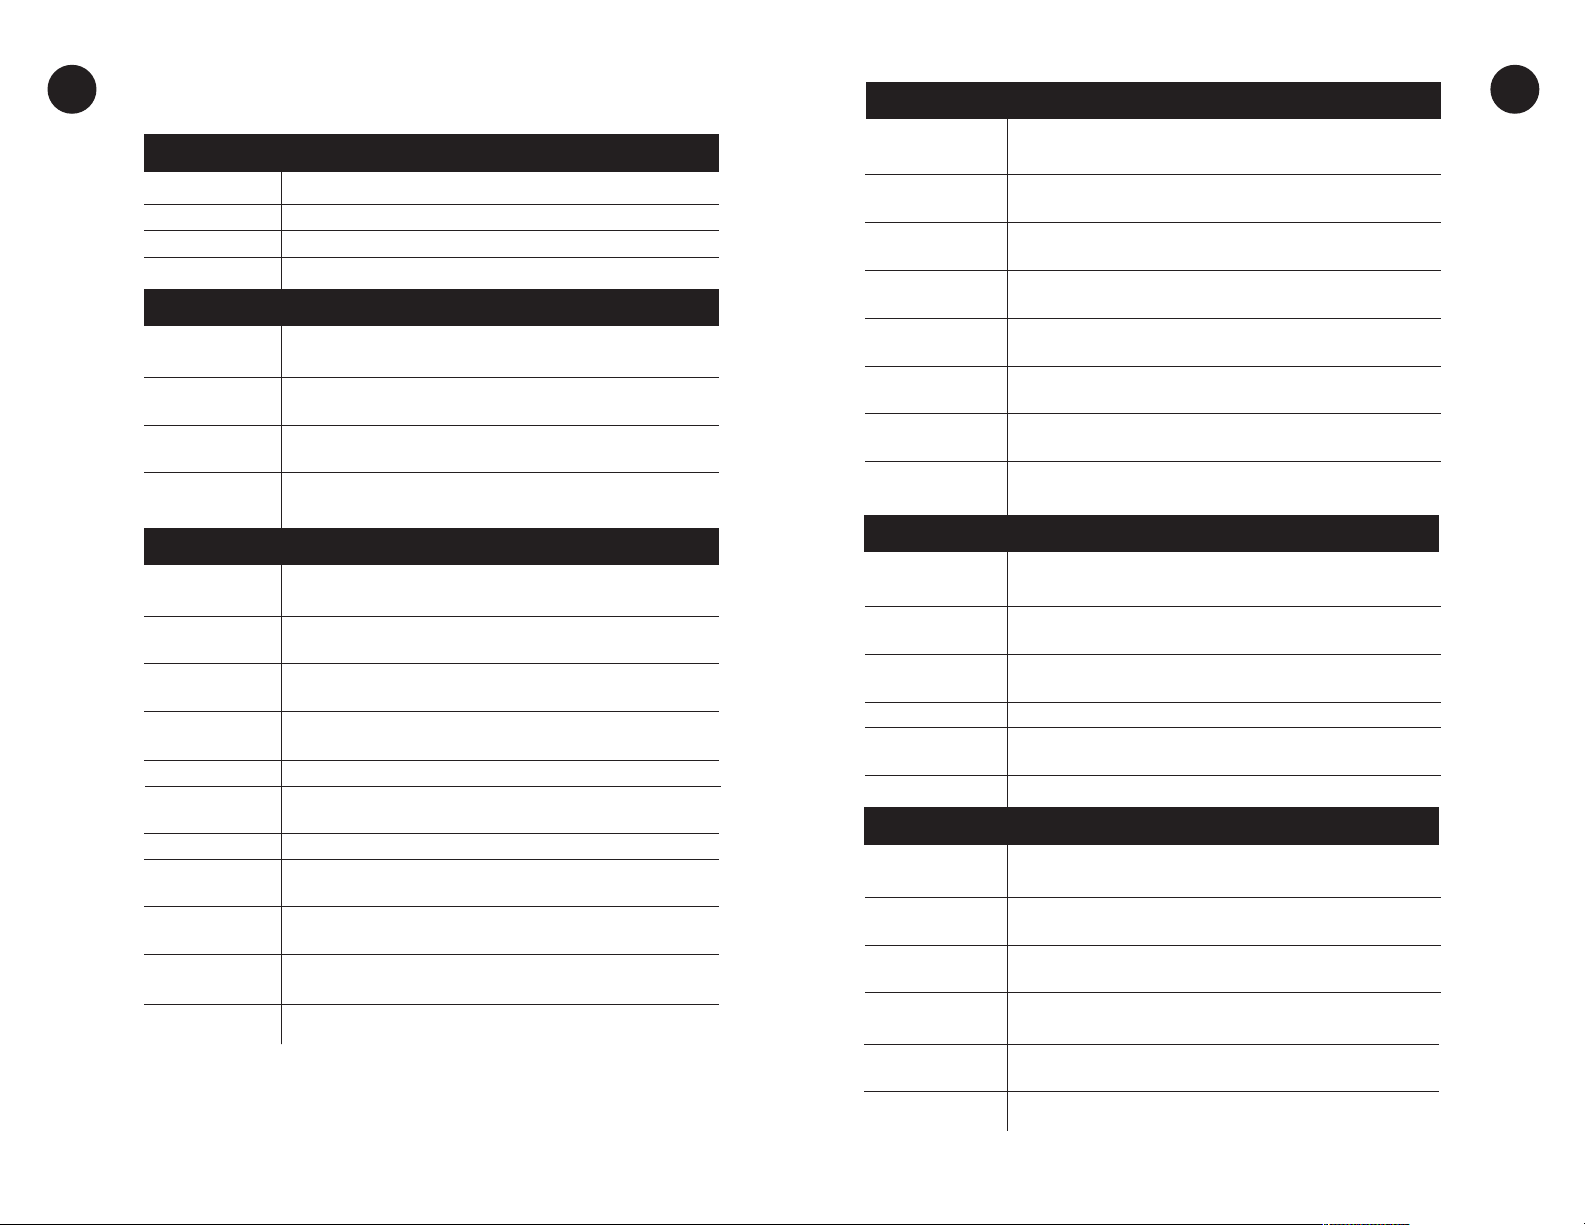
List of All PowerHub USB Part Numbers
EU and UK Variants | USB Passthrough
5
US Variants
TA-7530US-US2 PowerHub USB, 2xUS, Classic trim with end caps, 2 metres
TA-7530US-US3 PowerHub USB, 2xUS, Classic trim with end caps, 3.5 metres
TA-7530US-USN2 PowerHub USB, 2xUS, Slimline trims, 2 metre US cord
TA-7530US-USN3 PowerHub USB, 2xUS, Slimline trims, 3.5 metre US cord
US Variants | USB Passthrough
Installation Guide
|
™
TA-7533US-US2 PowerHub USB, 2xUS, USB passthrough,
Classic trim with end caps, 2 metre US cord
TA-7533US-US3 PowerHub USB, 2xUS, USB passthrough,
Classic trim with end caps, 3.5 metre US cord
TA-7533US-USN2 PowerHub USB, 2xUS, USB passthrough,
Slimline trims, 2 metre US Cord
TA-7533US-USN3 PowerHub USB, 2xUS, USB passthrough,
Slimline trims, 3.5 metre US cord
EU and UK Variants
TA-7530EU-EU3 PowerHub USB, 2xEU, Classic trim with end caps,
3.5 metre EU cord
TA-7530EU-EUN3 PowerHub USB, 2xEU, Slimline trims,
3.5 metre EU cord
TeleAdapt PowerHub USB
TA-7530UK-UK3 PowerHub USB, 2xUK, Classic trim with end caps,
3.5 metre UK cord
TA-7530EK-EU3 PowerHub USB, 2xEU, Classic trim with end caps,
3.5 metre EU cord
TA-7530EU-EUN3 PowerHub USB, 2xEU, Slimline trims, 3.5 metre EU cord
TA-7530UK-UK3 PowerHub USB, 2xUK, Classic trim with end caps,
3.5 metre UK cord
TA-7530UK-UKN3 PowerHub USB, 2xUK, Slimline trims, 3.5 metre UK cord
TA-7530EK-EU3 PowerHub USB, 1xEU+1xUK, Classic trim with end caps,
3.5 metre EU cord
TA-7530EK-EUN3 PowerHub USB, 1xEU+1xUK, Slimline trims,
3.5 metre EU cord
TA-7530EK-UK3 PowerHub USB, 1xEU+1xUK, Classic trim with end caps,
3.5 metre UK cord
TA-7530EK-UKN3 PowerHub USB, 1xEU+1xUK, Slimline trims,
3.5 metre UK cord
TA-7533EU-EU3 PowerHub USB, 2xEU, USB passthrough, Classic trim with
end caps, 3.5 metre EU cord
TA-7533EU-EUN3 PowerHub USB, 2xEU, USB passthrough, Slimline trims,
3.5 metre EU cord
TA-7533UK-UK3 PowerHub USB, 2xUK, USB passthrough, Classic trim
with end caps, 3.5 metre UK cord
TA-7533UK-UKN3
3.5 metre UK cord
TA-7533EK-EU03 PowerHub USB, 1xEU+1xUK, USB passthrough, Classic
trim with end caps, 3.5 metre EU cord
TA-7533EK-EUN3 PowerHub USB, 1xEU+1xUK, USB passthrough,
Slimline trims, 3.5 metre EU cord
TA-7533EK-UK3 PowerHub USB, 1xEU+1xUK, USB passthrough,
Classic trim with end caps, 3.5 metre UK cord
TA-7533EK-UKN3 PowerHub USB, 1xEU+1xUK, USB passthrough,
Slimline trims, 3.5 metre UK cord
PowerHub USB, 2xUK, USB passthrough, Slimline trims,
Installation Guide
|
™
Universal Variants
TA-7530U-CN3 PowerHub USB, 2xUniversal, USB passthrough,
Classic trim with end caps, 3.5 metre CN cord
TA-7533U-CNN3 PowerHub USB, 2xUniversal, USB passthrough,
Slimline trims, 3.5 metre CN cord
TA-7533U-EU3 PowerHub USB, 2xUniversal, USB passthrough,
Classic trim with end caps, 3.5 metre EU cord
TA-7530U-EUN3
TA-7530U-UK3 PowerHub USB, 2xUniversal, Classic trim with end caps,
3.5 metre UK cord
TA-7530U-UKN3
PowerHub USB, 2xUniversal, Slimline trims, 3.5 metre EU cord
PowerHub USB, 2xUniversal, Slimline trims, 3.5 metre UK cord
TeleAdapt PowerHub USB
Universal Variants | USB Passthrough
TA-7533U-CN3
Classic trim with end caps, 3.5 metre CN cord
TA-7533U-CNN3 PowerHub USB, 2xUniversal, USB passthrough,
Slimline trims, 3.5 metre CN cord
TA-7533U-EU3 PowerHub USB, 2xUniversal, USB passthrough,
Classic trim with end caps, 3.5 metre EU cord
TA-7533U-EUN3 PowerHub USB, 2xUniversal, USB passthrough,
Slimline trims, 3.5 metre EU cord
TA-7533U-UK3 PowerHub USB, 2xUniversal, USB passthrough,
Classic trim with end caps, 3.5 metre UK cord
TA-7533U-UKN3 PowerHub USB, 2xUniversal, USB passthrough,
Slimline trims, 3.5 metre UK cord
PowerHub USB, 2xUniversal, USB passthrough,
Page 5

6
Important Safety Instructions
7
Read these instructions carefully before attempting any
installation. Follow all instructions and heed all warnings.
These instructions should be kept for future reference.
1 This equipment must be securely attached to furniture in strict
accordance with these installation instructions.
Installation Guide
|
™
2 This equipment is designed for indoor use only.
3 Only use with attachments and accessories as specified
by the manufacturer.
4 The mains plug used to disconnect this equipment from its
power source must be readily accessible at all times.
5 Ensure the power cord is uncoiled before installation.
6 Protect the power cord from being walked on or pinched
par ticularly at plugs, convenience receptacles and the point
where they exit from the equipment.
7 The power cord must be plugged into a mains socket outlet
with protective earthing.
TeleAdapt PowerHub USB
8 Clean only with a dry cloth.
9 Refer all servicing to qualified service personnel. Servicing is
required when the equipment has been damaged in any way,
for example if the power supply plug or cord is damaged,
liquid has been spilled or objects have fallen into the
equipment, the equipment has been exposed to rain or
moisture, does not operate normally or has been dropped
or damaged.
10 Unplug this equipment during lightning storms or when
unused for long periods of time.
11 Do NOT defeat the safety purpose of the grounded plug.
If the provided plug does not fit into your outlet consult a
qualified electrician to replace the obsolete outlet.
12 Do NOT install or use this equipment near water.
13 Do NOT expose this apparatus to rain or moisture.
14 Do NOT expose to dripping or splashing. No objects filled
with liquid such as vases shall be placed on the equipment.
15 Do NOT install near any heat sources such as radiators,
convection heaters or other apparatus such as amplifiers that
produce heat.
16 Do NOT exceed the maximum load of 10 amps.
Approval Information
All US variants are UL Listed for US and Canada and are
approved to UL1310 and UL962A. They also
comply with FCC Part 15B.
All EU, UK and EK variants are CE compliant
and are tested against EN60065, EN61000-6-1,
EN61000-6-3+A11 2004. They are also RoHS compliant.
Universal variants have no approvals.
Installation Guide
|
™
TeleAdapt PowerHub USB
Page 6
TeleAdapt PowerHub USB
™
|
Installation Guide
TeleAdapt PowerHub USB
™
|
Installation Guide
Preparation For Installation
The PowerHub USB is designed to be installed in furniture.
Ensure the location chosen for the equipment complies with the requirements
of the “Important Safety Instructions” on page 6 of this guide.
A cutout will need to be made in the furniture. Other than this the only
tools you will need are a small sized cross head screwdriver and a
medium sized cross head screwdriver.
See cutout dimensions below.
Installation
Before starting installation make sure you have read and understood
the “Important Safety instructions” on page 6 of this guide.
Step 1
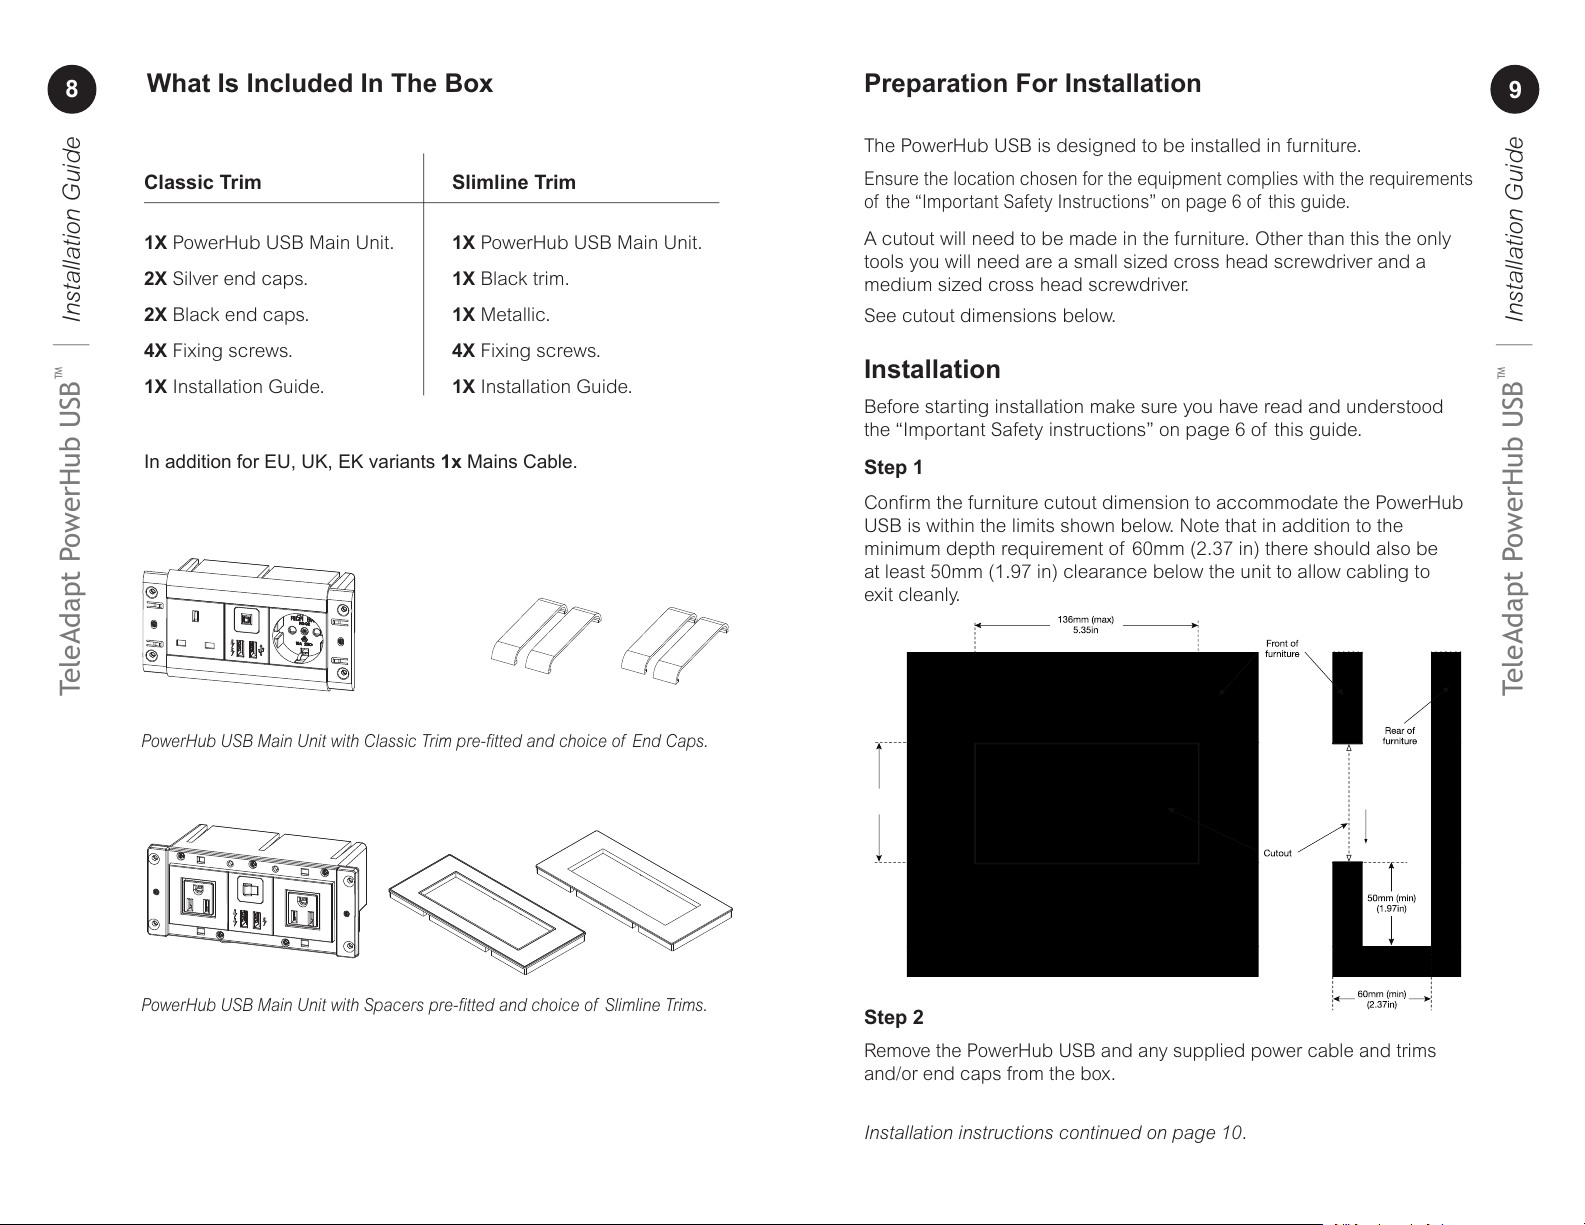
Confirm the furniture cutout dimension to accommodate the PowerHub
USB is within the limits shown below. Note that in addition to the
minimum depth requirement of 60mm (2.37 in) there should also be
at least 50mm (1.97 in) clearance below the unit to allow cabling to
exit cleanly.
Step 2
Remove the PowerHub USB and any supplied power cable and trims
and/or end caps from the box.
Installation instructions continued on page 10.
8
9
What Is Included In The Box
Classic Trim Slimline Trim
1X PowerHub USB Main Unit. 1X PowerHub USB Main Unit.
2X Silver end caps. 1X Black trim.
2X Black end caps. 1X Metallic.
4X Fixing screws. 4X Fixing screws.
1X Installation Guide. 1X Installation Guide.
PowerHub USB Main Unit with Classic Trim pre-fitted and choice of End Caps.
PowerHub USB Main Unit with Spacers pre-fitted and choice of Slimline Trims.
In addition for EU, UK, EK variants 1x Mains Cable.
70mm(max)
2.87In
Page 7
TeleAdapt PowerHub USB
™
|
Installation Guide
TeleAdapt PowerHub USB
™
|
Installation Guide
10
11
Mini-B USB socket
for passthrough
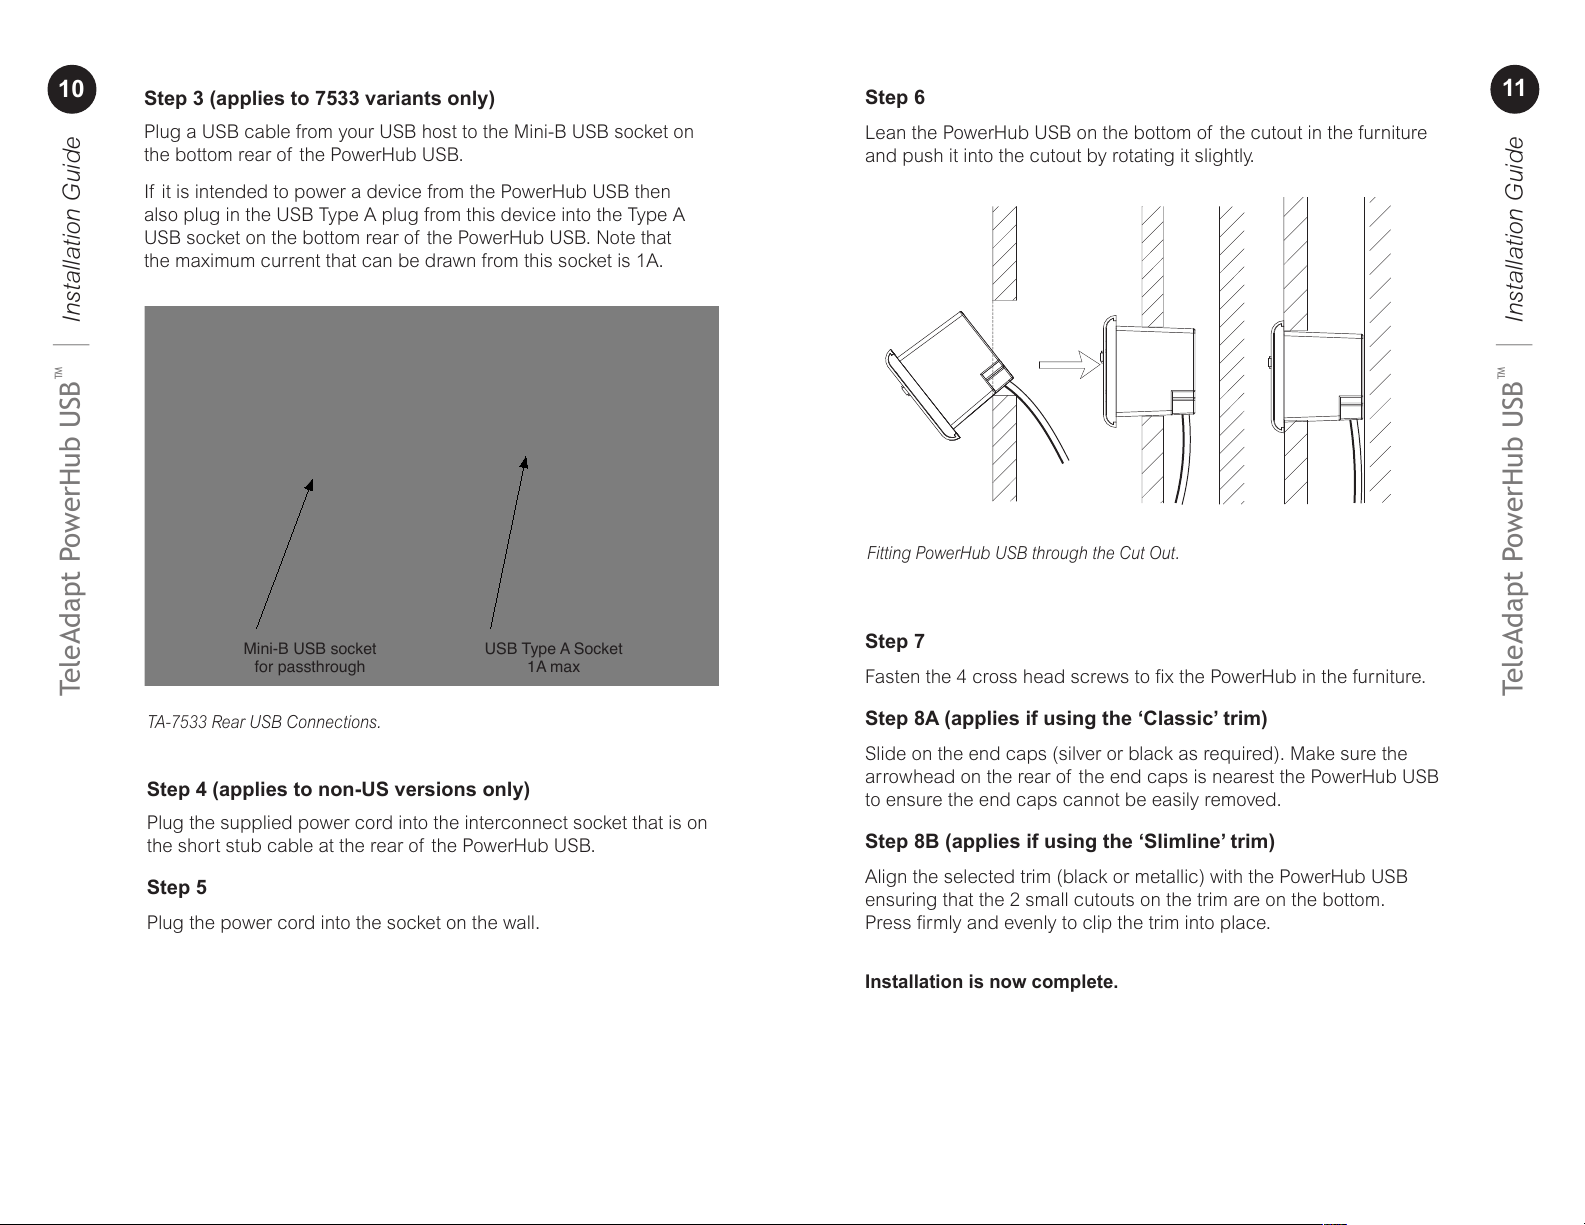
Step 3 (applies to 7533 variants only)
Plug a USB cable from your USB host to the Mini-B USB socket on
the bottom rear of the PowerHub USB.
If it is intended to power a device from the PowerHub USB then
also plug in the USB Type A plug from this device into the Type A
USB socket on the bottom rear of the PowerHub USB. Note that
the maximum current that can be drawn from this socket is 1A.
TA-7533 Rear USB Connections.
Step 4 (applies to non-US versions only)
Plug the supplied power cord into the interconnect socket that is on
the short stub cable at the rear of the PowerHub USB.
Step 5
Plug the power cord into the socket on the wall.
Fitting PowerHub USB through the Cut Out.
Step 6
Lean the PowerHub USB on the bottom of the cutout in the furniture
and push it into the cutout by rotating it slightly.
Step 7
Fasten the 4 cross head screws to fix the PowerHub in the furniture.
Step 8A (applies if using the ‘Classic’ trim)
Slide on the end caps (silver or black as required). Make sure the
arrowhead on the rear of the end caps is nearest the PowerHub USB
to ensure the end caps cannot be easily removed.
Step 8B (applies if using the ‘Slimline’ trim)
Align the selected trim (black or metallic) with the PowerHub USB
ensuring that the 2 small cutouts on the trim are on the bottom.
Press firmly and evenly to clip the trim into place.
Installation is now complete.
USB Type A Socket
1A max
Page 8

12 13
Installation Guide
|
™
Additional Information
Overload Protection
The PowerHub USB has overload protection which cuts power to the
front sockets and USB if an overload occurs.
Before resetting please make sure the equipment that caused the
overload is no longer connected.
To reset press the rocker switch (US and Universal variants) or the
small button (EU, UK and EK variants). These are located just above
the USB sockets on the front of the unit.
Dual USB Charging Variants (TA-7530)
TA-7530 variants of the PowerHub USB provide 2 USB charging
ports on the front of the unit. The left hand USB is suitable for tablets
and mobile phones and can provide up to 2.4A at 5V. The right hand
USB is suitable for mobile phones and can provide up to 1A at 5V.
USB Passthrough Variants (TA-7533)
The TA-7533 variants of the PowerHub USB provide a single USB
charging port on the front of the unit which is suitable for charging
tablets and mobile phones and supplies up to 2.4A at 5V. In addition
a USB passthrough is provided from the rear of the unit to a second
USB socket on the front. Finally a rear USB also provides up to 1A at
5V for powering other devices.
Contact Details
Europe
TeleAdapt Limited
Axis 5
Rhodes Way
Watford
WD24 4YW
United Kingdom
Tel: +44 (0)1923 810200
Americas
TeleAdapt Inc
1315 Greg Street
Suite 110
Sparks
NV 89431
USA
Tel: +1 775 355 8585
Asia
TeleAdapt HK, Ltd
Unit G, 15/F, Block 2
Leader Industrial Center
No. 188-202 Texaco Road
Tseun Wan
Hong Kong
Tel: +852 2780 9020
Website
For information on other
TeleAdapt products designed
for the hospitality industry,
including specification
and cut sheet downloads,
please visit our website at:
www.teleadapt.com
Installation Guide
|
™
TeleAdapt PowerHub USB
Removing the PowerHub USB from Furniture
If you need to remove the equipment for any reason, first ensure the
equipment is disconnected from the mains power source.
A unit with the ‘Classic’ trim can be removed as follows:
1 Insert a business card between the end cap and the trim and
then slide the end caps off to expose the 4 cross head screws.
2 Unscrew the 4 cross head screws and carefully withdraw the unit
from the furniture being careful not to damage any cables.
A unit with the ‘Slimline’ trim can be removed as follows:
1 Use a medium flat blade screwdriver to release 2 clips on the
bottom of the trim.
2 The trim can now be gently removed by hand. Be careful not to
bend the trim excessively or it may deform or break.
3 Unscrew the 4 cross head screws and carefully withdraw the unit
from the furniture being careful not to damage any cables.
Warranty
Please see TeleAdapt “Sales Terms & Conditions” which are available
at http://www.teleadapt.com/teleadapt/sales-terms-conditions.html
Middle East
TeleAdapt Limited
Dubai Media City
Thuraya Tower 1
Office 1008
PO Box 500344
Dubai
UAE
Tel: +971 367 8283
TeleAdapt PowerHub USB
 Loading...