

Page 1
RD000519Rev A AC-211N
Installing the Access 211N VoIP Gat eway
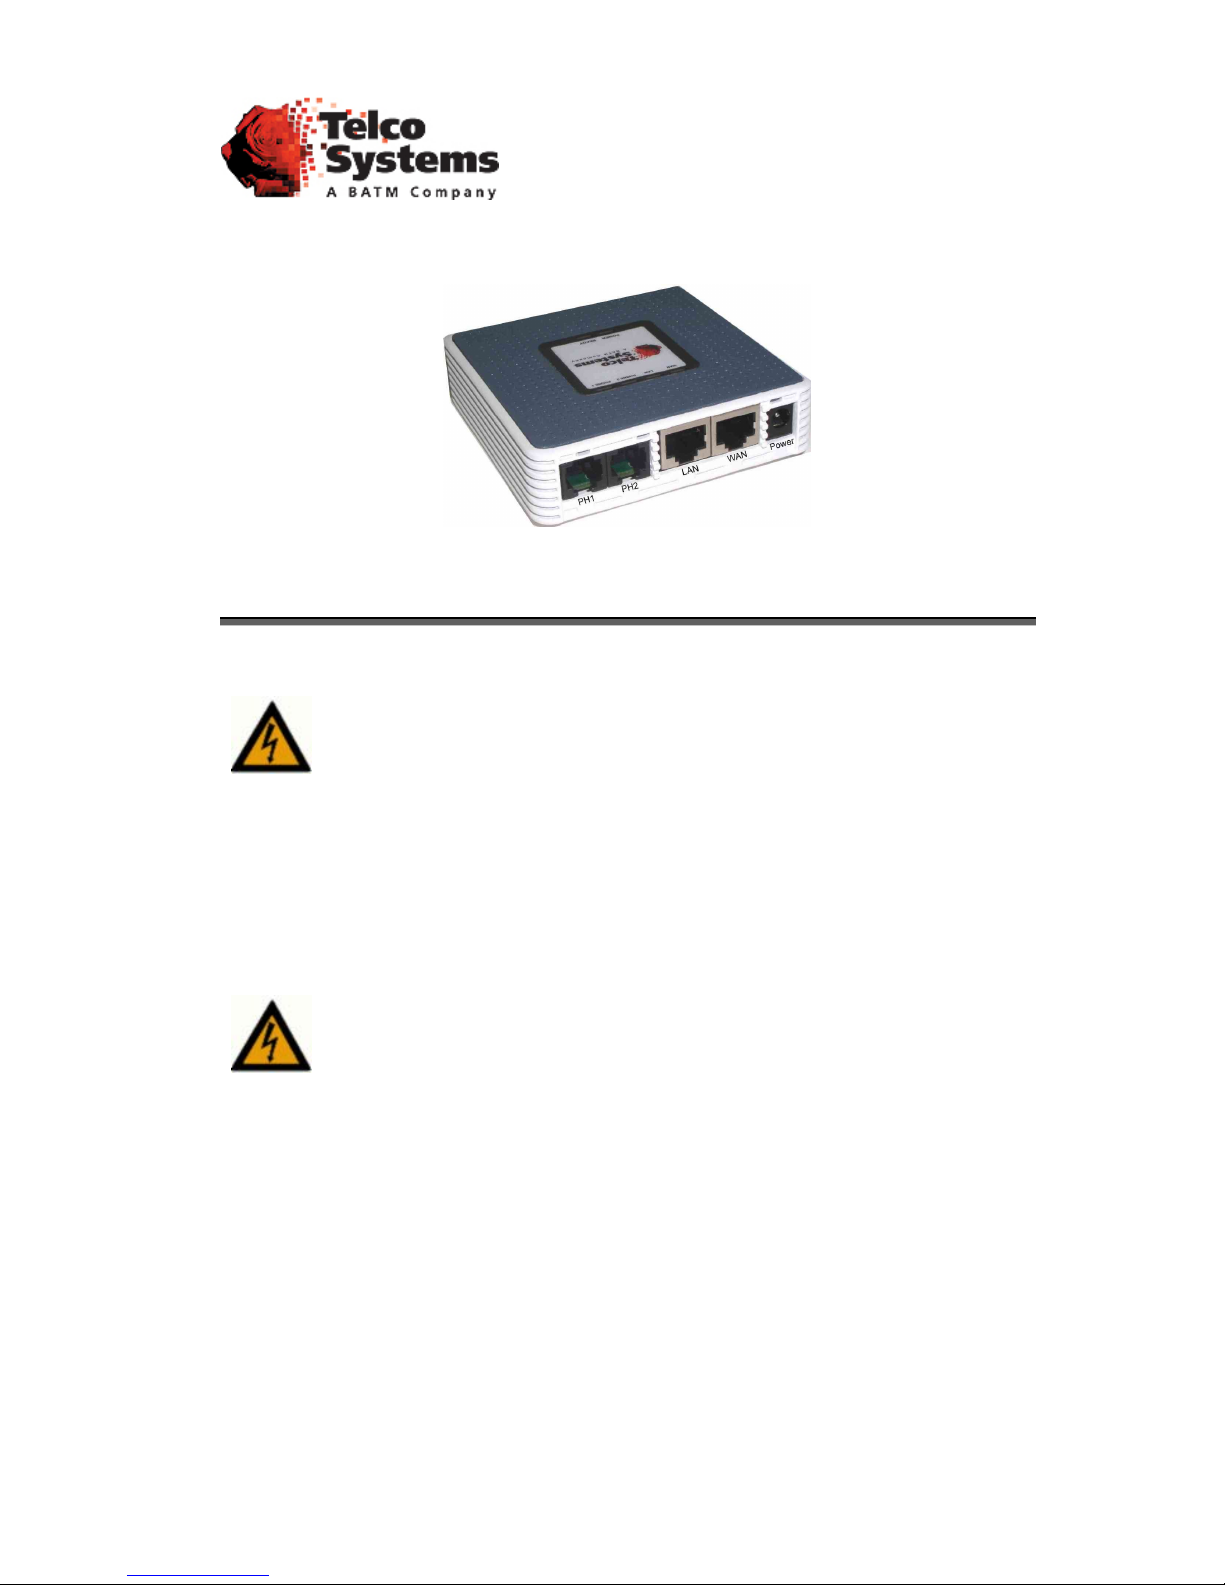
Access 211N Gateway Rear Panel
Important Safety Instructions:
Wh en usi ng the Acces s 211N Gatewa y and the a tta che d te l e ph one set, basic sa fe ty
precau tions should al ways be followed to reduce the ri s k of fire, el e c tric s hock an d
in jury to persons , including the following :
1. Do not use this equi pment ne a r water, for exam ple, ne ar a bath tub, wash bowl,
kitchen sink or laundry tub, in a wet basement or near a s wimmi ng pool.
2. Av oid u s ing the eq uip m e nt d u ring an e l ectr ica l storm. Ther e may b e a rem ot e risk
of el ec tric s hoc k fr o m lightn i ng .
3. Do not use th e attached t el epho n e to r ep ort a ga s leak i n the vic in ity of the leak .
4. Do not cover the unit or b lo ck ventilat ion inlets.
The Acce ss 211N Gate way mus t be powered by a n external UL l i s t e d li mite d power
source or Class II power source (AC/DC adapter), rated input: 100 -240 V, 47-63Hz ,
0.5A, output: 5VDC @ 2A.
The phon e po r ts ( P H1 a nd P H2) a re i nte nded for ind oor conn ec tio ns on ly and m u st not
be conne c ted to the Pu bli c Tele communication Net work .
Page 2
RD000519Rev A AC-211N
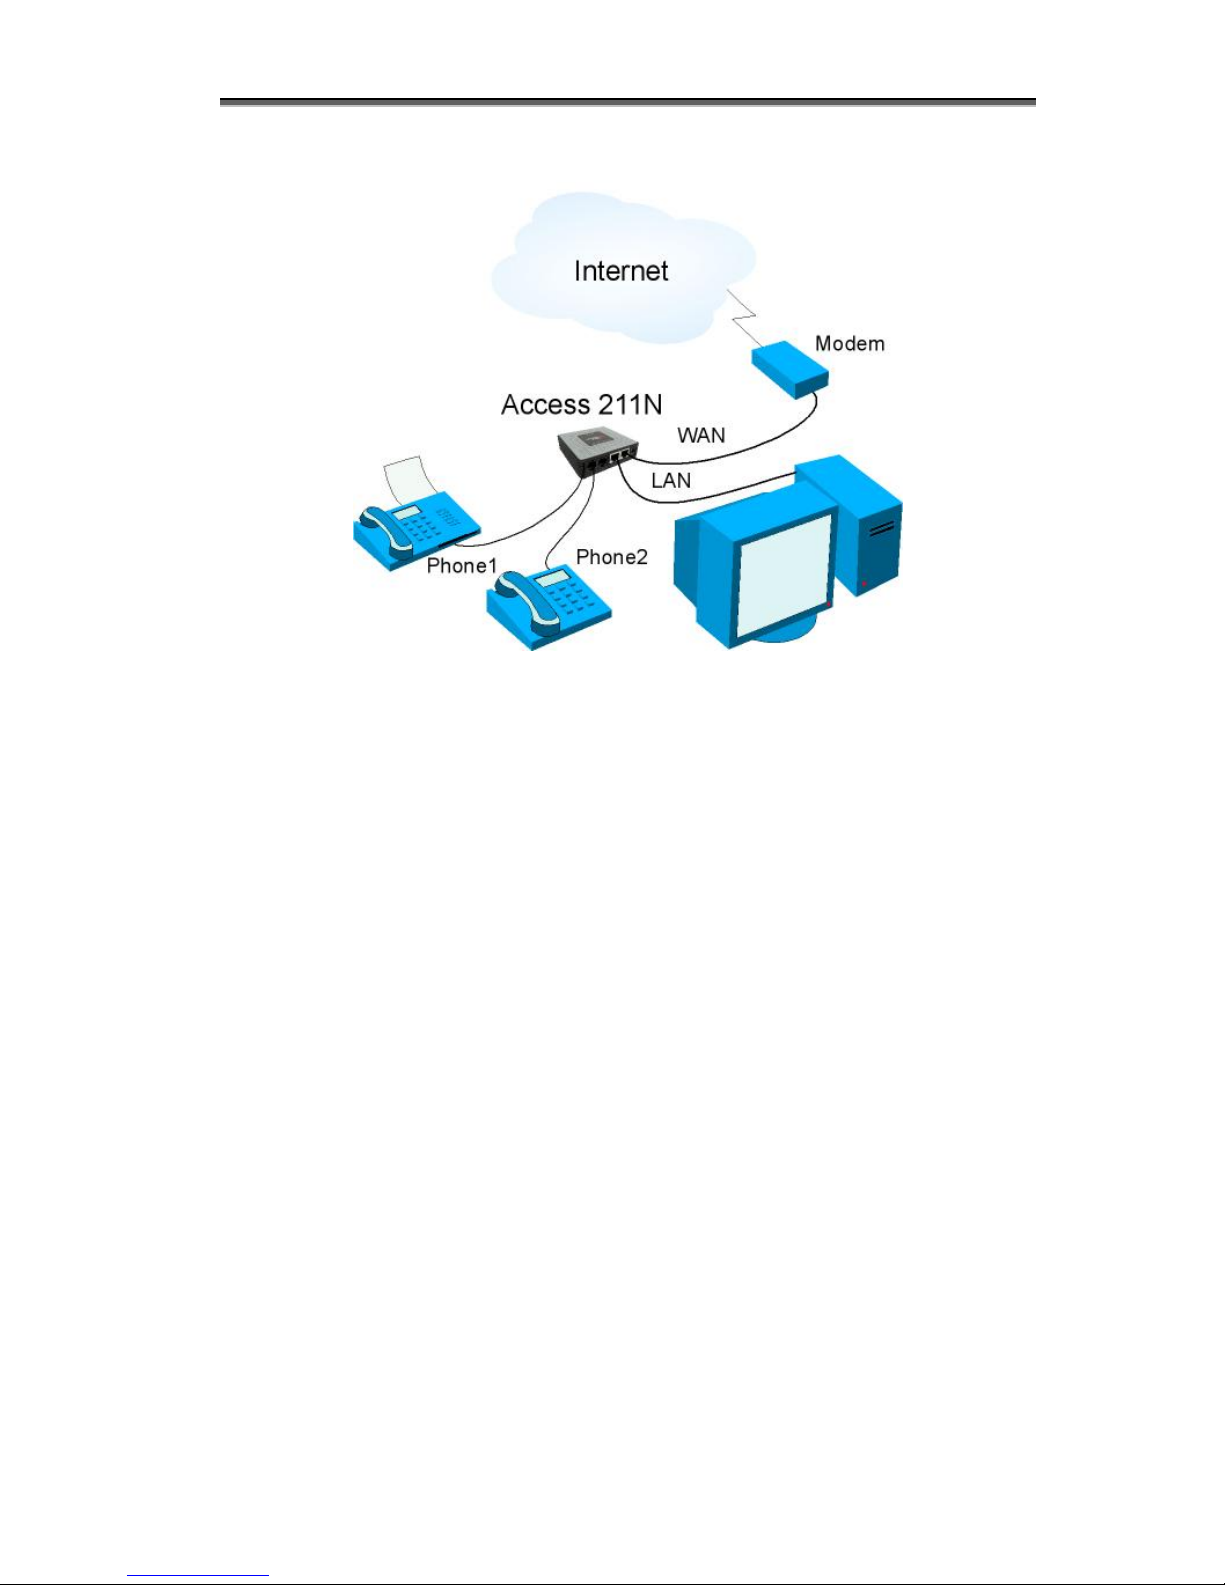
To install y our Access 211N V oIP G at eway with a single P C:
1. Unpack the Access 211N Gateway unit.
Place the Gateway on a desktop or ot her level surface, or mount it on a wall. Choose a
locat ion t hat is near th e devices to be conn ected an d close to an electrical outlet.
2. Connect the WAN port on the Gateway’s rear panel to the Ethernet socket on your
broadband modem with the Ethernet 10/100BaseT X (RJ-45) cable that was prov ided
with yo ur mo dem .
3. Optionally connect t he LAN port on the Gateway’s rear panel to the network socket on
your PC with an Ethernet 10/100BaseTX (RJ-45) cable.
4. Connect the phones to the P H1 and PH2 port s on the Gateway rear panel with RJ-11
Phone cables (if your provider enables only one phone line, connect the phone to the
PH1 port).
5. Verify that all system components are properly installed. Make sure that all cable
connect ors are secur ely p ositioned in the appropriate port s.
6. C onnect the pow e r ad ap ter to the p ower c on nector of t he unit a nd to the power sou r ce .
7. Check that the Power LED on the Gat eway front pan el glows steadi ly.
8. Tur n on you r PC .
9a . If you ar e using a D SL mo dem, yo u will nee d t o en able PPPoE o n the Gat eway a nd
d is a bl e PPPo E on yo ur PC. To ena bl e PP P o E on the G atewa y:
1) Ope n th e web br owser a nd put the IP of t h e gateway in the address fie ld (t he fact ory
default IP address of the LAN interface is 192.168.100.1).
2) I n th e verti cal men u bar on the left of the Gat ewa y Web page, s elect WAN.
The WAN Status page appe ars .
3) In th e horizont al menu bar of the WAN page, select PPPoE. The WAN PPPoE
Configuration page appears.
4) Select Yes in the Enable PPP oE dr op- down l ist box.
5) Fill in th e usern a me and pa ssword in th e Authentication f iel ds as sup pl ied by y our
DSL p rovider . Optionally you can ent er the serv ice name for t he requested serv ice.
Page 3
RD000519Rev A AC-211N
To select a specific p rovider, enter his access name in th e AC name field.
6) Click Save PPPo E Settings.
7) After entering and saving all configurations, you must reset the Gateway. In the
vertical menu bar of t he curr en t pag e, s elec t Reset. The Reset page appea rs.
8) Select Power on reset and click the Reset button. The Gateway power cycles an d
the application home page opens with the new configuration settings.
For more information see section “Enabling Point-to-Point Protocol over Ethernet
(PPPoE)” in the Access 211N VoIP Gateway (AC-211N) User Guide.
9b. If y o u are using a cable modem, not e th at some cable modems need to be po wer cycled
after being connected to t he Gat eway. For such mo dems you can also power cycle th e
Access 211N Gateway for faster connection.
10. Wait fo r the res pec tiv e Phone (Voice) LED (Phone1 for PH1 port /Phone2 for PH2 port)
on the front if the gat eway to glow, indicat ing you are connect ed to your VoIP service
providers. It may take a minute or two for these connections to be est ablished.
11 Ver ify that you have Int ernet access.
12 . Pick up the phone on each line to verify th at yo u can hear the dial ton e.
Once the inst allat ion is co mplet e, you can use your Access 211N Gateway for t elephone calls and
f or t he Internet, a s s uming that you have a c onnection s uppli ed by your VoIP provide r.
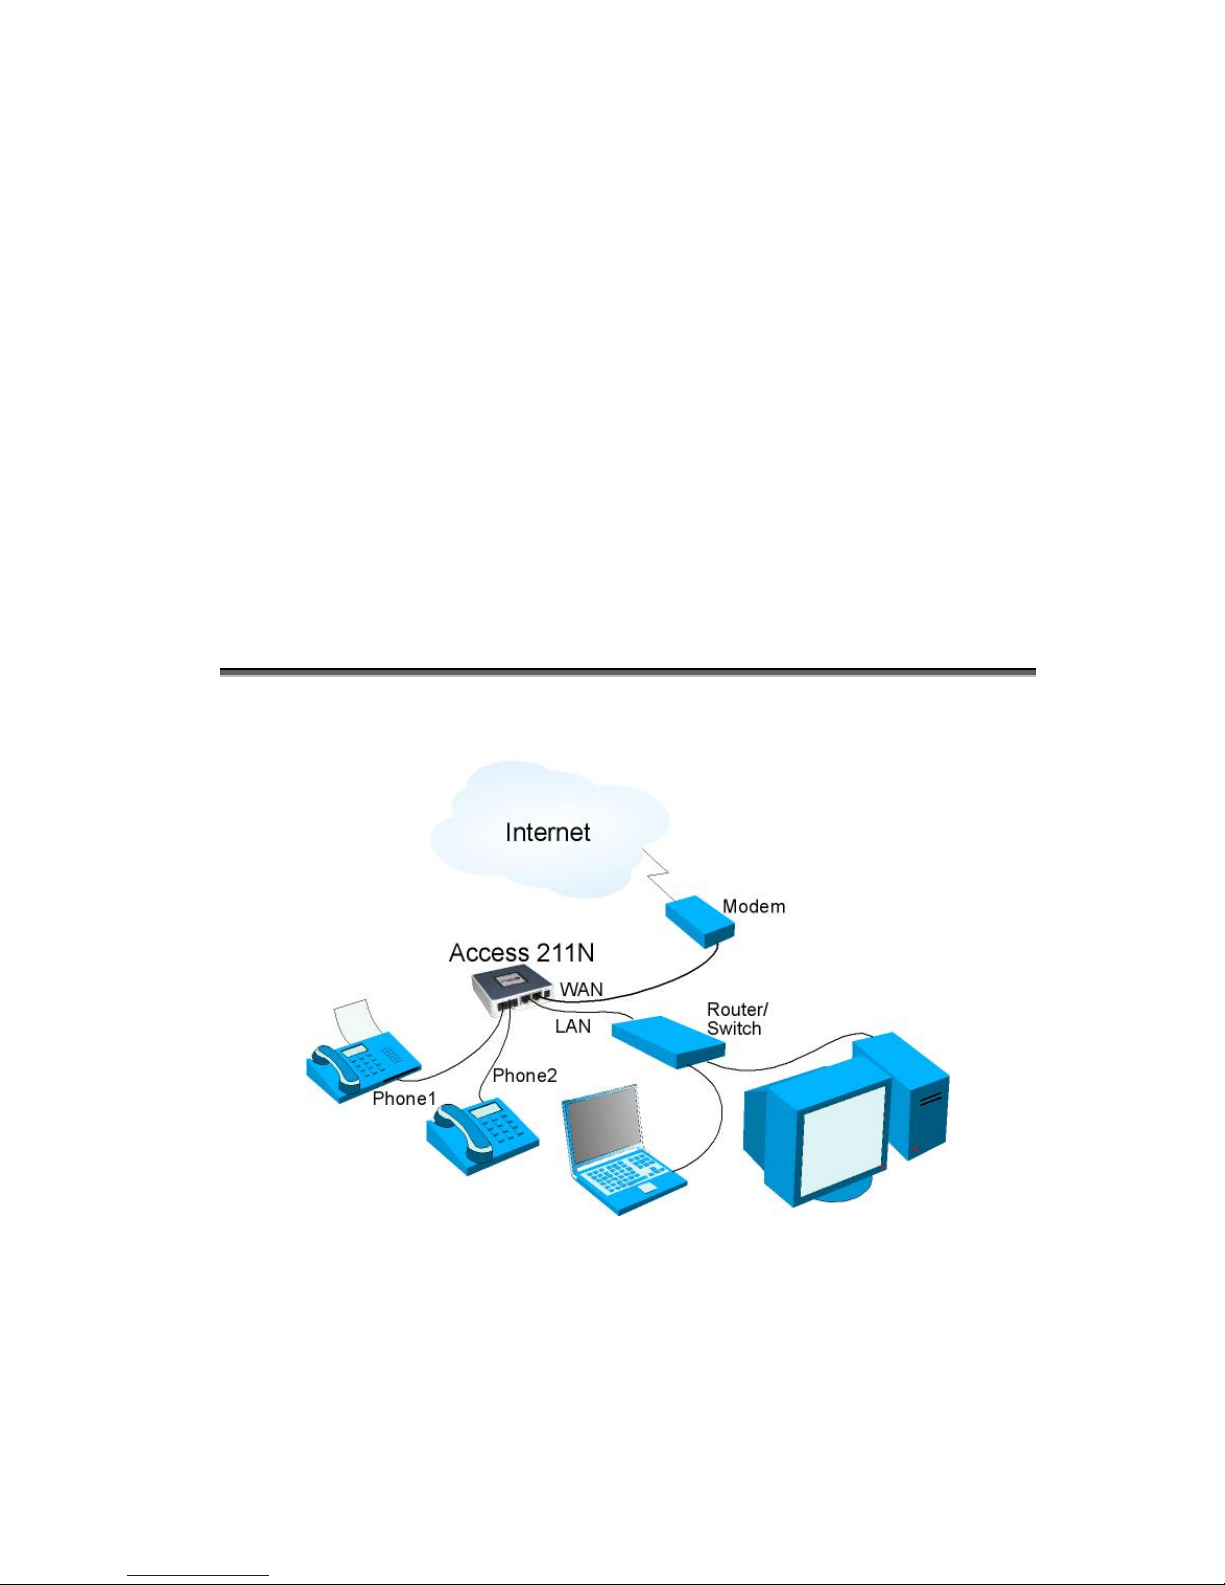
To install y our Access 211N V oIP G at eway with a home n et wo rk:
1. Unpack the Access 211N Gateway unit.
P lace the Gateway on a deskt op or other lev el surface, or mo unt it on a wall. Choose a
locat ion t hat is near th e devices to be conn ected an d close to an electrical outlet.
2. Connect the WAN port on the Gateway’s rear panel to the Ethernet socket on your
broadband modem with the Ethernet 10/100BaseT X (RJ-45) cable that was prov ided
with yo ur mo dem .
3. Connect the LAN port on the Gateway’s rear panel to an open Ethernet WAN port on
yo ur rout er /switch with a supplied Ethernet 10/100BaseTX (RJ-45) cable, in accordance
Page 4

RD000519Rev A AC-211N
w i th the i nstructi ons pr ovi d e d w i th your route r/ s witch.
4. Connect the phones to the P H1 and PH2 port s on the Gateway rear panel with RJ-11
Phone cables (if your provider enables only one phone line, connect the phone to the
Phone1 port).
5. Verify that all system components are properly installed. Make sure that all cable
connect ors are secur ely p ositioned in the appropriate port s.
6. C onnect the pow e r ad ap ter to the p ower c on nector of t he unit a nd to the power sou r ce .
7. Check that the Power LED on the Gat eway front pan el glows steadi ly.
8a . If you ar e using a D SL mo dem, yo u will nee d t o en able PPPoE o n the Gat eway a nd
disable PPPoE on your router. To enable PPPoE on the Ga teway see ste p 9 a
in the above
instruct ion s for installin g your Access 211N VoIP Gat ewa y wit h a single PC.
8b. If y o u are using a cable modem, not e th at some cable modems need to be po wer cycled
after being connected to t he Gat eway. For such mo dems you can also power cycle th e
Access 211N Gateway for faster connection.
9. Wait for the respective P hone (Voice) LED ( Phone1 for PH 1 po r t/ Phone2 for PH2 po rt)
o n t h e Gate way f ront p an el to glo w, in di ca t in g co nn ect i on t o your I nt ern et an d Vo IP
providers. It may take a minute or two for these connections to be est ablished.
1 0 . Re set yo ur ro ut er an d v er if y th at y o ur br oa dban d m ode m an d yo ur ro ut e r ar e wor k in g.
Ver ify that you have Int ernet access.
11. P ick up the phone on each line t o verify that you can hear the dial tone. If no dial tone is
heard, r efer to the the Access 211N VoIP Gateway (AC-211N) User Guide.
Once the inst allat ion is complete, you can use your Access 211N Gat eway f o r telephone calls and
f or t he Internet, a s s uming that you have a c onnection s uppli ed by your VoIP provide r.
If any problems are experienced during the installation of the unit, please contact your local
vendor.
 Loading...