

Telcare TELCBGM03 User Manual
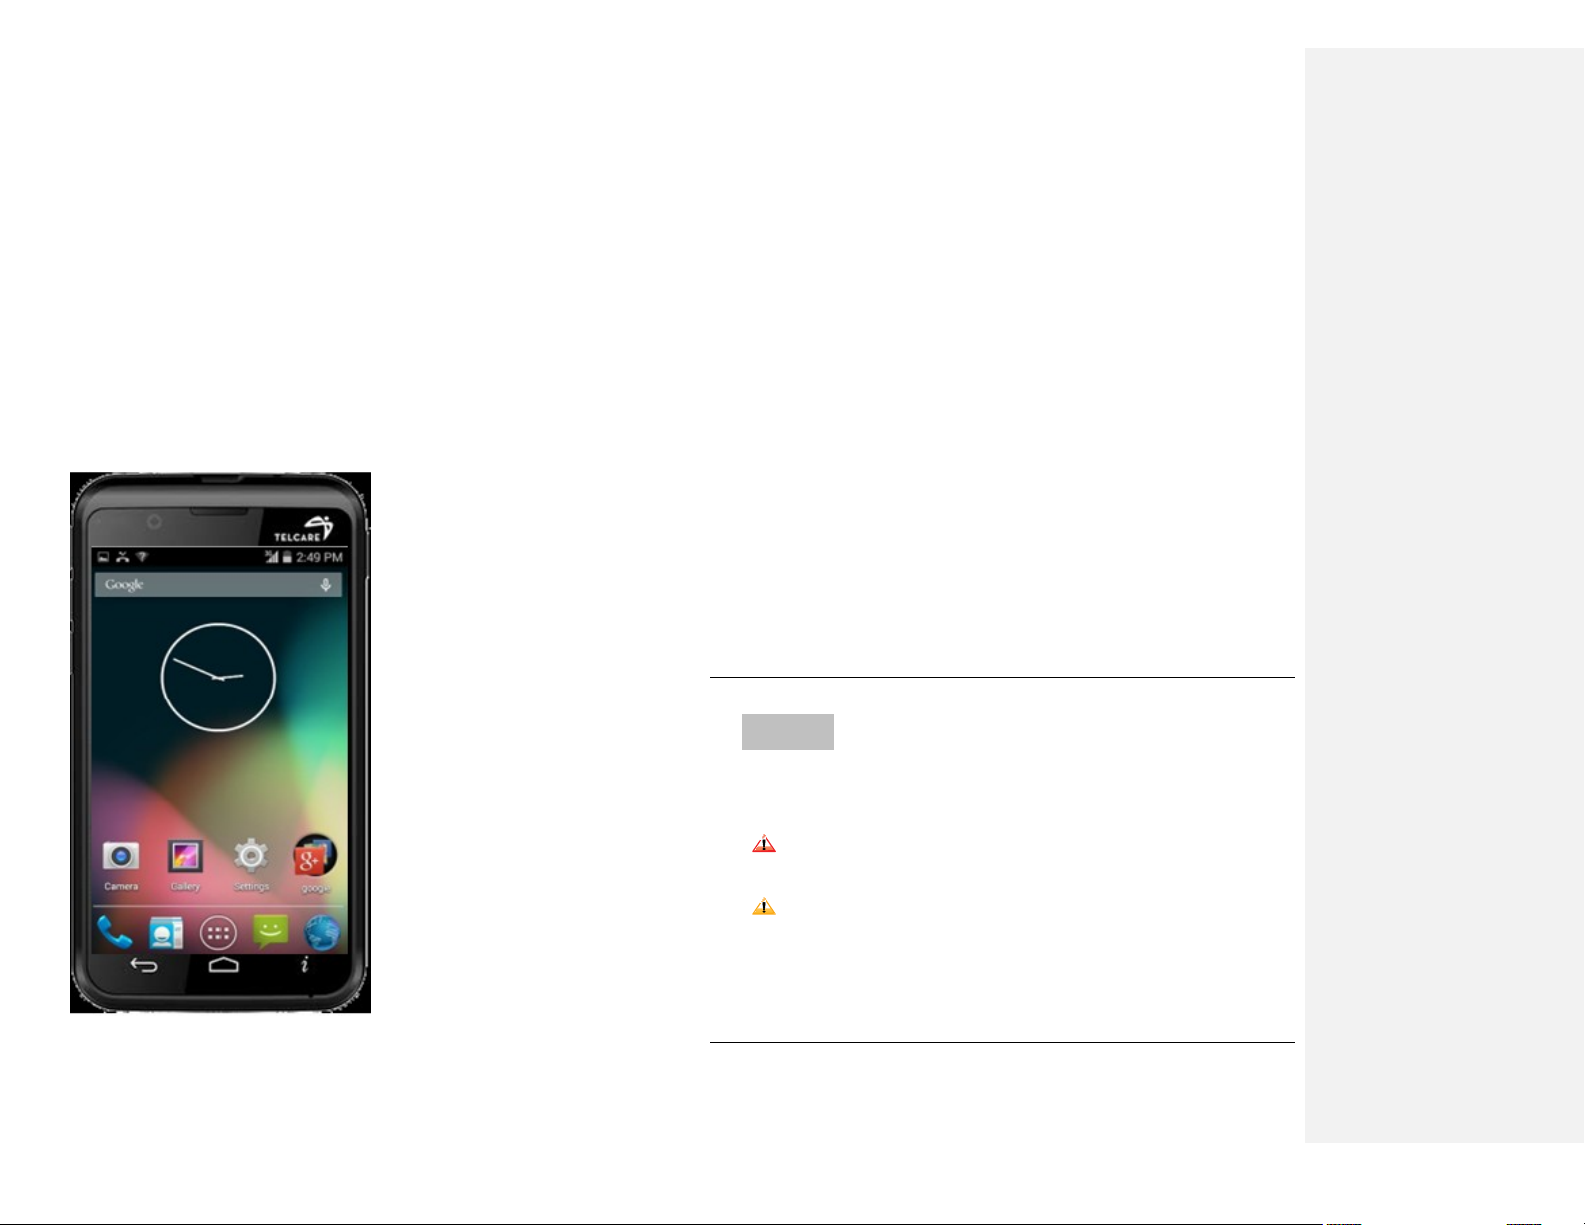
Telcare
User Manual
Conventions used in this guide
In this user guide, we use the following
symbols to indicate useful and important
information:
NOTE NOTE
Notes, usage tips, or additional information
Warning Situations that could cause
injury to yourself or others
Caution Situations that could cause
damage to your device or
other equipment

1
Specifications ......................................................................................... 3
Basics ....................................................................................................... 4
In Box ............................................................................................... 4
Phone Overview ............................................................................ 4
Battery ............................................................................................. 4
MicroSD Card ................................................................................ 6
Turning Phone On or Off ............................................................ 6
Phone Options ............................................................................... 7
Touchscreen Gestures .................................................................. 7
Using the Onscreen Keyboard .................................................... 8
Editing Text .................................................................................... 9
Getting Started .................................................................................... 10
Google Account ........................................................................... 10
Getting to Know the Home Screen .......................................... 11
Customizing the Home Screen ................................................. 11
Essential Display Icons .............................................................. 13
Notifications Panel ..................................................................... 14
Opening & Switching Between Applications ....................... 14
Sleep Mode ................................................................................... 15
Adjusting Volume....................................................................... 16
Searching Your Phone and the Web ........................................ 16
Connecting Your Phone to a Computer .................................. 17
Phone Calls ........................................................................................... 18
Making Calls ................................................................................ 18
Answering or Rejecting Calls ................................................... 19
Using In-Call Options ................................................................ 20
Using Call Log ............................................................................. 20
Listening to Your Voicemail ..................................................... 21
Using Voice Dialer ...................................................................... 21
People .................................................................................................... 23
About People ................................................................................ 23
Opening Your People ................................................................. 23
Getting Started............................................................................. 23
Editing/Deleting Contacts ......................................................... 25
Communicating ........................................................................... 26
Account Setting ........................................................................... 26
Messaging ............................................................................................ 27
About Messaging ........................................................................ 27
Sending Messages ...................................................................... 27
Reading Messages ...................................................................... 29
Receiving Emergency Alerts Messages .................................. 30
Changing Messaging Settings .................................................. 31
Google ................................................................................................... 33
Gmail ............................................................................................. 33
Maps .............................................................................................. 35
Calendar ....................................................................................... 38
Play Music .................................................................................... 41
Google Play Store ....................................................................... 41
Play Books .................................................................................... 45
Web ........................................................................................................ 47
Email ............................................................................................. 47
Browser ......................................................................................... 52
YouTube ....................................................................................... 56
Wi-Fi .............................................................................................. 59
Downloads ................................................................................... 60
Bluetooth .............................................................................................. 62
Using Bluetooth .......................................................................... 62
Disconnecting or Un-pairing from a Bluetooth Device ...... 63
Connecting to a Bluetooth Headset ......................................... 63
Sending and Receiving Information Using Bluetooth ........ 64
Entertainment ...................................................................................... 66
Camera/Camcorder ..................................................................... 66
Gallery .......................................................................................... 68
Playing videos ............................................................................. 70
Sound Recorder ........................................................................... 71
Tools ...................................................................................................... 71
Clock ............................................................................................. 72
Calculator ..................................................................................... 73
Settings ................................................................................................. 74
Settings on Your Phone ............................................................. 74
Firmware Upgrade Using microSD Card ............................... 77
Safety and use ..................................................................................... 79

2
Please read before proceeding .................................................. 79
Limitation of damages ................................................................ 80
Important health information and safety precautions ......... 80
Regulatory agency identifications ........................................... 91
Hearing aid compatibility HAC for wireless
communications devices ............................................................ 94

3
Specifications
1. Display
• 4.0‛WVGA
• Capacitive Touch Screen
2. Camera
• Primary Camera:5.0MP
3. Dimensions and Weight
• Dimensions: 121x 65x 13mm
• Weight: 145 grams.
4. Memory
• 4GB (ROM)/4GB (RAM)
• External memory : Supports up to 64GB
5. Operating System
• Android 4.4.4KitKat
6. Connectivity
• BT 3.0 +EDR, Wi-Fi 802.11 b/g/n
7. Sensors
• Accelerometer, Proximity sensor, Geomagnetic sensor,
Ambient Light sensor, Orientation sensor
8. Power Management (Performance)
Battery Type
Capacity
Standby Time
Talk Time
Lithium-
Ion(Li-ion)
1800mAh
Up to 192Hours
(8Days)
Up to
240minutes
4
Basics
In Box
The Telcare comes with the following items included in the box:
1.Mobile phone
2. Micro USB cable
3. Battery cover
4. Battery
5. USB power adapter
6 .QSG
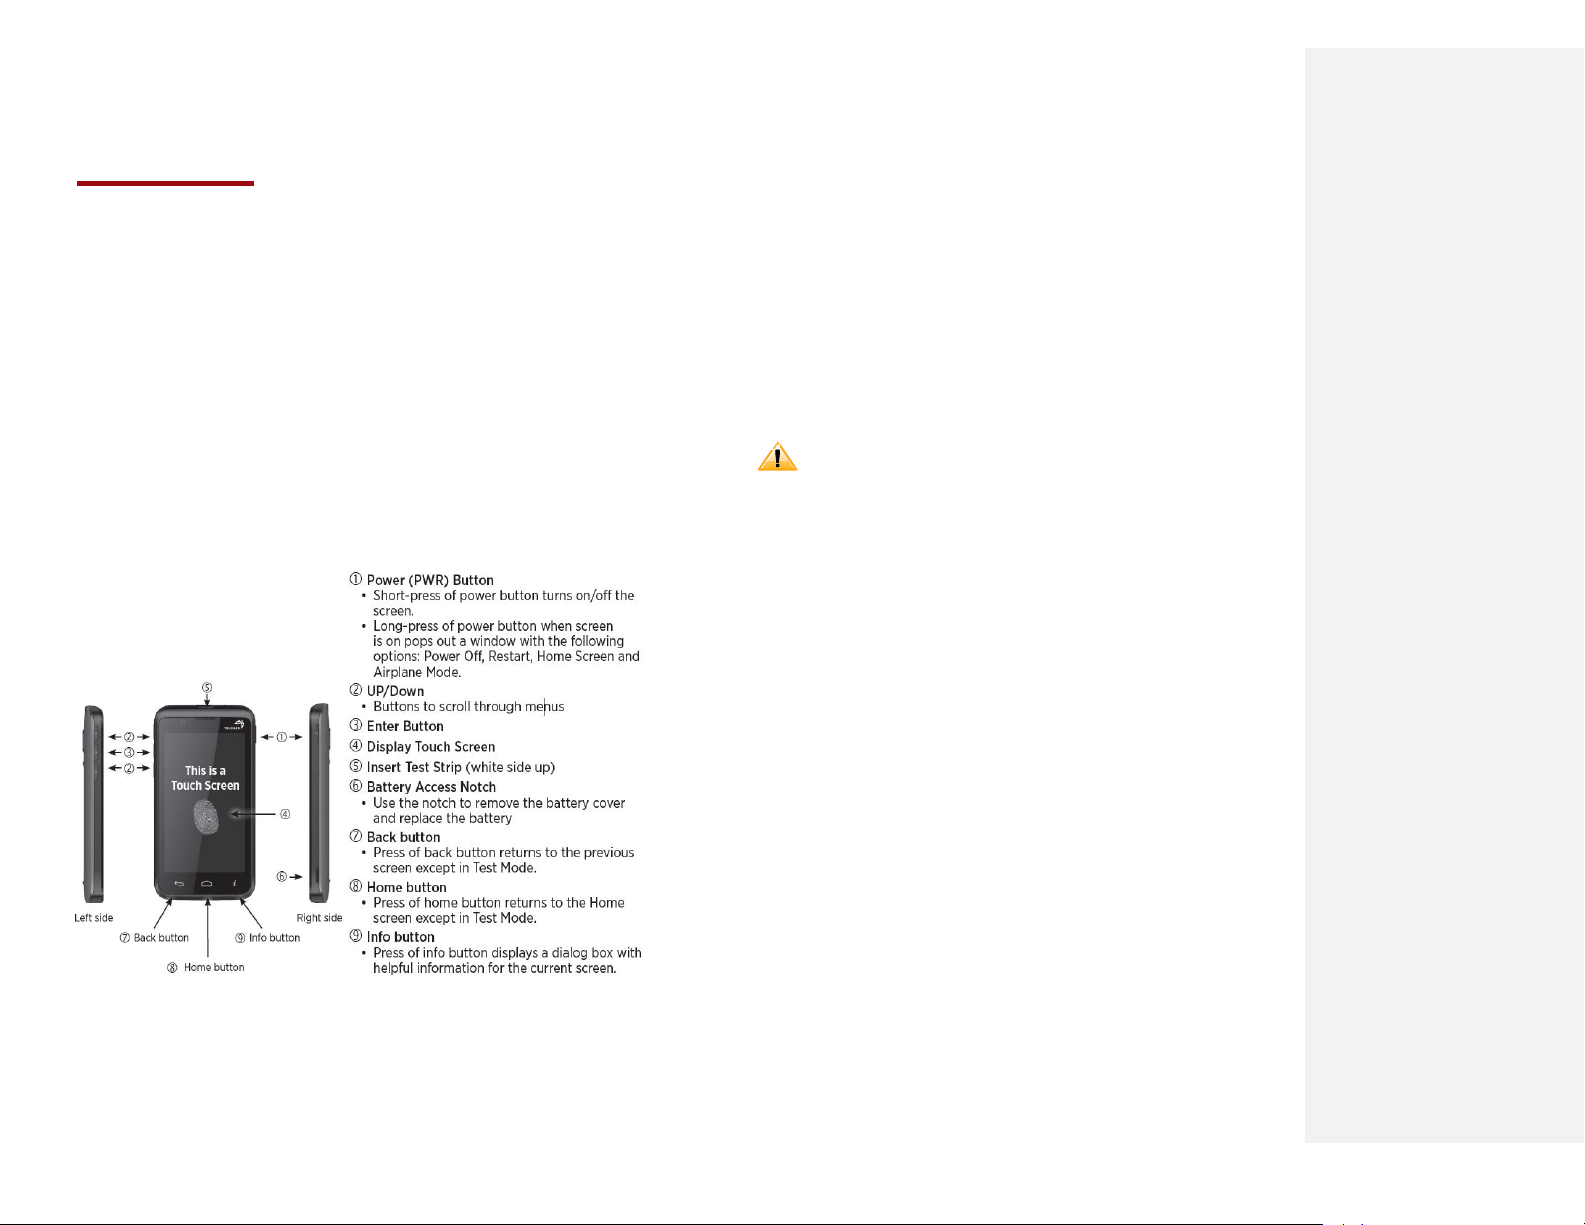
Phone Overview
Battery
Note that browsing the web frequently, extended data
usage, being in a poor signal area, or subjecting the device
to extreme temperatures will cause the battery to discharge
quicker than normal. To increase battery life, limit your
data usage, or turn off GPS and Bluetooth when not
required.
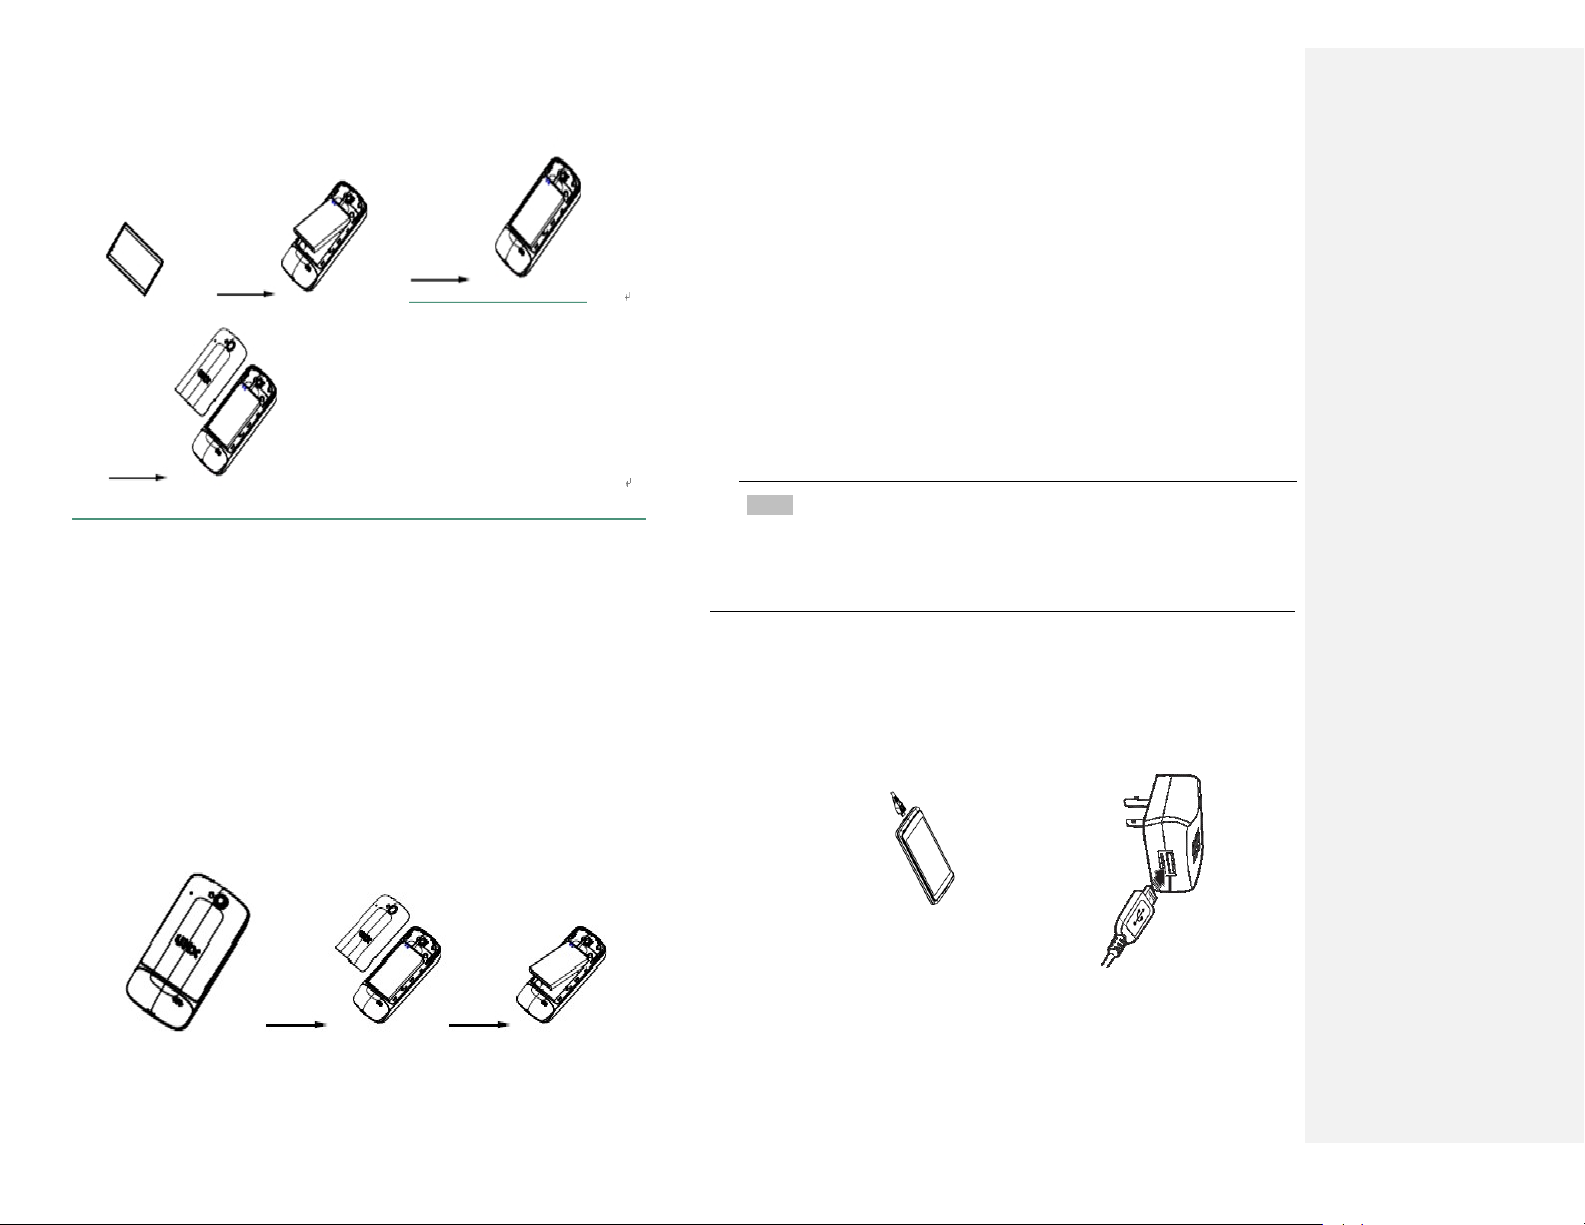
1. Installing the battery
Please use only the original batteries and accessories
you received with your phone or UMX recommended
replacements.
1.Remove the battery cover from the unit.
2. Align the battery’s exposed gold contacts with the
battery connectors inside the battery compartment.
3. Insert the battery with the contacts aligned to the
connectors.
4. Gently push the battery into the battery compartment
and press down until you hear a click. Replace
the battery door.
5
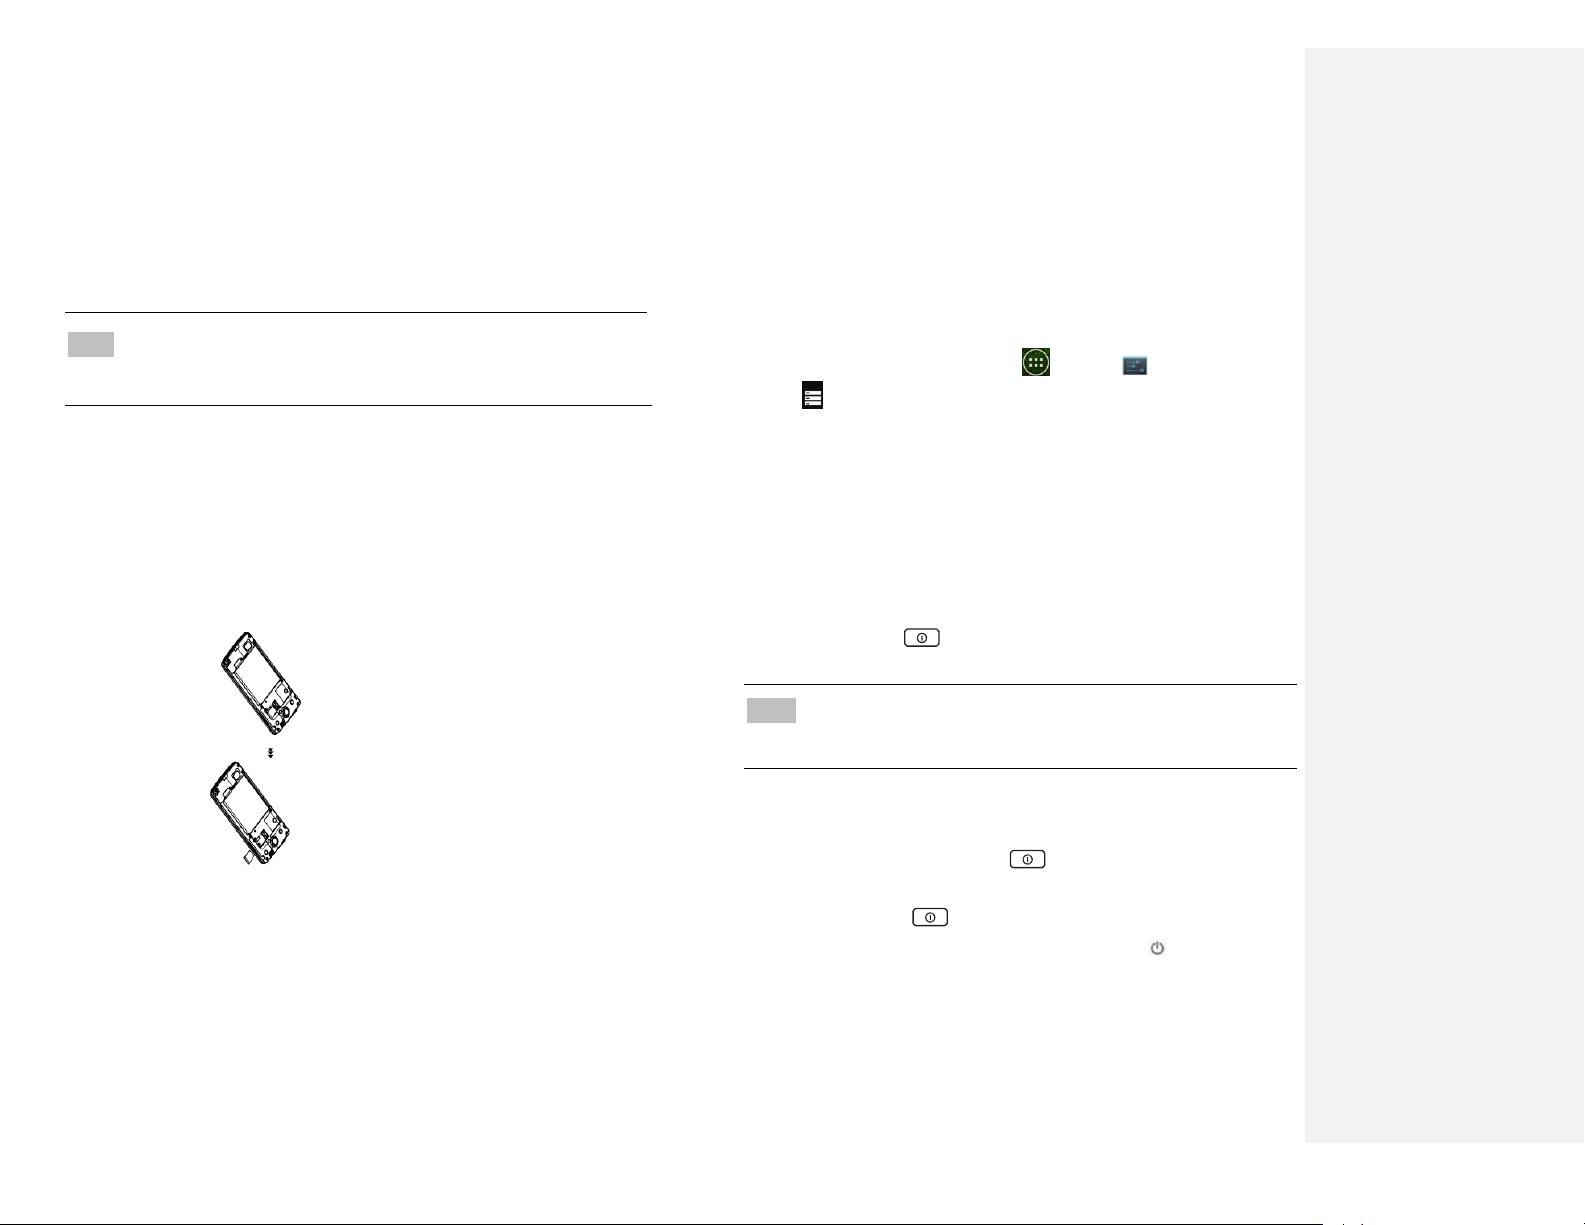
2. Removing the battery
1. Make sure that your device is turned off. To
remove the battery cover from your phone,
open the back cover using your finger at the small
opening on the left of the phone.
2. Push the bottom of the battery upwards and remove
the battery.
3.Charging your battery
Before you turn on your device and start using it, it is
recommended that you charge the battery.
1. Plug the USB cable into the USB power adapter.
2. Plug the power adapter into a standard outlet.
3. Locate the USB port located on the underneath of your
device.
4. Plug the other end of the USB cable into the phone’s
micro USB port.
5. The USB icon on the cable should always face up when
connecting the cable to your device as shown.
NOTE
• It is more efficient to charge the battery with your device powered
off.
• Battery operating time gradually decreases over time.
6
MicroSD Card
Use the microSD card to store your photos, videos, music
and certain apps from Google PlayTM Store. You can also
move and copy files to your computer from your device.
NOTE When you insert or remove the microSD card, you should
remove the battery cover firstly then open the TF cover.
1. Insert the microSD card
1. Locate the microSD card slot and remove the cover.
Insert the microSD card into the slot with its
gold contacts facing left above battery until it clicks
into place.
2.Removing the microSD card
1. Remove the microSD card cover.
2. Press the microSD card to eject it from the slot then
slide it out the rest of the way.
3. Removing the microSD card while
the phone is on
If you need to remove the microSD card while the
phone is on, unmount the microSD card first to
prevent corrupting or damaging the files in the
microSD card.
1. From the Home screen, tap Apps > Settings.
2. Tap Storage >Unmount SD card >OK.
3. Remove the microSD card by following the steps in ‚SD
card safe to remove‛.
Turning Phone On or Off
1.Turning your phone on
1. Press and hold Power/Lock.
NOTE The first time you use your phone you’ll need to set it up. See
the Getting Started chapter for details.
2.Turning your phone off
1. If the display is off, press Power/Lock to turn it
back on.
2. Press and hold Power/Lock for a few seconds.
3. When Phone options menu appears, tap Power
off >OK.
7
Phone Options
1.Silent mode
1. Press and hold Power/Lockto display Phone
Options.
2. Tap Silent mode.
• When you select Silent mode, is displayed in
the Status bar. Ringtones, alerts, and all audible
sounds except media and alarms are silenced.
NOTE To turn silent mode off, press and hold Power/Lock and
then tap .
2.Airplane mode
1. Press and hold Power/Lockto display Phone
Options.
2. Tap Airplane mode.
• When you set Airplane mode, is displayed in the
Status bar. Wi-Fi, Bluetooth, and mobile network
functions are all disabled.
NOTE To turn airplane mode off, press and hold Power/Lock
and then tap Airplane mode again.
Touchscreen Gestures
Tap
To select onscreen items such as application
and settings icons or press onscreen buttons,
simply touch them with your finger.
Tap andhold
To open available options for the item,
simply touch and hold your finger on the
screen over the item.
Swipe or slide
Quickly drag your finger vertically or
horizontally across the screen.
Drag
Tap and hold your finger before you start
to drag. While dragging, do not release
your finger until the item reaches your
desired location.
Flick
Flicking the screen is similar to swiping, but
you only need to swipe your finger in lighter
and quicker strokes. This finger gesture is
always in a vertical direction, such as
flicking through the contacts or the message
lists.
Rotate
For most screens, you can automatically
change the screen orientation from portrait
to landscape by turning the phone
sideways. When entering text, you can turn
the phone sideways to bring up a bigger onscreen keyboard.
8
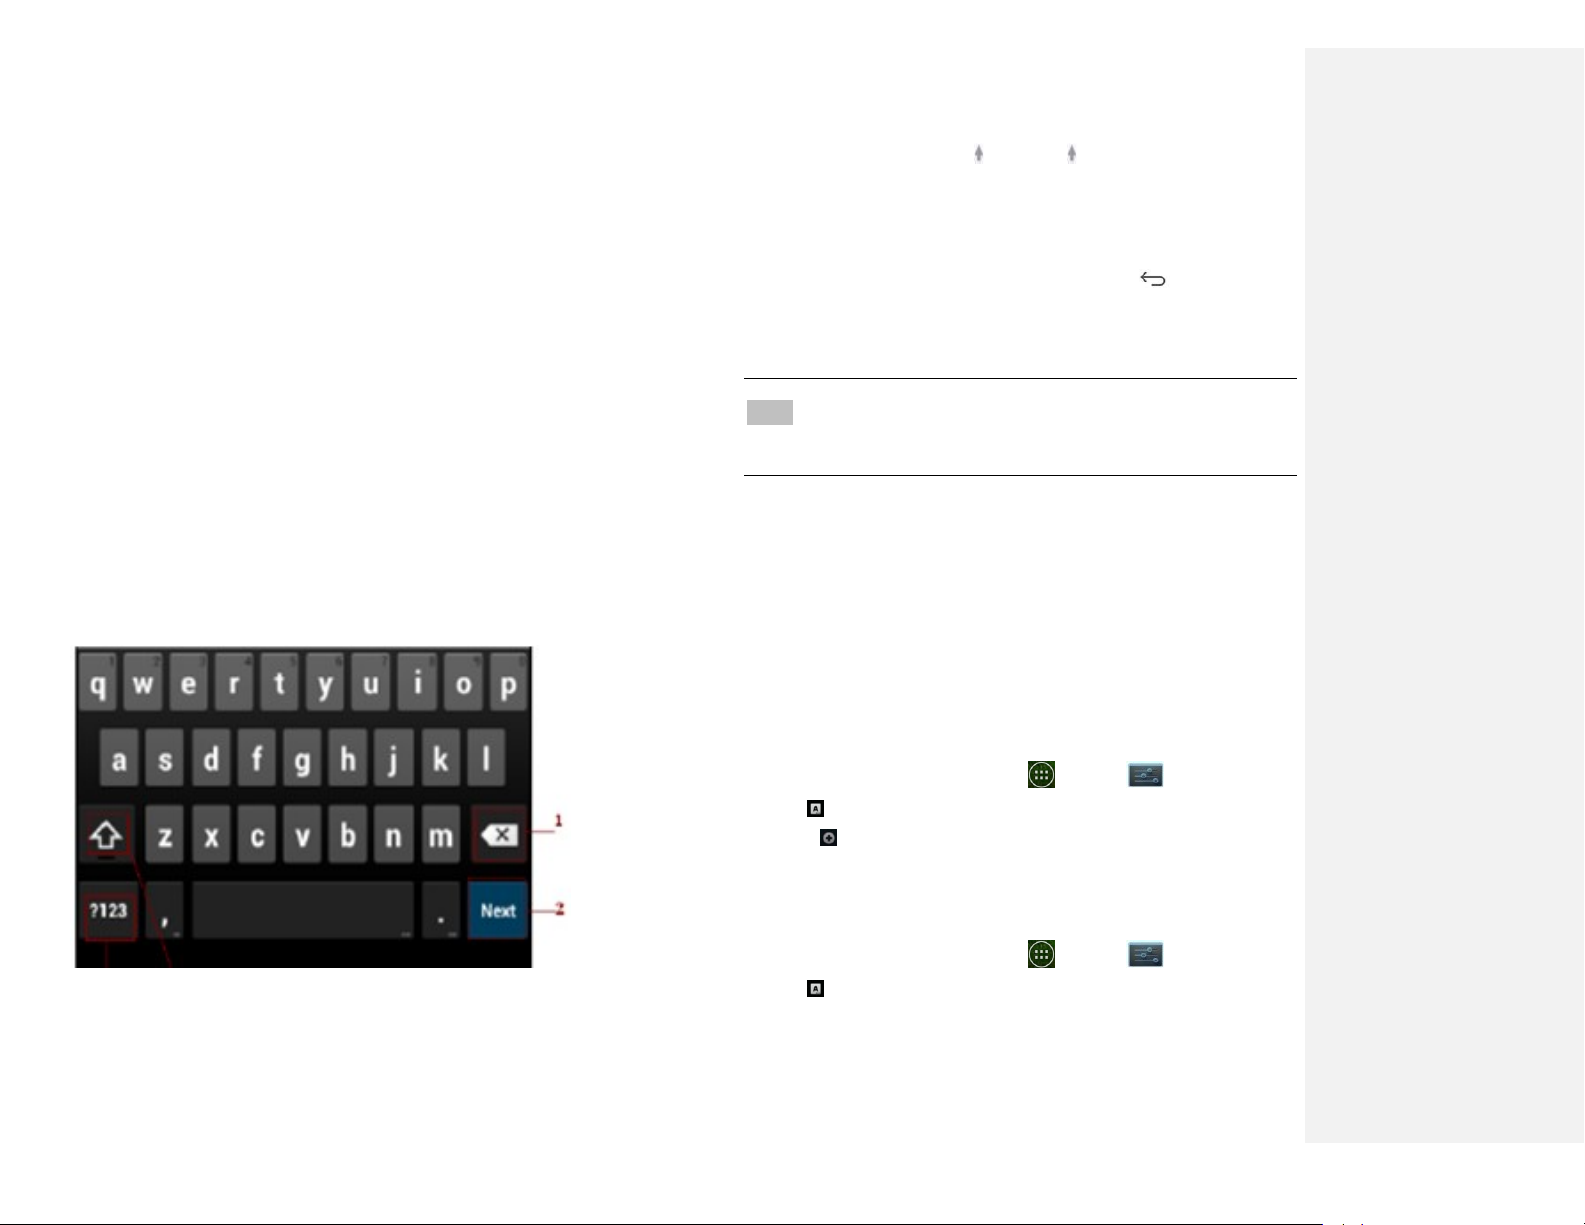
Using the Onscreen Keyboard
You can enter text using the onscreen keyboard.
Someapplications open the keyboard automatically.
Inothers, tap anywhere in a text field to open the
keyboard.
1.Tap each letter on the on-screen keypad.
2.Tap and hold a letter for additional key options (not all
keys have additional options). Additional key options
include numbers and letters with accent marks. If
options are available, you will see a box with all the
options shown. Slide your finger to select the
character you want.
3.Continueuntilyouhavefinishedtheword.
Youcanalso usethefollowingicons:
4 3
•Tap 3 while you type. When you release the key,
the lowercase letters reappear.
•Turn caps lock on. double-tap or touch & hold
•Tap 3, so it changes to . Touch shift key again
to return to lowercase.
• Tap 1 you can to delete words, tap 4 you can change to
the number and sign keyboard.
•TohidetheAndroidkeyboard,pressBack .
• When you write a new message, you can tap 2 to skip from
the receiver frame to text frame.
NOTE When you type the notification panel will have a ‚select input
method‛ you can set the input methods.
Adding, Editing or Deleting Words in the User Dictionary
Sometimes you may need to add a word to the predictive
text dictionary, for example, a name or a specialized
technical word. If you want to add a word to your User
dictionary while entering text, double tap the word to
highlight it, then tap and hold the word and select Add **
to dictionary.
Adding a word manually
1. From the Home screen, tap Apps > Settings.
2. Tap Language &input>Personal dictionary.
3. Press Add.
4. Type the word >tap OK.
Editing or deleting a word
1. From the Home screen, tap Apps > Settings.
2. Tap Language &input>Personal dictionary.
• To edit words from the dictionary, tap the word you
want to edit >Edit > Edit the word > Tap OK.
9
• To delete words from the dictionary, tap the word you
want to delete >Delete.
Editing Text
You can select, copy or cut the text you’ve entered, then
paste it in another text field within the user interface.
NOTE Some applications may offer different text editing methods.
1.Selecting text
1. Tap the text field.
2. Move the cursor to the beginning or end of the desired
text by tapping in the location you want the cursor.
3. Tap and hold the text field.
4. Tap Select word in the pop-up menu.
• Or tap Select all to select all the text in the text field.
5. Drag your finger to move the text cursor to a letter
within the text that you want to select. The selected
text is highlighted in orange.
2.Cutting and copying the text
1. Double-click to select the text to cut or copy it.
2. Tap and hold the selected text.
3. Tap Cut or Copy in the menu that opens.
•If you tap Cut, the selected text is removed
from thetext field. In this case, the text is saved to
theclipboard, so that you can paste it into another
text field.
3.Pasting the text
1. Cut or copy the text to paste.
2.Tap the text field where you want to paste the text and
move the cursor to your desired location.
• You can paste text that you copied from one
application into the text field in any other application.
3. Tap and hold then select Paste in the pop up menu.
• The text is inserted after the cursor. The text also
remains in the clipboard, so you can paste that same
text into another location.

10
Getting Started
Google Account
You must sign in to a Google account to use Gmail,
Google Calendar, and other Google applications; to
download applications from Google Play Store; to back
up your settings to Google servers; and to take advantage
of other Google services on your phone.
1.Registering a Google account
Gmail, Google Play Store, and other applications require
a valid Google account for use. You will be prompted to
login intoGoogle the first time you use these applications.
1. Tap Existing>Sign in to register your Google account.
• If you don’t have a Google account, tap Newinstead.
See the next section for more details.
2. Enter your Google account Emailand Password > Tap
Sign in.
2.Creating a new Google account
1. Tap New> Enter First name, Last name and Email>
Tap Next.
2. Enter a password in to the Type a password, Confirm
password fields,then tap Next.
•Password tip: Your password must be a minimum
of 8characters in length.
3. Select Security question and enter the Answer, which
will be needed if you forget your password and then
enter aSecondary Email >Create.
4. Read through Google Terms of Service > Tap I agree,
Next.
5. Enter the letters shown on the screen > Tap Next > Tap
Finish.
3.Adding a Google account
1. From the Home screen, tap Apps > Settings.
2. Tap Accounts >Add account.
3. Tap Google > Tap Existing.
4. Tap Sign in to register your Google account.
5. Enter your Google account Emailand Password > Tap
Sign in >Finish.
• The U671Cdevicesupports multiple Google accounts.
• If you have the same contact across multiple Google
accounts, you can merge duplicates into a single
item in the contact list.
4.Add a Google account
1. From the Home screen, tap Apps > Settings.
2. Tap Add account.
11
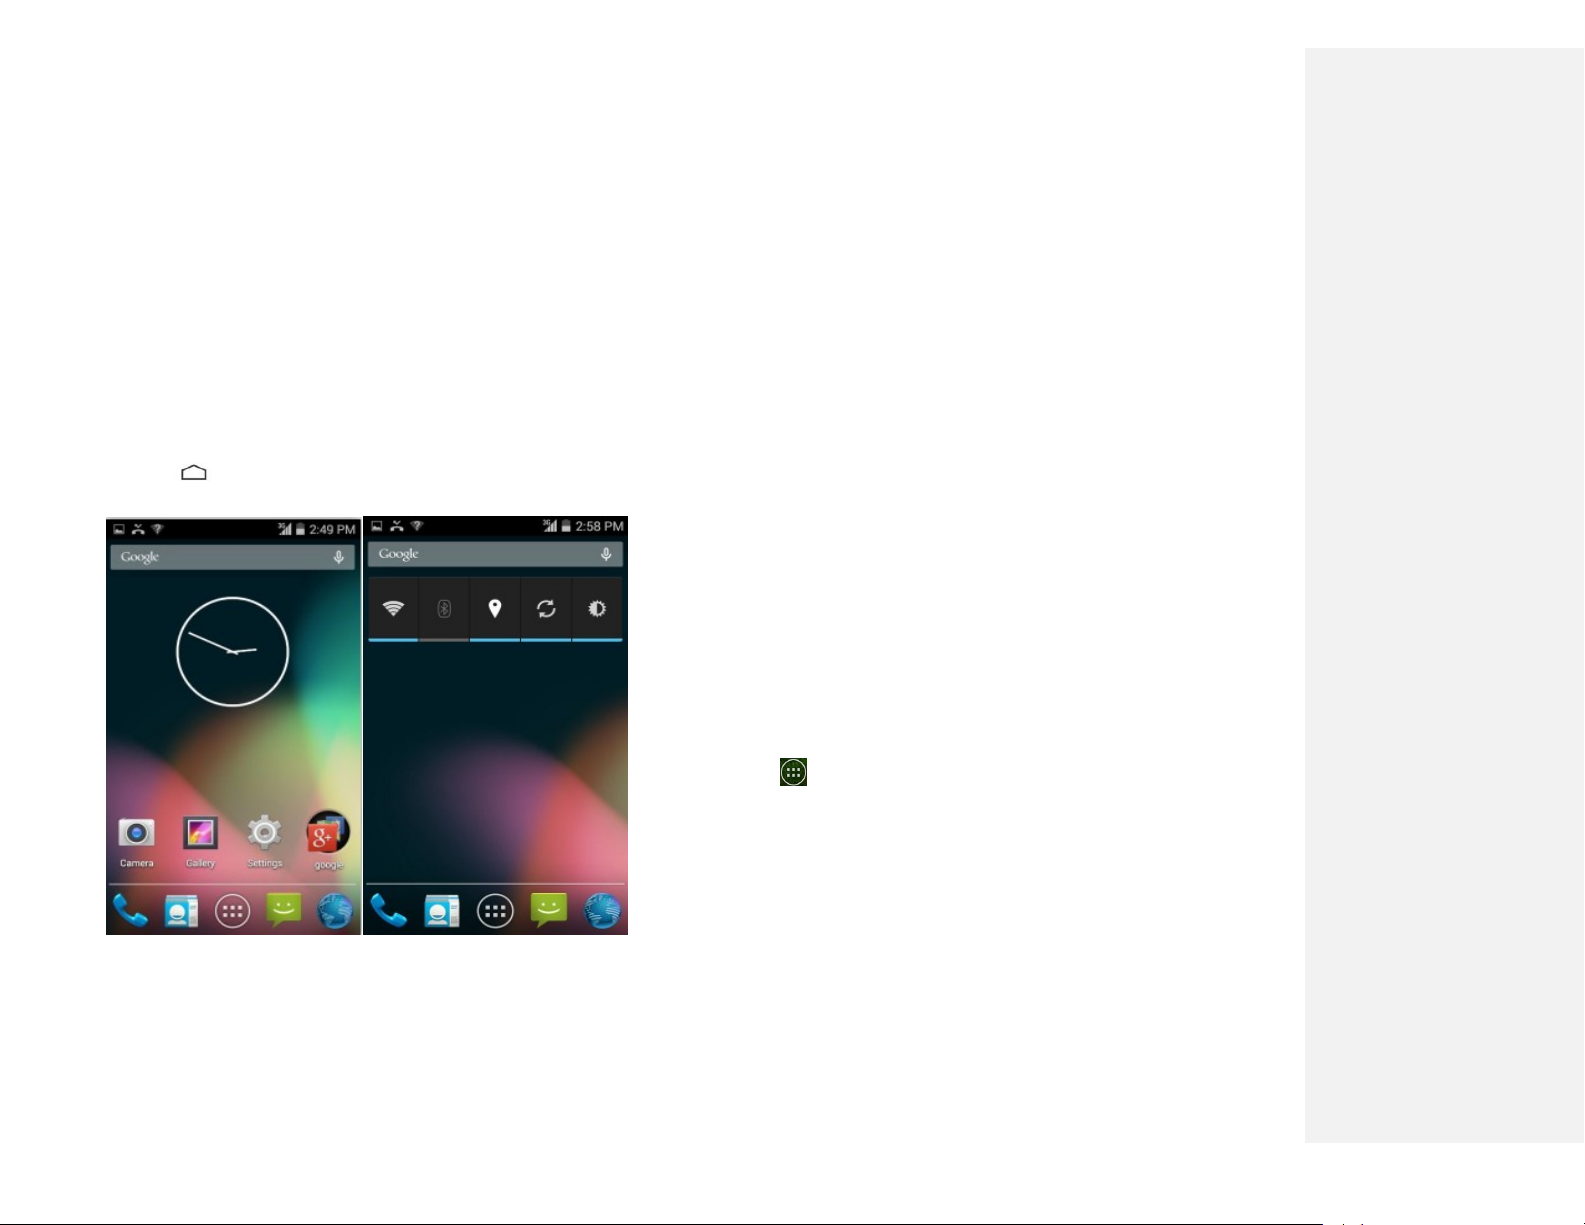
Getting to Know the Home
Screen
1.The Home screen is displayed when the device is in
idle mode. You can add your favorite apps, shortcuts,
folders and widgets to the Home screen so they’re only
a tap away.
2.The Home screen is actually five separate screens. Slide
your finger the left or right and you’ll
discover more space to add icons,widgets, and more.
Press Home to return to the center home screen.
1.Previewing the Home screens
1. From any Home screen, tap and hold an application.
2.When you choose a desired Home screen, the
applicationshifts to the selected Home screen.
Customizing the Home Screen
The Home screens and display wallpaper are customizable.
1. Home screen customization options
Open the Home screen you want to customize.
2. Moving an item on the Home screen
1. From the Home screen, tap and hold the item you want
to move until it vibrates. Don’t lift your finger.
2. Drag the item to a new location on the Home screen.
3. Lift your finger at the location where you want the item.
To add a shortcut for any application to a Home screen,
tap Apps, tap and hold the item, then drag it onto a
Home screen.
3.Removing an item from the Home screen
1. From the Home screen, tap and hold an item until it
vibrates. Don’t lift your finger. The × Remove icon will
appear at the top of the display.
2.Drag the item to×Remove.

12
3. When the item turns blue, lift your finger.
4.Changing the Wallpaper of the Home
screen
1. From the Home screen, tap and hold any empty area on
a Home screen long time.
2. Tap one of the following:
Gallery: Choose a photo from your
camera gallery or memory card
storage. You can crop the image
before setting it as the wallpaper.
Live wallpapers: Choose from pre-loaded
animated wallpapers. Additional
live wallpapers can be
downloaded from the Google
Play Store.
Wallpapers: Choose from the pre-loaded
animated or static wallpapers.
Additional wallpapers can be
downloaded from the Google
Play Store.
3. Tap Set wallpaper.
13
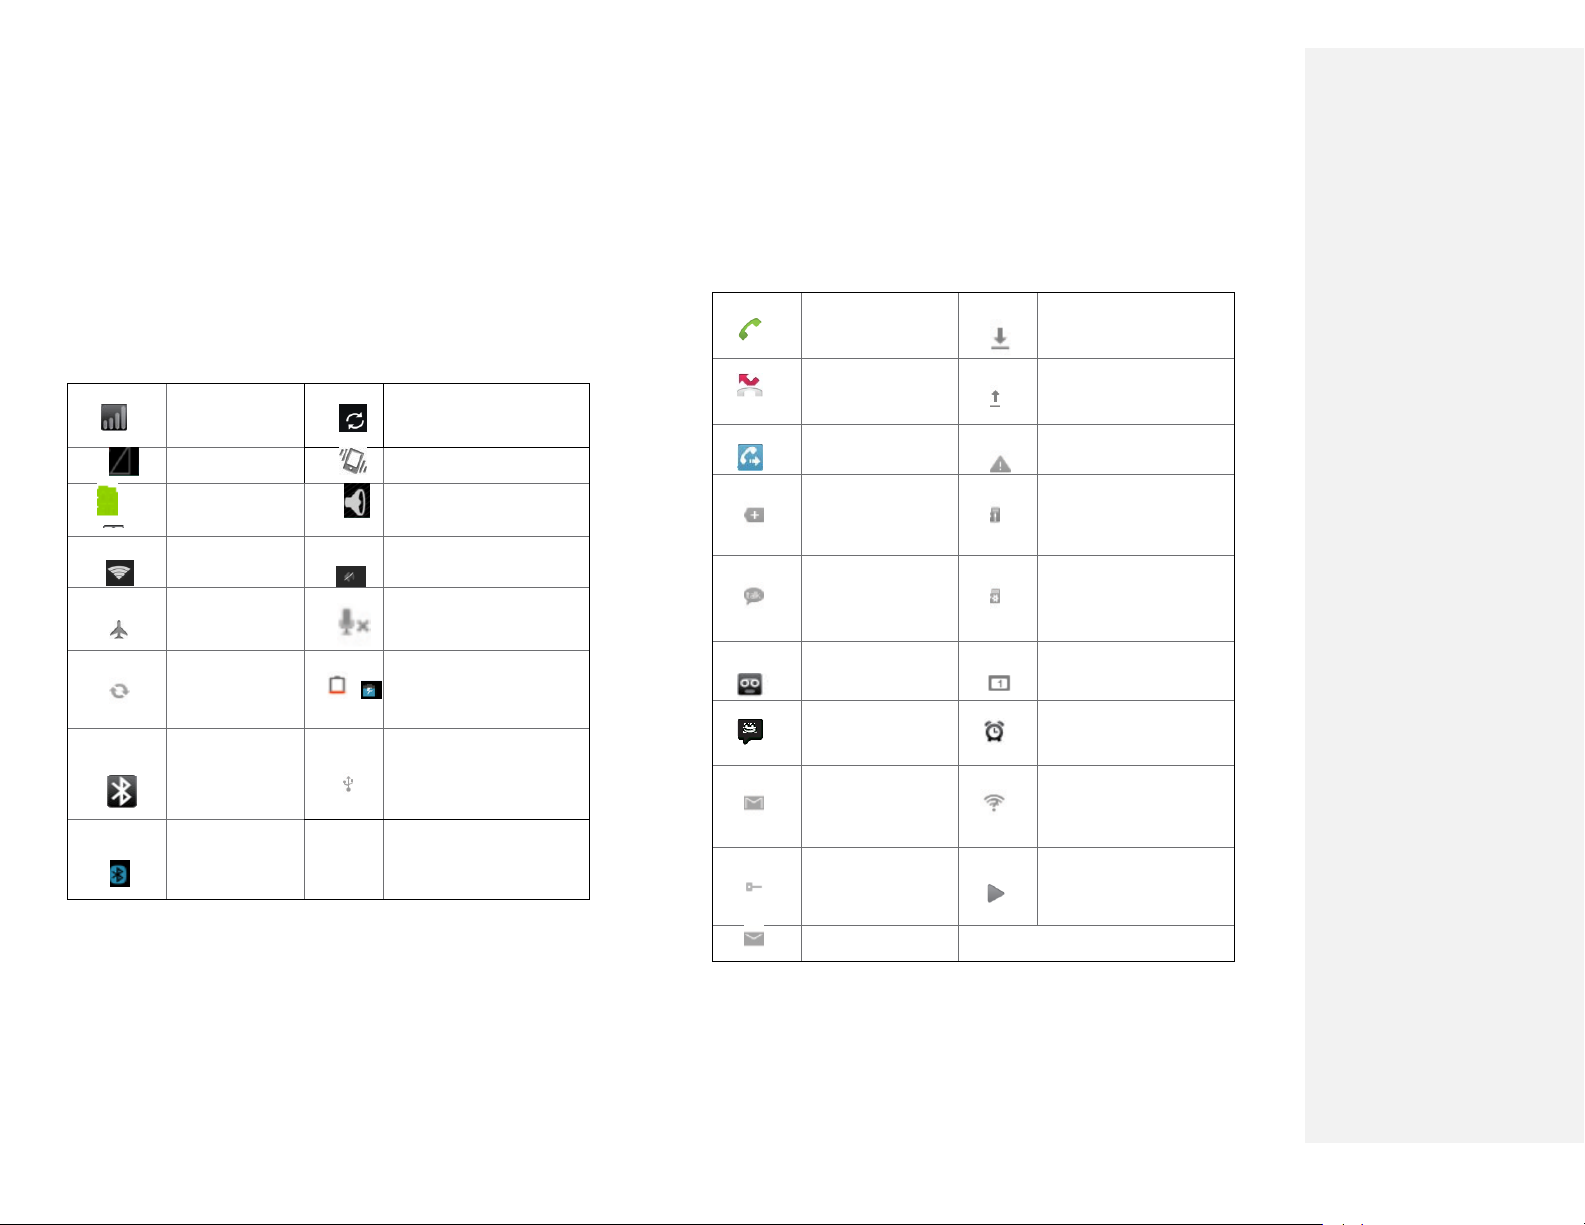
Essential Display Icons
1. Status icons
You can tell a lot about your phone when you
understand the icons in the Status bar. Here’s what each
one means:
Signal strength
Synchronized with the
web
No signal
Vibrate only mode
3G network
connected
Speakerphone is on
Wi-Fi signal
strength
Silent mode-no audio
or vibration
Airplane mode
Microphone is muted
Data
synchronizing
~
It indicates that battery
is remaining
Bluetooth is on
Connected to a
computer via USB
cable
Bluetooth
device
connected
2. Notification icons
Notification icons in the Status bar alert you to items that
may require your attention such as new messages,
calendar event reminders, missed call notifications, etc.
Here’s what each one means:
Call in progress
Downloading data
Missed call
Uploading data
(animated)
Call Diverted
General Warning
Icon
More (not
displayed)
notifications
No microSD card
installed
New Google
Talk instant
message
MicroSD card is
being prepared
New voicemail
Upcoming event
New message
Alarm is set
New Gmail
Wi-Fi is on and
wireless networks are
available
Connected to or
disconnected
from VPN
Song is playing
New Email
14
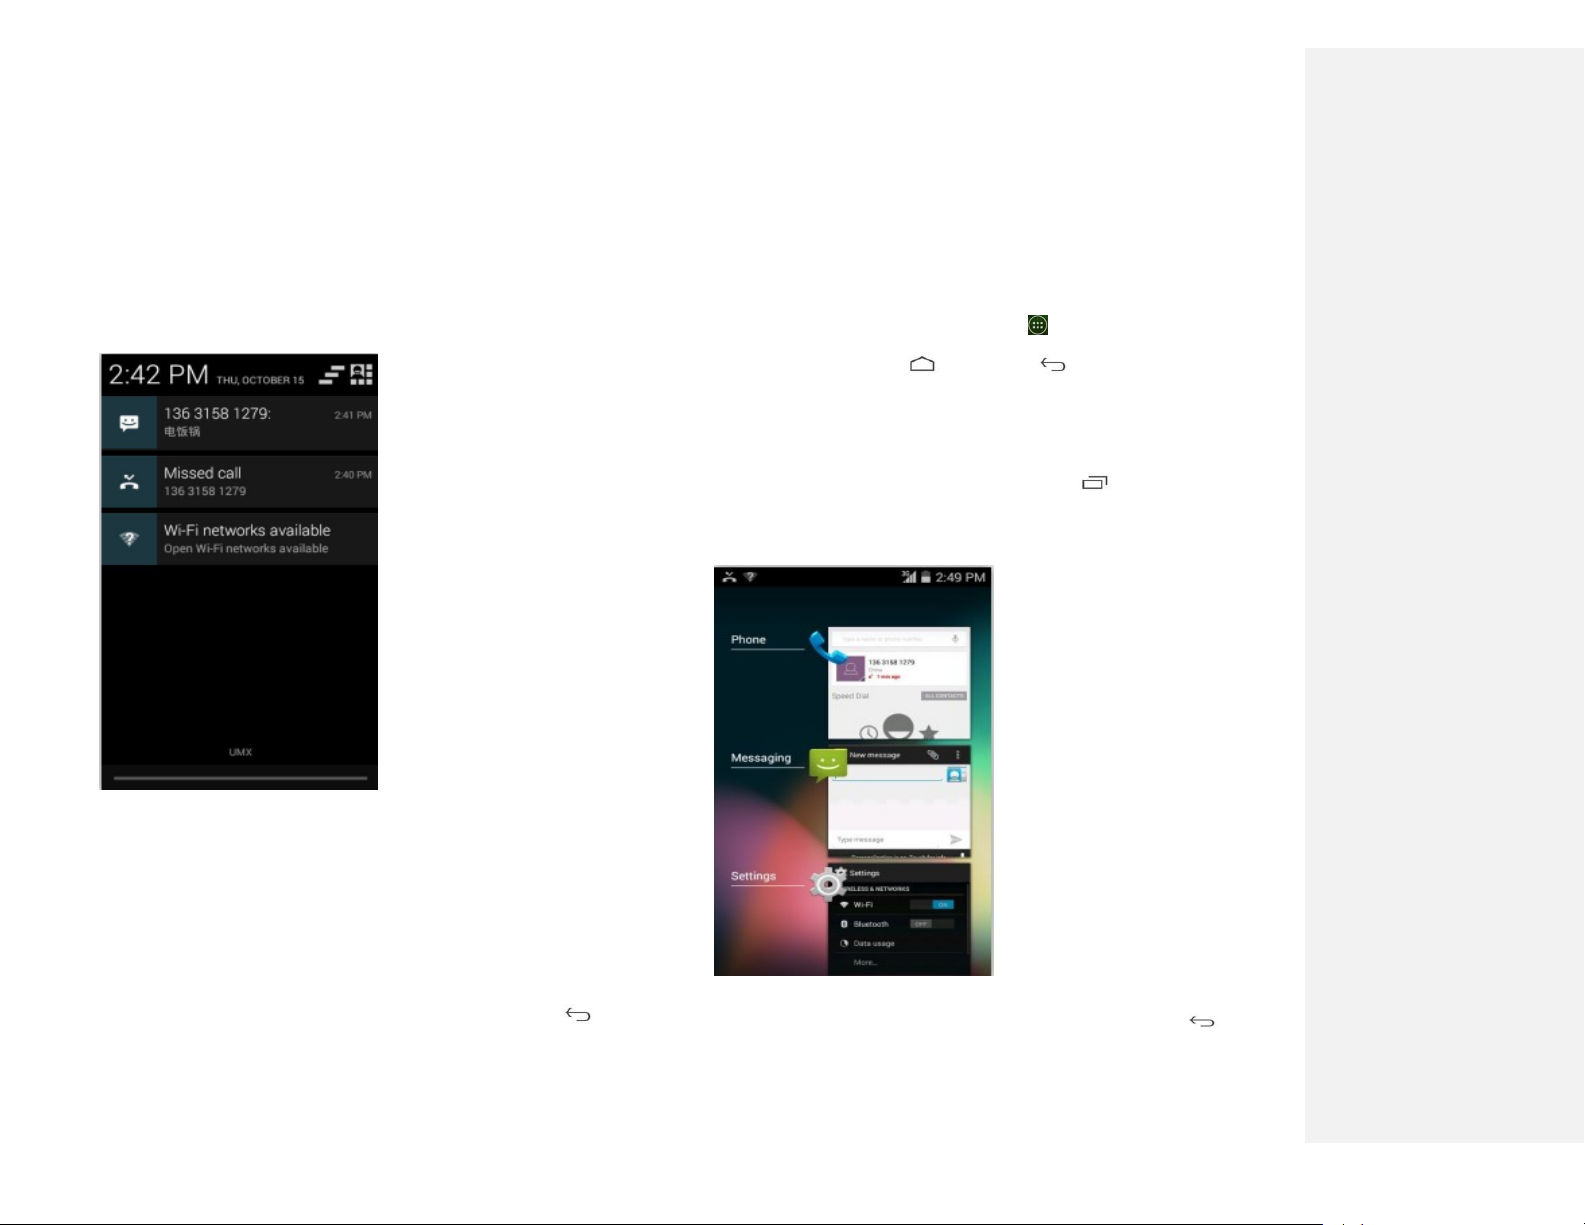
Notifications Panel
When you receive a new notification, an icon will be
displayed in your status bar at the top of your screen.
1.Viewing and responding to Notifications
1. Tap and hold Status bar, and then slide your finger
downward to open the Notifications panel.
2. If you have multiple notifications, you may need to
scroll to see them all.
3. Tap a notification to respond to it.
2.Closing the Notifications panel
Drag the bottom bar of the panel up. Or just press Back.
Opening & Switching Between
Applications
1.Opening and closing the Applications List
1. From the Home screen, tap Apps.
2. To close, press Home or Back.
2.Switching to a recently used application
1. From any screen, press and hold Recent apps.
Scroll to see all recently used application.
2.Tap an icon to open the application or press Back
to return to your previous screen.

15
Sleep Mode
Sleep mode saves battery power by turning off your display.
You will still receive messages and calls when the display is
turned off.
1. Switching to Sleep mode
1. Press Power/Lock to switch your phone to Sleep
mode.
2. Your phone automatically turns off the display after a
period of inactivity. To customize the screen timeout
settings, from theHome screen, tap Apps >
Settings > Display >Sleep.
2. Waking up from Sleep mode
1.Your phone automatically wakes up when you have an
incoming call.
2. To wake it up manually, press Power/Lock. You’ll
need to unlock the screen as described below.
3. Unlocking the screen
On the lock screen, tap the unlock icon and slide
your finger in the direction of the arrows to unlock
the screen. The screen unlocks automatically when
you answer an incoming call.
NOTE If you have set up a screen unlock pattern, pin, or password,
you will be asked to draw the pattern on the screen or
enter the PIN or password to access the phone software.
4. Activating Secure Screen Lock
1. From the Home screen, tap Apps > Settings.
2. Tap security >screen lock.
• If you have already configured the screen lock, tap
Change screen lock to change how to lock or
unlock your screen.
3. Tap Pattern, PIN, Password, or Face Unlock. Then enter
a custom pattern, PIN or password as prompted.
•If you select ‘None’, screen unlock security
iscancelled
16
Adjusting Volume
Ringtone and Media volume are independent of each other
and adjusted separately.
1. Adjusting the ringer volume
From the Home screen, press Volume up or Volume
down on the right side of the phone to
adjustthe ringer volume to your desired level.
• While in the lowest ringer volume level, press
Volume up or Volume downonce to set your phone
to Vibrate mode. To set your phone to Silent mode,
you can press Volume downonce again.
• While in the Silent mode or Vibrate mode, press
Volume up once to switch to ringtone mode.
2. Adjusting the media volume
While playing music, watching a video or using
preloaded or downloaded games or applications, press
Volume up orVolume down on the right side of the
phone to adjust the media volume.
3. Adjusting the earpiece volume for phone
calls
During a phone call, press Volume up or Volume down.
4. Adjusting the volume via Settings menu
1. From the Home screen, tap Apps > Settings.
2.Tap Sound >Volumes.
1. Drag the volume sliders left or right to adjust your
phone’s Ringtone, Media, and Alarm. Your phone
plays a sample tone at the selected volume level
while you drag the slider.
NOTE If you uncheck the option to use call volume for notifications,
you can set the notification ringtone volume independently.
2. When you’re done, tap OK.
Searching Your Phone and the
Web
The search key is a powerful part of the U671C’s device’s
software and enables you to quickly locate files, contacts,
and applications. You can also search the web using your
favorite web search service.
1. Tap Apps > Google.
2. Begin entering text, or tap a previously used search
term.
• As you enter the text, matching items on your phone
and suggestions from Google web search will appear
on the screen.
3. Tap a suggestion to go directly to that result.

17
Connecting Your Phone to a
Computer
1. Copying files to/from the microSD card
You can copy your music, photos, and other files to
the microSD card of your phone.
NOTE This option is available only when a microSD card is
inserted into the slot of your phone. While your phone is
connected to a computer, USB Mass storage mode
prevents you from using applications that access the
memory card.
1. Connect your phone to your computer using the supplied
USB cable.
2. Open the Notifications panel >tap USB connected.
3. On your computer, the connected phone is recognized as
a removable hard drive.
4. Navigate to the removable drive and open it.
5. Do one of the following:
• Copy the files from the computer to the microSD card’s
root folder.
• Copy the files from the phone’s microSD card to a folder
in your computer.
6. After copying the files, un-mount the removable drive
(that is, your phone) as required by your computer’s
operating system to safely remove your phone.
7. After you have un-mounted the removable drive, you can
disconnect the phone from the computer.

18
Phone Calls
Making Calls
The simplest way to make a call is to dial the number
directly. You can also call numbers listed in your call log or
Contacts list.
1. Making a call from the dialer screen
1. From the Home screen, tap Phone. Or tap Apps >
Phone.
2. Tap the number you want to dial.
• If you make a mistake, tap to erase a single character.
Tap and hold to erase the entire string.
3. Tap Dial.
• The Calling screen is shown and appears in the
Status bar while the call is active.
• To change the volume during a call, press Volume up
/ Volume down.
4. To end the call, tap End Call.
2. Entering a Pause/Wait
Pause and wait options can help you dial additional
numbers such as a voicemail password, or phone
banking system menus.
1. From the Home screen, tap Phone.
2. Tap the number you wish to dial >tap
Option>Add2-sec pause orAdd wait.
• Add 2-sec pause: Your phone will wait for 2 seconds
then continue to dial the remaining
numbers automatically.
• Add wait: Your phone will wait with the message,
‘Send the following tone?’ until Send is
tapped, then continue dialing the
remaining numbers.
3. Making an international call
1. From the Home screen, tap Phone.
2. Tap and hold 0 until the international prefix ‘+’ appears.
3. Tap the country code, area code, and phone number.
4. Tap Dial.
4. Calling a number from the Call log
Your phone logs all incoming and outgoing calls.
1. From the Home screen, tap Phone >MISSED Call log.
2. Tap Dial at the right of any entry to dial.
• Calls are listed with the most recent at the top.
• Calls to the same phone number are grouped together.
• Scroll up or down to view additional entries in the log.
• If you want to edit a number before calling, tap
and hold the desired number, and then tap Menu
>Edit number before call.
5. Making a call from the Contact list
1. From the Home screen, tap Phone> . Or tap
Apps > People.
2. Scroll through the contact list.
19
• To find a specific contact, you can search by tapping
Search. Enter the name of the contact you’re
searching for. As you type, contacts with matching
names appear below the search box. Or you can use
the tab on the right hand side of the screen to scroll
through the alphabetical contacts.
3. Tap the contact you want to call.
4. Tap the phone or mobile number.
6. Making an emergency call
Your phone supports international emergency
numbers such as 911. Emergency calling is supported
anywhere the phone has a network signal.
1. Making an emergency call
1. From the Home screen, tap Phone.
2.Tap the emergency number for your location.
This is usually 911, *911 or #911.
3. Tap Dial.
4. To end the emergency call, tap End Call.
2.Making an emergency call while the phone is locked
1. When your phone is no service status, Emergency call
button is displayed on the lock screen. Tap Emergency
call.
2. Tap the emergency number for your location. This is
usually 911, *911 or #911.
3. Tap Dial.
4. To end the emergency call, tap End Call.
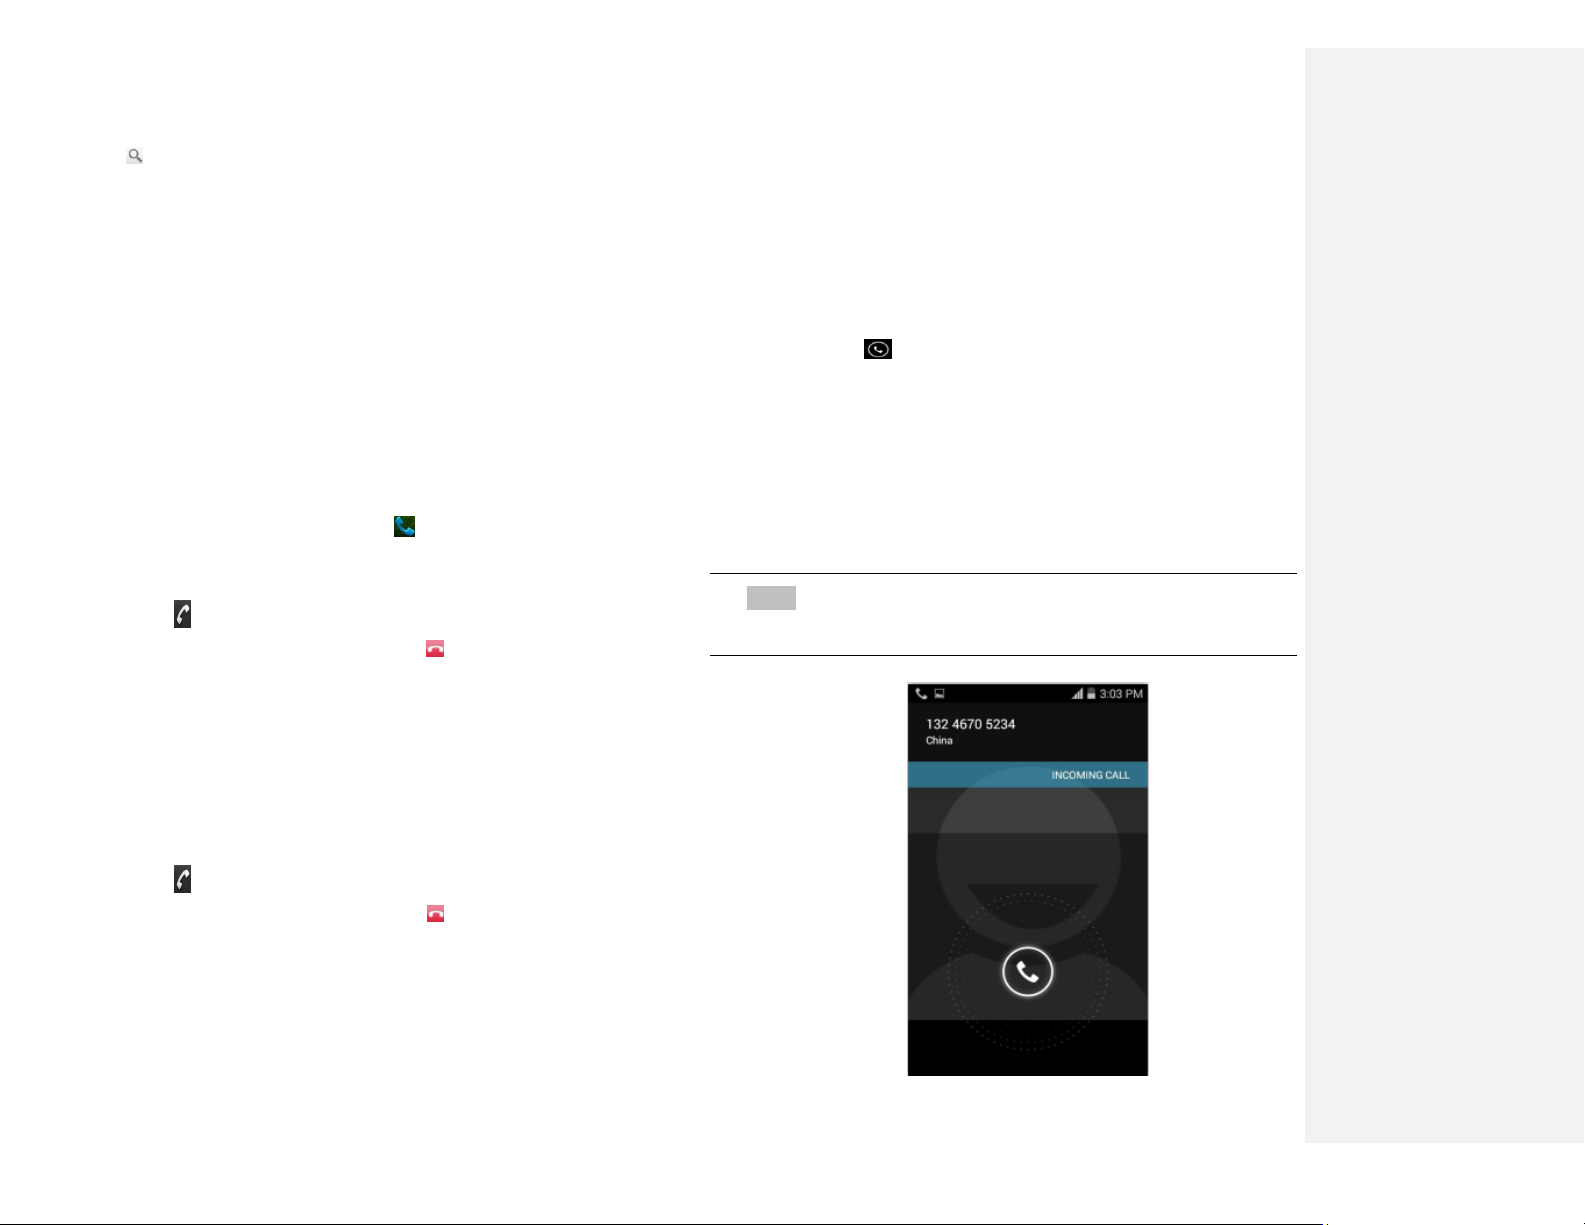
Answering or Rejecting Calls
When you receive a phone call, the screen displays the
caller’s name, phone number, and caller ID icon (if stored
in Contacts). When you receive a phone call from a phone
number not stored in your Contacts, only the default
caller ID icon and phonenumber are shown.
All incoming calls are recorded in the Call log. If you miss a
call, you receive a reminder notification.
1. Answering or rejecting an incoming call
1. Drag the icon in the direction of the arrows
to answer the call.
• If you were already in a call, the first call is placed on
hold during answering the new call.
• To silence the ringer before answering the call, press
either of the volume keys.
NOTE The caller you reject is sent directly to your voicemail box to
leave a message.
20
2. Checking missed calls
• If you miss a call, is displayed in the Status bar.
• If you open the Notifications panel, you will see the
number of missed calls. Tap the notification to be
taken to the call log and view detailed information.
Using In-Call Options
When a call is in progress, the following options are
available:
NOTE To avoid damaging your hearing,do not hold the phone up to
your ear when the speakerphone is on.
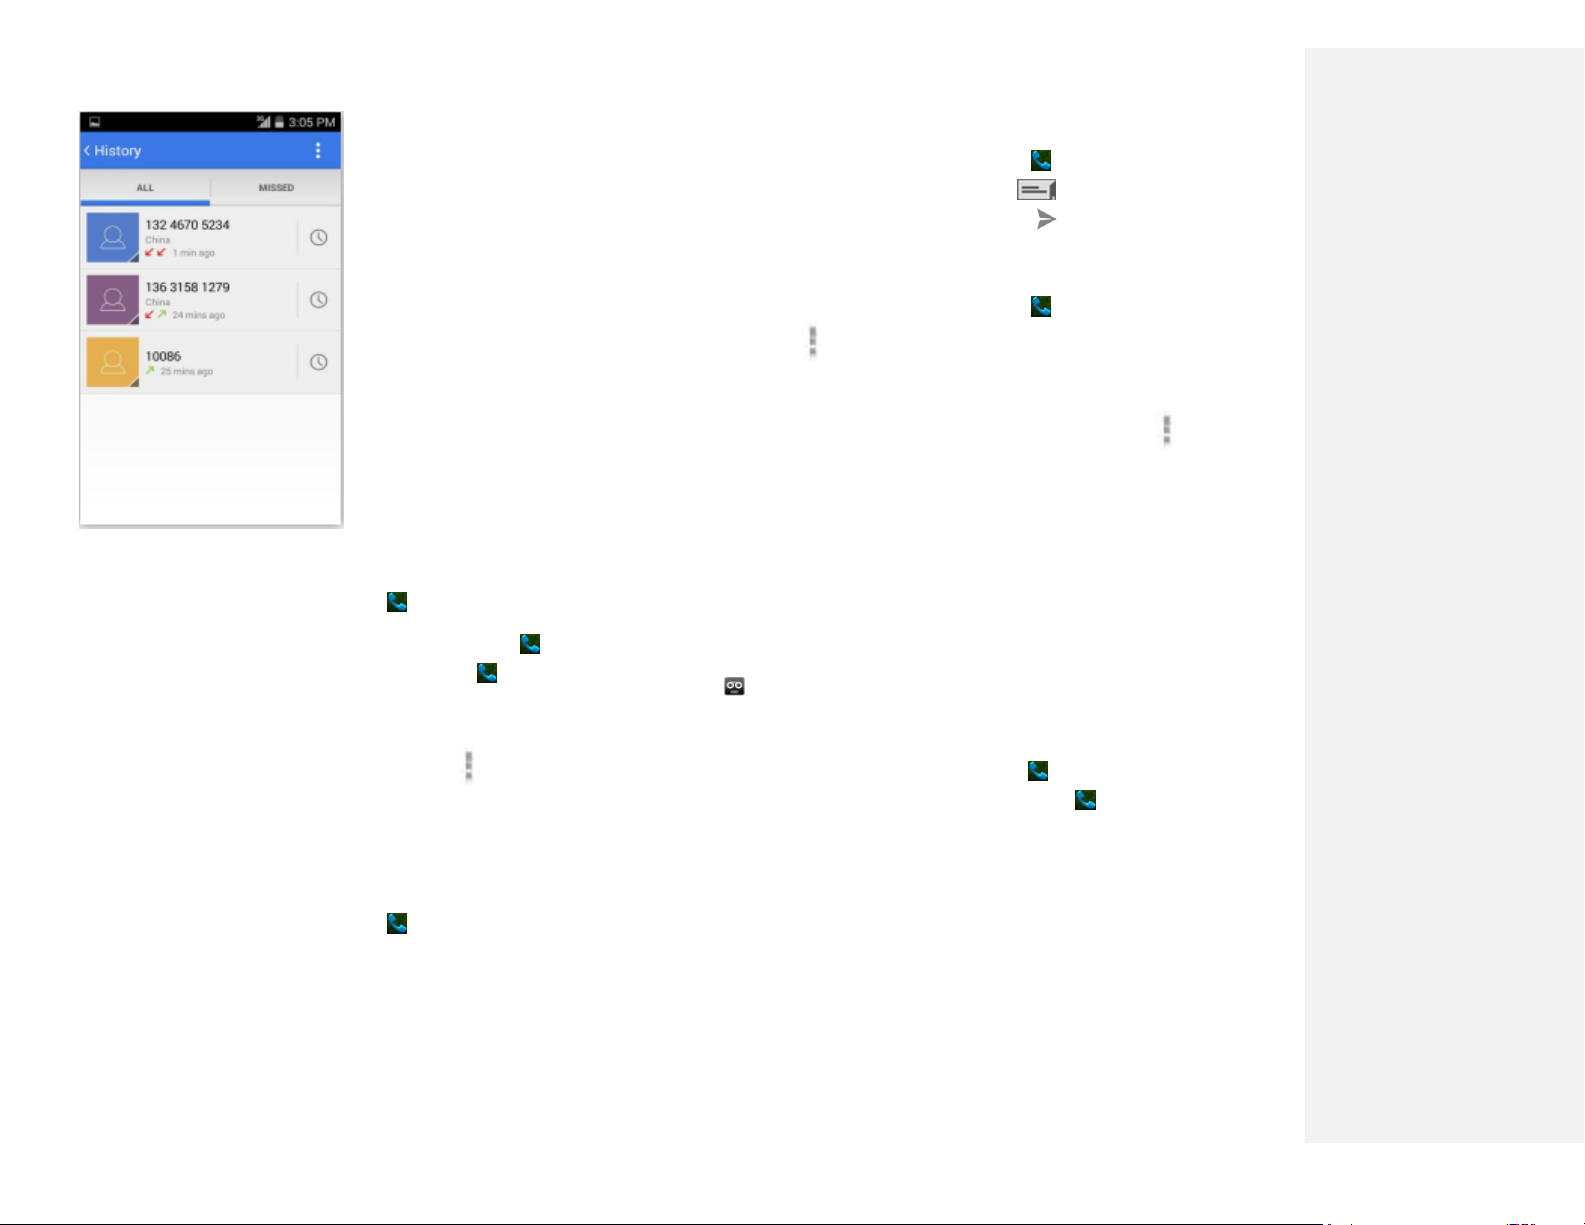
Using Call Log
The phone stores the numbers of all incoming and
outgoing calls in the Call log. The Call log displays the
details of the call including time, date, and duration.
1. Opening the Call log
1. From the Home screen, tap Phone > Call log.
• Calls are listed with the most recent at the top.
Calls of the same phone number are grouped
together. Scroll to view earlier entries in the log.
NOTE You can tap and hold the desired number in the call log
list to select options such as Call, View contact, Edit
number before call, Send textmessage, Add to contacts,
Remove from call log.
Dial Pad
Tap Dial Pad to enter additional numbers
during your call.
Mute
You can unmute the microphone by tapping
Mute icon again.
Audio
You can turn the speakerphone off by tapping
the Speaker icon again.
Bluetooth
When a Bluetooth device is paired and
connected to your phone, you can conduct all
calls using Bluetooth for hands-free
conversation. When using Bluetooth headset
during a call, the current call screen has a blue
border and the Ongoing Call icon turns blue in
the Status bar.
Tap Bluetooth icon to toggle in-call audio to
and from the Bluetooth accessory.
21
2. Calling a number from the Call log
1. From the Home screen, tap Phone >MISSED Call log.
2. If you want to call a number directly ,tap at the right
of the entry.Or,select a contact > tap Dial
• If you want to edit a number before calling, tap
and hold the desired entry, and then tap Option>Edit
number before call.
3. Adding a phone number from your Call log
to your Contacts list
1. From the Home screen, tap Phone >MISSED Call log.
2. Tap and hold the desired entry >Add to contacts.
3. In the list of contacts that opens, tap Create new
contact or add to an existing contact.
4. Tap Done.
4. Sending a text message from the Call log
1. From the Home screen, tap Phone >MISSED Call log.
2. Tap and hold the contact > Send text message.
3. Enter your message and tap to Send.
5. Clearing the Call log
1. From the Home screen, tap Phone >MISSED Call log.
2. Tap Option>Clear call log >OK.
• To remove just one entry from the Call log, tap and
hold the entry. In the pop up menu, tap
Menu>Remove from call log.
Listening to Your Voicemail
Voicemail application is displayed only when phone calls
are available. When you have a new voicemail message,
appears in the Status bar.
1. Calling your voicemail from the Dial Pad
1. From the Home screen, tap Phone.
2. Tap your phone number and tap Dial.
2Calling your voicemail from the Notification
panel
1. Open the Notifications panel and tap” New voicemail”.
Using Voice Dialer

22
You can use the Voice Search application or Voice Dialer
application to place a phone call by speaking the name of a
contact or a phone number.
1. From the Home screen, tap Apps > Voice Dialer.
• If you have a Bluetooth headset that supports
‚voice-recognition‛ or ‚voice-dialing,‛ you may be
able to open Voice Search by pressing and holding
your headset’s main button and dial by voice
using your headset. For details, see your headset
manual.
2. The Voice Dialer opens, listens for your spoken
instructions, and displays some hints for how to use it.
3. Say ‚Call‛ followed by the name of the contact to call.
• Or, follow one of the suggestions for dialing a number
or controlling your phone in other ways.

23
People
About People
People give you quick and easy access to the people you
want to reach. Contacts from Google accounts are also
downloaded and synced with the Contact list.
You can manage your communications with your
contacts via phone, messaging, and email without the
need to jump from one app to another.
Opening Your People
Open People to add, view, and communicate with
your friends and acquaintances.
1. From the Home screen, tap Apps > People.
• All of your contacts are displayed alphabetically in a
scrolling list.
• You can use the tab on the right hand side of
thescreen, or flick your finger up or down to
scroll quickly.
Getting Started
1. Adding a new contact
1. From the Home screen, tap Apps > People.
2. Tap .
3. If you have more than one account, select an account
then enter the information for the contact.
• Tap > select Take photo or Choose photo from
Gallery to add a picture.
• Enter your contact’s information.
4. Tap Done.
Saving a phone number from the Dial Pad
1. From the Home screen, tap Phone.
2. Enter the number >Tap Option>Add to contacts.
3. Tap Create new contact or an existing contact.
4. Enter the information for the contact>tap Done.
Storing a contact using Call log
1. From the Home screen, tap Apps > People.
2. Tap MISSED Call log >tap the number you want to
save >Add to contacts.
3. Tap Create new contact or select an existing contact.
4. If you have more than one account, tap the account
where you want to save the contact >enter the
information for the contact > tap Done
2. Importing / Exporting / Sharing contacts
Importing contacts from your microSD card
If you have contacts stored in vCard format on
themicroSD card, you can import them into Contacts on
your phone.
1. From the Home screen, tap Apps > People.
2. Tap Option>Import/Export.
3. Tap Import from storage.
4. If you have more than one account on your phone,
select the desired account.
24
5. Tap the option to Import one vCard file, Import
multiple vCard files or Import all vCard files on the
microSD card.
6. Tap OK to confirm. The contacts are imported
Exporting contacts to your microSD card
1. From the Home screen, tap Apps > People.
2. Tap Option>Import/Export.
3. Tap Export to storage.
4. Tap OK to confirm.
• This process creates a file containing all your contacts
with a .vcf extension on your microSD card.
Sharing visible contacts
1. From the Home screen, tap Apps > People.
2. Tap Option>Import/Export.
3. Tap Share visible contacts > Select Bluetooth,
Email, Gmail.
3. Viewing details about a contact
1. From the Home screen, tap Apps > People.
2. Tap the contact whose details you want to view.
3. Tap the communication icon to start dialing, texting, or
emailing the contact.
4. Search for a contact
1. From the Home screen, tap Apps > People.
2. Tap Search.
3.Start entering the contact’s name.
As you type, contacts with matching names appear
below the search box.
4. Tap the matching contact in the list to open.
25
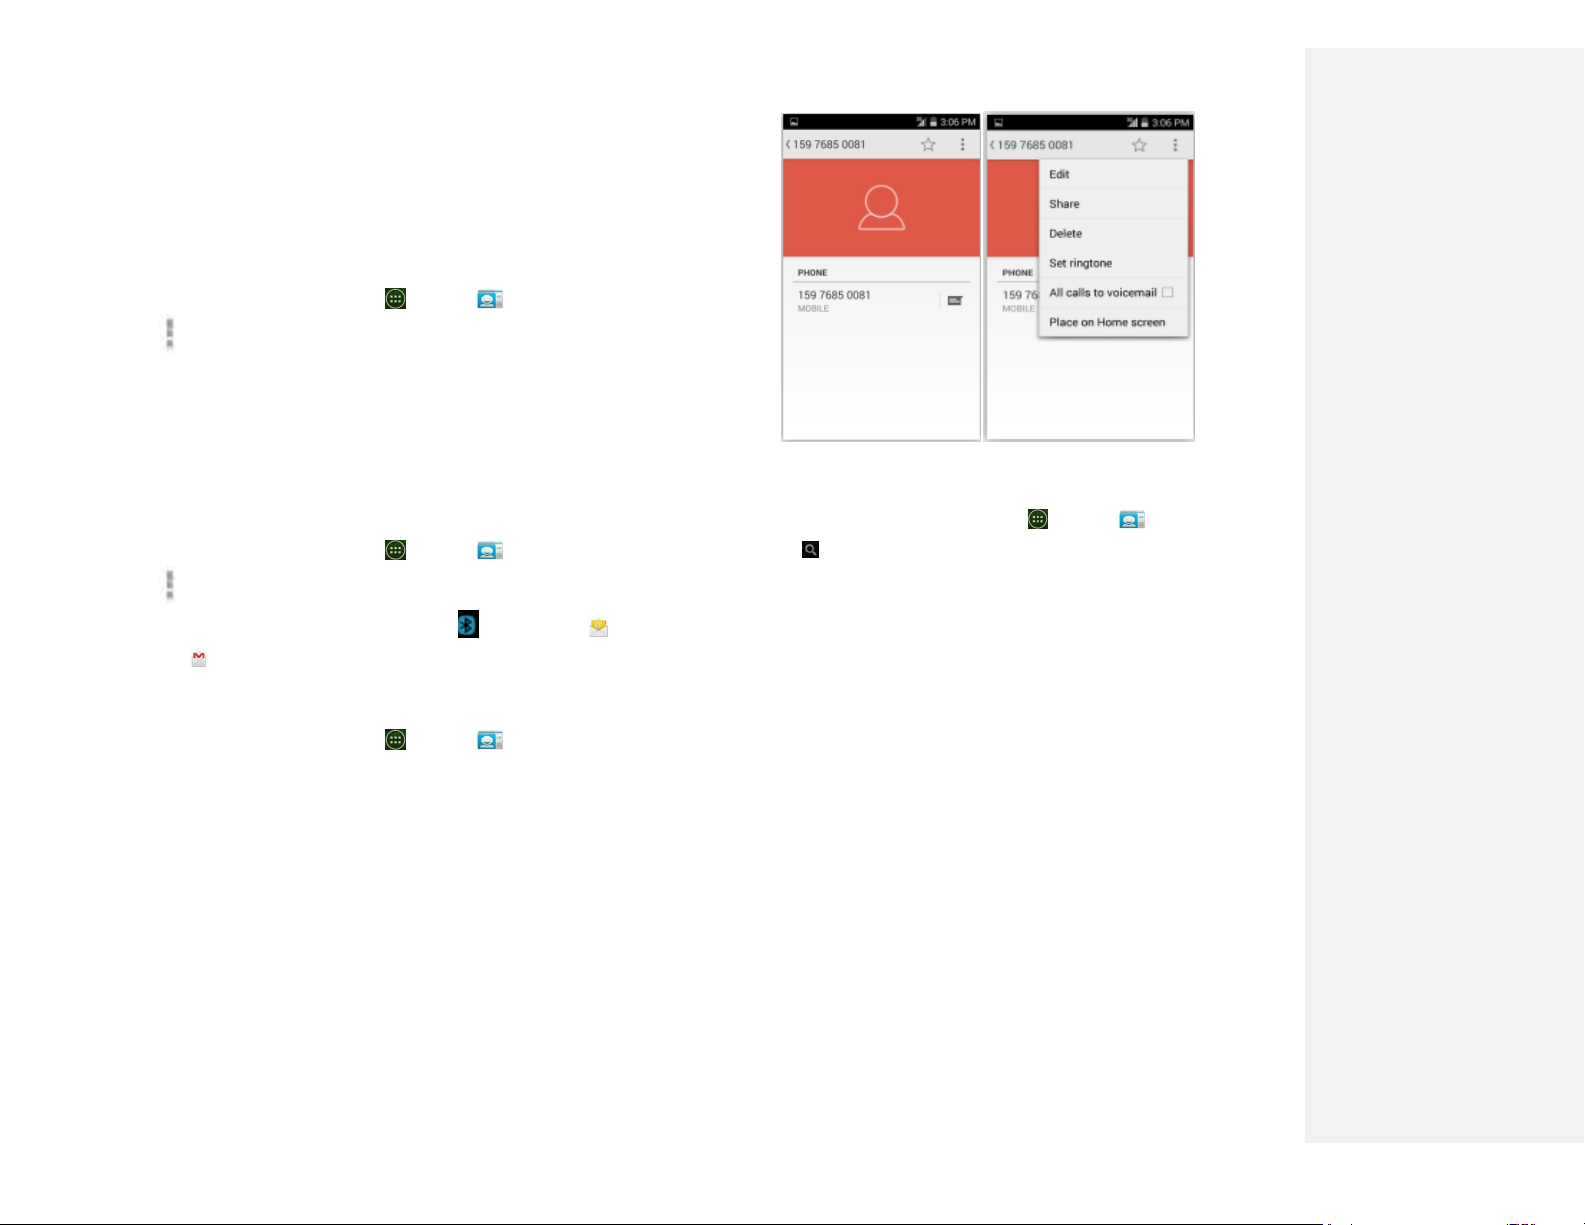
Editing/Deleting Contacts
1. Editing contact details
1. From the Home screen, tap Apps > People.
2. Tap and hold the contact you want to edit >Tap
Option>Tap Edit contact.
3. Edit the contact information.
4. Tap Done.
2. Setting a contact’s default phone
number/email
Setting a contact’s default phone number
The default phone number is used when you initiate a
call or text message by tapping and holding a contact.
1. From the Home screen, tap Apps > People.
2. Find the desired contact > Tap and hold the phone
number to designate it as the default phone number.
3. Tap Set default.
• The default phone number is indicated with a
checkmark.
Setting a contact’s default email
The default email is used when you send an email from
the list by tapping and holding a contact.
1. From the Home screen, tap Apps > People.
2. Find the desired contact > Tap and hold the email
address to designate it as the default email address.
3. Tap Set default.
• The default email is indicated with a checkmark.
3. Setting a ringtone for a contact
1. From the Home screen, tap Apps > People.
2. Tap the desired contact.
3. Tap Option>Set ringtone.
• Tap a ringtone from the list to play when the contact
calls. A sample of the ringtone is played.
4. Tap OK.
4. Adding a contact to your favorites
1. From the Home screen, tap Apps > People.
2. Tap and hold the desired contact >Tap .
• To remove a contact from your favorites list, tap
People>tapand hold the contact .
5. Joining contacts
1. From the Home screen, tap Apps > People.
2. Tap the contact you want to save. The others will
merge into this file. This is the contact you will see in
contacts after joining.
3. Tap Option>Edit >Tap Option>Join.
4. Tap the contact you want to join with the first contact.
The information from the second contact is added to
the first contact, and the second contact is hidden.
6. Deleting a contact
1. From the Home screen, tap Apps > People.
2. Tap the contact you want to delete, tap
Option>Delete.
3. Tap OK.
26
Communicating
1. Sending text message
1. From the Home screen, tap Apps > People.
2. Tap and hold the contact you want to send >tap .
• The Primary Phone Number is used, or you
are prompted to choose a phone number.
2. Making calls
1. From the Home screen, tap Apps > People.
2. Tap and hold the contact to call >tap the number.
• The Primary Phone Number is used, or you are
prompted to choose a phone number.
3. Connecting by using Quick Contact
1. From the Home screen, tap Apps > People.
2. Tap the icon or photo next to your desired contact >tap
the desired communication method.
•Only the icons relevant to your contact’s data
are displayed.
•If there are too many icons to fit on the screen, drag
to the left or right to select an icon.
Account Setting
1. Working with Google accounts
1. From the Home screen, tap Apps > People.
2. Tap Menu>Accounts.
• After registering your Google account, your online
Google contacts are synchronized to your phone.
Changes made online or on the phone are
automatically synchronized and updated in both
locations. This address book will be used
throughout the user interface.
• If you register two or more accounts, you can merge
address books from the multiple accounts into one
address book.
2. Contact List Display Options
1. From the Home screen, tap Apps > People.
2. Tap Option>Contacts to display.
• Only contacts with phones: Only contacts with phone
numbers are shown in the contacts list.
• Sort list by: Select First name or Last name.
• View contact names as: Select First name first or Last
name first.
• Choose contacts to display: Tap an account to open its
list of groups. Check or uncheck the groups you want
to display in the contact list.
27
Messaging
About Messaging
Use Messaging to send text messages (SMS) and multimedia
messages (MMS) to other mobile phones and email addresses.
1. From the Home screen, tap Apps > Messaging.
On the Messaging screen, your sent and received
messages are neatly grouped into conversations, by
contact names or phone number. You can:
• Scroll up or down the list of conversations by flicking your
finger on the screen.
• Tap a contact name or number to view the conversation
history.
• Tap the photo or to open additional menu options.
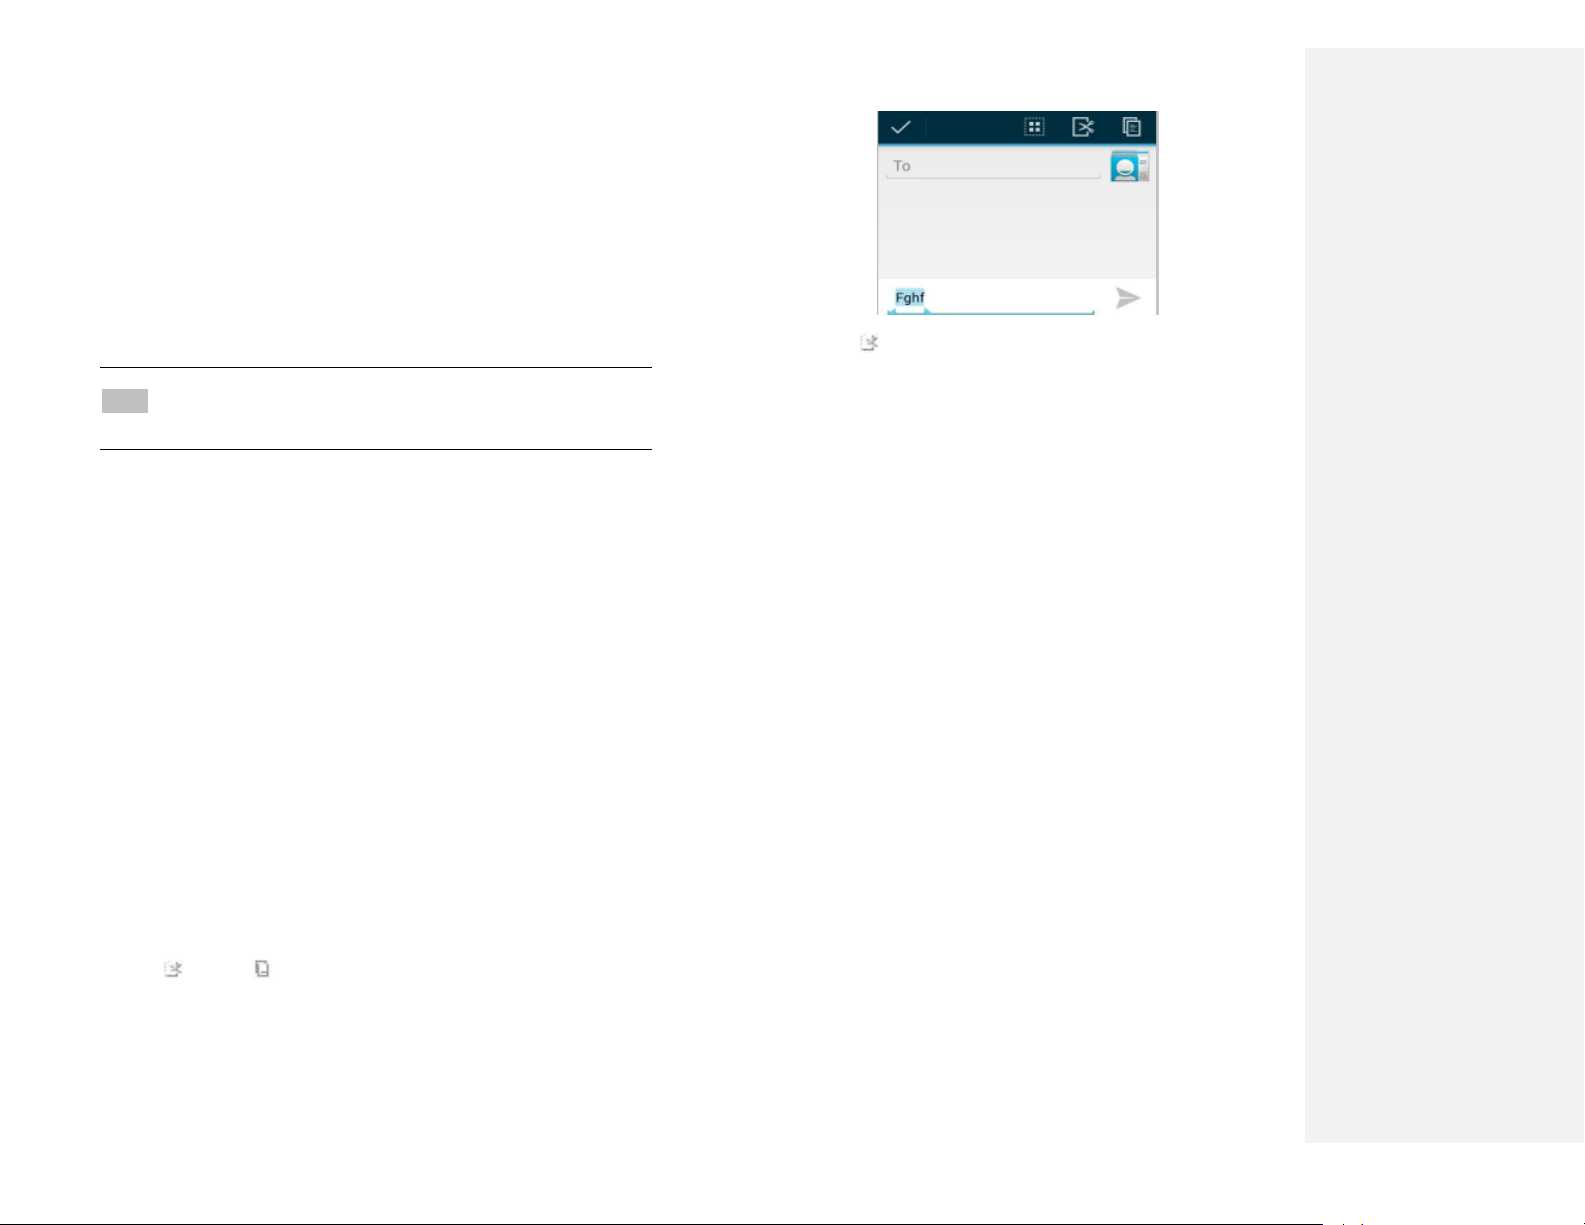
Sending Messages
1. Sending a Text Message
NOTE Depending on your billing plan, if you exceed the single
text message character limit, you will be billed for multiple
messages.
1. From the Home screen, tap Apps > Messaging.
2. Tap Create New message.
3. Enter the phone number in the Tofield. Fill in one or more
recipients. You can:
• Enter the first few letters of a contact name or phone
number. Matching contacts are displayed. Continue typing
or tap a name or phone number from the search results.
• Tap > Select message recipients from your contact
list >Ok.
4. Tap Type message>enter your message.
• Tap Menu to see more options.
28
Add subject
Add subject.
Attach
Attach Media Files or a Slideshow
within the message.
Send
Send the message.
Insert smiley
Insert a smiley in the message.
Discard
Delete the message in progress.
Import Temple
Some default text
5. Tap to Send.
• Tap Back to save the message as a draft.
NOTE Your text message automatically becomes a multimedia message on
below condition:
• Add subject
• Attach an item
2. Sending a multimedia message (MMS)
To compose a multimedia message, start by creating a new
text message. Then simply add an attachment.
1. From the Home screen, tap Apps > Messaging.
2. Tap Create New message.
3. Enter the phone number in the Tofield. Or select recipients
from the contact list.
4. Tap Type message> enter your message. Tap to add the
message template.
5. Tap Attach > choose the type of attachment.
Pictures
Select a photo.
Capture picture
Capture a new photo.
Videos
Select a video.
Capturevideo
Record a new video.
Audio
Select an audio file.
Record audio
Record a new audio file.
Slideshow
Create a slideshow from up to 10
of your photos.
6. From the message body, tap:
• View: To view the attached item.
• Replace: To change attached files.
• Remove: To remove attached files.
7. Tap Send MMS.
29
• Tap Back to save it as a draft.
3. Resuming a draft message
1. From the Home screen, tap Apps > Messaging.
2. Tap the message indicated by ‚Draft‛ to resume editing.
3. When you finish editing, tap Send.
Reading Messages
1. From the Home screen, tap Apps > Messaging.
2. Tap a message thread.
3. Tap and hold an individual message to see more options.
Lock/Unlock message
To lock/unlock a message.
Call ***
To call the message sender. (Only
on incoming messages)
Add *** to Contacts
To save the phone number or email
address to Contacts. (Only on
incoming messages)
Forward
To forward a message. Enter a
recipient, edit the content of the
message as needed >tap Send.
Copy message text
To copy text from a message.
View message details
To view details about a message.
Delete message
To delete a message.
1. Deleting a message thread
1. From the Home screen, tap Apps > Messaging.
2. Tap and hold the message thread, tap Option
>Delete thread.
• If you want delete all message threads, tap
Option>Delete all threads.
3. Tap Delete.
2. Searching messages
1. From the Home screen, tap Apps > Messaging.
2. Tap Search to search.
3. Enter the search term >tap Search.
3. Replying to a message
1. From the Home screen, tap Apps > Messaging.
 Loading...