

Page 1
1
Welcome
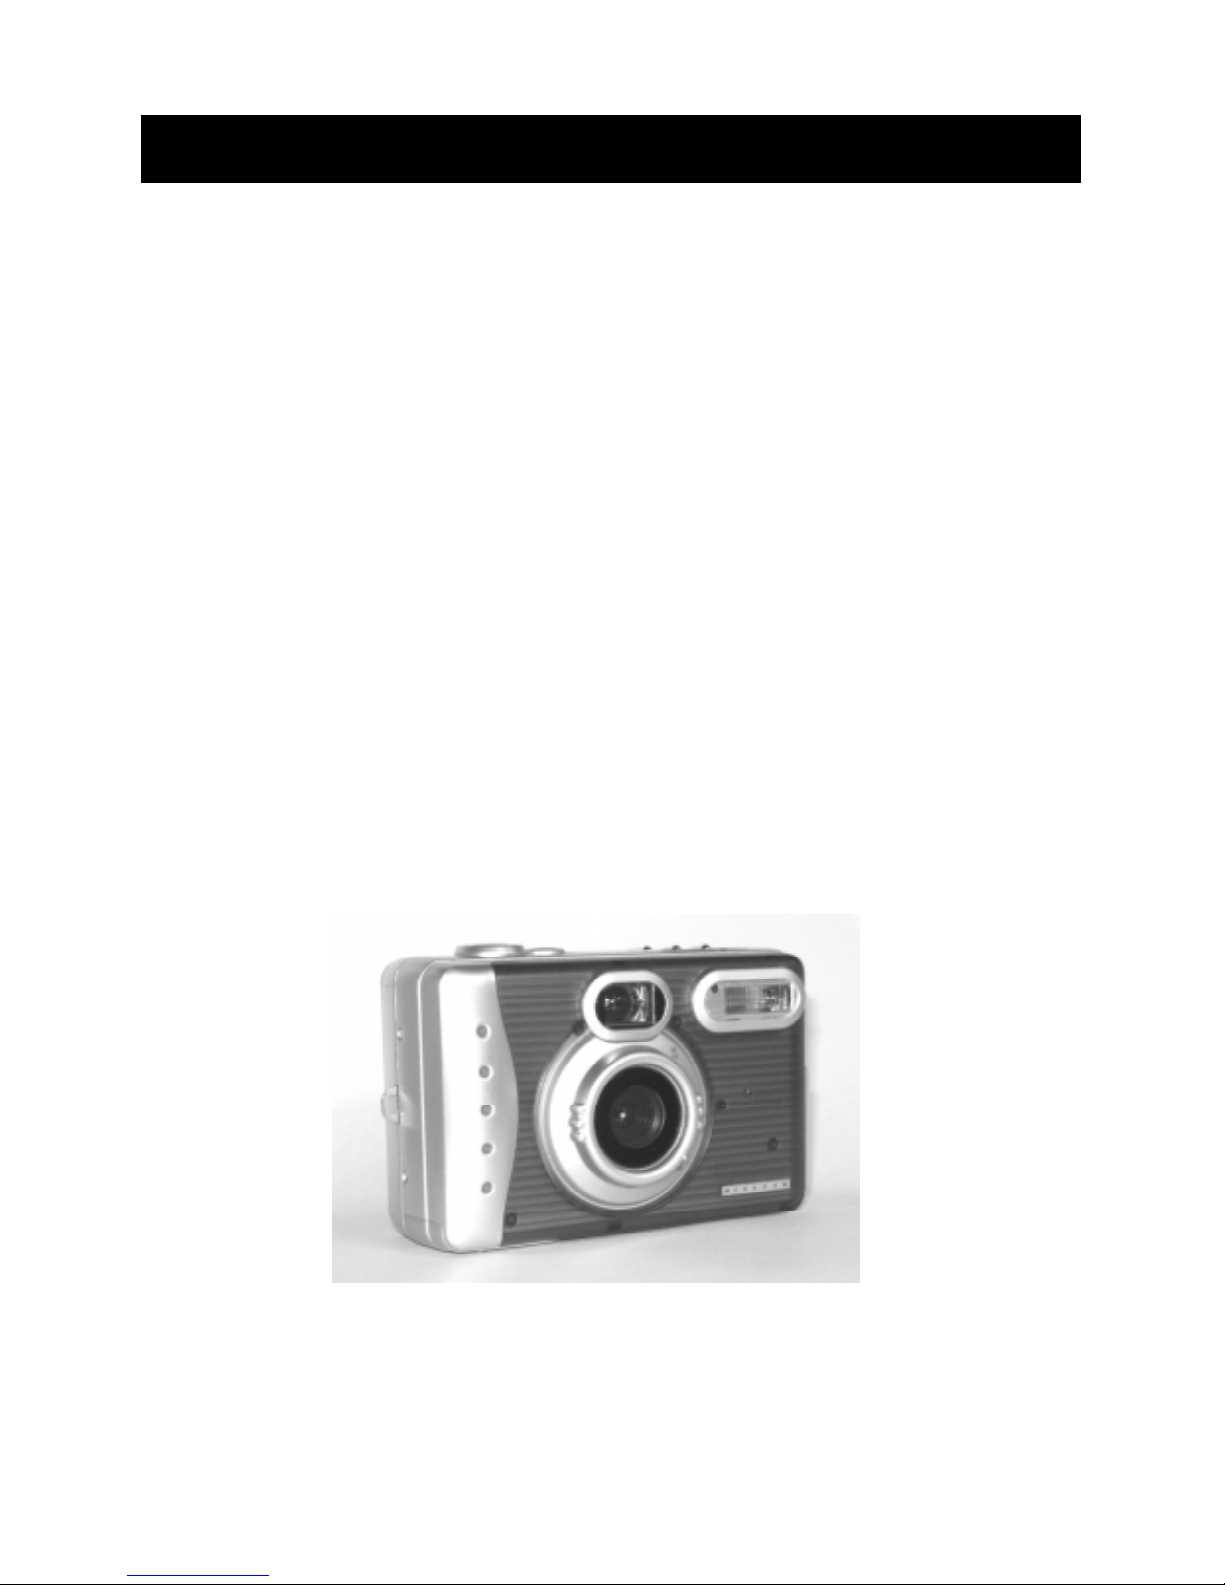
MegaCam is a high-quality yet affordable digital camera that allows you to
create, edit, share and send photos to friends and family.
MegaCam is also not just a digital camera. It lets you record short segments of
video. What’s more, it can be used as a Web camera when you connect it to a
computer.
This easy-to-follow manual shows you how to use your new camera and install
all the software that is included in the Digital Camera CD. You’ll find clear
instructions on how to take pictures, record video, and use your camera as a PC
camera. Guidelines on how to use the software to transfer photos and video clips
from the camera into your computer are also provided.
Whether you want to send snapshots or short video clips via mails, create
exciting photo projects, produce movies, or meet friends and family face to face
over the Internet, MegaCam gives you all the tools that you need.
Page 2

2
Contents
Know Your Camera ................................................................................................................ 3
Camera Controls .................................................................................................................... 3
Digital Interface Compartment ................................................................................................. 6
Preparing Your Camera .......................................................................................................... 7
Start Using Your Camera ........................................................................................................ 7
Formatting the Memory Card ................................................................................................. 8
Shooting Photos ...................................................................................................................... 8
Viewing Photos ...................................................................................................................... 9
Taking Close-ups, Portrait and Distant Pictures ...................................................................... 9
Printing Photos........................................................................................................................ 9
Deleting Photos ..................................................................................................................... 10
Camera Settings ................................................................................................................... 11
Hooking Up to Your Computer .............................................................................................. 12
Hooking Up to Your TV/VCR ................................................................................................ 12
Recording Video ................................................................................................................... 13
Installing Software................................................................................................................. 14
Downloading photos ............................................................................................................ 16
Appendix: Camera Specifications ........................................................................................ 17
Page 3
3
Know Your Camera
This is not your traditional camera. This
is a “digital camera”. A digital camera
allows you to take pictures without the
use of film.
Eliminate developing costs by
downloading the photos to your PC. You
can send your photos via email, upload
them to your web site.
Now, familiarize yourself with the camera
controls of MegaCam.
Camera Controls
Top of Digital Camera
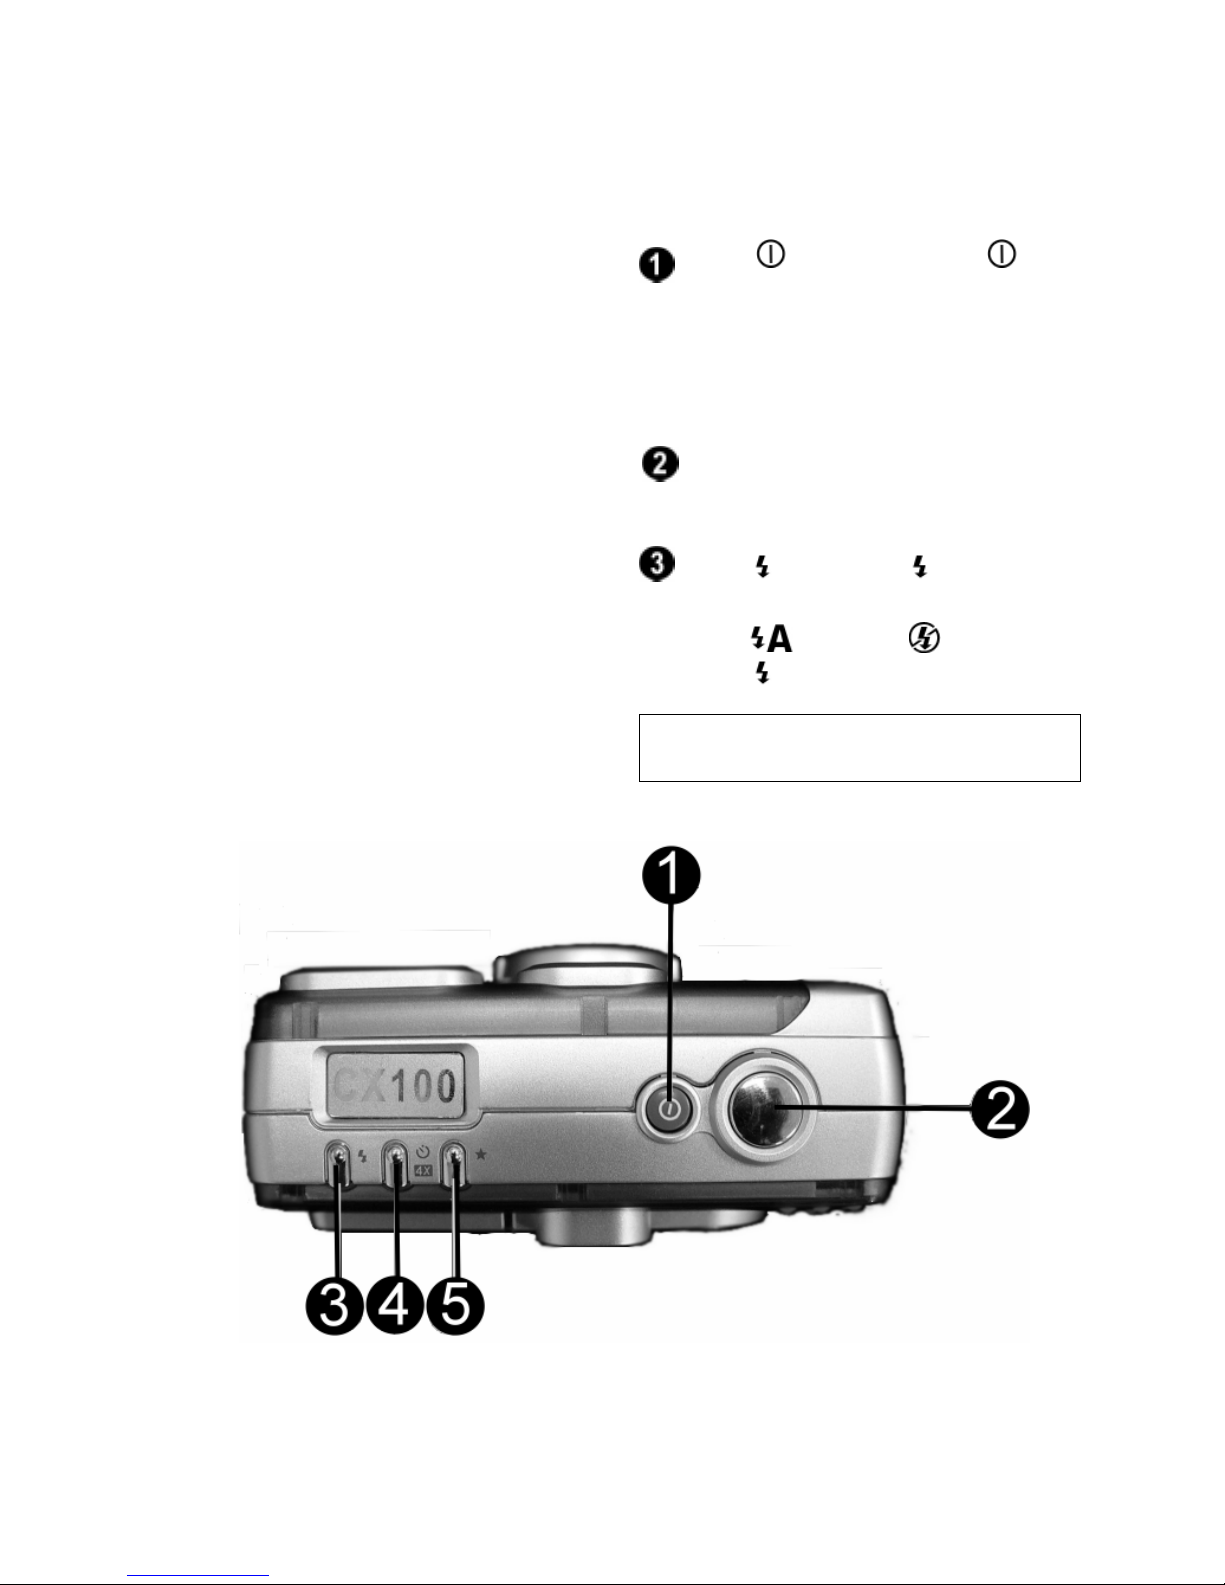
Power - Press the Power
button for one second to turn the
digital camera on and off. You will
then hear two beep sounds to remind
you the camera is on.
Shutter Release - Press the Shutter
Release button to take the picture.
Flash - The Flash button gives
you the options of choosing Auto
Flash
, No Flash or Force
Flash
.
Note: The default setting is “No Flash”.
Page 4
4
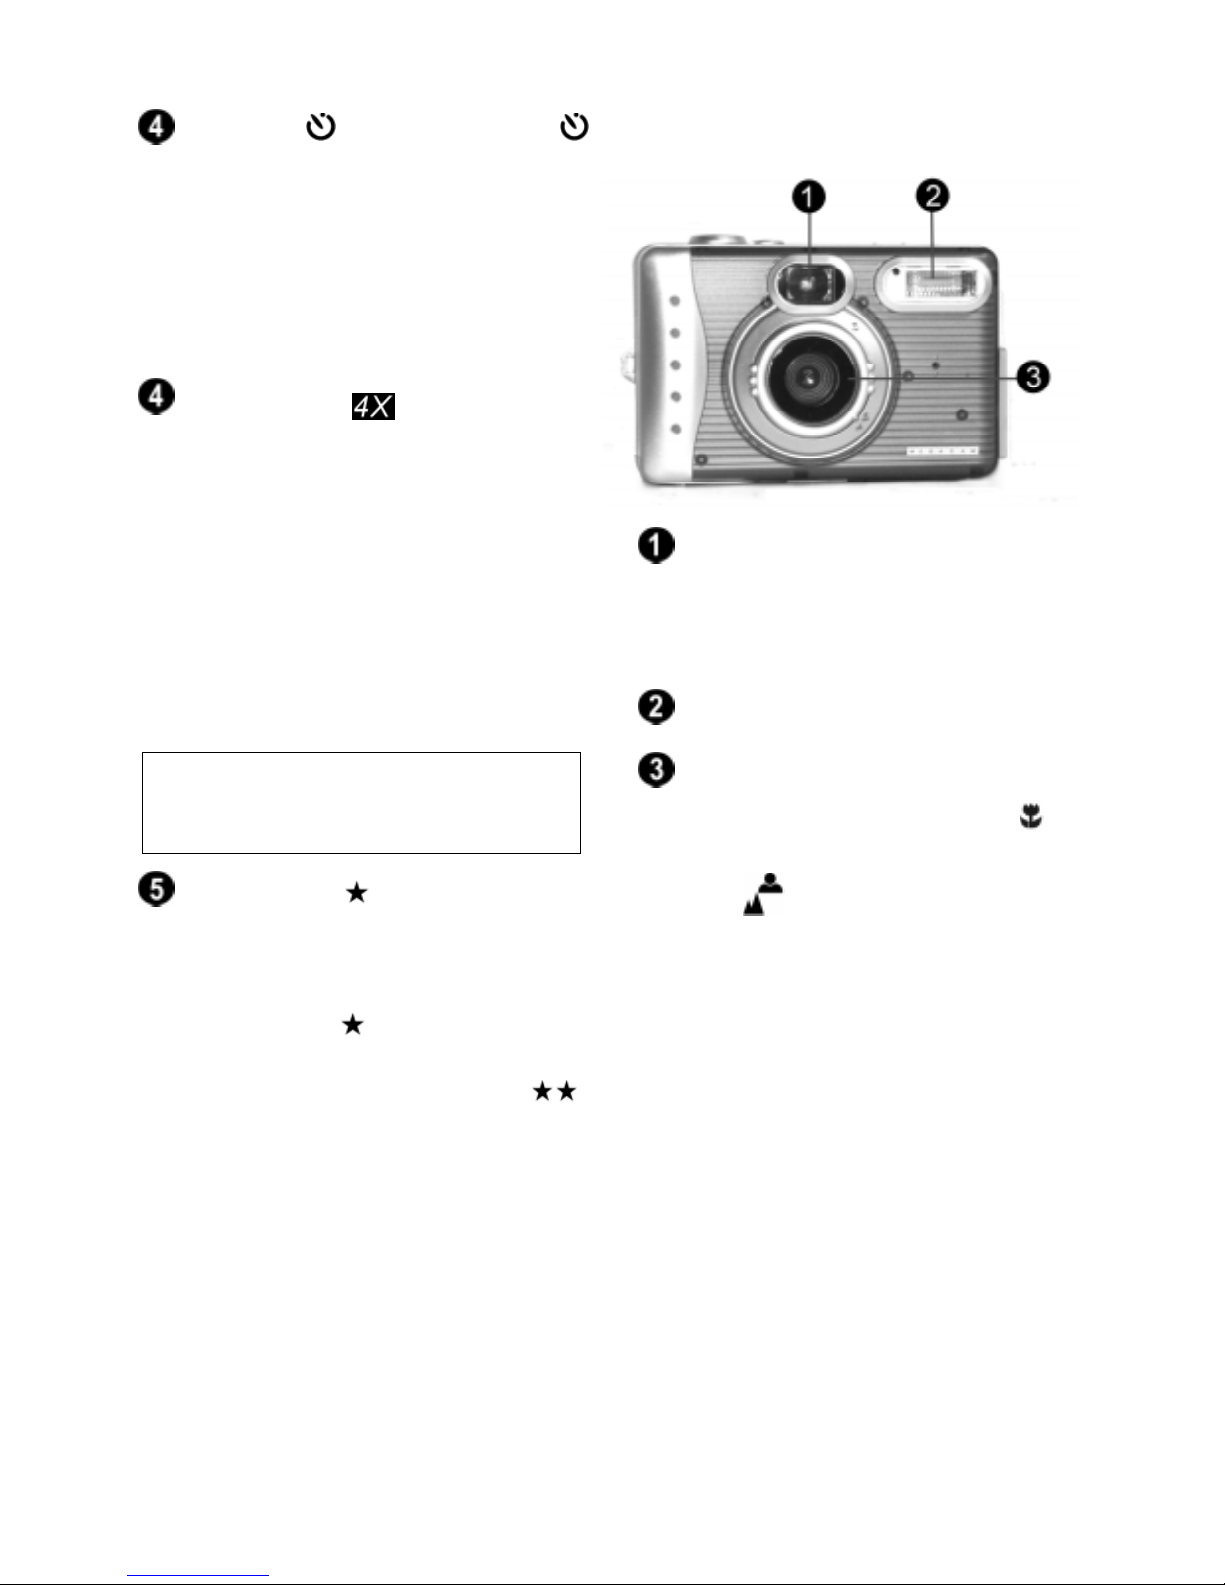
Self-Timer - Use the Self-Timer
button when you need to shoot photos
of yourself. After you press the Shutter
Release button, a 10-second
countdown, giving you time to position
yourself in front of the camera before
your photo is taken.
Digital Zoom - MegaCam
provides four times magnification
beyond the optical zoom. Press the
Record mode button to activate
Preview and use the LCD display to
frame your subject. And press zoom
button once to magnify your object.
It does not function when you select
2M & 3M Scale up for your photo
quality.
Note: Self-timer and Digital Zoom are
actually sharing the same button.
Photo Quality - The Photo Quality
button lets you choose: Fine, Best
quality, 2M and 3M Scale up.
At Fine quality
photos will be
moderately compressed to keep their
file sizes smaller. At Best quality
photos appear clearer and sharper, and
their file sizes will be larger. And
what’s more is MegaCam allows you
to scale the resolution up to 3
megapixels at 3M Scale up.
Using the 8MB built-in memory that’s
included in your camera, you can take
about 90 pictures at Fine quality, 30
pictures at Best quality, 19 pictures at
2M Scale up and 12 at 3M Scale up.
Front of Digital Camera
Viewfinder Window - The
Viewfinder window allows you to
center on the subject or scene you
want to photograph.
Flash - This is the camera flash.
Lens - Adjust the camera lens to take
close-up pictures (Macro mode
)
or portrait/scenery (Normal / Infinity
mode
).
Page 5
5
Back of Digital Camera
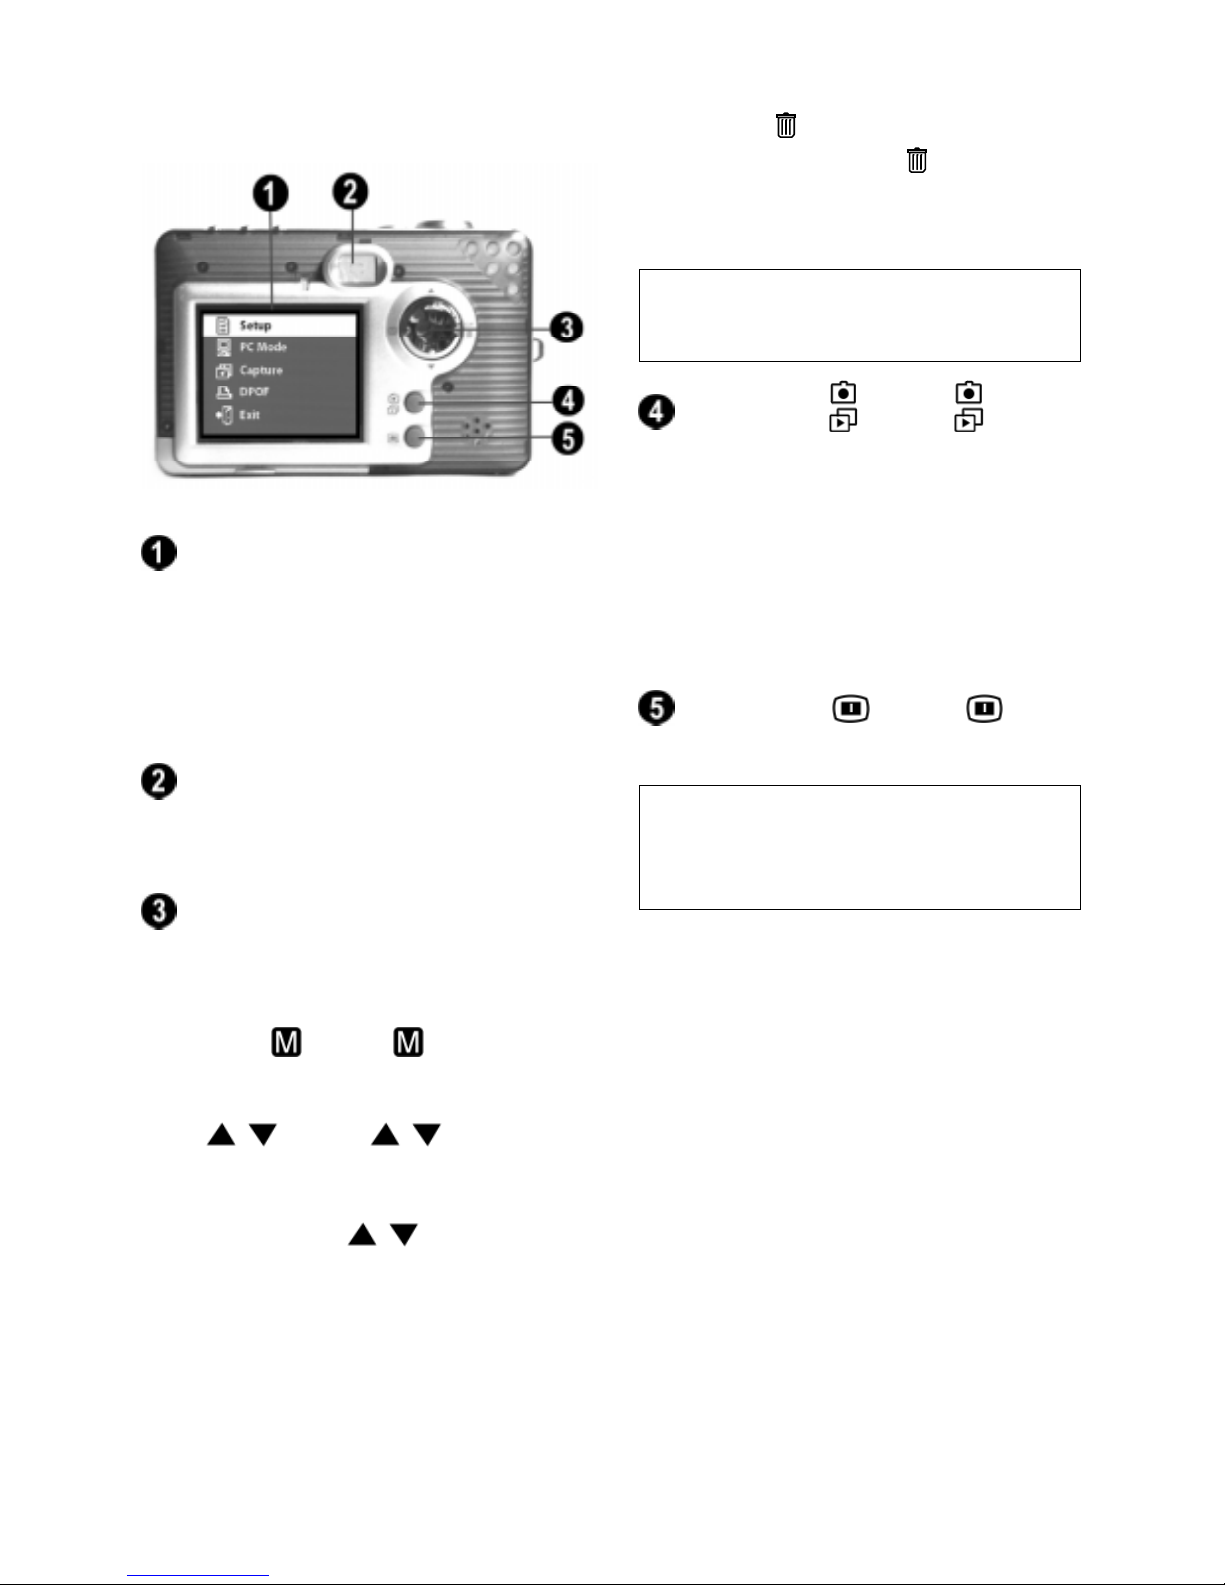
LCD Display - The LCD Display
(Liquid Crystal Display) is one way
used to view the photos you have
taken; indicate camera settings as
well as access the menu and info
options.
Viewfinder - Look through the
Viewfinder to view the real life subject
you want to photograph.
Controller - Use the Controller
button to open the camera menu and
change option settings:
• Menu
- Press to open the
camera menu on the LCD Display.
•
- Press to move up
or down in the camera menu when
in Record mode. When in Play
mode, press to browse
through the photos you have in the
memory.
• OK - Press OK to select a menu
option or setting. Also press OK
when you are replying to screen
messages.
•Erase
- When in Play mode,
pressing the Erase
button allows
you to remove a picture from the
memory.
Note: Erase and OK are actually just a
single button.
Record/Play - Press to
switch between Record and Play
modes. Record mode allows you to
take photos as well as record video
with the camera. Play mode lets you
view the photos or videos you have
taken on the LCD Display and erase
unwanted photos or videos.
LCD Display - Press to
turn On/Off the LCD display.
Note: It will be automatically shut off if
no operation in 30 seconds to save your
battery power.
Page 6

6
Picture Counter
Number of remaining shots
(Record mode)
Number of stored photos
(Play mode)
Digital Interface
Compartment
Located on the left side of the camera are
the two ports for attaching the following
cables: Video Output and USB. These
ports will enable you to attach the
appropriate cables from the camera to
your computer and TV/VCR.
Video Output - used to hook your
camera to a TV/VCR for viewing
images taken with your camera.
USB Connection - used to connect
your camera to the computer through
the USB port. You can then transfer
photos and recorded videos from the
camera to your computer, or use the
digital camera as a Web camera.
Zoom
4x Digital zoom
3x Digital zoom
2x Digital zoom
1x Digital zoom
LCD Display Status icons
Battery power level
Full battery power
Medium battery power
Low battery power
Photo quality
Fine quality, 640x480 pix
Best quality, 1280x1024 pix
2M Scale up, 1600*1200 pix
3M Scale up, 1920*1440 pix
TV/VCR output
NTSC/PAL
Flash setting
Auto
Force Flash
No Flash
Self-timer
Self-timer On
Page 7
7
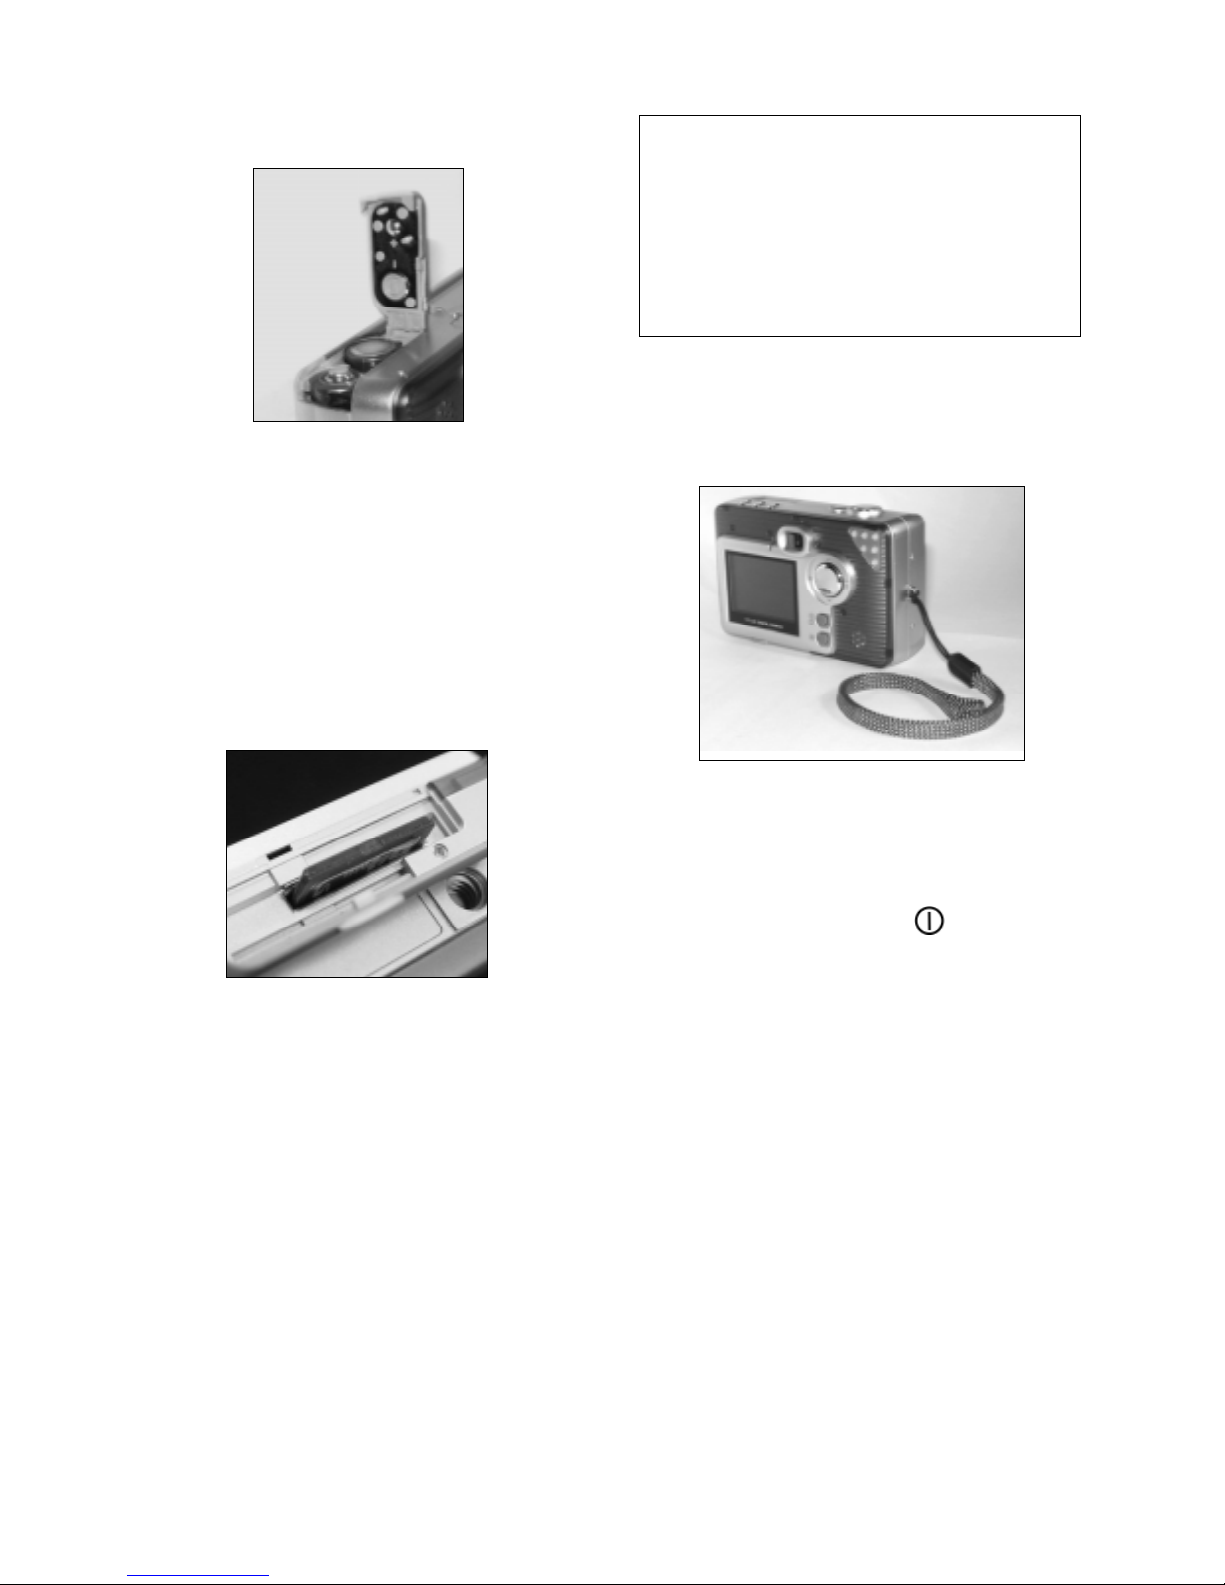
Note: 1. To remove the SD card, push
the SD card once and the card will be
ejected from the memory compartment.
2. MegaCam comes with built-in 8Mbyte
internal NAND Flash memory. You don’t
necessarily add extra memory for it.
• Step 3 Attach the wrist strap to the strap
holder at the side of the camera as
illustrated in the picture below.
Start Using Your Camera
• Step 1 Press the Power button to
turn on the camera. A green light just
beside the Viewfinder then lights up.
• Step 2 The LCD Display will be turned
on automatically.
Preparing Your Camera
• Step 1 Insert the two AA batteries into the
battery compartment located at the bottom
of your digital camera. When closing the
battery door, push the battery door down
and then slide it closed.
• Step 2 Open the memory compartment
cover located at the bottom of your
camera and insert the SD memory card.
When inserting, hold the memory card so
that its pin connector is pointing towards
the camera. Also, the front side of the
memory card should be facing the front
side of the camera.
Then, push the memory card all the way
into the memory compartment and close
the cover.
Page 8
8
• Step 6 After the memory card has been
formatted, all the pictures in the memory
card will be deleted. And there is a
message appeared: No pictures in
memory.
Press
to switch to Record mode. You
can now begin taking pictures.
Shooting Photos
Taking pictures with your digital camera is
a snap. Just point and shoot!
• Step 1 Make sure that the camera is
turned on.
• Step 2 Use the LCD display or the
Viewfinder to frame the subject you want
to photograph.
• Step 3 Press the Shutter Release
button to take the picture.
The picture will remain on the display and
LCD will display “Processing” until it is
stored in the memory. Now LCD Display
will resume, you may focus your next
target to take the next picture.
Tip: Unlike a traditional camera, if you
move the camera your image will not be
blurred at this time.
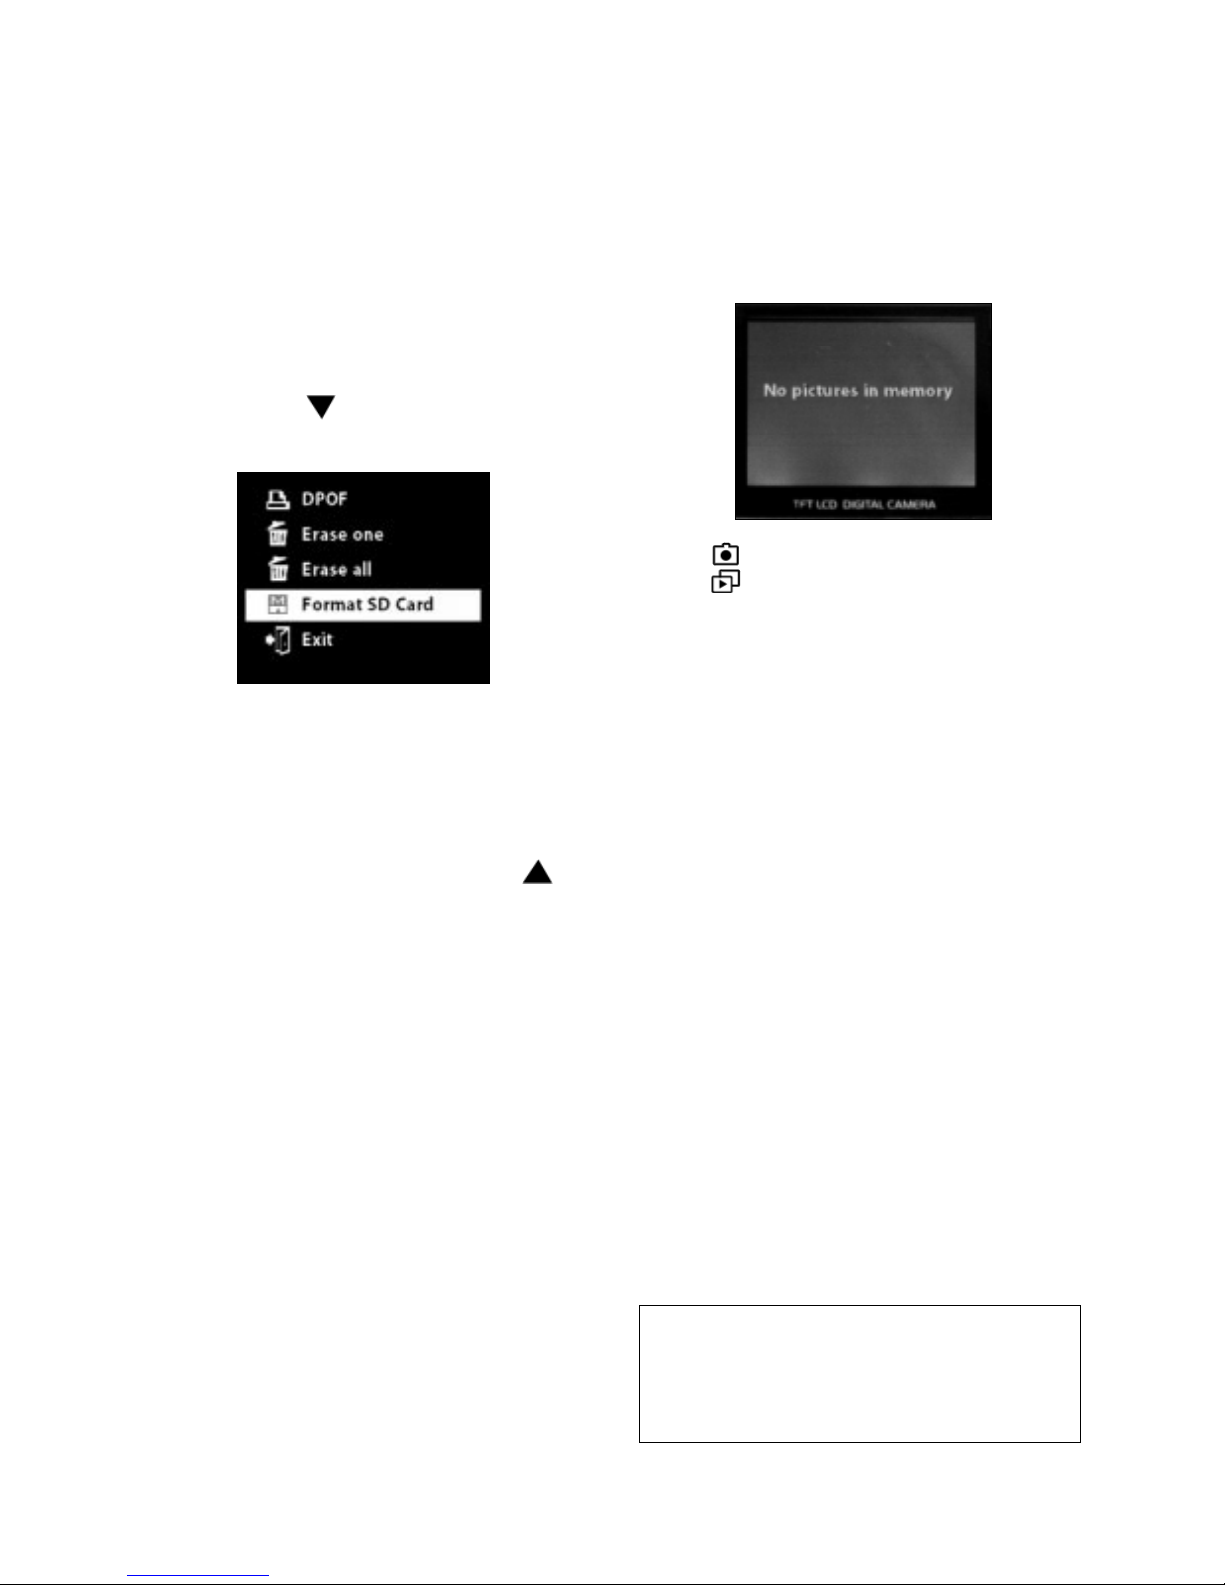
Formatting the SD Card
It is best to format your SD memory card
before using it to store pictures.
• Step 1 First switch to Play mode and
press OK Button to bring up the Erase
menu.
• Step 2 Press
to move down to the
Format SD Card option.
• Step 3 Press OK.
• Step 4 The message “Format the
storage?” then appears.
To format the memory card, press
to
select Yes on the screen and then press
the OK button. You will hear a ring
sound when you press it.
If you do not want to continue with
formatting the memory card, select
Cancel on the screen and then press
the OK button.
• Step 5 The camera then begins
formatting the memory card. Wait for the
formatting process to finish.
Page 9
9
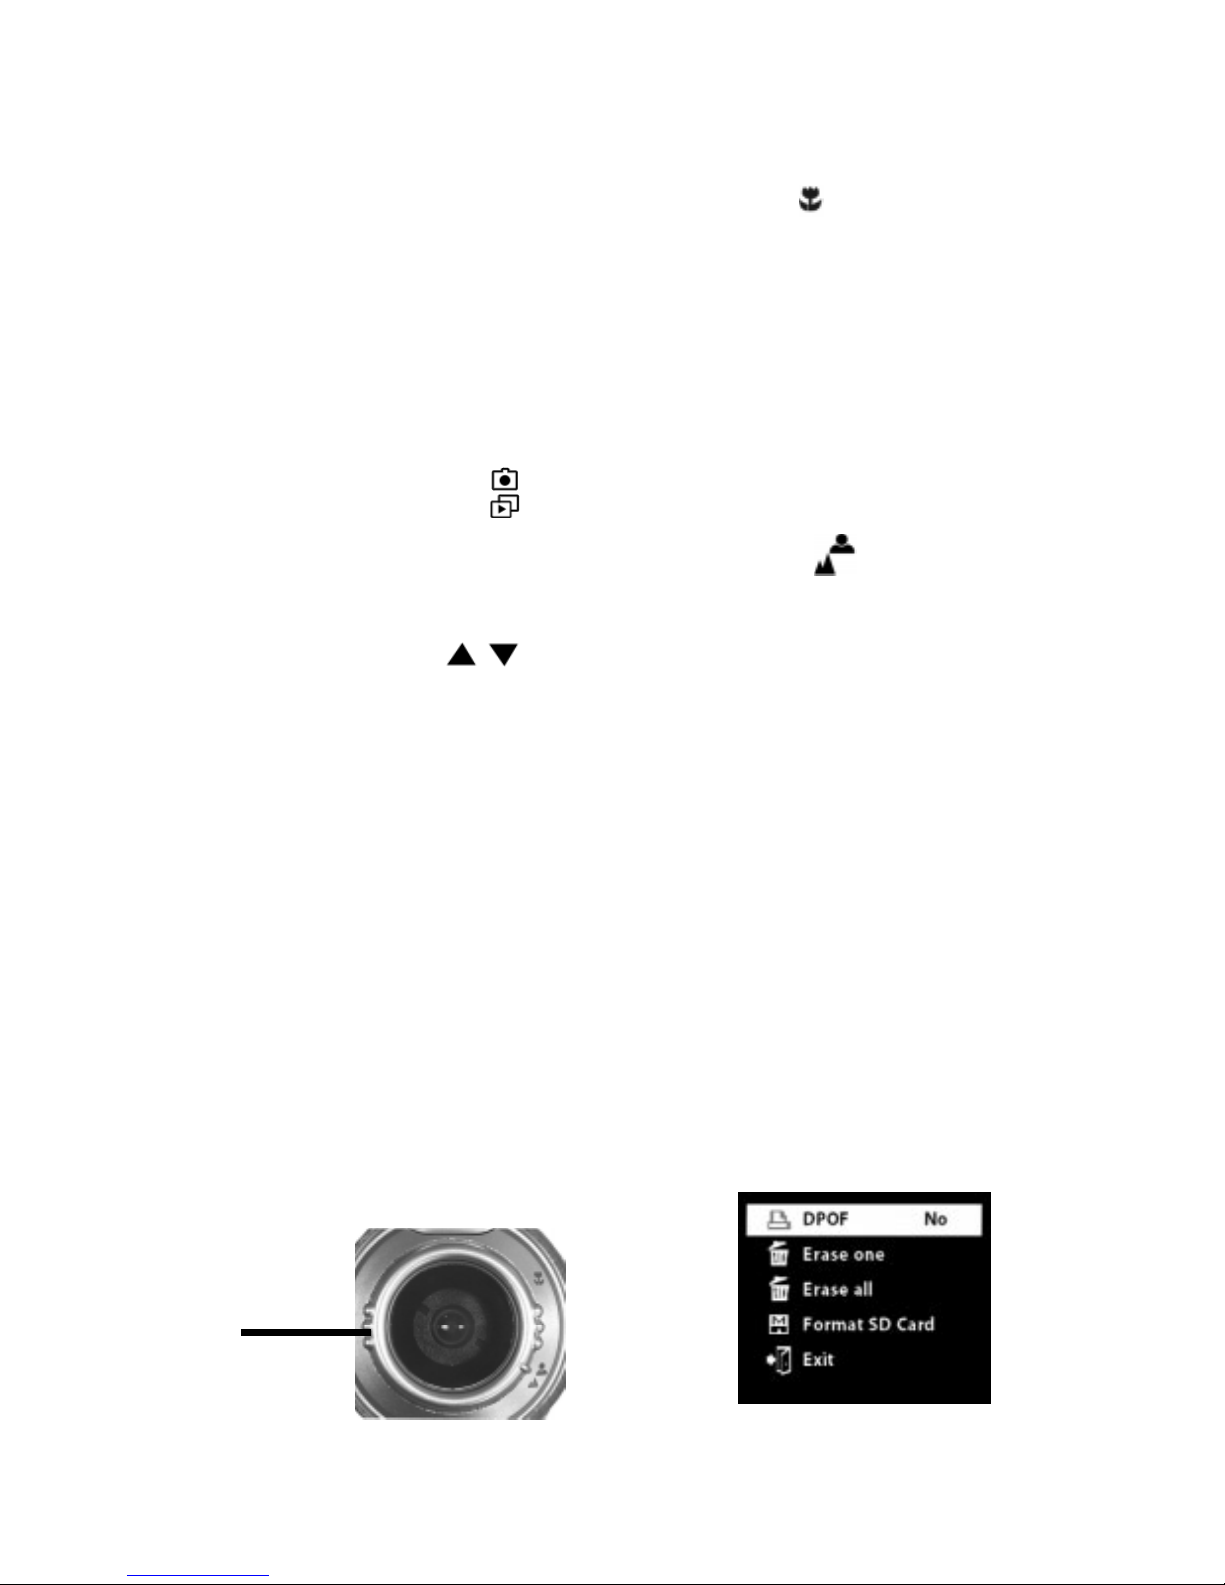
• Step 1 Turn the lens all the way to the
left. This sets the digital camera to
Macro mode
, allowing you to take
pictures at close range.
• Step 2 To take pictures, follow the steps
in the section, “Shooting Photos” on
page 8.
To take portrait and distant pictures:
• Step 1 Turn the lens all the way to the
right. This sets the digital camera to
Normal mode
, allowing you to
take pictures of people or sceneries.
• Step 2 To take pictures, follow the steps
in the section, “Shooting Photos” on
page 8.
Printing Photos
By selecting DPOF optionin in erase
menu, camera can directly send your
selected photo to the compatible printers
that read DPOF (Digital Print Order
Format).
After a photo is selected for printing with
DPOF option, the DPOF icon will show on
the photo when previewing the image in
Palyback mode.
Now that you have taken the photos, they
are stored in camera memory, let’s view
them.
Viewing Photos
• Step 1 Turn on your MegaCam.
• Step 2 After two beep sounds, the LCD
Display will be also turned on
automatically.
• Step 3 Press the Record/Play
button to switch the camera to Play
mode.
• Step 4 View the pictures one at a time
on the LCD Display. Press
to
move backward and forward through
the pictures.
Taking Close-ups,
Portrait and Distant
Pictures
The lens at the front of the digital camera
can be adjusted for taking close-up
pictures as well as people portrait and
distant pictures.
To take close-up pictures:
Adjustable
lens
Page 10
10
Deleting Photos
You can choose to delete a single photo or
all the photos previously taken with the
digital camera.
Deleting a Single Photo
If you are not satisfied with some pictures,
you may delete them from the memory.
• Step 1 Make sure that the camera is
turned on.
• Step 2 Press the Record/Play
button to switch the camera to Play
mode.
• Step 3 Press
to move
backward and forward through the
pictures.
• Step 4 When you see a picture that you
want to delete, press the Erase
button.
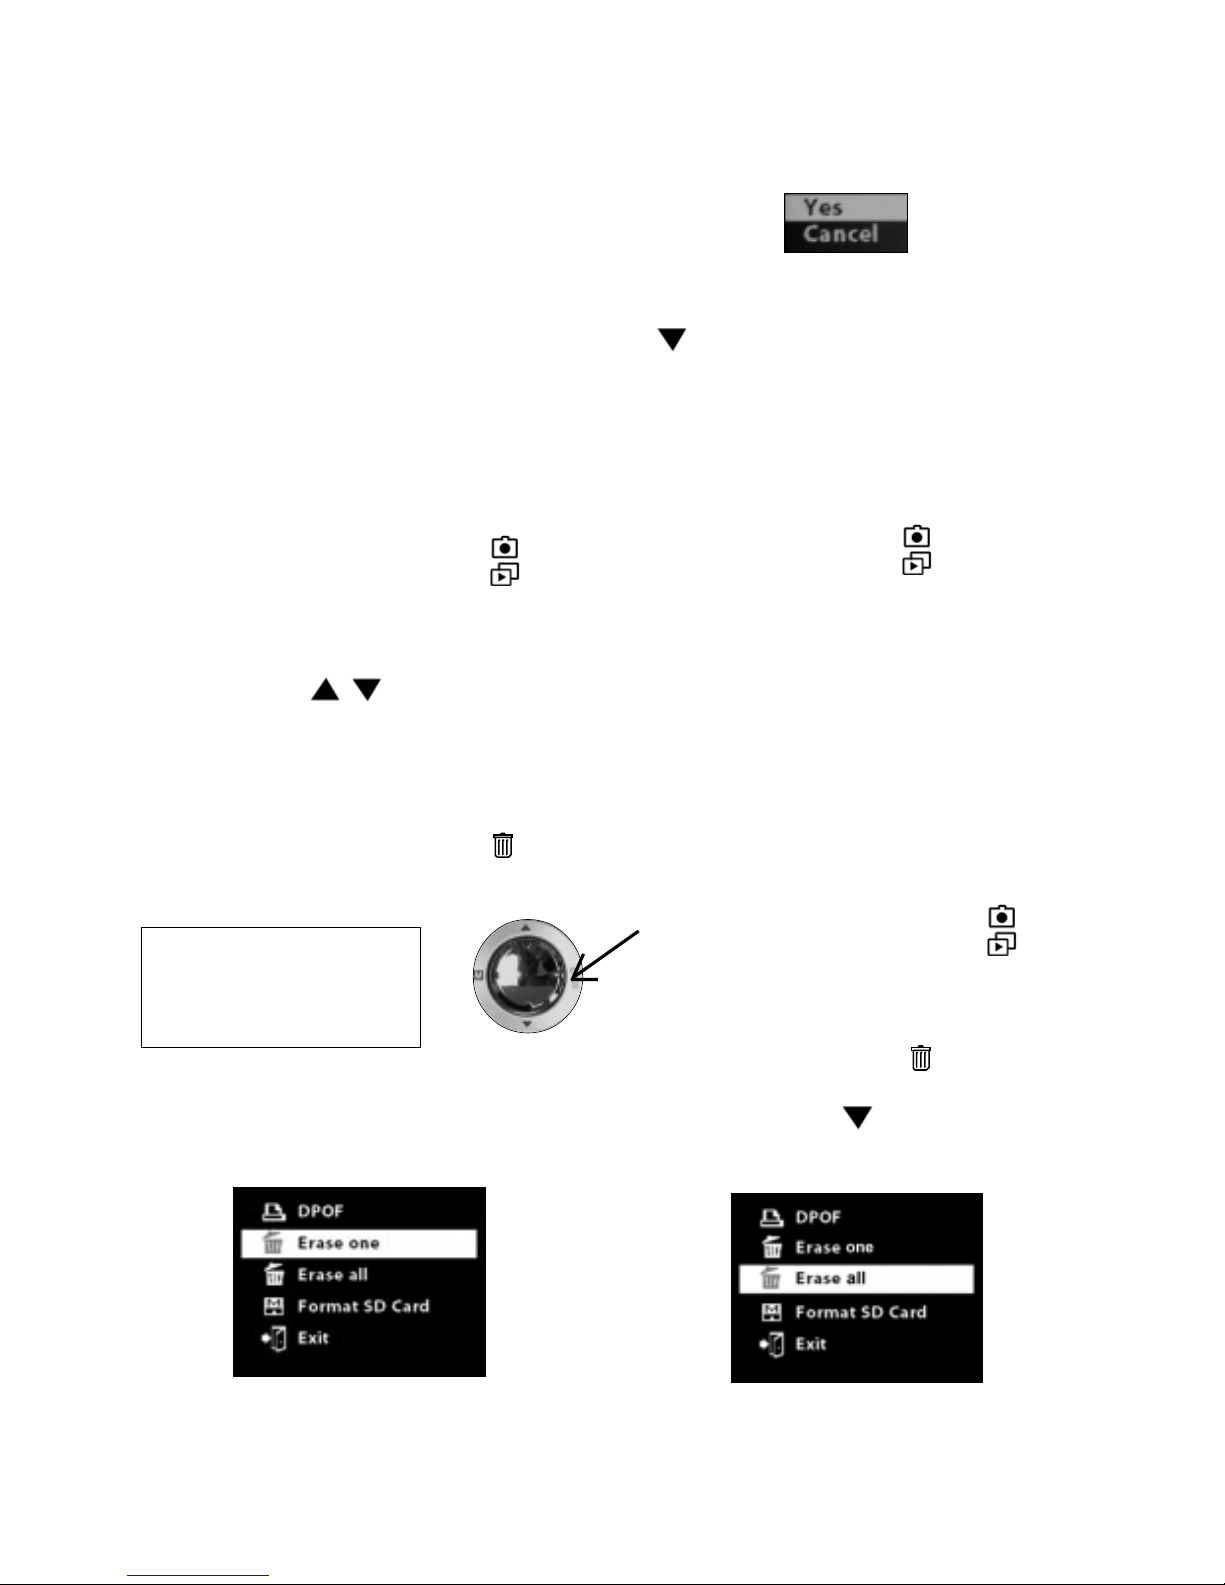
Note: Erase and OK are
actually just a single
button.
• Step 5 A menu then appears, with the
Erase one option highlighted.
• Step 6 Press the OK button to erase the
current picture.
If you change your mind and do not
want to erase the current picture, press
to select the Cancel option on the
menu screen, and then press the OK
button. The menu closes and the current
picture remains undeleted.
• Step 7 To continue taking pictures,
press the Record/Play
button to
switch the camera to Record mode.
Deleting All Photos
You may also choose to delete all of the
photos if the memory is already full and
you want to free up the space to take
more photos. But before you remove all
photos, remember to transfer them first to
your computer.
• Step 1 Press the Record/Play
button to switch the camera to Play
mode.
• Step 2 Press the Erase
button.
• Step 3 Press the
to move down to
the Erase all option.
Page 11
11
• Step 4 Press the OK button.
• Step 5 When you see the message,
“Delete All Images?”, press
to select
Yes on the screen and then press the
OK button to erase all of your pictures.
If you change your mind and do not
want to continue deleting all the pictures,
press
or to select Cancel on the
menu screen. Then press the OK
button. All your pictures will be retained.
• Step 6 After all the pictures have been
deleted, there is a message appeared:
No pictures in memory.
Press Record/Play
button to switch
the camera to Record mode to take more
photos.
Camera Settings
Using the default camera settings,
sometimes, the picture quality may not
come out the way you want it. Different
lighting environments usually produce
different results.
To have more control over the quality of
your pictures, adjust the camera settings
to suit your needs.
Changing Camera Settings
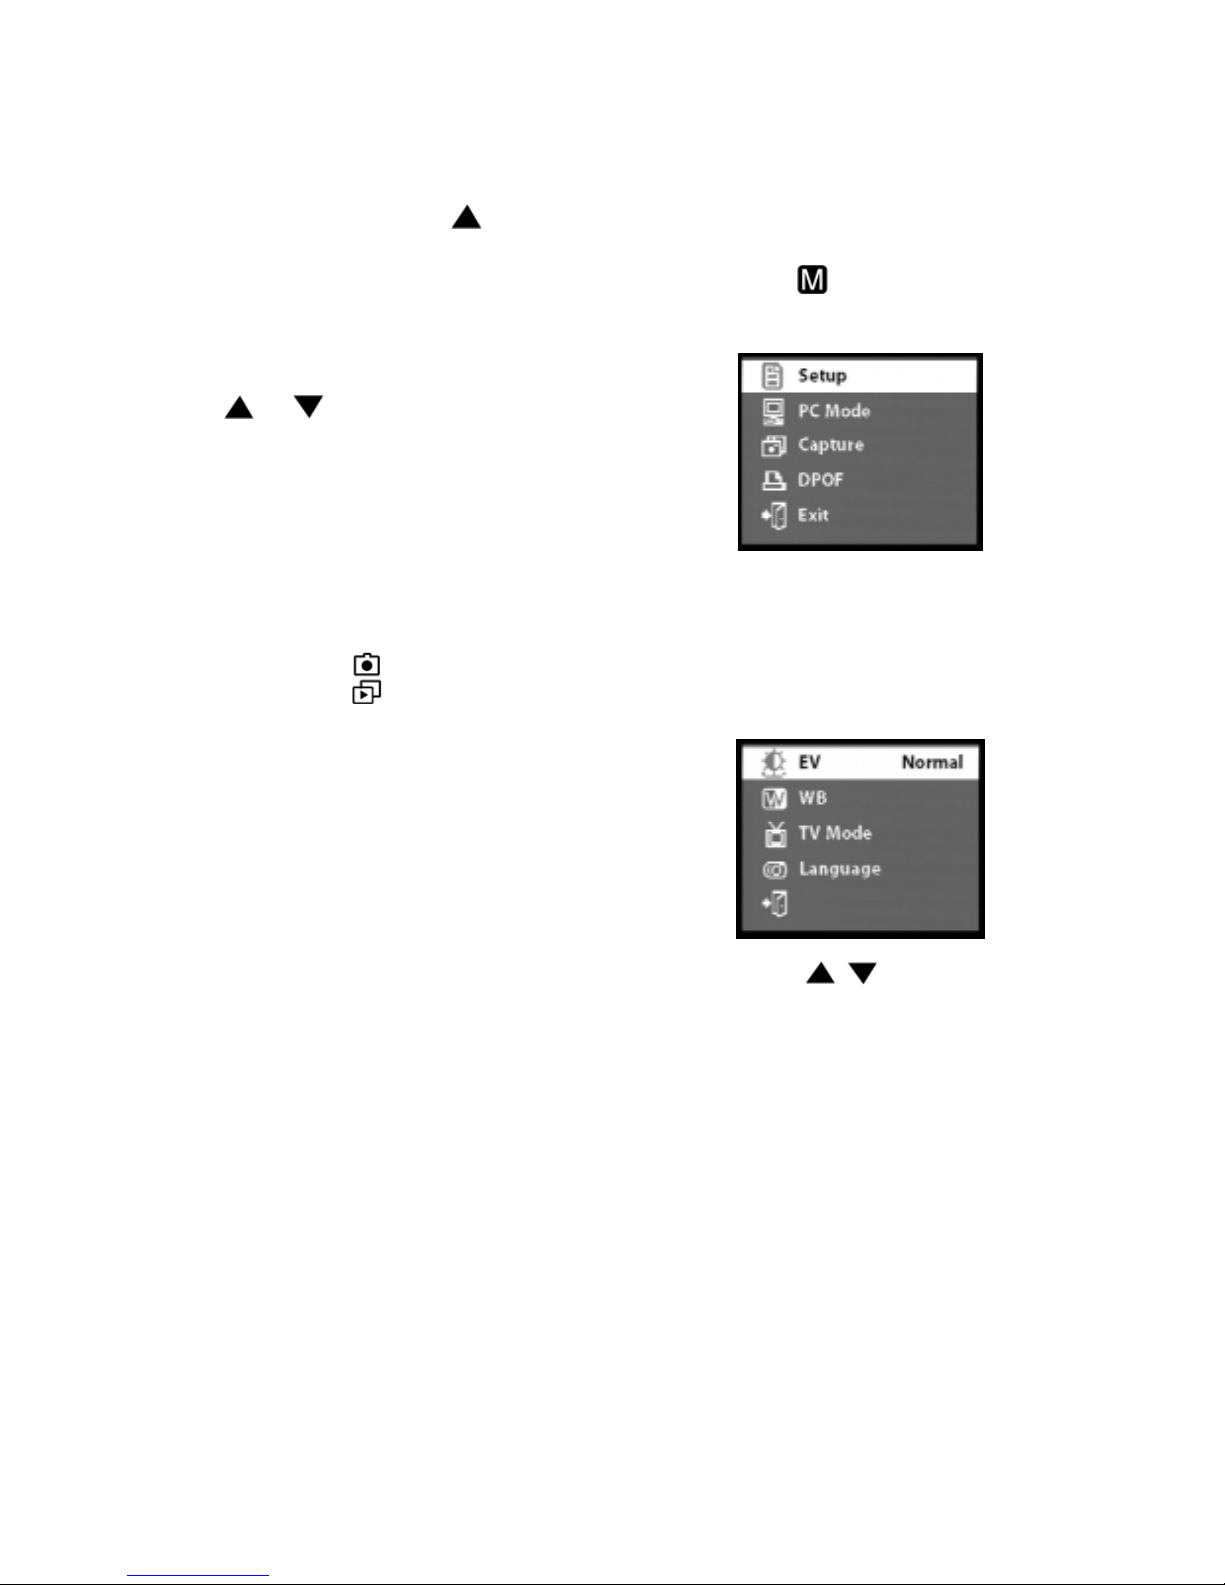
Access the Camera Setup menu in your
digital camera to change camera settings.
• Step 1 Press
to bring up the
camera’s menu screen.
• Step 2 Press OK on the Setup option.
• Step 3 The Camera Setup menu then
appears on the LCD display.
• Step 4 Press
to move up or
down in the Camera Setup menu.
The Camera Setup menu lists the
following options:
• EV (Compensation) - Sets the
exposure setting to control the
brightness of photos. Choose a
positive value to have brighter photos,
or a negative value to have darker
photos.
Page 12
12
• WB (White Balance) - Allows the
camera to adjust to light conditions
using preset selections (auto, sun,
shade, tungsten, fluorescent).
• TV Mode - Choose the TV standard
that you use in your country for the
video you record.
• Language - Let you to choose different
languages for Camera menu.
• Step 5 Press OK to select a menu
option. The selected option will be
highlighted.
• Step 6 Press
to cycle through
the available settings.
• Step 7 Press OK to choose a setting.
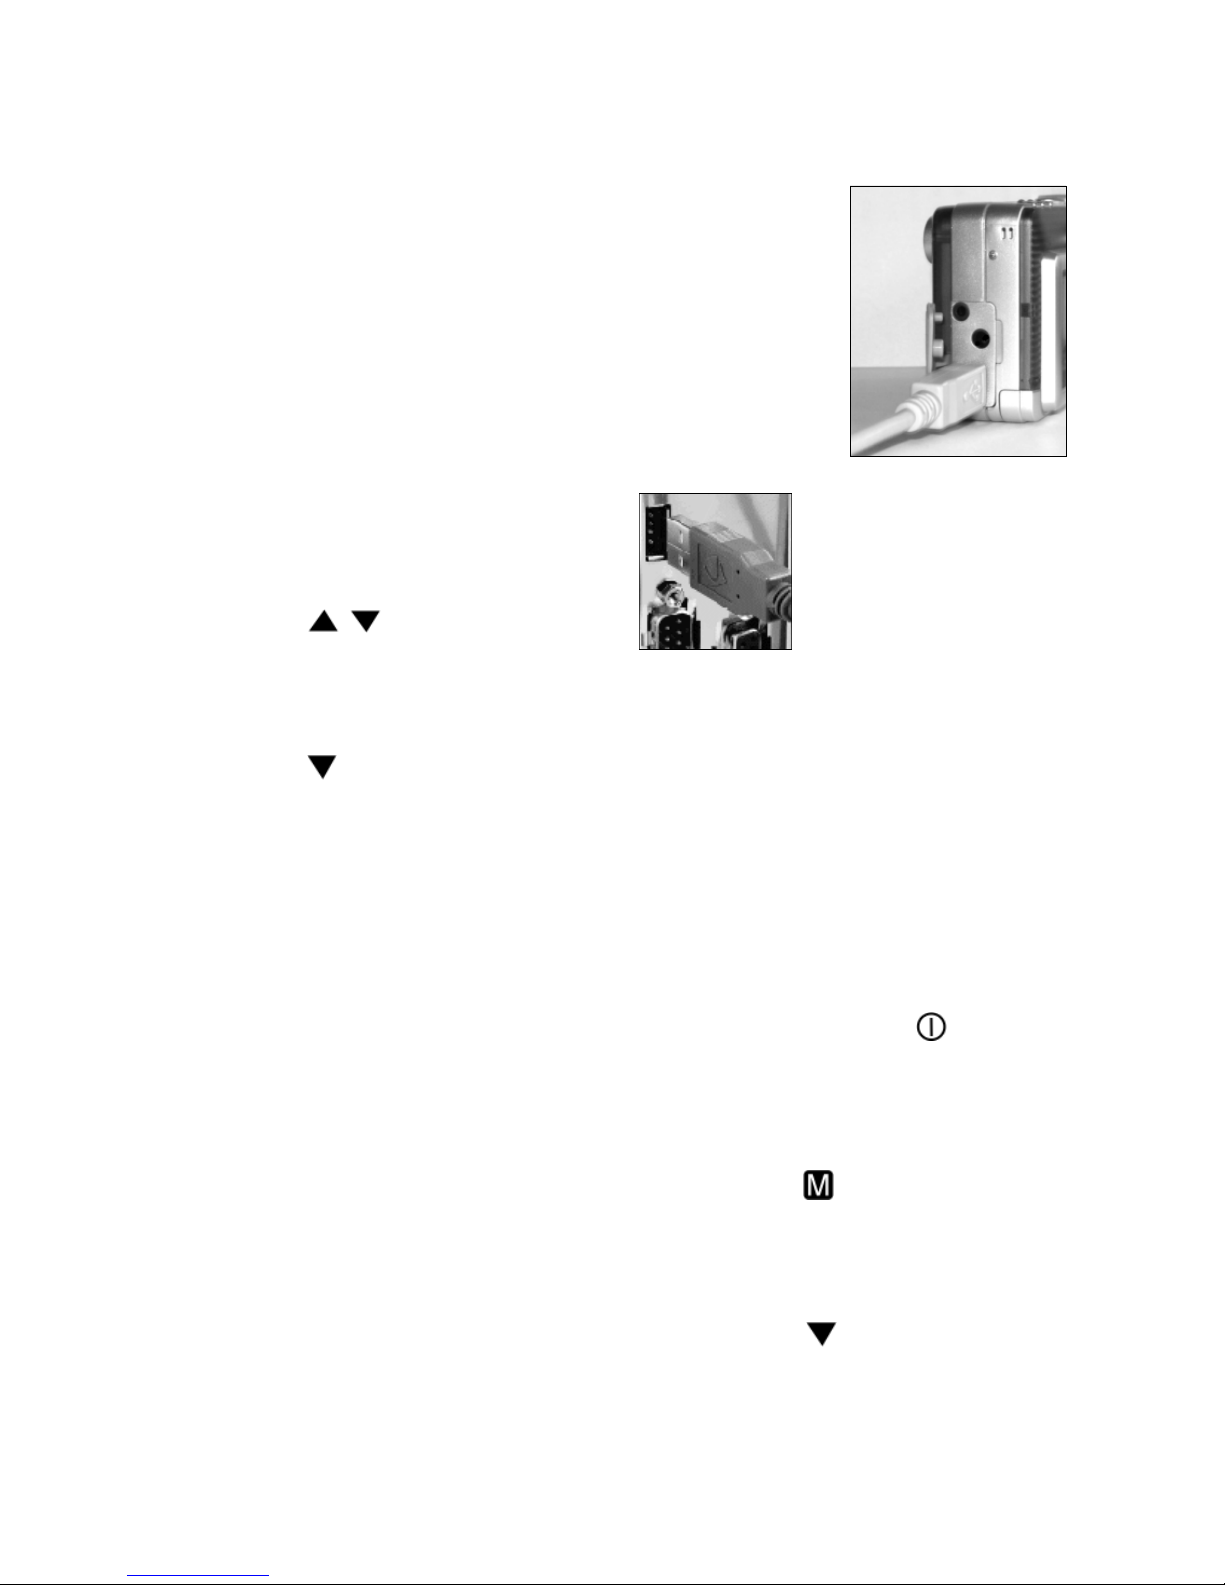
The USB Port is located in the Digital
Interface Compartment on the left side of
the camera.
• Step 1 Connect
the smaller end
of the USB cable
into the USB port
of your digital
camera.
• Step 2 Connect the
other end of the USB
cable to the USB port
located on the back of
your computer.
Hooking Up to Your TV/
VCR
Connect your camera to a television set if
you want to have a larger view of your
photos.
To view your images on television
set:
• Step 1 Press the Power
button to
turn your camera on. Wait for the
indicator light to signal that the camera is
ready.
• Step 2 Press
to bring up the
camera’s menu screen.
• Step 3 Press OK on the Setup option.
• Step 4 Press
to move down the
menu until the TV Mode option is
highlighted and select the TV standard
that use in your country (NTSC/PAL).
• Step 8 Press
to move down the
menu screen and choose Exit. Then,
press OK to exit the menu screen.
Hooking Up to Your
Computer
You need to connect the camera to your
computer’s USB port to transfer photos into
your computer. This section shows how
you can connect the camera to your
computer.
You must install the Dual Camera Driver
from the Digital Camera CD before
connecting in order for your computer to
function properly using the USB. See the
section, “Installing Software” on page 14
for details on how to install the driver.
Page 13
13
Press Move to Exit to exit the menu.
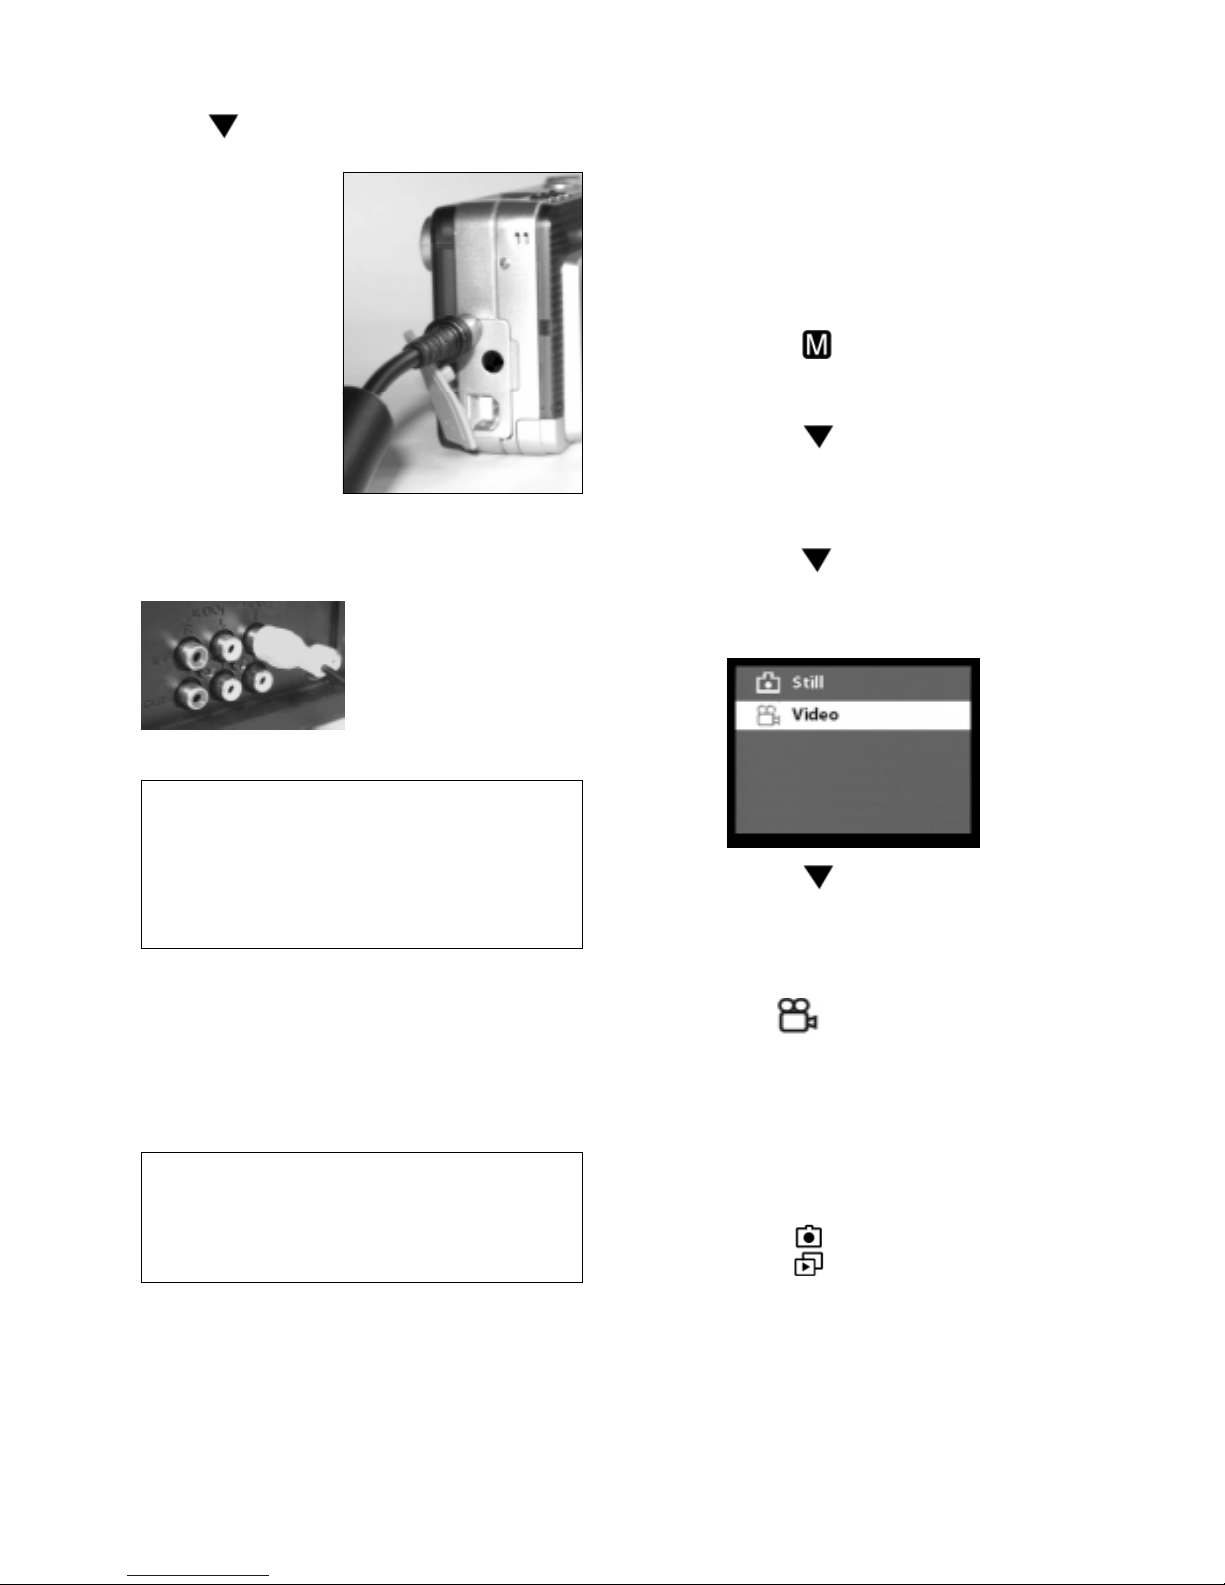
• Step 5 Connect
one end of the
video output
cable (the black
colored plug)
into the video
out port located
in the Digital
Interface
Compartment on
the left side of the camera.
• Step 6 Connect the
other end of the video
output cable (the
yellow plug) to the
video in plug on your
TV/VCR.
Note: TV/VCR manufactures vary.
Locate the audio/video ports on your
individual TV/VCR and insert the video
output connector into the Video port.
• Step 7 Turn on your TV and VCR.
• Step 8 On your television, select the
channel for auxiliary video input (not Ch
or 4).
Note: Channel may vary by
manufacturer; refer to your VCR’s
operating manual.
Recording Video
With your camera, you can record short
sequences of video at a rate of twenty
frames per second. The camera stores
video in *.AVI format.
Before recording, first set the camera
to video recording mode.
• Step 1 Press
to bring up the Main
Menu.
• Step 2 Press
to move down to the
Capture option, then press the OK
button to select it.
• Step 3 Press
to select the Video
option, then press the OK button.
• Step 4 Press
to move down to the
Exit option, then press the OK button to
close the menu screen.
A Video icon
then appears on the
LCD Display.
Now you can start recording short
video clips with the camera.
• Step 1 If the camera is not in Record
mode, press to switch to this mode.
• Step 2 Press once the Shutter Release
button to start recording video. You will
see on the LCD Display live view of the
subjects or scenes you are recording.
Page 14
14
• Step 3 And while you are recording, A
red text “REC” appears on the upper
right side of the LCD Display. And
disappears after you terminate the
recording process. And the remaining
seconds will be counted down as you
continue shooting.
• Step 4 To stop recording, press the
Shutter Release button again.
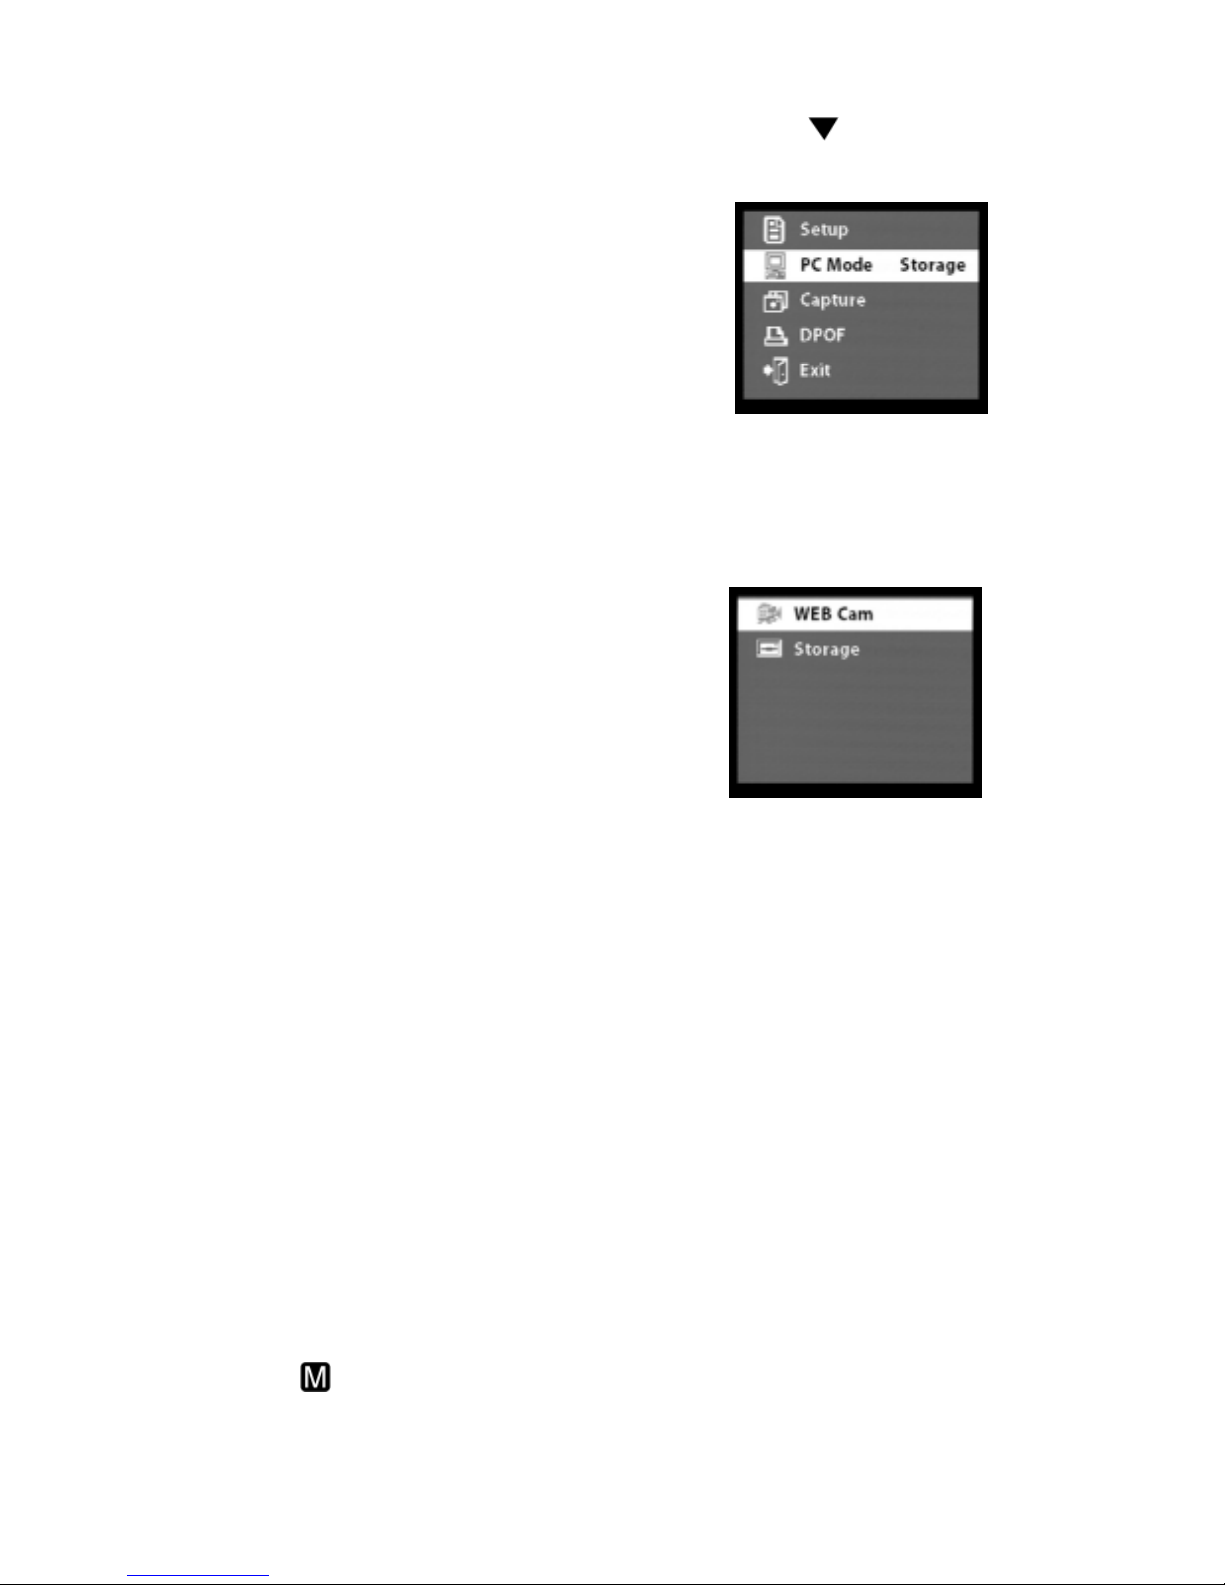
• Step 2 Press
to move down to PC
Mode.
• Step 3 Press the OK button.
• Step 4 There are two options in the list:
WEB Cam and Storage. Select WEB
Cam.
Using the Digital Camera as a Web Camera
When you connect MegaCam to your
computer, you can use it as a Web
camera. You can then join video
conferencing sessions on the Internet with
your camera. You need to install the Dual
Camera Driver and the Microsoft
NetMeeting software from the Digital
Camera CD before you can start use it as
a Web camera. See the next section,
“Installing Software”, for installation
instructions.
When functioning as a Web camera, your
camera also lets you capture video
directly into your computer and edit or
enhanceyourvideoclips.
Setting Your Web Camera
• Step 1 Press to bring up the
camera’s menu screen.
• Step 5 Press OK button to go back to
the menu.
Your camera is now able to function as a
Web camera.
Installing Software
The MegaCam CD includes software for
downloading photos and recorded video
from the camera to the computer, touching
upphotos,andvideo conferencing.
Page 15
15
Installing All Software and
Driver
To install the digital camera driver and all
the software in the MegaCam CD:
• Step 1 Place the MegaCam CD into
your CD-ROM drive.
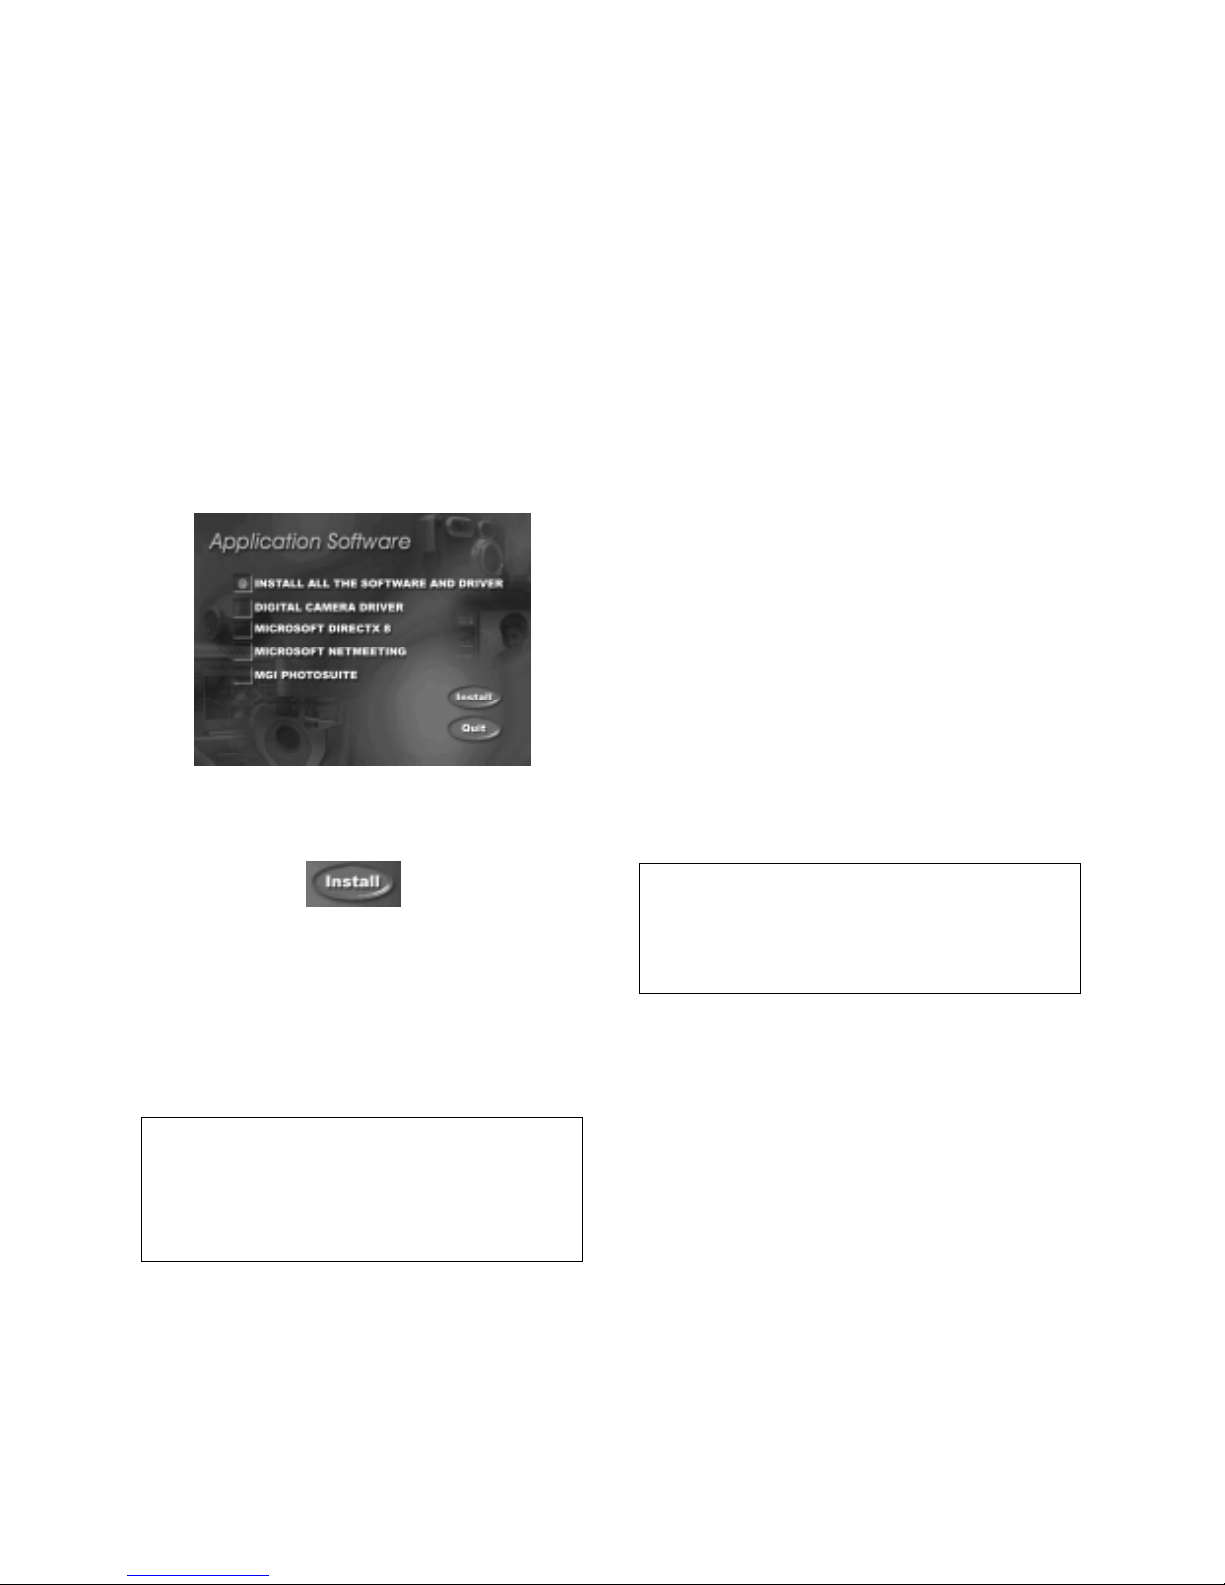
• Step 2 The Software Installation screen
appears, with the Install All the
Software and Driver option selected.
Click Install to start the installation.
• Step 3 All the other software will be
installed one after the other. Simply
follow the on-screen instructions to
complete the installation of the camera
driver and all the software.
Note: The section, “Installing MegaCam
Driver” on page 16 provides details on
installing the digital camera driver.
• Step 5 After installing everything, select
Yes, I want to restart the computer
now, and click Finish to reboot your
computer.
Installing Selected Software
To choose the software to install:
• Step 1 Place the MegaCam CD into
your CD-ROM drive. The Software
Installation screen appears.
• Step 2 Deselect the Install All
Software and Driver item. Then
choose the software that you want to
install.
• Step 3 When selecting software to
install:
First, click on the MegaCam Driver
item. This option must be selected if you
want to connect the digital camera to
your computer and download photos,
transfer recorded video clips, or use the
camera as a Web camera.
Note: The next section, “Mega Cam
Driver”, provides details on installing the
digital camera driver.
• If you want to install the multimedia
application programming interfaces
software, select the Microsoft
DirectX item.
• If you want to install the video
conferencing software, select the
Microsoft NetMeeting item.
• If you want to install the photo editing
software, select on MGI PhotoSuite.
• Step 4 The other software you selected
will be installed one after the other.
Page 16

16
Simply follow the on-screen instructions
to complete the installation.
Note: At the end of each software
installation, “Setup Complete” appears
and prompts you to restart your
computer. If you have not yet finished
installing the other software, click
Cancel. Click Yes and restart your
computer only when you have finished
installing the last software.
Installing MegaCam Driver
The MegaCam Driver option in the
installation screen installs two drivers into
your computer: the MegaCam Driver and
MSDC Driver. The PC Cam Driver allows
you to connect the camera to your
computer and download photos as well as
use the digital camera as a Web camera.
MSDC lets you copy photos and recorded
video clips from the camera into your
storage driver.
To install MegaCam Driver:
• Step 1 In the “Application Softwares”
dialog box, click Next.
• Step 2 In the “Choose Destination
Location” dialog box, specify the folder
location in your computer where you
want to install the MegaCam Driver.
The location, “C:\Program
Files\Digital\Digital Camera”, is the
default location chosen for installing the
driver.
Click Next.
• Step 3 The Setup program then starts
copying files to your computer. Wait for
the installation to be completed.
• Step 4 When installation of the
MegaCam Driver is complete, “Setup
Complete” appears. Select Yes, I want
to restart the computer now, and
click Finish.
After your computer reboots and starts up
Windows, continue installing the other
software.
Downloading photos
Here is the exciting time! After you have
finished taking photos, you must like to
see how the result is. Simply follow the
steps below you will realize how easy
downloading photos can be:
• Step 1 Go to PC Mode options in your
MegaCam Setup menu and select
Storage Mode.
• Step 2 Connect your camera to a
computer with the USB cable.
• Step 3 There will be a DSC Storage
folder soon appeared in your Windows
explorer. This folder is for storing your
photos in camera’s memory card.
Double click this folder, you will see the
photos that you just took.
• Step 3 Now, you will be able to quickly
copy photos from DSC Storage folder to
your local hard drive and share them
wth your families!
Page 17

17
Appendix: Camera Specifications
Image Sensor 1.3M CMOS Image sensor
Optical Viewfinder Built-in
LCD Display 1.5" color TFT LCD, Field of View 80%
LED Backlight
Resolution: 288 x 220
LCD Frame Rate: Min. 30 frame per sec.
Image size (HxV) 640 x 480 pixels (Fine)
1280 x 1024 pixels (Best),
1600 x 1200 pixels (2M scale up)
1920 x 1440 pixels (3M scale up)
Color 24-bit RGB
Memory Comes with 8MB Nand Flsah Memory Card :
About 90 pictures (Fine quality)
About 30 pictures (Best quality)
About 19 pictures (2M Scale up)
About 12 pictures (3M Scale up)
Support SD Card (Security Digital Card)
Exposure Control Gain: Auto
Compensation: Auto
Shutter control: Auto
Lens Fixed lens with switchable Macro/Normal mode
Focus Length 2 steps, (Macro: 55cm to 80cm, Normal: 160cm to infinity )
Flash Mode Auto, Off, Force
Self-timer 10 sec. delay
White Balance Auto, Sun, Shade, Tungsten, and Fluorescent
Compression method JPEG
USB Connection USB Connector Type B
USB 1.1
PC Camera Frame rate: About 20 fps CIF
USB connection
 Loading...