

Page 1

V091814
71021-DI Standard Drop-In
Installation Guide
Contact us for additional information or to find an Authorized TEKVOX Dealer in your area.
11831 Radium Street, San Antonio, TX 78216 | 210.348.6565 o | 713.490.3135 f | tekpatrol@TEKVOX.com | www.TEKVOX.com
The 71021-DI package is a complete mediated classroom system with remote monitoring and control. To simplify the
installation and maintenance of this system a 2x1 ceiling box with an HDMI receiver and TEK 2 are mounted and
prewired from TEKVOX. Installation of the celling box does require an electrician to provide power to the box. All cables
going to the projector are connected below the ceiling to eliminate the need for plenum cables. Make certain the box is
mounted so the door can be opened fully and cables do not go across the door.
From the TEK 1201 in the podium to the receiver in the ceiling box only a single Cat 5e cable is required. This cable
provides for both video and control of the system.
Typical video connections to the TEK 1201 are listed below and can easily be changed by Macro settings in the TEK 2.
PC HDMI 1
Laptop HDMI HDMI 2
Laptop VGA VGA 1
Document Camera HDMI 3
DVD Component
VCR Video 2 DVD/VCR Audio
The TEK 1201 provides a mirrored output for both HDMI and VGA.
These outputs can be uses for a confidence monitor. Some of the
campuses do not want a confidence monitor since it will take away
the ability for the instructor to view their PC while showing other
content to the students. If a DVI monitor is used as a confidence
monitor the HDMI audio may need to be turned off. It would be
best to use VGA instead.
Included in the 71021-DI package:
Part # Description Qty.
70001 TEK 2 - TekMonitor 1
10030 TekMonitor Power Supply 1
78001 TekSecurity With 4’ RJ12 Cable 1
78006 TekSecurity Cable for projector 1
78002 SR Occupancy Sensor 1
78038 TEK CB1-A Ceiling Box 1
78036 TEK TSC7 Table Top Cubby 1
79033 TEK 1201-HD with receiver 1
Page 2
Contact us for additional information or to find an Authorized TEKVOX Dealer in your area.
11831 Radium Street, San Antonio, TX 78216 | 210.348.6565 o | 713.490.3135 f | tekpatrol@TEKVOX.com | www.TEKVOX.com
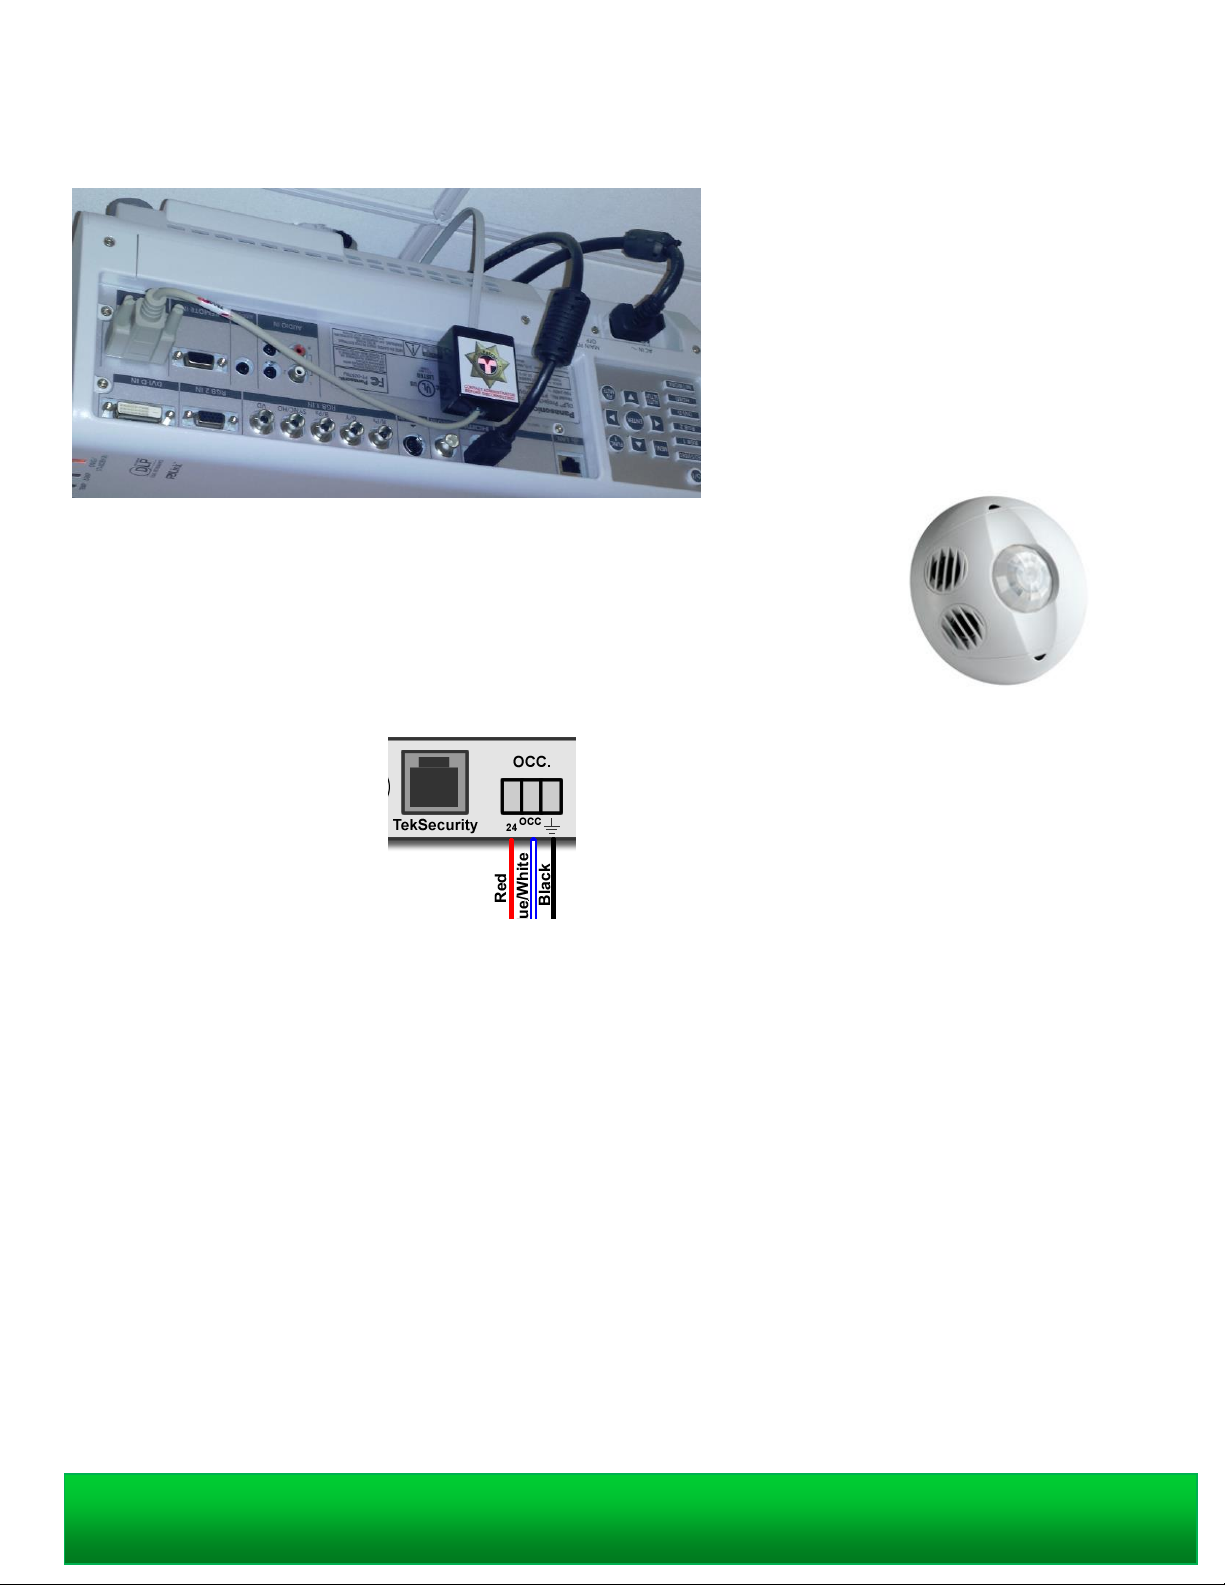
The TekSecurity module should be mounted to the side of the projector using the supplied Velcro.
When installing the occupancy sensor it is best to place it behind or above the
instructor’s and face the vents towards the students. Make certain there are no air vents
within 4 feet or air is blowing across the sensor.
It is best to use a three conductor 22 AWG plenum cable to wire the occupancy sensor.
We recommend the West Penn 25231B.
Wire connections
Red ------- TEK 2 +24V
Blue ------ TEK 2 OCC
Black ----- TEK 2 GND
TekTouchPad Installation
When installing the Wedge, use the 4 supplied #6 screws. The wedge hole template below can be used as a drill guide.
On the 80014 cable there are three breakout cables extruding from the DB-9 male connector. The RJ-12 cable is to be
connected to the back of the TekTouchPad. Make certain you leave enough slack to remove the TekTouchPad once it is
installed. Connect the female 2.1 mm power cable to the supplied 12 volt power supply. The other cable is a 3.5 mm
mono connector that can be used with the old CMC-3 systems. Connect the DB-9 male to the supplied DB-9 female
cable for the TEK 1201.
Once the wedge is installed, place the TekTouchPad Sub base on the wedge and use the two #6 chrome plated
mounting screws to secure it. Insert the RJ-12 connector into the back of the TekTouchPad, if the power supply is
connected, an LED on the circuit board will flash and the touchscreen will start to display a loading screen. Carefully
press the TekTouchPad on to the Sub base, without pressing on the glass, until it is firmly inserted.
Page 3

Contact us for additional information or to find an Authorized TEKVOX Dealer in your area.
11831 Radium Street, San Antonio, TX 78216 | 210.348.6565 o | 713.490.3135 f | tekpatrol@TEKVOX.com | www.TEKVOX.com
If touchscreen needs calibration, power cycle the unit while pressing center of screen. It is best to use a stylist or
78035 Wedge Hole Template
Might not be to scale when printed.
something like a small eraser to set calibration points.
Page 4

Contact us for additional information or to find an Authorized TEKVOX Dealer in your area.
11831 Radium Street, San Antonio, TX 78216 | 210.348.6565 o | 713.490.3135 f | tekpatrol@TEKVOX.com | www.TEKVOX.com
1.392in.1.392in.
1.464in. 1.464in.
0.700in. 0.700in.
1.000in.1.000in.
2.361in.
4.764in.
3.62
1.75
Podium Wedge Installation Template
Wedge part number: 78035
Hole drilling instructions:
1. Place this template on the podium or surface
where you would like to mount the Keypad Wedge.
2. Place the Wedge on top of the template and
visualize its placement.
3. If you are sure of its placement, TAPE the
template to the podium.
4. Drill four 1/16" holes through the template and into
the podiums surface. About ½” deep.
5. Remove the template.
6. Place a provided No. 6, ½” long, phillips head
screw in each of the four holes of the Wedge.
7. Screw to podium.
TOP
(High end of Wedge)
5/8”
Hole Size
1/16”
Hole Size
 Loading...