

Tektronix Phaser 780, Z780/P - Phaser 780 Plus Color Laser Printer, Z780N - Phaser 780 Color Laser Printer Install Manual
Page 1
P H A S E R® 7 8 0 C O L O R
LASER PRINTER
Setup Guide
www.tek.com/Color_Printers/
®
Page 2

Phaser
®
780 Color Laser Printer
Setup Guide
First printing October 1998
063-3094-00
Page 3

Copyright © Tektronix, Inc. Unpublished rights reserved under the copyright laws of the United States. Contents of
this publication may not be reproduced in any form without permission of Tektronix, Inc.
Tektronix
®
, Phaser
®
, PhaserShare
®
, the TekColor
®
icon, and Made For Each Other
®
are registered trademarks of
Tektronix, Inc. PhaserLink™, PhaserPrint™, PhaserSym™, PhaserTools™, PhaserMatch™ ICC, TekSMART™, and
the TekColor™ name are trademarks of Tektronix, Inc. TekColor Care
SM
and RealSUPPORT
SM
are service marks of
Tektronix, Inc.
Adobe
®
, Acrobat
®
, Acrobat
®
Reader, Illustrator
®
, PageMaker
®
, Photoshop
®
, PostScript
®
, ATM
®
, Adobe Garamond
®
,
Birch
®
, Carta
®
, Mythos
®
, Quake
®
, and Tekton
®
are registered trademarks and Adobe Jenson™, Adobe Brilliant
Screens™ technology, and IntelliSelect™ are trademarks of Adobe Systems Incorporated or its subsidiaries which may
be registered in certain jurisdictions.
Apple
®
, LaserWriter
®
, LocalTalk
®
, Macintosh
®
, Mac
®
OS, AppleTalk
®
,
TrueType2
®
, Apple Chancery
®
, Chicago
®
,
Geneva
®
, Monaco
®
, and New York
®
are registered trademarks and QuickDraw™ is a trademark of Apple Computer,
Incorporated.
Marigold™ and Oxford™ are trademarks of AlphaOmega Typography.
Avery™ is a trademark of Avery Dennison Corporation.
FTP
®
Software is a registered trademark of FTP Software, Incorporated.
PCL
®
is a registered trademark of Hewlett-Packard Corporation.
Hoefler Text was designed by the Hoefler Type Foundry.
ITC Avant Guard Gothic
®
, ITC Bookman
®
, ITC Lubalin Graph
®
, ITC Mona Lisa
®
, ITC Symbol
®
, ITC Zapf Chancery
®
,
and ITC Zapf Dingbats
®
are registered trademarks of International Typeface Corporation.
Bernhard Modern™, Clarendon™, Coronet™, Helvetica™, New Century Schoolbook™, Optima™, Palatino™,
Stempel Garamond™, Times™, and Univers™ are trademarks of Linotype-Hell AG and/or its subsidiaries.
MS-DOS
®
and Windows
®
are registered trademarks of Microsoft Corporation.
Wingdings™ in TrueType
®
format is a product of Microsoft Corporation. WingDings is a trademark of Microsoft
Corporation and TrueType is a registered trademark of Apple Computer, Inc.
Albertus™, Arial™, Gill Sans™, Joanna™, and Times New Roman™ are trademarks of Monotype Corporation.
Antique Olive
®
is a registered trademark of M. Olive.
Eurostile™ is a trademark of Nebiolo.
Novell
®
and NetWare
®
are registered trademarks of Novell, Incorporated.
Sun
®
, Sun Microsystems
®
, and Sun Microsystems Computer Corporation
®
are registered trademarks of Sun
Microsystems, Incorporated. SPARC
®
is a registered trademark of SPARC International, Incorporated.
SPARCstation™ is a trademark of SPARC International, Incorporated, licensed exclusively to Sun Microsystems,
Incorporated.
Ethernet
®
is a registered trademark of Xerox Corporation.
UNIX
®
is a registered trademark in the United States and other countries, licensed exclusively through X/Open
Company Limited.
Other marks are trademarks or registered trademarks of the companies with which they are associated.
PANTONE
®
Colors generated by the Phaser 780 Color Printer are four- and/or three-color process simulations and
may not match PANTONE-identified solid color standards. Use current PANTONE Color Reference Manuals for
accurate colors.
P ANT ONE Color simulations ar e only obtainable on this product when driven by qualified Pantone-licensed softwar e
packages. Contact Pantone, Inc., for a current list of qualified licensees.
All trademarks noted herein are either the property of Tektronix, Inc., Pantone, Inc., or their respective companies.
© Pantone, Inc., 1988.
Page 4

Phaser
®
780 Color Laser Printer Warranty
Tektronix warrants that the Phaser 780 Printer will be free from defects in materials and workmanship for a period of
one (1) year from the date of shipment. If the product proves defective during the warranty period, Tektronix, at its
option, will repair the defective product on site or by means of telephone support, without charge for parts and labor,
or provide a replacement in exchange for the defective product.
Under this product warranty, Customer must notify Tektronix or its authorized representative of the defect before the
expiration of the warranty period and if instructed by T ektr onix make suitable arrangements for repair. Tektronix or its
authorized representative will provide warranty repair during the warranty period at Customer’s site, if required,
without charge within the United States or outside the United States if the product is located in a customary on-site
service area. Outside the United States, a description of the customary on-site service area may be obtained from the
local Tektronix Subsidiary or Authorized Tektronix Distributor.
The Customer Replaceable Consumables (CRCs)* in this product will be free from defects in materials and
workmanship for a period of (a) ninety (90) days from the date of installation, but not more than one (1) year from date
of shipment; or (b) six (6) months where longer periods are required by law. Under this warranty, Customer must
notify Tektronix or its authorized representative of the defect before the expiration of the warranty period. Tektronix
or its representative will ship a replacement CRC, at Tektronix expense, to replace the defective CRC. Customer shall
be responsible for paying any associated taxes or duties. Tektronix may require that the CRC be returned to the
designated Tektronix depot or the Tektronix authorized representative from which the CRC was originally pur chased.
This warranty shall not apply to any defect, failure or damage caused by improper use or improper or inadequate
maintenance and care. Tektronix shall not be obligated to furnish service under this warranty:
a) to repair damage resulting from attempts by personnel other than Tektronix representatives to install, repair or
service the product or CRC;
b) to repair damage resulting from improper use or connection to incompatible equipment;
c) to repair any damage or malfunction caused by the use of non-Tektronix supplies or consumables;
d) to repair a product or CRC that has been modified or integrated with other products when the effect of such
modification or integration increases the time or difficulty of servicing the product or CRC;
e) to repair damage or malfunction resulting from failure to perform user maintenance and cleaning at the frequency
and as prescribed in the user manual; or
f) to repair this product after the limit of its duty cycle of 100,000 monochrome pages per month or 25,000 color pages
per month has been reached; all service thereafter shall be billed on a time and material basis.
g) to repair or replace CRCs that have been used beyond their stated capacities.
THE ABOVE WARRANTIES ARE GIVEN BY TEKTRONIX WITH RESPECT TO THIS PRODUCT AND ITS
CUSTOMER REPLACEABLE CONSUMABLES IN LIEU OF ANY OTHER WARRANTIES, EXPRESS OR IMPLIED.
TEKTRONIX AND ITS VENDORS DISCLAIM ANY IMPLIED WARRANTIES OF MERCHANTABILITY OR FITNESS
FOR A PARTICULAR PURPOSE. TEKTRONIX' RESPONSIBILITY TO REPAIR OR REPLACE DEFECTIVE
PRODUCTS AND CUSTOMER REPLACEABLE CONSUMABLES IS THE SOLE AND EXCLUSIVE REMEDY
PROVIDED TO THE CUSTOMER FOR BREACH OF THIS WARRANTY. TEKTRONIX AND ITS VENDORS WILL
NOT BE LIABLE FOR ANY INDIRECT, SPECIAL, INCIDENTAL OR CONSEQUENTIAL DAMAGES
IRRESPECTIVE OF WHETHER TEKTRONIX OR THE VENDOR HAS ADVANCE NOTICE OF THE POSSIBILITY OF
SUCH DAMAGES.
* Customer Replaceable Consumables in this product are, specifically, fuser roll cartridge, imaging unit, imaging unit
waste cartridge and toner cartridges.
WARRANTY 2i
Page 5
User safety summary
Terms in manual:
CAUTION Conditions that can result in damage to the product.
WARNING Conditions that can result in personal injury or loss of life.
Power source:
Do not apply more than 250 volts RMS between the supply conductors or between either supply
conductor or ground. Use only the specified power cord and connector. Refer to a qualified service technician for
changes to the cord or connector.
Operation of product:
Avoid electric shock by contacting a qualified service technician to replace fuses inside the
product. Do not operate without the covers and panels properly installed. Do not operate in an atmosphere of
explosive gases.
Safety instructions:
Read all installation instructions carefully before you plug the product into a power source.
Terms on product:
CAUTION A personal injury hazard exists that may not be apparent. For example, a
panel may cover the hazardous area. Also applies to a hazard to property
including the product itself.
DANGER A personal injury hazard exists in the area where you see the sign.
Care of product:
Disconnect the power plug by pulling the plug, not the cord. Disconnect the power plug if the power
cord or plug is frayed or otherwise damaged, if you spill anything into the case, if product is exposed to any excess
moisture, if product is dropped or damaged, if you suspect that the product needs servicing or repair, and whenever
you clean the product.
Ground the product:
Plug the three-wire power cord (with grounding prong) into grounded AC outlets only. If
necessary, contact a licensed electrician to install a properly grounded outlet.
Symbols as marked on product:
WARNING:
If the product loses the ground connection, usage of knobs and controls (and other conductive
parts) can cause an electrical shock. Electrical product may be hazardous if misused.
WARNING:
For your protection, do not defeat any interlocks.
DANGER high voltage: Protective ground (earth) terminal: Use caution. Refer to the manual(s)
for information:
Hot surface on or in the printer.
Use caution to avoid personal
injury:
This product is certified under IEC
825 as a Class 1 Laser Product:
Page 6
CAUTION:
This product utilizes a laser. Use of control or adjustments or performance of procedures other than those
specified herein may result in hazardous radiation exposure. Do not open covers and do not repair yourself.
Refer servicing to qualified personnel.
FOR USERS IN JAPAN
This equipment is in the 2nd Class category (information equipment to be used in a residential area
or an adjacent area thereto) and conforms to the standards set by the Voluntary Control Council For
Interference by Information Technology Equipment aimed at preventing radio interference in such
residential area.
When used near a radio or TV receiver, it may become the cause of radio interference. Read the
instructions for correct handling.
3094-69
DANGER:
Invisible laser radiation
when open and interlock
defeated.
AVOID DIRECT
EXPOSURE TO BEAM.
CAUTION:
Invisible laser radiation
when open and
interlocks defeated.
AVOID DIRECT
EXPOSURE TO BEAM.
VORSICHT:
Unsichtbare Laserstrahlung,
wenn Abdeckung geöffnet
und Sicherheitsverriegelung
überbrückt.
NICH DEM STRAHL
AUSSETZEN.
ATTENTION:
Rayonnement laser invisible
dangereux en cas
d'ouverture et lorsque
la sécurité est neutralisée.
EXPOSITION DANGEREUSE
AU FAISCEAU.
Class 3B
PELIGRO:
Cuando se abre y se
invalida el bloqueo, se
producen radiaciones
invisibles de láser.
EVITESE LA
EXPOSICION
DIRECTA A TALES
RAYOS.
´
VARNING:
Osynlig laserstrálning när denna
del är öppnad och
spärrar är
urkopplade.
STRÅLEN
ÄR FARLIG.
VARNING:
Osynlig laserstrálning
när denna del är
öppnad och spärrar är
urkopplade.
BETRAKTA EJ
STRÅLEN.
VAROI:
Näkymätön
avattaessa ja
suojalukitus
ohitettaessa olet
alttiina lasersäteilylle.
ÄLÄ KATSO
SÄTEESEN.
ADVARSEL:
Usynlig laserstràling
ved abning når
sikkerhedsafbrydere
er ude af funktion.
UNDGÅ UD
ÆTTELSE FOR
STRÅLING.
ADVARSEL:
Usynlig laserstraling
nar deksel åpnes og
sikkerhedslas brytes.
UNNGÅ
EKSPONERING
FOR STRÅLEN.
PJQT4521ZA
Page 7

Setup Guide
1
Getting Set Up
At a glance
Page
1.
What you get with your printer
2
2.
Select a location for the printer.
4
■
Optional: Set the printer on the Lower Tray Assembly.
3.
Set up the printer:
6
■
Load the toner cartridges.
7
■
Install the imaging unit.
12
■
Install the fuser roll cartridge.
15
■
Attach the extensions for the multi-purpose tray.
19
4.
Plug in and turn on the printer.
23
5.
Set the front panel language.
25
6.
Load paper and make a test print from the front panel.
26
7.
Connect the printer:
32
■
To a PC:
■
Connect the printer to your computer.
33
■
Connect optional peripherals (scanner, hard disk).
34
■
To a network:
■
Connect optional peripherals (scanner, hard disk).
34
■
Go to the
PhaserShare Networking Setup Guide.
8.
Install printer software.
35
9.
Register your printer.
42
10. Where to go from here
43
Page 8
2
Phaser 780 Color Laser Printer
What you get with your printer
Fuser roll cartridge Attachments for the multi-purpose tray (2)
Toner cartridges (4) Parallel adapter and power cord
Imaging unit Media samples
Setup Guide, User Guide, PhaserShare Networking Setup Guide,
printer CD-ROM, Adobe Typeface CD-ROM, PhaserMatch ICC CD-ROM (optional),
registration packet, “Welcome” folder
3094-01
3094-02
3094-03
3094-04
3094-05
3094-06
3094-07
Page 9
Setup Guide
3
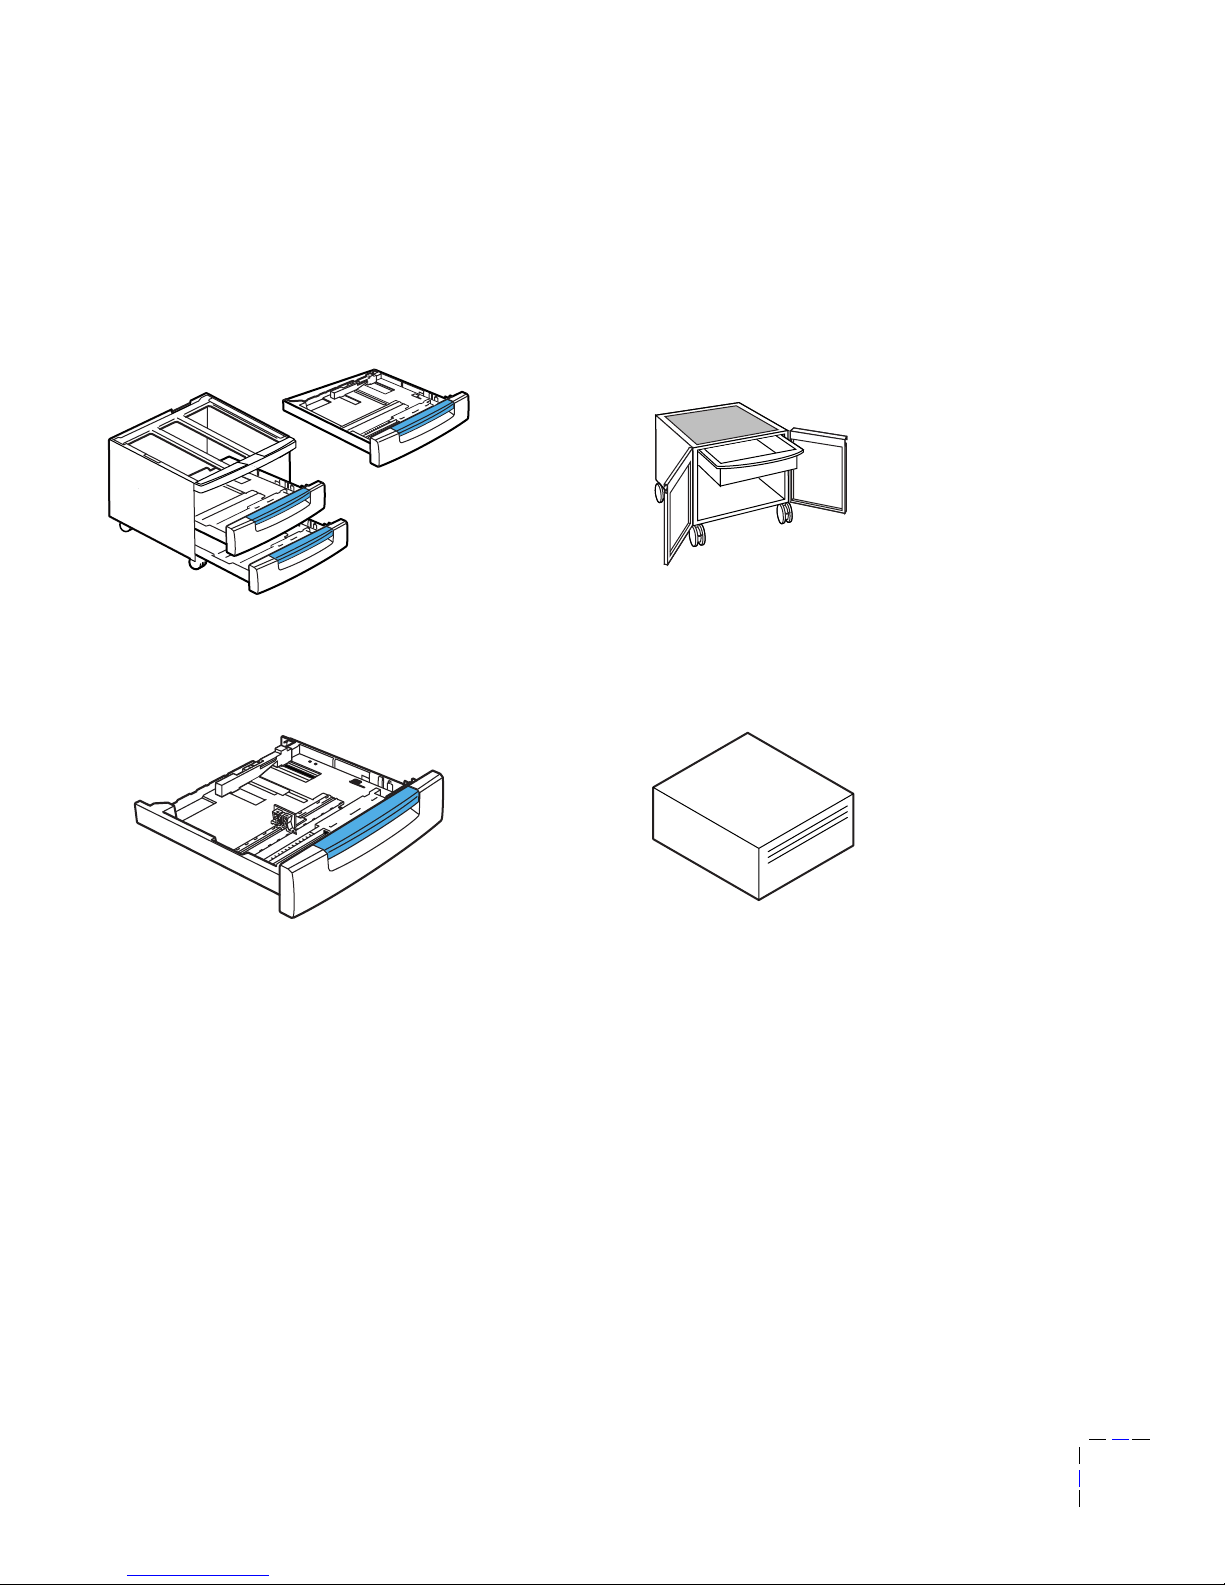
Options and accessories
Lower Tray Assembly with transparency tray
(order number Z780LTA)
Printer Station
(order number ZCARTB)
Transparency tray
(order number 436-0368-00)
4.5-Gbyte SCSI hard disk
(order number ZDISK)
3094-09
3094-70
3094-11
3094-12
Page 10
4
Phaser 780 Color Laser Printer
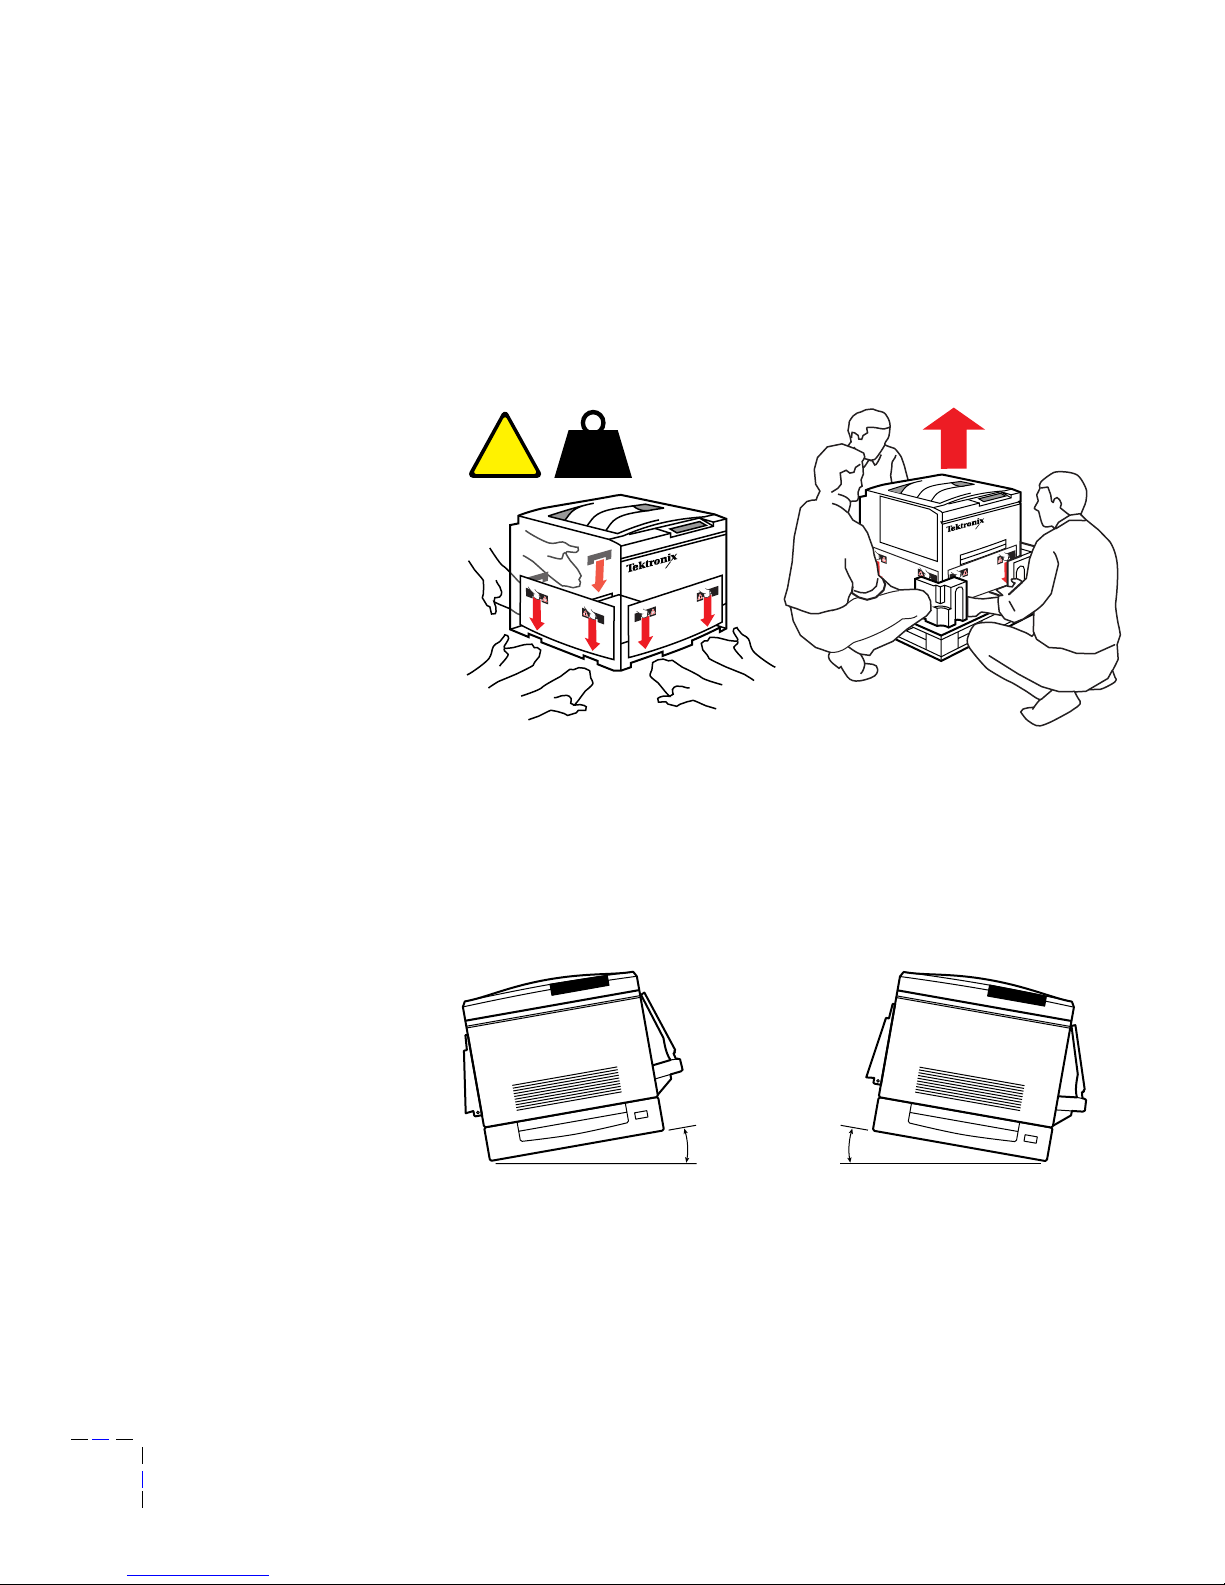
Select a location
1.
Handle the printer carefully when moving it.
2.
Select a location for the printer:
■ On a desktop: Put the printer on a strong, level surface, capable of
supporting 91 kg (200 lb.) and with dimensions of at least 791 mm
(31 in.) by 1520 mm (60 in.). Do not tilt more than 3 degrees, or
7 cm (2.8 in.), in any direction.
■ On the optional Printer Station.
70 kg
153 lbs.
!
3094-15
3094-13
3° 3°
Page 11
Setup Guide
5
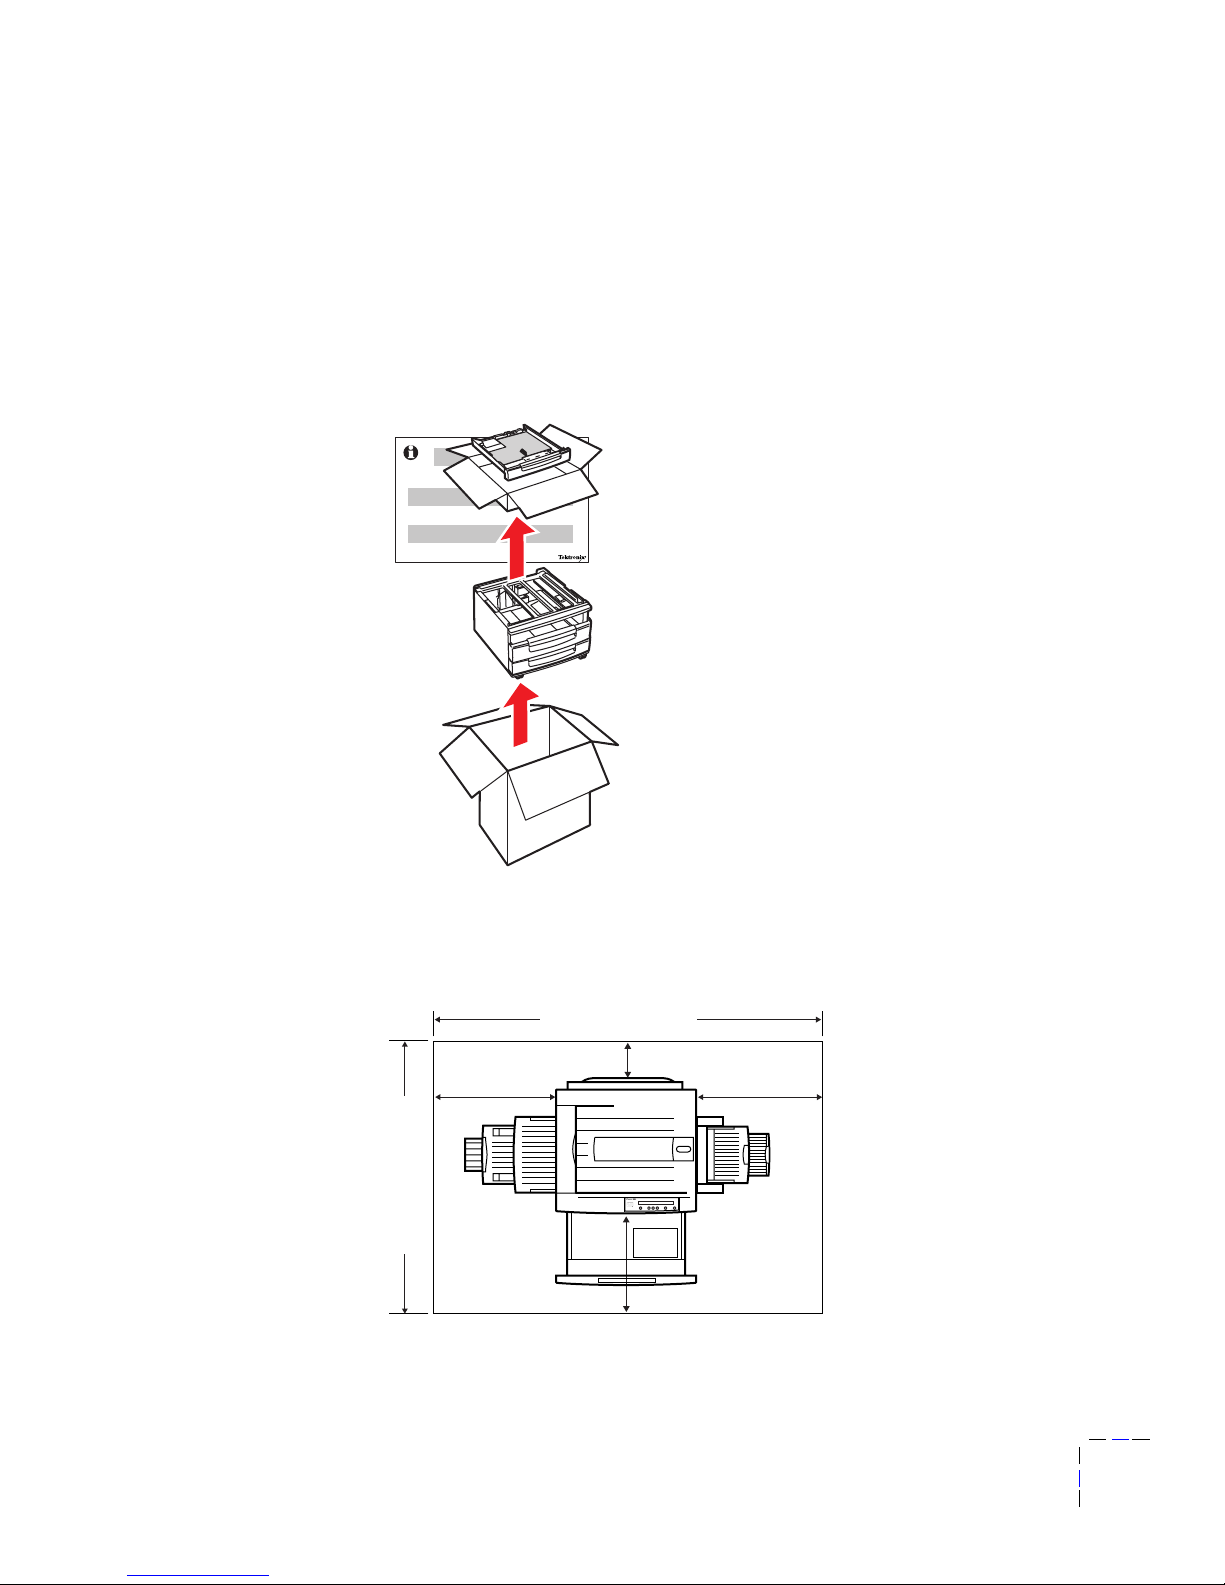
■ On the optional Lower Tray Assembly: If you have purchased
the optional Lower Tray Assembly, set it up now. Follow the
instructions packed with the unit, then complete the printer setup
as outlined in this guide.
3.
Allow enough room on all sides of the printer according to the
following specifications:
R
3094-57
3094-14
503 mm
(20 in.)
551 mm
(21.7 in.)
835 mm (32.5 in.)
150 mm (6 in.)
1.61 m (63.7 in.)
1.59 m (62.5 in.)
Page 12
6
Phaser 780 Color Laser Printer
Set up the printer
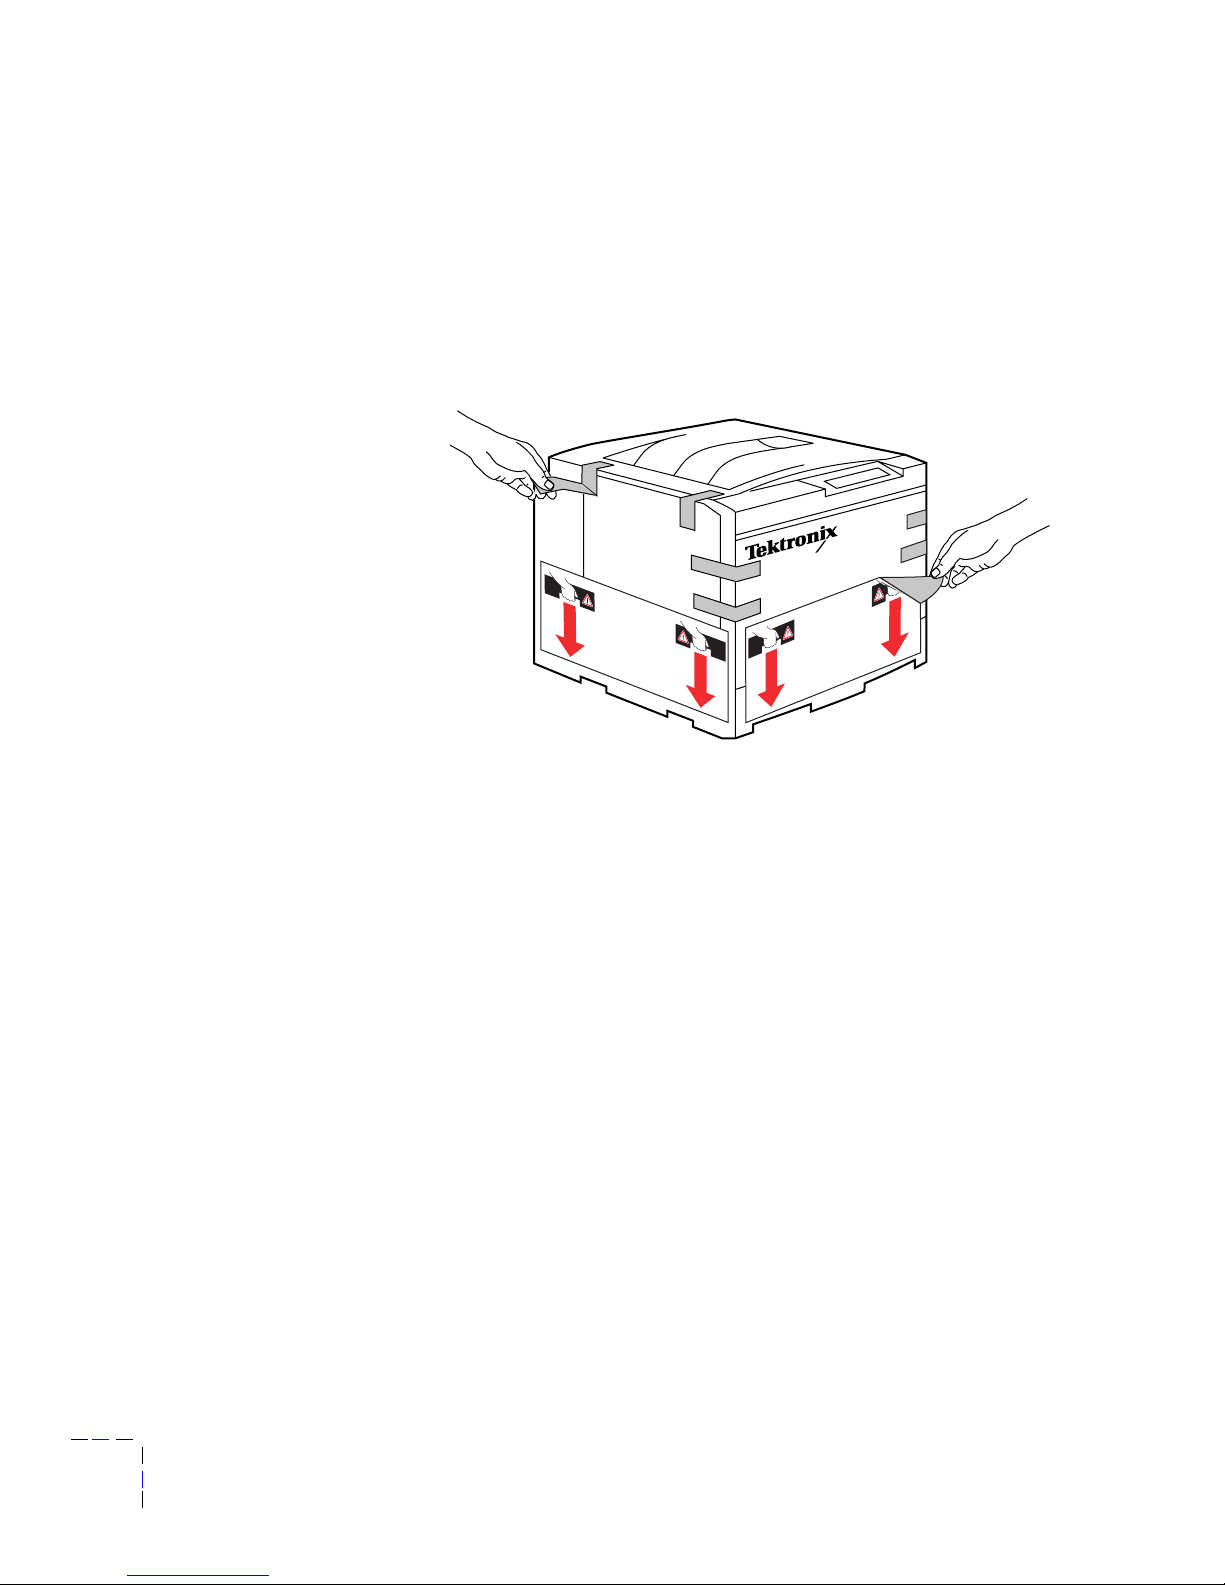
Remove all packing tape and labels from the outside of the printer.
N O T
E
Save all shipping materials and packing inserts in case you need to move or
ship the printer later.
3094-16
Page 13
Setup Guide
7
Load the toner cartridges
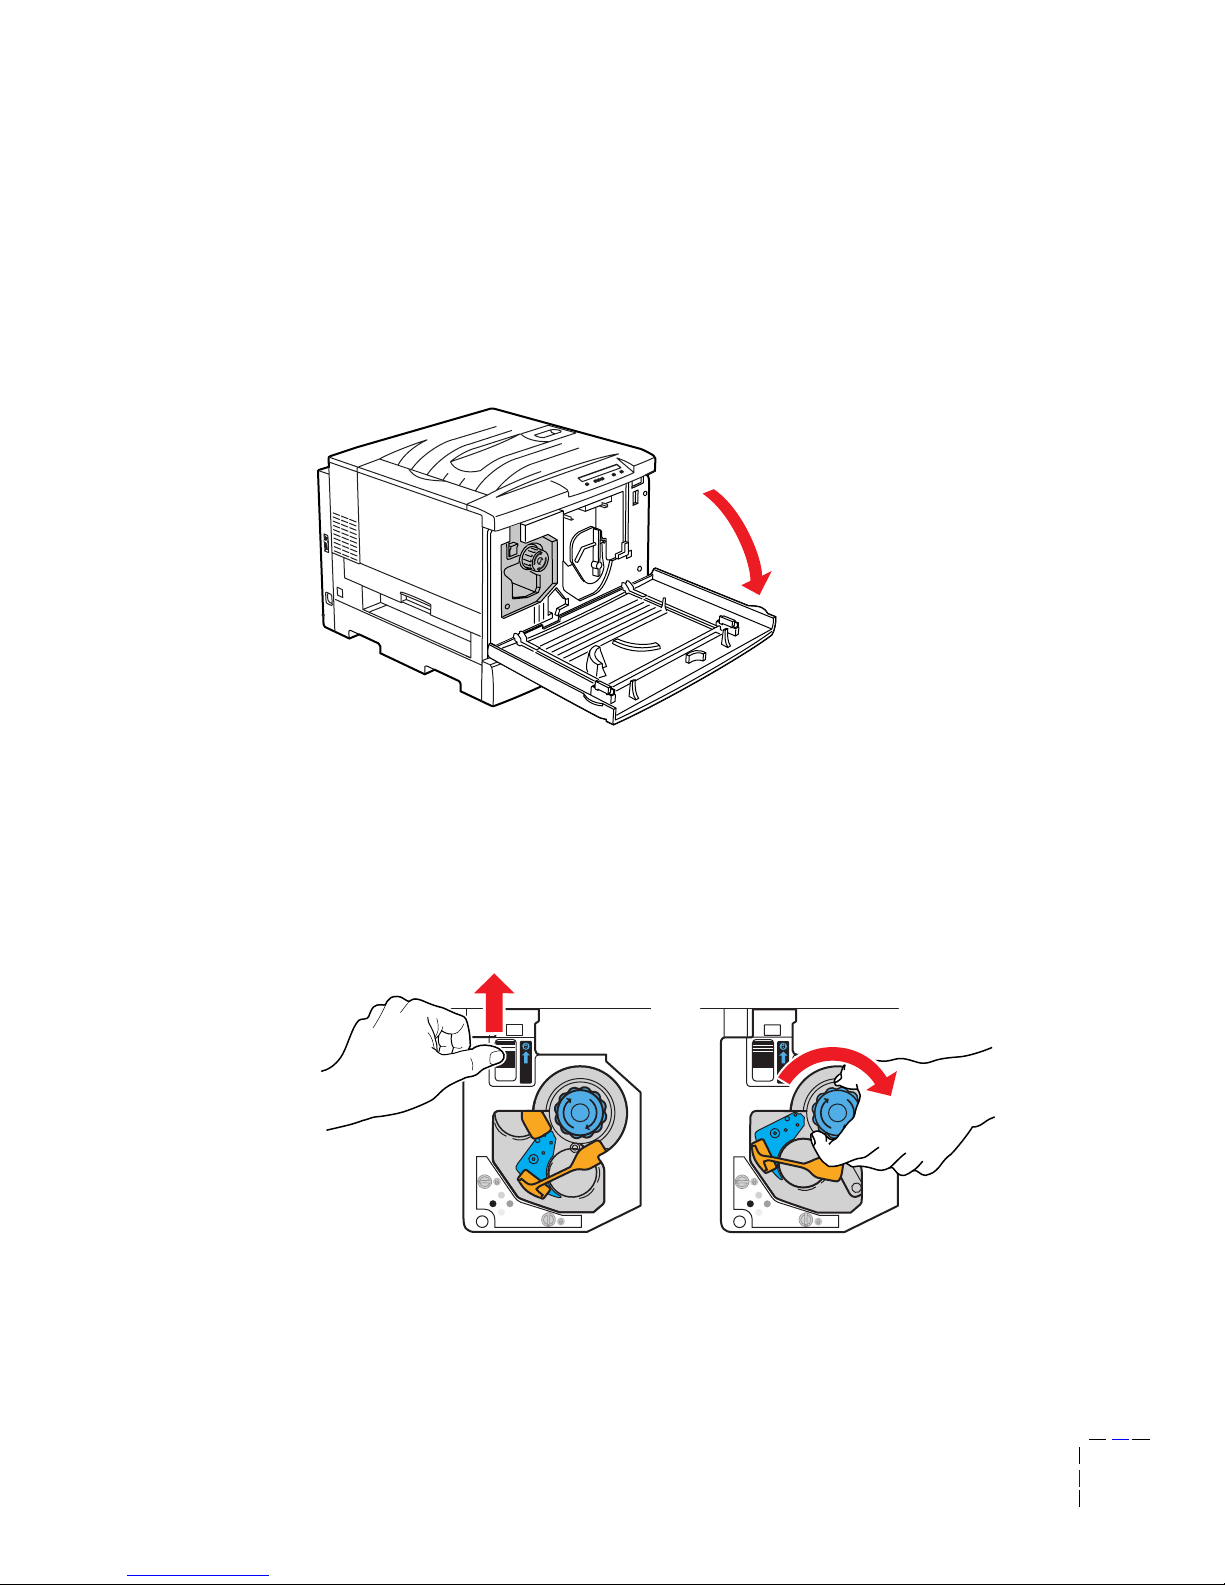
1.
Open the front cover.
2.
Remove the four plastic shipping inserts from the toner carousel as
follows:
a.
Push up the black switch to release the toner carousel knob.
b.
Turn the knob clockwise until a tab is completely visible.
3094-17
Toner
3094-18
Toner
a
b
Page 14
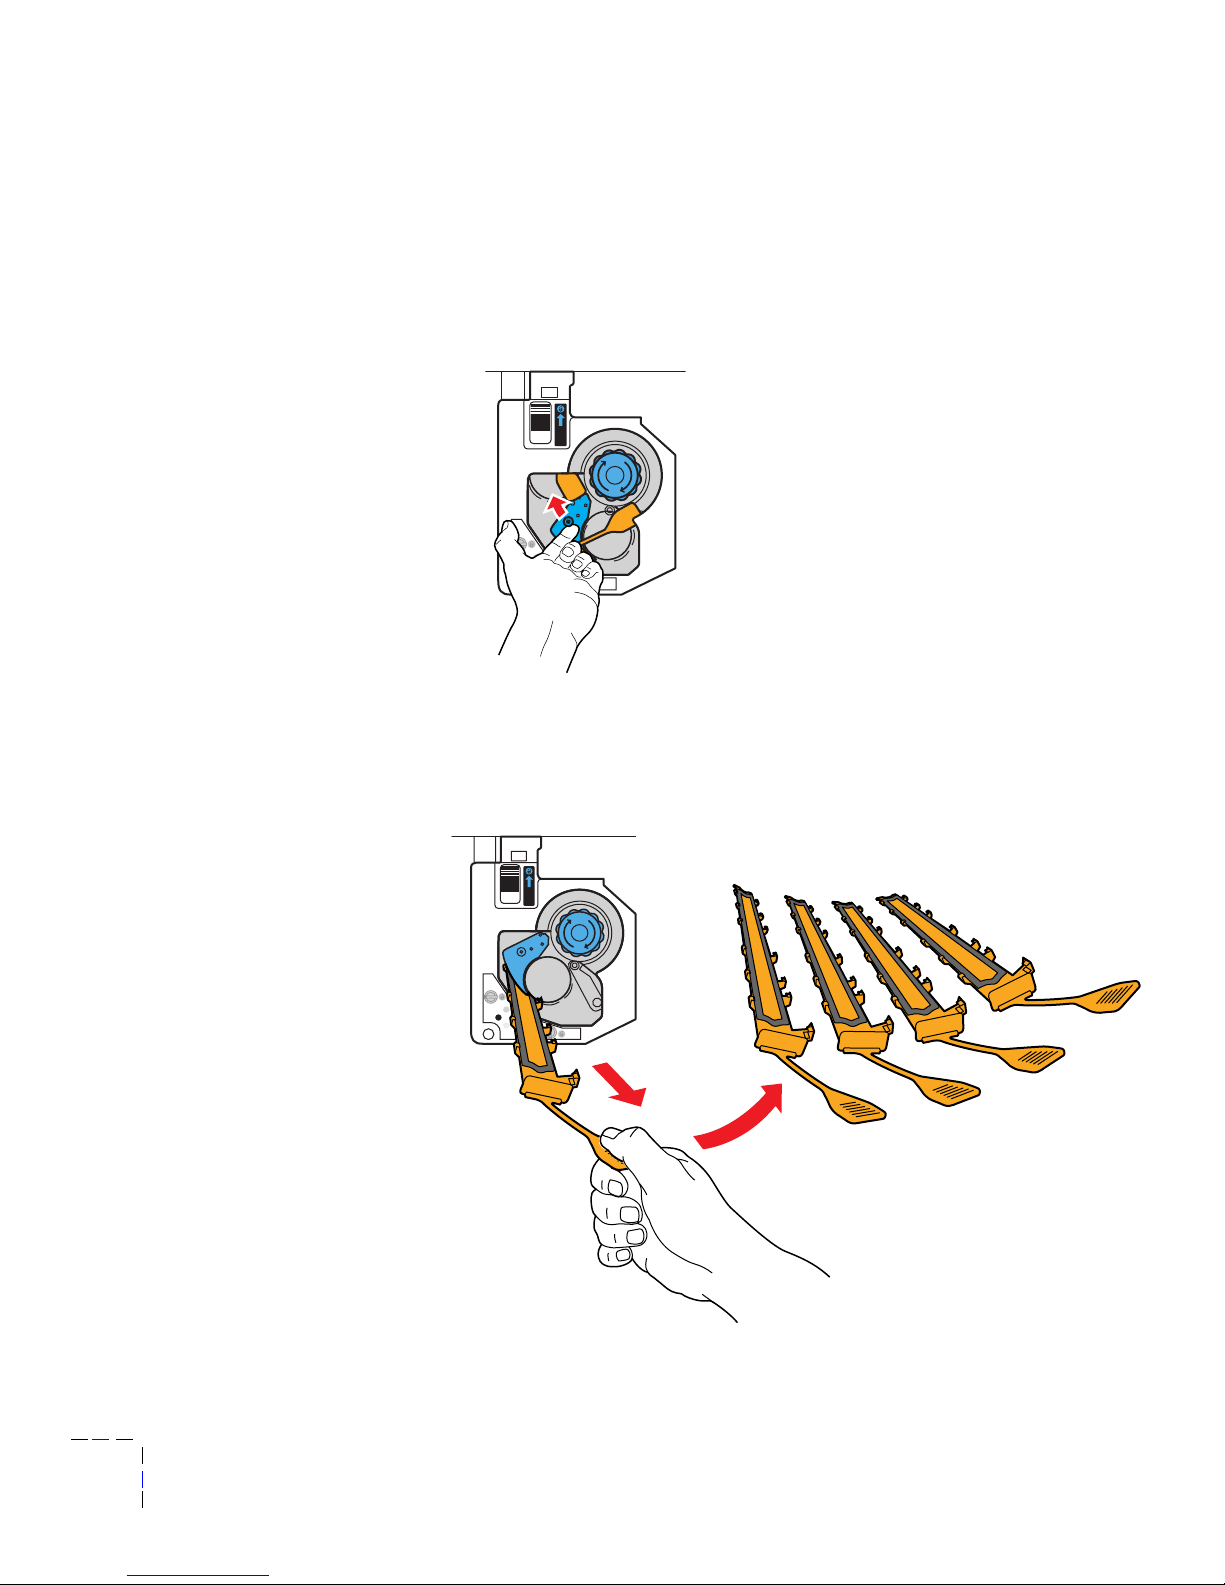
8
Phaser 780 Color Laser Printer
N O T
E
If the carousel knob is difficult to turn, push up on the carousel as shown.
c.
Grasp the tab firmly. Pull straight out, and then down and to the
right to remove the insert.
d.
Repeat Steps a through c until you have removed all four inserts.
Toner
3094-71
Toner
d
c
3094-19
Page 15
Setup Guide
9
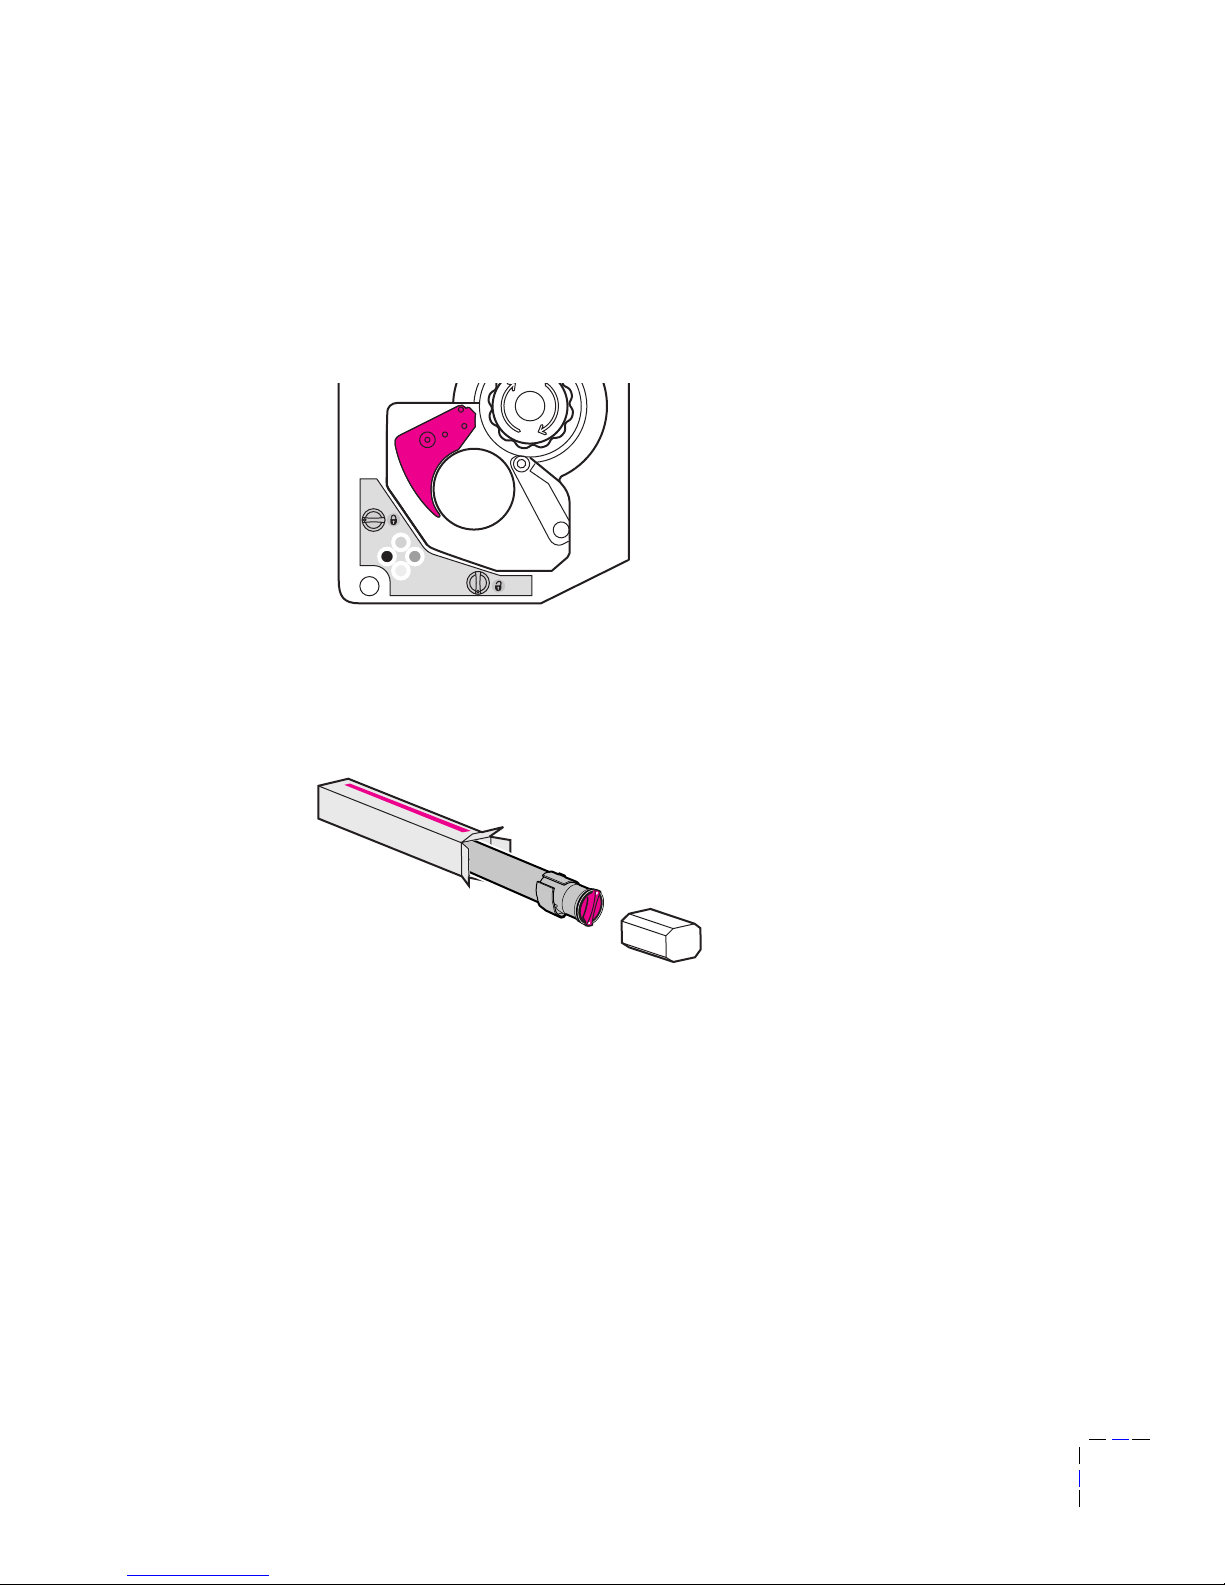
3.
Note the color (cyan/blue, magenta, yellow, or black) visible in the
toner carousel.
4.
Unpack the matching toner cartridge.
3094-23
Toner
3094-24
Page 16

10
Phaser 780 Color Laser Printer
5.
Shake the toner cartridge vigorously, seven or eight times.
6.
Insert the toner cartridge into the printer, with the arrow on top (a).
Gently but firmly push the cartridge in as far as it will go; the inner
tube will slide in until the colored knob rests against the "collar" as
shown (b).
3094-25
3094-26
a
b
Page 17

Setup Guide
11
7.
Simultaneously push in and turn the toner cartridge clockwise a quarter
turn to the "lock" position to finish installing it.
C A U T I O
N
Make sure that the cartridge is pushed in as far as it will go before you turn it
clockwise. If you cannot turn the toner cartridge easily, do not force it; you
may damage the cartridge and cause poor print quality. Instead, pull out the
cartridge and reinsert it following Steps
6
and 7 above.
8.
To install the remaining toner cartridges:
a.
Push up the switch.
b.
Turn the carousel knob clockwise until it stops.
c.
Repeat Steps 3 through 9 until all four toner cartridges (cyan/blue,
magenta, yellow, and black) are installed.
3094-28
Toner
3094-30
Toner
Toner
ab
Page 18

12
Phaser 780 Color Laser Printer
Install the imaging unit
1.
Open the front cover. Turn the large blue switch to the left, to the
"unlock" position.
2.
Unpack the imaging unit. Make sure that the top of the box is up.
3094-72
2.1 kg
4.6 lbs.
!
3094-31
Page 19

Setup Guide
13
3.
Take off the protective wrapper. Do not touch the surface of the blue
drum. Lift the imaging unit by the blue strap on top.
C A U T I O
N
To prevent permanent damage to the imaging unit, do not touch, scratch,
overexpose to light, or otherwise contaminate the b lue drum. Carefully set the
imaging unit on a flat surface only.
3094-32
!
Page 20

14
Phaser 780 Color Laser Printer
4.
To insert the imaging unit, carefully align the arrows on the top of the
imaging unit with the guides in the printer. Slide the imaging unit all
the way into the printer and latch firmly.
5.
Set the two blue switches to the "lock" position.
C A U T I O
N
To prevent damage to the imaging unit, avoid touching the blue drum to other
surfaces as you insert the imaging unit.
3094-33
3094-34
Page 21

Setup Guide
15
Install the fuser roll cartridge
C A U T I O
N
To prevent damage to the printer, install a Hi-Duty Fuser Roll Cartridge if you
print more than 500 pages per day.
1.
Pull out the drawer on the lower left side of the printer. Remove all
packing tape.
2.
Remove the white foam packing insert.
3094-35
3094-36
Page 22

16
Phaser 780 Color Laser Printer
3.
Remove the two shipping inserts.
4.
Unpack the fuser roll cartridge. Hold it as shown.
3094-63
3094-64
Page 23

Setup Guide
17
5.
Remove the white plastic shipping cover (a), and pull out the two
retaining pins (b) on either end.
6.
Insert the fuser roll cartridge into the printer, aligning the blue labels
with the blue arrows.
7.
Snap both ends securely into place.
C A U T I O
N
To avoid stains, do not touch the white oil roller or get it on your clothing; do not set
the fuser roll cartridge on an uncovered surface.
3094-38
a
b
b
3094-39
6
7
Page 24

18
Phaser 780 Color Laser Printer
8.
Push in the lower left unit.
3094-40
Page 25

Setup Guide
19
Attach the multi-purpose tray and output extensions
1.
Pull out the multi-purpose tray unit on the right side of the printer.
2.
Remove the packing inserts.
C A U T I O
N
Failure to remove these inserts may result in damage to the printer.
3094-41
3094-42
Page 26

20
Phaser 780 Color Laser Printer
3.
Push in the multi-purpose tray.
4.
Unpack the multi-purpose tray extension.
3094-43
3094-44
Page 27

Setup Guide
21
5.
Attach the extension to the multi-purpose tray by inserting the pin on
the right (a) then squeezing the left arm to insert the black pin on the
left (b).
6.
Unpack the output tray (a). Orient it as shown (b).
3094-45
a
b
3094-46
b
a
Page 28

22
Phaser 780 Color Laser Printer
7.
Pull down and hold the spring on the right side of the output tray
while inserting the right pin into the printer . The spring will rest on the
outside of the printer.
8.
Press in on the left side of the output tray to insert the left pin.
3094-47
3094-48
Page 29

Setup Guide
23
Turn on the printer
C A U T I O
N
Turn on the printer
before you load paper
to set the paper-feed rollers in the
correct position and prevent a paper jam.
1.
Attach the power cord to the printer at the back left side and plug the
printer into a grounded outlet. Close all doors and covers.
3094-49
Page 30

24
Phaser 780 Color Laser Printer
2.
T urn on the printer. The printer takes about 3 – 5 minutes to warm up.
■ When the power-up sequence is complete, the top line of the front
panel message reads Ready.
N O T
E
The noises the printer makes as it warms up are normal.
3094-50
Page 31

Setup Guide
25
Select a language for the front panel
N O T
E
Skip this step if the front panel already displays the language you want.
By default, the front panel displays in English. Use the printer’s front panel
menus to change the default to any of these other languages: Spanish, French,
German, Italian, or Japanese. (If the Kanji font is installed, front panel messages
will display in Japanese. If the Chinese or Korean font is installed, the front
panel displays in English, but prints use the specified font.)
1.
When the printer is warmed up, it displays the following message:
Ready
Printer Menu Select
2.
Press Select; you see this message:
Printer Menu
Help Pages Menu
3.
Press to scroll to this message:
Help Pages
Language Menu
4.
Press Menu; you see this message:
Language
*English Select
The asterisk (*) indicates the current default.
5.
Press to scroll to the language you want.
6.
Press Select.
7.
Press until Ready is displayed in the selected language.
Page 32

26
Phaser 780 Color Laser Printer
Load the paper tray
C A U T I O
N
Make sure that the printer is turned on
before
you load the paper tray and start
printing; otherwise the printer will jam. You can load paper while the printer is
warming up.
1.
Open the paper tray at the bottom front of the printer.
2.
Squeeze the paper guide (a) at the rear of the tray (make sure that the
paper tray is open all the way) and slide it back. Remove the foam
packing block (b). Remove the tape and foam from the tray handle (c).
3094-51
b
a
3094-52
c
Page 33

Setup Guide
27
3.
Load paper:
a.
Press down on the metal plate until it locks into place.
b.
Squeeze and slide back the paper guides.
c.
Fan the paper.
d.
Insert the paper, setting it flush against the right side of the tray
and pressing it down under the hook at the front of the tray.
3094-53
ab
3094-54
cd
Page 34

28
Phaser 780 Color Laser Printer
e.
Readjust the paper guides to the correct paper size.
N O T
E
Load letter- and A4-size media with the short edge at the front and rear of the tray
as shown.
3094-66
3094-55
Page 35

Setup Guide
29
f.
Push in the paper tray.
4.
Optional: If you have the Lower Tray Assembly, repeat the previous
steps to load each tray.
N O T
E
For instructions on loading other media and on using the multi-purpose tray
(the external paper tray on the right side of the printer), see the
User Guide
.
3094-56
Page 36

30
Phaser 780 Color Laser Printer
Make a test print
1.
When the printer is warmed up, the front panel displays the following
message:
2.
Press Select; the following message appears:
3.
Press Menu; the following message appears:
4.
Press until you see the following message:
5.
Press Print.
N O T
E
The printer’s Help Pages provide useful information on your printer. Print the
Menu Map for an ov erview of printer functions or the Consumables P age for the
status of replaceable components. See the
User Guide
for information on
using the Help Pages.
Printer Menu
Help Pages Menu
Help Pages
Consumables Page Print
Help Pages
Configuration Page Print
Ready
Printer Menu Select
3040-01
Page 37

Setup Guide
31
Attach the
User Guide
1.
Find the User Guide in the “Getting Started” box.
2.
Peel off the backing from the adhesive strip on the back cover of the
guide and attach the User Guide to the right panel of the printer.
3094-67
Page 38

32
Phaser 780 Color Laser Printer
Connect the printer
The printer can be connected to networks and single workstations and to
optional peripheral devices (scanners, hard disks).
Printer ports
The printer has the following ports:
1.
SCSI (Small Computer Systems Interface; included with optional
printer configuration)
2.
Parallel port
3.
10BaseT Ethernet connection
4.
Slot for an optional network card (shown with card installed).
Network options include:
■ 100BaseT Ethernet card
■ Token Ring card
■ LocalTalk card
3094-58
1
2
3
4
Page 39

Setup Guide
33
Set up the printer on a network
1.
Connect optional peripherals; refer to page 34 in this guide.
2.
Find the PhaserShare Networking Setup Guide in the “Getting
Started” box, and follow the instructions in that guide.
3.
Install the printer software, then turn to page 35 in this setup guide.
Connect to a PC
1.
Turn off the printer and your computer.
2.
Use a high-density bidirectional parallel cable or a Tektronix 36-pin
high-density printer to 25-pin DSUB PC cable (order number
012-1468-00). Otherwise, use a 36-pin to 36-pin parallel cable and the
parallel adapter supplied with the printer.
3.
Connect the parallel interface cable to your computer and to the
printer’s parallel port.
4.
If you are connecting any optional peripheral devices, such as a
scanner or hard disk, do so now; refer to page 34 for guidelines.
Otherwise, turn on your computer and printer and proceed to “Install
printer software” on page 35.
C A U T I O
N
The maximum length for the parallel cable is 3 meters (10 ft.).
3094-59
Page 40

34
Phaser 780 Color Laser Printer
Connect optional peripheral devices
N O T
E
Requires a SCSI port, available on optional printer configuration.
The printer’s SCSI ID number is 7; available SCSI ID numbers for peripheral
devices are 0 – 6. You can connect the following peripheral devices to the SCSI
port:
■
Scanner
Allows you to use your printer as a color copier.
■
External SCSI hard disk
Provides additional storage for
downloadable fonts or printer collation.
1.
Turn off the printer and all SCSI devices before plugging in or
unplugging any cables.
2.
Connect the cable to the device and to the SCSI port on your printer.
Terminate the final SCSI device on a SCSI chain.
Refer to the printer’s CD-ROM or the Tektronix web site for detailed
information on connecting a SCSI device to your printer.
C A U T I O
N
Failure to turn off the printer and any peripherals may result in damage to
them.
3094-60
Page 41

Setup Guide
35
Install printer software
PC/Windows software
C A U T I O
N
Close all other programs before beginning this installation, including Microsoft
Office, toolbars, and virus checkers. Failure to do so could result in computer
errors.
Before you begin
Make a note of this information and refer to it during the on-screen installation.
1.
What is your printer’s configuration? Look on the printer’s
Configuration or Startup Page under Feature Set (see page 30 for
instructions on printing these pages).
2.
To which port is your printer connected? See page 32 for details.
Page 42

36
Phaser 780 Color Laser Printer
Installing the driver
1.
Insert the printer’s CD-ROM.
2.
Start the Installer; use one of the following procedures:
■ If the Windows autorun feature is enabled, the Installer starts
automatically.
■ If the Windows autorun feature is disabled, double-click My
Computer, then double-click the CD-ROM icon to launch the
CD-ROM.
■ View the brief introductory information, then click Install Drivers
to launch the installer.
3.
View the license agreements, and click Yes to continue.
Page 43

Setup Guide
37
4.
Choose the set of files to install from one of these options:
■
Easy Install
to install a printer driver and support files.
■
Custom Install
to specify which files to install.
5.
Follow the on-screen prompts to complete the installation and
electronic registration.
6.
When the CD-ROM introduction screen reappears, click Exit or click
Explore CD to launch the web browser. You can view manuals and
QuickTime videos on the CD-ROM or connect to the Internet for
additional information about your printer.
N O T
E
For additional information about adding a printer and setting up printer drivers,
refer to Microsoft Windows Help.
If you are setting up the printer on a network
Refer to the PhaserShare Networking Setup Guide provided with your printer for
detailed information about network configurations.
Page 44

38
Phaser 780 Color Laser Printer
Configuring the driver
After your software installation is complete, the printer driver needs to be
configured for your printer’s installed options.
Windows 95/Windows 98/Windows NT4
1.
From the Start menu, select Settings, then select Printers.
2.
From the pop-up menu, select your Tektronix printer driver and
choose Properties.
3.
Click the Device Options (Windows 95/Windows 98) or Device
Settings (Windows NT4) tab.
4.
Under Installable Options, select the options that are installed in your
printer (for example, memory configuration, Lower Tray Assembly).
Setting up the driver allows you to select all printer options when
printing.
5.
Click OK.
N O T
E
Do not change the value for Available PostScript Memory Setting ; this value
is already properly set.
Page 45

Setup Guide
39
Macintosh software
Before you begin
Make a note of this information and refer to it during the on-screen installation
procedure.
■ What is your printer’s configuration? Look on the printer’s
Configuration or Startup Page under Feature Set (see page 30 for
instructions).
Installing the driver
1.
Insert the printer’s CD-ROM.
2.
Double-click Start Me First. View the brief introductory information,
then click Install Drivers to launch the installer. Click Continue.
3.
View the license agreements and click Accept to continue.
Page 46

40
Phaser 780 Color Laser Printer
4.
From the pull-down menu, select Easy Install or Custom Install:
Easy Install
to install a printer driver and support files.
a.
Click Read Me for details on each item to be installed.
b.
Click Install.
Custom Install
to specify which files to install.
a.
Select Custom Install.
b.
Select items to install.
c.
Click the i button for information on each item.
d.
Click Install.
5.
When the CD-ROM introduction screen reappears, click Exit or click
Explore CD to launch a web browser. You can view manuals and
QuickTime videos on the CD-ROM or connect to the Internet for
additional information about your printer.
Page 47

Setup Guide
41
Setting up the driver
1.
From the Apple menu, select Chooser.
2.
Click the LaserWriter 8 icon.
3.
Click the Zone for your printer.
4.
From the list of printers, select your printer. If it is not in the list, check
your hardware connections and which zone you have selected in the
Chooser.
5.
Click Setup/Create to select the correct PPD (PostScript Printer
Description) file.
6.
After the automatic setup has completed, click Setup and click
Configure.
7.
Select the options that are installed in your printer (for example,
memory configuration, Lower Tray Assembly). Setting up the driver
allows you to select all printer options when printing.
8.
Click OK.
9.
Close the Chooser.
Page 48

42
Phaser 780 Color Laser Printer
Register your printer
By registering your printer with Tektronix, you are validating the product
warranty and ensuring that you will be sent information about upgrades,
service, and accessories as it becomes available.
During the software installation, the online registration screen appears. Follow
the prompts:
You will need the printer’s serial number when registering the printer. It
appears on the Startup Page, which prints when you turn on the printer.
You can send your registration to Tektronix in one of the following ways:
■ Online, via modem or direct Internet connection.
■ Print the registration and fax the form to Tektronix.
■ Print the registration and mail the form to Tektronix.
■ Fill out the form in the “Register Now” envelope that was shipped
with your printer documentation and mail it to Tektronix.
3094-61
Page 49

Setup Guide
43
Where to go from here
Task / Information needed Resource Where
Set up your printer on a
network
PhaserShare Networking
Setup Guide
■ “Getting Started” box
Network services
■ Using a network
■ Printer management
PhaserShare Networking
Manual
■ Printer’s CD-ROM in the
“Getting Started” box
■ Tektronix web site
■ Order number for a
printed copy:
070-9789-00
Learn to use your printer
■ Loading media
■ Using specialty media
■ Consumables information
■ Troubleshooting
User Guide
■ “Getting Started” box
Learn more about color
■ Lessons
■ Templates and tools
■ Tips and techniques
■ Articles and reviews
■ Questions and answers
Online resource
www.colorize.com
Learn more about printer
features
■ Advanced printer features
■ Troubleshooting
Advanced Features and
Troubleshooting Manual
■ Printer’s CD-ROM in the
“Getting Started” box
■ Tektronix web site
■ Order number for a
printed copy:
070-9925-00
Printer support
■ Reorder printer supplies
■ Contact local Tektronix
resellers
■ Update subscription
service
■ Contact customer support
Tektronix web site
www.tek.com/Color_Printers/
Self-help troubleshooting TekSMART™
Knowledge Base
www2.tek.com/merlin/tko
Page 50

44
Phaser 780 Color Laser Printer
 Loading...