

Page 1

User Manual
Y350C
NetTek Analyzer Platform
Serial Number B033000 and above
071-0805-05
This document supports firmware version 1.118
and above.
www.tektronix.com
Page 2

Copyright © Tektronix, Inc. All rights reserved.
Tektronix products are covered by U.S. and foreign patents, issued and
pending. Information in this publication supercedes that in all previously
published material. Specifications and price change privileges reserved.
Tektronix, Inc., P.O. Box 500, Beaverton, OR 97077
TEKTRONIX and TEK are registered trademarks of Tektronix, Inc.
Page 3

WARRANTY
Tektronix warrants that the products that it manufactures and sells will be free from defects
in materials and workmanship for a period of one (1) year from the date of purchase from
an authorized T ektronix distributor. If any such product proves defective during this
warranty period, Tektronix, at its option, either will repair the defective product without
charge for parts and labor, or will provide a replacement in exchange for the defective
product. Batteries are excluded from this warranty.
In order to obtain service under this warranty, Customer must notify Tektronix of the
defect before the expiration of the warranty period and make suitable arrangements for the
performance of service. Customer shall be responsible for packaging and shipping the
defective product to the service center designated by Tektronix, shipping charges prepaid,
and with a copy of customer proof of purchase. Tektronix shall pay for the return of the
product to Customer if the shipment is to a location within the country in which the
Tektronix service center is located. Customer shall be responsible for paying all shipping
charges, duties, taxes, and any other charges for products returned to any other locations.
This warranty shall not apply to any defect, failure or damage caused by improper use or
improper or inadequate maintenance and care. Tektronix shall not be obligated to furnish
service under this warranty a) to repair damage resulting from attempts by personnel other
than T ektronix representatives to install, repair or service the product; b) to repair damage
resulting from improper use or connection to incompatible equipment; c) to repair any
damage or malfunction caused by the use of non-Tektronix supplies; or d) to service a
product that has been modified or integrated with other products when the effect of such
modification or integration increases the time or difficulty of servicing the product.
THIS WARRANTY IS GIVEN BY TEKTRONIX WITH RESPECT TO THE
LISTED PRODUCTS IN LIEU OF ANY OTHER WARRANTIES, EXPRESS OR
IMPLIED. TEKTRONIX AND ITS VENDORS DISCLAIM ANY IMPLIED
WARRANTIES OF MERCHANTABILITY OR FITNESS FOR A PARTICULAR
PURPOSE. TEKTRONIX’ RESPONSIBILITY TO REPAIR OR REPLACE
DEFECTIVE PRODUCTS IS THE SOLE AND EXCLUSIVE REMEDY
PROVIDED TO THE CUSTOMER FOR BREACH OF THIS WARRANTY.
TEKTRONIX AND ITS VENDORS WILL NOT BE LIABLE FOR ANY
INDIRECT, SPECIAL, INCIDENTAL, OR CONSEQUENTIAL DAMAGES
IRRESPECTIVE OF WHETHER TEKTRONIX OR THE VENDOR HAS
ADVANCE NOTICE OF THE POSSIBILITY OF SUCH DAMAGES.
Page 4

Page 5

Table of Contents
General Safety Summary v............................
Battery Recycling vii................................
Preface ix............................................
Manual Organization ix.................................
Conventions x........................................
Firmware Version x....................................
Contacting Tektronix xii................................
Getting Started
Product Description 1--1..................................
Components and Accessories 1--3.......................
Installing Batteries 1--5...................................
Checking the Battery Charge 1--8........................
Optimizing Battery Life 1--8............................
Removing Batteries 1--8..................................
Connecting the Desktop Power Supply 1--10...................
Connecting the In-Vehicle Power Adapter 1--11................
Installing and Removing Instrument Modules 1--11.............
Setting Up the Tilt Stand 1--15..............................
Installing the Shoulder Strap 1--17...........................
Using the Strand Hook 1--18................................
Powering On the NetTek Analyzer 1--19......................
Performing a Power On Self Test 1--19.......................
Calibrating the Touch-Screen Display 1--20...................
Setting the Stylus Sensitivity 1--20........................
Setting the Stylus Centering 1--20........................
Powering Off the NetTek Analyzer 1--21......................
Suspend Mode 1--21...................................
Shutdown 1--21.......................................
Restart (Software Reset) 1--22...........................
Understanding the Power Switch 1--22.......................
Front-Panel Reset Switch 1--22...........................
Preventing Personal Injury from the Effects of Lightning 1--23....
Y350C NetTek Analyzer Platform User Manual
i
Page 6

Table of Contents
Operating Basics
Functional Overview 2--1.................................
Identifying Front-Panel Controls and Indicators 2--2............
Locating Inputs, Outputs, and Storage Devices 2--3............
Navigating the Desktop 2--5...............................
Icons 2--5...........................................
Taskbar 2--5.........................................
Using Menu and Toolbar Buttons 2--7.......................
Using the Input Panel (Soft Keyboard) 2--9...................
Getting Help 2--10.......................................
Loading Module Software 2--11.............................
Reference
Using the Start Menu 3--1................................
Managing Batteries 3-- 3.................................
Caring for Batteries 3--3.................................
Continuous Charging 3--3..............................
Charging Temperature 3--4.............................
Discharging Temperature 3--4...........................
Short Term Storage 3--4...............................
Long Term Storage 3--4...............................
Service Life 3--4.....................................
Checking the Charge and Calibration Status 3--5...............
Battery Indicator 3--5.................................
Taskbar Icon 3--6.....................................
Control Panel 3--6....................................
Charging Batteries 3--7...................................
Internal Charge 3--7...................................
External Charge 3--8..................................
Partial Charge 3--8....................................
Calibrating Batteries 3--8.................................
External Calibration 3--9...............................
Internal Calibration 3--9...............................
Replacing the Original Batteries 3--10.......................
Conserving Battery Power 3--11.............................
PowerSaver Options 3--11...............................
ii
Y350C NetTek Analyzer Platform User Manual
Page 7

Table of Contents
Understanding Memory Resources 3--15....................
Loading a Floppy Disk 3--17..............................
Installing a PC Card 3-- 19................................
Connecting to a Remote Computer 3--21....................
PC Requirements 3--21....................................
Connecting the Analyzer to a PC 3--21.......................
Installing Microsoft ActiveSync on the PC 3-- 21................
Establishing a Connection Between the NetTek Analyzer
and PC 3--22.........................................
Setting up a Partnership 3--22...............................
Establishing Future Connections 3--23........................
Troubleshooting 3--23.....................................
Remote Control 3--25....................................
Installing the Virtual CE for NetTek Software 3--25.............
Setting Up the Virtual CE for NetTek Software 3--26............
Using Virtual CE for NetTek over a Modem Connection 3--30.....
Recording Actions 3--31...................................
Recording Keystrokes and Mouse Clicks 3--31..............
Playing Recorded Keystrokes and Mouse Clicks 3--32........
Recording an AVI (Series of Screen Captures) 3--33..........
Performing Screen Captures 3--34...........................
About the vxHpc Software 3--36............................
Changing Languages and Upgrading Software 3--37..........
Installing Software 3--37...................................
Instrument Module Language Support 3--38...................
Appendices
Appendix A: Specifications A-- 1...........................
Appendix B: Accessories B--1.............................
Standard Accessories B--1.................................
Optional Accessories B-- 2.................................
Upgrade Kits B--3.......................................
Appendix C: Options C--1................................
Appendix D: Maintenance D--1...........................
Installing the Screen-Protector Sheet D-- 1....................
Cleaning D-- 3...........................................
Y350C NetTek Analyzer Platform User Manual
iii
Page 8

Table of Contents
Transporting the Analyzer D-- 3.............................
Repackaging for Shipment D--4............................
Appendix E: Diagnostic Tests E--1.........................
Test Results Reporting E--2................................
Test Descriptions E--4....................................
Index
iv
Y350C NetTek Analyzer Platform User Manual
Page 9

General Safety Summary
Review the following safety precautions to avoid injury and prevent
damage to this product or any products connected to it. To avoid
potential hazards, use this product only as specified.
Only qualified personnel should perform service procedures.
While using this product, you may need to access other parts of the
system. Read the General Safety Summary in other system manuals
for warnings and cautions related to operating the system.
WARNING. To avoid injury, do not connect this product to any source
which may be subject to the effects of lightning. See page 1--23 for
complete information.
To Avoid Fire or Personal Injury
Use Proper Power Cord. Use only the power cord specified for this
product and certified for the country of use.
Observe All Terminal Ratings. To avoid fire or shock hazard, observe all
ratings and markings on the product. Consult the product manual for
further ratings information before making connections to the product.
Replace Batteries Properly. Replace batteries only with the proper type
and rating specified.
Recharge Batteries Properly. Recharge batteries for the recommended
charge cycle only.
Use Proper AC Adapter. Use only the AC adapter specified for this
product.
Do Not Operate Without Covers. Do not operate this product with
covers or panels removed.
Avoid Exposed Circuitry. Do not touch exposed connections and
components when power is present.
Y350C NetTek Analyzer Platform User Manual
v
Page 10

General Safety Summary
Wear Eye Protection. Wear eye protection if exposure to high-intensity
rays or laser radiation exists.
Do Not Operate With Suspected Failures. If you suspect there is damage
to this product, have it inspected by qualified service personnel.
Do Not Operate in an Explosive Atmosphere.
Safety Terms and Symbols
Terms in This Manual. These terms may appear in this manual:
WARNING. Warning statements identify conditions or practices that
could result in injury or loss of life.
CAUTION. Caution statements identify conditions or practices that
could result in damage to this product or other property.
Terms on the Product. These terms may appear on the product:
DANGER indicates an injury hazard immediately accessible as you
read the marking.
WARNING indicates an injury hazard not immediately accessible as
you read the marking.
CAUTION indicates a hazard to property including the product.
Symbols on the Product. These symbols may appear on the product:
CAUTION
Refer to Manual
vi
Y350C NetTek Analyzer Platform User Manual
Page 11

General Safety Summary
Battery Recycling
This product contains a Lithium-Ion battery, which must be recycled
or disposed of properly. For the location of a local battery recycler in
the U.S. or Canada, please contact:
RBRC (800) BATTERY
Rechargeable Battery Recycling Corp. (800) 227-7379
P.O. Box 141870 www.rbrc.com
Gainesville, Florida 32614
Y350C NetTek Analyzer Platform User Manual
vii
Page 12

General Safety Summary
viii
Y350C NetTek Analyzer Platform User Manual
Page 13

Preface
This manual contains set up and operating instructions for the
Tektronix Y350C NetTek Analyzer Platform.
Information specific to the instrument module test tools (that attach
to the Y350C) is available separately. Refer to the individual test tool
manuals for information specific to each instrument module product.
Manual Organization
The following table identifies where to find information in this
manual.
For information on See page
Product overview 1--1
Battery and AC power 1--5
Instrument module installation 1--11
Power on and functional check 1--19
Touch-screen calibration 1--20
Operating instructions 2--1
Online help 2--10
Menu descriptions 3--1
Battery care 3--3
Memory resources 3--15
Floppy disk storage 3--17
PCMCIA interface 3--19
Remote PC connection 3--21
Upgrade software, change language 3--37
Y350C NetTek Analyzer Platform User Manual
ix
Page 14

Preface
For information on See page
Technical specifications A--1
Accessories B--1
Options C--1
Maintenance D--1
Diagnostics E--1
Conventions
The NetTek Analyzer Platform uses the following convention to
control basic operations, such as opening windows, changing
settings, or running programs.
To open the help window and find information on a specific topic,
you would be instructed to select Start > Help. To accomplish this,
tap Start in the toolbar at the bottom of the desktop window; then
tap Help in the resulting WindowsCE menu.
See page 2--1 for an introduction to tapping and dragging objects on
the touch-screen.
Related Products
The Y350C NetTek Analyzer Platform supports the NetTek Series of
OTDR and BTS instrument module test tools that you can add or
remove from the analyzer platform.
Firmware Version
This manual supports NetTek Analyzer Platform firmware
version 1.118 and above.
To verify your firmware version, do the following:
1. Select Start > Programs > Tektronix Utilities > System
Configuration.
x
Y350C NetTek Analyzer Platform User Manual
Page 15

2. Open the Hardware tab.
3. Select Platform; then select Properties.
Preface
Y350C NetTek Analyzer Platform User Manual
xi
Page 16

Preface
Contacting Tektronix
Phone 1-800-833-9200*
Address Tektronix, Inc.
Web site www.tektronix.com
Department or name (if known)
14200 SW Karl Braun Drive
P.O. Box 500
Beaverton, OR 97077
USA
Sales support
Service
support
Technical
support
* This phone number is toll free in North America. After office
hours, please leave a voice mail message. Outside North
America, contact a Tektronix sales office or distributor; see the
Tektronix web site for a list of offices.
1-800-833-9200, select option 1*
1-800-833-9200, select option 2*
Email: techsupport@tektronix.com
1-800-833-9200, select option 3*
6:00 a.m. -- 5:00 p.m. Pacific time
xii
Y350C NetTek Analyzer Platform User Manual
Page 17

Getting Started
Page 18

Page 19
Getting Started
This section introduces you to the Y350C NetTek Analyzer Platform
and provides information on the following topics:
H Installing batteries and connecting external power
H Installing and removing instrument m odules
H Installing the support stand and carrying strap
H Powering the analyzer on and off
H Performing a functional check
H Calibrating the touch-screen
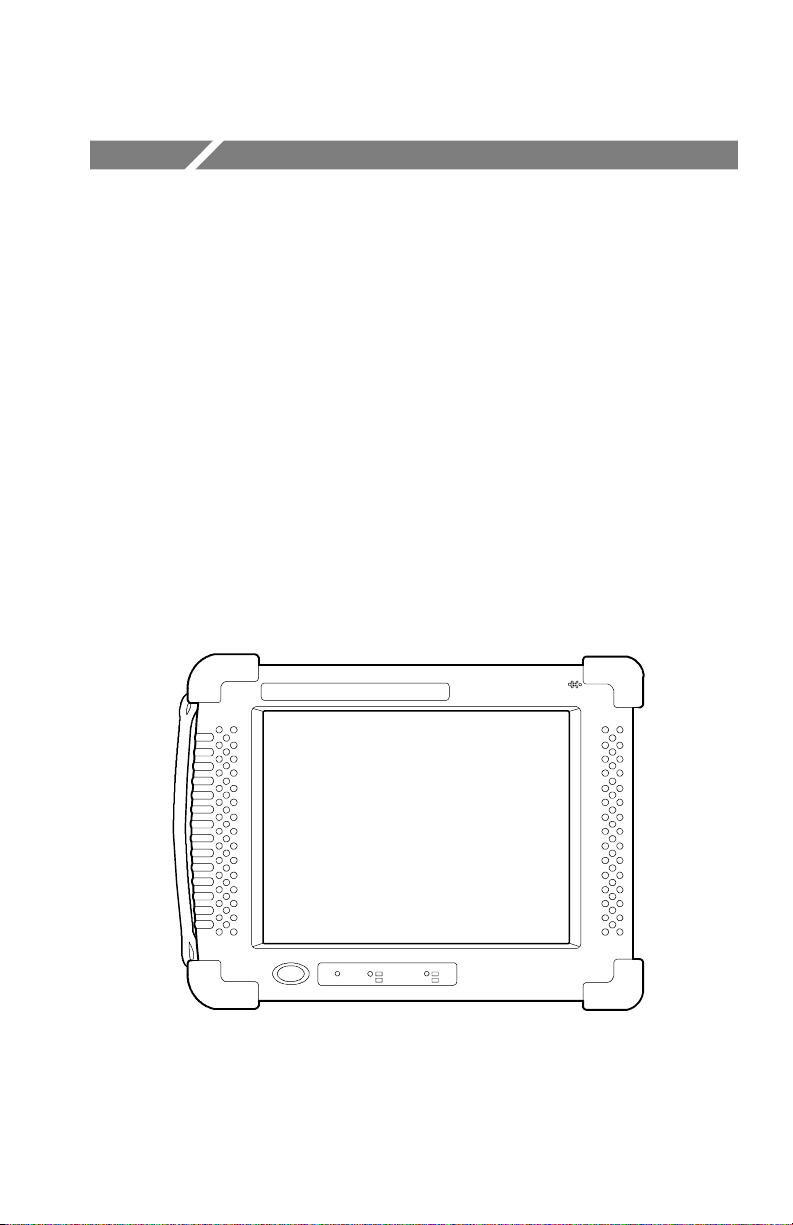
Product Description
Figure 1- 1: Y350C NetTek Analyzer Platform
Y350C NetTek Analyzer Platform User Manual
1- 1
Page 20

Getting Started
The NetTek Analyzer Platform is a hand-held battery operated user
interface that supports the NetTek Series of instrument module test
tools. The NetTek Series of test tools is designed for technicians who
install and maintain cable, telephony, and wireless networks.
You can attach up to four separate instrument modules onto the rear
of the NetTek Analyzer Platform. Instrument module test tools
communicate with the platform through the internal bus and to the
network under test through their own input and output connectors.
The Windows CE operating system and large touch-screen display
administer platform utilities and communications. With the purchase
of a PCMCIA Ethernet or modem card, network and Internet
capabilities are also possible. With the optional Virtual CE for
NetTek software, remote control of instrument modules across a
network by modem or ethernet is possible.
Y350C NetTek Analyzer Platform features include the following:
H Touch-sensitive color liquid-crystal display
H Modular instrument architecture
H Standards-based interfaces
1- 2
H Flexible networking capabilities
H Built-in speaker
H Removable battery packs
H Ruggedized package
NOTE. You must charge the batteries before you can operate the
NetTek Analyzer Platform and instrument modules from internal
battery power. See page 3--7 for additional information.
Y350C NetTek Analyzer Platform User Manual
Page 21
Components and Accessories
Table 1--1 contains general information on the NetTek Analyzer
Platform components and accessories.
For a complete list of standard and optional accessories, see
Appendix B, beginning on page B--1.
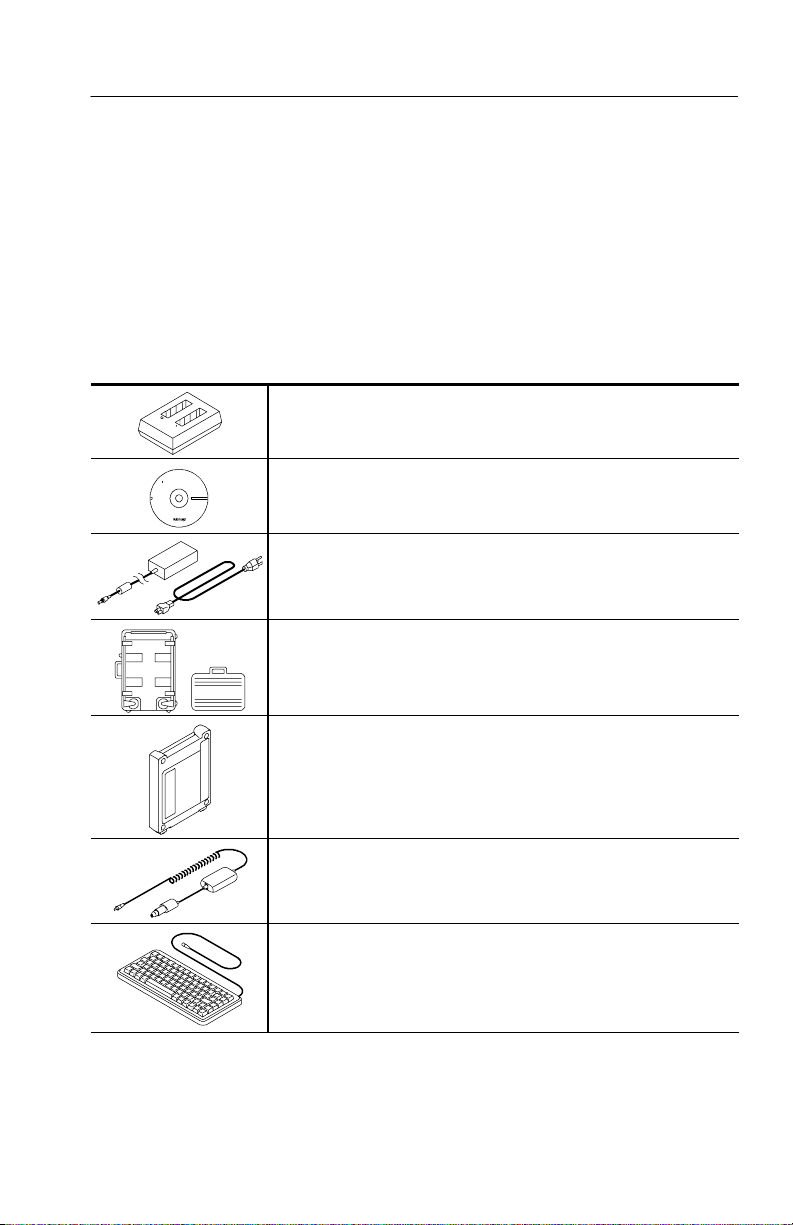
Table 1- 1: Components and accessories
Getting Started
Battery Calibrator and Charger.
1, 2
Charge and calibrate
NetTek Analyzer batteries. Holds two batteries. See the list of
optional accessories on page B--2.
CD-ROM. Install language options and software upgrades from
your desktop or laptop computer. See page 3--37 for additional
information.
Desktop Power Supply with Cord.
1, 2
120VACto24VDC.See
page 1--10 for additional information.
Hard Carrying Cases. Transport NetTek Series products in
these rugged carrying cases, attache or steamer trunk available.
See the list of optional accessories on page B--2.
Instrument Modules.2Perform OTDR, base station analysis,
and antenna testing with NetTek Series instrument module test
tools. You must purchase these products separately.
In-Vehicle Power Adapter
1, 2.
Operate the NetTek Analyzer from
your vehicle and charge batteries: 12 VDC input 24 VDC output.
See the list of optional accessories on page B--2.
Keyboard. Use the miniature keyboard to input text or issue
commands to the NetTek Analyzer. See the list of optional
accessories on page B--2.
Y350C NetTek Analyzer Platform User Manual
1- 3
Page 22
Getting Started
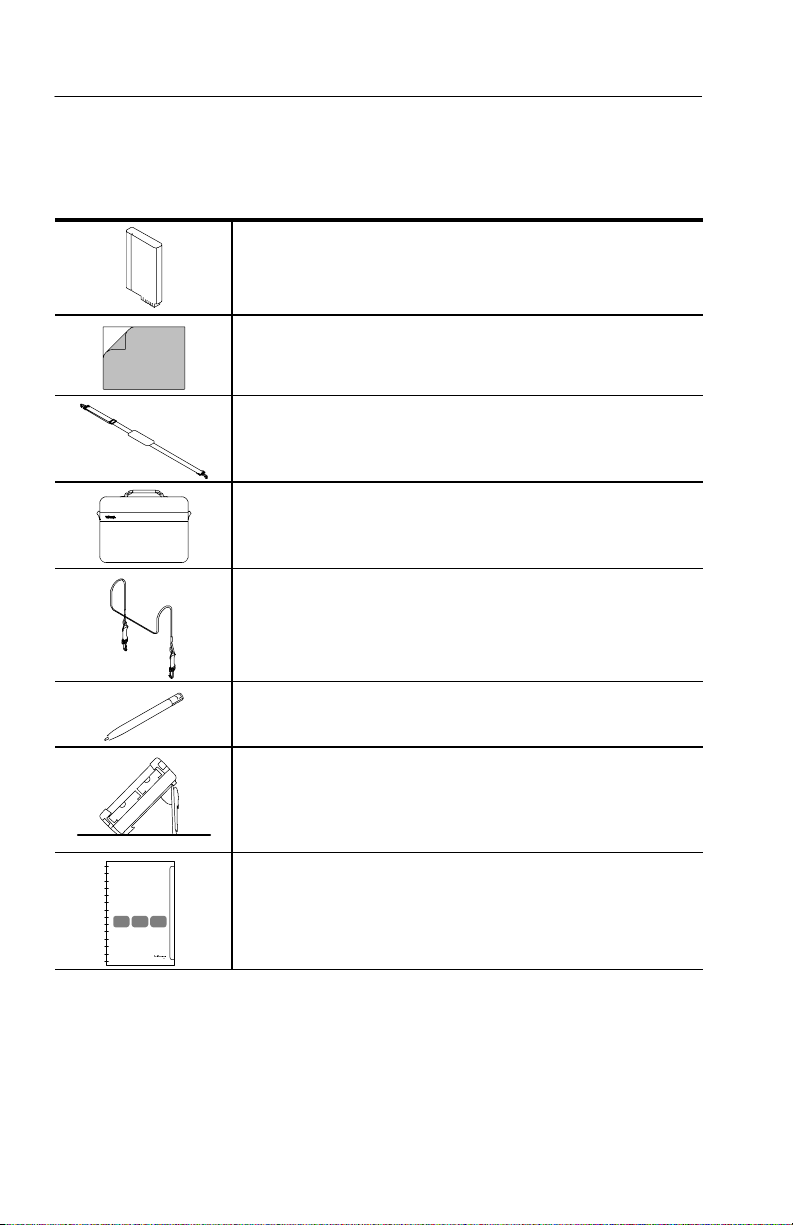
Table 1- 1: Components and accessories (Cont.)
Battery. Li-Ion battery to power the NetTek Analyzer at remote
locations. The product includes one battery as a standard
accessory. Additional batteries are available; see page B--2
optional accessories.
Screen-Protector Sheet. Protect the touch-screen display from
abrasion and scratching. Available in packages of five. See
page D--1 for additional information.
Shoulder Strap. Attaches to the top of the NetTek Analyzer for
easy carrying.
Soft Carrying Case. Protect the NetTek Analyzer and organize
your accessories. Use the soft case to transport your test
equipment to the measurement site.
Strand Hook. Hang the NetTek Analyzer from a wire strand or
other support. See the list of optional accessories on page B--2.
Stylus. Use this tool to tap the NetTek Analyzer touch-screen
display
Tilt Stand. Supports the NetTek Analyzer in an upright position.
Use the tilt stand for bench or desktop operation. See page 1--15
for additional information.
User Manual. Contains information on set up and basic
operation.
1
Power adapters and chargers are not rated for temperatures below freezing and
are not intended for outdoor use.
2
Environmental ratings for instrument modules may not be the same as
those for the NetTek Analyzer Platform. Refer to your instrument module
user manual for environmental ratings.
1- 4
Y350C NetTek Analyzer Platform User Manual
Page 23

Installing Batteries
The battery is not installed when the NetTek Analyzer is shipped
from the factory. To operate the analyzer from battery power, use the
following procedure to install the battery.
NOTE. The NetTek Analyzer comes standard with a single battery.
You can add a second battery to increase the operating time of the
analyzer. To purchase a battery from Tektronix, see Table B--2 on
page B--2 for the correct part number.
1. Place the NetTek Analyzer on a flat surface with the touch-screen
display facing towards you and the battery compartment door
facing up. See Figure 1--2.
2. Push the battery door latch towards the rear of the analyzer.
3. Lift up the battery compartment door and rotate it towards the
rear of the analyzer.
Getting Started
Battery door latch
Figure 1- 2: NetTek Analyzer battery compartment
Y350C NetTek Analyzer Platform User Manual
Battery
compartment door
1- 5
Page 24
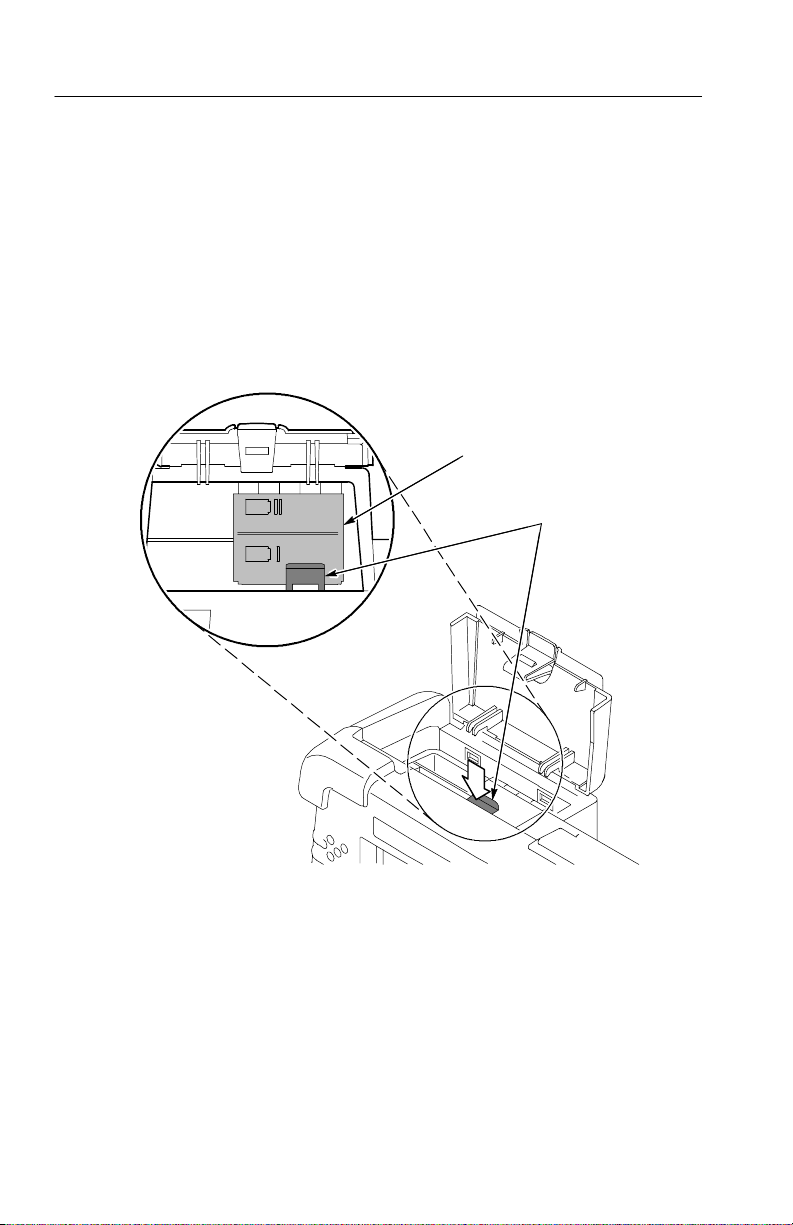
Getting Started
4. Locate the battery retaining tab. See Figure 1 --3.
5. Push down on the tab with your finger to release the battery
6. Lift up the battery retaining door and rotate it towards the rear of
retaining door.
the analyzer. You must hold the door in place to install the
battery.
Battery retaining door
Battery retaining tab
1- 6
Figure 1- 3: Battery retaining tab
Y350C NetTek Analyzer Platform User Manual
Page 25
Getting Started
7. Position the battery above the analyzer. The electrical contacts on
the bottom of the battery must face in the direction shown in
Figure 1--4.
8. Lower the battery into the battery compartment and apply a firm
pressure to seat the electrical contacts.
9. Rotate the battery retaining door down over the battery; then
press down until you hear the latch click.
10. Close and latch the battery compartment door.
Battery removal strap
Figure 1- 4: Installing a battery
Y350C NetTek Analyzer Platform User Manual
Battery retaining door
in open position
1- 7
Page 26

Getting Started
Checking the Battery Charge
The batteries may not be completely charged when the analyzer
arrives from the factory. To verify the charge status of the ba tteries,
do the following:
1. Select Start > Settings > Control Panel.
2. Open (double-tap) the Power Management icon. The Batteries
tab lists the status of each battery.
If the charge level is low, see Charging Batteries on page 3--7.
Optimizing Battery Life
For tips on how to maximize battery operating time, refer to the
NetTek Analyzer online help. Select Start > Help > Settings >
Power Management.
Removing Batteries
Use the following procedure to remove a battery for charging or
replacement.
1- 8
1. Place the NetTek Analyzer on a flat surface with the touch-screen
display facing towards you and the battery compartment door
facing up. See Figure 1--2.
2. Push the battery door latch towards the rear of the analyzer.
3. Lift up the battery compartment door and rotate it towards the
rear of the analyzer.
4. Locate the battery retaining tab. See Figure 1 --3.
5. Push down on the tab with your finger to release the battery
retaining door.
6. Lift up the battery retaining door and rotate it towards the rear of
the analyzer. You must hold the door in place to remove a battery.
7. Pull up on the battery removal strap to remove the battery. See
Figure 1--5.
Y350C NetTek Analyzer Platform User Manual
Page 27
Battery removal strap
Battery 1
Getting Started
Figure 1- 5: Removing a battery
NOTE. To install a new or recharged battery, follow the instructions
on page 1--7 steps 7 through 10.
Y350C NetTek Analyzer Platform User Manual
1- 9
Page 28
Getting Started
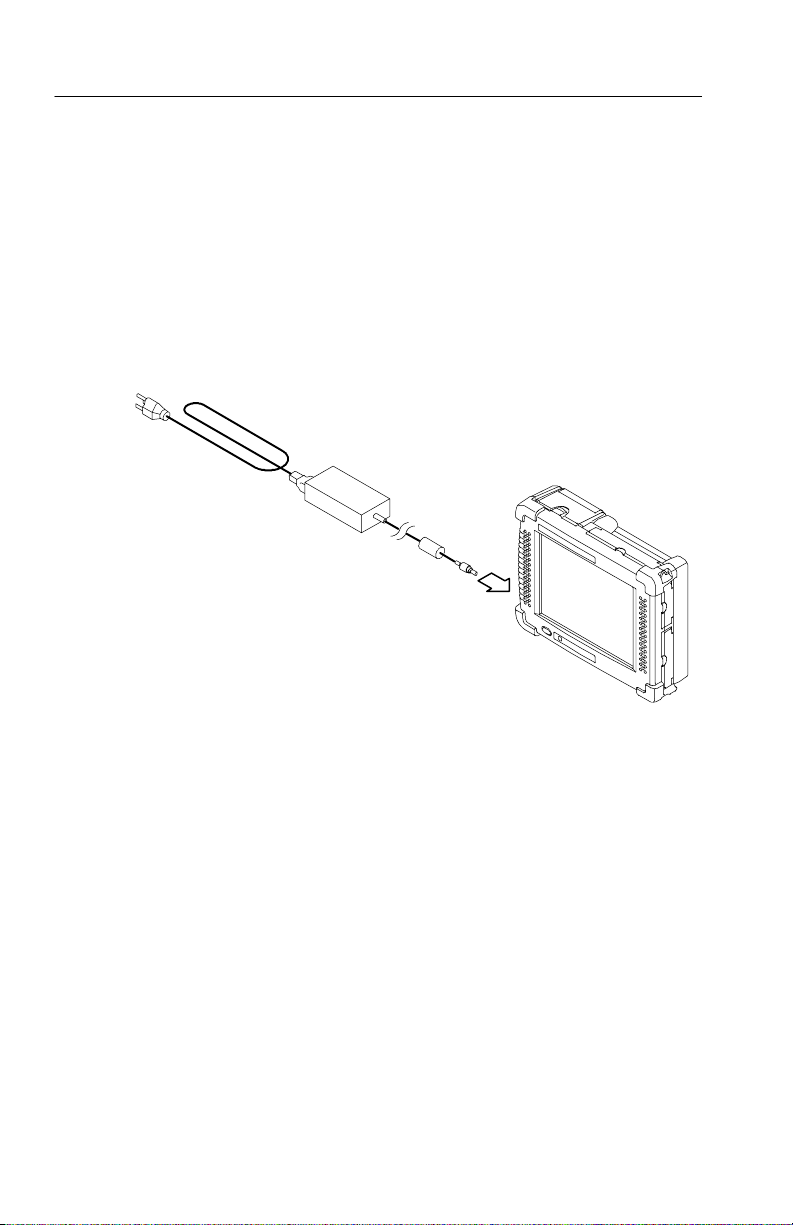
Connecting the Desktop Power Supply
To supply external power for bench or desktop use, connect the
Desktop Power Supply to the NetTek Analyzer as shown in
Figure 1--6.
The universal power supply operates from 100 to 240 VAC 50/60 Hz
mains. See Appendix B on page B--1 for power cord options.
1- 10
Figure 1- 6: Desktop power supply
Y350C NetTek Analyzer Platform User Manual
Page 29
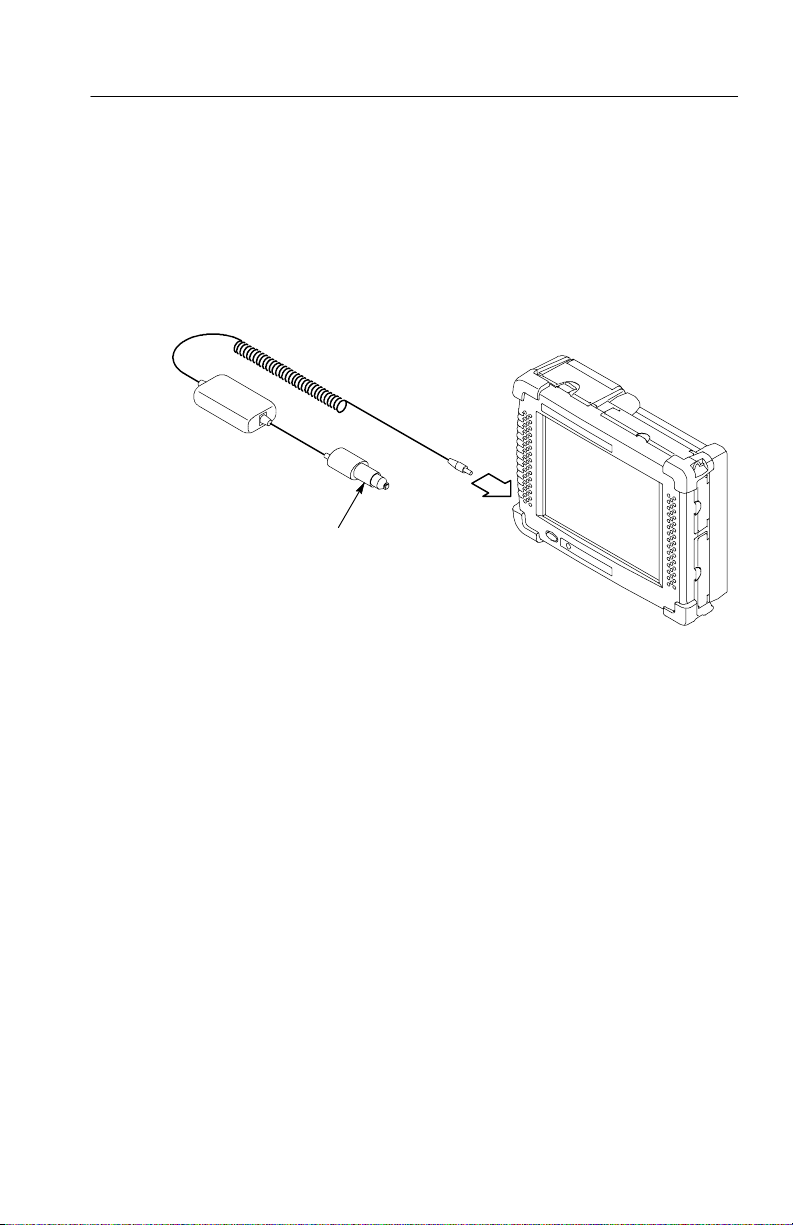
Connecting the In-Vehicle Power Adapter
To supply external power or quick charge a battery in your vehicle,
connect the In-Vehicle Adapter to the NetTek Analyzer as shown in
Figure 1--7.
Plug into vehicle
12 VDC power outlet
Getting Started
Figure 1- 7: In-vehicle power adapter
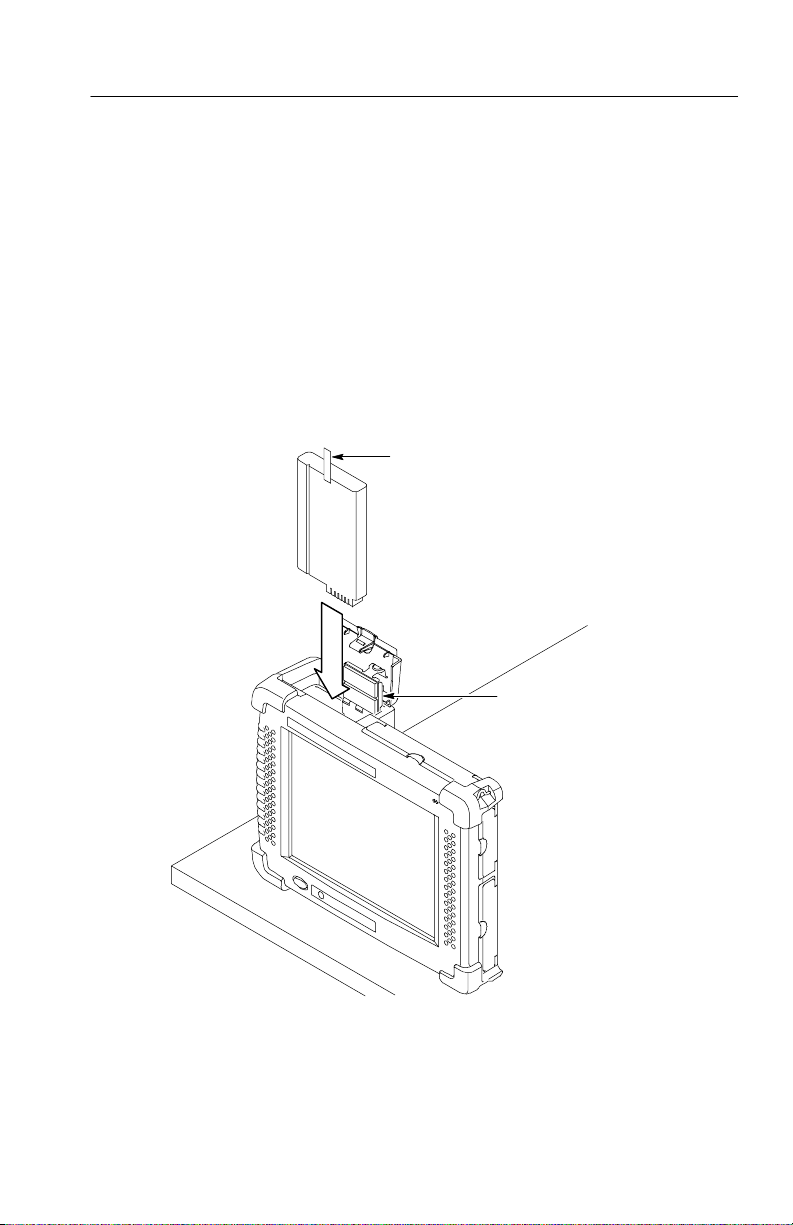
Installing and Removing Instrument Modules
Use the following procedure to install an instrument module onto the
rear of the NetTek Analyzer Platform or to attach one module onto
another. Refer to Figure 1--9 throughout this procedure.
Installing an Instrument Module
1. Power off the NetTek Analyzer Platform. Press the large oval
blue button in the lower-left corner.
2. Disconnect all cables to the NetTek Analyzer Platform and
instrument modules.
3. Place the NetTek Analyzer face down on a flat surface. Support
the analyzer by its four corner bumpers only.
Y350C NetTek Analyzer Platform User Manual
1- 11
Page 30

Getting Started
4. Remove the bus door from the rear of the NetTek Analyzer
Platform or instrument module. See Figure 1--8 or 1--9.
Bus door
Bus connector
NetTek Analyzer Platform
1- 12
Figure 1- 8: Removing the bus door
5. Carefully lower an Instrument module onto the NetTek Analyzer
Platform or previously installed module to engage the bus
connector. See Figure 1--9.
6. Press down firmly to seat the connector and ensure electrical
contact.
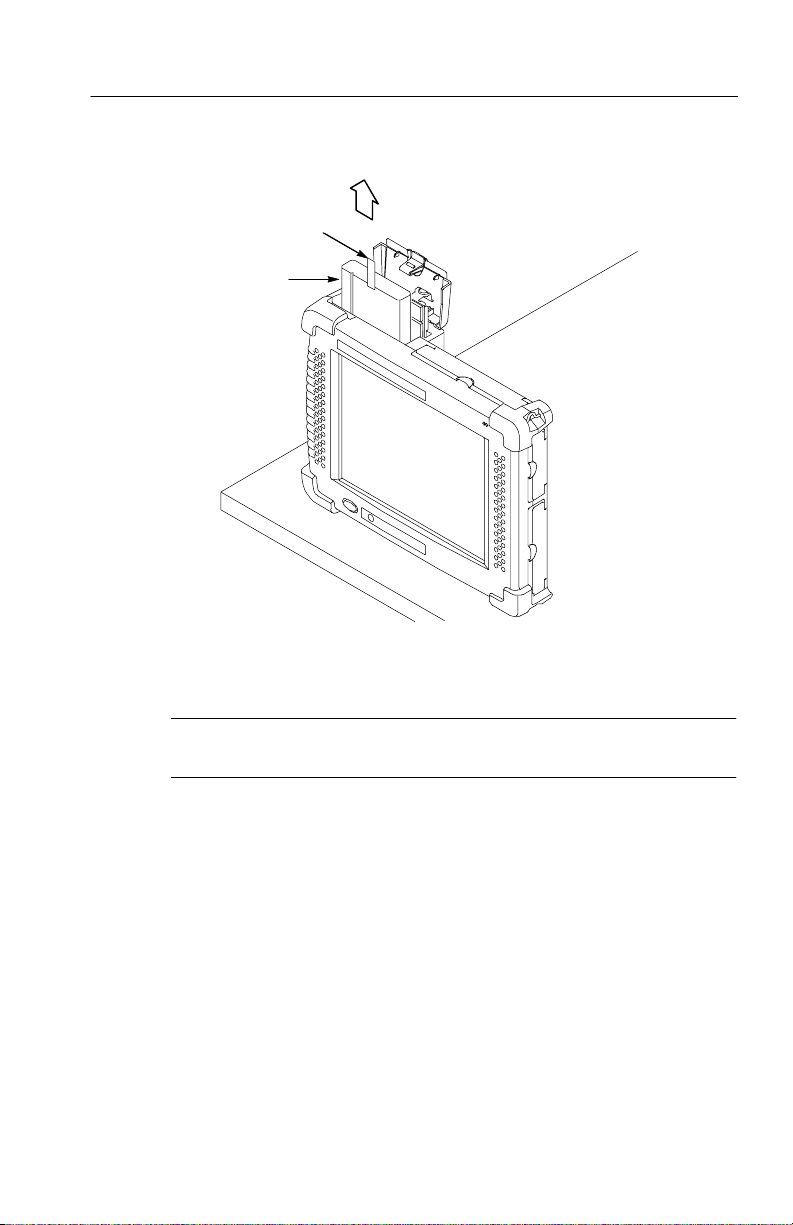
7. Locate the four thumb screws. See Figure 1--9.
8. For each thumb screw, push down on the head and turn it in a
counter-clockwise direction to extend the length.
Y350C NetTek Analyzer Platform User Manual
Page 31

Bus door
Getting Started
Thumb screw (4)
Instrument module
NetTek Analyzer
Platform
Bus connector
Figure 1- 9: Install instrument module
9. Tighten the screws by turning them in a clockwise direction. Use
the coin slot in the top of the thumb screw if you require
additional torque. Be sure to tighten all screws evenly.
10. To recess the thumb screw heads, push and turn each screw head
in a clockwise direction.
11. To maintain the enclosure seal integrity, reinstall the bus door
into the rear of the instrument module.
Y350C NetTek Analyzer Platform User Manual
1- 13
Page 32

Getting Started
Removing an Instrument Module
1. Power off the NetTek Analyzer Platform. Press the large oval
2. Disconnect all cables from the NetTek Analyzer Platform and
3. Place the NetTek Analyzer face down on a flat uncluttered
4. To release the thumb-screw heads, push and turn each screw head
5. Disengage all four screws by turning them in a counter-clockwise
6. Pull up on the instrument module to remove it.
7. To maintain enclosure seal integrity, reinstall the bus door into
blue button in the lower-left corner.
instrument modules.
surface. Support the analyzer by its four corner bumpers only.
in a counter-clockwise direction.
direction. A tool or coin may be required if the screws are tight.
the NetTek Analyzer Platform or instrument module.
1- 14
Y350C NetTek Analyzer Platform User Manual
Page 33

Setting Up the Tilt Stand
For bench or desktop use, attach the tilt stand to the NetTek
Analyzer and fold into place. See Figure 1--10.
Getting Started
Attach tilt stand with
thumb screws (3)
Tilt stand
Stylus holders
Bottom thumb screw
located under Velcro flap
Figure 1- 10: NetTek Analyzer with tilt stand installed
Y350C NetTek Analyzer Platform User Manual
1- 15
Page 34

Getting Started
To install the tilt stand with two or more instrument modules
attached, use the provided spacers as shown in Figure 1--11.
Instrument
module
instrument module
Spacer(s)
Velcro fastener
Tilt stand
Additional
1- 16
Figure 1- 11: Installing the tilt stand with multiple instrument modules
Y350C NetTek Analyzer Platform User Manual
Page 35

Installing the Shoulder Strap
Use the shoulder strap to carry the NetTek Analyzer to the job site.
Install the strap as shown in Figure 1--12.
Getting Started
Figure 1- 12: NetTek Analyzer with shoulder strap installed
Y350C NetTek Analyzer Platform User Manual
1- 17
Page 36

Getting Started
Using the Strand Hook
Use the Strand hook to hang the NetTek Analyzer from a wire
strand, ladder, or other support. Install the strand hook as shown in
Figure 1--13.
CAUTION. The NetTek Analyzer can weigh in excess of 12 kg (25 lbs),
depending on the number of batteries and instrument modules
installed. Use caution when hanging the analyzer from any support.
1- 18
Figure 1- 13: NetTek Analyzer with strand hook attached
Y350C NetTek Analyzer Platform User Manual
Page 37

Powering On the NetTek Analyzer
To power on the analyzer, press the large oval button in the
lower-left corner. The power status indicator illuminates immediately. Allow one minute for the analyzer platform to become functional.
NOTE. The Batteries indicator briefly illuminates red if the batteries
are too low to power on the analyzer. Connect the external power
supply or charge the batteries.
Performing a Power On Self Test
The NetTek Analyzer Platform performs four different self-tests
during the first few seconds of the power on sequence. Audible
beeps indicate a test failure. The platform generates a different beep
code for each type of test failure as described in Table 1--2.
Getting Started
Table 1- 2: Functional check tests
Test Test description
RAM Test entire RAM with multiple patterns. 1 beep
Boot ROM
Checksum
Operating system
checksum
Super I/O Verify I/O port controller is responding. 4 beeps
In most cases, the analyzer platform will attempt to boot following a
functional check failure. If the boot is successful, an error dialog
appears informing the user that a power on self-test error occurred.
The error dialog includes a button to open the diagnostics failure log.
Details of the failure will be described in the log.
To perform additional diagnostic tests, see Appendi x E--1.
Y350C NetTek Analyzer Platform User Manual
Checksum test of flash memory, boot
ROM portion.
Checksum test of flash memory, OS
ROM portion.
Failure
indicator
2 beeps
3 beeps
1- 19
Page 38

Getting Started
Calibrating the Touch-Screen Display
In order for the touch-screen display to respond correctly to your
taps, you must set the touch sensitivity and centering.
Setting the Stylus Sensitivity
1. Select Start > Settings > Control Panel.
2. Open (double-tap) the Stylus icon.
3. In the Double-Tap tab, double-tap the checkerboard grid at a
comfortable speed with your stylus or finger. This sets the tap
rate sensitivity.
4. Double-tap the clapboard to verify your settings.
Setting the Stylus Centering
1. Select Start > Settings > Control Panel.
2. Open the Stylus icon.
3. In the Calibration tab, select Recalibrate.
4. Follow the on-screen instructions to set the location and amount
of pressure needed for the touch-screen to respond to your taps.
Apply pressure to the touch-screen for approximately 5 seconds
to register each tap.
1- 20
5. Select OK to close the dialog box.
6. To save the touch-screen display settings, press the front-panel
power switch.
7. Wait approximately 10 seconds and press the front-panel power
switch again to resume operations.
NOTE. Performing a system reset (Start > Programs > Tektronix
Utilities > System Reset) automatically initiates a touch-screen
calibration at power on.
Y350C NetTek Analyzer Platform User Manual
Page 39

Powering Off the NetTek Analyzer
The NetTek Analyzer has separate, interrelated, standby and power
off functions similar to a laptop PC.
Suspend Mode
Use Suspend mode to place the analyzer in a suspended (standby)
state. This is the typical power down mode that allows currently
loaded instrument module software to remain in volatile memory. If
the analyzer remains in Suspend mode for an extended time
(approximately two hours), it will automatically enter Shutdown
mode and the contents of volatile memory will be lost.
To suspend analyzer operation, choose one of the following methods:
H Press the front-panel power switch.
H Select Start > Shutdown. In the Shut Down dialog box, select
Suspend.
To activate the analyzer following Suspend, press the front-panel
power switch. The analyzer will return to the software and setup
state that existed before the user invoked suspend.
Getting Started
Shutdown
To completely power down the analyzer, do the following:
1. Select Start > Shutdown.
2. In the Shut Down dialog box, select Shutdown.
A shutdown clears volatile memory, including currently loaded
instrument module software, user setups, and measurement data not
saved to nonvolatile memory. For information on how to save these
items to nonvolatile memory, refer to the NetTek Analyzer Platform
online help. Select Start > Help. In the Help window select
Tektronix Basics; then select Store Data in Nonvolatile Memory.
The next time you press the front-panel power switch following a
shutdown, the analyzer will cycle through the complete power up
process taking approximately one minute. You will need to load
instrument module software at this time, unless you previously
configured the software to load at startup.
Y350C NetTek Analyzer Platform User Manual
1- 21
Page 40

Getting Started
For information on how to load software at start up, refer to the
online help. Select Start > Help. In the Help window select
Tektronix Utilities > System Configuration > Software Configuration.
Restart (Software Reset)
To restart the analyzer, do the following:
1. Select Start > Shutdown.
2. In the Shut Down dialog box, select Restart.
The display blanks for approximately five seconds. Software
configured to load at startup, and programs loaded following startup,
are reloaded. A Restart does not empty volatile memory.
Understanding the Power Switch
Press the front-panel power switch to perform one of the following
functions:
H If the analyzer is shutdown: to power on the instrument.
1- 22
H If the analyzer is operating: to initiate Suspend mode.
H If the analyzer is in Suspend mode: to cancel Suspend mode and
activate the analyzer.
H If the analyzer is in PowerSaver mode (touch-screen display off):
to activate the display.
Front-Panel Reset Switch
See page 2--2 for information on the front-panel hardware reset
switch.
Y350C NetTek Analyzer Platform User Manual
Page 41

Getting Started
Preventing Personal Injury from the Effects of Lightning
WARNING. To prevent personal injury from the effects of lightning,
exercise the following precautions when using this product.
Before connecting this product to any source
H Be sure there is no lightning in your vicinity.
H Check your local weather forecast for the possibility of
thunderstorms or lightning.
H If weather conditions could allow thunderstorms or lightning to
develop, be sure to visually check the sky and weather conditions
in your area frequently.
H If you can hear thunder or if you see lightning, do not connect
this product to any source that may be exposed to the effects of
lightning.
H Use your own good judgement and common sense. You must
protect yourself from the effects of lightning.
H You must assume that hazardous voltages will be present on
exposed surfaces of this product if it is connected to a source
exposed to lightning. The insulation of this product will not
protect you from these hazardous voltages.
Do not connect this product to any source which might be subject to
the effects of lightning
If thunderstorms or lightning are in your vicinity:
H When weather conditions that could lead to lightning activity
exist in your area, you could be at risk of a lightning strike
before the cloud is close enough for you to hear thunder or see
lightning.
H When lightning strikes a structure or facility, current travels
through the rebar, concrete, pipes, cables, vent stacks, and
electrical system.
Y350C NetTek Analyzer Platform User Manual
1- 23
Page 42

Getting Started
H Lightning can induce electric and magnetic fields into structures
Be alert and aware of the effects of lightning
H When lightning strikes a conductor, which in turn introduces
H Conductors such as the braided shields of cables or unshielded
H Induced voltages may cause breakdown of insulation in wiring at
and portions of wiring. The length of a conductor affected by the
magnetic field of a lightning strike may exceed two miles.
current into an area some distance from the ground strike point,
equipment can be damaged and personnel injured if they
become an indirect path in the completion of the ground circuit.
wires, will have significant transient currents flowing in them in
regions exposed to the electric field effect of lightning.
connectors and in electrical components, or breakdown of air.
1- 24
Y350C NetTek Analyzer Platform User Manual
Page 43

Operating Basics
Page 44

Page 45

Operating Basics
This section contains NetTek Analyzer Platform operating
information on the following topics:
H Identifying controls, connectors, and indicators
H Locating inputs, outputs, and storage devices
H Understanding the user interface
H Using online help
H Loading instrument module software
Functional Overview
The NetTek Analyzer Platform employes a touch-screen display and
stylus instead of a keyboard and mouse. (An optional keyboard is
available, see page B--2). To use the stylus as you would the mouse
on your desktop computer, select an object by tapping it (pressing
down). To move the object on the screen, continue pressing down
while sliding the object to the desired location.
CAUTION. Only use soft objects, such as plastic or your finger, to tap
the touch-screen display. Do not use metal or other abrasive
materials as they will damage the display surface. To clean the
display, see page D--3 for instructions.
Y350C NetTek Analyzer Platform User Manual
2- 1
Page 46

Operating Basics
Identifying Front-Panel Controls and Indicators
Use the front-panel controls to power the NetTek Analyzer on and
off, reset the analyzer, and determine operating status.
2- 2
123 4
Figure 2- 1: NetTek Analyzer front-panel controls and indicators
1.
Power/Suspend Switch. Push on; push off. See pages 1--19 and
1--21 for specific information.
2.
Reset Switch. Push to perform a hardware reset if a lock-up
occurs. Use a pointed object, such as a paper clip or pen tip, to
access the switch through the front-panel opening. Programs
loaded into volatile memory since startup will be lost.
Y350C NetTek Analyzer Platform User Manual
Page 47

3.
Status Indicator. Green indicates power on. Amber indicates
display off PowerSaver mode.
4.
Batteries Indicator. Green indicates battery charging. Red
indicates a low battery. The low battery indicator illuminates
when the battery capacity reaches 20% of total charge. The
NetTek Analyzer will initiate a memory backup and shutdown
when the remaining capacity reaches 5% of total charge.
Locating Inputs, Outputs, and Storage Devices
Figures 2--2 and 2--3 identify the locations of the NetTek Analyzer
inputs, outputs, and storage devices.
12345
Operating Basics
Figure 2- 2: NetTek Analyzer inputs and outputs.
1.
Parallel Port. Connect to an external device for parallel
communications.
2.
RS-232 Port. Connect to an external device for serial
communications.
3.
Keyboard Port. Connect to an external PS/2 keyboard. See
page 1--3 for additional information.
4.
Headphone Jack. Connect to portable headphones, 3.5 mm
1
(
/8in) diameter. See page A--2 for electrical specifications.
5.
External Microphone Jack. Connect to a portable microphone,
3.5 mm (
1
/8in) diameter. See page A--2 for electrical
specifications.
Y350C NetTek Analyzer Platform User Manual
2- 3
Page 48

Operating Basics
6
9
7
Figure 2- 3: NetTek Analyzer audio accessories, power inputs, and
storage devices.
6.
PCMCIA Ports. Location of the two PCMCIA Type II ports. See
page 3--19 for additional information.
7.
Floppy Disk Drive (Optional). Location of the optional floppy
disk drive. See page 3--17 for additional information.
8.
Speaker. Location of the internal speaker.
9.
DC Power Jack. Connect to the desktop power supply or
in-vehicle adapter. See pages 1 --10 and 1--11 for additional
information.
8
2- 4
Y350C NetTek Analyzer Platform User Manual
Page 49

Navigating the Desktop
The NetTek Analyzer desktop is your primary workspace. Use the
desktop to configure hardware and software, adjust settings, establish
communications, and access instrument m odule t est tools.
Icon
Operating Basics
Desktop
Taskbar
Icons
Double-tap desktop icons to open folders or to start programs.
Taskbar
The Taskbar contains the Start menu, buttons to identify the
programs you are running, a status area, and a desktop icon.
Y350C NetTek Analyzer Platform User Manual
2- 5
Page 50

Operating Basics
Start menu
Program button Status area
Start Menu. Use the Start menu to load and run instrument modules
Desktop button
and other programs, access settings, open documents, and obtain
help. Select (tap) Start to open the menu; then select the entry you
want.
For information on the Start menu selections, see Using the Start
Menu on page 3--1.
2- 6
Select Start to open
Program Buttons. To hide a program that is running, select its taskbar
button. To restore the program, select the button again.
Status Area. Icons and buttons appearing in this area indicate status,
activate features, or open settings windows. Double-tap the icons for
further information.
Table 2--1 explains the function of some common status icons. For a
complete list and explanation of all status area icons, refer to the
NetTek Analyzer Platform online help. Select Start > Help.Inthe
Help window select Windows CE Basics; then select Understand-
ing T askbar Icons.
Y350C NetTek Analyzer Platform User Manual
Page 51

Table2-1:Statusareaicons
Tap this
icon To Details
Operating Basics
Double-tap to open the Power
Management utility.
Double-tap to open the Power
Management utility.
Double-tap to open the Power
Management utility.
Double-tap to open the Backlight
utility.
Single-tap to open the Input
Panel soft keyboard.
Double-tap to open the Date/Time
utility.
Desktop Button. Tap the desktop icon to minimize all running
programs and display the desktop.
Using Menu and Toolbar Buttons
Most programs have a command bar at the top of the program
window. Command bars contain menu titles and toolbar buttons that
change depending on the program requirements.
The analyzer is operating
on external AC power.
The analyzer is charging
batteries.
The analyzer is operating
on battery power. Also
indicates charge level.
Adjust the backlight brightness.
Single-taptoclosethe
keyboard.
Set the date and time.
SliderMenu titles Toolbar buttons
Address field
Y350C NetTek Analyzer Platform User Manual
2- 7
Page 52

Operating Basics
Menu Titles. To open a menu, select (tap) the menu name; then select
the entry you want.
Slider. Select the command bar slider to switch between displaying
toolbar buttons only or menu names and toolbar buttons. You can
drag the slider to display the buttons and menu names you want. You
can also drag the slider down to move the toolbar buttons under the
menus.
Toolbar Buttons. To execute a command from a toolbar button, select
(tap) the button.
Address Field. Enter text in the address field from an external
keyboard or the Input Panel soft keyboard.
1. Enter text directly from an external keyboard or from the soft
keyboard. (See Input Panel (Soft Keyboard on page 2--9. )
2. Press R
ETURN on the external keyboard or tap on the soft
keyboard to enter text or execute the command.
For additional information on how to use My NetTek menus and
toolbars buttons (or for other general information), refer to the
NetTek Analyzer Platform online help. Select Start > Help; then
select Window CE Basics in the Help window.
NOTE. For details on the menus and tool bar buttons of individual
programs, refer to their online help. Tap the
icon in the
upper-right corner of the program window.
2- 8
Y350C NetTek Analyzer Platform User Manual
Page 53

Using the Input Panel (Soft Keyboard)
Use the Input Panel soft keyboard to type characters into text boxes
or address fields without using an external keyboard.
1. Tap the icon in the toolbar status area.
2. Tap the Input Panel keys to enter text.
Operating Basics
3. Tap
4. Tap the keyboard icon to close the keyboard.
To set soft keyboard properties, select Start > Settings > Control
Panel. Open the Input Panel icon, and then select Options.
Special Characters
The soft keyboard includes characters not visible on the startup
keyboard.
CAP Key. Tap the CAP (lock) key to create all capital letters and
common characters.
Shift Key. Ta p the Shift key to create a single capital letter or
common character.
Y350C NetTek Analyzer Platform User Manual
(RETURN) to wrap text or execute a command.
Key. Tap this key to create special characters.
2- 9
Page 54

Operating Basics
Getting Help
To open the Help window and obtain general information on NetTek
Analyzer Platform topics, select Help from the Start menu.
To get help information for the program you are currently running or
from a dialog box, tap the
active screen or dialog box.
The Help Window
Table 2--2 explains how to use the Help window buttons.
Table 2- 2: Help window buttons
Tap this button To
icon in the upper-right corner of the
All Topics Display the NetTek Analyzer main table of contents.
Back Return to the previous help screen.
Contents Display the current program or local table of contents.
2- 10
Display full-screen help text.
Display the help text in its own window. Tap and drag
the Help window title bar to move the window.
Close the Help window. To reopen the window, tap
theHelpiconinthetaskbar.
Close the Help window and quit help.
Scroll the text towards the bottom of the screen.
Scroll the text towards the top of the screen.
Y350C NetTek Analyzer Platform User Manual
Page 55

Loading Module Software
To perform test tool measurements, such as OTDR or base station
analysis, you must install instrument modules onto the rear of the
NetTek Analyzer Platform and access their ROM-based software.
Seepage1--11,Installing and Removing Instrument Modules.
Once the instrument module is installed, you have the following
options to load and run measurement software:
H Double-tap an instrument module application icon on the
desktop. (A shortcut must be previously user-created or installed
at the factory.)
H In the toolbar, select Start > Programs > NetTek; then select the
<Instrument Module Application Software> you want to run.
H In the toolbar, select Start > Programs >Tektronix Utilities >
System Configuration. In the Software tab select the application
name of the software you want to run, and then select Load.You
can also configure applications to load automatically at startup.
Operating Basics
NOTE. Depending on the factory configuration of your analyzer,
instrument module software may load automatically at startup.
Y350C NetTek Analyzer Platform User Manual
2- 11
Page 56

Operating Basics
2- 12
Y350C NetTek Analyzer Platform User Manual
Page 57

Reference
Page 58

Page 59

Using the Start Menu
This section provides information on the Start menu selections. Use
the Start menu to load and run instrument module software and other
programs, access settings, open documents, and obtain help.
To open the Start menu, select Start in the toolbar at the bottom of
the desktop window. For additional information on individual menu
selections, refer to the online help.
Select Start to open these menus: So you can:
> Programs > Communication > PC Link Communicate with a
desktop computer.
> Remote
Networking
> Terminal Emulate a terminal;
> Virtual CE Enable remote control
> vxHpc Perform serial and
> NetTek > instrument
module
application
> Tektronix Utilities > Diagnostics Run NetTek Analyzer
> Module
Upgrade
> System
Configuration
> System
Reset
Set up modem and
custom PC Link connections.
connect to a server.
of NetTek Analyzer
from a PC.
telnet communications
(evaluation version)
Run the selected
instrument module
application software.
diagnostics.
Install instrument module upgrade software.
List properties; load
software; set startup.
Reset the analyzer
following a software
upgrade.
Y350C NetTek Analyzer Platform User Manual
3- 1
Page 60

Using the Start Menu
Select Start to open these menus: So you can:
> Command Prompt Open a window to enter and execute
commands.
> Programs
(Cont.)
> Favorites Open programs and folders. See Start > Help > Windows CE
> Documents Open a document created since the last shutdown.
> Settings > Control Panel Open the Control Panel.
> Help Display the NetTek Analyzer main help table of contents.
> Run Run a program. Enter a name or select Browse to make a selection.
> Shutdown Shutdown, suspend, or restart the analyzer.
> Inbox Run Pocket Inbox. Send and receive email.
> Start Floppy Disk Start the floppy disk drive after installing a
disk.
> Internet Explorer Run Pocket Internet Explorer. Access the
Internet.
> Microsoft Pocket
Word
> Windows Explorer Run Pocket Explorer. Access the NetTek
Basics > Index > Favorites command for add/remove instructions.
> Taskbar Set taskbar properties options.
Run Pocket Word. Create and view Word
documents.
Analyzer file system.
3- 2
Y350C NetTek Analyzer Platform User Manual
Page 61

Managing Batteries
This section contains information on the following topics:
H Caring for batteries
H Checking the charge status
H Charging batteries
H Calibrating batteries
H Replacing the original batteries
H Conserving battery power
Caring for Batteries
The NetTek Analyzer uses Lithium-Ion (Li-Ion) batteries designed to
last at least two years or 300 charge-discharge cycles. Failure to
charge, discharge, or operate a battery under conditions recommended in this section, can shorten battery life.
Li-Ion batteries have an internal circuit that monitors their charge
status. When batteries are not fully discharged or fully charged, the
circuit accumulates charge-tracking errors. If the circuit detects
accumulated errors of greater than 10%, the analyzer reports the
battery as uncalibrated. An uncalibrated battery cannot accurately
report its operating capacity.
Although Li-Ion batteries do not exhibit the memory effects of other
battery technologies (NiCad, NiMH), they should still be fully
discharged before being recharged. Following this practice maintains
battery calibration, allowing the analyzer to accurately predict the
remaining time it can operate.
Continuous Charging
You do not need to continuously charge (trickl e ch arge) Li-Ion
batteries to maintain full operating capacity between jobs. A fully
charged Li-Ion battery can lose up to 10% of its charge during the
first month of nonuse. Self-discharge then tapers off in increments of
Y350C NetTek Analyzer Platform User Manual
3- 3
Page 62

Managing Batteries
about 5% per month. If you plan to store batteries long term, read the
Long Term Storage instructions below.
Charging Temperature
Charge the batteries within an ambient temperature range of 0 to
45 _C (32 to 113 _F). Charging batteries outside of this range can
damage cells or cause them to leak. Charging efficiency is best
between 0 and 30 _C (32 and 86 _F).
Discharging Temperature
The batteries are rated to operate between --10 _Cto+50_C(--14to
+122 _F). Operating outside of this range can produce damage.
Battery discharge capacity drops significantly at temperatures below
0 _C(32_F) and above 45 _C(113_F).
Cold temperatures adversely affect the normal electrochemical
reactions within a battery, reducing the available capacity. Although
Li-Ion batteries can operate down to --20 _C without damage, the
available capacity is significantly reduced below 0 _C. You can
minimize this loss by keeping the batteries warm prior to and during
use.
3- 4
Short Term Storage
Store batteries in a low-humidity environment free of corrosive
gases. Storage temperature should range between --40 to +50 _C
(--40to+122_F). Storing batteries in high humidity environments,
or outside the temperature range, can rust metallic parts and cause
leakage.
Long Term Storage
Store Li-Ion batteries for one year or longer in a location with a
temperature range between 10 and 30 _ C (50 and 86 _F).Itisbestto
fully discharge batteries before long term storage. Fully charge and
discharge batteries once a year to prevent internal leakage and
deterioration.
Service Life
Because batteries rely on internal chemical reactions, performance
deteriorates not only with use but also during prolonged storage. A
Li-on battery will last two years or 300 charge-discharge cycles, if
Y350C NetTek Analyzer Platform User Manual
Page 63

used under the conditions described in this section. Improper use can
shorten battery life or reduce performance.
NOTE. Significantly reduced reserve capacity, despite proper
charging and discharging, indicates the end of battery life.
Li-batteries must be disposed of properly. See page vii for battery
disposal and recycling information.
Checking the Charge and Calibration Status
Use the following methods to check battery charge level, cali bration
status, and remaining operating time.
Battery Indicator
Each Li-Ion battery has an internal microprocessor that monitors its
charge level.
Managing Batteries
To check the charge level, do the following:
1. Remove the battery from the analyzer. See page 1--8 for
instructions.
2. Press the
PUSH switch on the side of the battery.
3. Use the following table to determine the battery charge status.
Indicators Activity Charge capacity
Blinks 3 times At or below 10%
Lights for 5 seconds 10 to 25%
Lights for 5 seconds 26 to 50%
Lights for 5 seconds 51 to 75%
Lights for 5 seconds 76 to 100%
Y350C NetTek Analyzer Platform User Manual
3- 5
Page 64

Managing Batteries
Taskbar Icon
A battery icon appears in the taskbar when the analyzer operates
from battery power. The icon displays the battery charge level in
10% increments. If two batteries are installed, the icon displays the
average charge level of the two combined batteries.
When the analyzer operates from AC power (from the Desktop
Power Supply) a plug icon appears in the Taskbar status area.
Control Panel
The Power Management Batteries tab provides general information
on battery status. This is the most accurate method of assessing
battery conditions. Batteries must be in a calibrated state to
accurately assess their charge level. See page 3--8 for calibration
information.
To open the Batteries tab do the following:
1. Select Start > Settings > Control Panel.
2. Open the Power Management icon, and then select the Batteries
tab.
3- 6
The charge level, an estimate of the remaining operating time (based
on the average current presently being drawn), and the calibration
status is reported.
Remaining Time. The Remaining Time field in the Power Management
Batteries tab shows the amount of time you can continue to operate
the analyzer and attached module(s) from the battery in use. This
information is not reported for a second battery (if installed) or if the
analyzer is operating from external power. The remaining time
calculation is based on a one minute running average of the current
drain for the battery in use. Wait at least one minute following any
power event (power on, restore from suspend, instrument module
start up, etc) before trusting the reading.
Y350C NetTek Analyzer Platform User Manual
Page 65

Charging Batteries
Use the following methods to charge the batteries.
WARNING. Do not attempt to charge a battery below 0 _ C(32_F) or
above 45 _C(113_F). Charging a battery outside of this range can
damage the battery and will result in a partial charge.
Internal Charge
The analyzer has a built-in charge system that can charge its internal
batteries while the analyzer is operating or shutdown. A fully
discharged battery requires approximately 4 hours to fully charge if
the analyzer is shutdown. If the analyzer is operating, a battery can
take up to 8 hours to fully charge.
If the analyzer has two batteries installed, it will charge the battery
with the highest available capacity first, until fully charged. It will
then charge the second battery.
Managing Batteries
Likewise, if the analyzer has two batteries installed, it will operate
from the battery with the lowest available capacity until it reaches
full discharge. The analyzer will then operate from the second
battery until it reaches full discharge.
NOTE.The
charging.
To charge a battery, do the following:
1. Place the battery in the battery compartment. See page 1-- 5 for
instructions.
2. Apply external power from the desktop power supply. The
front-panel Charger indicator illuminates green and the battery
begins to charge immediately.
Y350C NetTek Analyzer Platform User Manual
icon appears in the Taskbar when a battery is
3- 7
Page 66

Managing Batteries
External Charge
If you purchased the optional battery charger as an accessory (see
Optional Accessories, page B--2 ), use the following method to
charge the batteries:
1. Place up to two batteries in the charger slots.
2. The batteries will begin to charge immediately.
A fully discharged battery can take up to three hours to recharge.
Partial Charge
You can quick charge partially discharged batteries by applying
power from the desktop power supply or in-vehicle adapter.
However, repeatedly charging partially discharged batteries will
cause them to become uncalibrated over time. Refer to the Start >
Settings > Control Panel > Power Management > Batteries tab to
determine the charge and calibration status of your batteries.
Calibrating Batteries
3- 8
Calibration refers to the ability of a battery to report its current
capacity, which the analyzer uses to calculate how much longer it
can operate under the current conditions.
To determine the calibration status of a battery, select Start>
Settings > Control Panel > Power Management > Batteries.The
Batteries tab lists the calibration status of the batteries, as well as
other useful information.
A battery loses its calibration after extended periods of discharging
and charging when the battery is not allowed to fully discharge. For
example, if you operate a battery for one hour a day or less, and
recharged it after each use, over time the battery will become
uncalibrated.
Li-Ion batteries have an internal circuit that monitors their charge
status. When a battery is not fully discharged or fully charged, this
circuit accumulates charge-tracking errors. If the circuit detects
accumulated errors of greater than 10%, the analyzer reports the
battery as uncalibrated. An uncalibrated battery cannot accurately
report its remaining operating time.
Y350C NetTek Analyzer Platform User Manual
Page 67

Managing Batteries
The basic idea of calibration is to cycle the battery from a fully
charged state to a fully discharged state, and then back to a fully
charged state. This is what the external charger does automatically,
and what the internal charge method does step-by-step. Using the
fully charged state as a reference, the analyzer can track the charge
status of a battery.
If a battery is reported uncalibrated by the Power Management >
Batteries tab, you can no longer use the reported information to
predict how much longer the analyzer will operate.
External Calibration
If you purchased the optional battery charger as an accessory (see
Optional Accessories, page B--2 ), use the following method to
calibrate a battery.
1. Place the battery in the left-hand slot of the charger.
2. Press the Push to Recalibrate Left Battery Bay button.
The charger will charge, discharge, and then fully recharge the
battery returning it to a fully calibrated state. The calibration process
can take up to ten hours to complete. Overnight calibration is
recommended due to the slow nature of the discharge-charge cycle.
Internal Calibration
If you do not have the optional battery charger, use the following
method to calibrate a battery inside the analyzer.
1. Select Start>Settings > Control Panel > Power Management
and open the Batteries tab. Verify the battery is uncalibrated.
2. Shutdown the analyzer to allow a faster charge rate.
3. Apply external power from the desktop power supply or
in-vehicle adapter for approximately 4 hours.
4. Press the front panel power switch to power on the analyzer.
5. Open the Batteries tab to verify the battery is fully charged (see
step 1 above).
Y350C NetTek Analyzer Platform User Manual
3- 9
Page 68

Managing Batteries
6. Disable the PowerSaver feature. Select Start>Settings >
Control Panel > Power Management > PoweSaver; then select
No PowerSaver actions.
7. Operate the instrument until the analyzer powers off, indicating
the battery is fully discharged (approximately six hours).
8. Again, apply external power from the desktop power supply or
the in-vehicle adapter for approximately 4 hours. Leave the
analyzer in the shutdown state.
9. Select Start>Settings > Control Panel > Power Management
and open the Batteries tab. Verify that the battery is fully
charged and calibrated.
If the battery is not fully charged and calibrated, attempt to calibrate
the battery again. If the second attempt fails, replace the battery.
Replacing the Original Batteries
Connect the desktop power supply, or install a second battery, to
avoid possible loss of data when replacing the battery.
3- 10
Use the instructions on page 1--8 and 1--7 to remove and replace the
battery.
NOTE. Replace the Li-Ion batteries only with the type and model
recommended: Moltech type NI2020.
Lithium batteries must be disposed of properly. See page vii for
battery disposal and recycling information.
To achieve optimum performance from a new battery, fully charge
the battery as described on page 3--7; then disable the PowerSaver
feature (Start > Settings > Control Panel>Power Management >
PowerSaver > No PowerSaver actions) and fully discharge the
battery. Finally, fully recharge the battery again.
Y350C NetTek Analyzer Platform User Manual
Page 69

Conserving Battery Power
Under normal conditions, you can operate the NetTek Analyzer for
several hours using the internal batteries. Here are a few tips to help
you conserve battery life:
1. In general, connect the desktop power supply and use external
power whenever possible, especially when:
H Establishing a dial-up connection (some modems use
considerable power).
H Operating the touch-screen display at high brightness.
H Connecting to a desktop computer.
H Using a PC card or other peripheral.
2. Set the analyzer to suspend operations or turn off instrument
modules when not taking measurements.
PowerSaver Options
To turn off features following a period of user inactivity, do the
following:
Managing Batteries
1. Select Start > Settings > Control Panel.
2. Open the Power Management icon.
3. Select the PowerSaver tab.
4. Select an action to reduce power consumption when idle:
H Suspend (suspends instrument operation and terminates
measurements).
H Turn off screen and backlight
H No PowerSaver actions
5. Select Use PowerSaver on external power to implement
PowerSaver actions while operating on external power.
6. Select the Minutes of idle time until PowerSaver up/down
arrows to set the amount of idle time before the PowerSaver
actions take effect.
Y350C NetTek Analyzer Platform User Manual
3- 11
Page 70

Managing Batteries
7. Select OK to apply changes or Cancel to return the initial
settings.
PowerSaver actions take effect following the specified idle period
(Minutes of idle time until PowerSaver), if you do not touch the
keyboard or tap the touch-screen display.
NOTE. To activate the screen and backlight following a PowerSaver
action, tap the screen or press the front-panel power switch.
To reactivate the analyzer following a “Suspend” PowerSaver
action, press the front-panel power switch.
Turn Off Instrument Modules
To turn off unused modules, do the following:
1. Select Start > Settings > Control Panel.
2. Open the Power Management icon.
3- 12
3. Select the Modules tab.
4. Select an option to reduce power consumption:
H Only the modules used by the selected window in the
display receive power. Only instrument modules running
software in the active window (foreground) receive power.
All other modules will be shut down.
H All modules receive power at all times. All instrument
modules running software on the NetTek Analyzer Platform
receive power at all times, regardless of windowing.
Y350C NetTek Analyzer Platform User Manual
Page 71

Managing Batteries
NOTE. Depending on the power requirements of the the attached
Instrument modules, the NetTek Analyzer Platform cannot always
supply enough power to run all modules at once, even with the
desktop power supply connected. If the platform detects a power
conflict when it loads a module, a warning is issued and you must
decide which modules to run with the available power.
Turn Off Sounds
By default the analyzer produces sounds in response to a number of
events, such as warnings, appointments, and button presses.
To turn off unwanted sounds, do the following:
1. Select Start > Settings > Control Panel.
2. Open the Volume and Sounds icon.
3. Select the Sounds tab.
4. Turn off any unnecessary sound events.
5. If desired, select the Vo l um e tab and move the slider to reduce
the volume.
Y350C NetTek Analyzer Platform User Manual
3- 13
Page 72

Managing Batteries
3- 14
Y350C NetTek Analyzer Platform User Manual
Page 73

Understanding Memory Resources
The NetTek Analyzer Platform uses SDRAM and Flash ROM to
support the internal requirements of the CPU and operating system.
The platform supports the standard and optional storage media
summarized in Table 3--1.
Table 3- 1: NetTek Analyzer Platform memory resources
Memory
location
OS Flash 32 MB Read only
SDRAM 64 MB Read/write
Capacity Memory
description
(ROM)
(RAM)
1
2
\BuiltInDisk 16 MB Read/write
\Floppy-
3
Disk
\Storage
Card
\Storage
Card2
1
Nonvolatile memory.
2
Volatile memory.
3
Optional accessory, see page B- 3.
1.4 MB Read/write,
diskette
1
User purchase Read/write
(PC card)
User purchase Read/write
(PC card)
Notes
Hosts operating system.
32 MB run-time OS, 16 MB
program, 16 MB file system
memory. To adjust the
memory allocation, select
Start > Settings > Control
Panel > System and open
the Memory tab.
1
Select Start > Programs >
Windows Explorer to
access the file system.
1
1
Y350C NetTek Analyzer Platform User Manual
3- 15
Page 74

Understanding Memory Resources
3- 16
Y350C NetTek Analyzer Platform User Manual
Page 75

Loading a Floppy Disk
Use the following procedure to load a floppy disk.
1. Open the access door on the right side of the analyzer. See
Figure 3--1.
2. Insert a floppy disk into the drive as shown.
NOTE. The NetTek Analyzer does not support disk formatting.
Purchase 3.5 inch, 1.44 MB high-density preformatted disks or
format disks on another PC.
Figure 3- 1: Installing a floppy disk
Y350C NetTek Analyzer Platform User Manual
Access door
3- 17
Page 76

Loading a Floppy Disk
3. Select Start > Programs > Start Floppy Drive.
4. Select Start > Programs > Windows Explorer.
5. Double-tap the FloppyDisk folder to access files and folders on
the floppy disk.
6. To release the disk, press the button at the top of the drive.
7. Repeat steps 2 and 3 above if you insert another disk or reinstall
thesamedisk.
3- 18
Y350C NetTek Analyzer Platform User Manual
Page 77

Installing a PC Card
Use the two PCMCIA Type II ports to interface with PC cards or
other devices. (See page B--2 for a list of optional accessories.)
H FlashDisk card. Add extra memory to the NetTek Analyzer file
system.
H Ethernet card. Connect to a LAN (l ocal area network) over an
Ethernet.
H Modem card. Establish a dial-up connection to a remote host.
CAUTION. Suspend or shutdown the NetTek Analyzer before installing
any PC card. Failure to do so could result in loss of user data due to
a system crash.
To install a PC card do the following:
1. Read any manufacturer’s instructions on installing the PC card.
2. Open the access door on the right side of the analyzer. See
Figure 3--2.
3. With the PC card label facing the analyzer display, slide the card
into the NetTek Analyzer as shown.
4. Press firmly to seat the card connector.
5. To release the card, press the button at the top of the card slot.
Y350C NetTek Analyzer Platform User Manual
3- 19
Page 78

Installing a PC Card
Figure 3- 2: Installing a PC card
Access door
Label side
3- 20
NOTE. Regardless of the initial slot occupied, the first PC card you
insert will be designated PCMCIA Port 1. The second card you
insert will be designated Port 2.
Accessing Flash Card or SRAM Memory. To access PC card memory, do
the following:
1. Select Start > Programs > Windows Explorer.
2. Double-tap the Storage Card folder.
3. Open the desired PC card folders and files.
Y350C NetTek Analyzer Platform User Manual
Page 79

Connecting to a Remote Computer
To install module upgrade software you need to set up communications between the NetTek Analyzer Platform and a remote PC
computer.
PC Requirements
Use a desktop computer with CD-ROM drive and Windows 95, 98,
NT 4.0, Windows 2000 or Windows XP operating system.
Connecting the Analyzer to a PC
1. Connect one end of the standard accessory 9-pin RS-232 cable to
the serial (COM) port on the PC. See your computer documentation for the port location.
2. Connect the other end on the cable to the NetTek Analyzer serial
port. See page 2--3 for the port location.
Installing Microsoft ActiveSync on the PC
1. Insert the Microsoft ActiveSync CD-ROM (shipped with the
analyzer) into the CD-ROM drive of the PC.
2. The disk should start up automatically. If it does not, select
Start > Run. In the Open field, type d:\setup,whered is your
CD-ROM drive.
3. The Microsoft ActiveSync Setup window appears on the PC
desktop. Follow the on-screen instructions to install the software
and establish a connection to your NetTek Analyzer.
Y350C NetTek Analyzer Platform User Manual
3- 21
Page 80

Connecting to a Remote Computer
Establishing a Connection Between the NetTek Analyzer and PC
1. In the PC taskbar, double-click the ActiveSync icon.
2. In the ActiveSync window, select File > Get Connected. Follow
the on-screen instructions to establish a connection.
3. On the NetTek Analyzer, select Start > Programs > Commu-
nications > PC Link.
You may have to repeat step 3 and or click Retry in the Get
Connected dialog box several times to complete the connection.
You may also see a Connection Dropped dialog box on the
analyzer.
Setting up a Partnership
After a connection is established between the NetTek Analyzer and
the PC, the New Partnership Wizard window will appear.
4. Select No in the New Partnership Wizard dialog box.
3- 22
5. Click Next.
This completes the connection between the NetTek Analyzer and the
PC.
NOTE. The Connection
NetTek Analyzer when a connection is established. On the PC, the
ActiveSync icon
been established.
6. Press the NetTek Analyzer front-panel power switch to suspend
operations and save the connections settings in nonvolatile
memory.
7. Press the NetTek Analyzer front-panel power switch again to
restore operations.
changes to bright green when a connection has
Y350C NetTek Analyzer Platform User Manual
icon appears in the taskbar of the
Page 81

Establishing Future Connections
If you leave ActiveSync installed on your PC, use the following
procedure to remotely access the NetTek Analyzer the next time you
want to install module upgrade software.
1. Connect one end of the standard accessory 9-pin RS-232 cable to
the serial (COM) port on the PC. See your computer documentation for the port location.
2. Connect the other end on the cable to the NetTek Analyzer serial
port. See page 2--3 for the port location.
3. When you power on the NetTek Analyzer, ActiveSync will
display a Device Not Recognized dialog box. When this occurs,
go to the NetTek Analyzer, select Start > Programs > Commu-
nications > PC Link.
4. In the Device Not Recognized dialog box, select Retry to
establish the connection.
Troubleshooting
Connecting to a Remote Computer
If you experience trouble making a connection, try the following:
H Check the cable connections.
H Restart the analyzer.
H Make sure the PC and NetTek Analyzer are using the same baud
rate. 19200 is the recommended rate. You may need to lower the
rate on both computers.
H Double-click the ActiveSync
File > Connection Settings and make sure Allow serial cable or
infrared connection to this COM port is enabled. Ensure that
the correction COM port is selected.
Y350C NetTek Analyzer Platform User Manual
icon in the PC taskbar. Select
3- 23
Page 82

Connecting to a Remote Computer
3- 24
Y350C NetTek Analyzer Platform User Manual
Page 83

Remote Control
You can control the NetTek Analyzer and any installed instrument
module remotely using the optional Virtual CE for NetTek software.
The Virtual CE for NetTek software works by displayi ng a virtual
NetTek Analyzer display in a window on your PC. Using the mouse,
you click elements of the virtual display as though you were tapping
the display of the NetTek Analyzer and the software relays the action
to the NetTek Analyzer which then performs the desired action. The
Virtual CE for NetTek software works with all NetTek Series
instrument modules.
Installing the Virtual CE for NetTek Software
To use the Virtual CE for NetTek software , you must first install the
client software on a PC.
To install the Virtual CE for NetTek client software:
1. Insert your NetTek Analyzer CD-ROM into the PC. The NetTe k
Analyzer SW Upgrade window will appear. (If the window is not
automatically displayed, use Windows Explorer to display the
contents of the CD--ROM and double-click the NetTek.htm file to
display the NetTek Analyzer SW Upgrade window.)
2. In the Virtual CE for NetTek section, locate “Click here to
install the Virtual CE for NetTek client software on this
workstation” and click the link here. A File Download prompt
will appear.
3. Select Run this program from its current location and click
OK.
4. A security warning will appear informing you that the Autheni-
code signature was not found. This is normal. Click Ye s to
continue. This starts the InstallShield Wizard that will install the
software.
5. Follow the on-screen instructions to install the Virtual CE for
NetTek Software.
Y350C NetTek Analyzer Platform User Manual
3- 25
Page 84

Remote Control
Setting Up the Virtual CE for NetTek Software
Once the Virtual CE for NetTek software is installed, you will need
to configure the software to communicate with your NetTek
Analyzer.
The following communication methods are supported by Virtual CE
for NetTek:
H COM1
H LAN
H WAN/Internet
H Remote networking over a modem
H ActiveSync (over COM1 port only)
Virtual CE for NetTek does not support IRDA, USB, or ActiveSync
over Ethernet.
To configure the Virtual CE for NetTek software client on the PC:
1. Select Start > Programs > Virtual CE for NetTek > Virtual
CE for NetTek. This displays the Virtual CE for NetTek window
shown in Figure 3--3.
3- 26
Figure 3- 3: Virtual CE for NetTek window
2. To configure the connection settings, click the wrench
icon (
Figure 3--4.
). This displays the Configure window shown in
Y350C NetTek Analyzer Platform User Manual
Page 85

Remote Control
Figure 3- 4: Configuring the connection
3. Select the desired communication method from the drop-down
list. If you select the WAN/Internet method, you will need to
specify the IP address assigned to the NetTek Analyzer.
H With the LAN setting, the Virtual CE for NetTek client
program (on the PC) broadcasts a short message on the
network once every second to find the Virtual CE for NetTek
server side (on the NetTek Analyzer) without having to know
its IP address in advance. Once found, they will connect and
not broadcast any more messages. This method will not be
able to get past routers (the IP subnet address of both the
NetTek Analyzer and PC running the server must be the
same). However, this is very convenient when you are using
dynamic IP addresses.
H The WAN setting uses the provided IP address to connect to
the target NetTek Analyzer even across the internet (though
not through firewalls). To get through firewalls, allow ports
1899--1904 to operate.
H If ActiveSync is running and you want to use a direct
communication method, ensure it is not trying to use the same
Y350C NetTek Analyzer Platform User Manual
3- 27
Page 86

Remote Control
H ActiveSync will always be slower over the same comm port.
4. Set the refresh rate to 1-- 4 fps. Setting it any faster will degrade
the performance of applications running on the NetTek Analyzer.
5. If you wish, you can set the Scale (magnification) for 1--3. Note
that the NetTek Analyzer display is 640 x 480, so if you set the
scale at 2, you will need to set the display on your PC to at least
1600 x 1200 if you want to see the entire NetTek Analyzer screen
(plus the Virtual CE for NetTek window) on your PC display.
Virtual CE for NetTek can record keyboard and mouse actions for
later playback. This can be useful for training. See page 3--31 for
more information.
6. After you have made the necessary settings in the Configure
window, select OK.
7. Connect the NetTek Analyzer to the PC or network using the
method you selected in the Configure dialog window (Serial,
WAN/LAN, or Ethernet).
communication method (uncheck the setting in the ActiveSync Configuration dialog for serial connections).
Use a direct communication method if possible.
3- 28
If you are connecting to a network using an Ethernet card, see
page 3--19 for the PCMCIA card installation procedure.
8. Once you have physically connected the NetTek Analyzer to your
PC via a serial cable or network connection, power up the NetTek
Analyzer.
9. On the NetTek Analyzer select Start > Programs > Commu-
nication > Virtual CE. This starts the Virtual CE Server software
on the NetTek Analyzer. See Figure 3--5.
Y350C NetTek Analyzer Platform User Manual
Page 87

Remote Control
Figure 3- 5: Virtual CE running on the NetTek Analyzer
10. Tap the Configure button to display the Configure dialog box.
11. Verify that the setting for the connection type is correct. See
Figure 3--6. Remember that Virtual CE for NetTek does not
support IRDA, USB, or ActiveSync over Ethernet
Figure 3- 6: Virtual CE server configure window
12. Click OK to close the dialog box.
13. If it is not already running on your PC, select Start > Programs > Virtual CE for NetTek > Virtual CE for NetTek. This
launches the Virtual CE for NetTek Client.
The Virtual CE for NetTek software should establish a connection
within several seconds. See Figure 3--7.
Y350C NetTek Analyzer Platform User Manual
3- 29
Page 88

Remote Control
Figure 3- 7: Virtual CE for NetTek client displaying NetTek Analyzer
screen
Once the connection between the NetTek Analyzer and the PC is
established, you control the NetTek Analyzer by using the mouse to
perform actions in the Virtual CE for NetTek client display. You can
also use the keyboard on your PC as though it were attached to the
NetTek Analyzer.
Using Virtual CE for NetTek over a Modem Connection
Virtual CE for NetTek does not support a dire ct connection using a
modem. However, remote networking can be used to allow Virtual
CE for NetTek to use a modem. Tektronix recommends a 56K
modem.
To use a modem with Virtual CE for NetTek:
1. Connect using the modem via “Remote Networking”. See
ConnectingtoaNetworkin the NetTek Analyzer online help for
a procedure to follow. This requires that you have a Remote
3- 30
Y350C NetTek Analyzer Platform User Manual
Page 89

Remote Control
Access Services (RAS) account setup. See your network
administrator for an account.
2. Once a connection to a remote network is made, on the NetTek
Analyzer select Start > Programs > Communication >
Virtual CE and set the communication method to WAN/Inter-
net. Make sure that you do not have an ethernet card installed in
the NetTek.
3. Note the Primary IP address shown on the Virtual CE for NetTek
screen on the NetTek Analyzer. Typically the primary IP address
is dynamically assigned, so it will be different every time you
make a remote network connection.
4. Start Virtual CE for NetTek on your desktop/laptop machine and
set its configuration to use the WAN/Internet communication
method. Enter the Primary IP address from the previous step into
the Server IP Address.
5. Select 1 fps for the refresh rate and close the configuration
dialog.
Virtual CE for NetTek should connect within several seconds.
Recording Actions
The Virtual CE for NetTek software enables you to record actions as
either keystrokes and mouse clicks or an AVI (screen captures). If
you record keystrokes and mouse clicks, you are, in effect, recording
a kind of macro. If you record screens, you are, in effect, recording a
slide show (almost like a video).
Recording Keystrokes and Mouse Clicks
To record keystrokes and mouse clicks:
1. To specify the recording method, click the wrench icon (
This displays the Configure window shown in Figure 3--8.
Y350C NetTek Analyzer Platform User Manual
).
3- 31
Page 90

Remote Control
Figure 3- 8: Setting the record method to key + mouse
2. Select the Key + Mouse option button.
3. Click OK to save your selection.
3- 32
4. Set up the NetTek Analyzer as required.
5. Once the NetTek Analyzer is configured as required, click the
Record button (
6. The Virtual CE for NetTek software will display the Save dialog
for you to name the file to be recorded. Type a filename and click
OK. Recording will begin.
7. Perform the actions you wish to record.
8. To stop recording, click the Stop button (
The Virtual CE for NetTek software will begin recording.
Playing Recorded Keystrokes and Mouse Clicks
To play back recorded keystrokes and mouse clicks:
1. Set up the NetTek Analyzer as it was when the recording began.
) to begin recording.
).
Y350C NetTek Analyzer Platform User Manual
Page 91

Remote Control
2. Once the NetTek Analyzer is configured as required, click the
Play button (
3. The Virtual CE for NetTek software will display the Open dialog
for you to select the file to be played. Select the desired file and
click OK.
The Virtual CE for NetTek software will play the recorded actions.
Recording an AVI (Series of Screen Captures)
When the record method is set to AVI (Audio Video Interleave, a
common file format for Windows video), Virtual CE for NetTek
records the NetTek display (at the selected refresh rate) into an
uncompressed AVI file. Be aware that this file can grow very large
very quickly. Once recorded as a standard AVI file, it can later be
compressed into a MPEG, animated GIF or other compressed video
file.
To record an AVI:
).
1. To specify the recording method, click the wrench icon (
This displays the Configure window shown in Figure 3--9.
Figure 3- 9: Setting the record method to AVI
Y350C NetTek Analyzer Platform User Manual
).
3- 33
Page 92

Remote Control
2. Select the AV I option button.
3. Click OK to save your selection.
4. Set up the NetTek Analyzer as required.
5. Once the NetTek Analyzer is configured as required, click the
Record button (
6. The Virtual CE for NetTek software will display the Save dialog
for you to name the file to be recorded. Type a filename and click
OK. Recording will begin.
7. If you wish to record a sequence of actions, perform the act ions
you wish to record.
) to begin recording.
8. To stop recording, click the Stop button (
You can view the AVI file using the Windows Media Player or any
program that can display AVI files.
Performing Screen Captures
The Virtual CE for NetTek software provides three methods to
perform screen captures: File, Clipboard,andOne Click. The File
method saves the screen capture to a file you name. The Clipboard
method copies the screen capture to the Windows clipboard. The
One Click method saves the screen to an automatically named file
each time you click the mouse.
To make a screen capture:
1. To specify the capture method, click the wrench icon (
displays the Configure window shown in Figure 3--10.
).
). This
3- 34
Y350C NetTek Analyzer Platform User Manual
Page 93
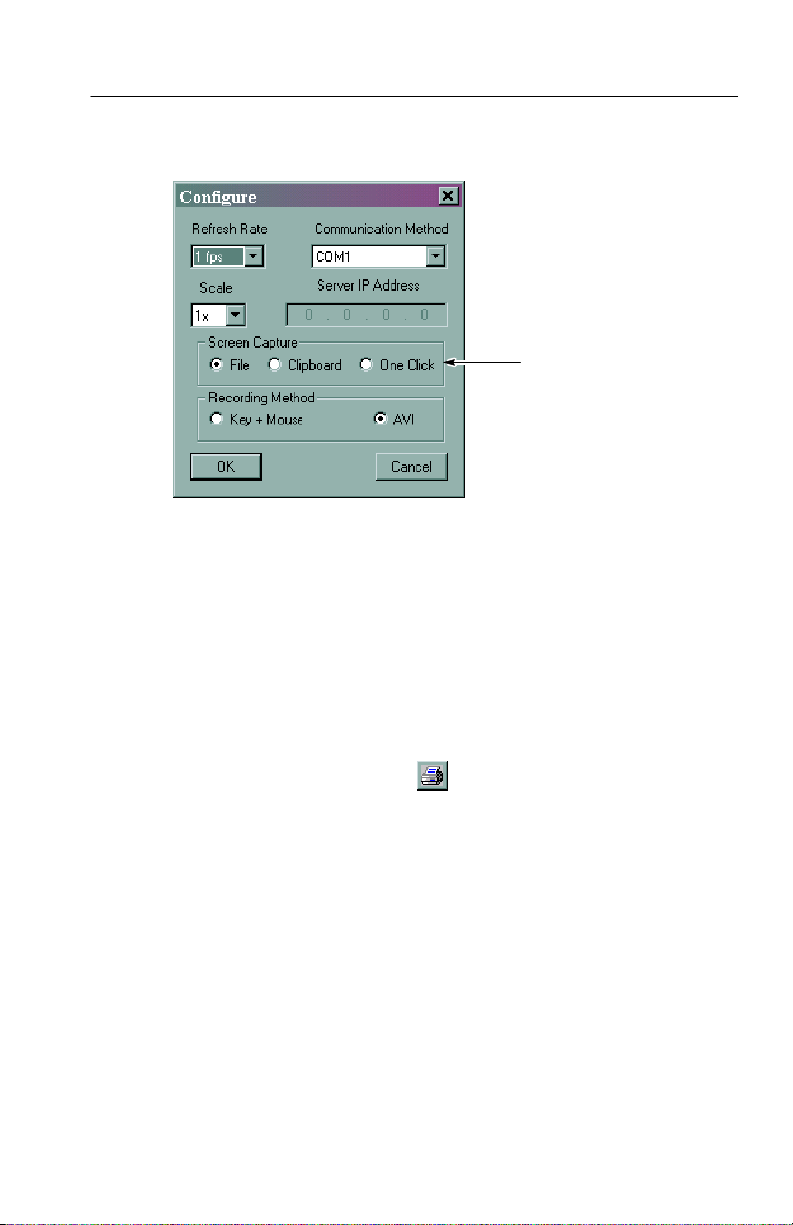
Remote Control
Figure 3- 10: Setting the screen capture method
2. Select the screen capture option button for the method you wish
to use.
3. Click OK to save your selection.
4. Set up the NetTek Analyzer as required.
5. When you have the screen appropriately set up for capture, click
the screen capture button (
6. What happens next depends on the selected method:
H If you selected the File method, the Save dialog box will
appear so that you can name the file to be saved. Enter a
name for the file and click OK.
H If you selected the Clipboard method, the screen capture i s
copied to the Windows clipboard. Once in the clipboard, you
can paste the image into a word processing document or
image file.
H If you selected the One Click method, the screen capture is
saved in an automatically named file located in the RECORDED DATA folder, within the Virtual CE for NetTek
Y350C NetTek Analyzer Platform User Manual
).
3- 35
Page 94

Remote Control
program folder. The screen is saved in BMP format. A screen
capture file is about 302 kB in size.
About the vxHpc Software
The NetTek Analyzer also includes a 30-day evaluation version of
the vxHpc High Performance Serial and Telnet Communications
Software from Cambridge Computer Corporation. vxHpc provides
more sophisticated and powerful communications capability than the
built-in Windows CE Terminal program. vxHpc provides a broad
range of terminal emulations, includes telnet (TCP/IP) communications capability, terminal emulation over the serial port, file transfer
and scripting. The vxHpc software is fully functional for 30 days
after its first use, after which you will have to purchase a license
from Cambridge Computer Corporation. For registration information, see the vxHpc online help: follow the Tips for using v xHpc link
on the first page or go to http://www.cam.com.
3- 36
Y350C NetTek Analyzer Platform User Manual
Page 95

Changing Languages and Upgrading
Software
Due to memory restrictions, the NetTek Analyzer Platform does not
support concurrent languages.
To change the resident language, you must download a new
operating system from the standard accessories CD-ROM.
The CD-ROM contains the following operating systems:
H English. Supports U.S. English language.
H French. Supports French language.
H German. Supports German language.
H Spanish. Supports Castilian Spanish language.
H Italian. Supports Italian language.
H Portuguese. Supports Brazilian Portuguese language.
H Japanese. Supports Japanese language.
H Korean. Supports Korean language.
H Chinese. Supports Simplified Chinese language.
Installing Software
To change the language of the operating system or upgrade the
operating system on your NetTek Analyzer, insert the Y350C NetTek
Analyzer Platform Language and Installation Software CD-ROM
into your PC and follow the on-screen instructions that appear. If no
instructions appear after you insert the CD-ROM, use Windows
Explorer to display the contents of the CD-ROM and double-click
the NetTek.htm file to display the installation instructions.
Y350C NetTek Analyzer Platform User Manual
3- 37
Page 96

Changing Languages and Upgrading Software
Instrument Module Language Support
NOTE. Due to memory restrictions, the NetTek Analyzer Platform
only supports a single operating system and language at a time.
Instrument Modules may support language options not supported by
the NetTek Analyzer Platform. Refer to individual instrument module
user manuals for information on language support.
3- 38
Y350C NetTek Analyzer Platform User Manual
Page 97

Appendices
Page 98

Page 99

Appendix A: Specifications
This section lists the electrical, environmental, and physical
specifications of the NetTek Analyzer Platform. All specifications
are guaranteed unless labeled “typical.” Typical specifications are
provided for your convenience and are not guaranteed.
The electrical characteristics listed in Table A--1 apply to the NetTek
Analyzer Platform operating within the environmental conditions
listed in Table A--4 on page A--4.
Table A- 1: Electrical characteristics
Characteristic Description
Battery
Technology Li-Ion, SMBus interface
Voltage 10.8 VDC
2
Capacity
Operational Life, typical 4hrs
Charge Time, nominal
4
5000 mA
3
Instrument shutdown: 4 hrs
Instrument operating: 8 hrs
Life Expectancy 300 charge-discharge cycles
External DC Input
Voltage 24 VDC ±15%, 60 W maximum
1
Compatible with SBDS revision 1.0.
2
Reduced battery capacity below 0_ C: approximately 75% available at --10_ C.
3
With backlight off and instrument modules removed.
4
From a fully discharged state at temperatures between 0_ C and 45_ C.
5
Retains 80% of rated capacity following the 300thcharge, typical.
1
5
Y350C NetTek Analyzer Platform User Manual
A- 1
Page 100

Appendix A: Specifications
Table A- 2: Display characteristics
Characteristic Description
LCD Display
Color Size: 10.4 in (265 mm), transmissive
Resolution: 640 x 480
Table A- 3: Input and Output Ports
Characteristic Description
Parallel Port
Connector DB25 female
Mode Centronics
RS-232 Port
Connector DB9 male
Baud Rate
6
≤115.2 kbyte/s
Keyboard
Connector DIN miniature, PS-2 compatible
Headphone Jack
7,8
Connector 3.5 mm (1/8in) diameter
Output
Microphone Jack
8
30 mW into 32 Ω (nominal) at 0.2% distortion
Connector 3.5 mm (1/8in) diameter
Sensitivity 10 to 200 mV
Bias Supply
9
1.5 V, 620 A
p-p
PCMCIA Port
Number of Ports Two Type II or one Type III
Floppy Disk Drive
10
1.44 MB, PC-compatible
A- 2
Y350C NetTek Analyzer Platform User Manual
 Loading...