


Installation Manual
TLA700 Series
Logic Analyzer
071-1235-01
Warning
The servicing instructions are for use by qualified
personnel only. To avoid personal injury, do not
perform any servicing unless you are qualified to
do so. Refer to all safety summaries prior to
performing service.
www.tektronix.com

Copyright © Tektronix, Inc. All rights reserved. Licensed software products are owned by Tektronix or its suppliers and
are protected by United States copyright laws and international treaty provisions.
Use, duplication, or disclosure by the Government is subject to restrictions as set forth in subparagraph (c)(1)(ii) of the
Rights in Technical Data and Computer Software clause at DFARS 252.227-7013, or subparagraphs (c)(1) and (2) of the
Commercial Computer Software -- Restricted Rights clause at FAR 52.227-19, as applicable.
Tektronix products are covered by U.S. and foreign patents, issued and pending. Information in this publication supercedes
that in all previously published material. Spec ifications and price change privileges reserved.
Tektronix, Inc., 14200 SW Karl Braun Drive, Beaverton, OR 97077
TEKTRONIX and TEK are registered trademarks of Tektronix, Inc.
TLAVu, PatGenVu, and MagniVu are trademarks of Tektronix, Inc.

HARDWARE WARRANTY
Tektronix warrants that the products that it manufactures and sells will be free from defects in materials and workmanship
for a period of one (1) year from the date of shipment. If a product prove s defective during this warranty period, Tektronix,
at its option, either will repair the defective product without charge for parts and labor, or will provide a replacement in
exchange for the defective product.
In order to obtain service under this warranty, Customer must notify Tektronix of the defect before the expiration of the
warranty period and make suitable arrangements for the performance of service. Customer shall be responsible for
packaging and shipping the defective product to the service center designated by Tektronix, with shipping charges prepaid.
Tektronix shall pay for the return of the product to Customer if the shipment is to a location within the country in which the
Tektronix service center is located. Customer shall be responsible for paying all shipping charges, duties, taxes, and any
other charges for products returned to any other locations.
This warranty shall not apply to any defect, failure or damage ca used by improper use or improper or inadequate
maintenance and care. Tektronix shall not be obligated to furnish service under this warranty a) to repair damage resulting
from attempts by personnel other than Tektronix representatives to install, repair or service the product; b) to repair
damage resulting from improper use or connection to incompatible equipment; c) to repair any damage or malfunction
caused by the use of non-Tektronix supplies; or d) to service a product that has been modifie d or integrated with other
products when the effect of such modification or integration increases the time or difficulty of servicing the product.
THIS W ARRANTY IS GIVEN BY TEKTRONIX IN LIEU OF ANY OTHER WARRANTIES, EXPRESS OR
IMPLIED. TEKTRONIX AND ITS VENDORS DISCLAIM ANY IMPLIED WARRANTIES OF
MERCHANTABILITY OR FITNESS FOR A PARTICULAR PURPOSE. TEKTRONIX’ RESPONSIBILITY TO
REPAIR OR REPLACE DEFECTIVE PRODUCTS IS THE SOLE AND EXCLUSIVE REMEDY PROVIDED TO
THE CUSTOMER FOR BREACH OF THIS W ARRANTY. TEKTRONIX AND ITS VENDORS WILL NOT BE
LIABLE FOR ANY INDIRECT, SPECIAL, INCIDENT AL, OR CONSEQUENTIAL DAMAGES IRRESPECTIVE
OF WHETHER TEKTRONIX OR THE VENDOR HAS ADVANCE NOTICE OF THE POSSIBILITY OF SUCH
DAMAGES.

SOFTWARE WARRANTY
Tektronix warrants that the media on which this software product is furnished and the encoding of the programs on the
media will be free from defects in materials and workmanship for a period of three (3) months from the date of shipment.
If a medium or encoding proves defective during the warranty period, Tektronix will provide a replacement in exchange
for the defective medium. Except as to the media on which this software product is furnished, this software product is
provided “as is” without warranty of any kind, either express or impli ed. Tektronix does not warrant that the functions
contained in this software product will meet Customer’s requirements or that the operation of the programs will be
uninterrupted or error-free.
In order to obtain service under this warranty, Customer must notify Tektronix of the defect before the expiration of the
warranty period. If Tektronix is unable to provide a replacement that is free from defects in materials and workmanship
within a reasonable time thereafter, Customer may terminate the license for this software product and return this software
product and any associated materials for credit or refund.
THIS W ARRANTY IS GIVEN BY TEKTRONIX IN LIEU OF ANY OTHER WARRANTIES, EXPRESS OR
IMPLIED. TEKTRONIX AND ITS VENDORS DISCLAIM ANY IMPLIED WARRANTIES OF
MERCHANTABILITY OR FITNESS FOR A PARTICULAR PURPOSE. TEKTRONIX’ RESPONSIBILITY TO
REPLACE DEFECTIVE MEDIA OR REFUND CUSTOMER’S PAYMENT IS THE SOLE AND EXCLUSIVE
REMEDY PROVIDED TO THE CUSTOMER FOR BREACH OF THIS WARRANTY. TEKTRONIX AND ITS
VENDORS WILL NOT BE LIABLE FOR ANY INDIRECT, SPECIAL, INCIDENTAL, OR CONSEQUENTIAL
DAMAGES IRRESPECTIVE OF WHETHER TEKTRONIX OR THE VENDOR HAS ADVANCE NOTICE OF
THE POSSIBILITY OF SUCH DAMAGES.

Table of Contents
General Safety Summary v...................................
Service Safety Summary vii....................................
Preface ix...................................................
TLA700 Series Logic Analyzers ix....................................
Related Documentation xi...........................................
Contacting Tektronix xii.............................................
Basic Installation 1..........................................
Check the Shipment 1..............................................
Environmental Considerations 1......................................
TLA715 Portable Mainframe Site Considerations 2.......................
TLA721 Benchtop Mainframe and TLA7XM Expansion Mainframe
Site Considerations 2...........................................
Installing TLA7XM Expansion Mainframes 2...........................
Install the Expansion Module 2.......................................
Install the Expansion Cables 5.......................................
Chassis Ground Connections 6.......................................
Installing TLA700 Modules 7........................................
Logical Address Switches 7.........................................
Merging Modules 8................................................
Installing Modules in the TLA715 Portable Mainframe 8..................
Installing Modules in the TLA721 Benchtop or TLA7XM Expansion
Mainframe 9..................................................
Module Keys 11....................................................
Covering Empty Slots 12.............................................
Connecting Accessories 13...........................................
Connecting Accessories to the TLA700 Series 13.........................
Additional Accessory Connection Information 14.........................
Connecting Probes 14...............................................
Connecting Probes to the Logic Analyzer Module 15......................
Configuring and Connecting the Pattern Generator Probes 17................
First Time Operation 18.............................................
Turning the Logic Analyzer On 18.....................................
Turning on the TLA7XM Expansion Mainframes 20.......................
Turning off the Mainframes 20........................................
Performing the Incoming Inspection 20.................................
Checking Logic Analyzer Probes (Optional) 21...........................
Checking the P624x Oscilloscope Probes (Optional) 22....................
Checking the P647x Pattern Generator Probes (Optional) 22................
Checking the TLA700 Mainframe (Optional) 22..........................
Backing Up User Files 22............................................
Removing the Replaceable Hard Disk Drive 22..........................
Connecting Probes to the Target System 23..............................
Additional Information 24............................................
Merging TLA700 Modules 25.................................
Logic Analyzer Merging Rules 25.....................................
TLA7PG2 Pattern Generator Module Merging Rules 26...................
Merge Procedure 26.................................................
TLA700 Series Logic Analyzer Installation Manual
i

Table of Contents
Merging TLA7Axx/TLA7NAx Logic Analyzer Modules 27.................
Unmerging TLA7Axx/TLA7NAx Logic Analyzer Modules 31..............
Merging TLA7Lx/Mx/Nx/Px/Qx Logic Analyzer Modules 32...............
Two-Way Logic Analyzer Merge Procedure 32...........................
Three-Way Logic Analyzer Merge Procedure 3 7..........................
Storing the Logic Analyzer Module Merge Cable 37.......................
Product Overview 39.........................................
Front Panel Controls 39..............................................
TLA700 Series External Connectors 39.................................
Restoring and Reinstalling Software 41.........................
Reinstalling the Hard Disk Image 41...................................
Backing Up Files 41................................................
Installing the Operating System and TLA Application Software 42...........
Reinstalling the TLA Application Software and the Pattern Generator
Application Software 45.........................................
Installing the TPI or PPI Remote Operation Software 46...................
Installing the TLAVu and PatGenVu Software on a PC 47...................
Upgrading or Restoring Firmware 48...................................
Upgrading Firmware on TLA7Axx/TLA7NAx Logic Analyzer Modules 48....
Upgrading Firmware on TLA7Lx/Mx/Nx/Px/Qx/Dx/7Ex Modules 50.........
Upgrading Firmware on the TLA7PG2 Pattern Generator Modules 53.........
Appendix A: TLA721 Mainframe Power Information 55...........
Appendix B: User Service Procedures 59.........................
Service Offerings 59................................................
Warranty Repair Service 59..........................................
Calibration and Repair Service 59.....................................
General Care 59....................................................
Preventive Maintenance 60...........................................
Cleaning the Flat Panel Display 60.....................................
Exterior Surfaces 60................................................
Floppy Disk Drive 61...............................................
In Case of Problems 61..............................................
Diagnostics 61.....................................................
Software Problems 62...............................................
Hardware Problems 62..............................................
Repacking for Shipment 62...........................................
ii
TLA700 Series Logic Analyzer Installation Manual

List of Figures
Table of Contents
Figure i: TLA715 Portable Mainframe ix........................
Figure ii: TLA721 Benchtop Mainframe with a TLA7XM
Expansion Mainframe x..................................
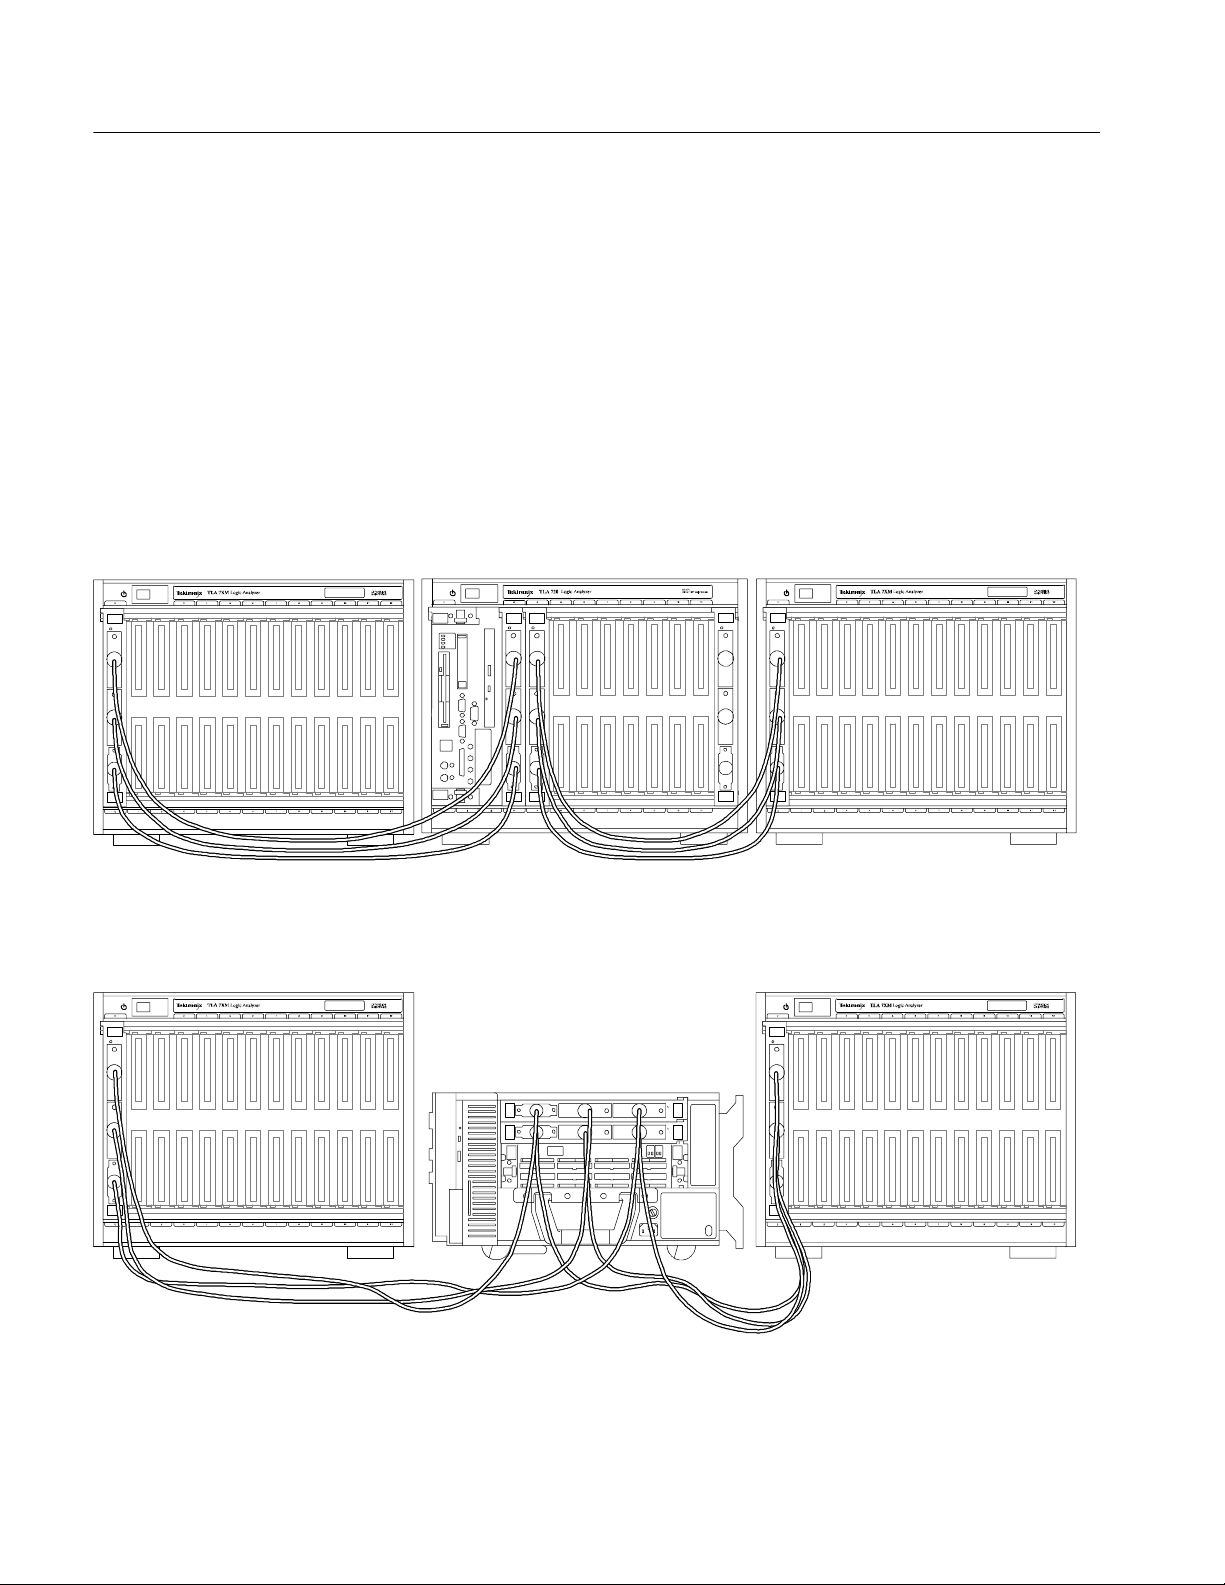
Figure 1: TLA721 Benchtop Mainframe with one TLA7XM
Expansion Mainframe. 3..................................
Figure 2: TLA721 Benchtop Mainframe with two TLA7XM
Expansion Mainframes 4..................................
Figure 3: TLA715 Portable Mainframe with two TLA7XM
Expansion Mainframes 4..................................
Figure 4: Location of the ground connection on the TLA700
logic analyzers 6.........................................
Figure 5: Logical address switches (set to address FF) 8...........
Figure 6: Installing modules 10.................................
Figure 7: Module keys 11......................................
Figure 8: Installing panel covers on the TLA715 Portable
Mainframe 12............................................
Figure 9: Installing panel covers on the TLA721 Benchtop
Mainframe 12............................................
Figure 10: TLA700 series accessories connections 13...............
Figure 11: Connecting the P68xx or P69xx logic analyzer probes
to the TLA7NAx logic analyzer module 15....................
Figure 12: Connecting the P68xx or P69xx logic analyzer probes
to the TLA7Axx logic analyzer module 16.....................
Figure 13: Connecting the P64xx logic analyzer probes to the
TLA7Lx/Mx/Nx/Px/Qx logic analyzer modules 17..............
Figure 14: Line fuse and power cord connector locations 19.........
Figure 15: TLA700 On/Standby switch locations 20................
Figure 16: Accessing the TLA700 replaceable hard disk drive 23.....
Figure 17: Location of modules in a merged system 27.............
Figure 18: Removing the merger connector assembly from the
module 28...............................................
Figure 19: Connecting modules in a merged set 29.................
Figure 20: Installing the merged module set in the mainframe 30....
Figure 21: Removing the cover 33...............................
Figure 22: Feeding the merge cable through the cover 34...........
Figure 23: Seating the cover on the chassis 35.....................
Figure 24: Lining up the two modules 36.........................
TLA700 Series Logic Analyzer Installation Manual
iii

Table of Contents
List of Tables
Figure 25: Positioning the merge cable before installing the cover 38.
Figure 26: TLA715 Portable mainframe front panel 39.............
Figure 27: TLA700 series external connectors 40..................
Figure 28: Flash programming pins 51..........................
Figure 29: Power cord identification chart 57.....................
Table i: Tektronix Logic Analyzer Family documentation xi........
Table 1: Additional accessory connection information 14...........
T able 2: TLA700 series line fuses 18............................
Table 3: TLA user file suffixes 42...............................
Table 4: Bios Boot settings for reinstalling software from the
CD-ROM 43.............................................
Table 5: TLA firmware files 52.................................
Table 6: Power for instrument modules 55.......................
iv
TLA700 Series Logic Analyzer Installation Manual

General Safety Summary
Review the following safety precautions to avoid injury and prevent damage to
this product or any products connected to it.
To avoid potential hazards, use this product only as specified.
Only qualified personnel should perform service procedures.
While using this product, you may need to access other parts of the system. Read
the General Safety Summary in other system manuals for warnings and cautions
related to operating the system.
ToAvoidFireor
Personal Injury
Use Proper Power Cord. Use only the power cord specified for this product and
certified for the country of use.
Connect and Disconnect Properly. Do not connect or disconnect probes or test
leads while they are connected to a voltage source.
Ground the Product. This product is grounded through the grounding conductor
of the power cord. To avoid electric shock, the grounding conductor must be
connected to earth ground. Before making connections to the input or output
terminals of the product, ensure that the product is properly grounded.
Observe All Terminal Ratings. To avoid fire or shock hazard, observe all ratings
and markings on the product. Consult the product manual for further ratings
information before making connections to the product.
Connect the ground lead of the probe to earth ground only.
Powering Off. The power cord provides Mains disconnect.
Do Not Operate Without Covers. Do not operate this product with covers or panels
removed.
Use Proper Fuse. Use only the fuse type and rating specified for this product.
Avoid Exposed Circuitry. Do not touch exposed connections and components
when power is present.
Do Not Operate With Suspected Failures. If you suspect there is damage to this
product, have it inspected by qualified service personnel.
Do Not Operate in Wet/Damp Conditions.
Do Not Operate in an Explosive Atmosphere.
Keep Product Surfaces Clean and Dry.
Provide Proper Ventilation. Refer to the manual’s installation instructions for
details on installing the product so it has proper ventilation.
TLA700 Series Logic Analyzer Installation Manual
v

General Safety Summary
Symbols and Terms
Terms in this Manual. These terms may appear in this manual:
WARNING. Warning statements identify conditions or practices that could result
in injury or loss of life.
CAUTION. Caution statements identify conditions or practices that could result in
damage to this product or other property.
Terms on the Product. These terms may appear on the product:
DANGER indicates an injury hazard immediately accessible as you read the
marking.
WARNING indicates an injury hazard not immediately accessible as you read the
marking.
CAUTION indicates a hazard to property including the product.
Symbols on the Product. The following symbols may appear on the product:
CAUTION
Refer to Manual
Mains Disconnected
OFF (Power)
WARNING
High Voltage
Mains Connected
ON (Power)
Protective Ground
(Earth) Terminal
Standby
vi
TLA700 Series Logic Analyzer Installation Manual

Service Safety Summary
Only qualified personnel should perform service procedures. Read this Service
Safety Summary and the General Safety Summary before performing any service
procedures.
Do Not Service Alone. Do not perform internal service or adjustments of this
product unless another person capable of rendering first aid and resuscitation is
present.
Disconnect Power. To avoid electric shock, switch off the instrument power, then
disconnect the power cord from the mains power.
Use Care When Servicing With Power On. Dangerous voltages or currents may
exist in this product. Disconnect power, remove battery (if applicable), and
disconnect test leads before removing protective panels, soldering, or replacing
components.
To avoid electric shock, do not touch exposed connections.
TLA700 Series Logic Analyzer Installation Manual
vii

Service Safety Summary
viii
TLA700 Series Logic Analyzer Installation Manual
Preface
This manual contains all information needed to install your Tektronix logic
analyzer and related accessories.
To prevent personal injury or damage consider the following requirements before
attempting service:
H The procedures in this manual should be performed only by qualified service
personnel.
H Read the General Safety Summary and Service Safety Summary found at the
beginning of this manual.
Be sure to follow all warnings, cautions, and notes in this manual.
TLA700 Series Logic Analyzers
The TLA700 series logic analyzers are comprised of a portable mainframe,
benchtop mainframe, expansion mainframe (Figure i and Figure ii), and all of the
accessories and supports that can be used with them. The logic analyzers are
built upon the Windows operating system which allows you to install any
PC-compatible, third-party hardware and software on the instrument.
The TLA700 series logic analyzers combine high-performance logic analyzer
and pattern generator modules with optional application modules or an external
Tektronix oscilloscope.
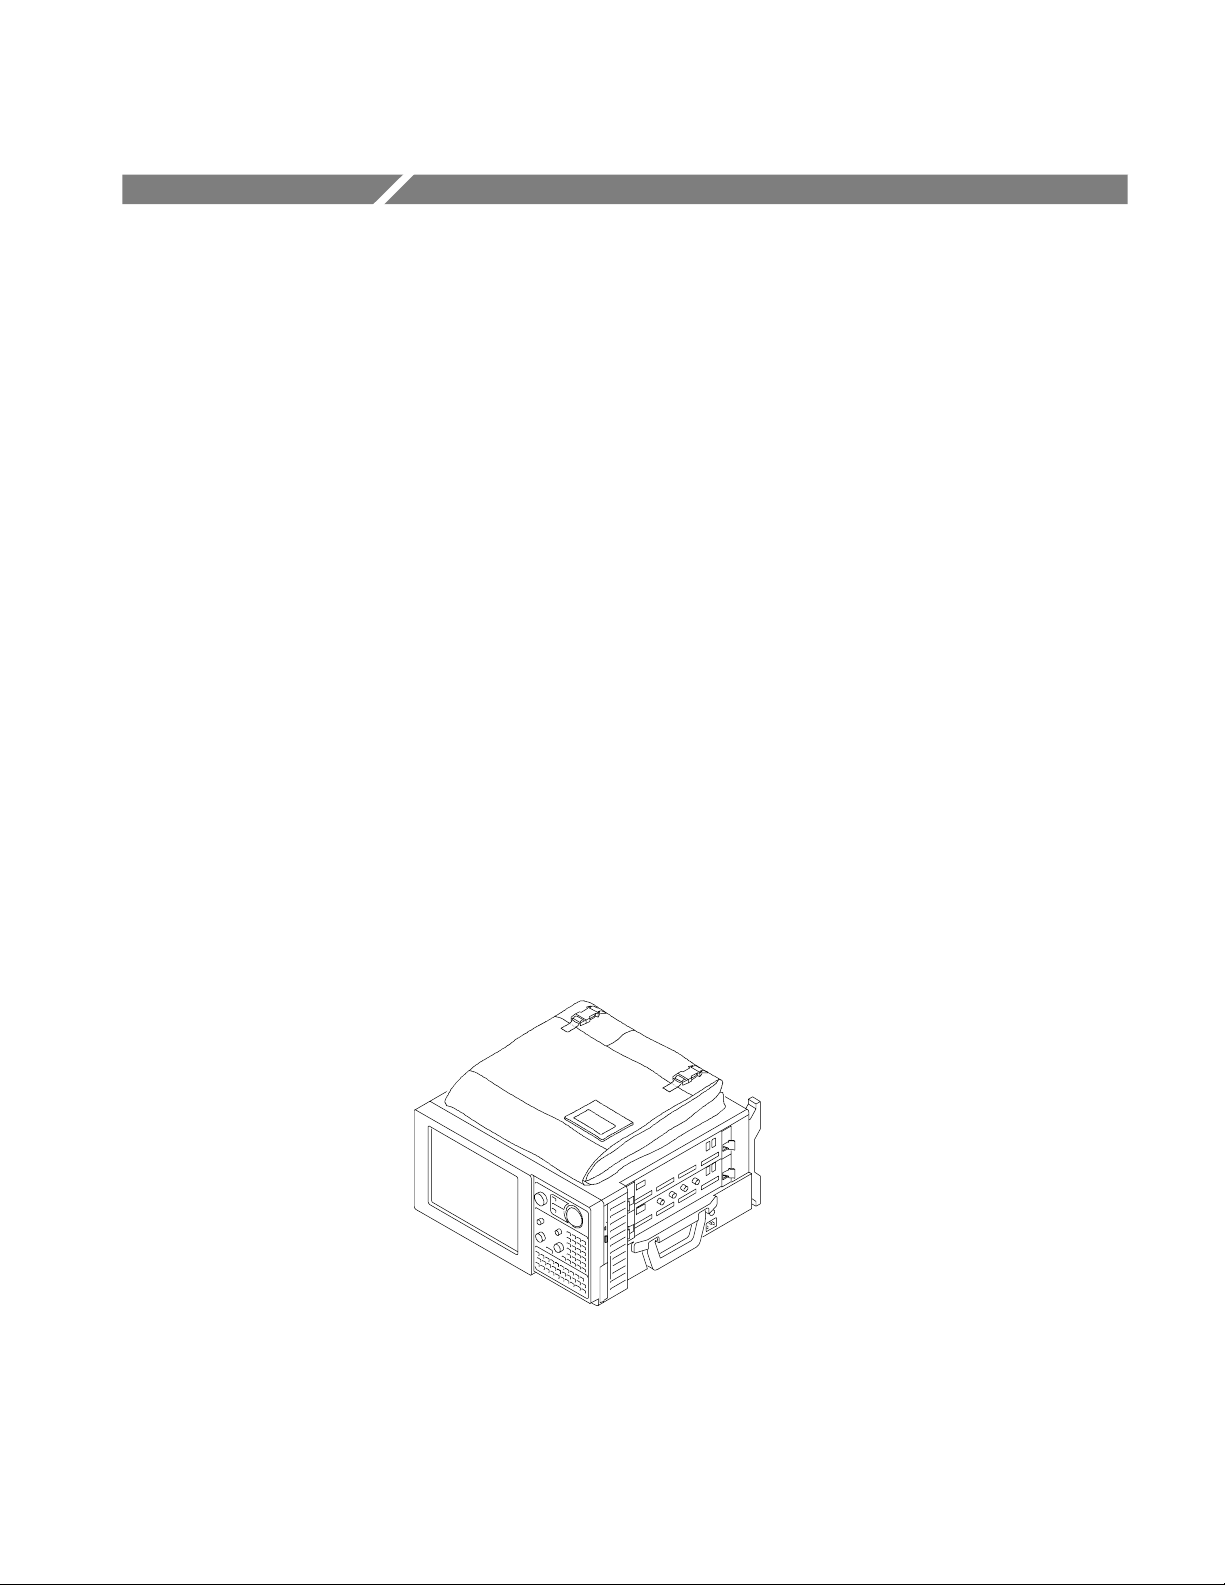
Figure i: TLA715 Portable Mainframe
TLA700 Series Logic Analyzer Installation Manual
ix

Preface
Several logic analyzer modules are available in various combinations of channel
width, state speed, and memory depth. All of the logic analyzer modules provide
simultaneous state and timing measurements through a single probe.
For a complete list of accessories, refer to the online help.
Expansion
mainframe
Benchtop
mainframe
Figure ii: TLA721 Benchtop Mainframe with a TLA7XM Expansion Mainframe
x
TLA700 Series Logic Analyzer Installation Manual

Related Documentation
Most of the product documentation is available via online help with the TLA or
Pattern Generator application. Table i lists other documentation that you may
need to support your Tektronix logic analyzer product.
For additional documentation, contact your local Tektronix representative.
Table i: Tektronix Logic Analyzer Family documentation
Location TLA Documentation
Documents available on the documentation CD, in printed form, and downloadable from the Tektronix website.
Tektronix Logic Analyzer Family User Manual
TLA700 Series Logic Analyzer Installat ion Manual
TLA7Axx\TLA7NAx Logic Analyzer Modul e Service Manual
P6960 & P6980 Logic Analyzer Probe Instruction Manual
Preface
P68xx Logic Analyzer Probe Instruction Manual
P6417 & P6418 Logic Analyzer Probes Instructions
P6419 Logic Analyzer Probe Instruction Manual
P6434 Mass Termination Probe Instructions
TLA7UP Field Upgrade Kit Instructi ons
TLA6UP Field Upgrade Kit Instructi ons
tektronix.com
Documents available only as PDF files on the documentation CD and downloadable from the Tektronix website.
TLA5KUP Field Upgrade Kit Instructi ons
TLA5Fxx, TLA6Fxx, & TLA7Fxx PowerFlex Upgrade Kit Instructions
TLA7PG2 Pattern Generator Module Instructions
TLA Series Product Specifications
Tektronix Logic Analyzer Programmatic Interface (TPI.net)
tektronix.com
TLA700 Series Logic Analyzer Installation Manual
xi

Preface
Contacting Tektronix
Phone 1-800-833-9200*
Address Tektronix, Inc.
Department or name (if known)
14200 SW Karl Braun Drive
P.O. Box 500
Beaverton, OR 97077
USA
Web site www.tektronix.com
Sales support 1-800-833-9200, select option 1*
Service support 1-800-833-9200, select option 2*
Technical support Email: techsupport@tektronix.com
1-800-833-9200, select option 3*
6:00 a.m. -- 5:00 p.m. Pacific time
* This phone number is toll free in North America. After office hours, please leave a
voice mail message.
Outside North America, contact a Tektronix sales office or distributor; see the
Tektronix web site for a list of offices.
xii
TLA700 Series Logic Analyzer Installation Manual
Basic Installation
Check the Shipment
This chapter describes all of the steps needed to install your Tektronix logic
analyzer and its related accessories. It is written from the perspective that you
purchased most of the items uninstalled and you intend to install all of the
pieces. If you purchased a logic analyzer with modules already installed, you
should still review this chapter and perform the steps that apply to your situation.
Check that you have received all of the parts of your logic analyzer that you
ordered. Also check the following:
H That you have the correct power cords for your geographical area.
H That you have the correct probes and modules.
H That you have all the standard and optional accessories that you ordered.
Fill out and return the customer registration card that is packaged with this
manual.
Environmental Considerations
Read this section before installing the logic analyzer. This section describes site
considerations, power requirements, and ground connections for your logic
analyzer.
CAUTION. Allow a 5.1 cm (2 in) clearance on each side, 2.54 cm (1 in) at the
bottom, and 10.16 cm (4 in) at the back of the instrument to ensure proper
cooling. Inadequate clearances can cause the instrument to overheat and shut
down.
TLA700 Series Logic Analyzer Installation Manual
1
Basic Installation
TLA715 Portable
Mainframe Site
Considerations
TLA721 Benchtop
Mainframe and TLA7XM
Expansion Mainframe Site
Considerations
You can use the TLA715 Portable Mainframe on a bench or on a cart in the
normal position (on the bottom feet). You can also use the logic analyzer while it
rests on the rear feet. If you use the instrument while it is resting on the rear feet,
make sure that you properly route any cables connected to the rear of the
instrument to avoid damaging them.
The TLA721 Benchtop and TLA7XM Expansion Mainframes are designed to
operate on a bench or in a rackmount environment. If you need to stack more
than two benchtop and expansion mainframes, install the mainframes in a rack.
Please refer to the online help under Standard and Optional Accessories for
rackmount kit part numbers.
WARNING. To avoid personal injury, never lift or move a benchtop or expansion
mainframe by yourself. The size and weight of these mainframes requires two
people to lift or move them.
Do not stack more then one expansion mainframe on top of a benchtop mainframe or another expansion mainframe. Always use a rackmount kit to ensure
that the expansion mainframes are secure and will not fall.
Installing TLA7XM Expansion Mainframes
If your logic analyzer does not contain any expansion mainframes, skip this
section. Observe the following guidelines when installing expansion mainframes:
CAUTION. Verify that all mainframes are powered off before continuing the
installation procedure. If you are installing more than two expansion mainframes, always use a rackmount kit. Contact your local Tektronix representative
for information on site considerations for multiple mainframes.
Install the Expansion
Module
If you have a benchtop mainframe, install the expansion module in any slot of
the mainframe except 0 through 2; these slots are reserved for the benchtop
controller module (refer to Figure 1 on page 3). If you have only one expansion
mainframe, install the expansion module in slot 12 to keep the expansion cables
out of your way.
If you are installing two expansion mainframes, consider installing the two
expansion modules next to the benchtop controller module to maximize the
number of open slots as shown in Figure 2 on page 4.
2
TLA700 Series Logic Analyzer Installation Manual

Basic Installation
If you have a TLA715 Portable Mainframe, install the expansion module in any
slot. If you install one or two expansion mainframes, you can install the
expansion module in slot 1 as shown in Figure 3 on page 4.
You can configure up to four expansion mainframes with the TLA715 Portable
Mainframe and up to ten expansion mainframes with a TLA721 Benchtop
Mainframe.
To install the expansion module complete the following steps:
1. If the expansion module is not already installed in slot 0 of the expansion
mainframe, install it now.
CAUTION. To avoid damaging the chassis, do not use the retaining screws to seat
the expansion module. These screws are intended for securing the module and
reinforcing the grounding.
2. Seat the expansion module by pushing it into place.
3. Use a screwdriver to tighten the retaining screws (maximum of 2.5 in-lbs).
Expansion mainframeBenchtop mainframe
Figure 1: TLA721 Benchtop Mainframe with one TLA7XM Expansion Mainframe.
4. Place the EXPANSION 1 label in the outlined area on the upper right side of
the expansion mainframe.
TLA700 Series Logic Analyzer Installation Manual
3
Basic Installation
When you install two expansion mainframes, software determines which
chassis is expansion 1 and which is expansion 2 by the order in which you
install the expansion modules in the TLA721 Benchtop Mainframe. The
expansion module in the lower numbered slot will be expansion 1, and the
expansion module in the higher numbered slot will be expansion 2.
5. For the setup in Figure 2 or Figure 3, place the EXPANSION 1 label in the
outlined area on the upper right side of the expansion mainframe to the left
of the TLA721 Benchtop Mainframe or TLA715 Portable Mainframe. Place
the EXPANSION 2 label in the outlined area on the upper right side of the
expansion mainframe to the right of the TLA721 Benchtop Mainframe or
TLA715 Portable Mainframe.
Expansion mainframe
TLA721 Benchtop Mainframe
Figure 2: TLA721 Benchtop Mainframe with two TLA7XM Expansion Mainframes
Expansion mainframe
TLA715 Portable Mainframe
Expansion mainframe
Expansion mainframe
Figure 3: TLA715 Portable Mainframe with two TLA7XM Expansion Mainframes
4
TLA700 Series Logic Analyzer Installation Manual

Basic Installation
Install the Expansion
Cables
To connect the three cables from the expansion modules together, complete the
following steps:
1. Examine the gray expansion cable to determine if the connectors have labels.
If the connectors are not labeled, apply the C labels to each connector.
2. Connect one end of the gray expansion cable to connector C of the expansion
module on the expansion mainframe side. Connect the other end of the gray
expansion cable to connector C of the expansion module on the TLA721
Benchtop Mainframe or TLA715 Portable Mainframe side.
3. Fasten the expansion cable connector to the expansion module by tightening
the two hold-down screws.
4. Examine the two blue expansion cables to determine if the connectors are
labeled A and B.
a. If the cables are labeled A and B, select the B cable and proceed to
step 5.
b. If the cables are not labeled, select either blue expansion cable and label
each connector with the B label. Select the other cable and apply the
A labels to each connector.
5. Connect one end of the blue expansion cable to connector B of the expansion
module on the expansion mainframe side. Connect the other end of the blue
expansion cable to connector B of the expansion module on the TLA721
Benchtop Mainframe or TLA715 Portable Mainframe side.
6. Fasten the expansion cable connector to the expansion module by tightening
the two hold-down screws.
7. Connect one end of the blue expansion cable to connector A of the expansion
module on the expansion mainframe side. Connect the other end of the blue
expansion cable to connector A of the expansion module on the TLA721
Benchtop Mainframe or TLA715 Portable Mainframe side.
8. Fasten the expansion cable connector to the expansion module by tightening
the two hold-down screws.
TLA700 Series Logic Analyzer Installation Manual
5

Basic Installation
Chassis Ground Connections
Use the chassis ground connections to connect the grounds of the target system
(system-under-test) to the logic analyzer to ensure a common ground connection
between instruments (see Figure 4).
WARNING. To reduce the risk of an electrical shock, do not remove the safety
ground screw from the logic analyzer. The safety ground screw must alw ays be in
place to ensure proper grounding of the power supply to the logic analyzer.
Chassis ground
Safety ground screw
(TLA721 Benchtop
mainframe only)
Figure 4: Location of the ground connection on the TLA700 logic analyzers
6
TLA700 Series Logic Analyzer Installation Manual

Installing TLA700 Modules
This section describes how to install modules in your TLA700 mainframe.
CAUTION. To avoid damaging the instrument, do not install or remove any
modules while the instrument is powered on. Always power down the instrument
before installing or removing modules.
Basic Installation
Logical Address Switches
Every module in the instrument must have a unique logical address; no two
modules can have the same address. Use the two rotary switches on the rear
panel of the modules to select the logical address (see Figure 5).
The factory default switch setting is FF (Dynamic Auto Configuration). With
dynamic logical address auto configuration, the instrument automatically sets the
address to an unused value.
Normally, you would not want to change the default settings. However, you can
set the address to a fixed static logical address value. You can select any static
addresses between 01 and FE hexadecimal (1 to 254 decimal). If you set the
logical address switches to any other setting than FF, you must verify that no two
modules (or devices) share the same address.
NOTE. Do not set any module to logical address 00. Logical address 00 is
reserved exclusively for the controller.
TLA700 Series Logic Analyzer Installation Manual
7

Basic Installation
Least-significant
digit
Most-significant
digit
Merging Modules
Installing Modules in the
TLA715 Portable
Mainframe
Figure 5: Logical address switches (set to address FF)
You can merge modules together to create wider modules. If your application
requires you to merge modules, refer to Merging TLA700 Modules (beginning on
page 25) for the merge instructions before continuing with this section.
You can install any of the modules in any slot that the module key will allow;
see Figure 7 on page 11. If you intend to merge the modules, refer to the merging
modules rules on page 25. If you are not merging the modules follow these
guidelines:
H Install a single module in slots 3--4. Place a double-width slot cover over
slots 1--2.
H When installing a logic analyzer module with an oscilloscope module, install
the oscilloscope module in slots 1--2, and the logic analyzer module in
slots 3--4.
Use a screwdriver to tighten the retaining screws to 2.5 in-lbs after seating the
modules in place. See Figure 6 on page 10.
8
TLA700 Series Logic Analyzer Installation Manual

Basic Installation
Installing Modules in the
TLA721 Benchtop or
TLA7XM Expansion
Mainframe
You must install the benchtop controller in the benchtop mainframe in slots 0--2
(the TLA7XM Expansion Module must be located in slot 0). You can install any
of the modules in any slot that the module key will allow; see Figure 7 on
page 11. If you intend to merge the modules, refer to the merging modules rules
on page 25. If you are not merging the modules, follow these guidelines:
H Install a single module in slots 3--4. Place a double-width slot cover over
slots 5--6, 7--8, 9--10, and 11--12.
H When installing two or more logic analyzer modules with different amounts
of memory, install the module with the largest memory in slots 3--4. Install
the module with the lower memory in slots 5--6. Place double-width slot
covers over the empty slots.
H When installing a logic analyzer module with an oscilloscope module, install
the logic analyzer module in slots 3--4 and the oscilloscope module in slots
5--6. Place double-width slot covers over slots 7--8, 9--10, and 11--12.
Use a screwdriver to tighten the retaining screws to 2.5 in-lbs after seating the
modules in place. See Figure 6.
TLA700 Series Logic Analyzer Installation Manual
9

Basic Installation
Portable mainframe Benchtop mainframe
Retaining screws
Injector/ejector handles
Figure 6: Installing modules
10
TLA700 Series Logic Analyzer Installation Manual

Basic Installation
Module Keys
Pay careful attention to the module keys when installing the modules. Each
module has a key that only allows certain modules to be installed next to other
modules. For example, you can install a TLA7Dx Oscilloscope module to the
left of a TLA7XM Expansion module, but you cannot install a TLA7Nx Logic
Analyzer module to the immediate left of a TLA7XM Expansion module. See
Figure 7.
Key Conflict
TLA7XM
Expansion Module
TLA721
Benchtop Controller
Key
TLA7XM
Expansion Module
Key
TLA7Nx
Logic Analyzer Module
Key
TLA7Dx
Oscilloscope Module
Figure 7: Module keys
TLA700 Series Logic Analyzer Installation Manual
TLA7XM
Expansion Module
TLA7XM
Expansion Module
TLA7Nx
Logic Analyzer Module
11
Basic Installation
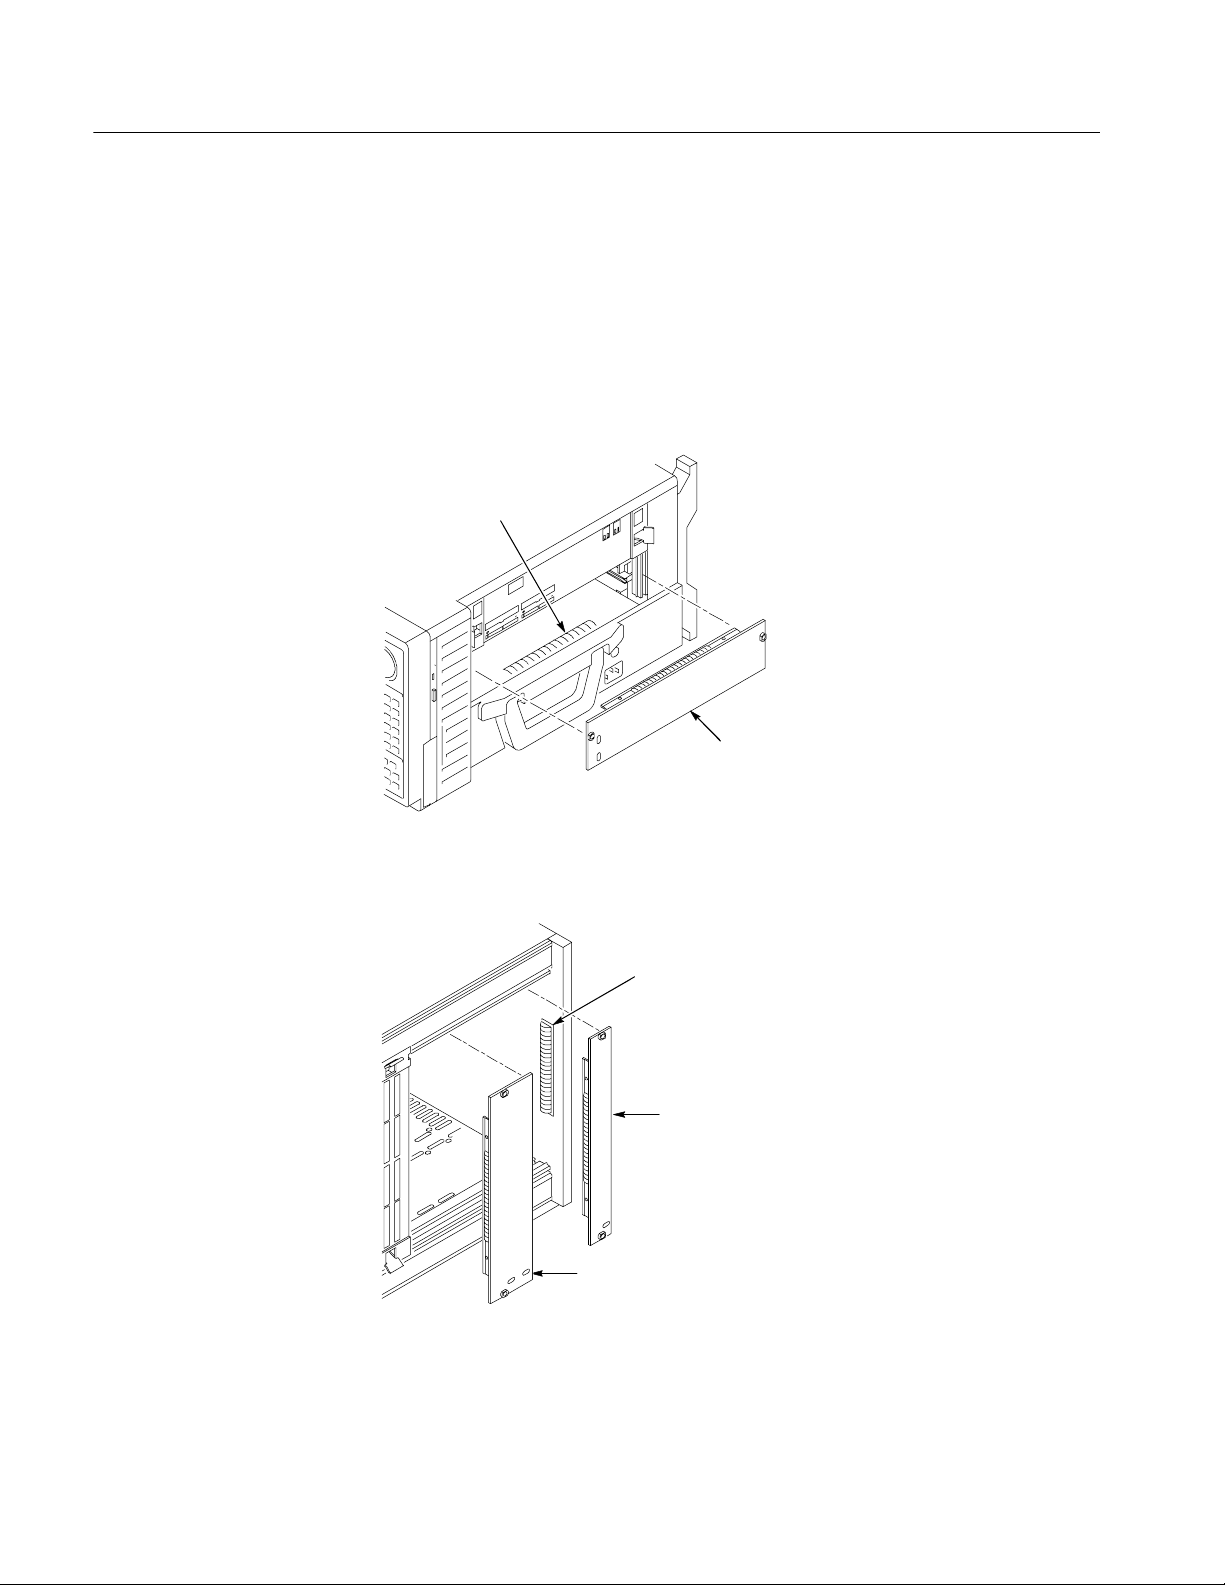
Covering Empty Slots
If you have any unused (empty) slots in your mainframe, install blank-slot panel
covers to meet EMC and cooling specifications. Install a blank-slot panel cover
for each empty slot as shown in Figure 8 or 9. Use only Tektronix TLA covers;
otherwise the mainframe may not meet EMC and cooling requirements.
Make sure that the EMI shielding is in contact with the adjacent panel or module
cover, and that the airflow shutter activation arms protrude through the holes in
the blank-slot panel.
EMI shielding strip
Double slot
panel cover
Figure 8: Installing panel covers on the TLA715 Portable Mainframe
EMI shielding strip
Single slot panel cover
Double slot panel cover
Figure 9: Installing panel covers on the TLA721 Benchtop Mainframe
12
TLA700 Series Logic Analyzer Installation Manual
Connecting Accessories
After installing the mainframes and modules, you can connect the accessories
such as monitors, keyboard, and mouse.
Basic Installation
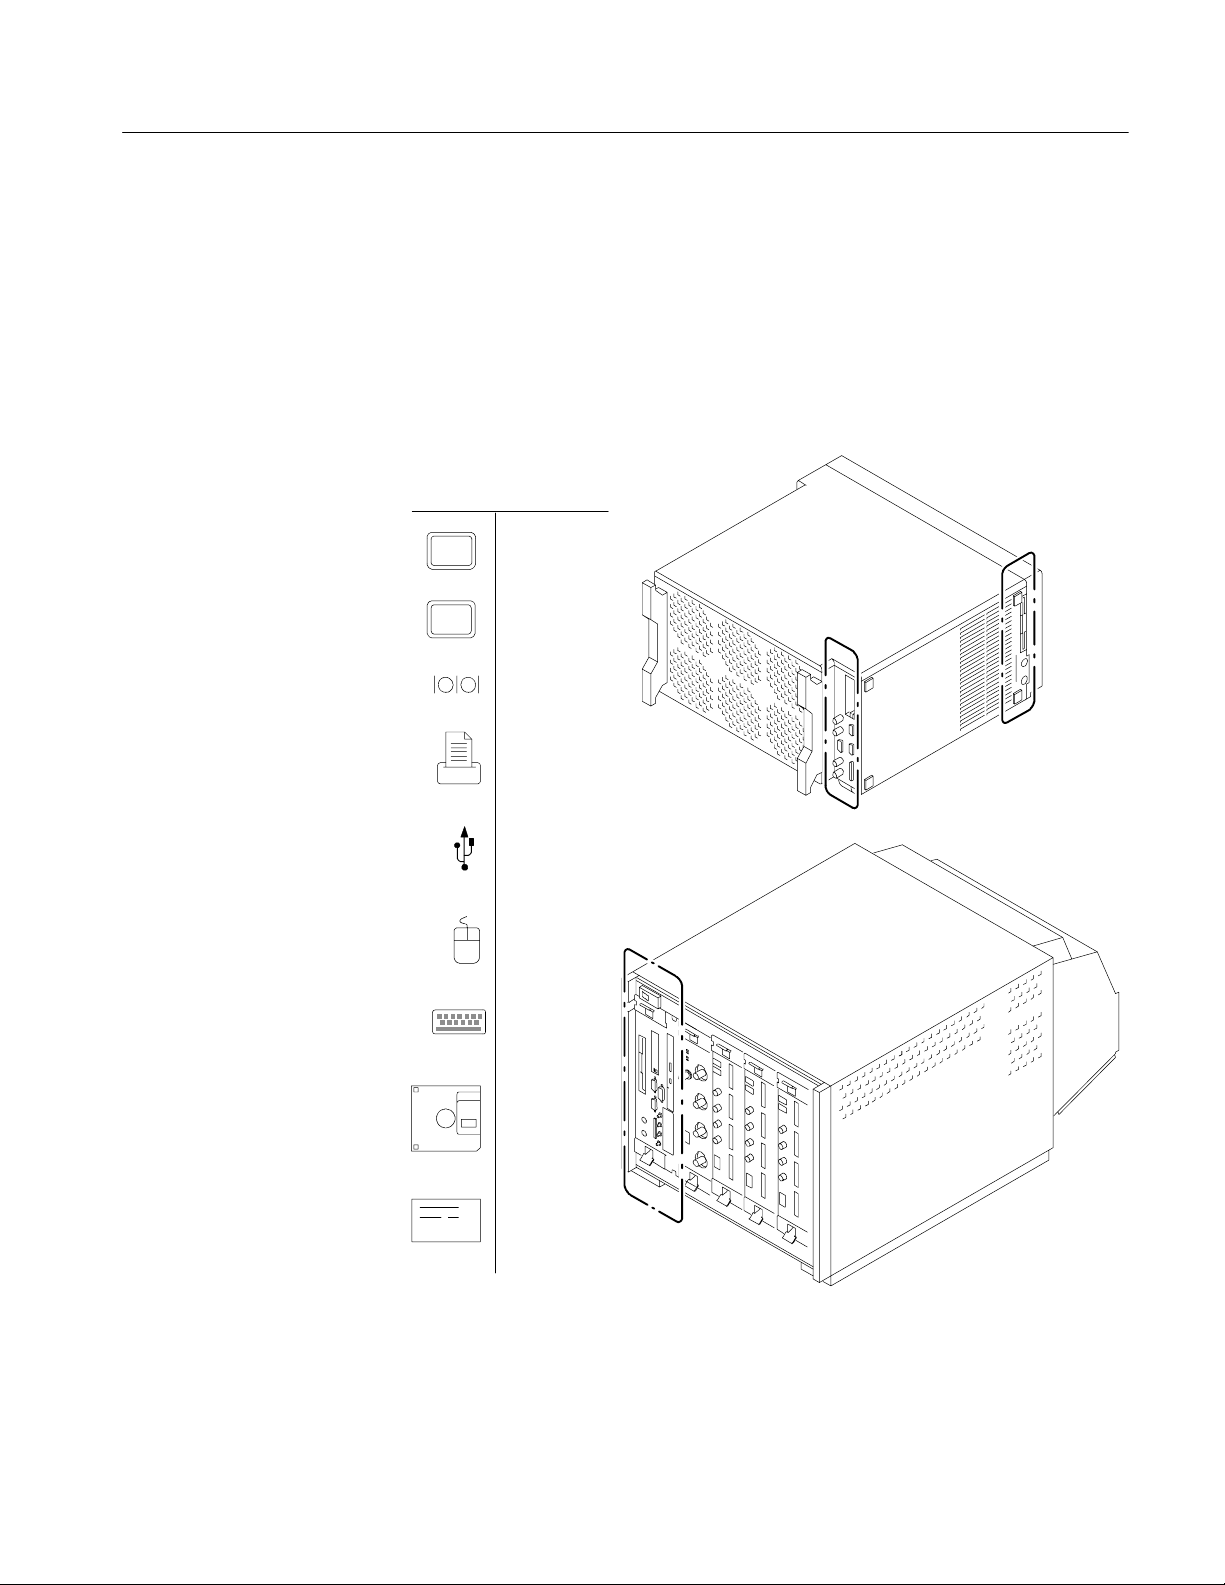
Connecting Accessories
to the TLA700 Series
The connection points are shown in Figure 10. Use the icons that appear in the
circled areas as a guide.
Icon Description
Primary
video
Secondary
video
RS-232
Printer
USB
Mouse
Keyboard
Floppy
disk drive
PC card
(LAN or other)
Figure 10: TLA700 series accessories connections
TLA700 Series Logic Analyzer Installation Manual
13

Basic Installation
NOTE. Only TLA715/721 instruments have both primary and secondary video
outputs.
Additional Accessory
Connection Information
Connecting Probes
Table 1 provides additional information on accessories.
Table 1: Additional accessory connection information
Item Description
Monitor Ensure that you connect your monitor to the Primary Video
port, not the Secondary Video port..
If you use a non standard monitor, you may need to change the
the Windows display settings to achieve the proper resolution.
Printer Connect the printer to the ECP connector directly. If your
printer has a DB-25 connector, use the adapter cable that
came with your logic analyzer to connect to the ECP connector.
Rackmount TLA721 Benchtop Mainframes, and the TLA7XM Expansion
Mainframes can be installed in rackmount ki ts. Refer to the
respective rackmount kit instructions for installation
information.
After you have connected all the accessories, you can connect the probes to the
instrument. Refer to the appropriate section for your instrument.
14
For additional information on the individual probes, refer to the instructions that
accompanied your probes.
CAUTION. When attaching probes to the logic analyzer, you must use care to
evenly tighten probe screws until they are snug. First slightly tighten screws,
then snug each screw to 4 in-lbs (max). Under tightening the probe screws can
result in intermittence. Over tightening can result in stripped screws.
TLA700 Series Logic Analyzer Installation Manual

Basic Installation
Connecting Probes to the
Logic Analyzer Module
Connect the logic analyzer probes as shown in Figure 11 through Figure 13.
Probe
Match color-- coded
labels
Figure 11: Connecting the P68xx or P69xx logic analyzer probes to the TLA7NAx
logic analyzer module
The P69xx probes are also compatible with TLA7Axx logic analyzer modules.
TLA700 Series Logic Analyzer Installation Manual
15

Basic Installation
Probe
Match
color--coded
labels
Figure 12: Connecting the P68xx or P69xx logic analyzer probes to the TLA7Axx
logic analyzer module
P68xx probes are also compatible with TLA7NAx logic analyzer modules.
16
TLA700 Series Logic Analyzer Installation Manual

Match color-coded labels
Basic Installation
Attach optional
probe retainer
brackets
Configuring and
Connecting the Pattern
Generator Probes
Figure 13: Connecting the P64xx logic analyzer probes to the
TLA7Lx/Mx/Nx/Px/Qx logic analyzer modules
Some of the TLA Pattern Generator probes require series termination resistors to
provide impedance matching for the pattern generator and the target system.
Determine the impedance matching for your application, and then refer to the
TLA7PG2 Probe Instruction Manual for information about how to change the
series termination resistors.
Always power down the logic analyzer before connecting the pattern generator
probes to the logic analyzer and to the target system.
TLA700 Series Logic Analyzer Installation Manual
17

Basic Installation
First Time Operation
Use the information in this section to turn on the logic analyzer for the first time.
CAUTION. Connect the keyboard, mouse, and other accessories before applying
power to the logic analyzer. Connecting the accessories after turning on the
logic analyzer can damage the accessories.
Turning the Logic
Analyzer On
Follow these steps to turn the logic analyzer on:
1. Check that the line fuse is correct for your application. See Table 2.
2. Connect the power cord. See Figure 14 on page 19.
3. If you have an external monitor, connect the power cord and turn on the
monitor.
Table 2: TLA700 series line fuses
Line voltage Rating Tektronix part number
Portable mainframe
90 V to 132 V operation 8 A, fast blow, 250 V 159-0046-xx
207 V to 250 V operation 6.3 A, fast blow, 250 V 159-0381-xx
Benchtop mainframe
90 V to 132 V operation 20 A, slow blow, 250 V 159-0379-xx
103 V to 250 V operation 15 A, fast blow, 125 V 159-0256-xx
207 V to 250 V operation 6.3 A, fast blow, 250 V 159-0381-xx
18
TLA700 Series Logic Analyzer Installation Manual

Basic Installation
AC power and fuse
Figure 14: Line fuse and power cord connector locations
CAUTION. To avoid overloading the power distribution system, if you have four
or more modules in your mainframe, you must determine the correct fuse and
power cord combination.
Although the benchtop mainframe can use the power cord with the 15 A plug,
mainframes operating at low line (90 VAC) with four or more instrument
modules may require the power cord with the 20 A plug.
See Appendix A: Power Cord and Line Fuse Requirements for the Benchtop
Mainframe for further information.
4. Press the On/Standby switch to turn on the mainframe (see Figure 15 for the
switch location).
5. Wait for the mainframe to complete the power-on self-tests and start
Windows.
TLA700 Series Logic Analyzer Installation Manual
19

Basic Installation
Figure 15: TLA700 On/Standby switch locations
Turning on the TLA7XM
Expansion Mainframes
Turning off the
Mainframes
The expansion mainframe automatically powers on when the connected benchtop
or portable mainframe powers on. If everything is properly connected and
operational, you will see the expansion mainframe and the installed modules in
the TLA Application System window.
NOTE. You must have a module installed in the expansion mainframe before the
expansion mainframe appears in the TLA Application System window.
To turn off the mainframes, press the On/Standby switch on the mainframe. Both
the portable and benchtop mainframes have a built-in soft power-down function
that safely powers down the mainframe when you press the On/Standby switch.
The expansion mainframes automatically power down when you turn off the
benchtop or portable mainframe.
Performing the Incoming Inspection
Incoming inspection consists of verifying the basic operation of the logic
analyzer. The power-on diagnostics check the basic functionality. The diagnostics run every time you turn on the logic analyzer.
20
You can also verify more detailed functionality by running the self-calibration
and extended diagnostics.
TLA700 Series Logic Analyzer Installation Manual

Basic Installation
NOTE. Allow the mainframe and modules to warm up for 30 minutes before
running the self calibration.
To run self calibration and diagnostics, perform the following:
1. Disconnect any probes attached to the modules.
2. Select the System menu and click Calibration and Diagnostics.
3. Run the self calibration, and then the extended diagnostics by selecting the
proper tab. Results of the tests display on the individual property page.
To run self calibration and external diagnostics for a pattern generator, perform
the following:
1. Select the Pattern Generator System menu and click Calibration and
Diagnostics.
2. Run the self calibration, and then the extended diagnostics by selecting the
proper tab. Results of the tests display on the individual property page.
Checking Logic Analyzer
Probes (Optional)
Functional Test
NOTE. The time required to run the self calibration on the logic analyzer
modules depends on the number of acquisition channels. Modules with a large
number of channels may take several minutes to run the self calibration.
Connect the logic analyzer probes to a signal source, start an acquisition, and
verify that the acquired data is displayed in either the listing or waveform
windows. You can also use the Activity Indicators in the logic analyzer Setup
window to view signal activity at the probe tips.
To perform a functional test on your logic analyzer probes, use a
NEX--PROBETESTER2 from Nexus Technology. Follow the procedure listed
for a functional test in the NEX--PROBETESTER2 manual. For more information, see the Nexus Technology Web site at www.busboards.com.
NOTE. If you connect probes to any channels other than the A2 and A3 groups,
you must define channel groups containing those channels in the LA Setup
window before you can view data from those channels in the Listing or
Waveform windows.
TLA700 Series Logic Analyzer Installation Manual
21

Basic Installation
Checking the P624x
Oscilloscope Probes
(Optional)
Checking the P647x
Pattern Generator Probes
(Optional)
Checking the TLA700
Mainframe (Optional)
Backing Up User Files
Connect the oscilloscope probes to the Probe Compensation connector on the
front panel of the oscilloscope modules. You can then run the Calibrate Probe
function in each vertical setup page for the module.
Set up a simple pattern generator program to output a signal to the probes.
Connect an oscilloscope probe to the probe outputs and verify that the signal is
present at the probe outputs.
To check the mainframe diagnostics not covered by the TLA Application
software, run the TLA700 Mainframe Diagnostics located under the Windows
Start menu (Start/Programs/Tektronix Logic Analyzer/TLA Mainframe
Diagnostics). Exit the TLA Application before running the external diagnostics.
Back up your user files on a regular basis. Use the Windows backup tools or
copy the files to another media. Always keep a backup copy of files that you
access on a regular basis.
Removing the Replaceable Hard Disk Drive
CAUTION. To avoid permanently damaging the replaceable hard disk drive, do
not remove it while the instrument is powered on. Always power down the
instrument before removing the hard disk drive.
1. Verify that the instrument is turned off.
2. Remove the replaceable hard disk drive cartridge by depressing it to release
the latch; see Figure 16 on page 23.
3. Pull on the replaceable hard disk drive cartridge to remove it from the
chassis.
22
TLA700 Series Logic Analyzer Installation Manual

Basic Installation
Figure 16: Accessing the TLA700 replaceable hard disk drive
Connecting Probes to the Target System
The logic analyzer connects to the target system through probes. The logic
analyzer probes allow you to connect to the target system in several different
ways. For probe-specific connection details, refer to the appropriate probe
instruction manual available on the TLA Documentation CD or the Tektronix
Web site.
TLA700 Series Logic Analyzer Installation Manual
23

Basic Installation
Additional Information
For a quick overview of your Tektronix logic analyzer, refer to Product Overview
beginning on page 39. For detailed information on using the logic analyzer refer
to the Tektronix Logic Analyzer Family User Manual or to the TLA online help.
To access main online help, go to the Help menu or click the toolbar buttons
shown:
Click for Topic help.
Click for What’s This? help on selected object.
TPI Online Help. Select Help on TPI from the Help menu for information on using
the TLA Programmatic Interface.
TLAScript Online Help. TLAScript is a script that works with TPI. Select Help
from the menu bar within the TLAScript application. To start TLAScript, select
Start > Programs > Tektronix Logic Analyzer > TLAScript.
PPI Online Help. Select Help on the TLA7PG2 PPI from the Help menu for
information on using the TLA Pattern Generator.
TLAVu and PatGenVu Sof tware. TLAVu and PatGenVu software applications
provide you with the ability to view your TLA data offline on your own
Microsoft Windows-based PC.
TLA Documentation CD. Additional documentation is available on the TLA
Documentation CD that shipped with your instrument.
Release Notes. To access the Logic Analyzer Release Notes, click Start >
Programs > Tektronix Logic Analyzer > TLA Release Notes. To access the
Pattern Generator Release Notes, click Start > Programs > Tektronix Pattern
Generator > Pattern Generator Release Notes.
Application Notes. To access the Logic Analyzer Application Notes, click Start >
Programs > Tektronix Logic Analyzer > Documentation > TLA Application
Notes.
24
TLA700 Series Logic Analyzer Installation Manual

Merging TLA700 Modules
This chapter describes how to merge TLA700 series logic analyzer and pattern
generator modules to form wider modules, that all operate from a single time
base.
A merged logic analyzer module set consists of a master logic analyzer module
and up to four slave logic analyzer modules that are physically connected
together by a merge cable and are merged in software. Review the guidelines
under Logic Analyzer Module Merging Rules and then follow the steps to
physically connect the modules together before installing the modules in the
mainframe.
A merged pattern generator module set consists of a master pattern generator
module and up to four slave pattern generator modules merged in software.
Review the guidelines under TLA7PG2 Pattern Generator Module Merging
Rules on page 26 before installing the modules in the mainframe.
Logic Analyzer Merging Rules
The following logic analyzer module merging rules must be followed:
H Only modules with 102 or 136 channels can be merged.
H Logic analyzer modules must be in adjacent slots and physically connected.
H Logic analyzer modules cannot be merged across mainframes.
H Merging logic analyzer modules with unequal memory depths will result in
the merged modules assuming the depth of the shallowest module.
H Merging logic analyzer modules with unequal speeds will result in the
merged modules assuming the speed of the slowest module.
H When merging logic analyzer modules of unequal channel widths, use the
logic analyzer module with the highest number of channels as the master
module. If there is a second slave module, the first slave must have greater
than or equal the number of channels as the second slave module. Slave 3
cannot have more channels than the master, slave 1 or slave 2. Slave 4
cannot have more channels than the master, slave 1, slave 2, or slave 3. See
Figure 17 on page 27 to determine the location of the master module with
the merged module set.
H The logic analyzer modules must have the same firmware version.
TLA700 Series Logic Analyzer Installation Manual
25

Merging TLA700 Modules
H The maximum merged combinations are two TLA7Lx and TLA7Mx logic
analyzer modules; three TLA7Nx, TLA7Px, or TLA7Qx logic analyzer
modules; and five TLA7Axx and TLA7NAx logic analyzer modules.
H TLA7Nx, TLA7Px, and TLA7Qx Logic analyzer modules cannot be merged
with TLA7Lx and TLA7Mx Logic analyzer modules (even if they are
connected together).
H TLA7Axx and TLA7NAx modules cannot be merged with TLA7Nx,
TLA7Px, TLA7Qx, TLA7Lx, or TLA7Mx modules.
H Any combination of TLA7Axx and TLA7NAx modules (up to five) can be
merged.
H To merge a logic analyzer module to an established merged set, the
established merged set must first be unmerged through software. Unmerged
modules are the only potential candidates to add to a merged configuration.
TLA7PG2 Pattern Generator Module Merging Rules
Merge Procedure
The following pattern generator module merging rules must be followed:
H Pattern generator modules are merged through software—no physical
connection is required.
H Pattern generator modules must be physically adjacent.
H Pattern generator modules may not be merged across mainframes.
H Merging pattern generator modules with unequal memory depths will result
in the merged set assuming the depth of the shallowest pattern generator
module.
H Pattern generator modules must have the same firmware version.
H When merged, the left-most pattern generator module is the master.
Complete the following steps to create a merged module from two or more
individual modules. You must complete these steps prior to installing the
modules in a mainframe.
26
CAUTION. To avoid damaging the mainframe or any modules, always power off
the mainframe before removing or installing modules.
TLA700 Series Logic Analyzer Installation Manual

Merging TLA700 Modules
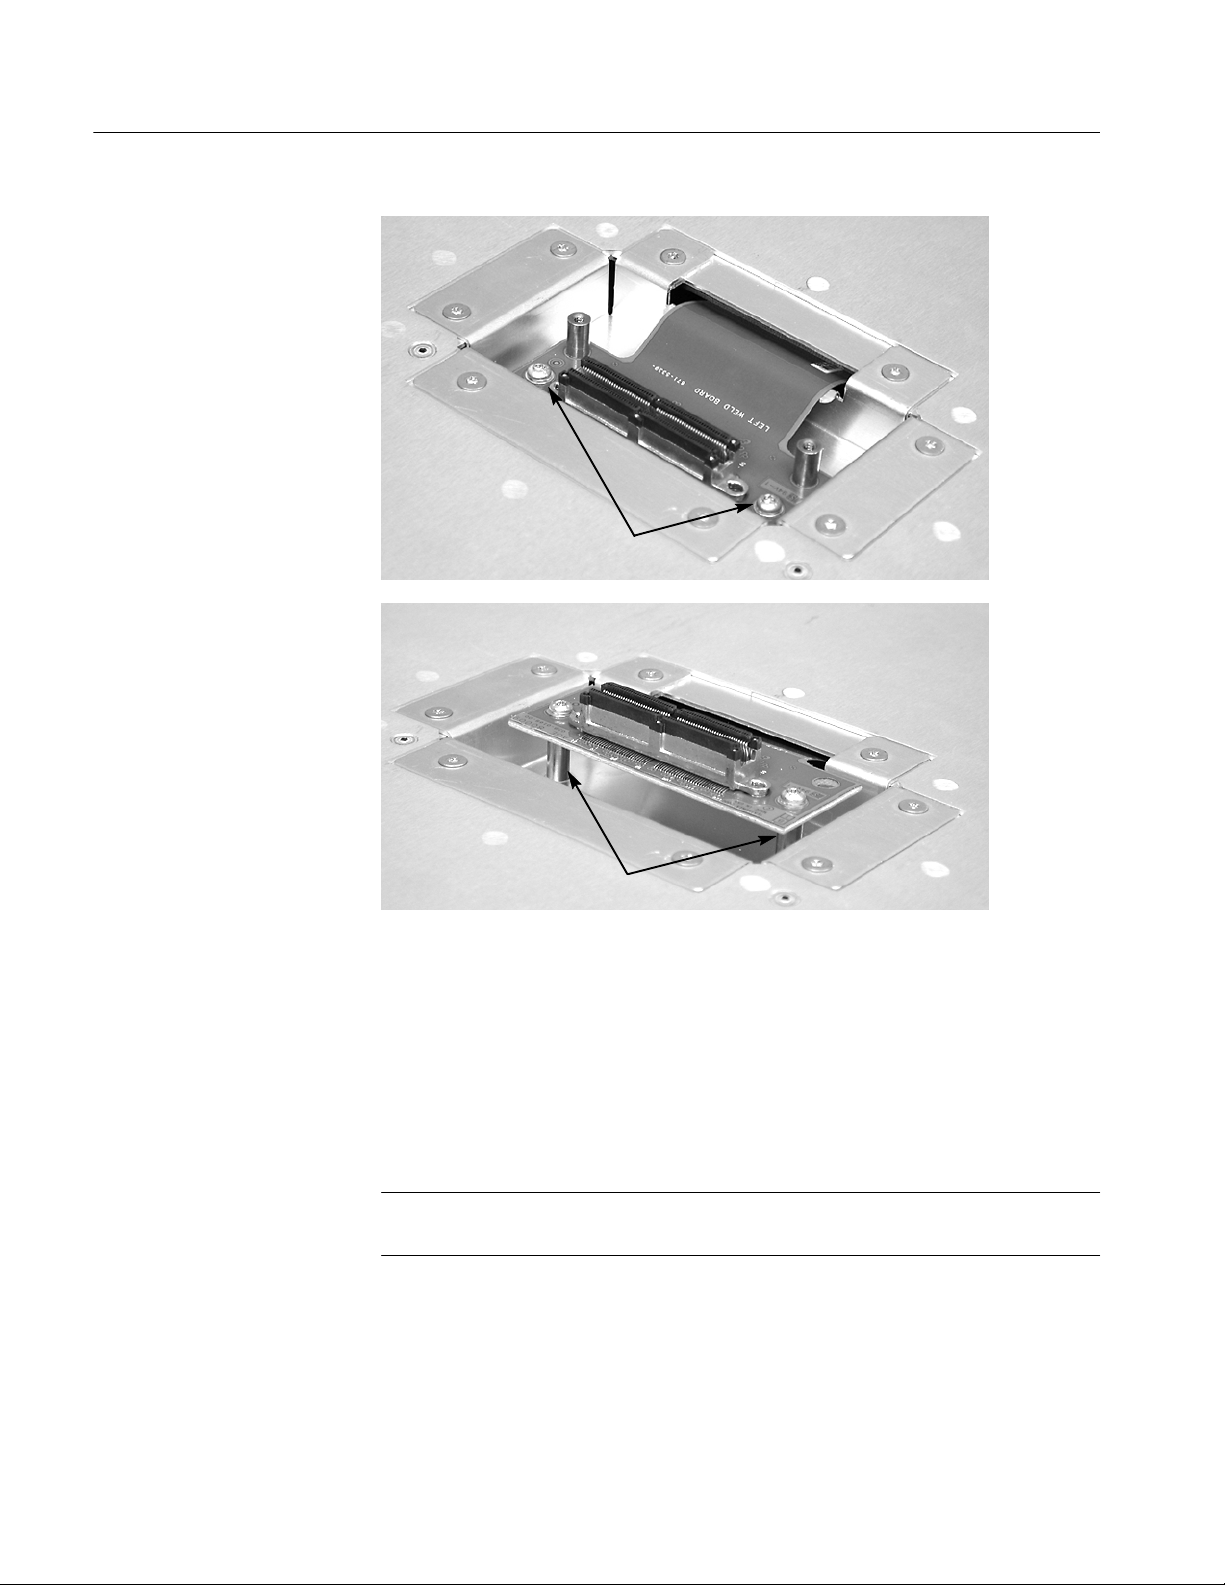
1. Determine which modules will reside in the highest-numbered slots in a
single mainframe.
2. Place the merge connector of these modules in the extended position. The
module in the lowest-numbered slot must have the merge connector in the
recessed position.
Use Figure 17 as a guide for determining the location of the master module
with the merged module set. Even though Figure 17 shows a five module
set, you can still use the illustration to position the master module with
respect to the slave module. For example, if you have a two module set, the
master module is located in the lower-numbered slot, and the slave module is
in the higher-numbered slot.
S
L
A
V
E
4
Figure 17: Location of modules in a merged system
S
L
A
V
E
2
M
A
S
T
E
R
S
L
A
V
E
1
S
L
A
V
E
3
Merging TLA7Axx/TLA7NAx Logic Analyzer Modules
Complete the following steps to create a merged module from any combination
of two to five individual TLA7Axx and TLA7NAx modules:
1. Place the module on the right side.
2. Using a Torx T-10 screwdriver, remove the two screws holding the merge
connector to the module (see Figure 18).
TLA700 Series Logic Analyzer Installation Manual
27
Merging TLA700 Modules
Remove two screws
Standoff posts
Figure 18: Removing the merger connector assembly from the module
3. Gently lift the merge connector out of the slot and place it in the extended
position such that the screw holes line up over the two standoff posts.
4. Install the two screws into the standoff posts. Tighten the screws to 4-in. lbs.
5. Repeat steps 1 through 4 for the remaining modules.
NOTE. When installing the merged modules into a mainframe, you may need the
help of another individual.
6. Place the first pair of modules to be merged side-by-side such that the merge
connector assemblies line up and connect between the two modules (see
Figure 19).
7. Push the two modules together until the connectors are seated in place.
28
TLA700 Series Logic Analyzer Installation Manual

8. Add any additional modules to the set.
Merging TLA700 Modules
Figure 19: Connecting modules in a merged set
CAUTION. Ensure that the mainframe is powered-off before installing or
removing the modules. Failure to do so can damage the mainframe or the
modules.
9. Place the merged module set into the mainframe.
10. Align the tops and bottoms of the modules with the slots in the mainframe
(see Figure 20 on page 30). You may need the help of another individual if
your merged module set contains more than two modules.
TLA700 Series Logic Analyzer Installation Manual
29

Merging TLA700 Modules
Align
Align
Slide module set
all the way in
30
Latch in place
Figure 20: Installing the merged module set in the mainframe
11. Slide the modules all the way into the mainframe until they rest against the
rear panel connectors.
TLA700 Series Logic Analyzer Installation Manual

12. Use the injector handles to firmly seat the modules in place one at a time.
The merge cable assembly should allow enough play between two side-byside modules to allow you to seat or unseat them individually.
13. Tighten the four retaining screws on each module to 2.5-in. lbs.
14. After installing all of the modules, power on the mainframe and complete the
merge process listed under the Merged Modules tab in the System Configuration dialog box.
Unmerging TLA7Axx/TLA7NAx Logic Analyzer Modules
Although you can unmerge modules from a merged set from within the TLA
application without physically separating modules, there will be situations when
you have to physically unmerge the modules. The following procedures provide
the steps for unmerging the modules.
CAUTION. Ensure that the mainframe is powered-off before installing or
removing the modules. Failure to do so can damage the mainframe or the
modules.
Merging TLA700 Modules
1. Power off the mainframe before removing the modules from the mainframe.
2. Loosen the four retaining screws on each module.
3. Use the ejector handles to disengage each module in the merged module set
from the mainframe.
4. With the assistance of another individual, slide all of the merged modules out
of the mainframe and place them on a static-free working surface.
5. Gently separate the modules one at a time from the merged module set.
6. Lay the modules on their right sides.
7. Remove the two Torx T-10 screws that hold the merge cable assembly to the
module.
8. Place the merge cable assembly into the recessed position.
9. Install the two Torx T-10 screws onto the assembly and tighten the screws to
4in-lbs.
10. Repeat steps 7 through 9 for the other modules.
You can now reinstall the modules in the mainframe as needed.
TLA700 Series Logic Analyzer Installation Manual
31

Merging TLA700 Modules
Merging TLA7Lx/Mx/Nx/Px/Qx Logic Analyzer Modules
Use the following procedures to physically merge the logic analyzer modules
together.
CAUTION. Ensure that the mainframe is powered-off before installing or
removing the modules. Failure to do so can damage the mainframe or the
modules.
Two-Way Logic Analyzer
Merge Procedure
Use the following procedure to merg two logic analyzer modules. For information on merging three modules, see Three-Way Logic Analyzer Merge Procedure
on page 37.
CAUTION. Static discharge can damage any semiconductor component in the
logic analyzer module.
Discharge the static voltage from your body by wearing a grounded antistatic
wrist strap while performing the merge procedure.
Perform the following steps to merge two modules:
1. If you have not already done so, power off the mainframe and remove the
modules that you want to merge together.
2. Determine which module will be designated as the slave module and which
module will be the master module.
3. Lay the slave module on the right side (as viewed from the front panel).
4. Remove the screws from the module cover with a screwdriver with a T-10
Torx tip; refer to Figure 21 on page 33.
5. Remove the screws near the front of the module.
32
6. Remove the screws holding the merge cable bracket to the cover.
7. Remove the top part of the cable bracket and set it aside.
8. Remove the module cover and locate the merge cable.
TLA700 Series Logic Analyzer Installation Manual

Mergecablebracket
Merging TLA700 Modules
Remove screws (2)
Remove screws (8)
Remove screws (4)
Module cover
Chassis
Figure 21: Removing the cover
9. Replace the cover while feeding the merge cable through the hole in the
cover (see Figure 22).
NOTE. Do not twist the cable while feeding it through the hole. If the cable is
twisted, the modules will not merge correctly.
TLA700 Series Logic Analyzer Installation Manual
33

Merging TLA700 Modules
Remove screws (2)
Mergecablebracket
Merge cable
Figure 22: Feeding the merge cable through the cover
10. Turn the merge cable bracket over so that the guide pins point up.
11. Place the bracket over the merge cable connector.
12. Install the two screws that hold the merge cable bracket in place.
CAUTION. To prevent damage to the module during the installation process,
reinstall the cover exactly as described in steps 14 through 19.
If the cover is not properly seated, the module can be damaged when you install
it in the mainframe and it will not meet EMC requirements.
34
TLA700 Series Logic Analyzer Installation Manual

Merging TLA700 Modules
13. Replace the logic analyzer module cover.
14. Push forward on the cover so the tab on the front edge of the cover inserts
into the rear of the front subpanel. Make sure that the cover is fully seated
(no gaps) against the front and rear chassis flanges.
Make sure tab inserts into
slot on rear of front panel
Leave no vertical gap
Figure 23: Seating the cover on the chassis
15. While holding the cover in place, install the screws at the front of the module
(two on the top and two on the bottom) to secure the cover to the chassis.
16. Install the screws near the front of the module.
17. Slide the rear panel on the chassis and install the rear panel screws.
TLA700 Series Logic Analyzer Installation Manual
35

Merging TLA700 Modules
18. Install the top and bottom rear screws.
19. Check and tighten all screws.
20. Place the master module adjacent to the slave module so that the two guide
pins from the slave module line up with the guide pin holes in the master
module.
Guide pins
Master module Slave module
Figure 24: Lining up the t wo modules
21. Gently push the two modules together so that the merge connector of the
22. Slide the modules all the way into the mainframe until they rest against the
23. Use the injector handles to firmly seat the modules in place one at a time.
24. Tighten the four retaining screws on each module to 2.5-in. lbs.
36
slave module merges with the connector on the master module.
rear panel connectors.
TLA700 Series Logic Analyzer Installation Manual

Merging TLA700 Modules
Three-Way Logic Analyzer
Merge Procedure
The following procedure is used for merging three logic analyzer modules
together to form a merged set with a higher logic analyzer channel count.
In a three-way merge (TLA7Nx, TLA7Px, and TLA7Qx logic analyzer modules
only), the master module is in the center. Slave module 1 is to the right of the
master module. Slave module 2 is on the left of the master module as shown in
Figure 17 on page 27.
CAUTION. Static discharge can damage any semiconductor component in the
logic analyzer module.
Discharge the static voltage from your body by wearing a grounded antistatic
wrist strap while performing the merge procedure.
Perform the Two-Way Logic Analyzer Merge Procedure beginning on page 32.
Perform the following steps to merge the second slave module:
1. Lay the two merged module set on its right side (as viewed from the front
panel).
2. Follow the procedure beginning on page 32 to merge the second slave
module to the left of the center master module.
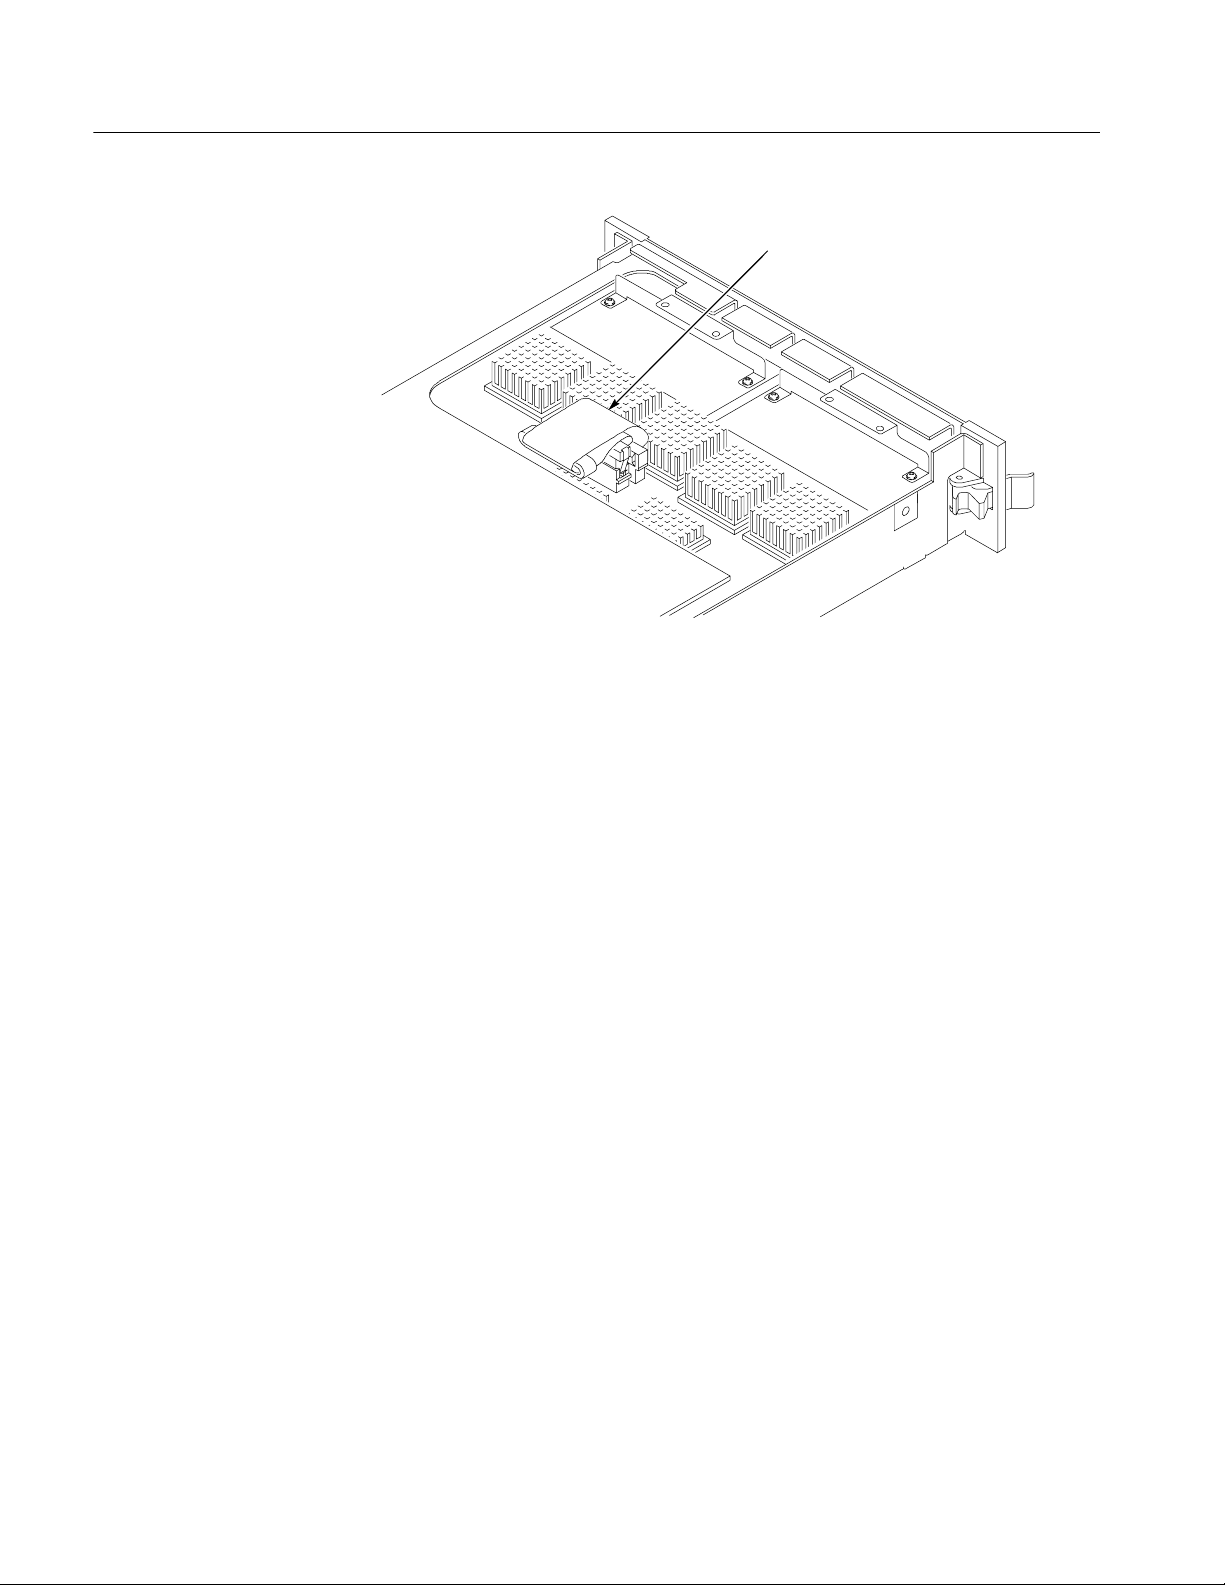
Storing the Logic Analyzer
Module Merge Cable
Perform the following steps to store the logic analyzer merge cable inside the
logic analyzer module:
1. Use the screwdriver with the T-10 Torx tip to remove the screws that hold
the merge cable bracket in place.
2. Remove the merge cable bracket.
3. Remove the screws from the side cover and rear cover.
4. Push the merge cable through the side cover and remove the cover.
5. Position the merge cable as shown in Figure 25.
TLA700 Series Logic Analyzer Installation Manual
37
Merging TLA700 Modules
Merge cable
Figure 25: Positioning the merge cable before installing the cover
6. Push forward on the cover so that you insert the tab on the front edge of the
cover into the rear of the front subpanel. Make sure that the cover is fully
seated and there are no gaps between the front and rear chassis flanges; refer
to Figure 23 on page 35.
7. While holding the cover in place, install the screws nearest the front of the
module to secure the cover to the chassis.
8. Install the screws near the front of the module.
9. Slide the rear panel on the chassis and install the rear panel screws.
10. Install the top and bottom rear screws.
11. Install the merge cable bracket so that the guide pins point into the module.
12. Install and tighten the screws on the merge cable bracket.
13. Verify that you have installed and tightened all screws on the module.
38
TLA700 Series Logic Analyzer Installation Manual

Product Overview
This chapter describes the product controls and connectors of the logic analyzers.
Refer to the online help for detailed operating information for the logic analyzer.
Front Panel Controls
You can use the front panel controls to operate most of the TLA715 portable
mainframes (see Figure 26). You can also attach an external keyboard, monitor,
and mouse to operate the logic analyzers. The TLA721 Benchtop Mainframes do
not have front-panel controls and require an external keyboard, monitor, and
mouse.
Changes the value in a selected
box (such as sample rate or
memory depth). With a cursor
selected, the knob controls cursor
position. Does not scroll data.
Scrolls data vertically.
Changes the height of
selected waveform
(Waveform window only).
Figure 26: TLA715 Portable mainframe front panel
TLA700 Series External Connectors
The mainframe external connectors are shown in Figure 27. The following
connections are available:
H System Trigger In and System Trigger Out, used to receive or send a trigger
from/to an external source.
Moves the display pointer
and selects objects.
Scrolls data horizontally.
Changes Time/Div in
the Waveform window.
H External Signal In and External Signal Out, used to receive or send a signal
from/to an external source.
H Accessory connections.
TLA700 Series Logic Analyzer Installation Manual
39

Product Overview
PC cards (2)
SYSTEM TRIG IN
SYSTEM TRIG OUT
COM port
EXTERNAL SIG IN
EXTERNAL SIG OUT
Portable mainframe (rear view)
Indicator
Floppy drive
Secondary video
Primary video
USB
Mouse
Keyboard
Secondary video
Primary video
LPT printer port
TLA715
PC cards (2)
CD-ROM Disc
COM port
Hard disk drive
SYSTEM TRIG IN
SYSTEM TRIG OUT
EXTERNAL SIG IN
EXTERNAL SIG OUT
40
LPT printer port
TLA721
Benchtop mainframe (front view)
Figure 27: TLA700 series external connectors
TLA700 Series Logic Analyzer Installation Manual

Restoring and Reinstalling Software
Most of the software comes factory-installed when you receive your logic
analyzer. You only need to refer to this section if you reinstall your software.
These instructions only refer to reinstalling the application software and
operating system. If you want to upgrade to a newer application software version
and operating system, contact your local Tektronix representative about
purchasing the TLA7UP field upgrade kit. This section also provides information on installing related logic analyzer software on a PC for remote operation or
for offline applications.
NOTE. If you install or reinstall software on a remote PC, make sure that the
software version matches that of the main application on the logic analyzer.
Reinstalling the Hard Disk Image
CAUTION. The software installation procedure using the Hard Disk Image CD
will overwrite the entire contents of your hard disk. If you want to save files or
software applications from the hard disk, back them up to another media (a
second hard disk drive, CD, or network drive) before continuing with this
procedure.
The Tektronix Logic Analyzer comes with a CD containing the Microsoft
Windows operating system and the latest application software. The process of
reloading the software on the hard disk will destroy any files or programs
installed on the hard disk.
Backing Up Files
TLA700 Series Logic Analyzer Installation Manual
Before loading the Hard Disk Image software, make sure that you back up any
files and personal documents to an external storage device.
You can find most TLA user files using the Windows Search utility. For
example, open Windows Explorer and select the C:\ drive. Right-click the drive
and select Search. Enter one of the suffixes from Table 3 to locate the files in the
current folder and all subfolders (you may want to search for other file suffixes
depending on the files installed on your logic analyzer).
41

Restoring and Reinstalling Software
Table 3: TLA user file suffixes
Suffix Description
.tla TLA setup f iles
.tsf TLA symbol files
.tbf Tektronix binary format
.tls TLA script file
.tpg Tektronix pattern generator files
.txt Tektronix TLA data exchange format files
.stk Stack files
.spz Protocol files
Once you find the files, copy them to the external storage device. Use this
procedure to find any files or applications that you may want to save.
If you purchased any microprocessor support packages, you need to reinstall the
application after you reinstall the hard disk image. If you don’t have a copy of
the microprocessor support software, contract your Tektronix Account Manager
to order a replacement copy. If you cannot contact the account manager, contact
the Tektronix Support Center (refer to Contacting Tektronix on page xii at the
beginning of this document).
Installing the Operating
System and TLA
Application Software
NOTE. You can reinstall the Microsoft Windows operating system and other
software only from the Hard Disk Image CD that came with your instrument.
These software applications are licensed and cannot be reinstalled by any other
method without violating the license agreements. The SnagIt and CheckIt
Utilities are also available on the Tektronix application CD.
This procedure removes all files and software from the hard disk, installs the
operating system software, and installs the Tektronix Logic Analyzer application
software. Because this procedure removes all files and software from the hard
disk drive, be sure to back up what you want to keep by following the steps in
the previous section.
CAUTION. To avoid losing user files on your hard disk, back them up before
proceeding.
42
TLA700 Series Logic Analyzer Installation Manual

Restoring and Reinstalling Software
Change the BIOS Boot Settings. Before installing the Hard Disk Image, you may
need to change the BIOS settings to enable booting the logic analyzer from the
CD-ROM.
1. Restart the logic analyzer and then press function key F2 to enter the BIOS
setup.
2. In the BIOS setup, go to the Boot menu.
3. Set the Boot devices for your instrument as shown in Table 4 (follow the
on-screen instructions to change the settings).
Table 4: Bios Boot settings for reinstalling software from the CD-ROM
Instrument Setting
TLA715 or TLA721 ATAPI CD-ROM Drive
+Removable Devices
+Hard Drive
4. Save the settings by pressing function key F10 and confirm that you want to
save the new settings.
TLA700 Series Logic Analyzer Installation Manual
43

Restoring and Reinstalling Software
Load the Hard Disk Image. Complete the following steps to load the Hard Disk
Image.
1. Insert the Hard Disk Image CD in the CD-ROM drive.
2. Reboot the logic analyzer.
3. Review the license agreement. If you agree to the terms of the license
NOTE. Use care when proceeding through the software license agreement.
Ensure that you make the proper selections.
4. After you review the software license agreement, a dialog box prompts you
5. There is a warning that the contents of your hard disk will be destroyed if
agreement, proceed with the next step.
to either continue or cancel the upgrade process. Click Continue to begin
loading the hard disk image.
you choose to continue. Click Yes to continue the process.
6. The program will automatically start and guide you through the rest of the
procedure. The image loading procedure is fully automatic and takes
approximately 15 minutes to complete.
The image loading procedure automatically installs and sets up the logic
analyzer application. You do not need to make any changes to the setup to
use the logic analyzer.
7. After the image is loaded, remove the CD from the CD-ROM drive and
reboot the logic analyzer.
8. The Systems Settings Change error message displays, prompting you to
restart the instrument before your changes can take effect. Click Yes to
restart the instrument.
9. Restore any user files that you backed up previously. Reinstall any software
(such as the microprocessor support packages) that you want to use on the
logic analyzer.
10. If desired, reconfigure the TLA network interface.
44
TLA700 Series Logic Analyzer Installation Manual

Restoring and Reinstalling Software
Reinstalling the TLA Application Software and the Pattern Generator Application Software
Complete the following steps to reinstall the current version of the TLA
application software or the pattern generator application software. Use these
steps as a first resort to recovering from application software problems. If you
still experience problems with the software after completing these steps, follow
the instructions under Reinstalling the Hard Disk Image beginning on page 41.
While using this procedure you will be asked to log on as Administrator. The
logic analyzer is initially set up to automatically log on as Administrator (with
no password) so you may not see the login prompt. If the network setups have
been changed on your instrument, make sure that you log on as Administrator or
as a user who has administrator privileges. Failure to do so can prevent the
software upgrade from completing successfully.
1. Log on to the instrument as Administrator and quit any applications.
2. Install Disc 1 of the Tektronix Logic Analyzer Family Application Software
in the CD-ROM drive of the logic analyzer.
3. Click Run in the Windows Start menu to display the Run dialog box.
4. To reinstall the TLA application software, enter D:\TLA Application
SW\Setup.exe in the Run dialog box (if your CD-ROM drive is not the
D-drive, enter the appropriate letter for your drive).
5. To reinstall the pattern generator application software, enter D:\Pattern
Generator Application SW\Setup.exe in the Run dialog box (if your
CD-ROM drive is not the D-drive, enter the appropriate letter for your
drive).
6. Click OK to perform the installation.
If you have an existing version of the software on the hard disk, the
installation program will detect it and ask if you want to remove it. Follow
the on-screen instructions to remove the software, answering “Yes” to any
prompts. Restart the instrument when prompted. Repeat Step 4 to reinstall
the software following any on-screen prompts.
7. After the software has been successfully installed, restart the instrument.
TLA700 Series Logic Analyzer Installation Manual
45

Restoring and Reinstalling Software
Installing the TPI or PPI Remote Operation Software
The TPI client software and the PPI client software are software packages that
allow you to remotely control the logic analyzer or pattern generator from a PC.
These software packages are located on Disc 1 of the TLA application software
set. You must ensure that the version of the TPI and PPI client software is the
same as that of TLA and pattern generator application on your logic analyzer.
NOTE. TPI and TPI.NET are two separate programmatic interfaces to the TLA
software. Controlling the TLA instruments with the TPI.NET software from a
PC, does not require the installation of any additional software. For information
on setting up and running the TPI.NET software on your PC, refer to the
TPI.NET Instructions on the TLA Documentation CD.
Complete the following steps to update the TPI and PPI client software packages
on your PC. If you have an older version already installed on your PC, the
program will automatically detect it and replace it during the upgrade process.
1. Install Disc 1 of the Tektronix Logic Analyzer Family Application Software
in the CD-ROM drive of the PC.
2. Click Run in the Windows Start menu to display the Run dialog box.
3. To install the TPI client software, enter D:\TPI Client SW\Setup.exe in the
Run dialog box.
4. To install the PPI client software, enter D:\PPI Client SW\Setup.exe in the
Run dialog box.
5. Click OK to perform the installation. Follow any on-screen instructions.
6. If you have an earlier version of either software package installed on your
PC, the Setup.exe program will uninstall the application before installing the
new version. If you are prompted for permission to remove unused shared
files or any read-only files, select Yes to All.
NOTE. You may also want to refer to the TPI or PPI online help for configuration instructions for the TPI and PPI client software.
46
TLA700 Series Logic Analyzer Installation Manual

Installing the TLAVu and PatGenVu Software on a PC
TLAVu application software and the PatGenVu application software allow you to
view data and create setups for your logic analyzer or pattern generator on a PC.
You must ensure that the versions of the software are the same as that of TLA
and PatGenVu applications. The TLAVu and PatGenVu application software are
located on Disc 2 of the Tektronix Logic Analyzer Family Application Software
set.
Complete the following steps to update the application software on your PC:
1. Install Disc 2 of the Tektronix Logic Analyzer Family Application Software
in the CD-ROM drive of the PC.
2. Click Run in the Windows Start menu to display the Run dialog box.
3. To install the TLAVu software, enter D:\TLAVu\Setup.exe in the Run dialog
box.
4. To install the PatGenVu software, enter D:\PatGenVu\Setup.exe in the Run
dialog box.
Restoring and Reinstalling Software
5. Click OK to perform the installation. Follow any on-screen instructions.
6. If you have an earlier version of the TLAVu or PatGenVu applications
installed on your PC, the respective Setup.exe programs will uninstall the
old application before installing the new version. If you are prompted for
permission to remove unused shared files or any read-only files, select Yes to
All.
NOTE. The ReadMe file for the TLAVu application contains most of the
information that you need to run the application. Access the ReadMe file by
selecting: Start → Programs → Tektronix Logic Analyzer → TLA Documentation → TLAVu ReadMe or Start → Programs → Tektronix Pattern Generator →
Pattern Generator Documentation → PatGenVu ReadMe.
TLA700 Series Logic Analyzer Installation Manual
47

Restoring and Reinstalling Software
Upgrading or Restoring Firmware
You may have to upgrade the firmware on the logic analyzer or on individual
modules if the firmware version is not compatible with the TLA application
software version. This will be indicated by one or more messages (one per
module) when you start the logic analyzer. The most current firmware for the
TLA application software resides in a file on the hard disk of the logic analyzer.
Although the firmware update procedures are similar, there are some key
differences between the Tektronix Logic Analyzer products and are therefore
listed as separate procedures. If you have mixed modules within your TLA700
mainframe, review the procedures for each of the modules before beginning the
upgrade.
Upgrading Firmware on
TLA7Axx/TLA7NAx Logic
Analyzer Modules
Use the following procedure to upgrade the firmware for the TLA7Axx/
TLA7NAx Series Logic Analyzer Modules.
1. Note which modules require new firmware.
If any modules are missing from the System window, you can verify the
status of the modules by doing the following steps:
a. Select System Properties from the System menu.
b. Click the Modules tab.
c. Note the information under the Messages column for any installed
modules. If any modules indicate invalid or similar messages, you must
update the firmware for those modules.
2. Exit the logic analyzer application.
3. Click Start → Programs → Tektronix Logic Analyzer → TLA Firmware
Loader.
4. You may be prompted to cycle the power on the mainframe after completing
the upgrade operation. Click Yes to continue.
The logic analyzer will scan the mainframe to determine which modules are
installed and which modules can have their firmware upgraded. If you have
any older modules, you may see them listed in the bottom half of the
window. These modules cannot be updated until you install the flash jumper
on the rear of the modules.
48
5. Select the modules that you want to update from the list of modules
displayed in the Supported list box near the top of the window. If you are
updating more than one module at a time, note the slot location of the
module in the selection box.
6. Select Load Firmware from the Execute menu.
TLA700 Series Logic Analyzer Installation Manual

Restoring and Reinstalling Software
7. Click the proper .lod for the selected module; refer to Table 5 on page 52 if
necessary.
NOTE. Be sure to select the proper .lod file for each module. Note the slot
number in the title bar so that you select the correct module for the .lod file.
8. Click OK. You will be prompted to confirm your action; click Yes.
NOTE. The program will not allow you to load firmware to an incompatible
module. For example, the program will not load oscilloscope firmware to a logic
analyzer module.
The program will load the firmware for each module one at a time. The
process may take several minutes per module.
9. When the firmware has been loaded for each module, exit the firmware
loader program and power down the logic analyzer. You must power down
the logic analyzer to allow the TLA application to start up properly.
10. Remove the logic analyzer module from the mainframe.
11. Locate the big label on the side of the module.
12. Record the firmware version that is printed on the label. You will need this
information to see that the firmware version matches the label.
13. Reinstall the module in the mainframe and power on the mainframe.
14. After the logic analyzer completes the power-on diagnostics, select System
Properties from the System menu.
15. Click the module tab (for example, LA1).
16. Verify that the firmware version for the selected module matches the version
on the label that you recorded in step 12.
17. If the firmware versions do not match, power down the mainframe, remove
the module from the mainframe and update the label.
TLA700 Series Logic Analyzer Installation Manual
49

Restoring and Reinstalling Software
Upgrading Firmware on
TLA7Lx/Mx/Nx/Px/Qx/
Dx/7Ex Modules
Complete the following steps to upgrade the module firmware on the TLA7Lx,
TLA7Mx, TLA7Nx, TLA7Px, or TLA7Qx logic analyzer modules and the
TLA7Dx or TLA7Ex oscilloscope modules. These modules require you to install
a jumper on the rear of the module before you can upgrade the firmware.
1. Note which of the modules that may require new firmware.
If any modules are missing from the System window, you can verify the
status of the modules by doing the following steps:
a. Select System Properties in the System menu.
b. Click the Modules tab.
c. Note the information under the Messages column for any installed
modules. If any modules indicate invalid or similar messages, you must
update the firmware for those modules.
2. Turn off the logic analyzer and disconnect the power cord.
3. Remove the modules from the logic analyzer.
4. Refer to Figure 28 on page 51 and locate the flash programming pins on the
rear of each module.
5. Install a jumper on the flash programming pins (use one of the spare jumpers
that came with your logic analyzer).
6. Reinstall the module(s) in the logic analyzer.
7. Reconnect the power cord and then power on the logic analyzer.
8. Wait for the TLA application to start.
NOTE. Any modules with the flash programming jumper installed will not display
in the System window.
9. Exit the TLA application (and pattern generator application if you have it
installed on your instrument).
50
TLA700 Series Logic Analyzer Installation Manual

Restoring and Reinstalling Software
Flash programming pins
Figure 28: Flash programming pins
10. Click Start → Programs → Tektronix Logic Analyzer → TLA Firmware
Loader.
11. Select the modules that you want to update from the list of modules
displayed in the Supported list box near the top of the window. This selects
the modules for the upgrade.
12. If you are upgrading more than one module at a time, note the slot location
of the module in the selection box.
13. Select Load Firmware from the Execute menu.
14. Click the proper .lod file for the selected module; refer to Table 5 if
necessary. (The .lod files are located in the C:\Program Files\TLA 700\Firmware directory).
TLA700 Series Logic Analyzer Installation Manual
51

Restoring and Reinstalling Software
NOTE. Be sure to select the proper .lod file for each module. Note the slot
number in the title bar so that you select the correct module for the .lod file.
Table 5: TLA firmware files
Module type .lod file
TLA7NAx logic analyzer modules TLA7NAx.lod
TLA7Axx logic analyzer modules TLA7Axx.lod
TLA7Nx, TLA7Px, TLA7Qx logic analyzer modules TLA7NPQ.lod
TLA7Lx and TLA7Mx logic analyzer modules TLA7LM.lod
TLA7Dx and TLA7Ex oscilloscope modules FirmwareDSO.lod
TLA720 Benchtop control ler module TLA720.lod
15. Click OK. You will be asked to confirm your action; click Yes when
prompted.
NOTE. The program will not allow you to load firmware to an incompatible
module.
The program will load the firmware for each module one at a time. The
process may take several minutes per module.
16. When the upgrade is complete, exit the program.
17. Turn off the logic analyzer and disconnect the power cord.
18. Remove the module from the instrument and remove the jumper from the
Flash programming pins on the rear of the module. Keep the jumper for
future updates.
19. Locate the big label on the side of the module.
20. Record the firmware version that is printed on the label. You will need this
information to see that the firmware version matches the label.
21. Reinstall the module in the mainframe and power on the mainframe.
22. After the logic analyzer completes the power-on diagnostics, select System
Properties from the System menu.
23. Click the module tab (for example, LA1).
52
24. Verify that the firmware version for the selected module matches the version
on the label that you recorded in step 20.
TLA700 Series Logic Analyzer Installation Manual

Restoring and Reinstalling Software
25. If the firmware versions do not match, power down the mainframe, remove
the module from the mainframe and update the label.
Upgrading Firmware on
the TLA7PG2 Pattern
Generator Modules
Use the following procedure to upgrade the firmware on the pattern generator
modules.
1. Note which modules require new firmware.
If any modules are missing from the System window, you can verify the
status of the modules by doing the following steps:
a. Select System Properties in the System menu.
b. Click the Modules tab.
c. Note the information under the Messages column for any installed
modules. If any modules indicate invalid or similar messages, you must
update the firmware for those modules.
2. Power down the mainframe and disconnect the power cord.
3. Remove the modules from the mainframe.
4. Refer to Figure 28 on page 51 and locate the flash programming pins on the
rear of each module.
5. Install a jumper on the flash programming pins (use one of the spare jumpers
that came with your pattern generator).
6. Reinstall the modules in the mainframe.
7. Reconnect the power cord, and then power on the mainframe.
8. Wait for the pattern generator application to start.
NOTE. Any modules with the flash programming jumper installed will not display
in the System window.
9. Exit the pattern generator application (and the TLA application).
10. Click Start → Programs → Tektronix Logic Analyzer → TLA Firmware
Loader.
11. Select the modules that you want to update from the list of modules
displayed in the Supported list box near the top of the window. This selects
the modules for the upgrade.
12. If you are upgrading more than one module at a time, note the slot location
of the module in the selection box.
TLA700 Series Logic Analyzer Installation Manual
53

Restoring and Reinstalling Software
13. Select Load Firmware from the Execute menu.
14. Select the tla7pg2.lod file for the selected module; if necessary , navigate to
15. Click OK. You will be prompted to confirm your action; click Yes.
16. When the upgrade is complete, exit the program.
17. Power down the mainframe and disconnect the power cord.
18. Remove the module from the instrument and remove the jumper from the
19. Locate the big label on the side of the module.
20. Record the firmware version that is printed on the label. You will need this
the C:\Program Files\Tektronix Pattern Generator\Firmware folder.
The program will load the firmware for each module one at a time. The
process may take several minutes per module.
Flash programming pins on the rear of the module. Keep the jumper for
future updates.
information to see that the firmware version matches the label.
21. Reinstall the module in the mainframe and power on the mainframe.
22. After the instrument completes the power-on diagnostics, select System
Properties from the System menu.
23. Click the module tab (for example, PG1).
24. Verify that the firmware version for the selected module matches the version
on the label that you recorded in step 20.
25. If the firmware versions do not match, power down the mainframe, remove
the module from the mainframe and update the label.
54
TLA700 Series Logic Analyzer Installation Manual

Appendix A: TLA721 Mainframe Power Information
The benchtop and expansion mainframes come with two power cords and three
fuses (one fuse is already installed).
CAUTION. You must determine the correct fuse and power cord for your
configuration. This is important to avoid overloading the power distribution
system and ensures that you comply with the National Electrical Code.
The power consumption depends on the number and type of instrument modules
installed in the mainframes. Table 6 lists the power consumed for each module.
To determine the total power consumption, perform the following steps:
1. Use Table 6 to determine the power consumption for each module.
2. Add the power for each module to determine the total power consumption.
3. Determine at which line voltage you will be operating.
4. Refer to Figure 29 on page 57 to determine the proper power cord and line
fuse for your mainframe.
Table 6: Power for instrument modules
Module type Power (Watts)
Mainframe
TLA721 Benchtop Controller 70
TLA7XM Expansion Module 20
TLA7AA1 50
TLA7AA2 75
TLA7AA3 100
TLA7AA4 125
TLA7AB2 75
TLA7AB4 125
TLA7NA1 45
TLA7NA2 70
TLA7NA3 95
TLA7NA4 120
TLA7Q2 51
TLA7Q4 75
1
100
TLA700 Series Logic Analyzer Installation Manual
55

Appendix A: TLA721 Mainframe Power Information
Table 6: Power for instrument modules (Cont.)
Module type Power (Watts)
TLA7P2 50
TLA7P4 74
TLA7N1 45
TLA7N2 58
TLA7N3 71
TLA7N4 82
TLA7L1 55
TLA7L2 73
TLA7L3 94
TLA7L4 109
TLA7M1 57
TLA7M2 76
TLA7M3 99
TLA7M4 116
TLA7D1 80
TLA7D2 111
TLA7E1 90
TLA7E2 121
TLA7PG2 110
1
Power for benchtop mainframe and expansion
mainframe with fans operating at maximum speed.
56
For power usage in the unshaded region of Figure 29, use either the power cord
with the 15 A plug (two parallel prongs and ground) or the power cord with the
20 A plug (two perpendicular prongs and ground).
TLA700 Series Logic Analyzer Installation Manual

Appendix A: TLA721 Mainframe Power Information
For high power usage combined with low input line voltages (shaded region),
use only the power cord with the 20 A plug. Select the proper fuse based on the
ranges shown in Figure 29.
Power Cord with 20A plug (NEMA 5--20P) ONLY!
Power Cord with 15A plug (NEMA 5--15P)
Power Cord with 20A plug (NEMA 5--20P)
130 150 170 190 210 230 250
Input Line Voltage (Volts AC)
6.3AF Fuse
Power Consumption (Watts)
800
700
600
500
400
300
200
100
0
90 110
20AT Fuse
115
15AF Fuse
Figure 29: Power cord identification chart
For example, assume that your TLA721 benchtop system consists of four
TLA7Q4 Logic Analyzer Modules and one TLA7E2 DSO Module. Also assume
that you will be operating the mainframe at 90 VAC.
Add 121 Watts (for the DSO Module) + 4 X 75 Watts (for the logic analyzer
modules) + 70 Watts (for the controller) + 100 Watts for the mainframe to come
up with a total value of 591 Watts.
Because the power consumption (at 90 VAC) is approaching the shaded area of
the graph in Figure 29, you should consider using the 20A power cord.
NOTE. If you are configuring an expansion mainframe, remember to use the
power value for the expansion module instead of the benchtop controller.
TLA700 Series Logic Analyzer Installation Manual
57

Appendix A: TLA721 Mainframe Power Information
58
TLA700 Series Logic Analyzer Installation Manual
Appendix B: User Service Procedures
This appendix describes high-level service information and procedures for the
Tektronix logic analyzers. Mainframe and module service troubleshooting
procedures are located in the service manuals.
Service Offerings
Tektronix provides service to cover repair under warranty as well as other
services that are designed to meet your specific service needs.
Whether providing warranty repair service or any of the other services listed
below, Tektronix service technicians are well equipped to service the logic
analyzers. Services are provided at Tektronix Services Centers and on-site at
your facility, depending on your location.
Warranty Repair Service
Calibration and Repair
Service
General Care
Tektronix warrants this product as described in the warranty statements at the
front of this manual. Tektronix technicians provide warranty service at most
Tektronix service locations worldwide. The Tektronix product catalog lists all
service locations worldwide.
In addition to warranty repair, Tektronix Service offers calibration and other
services that provide cost-effective solutions to your service needs and qualitystandards compliance requirements. Our instruments are supported worldwide by
the leading-edge design, manufacturing, and service resources of Tektronix to
provide the best possible service.
Protect the instrument from adverse weather conditions. The instrument is not
waterproof. Do not store or leave the instrument where the LCD display will be
exposed to direct sunlight for long periods of time.
CAUTION. To avoid damage to the instrument, do not expose it to sprays, liquids,
or solvents.
TLA700 Series Logic Analyzer Installation Manual
59

Appendix B: User Service Procedures
Preventive Maintenance
Once a year the electrical performance should be checked and the instrument
accuracy certified (calibrated). This service must be performed by a qualified
service technician using the procedures outlined in the appropriate service
manual for the Tektronix Logic Analyzer product.
Preventive maintenance mainly consists of periodic cleaning. Periodic cleaning
reduces instrument breakdown and increases reliability. Clean the instrument as
needed, based on the operating environment. Dirty conditions may require more
frequent cleaning than computer room conditions.
Refer to your logic analyzer probe instructions for specific cleaning procedures
for the probes and probe connectors.
Cleaning the Flat Panel
Display
The LCD flat panel is a soft plastic display and must be treated with care during
cleaning.
CAUTION. Improper cleaning agents or methods can damage the flat panel
display.
Do not use abrasive cleaners or commercial glass cleaners to clean the display
surface.
Do not spray liquids directly on the display surface.
Do not scrub the display with excessive force.
Avoid getting moisture inside the instrument while cleaning the display; use only
enough solution to dampen the wipe.
Clean the flat panel display surface by gently rubbing the display with a
cleanroom wipe (such as Wypall Medium Duty Wipes, #05701, available from
Kimberly-Clark Corporation).
If the display is very dirty, moisten the wipe with distilled water or a 75%
isopropyl alcohol solution and gently rub the display surface. Avoid using excess
force or you may damage the plastic display surface.
60
Exterior Surfaces
Clean the exterior surfaces with a dry, lint-free cloth or a soft-bristle brush. If dirt
remains, use a cloth or swab dampened with a 75% isopropyl alcohol solution. A
swab is useful for cleaning in narrow spaces around the controls and connectors.
Do not use abrasive compounds on any part of the instrument.
TLA700 Series Logic Analyzer Installation Manual

Appendix B: User Service Procedures
CAUTION. To avoid damaging the instrument follow these precautions:
Avoid getting moisture inside the instrument during external cleaning and use
only enough solution to dampen the cloth or swab.
Do not wash the front-panel On/Standby switch. Cover the switch while washing
the instrument.
Use only deionized water when cleaning. Use a 75% isopropyl alcohol solution
as a cleanser and rinse with deionized water.
Do not use chemical cleaning agents; they may damage the instrument. Avoid
chemicals that contain benzene, toluene, xylene, acetone, or similar solvents.
Floppy Disk Drive
In Case of Problems
The floppy disk drive requires routine maintenance to operate at maximum
efficiency. The disks can be damaged if dirt and dust accumulate on the
recording surfaces. To prevent damage, the disks should be properly stored in
their protective containers where they will not be exposed to dust or dirt. In
addition, you must clean the head periodically.
You will need a 3.5-inch floppy disk head-cleaning kit for routine maintenance.
Perform the routine maintenance as follows:
Clean the face of the floppy disk drive monthly with a dampened cloth.
CAUTION. Do not allow moisture to enter the disk drive. When power is applied,
the internal components can be damaged.
Clean the head monthly following the instructions provided with the head-cleaning kit.
Review the following sections if you encounter any problems with your
instrument. Detailed troubleshooting procedures are available in the service
manuals for your logic analyzer product. For addtional help, contact your local
Tektronix Service Representative.
Diagnostics
TLA700 Series Logic Analyzer Installation Manual
The logic analyzer runs power-on diagnostics every time you power on the
instrument. You can view the results of the diagnostics by selecting Calibration
and Diagnostics from the System menu. You can run more detailed diagnostics
by selecting Extended diagnostics. Here you can run all tests, loop on one or
more tests, or loop on a test until a failure occurs.
61

Appendix B: User Service Procedures
Before running the extended diagnostics, disconnect any attached probes.
TLA Mainframe Diagnostics. The TLA mainframe diagnostics program is a
stand-alone application. These diagnostics check the operation of the mainframe
beyond the basic PC circuitry. These diagnostics also check the front-panel
knobs of the portable mainframe.
CheckIt Utilities. The CheckIt Utilities is a separate application located in the
Windows Start Programs menu (Start > Programs > CheckIt Utilities). The
diagnostics check the basic PC operations of the controller.
Software Problems
Hardware Problems
Your logic analyzer comes with most software installed. Before running any of
the diagnostics, check the online release notes to verify that the logic analyzer
software is compatible with the module firmware.
Many software problems can be due to corrupted or missing software files. In
most cases the easiest way to solve software problems is to reinstall the software
and follow the on-screen instructions. Refer to Restoring and Reinstalling
Software beginning on page 41 for instructions on reinstalling or upgrading
software.
If you are certain that you have installed the logic analyzer correctly, run the
extended diagnostics (located under the System menu) to identify any problems.
If your logic analyzer powers up so that you have access to the desktop, run the
CheckIt Utilities software to identify possible controller hardware problems.
You can also run the external TLA mainframe diagnostics to identify problems
not covered by other diagnostics. The TLA mainframe diagnostics are located
under the Start menu under the Tektronix Logic Analyzer programs.
Repacking for Shipment
If a mainframe or module is to be shipped to a Tektronix service center for repair,
attach a tag to the mainframe or module showing the owner’s name and address,
the serial number, and a description of the problem(s) encountered and/or service
required. Always include the module and the probes so that the entire unit can be
tested.
62
When packing an instrument for shipment, use the original packaging. If it is
unavailable or not fit for use, contact your Tektronix representative to obtain new
packaging.
TLA700 Series Logic Analyzer Installation Manual

Index
A
Accessories, connecting, TLA700 series, 13
Address, Tektronix, xii
Air flow , 12
Application
PatGenV u, 24
TLAVu, 24
Autoconfiguration, module, 7
C
Calibration, service, 59
Chassis ground location, 6
Cleaning, 60
LCD display, 60
Configuring, P6470 pattern generator probes, 17
Connecting
accessories, TLA700 series, 13
LA probes, TLA700 series, 15
Connectors, external, TLA700 series, 39
Contacting Tektronix, xii
Cover plate installation, 12
Customer registration card, 1
D
Diagnostics, 61
mainframe, 62
documentation, xi
Dynamic autoconfiguration, 7
E
Expansion cables, installing, 5
Expansion module, installing
in a benchtop mainframe, 2
in a portable mainframe, 3
Extended diagnostics, 61
External, signal connectors, TLA700 series, 39
External connectors, 40
F
Firmware, Upgrading, 48
Front panel controls, TLA715 Portable Mainframe, 39
functional test, 21
Fuse, requirements, TLA700 series, 18
Fuse requirements
benchtop mainframe, 57
expansion mainframe, 57
G
General maintenance, 59
Ground
chassis, 6
safety, 6
Guidelines, for merging modules, 25
H
Hard disk
drive, removal, 22
image, installing, 41
reformatting, 42
Hardware problems, 62
I
Incoming inspection
checking the mainframe, 22
performing, 20
Installing
expansion cables, 5
expansion mainframe, 2
expansion module
in a benchtop mainframe, 2
in a portable mainframe, 3
software, 42
PatGenV u, 47
PPI software, 46
TLA application software, 45
TLAVu software, 47
TPI software, 46
L
LA module. See Logic analyzer
Logic analyzer
chassis ground connections, 6
description, x
installing software, 41
merge cable location, 32
merging, 25
merging rules, 25
TLA700 Series Logic Analyzer Installation Manual
63

Index
probes, connecting LA probes TLA700 series, 15
reinstalling software, 41
site considerations, 1
TLA700 Series description, ix
Logical address
module, 7
setting, 7
M
Mainframe
configuring P6470 pattern generator probes, 17
connecting accessories, TLA700 series, 13
connecting LA probes, TLA700 series, 15
cooling requirements, 12
diagnostics, 62
equipment required to merge modules, 32
fuse location, TLA700 series, 18
fuse requirements
for the benchtop mainframe, 55
for the expansion mainframe, 55
TLA700 series, 18
incoming inspection, 20
merging modules rules, 25
module installation
in the benchtop mainframe, 9
in the expansion mainframe, 11
in the portable mainframe, 8
keying, 11
panel cover, 12
power cord requirements
for the benchtop mainframe, 55
for the expansion mainframe, 55
Maintenance
equipment required to merge modules, 32
installing software, 41
merging modules rules, 25
Merged modules, rules, 25
Merging modules, 25
equipment required, 32
merge cable location, 32
three--way merge procedure, 37
two--way merge procedure, 32
Module
dynamic autoconfiguration of address, 7
installing
in the benchtop mainframe, 9
in the expansion mainframe, 11
in the portable mainframe, 8
keying, 11
logical address, 7
merge cable location, 32
merging, 25
merging guidelines, 25
power requirements, 55
expansion mainframe, 55
static logical address, 7
three--way merge procedure, 37
two--way merge procedure, 32
O
On/Standby switch
benchtop mainframe, 19
portable mainframe, 19
Online help
PPI help, 24
TLAScript, 24
TPI online help, 24
P
Panel cover installation, 12
Pattern Generator module
merging, 25
merging rules, 26
probes, configuring P6470, 17
PC card connector, TLA700 series, 39
Phone number, Tektronix, xii
Power cord, identification chart, 57
Power requirements
benchtop mainframe, 55
expansion mainframe, 55
Power-on diagnostics, 61
Power-on procedure
benchtop mainframe, 19
portable mainframe, 19
TLA714, 19
TLA720, 19
Preventive maintenance, 60
cleaning, 60
disks, floppy disk drive, 61
LCD display, 60
Probes
configuring P6470 pattern generator probes, 17
connecting LA probes, TLA700 series, 15
Problems
hardware, 62
software, 62
Product support, contact information, xii
64
TLA700 Series Logic Analyzer Installation Manual

Index
R
Registration card, 1
Reinstalling software, 42
PatGenV u, 47
Pattern Generator application software, 45
PPI software, 46
TLA application software, 45
TLAVu software, 47
TPI software, 46
Removing the hard disk drive, 22
Repacking for shipment, 62
Repair service, 59
Requirements, site consideration, 1
Rules, for merging modules, 25
S
Service, mainframe diagnostics, 62
Service offerings, 59
calibration and repair service, 59
warranty repair service, 59
Service support, contact information, xii
Service, user, preventive maintenance, 60
Setting the logical address, 7
Shipping, 62
Slot
covers, 12
fillers, 12
Software
installing, 41
PatGenV u, 47
Pattern Generator application software, 45
PPI software, 46
TLA application software, 45
TLA VU software, 47
TPI software, 46
mainframe diagnostics, 62
problems, 62
Static logical address, 7
T
Technical support, contact information, xii
Tektronix, contacting, xii
Three--way merge procedure, 37
TLA700 Series, logic analyzer description, ix
TLA7XM Expansion Mainframe
installing, 2
installing the expansion cables, 5
installing the expansion module, in a benchtop
mainframe, 2
Trigger, system, external signal, 39
Troubleshooting, 61
Two--way merge procedure, 32
U
Upgrading firmware, 48
URL, Tektronix, xii
User service
general maintenance, 59
preventive maintenance, 60
V
Video output
in a TLA715/721, 14
in a TLA714/720, 14
primary and secondary, 14
W
Warranty repair service, 59
Web site address, Tektronix, xii
TLA700 Series Logic Analyzer Installation Manual
65

Index
66
TLA700 Series Logic Analyzer Installation Manual
 Loading...