

Tektronix TBS1052B EDU, TBS1072B EDU, TBS1102B EDU, TBS1152B EDU, TBS1202B EDU User manual
...
xx
TBS1000B
Compliance and Safety
Instruct
1
*P0713
071-3223-01
NOTE. Probe statements in this document refer only to the
TPP0051, TPP0101, or TPP0201 probes that are standard
accessories to the oscilloscope.
Contacting Tektronix
Tektronix, Inc., 14150 SW Karl Braun Drive, P.O. Box 500,
Beaverton, OR 97077, USA
For product information, sales, service, and technical support:
In North America, call 1-800-833-9200.
Worldwide, visit www.tektronix.com t o find contacts in your
area.
al safety summary
Gener
Use the product only as specified. Review the following safety
utions to avoid injury and prevent damage to this product
preca
or any products connected to it. Carefully read all instructions.
n these instructions for future reference.
Retai
For correct and safe operation of the product, it is essential that
you follow generally accepted safety procedures in addition to
the safety precautions specified in this manual.
The product is designed t o be used by trained personnel only.
Only qualified personnel who are aware of the hazards involved
should remove the cover for repair, maintenance, or adjustment.
Before use, always check the product with a known source to
e it is operating correctly.
be sur
This product is not intended for detection of hazardous voltages.
oid fire or personal injury
To a v
Use proper power cord. Use only the power cord specified for
product and certified for the country of use.
this
Do not use the provided power cord for other products.
Connect and disconnect properly. Connect the probe output
to the measurement instrument before connecting the probe
to the circuit under test. Connect the probe reference lead
to the circuit under test before connecting the probe input.
Disconnect the probe input and the probe reference lead from
the circuit under test before disconnecting the probe from the
measurement instrument.
Ground the product. This product is grounded through the
grounding conductor of the power cord. To avoid electric
shock, the grounding conductor must be connected to earth
ground. Before making connections to the input or output
terminals of the product, ensure that the product is properly
grounded.
Do not disable the power cord grounding connection.
Ground-referenced oscilloscope use. Do not float the reference
lead of a TPP-series probe when using with the TBS1000B
oscilloscope. The reference lead must be connected to earth
potential (0 V).
x
ions
22301*
Observe all terminal ratings. To avoid fire or shock hazard,
observe all ratings and markings on the product. Consult the
product manual for further ratings information before making
connections to the product.
Connect the probe reference lead to earth ground only.
Do not exceed the Measurement Category (CAT) rating
and voltage or current rating of the lowest rated individual
component of a product, probe, or accessory. Use caution when
using 1:1 test leads because the probe tip voltage is directly
transmitted to the product.
Do not apply a potential to any terminal, including the common
terminal, that exceeds the maximum rating of that terminal.
Vertical measurement overrange (clipping). Waveforms that
extend beyond the screen (overrange) and display a ? in the
measurement readout indicates an invalid value. Adjust the
vertical scaling to ensure the readout is valid.
Avoid electric shock. Do not connect or disconnect probes
or test leads while they are connected to a voltage source.
When using probe accessories, never exceed the lowest rating
of the probe or its accessory, whichever is less, including the
measurement category and voltage rating.
Power disconnect. The power switch disconnects the product
from the power source. See instructions for the location. Do
not position the equipment so that it is difficult to operate the
power switch; it must remain accessible to the user at all times
to allow for quick disconnection if needed.
Do not op erate without covers. Do not operate this product with
covers or panels removed, or with the case open. Hazardous
voltage exposure is possible.
Do not operate with su spected failures. If you suspect that
there is damage to this p roduct, have it inspected by qualified
service personnel.
Disable the product if it is damaged, Do not use the product if it
is damaged or operates incorrectly. If in doubt ab
out safety of
the product, turn it off and disconnect the power cord. Clearly
mark the product to prevent its further operation
.
Before use, inspect voltage probes, test leads, and accessories
for mechanical damage and replace when damaged. Do not use
probes or test leads if they are damaged, if there is exposed
metal, or if a wear indicator shows.
Examine the exterior of the product before you use it. Look for
cracks or missing pieces. Use only specified replacement parts.
Beware of high voltages. Understand the voltage ratings for
the probe you are using and do not exceed those ratings. Two
ratings are important to know and understand:
The maximum measurement voltage from the probe tip
to the probe reference lead.
The maximum floating voltage from the probe reference
lead to earth ground.
These two voltage ratings depend on the probe and your
application. Refer to the Specifications section of the manual
for more information.
Avoid exposed circuitry. Do not touch exposed connections
and components when pow er is present.
Provide proper ventilation. The oscilloscope cools by
convection. Keep two inches of clearance on the sides, rear,
and top of the product to allow adequate air fl ow.
Do not operate in wet/damp conditions.
Do not operate in an explosive atmosphere.
Keep product surfaces clean and dry. Inspect the oscilloscope
and probes as often as operating conditions require. To clean
the exterior surface, perform the following steps:
1. Remove loose dust on the outside of the oscilloscope and
probes with a lint-free cloth. Use care to avoid scratching
the clear glass display filter.
2. Use a soft cloth dampened with water to clean the
oscilloscope. Use an aqueous solution of 75% isopropyl
alcohol for more efficient cleaning.
CAUTION. Avoid getting moisture inside the unit during
external cleaning. Use only enough cleaning solution
to dampen the cloth or swab. To avoid damage to the
oscilloscope or probes, do not expose them to sprays,
liquids, or solvents, do not use any abrasive or chemical
cleaning agents.
Termsinthismanual
These terms may appear in this manual:
WARNING. Warning statements identify conditions or
practices that could result in injury or loss of life.
CAUTION. Caution statements identify conditions or
practices that could result in damage to this product or
other property.
Symbols and terms on the product
These terms may appear on the product:
DANGER indicates an injury hazard immediately
accessible as you read the marking.
WARNING indicates an injury hazard not immediately
accessible as you read the marking.
CAUTION indicates a hazard to property i ncluding the
product.
The following symbol(s) may appear on the product:
Compliance information
This section lists the EM C (electromagnetic compliance),
safety, and environmental standards with which the instrument
complies.
EMC compliance
EC Declaration of Conformity – EMC
Meets intent of Directive 2004/108/EC for E lectromagnetic
Compatibility. Compliance was demonstrated to the following
specifications as listed in the Official Journal of the European
Communities:
EN 61326-1:2006, EN 61326-2-1:2006. EMC requirements for
electrical equipment for measurement, control, and l aboratory
123
use.
CISPR 11:2
Group 1, Class A
IEC 61000-4-2:2001. Electrostatic discharge immunity
IEC 61000-4-3:2002. RF electromagnetic field immunity
IEC 61000immunity
IEC 61000-4-5:2001. Power line surge immunity
IEC 61000-4-6:2003. Conducted RF immunity
IEC 61000immunity
EN61000-3-2:A1/A2 2009. AC power line harmonic emissions
EN 61000-3-3:2008. Voltage changes, fluctuations, and flicker
European contact.
Tektroni
Western Peninsula
West e r n R
Bracknell, RG12 1RF
United Ki
1
This product is intended for use in nonres idential areas only. Use in residential
areas may cause electromagnetic interference.
2
Emissions which exceed the levels required by this standard may occur when
this equipment is connected to a test object.
3
To ensure compliance with the EMC standards listed here, high quality shielded
interfac
4
The instrument will exhibit ≤ 1.0 division waveform displacement and ≤
2.0 division increase in peak- to-peak noise when subjected to radiated
interference per IEC 61000-4-3.
5
The instrument will exhibit ≤ 0.5 division waveform displacement and ≤
1.0 division increase in peak-to-peak noise when subjected to conducted
interference per IEC 61000-4-6.
6
Performance Criterion C applied at the 70%/25 cycle Voltage-Dip and
the 0%/2
instrument powers down upon a voltage dip or interruption, it will take longer
than ten
ia / New Zealand Declaration of Conformity – EMC
Austral
Complies with the EMC provision of the Radiocommunications
Act per t
CISPR 11:2003. Radiated and Conducted Emissions,
Group 1, Class A, in accordance with EN 61326.
Australia/New Zealand contact.
Baker & Mckenzie
Level 27
AMP Centre, 50 Bridge Street
Sydney NSW 2000
Australia
Safety compliance
EC Declaration of Conformity – Low Voltage
Compliance was demonstrated to the following specification as
listed in the Official Journal of the European Communities:
Low Voltage D irective 2006/95/EC.
EN 61010-1. (oscilloscope)
EN 6101
tionally recognized testing laboratory (NRTL) listing
U.S. na
UL 61010-1. (oscilloscope)
UL 6101
ian certification
Canad
CAN/CSA-C22.2 No. 61010-1. (oscilloscope)
CAN/C
ional compliances
Addit
IEC 61010-1. (oscilloscope)
IEC 61
ment type
Equip
Test and measuring equipment.
Safety class
1 – grounded product.
Class
tion degree description
Pollu
A measure of the contaminants that could occur in the
onment around and within a product. Typically the
envir
internal environment inside a product is considered to be the
s the external. Products should be used only in the
same a
environment for which they are rated.
Pollution Degree 1. No pollution or only dry,
nonconductive pollution occurs. Products in this category
are generally encapsulated, hermetically sealed, or located
in clean rooms.
Pollution Degree 2. Normally only dry, nonconductive
pollution occurs. Occasionally a temporary conductivity
that is caused by condensation must be expected. This
003. Radiated and conducted emissions,
4-4:2004. Electrical fast transient/burst
5
4-11:2004. Voltage dips and interruptions
6
x UK, Ltd.
oad
ngdom
e cables should be used.
50 cycle Voltage-Interruption test levels (IEC 61000-4-11). If the
seconds to return to the previous operating state.
he following standard, in accordance with ACMA:
0-031. (probes)
0-031. (probes)
SA-C22.2 No. 61010-031. (probes)
010-031. (probes)
4

location is a typical office/home environment. Temporary
condensation occurs only when the product is out of
service.
Pollution Degree 3. Conductive pollution, or dry,
nonconductive pollution that becomes conductive due
to condensation. These are sheltered locations where
neither temperature nor humidity is controlled. The area is
protected from direct sunshine, rain, or direct wind.
Pollution degree rating (oscilloscope and probes)
Pollution Degree 2 (as defined in IEC 61010-1). Rated for
indoor, dry location use only.
Measurement and overvoltage category descriptions
Measurement terminals on this product may be rated for
measuring mains voltages from one or more of the following
categories (see specific ratings marked on the product and in
the manual).
Category II. Circuits directly connected to the building
wiring at utilization points (socket outlets and similar
points).
Category III. In the building wiring and distribution
system.
Category IV. At the source of the electrical supply to the
building.
NOTE. Only mains power supply circuits have an overvoltage
category rating. Only measurement circuits have a
measurement category rating. Other circuits within the product
do not have either rating.
Overvoltage category (oscilloscope). Overvoltage Category II
(as defined in IEC 61010-1).
Measurement category (oscilloscope and probes). Measurement
Category II (as defined in IEC 61010-1).
Environmental considerations
Refer to the User Manual for information about the
environmental impact of the product.
Operating overview
Refer to the User Manual for complete operating information
and product specifications.
Power source
Use a power source that delivers 90 to 264 V
66 Hz. If you have a 400 Hz power source, it must deliver 90 to
132 V
, 360 to 440 Hz. Power rating is 30 W maximum.
AC RMS
This Oscilloscope operates from a single-phase power source
with the neutral conductor at or near earth ground. It is intended
for only ground-referenced measurements. A protective ground
connection through the grounding conductor in the power cord
is essential for safe operation.
Power the unit on by connecting the supplied power cord to
the rear-panel power connector (1). Push the power button (2)
on the top of the oscilloscope to turn the oscilloscope on.
To power the unit off, push the power button on the top
of the oscilloscope again to turn the oscilloscope off. To
remove power completely, disconnect the power cord from the
rear-panel of the oscilloscope.
AC RMS
,45to
Input Rating
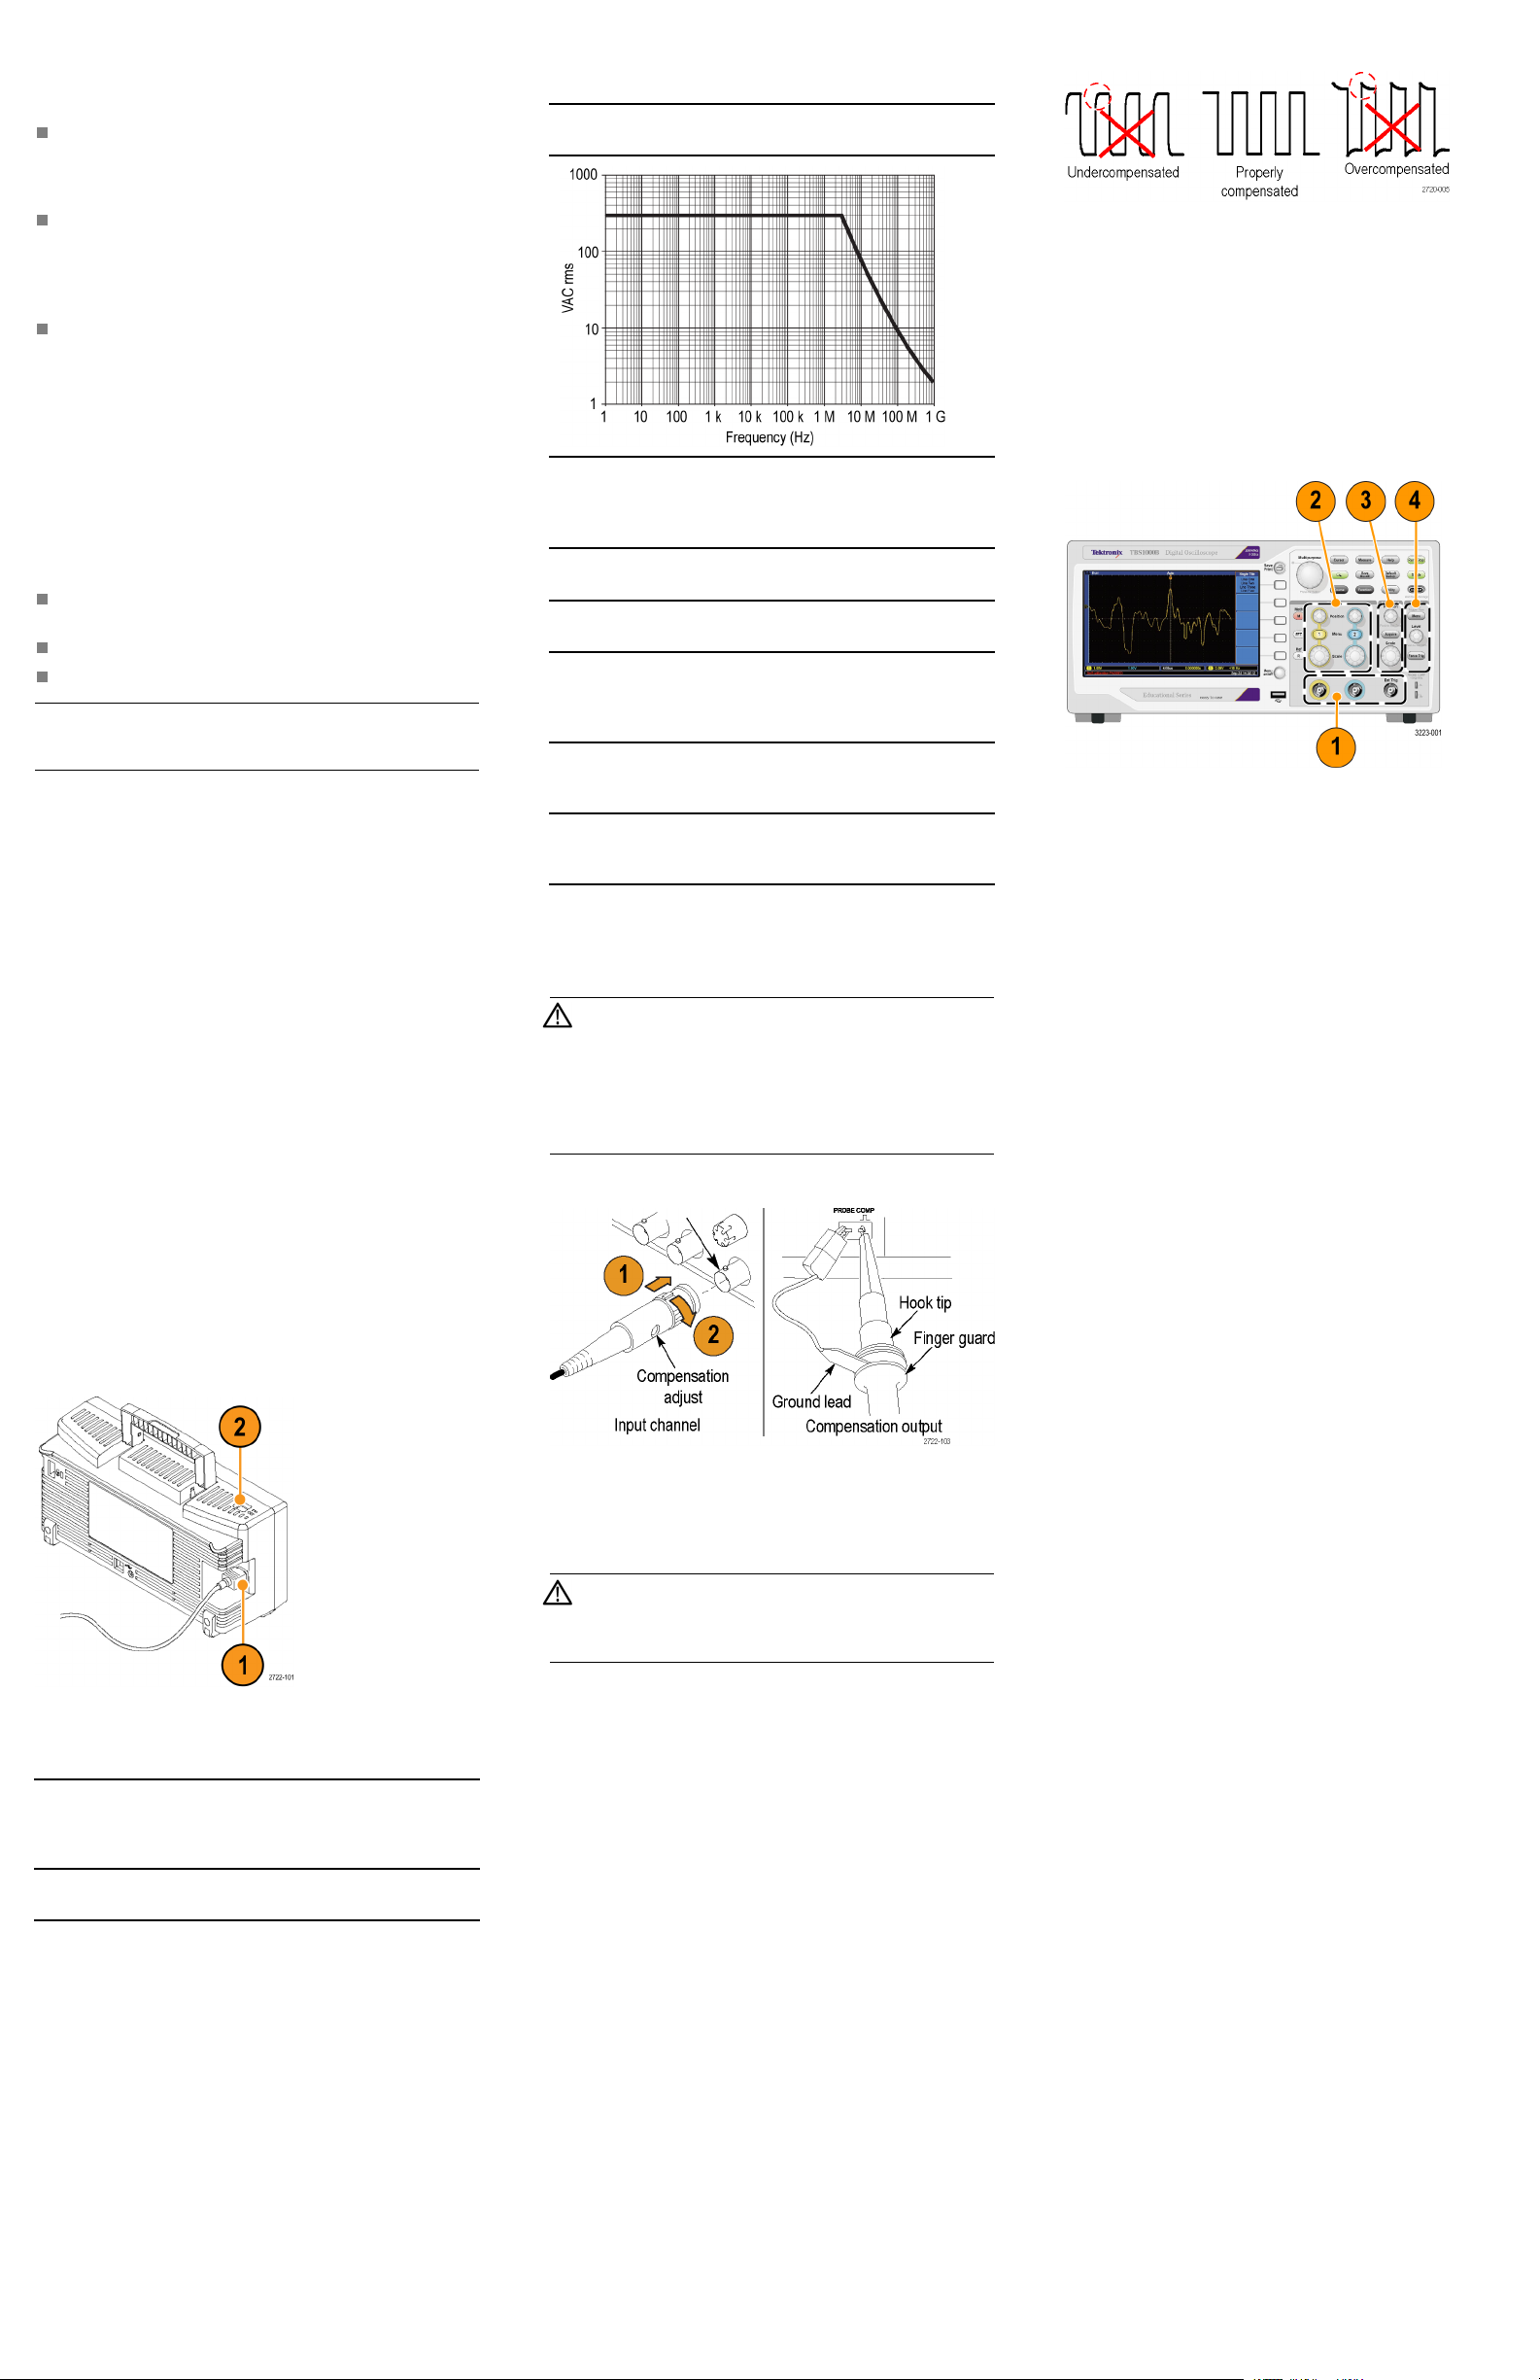
Probe tip
, Measurement Category II; derate as
300 V
RMS
shown in the following graph.
Table 2: Environmental ratings
Characteristic Description
Operating
temperature
(oscilloscope)
Operating
temperature
(probes)
Operating
humidity
(oscilloscope)
Operating
humidity
(probes)
Operating
altitude
(oscilloscope
and probes)
0° C to +50° C, with 5° C/minute maximum
gradient, noncondensing, up to 3000 meter
altitude
–10°Cto+55°C(14°Fto+131°F)
5% to 85% relative humidity (% RH) at up to
+40° C 5% to 45% RH above +40° C up to
+50° C, noncondensing, and as limited by a
Maximum Wet-Bulb Temperature of +37° C
(derates relative humidity to 45 % RH at +50° C)
5% to 95% relative humidity (%RH) up to
+30 °C (86 °F), 5% to 65% RH above +30° C
up to +55 °C (131 °F)
Up to 3000 meters (10,000 feet)
Probe information
The TPP0051, TPP0101, & TPP0201 probes are high
impedance, passive probes with 10X attenuation. The probes
have no serviceable parts.
WARNING. Do not float the probes on any oscilloscope.
To avoid electric shock when using the probe, keep fingers
behind the guard on the probe body, do not touch metallic
portions of the probe head while it is connected to a voltage
source, and ensure the ground lead or ground spring are
fully mated before connecting the probe to the circuit under
test.
Connecting the probe to the oscilloscope
Connect the probe as shown i n the illustration.
3. Push Autoset or otherwise adjust your oscilloscope to
display a stable waveform.
4. Adjust the trimmer in the probe until you see a perfectly
flat-top square wave on the display. (See illustration.)
Connecting the probe to the circuit
Use t he standard accessories included with the probe to connect
to your circuit. Check and observe probe ratings before using
probes. A guard around the probe body provides a finger
barrier for protection from electric shock. Connect the probe to
the oscilloscope, and connect the ground lead to ground before
you take any measurements.
Controls
The front panel is divided into easy-to-use functional areas.
1. Input connectors
1&2. Input connectors for waveform display.
Ext Trig. Input connector for an external trigger source.
2. Vertical controls
Position. Positions a waveform vertically.
Scale. Selects vertical scale factors.
Menu. Displ
ays the menu selections and toggles the
display of the waveforms on and off.
3. Horizontal controls
Position. Adjusts the horizontal position of all waveforms.
Scale. Selects the horizontal time/division (scale factor).
Acquire. Specifies sample, peak detect, or average data
acquisition.
4. Trigger controls
Level. Sets the amplitude level that the signal must cross
to acquire a waveform.
Tri g M e n u . Displays the Trigger Menu.
Force Trig. Completes the current waveform acquisition
whether or not the oscilloscope detects a trigger.
Table 1: Maximum voltage ratings
Input Rating
Oscilloscope
channel BNC
inputs
Probe ground
reference lead
300 V
, Measurement Category II; derate at
RMS
20 dB/decade above 100 kHz to 13 V peak AC
at 3 MHz and above. Based upon sinusoidal or
DC input signal.
0V
Compensating the probe
Due to variations in oscilloscope input characteristics, the
low-frequency compensation of the probe may need adjustment
after moving the probe from one oscilloscope channel to
another.
WARNING. To avoid electric shock, only connect to the
Probe Comp signal on the oscilloscope when making this
adjustment, and only use the insulated adjustment tool
when making compensation adjustments.
If a 1 kHz calibrated square wave displayed at 1 ms/division
shows significant differences between the leading and trailing
edges, perform the following steps to optimize low-frequency
compensation:
1. Connect the probe to the oscilloscope channel that you
plan to use for your measurements.
2. Connect the probe to the probe compensation output
terminals on the oscilloscope front panel.
Service safety summary
The Service safety summary section contains additional
information required to safely perform service on the product.
Only qualified personnel should perform service procedures.
Read this Service safety summary and the General safety
summary before performing any service procedures.
To avoid electric shock. Do not touch exposed connections.
Do not service alone. Do not perform internal service or
adjustments of this product unless another person capable of
rendering first aid and resuscitation is present.
Disconnect power. To avoid electric shock, switch off the
product power and disconnect the power cord from the mains
power before removing any covers or panels, or opening the
case for servicing.
Use care when servicing with power on. Dangerous voltages
or currents may exist in this product. Disconnect power,
remove battery (if applicable), and disconnect test leads
before removing protective panels, soldering, or replacing
components.
Verify safety after repair. Always recheck ground continuity
and mains dielectric strength after performing a repair.
Copyright © Tektronix, Inc. All rights reserved. www.tektronix.com
xx
TBS1000B 型
適合性および安全性
取扱説明書
2
23-01
071-32
注: このマニュアルにおけるプローブの説明は、TBS1000B
型オシロスコープのスタンダード・アクセサリである TPP0051
型、TPP0101 型、または TPP0201 型プローブのみに関する
ものです。
Tektronix 連絡先
Tektronix, Inc., 14150 SW Karl Braun Drive, P.O. Box 500,
Beaverton, OR 97077, USA
製品情報、代理店、サービス、およびテクニカル・サポート:
北米内:1
世界の他の地域では、www.tektronix.com にアクセスし、
お近くの代
安全にご使用いただくために
製品は指定された方法でのみご使用ください。人体への損
傷を避け、本製品や本製品に接続されている製品の破損を
防止するために、安全性に関する次の注意事項をよくお読
みください。すべての指示事項を注意深くお読みください。
必要なときに参照できるように、説明書を安全な場所に保管
しておいてください。
本製品を正しく安全にご使用になるには、このマニュアルに
記載された注意事項に従うだけでなく、一般に認められてい
る安全対策を徹底しておく必要があります。
本製品は訓練を受けた専門知識のあるユーザによる使用を
想定してい
たは調整を実施できるのは、あらゆる危険性を認識した専門
的知識のあ
使用前に、既知の情報源と十分に照らし合わせて、製品が
正しく動作していることを常にチェックしてください。
本製品は危険電圧の検出用にはご利用になれません。
火災や人体への損傷を避けるには
適切な電源コードを使用してください: 本製品用に指定さ
れ、使用される国で認定された電源コードのみを使用してく
ださい。
他の製品に付属していた電源コードは使用しないでください。
接続と切断は正しく行ってください: プローブ出力を測定器
に接続し
被測定回路にプローブの基準リードを接続してから、プロー
ブ入力を
リードを被測定回路から切断した後で、プローブを測定器か
ら切断し
本製品を
ド線を使用して接地します。感電を避けるため、グランド線を
アースに
接続する前に、製品が正しく接地されていることを確認して
ください
電源コードのグランド接続を無効にしないでください。
グランド基準のオシロスコープの使用: TBS1000B 型オシロ
スコープで使用する場合、TPP シリーズ・プローブの基準リー
x
-800-833-9200 までお電話ください。
理店をお探しください。
ます。製品のカバーを取り外して修理や保守、ま
る適格者のみに限定する必要があります。
てから、プローブを被測定回路に接続してください。
接続してください。プローブ入力とプローブの基準
てください。
接地してください: 本製品は、電源コードのグラン
接続する必要があります。本製品の入出力端子に
。
ドはフロートにしないでください。基準リードは接地電位(0 V)
に接続しなければなりません。
すべての端子の定格に従ってください: 火災や感電の危険
を避けるために、本製品のすべての定格とマーキングに従っ
てください。本製品に電源を接続する前に、定格の詳細につ
いて、製品マニュアルを参照してください。
プローブの基準リードは、グランドにのみ接続してください。
測定カテゴリ(CAT)の定格および電圧と電流の定格につい
ては、製品、プローブ、またはアクセサリのうちで最も低い定
格を超えないように使用してください。1:1 のテスト・リードを
使用するときは、プローブ・チップの電圧が直接製品に伝送
されるため注意が必要です。
コモン端子を含むいかなる端子にも、その端子の最大定格
を超える電圧をかけないでください。
垂直軸のオーバーレンジ(クリッピング): スクリーンの範囲
を超えており(オーバーレンジ)、測定のリードアウトに ? が
表示されている波形は、無効な値であることを示しています。
リードアウトが有効になるように垂直軸のスケールを調整して
ください。
感電を避けてください: プローブとテスト・リードが電圧源に接
続されている間は接続または切断しないでください。プロー
ブのアクセサリを使用する際、測定カテゴリおよび電圧定格
を含め、プローブやアクセサリの最も低い定格を超えないよ
うにしてください。
電源を切断してください: 電源スイッチにより、電源から製品
を切断します。スイッチの位置については、使用説明書を参
照してください。電源スイッチの操作が困難になる場所には
設置しないでください。必要に応じてすぐに電源を遮断でき
るように、ユーザが常にアクセスできる状態にしておく必要が
あります。
カバーを外した状態で動作させないでください: カバーやパ
ネルを外した状態やケースを開いたまま動作させないでくだ
さい。危険性の高い電圧に接触してしまう可能性があります。
故障の疑いがあるときは動作させないでください: 本製品
に故障の疑いがある場合には、資格のあるサー ビス担当者
に検査を依頼してください。
損傷した場合は操作を中止してください。損傷または動作に
異常が見られる場合は、本製品の使用を控えてください。安
全上の問題が疑われる場合には、電源を切って電源コード
を取り外してください。誤って使用されることがないように、問
題のある製品を区別できるようにしておいてください。
使用前に、電圧プローブ、テスト・リード、およびアクセサリに
機械的損傷がないかを検査し、故障している場合には交換
してください。金属部が露出していたり、摩耗インジケータが
見えているなど、損傷が見られるプローブまたはテスト・リー
ドは使用しないでください。
使用する前に、製品の外観に変化がないかよく注意してくだ
さい。ひび割れや欠落した部品がないことを確認してくださ
い。指定された交換部品のみを使用するようにしてください。
高電圧に注意: 使用するプローブの電圧定格について理解
し、その定格を超えないようにしてください。特に次の 2 つの
定格についてはよく理解しておく必要があります。
プローブ・チップとプローブの基準リード間の最大測定
電圧
プローブの基準リードとアース間の最大フローティング
電圧
上記の 2 つの電圧定格はプローブと用途によって異なりま
す。詳細については、プローブのマニュアルの仕様関連セク
ションを参照してください。
露出した回路への接触は避けてください: 電源が投入され
ているときに、露出した接続部分やコンポーネントに触れな
いでください。
適切に通気してください: このオシロスコープは、空気の自
然対流によって冷却されます。 オシロスコープの両側面、後
部、および上面に 2 インチ(約 5 cm)のスペースを空けること
によって、適切なエア・フローを確保してください。
湿気の多いところでは動作させないでください:
爆発性のガスがある場所では使用しないでください:
製品の表面を清潔で乾燥した状態に保ってください: 動作状
況に応じた頻度でオシロスコープとプローブを検査してくださ
い。外部表面の汚れを落とすには、次の手順を実行します。
1. 乾いた柔らかい布で、オシロスコープとプローブの表面
についた塵を落とします。ガラスのディスプレイ・フィルタ
を傷つけないように注意してください。
2. 水で湿らせたやわらかい布を使用して、オシロスコープ
の汚れを拭き取ります。75% イソプロピル・アルコール水
溶剤を使用すると汚れがよく落ちます。
注意: 外面をクリーニングしているときにユニット内部が
湿らないようにしてください。クリーニング溶液は、綿棒ま
たは布を十分に湿らせることができる必要最小限の量を
使用するようにしてください。 オシロスコープまたはプロー
ブが損傷する可能性がありますので、スプレー、液体、ま
たは溶剤等に触れないようにしてください。また、研磨剤
や化学洗浄剤は使用しないでください。
本マニュアル内の用語
このマニュアルでは次の用語を使用します。
警告: 人体や生命に危害をおよぼすおそれのある状態
や行為を示します。
注意: 本製品やその他の接続機器に損害を与えるおそ
れのある状態や行為を示します。
本製品に関する記号と用語
本製品では、次の用語を使用します。
DANGER:ただちに人体や生命に危険をおよぼす可能
性があることを示し ます。
WARNING:人体や生命に危険をおよぼす可能性がある
ことを示します。
CAUTION:本製品を含む周辺機器に損傷を与える可能
性があることを示します。
本製品では、次の記号を使用します。
適合性に関する情報
このセクションでは、本製品が適合している EMC 基準、安全
基準、および環境基準について説明します。
EMC 適合性
EC 適合宣言 - EMC
指令 2004/108/EC 電磁環境両立性に適合します。『Official
Journal of the European Communities』に記載の以下の基準
に準拠します。
EN 61326-1:2006, EN 61326-2-1:2006: 測定、制御、および
実験用途の電子機器を対象とする EMC 基準
CISPR 11:2003:グループ 1、クラス A、放射および伝導
エミッション
IEC 61000-4-2:2001:静電気放電イミュニティ
IEC 61000-4-3:2002:RF 電磁界イミュニティ
IEC 61000-4-4:2004:電気的ファスト・トランジット/バー
スト・イミュニティ
IEC 61000-4-5:2001:電源サージ・イミュニティ
IEC 61000-4-6:2003:伝導 RF イミュニティ
IEC 61000-4-11:2004:電圧低下と停電イミュニティ
EN61000-3-2:A1/A2 2009: AC 電源高調波エミッション
EN 61000-3-3:2008: 電圧の変化、変動、およびフリッカ
欧州域内連絡先:
Tektronix UK, Ltd.
Western Peninsula
Western Road
Bracknell, RG12 1RF
United Kingdom
1
本製品は住居区域以外での使用を目的としたものです。住居区域
で使用すると、電磁干渉の原因となることがあります。
2
本製品をテスト対象に接続した状態では、この規格が要求するレ
ベルを超えるエミッションが発生する可能性があります。
3
ここに挙げた各種 EMC 規格に確実
ルドを持つインタフェース・ケーブルが必要です。
4
IEC 61000-4-3 に規定された放射無線周波電磁界の干渉を受け
た場合、本器は 1.0 div 以下の波形変位および 2.0 div 以下の
p-p ノイズの増加を生じます。
5
IEC 61000-4-6 に規定された伝導性無線周波の干渉を受けた場
合、本器は 0.5 div 以下の波形変位および 1.0 div 以下の p-p ノ
イズの増加を生じます。
6
70%/25 サイクルの電圧低下および 0%/250 サイクル瞬断の各テス
ト・レベルにおいて、性能基準 C を適用します(IEC 61000-4-11)。
電圧低下または瞬断により本機器の電源が切れた場合、以前の
動作状態に戻るまでに 10 秒以上かかります。
に準拠するには、高品質なシー
オーストラリア/ニュージーランド適合
ACMA に従い、次の規格に準拠することで
Radiocommunication
s Act の EMC 条項に適合しています。
CISPR 11:2003:放射性および伝導性エミッション、グルー
プ 1、クラス A、EN 61326 に準拠
オーストラリア/ニュージーランドの連絡先:
Baker & Mckenzie
Level 27
AMP Centre, 50 Bridge Street
Sydney NSW 2000
オーストラリア
安全性
EC 適合宣言 - 低電圧指令
『Official Journal of the European Communities』に記載の以下
の基準に準拠します。
低電圧指令 2006/95/EC。
EN 61010-1:(オシロスコー プ)
EN 61010-031:(プローブ )
米国の国家認定試験機関(NRTL)のリスト
UL 61010-1:(オシロスコープ)
UL 61010-031:(プローブ)
カナダ規格
CAN/CSA-C22.2 No. 61010-1:(オシロスコープ)
CAN/CSA-C22.2 No. 61010-031:(プローブ)
その他の基準に対する適合性
IEC 61010-1:(オシロスコープ)
IEC 61010-031:(プローブ )
機器の種類
テスト機器および計測機器。
安全クラス
クラス 1 - アース付き製品。
汚染度
製品内部およびその周辺で発生する可能性がある汚染度の
尺度です。通常、製品の内部環境は外部環境と同じ規定が
123
4
5
6
宣言 - EMC
適用されるものとみなされます。製品は、その製品に指定さ
れている環境でのみ使用してください。
汚染度 1。汚染なし、または乾燥した非導電性の汚染
のみが発生します。このカテゴリの製品は、通常、被包
性、密封性のあるものか、クリーン・ルームでの使用を想
定したものです。
汚染度 2。通常、乾燥した非導電性の汚染のみが発生
します。ただし、結露によって一時的な導電性が発生す
ることもまれにあります。これは、標準的なオフィスや家
庭内の環境に相当します。一時的な結露は製品非動作
時のみ発生します。
汚染度 3。伝導性のある汚染、または通常は乾燥して導
電性を持たないが結露時に導電性を帯びる汚染。これ
らは、温度、湿度のいずれも管理されていない屋内環
境に相当します。日光や雨、風に対する直接の曝露か
らは保護されている領域です。
汚染度の評価(オシロスコープおよびプローブ)
汚染度 2(IEC 61010-1 の定義による)。 これは、屋内の乾燥
した場所での使用についてのみの評価です。
測定および過電圧カテゴリについて
本製品の測定端子は、測定する電源電圧について次の 1 つ
または複数のカテゴリに評価されます。
カテゴリ II:固定設備の屋内配線に直接接続される回路
(壁コンセントおよび類似する設備)。
カテゴリ III:屋内配線および配電系統。
カテゴリ IV:建物に電気を供給する起点部分。
注: 過電圧カテゴリ定格に該当するのは主電源回路のみで
す。測定カテゴリ定格に該当するのは測定回路のみです。製
品内部のその他の回路にはいずれの定格も該当しません。
過電圧カテゴリ(オシロスコープ): 過電圧カテゴリ II(IEC
61010-1 の定義によ る)。
測定カテゴリ(オシロスコープおよびプローブ): 測定カテゴ
リ II(IEC 61010-1 の定義による)。
環境条件について
本製品が環境に及ぼす影響については、ユーザ・マニュア
ルを参照してください。
操作の概要
操作に関する詳細な情報および製品仕様については、ユー
ザ・マニュアルを参照してください。
電源
90 ~ 264 V
ください。 400 Hz 電源の場合、電源は 90 ~ 132 V
360 ~ 440 Hz を供給する必要があります。 電力定格は最
大30Wです。
このオシロスコープはアース近傍電位の中性線を使用した
単相電源で動作します。 グランドを基準にした測定のみが
想定されています。安全な操作のためには、電源コード内の
接地線を通じた保護用のグランド接続が不可欠です。
付属の電源コードをリア・パネルの電源コネクタ(1)に接続し
て、電源をオンにします。 オシロスコープ上部の電源ボタン
(2)を押して、オシロスコープの電源を入れます。 オシロス
コープの電源をオフにするには、オシロスコープ上部の電源
ボタンを再び押します。 電源を完全に遮断する場合は、オ
シロスコープのリア・パネルから電源コードを抜きます。
、45 ~ 66 Hz を供給する電源を使用して
AC RMS
AC RMS
入力 定格
プローブ・チッ
プ
300 V
示すように低下。
、測定カテゴリ II;以下のグラフに
RMS
プローブと回路の接続
被測定回路との接続には、プローブに付属のスタンダード・
アクセサリを使用します。プローブを使用する前に、プローブ
の定格をチェックしてください。プローブ本体には、感電を防
ぐための指ガードがあります。 プローブをオシロスコープに
接続したら、実際に測定を行う前に、グランド・リードをグラン
ドに接続してください。
コントロール
フロントパネルは、使
いやすいように機能別に分けられてい
ます。
表 2: 環境要件
特性 説明
動作温度(オシ
ロスコープ)
動作温度(プ
ローブ)
動作湿度(オシ
ロスコープ)
動作湿度(プ
ローブ)
動作高度(オシ
ロスコープおよ
びプローブ)
プローブに関する情報
TPP0051 型 、 TPP0101 型、および TPP0201 型 は 、 減 衰 比
10:1、高インピーダンスの受動プローブです。これらのプロー
ブにはお客様が修理可能な部品はありません。
警告: プローブをオシロスコープから浮かせた状態で使
用しないでください。
プローブ使用中の感電を避けるため、プローブが電圧
ソースに接続されている間はプローブ・ヘッドの金属部分
には触れないでください。また、プローブを被測定回路
、
に接続する前に、グランド・リードとグランド・スプリングが
完全に噛み合っていることを確認してください。
プローブとオシロスコープの接続
以下の図に示すようにプローブを接続します。
0 ℃ ~ +50 ℃、最大勾配 5 ℃/min、結露
なし、高度 3,000 m 以下
–10 ℃ ~ +55 ℃(14 ゚F ~ +131 ゚F)
+40 ℃ 以下で 5% ~ 45% の相対湿度(%
RH)、40 ℃超、+50 ℃ 以下で 5% ~ 45% の
相対湿度、結露なし、最高湿球温度 +37 ℃
(+50 ℃で相対湿度は 45 % に低下)
+30 ℃(86 ゚F)以下で相対湿度 5% ~ 95%、
+30 ℃ ~ +55 ℃(131 ゚F)で相対湿度 5% ~
65%
3,000 m(10,000 フィ ート)以下
1. 入力コネクタ
1および2:波形表示用の入力コネクタです。
Ext Trig(外部トリガ):外部トリガ・ソース用の入力コネク
タです。
2. 垂直軸コントロール
Position(位置):波形の垂直方向の位置を調整します。
Scale( スケール) :垂直軸スケール・ファクタを選択しま
す。
Menu:メニュー項目を表示し、波形表示のオンとオフを
切り替えます。
3. 水平軸コントロール
Position(位置) :すべての波形の水平方向の位置を調
整します。
Scale(スケール):水平軸の時間/div(スケール・ファク
タ)を選択します。
Acquire(取得):サンプル、ピーク検出、または平均デー
タの取得を指定します。
4. トリガ・コントロール
Level(レベル):波形を取り込むために信号が超える必
要のある振幅レベルを設定します。
Trig Menu:Trigger Menu を表示します。
Force Trig(強制トリガ):トリガの検出の有無にかかわら
ず、現在の波形取得を完了します。
表 1: 最大電圧定格
入力 定格
オシロスコープ
のチャンネルの
BNC 入力
プローブのグラ
ンド基準リード
300 V
で低下し、3 MHz 以上では 13 V ピーク AC
まで低下。正弦波信号または DC 入力信
号に基づきます。
0V
、100 KHz を超えると 20 dB/decade
RMS
プローブの補正
オシロスコープの入力特性には個々に差異があるため、オ
シロスコープ上でプローブをあるチャンネルから別のチャン
ネルに接続し直した後は、プローブの低周波補正を調節し
なければならない場合があります。
警告: 感電を避 け る ため に、オシ ロ ス コ ープの Probe
Comp(プローブ補正)信号への接続は、この調節を行う
ときのみにしてください。また、補正の調整には絶縁の施
された調整ツールのみを使用してください。
校正済みの 1 KHz 方形波(1 ms/div で表示)の立上りエッ
ジと立下りエッジの間で顕著な差異が認められる場合は、以
下の手順を実行して低周波補正を最適化してください。
1. 測定に使用するオシロスコープのチャンネルにプロー
ブを接続します。
2. オシロスコープのフロント・パネルにあるプローブ補正出
力端子にプローブを接続します。
3. Autoset を押すか、その他の方法でオシロスコープを調
節し、安定した波形表示が得られるようにします。
4. ディスプレイに上端が完全に平坦な方形波が表示され
るまで、プローブのトリマを調整します(下図を参照)。
安全に保守点検していただくために
「安全に保守点検していただくために」のセクションには、製
品の保守点検を安全に行うために必要な詳細な情報が記載
されています。資格のあるサービス担当者以外は、保守点検
手順を実行しないでください。保守点検を行う前には、この
「安全に保守点検していただくために」と「安全にご使用いた
だくために」を読んでください。
感電を避けてください: 露出した接続部には触れないでくだ
さい。
保守点検は単独で行わないでください: 応急処置と救急蘇
生ができる人の介在がないかぎり、本製品の内部点検や調
整を行わないでください。
電源を切断してください: 保守点検の際にカバーやパネル
を外したり、ケースを開く前に、感電を避けるため、製品の電
源を切り、電源コードを電源コンセントから抜いてください。
電源オン時の保守点検には十分注意してください: 本製品
には、危険な電圧や電流が存在している可能性があります。
保護パネルの取り外し、はんだ付け、コンポーネントの交換
をする前に、電源の切断、バッテリの取り外し(可能な場合)、
テスト・リードの切断を行ってください。
修理後の安全確認: 修理を行った後には、常にグランド導
通と電源の絶縁耐力を再チェックしてください。
Copyright © Tektronix, Inc. All rights reserved. www.tektronix.com
xx
TBS1000B
合规性和安全
说明
3
23-01
071-32
说明: 本文但凡提及“探头”之处,仅均指示波器的标
准附件 TPP0051、TPP0101 或 TPP0201 探头。
Tektronix 联系信息
Tektronix, Inc., 14150 SW Karl Braun Drive, P.O. Box
500, Beaverton, OR 97077, USA
有关产品信息、销售、服务和技术支持:
在北美地区,请拨打 1-800-833-9200。
其他地区用户请访问 www.tektronix.com 查找当地的
联系信息。
常规安全概要
请务必按照规定使用产品。 详细阅读下列安全性预防措
施,以避免人身伤害,并防止损坏本产品或与本产品连接
的任何产品。 认真阅读所有说明。 保留这些说明以备将
来参考。
为了保证正确安全地操作产品,除本手册规定的安全性预
防措施外,您还必须遵守普遍公认的安全规程。
产品仅限经过培训的人员使用。 只有了解相关危险的合
格人员才能进行开盖维修、保养或调整。
使用前,请始终检查产品是否来自已知来源,以确保正确
操作。
本产品不适用于检测危险电压。
避免起火或人身伤害:
使用合适的电源线: 只使用本产品专用并经所在国家/地
区认证的电源线。
不要使用为其他产品提供的电源线。
正确连接和断开: 将探头连接到被测电路之前,先将探头
输出端连接到测量仪器。在连接探头输入端之前,请先将
探头基准导线与被测电路连接。将探头与测量仪器断开之
前,请先将探头输入端及探头基准导线与被测电路断开。
将产品接地: 本产品通过电源线的接地导线接地。 为避
免电击,必须将接地导线与大地相连。 在对本产品的输
入端或输出端进行连接之前,请务必将本产品正确接地。
不要切断电源线的接地连接。
以地参考的示波器使用: 使用 TBS1000B 示波器时,请勿
使 TPP 系列探头的基准导线浮地。 参考引线必须连接到
大地电势 (0 V)。
遵循所有终端的额定值: 为避免火灾或电击危险,请遵循
产品上所有的额定值和标记说明。在连接产品之前,请先
查看产品手册,了解额定值的详细信息。
只能将探头基准导线连接到大地。
不要超过本产品、探头或附件中各组件的额定值最低的测
量类别 (CAT) 额定值和电压或电流额定值。 在使用 1:1
测试引线时要小心,因为探头端部电压会直接传输到产品
上。
对任何终端(包括公共终端)施加的电压不要超过该终端
x
的最大额定值。
纵向测量过量程(削波): 波形超出了屏幕(过量程),
在测量度数中显示 ?,以此指明存在无效值。请调整垂直
比例,以确保读数有效。
避免电击: 探头或测试导线连接到电压源时请勿插拔。在
使用探头附件时,禁止超过探头或其附件的最低额定值
(以较小者为准),包括测量类别和电压额定值。
断开电源: 电源开关可以使产品断开电源。 请参阅有关位
置的说明。 请勿将设备放在难以操作电源开关的位置;
必须保证用户可以随时操作电源线,以在需要时快速断开
连接。
切勿开盖操作: 请勿在外盖或面板拆除或机壳打开的状态
下操作本产品。 可能有危险电压暴露。
在怀疑存在故障时请勿进行操作: 如果怀疑本产品已损
坏,请让合格的维修人员进行检查。
产品损坏后请弃用。如果损坏或者工作不正常,请勿使
用。 如果怀疑产品存在安全问题,请关闭产品并断开电
源线。 并做清晰标记以防其再被使用。
在使用之前,请检查电压探头、测试引线和附件是否有
机械损坏,如损坏则予以更换。 如果探头或测试引线损
坏、金属外露或出现磨损迹象,请勿使用。
在使用之前请先检查产品外表面。 查看是否有裂纹或缺
失部件。 仅使用规定的替换部件。
小心高电压: 了解您正在使用的探头的额定电压,请不要
超出这些额定值。 重要的是知道并理解两个额定值:
探头端部到探头参考引线的最大测量电压。
从探头参考引线到接地的最高浮动电压。
这两个额定电压取
决于探头和您的应用。 请参阅手册的
“技术规格”部分了解更多详情。
远离裸露电路: 电源接通后请勿接触外露的接头和元件。
保持适当的通风: 示波器通过对流冷却。在产品的两端、
后部以及顶部要
分别留出 2 英寸的空间以便使空气流通
顺畅。
请勿在潮湿环境下操作:
请勿在易燃易爆
的气体中操作:
保持产品表面清洁干燥: 按照操作条件的要求,经常检查
示波器和探头。
请按照下述步骤清洁仪器的外表面:
1. 使用不起毛的抹布清除示波器和探头外部的浮尘。请
千万小心以避免刮擦到光洁的显示器滤光材料。
2. 使用一块用水浸湿的软布清洁示波器。要更彻底地清
洁,可使用 75% 异丙醇的水溶剂。
注意: 在外部清洁时避免湿气进入设备内部。使用的
清洁溶剂量足以蘸湿软布或棉签即可。为避免损坏示
波器或探头,请勿将其置于雾气、液体或溶剂中;请
勿使用任何研磨或化学清洁剂。
本手册中的术语
本手册中可能使用以下术语:
警告: “警告”声明指出可能会造成人身伤害或危及
生命安全的情况或操作。
注意: “注意”声明指出可能对本产品或其他财产造
成损坏的情况或操作。
产品上的符号和术语
产品上可能出现以下术语:
DANGER(危险)表示您看到该标记时可直接导致人身
伤害的危险。
WARNING(警告)表示您 看到该标记时不会直接 导致
人身伤害的危险。
CAUTION(注意)表示可 能会对本产品或其他财 产带
来的危险。
产品上可能出现以下符号:
符合性信息
本部分列出了仪器遵循的 EMC(电磁兼容性)、安全和环
境标准。
EMC 符合性
EC 一致性声明 - EMC
符合 2004/108/EC 指令 有关电磁兼容性的要求。经证明
符合《欧洲共同体官方公报》中所列的以下技术规格:
EN 61326-1:2006, EN 61326-2-1:2006: 测量、控制和实
验室用电气设备的 EMC 要求。
CISPR 11:2003。 放射和传导辐射量,组 1,A 类
IEC 61000-4-2:2001。 静电放电抗扰性
IEC 61000-4-3:2002。 射频电磁场抗扰性
IEC 61000-4-4:2004。 电气快速瞬变/突发抗扰性
IEC 61000-4-5:2001。 电源线路浪涌抗扰性
IEC 61000-4-6:2003。 传导射频抗扰性
IEC 61000-4-11:2004。 电压跌落和中断抗扰性
EN61000-3-2:A1/A2 2009: 交流电源线谐波辐射
EN 61000-3-3:2008: 电压变化、波动和闪变
欧洲联系方式:
Tektronix UK, Ltd.
Western Peninsula
123
4
5
6
Western Road
Bracknell, RG12 1RF
United Kingdom(英国)
1
本产品仅在非居民区内使用。在居民区内使用可能造成电磁
干扰。
2
当该设备与测试对象连接时,可能产生超过此标准要求的辐
射级别。
3
为确保符合上面列出的 EMC 标准,应使用高质量的屏蔽接
口电缆。
4
该仪器将展示在受到 IEC 61000-4-3 规定的辐射干扰情况下 ≤
1.0 分度的波形位移以及 ≤ 2.0 分度的峰-峰值噪声增加。
5
该仪器在受到 IEC 61000-4-6 规定的传导干扰情况下将表现出 ≤
0.5 格的波形位移以及 ≤ 1.0 格的峰-峰值噪声增加。
6
性能标准 C 应用于 70%/25 周期电压跌落以及 0%/250 周期电压
中断测试水平 (IEC 61000-4-11)。如果仪器在电压跌落或中断时
断电,将需要十秒钟以上的时间才能返回到以前的工作状态。
澳大利亚/新西兰一致性声明 – EMC
根据 ACMA,符合 Radiocommunications Act(无线电通信
法)有关 EMC 规定的以下标准:
CISPR 11:2003。 放射和传导发射量,组 1,A 类,
依照 EN 61326。
澳大利亚/新西兰联系方式:
Baker & Mckenzie
Level 27 (27 级)
AMP Centre, 50 Bridge Street
Sydney NSW 2000
澳大利亚
安全符合性
EC 符合性声明 - 低电压
经证明符合《欧洲共同体官方公报》中所列的以下技术规
范:
低电压指令 2006/95/EC。
EN 61010-1(示波器)
EN 61010-031(探头)
美国国家认可的测试实验室 (NRTL) 列表
UL 61010-1(示波器)
UL 61010-031(探头)
加拿大认证
CAN/CSA-C22.2 No. 61010-1(示波器)
CAN/CSA-C22.2 No. 61010-031(示波器)
其他符合性
IEC 61010-1(示波器)
IEC 61010-031(探头)
设备类型
测试和测量设备。
安全级别
1级-接地产品。
污染度说明
污染度是指对产品周围和产品内部环境中可能出现的污染
的一种量度。通常认为产品的内部环境与外部环境相同。
产品只应在其规定环境中使用。
污染度 1。无污染或仅出现干燥、非导电性污染。此
类别的产品通常进行了封装、密封或被置于干净的房
间中。
污染度 2。通常只发生干燥、非导电性污染。偶尔会
发生由凝结引起的临时传导。典型的办公室/家庭环
境属于这种情况。只有当产品处于非使用状态时,才
会发生临时凝结。
污染度 3。导电性污染,或由于凝结会变成导电性污
染的干燥、非导电性污染。此类场所为温度和湿度不
受控制的建有遮盖设施的场所。此类区域不受阳光、
雨水或自然风的直接侵害。
污染度额定值(示波器和探头)
污染度 2(如 IEC 61010-1 中定义)。仅适合在室内的
干燥场所使用。
测量和过压类别说明
本产品上的测量端子可能适合测量以下一种或多种类别的
市电电压(请参阅产品和手册中标示的具体额定值)。
类别 II。 电路使用点(插座和类似点处)直接连接
到建筑物布线。
类别 III。 在建筑物布线和配电系统中。
类别 IV。 在建筑物电源处。
说明: 仅市电电源电路具有过压类别额定值。 仅测量电
路具有测量类别额定值。 产品中的其他电路不具有其中
任何一种额定值。
过压类别(示波器): 过压类别 II(如 IEC 61010-1 中
的定义)。
测量类别(示波器和探头): 测量类别 II(按 IEC
61010-1 中定义)。
环境注意事项
有关产品的环境影响,请参阅用户手册。
操作概述
有关完整的操作信息和产品规格,请参阅用户手册。
电源
请使用电压为 90 到 264 V
电源。如果使用频率为 400 Hz 的电压,则其电压必须为
90 到 132 V
,频率为 360 到 440 Hz。功率额定值最
AC RMS
高不得超出 30 W。
本示波器使用带接地或近地中性导线的单相电源。该仪器
的用途仅限于以地为参考的测量。通过电源线中的接地导
线提供保护性接地对于安全操作十分重要。
将所提供的电源线连接至后面板的电源接头 (1),即可接
通示波器的电源。按下示波器顶部的电源按钮 (2) 即可
,频率为 45 到 66 Hz 的
AC RMS
打开示波器的电源。若要关闭示波器,在此按下示波器顶
部的电源按钮即可。如果要完全切断电源,请从示波器后
面板断开电源线。
表 1: 最大电压额定值
输入 额定值
示波器通道
BNC 输入
探头接地基准
导线
探头端部 300 V
300 V
,测量类别 II;100 kHz 以上时
RMS
以 20 dB/10 倍频程下降,至 3 MHz 及
以上时为 13 V 交流峰值。基于正弦波
或直流输入信号。
0V
,测量类别 II;按下图所示下
RMS
降。
表 2: 环境额定值
特性 说明
工作温度(示
波器)
工作温度(探
头)
工作湿度(示
波器)
0℃ 至 +50℃,最大梯度 5℃/分钟,无
凝结,最高海拔 3000m
–10℃ 至 +55℃(14℉ 至 +131℉)
+40℃ 及以下时相对湿度 (% RH) 为 5% 到
85%,+40℃ 到 +50℃ 时为 5% 到 45%,
无凝结,同时限制于最大湿球温度 +37℃
(在 50℃ 时降至相对湿度 45 % RH)
特性 说明
工作湿度(探头)不高于 +30℃ (86℉) 时相对湿度 (%RH)
工作海拔(示
波器和探头)
为 5% 到 95%;+30℃ 到 +55℃ (131℉)
为 5% 到 65%
最高 3000m (10,000 ft)
探头信息
TPP0051、TPP0101 和 TPP0201 探头为 10X 衰减的高阻抗
无源探头。 此类探头无可维修件。
警告: 请勿在任何示波器时使此类探头浮地。
为避免在使用探头是发生电击,务必将手指置于探头
本体上的防护装置之后;在探头与电源相连时,请勿
触摸探头顶部的金属部分;在将探头连接至待测电路
前,务必确保地线或接地弹簧已完全匹配。
将探头连接到示波器
如图所示连接探头。
补偿探头
由于示波器输入特性不同,将探头在示波器的通道之间调
换时,探头的低频补偿可能需要调整。
警告: 为避免发生电击,只能在进行此项调整时方可
连接至示波器上的探头补偿信号,且在进行补偿调整
时,只能使用已绝缘的调整工具。
如果在 1 ms/格处显示的 1 kHz 校准方波显示出上升和
下降边沿之间存在显著差异,请执行以下步骤优化低频补
偿:
1. 将探头连接到计划用于测量的示波器通道上。
2. 将探头连接到示波器前面板上的探头补偿输出端子。
3. 按下“自动设置”或以其他方式调整示波器,使其显
示一条稳定波形。
4. 调整探头的微调电容器,直至在显示器上看到一个完
美的平顶方波。(见插图。)
将探头连接到电路
使用探头附带的
标准附件来连接电路。使用探头之前,请
查看并遵守探头的额定值。探头主体周围的防护装置可保
护手指以防止
电击。进行任何测量前,将探头连接到示波
器并将地线接地。
控制
前面板分成几个易于操作的功能区。
1. 输入连接器
1&2. 波形显示用输入连接器。
Ext Trig(外部触发)。 外部触发源用输入连接
器。
2. 垂直控制
定位。 垂直定位波形。
标度。 选择垂直标度因子。
菜单。 显示菜单选择项并打开或关闭通道波形显
示。
3. 水平控制
定位。 调整全部波形的水平位置。
标度。 选择水平时间/格(标度因子)。
采集。 指定取样、
峰值检测或平均数据采集。
4. 触发控制
电平。 设置信号采集波形时所必需经过的电平幅
度。
触发菜单。 显示触
发菜单。
强制触发。 完成当前波形采集,无论示波器是否检
测到触发。
维修安全概要
“维修安全概要”
部分包含安全执行维修所需的其他信
息。 只有合格人员才能执行维修程序。 在执行任何维
修程序之前,请阅
读此“维修安全概要”和“常规安全概
要”。
避免电击: 接通电源时,请勿触摸外露的连接。
请勿单独进行维修: 除非现场有他人可以提供急救和复苏
措施,否则请勿
断开电源: 为避
对本产品进行内部维修或调整。
免电击,请先关闭仪器电源并断开与市电
电源的电源线,然后再拆下外盖或面板,或者打开机壳以
进行维修。
带电维修时要小
心操作: 本产品中可能存在危险电压或电
流。 在卸下保护面板,进行焊接或更换元件之前,请先
断开电源,卸下
维修后验证安全
电池(如适用)并断开测试导线。
性: 请始终在维修后重新检查接地连续性
和市电介电强度。
版权所有 © Tektronix, Inc. 保留所有权利。 www.tektronix.com
 Loading...