


xx
ZZZ
SourceXpress
®
Waveform Creation Application
Printable Help Document
*P077114501*
077-1145-01


SourceXpress
®
Waveform Creation Application
ZZZ
Printable Help Document
www.tektronix.com
077-1145-01

Copyright © Tektronix. All rights reserved. Licensed software products are owned by Tektronix or its
subsidiaries or suppliers, and are protected by national copyright laws and international treaty provisions.
Tektronix products are covered by U.S. a nd foreign patents, issued and pending. Information in this
publication supersedes that in all previously published material. Specifications and price change privileges
reserved.
TEKTRONIX and TEK are registered trademarks of Tektronix, Inc.
SourceXpress is a registered trademark of Tektronix, Inc.
Microsoft, Windows, Windows XP Professional, and Windows 7 are registered trademarks of Microsoft
Corporation.
MATLAB is a registered trademark of The Mathworks, Inc.
Supports SourceXpress Software Version 5.0 and above.
Help part number: 076–0381–01
PDF of Help system part number: 077–1145–01
Contacting Tektronix
Tektronix, Inc.
14150 SW Karl Braun Drive
P. O . B o x 500
erton, OR 97077
Beav
USA
For product information, sales, service, and technical support:
In North America, call 1-800-833-9200.
Worldwide, visit www.tektronix.com to find contacts in your area.

Table of Contents
Introduction
Welcome............................................................................................................. 1
Documentation......................................... ................................ ............................. 2
Support information....... .................................. ................................ ....................... 3
Feedback........................ ................................ ................................ ..................... 4
Orientation
Elements of the display ............................................................................................ 5
Play button ................. ................................ .................................. ....................... 5
Menu bar............................................................................................................. 6
File menu ............................................................................................................ 6
Connectivity menu ................ .................................. ................................ ............... 8
Tools menu ......................... .................................. ................................ ............... 9
Windows menu .......... ................................ .................................. ........................ 10
Help menu........ ................................ ................................ .................................. 10
Open and save tools ............................................................................................... 11
Restore tools ............................. ................................ .................................. ........ 12
Screen interface features ........................ ................................ .................................. 12
Table of Contents
Connectivity
Connectivity.................. ................................ ................................ ...................... 15
Connected Generators list ...................... .................................. ................................ 15
Connect to a virtual generator
Connect to a virtual generator............................................................................... 17
Connect to an instrument
Connect to an instrument .................................................................................... 20
Waveforms tab
Waveforms tab ..................................................................................................... 23
Adding a waveform ........................... ................................ ................................ .... 23
Saving a waveform ................................................................................................ 27
Assign a waveform to a channel ........................... ................................ ...................... 27
Properties ............... .................................. ................................ .......................... 28
Sequence tab
Sequence tab . ................................ ................................ ................................ ...... 31
Adding a sequence... ................................ ................................ .............................. 32
Saving a sequence ......................... .................................. ................................ ...... 34
SourceXpress Printable Help Document i

Table of Contents
Assigning tracks to channels ................. ................................ .................................. .. 34
Edit a sequence .................................................................................................... 36
Waveform Plug-ins
Waveform Plug-ins ............................ ................................ .................................. .. 37
Matlab file creation
MATLAB waveform files............................. .................................. .......................... 39
Licensing
Licensing overview.................... ................................ .................................. .......... 43
How to purchase a license ........ ................................ .................................. .............. 44
How to install a license ........................................................................................... 44
How to return a license ........................................................................................... 46
Index
ii SourceXpress Printable Help Document

Introduction Welc ome
Welcome
SourceXpress is a waveform creation software application. With the various optional waveform modules,
you’re able to create a wide variety of digitally modulated signals and impairment waveforms.
SourceXpress is designed to interface seamlessly with AWG70000A Series arbitrary waveform generators,
either connected to a virtual generator or connected to an instrument.
Connected to a Virtual Generator. The default mode of operation is for SourceXpress to connect to a
Virtual AWG7000A series instrument, configured by you.
When connected to a virtual generator, SourceXpress provides a simulation of the the AWG70000A Series
instrument work space, allowing you access to all c ontrols and settings as if you were working with
an actual instrument.
Because you can create as many virtual generators as you like, each with different configurations, you can
create all your waveforms, sequences, and setups specific to instrument types, all in the absence of an
instrument. Then when an instrument is available, you can simply recall your saved files.
Connec
network for a AWG70000A Series instrument and connect directly to the instrument. The interface of the
AWG70000A instrument is displayed in the SourceXpress application window, providing you access to
all instrument controls, directly from SourceXpress. (The instrument itself displays a message that it is
being externally controlled.)
You can remotely connect to multiple AWG70000A series instruments, and control them, one at a time,
via SourceXpress.
In addition, you can control an active generator via the instruments GPIB programming commands. You
must send the GPIB commands to SourceXpress and then SourceXpress passes the command to the active
generator. Refer to the instrument’s programming manual for instrument specific commands.
NO
to the documentation for instrument type chosen.
ted to an instrument. With SourceXpress installed on a networked PC, the software can scan the
TE. Menus and controls of the selected active generator are not described in this help system. Refer
SourceXpress Printable Help Document 1
Introduction Documentation
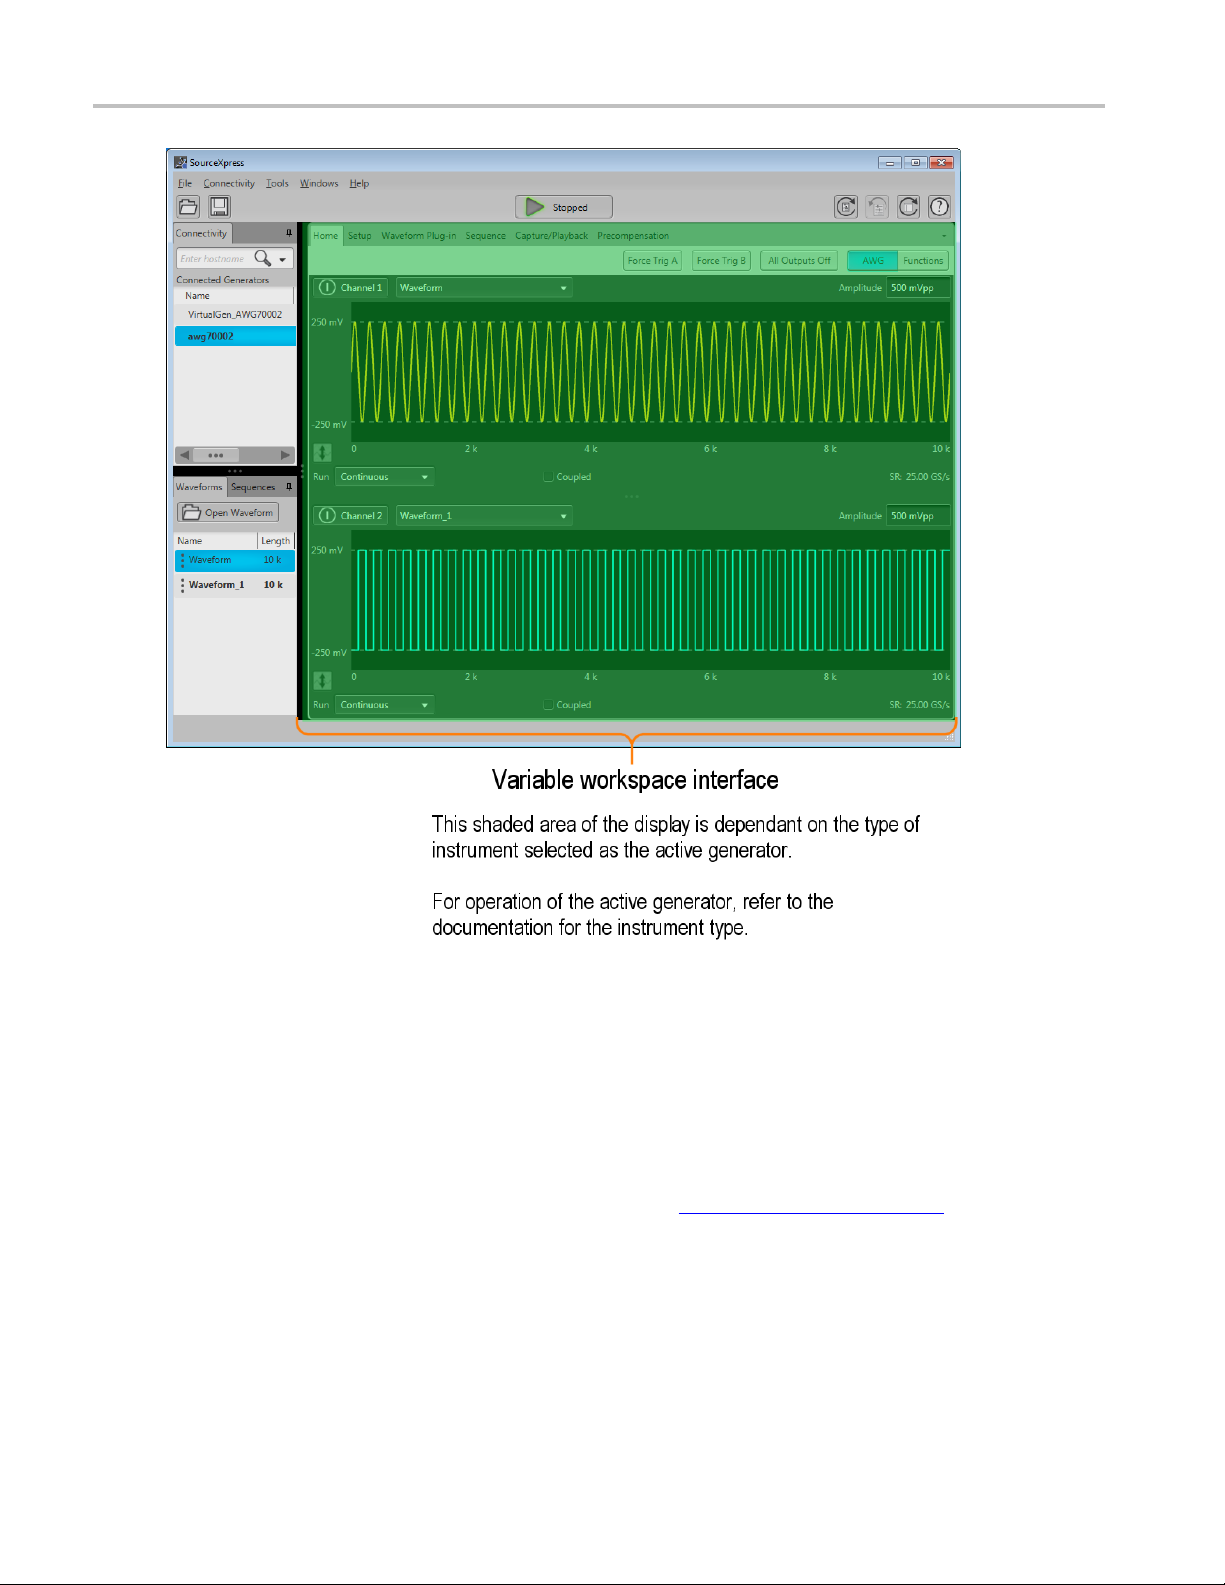
Workspace interface
The workspace provided in SourceXpress is dependent on the chosen active generator, regardless of
whether it is a virtual generator or connected to an instrument.
For operating information about the controls of the displayed generator, refer to the documentation
available for the specific instrument.
All documentation is available on the Tektronix web site (www.Tektronix.com/manuals
).
Documentation
In addition to this application Help system, the following documentation is available for the software.
2 SourceXpress Printable Help Document

Introduction Support information
All documentation is available on the Tektronix web site (www.Tektronix.com/manuals ).
To read about Use these documents
SourceXpress operation and user interface help Access the SourceXpress application help from the Help menu for
information on all controls and elements on screen.
The SourceXpr
on the Tektronix web site.
ess help system is also avail able in PDF format, available
SourceXpre
Connected instrument operation and user
interface
Connecte
xxx
ss programmer commands
help
d instrument programmer commands
Support information
Tektronix offers the following services in support of their products:
Technical Support. For application-related questions about a Tektronix product, contact us by
telephone or email ).
Service Support. For service-related questions about a Tektronix product, contact us by telephone
or email ).
Access the S
commands.
This document is available in PDF format located in the program’s
installati
For operation and interface help of a connected instrument, refer to the
instrumen
This is available with the instrument or on the Tektronix web site
For progr
instrument’s documentation.
This is available with the instrument or on the Tektronix web site
ourceXpress programmer m anual for the syntax of remote
on folder and also available on the Tektronix web site.
t’s documentation.
amming information of a connected instrument, refer to the
Tektronix also offers extended warranty and calibration programs a s options on many products. C ontact
your local Tektronix distributor or sales office.
SourceXpress Printable Help Document 3

Introduction Feedback
Feedback
Tektronix values your feedback on our products. To help us serve you better, please send any suggestions,
ideas, or other comments you may have regarding your instrument.
Directyourfeedbacktousbyemailatwww.tek.com/home/mytek/survey .
Pleasebeasspecificaspossible.
Recommended information to include
Instrument hardware, such as display and chassis type
Application software version
Optional information
Your name, company, mailing address, phone number, and FAX number
4 SourceXpress Printable Help Document

Orientation Elements of the display
Elements of the display
The main areas of the application window are shown in the following figure.
Note that the workspace area is not discussed in this document since it’s c ontent is based on the type of
instrument selected as the active generator. For information about controls of the active generator, you can
download the instrument’s documentation from the Tektronix web site.
Play button
The play button starts and stops the waveform playout whenSourceXpressisconnectedtoaninstrument
and the connected instrument is set to Active in the Connected Generators tab.
If a virtual generator is active (selected in the Connectivity tab), the Play button is not enabled.
SourceXpress Printable Help Document 5
Orientation Menu bar
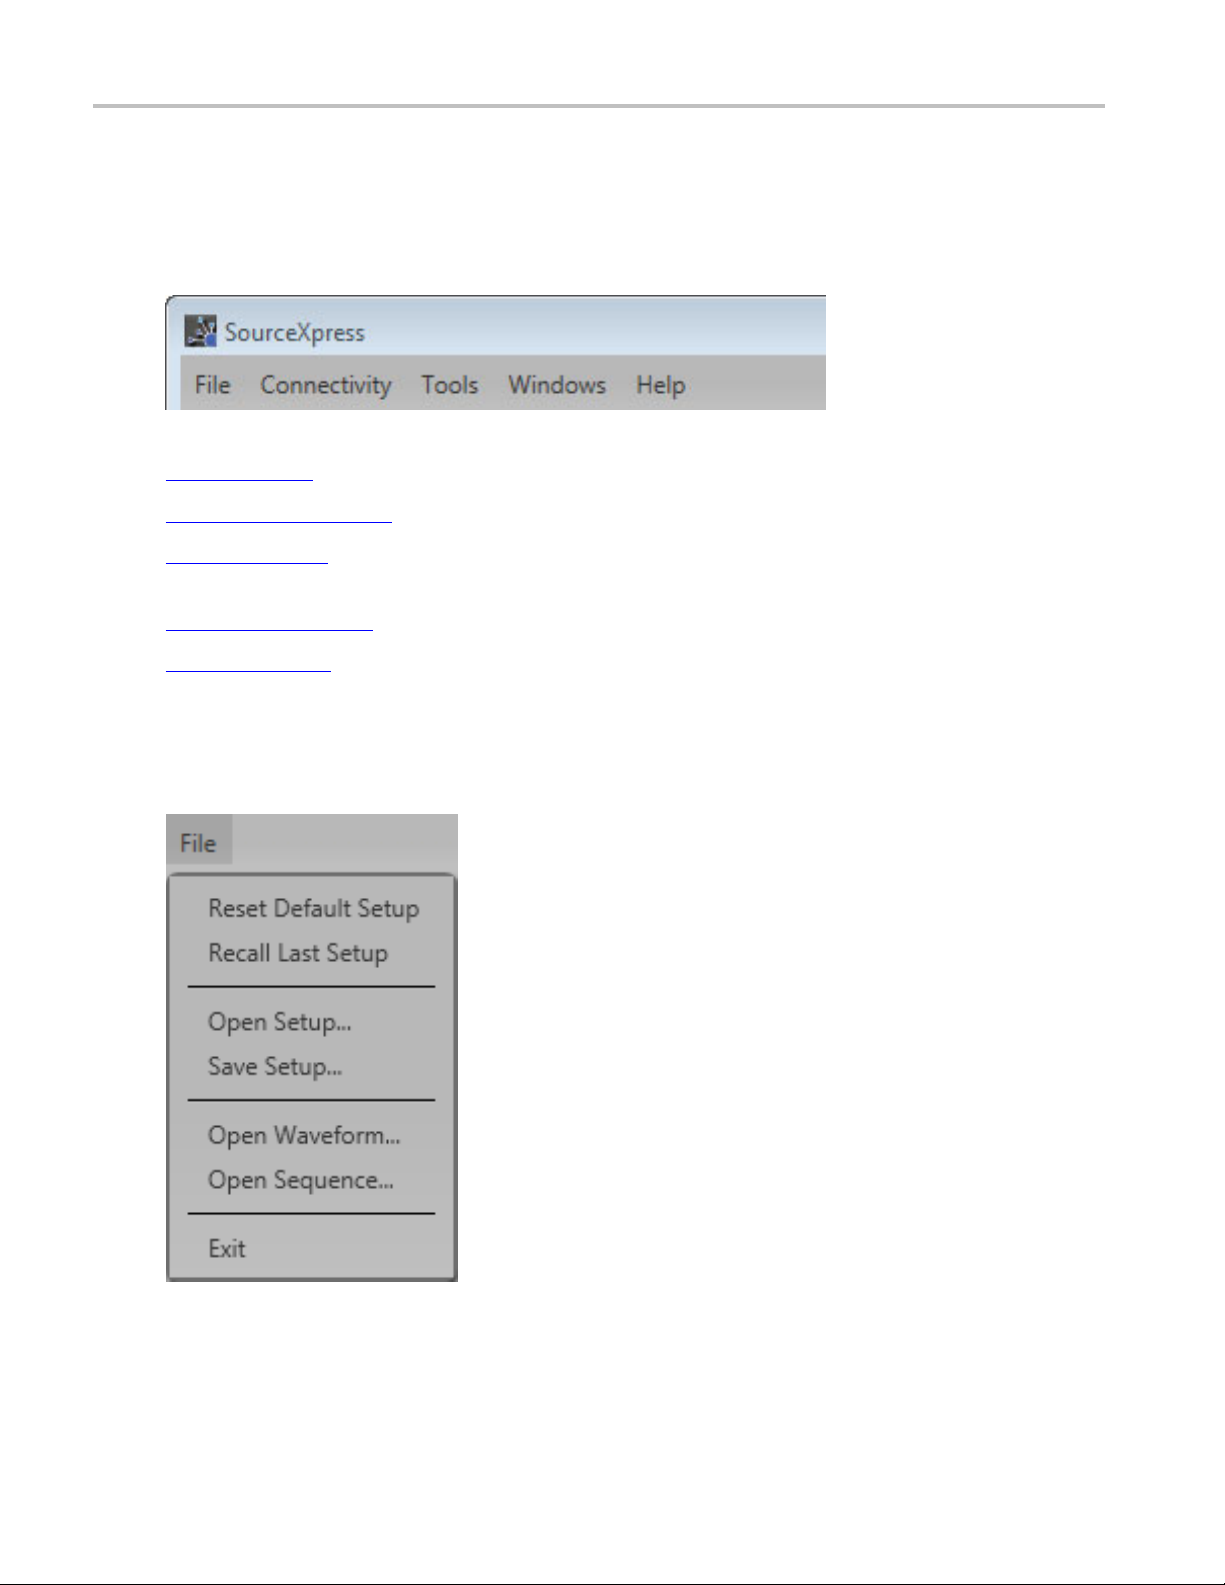
Menu bar
The Menu bar provides access to various actions.
File (see page 6) provides access to various open, save, and setup actions.
Connectivity
Tools
Status bar at the bottom of the screen.
Windows
Help
File me
(see page 8) provides access to add generators to the Connected Generators tab.
(see page 9) allows you to hide pop-up error messages, forcing the errors to only show in the
(see page 10) allows you to collapse or expand the tabbed panels.
(see page 10) provides access to the SourceXpress User manual and information about SourceXpress.
nu
6 SourceXpress Printable Help Document

Orientation File menu
Item Description
Reset Default Setup Returns all settings of the active generator to the factory settings.
NOTE. The cont
ents of the active generator’s Waveforms tab, Sequences tab,
and Captured Signal List are removed.
The contents of these lists of any connected instrument are not affected.
Recall Last Setup
Returns the active generator to the setup that was last accessed.
Open Setup... Opens a window to allow you to navigate to saved setup files. Opening a setup file
returns the
active generator to the settings saved with the setup file. Waveforms
and/or sequences saved with the setup file are also restored, removing all existing
waveform and sequence files .
Save Setup... Saves the current settings as a setup file, allowing you to easily return the application
to a known s
etup. A windows Save As dialog box opens to the most recent location
accessed. Use this window to navigate to where you want to save the setup.
In the Save As window, you can choose to save the setup file (which includes all
waveform
s and sequences) or s ave the setup file without the assets (which excludes
all waveforms and sequences).
ory location is C:\Program Files\Tektronix\SourceXpress\Samples.
The fact
NOTE. Signals listed in the Capture/Playback tab are not saved as part of the
setup file.
Open Waveform... Opens a window to allow you to navigate to saved waveform files. Performs the
ctions as the Open Waveform button in the Waveforms tab, opening any of
same a
the supported file types. Refer to Open File
depending on the type of file being opened.
Open Sequence... Opens a window to allow you to navigate to saved sequence files. To add a sequence
e Sequences tab, select the Open Sequence button. This opens a Windows
to th
dialog box that allows you to navigate to a saved sequence or setup file. If the
sequence or setup file is a valid file type, the sequences are added to the Sequences
nd waveforms (used in the sequence) are added to the Waveforms tab.
tab a
Exit Exits the application.
xxx
for a description of the actions taken
SourceXpress Printable Help Document 7
Orientation Connectivity menu
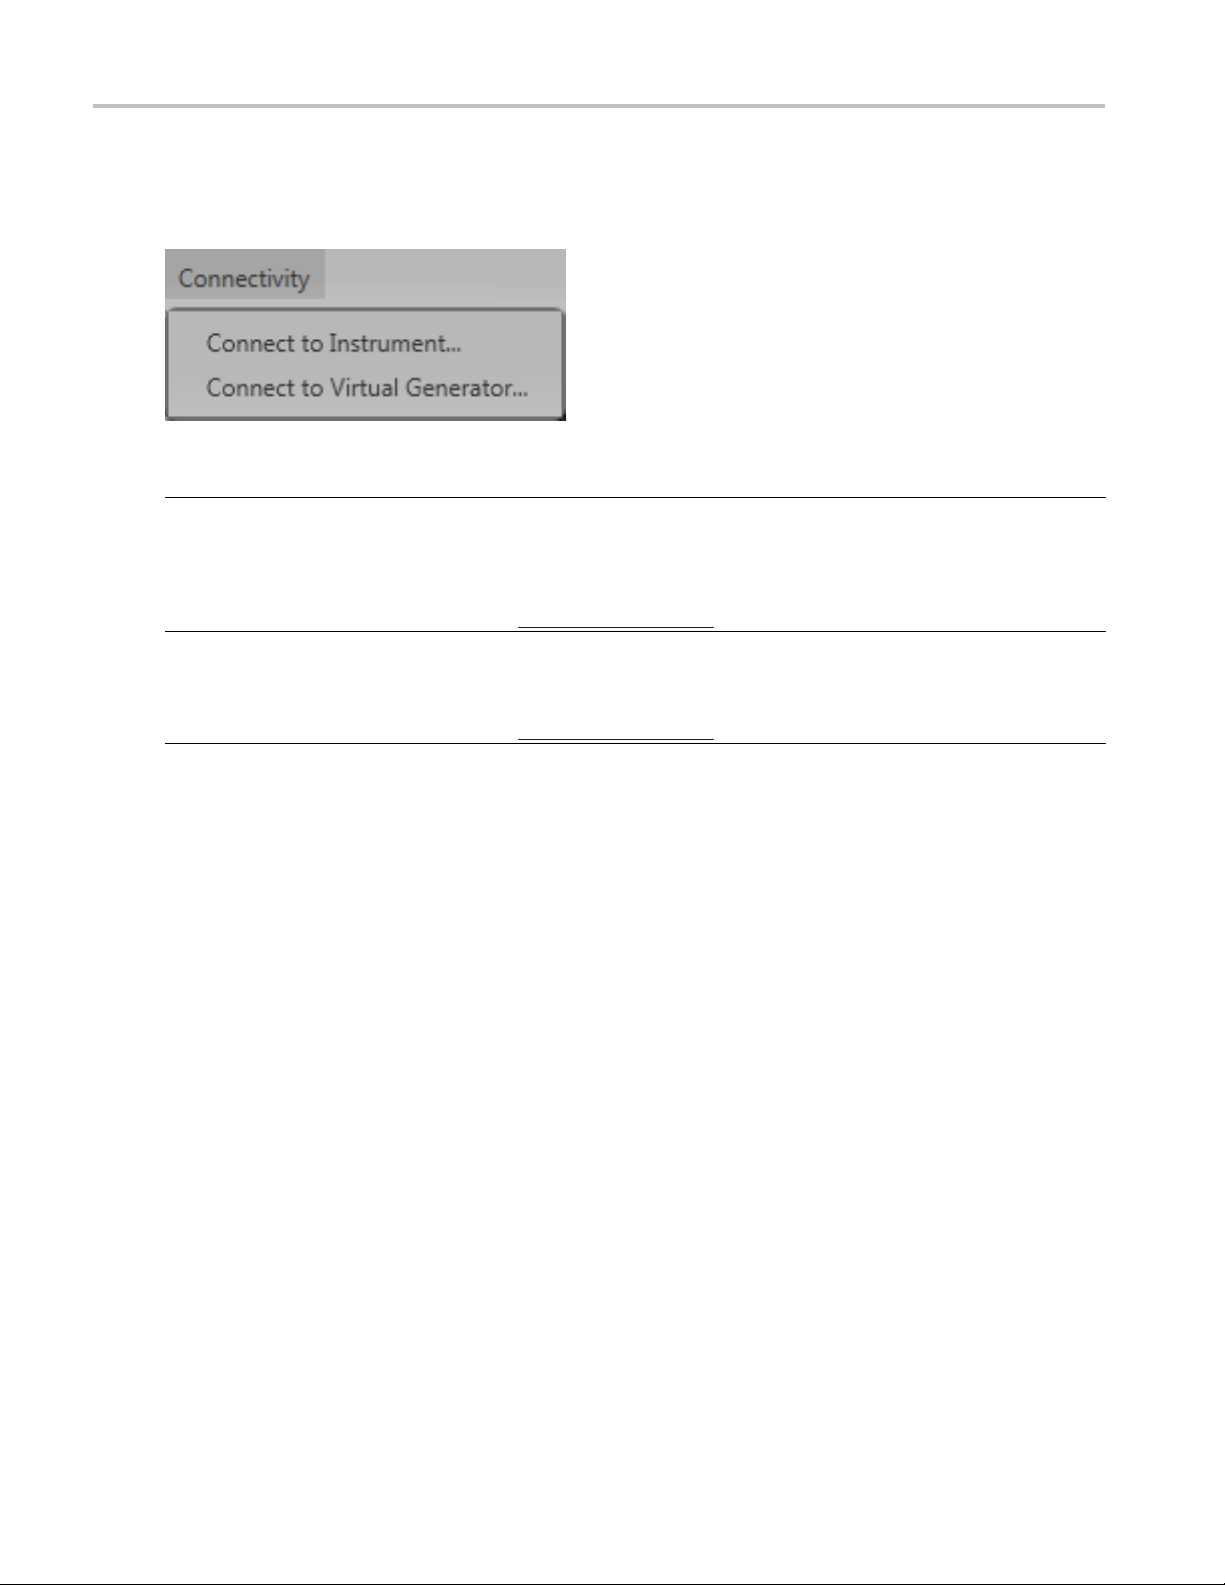
Connectivity menu
Item Description
Connect to Instrument...
Connect to virtual Generator... Displays the Available Generators dialog screen.
xxx
Displays th
Use the screen to select the instrument(s) you want to add to the Connected
Generators tab. This screen also allows you to search for, and add instruments to
the Connec
Refer to Connectivity
Enables you create virtual generators and add selected virtual generators to the
Connecte
Refer to Connectivity
e Available Instruments dialog screen.
ted Generators tab.
(see page 15) for detailed i nformation.
d Generators tab.
(see page 15) for detailed i nformation.
8 SourceXpress Printable Help Document

Orientation Tools men u
Tools menu
Item Description
Disable error pop-ups Enables or disables the pop-up error message windows. When disabled, error
messages only show in the status bar at the bottom of the screen.
The status bar shows the following icon to indicate the pop-up error messages a re
hidden.
Licenses... Displays the License Management window. The License Management window
displays the installed plug-in licenses and access to install or return a license.
See Licensing
xxx
(see page 43) for information about how licensing works.
SourceXpress Printable Help Document 9

Orientation Windows menu
Windows menu
Item Description
Connected Generator List Displays or hides the Connectivity tab.
Waveform List Displays or hides the Waveforms tab.
Sequence List Displays or hides the Sequences tab.
Reset Window Layout Returns all application windows to their original location and display. For example, all
undocked tabs are returned to their original location and all closed tabs are reopened.
xxx
Help menu
Help & Support button: Help & Support provides links where
documentation. About my SourceXpress button: About my SourceXpress provides y ou with detailed
information about your instrument, such as installed options and software version. This information is
helpful when contacting Tektronix about your instrument. You can use the Copy Instrument Info button to
copy and paste the instrument information into another application such as an email program.
Item Description
User manual
About SourceXpress... Provides you with detailed information about your application, such as the software
xxx
This is performs the same function as the
icon in the Restore tools.
you can obtain additional product help and
Opens the application help system, same as the
version. This information is helpful when contacting Tektronix about your instrument.
Use the Copy System Information button to copy and paste the instrument
information into another application such as an email program.
icon.
10 SourceXpress Printable Help Document

Orientation Open and save tools
Open and save tools
The Open and Save tools provide access to various open, save, and setup actions.
Open File allows you to open any of the supported file types. The action taken depends on
the file type opened.
Setup files: Opening a saved setup file returns the instrument to the settings saved with the
setup file. Waveforms and/or sequences saved with the setup file are also restored, removing
all existing waveforms and sequences.
Waveform files: Opening a waveform file from the toolbar allows you to select one waveform
file at a time to load into the Waveforms tab. (Matlab files that contain more than one waveform
will have all waveforms loaded into the Waveforms tab.
See Adding a waveform
(see page 23) for more information.
Sequence files: Opening a sequence file from the toolbar allows you to select one sequence
file at a time to load into the Sequence tab. If the sequence file contains subsequences, these
are also placed in the Sequences tab. All waveforms used in the sequence are loaded into
the Waveforms tab.
See Adding a sequence
A windows Open dialog box opens to most recent location accessed. Use this window to navigate
to your files.
The factory location is C:\Program Files\Tektronix\SourseXpress\Samples.
For more advanced options to add waveforms or sequences, use the Open icons located within
the Waveforms tab and Sequences tab panels.
Save Setup saves the current settings as a setup file, allowing you to easily return the active
generator to a known setup. A windows Save As dialog box opens to the most recent location
accessed. Use this window to navigate to where you want to save the setup.
In the Save As window, you can choose to s ave the setup file (which includes all waveforms
and sequences) or save the setup file without the assets (which excludes all waveforms and
sequences).
The factory location is C:\Program Files\Tektronix\SourceXpress\Samples.
(see page 32) for more information.
NOTE. Signals listed in the Capture/Playback tab are not saved as part of the setup file.
xxx
SourceXpress Printable Help Document 11

Orientation Restore tools
Restore tools
The Restore tools provide access to various actions to return the application to known setups and graphical
layout.
Reset to De
NOTE. The contents of the Waveforms tab, Sequences tab, and Captured Signal List are
removed.
The contents of these lists of any connected instrument are not affected.
Restore Last Setup returns the application to the setup that was last accessed.
Reset Wi
The User
xxx
ndow Layout returns all window panels (moved or undocked) to their original locations.
Manual button displays the help system.
Screen interface features
The graphical user interface (GUI) is designed with some features that are only accessible via the right
and left mouse clicks.
fault Setup returns all settings of the active generator to the factory settings.
12 SourceXpress Printable Help Document
Orientation Screen i nterface features
Left mouse clic
Right mouse click
Pull down lists
k
Left mouse clic
Right mouse cl
In some instances, a right mouse click is the only method to access some menus. For instance,
right click on one of the generators i n the Connected Generators list to display the menu to activate,
disconnect, o
Selections with a triangle incorporate a pull-down list. Left mouse click on the triangle to display
the list.
k on any control or setting to select or activate that control.
ick on various areas, controls, and settings display a menu of available actions.
r display instrument properties.
Drag and drop
Use the left mouse click to drag a waveform from the Waveforms tab onto the waveform display
area. If a waveform is already attached to the channel, the waveform is replaced. If the previous
waveform was currently playing, the new waveform starts playing immediately.
SourceXpress Printable Help Document 13

Orientation Screen interface features
Window resizing The various window panels can be adjusted in size where-ever two panels are divided. Use the
right mouse cl
ick to grab the 3 dot indicator and slide to increase or decrease its size.
Undocking and
docking ta
xxx
bs
Any tab can
be undocked from the GUI. This allows you to reposition a tab to a new location
or completely separate it from the main GUI. U sealeftmouseclicktograbatabandslideit
to a new area. The docking icon displays that you can use to choose how you want to dock
ion) the tab.
(reposit
Use the Reset Window Layout button to return the display to the factory settings.
14 SourceXpress Printable Help Document

Connectivity Connectivity
Connectivity
The Connectivity tab contains the list of generators that are currently connected to SourceXpress, whether
it’s a virtual generator or an instrument. You can connect to as many generators as you wish, but only
one can be act
At initial startup of the SourceXpress, one Virtual generater is connected by default, named
VirtualGen
AWG70002A interface.
Virtual Generator. The default mode of operation is for SourceXpress to connect to the default virtual
generator, simulating an AWG70000A series instrument. You can create as many virtual generators you
like, each with different configurations. Once you create additional virtual generators, you can choose
which is t
select default generator.) When connected to a virtual generator, you can create all your waveforms,
sequences, and setups specific to instrument types, all in the absence of an instrument. Then when an
instrument is available, you can simple recall your saved files.
Connected to an instrument. With SourceXpress installed on a networked PC, SourceXpress can remotely
connec
instrument is displayed in the SourceXpress application window, providing you access to all instrument
controls, directly from SourceXpress.
t and control a ny AWG70000A instrument on the network. The interface of the AWG70000A
ive at a time.
_AWG70002. This is automatically set to be the active generator and displays a simulated
he default virtual generator. (Right mouse click in the Available Virtual Generators screen to
Connected G enerators list
The Connectivity tab contains your list of available generators that SourceXpress is currently connected
with. You can connect to as many generators as you wish (virtual generators and instruments), but you can
only have one active at a time.
NOTE. All instruments appearing in the Connected Generators list are reserved by SourceXpress and their
instrument displays will indicate that it is being externally controlled. Anyone can regain control of the
nstrument directly from its display, or you can remove it from the Connected Generators list. If someone
i
regains control of a connected instrument from the instrument display, the instrument is removed from
the Connected Generators list.
SourceXpress Printable Help Document 15

Connectivity Connected Generators list
At initial startup of the application, one Virtual generated is created by default named
VirtualGen_AWG70002. This is automatically set to be the active generator and displays a simulated
AWG70002
A interface.
Virtual Generators
You can create as many virtua l instruments you like, each with different configurations. Use the
Connectivity > Connect to Virtual Generator... menu. When connected to a virtual instrument, you can
create all your waveforms or sequences, create setups specific to instrument types, all in the absence of an
instrument. Then when an instrument is available, you can simple recall your saved files.
Conne
With SourceXpress installed on a networked PC, SourceXpress can remotely connect and control any
AWG7
the SourceXpress application window, providing you access to all instrument controls, directly from
SourceXpress.
ct to instruments
0000A instrument on the network. The interface of the AWG70000A instrument is displayed in
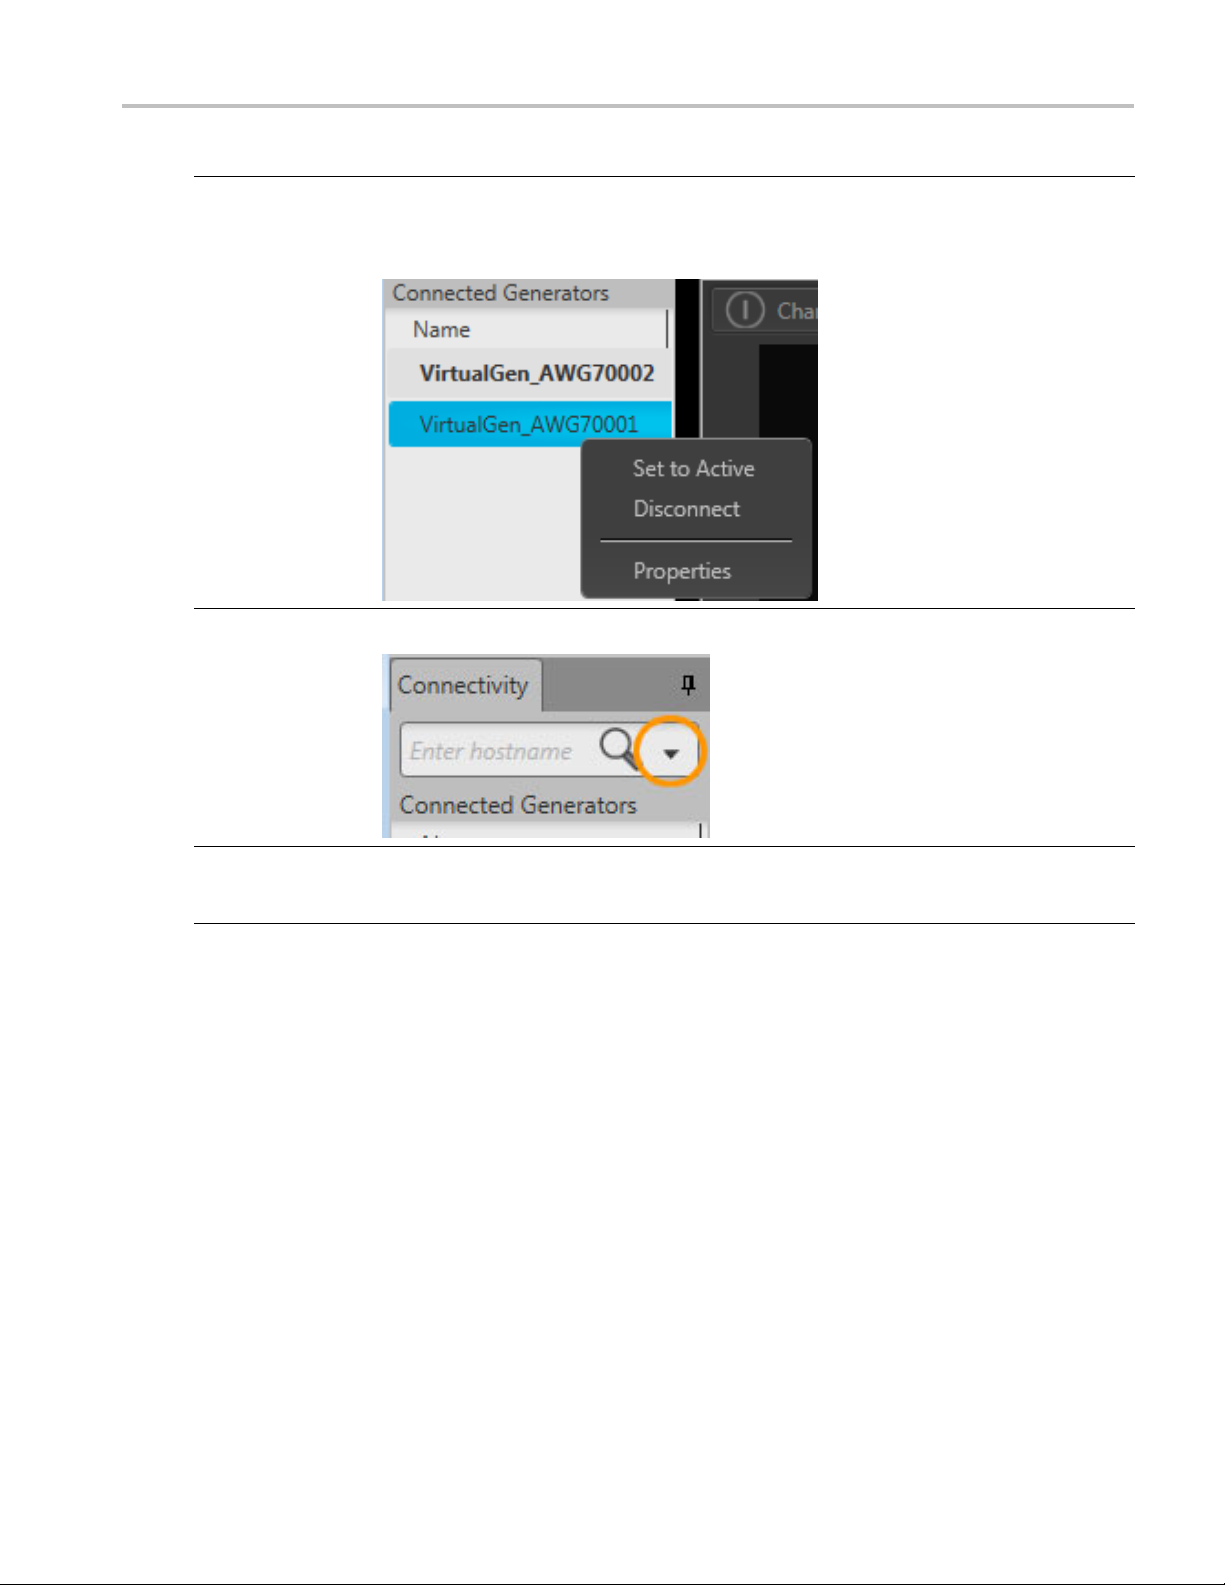
Quick instrument search/connect
The connectivity tab provides a window for you to directly enter the computer name (hostname) or IP
address of a networked instrument you wish to connect to.
You can obtain the correct hostname, go to the target instrument, select Computer > Properties and note the
computer name.
This method bypasses the search mechanism found in the menu Connectivity > Connect to Instrument...
Selecting the active generator
From the Connectivity tab, you select which instrument you want to access, regardless if it’s a virtual
generator or a connected instrument. Making the generator active brings its display into view.
16 SourceXpress Printable Help Document

Connectivity Connect to a virtual generator
There are two methods to make a generator active:
Double click on the generator.
Right-mouse click on the generator and select Set to Active from the pop-up window.
Next to the name of each generator, the Type of generator is displayed to help identify instruments from
virtual generators.
Right-click menu operations
Right mouse click on any generator name displays a menu of actions.
Item Description
Set to Active Sets the selected generator to the active generator, bringing its controls into view.
Only one active generator is allowed at a time.
Disconnect
Disconnects the selected generator from SourceXpress and is removed from the
Connected Generators list.
NOTE. You cannot disconnect the default virtual generator.
Properties
xxx
Displays the s ystem information about the selected generator.
Connect to a virtual generator
To connect to a virtual generator, you must select the menu Connectivity > Connect to Virtual Generator...
This displays the Available Virtual Generators window.
SourceXpress Printable Help Document 17

Connectivity Connect to a virtual generator
From this list, you can select one (or more) virtual generators to add to the Connected Generators (see
page 15) list.
The default virtual generator is indicated with an asterisk (*). The default generator is the virtual generator
that is initially connected to upon application start-up.
Not all
controls are enabled
When a virtual generator is the active generator, not all controls are active since it is a virtual generator.
For example, controls such as the Play/Stop button, Force Trigger buttons, Channel on/off buttons, and
others are not available.
Right-click menu operations
ht mouse click on any generator name displays a menu of actions.
Rig
Item Description
Set as Default Virtual Generator Defines the generator that is automatically connected to when the application is
started.
Remove
xxx
Removes the generator name from the list.
You cannot remove the default generator but you can reassign which is the default
generator.
18 SourceXpress Printable Help Document

Connectivity Connect to a virtual generator
Creating virtual generators
You can create additional virtual generators, each with its own set of properties, such as a two-channel or
single-channel instrument to simulate actual instrument you may connect to i n the future.
From the Available Virtual Generators window, s elect Create Generator.
Item Description
Name
Usetodefine a name for the generator you are creating.
ault, the name is given a base name of VirtualGen with the model type
By def
appended to the name. If needed, the name is appended further with a numerical
value.
n overwrite the Name field entirely by typing in a generator name.
You c a
NOTE. You cannot duplicate or overwrite an existing Virtual G enerator name.
ls
Mode
Options
Choose the model you want to simulate
ptions selections change depending on the model selected. This allows you to
The o
only choose options appropriate for the selected model.
SourceXpress Printable Help Document 19

Connectivity Connect to an instrument
Item Description
Create Creates the generator as defined, and adds the named generator to the Available
Virtual Gener
ators window.
NOTE. This only creates the generator and it becomes available as another
generator to connect to.
You still must select any new generators in the Available Virtual Generators window
to connect to
Cancel Exits out of
xxx
them (thus adding them to the Connected Generators list).
the Create Virtual Generator window without creating any new generators.
Connect to an instrument
To connect to an instrument, use the menu Connectivity > Connect to Instrument... to display the Available
Instrumen
With SourceXpress installed on a networked PC, the software automatically scans the network for any
AWG70000
NOTE. The auto discovery only discovers instruments on the same Subnet.
ts screen.
A Series instruments.
any (or all) instruments found and select OK to make a connection to them. The instrument will
Select
appear in the Connected Generators list. If no instruments are found, you can modify how the search is
performed by selecting the Modify Search Criteria
(see page 21) button.
NOTE. Once an instrument is connected to SourceXpress, its display is disabled. A message is dis played
indicating it is being remotely controlled. The connection can be disabled directly from the instrument’s
screen by ending the remote session.
20 SourceXpress Printable Help Document
Connectivity Connect to an instrument
Item Description
Refresh A network search is typically performed each time you choose C onnectivity >
Connect to Instrument. But this can be disabled from the search criteria screen.
h to scan the network for instruments.
log screen to change search parameters.
(see page 21) for details.
Modify Searc
h Criteria
Choose Refres
Opens the dia
See Modify Search Criteria
OK Select any (or all) instruments in the generators listed, then select OK to establish
the connection and add them to the connected Generators list.
Cancel Closes the dialog screen without adding connecting to any generators.
xxx
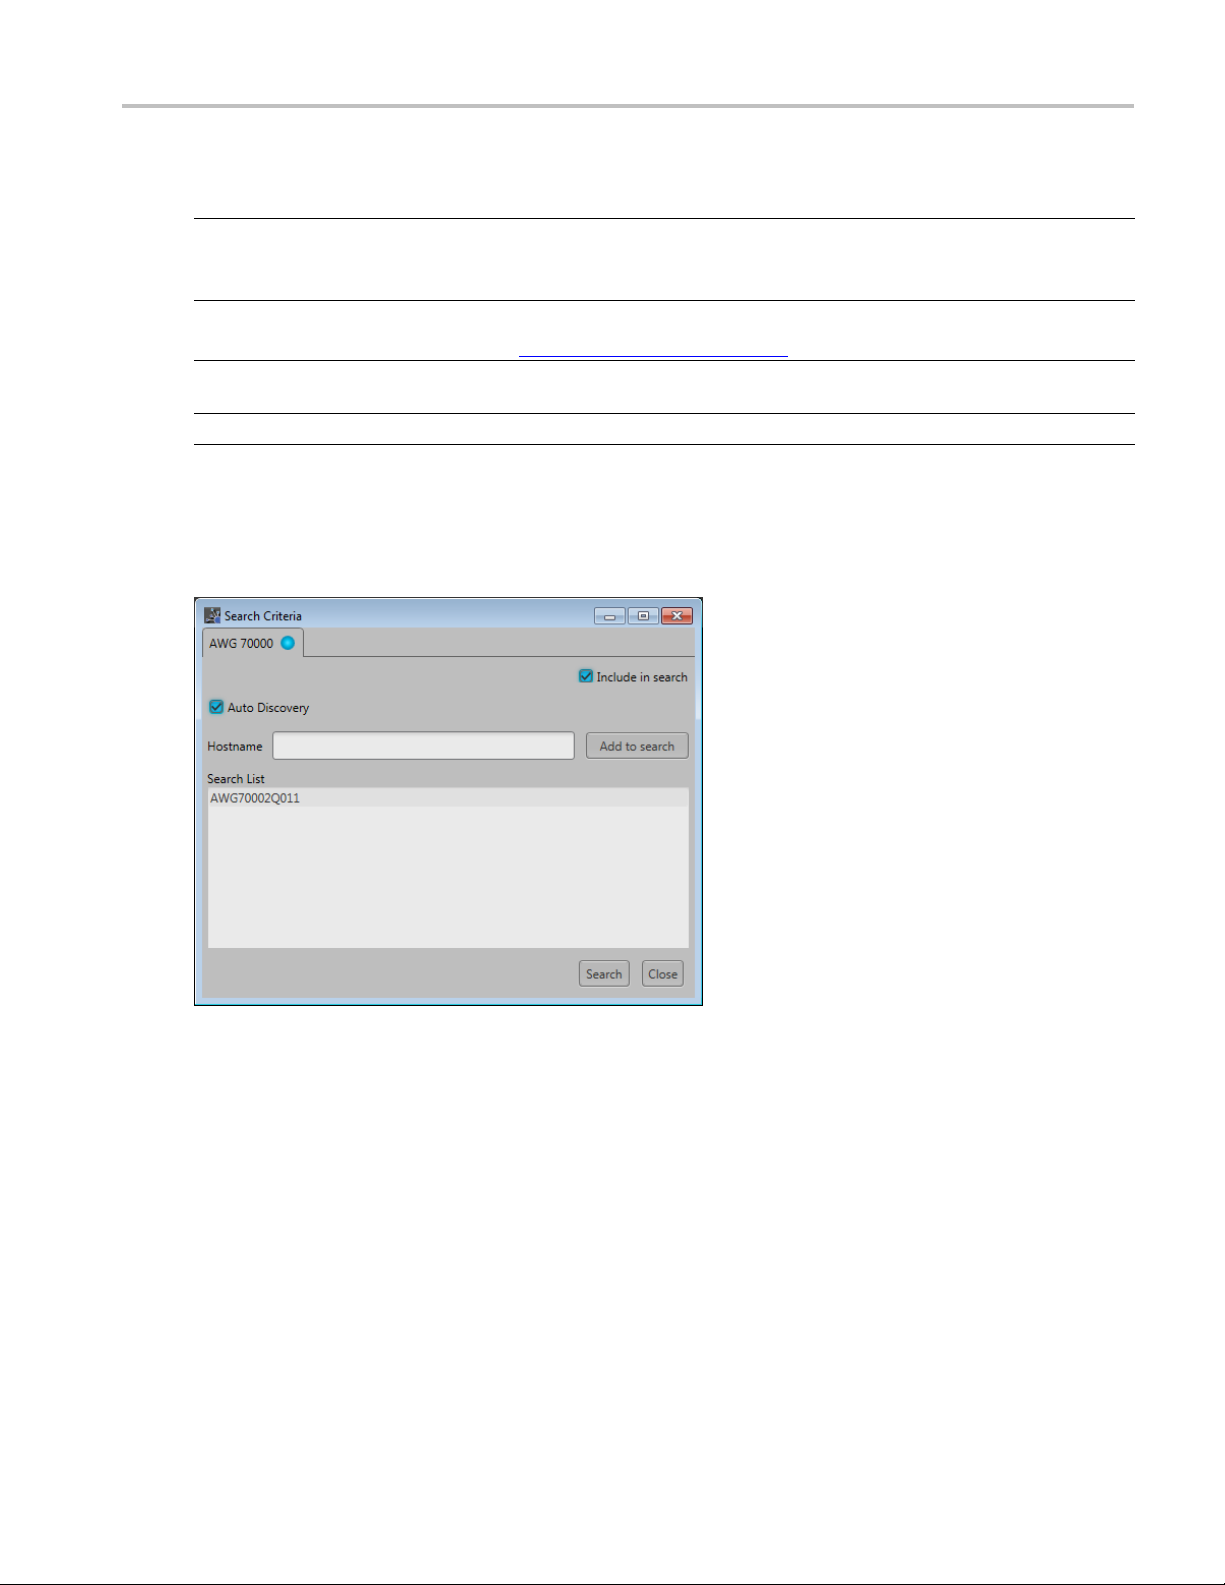
Modify Search Criteria
With SourceXpress installed on a networked PC, the software can scan the network for any AWG70000A
Series instruments (on the same Subnet) and connect remotely to the instrument.
SourceXpress Printable Help Document 21

Connectivity Connect to an instrument
Item Description
Auto Discovery
When checked, each time Connect to Instrument is selected from the Connectivity
menu, the appl
ication automatically initiates a search, looking for instruments on
the same Subnet.
NOTE. The instrument must be on the same subnet as the PC running the
application.
puter name (Hostname) or the IP address of a networked instrument
Hostname
SourceXpress
Enter the com
you wish to connect to.
NOTE. To obtain the correct hostname, go to the target instrument, select
Computer > P
After entering the Hostname, select the Add to search button. This places the
hostname in the Search List.
Add to search
Places the Hostname in the Search List.
Search List Stores a list of instruments to automatically search for each time a search is initiated.
Include in search
When checked, the AWG 70000 series instrument types are included in the automatic
search.
Search
Initiates a network search.
Close Closes
xxx
roperties and note the computer name.
Unchecking this will result in not finding any AWG70000 series instruments.
the dialog screen without initiating a search.
22 SourceXpress Printable Help Document

Waveforms tab Waveforms tab
Waveforms tab
The Waveforms tab contains the waveforms available to assign to a channel. Right-mouse click on a
waveform to display a pop-up menu of tools to modify waveforms, assign a waveform to a channel, save,
remove wavef
orms, and view a waveform’s properties.
You can drag and drop a waveform from the Wave
that waveform to play on the channel.
If a Precompensation plug-in is installe
navigate to a saved correction file and apply it to the selected waveform.
Adding a waveform
To add a waveform to the Waveforms tab, select the Open Waveform button. This opens a Windows
dialog box that allows you to navigate to a stored waveform, setup file, or sequence file. (You can load
waveforms contained in Setup files and sequence files.)
If the waveform is a valid waveform type, the waveform is added to the Waveforms tab. Once a waveform
is in the Waveforms tab, it can be assigned to a channel for playout. Click here to see the list of valid
waveform file types.
Valid file types Description
.AWGX file format Setup file created by Tektronix AWG70000A Series instruments or SourceXpress.
.WFMX file format Created by Tektronix AWG70000A Series instruments or SourceXpress.
forms tab onto the channel’s graph area, assigning
d, the Apply Corrections menu is available. This allows you to
Setup files can contain multiple waveforms and multip
NOTE. Opening a setup file from the Waveform List does not restore the instrument
settings, only the waveforms contained in the setup file are restored.
le sequences.
SourceXpress Printable Help Document 23

Waveforms tab Adding a waveform
Valid file types Description
.AWG file forma
t
Setup file crea
ted by Tektronix AWG5000 or AWG7000 Series instruments.
NOTE. The Tektronix AWG5000 or AWG7000 Series instruments had predefined
waveforms available for use.
Saved setup files that used predefined waveforms d id not save the actual waveform
data with the
used predefined waveforms will not import the waveforms. To import these types of
waveforms, first copy and rename the predefined waveform, then save the setup file
before impo
.WFM file for
.ISF file formats Created by Tektronix TDS/DPO/MSO/DSA Series instruments.
.PAT file formats Created by Tektronix AWG400/500/600/700 Series instruments.
.IQT file format Created by Tektronix RSA3000 Series instruments.
.TIQ file format Created by Tektronix RSA6000/5000 Series, SPECMON Series ,MDO4000 Series
.TFW fil
.TXT fi
.RFD fi
.SXD
.MAT
P file format
.TM
M file format
.PR
th the Sequen c ing option (Option 03), the following files types are also valid waveform sources.
Wi
SEQX file format
.
SEQ file format
.
xxx
mat
eformat
le format
le format
file format
file format
Created by T
Created by Tektronix AWG400/500/600/700 Series instruments.
Created by Tektronix TDS/DPO/MSO/DSA Series instruments.
instrum
Create
Creat
Creat
ted by Tektronix SDX100 SerialXpress high-speed serial data signals software.
Crea
ab file type, Level 5 or Level 7.3.
Matl
as BLUE file type.
Mid
as BLUE file type.
Mid
equence file created by Tektronix AWG70000A Series instruments or SourceXpress.
S
equence file created by Tektronix AWG400, AWG500, or AWG600 Series
S
instruments.
setup, only the waveform name. Hence, importing setup files that
rting to the AWG70000A Series instruments.
ektronix AWG5000/7000 Series instruments.
ents. or SignalVu-PC.
d by Tektronix AFG3000 Series instruments.
ed by Tektronix AWG5000 or AWG7000 Series instruments.
ed by Tektronix RFX100 RFXpress Advanced RF/IF/IQ waveform software.
If selecting a file type containing multiple waveforms (.AWGX, .MAT, .AWG, .SEQX), you are presented
with the Available Waveforms dialog box
(see page 25) that lists all waveforms contained in the setup file.
You can load all the waveforms or select a subset of the waveforms.
NOTE. When opening an AWG70000A Series setup file (.AWGX) from the Waveforms tab, only the
waveforms are extracted; instrument settings contained in the setup file are not restored. Use the File
> Open Setup... menu in the Menu bar
(see page 11) to restore both the settings and waveforms from a
.AWGX setup file.
If you want any of the waveforms (extracted from a setup file) to be available outside of the setup file,
select and save each individual waveform.
24 SourceXpress Printable Help Document

Waveforms tab Adding a waveform
Available waveforms
When adding an analog waveform file that exceeds the amplitude range of the instrument, you are
presented with the Importing waveform dialog screen
while adding to the Waveforms tab.
(see page 25) to normalize (rescale) the waveform
Import waveform
When adding a digital text (.TXT) waveform file, the Import Digital Waveform Text File (see page 26)
dialog box displays to specify the digital bit resolution of the file before the waveform i s added to the
Waveforms tab.
Choose from the following:
SourceXpress Printable Help Document 25

Waveforms tab Adding a waveform
8 Bits (waveform + 2 markers): For 10 bit files that use 8 bits for data, and two bits for markers.
9 Bits (waveform + 1 marker): For 10 bit files that use 9 bits for data, and one bit for a marker.
10 bits: For 10 bit files without markers.
It’s important to know the details of your waveform before you import so you do not affect the integrity of
the waveform. For instance, selecting 10 bits for a waveform that is intended to use 8 bits for data and two
bits for markers will add the marker bits to the waveform data and markers will not be available.
Import digital waveform text file
NOTE. If sequencing is available, waveforms are also added to the waveforms tab when loading a
sequence file or setup file that contains a sequence.
i-waveform select
Mult
Through the Open Waveform menu in the Waveforms tab, you can select multiple waveform files to load
o the waveform list at once.
int
To select a contiguous block of files, click the first fi le in the block. Then hold down the Shift key as you
ick the last file in the block. This will select not only those two files, but everything in between.
cl
To select multiple files that are not a contiguous block, click one file. Then hold down the Ctrl key while
ou click each additional desired file.
y
If your selection includes sequence files or setup files, all waveforms saved with those file types are
oaded into the waveform list.
l
CAUTION. Loading groups of waveforms will overwrite any existing waveform of the same name in
the Waveforms tab without warning.
26 SourceXpress Printable Help Document

Waveforms tab Saving a waveform
NOTE. Multiple file selection is available via the Open Waveform menu. Loading waveforms from the
Open File menu (in the tool bar) or from the pull-down list in the graphical waveform area does not
support multi
ple file selection.
Saving a waveform
To save a waveform, right mouse click on a waveform and select Save or Save As. This opens a Windows
dialog box t
hat allows you to navigate to a location to save the waveform.
Assign a waveform to a channel
Toplayawaveform,youneedtoassignittoachannel. This is true even for a single channel instrument.
There are several methods to assign a waveform to a channel.
Drag a waveform from the Waveforms tab onto a channel’s plot area.
Right mouse click on a waveform name in the Waveforms tab and use the pop-up window to assign
it to a channel.
Use the drop-down list in the channel’s plot area to assign the channel to play a waveform.
You can choose waveforms already loaded into the Waveforms tab or you c an browse for waveform
files. Selecting a waveform by browsing, the waveform is added to the Waveforms tab and assigned
to the channel for playout.
SourceXpress Printable Help Document 27

Waveforms tab Properties
If Sequencing is available, you can also open a sequence type fileandloadanyofthewaveforms
that were saved with the sequence.
Properties
You can select any waveform contained in the Waveform List to view its properties.
Select a waveform, touch and hold (or right mouse click) to display the waveform operations.
Select Properties to display the Waveform Properties dialog screen.
28 SourceXpress Printable Help Document

Waveforms tab Properties
The Waveform Properties dialog screen provides many details about the waveform that static (not able
to modify). But two items can be modified, allowing you to provide additional information about the
waveform
.
Signal Format is used to indicate the format of the waveform.
Undefined. Not specified.
Real. Use this setting to describe a waveform containing data other than I or Q.
I. Use this to describe a waveform containing I data.
Q. Use this to describe a waveform containing Q data.
Recom
change the recommend sample rate as needed.
mended sample rate is typically defined by the waveform when it was created. You can
SourceXpress Printable Help Document 29

Waveforms tab Properties
30 SourceXpress Printable Help Document

Sequence tab Sequence tab
Sequence tab
NOTE. When connected remotely to an AWG70000A series instrument, the connected instrument must
have the Sequ
The Sequences tab contains the available sequences. Right-mouse click on a sequence to display a pop-up
menu of tool
encing option installed.
s to modify, rename, save, copy, and remove sequences.
To add a sequence to the list, see Adding a sequence
From the Sequences tab you can assign the tracks to the output channels in various ways:
Drag and drop a sequence from the Sequences tab directly on a channel’s graph area, always assigning
track 1 to channel one. On a two channel instrument, the second track of the sequence is assigned
annel two.
to ch
Display the tracks of a sequence and drag and drop a track directly on a channel’s graph area.
Use the pull-down menu of a sequence track and assign the track to a channel. (Single channel
instruments do not have a channel selection>)
(see page 32).
SourceXpress Printable Help Document 31

Sequence tab Adding a sequence
For detailed information about how tracks are assigned to channels, refer to Assigning tracks to channels
(see page 34).
Adding a sequence
To add a sequence to the Sequences tab, select the Open Sequence button. This opens a Windows dialog
boxthatallowsyoutonavigatetoasavedsequenceorsetupfile. If the sequence or setup file is a valid
file type, th
to the Waveforms tab. Once a sequence is in the Sequences tab, a sequence track can be assigned to a
channel for playout. (See Assign a track to a channel.)
Valid sequence file types Description
.SEQX file format Sequence file created by Tektronix AWG70000A Series instruments or
.AWGX file format Setup file created by Tektronix AWG70000A Series instruments or SourceXpress.
.AWG fi
e sequences are added to the Sequence List and waveforms (used in the sequence) are added
(see page 34)
SourceXpress.
es can contain multiple sequences and multiple waveforms.
Setup fil
NOTE. Opening a setup file from the Sequence List does not restore the
instrument settings, only the sequences contained in the setup file are restored
ith any waveforms used in the sequences.
along w
le format
file created by Tektronix AWG5000 or AWG7000 Series instruments.
Setup
NOTE. The Tektronix AWG5000 or AWG7000 Series instruments had predefined
waveforms available for use.
Saved setup files that used predefined waveforms did not save the actual waveform
with the setup, only the waveform name. Hence, importing setup files that
data
used predefined waveforms will not import the waveforms. To import these types of
waveforms, first copy and rename the predefined waveform, then save the setup
efore importing to the AWG70000A Series instruments.
file b
NOTE. The Tektronix AWG5000 or AWG7000 Series instruments supported
subsequencing (using another sequence as a step in a sequence). Subsequences
imported as another sequence and added to the Sequences list.
are
Q file format
.SE
xxx
uence file created by Tektronix AWG400, AWG500, or AWG600 Series
Seq
instruments.
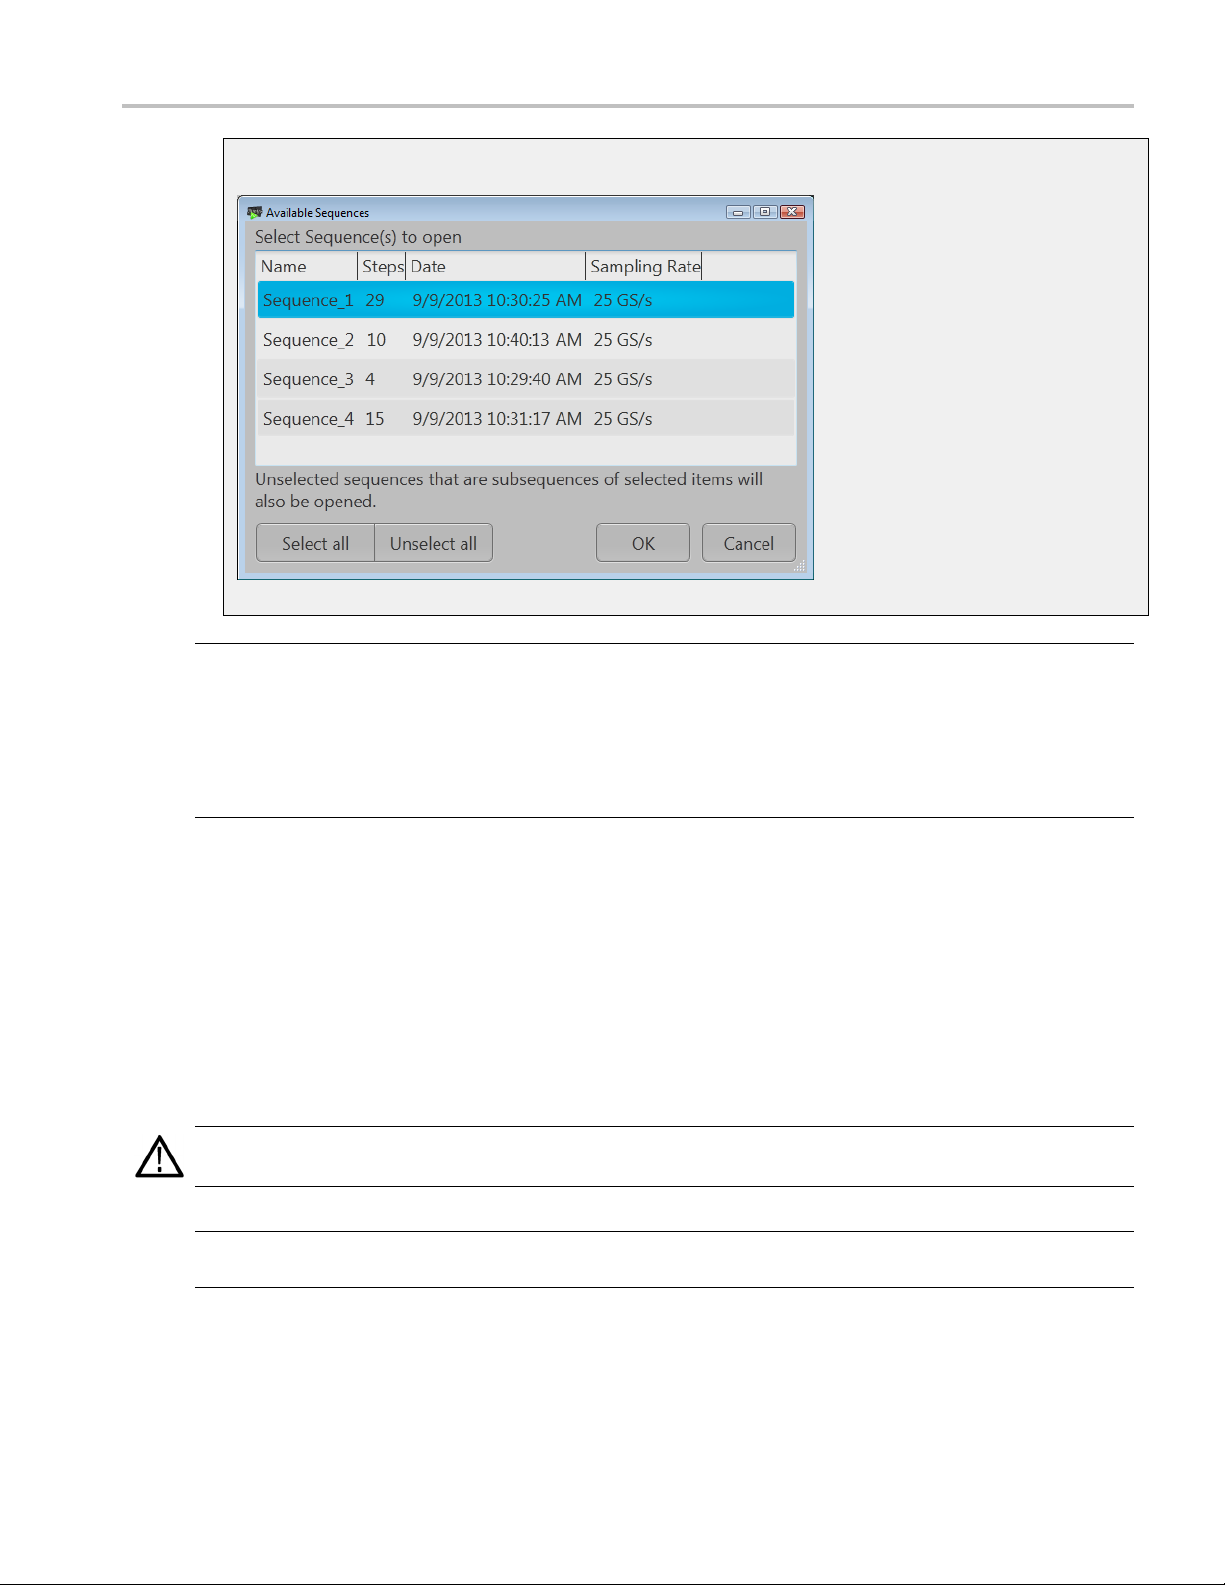
If selecting a setup type file containing multiple sequences, you are presented with the Available Sequences
(see page 33) dialog box that lists all sequences contained in the setup file. You can load all sequences or
elect a subset of the sequences. Waveforms that are part of any sequence are added to the Waveforms tab.
s
32 SourceXpress Printable Help Document
Sequence tab Adding a sequence
Available sequences
NOTE. Whe
only waveforms and sequences are extracted; instrument settings contained in the setup file are not
restored. Use the Open Setup in the File menu to restore the settings, waveforms, and sequences from a
.AWGX setup file.
If you want any of the waveforms or sequences (extracted from a setup file) to be available outside of the
setup file, select and save each individual waveform.
n opening an AWG70000A Series setup file (.AWGX) from the Waveforms or Sequences tabs,
Multi-sequence select
Though the Open Sequence menu in the Sequences tab, you can select multiple sequence files to load
into the sequence list at once.
To select a contiguous block of files, click the first file in the block. Then hold down the Shift key as you
click the last file in the block. This will select not only those two files, but everything in between.
To select multiple files that are not a contiguous block, click one file. Then hold down the Ctrl key while
you click each additional desired file.
UTION. Loading a group of sequences will overwrite any existing sequence of the same name in the
CA
Sequences tab without warning.
OTE. Multiple sequence selection is not available from the Open File menu in the tool bar or from the
N
pull-down list in the graphical waveform area.
SourceXpress Printable Help Document 33

Sequence tab Saving a sequence
Saving a sequence
To save a sequence, right mouse click and select Save or Save As. This opens a Windows dialog box that
allows you to navigate to a location to save the sequence.
Assigning tracks to channels
A sequence can consist of up to eight different tracks. (A minimum of one track is required). To play a
sequence track, you need to assign it to a channel. This is true even for a single channel instrument.
There are several methods to assign a sequence track to a channel. (See below for further information
regarding one channel and two channel instruments.)
Drag an entire sequence onto a channel’s plot area.
Drag a track from a sequence onto a channel’s plot area.
Right mouse click on a sequence track in the Sequences tab and use the pop-up window to assign
it to a channel.
Use the drop-down list in the channel’s plot area to assign the channel to play a sequence track.
You can choose sequence tracks from sequences already loaded into the Sequences tab or you can
browse for sequence files. When browsing, you select the sequence file, and then select the track to
assign to the channel.
34 SourceXpress Printable Help Document

Sequence tab Assigning tracks to channels
Assigning tracks on a one channel instrument
With a one channel instrument, the following actions occur when assigning a track to play on the channel:
If you drag and drop a sequence onto the channel’s graph area, Track 1 is assigned to the channel. This
is true regardless of how ma
You can drag and drop (or assign) any track from any sequence onto the channel’s graph area.
ny tracks the sequence may contain.
Assigning tracks on a two channel instrument
With a two channel instrument, you have the
or different sequences. You also have the option to play a sequence track on one of the channels while
playing a single waveform on the other.
The following describes the interactions between the two channels:
You can drag and drop the entire seque nce onto one of the channel’s graph area. This automatically
assigns Track 1 of the sequence to the channel.
If the sequence has only one track, you can drag and drop the sequence to one or both channel’s
graph area and the single track will play on both channels.
If the sequence has multiple tracks, you can drag and drop the sequence to either channel’s graph
area. Inthiscase,Track1isassignedtoChannel1andTrack2isassignedtoChannel2. Thisis
the track assignment regardless of which channel you drag the sequence to.
If playing tracks from the same sequence on both channels, the channels are coupled together.
This requires that the waveforms be of equal length for each step of the two tracks. In this case,
the Force jump to... buttons are coupled together. (Coupled Sequence is displayed on the Home
tabwhentracksfromthesamesequence are assigned to both channels.)
option to play multiple tracks, either from the same sequence
You can drag and drop (assign) a specific track from different sequences onto the channel’s graph area.
SourceXpress Printable Help Document 35

Sequence tab Edit a sequence
This gives you the freedom to play any track from any sequence. Since the tracks are from different
sequences, the channels are not coupled together.
You can play a sequence track on one channel while playing a waveform on the other channel.
Edit a sequence
You can select any sequence contained in the Sequences tab to modify it or create a new sequence based on
the existing sequence. Select any sequence in the list, right mouse click to display the sequence operations.
Selecting Modify sequence opens the sequence in the Sequences tab window for editing.
36 SourceXpress Printable Help Document
Waveform Plug-ins Waveform Plug-ins
Waveform Plug-ins
The Waveform Plug-in tab provides access to the available plug-in applications. Plug-ins provide
enhancements to the application software and are designed for installation into SourceXpress or
AWG70000A se
Plug-in applications must be installed and licensed in SourceXpress in order to compile waveforms from
SourceXpress. This is true whether you are using a virtual generator or connected to an instrument.
A plug-in that has a floating license can be moved between any installation of the plug-in. Refer to
Licensing
application.
NOTE. SourceXpresss must have the license file (for a plug-in requiring a license) installed in the
SourceXpress application in order to use the plug-in.
A plug-in installed and licensed in a connected instrument is not available for use through SourceXpress
unless SourceXpress also has a license for the plug-in.
ries arbitrary waveform generators.
(see page 43) for information about how to use license files to enable or move a plug-in
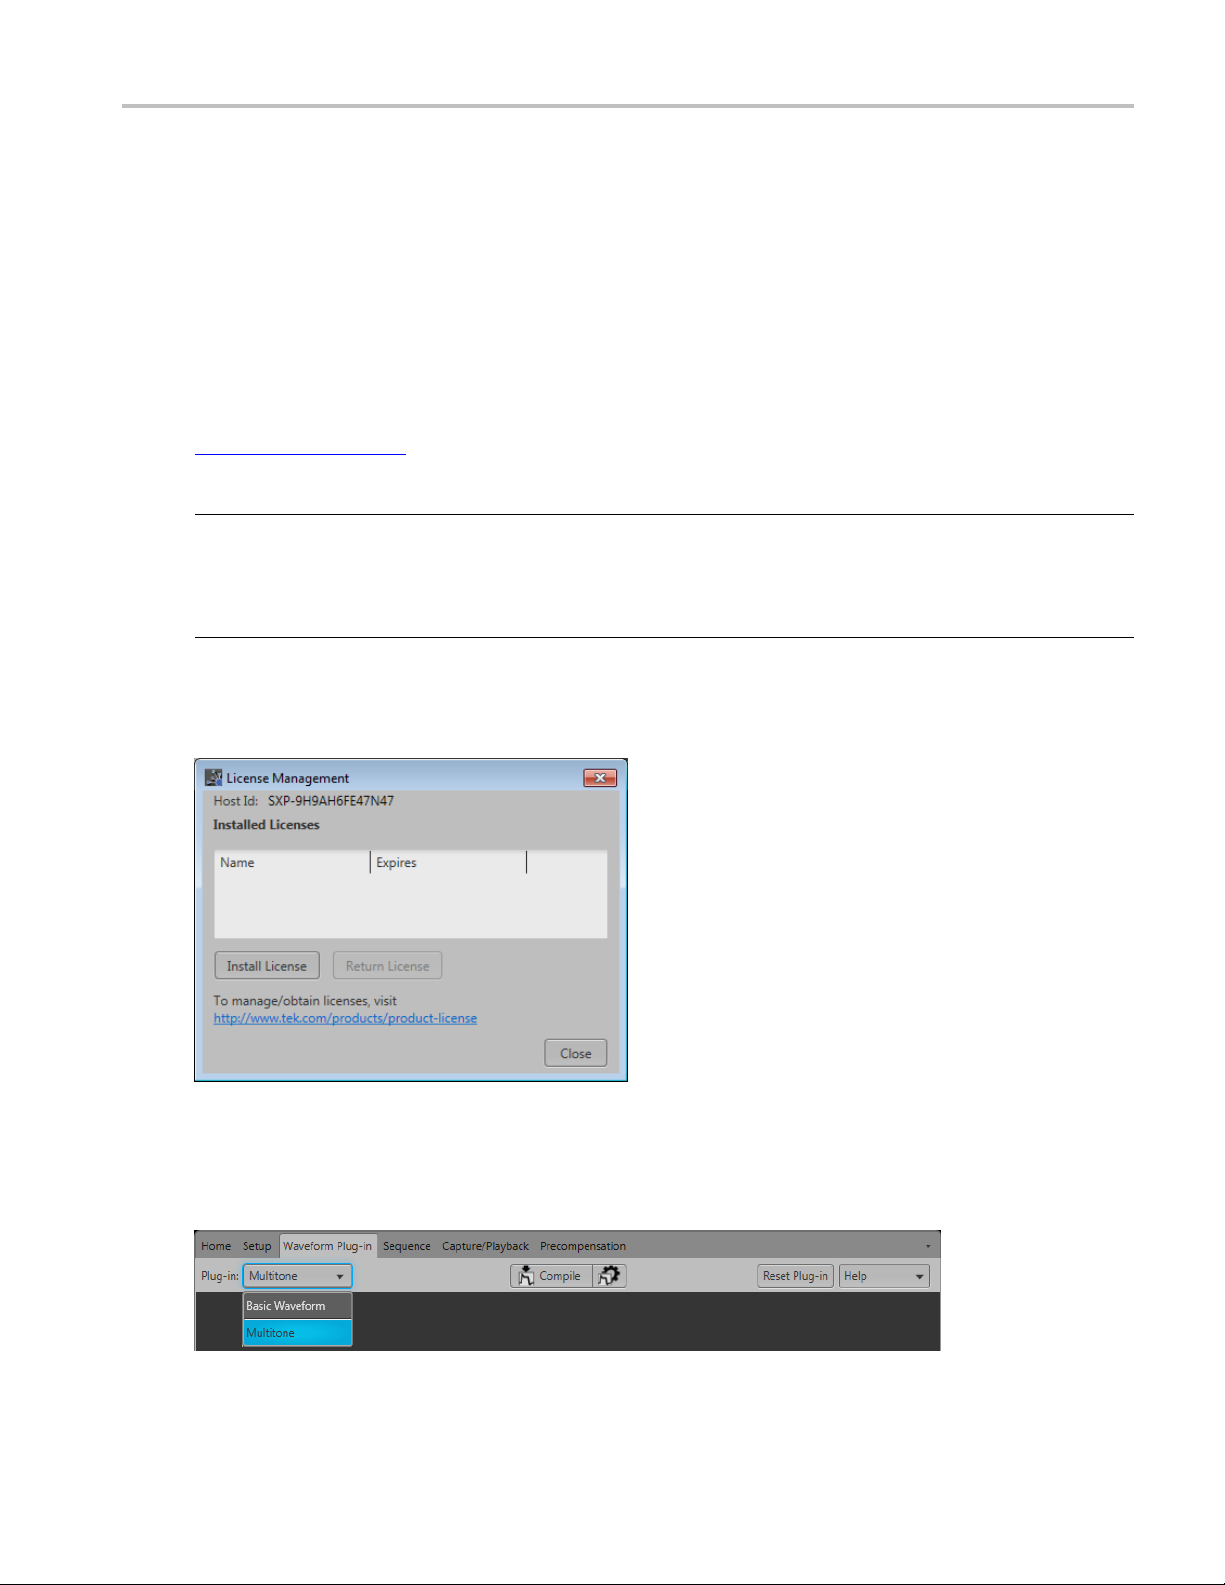
To view and install licenses, select Licenses... from the Tools menu to display the License Management
screen.
The Plug-in pull-down list displays the available plug-ins. (The example here shows that the Basic
Waveform and Multitone applications are installed.) As plug-ins are added, they appear in the Plug-in
pull-down list.
SourceXpress Printable Help Document 37

Waveform Plug-ins Waveform Plug-ins
Plug-in applications have their own installation programs available for download from the Tektronix Web
site. Plug-in applications have their own documentation and help systems and are not described in this
document.
NOTE. The Basic Waveform application is provided as a standard plug-in and requires no license.
The Basic Wav
AWG70000A series help system for information about using the Basic Waveform application.
Waveforms
to save or edit waveforms created by a plug-in.
eform application is an integral part of the AWG70000A series generators. Refer to the
created (compiled) using a plug-in are placed in the Waveforms tab. Use the Waveforms tab
38 SourceXpress Printable Help Document

Matlab file creation MATLAB waveform files
MATLAB waveform files
SourceXpress can read waveform files created with MATLAB (.MAT), a third party software application.
MATLAB files can contain multiple waveform data sets (including marker data) and can support files
greater than
target instrument.
2 GB. Waveforms created with MATLAB must m eet the waveform requirements of the
SourceXpre
ss supports the following levels of MATLAB files:
MATLAB level 5 can only support fileslessthan2GB.
MATLAB level 7.3 can support files larger than 2 GB.
This section defines the proper elements and conditions that the MATLAB file must be met to create an
AWG waveform file.
AWG MA T w
aveform elements
Waveform elements for an AWG MATLAB file format waveform must be contained in the same .mat file.
Each waveform will be grouped together by a trailing numerical value.
For example - given the following elements: Waveform_Name_1, Waveform_Data_1,
Waveform_Name_2, Waveform_Data_2, Waveform_M1_2, Waveform_M2_2, two complete
waveforms can be formed:
The first waveform will have the name identifier from Waveform_Name_1 and the data that was
held in Waveform_Data_1.
The second waveform will have the name identifier from Waveform_Name_2 and the data that
was held in Waveform_Data_2. Additionally, the second waveform will have Marker 1 and
ker 2 data.
Mar
Table 1: MATLAB required elements
Element Condition
Waveform_Name_# The MATLAB file must have the "Waveform_Name_#" specified.
The "Waveform_Name_#" must contain a string value denoting the waveform name.
Waveform_Data_# The AWG MATLAB file must have the "Waveform_Data_#" specified.
The "Waveform_Data_#" must contain an array of data values (representing waveform samples) in
one of the types: double, single, or UInt16.
Ideally, double and single should have values scaling from –1 to 1, and UInt16 should have values
ranging from 0 to 65535.
xxx
SourceXpress Printable Help Document 39

Matlab file creation MATLAB waveform files
Table 2: MATLAB optional elements
Element Condition
te_#
#
The AWG MATLAB
The "Waveform_M1_#" must contain a UInt8 array of marker values for the waveform's Marker
1. Only 1 and 0 are considered valid values.
The length of
array length.
The "Waveform_M2_#" must contain a UInt8 array of marker values for the waveform's Marker
2. Only 1 and
The length of the marker array must match that of the AWG MATLAB file format waveform data
array length.
The AWG MATLAB file can contain the sampling rate, having the "Waveform_Sampling_Rate_#"
specified
The "Waveform_Sampling_Rate_#" must contain a "Double" value, indicating the waveform's
suggested sampling rate.
The speci
change any sampling rate settings of the instrument.
The AWG MATLAB file can contain the waveform amplitude, having the "Waveform_Amplitude_#"
specified.
The "Wa
suggested amplitude.
The specified amplitude is the waveform's recommended amplitude, but will not directly change
any amp
The AW
"Waveform_Signal_Format_#" specified.
The "Waveform_Signal_Format_#" must contain a 'String' value indicating the unique waveform's
signa
Signal format indicates whether a Waveform is of the format type: Real, I, or Q.
.
fied sampling rate is the waveform's recommended sampling rate, but it will not directly
veform_Amplitude_#" must contain a "Double" value, indicating the unique waveform's
litude settings of the instrument.
G MATLAB file can contain the waveform signal format having the
lformat.
Waveform_M1_
Waveform_M2_# The AWG MATLAB file can contain marker 2 data, having the "Waveform_M2_#" specified.
Waveform_Sampling_Ra
Waveform_Amplitude_#
orm_Sig-
Wavef
nal_Format_#
xxx
file can contain marker 1 data, having the "Waveform_M1_#" specified.
the marker array must match that of the AWG MATLAB file format waveform data
0 are considered valid values.
MATLAB example
following MATLAB coding example demonstrates how to create a MATLAB file that:
The
creates a small, simple sinusoidal waveform with markers.
saves the waveforms into separate files.
saves the waveforms into a single file.
Table 3: MATLAB coding example
%% Create Sinusoid
x = 2399;
t = 0:1:x;
baseWfm = sin(2*pi*1/x*t); % Generate Sine Wave
baseMarkers = uint8(square(2*pi*1/x*t,50));
40 SourceXpress Printable Help Document

Matlab file creation MATLAB waveform files
Table 3: MATLAB coding example (cont.)
%% Create Waveform 1 (Double)
Waveform_Name_1 = 'MyDoubleWfm';
Waveform_Data_1 = baseWfm; %already a double array
Waveform_M1_1 = baseMarkers; %already uint8 array
Waveform_M2_1 = baseMarkers;
save('AWG_Double', '*_1', '-v7.3'); % MAT 7.3 Can save > 2GB
%% Create Waveform 2 (Single)
Waveform_Name_2 = 'MySingleWfm';
Waveform_Data_2 = single(baseWfm);
save('AWG_Float', '*_2', '-v7.3');
%% Save All Waveforms
save('All_Wfms.mat', 'Waveform_*', '-v7.3');
xxx
SourceXpress Printable Help Document 41

Matlab file creation MATLAB waveform files
42 SourceXpress Printable Help Document

Licensing Licensing overview
Licensing overview
License files are used in SourceXpress to enable optional plug-ins and features.
A Licensing scheme is used to host your license files. The product license administration is through
Tektronix Asset Management System (TekAMS). TekAMS has an easy to use web based interface that
provides:
Inventory of all the licenses in the company account
Ability to check out a license
Ability to check in a license
The Tektronix Asset Management System is available athttp://www.tek.com/products/product-license
To view an
License Management screen.
Generally, to properly install and activate a plug-in application, follow these steps.
1. Purchase a license from Tektronix. See How to purchase a license
2. Store the license file in a location available to the application. This can be on the instrument’s drive, a
USB flash drive, or any networked drive.
d install licenses in SourceXpress, select Licenses... from the Tools menu to display the
(see page 44).
.
3. Obtain the plug-in installation file. Plug-in installation files are available for download from the
Tektronix web site.
SourceXpress Printable Help Document 43

Licensing How to purchase a license
4. Install the plug-in application.
5. Install the license file. See How to install a plug-in license
How to purchase a license
Contact your local Tektronix Account Manager to purchase a plug-in license. After purchasing, you will
receive an email listing the licenses purchased. The email also contains the URL to the Tektronix Asset
Management System (TekAMS) that enables you to manage your licenses.
Floating Licenses provide the ability to move the license from an instrument or a personal computer to
another by checking in a license from an instrument or PC and checking it out to another.
The Tektronix Asset Management System (http://www.tek.com/products/product-license
inventory of the license(s) in your account. If a license is a Floating license, it also enables you to check
out or check in the license.
There are three different types of licenses available for plug-ins:
License type Description
ocked License
Node-L
ing License
Float
Trial License
Free
xxx
1
A Node-Locked license can be move up to two times after the initial installation to allow for operating system upgrades or other PC failures.
1
(see page 44).
) provides a n
This license is permanently assigned to a specific Hostid or product
model/serial number.
Node Lo
your instrument or personal computer.
This license can be moved between different Hostids or product
models.
Use t
out floating licenses.
This license has the same functionality as the floating license except
that it has a limited time period.
cked Licenses provide your own copy of the application on
he Tektronix Asset Management system to check in and check
How to install a license
License files are used to enable optional applications.
NOTE. Applications may have been previously installed, but without a license, you cannot create
waveforms.
1. Select Licenses... from the Tools menu to display the License Management screen.
44 SourceXpress Printable Help Document

Licensing How to install a license
2. Select the Install License button to display the license file selection
screen and browse to the location where you’ve stored the license
file.
3. Select the license file and select Open.
4. After the successful installation is finished, the name of the plug-in is listed along with the expiration
date and time.
Floating licenses display the expiration date for that application. The expiration date for a floating
cense is defined when the license is checked out from the Tektronix Asset Management system.
li
After the license expires, the application is automatically disabled and the license on the TekAMS is
free to be assigned to a different host.
SourceXpress Printable Help Document 45

Licensing How to return a license
Node locked license have no expiration date.
Howtoreturnalicense
You can return a floating license to the Tektronix Asset Management System (TekAMS). After a floating
license is returned to the TekAMS, it becomes available to be assigned to a different host.
NOTE. Only floating licenses can be returned and reassigned to different hosts.
When assigning a license, you need to specify the host id or instrument and include the duration the feature
is to be enabled on the host. This is all done on the Tektronix Asset Management System (TekAMS) web
site. Aft
TekAMS is free to be assigned to a different host.
er the license expires, the feature is automatically disabled on the host and the license on the
1. Select L
Return License. (A confirmation box is displayed in order to continue.)
After confirming to continue, a license exit file will be created. You need to provide a name for the exit
file and browse to a location to save the license exit file.
icenses... from the Tools menu. Under Installed Licenses, select the license to return and select
46 SourceXpress Printable Help Document

Licensing How to return a license
NOTE. The next step creates and saves the exit file. Once the exit file is created, the application will
immediately become nonfunctional (unable to compile).
2. Browse to the location where you would like to place the exit file (for example, a network drive or
a USB memory stick), and select Save to generate the exit file.
3. Login to your account on TekAMS (Tektronix Asset Management system) and upload the exit file.
Once the license is returned successfully, it can be re-assigned to a different host or instrument.
SourceXpress Printable Help Document 47

Licensing How to return a license
48 SourceXpress Printable Help Document

Index
Index
A
Add generator, 19
Adding a sequ
Adding a waveform, 23
Adding multiple waveforms, 23
Adding virtual generators, 19
Assign a waveform to a
channel, 27
Assign se
Assign tracks
one channel instruments, 35
two channel instruments, 35
ence, 32
quence track, 34
C
Connectivity
disconnect, 17
rties, 17
prope
set to active, 17
Connectivity menu, 8
D
Default layout, 12
Default setup, 12
Default Virtual Generator
ting, 18
set
Disable error pop-ups, 9
Disconnect, 17
Docking, 14
Documentation, 2
Connected instrument, 3
SourceXpress, 3
Drag and drop, 13
E
Edit sequence, 36
Error messages
hide pop-ups, 9
F
Feedback, 4
File menu, 6
Floating License, 44
Free Trial License, 44
G
Graphical interface features, 12
GUI features, 12
H
Help butt
Help menu, 10
Hide
on, 12
connected generator list, 10
sequence list, 10
waveform list, 10
I
t
Impor
analog waveform, 25
digital waveform, 25
Import sequence, 32
Import waveform, 23
Install a license, 44
L
tSetup, 12
Las
Layout
default, 12
Left mouse click, 13
License
install, 44
purchase, 44
reassign, 46
return, 46
types, 44
uninstall, 44
License a plug-in, 43
Licensing, 43
M
Manuals, 2
MATLAB
levels supported, 39
waveform elements, 39
MATLAB waveform files, 39
Menu bar, 6
Mouse click
left, 13
right, 13
Multi-waveform select, 26
N
Node-Locked License, 44
Normali
ze waveform, 25
O
Open File, 11
Open setup, 11
Open tool, 11
P
Play button
indicators, 5
g-in licensing, 43
Plu
Plug-ins, 43
Programmer commands
Connected instrument, 3
SourceXpress, 3
Properties, 17
aveform, 28
w
Pull down lists, 13
Purchase a license, 44
R
Recommended sample rate, 29
Rescale waveform, 25
Reset default setup, 12
Reset window layout, 12
Reset Window Layout, 10
Resizing windows, 14
Restore last setup, 12
Restore layout, 14
Restore tools, 12
SourceXpress Printable Help Document 49

Index
Return a license, 46
Right mouse click, 13
Run state cont
rol, 5
S
Save setup
with assets, 11
with sequences, 11
with waveforms, 11
without assets, 11
without se
without waveforms, 11
Save tool, 11
Saving a sequence, 34
Saving a waveform, 27
Screen interface features, 12
Sequen
Sequence list, 31
Sequence track
Service support, 3
Set to active, 17
Se
ce
adding, 31
assign to channel, 31
edit, 36
modify, 31
open, 11
savi
assign to channel, 34
tup
default, 12
quences, 11
ng, 31
open, 11
save, 11
Setup file
opening, 24
Signal format
defined, 29
Support information, 3
T
Tabs
repositio
Technical support, 3
TekAMS, 44
Tektronix Asset Management
System, 44
Tracks
assign
Types of licenses, 44
n, 14
to channel, 34
U
Undocking, 14
User manual, 12
V
Valid file types, 23
Virtual Generator
ault, 18
def
remove, 18
W
Waveform
open, 11
properties, 28
recommended sample rate, 29
signal format, 29
Waveform Pl
Waveform types
valid file types, 23
Waveforms
adding, 23
assign to channel, 23
copying,
modifying, 23
normalize, 23
properties, 23
removing, 23
renaming, 23
saving
Waveforms list, 23
Waveforms tab, 23
Window resizing, 14
Windows menu
connected generator list, 10
res
sequence list, 10
waveform list, 10
ug-ins, 37
23
,23
et window layout, 10
50 SourceXpress Printable Help Document
 Loading...