

Page 1

www.keithley.com
A GREATER MEASURE OF CONFIDENCE
Series 3400 Pulse Pattern Generators
User’s Manual
3400S-900-01 Rev. B / January 2007
Page 2

Page 3

WARRANTY
Keithley Instruments, Inc. warrants this product to be free from defects in material and workmanship for a period of
1 year from date of shipment.
Keithley Instruments, Inc. warrants the following items for 90 days from the date of shipment: probes, cables,
rechargeable batteries, diskettes, and documentation.
During the warranty period, we will, at our option, either repair or replace any product that proves to be defective.
To exercise this warranty, write or call your local Keithley Instruments representative, or contact
Keithley Instruments headquarters in Cleveland, Ohio. You will be given prompt assistance and return instructions.
Send the product, transportation prepaid, to the indicated service facility. Repairs will be made and the product
returned, transportation prepaid. Repaired or replaced products are warranted for the balance of the original
warranty period, or at least 90 days.
LIMITATION OF WARRANTY
This warranty does not apply to defects resulting from product modification without Keithley Instruments’ express
written consent, or misuse of any product or part. This warranty also does not apply to fuses, software,
non-rechargeable batteries, damage from battery leakage, or problems arising from normal wear or failure to follow
instructions.
THIS WARRANTY IS IN LIEU OF ALL OTHER WARRANTIES, EXPRESSED OR IMPLIED, INCLUDING ANY
IMPLIED WARRANTY OF MERCHANTABILITY OR FITNESS FOR A PARTICULAR USE. THE REMEDIES
PROVIDED HEREIN ARE BUYER’S SOLE AND EXCLUSIVE REMEDIES.
NEITHER KEITHLEY INSTRUMENTS, INC. NOR ANY OF ITS EMPLOYEES SHALL BE LIABLE FOR ANY
DIRECT, INDIRECT, SPECIAL, INCIDENTAL OR CONSEQUENTIAL DAMAGES ARISING OUT OF THE USE OF
ITS INSTRUMENTS AND SOFTWARE EVEN IF KEITHLEY INSTRUMENTS, INC., HAS BEEN ADVISED IN
ADVANCE OF THE POSSIBILITY OF SUCH DAMAGES. SUCH EXCLUDED DAMAGES SHALL INCLUDE, BUT
ARE NOT LIMITED TO: COSTS OF REMOVAL AND INSTALLATION, LOSSES SUSTAINED AS THE RESULT
OF INJURY TO ANY PERSON, OR DAMAGE TO PROPERTY.
A G R E A T E R M E A S U R E O F C O N F I D E N C E
Keithley Instruments, Inc.
Corporate Headquarters • 28775 Aurora Road • Cleveland, Ohio 44139
440-248-0400 • Fax: 440-248-6168 • 1-888-KEITHLEY (534-8453) • www.keithley.com
12/06
Page 4

Page 5

Series 3400
Pulse/Pattern Generators
User’s Manual
©2007, Keithley Instruments, Inc.
Document Number:
All rights reserved.
Cleveland, Ohio, U.S.A.
3400S-900-01 Rev. B / January 2007
Page 6

Manual Print History Series 3400 Pulse/Pattern Generators User’s Manual
Manual Print History
The print history shown below lists the printing dates of all Revisions and Addenda created for this
manual. The Revision Level letter increases alphabetically as the manual undergoes subsequent
updates. Addenda, which are released between Revisions, contain important change information that the
user should incorporate immediately into the manual. Addenda are numbered sequentially. When a new
Revision is created, all Addenda associated with the previous Revision of the manual are incorporated
into the new Revision of the manual. Each new Revision includes a revised copy of this print history page.
Revision A (Document Number 3400S-900-01)..................................................... July 2006
Revision B (Document Number 3400S-900-01)...............................................January 2007
All Keithley Instruments product names are trademarks or registered trademarks of Keithley Instruments, Inc.
Other brand names are trademarks or registered trademarks of their respective holders.
3400S-900-01 Rev. B / January 2007
Page 7

The following safety precautions should be observed before using this product and any associated instrumentation. Although
some instruments and accessories would normally be used with non-hazardous voltages, there are situations where hazardous
conditions may be present.
This product is intended for use by qualified personnel who recognize shock hazards and are familiar with the safety precautions
required to avoid possible injury. Read and follow all installation, operation, and maintenance information carefully before using
the product. Refer to the manual for complete product specifications.
If the product is used in a manner not specified, the protection provided by the product may be impaired.
The types of product users are:
Responsible body is the individual or group responsible for the use and maintenance of equipment, for ensuring that the
equipment is operated within its specifications and operating limits, and for ensuring that operators are adequately trained.
Operators use the product for its intended function. They must be trained in electrical safety procedures and proper use of the
instrument. They must be protected from electric shock and contact with hazardous live circuits.
Maintenance personnel perform routine procedures on the product to keep it operating properly, for example, setting the line
voltage or replacing consumable materials. Maintenance procedures are described in the manual. The procedures explicitly state
if the operator may perform them. Otherwise, they should be performed only by service personnel.
Safety Precautions
Service personnel are trained to work on live circuits, and perform safe installations and repairs of products. Only properly
trained service personnel may perform installation and service procedures.
Keithley Instruments products are designed for use with electrical signals that are rated Measurement Category I and
Measurement Category II, as described in the International Electrotechnical Commission (IEC) Standard IEC 60664. Most
measurement, control, and data I/O signals are Measurement Category I and must not be directly connected to mains voltage or
to voltage sources with high transient over-voltages. Measurement Category II connections require protection for high transient
over-voltages often associated with local AC mains connections. Assume all measurement, control, and data I/O connections are
for connection to Category I sources unless otherwise marked or described in the Manual.
Exercise extreme caution when a shock hazard is present. Lethal voltage may be present on cable connector jacks or test
fixtures. The American National Standards Institute (ANSI) states that a shock hazard exists when voltage levels greater than
30V RMS, 42.4V peak, or 60VDC are present. A good safety practice is to expect that hazardous voltage is present in any
unknown circuit before measuring.
Operators of this product must be protected from electric shock at all times. The responsible body must ensure that operators
are prevented access and/or insulated from every connection point. In some cases, connections must be exposed to potential
human contact. Product operators in these circumstances must be trained to protect themselves from the risk of electric shock.
If the circuit is capable of operating at or above 1000 volts, no conductive part of the circuit may be exposed.
Do not connect switching cards directly to unlimited power circuits. They are intended to be used with impedance limited sources.
NEVER connect switching cards directly to AC mains. When connecting sources to switching cards, install protective devices to
limit fault current and voltage to the card.
Before operating an instrument, make sure the line cord is connected to a properly grounded power receptacle. Inspect the
connecting cables, test leads, and jumpers for possible wear, cracks, or breaks before each use.
12/06
Page 8

When installing equipment where access to the main power cord is restricted, such as rack mounting, a separate main input
!
power disconnect device must be provided, in close proximity to the equipment and within easy reach of the operator.
For maximum safety, do not touch the product, test cables, or any other instruments while power is applied to the circuit under
test. ALWAYS remove power from the entire test system and discharge any capacitors before: connecting or disconnecting
cables or jumpers, installing or removing switching cards, or making internal changes, such as installing or removing jumpers.
Do not touch any object that could provide a current path to the common side of the circuit under test or power line (earth) ground.
Always make measurements with dry hands while standing on a dry, insulated surface capable of withstanding the voltage being
measured.
The instrument and accessories must be used in accordance with its specifications and operating instructions or the safety of the
equipment may be impaired.
Do not exceed the maximum signal levels of the instruments and accessories, as defined in the specifications and operating
information, and as shown on the instrument or test fixture panels, or switching card.
When fuses are used in a product, replace with same type and rating for continued protection against fire hazard.
Chassis connections must only be used as shield connections for measuring circuits, NOT as safety earth ground connections.
If you are using a test fixture, keep the lid closed while power is applied to the device under test. Safe operation requires the use
of a lid interlock.
If a screw is present, connect it to safety earth ground using the wire recommended in the user documentation.
The symbol on an instrument indicates that the user should refer to the operating instructions located in the manual.
The symbol on an instrument shows that it can source or measure 1000 volts or more, including the combined effect of
normal and common mode voltages. Use standard safety precautions to avoid personal contact with these voltages.
The symbol on an instrument shows that the surface may be hot. Avoid personal contact to prevent burns.
The symbol indicates a connection terminal to the equipment frame.
The WARNING heading in a manual explains dangers that might result in personal injury or death. Always read the associated
information very carefully before performing the indicated procedure.
The CAUTION heading in a manual explains hazards that could damage the instrument. Such damage may invalidate the
warranty.
Instrumentation and accessories shall not be connected to humans.
Before performing any maintenance, disconnect the line cord and all test cables.
To maintain protection from electric shock and fire, replacement components in mains circuits, including the power transformer,
test leads, and input jacks, must be purchased from Keithley Instruments. Standard fuses, with applicable national safety
approvals, may be used if the rating and type are the same. Other components that are not safety related may be purchased
from other suppliers as long as they are equivalent to the original component. (Note that selected parts should be purchased only
through Keithley Instruments to maintain accuracy and functionality of the product.) If you are unsure about the applicability of a
replacement component, call a Keithley Instruments office for information.
To clean an instrument, use a damp cloth or mild, water based cleaner. Clean the exterior of the instrument only. Do not apply
cleaner directly to the instrument or allow liquids to enter or spill on the instrument. Products that consist of a circuit board with
no case or chassis (e.g., data acquisition board for installation into a computer) should never require cleaning if handled
according to instructions. If the board becomes contaminated and operation is affected, the board should be returned to the
factory for proper cleaning/servicing.
Page 9

Table of Contents
Section Topic Page
1 Pulse/Pattern Generators Overview .................................................. 1-1
Series 3400 summary ................................................................................. 1-2
Features................................................................................................ 1-2
Basic pulse parameters............................................................................... 1-3
Pulse level parameters ......................................................................... 1-4
Pulse timing and triggering parameters................................................ 1-5
Operating modes......................................................................................... 1-5
Pulse mode........................................................................................... 1-5
Burst mode ........................................................................................... 1-5
Pattern mode ........................................................................................ 1-6
External Width mode ............................................................................ 1-7
Additional pulse characteristics................................................................... 1-8
Duty cycle ............................................................................................. 1-8
Interchannel delay (skew)..................................................................... 1-8
Jitter ...................................................................................................... 1-9
Distortion............................................................................................... 1-9
2 Getting Started........................................................................................ 2-1
General information..................................................................................... 2-2
Warranty information ............................................................................ 2-2
Keithley Instruments website – contact information.............................. 2-2
Inspection ............................................................................................. 2-2
Options and accessories ...................................................................... 2-2
Front and rear panel familiarization............................................................. 2-3
Front panel............................................................................................ 2-3
Rear panel ............................................................................................ 2-4
Power-up..................................................................................................... 2-5
Ventilation............................................................................................. 2-5
Display ........................................................................................................ 2-6
Editing parameter values and settings.................................................. 2-8
Defaults ....................................................................................................... 2-9
3 Signal Connections ............................................................................... 3-1
Introduction ................................................................................................. 3-2
Out 1 and Out 2 connections ...................................................................... 3-2
Trig Out and Ext In connections.................................................................. 3-3
Strobe Out connection................................................................................. 3-4
Clk In connections....................................................................................... 3-4
Ref Out and Ref In connections .................................................................. 3-5
Page 10

Table of Contents Series 3400 Pulse/Pattern Generators User’s Manual
Section Topic Page
4 Pulse/Pattern Generators Operation................................................. 4-1
Pulse, Burst and External Width operation ................................................. 4-3
Pulse mode .......................................................................................... 4-4
Burst mode ........................................................................................... 4-6
External Width mode ............................................................................ 4-7
Pattern operation ........................................................................................ 4-8
Saving and recalling setups ...................................................................... 4-12
Saving a setup.................................................................................... 4-12
Recalling a setup................................................................................ 4-12
Returning to default settings............................................................... 4-12
Pulse/pattern parameters.......................................................................... 4-13
Ampl – amplitude................................................................................ 4-13
Bit # .................................................................................................... 4-14
Block................................................................................................... 4-14
Brst Cnt – burst count......................................................................... 4-14
Cal – calibration.................................................................................. 4-14
ChAdd (3402 only) – channel add...................................................... 4-15
Channel .............................................................................................. 4-15
ClkIn – clock input .............................................................................. 4-15
Delay .................................................................................................. 4-15
Display................................................................................................ 4-16
Double ................................................................................................ 4-16
Edit ..................................................................................................... 4-16
Emul – emulation................................................................................ 4-16
ExtIn – external input.......................................................................... 4-17
Format ................................................................................................ 4-17
Freq – frequency ................................................................................ 4-17
GPIBAdd – GPIB address .................................................................. 4-17
Hi Cur – high current limit................................................................... 4-17
HiLvl – high level ................................................................................ 4-18
Hi Volt – high voltage limit .................................................................. 4-18
IOPort – I/O port (interface)................................................................ 4-18
I/V – current or voltage ....................................................................... 4-18
LeadE – leading edge ........................................................................ 4-18
Length ................................................................................................ 4-19
LoadZ – load impedance.................................................................... 4-20
Lo Cur – low current limit.................................................................... 4-21
LoLvl – low level ................................................................................. 4-21
Lo Volt – low voltage limit ................................................................... 4-21
Offset.................................................................................................. 4-21
On/Off (limits) ..................................................................................... 4-22
Per – period........................................................................................ 4-22
PerSrc – period source....................................................................... 4-22
Pol – polarity....................................................................................... 4-23
PLLRef – PLL reference..................................................................... 4-23
PRBS n – pseudo random bit sequence ........................................... 4-23
Recall ................................................................................................. 4-24
Save ................................................................................................... 4-24
SrcZ – source impedance .................................................................. 4-24
System ............................................................................................... 4-24
TrailE – trailing edge........................................................................... 4-24
TrgFreq – trigger frequency................................................................ 4-25
TrgMode – trigger mode ..................................................................... 4-25
TrigPer – trigger period....................................................................... 4-25
TrgSlope – trigger slope ..................................................................... 4-25
TrgSrc – trigger source....................................................................... 4-26
Update................................................................................................ 4-26
Width .................................................................................................. 4-26
ii 3400S-900-01 Rev. B / January 2007
Page 11

Series 3400 Pulse/Pattern Generators User’s Manual Table of Contents
Section Topic Page
5 Triggering................................................................................................. 5-1
Triggering overview..................................................................................... 5-2
Double pulse ........................................................................................ 5-2
Period source (PerSrc)......................................................................... 5-2
Trigger source (TrgSrc) ........................................................................ 5-3
Trigger Out and Strobe Out .................................................................. 5-3
PLL reference (PLLRef) ...................................................................... 5-3
Continuous.................................................................................................. 5-4
Continuous Pulse mode ....................................................................... 5-4
Continuous Burst mode........................................................................ 5-4
Continuous Pattern mode..................................................................... 5-5
Triggered..................................................................................................... 5-6
Triggered Pulse mode .......................................................................... 5-6
Triggered Burst mode........................................................................... 5-8
Triggered Pattern mode...................................................................... 5-10
Gated ........................................................................................................ 5-13
Gated Pulse mode.............................................................................. 5-13
Gated Burst mode .............................................................................. 5-14
Gated Pattern mode ........................................................................... 5-16
External Width........................................................................................... 5-17
User Interface and remote programming mapping ................................... 5-18
6 Remote Programming........................................................................... 6-1
Introduction ................................................................................................. 6-2
Remote interfaces....................................................................................... 6-2
Selecting an interface........................................................................... 6-2
IEEE-488 interface ............................................................................... 6-2
USB interface ....................................................................................... 6-3
Status model ............................................................................................... 6-4
Status register sets............................................................................... 6-5
Status byte and service request (SRQ) ................................................ 6-5
Standard Event Status Register ........................................................... 6-6
Operation Status group ........................................................................ 6-7
Questionable Status group ................................................................... 6-7
Service request programming example................................................ 6-7
Common commands................................................................................... 6-7
Command summary ............................................................................. 6-7
Command examples ............................................................................ 6-8
SCPI command reference........................................................................... 6-9
Command summary ............................................................................. 6-9
Command descriptions....................................................................... 6-14
Appendix Topic Page
A Specifications............................................................................................ A-1
Index I-1
3400S-900-01 Rev. B / January 2007 iii
Page 12

Table of Contents Series 3400 Pulse/Pattern Generators User’s Manual
This page left blank intentionally.
iv 3400S-900-01 Rev. B / January 2007
Page 13

List of Figures
Section Figure Title Page
1 Figure 1-1 Default pulse level and timing parameter settings
(Pulse mode, continuous triggering) .............................................. 1-3
Figure 1-2 Example output pattern for RZ and NRZ data formats................... 1-6
Figure 1-3 External Width mode ...................................................................... 1-7
Figure 1-4 Example of 50% duty cycle ............................................................ 1-8
Figure 1-5 Interchannel delay (skew) .............................................................. 1-8
Figure 1-6 Distortion – Preshoot, overshoot and ringing ................................. 1-9
2 Figure 2-1 Front panel familiarization (Model 3402-F)..................................... 2-3
Figure 2-2 Rear panel familiarization (Model 3402-R)..................................... 2-4
Figure 2-3 VOLTS menu options (default parameters).................................... 2-6
3 Figure 3-1 Out 1 and Out 2 connections ......................................................... 3-2
Figure 3-2 Trig Out connections ...................................................................... 3-3
Figure 3-3 Ext In connections.......................................................................... 3-3
Figure 3-4 Strobe Out connections.................................................................. 3-4
Figure 3-5 Clk In connections.......................................................................... 3-4
Figure 3-6 Ref Out and Ref In connections ..................................................... 3-5
4 Figure 4-1 Select operating mode .................................................................. 4-3
Figure 4-2 Configure Pulse mode parameters ............................................... 4-4
Figure 4-3 Configure triggering ....................................................................... 4-5
Figure 4-4 Setting Burst mode count............................................................... 4-6
Figure 4-5 PATTERN menu ........................................................................... 4-8
Figure 4-6 Block soft key options ................................................................... 4-9
Figure 4-7 Insert bit and delete bit examples ................................................ 4-10
Figure 4-8 Series 3400 output diagrams ....................................................... 4-20
Figure 4-9 Polarity ......................................................................................... 4-23
Page 14

List of Figures Series 3400 Pulse/Pattern Generators User’s Manual
Section Figure Title Page
5 Figure 5-1 Continuous Pulse mode ................................................................ 5-4
Figure 5-2 Continuous Burst mode ................................................................ 5-5
Figure 5-3 Continuous Pattern mode............................................................. 5-6
Figure 5-4 Triggered Pulse mode (positive slope) ......................................... 5-7
Figure 5-5 Triggered Pulse mode (negative slope) ........................................ 5-7
Figure 5-6 Triggered Pulse mode (positive and negative slope) .................... 5-8
Figure 5-7 Triggered Burst mode (VCO period source) ................................. 5-9
Figure 5-8 Triggered Burst mode (PLL or ClkIn period source) .................... 5-10
Figure 5-9 Triggered Pattern mode (VCO period source) ............................ 5-11
Figure 5-10 Triggered Pattern mode (PLL or ClkIn period source) ................ 5-12
Figure 5-11 Gated Pulse mode (VCO period source) .................................... 5-13
Figure 5-12 Gated Pulse mode (PLL or ClkIn period source) ........................ 5-14
Figure 5-13 Gated Burst mode (VCO period source) ..................................... 5-15
Figure 5-14 Gated Burst mode (PLL or ClkIn period source)......................... 5-15
Figure 5-15 Triggered Pattern mode (VCO period source) ............................ 5-16
Figure 5-16 Triggered Pattern mode (PLL or ClkIn period source) ................ 5-17
6 Figure 6-1 IEEE-488 and USB connector locations on rear panel.................. 6-3
Figure 6-2 Status model .................................................................................. 6-4
vi 3400S-900-01 Rev. B / January 2007
Page 15

List of Tables
Section Table Title Page
1 Table 1-1 Pulse level parameters................................................................... 1-4
Table 1-2 Pulse timing and triggering parameters.......................................... 1-5
2 Table 2-1 Menu summary .............................................................................. 2-7
Table 2-2 Power-on defaults .......................................................................... 2-9
4 Table 4-1 Pulse mode triggering .................................................................... 4-5
Table 4-2 Burst mode triggering..................................................................... 4-6
Table 4-3 External Width mode triggering...................................................... 4-7
Table 4-4 PRBS length settings ................................................................... 4-11
Table 4-5 Pattern mode triggering................................................................ 4-11
Table 4-6 Soft key parameters ..................................................................... 4-13
Table 4-7 Programmed voltage vs. actual voltage (VDUT)
for DUT impedance variations...................................................... 4-21
5 Table 5-1 Triggering summary ....................................................................... 5-2
Table 5-2 Mapping for User Interface settings and remote
programming commands ............................................................. 5-18
6 Table 6-1 Status Byte Register and Service Request Enable Register bits ... 6-6
Table 6-2 Standard Event Status Register bits............................................... 6-6
Table 6-3 Common commands ...................................................................... 6-7
Table 6-4 SCPI command summary ............................................................ 6-10
Table 6-5 :ARM:SOUR source selections.................................................... 6-17
Table 6-6 :DIG:PATT:DATA[1|2|3]................................................................. 6-19
Table 6-7 :TRIG:SOUR ................................................................................ 6-42
Page 16

List of Tables Series 3400 Pulse/Pattern Generators User’s Manual
This page left blank intentionally.
viii 3400S-900-01 Rev. B / January 2007
Page 17

In this section:
Top ic Page
Series 3400 summary ................................................................... 1-2
Basic pulse parameters .................................................................... 1-3
Operating modes............................................................................... 1-5
Section 1
Pulse/Pattern Generators Overview
Features........................................................................................ 1-2
Pulse level parameters ................................................................. 1-4
Pulse timing and triggering parameters ........................................ 1-5
Pulse mode................................................................................... 1-5
Burst mode ................................................................................... 1-5
Pattern mode ................................................................................ 1-6
External Width mode .................................................................... 1-7
Additional pulse characteristics ...................................................... 1-8
Duty cycle ..................................................................................... 1-8
Interchannel delay (skew)............................................................. 1-8
Jitter .............................................................................................. 1-9
Distortion....................................................................................... 1-9
Page 18

Section 1: Pulse/Pattern Generators Overview Series 3400 Pulse/Pattern Generators User’s Manual
Series 3400 summary
The Series 3400 Pulse/Pattern Generators, currently available in two basic models, offer extensive
control over pulse parameters - including amplitude, offset, leading and trailing edge times, pulse
width and duty cycle. The Model 3401 is a single-channel, 165MHz pulse/pattern generator; the
Model 3402 is similar, but includes a second signal output channel.
NOTE Each basic model is available with connectors located on the front panel (Model 3401-F
and Model 3402-F) or with all connectors located on the rear panel (Model 3401-R and
Model 3402-R).
The operational flexibility and pattern generation capability of the Series 3400 Pulse/Pattern
Generators makes them readily suitable to the specific needs of many different applications,
including simplified simulation of serial data patterns when testing devices to characterize their
performance under sub-optimal conditions.
Features
• Frequency Output Range: 1mHz to 165MHz
• Pulse Amplitude: ±10V (50Ω source impedance)
±20V (1kΩ source impedance)
• Pulse Width: Programmable from 3.02ns to (Period - 3.02ns)
• Leading and Trailing Edge Times: Programmable from 2.0ns to 200ms
• Pulse output programmable as voltage or current
• Four Operating Modes: Pulse mode
Burst mode
Pattern mode
External Width mode
• Channel Add (Model 3402 only): Make complex waveforms by adding pulse output for
Channel 1 and Channel 2
• Internal PLL and VCO period sources
• Save up to nine pulse/pattern generator setups in non-volatile memory
• GPIB and USB interfaces
• 2U full-rack design
1-2 Return to Section Topics 3400S-900-01 Rev. B / January 2007
Page 19

Series 3400 Pulse/Pattern Generators User’s Manual Section 1: Pulse/Pattern Generators Overview
Ampl
(Amplitude)
1Vpp
Width
+500mV
-500mV
Per
(Period)
LeadE
(Leading Edge)
2.5ns
Trigger
Delay
0ps
0V
HiLvl
(High
Level)
LoLvl
(Low Level)
Offset
(Median)
100ns
1µs
Freq
(Frequency)
1MHz
SrcZ (Source Impedance) = 50W
LoadZ (Load Impedance) = 50W
LeadE
(Leading Edge)
2.5ns
TrailE
(Trailing Edge)
2.5ns
Time Parameters
Not Drawn To Scale
Basic pulse parameters
On power-up, the instrument is in the Pulse mode with continuous triggering selected. When a
channel is enabled, it will continuously output pulses.
Figure 1-1 shows the first two pulses of the continuous pulse output. Shown are the fundamental
default settings. The parameter names in italic correspond to the parameter names in the front
panel VOLTS and TIME menus.
Figure 1-1
Default pulse level and timing parameter settings (Pulse mode, continuous triggering)
3400S-900-01 Rev. B / January 2007 Return to Section Topics 1-3
The basic pulse level, timing and triggering parameters are summarized in Table 1-1 and
Table 1-2. The last column (“yes” or “no”) in the two tables does not apply to the Model 3401.
Page 20

Section 1: Pulse/Pattern Generators Overview Series 3400 Pulse/Pattern Generators User’s Manual
Pulse level parameters
Table 1-1
Pulse level parameters
Independent
Channel
Settings*
Parameter Description
Output Function Configure pulse output as Current or Voltage. Yes
Source Impedance Set the source impedance of the Series 3400 for 50 Ohms or 1k Ohms. Ye s
Load Impedance The allowable setting ranges for pulse parameters are specified for a
Ω load. However, the load impedance setting of the Series 3400 can
50
be set to match the impedance of the DUT. Load impedance can be set
from 0.1 Ohm to 1M Ohm.
High Level
Low Level
Amplitude Amplitude is the low-to-high magnitude of the pulse. The Amplitude
Offset Offset is the median (average) value of the high and low levels:
Polarity Polarity can be set to Norm (normal) or Comp (complement).
Channel Add 3402 Only – Enable or Disable Channel Add. When enabled, Channel
Pulse Level Limits To protect DUT, high and low limits can be set for pulse output. Limits
* Yes = The parameter can be independently set for each of the two channels of the Model 3402.
No = The parameter setting applies to both channels of the Model 3402.
Configure the pulse high/low levels by setting the High Level and the
Low Level. Setting range depends on the source impedance setting:
50Ω into 50Ω: 0 to ±10V (or 0 to ±200mA)
1kΩ into 50Ω: 0 to ±20V (or 0 to ±400mA)
Changing the high and/or low level may change the amplitude and
offset.
setting range depends on the source impedance setting:
50Ω into 50Ω: 100mV to 10Vpp (or 2mApp to 200mApp)
1kΩ into 50Ω: 200mV to 20Vpp (or 4mApp to 400mApp)
Changing the amplitude will change the high and low levels. Offset is
not affected.
Offset = (High Level + Low Level) / 2.
The offset can be set to any value that allows the pulse to fit within the
level window. For a 100mVpp amplitude, offset can be programmed up
to 9.95V.
Changing the offset will change the high and/or low levels. Amplitude is
not affected.
Complement means that the pulse transitions from the High Level to
the Low Level.
1 pulse output is added to Channel 2 pulse output. The complex result
is available on channel 1; Channel 2 is disabled.
can be enabled (On) or disabled (Off). The Hi Lim and Lo Lim setting
ranges are the same as the setting ranges for High Level and Low
Level.
(3402 only)
Yes
Yes
Yes
Yes
Yes
No
Yes
1-4 Return to Section Topics 3400S-900-01 Rev. B / January 2007
Page 21

Series 3400 Pulse/Pattern Generators User’s Manual Section 1: Pulse/Pattern Generators Overview
Pulse timing and triggering parameters
Table 1-2
Pulse timing and triggering parameters
Independent
Channel
Settings*
Parameter Description
Frequency
Period
Width Pulse width is measured at the 50% amplitude level of the pulse. Width
Delay A delay between the trigger event and the start of each pulse can be set
Leading Edge
Trailing Edge
Pulse Number With Single pulse selected, one pulse per period will be output. With
Period Source The source for period generation can be PLL, VCO or an external clock
Trigger Source Select the trigger source to start pulse output: ExtIn (external input),
Trigger Mode Select the trigger mode: Cont (continuous), Trig’ d (triggered) or Gated. No
Trigger Frequency
Trigger Period
* Yes = The parameter can be independently set for each of the two channels of the Model 3402.
No = The parameter setting applies to both channels of the Model 3402.
Pulse cycle time can be set as frequency or period. Frequency can be
set from 1mHz to 165MHz. Period can be set from 6.06ns to 1000s.
can be set from 3.02ns to (Period - 3.02ns).
from 0 to (Period - 3.02ns).
Time intervals between corresponding 10% and 90% amplitude points
on the leading/trailing edge of the pulse. Leading and trailing edge
times (LeadE and Trai lE) can be individually set from 2ns to 200ms.
Double pulse selected, two pulses per period will be output.
input (ClkIn).
PLL or Manual.
Trigger speed for the PLL trigger source can be set as frequency or
period. Trigger Frequency can be set from 1mHz to 165MHz. Trigger
Period can be set from 6.06ns to 1000s.
(3402 only)
No
Yes
Yes
Yes
Yes
No
No
No
No
No
Operating modes
The Series 3400 Pulse/Pattern Generators have four operating modes: Pulse mode, Burst mode,
Pattern mode and External Width mode.
Pulse mode
Outputs a single pulse or continuous pulses per trigger event to the two output channels. The
basic pulse level, timing and triggering parameters are summarized in
Burst mode
This mode is similar to the Pulse mode, except that each trigger event will output a series (burst) of
pulses. In Burst mode, two to 65,536 pulses can be output.
Table 1-1 and Table 1-2.
3400S-900-01 Rev. B / January 2007 Return to Section Topics 1-5
Page 22

Section 1: Pulse/Pattern Generators Overview Series 3400 Pulse/Pattern Generators User’s Manual
RZ format
11
00
1
0
1
0
5V
0V
Logic 1 = 5V
Logic 0 = 0V
NRZ format
11
00
1
0
1
0
5V
Output Pattern
11100010
0V
Period Period PeriodPeriod PeriodPeriod Period Period
Bit 1 Bit 2 Bit 3 Bit 4 Bit 5 Bit 6 Bit 7 Bit 8
Bit 1 Bit 2 Bit 3 Bit 4 Bit 5 Bit 6 Bit 7 Bit 8
Pattern mode
Each channel can output a user configured bit pattern that consists of Logic 0’s and 1’s. The length
of the bit pattern can be two to 16,384 bits.
The two channels of a Model 3402 can have different bit patterns, but must be the same length.
Logic 0 represents the low pulse level (e.g., 0V) and Logic 1 represents the high pulse level. The
following example shows different 8-bit output patterns for the two channels:
Channel 1 Output Pattern: 00110011
Channel 2 Output Pattern: 11100010
Pattern data formats
There are two data formats for output patterns: RZ (return-to-zero) and NRZ (non-return-to-zero).
Figure 1-2 shows the difference between the RZ format and the NRZ format. The 8-bit pattern is
the same for both formats (11100010), and the logic levels are the same (Logic 0 = 0V, Logic 1 =
5V):
• RZ Format – For 50% duty cycle, a Logic 1 bit goes to 5V for the first half of the period, then
returns to 0V for the second half of the period (return-to-zero). A Logic 0 bit remains at 0V
for the entire period.
• NRZ Format – A Logic 1 bit goes to 5V and stays at 5V for the entire period (non-return-tozero). A Logic 0 bit goes to 0V and remains at 0V for the entire period.
NOTE For either data format, the level for Logic 0 does not have to be 0V. It simply must be less
positive (more negative) than Logic 1.
Example 1: Example 2:
Logic 1 = 4V Logic 1 = 0V
Logic 0 = 1V Logic 0 = -3V
Figure 1-2
Example output pattern for RZ and NRZ data formats
Pseudo Random Bit Sequencer (PRBS)
The PRBS is used to output a pseudo random pattern for testing purposes. The number of bits for
the PRBS output pattern can be set as follows:
1-6 Return to Section Topics 3400S-900-01 Rev. B / January 2007
PRBS size = 2n-1 where n = 5 to 14
The RZ or NRZ data format can be used for the PRBS pattern.
Page 23

Series 3400 Pulse/Pattern Generators User’s Manual Section 1: Pulse/Pattern Generators Overview
Amplitude
3 to 6V
(±)
External Input
(Ext In)
Pulse Output
(Out 1, Out 2)
Leading edge of external trigger
causes output to go high
Trailing edge causes
output to go low
External Width mode
In this mode, pulse output follows the edges of an external input trigger that is applied to the Ext In
connector. As shown in
causes the output to go low.
The external input trigger can be positive or negative polarity up to 6V. However, the external input
trigger voltage must be at least ±10mV in order to be detected by the pulse/pattern generator as a
valid trigger.
Figure 1-3
External Width mode
Figure 1-3, a rising edge causes the output to go high, while a falling edge
3400S-900-01 Rev. B / January 2007 Return to Section Topics 1-7
Page 24

Section 1: Pulse/Pattern Generators Overview Series 3400 Pulse/Pattern Generators User’s Manual
Period
1µs
Amplitude
50%
Width
500ns
Duty Cycle = (Width / Period) x 100%
= (500ns / 1µs) x 100%
= 0.5 x 100%
= 50%
Channel A
Output
Channel B
Output
Interchannel Delay Skew
Amplitude
Amplitude
Additional pulse characteristics
The following are characteristics inherent to pulse generation, and may or may not be affected by
various instrument settings and/or the load.
Duty cycle
The duty cycle is the amount of time – as a percentage of the pulse period – that the pulse is on
(pulse width). Duty cycle (as a percentage) is calculated as follows:
Duty Cycle = (Width / Period) x 100
Figure 1-4 shows an example for duty cycle.
Figure 1-4
Example of 50% duty cycle
Interchannel delay (skew)
As shown in Figure 1-5, interchannel delay is the time interval between the leading pulse edge of
the two Model 3402 output channels (Channel 1 and Channel 2). Skew can be adjusted through
the use of the pulse Delay for each individual channel.
Figure 1-5
Interchannel delay (skew)
1-8 Return to Section Topics 3400S-900-01 Rev. B / January 2007
Page 25

Series 3400 Pulse/Pattern Generators User’s Manual Section 1: Pulse/Pattern Generators Overview
0
100%
Preshoot (e.g., 2%)
Ringing (negative)
(e.g., -2%)
Ringing (positive)
(e.g., +3%)
Overshoot
(e.g., 5%)
Amplitude
Time
Jitter
Jitter is the short-term instability of one edge relative to a reference edge. Jitter is usually specified
as an RMS value, which is one standard deviation (or sigma). If distribution is assumed Gaussian,
six sigma represents 99.74% of peak-to-peak jitter.
The reference edge for period jitter is the previous leading edge. The reference edge for delay
jitter is the leading edge of the trigger output. Width jitter is the stability of the trailing edge with
respect to the leading edge.
Distortion
Distortion includes preshoot, overshoot and ringing. Preshoot and overshoot are peak distortions
preceding/following an edge. Ringing is the positive-peak and negative-peak distortion (excluding
overshoot) on pulse top or base. Distortion for a pulse is shown in
preshoot, overshoot and ringing specification of 5% implies an overshoot and undershoot <5% of
pulse amplitude.
Figure 1-6
Distortion – Preshoot, overshoot and ringing
Figure 1-6. A combined
3400S-900-01 Rev. B / January 2007 Return to Section Topics 1-9
Page 26

Section 1: Pulse/Pattern Generators Overview Series 3400 Pulse/Pattern Generators User’s Manual
This page left blank intentionally.
1-10 Return to Section Topics 3400S-900-01 Rev. B / January 2007
Page 27

In this section:
Top ic Page
General information........................................................................... 2-2
Front and rear panel familiarization ................................................. 2-3
Power-up ............................................................................................ 2-5
Section 2
Getting Started
Warranty information ..................................................................... 2-2
Keithley Instruments website – contact information ...................... 2-2
Inspection ...................................................................................... 2-2
Options and accessories ............................................................... 2-2
Front panel .................................................................................... 2-3
Rear panel..................................................................................... 2-4
Ventilation...................................................................................... 2-5
Display ................................................................................................ 2-6
Editing parameter values and settings .......................................... 2-8
Defaults............................................................................................... 2-9
Page 28

Section 2: Getting Started Series 3400 Pulse/Pattern Generators User’s Manual
General information
Warranty information
Warranty information is located at the front of this manual. Should your instrument require
warranty service, contact the Keithley representative or authorized repair facility in your area for
further information. When returning the instrument for repair, be sure to fill out and include the
service form at the back of this manual to provide the repair facility with necessary information.
Keithley Instruments website – contact information
Visit the Keithley website at www.keithley.com for information on contacting Keithley for your
customer service needs, such as calibration and repair.
Inspection
The instrument was carefully inspected electrically and mechanically before shipment. After
unpacking all items from the shipping carton, check for any obvious signs of physical damage that
may have occurred during transit. (there may be a protective film over the display lens, which can
be removed). Report any damage to the shipping agent immediately. Save the original packing
carton for possible future shipment. The following items are included with every instrument order:
• Series 3400 with line cord.
• Rack Mount/Handle Kit
• Accessories as ordered.
• CD with the Quick Start Guide, User’s Manual and any Release Notes
• Hardcopy of the Quick Start Guide
Options and accessories
Cables/adapters
• Model 7051-2 General Purpose BNC to BNC Cable (2 ft)
• Model 7007-1 Shielded GPIB Cable, 1m
• Model 7007-2 Shielded GPIB Cable, 2m
• Model 7051-2 General Purpose BNC to BNC Cable, 0.6m (2 ft)
• Model 7051-5 General Purpose BNC to BNC Cable, 1.5 (5 ft)
• 7755 50Ω Feed-Through Terminator
Communication interfaces
• Model KPCI-488 GPIB/IEEE488 Interface Board for PCI Bus
• Model KUSB-488 USB-to-GPIB interface adapter for USB
• When using USB directly, use one of the following USB cables:
– USB-B-1 USB Cable Type A to B, 1m
– USB-B-3 USB Cable Type A to B, 3m
2-2 Return to Section Topics 3400S-900-01 Rev. B / January 2007
Page 29

Series 3400 Pulse/Pattern Generators User’s Manual Section 2: Getting Started
On/Off
Switch
1
2
LCD Display
Channel 1
Parameters
2a
Selected
Parameter
2c
Channel 2
Parameters
2b
5
Rotory Knob
Cursor Keys
7
6
Numeric Keypad
3
Menu
Keys
Clock, Trigger and
Strobe Connectors
(BNC)
10
Clock
Input
10a
External
Input
10b
Trigger
Output
10c
Strobe
Output
10d
8
Output Enable
Pulse/Pattern
Output
Connectors
(BNC)
9
Soft Keys
4
Soft Key
Options
For the Rear Panel Output option,
items 9 and 10 connectors are
moved to the rear panel.
2 Width
Delay
LeadE
TrailE
3.00 ns
0 ps
2.5 ns
2.5 ns
Pulse Mode
Ch 1 Width
3.04 ns
Trigger = PLL
1 Width
Delay
LeadE
TrailE
3.04 ns
0 ps
2.5 ns
2.5 ns
Freq 165.0 MHz Per 6.06 ns
Channel Freq Per Width Delay More
+/-
Front and rear panel familiarization
Front panel
The front panel of the Model 3402-F is shown in Figure 2-1. The front panel controls and
connectors for the Model 3401-F single-channel pulse/pattern generator are similar except there is
only one channel. For the Model 3401, disregard all references to the second channel.
Figure 2-1
Front panel familiarization (Model 3402-F)
1. On/Off Switch – Push button switch toggles instrument on and off. When on, the green
indicator in the button turns on. Note that the main power switch for the rear panel Power
Module must be on (refer to
Figure 2-2).
2. LCD Display – On the Time and Volts menu keys, the display is divided into three areas:
a. Channel 1 Parameters – Displays Channel 1 parameters for the selected Function.
b. Channel 2 Parameters – Displays Channel 2 parameters for the selected Function.
c. Parameter Value – Displays the value of the selected parameter. Also displays related
information.
3. Menu Select Keys – The various menus are selected using these keys. The display then
shows the parameters, options and other choices available for the selected menu.
4. Soft Keys – The options that can be selected depend on the selected menu and are positioned in the display immediately above the soft keys.
5. Rotary Knob – Use this knob to modify (increase or decrease) the displayed parameter
value.
6. Numeric Keypad – Use this keypad to enter parameter values. After keying in a value,
available options (e.g., MHz range) are displayed as soft keys.
7. Cursor Keys – Use to increment/decrement parameter values.
8. Output Enable – Push button toggles output enable for each channel on and off. When on,
the green indicator in the button turns on. A trigger event will then start pulse/pattern output.
9. Pulse/Pattern Output Connectors – Output for the two channels is available at these
female BNC connectors. For the Rear Panel Output option, these connectors are moved to
3400S-900-01 Rev. B / January 2007 Return to Section Topics 2-3
the rear panel for greater convenience in rack-mounted environments.
Page 30

Section 2: Getting Started Series 3400 Pulse/Pattern Generators User’s Manual
2
Pulse/Pattern
Output
Connectors
(BNC)
3
Strobe, Trigger and
Clock Connectors
(BNC)
Reference
Output
Connector
(BNC)
5
Reference
Input
Connector
(BNC)
4
USB
Connector
6
IEEE-488
Connector
7
1
Power
Module
3a
Clock
Input
3b
External
Input
3c
Trigger
Output
3d
Strobe
Output
For the Front Panel Output
option, items 2 and 3
connectors are moved to the
front panel.
Cooling Vents
8
10. Clock, Trigger and Strobe Connectors – The following input/output female BNC connectors are provided:
NOTE For the Rear Panel Output option, these connectors are moved to the rear panel for
greater convenience in rack-mounted environments:
a. Clock Input – Connect an external clock.
b. External Input – Connect an external signal for external triggering.
c. Trigger Output – Provides a trigger pulse on each period.
d. Strobe Output – Programmable NRZ in Pattern mode, marks burst width in Burst mode.
Rear panel
The rear panel of the Model 3402-R is shown in Figure 2-2. The connectors for the Model 3401-R
single-channel pulse/pattern generator are similar except there is only one pulse/pattern output
channel. For the Model 3401, disregard all references to the second channel.
Figure 2-2
Rear panel familiarization (Model 3402-R)
1. Power Module – Contains the AC line receptacle, main power switch and the power line
fuse. Uses a toggle switch for AC power. The “0” position is off, and the “1” position is on.
This toggle switch must be in the “1” (on) position to enable the front panel On/Off Switch
(refer to
Figure 2-1).
2. Pulse/Pattern Output Connectors – Output for the two channels is available at these
3. Clock, Trigger and Strobe Connectors – The following input/output female BNC connec-
female BNC connectors. For the Rear Panel Output option, these connectors are moved to
the rear panel for greater convenience in rack-mounted environments:
tors are provided:
NOTE For the Rear Panel Output option, these connectors are moved to the rear panel for
greater convenience in rack-mounted environments.
a. Clock Input – Connect an external clock.
b. External Input – Connect an external signal for arming.
c. Trigger Output – Provides a trigger pulse on each period.
d. Strobe Output – Programmable NRZ in Pattern mode, marks burst width in Pulse mode.
2-4 Return to Section Topics 3400S-900-01 Rev. B / January 2007
Page 31

Series 3400 Pulse/Pattern Generators User’s Manual Section 2: Getting Started
4. Reference Input Connector – This female BNC connector accepts an external 10MHz
oscillator signal for PLL reference.
NOTEUse the Ref In and Ref Out to daisy-chain multiple Series 3400 units for the purpose
of using one PLL as the period source.
5. Reference Output Connector – This female BNC connector provides 10MHz single phase
locked to PLL.
6. USB Connector – For USB remote operation. Use a USB cable (Model USB-B-1 or USBB-3) to connect to the USB interface of the PC.
7. IEEE-488 Connector – For GPIB remote operation. Use a shielded cable (Model 7007-1 or
7007-2).
8. Cooling Vents – The instrument uses a cooling fan and vents to keep it from overheating.
Note that there is also a cooling vent on each side panel of the unit. Refer to “
information on maintaining proper ventilation for the instrument.
Ventilation” for
Power-up
The Series 3400 operates from a line voltage in the range of 100 to 240V single phase at a
frequency of 50 or 60Hz. Line voltage and line frequency are automatically sensed. Therefore,
there are no switches to set. Check to be sure the operating voltage in your area is compatible.
CAUTION Operating the instrument on an incorrect line voltage may cause damage, pos-
sibly voiding the warranty.
Perform the following steps to connect the Series 3400 to line power and turn it on:
1. Before plugging in the power cord, make sure the Series 3400 is turned off and the rear
panel power switch is in the off (0) position.
2. Connect the female end of the supplied power cord to the AC receptacle on the rear panel,
and return the power switch to the on (1) position.
WARNING The power cord supplied with the Series 3400 contains a separate ground for
use with grounded outlets. When proper connections are made, the instru
ment chassis is connected to power line ground through the ground wire in
the power cord. Failure to use a grounded outlet may result in personal injury
or death due to electric shock.
3. Turn on the instrument by pressing the front panel on/off button.
-
Line fuse replacement
Two line fuses are located in a drawer in the Power Module above the AC receptacle (refer to
Figure 2-2). After turning the power switch off and removing the line cord, remove the fuses and
replace a blown fuse with the following type:
Keithley Instruments Part Number: FU-81
Fuse Type: 2A, 250V, SlowBlo, 5mm x 20mm
Ventilation
The Series 3400 uses a fan and cooling vents in the rear panel and side panels to keep it from
overheating.
3400S-900-01 Rev. B / January 2007 Return to Section Topics 2-5
Page 32

Section 2: Getting Started Series 3400 Pulse/Pattern Generators User’s Manual
1 Ampl
Offset
HiLvl
LoLvl
Pol
1000 mVpp
0 mV
500 mV
-500 mV
Norm
2 Ampl
Offset
HiLvl
LoLvl
Pol
1000 mVpp
0 mV
500 mV
-500 mV
Norm
Pulse Mode
Ch 1 Ampl
1000 mVpp
Trigger = PLL
Channel Pol SrcZ LoadZ ChAdd More
1 Ampl
Offset
HiLvl
LoLvl
Pol
1000 mVpp
0 mV
500 mV
-500 mV
Norm
2 Ampl
Offset
HiLvl
LoLvl
Pol
1000 mVpp
0 mV
500 mV
-500 mV
Norm
Pulse Mode
Ch 1 Ampl
1000 mVpp
Trigger = PLL
Press More key to
display more VOLTS
menu options
Channel I/V Limits More
Press More key to
display more VOLTS
menu options
Press More to
wrap back to 1st
group of VOLTS
options
Ampl = Amplitude
HiLvl = High Level
LoLvl = Low Level
Pol = Polarity
SrcZ = Source Impedance
LoadZ = Load Impedance
ChAdd = Channel Add
I/V = Current or Voltage
Limits = User
programmable amplitude limits
Soft Keys (6)
Channel Ampl Offset HiLvl LoLvl More
Pulse Mode
Ch 1 Ampl
1000 mVpp
Trigger = PLL
1 Ampl
Offset
HiLvl
LoLvl
Pol
1000 mVpp
0 mV
500 mV
-500 mV
Norm
2 Ampl
Offset
HiLvl
LoLvl
Pol
1000 mVpp
0 mV
500 mV
-500 mV
Norm
CAUTION Observe the following precautions to maintain proper ventilation:
Keep the cooling vents from becoming blocked.
Do not position any devices adjacent to the instrument that force air (heated
or unheated) into or onto its surfaces or cooling vents. This additional airflow
could compromise accuracy performance.
When rack mounting the instrument, make sure there is adequate airflow
around the rear and sides to ensure proper cooling. Adequate airflow enables
air temperatures within approximately one inch of the instrument surfaces to
remain within specified limits under all operating conditions.
Display
The Series 3400 uses an LCD display to view and set the various pulse/pattern parameters. The
parameters that are displayed pertain to the selected menu.
items for the VOLTS menu. The pulse output for these default parameter settings are shown in
Figure 1-1.
As shown, the More soft key is used to display all the various options for the VOLTS menu. All of
the menus are summarized in
Table 2-1. For the Model 3402, the Channel soft key is used to
toggle between the two channels. Parameters are then set for the selected channel.
Figure 2-3 shows the default display
2-6 Return to Section Topics 3400S-900-01 Rev. B / January 2007
Figure 2-3
VOLTS menu options (default parameters)
The displays for the other menus (MODE, TIME, BURST, PATTERN, UTILITY, TRIGGER and
HELP) are similar in structure to the VOLTS menu, but use different parameter options.
A summary for all the menus is provided in Table 2-1.
Page 33

Series 3400 Pulse/Pattern Generators User’s Manual Section 2: Getting Started
Table 2-1
Menu summary
Menu Key Menu Item Description
MODE Pulse Select Pulse mode
Pattern Select Pattern mode
Burst Select Burst mode
ExtWidth External Width – Select External Width mode
VOLTS Channel 3402 only – Select channel
Ampl Amplitude – Set peak-to-peak amplitude
Offset Set offset
HiLvl High Level – Set high level
LoLvl Low Level – Set low level
Pol Polarity – Set polarity – Norm (normal) or Comp (complement)
SrcZ Source Impedance – Select source impedance – 50 Ohms or 1k Ohms
LoadZ Load Impedance – Set load impedance
ChAdd Channel Add (3402 only) – Enable or Disable Channel Add
I/V Current or Voltage – Select Current (I) or Voltage (V) output
Limits Set and control (On/Off) high and low limits (Hi Volt, Lo Volt, Hi Cur and
Lo Cur)
PATTE RN Channel Select output channel or Strobe
Format Set format (RZ or NRZ) for selected channel
Edit Change bit for to 0 or 1 (use “0”, “1” or “+” key)
Length Set the number of bits of the pattern
Bit # Select the bit to be edited
PRBS n Set PRBS length by setting the “n” in formula 2n-1; n = 5 to 14.
Block Edit pattern using Fill 0, Fill 1, Invert, Ins Bit and Del Bit
Update Update pattern continuously (Cont) or when Now soft key is pressed
TRIGGER TrgSrc Trigger Source – Select trigger source: External input (ExtIn), PLL or
Manual
TrgMode Trigger Mode – Select trigger mode; Continuous (Cont), triggered
(Trig’d) or Gated
TrgFreq Trigger Frequency – Set frequency for PLL trigger source
TrgPer Trigger Period – Set period for PLL trigger source
TrgSlope Trigger Slope – Set trigger slope; Pos, Neg or Both.
TIME Channel 3402 only – Select channel
Freq Frequency – Set pulse/pattern speed as frequency (Hz)
Per Period – Set pulse/pattern speed as period (time)
Width Set time for pulse width
Delay Set delay time
LeadE Leading Edge – Set transition time for leading edge
TrailE Trailing Edge – Set transition time for trailing edge
Double Enable (On) or disable (Off) double pulses per period
PerSrc Period Source – Select period source – VCO, PLL or clock input (ClkIn)
BURST Brst Cnt Burst Count – Set burst count for Burst mode
3400S-900-01 Rev. B / January 2007 Return to Section Topics 2-7
Page 34

Section 2: Getting Started Series 3400 Pulse/Pattern Generators User’s Manual
Table 2-1 (continued)
Menu summary
Menu Key Menu Item Description
UTILITY ClkIn Clock Input – Configure clock input – Termination (ClkInTrm; 50 Ohm
or 10 kOhm), slope (ClkInSlp; Pos or Neg) and threshold (ClkInThr)
ExtIn External Input – Configure external input – Termination (ExtInTrm; 50
Ohm or 10 kOhm) and threshold (ExtInThr).
Save Save instrument setup in memory – Save to Mem1 to Mem9.
Recall Recall instrument setup from memory – Recall from Mem1 to Mem9, or
return to Default settings.
PLLRef PLL Reference – Select Internal PLL or use Auto to check for PLL at
REF IN connector.
System System settings for Display, Calibration (Cal), GPIB address
(GPIBAdd), IOPort (GPIB or USB) and Emulation (Emul).
HELP N/A Provides a brief description for the presently selected parameter (soft
key). Press any menu key or soft key to cancel help.
Editing parameter values and settings
NOTE For the Model 3402, the soft key for Channel toggles the display between Channel 1 and
Channel 2.
1. Select a menu (e.g. VOLTS). The menu keys are located next to the keypad.
2. Press the soft key for the parameter to be edited. Use the More key to display additional
options. The parameter value or setting is displayed on the right side of the display.
3. Change a parameter value or setting as follows:
• Parameter value – If the parameter is a value, it can be changed using the rotary knob or
the keypad.
Rotary Knob – The knob increments or decrements the value.
Keypad – When keying in a value, the available ranges (e.g., mV, V) for the value will
appear at the bottom of the display. After keying in the value, use a soft key to select the
range.
Cursor keys – Use to increment or decrement values.
• Parameter setting – For a parameter setting, options (e.g., Enable, Disable, Cancel, etc.)
may appear on the bottom of the display and can be selected by pressing a soft key.
Additional soft keys for menu navigation will appear as needed:
Enter soft key – Use to enter the parameter setting or value.
Back soft key – Use to back up to the previous menu view.
Cancel soft key – Use to cancel a menu selection. Menu returns to the previous view.
Invalid entry error message
Trying to enter an invalid parameter setting will result in the following message in the upper righthand corner of the display:
Error, Press Help
Press the HELP menu key to display a message that explains the error. Press any key to cancel
the help message.
2-8 Return to Section Topics 3400S-900-01 Rev. B / January 2007
Page 35

Series 3400 Pulse/Pattern Generators User’s Manual Section 2: Getting Started
Defaults
The power-on defaults are listed in Table 2-2.
Table 2-2
Power-on defaults
Setting
Menu Parameter Setting or Value Menu Parameter
MODE Operating mode Pulse PATTERN Channel 1
TIME Channel 1 Format RZ
Frequency 1.000MHz Pattern Length 2 bits
Period 1.000µs Update Cont
Width 100.0ns PRBS Length 5
Delay 0.0ps UTILITY Clock Input:
Leading Edge 2.5ns Clock Input Terminator 50Ω
Trailing Edge 2.5ns Clock Input Slope Positive
Double Pulse Off Clock Input Threshold 1.0V
Period Source VCO External Input:
VOLTS Channel 1 External Input Terminator 50Ω
Amplitude 1000mVpp External Input Threshold 1.0V
Offset 0mV PLL Reference Auto
High Level 500mV System:
Low Level -500mV Display:
Polarity Normal Bright 8
Source Impedance 50Ω Contrast 6
Load Impedance 50Ω Timeout (in secs) 30
Channel Add (3402) Disabled GPIB Address* 10*
I/V Voltage IOPort* GPIB*
Limits Off, ± 500mV, ±10mA Emulation Mode Off
BURST Burst Count 2 bits TRIGGER Trigger Source ExtIn
Trigger Mode Cont
Trigger Frequency 100kHz
Trigger Period 10µs
Trigger Slope Positive
* At the factory, the GPIB is selected as the remote programming interface and the address is set to 10. Changing the
interace or address is saved in NVRM, and will therefore be remembered on subsequent power-on. You must reboot
the instrument after changing any communication parameters to ensure that such parameters are applied.
or Value
3400S-900-01 Rev. B / January 2007 Return to Section Topics 2-9
Page 36

Section 2: Getting Started Series 3400 Pulse/Pattern Generators User’s Manual
This page left blank intentionally.
2-10 Return to Section Topics 3400S-900-01 Rev. B / January 2007
Page 37

In this section:
Top ic Page
Introduction .......................................................................................... 3-2
Out 1 and Out 2 connections ............................................................... 3-2
Trig Out and Ext In connections........................................................... 3-3
Strobe Out connection ......................................................................... 3-4
Clk In connections................................................................................ 3-4
Section 3
Signal Connections
Ref Out and Ref In connections ........................................................... 3-5
Page 38

Section 3: Signal Connections Series 3400 Pulse/Pattern Generators User’s Manual
Out 1
DUT
HI
LO
DUT
HI
LO
Equivalent Circuit
BNC Cable
All Connectors: Female BNC
BNC Cable
All Connectors: Female BNC
BNC Cable
HI
HI
LO
Out 1
HI
Equivalent Circuit
DUT
Out 2
HI
LO
DUT
Connections to 2-Terminal Device:
Connections to 3-Terminal Device:
+/-
+/-
Introduction
For the Series 3400 Pulse/Pattern Generators front panel output option, signal connectors (except
Ref Out and Ref In) are located on the front panel. For the rear panel output option, all connectors
are on the rear panel to facilitate convenience for rack mounting. All signal connectors are female
BNC.
Out 1 and Out 2 connections
Figure 3-1 shows how to connect an output channel of the Series 3400 to a 2-terminal DUT. It also
shows an example of using both channels of a Model 3402 to pulse the gate and drain of a fieldeffect transistor (FET).
Figure 3-1
Out 1 and Out 2 connections
3-2 Return to Section Topics 3400S-900-01 Rev. B / January 2007
Page 39

Series 3400 Pulse/Pattern Generators User’s Manual Section 3: Signal Connections
BNC Cable
Trig Out
External Instrument
Ext In or
Ext Trig or
Trig In*
External Instrument can be one of the following:
· Scope being triggered to capture a waveform.
· Another Series 3400 being triggered to start Pulse, Burst, ExtWidth, or Pattern.
· Any other instrument being triggered to perform an operation.
* The actual label name
for the connector may
be different.
+/-
BNC Cable
Ext In
External Instrument
Ext Out or
Trig Out*
* The actual label name
for the connector may
be different.
External Instrument can be one of the following:
· Scope triggering the Series 3400 to start Pulse, Burst, ExtWidth or Pattern.
· A second Series 3400 triggering the first Series 3400 to start Pulse, Burst,
ExtWidth, or Pattern.
· Any other instrument triggering the Series 3400 to start Pulse, Burst, ExtWidth,
or Pattern.
+/-
Trig Out and Ext In connections
Figure 3-2 shows connections for Trig Out, and Figure 3-3 shows connections for Ext In. Trigger
output (Trig Out) marks each pulse or bit period (for Pattern mode). Trigger output is used to
trigger an external instrument to start an operation (e.g., trigger scope to capture the waveform).
After an external instrument completes the operation, (e.g., waveform capture), it can send a
trigger back to Ext In of the Series 3400 to output another pulse or bit. Using Trig Out and Ext In in
this manner together allows for synchronized operation between two instruments. Refer to
Section 5 for details on triggering.
Figure 3-2
Trig Out connections
Figure 3-3
Ext In connections
3400S-900-01 Rev. B / January 2007 Return to Section Topics 3-3
Page 40

Section 3: Signal Connections Series 3400 Pulse/Pattern Generators User’s Manual
BNC Cable
Strobe Out
External Instrument
Ext In or
Trig In*
* The actual label name
for the connector may
be different.
External Instrument can be one of the following:
· Scope being triggered to capture a waveform.
· Another Series 3400 being triggered to start Pulse, Burst, ExtWidth, or Pattern.
· Any other instrument being triggered to perform an operation.
+/-
BNC Cable
All Connectors: Female BNC
Clk In
External Instrument
* The actual label name for
the clock output connector
may be different.
Ext Clk or
Clk Out*
+/-
Strobe Out connection
Figure 3-4 shows the connections for Strobe Out. Strobe Out is available for the Burst and Pattern
modes. In Burst mode, strobe output marks the beginning and end of a burst. Strobe Out rises at
the leading edge of the first pulse of the burst, and falls at the leading edge of the last pulse of the
burst period. In Pattern mode, strobe output is bit programmable but is always NRZ format.
Strobe output is used to trigger an external instrument to start an operation (e.g., trigger scope to
capture the waveforms). After the external instrument finishes its operation, it can then trigger the
Series 3400 to start another burst or pattern, as shown in
on triggering.
Figure 3-4
Strobe Out connections
Figure 3-3. Refer to Section 5 for details
Clk In connections
The period source can be provided by an external clock, as shown in Figure 3-5. Refer to
Section 5 for details on triggering.
Figure 3-5
Clk In connections
3-4 Return to Section Topics 3400S-900-01 Rev. B / January 2007
Page 41

Series 3400 Pulse/Pattern Generators User’s Manual Section 3: Signal Connections
Ref Out
BNC Cable
Series 3400 Rear Panel Series 3400 Rear Panel
Ref In
Ref Out and Ref In connections
When using multiple Series 3400s in a test, the PLL reference of a single unit may be shared
(made common to all units) by daisy-chaining the Ref Out of one unit to Ref In of another.
6 shows two units connected together for using the PLL reference of the first unit.
In a multi-unit system sharing a single PLL reference, all but one Series 3400 must be set for
External PLL Reference (refer to "
PLL reference (PLLRef)" in Section 5). Note, when multiple units
share the same PLL reference, the frequencies of all of the units are synchronized.
Figure 3-6
Ref Out and Ref In connections
Figure 3-
3400S-900-01 Rev. B / January 2007 Return to Section Topics 3-5
Page 42

Section 3: Signal Connections Series 3400 Pulse/Pattern Generators User’s Manual
This page left blank intentionally.
3-6 Return to Section Topics 3400S-900-01 Rev. B / January 2007
Page 43

In this section:
Top ic Page
Pulse, Burst and External Width operation..................................... 4-3
Pattern operation............................................................................... 4-8
Saving and recalling setups ............................................................. 4-12
Pulse/pattern parameters.................................................................. 4-13
Section 4
Pulse/Pattern Generators Operation
Pulse mode ................................................................................... 4-4
Burst mode.................................................................................... 4-6
External Width mode..................................................................... 4-7
Saving a setup .............................................................................. 4-12
Recalling a setup........................................................................... 4-12
Returning to default settings ......................................................... 4-12
Ampl – amplitude .......................................................................... 4-13
Bit # ............................................................................................... 4-14
Block ............................................................................................. 4-14
Brst Cnt – burst count ................................................................... 4-14
Cal – calibration ............................................................................ 4-14
ChAdd (3402 only) – channel add................................................. 4-15
Channel......................................................................................... 4-15
ClkIn – clock input ......................................................................... 4-15
Delay ............................................................................................. 4-15
Display .......................................................................................... 4-16
Double........................................................................................... 4-16
Edit ................................................................................................ 4-16
Emul – emulation .......................................................................... 4-16
ExtIn – external input .................................................................... 4-17
Page 44

Section 4: Pulse/Pattern Generators Operation Series 3400 Pulse/Pattern Generators User’s Manual
Top ic Page
Pulse/pattern parameters (continued): 4-13
Format ........................................................................................... 4-17
Freq – frequency ........................................................................... 4-17
GPIBAdd – GPIB address ............................................................. 4-17
Hi Cur – high current limit .............................................................. 4-17
HiLvl – high level ........................................................................... 4-18
Hi Volt – high voltage limit ............................................................. 4-18
IOPort – I/O port (interface) ........................................................... 4-18
I/V – current or voltage .................................................................. 4-18
LeadE – leading edge.................................................................... 4-18
Length............................................................................................ 4-19
LoadZ – load impedance ............................................................... 4-20
Lo Cur – low current limit............................................................... 4-21
LoLvl – low level ............................................................................ 4-21
Lo Volt – low voltage limit .............................................................. 4-21
Offset ............................................................................................. 4-21
On/Off (limits) ................................................................................ 4-22
Per – period ................................................................................... 4-22
PerSrc – period source.................................................................. 4-22
Pol – polarity.................................................................................. 4-23
PLLRef – PLL reference................................................................ 4-23
PRBS n – pseudo random bit sequence ....................................... 4-23
Recall............................................................................................. 4-24
Save .............................................................................................. 4-24
SrcZ – source impedance.............................................................. 4-24
System........................................................................................... 4-24
TrailE – trailing edge...................................................................... 4-24
TrgFreq – trigger frequency........................................................... 4-25
TrgMode – trigger mode ................................................................ 4-25
TrigPer – trigger period.................................................................. 4-25
TrgSlope – trigger slope ................................................................ 4-25
TrgSrc – trigger source.................................................................. 4-26
Update ........................................................................................... 4-26
Width ............................................................................................. 4-26
4-2 Return to Section Topics 3400S-900-01 Rev. B / January 2007
Page 45

Series 3400 Pulse/Pattern Generators User’s Manual Section 4: Pulse/Pattern Generators Operation
Pulse Pattern Burst ExtWidth
Pulse Mode
Mode
Pulse
Trigger = PLL
Mode
A) Press the MODE key to select the MODE menu.
B) Press a Soft Key to select the desired operating
mode.
TRIGGER
TIME
VOLTS
BURST
PATTERN
UTILITY
HELP
MODE
Menu keys Located
next to the keypad.
MODE Menu
Soft Keys
Selected operating mode
shown in this area of the
display..
Pulse, Burst and External Width operation
NOTE For optimum performance, it is good practice to routinely perform self-calibration to
correct for internal zero drift due to changes in ambient temperature – Press UTILITY >
Press System > Press Cal > Press Cal Now. For details, see
After making connections to the Series 3400 (refer to Section 3), the fundamental steps to operate
Pulse, Burst and External Width are as follows:
1. Select the operating mode:
2. Configure the time and voltage parameters for the selected mode.
3. Configure triggering.
4. Enable the channel(s) and trigger the start of pulse output.
5. When finished, disable the output(s).
The two steps to select the operating mode are explained in Figure 4-1.
Figure 4-1
Select operating mode
Cal – calibration.
After selecting the operating mode, programmable parameters for that mode are set using the soft
keys, rotary knob and the keypad and/or cursor keys. Details on the methods to edit parameter
values and settings are provided on
Page 2-8.
NOTE Refer to “Pulse/pattern parameters” for details about the parameters. Each parameter is
listed alphabetically by its soft key name.
3400S-900-01 Rev. B / January 2007 Return to Section Topics 4-3
Page 46

Section 4: Pulse/Pattern Generators Operation Series 3400 Pulse/Pattern Generators User’s Manual
A) Press the VOLTS key to select the VOLTS menu.
B) Use the Soft Keys, rotary knob and/or keypad to select
and set parameters.
C) Press the TIME key to select the TIME menu.
TRIGGER
TIME
VOLTS
BURST
PATTERN
UTILITY
HELP
MODE
Menu keys Located
next to the keypad.
1 Ampl
Offset
HiLvl
LoLvl
Pol
1000 mVpp
0 mV
500 mV
-500 mV
Norm
2 Ampl
Offset
HiLvl
LoLvl
Pol
1000 mVpp
0 mV
500 mV
-500 mV
Norm
Pulse Mode
Ch 1 Ampl
1000 mVpp
Trigger = PLL
VOLTS Menu
Soft Keys
Freq
1 Width
Delay
LeadE
TrailE
1.000 MHz
100.0 ns
0 ps
2.0 ns
2.0 ns
Per
2 Width
Delay
LeadE
TrailE
1.000 µs
100.0 ns
0 ps
2.0 ns
2.0 ns
Pulse Mode
Frequency
1.000 MHz
Trigger = PLL
TIME Menu
D) Again, use the Soft Keys, rotary knob and/or
keypad to select and set the parameters.
Soft Keys
NOTE
For the Keithley 3402, use the Channel
Soft Key to toggle between Channel 1
and Channel 2 parameters.
Channel Ampl Offset HiLvl LoLvl More
Channel Freq Per Width Delay More
Pulse mode
1. Select the Pulse mode as explained in Figure 4-1.
2. Perform the steps in Figure 4-2 to configure the parameters in the VOLTS and TIME menus.
Figure 4-2
Configure Pulse mode parameters
3. Perform the steps in Figure 4-3 to configure triggering. Table 4-2 summarizes the trigger
configurations. Refer to Section 5 for details on triggering.
4-4 Return to Section Topics 3400S-900-01 Rev. B / January 2007
Page 47

Series 3400 Pulse/Pattern Generators User’s Manual Section 4: Pulse/Pattern Generators Operation
Pulse Mode
Trigger Source
PLL
Trigger = PLL
Trigger Parameters
TRIGGER Menu
Soft Keys
TrgSrc
TrgMode
TrgFreq
TrgPer
PLL
Cont
100.0 kHz
10.00 µs
A) Press the TRIGGER key to select the TRIGGER menu.
B) Use the Soft Keys, rotary knob and/or keypad to select
and set the parameters.
TRIGGER
TIME
VOLTS
BURST
PATTERN
UTILITY
HELP
MODE
NOTE
With the Manual trigger source
selected (TrgSrc = Manual), the
ManTrg Soft Key will appear on
the left side of the display.
The selected operating mode
is indicated here: Pulse Mode,
Burst Mode, Pattern Mode or
ExtWidth Mode
Note There are additional trigger configuration settings
in the UTILITY menu (ClkIn, ExtIn and PLLRef).
TrgSlope
Pos
TrgSrc TrgMode TrgFreq TrgPer TrgSlope
Figure 4-3
Configure triggering
Table 4-1
Pulse mode triggering
Trigger effect on Pulse Mode output
TrgMode Tr gSrc PerSrc
Cont ExtIn or
Manual
VCO, PLL
or ClkIn
Continuous pulse period output starts immediately.
Trig’d ExtIn N/A The active edge of an external trigger applied to the EXT IN connec-
tor triggers a single pulse period.
Manual N/A Pressing the ManTrg soft key triggers one single pulse period.
Gated ExtIn VCO, PLL,
ClkIn
The leading edge of an external trigger applied to the EXT IN connector triggers the first pulse period. The trailing edge trigger marks
the last pulse period.
N/A = Not Applicable (setting is not significant).
(assuming channel already enabled)
4. Enable channel(s) by pressing the key(s) located next to the BNC output connector(s): CH1
Enable and CH2 Enable (3402 only). A green indicator light in the key turns on to indicate
that the channel is enabled.
The enabled pulse output is triggered (output sequence started) according to the trigger
configuration.
5. When finished, disable the output(s) by again pressing the CH1 ENABLE and/or CH2
ENABLE (3402) keys. The green indicator light(s) turns off.
3400S-900-01 Rev. B / January 2007 Return to Section Topics 4-5
Page 48

Section 4: Pulse/Pattern Generators Operation Series 3400 Pulse/Pattern Generators User’s Manual
TRIGGER
TIME
VOLTS
BURST
PATTERN
UTILITY
HELP
MODE
Menu keys located
next to the keypad.
Burst Mode
Burst Count
2
Trigger = PLL
BURST Menu
A) Press the BURST key to select the BURSTmenu.
B) Press the Brst Cnt soft key, and use the rotary knob and/or
the keypad to specify the number of pulse periods.
Soft Keys
Burst Parameters
Brst Cnt
2
Brst Cnt
Burst mode
1. Select the Burst mode as explained in Figure 4-1.
2. Perform the steps in Figure 4-4 to set the Burst count. Burst count can be set from 2 to
65,536 pulse periods.
Figure 4-4
Setting Burst mode count
3. Perform the steps in Figure 4-3 to configure triggering. Table 4-2 summarizes the trigger
configurations. Refer to Section 5 for details on triggering.
Table 4-2
Burst mode triggering
TrgMode Tr gSrc PerSrc
Cont N/A VCO, PLL
or ClkIn
Trig’d ExtIn VCO, PLL
or ClkIn
PLL VCO The internal VCO triggers each burst of pulse periods. The PLL trig-
Manual VCO, PLL
or ClkIn
Gated ExtIn VCO, PLL,
ClkIn
N/A = Not Applicable (setting is not significant).
4. Enable pulse output by pressing the channel enable key(s) located next to the BNC output
connector(s): CH1 Enable and CH2 Enable (3402 only). The green indicator light in the key
shows that the channel is enabled.
The enabled output is triggered (started) according to the trigger configuration.
5. When finished, disable the output(s) by again pressing the CH1 ENABLE and/or CH2
4-6 Return to Section Topics 3400S-900-01 Rev. B / January 2007
ENABLE (3402) keys. The green indicator light(s) turns off.
Trigger effect on Pulse Mode output
(assuming channel already enabled)
Burst pulse period output starts immediately. Each burst of pulse
periods is repeated continuously.
The active edge of an external trigger applied to the EXT IN connector triggers a single burst of pulse periods.
gers the burst. The VCO controls pulse period of each pulse/bit in
the burst.
Pressing the ManTrg soft key triggers a single burst of pulse periods.
The edge of an external trigger applied to the EXT IN connector triggers the first burst of pulse periods. The trailing edge trigger marks
the last burst of pulse periods.
Page 49

Series 3400 Pulse/Pattern Generators User’s Manual Section 4: Pulse/Pattern Generators Operation
External Width mode
With the External Width mode selected (as explained in Figure 4-1), the rising and falling edges of
an external trigger connected to the Trig In connector controls the output.
1. Select the ExtWidth mode as explained in Figure 4-1.
2. Time parameters for width, frequency, period and delay are determined by the external
trigger signal and are not programmable.
3. Perform the steps in Figure 4-3 to configure triggering. Table 4-3 summarizes the trigger
configuration. For external triggering (ExtIn), make sure to set the input termination and
threshold voltage. These parameters are set using the ExtIn soft key from the UTILITY
menu. Menu structure is shown in
The enabled output is triggered (started) according to the trigger configuration.
Table 4-3
External Width mode triggering
TrgMode Tr gSrc PerSrc
N/A ExtIn N/A The output pulse level follows the edges of an external trigger
applied to the EXT IN connector. A rising edge trigger causes the
output to go high and a falling edge trigger causes the output to go
low.
N/A = Not Applicable (setting is not significant).
Table 2-1. Refer to Section 5 for details on triggering.
Trigger effect on Pulse Mode output
(assuming channel already enabled)
4. Enable pulse output by pressing the channel enable key(s) located next to the BNC output
connector(s): CH1 Enable and CH2 Enable (3402 only). The green indicator light in the key
shows that the channel is enabled.
5. When finished, disable the output(s) by again pressing the CH1 ENABLE and/or CH2
ENABLE (3402) keys. The green indicator light(s) turns off.
3400S-900-01 Rev. B / January 2007 Return to Section Topics 4-7
Page 50
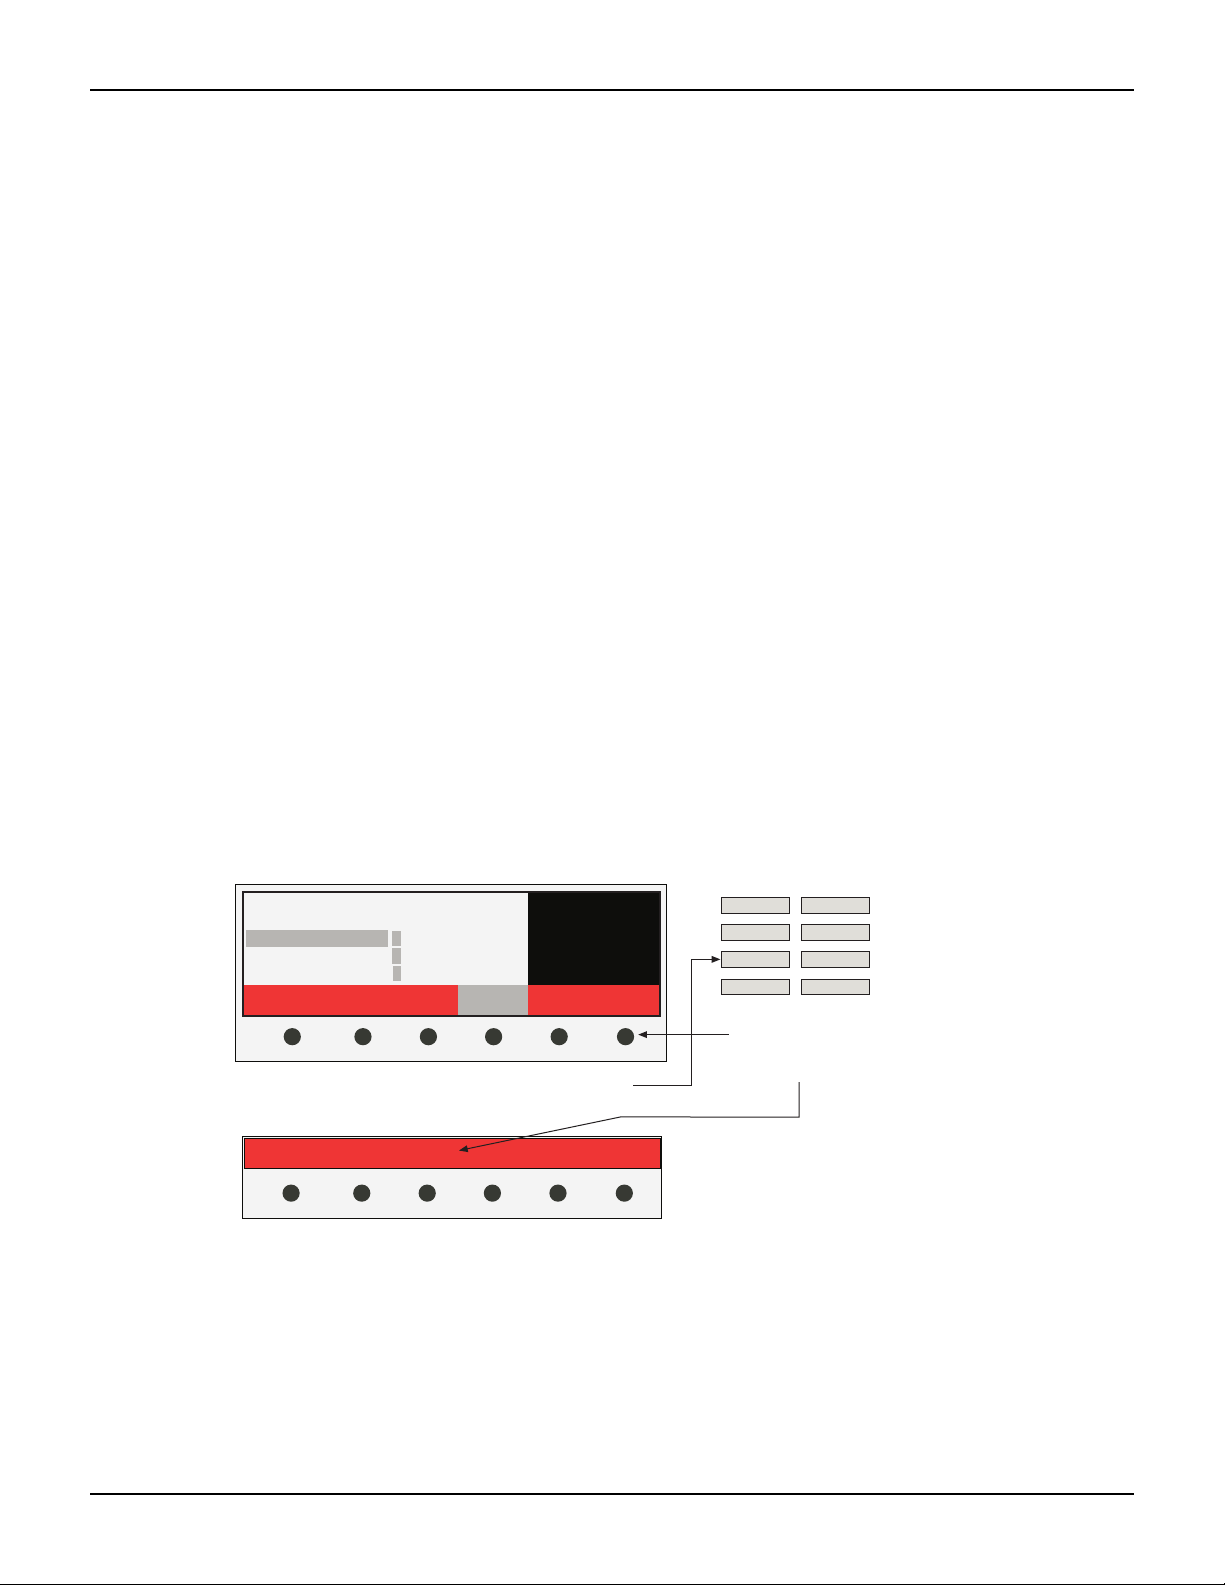
Section 4: Pulse/Pattern Generators Operation Series 3400 Pulse/Pattern Generators User’s Manual
PATTERN Menu
Soft Keys
Press the PATTERN key to select the PATTERN menu.
Use the Soft Keys to configure the pattern.
TRIGGER
TIME
VOLTS
BURST
PATTERN
UTILITY
HELP
MODE
The 1, 0, or + keys edit values
Length 2 Bit # 1
Ch 1 RZ 00
Ch 2 RZ 00
Strobe NRZ 00
PRBS n Block Update More
Press More Soft Key to
display these additional
Soft Key options
Channel Format Edit Length Bit # More
Pattern Mode
Pattern Length
2
Trigger = PLL
Pattern operation
NOTE For optimum performance, it is good practice to routinely perform self-calibration to
correct for internal zero drift due to changes in ambient temperature – Press UTILITY >
Press System > Press Cal > Press Cal Now. For details, see
After making connections to the Series 3400 (refer to Section 5), the fundamental steps to operate
the pulse/pattern generator are as follows:
Step 1) Select the Pattern operating mode:
Step 2) Configure the parameters for the Pattern mode.
Step 3) Configure triggering.
Step 4) Enable the channel(s) and trigger the start of pattern output.
Step 5) When finished, disable the outputs.
Step 1) Select Pattern mode
The Pattern mode is selected from the MODE menu. The two steps to select the Pattern mode are
explained in
Figure 4-1.
Step 2) Pattern configuration
Cal – calibration.
NOTE Level and time parameters for pattern mode are configured via the TIME and VOLTS
keys. Refer to “
Figure 4-5 shows how to select the PATTERN menu. For the default menu, the cursors (grey
highlighting) are positioned on “Ch 1 RZ” and the first column of bits (all 0’s).
Figure 4-5
PATTERN menu
1. Use the Channel soft key to move the cursor to the desired channel: Ch 1, or Ch 2 (3402).
2. Use the Format soft key to toggle between the NRZ and RZ pattern format.
A) Select Format for Pattern
An output channel can be set for the NRZ or RZ format:
The pattern format for Strobe output is always NRZ and cannot be changed.
See “Pulse mode” on page 4-4 for more information. for details.
4-8 Return to Section Topics 3400S-900-01 Rev. B / January 2007
Page 51

Series 3400 Pulse/Pattern Generators User’s Manual Section 4: Pulse/Pattern Generators Operation
Fill 0 Fill 1 Invert Ins Bit More Cancel
Del Bit Ins PRBS More Cancel
Press More Soft Key to
display these additional
Soft Key options
B) Set pattern Length
The length of a pattern can be set from 2 to 16,384 bits:
Press the Length soft key, and use the rotary knob or keypad to enter the pattern length. If using
the keypad, key in the value and press the Enter soft key. All added bits to the pattern will be 0’s.
The set pattern length is the same for the output channel(s) and strobe output.
C) Edit bits as desired (0 or 1)
Each pattern bit for the selected channel (or Strobe output) can be set to 0 or 1:
1. Initially, the cursor will be located on the first bit. To change cursor position, press the Bit #
soft key and use the rotary knob or the keypad to place the cursor on the bit to be changed.
2. Press the Edit soft key and press 0, 1 or +/- on the keypad to set the bit (the +/- key toggles
the bit value). The cursor moves right to the next bit, which can then be changed in the
same manner.
Advanced editing (Block)
The Block soft key (shown in Figure 4-5) can be used to edit a group of bits to 0s or 1s, or invert
the bits within that group. A pattern bit can also be inserted or deleted.
Perform the following steps to edit a group of bits:
1. Use the Bit # soft key to position the cursor on the first bit to be edited (refer to step C1
above). That bit and all the bits to the right are edited as a group.
2. Press the Block soft key to display the soft key options shown in Figure 4-6:
– Press the Fill 1 soft key to set all bits in the group to 1.
– Press the Fill 0 soft key to set all bits in the group to 0.
– Press the Invert soft key to invert each bit within the group. A 1 becomes a 0, and a 0
becomes a 1.
Figure 4-6
Block soft key options
A bit in the pattern can be inserted or deleted (insertions and deletions do not change the length of
the pattern). Press the Ins Bit soft key to insert a bit to right of the cursor. and press the Del Bit
soft key to delete the bit at the present cursor position.
3400S-900-01 Rev. B / January 2007 Return to Section Topics 4-9
Page 52

Section 4: Pulse/Pattern Generators Operation Series 3400 Pulse/Pattern Generators User’s Manual
Insert
1 1 1 0 0 1 1 0
Inserted bit
1 1 1 0 0 0 1 1 0
Original Bit Pattern:
(8-bits)
Extra bit is
truncated
1 1 1 0 0 0 1 1 0
1 1 1 0 0 0 1 1
New Bit Pattern:
(8-bits)
Delete
1 1 1 0 0 1 1 0
1 1 1 0 1 1 0
Original Bit Pattern:
(8-bits)
0 bit added
at end
1 1 1 0 1 1 0 0
New Bit Pattern:
(8-bits)
Insert Bit Delete Bit
Deleted bit
Figure 4-7 shows examples of the insert and delete process with the cursor on bit #4. After a bit is
inserted, the extra bit is truncated in order to maintain an 8-bit pattern. If bit #4 had been a 1, then
a 1 would have been inserted. After a bit is deleted, an extra bit (0) is added to maintain an 8-bit
pattern.
Figure 4-7
Insert bit and delete bit examples
1. Press the Update soft key shown in Figure 4-5. Two soft key options will then appear on the
2. Press the Cont soft key for continuos pattern update, or press Now when you are ready to
1. Select the format (RZ or NRZ) for the output pattern (refer to step A above).
2. Use the Length soft key to set an appropriate pattern length (refer to step B above). Keep in
3. Use the Bit # soft key to indicate the starting bit position for the random bit sequence.
4. Press the PRBS n soft key (shown in Figure 4-5).
5. Use the rotary knob or the keypad to set “n” for PRBS. If using the keypad, press the Enter
6. Press the Block soft key, and then press the Ins PRBS soft key to insert the random bit
4-10 Return to Section Topics 3400S-900-01 Rev. B / January 2007
Output Update
A pattern can be modified while it is available at an output. A pattern can be continuously updated
as it is being modified, or the update can be performed as a separate action:
Pseudo random bit sequencer (PRBS)
PRBS is used to output a pseudo random pattern at the output. The bit length for the PRBS output
pattern is determined by the binary sequence formula 2
user). The RZ or NRZ data format can be used for the PRBS pattern:
display: Now and Cont.
update the pattern.
n
-1, where n = 5 to 14 (which is set by the
mind that the length of the random bit sequence will not exceed the set pattern length. Any
PRBS bits that exceed the pattern length are truncated.
soft key after keying in the value.
The displayed parameter value (5 to 14) is “n” for formula 2n-1. Table 4-4 shows the maxi-
mum bit length for each “n” value of the formula. Again, the random bit sequence will not
exceed the pattern length set in step 2.
sequence into the pattern.
Page 53
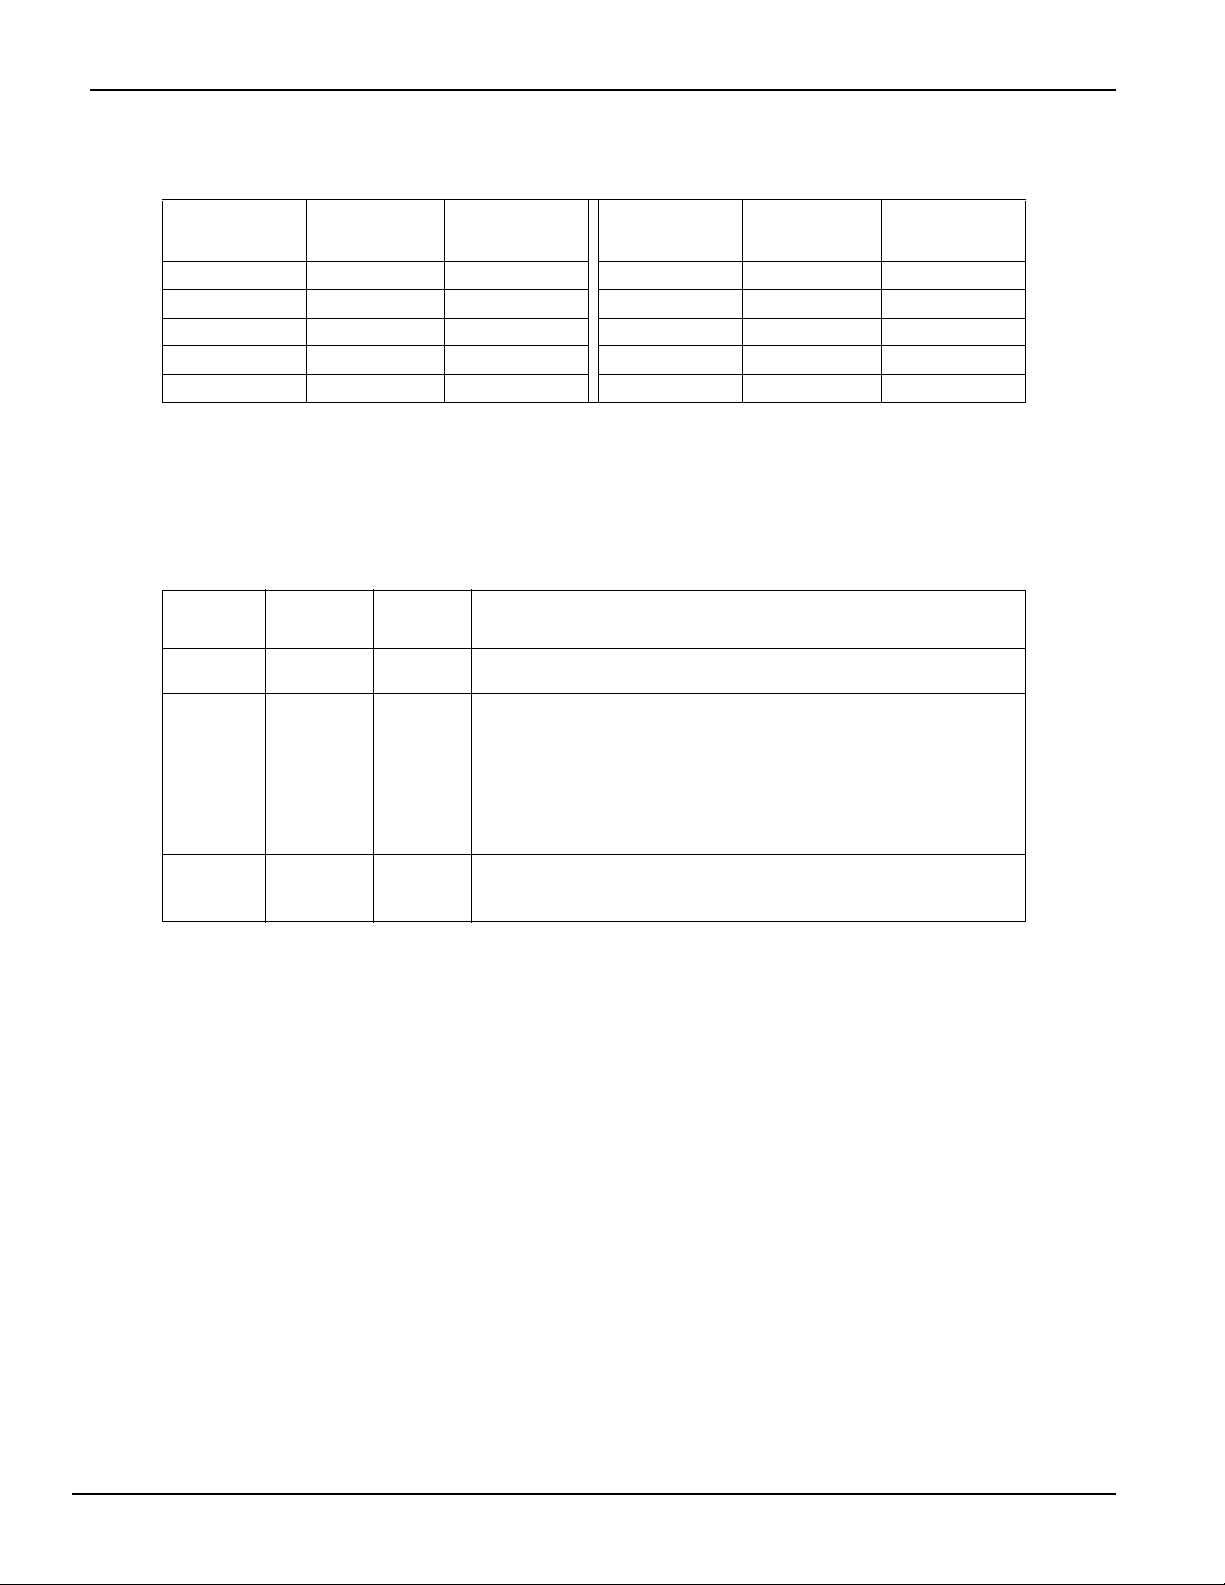
Series 3400 Pulse/Pattern Generators User’s Manual Section 4: Pulse/Pattern Generators Operation
Table 4-4
PRBS length settings
PRBS Length
Setting
5 25 - 1 31 10 210 - 1 1,023
6 26 - 1 63 11 211 - 1 2,047
7 27 - 1 127 12 212 - 1 4,095
8 28 - 1 255 13 213 - 1 8,191
9 29 - 1 511 14 214 - 1 16,383
Length
Calculation
(# of bits)
Step 3) Configure triggering
Perform the steps in Figure 4-3 to configure triggering. Table 4-5 summarizes the trigger
configurations. Refer to Section 5 for details on triggering.
Table 4-5
Pattern mode triggering
TrgMode Tr gSrc PerSrc
Cont N/A VCO, PLL
or ClkIn
Trig’d ExtIn VCO, PLL
or ClkIn
PLL VCO The internal VCO triggers each pattern of pulse periods. The PLL
Manual VCO, PLL
or ClkIn
Gated ExtIn VCO, PLL,
ClkIn
N/A = Not Applicable (setting is not significant).
Pattern pulse period output starts immediately. Each pattern of pulse
periods is repeated continuously.
The active edge of an external trigger applied to the EXT IN connector triggers a single pattern of pulse periods.
triggers the entire pattern. The VCO controls the individual pulse
period.
Pressing the ManTrg soft key triggers a single pattern of pulse periods.
The leading edge of an external trigger applied to the EXT IN connector triggers the first pattern of pulse periods. The trailing edge
trigger marks the last burst of pulse periods.
Length
PRBS Length
Setting
Trigger effect on Pulse Mode output
(assuming channel already enabled)
Length
Calculation
Length
(# of bits)
Step 4) Enable channel(s) and start pattern output
Enable pattern output by pressing the channel enable key(s) located next to the BNC output
connector(s): CH1 Enable and CH2 Enable (3402 only). The green indicator light in the key
shows that the channel is enabled.
The enabled output is triggered (started) according to the trigger configuration.
Step 5) Disable output(s)
When finished, disable the output(s) by again pressing the CH1 ENABLE and/or CH2 ENABLE
(3402) keys. The green indicator light(s) turns off.
3400S-900-01 Rev. B / January 2007 Return to Section Topics 4-11
Page 54

Section 4: Pulse/Pattern Generators Operation Series 3400 Pulse/Pattern Generators User’s Manual
Saving and recalling setups
The Series 3400 can save up to nine setups in non-volatile memory. In general, all the parameters
for a setup are saved for later recall. For example, Mem1 may be a setup for Pulse mode, Mem2
may be a setup for Burst mode, Mem3 may be a setup for Pattern mode, and so on. The
instrument can also be returned to the power-on default settings at any time.
Saving a setup
1. Configure the Series 3400 for the desired pulse/pattern operation.
2. Press the UTILITY menu key.
3. Press the SAVE soft key.
4. Save the setup to memory by pressing the appropriate soft key (Mem1 through Mem9).
Recalling a setup
1. Press the UTILITY menu key.
2. Press the Recall soft key.
3. Return the instrument to a saved setup by pressing the appropriate soft key (Mem1 through
Mem9).
NOTE When the instrument returns to a saved or the default setup, the output(s) will disable.
Returning to default settings
1. Press the UTILITY menu key.
2. Press the Recall soft key.
3. Return the instrument to the default settings by pressing the Default soft key.
4-12 Return to Section Topics 3400S-900-01 Rev. B / January 2007
Page 55

Series 3400 Pulse/Pattern Generators User’s Manual Section 4: Pulse/Pattern Generators Operation
Pulse/pattern parameters
As shown in Table 4-6, each parameter is listed alphabetically by its soft key name. Details follow
the table that included applicable operating modes for the parameter and the menu where the
parameter soft key is located.
Table 4-6
Soft key parameters
Parameter Parameter
Ampl – amplitude Limits
Bit # LoadZ – load impedance
Block Lo Cur – low current limit
Brst Cnt – burst count LoLvl – low level
Cal – calibration Lo Volt – low voltage limit
ChAdd (3402 only) – channel add Offset
Channel On/Off (limits)
ClkIn – clock input Per – period
Delay PerSrc – period source
Display Pol – polarity
Double PLLRef – PLL reference
Edit PRBS n – pseudo random bit sequence
Emul – emulation Recall
ExtIn – external input Save
Format SrcZ – source impedance
Freq – frequency System
GPIBAdd – GPIB address TrailE – trailing edge
Hi Cur – high current limit TrgFreq – trigger frequency
HiLvl – high level TrgMode – trigger mode
Hi Volt – high voltage limit TrigPer – trigger period
IOPort – I/O port (interface) TrgSlope – trigger slope
I/V – current or voltage TrgSrc – trigger source
LeadE – leading edge Update
Length Width
Ampl – amplitude
Operating mode: All
Menu: VOLTS
The low-to-high magnitude is the peak-to-peak amplitude of the pulse, and is calculated as
follows:
Amplitude = |High Level| + |Low Level|
In Figure 1-1, amplitude is 1Vpp: |500mV| + |-500mV| = 1V.
Changing the amplitude will also change the high and low levels. Offset is not affected. For
example, if the amplitude in
low level will each decrease by 250mV (500mV / 2). The high level becomes 250mV and low level
becomes -250mV.
The amplitude setting range is dependent on the selected source impedance (50Ω or 1kΩ) and the
impedance of the load. Pulse amplitude can be independently set for each output channel of the
Model 3402 Pulse/Pattern Generator.
Ampl setting range: 50Ω into 50Ω: 100mVpp to 10Vpp
3400S-900-01 Rev. B / January 2007 Return to Section Topics 4-13
Figure 1-1 is changed to 500mVpp, the magnitudes of the high and
2.0mApp to 200mApp
1kΩ into 50Ω: 200mVpp to 20Vpp
Page 56

Section 4: Pulse/Pattern Generators Operation Series 3400 Pulse/Pattern Generators User’s Manual
4mApp to 400mApp
NOTE Low voltage and current settings may be affected by the resolution specifications of the
Series 3400. For example, setting an amplitude of 250mVpp with an offset of 0V will
display HiLvl and LoLvl levels of +120mV and -120mV (instead of ±125mV). This is
because the setting resolution is 10mV.
Bit #
Operating mode: Pattern
Menu: PATTERN
The Bit # soft key is used to position the cursor on a bit that is to be edited. After pressing the Bit
# soft key, use the rotary knob or keypad to place the cursor on the bit to be edited. The pattern
can then be edited using the
NOTE Refer to Step 2 of “See “Pattern operation” on page 4-8 for more information.
Edit soft key or the options of the Block soft key.
Block
Operating mode: Pattern
Menu: PATTERN
Options of the Block soft key can be used to edit a group of pattern bits to 0s or 1s, or invert the
bits within that group. A pattern bit can also be inserted or deleted.
NOTE Refer to “See “Advanced editing (Block)” on page 4-9 for more information.” for details on
using the Block soft key.
Brst Cnt – burst count
Operating mode: Burst
Menu: BURST
Burst count specifies the number of pulse periods to output when a trigger event occurs.
Brst Cnt setting range: 2 to 65,536
Cal – calibration
Operating mode: All
Menu: UTILITY (System)
The Series 3400 has a self-calibration feature to optimize performance. Self-calibration should be
performed for the following conditions:
• Perform self-calibration after the Series 3400 is turned on and allowed to warm up for at
least one hour.
• Perform self-calibration when the ambient temperature has changed.
• Perform self-calibration after an extended period of time since the last self-calibration.
NOTE Cables can be left connected to the Series 3400 when performing a self-calibration
Cal: Cal Now
4-14 Return to Section Topics 3400S-900-01 Rev. B / January 2007
Page 57

Series 3400 Pulse/Pattern Generators User’s Manual Section 4: Pulse/Pattern Generators Operation
ChAdd (3402 only) – channel add
Operating mode: All
Menu: VOLTS
When enabled, Channel Add is used to add the pulse output of Channel 1 to the pulse output of
Channel 2. The complex result is available on Channel 1, and Channel 2 output is disabled.
With Channel Add enabled, changing the source and/or load impedance of either Channel 1 or
Channel 2 will change the source and/or load impedance of the output.
ChAdd settings: Enable or Disable
Channel
Operating mode: All
Menu: VOLTS, TIME and PATTERN
The Model 3402 has two channels. There are parameters that can be independently set for each
channel.
For the Pulse, Burst and External Width modes, the Channel soft key toggles between Channel 1
and Channel 2. With Channel 1 selected, the display for Channel 1 settings is activated. With
Channel 1 selected, the display for Channel 2 settings is activated.
In Pattern mode for the Model 3402, the Channel soft key is also used along with the Format soft
key to set the pattern format for each channel.
3402 Channel settings: 1 or 2
ClkIn – clock input
Operating mode: Pulse, Burst and Pattern
Menu: UTILITY
When using an external clock for pulse period generation, the terminator (input impedance of the
Clkln connector terminal), slope and threshold voltage need to be set. The external clock is
connected to the Clk In connector and the period source (PerSrc) is set for ClkIn.
Terminator – The clock input terminator setting needs to match the impedance of the external
clock (50
Slope – Clock input can be set to detect the positive (Pos) or negative (Neg) slope of the external
clock pulses.
Threshold – The threshold sets the trigger level (-3V to 3V) that will detected by the Series 3400
as a valid clock input pulse.
ClkIn settings: Terminator: 50Ω or 10kΩ
Ω or 10kΩ).
Slope: Pos or Neg
Threshold: -3V to 3V
Delay
Operating mode: Pulse, Burst and Pattern (RZ only)
Menu: TIME
After the programmed Trigger event occurs, pulsing will start after the programmed Delay period
expires. Delay can be independently set for each output channel of the 3402 Pulse/Pattern
Generator.
Delay setting range: 0s to (Period – 3.02ns)
3400S-900-01 Rev. B / January 2007 Return to Section Topics 4-15
Page 58

Section 4: Pulse/Pattern Generators Operation Series 3400 Pulse/Pattern Generators User’s Manual
Display
Operating mode: All
Menu: UTILITY (System)
There are display settings for brightness, contrast and timeout for the backlight. There are 10
settings each for brightness and contrast. Timeout is set in minutes. With timeout enabled
(Entimeout = on) the backlight will turn off when the timeout period expires.
Bright and Contrast setting range: 1 to 10
EnTimeout: Off or On
Timeout setting: Set in minutes
Double
Operating mode: Pulse and Burst
Menu: TIME
Each channel can be set to output one or two pulses per period. With Double disabled (Off), the
channel will output a single pulse per period. With Double enabled (On), each channel will output
two pulses per period.
Double settings: Off or On
Edit
Operating mode: Pattern
Menu: PATTERN
The Edit soft key is used with the Bit # soft key to change one or more bits of a pattern:
1. Press the Bit # soft key and use the rotary knob or the keypad to place the cursor on the bit
to be changed.
2. Press the Edit soft key and then press the 0, 1 or +/- key to set the bit (+- toggles the bit
value). The cursor moves right to the next bit, which can then be edited.
NOTE Refer to Step 2 of “See “Pattern operation” on page 4-8 for more information.” for details
on pattern configuration.
Emul – emulation
Operating mode: All
Menu: UTILITY (System)
The emulation mode can be used to allow the Series 3400 to operate like the Agilent 81110A with
the 81111A module installed. With emulation on, the *IDN? and *OPT? query commands will
respond with messages that indicate that it is an Agilent 81110A with the 81111A module installed:
*IDN? response: “Hewlett-Packard, HP81110A”
*OPT? response: 3401-“81111A”
3402-“8 1111 A , 8 1111A”
NOTE Emulation is provided for code compatibility only.
Emul settings: Off or On
NOTE Changing this setting requires a system reboot.
4-16 Return to Section Topics 3400S-900-01 Rev. B / January 2007
Page 59

Series 3400 Pulse/Pattern Generators User’s Manual Section 4: Pulse/Pattern Generators Operation
ExtIn – external input
Operating mode: Pulse, Burst or Pattern
Menu: UTILITY
For external triggering, the input impedance and threshold need to be set. The external trigger is
connected to the Ext In connector and the trigger source (TrgSrc) is set for ExtIn.
Terminator – The terminator setting (input impedance) needs to match the impedance of the
external trigger (50
Threshold – The threshold sets the trigger level (-3V to 3V) that will detected by the Series 3400
as a valid clock trigger pulse.
ExtIn settings: Terminator: 50Ω or 10kΩ
Ω or 10kΩ).
Threshold: -3V to 3V
Format
Operating mode: Pattern
Menu: PATTERN
Bit patterns can be output in the RZ or NRZ format. The pattern can be individually set for each
channel.
Format settings: RZ or NRZ
Freq – frequency
Operating mode: Pulse, Burst and Pattern
Menu: TIME
Pulse speed can be set as frequency (Hz) or period (time). When setting the frequency, period is
set according to the following calculation:
period = 1 / frequency
Refer to “Per – period” for details on setting pulse speed as time.
Freq setting range: 1mHz to 165MHz
GPIBAdd – GPIB address
Operating mode: All
Menu: UTILITY (System)
The GPIB primary address of the Series 3400 can be set from 0 to 30. At the factory, the primary
address is set to 10. The controller address is typically 0 or 21.
GPIBAdd setting range: 0 to 30
NOTE Changing this setting requires a system reboot.
Hi Cur – high current limit
Operating mode: All
Menu: VOLTS
Refer to “Limits”
3400S-900-01 Rev. B / January 2007 Return to Section Topics 4-17
Page 60

Section 4: Pulse/Pattern Generators Operation Series 3400 Pulse/Pattern Generators User’s Manual
HiLvl – high level
Operating mode: All
Menu: VOLTS
Pulse high and low levels can be set. The pulse amplitude and offset will automatically adjust to
correspond to the set high/low levels (refer to “
The high and low setting ranges are dependent on the selected source impedance (50Ω or 1kΩ)
and the impedance of the load.
High and low levels can be independently set for each output channel of the Model 3402 Pulse/
Pattern Generator.
High/Low Level setting range*: 50Ω into 50Ω: 0 to ±10V
1kΩ into 50Ω: 0 to ±20V
* The low-to-high magnitude (which is the amplitude) cannot be set to exceed the following
window levels:
•50Ω source impedance, 50Ω load impedance: 10Vpp or 200mApp
•1kΩ source impedance, 50Ω load impedance: 20Vpp or 400mApp
Ampl – amplitude” and “Offset”).
0 to ±200mA
0 to ±400mA
Hi Volt – high voltage limit
Operating mode: All
Menu: VOLTS
Refer to “Limits”
IOPort – I/O port (interface)
Operating mode: All
Menu: UTILITY (System)
Remote programming for the Series 3400 can be performed using the GPIB or USB interface. At
the factory, the GPIB interface is selected.
IOPort settings: GPIB or USB
NOTE Changing this setting requires a system reboot.
I/V – current or voltage
Operating mode: All
Menu: VOLTS
Pulse levels can be set as voltage (V) or current (I).
I/V settings: Current or Voltage
LeadE – leading edge
Operating mode: All
Menu: TIME
Transition times (leading edge and trailing edge) are the intervals between corresponding 10%
and 90% amplitude points on the rising/falling edge of the pulse. The leading edge time and
trailing edge time can be set independently for each output channel of the 3402 Pulse/Pattern
4-18 Return to Section Topics 3400S-900-01 Rev. B / January 2007
Page 61

Series 3400 Pulse/Pattern Generators User’s Manual Section 4: Pulse/Pattern Generators Operation
Generator. Also, there are ranges on which transition times can be independently set. Refer to
Appendix A: Specifications for specific ranges.
Changing the leading edge time may also change the trailing edge time. Therefore, after changing
the leading edge time, check the trailing edge time (refer to “
as needed.
LeadE setting range: 2ns to 200ms
TrailE – trailing edge“) and change it
Length
Operating mode: Pattern
Menu: PATTERN
Sets the length (number of bits) of the pattern. Both channels are set to the same length.
Format settings: 2 to 16,384
NOTE Limits
Operating mode: All
Menu: VOLTS
Each channel can be independently set for high and/or low limits (voltage and current). Limits
restrict the user from programming amplitude, high level and low level beyond certain values.
However, if the programmed load impedance (LoadZ) does not match the actual load impedance,
then output voltages could exceed the programmed limits.
After pressing the Limits soft key, the following soft keys display. After selecting a limit, use the
keypad or rotary knob to set the limit.
On/Off Hi Vol t Lo Vo l t Mo r e
On/Off – Use to turn limits on or off.
Hi Volt – Use to set the high limit for voltage
Lo Volt – Use to set the low limit for voltage
More – Use to display the following soft keys to set current limits:
Hi Cur Lo Cur
Hi Cur – Use to set the high limit for current
Lo Cur – Use to set the low limit for current
Limits are only valid assuming correct programming of source and load impedance.
Limits settings: Hi Volt and Lo Volt, and Hi Cur and Lo Cur:
Same setting ranges as HiLvl and LoLvl
On/Off: Off or On
3400S-900-01 Rev. B / January 2007 Return to Section Topics 4-19
Page 62

Section 4: Pulse/Pattern Generators Operation Series 3400 Pulse/Pattern Generators User’s Manual
1kW
Out
Series 3400
Pulse/Pattern Generator
Source Impedance (SrcZ) setting = 1kW
50W
Out
Series 3400
Pulse/Pattern Generator
Source Impedance (SrcZ) setting = 50W
DUT
I
SRC
DUT
IINT IINTIDUT IDUT
VDUT
VDUT
ISRC
LoadZ – load impedance
Operating mode: All
Menu: VOLTS
The Series 3400 specifications are rated for a source impedance of 50Ω or 1kΩ into a 50Ω load
impedance (refer to “
For non-50Ω load impedances, the load impedance setting of the Series 3400 needs to be
adjusted to match the actual impedance of the load in order for the output amplitude to match the
programmed amplitude. For example, if the actual impedance of the DUT is 40
(LoadZ) needs to be set to 40
LoadZ setting range: 0.1Ω to 1MΩ
Figure 4-8 shows the simplified output diagrams for the two source impedance settings (50Ω and
1kΩ). With load impedance (LoadZ) set to 50Ω (default), the programmed voltage will be the actual
voltage sourced to a 50
Figure 4-8
Series 3400 output diagrams
SrcZ – source impedance” to set source impedance).
Ω, load impedance
Ω.
Ω DUT.
Table 4-7 shows the actual sourced voltage for various DUT impedances. The programmed
voltage is 5V and load impedance (LoadZ) is set to 50Ω.
For a 50Ω DUT, the programmed voltage (5V) will be sourced to the DUT. The voltage sourced to
the DUT increases as the actual impedance of the DUT increases. The voltage sourced to the
DUT decreases as the actual impedance of the DUT decreases.
Changing the load impedance (LoadZ) setting increases or decreases the current (I
compensate for a non-50
Ω load.
SRC
) to
With Channel Add (Model 3402 only) enabled, changing the source and/or load impedance of
either Channel 1 or Channel 2 will change the source and/or load impedance of the output (refer to
ChAdd (3402 only) – channel add”).
“
Example
Assume you want to source 5V to a 40Ω load, and source impedance (SrcZ) and load impedance
(LoadZ) are both set to 50
Ω (defaults).
As shown by the first row of data in Table 4-7, 4.44V (not 5V) will be sourced to the 40Ω DU T. To
source 5V, set the load impedance to 40Ω. The current source (I
force 125mA through the DUT (I
V
= 125ma x 40Ω = 5V
DUT
DUT
) will increase to 225mA to
SRC
):
4-20 Return to Section Topics 3400S-900-01 Rev. B / January 2007
Page 63

Series 3400 Pulse/Pattern Generators User’s Manual Section 4: Pulse/Pattern Generators Operation
Table 4-7
Programmed voltage vs. actual voltage (V
) for DUT impedance variations
DUT
Prgm
Vol tag e
5V 50Ω 50Ω 40Ω 200mA 89mA 111m A 4.44V
5V 50Ω 50Ω 45Ω 200mA 95mA 105mA 4.74V
5V 50Ω 50Ω 50Ω 200mA 100mA 100mA 5.00V
5V 50Ω 50Ω 55Ω 200mA 105mA 95mA 5.24V
5V 50Ω 50Ω 60Ω 200mA 109mA 91mA 5.45V
5V 1kΩ 50Ω 40Ω 105mA 4mA 101mA 4.04V
5V 1kΩ 50Ω 45Ω 105mA 4.5mA 100.5mA 4.52V
5V 1kΩ 50Ω 50Ω 105mA 5mA 100mA 5.00V
5V 1kΩ 50Ω 55Ω 105mA 5.5mA 99.5mA 5.47V
5V 1kΩ 50Ω 60Ω 105mA 6mA 99mA 5.94V
* I
is the current through the internal Source Z.
INT
I
DUT
Prgm
Source Z
is the current through the external Load Z.
Prgm
Load Z
Lo Cur – low current limit
Operating mode: All
Menu: VOLTS
Refer to “Limits”
LoLvl – low level
Actual
DUT Z I
SRC
I
INT
* I
DUT
* V
DUT
Operating mode: All
Menu: VOLTS
Refer to “HiLvl – high level”
Lo Volt – low voltage limit
Operating mode: All
Menu: VOLTS
Refer to “Limits”
Offset
Operating mode: All
Menu: VOLTS
Offset is the median (average) value of the high and low pulse levels, and is calculated as follows:
Offset = (High Level + Low Level) / 2
Changing the offset will also change the high and low levels. Amplitude is not affected. For
example, assume the following levels:
High Level: 1V
Low Level: -1V
Amplitude: 2Vpp |1V| + |-1V| = 2Vpp
Offset: 0V (1V + -1V) / 2 = 0V
If offset is changed to 0.5V, amplitude will remain at 2Vpp but the high and low levels will shift up
(increase) by 0.5V. The high level becomes 01.5V (1V + 0.5V) and the low level becomes -0.5V
(-1V + 0.5V).
3400S-900-01 Rev. B / January 2007 Return to Section Topics 4-21
Page 64

Section 4: Pulse/Pattern Generators Operation Series 3400 Pulse/Pattern Generators User’s Manual
The offset can be set to any value that allows the pulse to fit within the level window. Keep in mind
that minimum amplitude is 100mVpp. For a 100mVpp amplitude, offset can be programmed up to
9.95V.
NOTE Low voltage and current settings may be affected by the resolution specifications of the
Series 3400. For example, setting an amplitude of 250mVpp with an offset of 0V will
display HiLvl and LoLvl levels of +120mV and -120mV (instead of ±125mV). This is
because the setting resolution is 10mV.
On/Off (limits)
Operating mode: All
Menu: VOLTS
Refer to “Limits”
Per – period
Operating mode: Pulse, Burst and Pattern
Menu: TIME
Pulse speed can be set as period (interval at which the pulse repeats) or frequency. When setting
the period, frequency is set according to the following calculation:
frequency = 1 / period
Refer to “Freq – frequency” for details on setting pulse speed as frequency.
Per setting range: 6.06ns to 1000s
PerSrc – period source
Operating mode: Pulse, Burst and Pattern
Menu: TIME
There are two internal period sources that can be used for period generation: PLL or VCO. The the
trigger speed for the internal PLL is adjustable, and can be set as frequency (refer to “
trigger frequency”) or period (refer to “TrigPer – trigger period”). The PLL period source and PLL
trigger source cannot be used cannot be used together at the same time.
An external period source connected to the Clk In connector can be used instead of an internal
period source.
PerSrc settings: VCO, PLL or ClkIn
TrgFreq –
4-22 Return to Section Topics 3400S-900-01 Rev. B / January 2007
Page 65

Series 3400 Pulse/Pattern Generators User’s Manual Section 4: Pulse/Pattern Generators Operation
Period
Norm
Comp
Polarity
Pol – polarity
Operating mode: All
Menu: VOLTS
With normal polarity (Norm) selected, pulses/patterns are output from low level to high level as
depicted In
level to low level:
Figure 4-9
Polarity
Figure 4-9. With complement (Comp) selected, pulses/patterns are output from high
Pol settings: Norm or Comp
PLLRef – PLL reference
Operating mode: Pulse, Burst and Pattern
Menu: UTILITY
PLLRef – The PLLRef soft key (accessed from the UTILITY menu) is used to select the following
options for multiple Series 3400 units that are daisy-chained using the Ref Out and Ref In
connectors:
• External - The Series 3400 uses the externally supplied signal as the reference for the PLL.
• Internal – The Series 3400 will use its internal frequency reference source for the PLL.
PLLRef settings: External or Internal
PRBS n – pseudo random bit sequence
Operating mode: Pattern
Menu: PATTERN
The length (number of bits) for the pseudo random bit sequence (PRBS) is determined by “n” in
the following equation: 2
PRBS for each “n” setting.
PRBS n settings: n = 5 to 14
n
-1, where n can be set from 5 to 14. Table 4-4 lists the length of the
3400S-900-01 Rev. B / January 2007 Return to Section Topics 4-23
Page 66

Section 4: Pulse/Pattern Generators Operation Series 3400 Pulse/Pattern Generators User’s Manual
Recall
Operating mode: All
Menu: Utility
Up to nine instrument setups can be saved in memory (refer to “Save”). An instrument setup can
be restored to a saved setup using the Recall soft key.
After pressing the Recall soft key, select the memory location of the saved setup. The instrument
will return to that setup. The instrument can also be returned to the default settings.
Recall options: Default, Mem1, Mem2, Mem3, Mem4, Mem5, Mem6, Mem7, Mem8 or Mem9
Save
Operating mode: All
Menu: Utility
Up to nine instrument setups can be saved in memory. After configuring the instrument as desired,
use the Save soft key to save the setup to one of the nine memory locations.
Use the Recall soft key to return the instrument to a saved setup (refer to “Recall”).
Save options: Mem1, Mem2, Mem3, Mem4, Mem5, Mem6, Mem7, Mem8, Mem9
SrcZ – source impedance
Operating mode: All
Menu: VOLTS
The Series 3400 specifications are rated for a source impedance of 50Ω or 1kΩ into a 50Ω load
impedance.
Refer to “LoadZ – load impedance” for details on load impedance and source impedance.
SrcZ settings: 50 Ohms or 1 kOhms
System
Operating mode: All
Menu: UTILITY
The System soft key displays the following soft key options for system based operations:
Refer to “Display”
Refer to “Cal – calibration”
Refer to “GPIBAdd – GPIB address”
Refer to “IOPort – I/O port (interface)”
Refer to “Emul – emulation”
TrailE – trailing edge
Operating mode: All
Menu: TIME
Transition times (leading edge and trailing edge) are the intervals between corresponding 10%
and 90% amplitude points on the rising/falling edge of the pulse. The leading edge time and
trailing edge time can be set independently for each output channel of the Model 3402 Pulse/
Pattern Generator. Also, there are ranges on which transition times can be independently set.
4-24 Return to Section Topics 3400S-900-01 Rev. B / January 2007
Page 67

Series 3400 Pulse/Pattern Generators User’s Manual Section 4: Pulse/Pattern Generators Operation
Changing the trailing edge time may also change the leading edge time. Therefore, after changing
the trailing edge time, check the leading edge time (refer to “
as needed.
TrailE setting range: 2ns to 200ms
LeadE – leading edge“) and change it
TrgFreq – trigger frequency
Operating mode: Pulse, Burst and Pattern
Menu: TRIGGER
Sets the frequency of the PLL trigger source. When setting the trigger frequency, trigger period
(time) is set according to the following calculation:
trigger period = 1 / trigger frequency
Refer to “TrigPer – trigger period” for details on setting trigger speed as time.
TrgFreq setting range: 1mHz to 165MHz
TrgMode – trigger mode
Operating mode: Pulse, Burst and Pattern
Menu: TRIGGER
Sets the trigger mode: Continuous, triggered or gated.
Continuous – For continuous (Cont), continuous pulse output starts when the channel is enabled.
Tri ggered – For triggered (Trig’d), the trigger source (TrgSrc) triggers a single pulse period, or a
burst of pulse periods, or a pattern of bits (periods).
Gated – For Gated, the leading edge of an external trigger (ExtIn) triggers the first pulse, burst or
pattern of pulse periods. The trailing edge trigger marks the last pulse, burst or pattern of pulse
periods
TrgMode settings: Cont, Trig’d or Gated
TrigPer – trigger period
Operating mode: Pulse, Burst and Pattern
Menu: TRIGGER
Sets the period (time) of the PLL trigger source. When setting the trigger frequency (Hz), trigger
period is set according to the following calculation:
trigger frequency = 1 / trigger period
Refer to “TrgFreq – trigger frequency” for details on setting trigger speed as frequency.
TrigPer setting range: 6.06ns to 1000s
TrgSlope – trigger slope
Operating mode: Pulse, Burst and Pattern
Menu: TRIGGER
With the ExtIn or PLL trigger source selected, the positive-edge, negative-edge (or both) of the
source will trigger a pulse/pattern period.
TrgSlope settings: Pos, Neg or Both
3400S-900-01 Rev. B / January 2007 Return to Section Topics 4-25
Page 68

Section 4: Pulse/Pattern Generators Operation Series 3400 Pulse/Pattern Generators User’s Manual
TrgSrc – trigger source
Operating mode: Pulse, Burst and Pattern
Menu: TRIGGER
For non-continuous operation, pulsing is controlled by a trigger source: External, PLL or Manual.
External – For external triggering (ExtIn), the external trigger source is connected to the Ext In
connector.
PLL – For internal triggering, the PLL is used for triggering. Note that the PLL period source
(PerSrc) and PLL trigger source (TrgSrc) cannot be used together.
Manual – For manual triggering (Manual), a trigger is generated when the ManTrg soft key is
pressed.
TrgSrc settings: ExtIn, PLL or Manual
Update
Operating mode: Pattern
Menu: PATTERN
A pattern can be edited while it is being sourced. With continuous (Cont) updating, the output
pattern will update immediately when it is changed. Otherwise, the pattern will not update until the
Now soft key is pressed.
Width
Update settings: Now or Cont
Operating mode: Pulse, Burst and Pattern (RZ only)
Menu: TIME
Pulse width is the interval between leading-edge and trailing-edge medians. The median is the
50% level of the amplitude. Pulse width can be independently set for each output channel of the
3402 Pulse/Pattern Generator.
Width setting range: 3.02ns to (Period – 3.02ns)
4-26 Return to Section Topics 3400S-900-01 Rev. B / January 2007
Page 69

In this section:
Top ic Page
Triggering overview........................................................................... 5-2
Section 5
Triggering
Double pulse ................................................................................. 5-2
Period source (PerSrc).................................................................. 5-2
Trigger source (TrgSrc) ................................................................. 5-3
Trigger Out and Strobe Out........................................................... 5-3
PLL reference (PLLRef) ................................................................ 5-3
Continuous......................................................................................... 5-4
Continuous Pulse mode ................................................................ 5-4
Continuous Burst mode................................................................. 5-4
Continuous Pattern mode ............................................................. 5-5
Trigg ere d ............................................................................................ 5-6
Triggered Pulse mode................................................................... 5-6
Triggered Burst mode.................................................................... 5-8
Triggered Pattern mode ................................................................ 5-10
Gated .................................................................................................. 5-13
Gated Pulse mode ........................................................................ 5-13
Gated Burst mode ......................................................................... 5-14
Gated Pattern mode...................................................................... 5-16
External Width.................................................................................... 5-17
User Interface and remote programming mapping ........................ 5-18
Page 70

Section 5: Triggering Series 3400 Pulse/Pattern Generators User’s Manual
Triggering overview
The Series 3400 has three triggering modes for Pulse, Burst and Pattern: Continuous, Triggered
and Gated. For the External Width mode, triggering is controlled by an external trigger.
summarizes the triggering capability of the Series 3400.
NOTE Timing diagrams are used throughout this section to show the relationship between the
trigger signals and the channel output(s).
Table 5-1
Triggering summary
TrgMode: Continuous (Cont) Triggered (Trig’d) Gated N/A
Table 5-1
Operating
Mode
Double
pulse:
PerSrc: VCO, PLL or ClkIn N/A
TrgSrc: N/A
Trig Out: Marks each pulse period or bit period
Strobe
4:
Out
1) For Pulse and Burst, output (PulseNum) can be single or double pulses. For Pattern, bit output format
can be NZ or NRZ.
2) N/A = Not Applicable (setting not significant).
3) PLL cannot be used as the period source (PerSrc) and trigger source (TrgSrc) at the same time.
4) Strobe Out:
Pulse – Not used.
Burst – Goes high when first pulse of burst is triggered. Goes low when last pulse is triggered.
Pattern – Bit pattern programmed by the user.
ExtWidth – Not used.
Pulse Burst Pattern Pulse Burst Pattern Pulse Burst Pattern ExtWidth
1:
Single or Double N/A
2
— 1st and
last
2
Bit
Pattern
Single or Double N/A2Single or Double N/A
2
ExtIn or
Manual
— 1st and
VCO, PLL3 or
ClkIn
ExtIn, PLL3 or
Manual
Bit
last
Pattern
VCO, PLL3 or ClkIn N/A
ExtIn ExtIn
— 1st and
last
Pattern
Bit
2
—
Double pulse
2
The Series 3400 can be set for Single or Double pulse output. For Single, a channel will output
one pulse per period. For Double, a channel will output two pulses per period.
The pulse number is set from the Double soft key (accessed from the TIME menu). From this
menu select Single or Double.
Period source (PerSrc)
The Series 3400 can use one of two internal period sources (VCO or PLL), or an external clock
(ClkIn) for pulse period generation. The PerSrc soft key (accessed from the TIME menu) is used
select and configure the period source:
PLL and VCO – The PLL is more accurate than the VCO, but the VCO is more precisely triggered
(startable). See specifications for accuracy differences. The PLL period source and the PLL trigger
source (TrgSrc) cannot be used at the same time.
ClkIn – The external clock signal (connected to Clk In) can be ±6V. Series 3400 settings for an
external clock include the following:
5-2 Return to Section Topics 3400S-900-01 Rev. B / January 2007
Page 71

Series 3400 Pulse/Pattern Generators User’s Manual Section 5: Triggering
• Input impedance (ClkInTerm): 50Ω or 10kΩ
• Slope (ClkInSlp): Pos or Neg
• Threshold (ClkInThr): -3V to +3V
Trigger source (TrgSrc)
For non-continuous triggering, Pulse, Burst or Pattern output can be controlled by external
triggering (ExtIn), the Manual soft key (Manual) or the internal PLL. The TrgSrc soft key
(accessed from the TRIGGER menu) is used select and configure the trigger source:
ExtIn – The external trigger (connected to Ext In) can be ±6V. Series 3400 settings for an external
trigger include the following:
• Input impedance (ExtInTrm): 50Ω or 10kΩ (UTILITY menu)
• Threshold (ExtInThr): -3V to +3V (UTILITY menu)
Manual – When Manual is selected as the trigger source and TrgMode = Trig’d, the ManTrg soft
key appears on the display. It is used to control triggering.
PLL – After PLL is selected as the trigger source, the trigger period (TrgPer) can be set from
6.06ns to 1000s. When set as frequency (TrgFreq), it can be set from 1mHz to 165MHz.
Trigger slope (TrgSlope) – With the ExtIn or PLL trigger source selected, the positive-edge,
negative-edge (or both) of the source will trigger a pulse/pattern period. Trigger slope can be set
for Pos, Neg or Both. The TrgSlope soft key is accessed from the TRIGGER menu.
Trigger Out and Strobe Out
Trigger Out is available for all operating modes and marks each pulse or bit. Each output trigger
sent to an external instrument triggers it to perform an operation. If the external instrument is a
scope, a waveform capture will be performed. If the external instrument is another Series 3400, a
Pulse, Burst or Pattern will be started.
Strobe Out is available in Burst mode and marks the first pulse and last pulse of each burst. It is
similar to Trigger Out, but will trigger the external instrument to start an operation when the last
pulse of the burst has started. Strobe Out is also available in Pattern mode and is bit
programmable by the user.
Trig Out and Strobe Out provide TTL (0V/2.4V) levels that have a 50Ω output impedance.
PLL reference (PLLRef)
When using multiple Series 3400s in a test system, the PLL in one Series 3400 can be used by all
the other Series 3400 units. Using one PLL provides synchronized period source generation for all
the units in the test system:
PLLRef – The PLLRef soft key (accessed from the UTILITY menu) is used to select the following
options:
• External - The series 3400 uses the externally supplied signal as the reference for the PLL.
• Internal – The Series 3400 will use its internal frequency reference source for the internal
PLL.
Ref In and Ref Out connectors – When using multiple Series 3400s in a test, the PLL reference
of a single unit may be shared (made common to all units) by daisy-chaining the Ref Out of one
unit to Ref In of another.
reference of the first unit.
3400S-900-01 Rev. B / January 2007 Return to Section Topics 5-3
Figure 3-6 shows two units connected together for using the PLL
Page 72

Section 5: Triggering Series 3400 Pulse/Pattern Generators User’s Manual
Period Source
(PerSrc)
VCO, PLL or ClkIn
Period
Out 1
Trig Out
Out 2
Period Period
Continuous
In the continuous trigger mode, output starts immediately as soon as a channel is enabled, and
continues until the channel is disabled.
Continuous Pulse mode
Timing for the continuous Pulse mode is shown in Figure 5-1:
Period Source – Pulse output is synchronized to the selected period source: VCO, PLL or Clk In.
Trig Out – A TTL level pulse is generated for every pulse period.
Figure 5-1
Continuous Pulse mode
5-4 Return to Section Topics 3400S-900-01 Rev. B / January 2007
Continuous Burst mode
Timing for the continuous Burst mode is shown in Figure 5-2:
Period Source – Pulse output is synchronized to the selected period source: VCO, PLL or Clk In.
Trig Out – A TTL level pulse is generated for every pulse period.
Strobe Out – TTL level goes high at the start of the first pulse period for the burst, and goes low at
the start of the last pulse period.
Page 73

Series 3400 Pulse/Pattern Generators User’s Manual Section 5: Triggering
Period
Out 1
Trig Out
Out 2
Period Period
Strobe Out
3-Period Burst
(Brst Cnt = 3)
Period Source
(PerSrc)
VCO, PLL or ClkIn
Figure 5-2
Continuous Burst mode
Continuous Pattern mode
Timing for the continuous Pattern mode is shown in Figure 5-3:
Period Source – Bit output is synchronized to the selected period source: VCO, PLL or Clk In.
Trig Out – A TTL level pulse is generated for every bit (period).
Strobe Out – TTL level output that is bit-programmable using the NRZ format.
3400S-900-01 Rev. B / January 2007 Return to Section Topics 5-5
Page 74

Section 5: Triggering Series 3400 Pulse/Pattern Generators User’s Manual
Period
(Bit)
Out 1
(RZ)
Trig Out
Out 2
(NRZ)
Period
(Bit)
Period
(Bit)
Strobe Out
3-Bit Pattern
(Length = 3)
11 0
01 1
11 0
Period Source
(PerSrc)
VCO, PLL or ClkIn
Figure 5-3
Continuous Pattern mode
Triggered
In triggered, an enabled channel output is controlled by a trigger source. Each trigger will start a
single Pulse, Burst or Pattern.
Triggered Pulse mode
Timing for the triggered Pulse mode is shown in Figure 5-4, Figure 5-5, and Figure 5-6.
Trigger Source – A single pulse period is triggered by an external trigger (ExtIn), the internal PLL,
or by pressing the Manual soft key (Manual):
• ExtIn – A pulse period is started by the active edge of an external trigger connected to the
Ext In connector. The active edge could be the positive (Pos) slope of the trigger source
Figure 5-4), the negative (Neg) slope (Figure 5-5) or Both (Figure 5-6).
(
• PLL – Each positive slope edge of the internal PLL triggers a pulse period (refer to Figure 5-
4). The trigger period (TrgPer) can be set from 6.06ns to 1000s. When set as frequency
(TrgFreq), it can be set from 1mHz to 165MHz.
• Manual – When the Manual trigger source is selected and TrgMode = Trig’d, the ManTrg
soft key appears on the display. Pressing this soft key starts a single pulse period.
Trig Out – A TTL level pulse is generated for every pulse period.
5-6 Return to Section Topics 3400S-900-01 Rev. B / January 2007
Page 75

Series 3400 Pulse/Pattern Generators User’s Manual Section 5: Triggering
Out 1
Trig Out
Out 2
Trigger Source
(TrgSrc)
ExtIn, PLL
or Manual
Each pulse triggered by the positive slope edge
of an external trigger or internal PLL, or when the
Manual Soft Key is pressed.
Positive Slope Trigger
Edge (For ExtIn,
ExtInSlp = Pos)
Out 1
Trig Out
Out 2
Trigger Source
(TrgSrc)
ExtIn or Manual
Each pulse triggered by the negative slope edge
of an external trigger, or when the Manual Soft
Key is pressed.
Negative Slope Trigger
Edge (For ExtIn,
ExtInSlp = Neg)
Figure 5-4
Triggered Pulse mode (positive slope)
Figure 5-5
Triggered Pulse mode (negative slope)
3400S-900-01 Rev. B / January 2007 Return to Section Topics 5-7
Page 76

Section 5: Triggering Series 3400 Pulse/Pattern Generators User’s Manual
Out 1
Trig Out
Out 2
Trigger Source
(TrgSrc)
ExtIn or Manual
Positive and Negative
Slope Trigger Edges
(For ExtIn, ExtInSlp
= Both)
Each pulse triggered by both positive and negative
slope edges of an external trigger, or when the
Manual Soft Key is pressed.
Figure 5-6
Triggered Pulse mode (positive and negative slope)
Triggered Burst mode
Timing for the triggered Burst mode is shown in Figure 5-7 (VCO period source) and Figure 5-8
(PLL or ClkIn period source). Note in Figure 5-8 that the PLL and ClkIn period sources are not
synchronized to the external trigger source (ExtIn). The delay between trigger and start of the
period is calculated as follows:
Delay = n x Period where, 1 < n ≤ 2
Trigger Source – A single burst of pulse periods is triggered by an external trigger (ExtIn), the
internal PLL or by pressing the Manual soft key (Manual):
• ExtIn – A burst of pulse periods is started by the active edge of an external trigger
connected to the Ext In connector. The active edge could be the positive (Pos) slope of the
trigger source, the negative (Neg) slope or Both.
• PLL – Each positive slope edge of the internal PLL triggers a burst of pulse periods. The
trigger period (TrgPer) can be set from 6.06ns to 1000s. When set as frequency (TrgFreq), it
can be set from 1mHz to 165MHz. Note that the PLL trigger source and PLL period source
cannot be used at the same time.
• Manual – When the Manual trigger source is selected and TrgMode = Trig’d, the ManTrg
soft key appears on the display. Pressing this soft key starts a single burst of pulse periods.
Period Source – Pulse output is synchronized to the selected period source: VCO, PLL or Clk In.
Note that the PLL period source and PLL trigger source cannot be used at the same time.
Trig Out – A TTL level pulse is generated for every pulse period.
Strobe Out – TTL level goes high at the start of the first pulse period of the burst, and goes low at
the start of the last pulse period.
5-8 Return to Section Topics 3400S-900-01 Rev. B / January 2007
Page 77

Series 3400 Pulse/Pattern Generators User’s Manual Section 5: Triggering
Period
Out 1
Trig Out
Out 2
Period Period
Strobe Out
3-Period Burst
(Brst Cnt = 3)
Period Source
(PerSrc)
VCO
Trigger Source
(TrgSrc)
ExtIn, Manual
or PLL
First period of
next burst
Figure 5-7
Triggered Burst mode (VCO period source)
3400S-900-01 Rev. B / January 2007 Return to Section Topics 5-9
Page 78

Section 5: Triggering Series 3400 Pulse/Pattern Generators User’s Manual
Period
Out 1
Trig Out
Out 2
Period Period
Strobe Out
3-Period Burst
(Brst Cnt = 3)
Period Source
(PerSrc)
PLL or ClkIn
Trigger Source
(TrgSrc)
ExtIn or Manual
First period of
next burst
PLL/ClkIn not
synchronized
to ExtIn.
Figure 5-8
Triggered Burst mode (PLL or ClkIn period source)
Triggered Pattern mode
Timing for the triggered Pattern mode is shown in Figure 5-9 (VCO period source) and Figure 5-10
(PLL or ClkIn period source). Note in Figure 5-10 that the PLL and ClkIn period sources are not
synchronized to the external trigger source (ExtIn). The delay between trigger and start of the
period is calculated as follows:
Delay = n x Period where, 1 < n ≤ 2
Trigger Source – A single pattern of bits (periods) is triggered by an external trigger (ExtIn), the
internal PLL or by pressing the Manual soft key (Manual):
Period Source – Pattern output is synchronized to the selected period source: VCO, PLL or Clk
In. Note that the PLL period source and PLL trigger source cannot be used at the same time.
Trig Out – A TTL level pulse is generated for every pulse period.
Strobe Out – TTL level output that is bit-programmable using the NRZ format.
• ExtIn – A pattern of bit periods is started by the active edge of an external trigger connected
to the Ext In connector. The active edge could be the positive (Pos) slope of the trigger
source, the negative (Neg) slope or Both.
• PLL – Each positive slope edge of the internal PLL triggers a pattern of bits. The trigger
period (TrgPer) can be set from 6.06ns to 1000s. When set as frequency (TrgFreq), it can
be set from 1mHz to 165MHz. Note that the PLL trigger source and PLL period source
cannot be used at the same time.
• Manual – When the Manual trigger source is selected, the Manual soft key appears on the
display. Pressing this soft key starts a single pattern of bits.
5-10 Return to Section Topics 3400S-900-01 Rev. B / January 2007
Page 79

Series 3400 Pulse/Pattern Generators User’s Manual Section 5: Triggering
Period
(Bit
Out 1
Trig Out
Out 2
Period
(Bit)
Period
(Bit)
Strobe Out
3-Bit Pattern
(Length = 3)
Period Source
(PerSrc)
VCO
Trigger Source
(TrgSrc)
ExtIn, Manual
or PLL
First bit of
next pattern
11 0 1
0 011
11 10
Figure 5-9
Triggered Pattern mode (VCO period source)
3400S-900-01 Rev. B / January 2007 Return to Section Topics 5-11
Page 80

Section 5: Triggering Series 3400 Pulse/Pattern Generators User’s Manual
Period
(Bit)
Out 1
Trig Out
Out 2
Period
(Bit)
Period
(Bit)
Strobe Out
3-Bit Pattern
(Length = 3)
Period Source
(PerSrc)
PLL or ClkIn
Trigger Source
(TrgSrc)
ExtIn or Manual
First bit of
next pattern
11 0
1
0011
11 10
PLL/ClkIn not
synchronized
to ExtIn.
Figure 5-10
Triggered Pattern mode (PLL or ClkIn period source)
5-12 Return to Section Topics 3400S-900-01 Rev. B / January 2007
Page 81

Series 3400 Pulse/Pattern Generators User’s Manual Section 5: Triggering
Period
Out 1
Trig Out
Out 2
Period Period
Period Source
(PerSrc)
VCO
Trigger Source
(TrgSrc)
ExtIn
Period
Gated
In the gated trigger mode, an enabled channel output is controlled by the leading and trailing edge
on an external trigger.
Gated Pulse mode
Timing for the gated Pulse mode is shown in Figure 5-11 (VCO period source) and Figure 5-12
(PLL or ClkIn period source). Note in Figure 5-12 that the PLL and ClkIn period sources are not
synchronized to the external trigger source (ExtIn). The delay between trigger and start of the
period is calculated as follows:
Delay = n x Period where, 1 < n ≤ 2
Trigger Source – Pulse periods start when the rising edge of an external trigger (ExtIn) is
detected. The falling edge of the trigger marks the last pulse period. In
12, three pulse periods are started by each gated trigger.
Period Source – Pulse output is synchronized to the selected period source: VCO, PLL or Clk In.
Trig Out – A TTL level pulse is generated for every pulse period.
Figure 5-11
Gated Pulse mode (VCO period source)
Figure 5-11 and Figure 5-
3400S-900-01 Rev. B / January 2007 Return to Section Topics 5-13
Page 82

Section 5: Triggering Series 3400 Pulse/Pattern Generators User’s Manual
Period
Out 1
Trig Out
Out 2
Period Period
Period Source
(PerSrc)
PLL or ClkIn
Trigger Source
(TrgSrc)
ExtIn
Period
PLL/ClkIn not
synchronized
to ExtIn.
Figure 5-12
Gated Pulse mode (PLL or ClkIn period source)
Gated Burst mode
Timing for the gated Burst mode is shown in Figure 5-13 (VCO period source) and Figure 5-14
(PLL or ClkIn period source). Note in Figure 5-14 that the PLL and ClkIn period sources are not
synchronized to the external trigger source (ExtIn). The delay between trigger and start of the
period is calculated as follows:
Delay = n x Period where, 1 < n ≤ 2
Tri gger Sou rce – Pulse periods for a burst start when the rising edge of an external trigger (ExtIn)
is detected. The falling edge of the trigger marks the last burst. In
Burst count is 2. Two 3-period bursts are started by each gated trigger.
Period Source – Pulse output is synchronized to the selected period source: VCO, PLL or Clk In.
Trig Out – A TTL level pulse is generated for every pulse period.
Strobe Out – TTL level goes high at the start of the first pulse period for the burst, and goes low at
the start of the last period for the Burst.
Figure 5-13 and Figure 5-14, the
5-14 Return to Section Topics 3400S-900-01 Rev. B / January 2007
Page 83

Series 3400 Pulse/Pattern Generators User’s Manual Section 5: Triggering
Period
Out 1
Trig Out
Out 2
Period Period
Period Source
(PerSrc)
VCO
Trigger Source
(TrgSrc)
ExtIn
Period
3-Period Burst
(Brst Cnt = 2)
Strobe Out
3-Period Burst
(Brst Cnt = 2)
Period Period
Period
Out 1
Trig Out
Out 2
Period Period
Trigger Source
(TrgSrc)
ExtIn
Period
3-Period Burst
(Brst Cnt = 2)
Strobe Out
3-Period Burst
(Brst Cnt = 2)
Period Period
ExtIn not
synchronized
to PLL/ClkIn.
Period Source
(PerSrc)
PLL or ClkIn
Figure 5-13
Gated Burst mode (VCO period source)
Figure 5-14
Gated Burst mode (PLL or ClkIn period source)
3400S-900-01 Rev. B / January 2007 Return to Section Topics 5-15
Page 84

Section 5: Triggering Series 3400 Pulse/Pattern Generators User’s Manual
Period
Out 1
RZ
Trig Out
Out 2
NRZ
Period Period
Period Source
(PerSrc)
VCO
Trigger Source
(TrgSrc)
ExtIn
Period
3-Period Burst
(Brst Cnt = 2)
Strobe Out
NRZ
3-Period Burst
(Brst Cnt = 2)
Period Period
110
110
110
110
101
010
Gated Pattern mode
Timing for the gated Pattern mode is shown in Figure 5-15 (VCO period source) and Figure 5-16
(PLL or ClkIn period source). Note in Figure 5-16 that the PLL and ClkIn period sources are not
synchronized to the external trigger source (ExtIn). The delay between trigger and start of the
period is calculated as follows:
Delay = n x Period where, 1 < n ≤ 2
Trigger Source – Bit periods for a pattern start when the rising edge of an external trigger (ExtIn)
is detected. The falling edge of the trigger marks the last pattern. In
the Pattern length is 3 bits. Two 2-bit patterns are started by each gated trigger.
Period Source – Pattern output is synchronized to the selected period source: VCO, PLL or Clk
In.
Trig Out – A TTL level pulse is generated for every bit period.
Strobe Out – Strobe output is programmable by the user.
Figure 5-15
Triggered Pattern mode (VCO period source)
Figure 5-15 and Figure 5-16,
5-16 Return to Section Topics 3400S-900-01 Rev. B / January 2007
Page 85

Series 3400 Pulse/Pattern Generators User’s Manual Section 5: Triggering
Period
Out 1
RZ
Trig Out
Out 2
NRZ
Period Period
Trigger Source
(TrgSrc)
ExtIn
Period
3-Period Burst
(Brst Cnt = 2)
Strobe Out
NRZ
3-Period Burst
(Brst Cnt = 2)
Period Period
110
110
110
110
101
010
ExtIn not
synchronized
to PLL/ClkIn.
Period Source
(PerSrc)
PLL or ClkIn
Figure 5-16
Triggered Pattern mode (PLL or ClkIn period source)
External Width
Trigger Source – In the External Width operating mode, the pulse width is controlled by an
external trigger:
ExtIn – The pulse level follows the edges of an external trigger. A rising edge causes the output to
go high, while a falling edge causes the output to go low.
3400S-900-01 Rev. B / January 2007 Return to Section Topics 5-17
Page 86

Section 5: Triggering Series 3400 Pulse/Pattern Generators User’s Manual
User Interface and remote programming mapping
Remote programming commands don't always map as expected to the front panel settings of the
User Interface (UI).
• If TrigMode = Cont or :ARM:SOUR is set to IMM, the user can set :ARM:SENS to EDGE or
LEV. The TrigSrc parameter on the front panel can be set to either ExtIn PLL or Manual,
with the exception of Pulse mode, where PLL cannot be used as the trigger source. The
:ARM:SENS setting or TrgSrc setting is ignored.
• If TrigMode ≠ Cont or :ARM:SOUR is set to either EXT or INT2 or MAN, the :ARM:SENS
command will be restricted. For example, if :ARM:SOUR is set to MAN, :ARM:SENS EDGE
is the only acceptable condition — an error will occur if :ARM:SENS LEV is sent. This is
because a manual gated condition cannot exist for the Series 3400.
Table 5-2
Mapping for User Interface settings and remote
programming commands
Table 5-2 provides the mapping between commands and UI settings.
User Interface Setting* Remote Command
TrigMode = Cont maps to :ARM:SOUR IMM
TrigMode = Trig'd maps to :ARM:SENS EDGE
TrigMode = Gated maps to :ARM:SENS LEV
TrigSrc = ExtIn maps to :ARM:SOUR EXT
TrigSrc = PLL maps to :ARM:SOUR INT2
TrigS rc = Man maps to :ARM:SOUR MAN
PerSrc = VCO maps to :TRIG:SOUR IMM
PerSrc = PLL maps to :TRIG:SOUR INT2
PerSrc = ClkIn maps to :TRIG:SOUR EXT2
* Trigmode and TrigSrc are set from the TRIGGER menu.
PerSrc is set from the TIME menu.
5-18 Return to Section Topics 3400S-900-01 Rev. B / January 2007
Page 87

In this section:
Top ic Page
Introduction........................................................................................ 6-2
Remote interfaces ............................................................................. 6-2
Status model ...................................................................................... 6-4
Section 6
Remote Programming
Selecting an interface.................................................................... 6-2
IEEE-488 interface ........................................................................ 6-2
USB interface ................................................................................ 6-3
Status register sets........................................................................ 6-5
Status byte and service request (SRQ)......................................... 6-5
Standard Event Status Register .................................................... 6-6
Operation Status group ................................................................. 6-7
Questionable Status group............................................................ 6-7
Service request programming example ........................................ 6-7
Common commands ......................................................................... 6-7
Command summary...................................................................... 6-7
Command examples ..................................................................... 6-8
SCPI command reference ................................................................. 6-9
Command summary...................................................................... 6-9
Command descriptions ................................................................. 6-14
Page 88

Section 6: Remote Programming Series 3400 Pulse/Pattern Generators User’s Manual
Introduction
This section provides detailed information on the remote programming of the Series 3400.
Remote interfaces
The Series 3400 has two remote interfaces: IEEE-488 and USB. Note that you can use only one
interface at a time.
NOTE The instrument must be rebooted after selecting a different interface or making any
changes to the communication parameters.
Selecting an interface
Select the interface to be used for remote operation (GPIB or USB):
1. On the front panel, press the UTILITY menu key, and then the System soft key.
2. Press the IOPort soft key to display the present interface selection.
3. Press the GPIB or USB soft key.
IEEE-488 interface
The Series 3400 can be connected to the IEEE-488 bus (also known as the GPIB, or General
Purpose Interface Bus) through a cable equipped with standard IEEE-488 connectors. The Series
3400 conforms to the IEEE-488.2 and SCPI standards (Standard Commands for Programmable
Instruments). IEEE-488.2 defines a syntax for sending data to and from instruments, how an
instrument interprets this data, what registers should exist to record the state of the instrument,
and a group of common commands. The SCPI standard defines a command language protocol. It
goes one step farther than IEEE-488.2 and defines a standard set of commands to control every
programmable aspect of an instrument.
Connections
The Series 3400 can be connected to the IEEE-488 bus through a cable equipped with standard
IEEE-488 connectors. The connector can be stacked to allow a number of parallel connections to
one instrument. Two screws are located on each connector to ensure that connections remain
secure.
Although any number of connectors could theoretically be stacked on one instrument, it is
recommended that you stack no more than three connectors on any one unit to avoid possible
mechanical damage.
In order to minimize interference caused by electromagnetic radiation, it is recommended that only
shielded IEEE-488 cables be used. The Models 7007-1 and 7007-2 shielded IEEE-488 cables are
available from Keithley Instruments.
Connect the Series 3400 to the IEEE-488 bus as follows:
1. Line up the cable connector with the connector located on the rear panel. The connector is
designed so that it will fit only one way.
nector on the instrument.
2. Tighten the screws securely, but do not overtighten them.
3. Add additional connectors from other instruments, as required.
4. Make certain that the other end of the cable is properly connected to the controller. Most
controllers are equipped with an IEEE-488 style connector, but a few may require a different
6-2 Return to Section Topics 3400S-900-01 Rev. B / January 2007
Figure 6-1 shows the location of the IEEE-488 con-
Page 89

Series 3400 Pulse/Pattern Generators User’s Manual Section 6: Remote Programming
USB
Connector
IEEE-488
Connector
type of connecting cable. Consult the instruction manual for your controller for the proper
connecting method.
Note that the IEEE-488 bus is limited to a maximum of 15 devices, including the controller. The
maximum cable length is 20-meters, or two meters times the number of devices, whichever is less.
Failure to observe these limits may result in erratic bus operation.
Figure 6-1
IEEE-488 and USB connector locations on rear panel
Address selection
The default primary address for the Series 3400 is 10. The primary address may be set to any
value between 0 and 30 as long as address conflicts with other instruments are avoided. Note that
controllers are also given a primary address, so do not use that address either. Most frequently,
controller addresses are 0 or 21, but you should consult the controller's instruction manual for
details. Whatever primary address you choose, you must make certain that it corresponds with the
value specified as part of the controller's programming language.
To check the present primary address or to change to a new one, perform the following procedure:
1. Press the UTILITY menu key on the front panel, and then press the System soft key.
2. Press the GPIBAdd soft key to display the current GPIB primary address.
3. Set the GPIB address to the desired value in the range of 0 to 30 using the knob and/or
numeric keys.
NOTE You must reboot the instrument after making changes to communication parameters.
USB interface
Before using the USB (Universal Serial Bus) interface, be sure to disconnect the GPIB from the
instrument, as only one interface can be used at a time.
Connections
The Series 3400 includes a type B USB socket located on the rear panel (refer to Figure 6-1).
Typically, you will use a USB cable equipped with a type A plug on one and a type B plug on the
other end. Connect the type A plug to the type A USB socket on the host computer or USB hub.
Connect the type B plug to the type B socket located on the rear panel of the Series 3400.
USB identifiers
Model 3401-F and 3401-R: VID (Vender ID) = 0x05E6
PID (Product ID) = 0x3401
Model 3402-F and 3402-R: VID (Vender ID) = 0x05E6
PID (Product ID) = 0x3402
3400S-900-01 Rev. B / January 2007 Return to Section Topics 6-3
Page 90

Section 6: Remote Programming Series 3400 Pulse/Pattern Generators User’s Manual
0
1
10
11
12
13
15
Logical
OR
12
13
Logical
OR
QSB
MAV
ESB
RQS
OSB
Status
Byte
Register
1
QSB
MAV
ESB
6
OSB
Service
Request
Enable
Register
&
&
&
&
&
&
&
Logical
OR
*STB? *SRE <0-255>
*SRE?
1
14 14
OPC
QYE
DDE
EXE
CME
PON
10
11
12
13
15
Event
Register
10
11
12
13
15
Register
&
&
&
&
&
&
&
&
&
&
&
&
&
&
&
&
Logical
OR
OPC
QYE
DDE
EXE
CME
PON
*ESR?
*ESE <0 to 255>
*ESE?
11
9
14
15
9
Questionable Event Registers
(Not Used)
Event Enable
Standard Event Registers
Operation Event Registers
(Not Used)
2
3
5
6
QSB = Questionable Summary Bit
MAV = Message Available
ESB = Event Summary Bit
RQS = Request for Service
OSB = Operation Summary Bit
Operation Complete
Query Error
Device Dependent Error
Execution Error
Command Error
Power On
8
8
9
9
7
14
4
8
0
1
2
3
5
6
7
4
8
10
11
0
2
0
2
Output Buffer
Always
Zero
66
Status model
The Series 3400 provides a number of status registers allowing the operator to monitor and
manipulate the various instrument events. The status model is shown in
the status model is the Status Byte Register. This register can be read by the user's test program
to determine if a service request (SRQ) has occurred, and what event caused it.
Figure 6-2
Status model
Figure 6-2. The heart of
6-4 Return to Section Topics 3400S-900-01 Rev. B / January 2007
Page 91

Series 3400 Pulse/Pattern Generators User’s Manual Section 6: Remote Programming
Status register sets
The Operation Status Register set and Questionable Status Register set are each made up of a
condition register, positive and negative transition filters, an event register, and an event enable
register.
NOTE The Operation Status group and Questionable Status group are not used by the Series
3400. While these registers can still be accessed with corresponding SCPI commands for
compatibility with other instruments, associated status register bits are not used and
always set to 0. Refer to “
information.
Condition register: Contains the current status of the hardware and firmware, is continuously
updated, and is not latched or buffered. Condition registers are read-only.
Transition filters: Used to detect changes of state in the condition register and set the
corresponding bit in the event register. Transition filter bits can be set to detect positive transitions
(PTR), negative transitions (NTR) or both. These registers are read-write registers and are not
affected by *CLS.
Event register: Latches transition events from the condition register. Event registers are cleared
either by reading or with the *CLS command. Event registers are read-only, and bits are not
buffered, so subsequent events are not recorded.
SCPI command reference” (later in this section) for more
Enable register: Defines which bits in an event register are included in the logical OR into the
summary bit. The enable register is logically ANDed with the event register and the resulting bits
ORed into the summary bit. Enable registers are read-write and are not affected by *CLS or
querying.
Status byte and service request (SRQ)
The Status Byte Register summarizes the information from all other status groups. The summary
bit for the Status Byte Register is located in bit 6 (RQS). When RQS is set, it generates an SRQ on
the IEEE-488 bus. The Status Byte Register is read using a serial poll sequence or with the *STB?
query.
An SRQ is enabled by setting the associated bit in the Service Request Enable Register with the
*SRE command. This register can be read using the *SRE? query.
Bits in the Status Byte Register and Service Request Enable Register are summarized in
Table 6-1.
3400S-900-01 Rev. B / January 2007 Return to Section Topics 6-5
Page 92

Section 6: Remote Programming Series 3400 Pulse/Pattern Generators User’s Manual
Table 6-1
Status Byte Register and Service Request
Enable Register bits
Bit Description
0 Not used (always 0)
1 Not used (always 0)
2 Not used (always 0)
3 Questionable Status Summary Bit (not used)
4 MAV: Message available in output buffer
5 Standard Event Status Summary bit
6 RQS: Request Service
7 Operation Status Summary Bit (not used)
Standard Event Status Register
Bits in the Standard Event Status Register are summarized in Table 6-2. Use *ESE to enable the
corresponding register bit(s) and the *ESE? query to read the enable register. Use *ESR? to read
the Standard Event Status Register bits.
Table 6-2
Standard Event Status Register bits
Bit Description
0 Operation Complete, set by *OPC
1 Not used (always 0)
2 Query Error
3 Device Dependent Error
4 Execution Error
5 Command Error
6 Not used (always 0)
7 Power On*
* Set bit indicates that a command/query has been sent, or a front
panel key has been pressed since the Series 3400 has been turned
on. Querying this bit resets it to zero, and remains zero as long as
the instrument remains on.
6-6 Return to Section Topics 3400S-900-01 Rev. B / January 2007
Page 93

Series 3400 Pulse/Pattern Generators User’s Manual Section 6: Remote Programming
Operation Status group
The Operation Status group is not used by the Series 3400. Bits in the associated status register
are not used and always set 0. For compatibility with other instruments, associated SCPI
commands can still be used. Refer to “
SCPI command reference” (later in this section) for more
information.
Questionable Status group
The Questionable Status group is not used by the Series 3400. Bits in the associated status
register are not used and always set 0. For compatibility with other instruments, associated SCPI
commands can still be used. Refer to “
SCPI command reference” (later in this section) for more
information.
Service request programming example
To generate a service request when a Query Error occurs, send these commands:
*ESE 4
*SRE 32
Common commands
Command summary
IEEE-488.2 common commands supported by the Series 3400 are summarized in Table 6-3.
Many of these commands are associated with the status model. Refer to “Status model” (earlier in
this section) for more information.
Table 6-3
Common commands
Command
*CLS Clear status structure
*ESE <0-255> Set Standard Event Status Register mask
*ESE? Read Standard Event Status Enable Register
*ESR? Read Standard Event Status Event Register
*IDN? Read Instrument's Identification string
*OPC Set Operation Complete bit when all pending actions are completed
*OPC? Read status of the Operation Complete bit
*OPT? Returns “K13401” for the Model 3401 or“K13402” for the Model 3402
*RCL <0-9> Recall complete instrument setting from memory
*RST Reset instrument to standard settings
*SAV <1-9> Save complete instrument setting to memory
*SRE <0-255> Set Service Request Enable Mask
*SRE? Read Service Request Enable Mask
*STB? Read Status Byte
1.Commands with numerics enclosed in angle brackets <> indicate parameter ranges for those commands. Commands without angle brackets have no parameters.
2.Does not clear front panel errors (only remote programming errors). Error messages will continue
to be displayed until you press HELP or any other key.
3.The *IDN? and *OPT? queries have different responses when Emulation mode is enabled. Refer to
Emul in Section 4 of this manual.
1
Description
2
3
3
3400S-900-01 Rev. B / January 2007 Return to Section Topics 6-7
Page 94

Section 6: Remote Programming Series 3400 Pulse/Pattern Generators User’s Manual
Table 6-3
(continued)
Common commands
Command
*TRG Trigger instrument
*TST? Execute instrument self-test. It will return a “0” if the Series 3400 boots
*WAI Wait until all pending actions are complete
1.Commands with numerics enclosed in angle brackets <> indicate parameter ranges for those commands. Commands without angle brackets have no parameters.
2.Does not clear front panel errors (only remote programming errors). Error messages will continue
to be displayed until you press HELP or any other key.
3.The *IDN? and *OPT? queries have different responses when Emulation mode is enabled. Refer to
Emul in Section 4 of this manual.
Command examples
*ESE 4
*RCL 5
*SAV 2
*SRE 8
Set Standard Event Status Register mask to decimal 4
Recall instrument setting # 5 from memory
Save complete instrument setting to memory location #2
Set Service Request Enable Mask to decimal 8
1
Description
correctly.
6-8 Return to Section Topics 3400S-900-01 Rev. B / January 2007
Page 95

Series 3400 Pulse/Pattern Generators User’s Manual Section 6: Remote Programming
SCPI command reference
Command summary
SCPI commands are summarized by subsystem in Table 6-4.
General notes:
• Brackets ([ ]) are used to denote optional character sets. These optional characters do not
have to be included in the program message. Do not use brackets in the program message.
• Angle brackets (< >) are used to indicate parameter type. Do not use angle brackets in the
program message.
• Uppercase characters indicate the short-form version for each command word.
• Default - Listed parameters are the *RST defaults, unless noted otherwise.
• The command parameter to set a state (on or off), can be sent as follows:
– ON or 1 (for the on state)
– OFF or 0 (for the off state).
The response message for the queries will be 0 or 1.
3400S-900-01 Rev. B / January 2007 Return to Section Topics 6-9
Page 96

Section 6: Remote Programming Series 3400 Pulse/Pattern Generators User’s Manual
Table 6-4
SCPI command summary
Command Parameters Default Description Page
:ARM ARM subsystem 6-14
[SEQuence[1] ⏐ :STARt]
[:LAYer[1]]
:EWIDth
[:STATe] ON | OFF | 1 | 0 0 Set/query External Width Mode 6-14
:FREQuency <numeric> 100kHz Set/query trigger frequency with internal
PLL used as source
:IMPedance <numeric> 50Ω Set/query impedance at EXT INPUT 6-15
:LEVel <numeric> +1.0V Set/query threshold level at EXT INPUT 6-15
:PERiod <numeric> 10.0μs Set/query trigger period with
internal PLL used as source
:SENSe EDGE | LEVel EDGE Set/query trigger on edge or on level 6-16
:SLOPe POS | NEG |
EITH
:SOURce IMM | INT[1] |
INT2 | EXT[1] |
MAN
POS Set/query trigger slope at EXT INPUT 6-16
IMM Set/query trigger source (VCO | PLL |
EXT INPUT | ManTrg key)
6-14
6-15
6-16
:CHANnel CHANnel subsystem 6-18
:MATH OFF | PLUS OFF Set/query addition of Ch 1 and Ch 2 at
Ch 1 output
:CALibration[:ALL] CALibration subsystem
Set/query calibration of period (VCO),
delay, and width circuits
:DIGital DIGital subsystem 6-19
[:STIMulus]
:PATTern
:DATA[1|2|3] [<start>], data #1200 Set/query pattern data, from bit <start> 6-19
:PRBS[1|2|3] [<n>], <length> Set PRBS 2n-1 data (n = 5 to 14) 6-20
[:STATe] OFF | ON | 0 | 1 0 Set/query pattern mode state of on/off 6-20
:UPDate OFF | ON | 0 | 1
ONCE
:SIGNal[1|2]
:FORMat RZ | NRZ RZ Set/query pattern format of
1 Set/query pattern mode update setting 6-20
designated output channel
6-18
6-18
6-20
6-10 Return to Section Topics 3400S-900-01 Rev. B / January 2007
Page 97

Series 3400 Pulse/Pattern Generators User’s Manual Section 6: Remote Programming
Table 6-4 (continued)
SCPI command summary
Command Parameters Default Description Page
:DISPlay DISPlay subsystem 6-21
:BRIGhtness <numeric> 8 Set display brightness 6-21
:CONTrast <numeric> 6 Set display contrast 6-21
:TIMeout
:DELay <numeric> 30 Set display backlight-saver timer 6-22
[:STATe] OFF | ON | 0 | 1 1 Enable or disable display
backlight-saver timer
:OUTPut [1|2] OUTPut subsystem 6-22
[:NORMal]
[:STATe] OFF | ON | 1 | 0 0 Set/query normal output state 6-22
:IMPedance
[:INTernal] <numeric> 50Ω Set/query internal source
impedance of output
:EXTernal <numeric> 50Ω Set/query external load
impedance
:POLarity NORM | INV NORM Set/query output polarity 6-24
6-22
6-23
6-23
[:SOURce] SOURce subsystem 6-24
:CURRent [1|2] 6-24
[:LEVel]
[:IMMediate]
[:AMPlitude] <numeric> 20mA Set/query channel current
amplitude
:OFFSet <numeric> 0.0μA Set/query channel current offset 6-25
:HIGH <numeric> +10mA Set/query channel current high level 6-25
:LOW <numeric> -10mA Set/query channel current low level 6-26
:LIMit
[:HIGH] <numeric> +10mA Set/query channel current max limits 6-26
:LOW <numeric> -10mA Set/query channel current min
limits
:STATe ON | OFF | 1 | 0 0 Enable/disable channel current limits 6-27
:FREQuency
[:CW | :FIXed] <numeric> 1MHz Set/query pulse frequency 6-27
:AUTO ONCE Measure frequency at CLK IN 6-27
:HOLD [1|2] VOLT | CURR VOLT Switch between VOLTage and CURRent
targeted commands
:PHASe [1|2]
[:ADJust] <numeric> 0.0 Set/query channel phase 6-28
6-26
6-28
3400S-900-01 Rev. B / January 2007 Return to Section Topics 6-11
Page 98

Section 6: Remote Programming Series 3400 Pulse/Pattern Generators User’s Manual
Table 6-4 (continued)
SCPI command summary
Command Parameters Default Description Page
[:SOURce] SOURce subsystem (cont.)
:PULSe
:DCYCle [1|2] <numeric> 10.0% Set/query channel duty cycle 6-28
:DELay [1|2] <numeric> 0.0 Set/query channel delay 6-29
:HOLD TIME | PRATio TIME Hold absolute delay or delay as percent
of period fixed with varying frequency
:UNIT S | SEC | PCT |
DEG | RAD
:DOUBle [1|2]
[:STATe] OFF | ON | 0 |1 0 Enable/disable double pulses 6-30
:DELay <numeric> 0ps Set/query delay between double pulses 6-30
:HOLD TIME | PRATio TIME Hold absolute delay or delay as percent
:UNIT S | SEC | PCT S Set/query delay units 6-31
:HOLD [1|2] WIDTh | DCY-
Cle | TDELay
:PERiod <numeric> 1μs Set/query pulse period 6-32
:AUTO ONCE Measure pulse period at CLK IN 6-32
:TDELay [1|2] <numeric> 100ns Set/query trailing edge delay 6-33
:TRANsition [1|2]
:HOLD TIME | WRATio TIME Hold absolute transitions
:UNIT S | SEC | PCT S Set/query transition time units 6-33
[:LEADing] <numeric> 2ns Set/query leading edge transition 6-34
:TRAiling <numeric> 2ns Set/query trailing edge transition 6-34
:AUTO OFF | ON | 0| 1
ONCE
:WIDTh [1|2] <numeric> 100ns Set/query channel pulse width 6-35
:ROSCillator
:SOURce INTernal |
EXTernal
S Set/query delay units 6-30
of period fixed with varying frequency
WIDTh Hold width|duty cycle|trailing edge delay
fixed with varying frequency
transitions as width ration fixed with varying width
1 Couple trailing edge to leading edge 6-34
EXT Set/query PLL reference source 6-35
6-29
6-31
6-32
6-33
6-12 Return to Section Topics 3400S-900-01 Rev. B / January 2007
Page 99

Series 3400 Pulse/Pattern Generators User’s Manual Section 6: Remote Programming
Table 6-4 (continued)
SCPI command summary
Command Parameters Default Description Page
:SOURce] SOURce subsystem (cont.)
:VOLTage [1|2]
[:IMMediate]
[:AMPLitude] <numeric> 1000mV Set/query channel amplitude
voltage
:OFFSet <numeric> 0.0mV Set/query channel offset voltage 6-36
:HIGH <numeric> +500mV Set/query channel high level
voltage
:LOW <numeric> -500mV Set/query channel low level
voltage
:LIMit
[:HIGH] <numeric> +500mV Set/query max voltage limit 6-38
:LOW <numeric> -500mV Set/query min voltage limit 6-38
:STATe ON | OFF | 1 | 0 0 Enable/disable voltage limits 6-39
:STATus STATus subsystem
:OPERation 6-39
[:EVENt]? <numeric> Query operation event register
:CONDition <numeric> Query operation condition register
:ENABle <numeric> Set/query operation enable register
:NTRansition <numeric> Set/query operation negative transition
register
:PTRansition <numeric> Set/query operation positive transition
register
:PREset 6-39
:QUEStionable 6-39
[:EVENt]? <numeric> Query questionable event register
:CONDition? <numeric> Query questionable condition register
:ENABLe <numeric> Set/query questionable enable register
:NTRansition <numeric> Set/query questionable negative transi-
tion register
:PTRansition <numeric> Set/query questionable positive transi-
tion register
6-36
6-37
6-37
3400S-900-01 Rev. B / January 2007 Return to Section Topics 6-13
Page 100

Section 6: Remote Programming Series 3400 Pulse/Pattern Generators User’s Manual
Table 6-4 (continued)
SCPI command summary
Command Parameters Default Description Page
:SYSTem SYSTem subsystem 6-40
:CHECk[:ALL][:STATe] OFF | ON| 0 | 1 1 Disable or enable error checking. 6-40
:ERRor? Query error queue 6-40
:PRESet No function
:VERSion? Query SCPI compliance setting 6-40
:TRIGger TRIGger subsystem 6-40
[:SEQuence [1]|:STARt]
:COUNt <numeric> 1 Set/query number of triggered periods to
ge generated per ARM event
:IMPedance <numeric> 50Ω Set/query impedance at CLK IN 6-41
:LEVel <numeric> 1.00V Set/query threshold level at CLK IN 6-42
:SLOPe POS | NEG POS Set/query trigger slope at CLK IN 6-42
:SOURce IMM | INT[1] |
INT2 | EXT[2]
IMM Set/query trigger source (IMM | VCO |
PLL | CLK IN)
6-40
6-42
Command descriptions
ARM subsystem
:ARM:EWID
:ARM[:SEQuence[1]|:STARt][:LAYer]:EWIDth[:STATe]
Parameters ON | OFF | 1 | 0
Default 0
Query :ARM:EWID?
Description Use this command to enable the EXT WIDTH trigger mode available on the Mode/
Trigger screen. When EXT WIDTH mode is switched on, the rest of the :ARM and
:TRIG system is disabled. In EXT WIDTH mode a signal applied to the EXT
INPUT determines the width and period of the output signal(s) from the instru
ment. You can still control the edge transition times and levels of the output signal(s).
Example :ARM:EWID ON
:ARM:FREQ
:ARM[:SEQuence[1]|:STARt][:LAYer]:FREQuency[:CW][:FIXed]
Parameters Numeric
-
Suffix HZ with engineering prefixes, e.g.: MHZ is Megahertz
Limits 1mHz to 165MHz
Default 100kHz
Query :ARM:FREQ?
6-14 Return to Section Topics 3400S-900-01 Rev. B / January 2007
 Loading...