

Tektronix RSA306RACK User manual

xx
RSA306RACK
RSA306 Rackmount Kit
ZZZ
Installation
General safety summary
Review the following safety precautions to avoid injury and
prevent damage to this product or any products connected to it.
To avoid potential hazards, use this product only as specified.
Only qualified personnel should perform service procedures.
To avoid damage to equipment and personal injury
Do not exceed rackmount weight ratings.
kit only for RSA306 instruments.
Use proper hardware.
specified mounting screws.
Use care when installing and removing product from rack.
pinching fingers and hands when installing and removing. Do
not force the product when installing. Gently pull the product
out when removing.
Use only with specified products.
products for which it was not intended. Refer to individual
product manuals for details or contact Tektronix Customer
Service when in doubt.
Contacting Tektronix
Tektronix, Inc.
14150 SW Karl Braun Drive
P.O. Box 500
Beaverton, OR 97077
USA
Do not interchange hardware. Use only
Use this rackmount
Avoid
Do not use rackmount on
Kit description
The rackmount kit is a collection of parts that, once installed,
configures specific products, including Tektronix RSA306
Spectrum Analyzers, for mounting into a standard 19-inch
equipment rack. You will need a Phillips #2 screwdriver to
complete the installation.
Installation
The RSA306 rack frame comes completelyassembledwiththe
façade and closure plate in place. Use the following procedure
and refer to the illustration to assemble the rackmount hardware
and install the instrument into the rack. (See Figure 1.)
1.
Attach the RSA306 rack frame (item 8) into your rack
chassis using four 10-32 screws (item 5) and four finishing
washers (item 6). If necessary, use four lock nuts (item 7)
to secure the screws to the rack chassis.
2.
Remove the closure plate and façade (items 3 & 4) by
unscrewing the four thumb screws (item 1).
3.
Insert the RSA306 instrument(s) into the rack frame.
4.
Reinstall the façade (item 4).
a.
If installing one instrument: Reinstall the façade
(item 4) using two thumb screws (item 1) and washers
(item 2), then reinstall the closure plate (item 3) using
two thumb screws (item 1) and washers (item 2).
b.
If installing two instruments: Reinstall the façade
(item 4) using four thumb screws (item 1) and
washers (item 2).
*P071332702*
071-3327-02
x
For product information, sales, service, and technical support:
In North America, call 1-800-833-9200.
Worldwide, visit www.tektronix.com to find contacts in your
area.
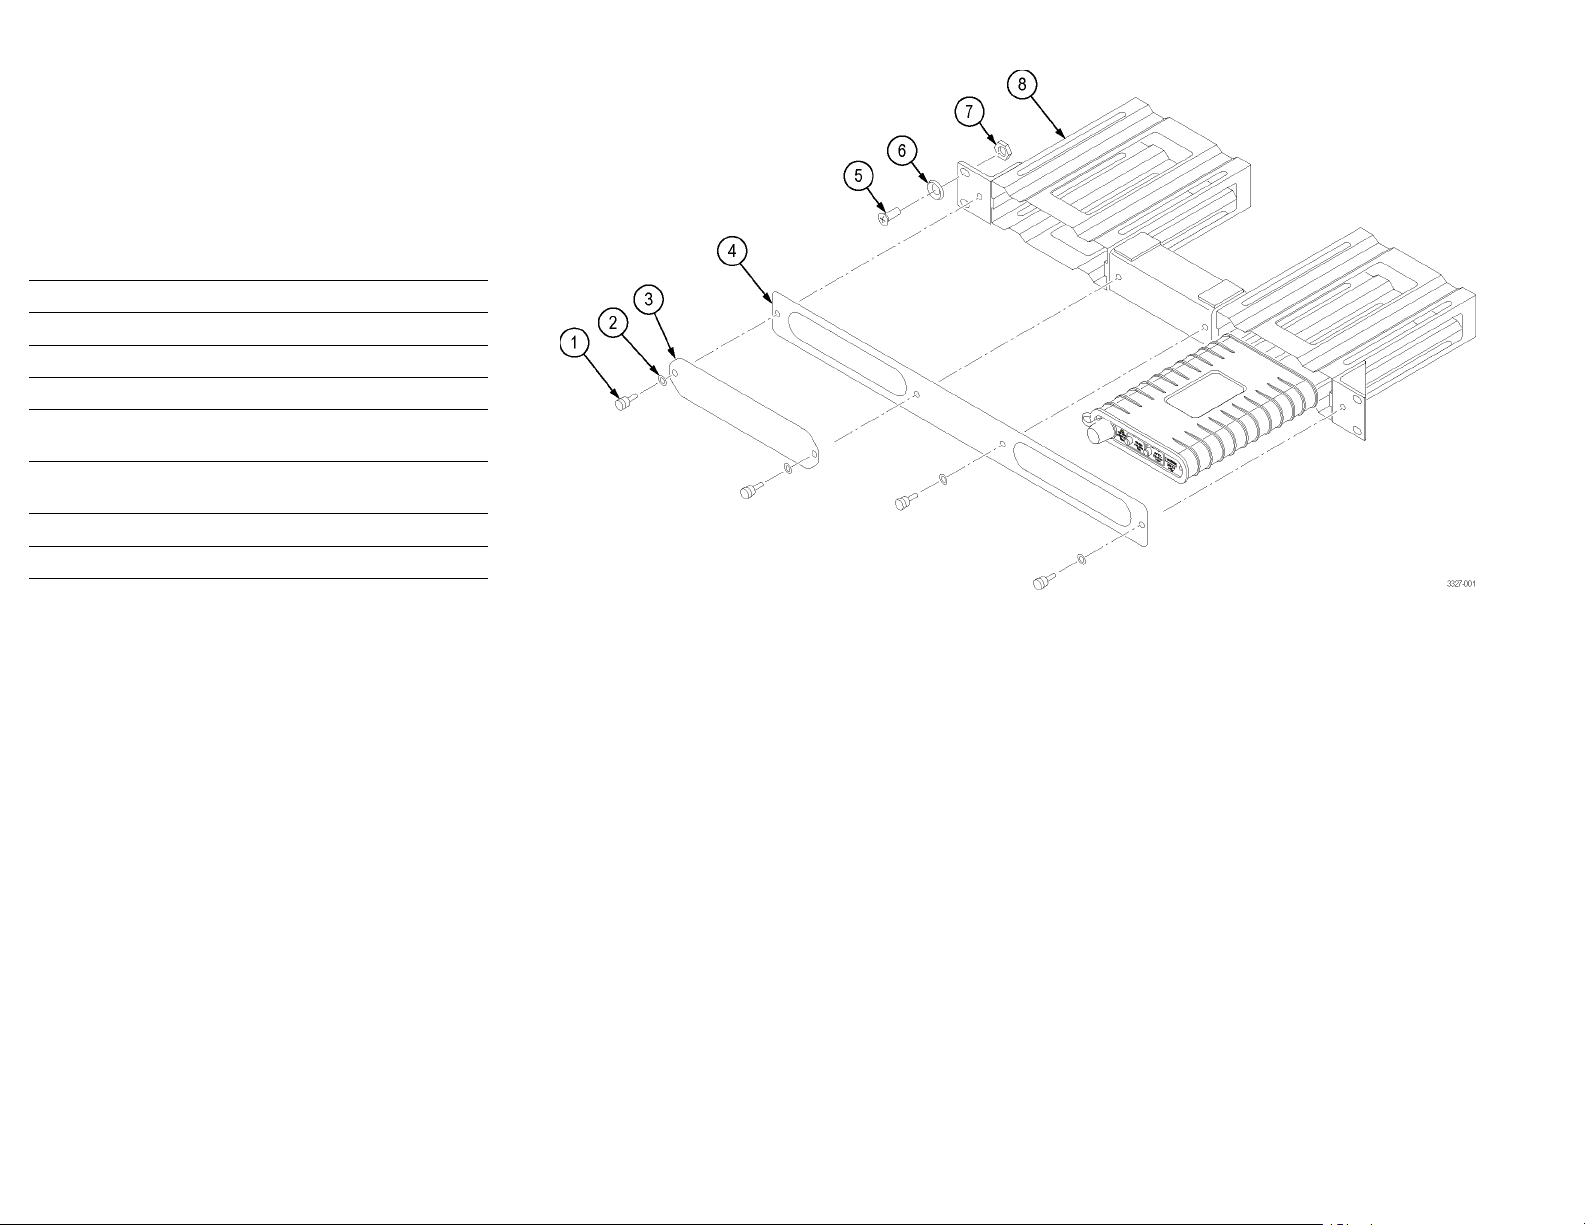
Kit parts list
The following table lists the parts contained in this kit. Use
the associated figure to identify the parts and to assemble the
kit. (See Figure 1.)
Table 1: RSA306RACK Rackmount kit parts list
Item
no. Qty. Name and description
1-1 4
1–2 4
1-3 1
1-4 1
1-5 4
1-6 4
1-7 4
1-8 1
THUMBSCREW, BRASS; 6-32 X 0.5
INTERNAL-TOOTH LOCK WASHER; 6-32
CLOSURE PLATE
RACK FACADE
RACKMOUNT SCREW, POZI-DRIVE, NICKEL PLATED
STEEL; 10-32 X 0.75
WASHER, FINISHING, NICKEL PLATED STEEL; 0.187
I.D. X 0.580 O.D.
NUT, LOCKING, ZINC PLATED STEEL; 10-32 X 0.375
RACK FRAME ASSEMBLY
Figure 1: Rackmount kit assembly
Copyright © Tektronix, Inc. All rights reserved. www.tektronix.com
 Loading...