


xx
QCloud
ZZZ
Automated Video Content Verification System
User Manual
*P077094300*
077-0943-00


QCloud
Automated Video Content Verification System
ZZZ
User Manual
www.tektronix.com
077-0943-00

Copyright © Tektronix. All rights reserved. Licensed software products are owned by Tektronix or its
subsidiaries or suppliers, and are protected by national copyright laws and international treaty provisions.
Tektronix products are covered by U.S. and foreign patents, issued and pending. Information in this
publication supersedes that in all previously published material. Specifications and price change privileges
reserved.
TEKTRONIX and TEK are registered trademarks of Tektronix, Inc.
QCloud is trademark of Tektronix, Inc.
This document supports software version 7.6 and above.
QCloud Te
To obtain technical support for QCloud , send an e-mail to the following address: cerify-support@tek.com
Contac
Tektronix, Inc.
14150 SW Karl Braun Drive
P. O . B o x 5 0 0
Beaverton, OR 97077
USA
For product information, sales, service, and technical support:
In North America, call 1-800-833-9200.
Worldwide, visit www.tektronix.com to find contacts in your area.
chnical Support
ting Tektronix
.

Warranty
Tektronix warrants that the media on which this software product is furnished and the encoding of the programs
on the media will be free from defects in materials and workmanship for a period of three (3) months from the
date of shipment. If any such medium or encoding proves defective during the warranty period, Tektronix will
provide a rep
product is furnished, this software product is provided “as is” without warranty of any kind, either express or
implied. Tektronix does not warrant that the functions contained in this software product will meet Customer's
requirements or that the operation of the programs will be uninterrupted or error-free.
In order to obtain service under this warranty, Customer must notify Tektronix o f the defect before the
expiration of the warranty period. If Tektronix is unable to provide a replacement that is free from defects in
materials and workmanship within a reasonable time thereafter, Customer may terminate the license for this
software product and return this software product and any associated materials for credit or refund.
THIS WARRANTY IS GIVEN BY TEKTRONIX WITH RESPECT TO THE PRODUCT IN LIEU OF ANY
OTHER WARRANTIES, EXPRESS OR IMPLIED. TEKTRONIX AND ITS VENDORS DISCLAIM ANY
IMPLIED
TEKTRONIX' RESPONSIBILITY TO R EPLACE DEFECTIVE MEDIA OR REFUND CUSTOMER'S
PAYMENT IS THE SOLE AND EXCLUSIVE REMEDY PROVIDED TO THE CUSTOMER FOR
BREACH OF THIS WARRANTY. TEKTRONIX AND ITS VENDORS WILL NOT BE LIABLE FOR
ANY INDIRECT, SPECIAL, INCIDENTAL, OR CONSEQUENTIAL DAMAGES IRRESPECTIVE OF
WHETHER TEKTRONIX OR THE VENDOR HAS ADVANCE NOTICE OF THE POSSIBILITY OF
SUCH
lacement in exchange for the defective medium. Except as to the media on which this s oftware
WARRANTIES OF MERCHANTABILITY OR FITNESS FOR A PARTICULAR PURPOSE.
DAMAGES.


Table of Contents
Acknowledgements
Acknowledgements................................................................................................. 1
Preface
Preface............................................................................................................... 3
Contents
Related documentation ............................. .................................. ......................... 3
Getting started
Product description ................................................................................................. 5
System components .............. .................................. ................................ ........... 5
System installation ................................................................................................ 14
Prerequisites..................... ................................ ................................ .............. 14
Software installation.......................................................................................... 17
Uninstalling software .... . .... . .... ..... .... . .... . .... ..... ..... .... . .... . .... ..... ..... .... . .... . .... ..... ... 26
Software reinstallation ..... .................................. ................................ ................ 26
Software upgrade ............................................................................................. 27
Network settings . . .... . .... . .... ..... ..... .... . .... . .... . .... . .... ..... ..... .... . .... . .... . .... . .... ..... ..... 27
Accessing the application............................. .................................. .......................... 29
Starting the application........................................... ................................ ............ 29
Configuring a license......................................................................................... 29
QCloud Windows service .............................. .................................. .................... 31
Starting a cluster .............................................................................................. 31
Accessing the Web user interface........................................................................... 32
of this manual .......................... ................................ ............................. 3
Table of Contents
Operating Basics
Concepts .................. ................................ .................................. ........................ 35
Users ....... ................................ ................................ .................................. .. 35
MediaLocations............................................................................................... 36
MediaSets...................................................................................................... 36
Templates ...................................................................................................... 36
Profiles ..... .................................. ................................ ................................ .. 37
Jobs............................................................................................................. 37
Alerts ........................................................................................................... 37
Reports ......................................................................................................... 38
Archiving ...................................................................................................... 38
Clustering.... ................................ .................................. ................................ 38
Growing file support.............................. ................................ ............................ 38
QCloud Automated Video Content Verification System User Manual i

Table of Contents
Audio Loudness correction .................................................................................. 39
Functional overview..................... ................................ .................................. ........ 40
System tray icon .......... ................................ .................................. .................. 40
Web user interface ............................ .................................. .............................. 41
Error handling. ................................ ................................ ................................ 47
Tutorials ............................................................................................................ 49
Work flow.................................... .................................. ................................ 50
Before you begin...................... ................................ ................................ ........ 51
Creating a MediaLocation ................... ................................ ................................ 53
Creating a MediaSet.................. ................................ ................................ ........ 54
Creating a template........................................................................................... 57
Creating a profile........................................ ................................ ...................... 59
Creating a job ....................... .................................. ................................ ........ 60
Inspecting job results ......................................................................................... 60
Generating a report ........................................................................................... 61
Archiving ...................................................................................................... 61
Exporting templates ........ ................................ ................................ .................. 62
Importing templates ........ ................................ ................................ .................. 62
Reference
Introduction ........................................................................................................ 63
Jobs...................... ................................ .................................. .......................... 63
Jobs monitor..... ................................ .................................. ............................ 63
New job ............ .................................. ................................ .......................... 64
New single file job............................................................................................ 65
Modifying jobs................................................................................................ 69
Job details.. ................................ ................................ .................................. .. 70
Processing results ............................................................................................. 71
Alert levels .................................................................................................... 72
Alert details...................... .................................. ................................ ............ 73
Start and End positions of quality alerts. .... . .... . .... ..... .... . .... . .... ..... ..... .... . .... . .... ..... ..... 74
Frame view .................................................................................................... 75
Media processing limitations................ ................................ ................................ 75
Profiles.............................................................................................................. 78
Profile details .................................. ................................ ................................ 79
Edit profile..................................................................................................... 79
New profile ............ .................................. ................................ ...................... 80
Templates............................... ................................ .................................. .......... 81
Template details............................................................................................... 84
Edit template ...... ................................ ................................ ............................ 85
New template.................................................................................................. 86
Deleting templates.............. ................................ .................................. ............ 87
ii QCloud Automated Video Content Verification System User Manual

Table of Contents
Exporting templates ........ ................................ ................................ .................. 88
Importing templates ........ ................................ ................................ .................. 89
Container templates ............................................................................................... 91
Checks common to all container layers .................................................................... 91
Container checks specific to Microsoft Smooth Streaming (MSS)...................................... 92
Container checks specific to MPEG-2 transport stream standard ....................................... 93
Container checks specific to MPEG-2 program stream standard.. ................................ ...... 96
Container checks specific to SMPTE 377M / MXF standard............................................ 96
Container checks specific to LXF standard .............................. .................................. 99
Container checks specific to QuickTime standard ................................ ...................... 100
Container checks specific to AVID AMT standard ..................................................... 100
Video templates ............................ ................................ .................................. .... 102
Common video configuration checks....... .................................. ............................ 102
Video quality . . .... ... . . .... . .... . .... ..... .... . .... . .... ..... ... . . .... . .... . .... .... . .... . .... . .... ..... .... 106
Video checks specific to MPEG-4 standard.................... .................................. ........ 111
Video checks specific to MPEG-2 standard.................... .................................. ........ 112
Video checks specific to VC-1 standard.................................................................. 116
Video checks specific to H.264/AVC standard .. .................................. ...................... 116
Video checks specific to the DV50/100/DVCPro standard ............................................ 120
Video checks specific to the ProRes standard ........................................................... 121
Video checks specific to generic QuickTime video ..................................................... 122
Video checks specific to JPEG 2000...................................................................... 122
Video checks specifictoRawvideo
Audio templates.... .................................. ................................ ............................ 124
Common audio configuration checks....... ................................ .............................. 124
Audio quality checks ....................................................................................... 125
Audio checks specific to MPEG1 and MPEG-2 audio standards.................................... .. 129
Audio checks specific to Dolby-E audio standard......................................... .............. 129
Audio checks specific to AC-3 audio standard .......................................................... 132
Audio checks
Audio checks specific to PCM audio standard .......................................................... 133
Audio checks specific to DV audio standard .. .................................. ........................ 134
Audio checks specific to Cross Track audio ............................................................. 134
Action templates................................................................................................. 137
MediaSets ........................................................................................................ 143
New MediaSet....................................... ................................ ........................ 144
Edit MediaSet ............................................................................................... 145
Configure DropBox......................................................................................... 147
DropBox Filters.... ..... ..... ..... .... . .... . .... . .... . .... . .... . .... . .... . .... . .... . .... . .... . .... ..... ..... 149
Reports................ ................................ .................................. .......................... 151
Options.......................... ................................ ................................ .................. 152
Change password ............. ................................ .................................. ............ 152
specific to AAC / HE-AAC audio standard ................................. ............ 132
........................ ................................ .............. 123
QCloud Automated Video Content Verification System User Manual iii

Table of Contents
Records per page.................... .................................. ................................ ...... 152
Jobs view .... ................................ ................................ ................................ 152
Admin......... ................................ ................................ .................................. .. 153
User management........................................................................................... 153
Modify user...................... ................................ ................................ ............ 153
New user ......................... ................................ .................................. .......... 154
Delete user................................................................................................... 154
MediaLocation management .............................................................................. 154
Mail settings . . .... ..... .... . .... . .... . .... . .... ..... ..... .... . .... . .... . .... . .... ... . . .... . .... . .... . .... .... 160
Processing settings... . .... ... . . .... . .... ..... .... . .... . .... ..... .... . .... . .... .... . .... . .... ... . . .... . .... .. 160
Database management................................ ................................ ...................... 161
Schedule job deletion......................... ................................ .............................. 163
Schedule job media file deletion .......................................................................... 163
Cloud license settings ...... .................................. ................................ .............. 163
QCloud usage report........................................................................................ 164
Report fi le settings............................ ................................ .............................. 165
Custom logo settings .... . .... . .... . .... ..... ..... .... . .... . .... . .... . .... .... . .... . .... . .... . .... ..... ..... 165
Stream information ....................... .................................. ................................ 165
VLC playback............................................................................................... 166
Application log............ .................................. ................................ ................ 168
Media test units page ....................................................................................... 168
Help ............................................................................................................... 169
Accessing the help.......................................................................................... 169
Using the help............................................................................................... 169
Appendices
Appendix A: Alerts................ .................................. ................................ ............ 171
List of Alerts ................................ .................................. .............................. 171
Appendix B: Supported compression standards.............................................................. 245
Supported video compression standards . ................................ ................................ 245
Supported Audio compression standards..... .................................. .......................... 249
File types and container formats ................ ................................ .......................... 252
Supported wrapper and codec combinations............................................................. 254
Standards references........................................................................................ 255
Appendix C: Software maintenance ..................... .................................. .................... 257
Configuring the QCloud application...................................................................... 257
Reinitializing the QCloud application . .... . .... . .... . .... .... . .... . .... ..... .... . .... . .... . .... .... . .... . 259
Database backup/restore utility. . .... . .... . .... ..... ... . . .... . .... . .... ..... ..... .... . .... . .... . .... . .... .. 259
Capturing QCloud status information using th
Using NFS client on Windows ............................................................................ 263
Appendix D: CeriTalk........................................................................................... 265
CeriTalk XML reports...................... ................................ ................................ 265
e support monitor script .............................. 261
iv QCloud Automated Video Content Verification System User Manual

Appendix E: Configuring your QCloud installation ........................... .............................. 272
Glossary
Glossary terms ........................... ................................ .................................. ...... 281
Index
Table of Contents
CeriTalk SOAP API ........................................................................................ 268
Number of files
Modes of operation ....... ................................ ................................ .................. 273
Configuring your QCloud installation for best performance........................................... 277
to be processed simultaneously ............ ................................ ............ 272
QCloud Automated Video Content Verification System User Manual v

Table of Contents
vi QCloud Automated Video Content Verification System User Manual

Acknowledgements Acknowledgements
Acknowledgements
Apache. This product uses software developed by the Apache Software Foundation,
http://www.apache.org/
Castor, Log4
Apple. This product uses parts of the Darwin Streaming Server source code covered by the Apple Public
Source License. For copies of this license and modifications made to the sour
software license notices and source code provided with QCloud.
Apple and QuickTime are trademarks of Apple Inc., registered in the United States and other countries.
http://www.apple.com/
Dolby. Manufactured under license from Dolby Laboratories. This product uses software developed
by Dolby Laboratories. http://www.dolby.com/
Dolby Decoder: "Dolby", "Pro Logic", and the double-D symbol are trademarks of Dolby Laboratories.
Confidential unpublished works. © 1992-1999 Dolby Laboratories. All rights reserved.
Dolby E Professional (Decoder): © 1998-2008 Dolby Laboratories. All rights reserved.
j, Struts, Spring and Xerces.
. This includes the following software: Andariel, Ant, Apache Commons, Axis,
ce code please refer to the
Dolby Professional Loudness Metering and Correction (Object Code): © 2003-2012 Dolby Laboratories.
All rights reserved.
DynamicReports libraries. This product uses DynamicReports libraries for creating PDF reports.
dynamicreports.sourceforge.net/index.html
Expat. This product uses the Expat XML Parser. http://expat.sourceforge.net/
FFmpeg. This product uses software developed by the FFmpeg project, ffmpeg.mplayerhq.hu.
Specifically, support for DV is provided by some components of the libavcodec and libavutil libraries.
HardingFPA OEM Interface library. This product uses HardingFPA OEM Interface library f or PSE
analysis developed by and used under license from Cambridge Research Syste ms. http://www.crsltd.com/
HTMLUNIT. This product includes software developed by Gargoyle Software Inc.
http://www.GargoyleSoftware.com/
Java This product uses Java™ technology. The TM and technology are explicitly required by Sun.
http://www.sun.com/policies/trademarks
JBoss. Modifications have been made to the source code of the JBoss application server. This source code
is available on request. http://www.jboss.org/developer
JCIFS. This product uses the Java CIFS Client Library, jcifs.samba.org. http://jcifs.samba.org/
JDIC This pr
oduct uses the JDIC Java integration components. https://jdic.dev.java.net/
JPEG. This product uses free JPEG software from the Independent JPEG Group.
JUnit. This product uses the JUnit regression testing framework, www.junit.org.
MXF. This product uses MXF software d eveloped by and used under license from OPENCUBE
Technologies SAS, http://www.mxftk.com/
QCloud Automated Video Content Verification System User Manual 1
.

Acknowledgements Acknowledgements
MainConcept decoder libraries. This product uses MainConcept decoder libraries for decoding AVC,
MPEG-2, VC-3/DNxHD, and JPEG 2000. These libraries are used under license from MainConcept.
http://www.m
MySQL. This product is powered by the MySQL database. MySQL is written and distributed under
the GNU Gener
the general public.
ainconcept.com/
al Public License which means the source code is freely distributed and available to
Neko. This p
OpenCV. This product uses OpenCV (Open Source Computer Vision Library), http://opencv.org/
Rhino. This product uses the Rhino implementation of JavaScript, http://www.mozilla.org/rhino/
Saxon. This product uses Saxon XSLT processor, saxon.sourceforge.net.
Windows Media. This product is protected by certain intellectual property rights of Microsoft. Use or
distribution of such technology outside of this product is prohibited without a license from Microsoft.
WinDump. This product uses the WinDUMP network diagnostic utilities.
http://www.winpcap.org/windump
WinPcap. This product uses the WinPcap packet capture libraries. http://www.winpcap.org/
7-Zip. This product uses the 7-ZIP file archiver. http://www.7-zip.org/
roduct includes software developed by Andy Clark.
.
.
2 QCloud Automated Video Content Verification System User Manual

Preface Preface
Preface
QCloud is an automated system for testing compressed digital media before transmission or use. Through
a Web-based interface, you can create a Job, which will perform a sequence of checks on a set of media
files, and vie
Contents of this manual
This manual describes the system in detail, provides procedures for using the system, and includes full
reference documentation.
Getting Started describes the system capabilities, configuration, and first time operation.
w the results.
Operatin
Reference provides detailed information about each page (or window, or menu item) in the user
interfa
Appendix A: Alerts lists and defines all the stream compliance and integrity checks that can be
carrie
Appendix B: Supported Compression Standards describes compression standards and file formats
that th
Appendix C: Software Maintenance details the procedure to reinitialize the QCloud.
Appendix D: CeriTalk provides information abou t an XML-based API that lets you interact with
QCloud from within other applications, making it possible to integrate QCloud with other content
mana
Appendix E: Configuring Your QCloud Installation provides information on modes of operation,
con
recommendations.
gBasicsprovides a functional overview, basic concepts, and tutorials for using the system.
ce.
d out.
e system recognizes.
gement, broadcast automation, and workflow systems.
figuring your installation for best performance and commercial off-the-shelf platform
Related documentation
The following related documents support the product:
QCloud Help
Cloud Quick Start User Manual (Tektronix part number, 077-0942-xx)
Q
QCloud Release Notes (Tektronix part number, 077-0941-xx)
QCloud Third Party Software License Notice Document (Tektronix part number, 001-1653-xx)
QCloud Automated Video Content Verification System User Manual 3

Preface Preface
4 QCloud Automated Video Content Verification System User Manual

Getting started Product description
Product description
This is a media testing product which runs either on a single computer or on a cluster of two or more
dedicated computers connected on a network running Microsoft Windows. This automated video content
verification
parameters. It provides both broadcast and production operations with a fast, cost effective QC solution.
system can be used to check for correct digital encoding and against baseband quality
QCloud can b
management systems and provide a completely automated workflow. A Web based user interface allows
test results to be viewed from any network connected workstation.
e integrated with your existing infrastructure using the CeriTalk API to interface with asset
System components
QCloud accesses digital media from local storage, such as a local hard drive or DVD, as well as network
storage, such as a Windows file server, FTP server, or s3 bucket.
A QCloud system can be set up in three basic ways:
The first consists of a single self-contained unit which runs all the management and testing processes
of the system.
The second consists of a networked cluster of two or more units, which enables simultaneous
processing of a greater number of files. The networked cluster contains a single Supervisor and one
or more Media Test Units.
The third consists of a cluster of three or more units with high availability (HA) support. QCloud
Enterprise Cluster with high availability (also referred to as an HA cluster) is a QCloud cluster enabled
with support in the case of a Supervisor system failure.
QCloud Automated Video Content Verification System User Manual 5

Getting started Product description
Networking
EC2s (Elastic Computing Clouds) are syste ms on AWS Cloud. In a clustered configuration, EC2s should
be part of a VPC (Virtual Private Cloud).
Clustering topology
6 QCloud Automated Video Content Verification System User Manual

Getting started Product description
Software components
Software components include:
A Web-based user interface, which allows users to create and control Jobs, and to view or report the
results of these Jobs. This interface is accessed over the network by using a Web browser. All you
need to know is the IP address of your computer.
Media test service, which performs media file verification according to the rules you choose.
A database, which provides robust storage of the system entities, including users, Jobs, a nd Job results.
An XML-based control and reporting API known as CeriTalk. CeriTalk allows interaction with
QCloud from within other applications, making it possible to integrate QCloud with other content
management, broadcast automation, and workflow systems.
A Web application server that provides access to the Web interface and runs the core services for
the application.
A license server, which controls the types of files that can be processed and tracks usage of the
various features.
The system tray icon and menu, which provides access to the QCloud Web-based user interface and
allows the application to be started and stopped. The system tray icon is not available when QCloud is
installed as a Windows service.
ud as a standalone system
QClo
A standalone system is a single machine that combines the functions of a Supervisor unit and a Media Test
. The process that carries out the media file testing is known as the Media Test Client (MTC).
Unit
QCloud Automated Video Content Verification System User Manual 7

Getting started Product description
QCloud enterprise cluster
The Supervisor unit controls the cluster system. It hosts the database and the Web server, allowing
multiple users to set up and view Jobs. It is responsible for locating the media files from the network, but
delegates actual transfer and processing of these files to one or more Media Test Units. The Supervisor
unit organiz
Each Media Test Unit is responsible for processing the digital media files in a networked cluster. It
applies the
process the files.
es and stores the resulting outputs.
user-specified tests, and reports back the results. The Supervisor can also be configured to
On an AWS Cl
oud, the following configurations are required for a QCloud enterprise cluster to function:
Security groups configuration within a VPC for QCloud
A security group is a firewall that regulates the flow of traffic across the EC2s within a VPC network on
Cloud. Each EC2 can be associated with a particular available security group. The security group contains
a set of rules that allow or disallow inbound and outbound traffic to those EC2s. Multiple security groups
can be configured within a VPC. The security group should be configured in such a way that it allows
both inbound and outbound traffic across a cluster of EC2s. At the same time, it secures the systems
from ex
ternal communication.
Example configuration of a security group
In the EC2 management console, open EC2 dashboard. Click on the “Security Groups” option under the
“Network and Security” section. This will list down all the available security groups. Note that this list
displays the “Group Id” for each of the security groups. Select the security group to be updated with the
rules. The lower panel will display the security group details.
to set inbound rules. The following procedure shows you how to set inbound rules.
How
1. Select the “Inbound” tab.
2. Select “Custom TCP rule” from the “Create a new rule” selection box.
3. In the “Port Range” text box, enter 0-65535. This will open up all available ports on TCP.
4. In the “Source” text box, enter the ID of the security group. Each security group will come with an
id assigned to it in the form E.g.-<abcd1234>. This is same as the one displayed under “Group Id”
column mentioned above for this security group.
5. Setting Outbound rules: 1: Select the Outbound tab. 2: Select “All TCP rule” from the “Create
a new rule” selection box. 3: In the “Source” text box, enter 0.0.0.0/0 Basically this rule allows
all TCP traffic between the EC2s that are associated with this security group. Also, this allows all
trafficfromtheEC2totheoutside.
8 QCloud Automated Video Content Verification System User Manual

Getting started Product description
How to set outbound rules. The following procedure shows you how to set outbound rules.
1. Select the Outbound tab.
2. Select “All TCP rule” from the “Create a new rule” selection box.
3. In the “Source” text box, enter 0.0.0.0/0 Basically this rule allows all TCP traffic between the EC2s
that are associated with this security group. Also, this a llows all trafficfromtheEC2totheoutside.
QCloud Automated Video Content Verification System User Manual 9

Getting started Product description
QCloud high availability enterprise cluster
The QCloud high availability enterprise cluster (also referred to as an HA cluster) is a QCloud cluster
enabled with support in the case of a Supervisor system failure. In an HA cluster, one of the member units
of the cluster is configured as a backup to the Primary Supervisor and is called the Secondary Supervisor.
If QCloud on the Primary Supervisor goes down for any reason (for example, du
Secondary Supervisor automatically takes over and manages the cluster. All other units (MTUs) now form
a cluster with the Secondary Supervisor. Once the Primary Supervisor recovers, it w ill assume the role of
the Secondary Supervisor and will be ready to take over when the current Supervisor goes down.
The Secondary Supervisor is a part of the HA cluster and can also process files like the Primary Superviso
and the MTUs in the cluster while performing the job of a Secondary Supervisor.
In an HA cluster, it is mandatory to attach an additional network interface for the EC2 that acts as Primary
supervisor prior to installation. The private IP of this additional attached network interface should be used
for communication (Ceritalk/Web UI). The private IP address of primary network interface (which is pre
configured with an EC2) should be used for QCloud cluster communication.
When starting an HA cluster, the cluster units should be started in the following order:
1. Primary Supervisor
2. Secondary Supervisor
3. Media Test Units: these should be started one by one after both the Primary Supervisor a nd Secondary
Supervisor are started
etoamachinecrash),the
Cloud level and EC2 level configurations required before installation of the HA cluster units
The following are the configurations that need to be in place before QCloud is installed on EC2 systems.
r
1. Define IAM role in the Amazon AWS Cloud console as follows:
a. In the console, get the IA
b. Create a new role using the “create new role” option in this page.
c. Select this newly created role and create a new policy for this role. For this, se
created above a nd click on Attach Role Policy button at the bottom of the dashboard. In the UI
that comes up, select “Custom Policy” option and click on Select next to it. In the Set Permissions
window, enter a name for this policy and copy the below lines in the “Policy Document” text box.
These lines set the permission for QCloud to attach and detach network interface which is required
for the functioning of HA and access of web UI using the single Ceritalk IP address even after
fail over.
{ "Version": "2012-10-17", "Statement": [ { "Action": [ "ec2:AttachNetworkInterface",
"ec2:DetachNetworkInterface" ], "Effect": "Allow", "Resource": "*" } ] }
d. Click on “Apply Policy” button and this policy will now be displayed under the “Permissions tab”.
2. Create EC2 instances with the IAM role attached as follows:
a. After setting up the IAM role mentioned above, now the user should proceed to create EC2
instances required for the HA cluster. During the creation of the instance, an option is provided
M dashboard.
lect the new role
10 QCloud Automated Video Content Verification System User Manual

Getting started Product description
for the user to select the IAM role. This will be a drop down control that will display all the
configured IAM roles. The user should select the IAM role that has the above policy created in
it and proceed
existing instance if it is not attached during the creation of the instance. Hence, the IAM role with
the mentioned policy has to be created before creation of the EC2 instance and attached to the
EC2 during the creation of instance.
3. Create an external network interface and select IP addresses during the installation of the Primary
Supervisor as follows:
a. The HA cluster requires at least 2 Network Interface Cards to be present on the system where
primary supervisor is installed before the start of the installation of QCloud. This second network
interface card should be an externally added network interface after the creation of the EC2
instance and before starting QCloud installation on Primary Supervisor. While creating the
external
address for that network interface.
creating the EC2 instance. Please note: The IAM role cannot be attached to an
network interface, it is possible to assign an IP address of your choice as private IP
b. The inte
network interface card. The private IP address associated with this interface should be selected
as the network interface for cluster formation during the installation of the QCloud Primary
Supervisor in the Supervisor settings installation screen.
c. The private IP address associated with the externally attached network interface card should
be selected for the Ceritalk\web UI communication during the installation of QCloud primary
supervisor in the Supervisor settings installation screen.
4. Update hosts file with IP Address and hostname combination as follows:
a. The IP address and h ostname combination have to be updated into the hosts file for the IP address
resolution during cluster formation. This detail of all the units in the cluster needs to be updated
into the hosts file of primary and secondary supervisor. The details of primary and secondary
supervisors need to be updated into the hosts file of all the MTUs. The hosts file is found in
c:
address and not the Ceritalk\web UI communication IP. This will be the IP address selected for
cluster formation during the installation.
rface that comes along with the EC2 instance during EC2 creation is called the primary
\windows\system32\drivers\etc folder. Please note: This should be the cluster formation IP
QCloud Automated Video Content Verification System User Manual 11

Getting started Product description
Clustering requirements
Two or more PCs with 64-bit Windows Server 2008 SE OS installed.
Administrator privileges on all the machines on which the QCloud software will be installed.
All of the systems with QCloud installed need to meet the minimum hardware specifications.
All of the cl
same network (VPC) as the Supervisor unit. It is recommended that each cluster unit be configured
with Static IP addresses.
All of the PCs in the cluster should be able to route to each other. The Supervisor unit and the
Secondary Supervisor unit (in the case of an HA cluster) each need to be given a network name that is
recognized and resolved by all of the units in the clus t er.
You should know the NetBIOS name of the Supervisor unit and the Secondary Supervisor unit and
provide these when the installer of the other units in the cluster asks for the names of the Supervisor
and Secondary Supervisor units.
Time synchronization between all the units in cluster must be maintained. For example, use an NTP
server to synchronize the units in a cluster.
All the units in the cluster should be configuredtobeinthesametimezone.
ustering PCs, Media Test Units, and Secondary Supervisor unit should reside on the
12 QCloud Automated Video Content Verification System User Manual

Getting started Product description
Clustering scenarios that may not work
Clusters may not work in the following scenarios:
If a Media Test Unit or Secondary Supervisor cannot resolve Supervisor host name.
In the case of an HA cluster, if the Supervisor can not resolve the host name of the Secondary
Supervisor and vice versa.
If the Supervisor does not have a host name or if the Supervisor has a host name with Japanese
or Chinese characters.
If a network has another system with the same host name as the Supervisor (or Secondary Supervisor)
system.
If the host name of the Supervisor (or Secondary Supervisor) changes after cluster installation.
If the htt
p port on the Supervisor is configured to a different port number after cluster installation. In
this case, the property cerify.supervisor.httpport in the system.properties on the Media Test Units must
be changed to the new port number.
If the http port on the Supervisor is configured differently than that of the Secondary Supervisor.
If the p
rivate IP addresses of any units in the cluster change after the installation. In this case, the
property cerify.jboss.bindaddress must to be changed to the current IP address.
case of a normal (non-HA) cluster, if the Supervisor has multiple network interfaces connected
In the
to the same network and if DNS/WINS are not configured properly, troubleshoot this problem by
adding an entry containing the Supervisor host name and the IP address used by QCloud on Supervisor
in "hosts" file, which can be found in
C:\WINDOWS\system32\drivers\etc in all the Media
Test Units.
QCloud Automated Video Content Verification System User Manual 13

Getting started System installation
System installation
This section provides details of hardware, software and user prerequisites for the system and instructions
on performing the software installation.
Prerequisites
Hardware prerequisites
QCloud is designed to be run on a variety of hardware. Consequently, the choice of hardware is determined
by performance and throughput requirements for your installation.
This section recommends hardware configuration for some situations in which QCloud is typically used.
QCloud can be installed as either of the following two configurations on a given computer:
QCloud c
performance requirements that are expected from such installations, it is recommended that server class
hardware and operating systems be used in such cases.
In addition to the throughput required, the hardware requirements also depend heavily on the mode of
operation that will be used. QCloud can operate in two modes:
The mode of operation that applies to your QCloud installation depends on the file formats you would like
test and other work flow and connectivity related constraints that might apply to your situation. See the
to
Modes of Operation
he functional differences between these two modes of operation impact primarily on the disk space
T
availability and disk configuration requirements. Specifically, the copying mode requires a greater amount
of disk space and high levels of concurrent read/write performance from the hard drives in order for best
overall performance while the streaming mode can derive comparable overall performance with a lesser
amount of disk space and lower read/write efficiency.
an test one or more media files at a time on a single unit. Due to the high throughput and
Streaming mode
s mode, media files are read directly from the media server hosting the file and are not copied to
In thi
the local hard disk of the QCloud system.
ing mode
Copy
Media files are copied to the local hard disk of the QCloud system as soon as processing begins
when sufficient data are available.
and
(see page 273) for a detailed discussion on the factors that influence this.
The general guidelines that should be followed when selecting hardware are:
Processor: 3 GHz
QCloud is capable of using as many processor cores as available for improved processing performance.
While the minimum required configuration is 1 core per channel, for optimum performance, it is
14 QCloud Automated Video Content Verification System User Manual

Getting started System installation
recommended to allocate between 4 and 6 processor cores per QCloud channel. It is also recommended
that for best performance, you choose as much on-chip memory cache as possible.
NOTE. QCloud i
Intel based server platform.
Memory:
It is recommended to use a minimum of 4 GB of RAM per channel and an additional 4 GB for
the operat
recommended memory therefore is: 4 x 4 GB (per channel) + 4 GB = 20 GB. W he n the expected
load in QCloud is likely to be largely composed of huge media files, more memory per channel
may be necessary.
Hard disk drive:
It is recommended to configure 500 GB of EBS storage for QCloud to work optimally. The installation
of QCloud should be done on this EBS storage where the QCloud database also resides.
The amount of additional storage you need depends on the mode of operation that applies to your
installation, the average size of the files you will be processing and the number of simultaneous files
being processed. It does not need to be persistent storage, so you can use EC2's Ephemeral Storage
when it is available.
Streaming mode
Due to the minimal hard disk utilization when operating in the streaming mode, it is sufficient to
provide a disk space of 100 GB in size as temporary storage for QCloud.
s optimized for Intel processor architectures, and therefore it is recommended to use an
ing system and the QCloud database. For optimum performance for 4 channels, the
Copying mode
The minimum disk space provided must be greater than the average file size being processed
multiplied by the number of channels.
Network interface: 1 Gbit/s
Supported platforms
Windows Server 2008 64-bit
Windows Server 2008 R2 64-bit
NOTE. QCloud is expected to operate correctly on other variants of Windows as well, but it has been
qualified only on the ones specified above.
QCloud Automated Video Content Verification System User Manual 15

Getting started System installation
Software prerequisites
The computer on which the application is installed will need the following:
To run one of the Supported Platforms.
To access the system through its Web user interface from another computer on the network, the client
computer must have a Web browser installed.
NOTE. To access the application, the preferred Web browser is Microsoft Internet Explorer
and 8.0). The application has also been tested with Mozilla Firefox. There may be minor visual differences
in the appearance of the user interface in different Web browsers.
(version 7.0
16 QCloud Automated Video Content Verification System User Manual

Getting started System installation
Software inst
Before installing Q Cloud, you should be aware of the following information:
It is recommended that the QCloud application be installed on a machine where it can be used as the
sole running application. QCloud makes intensive use of both CPU and memory and will considerably
degrade the p
services simultaneously will degrade the performance of QCloud and increase the time taken to
process a media file.
QCloud relies on third-party software applications that are packaged and installed with it: JBoss and
MySQL. If these applications are already used on the computer, you should remove them before
attempting to install the QCloud.
QCloud uses a number of network services that are local to the host computer. These services can
sometimes be blocked by personal firewall software, in which case an error message will be displayed
when QCloud starts.
In such situations, configure the firewall to allow the service on the appropriate port, or alternatively
disable the firewall entirely.
An installation log is written to the "%userprofile%\QCloud\QCloudInstallationLogs_<Timestamp>"
folder. T his log gives details of selections you made during t he install and any errors encountered
in case of failure to install.
QCloud should be installed on a EBS location.
allation
erformance of other running applications. Similarly, running other applications or
While choosing the location for storing temporary video files during installation, make sure that
thereissufficient free space in this folder to store large video files. EC2's Ephemeral Storage can be
used to store temporary video files.
QCloud uses the computer name (as stored in the environment variable named "COMPUTERNAME")
to uniquely identify some of its network services. This will not work if non-ASCII characters are
ed in the computer name.
us
QCloud will fail to run if any other Web services using port 80 are running on the system where the
Cloud is installed (for example, the IIS Admin service, Skype or Apache). You can run QCloud once
Q
you shut down the other port 80 services running on the system. Alternatively, you can configure the
QCloud Web port to use a port other than 80.
It is not possible to install a lower version of QCloud when you have a higher version of QCloud
already installed. For example, if you install QCloud version 7.7 and then you want to go back to
QCloud version 7.6, you will need to first uninstall QCloud 7.7 and then install QCloud 7.6.
Installing QCloud
The installation of the QCloud application takes several minutes; typically between 3 and 5 minutes
depending on the speed of your computer.
CAUTION. To prevent installation problems, be sure to read about the known installation limitations.
Installation Issues to Consider
QCloud Automated Video Content Verification System User Manual 17

Getting started System installation
To install QCloud, you need to perform the following steps:
1. Run the QCloud Installer.
2. Optional: Install Apple QuickTime Player. If QCloud is running while Quicktime Player is installed,
you will need to restart QCloud for Quicktime player to be available to QCloud for file processing.
18 QCloud Automated Video Content Verification System User Manual

Getting started System installation
Running the QCloud installer.
Ensure that you are logged in as a user with administrator privileges.
NOTE. If you try to install the QCloud application without administrator privileges, the following message
appears: “The QCloud application can be installed or uninstalled only by a system administrator. Please
loginasadmi
Copy the QCloud installer (QCloudSetup<version>.exe) onto the EC2 where QCloud needs to be
installed
click on the copied installer file. Follow the on-screen instructions to perform the installation.
NOTE. If you try to install the QCloud application on an unsupported platform
(refer to Supported Platforms
Windows operating system. QCloud will probably operate correctly but has not been validated on this OS.
Do you wish to continue installation?”
A number of third party software applications are installed during the installation process. Most of these
are not visible, but you will be notified as the WinPcap is installed.
nistrator and try again”.
. You can download the installer from the Tektronix web site from the EC2 itself. Double
(see page 15)), then the following message appears: “This is not a supported
NOTE.
collect support diagnostics to troubleshoot networking issues with QCloud. For more information on
support diagnostics, refer to Capturing QCloud Status Information Using the Support Monitor Script
(see page 261).
WinPcap is not used in the normal operation of the QCloud application. It is used when you
QCloud Automated Video Content Verification System User Manual 19

Getting started System installation
Installation options
QCloud can be installed in the following ways:
Standalone
Supervisor (for an Enterprise cluster): The Supervisor unit controls the cluster system. It hosts the
database and the Web server, allowing multiple users to set up and view Jobs. Use this option to install
the Supervisor for a normal cluster (without high availability support).
Media Test Unit (for an Enterprise cluster): Each Media Test Unit is responsible for processing the
digital media files in a networked cluster. Use this option to install Media Test Units for a normal
cluster (without high availability support).
Supervisor (for an HA cluster): Use this option to install the Primary Supervisor for an HA (high
availability) cluster.
Secondary Supervisor (for an HA cluster): Use this option to install a Secondary Supervisor for an
HA (high availability) cluster, which will act as the Primary Supervisor if the Primary Supervisor
system goes down.
Media Test Unit (for an HA cluster): Use this option to install Media Test Units for an HA (high
availability) cluster.
NOTE.
installer provides the list of IP addresses and asks the user to select the IP address to be used by QCloud.
Whil
also provides the option to select the IP address for communication (such as the IUP address used for
communicating with QCloud through either Ceritalk or the Web user interface). Make sure to choose the
IP address of the additional attached network interface for this purpose. Do not select the IP address of
the primary network interface that came with EC2 by default for communication.
The installer also provides an option to install QCloud as a service. This option is selected by default. If
you want to install QCloud in application mode, this option needs to be deselected.
During the installation of QCloud, if there are multiple network interfaces in the system, the
e installing the Supervisor and the Secondary Supervisor (in the case of an HA cluster), the installer
20 QCloud Automated Video Content Verification System User Manual

Getting started System installation
Customer reference ID. The screen containing the selection for installation options also contains the field
to enter the Customer Reference ID. Enter the Customer Reference ID provided in the entitlement e-mail
sent from Tekt
to be specified for standalone and supervisor (primary supervisor in the case of HA enterprise cluster)
installation.
ronix. This is used for licensing authentication purposes. The Customer Reference ID has
Installing QCloud as a Supervisor. Follow the steps described in Run QCloud Installer
and Installing QCloud (see page 17) to install QCloud as a Supervisor. During the installation, a dialog
box appears
To continue with the Supervisor installation for a normal Enterprise cluster, select Supervisor under the
option “En
To install the Supervisor for an HA cluster, select Supervisor under the option “High Availability
Enterpri
During the installation, a dialog box appears where you must:
Specify the Customer Reference ID.
Choose the IP address to be used by QCloud.
Choose the IP address to be used for all QCloud communication. This option is available only while
installing the Supervisor for an HA cluster.
Enter the host name of the Secondary Supervisor. This option is available only while installing the
Supervisor for an HA cluster.
Enter the host names or IP addresses for all the Media Test Units.
Installing QCloud as a Secondary Supervisor. Follow the steps described in Run QCloud Installer
page 19) and Installing QCloud (see page 17) to install QCloud as a Secondary Supervisor for an HA
uster. During the installation, a dialog box appears with the list of installation options.
cl
with the list of installation options.
terprise Cluster” in the installation options dialog box.
se Cluster” in the installation options dialog box.
(see page 19)
(see
To continue with the Secondary Supervisor installation, select Secondary Supervisor under the option
igh Availability Enterprise Cluster” in the installation options dialog box.
“H
During the installation, a dialog box appears where you must:
Choose the IP address to be used by QCloud.
Choose the IP address to be used for all QCloud communication.
Enter the host name of the Supervisor.
Enter the host names or IP addresses for all of the Media Test Units.
QCloud Automated Video Content Verification System User Manual 21

Getting started System installation
Installing QCloud as a Media Test Unit. Follow the steps described in Run QCloud Installer (see page 19)
and Installing QCloud (see page 17) to install QCloud as a Media Test Unit. During the installation, a
dialog box app
To continue with the Media Test Unit installation for a normal Enterprise cluster, select Media Test Unit
under the “En
To continue with the Media Test Unit installation for an HA cluster, select Media Test Unit under the
“High Avail
During the installation, a dialog box appears where you must:
Enter the host name of the Supervisor.
Enter the host name of the Secondary Supervisor. This option is available only while installing Media
Test Unit for an HA cluster.
Choose the IP address to be used by QCloud.
Configuring a non-HA cluster. To co nfigure a non-HA cluster, you must:
Install QCloud as a Supervisor on the system which must be configured as supervisor of the cluster.
Install QCloud as a Media Test Unit on one or more systems.
ears with the list of installation options.
terprise Cluster” option in the installation options dialog box.
ability Enterprise Cluster” option in the installation options dialog box.
When installing QCloud as a Media Test Unit, the installer prompts you to enter the Supervisor host name.
You can also configure multiple clusters on the same network. To configure multiple clusters on the same
network, you need to install multiple Supervisors. During a Media Test Unit installation, in the QCloud
System Settings dialog box, you must enter the respective Supervisor host name.
NOTE. To c o nfigure a cluster, the versions of QCloud on the Supervisor and the Media Test Unit should be
the same. Once the installation is complete, QCloud will be started on both the Supervisor and the Media
t U nit. Access Supervisor using QCloud Web UI and navigate to the Admin page, click the Media Test
Tes
Units link to the page containing the list of Media Test Units.
22 QCloud Automated Video Content Verification System User Manual

Getting started System installation
Configuring an HA cluster. To co nfigure an HA (high availability) cluster, you must:
Install QCloud as a Supervisor by choosing Supervisor under the “High Availability Enterprise
Cluster” option on the system that is to be configured as the Primary Supervisor of the cluster.
Install QCloud as a Secondary Supervisor by choosing Secondary Supervisor under the “High
Availability Enterprise Cluster” option on the system that is to be configured as the Secondary
Supervisor of the cluster.
Install QCloud as a Media Test Unit by choosing Media Test Unit under the “High Availability
Enterprise Cluster” option on one or more systems.
When installing QCloud as a Media Test Unit for an HA cluster, the installer prompts you to enter the host
names of the Supervisor and Secondary Supervisor systems.
NOTE. To c
Supervisor, and the Media Test Units should be the same. Once the installation is c omplete, QCloud will
be started on the Supervisor, Secondary Super visor, and the Media Test Units. Access the Supervisor
using the QCloud Web UI and navigate to the Admin page. Click the Media Test Units link to the page
containing the list of Media Test Units.
Upgrading and uninstalling a cluster. The following list provides information about upgrading and
uninstalling a cluster.
Upgrade QCloud on the Supervisor by running the latest version of installer and choosing Supervisor
as installer type. You can upgrade to either Supervisor for a normal Enterprise cluster or to Supervisor
for an HA cluster by choosing the appropriate options.
Upgrade QCloud on the Secondary Supervisor by running the latest version of installer and choosing
Secondary Supervisor as the installer type.
Upgrade QCloud on all of the Media Test Units by running the latest version of installer and choosing
Media Test Unit as the installer type. You can upgrade to either Media Test Unit for a normal
En
Refer to the Software Upgrade
To uninstall a cluster, do the following:
Uninstall QCloud on the Supervisor.
onfigure an HA cluster, the version of QCloud that is installed on the Supervisor, Secondary
terprise cluster or to Media Test Unit for an HA cluster by choosing the appropriate options.
(see page 27) section for instructions on upgrading.
Uninstall QCloud on the Secondary Supervisor (in the case of an HA cluster).
Uninstall QCloud on all of the Media Test Units.
Refer to the Software Uninstallation
QCloud Automated Video Content Verification System User Manual 23
(see page 26) section for instructions on uninstallation.

Getting started System installation
Installation folders. During the installation process, select the following locations:
Installation location: The folder where the application is installed. You will need to choose an EBS
location as the installation location. It is possible to install QCloud on the root drive on an EC2
because the root drive of a Windows EC2 instance is always on EBS. But the default root drive has
only 30 GB of d
the database). Therefore, it is recommended to installQCloudonanEBSlocationthathasatleast
500GBofdiskspace.
Temporary storage location: Before processing media files from an external server, QCloud may
need to copy the remote files to the computer on which the QCloud application is installed. This folder
is used as the location to store such temporary copies. QCloud copies the file only when operating in
copy mode and accesses the file using the ftp://, smb://, or s3:// protocols. See Modes of Operation
(see page 273) for help determining the mode that applies to your installation.
isk space, which may not be enough for QCloud installation (which also includes
NOTE. Th
this temp folder can be on EC2's ephemeral storage.
If you w
select a location that has read and write permissions for those users. A temporary directory located within
a users private directory is not suitable in this case.
ereshouldbesufficient free space in the temp folder to store large video files. The location for
ould like multiple users to be able to run the QCloud application on the computer, make sure to
24 QCloud Automated Video Content Verification System User Manual

Getting started System installation
By default, the number of files that can be simultaneously processed by QCloud is computed as follows:
1. This will be minimum of (RAM – 4) / 4 and “(number of logical processers-1)/2”.
2. For supervisor and secondary supervisor, the number of files that will be processed simultaneously
will be 20% less than the above computed value.
3. For any QCloud instance, if computed values become equal to 0, then only one file can be processed
at a time.
The installer displays the default number of files that will be processed simultaneously for different modes
of installation on one of the screens.
Sometimes, you may need to change the number of files that can be simultaneously processed by
QCloud. You can change this by editing the value of the property “cerify.processorsperbox” in the
“system.properties” file located at
<Installation Director y>/JBoss/server/all/conf.
NOTE. The value for the cerify.processorperbox property can not be greater than the minimum of
(RAM-2)
/2 and (number of logical processors-1). If you configure a greater value, then QCloud will
default the number of files to be processed simultaneously to the minimum of (RAM-2)/2 and (number of
logical processors-1). If you want to disable processing on Supervisor and Secondary Supervisor, then you
will need to set the value of property of cerify.processorsperbox to -1.
Install Apple QuickTime player.
To process Apple ProRes files or to process files using the Generic QuickTime Video template
you have to install QuickTime Player. You can download QuickTime player from the link
http://www.apple.com/quicktime/download/
.
NOTE. If QuickTime Player is already installed, make sure that it is version 7.5.5 or later.
QCloud Automated Video Content Verification System User Manual 25

Getting started System installation
Uninstalling
Before uninstalling the software, ensure that you have administrator privileges. If you try to uninstall
QCloud withou
QCloud can be uninstalled in two ways:
Through Start > Control Panel > Add or Remove Programs.
By rerunning the QCloudSetup<version>.exe that you used to install the current version and
following the on-screen instructions.
NOTE. If the QCloud installer version is higher than the currently installed version, the installation
will be up
If the QCloud installer version is lower than the current installed version, the installer will abort without
taking a
NOTE. The QCloud installation process places the WinPCap utility in the Add or Remove Programs list.
The uni
want to continue to use it for other purposes. If you want to uninstall WinPCap, this can be done in the
usual way from the AddorRemoveProgramslist.
software
t administrator privileges, the process will be aborted.
graded to the newer version.
ny action.
nstallation process does not remove WinPCap in case it is being used by other programs or you
NOTE. If you select the Backup database option during uninstallation, the current database will be
backed up to
sion>_<timestamp>
back up the database. All relevant configuration files will be backed up to
Settings\<username>\QCloud\QCloudConfig_<version>_<timestamp>
abase" option will not be available if you are uninstalling the Media Test Unit, as the Media Test
dat
Unit does not have its own database.
C:\Documents and Settings\<username>\QCloud\QCloudBackup_<ver-
Software reinstallation
To reinstall QCloud, you must uninstall QCloud, and then rerun the installer. Rerunning the installer
that was u sed to install the current version of QCloud will cause QCloud to be uninstalled. It does not
repair the existing installation.
. You are given the option to change the directory where you want to
C:\Documents and
. The "Backup
26 QCloud Automated Video Content Verification System User Manual

Getting started System installation
Software upgr
To upgrade your existing version of QCloud to the latest version, run the setup file for the latest version
of QCloud and f
It is possible to upgrade any type of QCloud installation to any other QCloud installation type (for
example, upg
If you would like to back up the current database while you are upgrading from Supervisor, Secondary
Superviso
process. The current database is backed up to the location
name>\QCloud\QCloudConfig_<version>_<timestamp>
by choosing a different folder for backing up the files.
The upgrade process also backs up relevant configuration files from the current installation. These files
are backed up to
sion>_<timestamp>
When you are upgrading to a Supervisor or standalone QCloud, the database is upgraded automatically
after the installation. If the database upgrade fails, the installer will install QCloud with a clean database
and inform you about the failure. The Backup database option will not be available while upgrading from
Media
Reverting to a previous version
Test Units, as they do not have their own database.
ade
ollow the on-screen instructions.
rading a Media Test Unit to a Supervisor).
r, or Standalone QCloud, choose the Backup database option during the upgrade
C:\Documents and Settings\<User
by default. You may change this location
C:\Documents and Settings\<User name>\QCloud\QCloudBackUp_<ver-
.
In some circumstances, such as a failed software upgrade, you might want to revert to an older version of
QCloud. To do this, follow these steps:
NOTE. You should have a database backup and a copy of configuration files from the version you would
like to revert to as a pre-condition.
1. Uninstall the current version of QCloud. While uninstalling, back up the database by selecting the
Backup database option.
2. Install the older version of QCloud.
3. Restore the database of older version using Database Backup/Restore Utility. For help on how to use
this tool, refer to Database Backup/Restore Utility
Network settings
NOTE. The Q Cloud software does no particular configuration of any network interfaces - IP address,
netmask, DNS, Net BIOS, etc. These should be set using the usual Windows methods.
(see page 259).
QCloud Automated Video Content Verification System User Manual 27

Getting started System installation
Two network interfaces
In most circumstances, the computer on which QCloud is installed requires only one network interface.
There are three scenarios where it is necessary to have two network interfaces:
When the network on which the Web clients will access the Web user interface needs to be physically
separate from the network that stores the media file assets.
When the QCloud system is to access media files from a Grass Valley Profile or K2 server. In this
case, the additional network interface should be connected to the control network that runs the
Grass Valley AMP service. This enables QCloud to list the contents available on the Grass Valley
servers. T
server network as follows:
he first network interface on the computer should continue to be connected to the video
On a stand
of a Universal Interface Module (UIM), if present
On a SAN-
Interface Module, if present
On a SAN
For a K2 network, it is possible to use direct FTP connectivity, in the same fashion as other video
rs. In this case, the AMP control network does not need to be accessed and no additional
serve
network interface is needed.
When i
case, the second network is used for communication to QCloud via Ceritalk or Web user interface.
nstalling a Supervisor or Secondary Supervisor for an HA (high availability) cluster. In this
alone Profile XP, to e ither the Media Ethernet card, if present, or the Ethernet interface
based Profile XP network, to the Gigabit Media network provided by a Universal
-based K2 network or a standalone K2 Media Client, to the Media/FTP network
28 QCloud Automated Video Content Verification System User Manual

Getting started Accessing the application
Accessing the application
Starting the application
Before accessing the Web user interface, it is necessary to start the application. The QCloud application
is typically left running for long periods, even when there are no active users, because new jobs or files
mightneedtobeprocessedduetotheuseofdropboxesorCeriTalk.
To start the application, click the Start QCloud icon. Alternatively, the application may be started from
the Windows Start menu. If QCloud is installed as a Windows service, the startup is controlled via the
Services applet in the Windows Control Panel.
NOTE. QCloud will fail to start if any other Web services using port 80 are running on the system where
QCloud is installed. You can run QCloud once you shut down other Web services running on port 80 on
the system.
The startup time of the QCloud application can be up to 3 minutes. The application has started and is
ready to use when you see a QCloud login page in your Web browser.
To run QCloud, the user should have administrator rights.
You can change the port number used by QCloud b y updating the QCloud system property
“cerify.http.port”. See Configuring the QCloud Application
QCloud system properties.
NOTE. On start up, QCloud reads this port number from “system.properties” and check
this port is not used by any other application. If it finds the port number specified to be in use, an error
message detailing the failure is displayed and startup operation is aborted. If the system cannot find any
value set to this system property, it will use the default port number 80.
Once the application has started, you can access the Q Cloud Web user interface from any computer on the
same network. You can access the Web user interface using the URL
port>
where <http port> is the value set for the property cerify.http.port.
Configuring a license
When the QCloud application is first launched, the page header shows the licensing status as "Unlicensed."
Youwillneedtoconfigure the license. To do this, you will need the Customer Reference ID, User ID,
and Password from the entitlement details supplied to you by Tektronix in an email. Once you have that
information, do the following:
(see page 257) for details on how to update
s to ensure that
http://<IP Address>: <http
1. Install QCloud and specify the Customer Reference ID.
2. Launch the application.
QCloud Automated Video Content Verification System User Manual 29

Getting started Accessing the application
3. Click the Admin tab and go to the QCloud License Settings section.
4. Enter the User ID and Password.
On successful authentication, the page header will show the licensing stat us as "Licensed" and jobs will
start processing.
30 QCloud Automated Video Content Verification System User Manual

Getting started Accessing the application
QCloud Window
QCloud can be optionally configured as a Windows service during installation.
NOTE. You m us
Windows service after the software has been installed.
Controlling of QCloud service
When QCloud is running as a service, you can control the service using the Services applet in the
Windows Control Panel.
Limitations
If a MediaLocation is configured with a mapped network drive, then QCloud configured as a Windows
service cannot access the files in this MediaLocation until the user is logged into the system.
Starting a cluster
m the following steps to start a Cluster:
Perfor
s s ervice
t reinstall the QCloud software if you want to change the configuration to run QCloud as a
1. Start QCloud on the Supervisor unit by clicking Start > All Programs > Te ktro nix > QCloud
tQCloudor start the QCloud service.
> Star
2. Start QCloud on the Secondary Supervisor unit by clicking Start > All Programs > Tektronix >
ud > Start QCloud or start the QCloud service (in the c ase of an HA cluster).
QClo
3. Start QCloud on Media Test Units by clicking Start > All Programs > Tektronix >QCloud Media
tUnit> Start QCloud or start the QCloud service.
Tes
4. Enter the URL http:// <QCloud host name> into your Web browser where QCloud host name is the
pervisor host name. In the case of an HA cluster, you are recommended to use the IP address
Su
instead of the host name of the Supervisor unit, which is configured for the network interface that was
chosen for QCloud communication during the Supervisor installation.
QCloud Automated Video Content Verification System User Manual 31

Getting started Accessing the application
Accessing the
To access the application, you will need a Web browser installed on y our computer.
To access the Web user interface from a remote computer, you need to know the IP address of the computer
on which QCloud is installed in Standalone or Supervisor mode.
In the case of non-HA cluster or Standalone installation, enter the URL http://<QCloud IP
address>
QCloud is i
In the case of HA cluster, enter the URL http://< QCloud communication IP address> into your Web
browser wh
interface that was chosen for QCloud communication during the Supervisor installation.
NOTE. For cluster configuration, Tektronix recommends that the Supervisor, Secondary Supervisor (in the
case of an HA cluster), and Media Test Units are each configured with a static IP Address.
To access the Web user interface in a more convenient fashion on the computer on which QCloud is
installed, click Start > All Programs > Te k tro n ix > QCloud > Launch QCloud Web UI, or from the
corresponding desktop shortcut. This will automatically launch your default Web browser and take you
to the correct QCloud Web page. Alternatively, when QCloud is installed as a Windows application,
you ca
UI. The system tray icon is not available when QCloud is installed as a Windows service.
Web user interface
into your Web browser where "QCloud IP address" is the IP address of the system, where
nstalled in Standalone or Supervisor mode.
ere “QCloud communication IP address” is the IP address configured for the network
n do this by right clicking on the QCloud system tray icon and selecting Launch QCloud Web
NOTE. To access the Web user interface on a Media Test Unit, click Start > All Programs > Tektr onix >
QCloud Media Test Unit >Launch QCloud Web UI.
Logging in to the application
When you access the QCloud Web page, you are presented with the QCloud application login screen.
1. Enter your Username and Password in the login page. Once these credentials have been correctly
supplied, the QCloud Web browser will display the top level Jobs page
2. Use your mouse and keyboard to navigate this Web interface and enter information in the usual way.
NOTE. The d efault user name is “admin” and password is “admin”.
NOTE. If the user name and password are invalid, an error message appears, and you will remain on
the login page. There is no limit to the number of times you can attempt to log in. User names and
passwords are case sensitive, so if you have trouble logging in, check the Caps Lock key. If you forget
your password, contact the QCloud administrator.
(see page 37).
32 QCloud Automated Video Content Verification System User Manual

Getting started Accessing the application
CAUTION. If a session is inactive for a period, you will automatically be logged out. Any attempt to
resume the session will redirect you to the login page.
Logging out o
Click the text that reads Log out in the page header to log out of the application. This returns you to the
login page.
f the application
Limitations with the Web user interface
Windows style paths (E.g. C:\Temp\file.text) are now supported the user interface for creating
MediaLocations and MediaSets. However, they should not be used in Action Templates, where it
is still necessary to use file:// style file names.
Altering the URL or user credentials of a MediaLocation that is being used by one or more MediaSets
may cause inconsistent behavior in the Web user interface. If this occurs, create a new MediaLocation
and recreate the MediaSets that were using the old MediaLocation. Changing the properties of a
MediaLocation that is not yet being used by any MediaSets does not cause any problems.
When setting up Grass Valley MediaLocations, you must specify the username and password to
use to access the Grass Valley server. The system no longer assumes the username "movie" when
fields are left blank.
these
When jobs are restored from being archived they will always have a stopped status. This avoids the
ored job cause unexpected processing if the relevant MediaSet has had media files added since the
rest
job was archived; this would cause a previously complete job to resume proces sing. You can restart
stopped jobs using the Resume action in the drop-down menu at the bottom of the jobs monitor page.
The use of "<", "?", "&", "#", "%", "+" and "\" characters within media file name (or name of the
folder containing the media file) will prevent the media file from being added to a MediaSet . If
this occurs, rename the file (or folder).
The Web user interface has been t ested using Microsoft Internet Explorer versions 7 and 8 and current
versions of Mozilla Firefox 3.0 and Google Chrome.
When creating a MediaSet, the Web user interface file browser might respond slowly if the directory
being listed contains many thousands of sub directories. This situation is typical when using Pinnacle
servers. During this period, the Web browser will show the message “Please Wait.” However, in
some situations the Web browser will also display a warning dialog message indicating that the
page's JavaScript is responding slowly. The message may be safely ignored and the script should be
allowed to continue to completion.
You can use action templates to copy and delete single media files after they have completed
processing. For video servers that store assets using directories (for example, Pinnacle servers), or
referenced formats (for example, Omneon Quick Time files), it is not possible to copy or delete
the entire media clip asset with this mechanism.
Not all files that QCloud is able to process can be played back using VLC. More details can be found
in the "Enabling VLC playback" section of the user manual.
QCloud Automated Video Content Verification System User Manual 33

Getting started Accessing the application
When VLC is being used to playback media files, the client computer (that is, the computer being used
to view the Web user interface and playback the files) accesses the media files using the same media
file URL that QC
For SMB/CIFS access, the shared folder must previously have been mapped on the client
computer. Th
Only standard FTP servers can be accessed. This excludes some video servers, such as Omneon.
This is a lim
Remote VLC players are unable to playback files that were originally processed using the file://
protocol.
playback files processed using the file:// protocol.
loud uses. This has the following implications:
is is a Windows limitation.
itation of the FTP client within VLC
A VLC installation on the same computer that QCloud is installed on will be able to
For b est V
Files cannot be added to a MediaSet if full filename and path total more than 250 characters.
When processing multiple files whose names are identical, even though their paths may be different
(e.g. from Pinnacle servers where all assets are named 'std' and are stored in folders named after an
ID), us
one with the same name at the target location.
UNC no
\\machinename\dir are not considered valid.
LC playback functionality, it is recommended to use VLC Player version 1.1.5 or above.
ing the copy action in the action template will result in files being copied over the previous
tation is not supported in MediaLocation URLs. For example, paths of the form
34 QCloud Automated Video Content Verification System User Manual

Operating Basics Concepts
Concepts
This section introduces the central concepts and entities used within the system. These entities and their
relationships are shown in the following figure.
NOTE. The fol
shows one of each type of entity. In practice, there can be many instances of each type of entity, with each
child entity potentially being used by multiple parent entities.
lowing figure indicates the basic relationships between the entities. For simplicity, the figure
Entities
Users
Before using the system, you must log in with your username and password credentials. These credentials
will have been assigned by a user who has administrator access.
By default, the system is installed with a single predefined user whose name and password are both set
to admin. This user has administrator access. It is recommended that this password is changed the first
time the administrator logs into the system. Administrator access rights allow a user to modify system
properties, and in particular to create and modify MediaLocations
You can find more information about users in the Modify User
page 154) sections.
QCloud Automated Video Content Verification System User Manual 35
(see page 36) and Users.
(see page 153) and New User (see

Operating Basics Concepts
MediaLocations
A MediaLocation is a local or network file storage location from which the system can access media files.
Typically, this would be a directory on the hard drive or a video server that provides FTP or Windows file
share access. To create a MediaLocation, a user must supply its URL and the username and password
required to access this URL. In addition, you must supply a unique name to be used within the system to
identify the MediaLocation.
Only users with administrator access are able to create or modify MediaLocations.
Refer to Admin Page
MediaSets
A MediaSet is a collection of media files that you want to check.
A MediaSet can be a DropBox. A DropBox is a directory that is continually monitored for new media
files. A MediaSet that is not a DropBox is simply a static collection of media files manually selected from
one or more of the MediaLocations.
If a Job is associated with a DropBox, every file that appears in the DropBox over time will be processed.
For additional information, refer to MediaSets
Templates
To check a media file, you must define which checks should be applied when the file is tested. A
Template is a collection of such checks chosen to perform specific tests that you require. The four types
of Te
(see page 153) and MediaLocation Management (see page 154) for more information.
(see page 143).
mplates are:
Container Templates, which apply to the transport/container layer of a media file
Video Templates, which apply to the digital video content of a media file
Audio Templates, which apply to the digital audio content of a media file
Action Templates, which specify actions to be performed as a result of processing a media file
You can create multiple Templates of the same type for different purposes. For example, you might create
a "Movies" Template, which contains a set of rules appropriate for HD MPEG-2 content, and an "on-line
content" Template, which contains a set of rules appropriate for lower resolution H.264/AVC content.
For additional information, refer to Templates
36 QCloud Automated Video Content Verification System User Manual
(see page 81).

Operating Basics Concepts
Profiles
AProfile gathers together a container, video, audio, and action Template, providing a complete set of
checks that can be applied when you want to test one or more media files. Any of the component Templates
can be omitted, depending on your requirements. For example, it makes no sense to apply any container or
audio checks to a media file that consists solely of a video elementary stream.
You can define multiple Profiles for different purposes. Following on from the previous example, you
might create an "on-line content" Profile, which specifies a QuickTime Mov file wrapper in the container
Template, H.264/AVC checks for the video Template, and AAC checks for the audio Template.
Jobs
For additional information, refer to Profiles
A Job is the term given to an individual testing process that can be run by the system. Each Job can
process multiple media filesorasinglemediafile, depending on the requirements of the user. The set of
files processed by a Job is defined by its MediaSet.
By creating a Job, you request the checks defined by a particular Profile be applied to the files in a
particular MediaSet. In addition, you must specify the name and priority of the Job. The system can queue
multiple
The system processes one media file at a time.
How long it takes to process a Job depends upon a number of factors:
Jobs to be run, whereby each Job is scheduled to be processed according to its priority.
The resolution of the video being processed (the larger the picture, the slower the processing)
The video standard concerned (some standards, such as H.264/AVC, take more time to process)
The number of tests selected (performing all the video quality checks can be processor intensive,
because it requires the analysis of every pixel in each frame of video)
The bit rate (in general, the higher the bit rate, the slower the processing)
(see page 78).
Hardware performance of the computer on which QCloud is installed
For additional information, refer to Jobs
(see page 63).
Alerts
Alerts announce any checks that fail as a Job executes. Each alert indicates the severity of the failure,
as well as where and why the check failed. The system gathers alerts associated with a particular Job,
so that you can access the results from the top level and easily navigate to the details, such as which
individual frames have Alerts.
The system organizes and summarizes any alerts raised against a particular Job, so that, at the top level, a
single processing result status can be assigned to the Job. To view more detailed information, you can
drill down through the interface, revealing (for example) which individual frames have raised alerts.
For additional information, refer to Alert Details
QCloud Automated Video Content Verification System User Manual 37
(see page 73).

Operating Basics Concepts
Reports
Reports provide you with a way to query the system database and obtain information in a predefined
format. A Job report presents the results of a particular Job in tabular form.
For additional information, refer to Reports
Archiving
The system allows you to archive entities that are no longer required. MediaSets, Templates, Profiles,
and Jobs can all be archived.
When an entity is archived, it remains present in the database, and can be recovered if necessary. Archived
entities are inactive and usually hidden from view. Inactive entities cannot be used to construct new
entities. So, for example, if a Job is archived before completion, it will not process any pending media files.
For additional information, refer to Active/Archive View Control
Control (see page 45).
Cluster
ing
To increase processing throughput, units can be clustered. Each cluster consists of a single Supervisor
unit an
In a cluste red configuration, the Supervisor unit hosts the database and the Web server. The Supervisor
unit c
interface. The Media Test Units are allocated media files to process by the Supervisor unit. The results of
this processing are stored by the Supervisor unit into a single database.
(see page 151).
(see page 44) and Archive/Restore
d one or more Media Test Units.
ommunicates with the rest of the local network, accessing media files and serving the Web user
Growing file support
QCloud supports the processing of growing file on FTP, SMB, and File protocols. QCloud can start
processing the file as soon as the file copy is started. For more information refer to Growing Media Files
(see page 275).
38 QCloud Automated Video Content Verification System User Manual

Operating Basics Concepts
Audio Loudness correction
QCloud supports audio loudness correction for AC3, Dolby E and PCM (RIFF, BWF) audio types. QCloud
also supports rebundling of corrected audio tracks of type AC3 in the case of MPEG transport streams and
RIFF, BWF and Dolby E formats in the case of AS-02 MXF streams.
Audio is corrected using Dolby audio correction library. AC3, Dolby E and PCM audio templates have
rules for configuring parameters for audio loudness correction. TS and MXF container templates have
rules for configuring rebundling related settings.
If QCloud does not support the rebundling of corrected audio or if the container re bundling settings are
not selected (or not present), then corrected elementary stream will be stored in the asset location with the
name in the format <original_file_name> corrected_ES <track ID>.es. For any reason, if the attempt to
store the
then a copy will be retained in the QCloud temp folder.
corrected file (elementary stream or the re bundled stream) into the original asset location fails,
QCloud Automated Video Content Verification System User Manual 39

Operating Basics Functional overview
Functional overview
This section gives an overview of the QCloud user interface.
System tray icon
When QCloud is installed as a Windows application, the system tray icon appears in the system tray, near
the c lock, once the application is started. The system tray icon is not available w hen QCloud is installed as
a Windows service. The system tray icon provides men u items that allows easy control of the application.
QCloud system tray icon
Left-click the icon to launch the default Web browser and load the QCloud page showing the list of
jobs in it.
Right-click the icon to bring up the system tray icon menu, which provides four options:
Launch QCloud Web UI, which launches the default Web browser and loads the QCloud page
showing the list of jobs in it.
About, which shows the About Box of the application. The About Box displays product details
such as product name, version and copyright information. The About Box can be closed by
simply clicking on it.
Stop QCloud, which stops all job processing and shuts down the application completely. The
application takes about 2 to 3 minutes to shut down completely. Note that shutting down the Web
browser when using the Web user interface does not stop QCloud or stop any jobs running.
CAUTION. Do not stop the application or its component services using the M
Manager. Always use the system tray menu for shutting down the application.
Launch QCloud User manual, which launches the user manual PDF.
icrosoft Windows Task
QCloud system tray menu
40 QCloud Automated Video Content Verification System User Manual

Operating Basics Functional overview
Web user inter
The user interface consists of a structured collection of various types of pages accessed using a Web
browser. The p
elements:
Icons (see pa
Navigation bar (see page 43)
Login Details and AutoRefresh links (see page 43)
Trail widget (see page 44)
Active/archive view control (see page 44)
Archive/restore control (see page 45)
Tables (
Footer (see page 46)
face
ages contain a page header, p age body, and footer. The pages can contain the following
ge
42)
see page
45)
QCloud Automated Video Content Verification System User Manual 41

Operating Basics Functional overview
Icons
The following table lists the icons used in the interface.
Icon Description
Collapse this section
Expand this s
ection
Copy this item
Remove this item
Edit this item
Directory
Fileinadirectory
Obtain co
Status un
ntext sensitive help
known
Failed with fatal error status
Failed with error status
Failed with warning status
Succeeded with no errors or warnings
eated through the QCloud Web user interface
Item cr
Item created through CeriTalk API
ems in this column in descending order
Sort it
tems in this column in ascending order
Sort i
Press this button to trigger the selected action
Add another set of values to the rules
Removes any set of values from the rule
xxx
42 QCloud Automated Video Content Verification System User Manual

Operating Basics Functional overview
Page header
Navigation ba
r. The navigation bar provides a quick route to the top level of any of the pages. The
selected button on this header indicates which top-level page is selected. In the following example,
the Jobs page
(see page 63) is selected.
Navigation bar
Login details and AutoRefresh links.
The login details, located below the navigation bar at the top-right section of the screen, show who you are
logged in as and provide a link enabling you to log out.
The license status of QCloud is also reported in this section. The license information can be one of the
following:
License status Details
Licensed
Unlicensed
xxx
QCloud is fully licensed. Jobs can be processed.
QCloud is unlicensed. The Web interface may be used but
no new Jobs can be started and Jobs in progress will stop.
If QCloud cannot find a license when it starts up, Jobs will
remain in the waiting state until a license can be found. An
additional message will be displayed in the Jobs Monitor
page, above the list of Jobs in this case.
If Q Cloud finds a license when it starts up and later becomes
unlicensed, Jobs will be processed, but will fail because
no license is available.
QCloud Automated Video Content Verification System User Manual 43

Operating Basics Functional overview
Breadcrumb. The breadcrumb allows you to see your position in the hierarchy and to navigate from this
position. For example, the following figure shows that you have navigated three levels down from the
Jobs Monitor
Monitor, Job Details, Processing Result, and Alert Details fields are all links that allow you to quickly step
up one or more levels.
The breadcrumb
see page
(
63) to view the Alert Details (see page 73) for a particular media file. The Jobs
Page body
The body of the page holds the buttons, forms, tables, and reports that are used to query and control
the system.
obs Monitor page body
The J
Active/Archive view control. Jobs
MediaSets
which entities of a particular type to view. Using this control, you can view Active, Archived, or All
tities of a given type. For example, the preceding figureshowsapageofActiveJobs.
en
NOTE. When an entity is archived, it is not removed from the database, but it becomes inactive. Inactive
entities cannot be used to construct new entities.
For example, a new Job
active Profiles
44 QCloud Automated Video Content Verification System User Manual
(see page 143) can all be archived. The Active/Archive view control allows you to choose
(see page 63) can only be constructed from active MediaSets (see page 143) and
(see page 78).
(see page 63), Profiles (see page 78), Templates (see page 81) and

Operating Basics Functional overview
Archive/Restore control. The Archive/Restore control allows you to archive and restore entities. This
control appears below the tables of items on the Jobs Monitor
(see page 63) page for example.
To archive entities, select the corresponding check boxes in the left column of the table, and then click the
Go button on the Archive/Restore Control. The preceding figure shows a user ready to archive three Jobs.
To restore entities from archive, set the Active/Archive View Control
(see page 44) to All or Archived,
whichallowsyoutoselectarchivedobjects. Afterselectingtheitemsthatyouwouldliketorestore,setthe
Archive/Restore Control to Restore from archive, and then click the Go button on the Archive/Restore
Control. You can also delete, stop, and resume entities. For more information, refer to Modifying Jobs
(see page 69).
Select all control. The Select All control is presented as a checkb
ox input associated with the Sel column
header in entity tables in the QCloud Web user interface. This control can be used to select/deselect all
items in the associated table before performing actions on them using the Archive/Restore control.
This control is available on the tables that list Jobs
(see page 63), Profiles (see page 78), Templates (see
page 81) and MediaSets (see page 143).
Tables.
The system displays collections of entities in the form of tables. These tables share a number of common
features.
The leftmost column of the table allows you to select the item.
The arrow icons and allow you t
o sort the table based on values in a p articular column (for
example, sort a table of Jobs based on their Start Time).
The white arrow shows the currently active sort order.
Sorting the table deselects all items.
Clicking the help icon provides information on a particular column.
In the preceding figure, since you have selected to view a maximum number of five rows in a table and
there are more than five active Jobs, table paging controls appear below the table. For information on
changing the t able display preferences, refer to the Options
(see page 152) page.
The highlight indicates that page 1 is the current page.
To select a different page, use the numbered links or the prev and next links.
The following table describes each column in the tables.
Column heading Description
Channel
Shows if a Job or MediaSet was created by a user through the Web user interface
or by an automation system through the CeriTalk API
Copy
Click the copy icon
Creator Shows which user created an item
Creation Time Shows when this Job was created
to copy an item and edit the copy
QCloud Automated Video Content Verification System User Manual 45

Operating Basics Functional overview
Column heading Description
Description
Edit
End Time
Files
File Size Shows the total size of all the files in a MediaSet. Note that QCloud uses "kB", "MB" and
Job Status Shows the status of a Job (for example, Processing)
MediaSet Shows the MediaSet name for this Job
Name
Priority
Profile Shows the Profile name for this Job
Progress
Result
Sel Check the box in this column to select an item to be archived or restored
Start Time Shows when a Job or media file started processing
Status Shows the Active/Archive status of an item
DropBox
xxx
Shows the desc
Click on the edit icon
Shows when a Job or media file finished executing
Shows the total number of files in a MediaSet
"GB" to represent 1024 bytes, 1048576 bytes, and 1073741824 bytes, respectively; a
1000 based system is not used.
Shows the name of an item, as originally entered by the user
Shows a Job priority (for example, High)
Shows the percentage progress of a Job
Shows a Job processing result
Indicates if a given MediaSet is a DropBox
ription of an item, as originally entered by the user
to edit an item
Empty tables. When you navigate to the Jobs page, if no Jobs (see page 63) have been created, or all Jobs
are archived, the page body will appear as shown in the following figure.
No Jobs
Collapsing headings. Some pages contain sections that can be expanded or collapsed to control how much
information is displayed on the page. Click anywhere on a line containing the collapse icon
information. Click on a line containing the expand icon
to view more information.
to hide
Footer
The footer displays a copyright notice and version information.
46 QCloud Automated Video Content Verification System User Manual

Operating Basics Functional overview
Error h andling
Form input errors
The system informs you if a mistake is made while filling an input form. For example, if you attempt
to create a New Job
be redisplayed with an error message. The error message is in red text, next to the invalid fieldonthe
form as show
ninthefollowingfigure.
(see page 64) without supplying any text in the Job Name field, the form will
Input errors
QCloud Automated Video Content Verification System User Manual 47
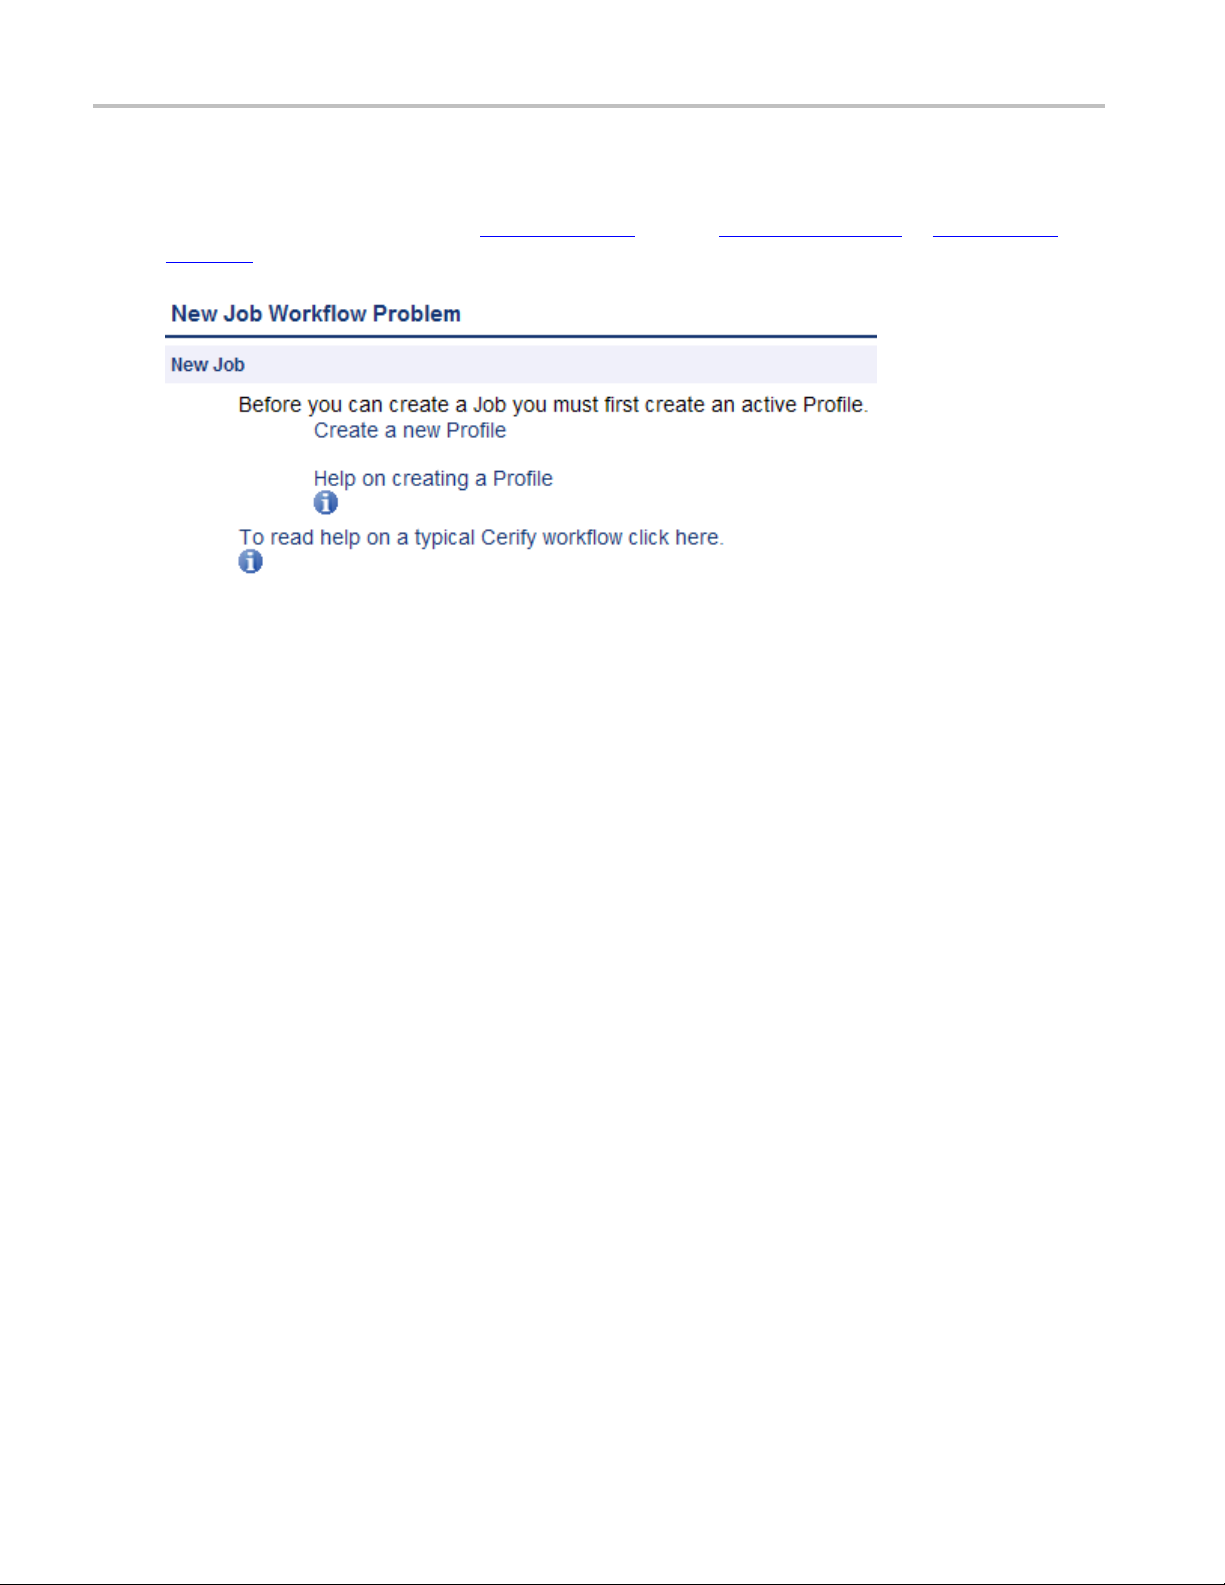
Operating Basics Functional overview
Work flow errors
The system informs you if an attempt is made to perform an operation out of the correct sequence. For
example, if you attempt to create a Job
page 143) has been created, an error page will appear, as shown in the following figure:
Work flow error page
(see page 63) before a Profile (see page 78) or MediaSet (see
Application errors
Occasionally the application is unable to handle a request, in which case it will display the message: An
internal QCloud Error has occurred. You should be able to continue using the application as normal
after this. If the problem persists, contact your local Tektronix representative.
48 QCloud Automated Video Content Verification System User Manual

Operating Basics Tutorials
Tutorials
The following tutorials start from a clean installation and step through the process of creating a new Job
and checking on its progress. To run these tutorials, you will need the following:
Access to a computer with QCloud installed
A QCloud user account with administrator privileges (see page 153)
The tutorials are as follows:
Before You Begin (see page 51): How to start using the system
Creating a
Creating a MediaSet (see page 54): How to create a MediaSet by selecting files from a MediaLocation
Creating a Template (see page 57): How to create a Video Template
Creating a Profile (see page 59): How to create a Profile from your Video Template
Creating a Job (see page 60): How to create a Job from your Profile and MediaSet
Inspecting Job Results (see page 60): How to review the progress of a Job and inspect the Job results
Creati
Archiving (see page 61): How to archive the MediaSet and the Job
Exporting Templates (see page 88): How to export the Video Template
Importing Templates (see page 62): How to import the Video Template previously exported
MediaLocation
ng a Report
(see page 61): How to create a printable report on the Job
(see page 53): How to create a MediaLocation
QCloud Automated Video Content Verification System User Manual 49

Operating Basics Tutorials
Work flow
The following figure indicates the dependencies between the entities that make up a Job. It shows,
for example, t
MediaLocations exist will generate a Work Flow Error
attempt to create a Job when there are no active MediaSets or Profiles.
hat a MediaSet requires a MediaLocation; any attempt to create a MediaSet when no
(see page 48). Similarly, it is a work flow error to
Entity relationships
50 QCloud Automated Video Content Verification System User Manual

Operating Basics Tutorials
Before you beg
1. Start the QCloud application by clicking the Start QCloud icon on your desktop or by using the Start
menu. For info
NOTE. To run this tutorial, you must log in with administrator access. Note that the system comes with a
single user already set up as administrator. The Username and Password are both set to admin.
If a session is inactive for a certain period of time, you will be logged out. If this happens during the
tutorial, you will be redirected to the login page. Log back in to continue.
2. On successful start up, QCloud presents you the login page using your default browser. The following
login page shows a user about to log in to the system at
TIP. On any Web page you can click the help icon
obtain context-sensitive help.
in
rmation about accessing the application, see Accessing the Application
http://134.64.235.216.
(shown below on the right side of the login page) to
(see page 29).
npage
Log i
3. Ent
QCloud Automated Video Content Verification System User Manual 51
er your user name and password into the appropriate fields in the login page and click the Enter
button. After you have logged in, you will be taken to the Jobs Monitor
(see page 63).

Operating Basics Tutorials
The following figure shows what this page looks like when no Jobs are active, which will be the case if
this tutorial is being run from a clean installation.
Jobs Monitor page
The header contains the Navigation Bar
the major
of the Jobs pages.
In addit
The body of the page contains:
areas of the user interface. In this case, the Jobs button is selected, indicating you are o n one
ion, the header shows that you are logged in as admin.
A line of text informing you that there are no Jobs in this view
An Active/Archive View Control (see page 44), allowing you to view any archived Jobs (see page 37)
A New Job button. Clicking this button will generate a workflow error, because you have not yet
created a Profile and a MediaSet. For additional information, refer to Work Flow Errors
(see page 43), which allows you to quickly navigate between
(see page 48).
52 QCloud Automated Video Content Verification System User Manual

Operating Basics Tutorials
Creating a Med
A MediaLocation is a network location from which the system can access media files. Users with
administrato
1. Click the Admin button on the Navigation Bar
page, as show
Creating a MediaLocation
iaLocation
r access can create and modify MediaLocations
(see page 43) to access the Admin (see page 153)
ninthefollowingfigure.
(see page 36).
2. Start creating a new MediaLocation by clicking the Go button next to the text that reads Create
new MediaLocation. You should see a form.
3. Fill in the fields in the form as shown in the following table, and then click Create to create the
MediaLocation.
Field Value
MediaLocation Name
URL
Username
Password
xxx
QCloud example content
D:\streams\DemoStreams
-
-
New MediaLocation
QCloud Automated Video Content Verification System User Manual 53

Operating Basics Tutorials
NOTE. The system validates the MediaLocation details when you click the Create button, checking that the
MediaLocation name is unique, the URL exists, and that the specified user can access files at that URL.
If any of these
to the screen with an error message indicating what the problem is.
checks fail, the MediaLocation will not be created; instead, the form will be posted back
For addition
page 154)
al information on creating MediaLocations, refer to MediaLocation Management
Creating a MediaSet
Now that you have created a MediaLocation, you can create a MediaSet that collects together some of
the files at this location.
1. Click the MediaSets buttonontheNavigation Bar
2. Start creating a new MediaSet by clicking the New MediaSet button. You will see a page like the one
shown in the following figure.
New mediaset
(see
(see page 43) to visit the MediaSets page.
3. Select no for the DropBox mode.
54 QCloud Automated Video Content Verification System User Manual

Operating Basics Tutorials
4. Enter a suitable name for the MediaSet and click Create to create the MediaSet and continue to the
Edit MediaSet
(see page 145), a s shown in the following figure.
Edit MediaSet
The Edit MediaSet page provides details of the files already in the MediaSet (there should be none
yet). It shows directories with a
for you to add new files.
5. Add files to the MediaSet using the directory and file browser.
To reveal the contents of a directory, double-click the directory.
lose the directory and go up a level, open the drop-down menu control at the top right of the
To c
file browser to provide a selection of recent directories.
To select a file, double-click the file icon (it will appear in the Files table).
icon, and files with a icon. The page also provides the controls
QCloud Automated Video Content Verification System User Manual 55

Operating Basics Tutorials
The following figure shows a MediaSet to which three files have been added.
MediaSet containing files
6. You can also add a file to the MediaSet by entering the full path to the file in the File name text
field at th
e bottom of the page.
This path must include the full URL of the file. For example,
port_in
terview.ts
.
D:\streams\DemoStreams\air-
56 QCloud Automated Video Content Verification System User Manual

Operating Basics Tutorials
Creating a tem
To test the files in your new MediaSet, you need to decide which checks to apply. Checks can be applied
to the container or wrapper layer, the video stream, and the audio stream, using container, video, and
audio Templates, respectively.
In addition, using an Action Template, you can define actions to take when files have been checked.
1. Click the Temp l ates buttonontheNavigation Bar
see a page listing the Templates that are present in your current Templates view.
Select video template type
1. Click the New Video Template button to create a new Video Template. You will be prompted to select
a Template type, as shown in the following figure.
plate
(see page 43) to start creating a Template. You will
Select Template type
The Template type you choose depends on the type of video content you want to check.
be the Video Standard used when the video was encoded: for example, MPEG-2 or H.263.
2. Use the drop-down menu to select MPEG-2, and then click th
Video Templ ate page. The New Video Template page is where you define which checks to include in
your Video Template.
e Select button to take you to the New
This type will
New video template
CAUTION. The new Template will not be saved until you click the Create button at the bottom of the
page. When you click Create, the system will check th
prompt you to fix any problems. If there are no problems, the new Template will be created and stored
in the database.
1. Enter a name for the Template, “ News Video”, and optionally a description.
2. Configure the checks to be applied by selecting the check boxes and entering values into the text fields.
(See the following figure for a typical Video Template configuration.) Use the Add / Remove buttons
to configure the Resolution rule with multiple sets of valid values
of the checks performed by each rule, click on the
at the fields you have filled contain valid data, and
(see page 87). For a full explanation
icon next to each rule name.
3. Click the Create button at the bottom of the page to create the new Video Template.
QCloud Automated Video Content Verification System User Manual 57

Operating Basics Tutorials
The following figure shows a typical MPEG-2 Video Template configuration. When this Template
is used to check a video stream, it will check:
The video is MPEG-2 encoded.
The video is encoded using MPEG-2 Main Profile, Main Level.
The video bit stream syntax conforms with the MPEG-2Standard,butanyalertsrelatingtoBuffer
analysis and alert number 22209 will be suppressed.
A maximum of 500 alerts will be displayed.
Each alert type will be displayed a maximum of 20 times.
The video r
esolution is 720 by 480 pixels or 1280 by 1080 pixels.
Video template configuration
For additional information, refer to Video Templates
58 QCloud Automated Video Content Verification System User Manual
(see page 102).

Operating Basics Tutorials
To create an Audio template, the process is very similar as described in the following steps.
1. Return to the Templates page by clicking the Te m plat e s link on the navigation b ar.
2. Click the New Audio Template button to create a new Audio Template. Select MPEG-1 /
MPEG-2 Audio from the select box, and then click the Select button.
3. Enter the name "News Audio" for the Template, and optionally a description.
4. Configure the checks to be applied by selecting the check boxes and entering values into the text fields.
The precise choice of rules and parameters does not matter for the purposes of this tutorial.
5. Click the Create button at the bottom of the page to create the new Audio Template.
Create a Container template using the same steps. When prompted to select the template type, choose
MPEG-2 Transport Stream; otherwise follow the same steps as for the other templates. The p recise
choice of rules and parameters does not matter for the purposes of this tutorial.
Creating a profile
To use your new template in a Job, you must include it in a Profile.
1. Click the Profiles buttonontheNavigation Bar
2. Click the New Profile button.
3. Enter a name and optionally a description for the Profile, as shown in the following figure.
4. Select the Container Template, Audio Template, and Video Template you just created. If you created
more than one audio template, click the Plus icon to display another audio template selection field.
5. Click the Create button to create a Profile.
(see page 43) to go to the top-level Profiles page.
For additional information, refer to Profiles (see page 78).
QCloud Automated Video Content Verification System User Manual 59

Operating Basics Tutorials
Creating a job
Having created a MediaSet and a Profile, you can now create a Job.
1. Click the Jobs button on the Navigation Bar
2. Click the New Job button.
3. Enter a name for the Job. Set the Job priority to "Low", and select the Profile and MediaSet that
you previously created.
4. Click Create to create the Job.
Creating a job
Inspecting job results
(see page 43) to go to the top-level Jobs page.
1. Access the Jobs Monitor page by clicking the Jobs buttonontheNavigation Bar (see page 43).This
page gives feedback on the status of all running Jobs (unless the Job view has been set to Archived).
This feedback includes:
A processing result summary for each Job
Status and progress information for each Job
mmary information about the entities associated with each Job
Su
Timing information for each Job
2. Click the AutoRefresh button in the page header to arrange for the page to refresh periodically
with no further intervention. This is useful when you are monitoring the progress of a large Job that
ight take several minutes to complete.
m
3. Wait for the Job Status to show complete before continuing with this tutorial. This may take several
minutes.
4. From the Jobs Monitor, you can drill down for more details about a Job result. For additional
information on Inspecting Job Results, refer to Job Details
page 71) and Alert Details (see page 73).
(see page 70), Processing Result (see
60 QCloud Automated Video Content Verification System User Manual

Operating Basics Tutorials
Generating a r
1. Access the Reports page by clicking the Reports buttonontheNavigation Bar (see page 43).This
page allows yo
2. In the Enter Jobname field, enter the name of the job that you created.
3. Select the report format. You can select either HTML or PDF (Summary or Complete) report format.
4. Click the Generate button to generate a report on your Job. For detailed description, refer to Reports
(see page 151).
Archiving
1. To archive your Job (refer to Archiving (see page 38)), go to the Jobs Monitor page by clicking the
Jobs butt
a. Select the Job to archive by selecting the checkbox in the left column of the Jobs Monitor table.
b. Make sure that the action drop-down menu under the table reads Archive, and then click Go to
eport
u to generate Job processing reports.
on on the Navigation Bar
archive the Job.
(see page 43).
Archiving a Job
2. To view archived Jobs, set the Active/Archive view control to All or Archived. The table will
be updated to reflect your choice. You can restore archived Jobs from this new view, if required.
MediaSets, Templates, Profiles, and Jobs can all be archived.
QCloud Automated Video Content Verification System User Manual 61

Operating Basics Tutorials
Exporting templates
1. To export your Templates, go to the Templates page by clicking the Te m plat es buttononthe
Navigation Bar
2. Select the Templates to export by selecting the checkbox in the left column of the appropriate
Template table.
3. Click on the Export button at the bottom of the page to export the selected Template.
(see page 43).
4. When prompt
the location you select.
Importing templates
1. To import the XML Template file generated by Exporting Templates (see page 88),gototheTemplates
page by clicking the Templ a tes button on the Navigation Bar
2. Click the Browse button at the bottom of the page to access the Open File dialog.
3. Navigate to the location where the file is, select it, and click Open.
4. Click o
the option If a template of the same name already exists, replace it, and then import the template.
5. The Te
displayed on the Te m plat e s page.
NOTE. There is a range of example templates in the
Templates
you can view them in the Templates page.
ntheImport button to import the selected file. A template with the same name will exist, select
mplates defined in the file will be successfully imported, and a success message will be
directory that may be useful to you. The example templates are preloaded onto QCloud and
ed, select a location to save the Templates file, and click Save.Thefile will be saved to
(see page 43).
<installation directory>/Example
62 QCloud Automated Video Content Verification System User Manual

Reference Introduction
Introduction
This chapter provides a reference guide for users. Itisorganizedinmuchthesamewayastheuser
interface is organized, with sections for each main page and subsections for the subpages.
Jobs
A Job applies the various checks in a Profile (see page 78) against the media files in a MediaSet (see
page 143).
A Job is identified by its unique name. In addition, a Job is assigned a Priority upon creation.
The top-level Jobs page is accessed by selecting the Jobs button from the navigation bar. When you open
this page, you will be presented with a Tabl e
the Archive/Restore Control
will be d
isplayed.
(see page 45). If no Jobs match the current filter, an informative message
(see page 45) displaying Jobs that are filtered according to
Jobs monitor
The Jobs Monitor page provides a top-level view of the status of Jobs. The following figure shows the
status of three Jobs. One Job is succeeded with no errors or warnings; the remaining two have raised errors.
NOTE. In this example, the user has limited both how many rows and which columns of the Jobs Monitor
are displayed.
The Jobs monitor page
QCloud Automated Video Content Verification System User Manual 63

Reference Jobs
From this page it is possible to:
View Job Details (see page 70) for a Job by clicking on the Job name.
View the details for the Job MediaSet (see page 143) and Profile (see page 78) by clicking on the
MediaSet or Profile name.
Create a New Job (see page 64) by clicking the New Job button.
Create a New Job (see page 64) by clicking the copy icon.
Modifying Jobs (see page 69) by clicking the jobs to be modified, selecting the required action from
the Archive/Restore control and clicking the Go button.
New job
The New job page is accessed either by copying an existing Job (see page 63), or by creating a new Job.
TheNewjobpage
You should enter a Job Name,setthePriority, and choose a Profile and a MediaSet, before clicking the
Create button to create the Job.
TION. Jobs cannot be created unless one or more MediaSets
CAU
are active. If this is not the case, then any attempt to create a Job will generate a Work Flow Error
(see page 48).
(see page 143) and Profiles (see page 78)
64 QCloud Automated Video Content Verification System User Manual

Reference Jobs
New s ingle file
To create a new Job against a single file, click New single fi le job in the Jobs page to open the job creation
wizard page sh
The new single file job page
You should enter a Job Name,setthePriority,andenteraMedia Location URL. This url can be any
of the su
accessing the url have to be supplied in the Username and Password text boxes. In the case of s3 u rls, the
access key and secret key for the corresponding s3 bucket have to be supplied.
job
own in the following figure.
pported types such as ftp, smb, and s3 file. In case of the ftp and smb urls, the credentials for
Click the Browse buttontoopenthefile browser page shown in the following figure, which allows you to
select the required file for processing.
QCloud Automated Video Content Verification System User Manual 65

Reference Jobs
The File
After y
the essence details in the stream. After retrieving the stream details, the wizard brings up the Template
Selection page shown in the following figure. This page has the selections for the container and/or video
and/or audio and cross track template based on their presence in the stream.
The template will have both the audio and cross track template selection options if the presence of audio
is detected in the stream. The action template selection will always be present for selection irrespective
of the contents of the stream.
selection browser page
ou select a file, click the Next button, which starts the wizard to partially process the file to retrieve
66 QCloud Automated Video Content Verification System User Manual

Reference Jobs
The Template selection page
Template selection options
Each of the template types has a check box to enable or disable the use of the template for this particular
job. A check in the check box for a particular template type will include this template in the profile for this
job. Each of the template types has the following three options for creating/using a template:
New Template. Use this option to create a new template. When you select this option and click Next,
the Create New Template page opens for the particular essence type that was detected (Container,
o and/or the Audio type).
Vide
New Template Based On. Use this option to create a copy of any existing template. When you select
s option and click Next, a page opens showing all of the available templates (templates already
thi
created and available in the database). When you select a template from the list and click Next,the
Create New Template page opens with the tests from the selected template preselected.
Use Existing Template. Use this option to use an existing template listed in the selection box next to
this option.
QCloud Automated Video Content Verification System User Manual 67
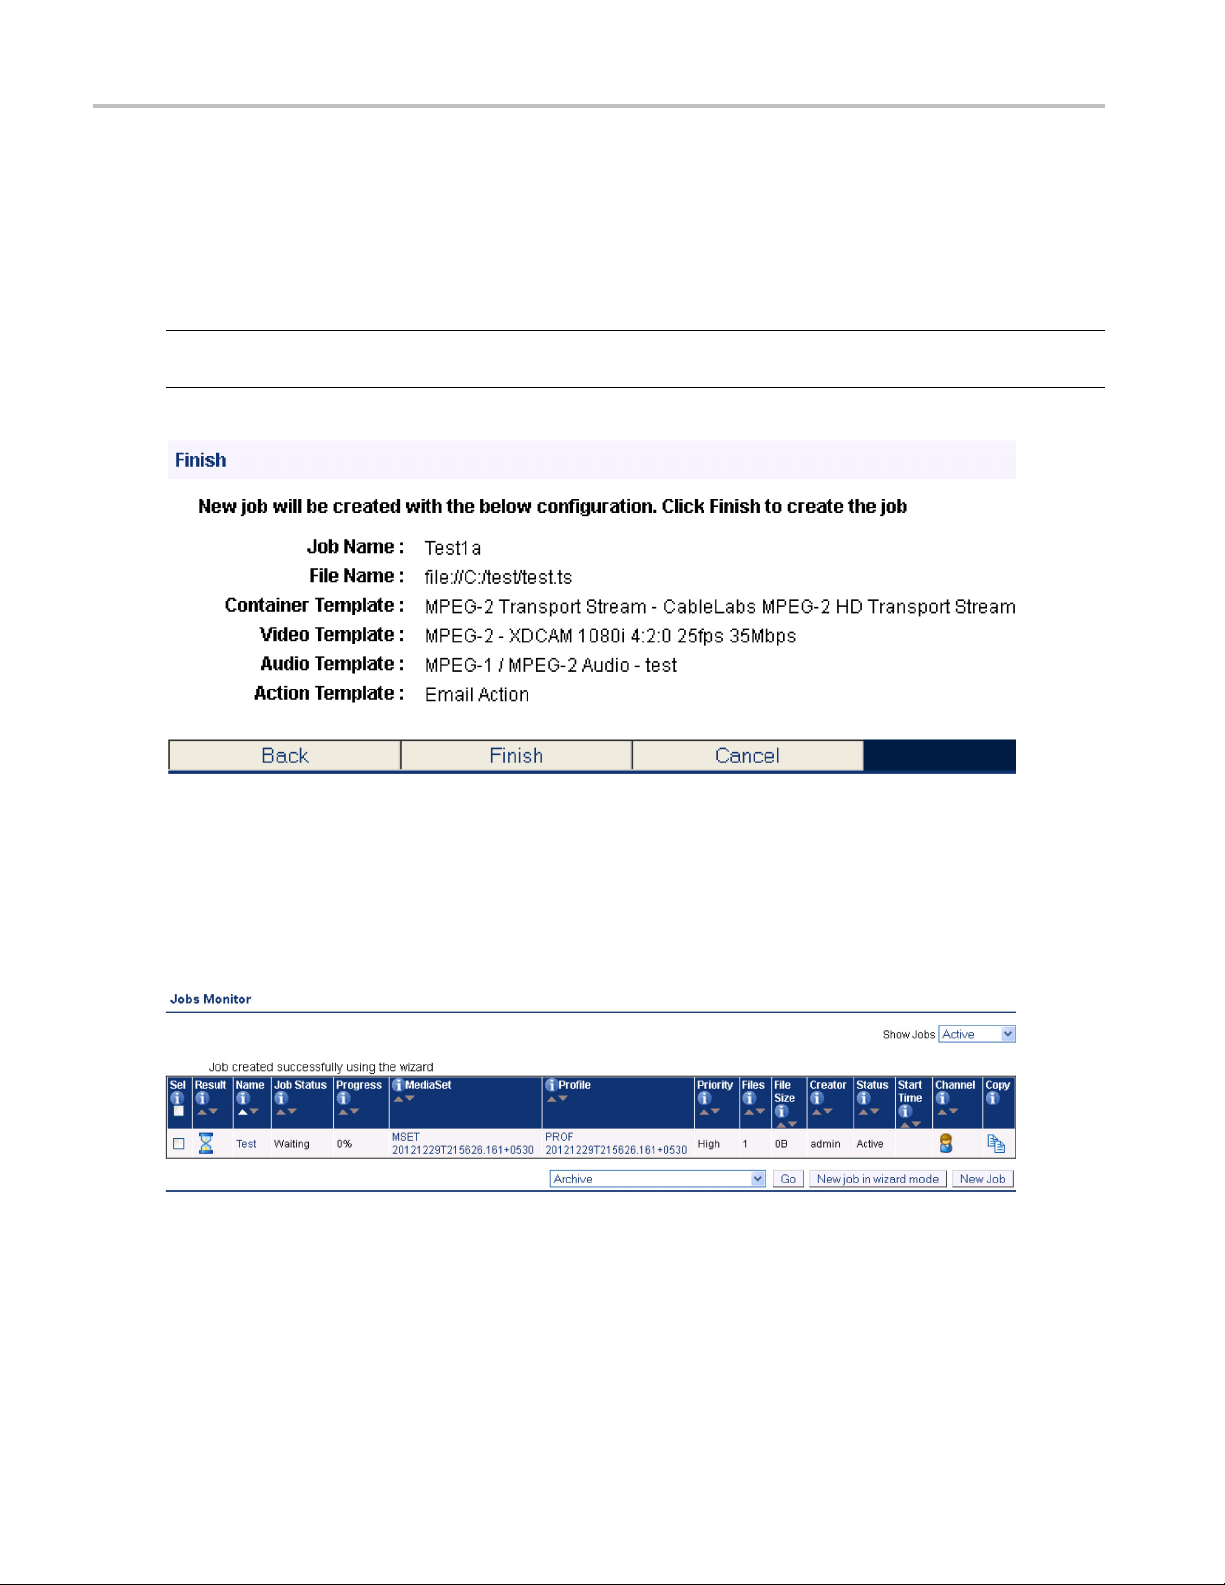
Reference Jobs
From the Create New Template page, click Next to open the Create New Template page for the next
essence type if the next essence type is enabled with the New Template or New Template Based On
option. For ex
Templates Selection page, the Create Container Template page opens. If you click Next on this page, the
Create New Template page for video opens, and so on. When you click Next from the last page of the
template types, the Finish page opens.
NOTE. The Finish page also opens when you click Next in the Templates Selection page with the Use
Existing Template option selected for all of the enabled templates.
ample, with the Container, Video and Audio templates e nabled, if you click Next on the
The Finish page
The Finish page allows you to examine the current preferences and also provides an option to revisit
the preference selections by using the Back button. Click Finish to create a new job. The new job
reated is displayed in the Jobs Monitor page. You can monitor and/or verify the job results from
you c
the Jobs Monitor page.
The Jobs monitor page
68 QCloud Automated Video Content Verification System User Manual

Reference Jobs
Modifying job
It is possible to modify the state of existing Jobs in a number of ways, using the same Archive/Restore
control (see p
To modify a Job, do the following:
1. Select the Jobs you want to modify by selecting the checkbox in the left column of the Jobs Monitor
table.
2. Select the desired action from the action drop-down menu under the table.
3. Click Go to carry out the action.
It is possible to select the following actions:
Archive, Restore from archive. Used to remove from view or restore to view the selected Jobs. Note
that archiving processing Jobs will automatically cause those Jobs to be immediately stopped. When
the Job is removed from the archive, it will remain in the stopped state until the user chooses to resume
the Job. This is to prevent unwanted processing of Jobs occurring when the Job was complete at the
point of archive, but could restart processing when removed from the archive because the associated
MediaS
Stop (finish current files), Stop (immediately). Stop processing the Job. Results of media files
that h
resumed when desired. The first option allows media files that are currently being processed to run to
completion, whereas the second option will immediately terminate all processing. In the latter case,
all results from the currently processing media files for that Job will be removed, and if the Job is
resumed, processing will restart from the beginning of the media file.
s
age
45) that is described in the Archiving Tutorial (see page 61).
et has had new files placed in it.
ave already b een completed will be retained and processing of unprocessed media files can be
Resume. Resume the processing of a stopped Job. Any media files that have not yet been processed
will begin processing.
Setprioritytohigh, Setprioritytomedium, Setprioritytolow. Change the priority of the
selected Jobs to the new priority. This will affect waiting Jobs and the priority which are assigned to
unprocessed media files in currently processing Jobs. Changing Job priorities never causes a currently
unning media test process to be stopped.
r
Delete. Delete the selected Jobs from the database. All the results associated with that Job, including
stream information, alert details and thumbnails, will be permanently deleted. Use the archive
functionality if you want to remove the Job from view, but be able to revisit the results in future.
QCloud Automated Video Content Verification System User Manual 69

Reference Jobs
Job details
The Job details page is accessed from the Jobs Monitor (see page 63) page. It provides summary details for
all the media files in the Jobs MediaSet as shown in the following figure.
This page also provides an option to playback the media files in the Jobs MediaSet. This option becomes
available only w hen the VLC playback
The Jobs details page
(see page 166) feature is enabled.
To see exactly which errors caused the Job to fail, click either the
file name. This will take you to the Processing Result
Clicking the
To play back the media file, it must satisfy the following conditions:
The media file has not moved from the original location from where it was analyzed
The media file has an encoding scheme that is supported by the VLC media player
play button starts the playback of the media file using the VLC media player.
(see page 71) page.
processing result icon or the media
70 QCloud Automated Video Content Verification System User Manual

Reference Jobs
Processing r esults
The Processing results page provides information on the alerts raised by a particular media file. This page
also displays the stream information for the media file concerned. Stream information is grouped into three
separate sections: Container Info, Video Info, and Audio Info. Where there are multiple audio tracks in
the stream, all track information is displayed. You can select the extent of stream information that gets
displayed on this page using the stream information display
Stream information is updated as processing progresses. Many properties (such as "Picture size" or "Video
standard") will be available shortly after processing begins, and others (such as "Length") will only be
available
processing. The values displayed will always be the most recent values encountered in the stream.
If the VLC player has been installed and enabled, you can also play back the media file from this page
by selecting the play button that is available against eligible alerts.
after processing is complete. Some properties may be output and subsequently updated during
(see page 165) setting.
The Processing results p age
You can drill down for more Alert Details
processing result icon or the title of the alert.
QCloud Automated Video Content Verification System User Manual 71
(see page 73) on a particular alert by clicking either the

Reference Jobs
Alert levels
Four different levels of alerts can be reported by QCloud according to the severity of the issue: fatal,
error, warning, and info.
Fatal
A fatal ale rt occurs when it is not possible for the system to complete processing of a media file and the
processing is terminated. This might be caused by something in the media file bitstream, such as a severe
syntax error that makes that stream completely unintelligible or an option being present in the bitstream
that is not
as a license error, or failure to copy a media file off a video server.
Error
An error alert occurs where the media file fails a check specified by one of the Templates that the media
is being checked against. Alerts raised by syntax checking will be given an error status if they have the
potential to prevent correct decoding of the stream. An example of this is where an out of range value
has been used in a bit stream.
supported by the decoder. Alternatively, the alert might be caused by a system problem, such
Warning
Awarn
This might be that a certain number of alerts has been exceeded or that the bitstream is non-compliant in
some minor w ay that almost certainly will not affect the decoding of the stream.
ing alert indicates that there is some issue with the stream, but that this is not necessarily a problem.
Info
Info alerts are relatively rare, and are used to inform users of additional useful information that will not
cause a problem.
72 QCloud Automated Video Content Verification System User Manual

Reference Jobs
Alert details
The Alert Details page provides more information on an individual alert, including thumbnail images of
surrounding frames (where appropriate). The thumbnail images link to full Frame View
of these frames.
(see page 75)
The Alert details page
The table within the details section provides specific details about the alert. Each of the table columns is
outlined below.
Column Description
Level
Alert ID
Location
Start Optional column, only present for quality alerts. For more information, refer to, start and
End
You c an ref er t o alert levels
for detailed description.
Unique alert ID. See alert IDs
This is the position relative to the start of the stream where the alert was generated.
For quality alerts, a more detailed description is given in start and end positions of
quality alerts (see page 74).
The location is displayed in “HH:MM:SS:FF frame n” format in the case of non-drop
frame timecode and “HH:MM:SS;FF frame n” format in the case of drop frame timecode.
end positions of quality alerts (see page 74).
The start time is displayed in “HH:MM:SS:FF” format in the case of non-drop frame
timecode and “HH:MM:SS;FF” format in the case of drop frame timecode.
Optional column, only present for quality alerts. You can refer to start and end positions
of quality alerts (see page 74) for detailed description.
The end time is displayed in “HH:MM:SS:FF” format in the case of non-drop frame
timecode and “HH:MM:SS;FF” format in the case of drop frame timecode.
(see page 72) and their associated icons (see page 171)
(see page 171).
QCloud Automated Video Content Verification System User Manual 73

Reference Jobs
Column Description
Channel Index Optional colu
a multi-channel audio stream, this index will indicate the channel to which the alert
applies. Channel indices start from 1.
Channel Name Optional column, only present for audio quality alerts (see page 125). The name of the
channel to wh
Title
Details
Thumbnail
xxx
Descriptio
Details of t
the test failed.
Thumbnail of the video frame (if available) at the alert location. Click the image to
view the full Frame View
mn, only present for audio quality alerts
ich the alert applies, as given by the audio standard.
n of alert type. This will always be the same for a given alert ID.
he alert specific to this occurrence. This should provide a reason as to why
(see page 75)
(see page 125). When processing
Start and End positions of quality alerts
The quality alerts ( video quality (see page 106) and audio quality (see page 125) ) are special in that they
can apply to a range of video or audio. This is in contrast to most alerts, which have an instantaneous
on. Because of this, quality alerts within QCloud contain the following additional information:
positi
The start position of the error condition
The location at which the error condition exceeded its permitted length
The end position of the error condition
Only one alert will be raised for a given error condition sequence, regardless of length.
Example: A rule is set up to disallow more than 5 seconds of black during video. A video clip has an
unwanted sequence of 30 seconds of black beginning at 1m 20s. QCloud will generate a single video
quality alert with the following information:
Start: 1m 20s - the start of the black sequence
Location: 1m 25s - the point at which 5 second limit was exceeded
d: 1m 50s - the end of the black sequence
En
74 QCloud Automated Video Content Verification System User Manual

Reference Jobs
Frame view
The Frame View Page shows a larger thumbnail image of the Frame. This thumbnail is based upon a down
sampled version of the full frame, using the top field only for interlaced content, so in some cases the
detected artifact may not be visible. Red rectangles highlight any areas of the frame that generated alerts.
The frame time is displayed in “HH:MM:SS:FF” format in the case of non-drop frame timecode and
“HH:MM:SS;FF” format in the case of drop frame timecode.
The "next" and "prev" links at the bottom of the frame image allow navigationacrossframesinthe
film-strip display for the alert. These links are displayed based on the position of the current frame in
the film-st
frame has only the "prev" link on it.
rip. The first frame of the film-strip has only the "next" link associated with it and the last
The Frame View page
Media processing limitations
Cloud can process many kinds of video media. Consider the following limitations before processing
Q
video files:
QCloud Automated Video Content Verification System User Manual 75

Reference Jobs
Some video servers (e.g. Omneon) put a lead-in at the start of a stream with a different VBV buffer size
to the rest of the content in the stream. QCloud always reports the first VBV buffer size it encounters,
making it poss
ible for the reported buffer size to not match the expected value for the stream.
Some AVC streams do not indicate a video frame rate. For these streams a frame rate check
selected in the video template, will fail. Video template tests that can be checked over a user-specified
length of time (e.g. black frame or blockiness checks) will calculate the length of time to check based
upon the <number of frames> / 25; i.e. a frame rate of 25 frames per seconds is assumed. If this
assumption is not correct the user should specify the length of check based upon number of frames
rather than length of time.
QCloud does not support in-stream changing of frame size. QCloud will terminate processing of a
file if the frame size changes.
Audio streams with varying sample rates/SBR information are not supported.
The system template "Omneon QT" can be used to process any type of file that adheres to the Apple
Quick Time format containing atoms supported by QCloud (refer to Appendix B of the user manual for
details). This includes files that have interleaved essence and those that refer to external essence files.
VC-1 streams that do not contain a header at the start of the file will not be decoded correctly.
When processing media files, you can limit the number of alerts so that processing will terminate after
the limit is reached. In this situation, the reported length of stream - and any derived stream properties,
for example, bit rate - will be calculated on the basis of the length of stream actually processed,
and not the complete stream. Also, checks that depend on the end of stream being found such as a
check for black frames at the end of the stream will not be carried out. An alert is raised that warns
the user of this fact.
The file size of referenced / non-embedded wrapper formats (such as some Quick Time and MXF files)
is reported as just the size of the wrapper file and not the sum of all the referenced files. Care should be
taken when using stream properties or checks (e.g. bit rate) for the system template. Stream properties
and checks for referenced audio or video content can still be reliably used.
,if
The detection of poster frames and the execution of black frame tests are only supported for 8-bit video.
When running black frame tests and silence tests, there may be a conflict if "test during video" and
"test at end" checks are used in combination. If the former is set to check black frames during video,
while the latter test requires black frames at the end of the video, an alert will erroneously be raised
during the end period due to the former check. No alerts are missed so this behavior is still fail-safe.
Detection of audio test tones during video is not supported. Detection of test tones at start and end of
media playback is supported.
Test coverage of the MPEG-4 main profile video codec is limited.
When the Loss of Chroma or Pillar-box tests are set-up to ignore more than two seconds at the end of
the stream, it is possible for the system to raise an alert without a video/audio thumbnail associated
with it. The alert itself is legitimate and should be considered valid.
In some cases, video servers do not report a size for the file being transferred to QCloud for testing. In
such cases, QCloud has no way of sensibly reporting the progress since QCloud requires the file size to
calculate the progress percentage. As a result, QCloud reports the file to be at 0% progress for the
duration of processing. Eventually, when QCloud has stopped receiving file data from the server, it
76 QCloud Automated Video Content Verification System User Manual

Reference Jobs
considers the file-end to have been reached and accordingly moves the progress percentage from 0%
to 100%. This is typically seen when processing files from video servers like Grass Valley servers
that dynamica
a virtual file system.
lly create the file for processing on request and with servers like Nexio that maintain
After instal
take effect.
Automatic r
not supply the file properties like file size and last modified time correctly.
Automatic
Automatic reprocessing of files based on file size will not work c orrectly if vqual.io.ftp.filesizeunknown
property
ling QuickTime Player, restart the system before running QCloud for the changes to
eprocessing of files within a DropBox may not work as expected, if the video server does
reprocessing of files is not supported for DropBox created using GVG protocol.
is set to true in system.properties.
QCloud Automated Video Content Verification System User Manual 77

Reference Profiles
Profiles
AProfile gathers together a Container (see page 91), Video (see page 102), Audio (see page 124) and
Action
page 143).Anyof
The top-level Profiles page is accessed by selecting the Profiles button from the navigation bar. When
you open thi
to Active/Archive View Control
message will be displayed.
(see page 137) Template, providing a complete set of checks that can be applied to a MediaSet (see
the component Templates can be omitted, depending on user requirements.
s page, you are presented with a table
(see page 44).IfnoProfiles match the current filter, an informative
(see page 45) displaying Profiles filtered according
ofiles page
The Pr
the top-level Profiles page
From
Archive, restore, and delete Profiles
View Pro file details (see page 79) by clicking the Profile name in the ProfileName column.
Edit a Profile (see page 79) by clicking the edit icon.
Create a new Profile (see page 80) by clicking the New Profile button.
Create a new Profile from an existing one (see page 80) by clicking the copy icon.
(see page 78), it is possible to:
78 QCloud Automated Video Content Verification System User Manual

Reference Profiles
Profile detail
The Profile Details page shows detailed information about a Profile.
s
The Profile Details page
Edit profile
AProfile can be edited to change its constituent Templates:
ainer
Cont
Vid eo (see page 102)
Audio (see page 124)
Action (see page 137)
(see page 91)
QCloud Automated Video Content Verification System User Manual 79

Reference Profiles
The Profile name and description cannot be changed.
Edit Profile page
Click the Update button to submit changes to the Profile
New profile
The New Profile page is accessed either by copying an existing Profile or by creating a new Profile.
(see page 78).
The New Profile page
To create a new Profile,enteranamefortheProfile and, optionally, a description, and select the desired
Templates
next to the audio field. Click the Create buttontocreatetheProfile.
80 QCloud Automated Video Content Verification System User Manual
(see page 81) from the drop-down menus. To add a second audio template, click the plus icon

Reference Templates
Templates
Templates allow you to collect together rules to be used or actions to be taken when checking files in
a MediaSet
The four types of Templates are:
Container Templates (see page 91), which gather rules applying to the container layer
Video Templates (see page 102), which gather rules applying to video elementary streams
Audio Templates (see page 124), which gather rules applying to audio elementary streams
Action Tem
processing events
(see page 143).
plates
(see page 137), which gather actions to be performed when generating Job
The top-l
When you open this page, you are presented with tables
and Action Templates filtered according to Active/Archive View Control
match the current filter, an informative message will be displayed. The following figure shows a Container
Template, a Video Template, an Audio Template, and an Action Template.
evel Templates page is accessed by selecting the Te mplat e s button from the navigation bar.
(see page 45) displaying Container, Video, Audio,
(see page 44). If no Templates
QCloud Automated Video Content Verification System User Manual 81

Reference Templates
82 QCloud Automated Video Content Verification System User Manual

Reference Templates
NOTE. Some example templates are preloaded onto QCloud. These templates can be used, copied, edited,
and archived in the same way as those created by users. The XML files containing these templates can be
found in <Inst
From the top-level Templates page (see page 81) it is possible to:
Archive and restore Templates (see page 45)
Delete Templates (see page 87)
View details of a Template (see page 84) by clicking its name in the Template Name column
Edit a Template (see page 85) by clicking the edit icon
Create a new Template (see page 86) by clicking the New Template button for the type of Template
(see page 81) required
Create a new Template from an existing one (see page 86) by clicking the copy icon
Export Templates (see page 88)
allation directory> /Example Templates.
Import Templates (see page 89)
QCloud Automated Video Content Verification System User Manual 83

Reference Templates
Template details
The Template Details page shows detailed information about a Template, but does not allow the details to
be changed.
The Template Details page
84 QCloud Automated Video Content Verification System User Manual

Reference Templates
Edit template
A template can be edited to change the Template Name, Description, and Template rule parameters. In
the following figure, the user has entered a Temp l ate N a me and description, and has enabled some rules.
Not all of the rules for the Template are shown.
The Edit Template page
Click the Update button at the bottom of the page to submit changes to the Template. This will also update
the version of the Template.
QCloud Automated Video Content Verification System User Manual 85

Reference Templates
New template
The New template page is accessed either by copying an existing Template, or by creating a new Template
(see page 81).
To create a new Template, determine the type of Template you want to create and click the corresponding
New Container Template, New Video Template, New Audio Template,orNew Action Template
button.
In the following screen, select the standard for the Template you want to create. For a Video Template,
this might be MPEG-2, MPEG-4 or some other video standard. The resulting New Template page is very
similar to the Edit Template
Enter a name for the Template and, optionally, a description. Finally, you must set up the Template
rule definitions.
Template rules specify precisely what to check when processing content. For example, a Template rule
might require that video content has a certain resolution, or that the audio stream has a certain bit rate. The
Template rules that can be defined depend upon the type of Template and its standard.
For more details on each rule, refer to the descriptions in the following sections on Container Templates
(see page 91), Video Templates (see page 102), Audio Templates (see page 124) and Action Templates
ge
(see pa
137).
(see page 85) page.
To find more information about a rule when defining a Template, click the
Template rules are enabled and disabled by clicking the checkbox on the left side of the Edit Template
page. A Template can contain a single enabled rule or many enabled rules. Different rules require different
parameters to be defined, depending on the type of rule. For example, a rule that specifies video resolution
l require you to enter the expected number of pixels.
wil
When you have finished defining all of the rules, click the Create button at the bottom of the page
reate the Template.
to c
If you are uncertain as to what rules and parameter values to use, try looking at one of the preloaded
ample templates and gradually adjust the rules until you are comfortable with the operation of the
ex
template.
f you have imported a database from an earlier version of QCloud (before 6.x), the pre-loaded example
I
templates will not be available. In this case, they can be imported as described in the Importing Templates
(see page 62) section.
next to the rule name.
86 QCloud Automated Video Content Verification System User Manual

Reference Templates
Multiple Sets of Values
Some of the rules in Container, Video and Audio Templates accept multiple sets of values. You can define
these rules like any other - with a single set of values, or you can define multiple set valid values. If you
use multiple sets, the test will pass if the value matches any of the sets.
These rules c
Rules that accepts multiple sets of values
To add another set of valid values to the rule, click on the
at the bottom of the rule. You can add as many new rows as you need.
To r emov
row will disappear from the rule. You can remove all rows but one.
an be recognized by the add/remove buttons to the right of the rule.
e any set of values from the rule, click on the
Deleting templates
To delete a template, do the following:
1. Select the template you want to delete by selecting the corresponding checkbox in the left column
of the templates page.
2. Select delete from the action drop-down menu under the table.
3. Clic
k Go to carry out the action.
Add button. A new row of inputs will appear
Remove button to the right of that row. The
NOTE. Only the templates which are not part of any existing profiles can be deleted.
QCloud Automated Video Content Verification System User Manual 87

Reference Templates
Exporting templates
Templates can be exported from the top-level Templates page. Once exported, Templates can be imported
into any QCloud system running a compatible version of QCloud. Any number of Templates, of any type
(Container, Video, Audio and Action) and status (Active or Archived), can be exported to a single file.
NOTE. When exporting Action Templates, passwords used by rules to access remote locations are not
exported.
To export a set of Templates, select the templates you want to export by checking the corresponding check
boxes in the leftmost column of the Templates tables and pressing the Export button at the bottom of the
page. Choose a location to save the Templates export file to when prompted. Exported Template files use
XML to sto
If you are viewing this page from the Help pages in the QCloud Web interface, you can click the following
linktov
To download the Template information XML schema:
In Microsoft Internet Explorer, right-click the above link and select the Save Target As option from
the pop-up menu.
re template information, following the Template Information schema definition.
iew the Template Information schema definition
In Mozilla Firefox, right-click the above link and select the Save Link As option from the pop-up
menu.
If you are viewing this page from a printed or a PDF version of the QCloud user manual, access the URL
http://your_qcloud_host/TemplateInformation.xsd,replacingyour_qcloud_host with the
dress or host name of your QCloud system, to view the Template Information Schema definition.
IP ad
When a table contains too many Templates to fi t on a single page, the system will split it to be displayed
r a number of pages. If you cannot see all the Templates you want to export in the tables, you may
ove
need to change the number of Records per page
each page. You may also need to change the Active/Archive view
and/or Archived Templates.
(see page 152) to allow more Templates to be shown on
(see page 44) to display both Active
88 QCloud Automated Video Content Verification System User Manual
 Loading...