

Page 1

xx
ZZZ
PC Courseware Editor
User Manual
*P077099300*
077-0993-00
Page 2

Page 3

xx
ZZZ
PC Courseware Editor
User Manual
Register now!
Click the following link to protect your product.
► www.tektronix.com/register
www.tektronix.com
077-0993-00
Page 4

Copyright © Tektronix. All rights reserved. Licensed software products are owned by Tektronix or its subsidiaries
or suppliers, and are protected by national copyright laws and international treaty provisions.
Tektronix products are covered by U.S. and foreign patents, issued and pending. Information in this publication
supersedes that in all previously published material. Specifications and price change privileges reserved.
TEKTRONIX and TEK are registered trademarks of Tektronix, Inc.
Contacting Tektronix
Tektronix, Inc.
14150 SW Karl Braun Drive
P.O. Box 500
Beaverto
USA
For product information, sales, service, and technical support:
n, OR 97077
In North America, call 1-800-833-9200.
Worl dwid e, v isit www.tektronix.com to find contacts in your area.
Page 5

Table of Contents
PC Courseware Editor User Manual. ................................ ................................ ............. 1
Launching the PC Courseware Editor....................................................................... 2
Understanding the workspace ................................................................................ 4
Opening a ne
Opening an existing workspace .............................................................................. 7
Creating a lab experiment.................... ................................ ................................ . 7
Performing other operations with labs...................... ................................ ................ 11
Exporting a lab................................................................................................ 12
Setting up an author profile .............. .................................. ................................ .. 15
Develop
Working with packages ...................... ................................ ................................ 20
Making miscellaneous settings . . ..... . ..... . ..... . ..... . ..... . ..... . ... . . . .... . . .... . . .... . ..... . ..... . ..... 27
w workspace .................................................................................... 5
ing a course.. ................................ .................................. ...................... 17
PC Courseware Editor i
Page 6

Table of Contents
ii PC Courseware Editor
Page 7

PC Courseware Editor User Manual
The PC Courseware Editor helps you create lab descriptions and instructions on a
PC and upload the material directly onto a TBS1000B-EDU oscilloscope. Your
students can
their progress in a report file consisting of oscilloscope screen captures.
then perform their lab work directly on the oscilloscope and record
Your studen
pushing the oscilloscope’s dedicated, front-panel Course button. Using the
oscilloscope’s soft keys and the multipurpose knob, they can access up to eight
courses which can have up to 30 labs each. To accommodate situations where and
instrument is used for several classes, up to 100 MB of course material can be
stored on the oscilloscope. Once the students choose a lab, they can review the
overvie
check and save the data results and generate reports that show the waveforms
created for each step in the procedure. They perform all of this work directly on
the oscilloscope.
The associat ed Tektronix Courseware Web Page lets you exchange course material
or get inspired by reviewing ideas from your peers. You can share courseware
materials between different labs, fellow professors at the your institution or
between educators from around the world.
This document describes how to:
Install the PC Courseware Editor on a PC from the CD that came with your
TBS1000B-EDU
Create lab courseware
Export, import and edit existing lab courseware
Create course and associate labs
ts can access the content on their TBS1000B-EDU oscilloscope by
w section, perform the lab using the step-by-step procedure, collect data,
reate a courseware package for viewing on a TBS1000B-EDU oscilloscope
C
PC Courseware Editor 1
Page 8

PC Courseware Editor User Manual
Launching the
PC Courseware Editor
To launch the PC Courseware Editor on your PC, copy the Courseware Editor
folder from Tektronix Education CD, which came with your TBS1000B-EDU
oscilloscop
www.tektronix.com/manuals. Start using the tool by double clicking on
“courseeditor.exe” file. You can launch the PC Courseware Editor without having
to run any special installation routines on your computer.
e, to your computer. You can also download a copy from
Figure 1: Start by clicking on the “courseeditor.exe” file item
The PC Courseware Editor lets you:
Create new labs
Edit labs
Export labs as PDF document
Create courses
Addlabstodifferentcourses
Create lab packages
2 PC Courseware Editor
Page 9
PC Courseware Editor User Manua l
Put courses int
Export packages for viewing the labs on the TBS1000B-EDU oscilloscope
Import an existing package to revise it
Create and save a workspace
Create an author profile and add it to the courseware
Double clicking on “courseeditor.exe” will launch the Editor in the default
workspace.
o packages
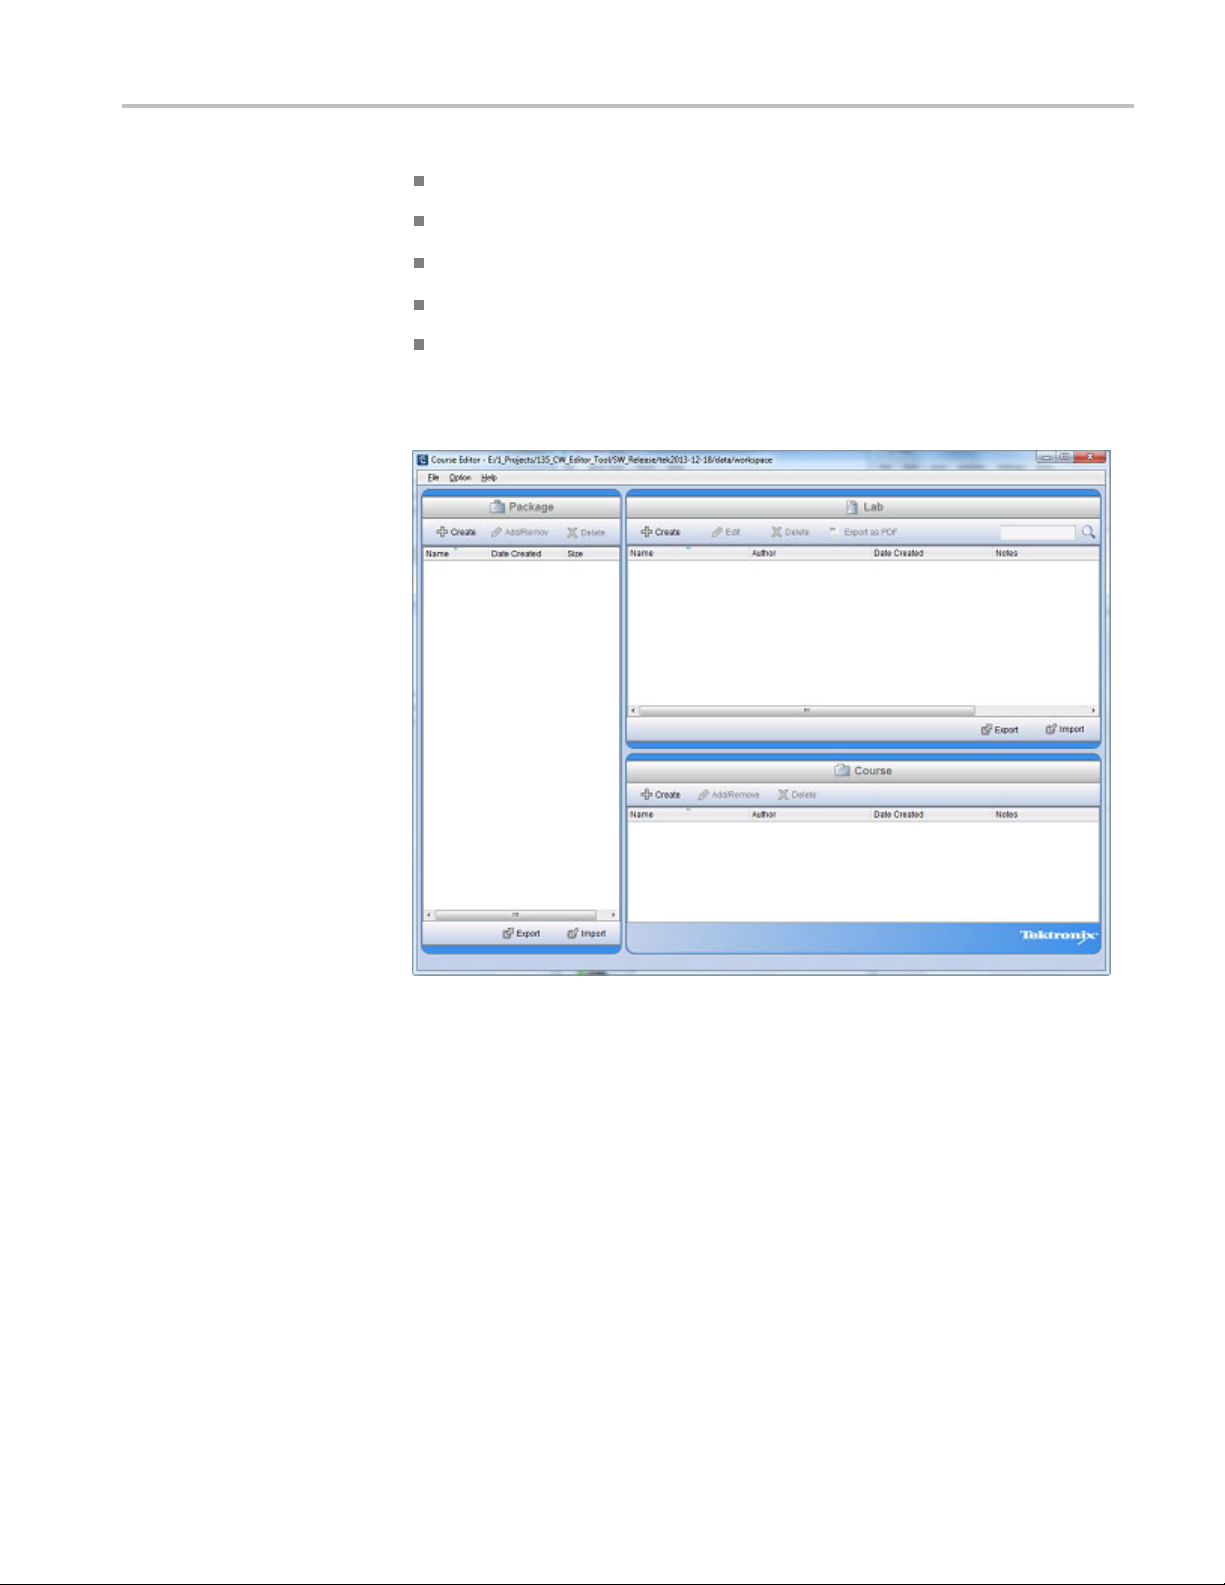
Figure 2: Work from the PC Courseware Editor main screen
The three panes of the Editor workspace window help you to manage labs,
courses and packages.
A lab is the basic module of the courseware. It can provide an overview of the
objectives and equipment needed, as well as the step-by-step detailing of an
experiment, which students will perform in the laboratory.
A course is collection of labs that typically share a common theme. Use courses
to organize labs that support a specific class, such as EE102, Basic Electronics or
Linear Integrated Circuits. To provide fl exibility when creating a curriculum, the
PC editor tool also allows labs to be assigned to multiple courses.
PC Courseware Editor 3
Page 10
PC Courseware Editor User Manual
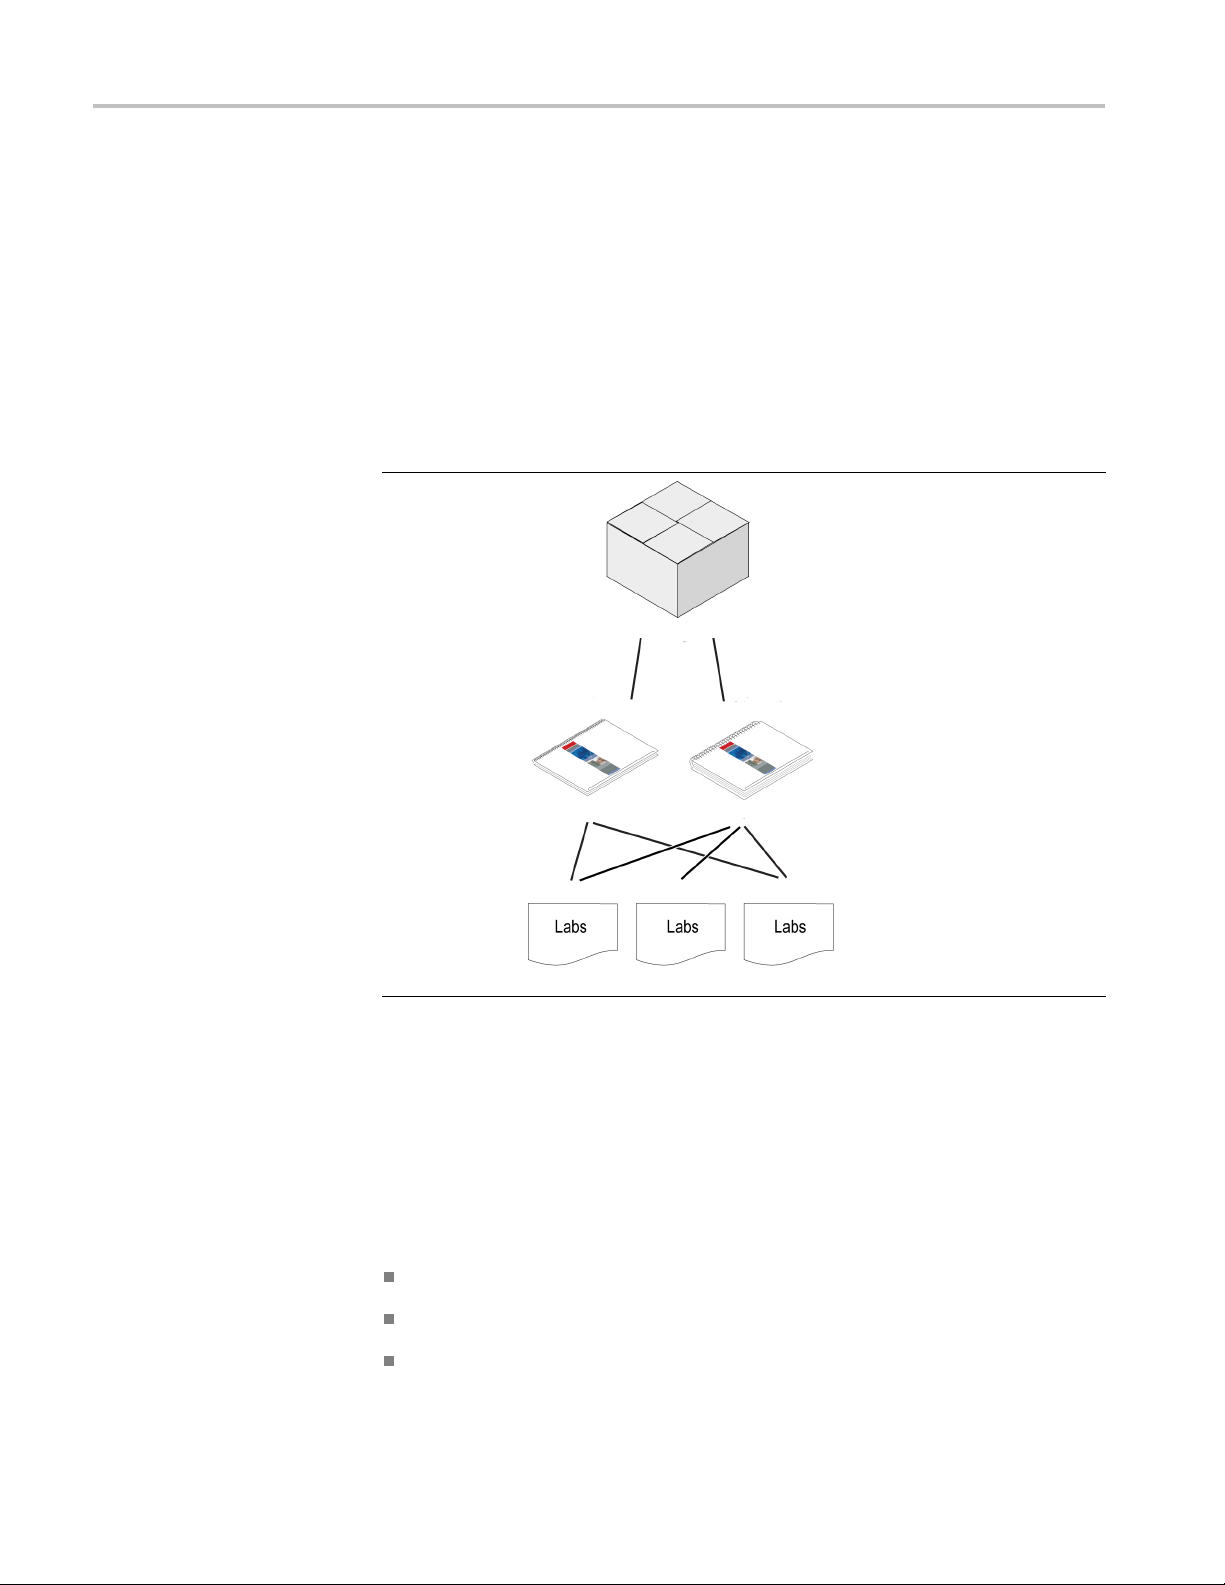
A package is col
lectionofcourses. Uptoeightcoursescanbebundledintoa
package and uploaded onto a TBS1000B-EDU oscilloscope. The combination of
the eight courses along with the associated labs cannot exceed 100 MB. To help
you keep your package within the 100 MB limit, the PC editor displays a counter
that indicates how large the package file will be. The PC Courseware Editor Tool
provides added flexibility by allowing courses to be associated with multiple
packages. W
hen completed, a package can be exported onto a USB memory drive
for uploading onto a TBS1000B-EDU oscilloscope.
Table 1:
Item Description
Package
Courses
Labs
Understanding the workspace
When creating, saving and opening files, the PC Courseware Editor Tool uses a
.xwsp or workspace format. All of the lab, course and package information is
saved in this format and is accessed using the typical Windows Save and Open
functions.
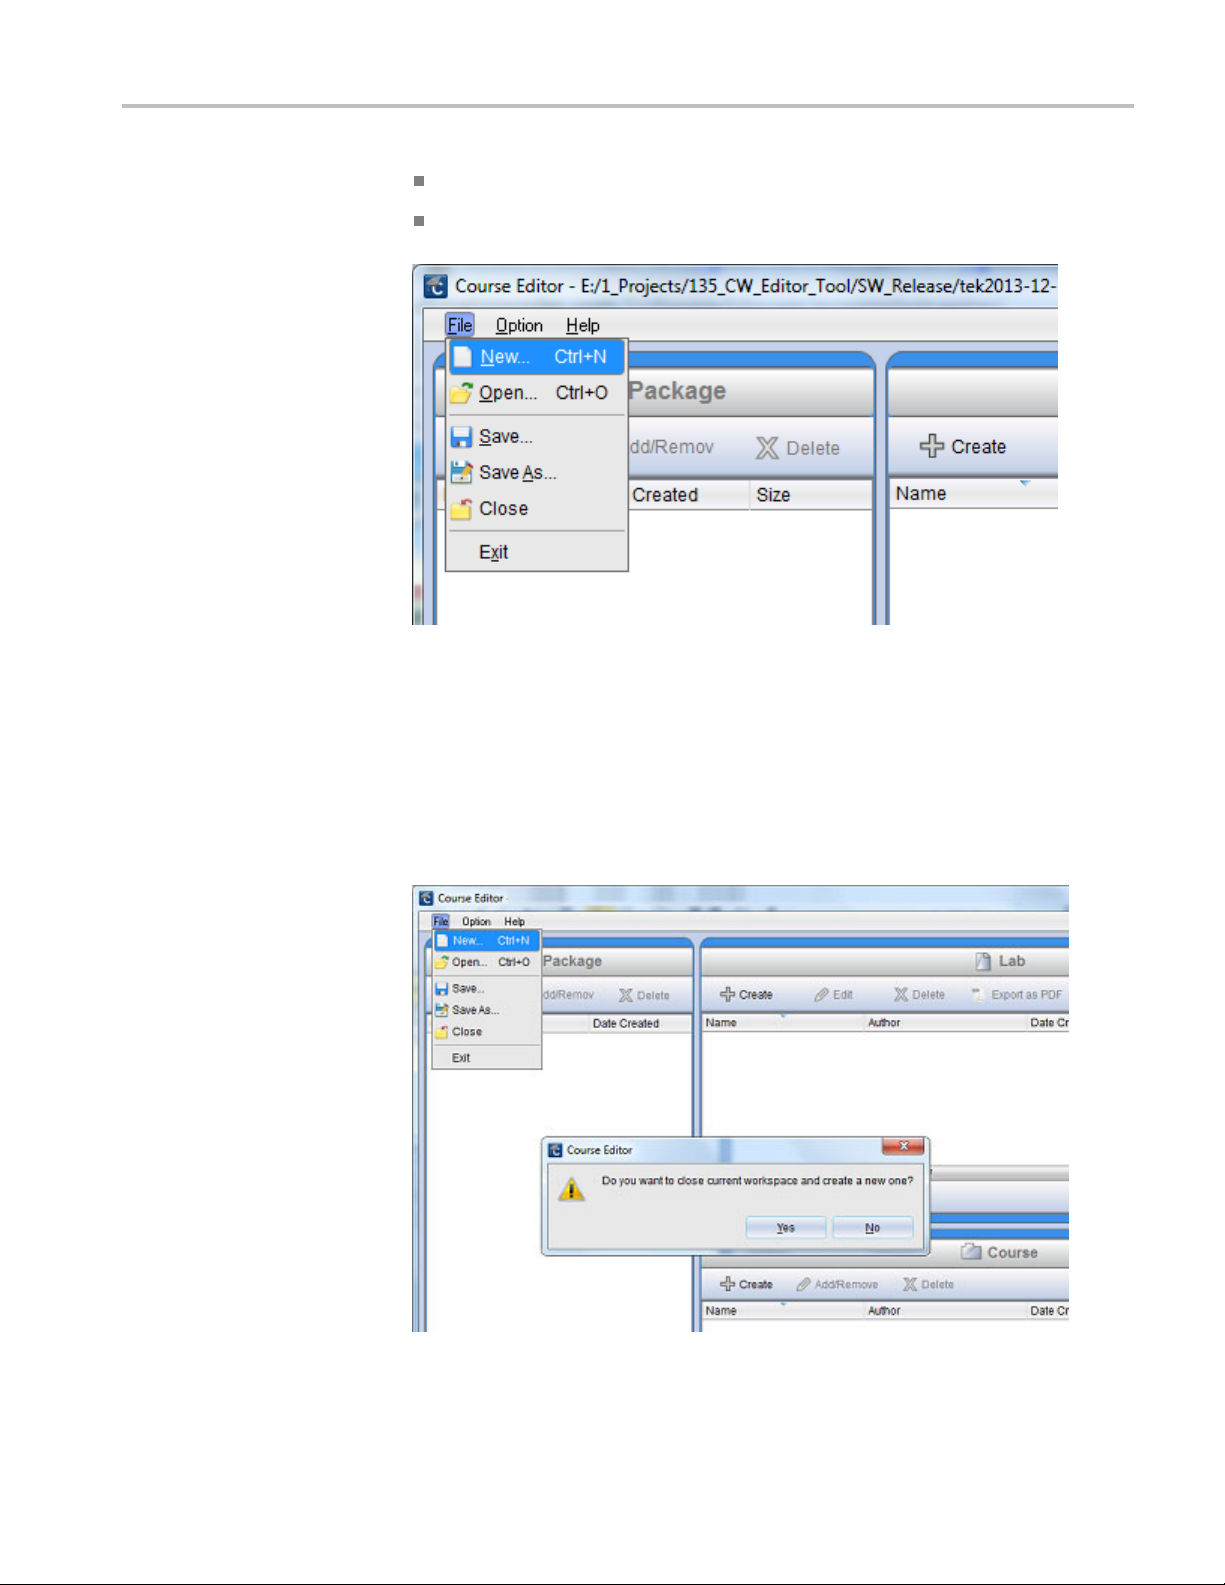
UsingthecommonMS-Windows-basedfile-menu structure, you can:
Create a new workspace
Open an existing workspace
Save the current workspace
elationship between labs, courses, and a package
The r
4 PC Courseware Editor
Page 11
PC Courseware Editor User Manua l
Figure 3: Use the File menu to create, open, and save workspaces
Opening a new workspace
Save the curren
Exit the Editor
t workspace under another name
To create a new workspace, navigate to the File ► New option from the top
menu. The program will ask for a confirmation on closing the current workspace
and creating a new one.
Figure 4: Create a new workspace
PC Courseware Editor 5
Page 12

PC Courseware Editor User Manual
Click Ye s to ope
workspace name and location.
n a dialogue box, prompting you to fill in the details for the new
Figure 5: Specify a new workspace name and path
After filling in the details, press OK to create the new workspace. The program
will display the workspace name and path in the title bar.
Figure 6: View the workspace path in the title bar
6 PC Courseware Editor
Page 13

PC Courseware Editor User Manua l
Opening an exi
sting workspace
To open an existing workspace, n avigate to the File ► Open option. The program
will ask for confirmation o n closing the existing workspace and opening a new
one. You can b
Creating a lab experiment
To cre ate a
“Lab” area. This opens up a dialogue box where you can enter a lab name,
instructor information, and notes about the lab.
rowse for the desired workspace file (.xwsp) and click Open.
new lab experiment, you need to click on the Create button in the
Figure 7: Use the Create Lab dialogue box to specify lab properties
After entering the details, click OK. This will create a lab experiment, which will
be added to the list in the “Lab” area.
PC Courseware Editor 7
Page 14

PC Courseware Editor User Manual
Figure 8: View available labs in the workspace lab area
After you create a lab, you can use the edit function or double-click on the lab.
In this example, the name is “myFirstLab”. A window will open and allow you
enter details.
Lab content is organized in two sections called Overview and Procedure.The
Overview section describes the lab experiment. For example, it may contain:
The experiment’s objectives
Equipment and instruments required to carry out the experiment
Theory and technical background, which students should know to perform
this experiment
Figure 9: Click the Overview tab to record lab objectives, equipment, and theory
8 PC Courseware Editor
Page 15

PC Courseware Editor User Manua l
The content edi
tor allows you to enter text, images, (pictures from files or screen
captures), equations and an author profile.
Figure 10: Use the tool bar after pushing the lab overview and procedure tabs to
access multiple editing tools
1. Undo
2. Redo
3. Save
4. Cut 11. Insert formula
5. Copy 12. Grab screen
6. Paste 13. Image zoom 20. Text color
7. Left justify 14. Re-size in/out
e Procedure section provides a way to create the step-by-step instructions
Th
8. Right justify
9. Add profile
10. Insert picture 17. Text size: small
15. Insert table
16. Italics
18. Text size: medium
19. Text size: large
needed to perform the experiment. You can add steps and create content for each
step. Lab experiments can include:
Instructions on how to set up the device or circuit under test
nstructions on how to set up the oscilloscope or other instruments
I
Directions on how to take the desired measurements
Instructions on which signals to analyze or measure
PC Courseware Editor 9
Page 16

PC Courseware Editor User Manual
Figure 11: Click the procedure tab to specify step-by-step instructions to perform
the experiment
After completing the step-by-step instructions needed to perform the experiment,
you can press the Save and Quit buttontogobacktomainwindow(workspace).
10 PC Courseware Editor
Page 17

PC Courseware Editor User Manua l
Performing ot
her operations with labs
Figure 12: Use the menu items in the lab area to manage the available labs
1. Edit the lab contents (overview and procedures)
2. Remove
the lab from the workspace
3. Create a PDF version of the lab
4. Search for a lab by entering a keyword o f the lab name, the author, or notes
5. Select the lab and click on the right mouse button
6. Export the lab as a .xlab file. You can then open it in another workspace
7. Import a .xlab file into your workspace and repackage it or revise it for this
workspace
PC Courseware Editor 11
Page 18

PC Courseware Editor User Manual
Exporting a lab
You can save a lab as a PDF document to create a hard copy of the lab. To create
the PDF version, select a lab and click the Export as PDF button on the toolbar in
the lab pane of the workspace window. This opens up a PDF file save dialogue
box.
Figure 13: Save a lab as a PDF document
1. Select a lab from the list of available ones
2. Click Export as PDF
3. Enter the name and location to save the PDF version of the lab
4. Click Save
You can export (save) labs as an .xlab file using the Export button in the lab
pane. You can bring labs that are in .xlab format into the workspace using Import
function. This allows:
The sharing of labs across workspaces – you can export the labs created in
one workspace and import them into another workspace
The sharing of labs across different computers – you can create labs on one
computer open them on another, using .xlab files
12 PC Courseware Editor
Page 19

PC Courseware Editor User Manua l
Figure 14: Export and import labs to and from the workspace (as an .xlab file)
1. Export labs in the .XLAB format
2. Import your .XLAB file as a lab
3. Share your .XLAB lab files with others. Use E-mail, the Web, or a USB
memory device
Clicking the Export button opens up a dialogue box where you c an select the
labs to export and the destination folder.
PC Courseware Editor 13
Page 20

PC Courseware Editor User Manual
Figure 15: Export labs from your workspace with the Export Lab dialogue box
Similarly, clicking on the Import button in the lab area opens a dialogue box
where you can browse for the .xlab file you want to bring into the current
workspace.
14 PC Courseware Editor
Page 21

PC Courseware Editor User Manua l
Settingupa
1. Field to enter t
workspace
2. The labs selec
3. Labs available but not selected to import
4. Labs in the current workspace
nauthorprofile
To identify the original author or creator of a lab, the PC Courseware Editor has
the ability to create an author profile. It can be automatically added to e very
lab. The “
Option ► Profile.
The profi
profile is created, it can be added in the lab by clicking on the Insert profile
button on the text editor toolbar in the “Lab” section.
he file path from which to import the .XLAB file to the
ted to import to the workspace
Profile Creator” dialogue box can be opened from the option menu:
le can include the author’s picture and an organization logo. Once the
Figure 16: Create an author profile
PC Courseware Editor 15
Page 22

PC Courseware Editor User Manual
Figure 17: Add an author profile to a lab
16 PC Courseware Editor
Page 23

PC Courseware Editor User Manua l
Developing a course
Creating a course
1. Click on the tex
2. ClickontheInsertProfile button from the toolbar.
3. The Editor will insert the profile in the selected location
A workspace course is a collection of labs that generally follow a common theme.
A course is a means to group one or more labs together as part of a class or special
assignment. A lab’s contents is not changed if it is associated or disassociated
with one or
You can create a course by clicking on the Create button on the Course Toolbar.
This opens up a dialogue box for entering course details.
more courses.
t editor and specify the place to insert the profile
Figure 18: Create a course
PC Courseware Editor 17
Page 24

PC Courseware Editor User Manual
Adding labs to a course
1. ClickontheCre
2. Click on OK in the Create Course window. View the new course listing in
the course pan
Once you create a course, you can include/associate labs with it by:
Dragging labs from the “Lab” area and dropping them onto the course name.
Clicking on the Add/Remove button. This will open up a dialogue window
for adding or removing labs from a given course.
ate button to bring up the Create Course window
e of your workspace window
18 PC Courseware Editor
Page 25

PC Courseware Editor User Manua l
Figure 19: Add or remove labs using the "Add or Remove" dialogue box.
PC Courseware Editor 19
Page 26

PC Courseware Editor User Manual
1. To add a lab : Sel
2. To delete a lab: Select the course lab and click the Remove button
3. To delete a lab (alternative method): Click on the course lab listing twice
4. To add a lab (alternative method): Click on the available lab listing twice
When labs are added to a course, they are shown in the course section. Each
course will have a list of all of the labs assigned to it. Any changes made to the
contents of a lab (editing of a lab from the “Lab” area) will automatically update
each course the lab is associated with.
ect the available lab and click the Add button
Figure 20: Create courses and add labs
Working with packages
A workspace package is a collection of courses. Once you add the appropriate
courses to the package, you can use the package to create a file (.xplg file) to
upload onto a TBS1000B-EDU oscilloscope.
Creating a package
20 PC Courseware Editor
You can create a package by clicking on the Create button on the Package toolbar
and filling in the details of the package dialogue box.
Page 27

PC Courseware Editor User Manua l
Adding co urses to a
package
Figure 21: Create a package
1. Click on Create in the package pane of your workspace window
2. Type in the package name, the instructor name and notes in the resulting
window
an add courses to a package, either by dragging a course onto a package
You c
name or by opening the Add/Remove course dialogue box. The dialogue box is
opened by clicking the Add/Remove button on the toolbar or b y double clicking
a package name.
PC Courseware Editor 21
Page 28

PC Courseware Editor User Manual
Packag
e Export / Impo rt —
.XPKG format
Figure 22: Add courses to a package
A package can be exported (saved) as a .xpkg file using the Export button located
at the bottom of the package pane. Packages in .xpkg format can be brought back
into the workspace using import function. This allows:
The sharing of course s across workspaces – you can export a package created
in one workspace and import (recall) it into another workspace
The sharing of packages between multiple computers
22 PC Courseware Editor
Page 29

PC Courseware Editor User Manua l
Figure 23: Use the Export / Import function for a package of courses (as an .xpkg file)
1. Export the package in the .XPKG format
2. Import an .XPKG file as a package
3. Share your .XPKG file with others. Use E-mail, the Web, or a USB memory
device
Clicking on the Export button opens up a dialogue box where you can select the
package you need to export and the destination folder.
PC Courseware Editor 23
Page 30

PC Courseware Editor User Manual
Figure 24: Export packages with the Export Package dialogue box
Similarly, clicking on the Import button at the bottom of the package pane opens
up a dialogue box where you can browse for the .xpkg file that you want to bring
e current workspace.
into th
24 PC Courseware Editor
Page 31

PC Courseware Editor User Manua l
Sending the lab package
to a TBS
1000B-EDU
oscilloscope
Figure 2
After you export a package file from the PC Courseware Editor, you should put all
the file
TBS1000B-EDU oscilloscope.
Figure 26: Sample contents of a package to export
1. The package to export
2. The workspace information
3. The package file, as specified during the export operation
5: Import packages to your workspace with the Import Package dialogue box
s and the folder onto a USB memory drive, to load the package onto the
PC Courseware Editor 25
Page 32

PC Courseware Editor User Manual
Figure 27: Export the package from your PC to your USB memory device
Figure
TBS1000B-EDU oscilloscope
To create labs to update the courseware on the oscilloscope:
1. Star
2. Create a workspace and develop labs.
3. Create courses and associate labs with them.
4. Create a package and add courses to it.
5. Export the package. Put the filesonaUSBmemorydrive.
6. Connect the USB memory device to a TBS1000B-EDU, and update the
28: Import the package from your USB memory device into your
t the PC Courseware Editor Tool on a PC.
courseware on the oscilloscope
26 PC Courseware Editor
Page 33

Making miscellaneous settings
You have the option of setting the default language of the PC Courseware Editor
Tool and setting the default location of a new workspace.
PC Courseware Editor User Manua l
Changing the Editor
language
To change the user interface language, use: Option ► Language Settings.You
must restart the Editor in order for the language change to take effect.
Settingupadefault
location for the workspace
Figure 29: Change the default language
To change the default location for new workspace files, go to Option
►Workspace Settings and choose the new location using the dialogue box.
Use the Browse button to find the desired workspace location or simply type it in.
PC Courseware Editor 27
Page 34

PC Courseware Editor User Manual
Figure 30: Specify a default location for a workspace
28 PC Courseware Editor
 Loading...