


Technical Reference
P7380A
8 GHz Z-Activet
Differential Probe
071-1715-03
www.tektronix.com

Copyright © Tektronix. All rights reserved. Licensed software products are owned by Tektronix or its subsidiaries or
suppliers, and are protected by national copyright laws and international treaty provisions.
Tektronix products are covered by U.S. and foreign patents, issued and pending. Information in this publication supercedes
that in all previously published material. Specifications and price change privileges reserved.
TEKTRONIX, TEK, TekConnect, and Z-Active are registered trademarks of Tektronix, Inc.
Velcro is a registered trademark of Velcro Industries B.V.
Tip-Clip is a trademark of Tektronix, Inc.
Contacting Tektronix
Tektronix, Inc.
14200 SW Karl Braun Drive
P.O. Box 500
Beaverton, OR 97077
USA
For product information, sales, service, and technical support:
H In North America, call 1-800-833-9200.
H Worldwide, visit www.tektronix.com to find contacts in your area.

Table of Contents
General Safety Summary v...................................
Introduction 1..............................................
Theory of Operation 3.......................................
Input Voltage Limits 3..............................................
Maximum Input Voltage 3.......................................
Operating Voltage Window 4.....................................
Differential-Mode Signal Range 4.................................
Common-Mode Rejection 4.........................................
Probing Techniques to Maximize Signal Fidelity 5.......................
Input Impedance and Probe Loading 6.................................
Electrical Effects of Accessories 8....................................
Reference 9.................................................
Single-Ended Measurements 9.......................................
Differential Measurements 10.........................................
Common-Mode Rejection Ratio 10.................................
Assessing CMRR Error 11........................................
Input Impedance Effects on CMRR 11..............................
Serial Bus Standards 12..............................................
Specifications 13.............................................
Warranted Characteristics 13..........................................
Typical Characteristics 14............................................
Nominal Characteristics 17...........................................
Tip-Clip Assembly Specifications 20...................................
Performance Verification 29...................................
Equipment Required 29..............................................
Special Adapters Required 31.........................................
Equipment Setup 33................................................
Output Offset Voltage 34.............................................
DC Gain Accuracy 35...............................................
Gain Check at 5X Attenuation 35..................................
Gain Check at 25X Attenuation 36.................................
Rise Time 37......................................................
Rise Time Measurements Using the Probe Calibration Fixture 38.........
Rise Time Check at 25X Attenuation 39.............................
Test Record 43.....................................................
User Service 45..............................................
Probe/Adapter/Oscilloscope Compatibility 45............................
Error Condition 45..................................................
Replacement Parts 45...............................................
Preparation for Shipment 46..........................................
P7380A Z-Active Differential Probe\
i

Table of Contents
List of Figures
Figure 1: Dynamic range 4....................................
Figure 2: Use the Short Flex, Small Resistor Tip-Clip assembly 5...
Figure 3: Typical probe input model 6..........................
Figure 4: Symmetric coupled line 7............................
Figure 5: Transmission line equivalent 7........................
Figure 6: Lumped element equivalent 7.........................
Figure 7: Simplified model of a differential amplifier 10............
Figure 8: Typical Common-Mode Rejection Ratio (5X attenuation) 15
Figure 9: Typical differential input impedance verses frequency 15...
Figure 10: Probe and Tip-Clip dimensions 16.....................
Figure 11: Z-Active probe dynamic range verses frequency
5X gain setting 17.........................................
Figure 12: Z-Active probe dynamic range verses frequency
25X gain setting 18.......................................
Figure 13: P7380A, P7360A, and P7340A dynamic range
5X gain setting 18.........................................
Figure 14: P7380A, P7360A, and P7340A dynamic range
25X gain setting 19........................................
Figure 15: TekConnect-to-SMA adapter 31.......................
Figure 16: Probe Calibration fixture 31..........................
Figure 17: Adapter fixture 32..................................
Figure 18: Preliminary test setup 33.............................
Figure 19: Setup for the output offset zero test 34..................
Figure 20: DC Gain Accuracy setup 35..........................
Figure 21: Reverse the power supply polarity on the probe inputs 36.
Figure 22: Handheld adapter and calibration fixture 38............
Figure 23: PPM203B Articulated Arm with the Handheld adapter 38.
Figure 24: Test system rise time setup 39.........................
Figure 25: Setting the TDR parameters 40.......................
Figure 26: Test probe rise time setup 41..........................
ii
P7380A Z-Active Differential Probe\

List of Tables
Table of Contents
T able 1: Offset ranges 9......................................
T able 3: Warranted electrical characteristics 13.................
T able 4: Typical electrical characteristics 14......................
Table 5: Typical mechanical characteristics 16....................
T able 6: Nominal electrical characteristics 17.....................
Table 7: Test equipment 29....................................
Table 8: Differential probe compatibility issues 45................
P7380A Z-Active Differential Probe\
iii

Table of Contents
iv
P7380A Z-Active Differential Probe\

General Safety Summary
Review the following safety precautions to avoid injury and prevent damage to
this product or any products connected to it. To avoid potential hazards, use this
product only as specified.
Only qualified personnel should perform service procedures.
While using this product, you may need to access other parts of the system. Read
the General Safety Summary in other system manuals for warnings and cautions
related to operating the system.
ToAvoidFireor
Personal Injury
Connect and Disconnect Properly. Connect the probe output to the measurement
instrument before connecting the probe to the circuit under test. Disconnect the
probe input from the circuit under test before disconnecting the probe from the
measurement instrument.
Observe All Terminal Ratings. To avoid fire or shock hazard, observe all ratings
and markings on the product. Consult the product manual for further ratings
information before making connections to the product.
Do not apply a potential to any terminal, including the common terminal, that
exceeds the maximum rating of that terminal.
Do Not Operate Without Covers. Do not operate this product with covers or panels
removed.
Avoid Exposed Circuitry. Do not touch exposed connections and components
when power is present.
Do Not Operate With Suspected Failures. If you suspect there is damage to this
product, have it inspected by qualified service personnel.
Do Not Operate in Wet/Damp Conditions.
Do Not Operate in an Explosive Atmosphere.
Keep Product Surfaces Clean and Dry.
P7380A Z-Active Differential Probe\
v

General Safety Summary
Symbols and Terms
Terms in this Manual. These terms may appear in this manual:
WARNING. Warning statements identify conditions or practices that could result
in injury or loss of life.
CAUTION. Caution statements identify conditions or practices that could result in
damage to this product or other property.
Symbol on the Product. The following symbol may appear on the product:
CAUTION
Refer to Manual
vi
P7380A Z-Active Differential Probe\

Introduction
This manual discusses topics not covered or otherwise mentioned briefly in the
P7313 12.5 GHz, P7380A 8 GHz, P7360A 6 GHz, and P7340A 4 GHz Z-Active
Differential Probe Family User Manual.
The following is a list of brief explanations:
H Theory of Operation — Contains probe details not mentioned in the user
manual.
H Reference — Contains information about differential measurements and how
to increase measurement accuracy.
H Specifications — Contains warranted, typical, and nominal characteristics
for the probe and probe Tip-Clip assemblies.
H Performance Verification — Describes the procedures for verifying the
warranted specifications.
H User Service — Describes troubleshooting and probe maintenance.
P7380A Z-Active Differential Probe\
1

Introduction
2
P7380A Z-Active Differential Probe\

Theory of Operation
This section discusses operating considerations and probing techniques. For
more detailed information about differential measurements and common-mode
rejection ratio (CMRR), see the Reference sectiononpage9.
The P7380A Probe is optimized for high bandwidth; it is not a general purpose
probe. The probe head and tips are miniaturized for electrical characteristics and
access to dense circuitry, and must be handled carefully.
CAUTION. To prevent damage to the probe, use care when handling the probe.
Rough or careless use can damage the probe.
Input Voltage Limits
The P7380A Differential Probe is designed to probe low-voltage circuits. B efore
probing a voltage, take into account the limits for maximum input voltage, the
common-mode signal range, and the differential-mode signal range. For specific
limits, refer to page 14.
Maximum Input Voltage
The maximum input voltage is the maximum voltage to ground that the inputs
can withstand without damaging the probe input circuitry.
CAUTION. To avoid damaging the inputs of the P7380A Differential Probe, do
not apply more than ±15 V (DC + peak AC) between each input or between
either probe input and ground.
P7380A Z-Active Differential Probe\
3

Theory of Operation
Operating Voltage Window
Differential-Mode Signal
Range
The operating voltage window defines the maximum voltage that you can apply to
each input, with respect to earth ground, without saturating the probe input circuitry.
See Figure 1. A common-mode voltage that exceeds the operating voltage window
may produce an erroneous output waveform even when the differe ntial- mode
specification is met. For specifications, refer to page 14.
The differential-mode signal range is the maximum voltage difference between
the plus and minus inputs that the probe can accept without distorting the signal.
The distortion from a voltage that is too large can result in a clipped or otherwise
inaccurate measurement. For specifications, refer to page 14.
1.3 V
+4.0 V
5X
25X
Figure 1: Dynamic range
Common-Mode Rejection
The common-mode rejection ratio (CMRR) is the ability of a probe to reject
signals that are common to both inputs. More precisely, CMRR is the ratio of the
differential gain to the common-mode gain. The higher the ratio, the greater the
ability to reject common-mode signals. CMRR varies with frequency, usually
decreasing at higher frequencies. For additional information about CMRR, see
page 15.
5.0 V
-- 3 . 0 V
4
P7380A Z-Active Differential Probe\

Probing Techniques to Maximize Signal Fidelity
Signal fidelity is an indication of how accurately a probe represents the signal
being measured. The signal fidelity of the probe is best when the probe is applied
directly to the circuit with the Short Flex, Small Resistor, Tip-Clip assembly
shown in Figure 2. This Tip-Clip assembly achieves high signal fidelity by
minimizing the distance between the probe head and the signal source. This
reduces probe interconnect parasitics that tend to degrade signal fidelity.
However, some probing tasks are made easier using other accessories included
with the probe.
The Tip-Clip specifications starting on page 20 show pulse response illustrations
that give some indication of signal fidelity with different Tip-Clip assemblies.
Signal fidelity is affected by both the probe interconnect and the speed of the
signal. It is recommended that the longer Tip-Clip assembly be used with
somewhat slower speed signals for better signal fidelity.
Theory of Operation
Figure 2: Use the Short Flex, Small Resistor Tip-Clip assembly
P7380A Z-Active Differential Probe\
5

Theory of Operation
Input Impedance and Probe Loading
When you connect the probe inputs to a circuit, you are introducing a new
resistance, capacitance, and inductance into the circuit. Each input of the
differential probe has a characteristic input impedance of 50 kΩ to ground.
60 fF
3.12 pF
3.12 pF
60 fF
Input
+
Input
--
1
See the following figures for an explanation of cpl.
2
Short Tip-Clip (blue) length
38 Ω
38 Ω
37 Ω
20 fF
20 fF
37 Ω
1
Cpl
Zodd=95
Zeven=190
L=3.7 mm
Kodd ~ Keven ~ 1
2
140 Ω
50 kΩ
310 Ω
310 Ω
50 kΩ
140 Ω
Figure 3: Typical probe input model
For signals with low source impedance and frequency, the 50 kΩ input impedance on each input is large enough to prevent the inputs from loading the signal
sources. As the signal source impedance on an input increases, the more the
probe loads the source and reduces the signal amplitude. The greater the source
impedances and the higher the signal frequencies, the more you must take these
factors into account. See Figure 3.
The frequency of the signal also affects signal measurement. As the frequency of
the signal increases, the input impedance of the probe decreases. The lower the
impedance of the probe relative to that of the source, the more the probe loads
the circuit under test and reduces the signal amplitude. For a graph of input
impedance versus frequency, refer to Figure 9 on page 15.
6
P7380A Z-Active Differential Probe\

Cpl
ZOO= 100 Ω
ZOE= 190 Ω
L=3.7mm(air)
Figure 4: Symmetric coupled line
Z0 = ZOE= 190 Ω,
Td = 12.1 ps
Z0 = 2(ZOOZOE)/(ZOE-- ZOO) =211 Ω,
Td = 12.1 ps
Theory of Operation
Z0 = ZOE= 190 Ω,
Td = 12.1 ps
TD = 12.1 ps
(3.7 mm in air)
Figure 5: Transmission line equivalent
Cg = (C11+C12)/2
= 31.9 ff
Cg = --0.5C
= 14.4ff
12
Lp = Ls = L11=1.76nH
= 0.545 nH
M=L
12
11+C12
)/2
Cg = (C
= 31.9ff
Cg = --0.5C
= 14.4 ff
12
Figure 6: Lumped element equivalent
P7380A Z-Active Differential Probe\
7

Theory of Operation
Electrical Effects of Accessories
The Tip-Clip accessories included with your probe help connect to different
types of components. The Tip-Clip accessories are designed to provide optimum
performance as a system. Each Tip-Clip accessory has distinct characteristics.
While these accessories make connections easier, be aware that the Tip-Clip
accessory you choose affects the signal you are measuring, depending on a
variety of factors, including signal frequency, source impedance, and lead length.
Refer to Specifications on page 13 for more Tip-Clip information.
8
P7380A Z-Active Differential Probe\

Reference
This section contains important reference information about differential
measurements and how to increase measurement accuracy.
Single-Ended Measurements
A differential probe, for example the P7380A Differential Probe, can be used for
single-ended measurements within the limits of its dynamic and offset voltage
ranges. Single-ended probes such as the P7240 typically have a wider offset
range than corresponding differential probes (see Table 1).
Table 1: Offset ranges
Probe examples DC Offset, 5X Dynamic
Range, 5X
P7240 +/-- 5 V
P7380A Differential Probe
+4 V, --3 V 2V
-- -- --
PP
DC Offset, 25X Dynamic
Range, 25X
-- --
+4 V, --3 V 5V
-- -- --
PP
Differential probes are ideal for a class of single-ended measurements where the
reference voltage is not ground:
H SSTL_1,2: V
H PECL: V
TT,VREF=VDD
REF=VCC
/2
--1.3
To measure single-ended signals in this class, connect the negative input of the
P7380A Differential Probe to V
REF
.
A differential probe in these applications displays the true signal despite any AC
or DC variation in V
displays the signal plus the variation in V
from its nominal value. While a single-ended probe
REF
.
REF
Differential probes can also be used to make ground referenced single-ended
measurements on either single-ended signals or differential signals like PCI Express or Serial ATA. To measure ground referenced single-ended signals, connect
the negative input of the P7380 to ground.
Single-ended measurements on differential signals are used to measure common
mode voltage and check for differential signal symmetry.
P7380A Z-Active Differential Probe\
9

Reference
Differential Measurements
A differential probe is optimized to make measurements of high speed differential signals. Differential signals are formed from two complementary signal with
a common reference voltage. See Figure 7.
Devices designed for differential measurements avoid problems presented by
single-ended systems. These devices include a variety of differential probes,
differential amplifiers, and isolators.
A differential probe is basically a differential amplifier (Figure 7), which is used
to make differential measurements that reject any voltage that is common to the
inputs and amplifies any difference between the inputs. Voltage that is common
to both inputs is often referred to as the Common-Mode Voltage (VCM) and
voltage that is different as the Differential-Mode Voltage (VDM).
Common-Mode Rejection
Ratio
Common
mode
V
CM
V
DM
2
+
V
DM
2
Differential
+
+
Differential
mode
mode
+
V
--
out
Figure 7: Simplified m odel of a differential amplifier
Differential amplifiers cannot reject all of the common-mode signal. The ability
of a differential amplifier to reject the common-mode signal is expressed as the
Common-Mode Rejection Ratio (CMRR). The CMRR is the differential-mode
gain (A
) divided by the common-mode gain (ACM). It is expressed either as a
DM
ratio or in dB.
A
DM
A
CM
CMRR =
A
DM
A
CM
dB = 20 log
10
CMRR generally is highest (best) at DC and degrades with increasing frequency.
P7380A Z-Active Differential Probe\

Reference
Assessing CMRR Error
Input Impedance Effects
on CMRR
Figure 8 on page 15 shows the CMRR of the P7380A Differential Probe. This
derating graph assumes a sinusoidal common-mode signal.
A quick way to assess the magnitude of CMRR error when the common-mode
signal is not sinusoidal is to connect both leads to the same point in the circuit.
The oscilloscope displays only the common-mode component that is not fully
rejected by the probe. While this technique may not give you accurate measurements, it does allow you to determine if the magnitude of the common-mode
error signal is significant. Make the probe Tip-Clip wires the same length to
maximize the probe CMRR.
The lower the input impedance of the probe relative to the source impedance, the
lower the CMRR for a given source impedance imbalance. Differences in the
source impedance driving the two inputs lowers the CMRR. Note that single-ended measurements generally result in asymmetric source impedances which tend
to reduce the differential mode CMRR.
P7380A Z-Active Differential Probe\
11

Reference
12
P7380A Z-Active Differential Probe\

Specifications
The specifications in Tables 2 through 5 apply to the P7380A Differential Probe
installed on any TekConnect instrument or Tektronix 80A03 TekConnect adapter.
When the probe is used with another oscilloscope, the oscilloscope must have an
input impedance of 50 Ω. The probe must have a warm-up period of at least
20 minutes and be in an environment that does not exceed the limits described in
Table 2. Specifications for the P7380A Differential Probe fall into three
categories: warranted, typical, and nominal characteristics.
Warranted Characteristics
Warranted characteristics (Table 2) describe guaranteed performance within
tolerance limits or certain type-tested requirements. Warranted characteristics
that have checks in Table 2 are marked with the n symbol.
Table 2: Warranted electrical characteristics
Characteristic Description
n DC attenuation accuracy ±2%
n Output Zero ±3mV(+20to+30_C,+68to+86_F) (5X) ±15 mV on oscilloscope
±3mV(+20to+30_C,+68to+86_F) (25X) ±75 mV on oscilloscope
n Rise time <55 ps (probe only, Short Flex, Small Resistor Tip-Clip), all other Tip-Clip assemblies are
typical
Temperature Operating: 0 to +40 _C(+32to+104_F),
Nonoperating: --55 to +75 _C (--131 to +167 _F)
Humidity Operating: 0--90% RH, tested at +0 to +40 _C(+32to+104_F)
Nonoperating: 0--90% RH, tested at --55 to +75 _C (+67 to +167 _F)
1
See warning that follows.
1
WARNING. To avoid a burn hazard at high ambient temperatures, do not touch
the probe with bare hands at nonoperating temperatures above +75 _C
(+167 _F). Allow sufficient time for the probe to cool before handling.
P7380A Z-Active Differential Probe\
13

Specifications
Typical Characteristics
Typical characteristics (Tables 3 and 4) describe typical but not guaranteed
performance.
Table 3: Typical electrical characteristics
Characteristic Description
Differential input resistance, DC coupled 104 kΩ ±2%
Common-mode input resistance, DC
coupled
Differential offset range -- 3 . 0 V t o + 4 V
52 kΩ ±1kΩ
Noise
Input impedance SeeFigure9
Bandwidth See Tip-Clip assemblies starting on page 20 for more detail information.
Small signal rise time See Tip-Clip assemblies starting on page 20 for more detail information.
Common-mode rejection ratio SeeFigure8
Maximum non destructive input voltage ±15 V
Dynamic range (DC coupled)
Operating Voltage Window --3.0 V to +5.0 V at (5X or 25X)
Linearity
< 31 nV Hz(5X), ≤ 550 VRMS
< 75 nV Hz(25X), ≤ 2.75 VRMS
(+ 2.0dB, --3 dB) for an ambient temperature range of 20 _Cto30_C
Ambient temperature range of 20 _Cto30_C
≤50 dB: DC — 1 MHz in
≤35 dB: >1 MHz — 800 MHz in
≤20 dB: >800 MHz — 8 GHz in
(DC + peak AC)
±1 V at attenuation setting of 5X
±2.5 V at attenuation setting of 25X
±1 V at 2% at attenuation setting of 5X
±0.75 V at 1% at attenuation setting of 5X
±0.5 V at 0.5% at attenuation setting of 5X
±3 V at 2% at attenuation setting of 25X
±2.5 V at 1% at attenuation setting of 25X
±1.5 V at 0.5% at attenuation setting of 25X
between each input or between either probe inputs and ground.
DC offset drift 150 μV/_C (at the output of the probe)
0.75 mV/_C (displayed on screen with t he TekConnect int erf ace)
DC voltage measurement accuracy ±〈2% of input + (2% of offset) + 50 mV + 7.5 mV) 5X
±〈2% of input + (2% of offset) + 50 mV + 40 mV) 25X
14
P7380A Z-Active Differential Probe\

Differential Mode
Gain (5X)
dB
-- 1 4
-- 2 4
-- 3 4
-- 4 4
-- 5 4
Specifications
CMRR
Common Mode
Gain (5X)
-- 6 4
-- 7 4
-- 8 4
50 MHz
Note: Short Flex, Small Resister Tip-Clip assembly graph
Frequency
Figure 8: Typical Common-Mode Rejection Ratio (5X attenuation)
10 GHz
Figure 9: Typical differential input impedance verses frequency
P7380A Z-Active Differential Probe\
Note: Short Flex, Small Resister Tip-Clip assembly
15

Specifications
Table 4: Typical mechanical characteristics
Characteristic Description
Dimensions, compensation box 107 mm × 41 mm × 26 mm (4.2 in × 1.6 in × 1.0 in)
Dimensions, probe head 19.43 mm × 3.30 mm × 7.6 mm (0.765 in × 0.130 in × 0.300 in)
Dimensions, cable length 1.2 m (47 in) (from the probe head to the compensation box)
Unit weight 1.406 kg (3.1 lbs) (probe, accessories and packaging)
Large Resistor, Flex
Tip-Clips, 20 mil dia wire
5.08 mm
(.20 in)
3.30 mm
(.130 in)
12.7 mm
(.50 in)
4.77 mm
(.188 in)
7.6 mm
(.300 in)
25.4 mm
(1.00 in)
19.43 mm
(.765 in)
124.46 mm
(.490 in)
Small Resistor, Flex
Tip--Clips, 8 mil dia wire
2.03 mm
(.080 in)
89.78 mm
(3.53in)
33.02 mm
(1.3 in)
5.08 mm
(.20 in)
25.4 mm
(1.00 in)
26.0 mm
(1.00 in)
41.0 mm
(1.60 in)
107 mm
(4.2 in)
Figure 10: Probe and Tip-Clip dimensions
16
P7380A Z-Active Differential Probe\

Nominal Characteristics
Nominal characteristics (Table 5) describe guaranteed traits, but the traits do not
have tolerance limits.
Table 5: Nominal electrical characteristics
Characteristic Description
Input configuration Differential (two inputs, + and --)
Output coupling DC
Attenuation settings 5X and 25X
Termination Terminate output into 50 Ω
Specifications
Figure 11: Z-Active probe dynamic range verses frequency 5X gain setting
P7380A Z-Active Differential Probe\
17

Specifications
Figure 12: Z-Active probe dynamic range verses frequency 25X gain setting
18
Figure 13: P7380A, P7360A, and P7340A dynam ic range 5X gain setting
P7380A Z-Active Differential Probe\

Specifications
Figure 14: P7380A, P7360A, and P7340A dynam ic range 25X gain setting
P7380A Z-Active Differential Probe\
19

Specifications
Tip-Clip Assembly Specifications
Note. All specifications are typical in the
following Tip-Clip assemblies, unless otherwise indicated.
Short Flex, Small Resistor, Tip-Clip
Assembly
Tektronix part number: 020-2600-XX
Bandwidth: >8.0 GHz
10/90 Rise time: <55 ps
20/80 Rise time: <35 ps
*
Guaranteed
Loading: Differential Z
Best overall signal fidelity. The small
resistors are ideal for connecting to small
vias and fine pitch circuitry.
*
290 Ω to 8 GHz
MIN
20
P7380A Z-Active Differential Probe\

Short Flex, Large Resistor, 1/8 Watt,
Tip-Clip Assembly
Tektronix part number: 020-2601-XX
Bandwidth: >8.0 GHz
10/90 Rise time: <55 ps
20/80 Rise time: <35ps
Specifications
Loading: Differential Z
8GHz
High bandwidth and good signal fidelity,
ideal for connecting to large components.
MIN
290 Ω to
P7380A Z-Active Differential Probe\
21

Specifications
Medium Flex, Small Resistor,
Tip-Clip Assembly
Tektronix part number: 020-2602-XX
Bandwidth: >7.0 GHz
10/90 Rise time: <55 ps
20/80 Rise time: <35ps
Loading: Differential Z
Good compromise between ease-of-use
and maximum performance when
attaching to smaller devices or circuit
board vias.
290 Ω to8GHz
MIN
22
P7380A Z-Active Differential Probe\

Medium Flex, Large Resistor, 1/8 W,
Tip-Clip Assembly
Tektronix part number: 020-2603-XX
Bandwidth: >8.0 GHz
10/90 Rise time: <55 ps
20/80 Rise time: <35 ps
Specifications
Loading: Differential Z
Good compromise between ease-of-use
and maximum performance when
attaching to larger devices.
260 Ω to8GHz
MIN
P7380A Z-Active Differential Probe\
23

Specifications
Long Flex, Small Resistor,
Tip-Clip Assembly
Tektronix part number: 020-2604-XX
Bandwidth: >6.0 GHz
10/90 Rise time: <130 ps
20/80 Rise time: <40 ps
Loading: Differential Z
8GHz
Extended reach with good Step Response. Useful for connecting to hard to
reach small vias and fine-pitch circuitry.
Conveniently sized to fit between DIMM
modules. Not recommended for signals
faster than 4 GHz.
MIN
360 Ω to
24
P7380A Z-Active Differential Probe\

Long Flex, Large Resistor, 1/8 W,
Tip-Clip Assembly
Tektronix part number: 020-2605-XX
Bandwidth: >7.0 GHz
10/90 Rise time: <75 ps
20/80 Rise time: <40 ps
Specifications
Loading: Differential Z
Extended reach with good step response.
Useful for connecting to hard-to-reach
circuitry with large features. Conveniently
sized to fit between DIMM modules. Not
recommended for signals faster than
4GHz.
300 Ω to8GHz
MIN
P7380A Z-Active Differential Probe\
25

Specifications
Square Pin,
Tip-Clip Assembly
Tektronix part number: 020-2701-XX
Bandwidth: >6.0 GHz
10/90 Rise time: <70 ps
20/80 Rise time: <50 ps
Use the Square Pin Tip-Clip assembly for
probing 0.025-in diameter square pins
spaced 0.1-in on center. Square pins are
not an ideal transmission path for high
speed electrical signals. Square pins are
not recommended for signals faster than
100 ps or 3 GHz.
Square Pin Tip-Clip assembly measuring differential 100 ps risetime
signal with 0.34-in long square pins.
6
3
0
-- 3
dB
-- 6
-- 9
-- 1 2
1.00E+08 1.00E+09 1.00E+10
Frequency (Hz)
Square Pin Tip-Clip assembly frequency response with 0.34-in long
square pins.
26
P7380A Z-Active Differential Probe\
Variable Spacing Tip-Clip Assembly
Tektronix part number: 020-2596-XX
Bandwidth: >8 GHz
: 10/90 <55 ps, 20/80 <35 ps
T
R
Loading: Differential Z
MIN
220 Ω to
8GHz
Use the Variable Spacing Tip-Clip
assembly for probing test points spaced
from 0.020-in to 0.180-in apart.
Exercise care when handling the articulated pins.
Specifications
P7380A Z-Active Differential Probe\
27

Specifications
28
P7380A Z-Active Differential Probe\

Performance Verification
The following procedures verify the warranted Output offset voltage, DC
attenuation accuracy, and Rise time specifications of the P7380A Differential
Probe. The recommended calibration interval is one year.
CAUTION. To avoid ESD damage to the probe, always use an antistatic
wrist strap (provided with your probe), and work at a static-approved
workstation when handling the probe.
Equipment Required
Table 6 lists the equipment required for the performance verification procedure.
The types and quantities of connectors depends on the specific equipment you
use.
Table 6: Test equipment
Description and quantity Performance requirement Recommended example
Sampling Oscilloscope Tektronix TDS 8200 Series
Sampling Module 20 GHz bandwidth Tektronix 80E03 or 80E04
Pulse Generator <25 ps rise time Tektronix 80E04 TDR
Sampling Head Extender
Cable
TekConnect Probe Interface
Module with semi-rigid cable
TekConnect-to-SMA adapter See page 31 Tektronix TCA-SMA
DMM (2), with leads
Dual Power Supply 5.0 VDC at 200 mA B+K Precision 1760A or
Coaxial cable
Test leads (1) Banana plug ends, red 012-0031-XX
Test leads (1) Banana plug ends, black 012-0039-XX
Test leads (2) Mini plunger with test clip Mueller BU-1120
Adapter
Adapter BNC(M)-to-Minigrabbers 013-0342-XX
Adapter SMA Male-to-BNC female 015-1018-XX
1m 012-1568-XX
Firmware version V:1.2 or 1.3 Tektronix 80A03, with
174-4857-XX cable
0.1 mV and 0.01 Ω resolution
Male-to-Male BNC, 50 Ω
SMA 50 Ω termination (comes with
the probe calibration fixture)
Fluke 187 or equivalent
equivalent
012-0057-XX
015-1022-XX
1
P7380A Z-Active Differential Probe\
29

Performance Verification
Table 6: Test equipment ( cont.)
Description and quantity Recommended example
Adapter (2) SMA Male-to-Male 015-1011-XX
Feed through termination
Probe calibration fixture See page 31 067-0419-XX
Short Flex, Small Resistor,
Tip-Clip assembly
Long Flex, Large Resistor,
1/8 Watt Tip-Clip assembly
Super glue Loctite 444 12292
SMA torque wrench 5/16-in, 7 in-lb.
1
Nine-digit part numbers (xxx-xxxx-xx) are Tektronix part numbers.
Performance requirement
BNC, 50 Ω ± 0.05 Ω
011-0129-XX
020-2600-XX
020-2605-XX
2
2
2 Standard accessories included with the probe.
H Optional Tool. A torque wrench helps to ensure reliable connections by
meeting the nominal torque values listed in these instructions.
1
30
P7380A Z-Active Differential Probe\

Special Adapters Required
Performance Verification
Some of the adapters listed in Table 6 are available only from Tektronix. These
adapters are described on the following pages.
TekConnect-to-SMA
Adapter
Probe Calibration Fixture
The TekConnect-to-SMA adapter, Tektronix part number TCA-SMA, lets you
connect an SMA cable to a TekConnect input. See Figure 15. Connect and
disconnect the adapter the same way as you do the probe.
This adapter is an oscilloscope accessory that can be used for measurement
applications, as well as these performance verification procedures.
Figure 15: TekConnect-to-SMA adapter
Some of the procedures in this manual use a probe calibration fixture, Tektronix
part number 067-0419-XX.
The calibration fixture provides a means to test the probe for common mode
(CM) and differential mode (DM) measurements. SMA connectors on the front
and back of the fixture allow you to apply stimulus signals.
Figure 16: Probe Calibration fixture
P7380A Z-Active Differential Probe\
31

Performance Verification
PPM203B Articulated Arm
and Probe Arm Adapter
Some of the procedures in this manual use a PPM203B Articulated Arm. This is
a general purpose benchtop probe holder that provides a method for securing the
probe and must be used with the Probe Arm adapter. Use the following steps and
Figure 17 to attach the Probe Arm adapter to the PPM203B Articulated Arm.
1. Using the Hex wrench, remove the screw from the end of the articulated arm.
2. Using the Hex wrench, attach the adapter bottom to the probe arm.
3. Loosen the adapter top by turning the two thumb screws counter clockwise.
4. Place the probe in the loosened adapter bottom (keyed).
5. Secure the adapter top by tightening the two thumb screws.
Tighten
thumb
screws
Adapter
top
Adapter to
probe arm
Probe arm
connection
Figure 17: Adapter fixture
Hex
wrench
Adapter
bottom
32
P7380A Z-Active Differential Probe\

Equipment Setup
Performance Verification
CAUTION. To avoid ESD damage to the probe, always use an antistatic
wrist strap (provided with your probe), and work at a static-approved
workstation when handling the probe.
Perform the following verification procedures in order.
Use the following procedure to set up and warm the equipment to test the probe.
1. Connect the 80A03 TekConnect probe interface to channels 3 and 4 of the
TDS 8200 oscilloscope. See Figure 18.
2. Connect the 80E0X module to the 80A03 TekConnect probe interface.
3. Connect the probe to one of the 80A03 probe interface channels.
4. Turn on the oscilloscope and allow 20 minutes for the equipment to warm
up.
5. From the Utilities menu, select Utilities Compensation to compensate and
save the compensation for module channels 3 and 4.
6. Photocopy the test record on page 43 to record the performance test results.
TDS/CSA8200 Series Oscilloscope
AB
80A03
80E0X Module
CH 4 (measurement channel)
80A03 TekConnect probe
interface module
P7380 Probe
Figure 18: Preliminary test setup
P7380A Z-Active Differential Probe\
33

Performance Verification
Output Offset Voltage
NOTE. Before beginning these procedures, refer to page 43 and photocopy the
test record (if you have not already done so) and use it to record the performance
test results.
Use the following procedure to test the Output Offset voltage.
1. Connect the equipment as shown in Figure 19.
2. Plug the probe into the 80A03 module, if not done.
3. Short the two Tip-Clip leads together (see Figure 19.) We recommend using
the BNC(m)-to-Minigrabber (black) with the Minigrabber not grounded.
TDS/CSA8200 Series Oscilloscope
80A03
BNC-SMA
adapter
50 Ω Precision
termination
P7380 Probe
BNC cable
--
+
Long Flex, Large
Resistor, 1/8 W
Tip-Clip assembly
Figure 19: Setup for the output offset zero test
4. Set the multimeter to read DC volts.
5. Verify that the output voltage is 0 V
±3.0 mV for both the 5X and 25X
attenuation settings.
6. Record the results on the test record.
DMM
BNC-to-dual
banana adapter
34
P7380A Z-Active Differential Probe\

DC Gain Accuracy
Performance Verification
This test checks the DC gain accuracy of the probe at the 5X and 25X attenuation settings.
Gain Check at 5X
Attenuation
1. Set the probe attenuation to 5X.
2. Connect the probe with a Tip-Clip assembly to the power supply as shown in
Figure 20. Monitor the source voltage with one of the DMMs.
DMM (V in)
TDS/CSA8200 Series Oscilloscope
+
--
Power supply
Banana
lead
red
80A03
BNC-SMA
adapter
50 Ω Precision
termination
P7380 Probe
Long Flex, Large
Tip-Clip assembly
Banana
black
--
+
Resistor, 1/8 W
BNC cable
lead
-- +
--
test leads (2),
w/mini plunger
BNC-to-dual
banana adapter
+
DMM (V out)
Figure 20: DC Gain Accuracy setup
3. Set the power supply to approximately +0.5 V. This represents 80% of the
4. Record the output voltage (on the second DMM) as V
5. Disconnect the test leads from the power supplies. Leave the DMM leads
6. Reverse the polarity of the voltage applied to the probe inputs by swapping
7. Record the actual source voltage (now a negative value), as V
P7380A Z-Active Differential Probe\
probe dynamic range in this attenuation setting. Record this source voltage
1.
as V
in
1.
out
connected to the adapters.
both sets of banana leads at the power supply, as shown in Figure 21.
2.
in
35

Performance Verification
DMM (V in)
TDS/CSA8200 Series Oscilloscope
80A03
BNC-SMA
adapter
50 Ω Precision
termination
P7380 Probe
Banana
lead
red
--
+
Long Flex, Large
Resistor, 1/8 W
Tip-Clip assembly
BNC cable
--
+
Power supply
-- +
--
+
Test leads (2)
w/mini plunger
BNC-to-dual
banana adapter
Banana
lead
black
DMM (V out)
Figure 21: Reverse the power supply polarity on the probe inputs
8. Record the output voltage on the second DMM (now a negative value) as
2.
V
out
36
Gain Check at 25X
Attenuation
9. Calculate the gain as follows: (V
out
1--V
2) ÷ (Vin1--Vin2).
out
10. Verify that the gain is 0.2, ±2.0%.
11. Record the calculated gain for the 5X setting on the test record.
1. Set the attenuation on the probe to 25X.
2. Repeat steps 2 through 9, but in step 3, set the power supply to 1.5 V.
3. Verify that the gain is 0.04, ±2.0%.
4. Record the calculated gain on the test record.
P7380A Z-Active Differential Probe\

Rise Time
Performance Verification
This procedure verifies that the probe meets the rise time specification. Two rise
times are measured; the test system alone, and the test system with the probe
included. The probe rise time is calculated using the two measurements.
This test uses the TDR function of the 80E04 sampling head as a fast rise time
signal source. The measurements are made using an 80A03 TekConnect probe
interface. Although the following procedure assigns the TDR and measurement
functions to specific oscilloscope channels, any valid channel combination can
be used. However, the TDR function is only available on 80E04 sampling heads.
This test checks both of the probe attenuation settings.
Review Rise Time Measurements Using the Probe Calibration Fixture on
page 38 if you have not used a calibration fixture before.
P7380A Z-Active Differential Probe\
37

Performance Verification
Rise Time Measurements
Using the Probe
Calibration Fixture
1. Connect the fixture to the pulse generation using an SMA adapter.
2. Connect the 50
Ω termination included with the fixture to the unused SMA
connector.
3. Probe the calibration fixture using the Handheld adapter (see Figure 23).
NOTE. It is recommended that you use the PPM203B Articulated Arm with the
Probe Arm adapter (see page 32) to stabilize the probe while verifying the
differential rise time specification.
Signal
source
50 Ω
Termination
Figure 22: Handheld adapter and calibration fixture
Figure 23: PPM203B Articulated Arm with the Handheld adapter
PPM203B
Articulated Arm
Signal
source
50 Ω
Termination
38
P7380A Z-Active Differential Probe\

Performance Verification
Rise Time Check at 25X
Attenuation
1. Connect the standard 80A03 semi-rigid SMA connector between the 80A03
probe output and the 80E0X module input. Insert a TCA-SMA adapter into
the TekConnect interface on the 80A03.
2. Connect the test equipment as shown in Figure 24. A sampling module
extender cable is used with the TDR pulse generator to minimize cable loss
problems.
CAUTION. To prevent mechanical strain on the connectors, use care when
working with SMA connectors: Support equipment and use a torque wrench to
tighten connections to 7 in-lbs.
TDS/CSA8000 Series Oscilloscope
CH 7 and 8 (module slot)
CH 4 (measurement
channel)
80A03
80E0X sampling
Module
SMA male-to-male
connector
TCA-SMA adapter
SMA male-to-male
connector
Calibration fixture
80E04 TDR pulser
Sampling module extender cable
Figure 24: Test system rise time setup
NOTE. The 80A03 firmware version must be version V 2.0 or above. The
firmware version label is on the rear panel of the instrument.
3. Turn on Channel 4, and set the vertical scale to 50 mV/div.
P7380A Z-Active Differential Probe\
39
Performance Verification
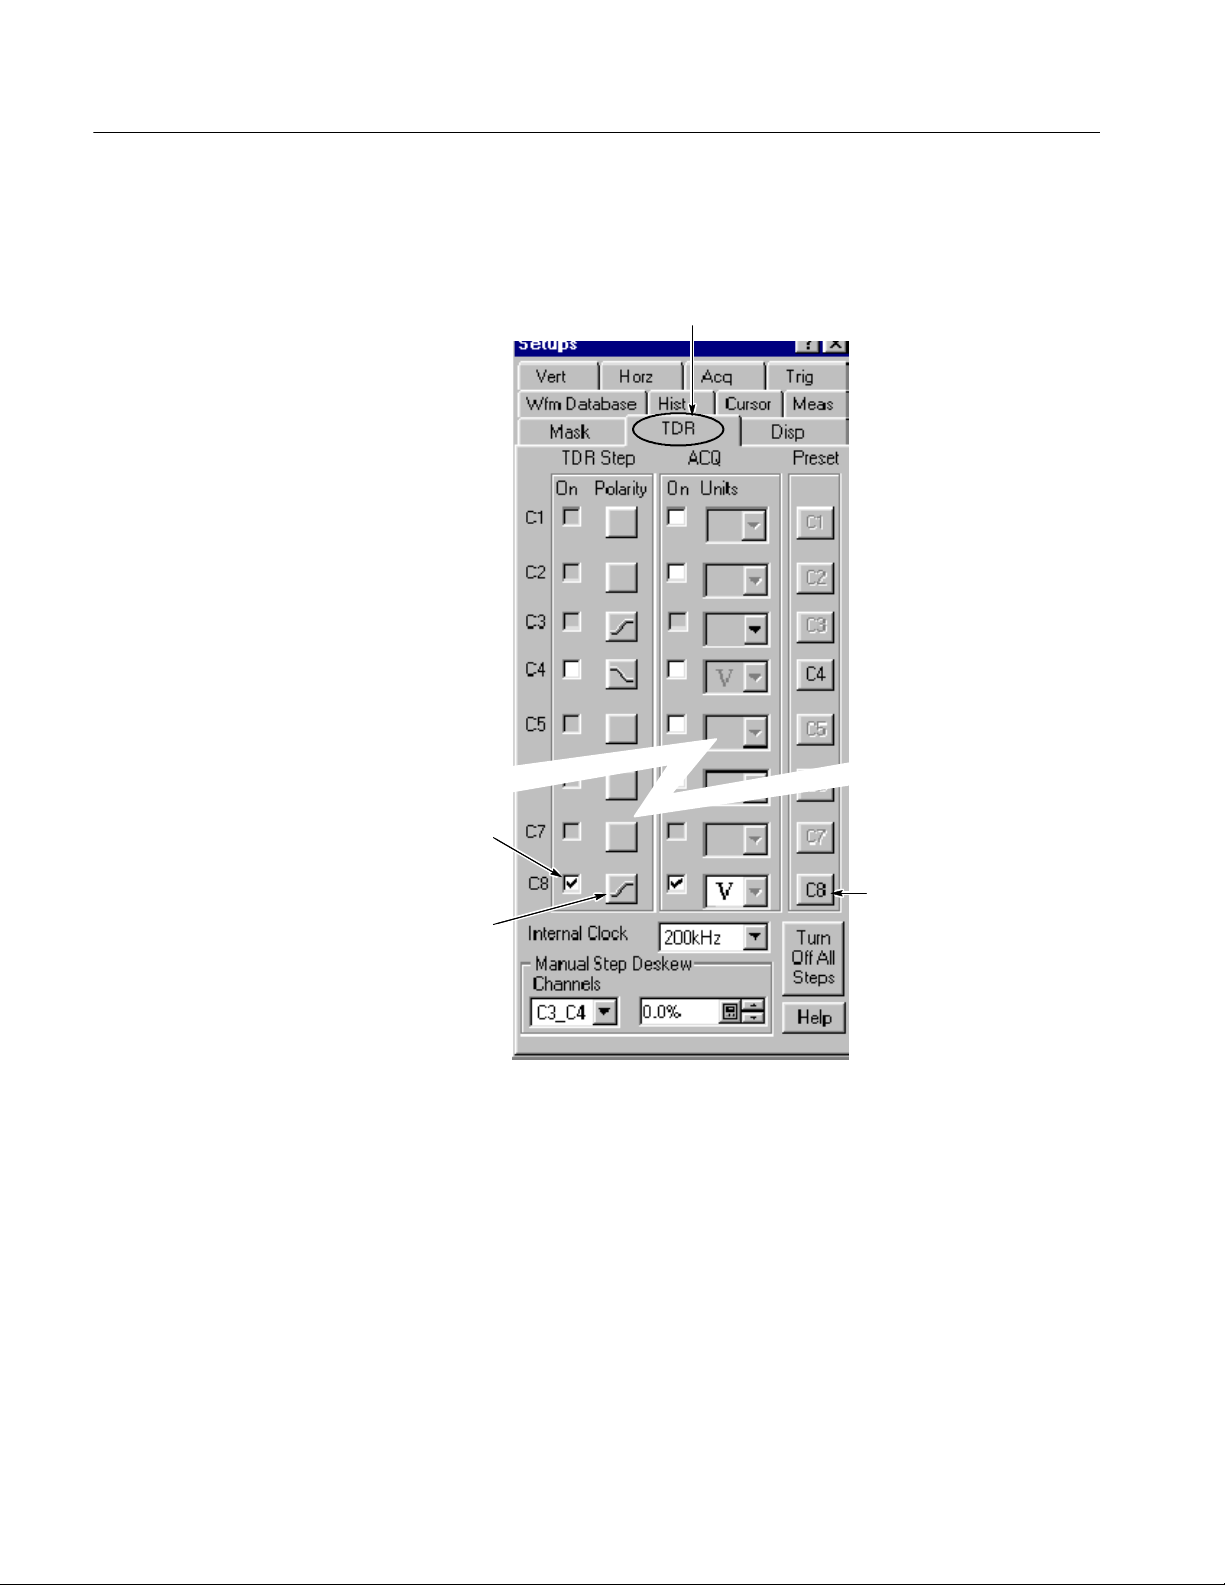
4. Set the Channel 8 sampling head to TDR mode:
Press the SETUP DIALOGS button and select the TDR tab. See Figure 25.
TDR tab
Enable outputs
Preset
Step polarity
Figure 25: Setting the TDR parameters
5. Set the Preset of Channel 8. The sampling module turns on a red light next
to the SELECT channel button, indicating that TDR is activated for that
channel.
TDR Preset sets Internal Clock in the Trigger menu, turns on the TDR Step
in the TDR Setups menu, turns on the channel and selects the acquisition
units in the TDR Setups menu, and sets the horizontal scale, position, and
reference.
40
P7380A Z-Active Differential Probe\

Performance Verification
6. Turn off the display for Channels 8, then only Channel 4 is shown on the
screen.
7. Adjust the oscilloscope horizontal and vertical position controls to display a
signal similar to that shown in Figure 24.
8. Set the oscilloscope horizontal scale to 100 ps/div and center the waveform.
9. Use the oscilloscope measurement capability to display rise time. Increase
the stability of the pulse-edge measurement by using averaging, if available.
Rise time is measured from the 10% and 90% amplitude points on the
waveform. Rise time can be measured using the automatic measurement
capability of the TDS8200 series oscilloscopes. Record the system rise time
as t
This value is used to calculate both the 5X and 25X probe rise times.
s.
The following steps instruct you to assemble the test setup that includes the
probe, as shown in Figure 26. The system and probe rise time (t
measure in step 17 is used to calculate the probe rise time (t
TDS/CSA8000 Series Oscilloscope
p
) that you
s+p
)instep18.
CH 4 (measurement
channel)
80E0X sampling
module
50 Ω Termination
Variable Spacing Tip-Clip
SMA male-to-male
connector between 80E04
and calibration fixture
underneath the probe
Figure 26: Test probe r ise time setup
CH 7 and 8
(module slot)
P7380 TekConnect
and probe
80A03
Calibration fixture
80E04 TDR pulser
Sampling module extender cable
P7380A Z-Active Differential Probe\
41

Performance Verification
10. Remove the calibration fixture from the TCA--SMA adapter and disconnect
the TCA--SMA adapter from the 80A03 TekConnect probe interface.
11. Connect the probe to the 80A03 TekConnect probe interface.
12. Check that an SMA 50
Ω termination included with the probe calibration
fixture is connected to the open SMA output on the fixture.
13. Set the attenuation on the probe to 25X.
14. Connect the probe input to the probe calibration fixture as shown in
Figure 22 on page 38. Check that the TDR function is still active.
The test setup should now be connected as shown in Figure 26.
15. Adjust the vertical scale to 50 mV/div, averaging on.
16. Expand the horizontal scale to help locate the step edge, then adjust the
horizontal range to 100 ps/div while centering the edge view. For a more
stable measurement display, turn averaging on.
17. Use the oscilloscope measurement capability to display rise time. Rise time
is measured from the 10% and 90% amplitude points on the waveform.
Record the rise time as t
s+p.
18. Calculate the probe rise time using the following formula:
2
Ꭹ
tp= t
(s+p)
− t
2
s
19. Record the calculated probe rise time on the test record.
Rise Time Check at 5X
Attenuation
42
20. Set the attenuation on the probe to 5X.
21. Repeat steps 16 through 19 for the 5X attenuation setting.
P7380A Z-Active Differential Probe\

Performance Verification
Test Record
Probe Model/Serial Number: Certificate Number:
Temperature: RH %:
Date of Calibration: Technician:
Performance test Minimum Results Maximum
Output offset voltage 25X
± 3mV(20_Cto30_C)
5X
± 3mV(20_Cto30_C) -- 3 mV
DC attenuation accuracy 25X 0.0392 0.0408
5X 0.196 0.204
Rise time 25X N/A 55 ps
5X N/A 55 ps
-- 3 m V +3mV
+3mV
P7380A Z-Active Differential Probe\
43

Performance Verification
44
P7380A Z-Active Differential Probe\

User Service
This section covers troubleshooting and probe maintenance.
Probe/Adapter/Oscilloscope Compatibility
The P7380A Differential Probe is designed to work with all TekConnect-interface oscilloscopes and adapters. However, there may be some cases where probe
features may not work properly.
Table 7: Differential probe compatibility issues
Symptom Likely cause
P7380A Differential Probe
does not work with an 80A03
TekConnect Probe Interface
Adapter.
The LED on the 80A03 Adapter glows red, indicating an
incompatible probe.
The 80A03 Adapter requires firmware version V1.2 or above.
The firmware version label is on the rear panel of the
instrument. Contact Tektronix for information on updating the
adapter firmware.
Error Condition
Replacement Parts
The LEDs on the probe alert you to error or status conditions affecting the probe.
If the probe LEDs flash or otherwise appear to be malfunctioning, an error
condition may exist. Call your Tektronix representative for service.
When the probe is functioning correctly there is a quick flash of the LEDs on the
probe just after connecting to the oscilloscope.
There are no user replaceable parts within the probe. Refer to your product user
manual for a list of replaceable accessories for your probe.
If your probe does not meet the specifications tested in the Performance
Verification, you can send the probe to Tektronix for repair. Follow the procedure
on page 46 to prevent damage to the probe during shipping.
P7380A Z-Active Differential Probe\
45

User Service
Preparation for Shipment
If the original packaging is unfit for use or not available, use the following
packaging guidelines:
1. Use a corrugated cardboard shipping carton having inside dimensions at least
2. Put the probe into an antistatic bag or wrap to protect it from dampness.
3. Place the probe into the box and stabilize it with light packing material.
4. Seal the carton with shipping tape.
5. Refer to Contacting Tektronix on the copyright page of this manual for the
one inch greater than the probe dimensions. The box should have a carton
test strength of at least 200 pounds.
shipping address.
46
P7380A Z-Active Differential Probe\
 Loading...