

Tektronix P5122 User manual

xx
P5122
200 MHz 100X High Voltage Probe
Instructions
*P071272003*
x
071-2720-03
P5122 100X Probe
The P5122 Probe is a high voltage probe with 100X
attenuation and a compensation range of 10 to 25 pF.
The probe is designed for use with Tektronix TPS2000
and THS3000 series floating oscilloscopes with high
input impedance (1 M Ω). The probe has no user- or
Tektronix-serviceable parts.
WARNING.
always the same voltage as the reference lead. To avoid
arc flash, always ensure the insulation sleeve or hook
tip is installed to cover the reference contact ring.
Connecting the Probe to the Oscilloscope
Connect the probe as shown in the illustrations below.
Compensating the Probe
Due to variations in oscilloscope input characteristics,
the low-frequency compensation of the probe may need
adjustment after moving the probe from one oscilloscope
channel to another.
If a 1 kHz calibrated square wave displayed at 1 ms/division
shows significant differences between the leading and
trailing edges, perform the following steps to optimize
low-frequency compensation:
1.
Connect the probe to the oscilloscope channel that you
plan to use for your measurements.
2.
Connect the probe to the probe compensation output
terminals on the oscilloscope front panel.
WARNING.
Probe Comp signal on the oscilloscope when making
this adjustment.
The reference contact ring (see below) is
To avoid electric shock, only connect to the
3.
Depress the locking pin inside the protective sleeve.
4.
Turn the sleeve and the cable end until the adjustment
is visible through the opening.
5.
Push AUTOSET or otherwise adjust your oscilloscope
to display a stable waveform.
6.
Adjust the trimmer in the probe until you see a perfectly
flat-top square wave on the display. (See illustration.)
WARNIN G.
To avoid electric shock, only use the
insulated adjustment tool when making compensation
adjustments.
7.
Turn the sleeve back and lock the sleeve in place.
WARNIN G.
To avoid electric shock, ensure that the
sleeve is locked in the closed position after making
compensation adjustments.
Connecting the Probe to the Circuit
Use the standard accessories included with the probe to
connect to your circuit. (See Table 1.)
WARNIN G.
To avoid electric shock when using the probe
or accessories, keep fingers behind the finger guard of
probe body & accessories (as shown).
To reduce risk of shock, when using the probe on floating
measurements, ensure the reference lead accessories are
fully mated before connecting the probe to the circuit
under test.
Standard Accessories
The standard accessories included with the probe can be
reordered as a kit. The kit includes one of each item shown
below. Order Tektronix part number 020-3046-00.
Table 1: Probe accessories kit
Item Description
Hook tip
1. Press onto
probe tip
2. Squeeze the
hook tip to extend
the conductive
hook
3. Clamp hook
onto conductor
Reference lead,
with hook clip
1. Secure lead to
probe head ground
pin
2. Connect hook
clip to circuit
reference
Reference
lead, with
mini-alligator clip
1. Secure lead to
probe head ground
pin
2. Squeeze clip
and connect to
circuit reference
Ground spring
for probe tip
1. Press onto
CAUTION.
maximum. Do not use for MAINS connection.
This accessory is rated 30 VAC
probe tip
2. Probe circuits
with nearby
reference test
points
Adjustment tool
Use only this
insulated tool for
compensation
adjustments
Specifications
Read the caution below if you are using the probe with the
TPS2000 series oscilloscope input set to AC coupling.
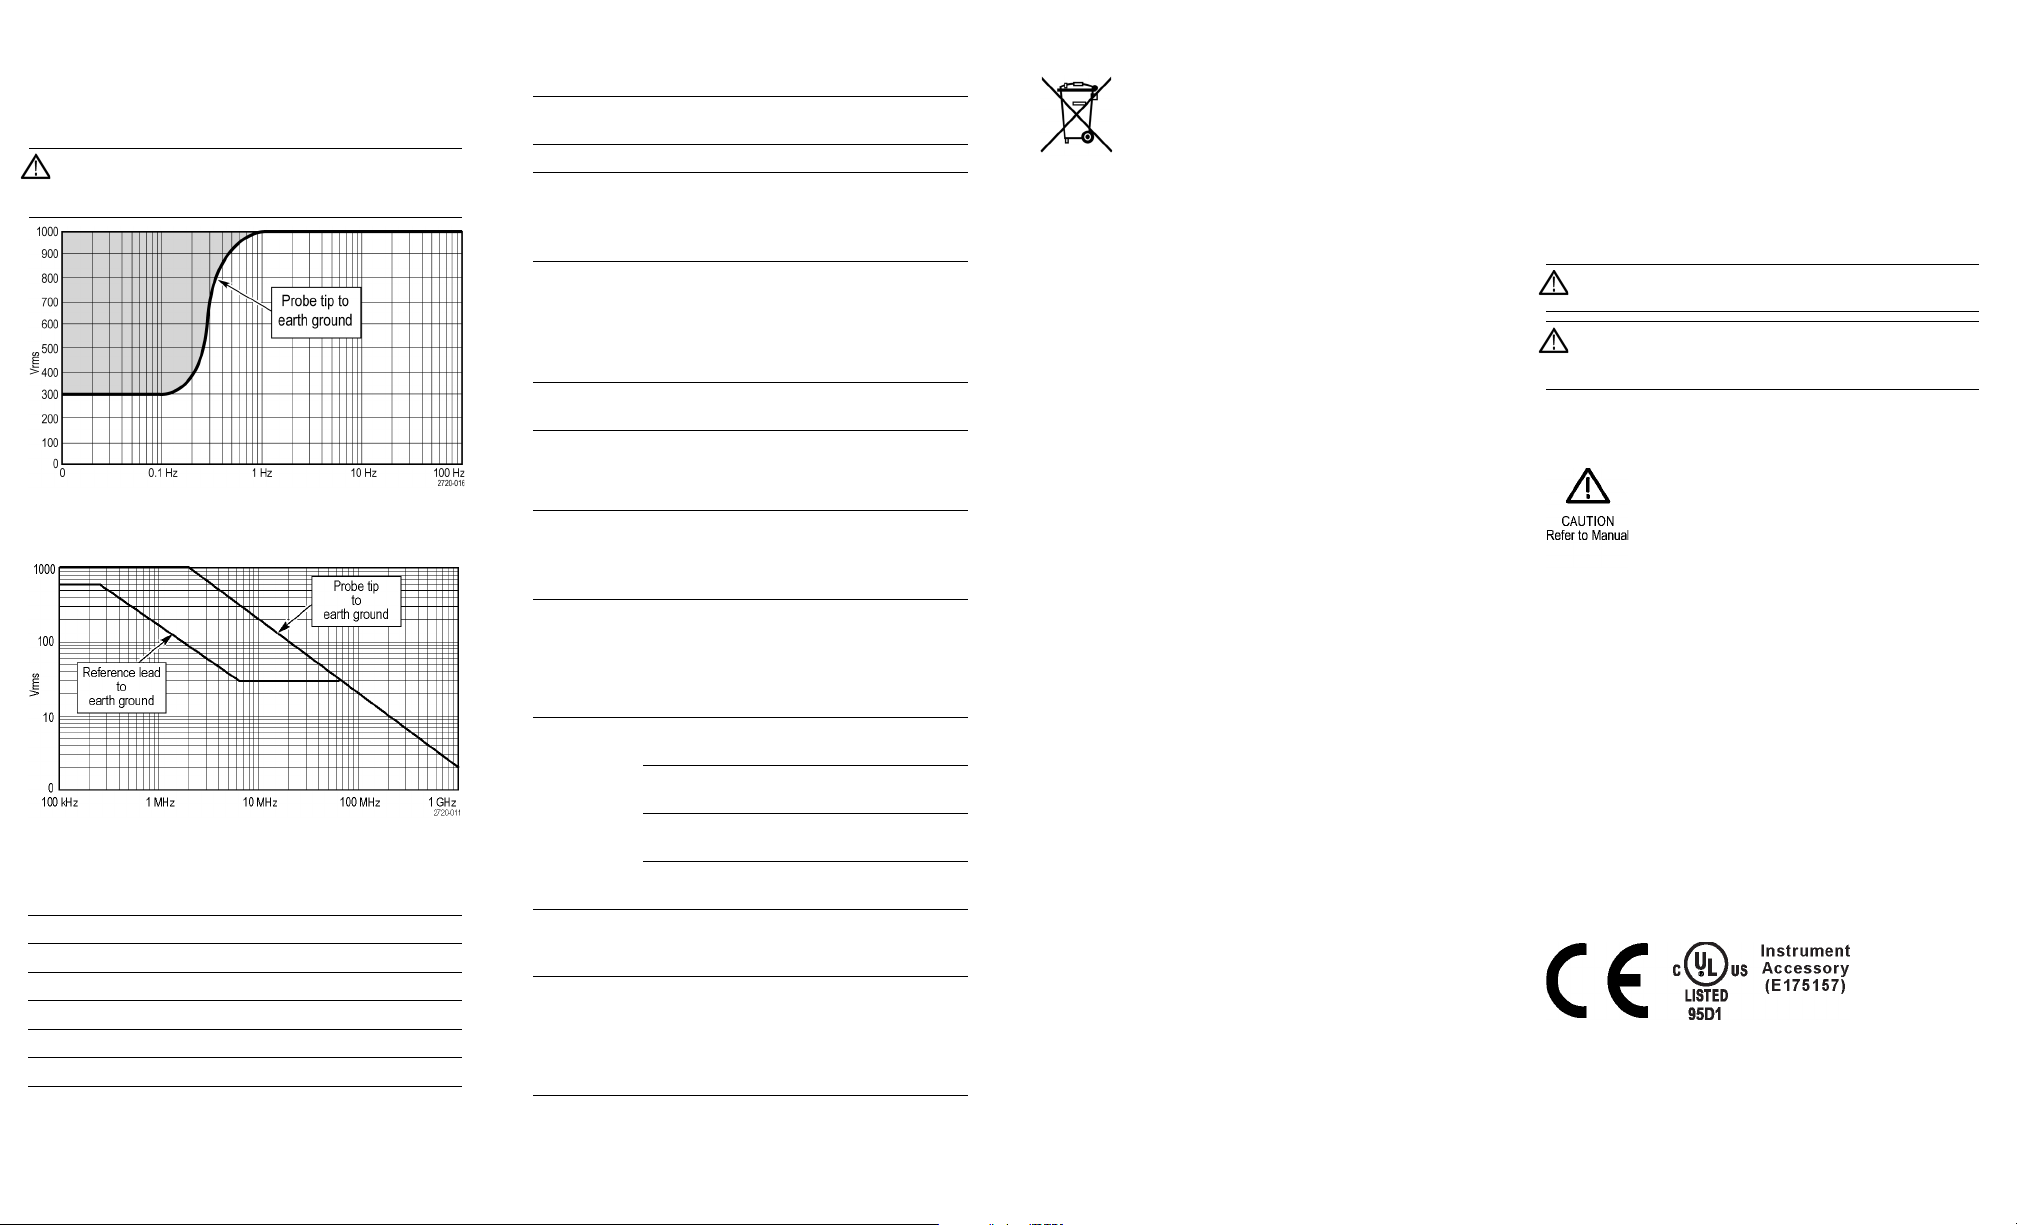
CAUTION.
When the oscilloscope input is set to AC
Coupling, do not probe DC levels >300 V or AC signals
less than 1 Hz and >300 V
. (See graph below.)
RMS
Refer to the reference lead derating curve below when
making floating measurements.
Table 2: Electrical and mechanical specifications
Characteristic Specification
Bandwidth
System attenuation accuracy
Compensation range
System input resistance 100 MΩ
System input capacitance
Maximum tip input voltage
DC to 200 MHz (–3 dB)
100:1
10 pF–25 pF
4.6 pF
1000 V CAT II
Characteristic Specification
Maximum reference lead
voltage to ground
Cable length
600 V CAT II
1.2 m
Table 3: Environmental specifications
Characteristics Description
Temperature
Maximum operating
Minimum operating
Nonoperating
Humidity
Altitude
Operating
Nonoperating
+40 °C (+104 °F)
+5 °C (+40 °F)
–55°Cto+75°C(–67°Fto
+167 °F)
80% up to +30 °C (+86 °F), falling
linearly to 50% at +40 °C (+104 °F)
2.0 km (6,600 ft) maximum
15 km (50,000 ft) maximum
Table 4: Certifications and compliances
Characteristics Description
EC
Declaration
of
Conformity
Measurement
Category
Descriptions
Pollution
Degree 2
Additional
Safety
Standards
Compliance was demonstrated to the following
specification as listed in the Official Journal of
the European Communities:
Low Voltage Directive 2006/95/EC:
EN61010-031: 2002
Category Examples of Products in this
CAT III Distribution-level mains, fixed
CAT II
CAT I Circuits not directly connected to
Do not operate in environments where cond–
uctive pollutants may be present (as defined in
IEC 61010-1). Rated for indoor use only.
UL61010B-1, First Edition & UL61010B-2-031,
First Edition.
CAN/CSA-C22.2 No. 1010.1-92, &
CAN/CSA-C22.2 No. 1010.2.031-94
IEC61010-031:2002
Category
installation
Local-level mains, appliances,
portable equipment
mains.
Equipment Recycling.
with the European Union’s requirements
according to Directive 2002/96/EC on waste
electrical and electronic equipment (WEEE). For
more information about recycling options, check
the Support/Service section of the Te ktronix
Web site (www.tektronix.com).
This product complies
Safety Summary
Review the following safety precautions to avoid injury and
prevent damage to this product or any products connected
to it. To avoid potential hazards, use this product only as
specified. Using the probe or accessories in a manner not
specified could result in a shock or fire hazard.
To Avoid Fire or Personal Injury
For Use With TPS2000 and THS3000 Series Oscilloscopes
Do not float the reference lead of this probe above the
Only.
rated float voltage (600 V RMS CAT II).
Connect and Disconnect Properly.
Connect the probe output
to the measurement instrument before connecting the probe
to the circuit under test. Disconnect the probe input and
the probe reference lead from the circuit under test before
disconnecting the probe from t he measurement instrument.
Avoid Electric Shock.
To avoid injury or loss of life, do not
connect or disconnect probes or test leads while they are
connected to a voltage source.
Observe All Terminal Ratings.
To avoid fire or shock hazard,
observe all ratings and markings on the product. Consult
the product manual for further ratings information before
making connections to the product.
Avoid Electric Shock.
When using probe accessories, never
exceed the lowest rating of the probe or its accessory,
whichever is less, including the measurement category and
voltage rating.
Avoid Electric Overload.
To avoid injury or fire hazard, do
not apply potential to any input, including the reference
inputs, that varies from ground by more than the maximum
rating for that input.
Avoid Exposed Circuitry and Do not Operate Without
Covers.
Do not touch exposed connections and components
when power is present.
Inspect The Probe And Accessories.
Before each use,
inspect probe and accessories for damage (cuts, tears,
defects in the probe body, accessories, cable jacket, etc.).
Do not use if damaged.
Do Not Operate in Wet/Damp Conditions.
Do Not Operate in an Explosive Atmosphere.
Keep Product Surfaces Clean and Dry.
Safety Terms and Symbols Terms in This Manual.
These terms may appear in this manual:
WARNING.
Warning statements identify conditions or
practices that could result in injury or loss of life.
CAUTION.
Caution statements identify conditions or
practices that could result in damage to this product or
other property.
Symbols on the Product.
These symbols may appear on
the product:
Contacting Tektronix
Web site: www.tektronix.com
Phone: 1-800-833-9200
Address: Tektronix, Inc.
Email:
Department or name (if known)
14200 SW Karl Braun Drive
P.O. Box 500
Beaverton, OR 97077
USA
techsupport@tektronix.com
Warranty Information
For warranty information, go to
www.tektronix.com/warranty
Copyright © Tektronix, Inc. All rights reserved. www.tektronix.com
 Loading...