

Page 1

Instruction Manual
OI2125 O/E Receiver
071-1053-00
Warning
The servicing instructions are for use by qualified
personnel only. To avoid personal injury, do not
perform any servicing unless you are qualified to
do so. Refer to all safety summaries prior to
performing service.
www.tektronix.com
Page 2

Copyright © T ektronix, Inc. All rights reserved.
T ektronix products are covered by U.S. and foreign patents, issued and pending. Information in this publication supercedes
that in all previously published material. Specifications and price change privileges reserved.
T ektronix, Inc., P.O. Box 500, Beaverton, OR 97077
TEKTRONIX and TEK are registered trademarks of T ektronix, Inc.
Page 3

WARRANTY
T ektronix warrants that the products that it manufactures and sells will be free from defects in materials and workmanship
for a period of one (1) year from the date of purchase from an authorized T ektronix distributor. If any such product proves
defective during this warranty period, T ektronix, at its option, either will repair the defective product without charge for
parts and labor, or will provide a replacement in exchange for the defective product. Batteries are excluded from this
warranty.
In order to obtain service under this warranty, Customer must notify Tektronix of the defect before the expiration of the
warranty period and make suitable arrangements for the performance of service. Customer shall be responsible for
packaging and shipping the defective product to the service center designated by T ektronix, shipping charges prepaid, and
with a copy of customer proof of purchase. T ektronix shall pay for the return of the product to Customer if the shipment is
to a location within the country in which the T ektronix service center is located. Customer shall be responsible for paying
all shipping charges, duties, taxes, and any other charges for products returned to any other locations.
This warranty shall not apply to any defect, failure or damage caused by improper use or improper or inadequate
maintenance and care. T ektronix shall not be obligated to furnish service under this warranty a) to repair damage resulting
from attempts by personnel other than T ektronix representatives to install, repair or service the product; b) to repair
damage resulting from improper use or connection to incompatible equipment; c) to repair any damage or malfunction
caused by the use of non-T ektronix supplies; or d) to service a product that has been modified or integrated with other
products when the effect of such modification or integration increases the time or difficulty of servicing the product.
THIS WARRANTY IS GIVEN BY TEKTRONIX WITH RESPECT TO THE LISTED PRODUCTS IN LIEU OF
ANY OTHER WARRANTIES, EXPRESS OR IMPLIED. TEKTRONIX AND ITS VENDORS DISCLAIM ANY
IMPLIED WARRANTIES OF MERCHANTABILITY OR FITNESS FOR A PARTICULAR PURPOSE.
TEKTRONIX’ RESPONSIBILITY TO REPAIR OR REPLACE DEFECTIVE PRODUCTS IS THE SOLE AND
EXCLUSIVE REMEDY PROVIDED TO THE CUST OMER FOR BREACH OF THIS WARRANTY. TEKTRONIX
AND ITS VENDORS WILL NOT BE LIABLE FOR ANY INDIRECT , SPECIAL, INCIDENTAL, OR
CONSEQUENTIAL DAMAGES IRRESPECTIVE OF WHETHER TEKTRONIX OR THE VENDOR HAS
ADVANCE NOTICE OF THE POSSIBILITY OF SUCH DAMAGES.
Page 4

Page 5

Table of Contents
General Safety Summary v. . . . . . . . . . . . . . . . . . . . . . . . . . . . . . . . . . . . . . . . . . .
Contacting T ektronix viii. . . . . . . . . . . . . . . . . . . . . . . . . . . . . . . . . . . . . . . . . . . . . .
Getting Started 1. . . . . . . . . . . . . . . . . . . . . . . . . . . . . . . . . . . . . . . . . . . .
Options 2. . . . . . . . . . . . . . . . . . . . . . . . . . . . . . . . . . . . . . . . . . . . . . . . . . . . . . . . .
Standard Accessories 3. . . . . . . . . . . . . . . . . . . . . . . . . . . . . . . . . . . . . . . . . . . . . .
Optional Accessories 4. . . . . . . . . . . . . . . . . . . . . . . . . . . . . . . . . . . . . . . . . . . . . .
Installation 5. . . . . . . . . . . . . . . . . . . . . . . . . . . . . . . . . . . . . . . . . . . . . . . . . . . . . .
Functional Check 6. . . . . . . . . . . . . . . . . . . . . . . . . . . . . . . . . . . . . . . . . . . . . . . . .
Operating Basics 9. . . . . . . . . . . . . . . . . . . . . . . . . . . . . . . . . . . . . . . . . . .
Handling 9. . . . . . . . . . . . . . . . . . . . . . . . . . . . . . . . . . . . . . . . . . . . . . . . . . . . . . . .
Connecting Signals 9. . . . . . . . . . . . . . . . . . . . . . . . . . . . . . . . . . . . . . . . . . . . . . . .
Front Panel Description 12. . . . . . . . . . . . . . . . . . . . . . . . . . . . . . . . . . . . . . . . . . . .
Clock Recovery Modules 14. . . . . . . . . . . . . . . . . . . . . . . . . . . . . . . . . . . . . . . . . . .
Rear Panel Connections and Controls 18. . . . . . . . . . . . . . . . . . . . . . . . . . . . . . . . .
Using the Rear-Panel Remote Interface 19. . . . . . . . . . . . . . . . . . . . . . . . . . . . . . . .
Specifications 23. . . . . . . . . . . . . . . . . . . . . . . . . . . . . . . . . . . . . . . . . . . . . .
Theory of Operation 31. . . . . . . . . . . . . . . . . . . . . . . . . . . . . . . . . . . . . . . .
O/E Receiver 32. . . . . . . . . . . . . . . . . . . . . . . . . . . . . . . . . . . . . . . . . . . . . . . . . . . .
Clock Recovery Modules 33. . . . . . . . . . . . . . . . . . . . . . . . . . . . . . . . . . . . . . . . . . .
Performance Verification 35. . . . . . . . . . . . . . . . . . . . . . . . . . . . . . . . . . . .
Prerequisites 36. . . . . . . . . . . . . . . . . . . . . . . . . . . . . . . . . . . . . . . . . . . . . . . . . . . . .
Equipment Required 36. . . . . . . . . . . . . . . . . . . . . . . . . . . . . . . . . . . . . . . . . . . . . . .
Photodetector Optical Input 38. . . . . . . . . . . . . . . . . . . . . . . . . . . . . . . . . . . . . . . . .
Data Output 41. . . . . . . . . . . . . . . . . . . . . . . . . . . . . . . . . . . . . . . . . . . . . . . . . . . . .
Eye Pattern T est Matrix 45. . . . . . . . . . . . . . . . . . . . . . . . . . . . . . . . . . . . . . . . . . . .
Clock Recovery Module T ests 51. . . . . . . . . . . . . . . . . . . . . . . . . . . . . . . . . . . . . . .
OI2125 O/E Receiver T est Record 55. . . . . . . . . . . . . . . . . . . . . . . . . . . . . . . . . . . .
Clock Recovery Module T est Records 57. . . . . . . . . . . . . . . . . . . . . . . . . . . . . . . . .
Maintenance 59. . . . . . . . . . . . . . . . . . . . . . . . . . . . . . . . . . . . . . . . . . . . . . .
Inspection and Cleaning 59. . . . . . . . . . . . . . . . . . . . . . . . . . . . . . . . . . . . . . . . . . . .
General Care 59. . . . . . . . . . . . . . . . . . . . . . . . . . . . . . . . . . . . . . . . . . . . . . . . . . . . .
Exterior Cleaning 59. . . . . . . . . . . . . . . . . . . . . . . . . . . . . . . . . . . . . . . . . . . . . . . . .
Inspection 60. . . . . . . . . . . . . . . . . . . . . . . . . . . . . . . . . . . . . . . . . . . . . . . . . . . . . . .
Cleaning Optical Connectors 60. . . . . . . . . . . . . . . . . . . . . . . . . . . . . . . . . . . . . . . .
Repackaging Instructions 62. . . . . . . . . . . . . . . . . . . . . . . . . . . . . . . . . . . . . . . . . . .
Replaceable Parts 63. . . . . . . . . . . . . . . . . . . . . . . . . . . . . . . . . . . . . . . . . .
Glossary 67. . . . . . . . . . . . . . . . . . . . . . . . . . . . . . . . . . . . . . . . . . . . . . . . . .
Index 73. . . . . . . . . . . . . . . . . . . . . . . . . . . . . . . . . . . . . . . . . . . . . . . . . . . . .
OI2125 O/E Receiver Instruction Manual
i
Page 6

Table of Contents
List of Figures
Figure 1: OI2125 Optical-to-Electrical Receiver 1. . . . . . . . . . . . . . . . .
Figure 2: Functional test setup 6. . . . . . . . . . . . . . . . . . . . . . . . . . . . . . . .
Figure 3: Oscilloscope display of an eye pattern 7. . . . . . . . . . . . . . . . .
Figure 4: Connecting a fiber optic cable 11. . . . . . . . . . . . . . . . . . . . . . . .
Figure 5: OI2125 front panel 12. . . . . . . . . . . . . . . . . . . . . . . . . . . . . . . . .
Figure 6: Clock Recovery Modules for the receiver 14. . . . . . . . . . . . . . .
Figure 7: Installing a Clock Recovery Module 16. . . . . . . . . . . . . . . . . . .
Figure 8: Releasing the module with the latch 17. . . . . . . . . . . . . . . . . . .
Figure 9: OI1125 rear panel 18. . . . . . . . . . . . . . . . . . . . . . . . . . . . . . . . . .
Figure 10: Rear Remote Interface connector pinout 19. . . . . . . . . . . . . .
Figure 11: OI2125 Output Voltage versus Input Optical Power 25. . . . .
Figure 12: O/E Receiver interconnect diagram 31. . . . . . . . . . . . . . . . . .
Figure 13: Setup for the LOS threshold test 38. . . . . . . . . . . . . . . . . . . . .
Figure 14: Setup for the bandwidth test 41. . . . . . . . . . . . . . . . . . . . . . . .
Figure 15: Proper positioning of the impulse
for optimum curve download 44. . . . . . . . . . . . . . . . . . . . . . . . . . . . . .
Figure 16: Setup for the eye pattern test matrix 46. . . . . . . . . . . . . . . . .
Figure 17: Measurements taken from the eye pattern 49. . . . . . . . . . . . .
Figure 18: OM1420 Clock Recovery Module test setup 51. . . . . . . . . . .
Figure 19: RMS Jitter measurement 53. . . . . . . . . . . . . . . . . . . . . . . . . . .
Figure 20: Cleaning an optical connector 61. . . . . . . . . . . . . . . . . . . . . . .
Figure 21: Standard accessories 63. . . . . . . . . . . . . . . . . . . . . . . . . . . . . . .
Figure 22: Optional power cords 65. . . . . . . . . . . . . . . . . . . . . . . . . . . . . .
ii
OI2125 O/E Receiver Instruction Manual
Page 7

List of Tables
Table of Contents
Table 1: Power cord options 2. . . . . . . . . . . . . . . . . . . . . . . . . . . . . . . . .
Table 2: Service options 2. . . . . . . . . . . . . . . . . . . . . . . . . . . . . . . . . . . . .
Table 3: Receiver standard accessories 3. . . . . . . . . . . . . . . . . . . . . . . .
Table 4: Clock Recovery Module standard accessories 4. . . . . . . . . . .
Table 5: Optional accessories 4. . . . . . . . . . . . . . . . . . . . . . . . . . . . . . . . .
Table 6: Remote Port signals 20. . . . . . . . . . . . . . . . . . . . . . . . . . . . . . . . .
Table 7: OM1420 Module data rate select and status logic 20. . . . . . . .
Table 8: Clock recovery module type select logic 21. . . . . . . . . . . . . . . .
Table 9: OI2125 Receiver specifications 23. . . . . . . . . . . . . . . . . . . . . . . .
Table 10: OM1420 Clock Recovery Module specifications 24. . . . . . . .
Table 11: Environmental characteristics 26. . . . . . . . . . . . . . . . . . . . . . .
Table 12: Certifications and compliances 27. . . . . . . . . . . . . . . . . . . . . . .
Table 13: Safety characteristics 27. . . . . . . . . . . . . . . . . . . . . . . . . . . . . . .
Table 14: OI2125 Receiver PV checks 35. . . . . . . . . . . . . . . . . . . . . . . . .
Table 15: Clock Recovery Module PV checks 35. . . . . . . . . . . . . . . . . . .
Table 16: Test equipment 36. . . . . . . . . . . . . . . . . . . . . . . . . . . . . . . . . . . .
Table 17: OI2125 Receiver test record 55. . . . . . . . . . . . . . . . . . . . . . . . .
Table 18: BERT input @2.48832 Gb/s bit rate 55. . . . . . . . . . . . . . . . . .
Table 19: BERT input @9.95328 Gb/s bit rate 55. . . . . . . . . . . . . . . . . .
Table 20: BERT input @12.50000 Gb/s bit rate 56. . . . . . . . . . . . . . . . .
Table 21: OM1420 test record 57. . . . . . . . . . . . . . . . . . . . . . . . . . . . . . . .
Table 22: OM1420 clock output data 57. . . . . . . . . . . . . . . . . . . . . . . . . .
Table 23: Inspection check list 60. . . . . . . . . . . . . . . . . . . . . . . . . . . . . . . .
OI2125 O/E Receiver Instruction Manual
iii
Page 8

Table of Contents
iv
OI2125 O/E Receiver Instruction Manual
Page 9

General Safety Summary
Review the following safety precautions to avoid injury and prevent damage to
this product or any products connected to it. To avoid potential hazards, use this
product only as specified.
Only qualified personnel should perform service procedures.
While using this product, you may need to access other parts of the system. Read
the General Safety Summary in other system manuals for warnings and cautions
related to operating the system.
To Avoid Fire or
Personal Injury
Use Proper Power Cord. Use only the power cord specified for this product and
certified for the country of use.
Ground the Product. This product is grounded through the grounding conductor
of the power cord. To avoid electric shock, the grounding conductor must be
connected to earth ground. Before making connections to the input or output
terminals of the product, ensure that the product is properly grounded.
Observe All Terminal Ratings. To avoid fire or shock hazard, observe all ratings
and markings on the product. Consult the product manual for further ratings
information before making connections to the product.
Do Not Operate Without Covers. Do not operate this product with covers or panels
removed.
Use Proper Fuse. Use only the fuse type and rating specified for this product.
Wear Eye Protection. Wear eye protection if exposure to high-intensity rays or
laser radiation exists.
Do Not Operate With Suspected Failures. If you suspect there is damage to this
product, have it inspected by qualified service personnel.
Do Not Operate in Wet/Damp Conditions.
Do Not Operate in an Explosive Atmosphere.
Keep Product Surfaces Clean and Dry .
Provide Proper Ventilation. Refer to the manual’s installation instructions for
details on installing the product so it has proper ventilation.
OI2125 O/E Receiver Instruction Manual
v
Page 10

General Safety Summary
Symbols and Terms
T erms in this Manual. These terms may appear in this manual:
WARNING. Warning statements identify conditions or practices that could result
in injury or loss of life.
CAUTION. Caution statements identify conditions or practices that could result in
damage to this product or other property.
T erms on the Product. These terms may appear on the product:
DANGER indicates an injury hazard immediately accessible as you read the
marking.
WARNING indicates an injury hazard not immediately accessible as you read the
marking.
CAUTION indicates a hazard to property including the product.
Symbols on the Product. The following symbols may appear on the product:
CAUTION
Refer to Manual
Protective Ground
(Earth) Terminal
Avoid Exposure- Laser Radiation
is Emitted from this Aperture
vi
OI2125 O/E Receiver Instruction Manual
Page 11

Preface
This is the instruction manual for the OI2125 O/E Receiver. This manual
provides user information and performance verification procedures for the
instrument.
This manual also provides specifications and performance verification procedures for the optional Clock Recovery Modules.
OI2125 O/E Receiver Instruction Manual
vii
Page 12

Preface
Contacting Tektronix
Phone 1-800-833-9200*
Address Tektronix, Inc.
Department or name (if known)
14200 SW Karl Braun Drive
P.O. Box 500
Beaverton, OR 97077
USA
Web site www.tektronix.com
Sales support 1-800-833-9200, select option 1*
Service support 1-800-833-9200, select option 2*
Technical support Email: techsupport@tektronix.com
1-800-833-9200, select option 3*
6:00 a.m. – 5:00 p.m. Pacific time
* This phone number is toll free in North America. After office hours, please leave a
voice mail message.
Outside North America, contact a Tektronix sales office or distributor; see the
Tektronix web site for a list of offices.
viii
OI2125 O/E Receiver Instruction Manual
Page 13

Getting Started
The OI2125 (see Figure 1) is an optical-to-electrical receiver that converts a
modulated optical input signal to an electrical data output signal at data rates up
to 12.5 Gb/s. Using an amplified high-speed photodetector, the OI2125 O/E
Receiver operates over a wavelength range of 1100 nm to 1650 nm.
You can use the receiver in a test system to convert the optical signal from a
DUT (Device Under Test) to an electrical signal to be measured with an
oscilloscope or used as a part of a BER (Bit Error Rate) test. When you use the
receiver as part of a BER test, the BERT Pattern Generator supplies a data signal
that is converted to a modulated optical signal by an OI1125 E/O Transmitter.
The OI2125 O/E Receiver is used to convert the optical BER test pattern back to
an electrical signal for analysis by the BERT Error Analyzer.
Using the transmitter and receiver combined with a BERT, you can test the bit
error rate of optical signals in SONET/SDH and other optical transmission
systems.
Figure 1: OI2125 Optical-to-Electrical Receiver
The OI2125 O/E Receiver provides the following features:
H Supports standard SONET data rates from OC48 to OC192 and FEC data
rates up to 12.5 Gb/s.
H Optical wavelength range designed to operate in C band (1530 nm to
1565 nm), but is usable over an extended wavelength range of 1100 nm to
1650 nm.
H Optional clock recovery modules provide data rates for OC-192 and
OC-192 FEC.
OI2125 O/E Receiver Instruction Manual
1
Page 14

Getting Started
Options
The OI2125 O/E Receiver provides a slot for an optional clock recovery module.
Clock recovery modules currently available:
H The OM1420 clock recovery module provides clock recovery at one of two
selectable data rates: OC-192 (9.953280 Gb/s), and OC-192 Forward Error
Correction (10.66423 Gb/s).
The AC power input to the OI2125 O/E Receiver is supplied through a standard
IEC320 AC input connector. The internal power supply in the receiver operates
with AC power from 100 to 240 VAC at either 50 or 60 Hz. The standard power
cord supplied with the OI2125 O/E Receiver is a 120 VAC North American
power cord.
Table 1 lists the power cord options that are available for your OI2125 O/E
Receiver.
T able 1: Power cord options
Option Description
A1 European power cord (240 V, 50 Hz)
A2 UK power cord (240 V , 50 Hz)
A3 Australian power cord (240 V , 50 Hz)
A5 Swiss power cord (240 V , 50 Hz)
AC Chinese power cord
A99 No power cord
Table 2 lists the Tektronix service options. These options are modular, flexible,
and easy to order with your instrument. Designed to support tracking of
calibration to requirements of ISO9000 and to provide for extended repair
coverage, these options help fix your long-term maintenance costs and eliminate
unplanned expenditures.
T able 2: Service options
Option Description
D1 Provides the initial Test Data Report from the factory on delivery.
C3 Provides factory calibration certification on delivery, plus two more years of
calibration coverage. Throughout the coverage period, the instrument will be
calibrated according to its Recommended Calibration Interval.
D3 Provides test data on delivery plus a Test Data Report for every calibration
performed during three years of coverage (requires Option C3).
2
OI2125 O/E Receiver Instruction Manual
Page 15

Standard Accessories
Getting Started
T able 2: Service options (Cont.)
Option Description
R3 Extends product repair warranty to a total of three years.
C5 Provides factory calibration certification on delivery, plus four more years of
calibration coverage. Throughout the coverage period, the instrument will be
calibrated according to its Recommended Calibration Interval.
D5 Provides test data on delivery plus a Test Data Report for every calibration
performed during five years of coverage (requires Option C5).
R5 Extends product repair warranty to a total of five years.
Tektronix Service Options are available at the time you order your instrument.
Contact your local Tektronix Sales Office for more information.
Table 3 lists the standard accessories that come with the OI2125 O/E Receiver.
T able 3: Receiver standard accessories
Accessory Part number
US power cord 161-0066-00
Slot Cover Module (preinstalled) 119-6690-00
Low-loss SMA cable 015-0561-00
Optical cable, FC/PC-FC/PC, 2 M 174-3922-00
50 W terminator (2 ea, preinstalled) 015-1022-01
FC/PC adapter (preinstalled) 119-5115-00
Optical connector cleaning kit 006-8217-00
Instruction Manual 071-1053-XX
Certificate of Calibration –––
OI2125 O/E Receiver Instruction Manual
3
Page 16

Getting Started
The Clock Recovery Modules are orderable separately. Table 4 lists the standard
accessories that come with the modules.
T able 4: Clock Recovery Module standard accessories
Accessory Part number OM1420
Flexible SMA jumper cable 174-4699-00
n
Optional Accessories
Low-loss SMA cable 015-0561-00
50 W terminator (preinstalled) 015-1022-01
Certificate of Calibration ––––––––
Instructions 071-1055-XX
n
n (2 ea)
n
Table 5 lists the optional accessories that are recommended for the OI2125 O/E
Receiver.
T able 5: Optional accessories
Item Part number
SMA 2.5 UCI adapter 119-4517-00
DIAMOND 2.5 UCI adapter 119-4556-00
SMA UCI adapter 119-4557-00
DIAMOND 3.5 UCI adapter 119-4558-00
FC/PC adapter 119-5115-00
SC/APC adapter 119-5116-00
DIN/PC 47256 adapter 119-5887-00
ST/APC adapter 119-5888-00
FC/PC 5dB attenuator 131-7368-00
Side-By-Side Instrument Rack Adapter TVGF13
4
OI2125 O/E Receiver Instruction Manual
Page 17

Installation
Getting Started
To learn how to install, access the front panel, power on, and power off the
OI2125 O/E Receiver, do the following procedures:
Preparation
To properly install and power on the receiver, do the following steps:
1. Be sure the operating environment is within the specifications listed in
Table 11 starting on page 26.
CAUTION. To prevent damage to the receiver, provide proper ventilation. A small
fan is located on the bottom of the chassis. Do not block the cabinet ventilation
holes, or disable the fan. Do not remove the cabinet feet; the feet provide proper
clearance for ventilation.
2. Leave space for cooling. Do this by verifying that the ventilation holes on
the sides, top, and bottom of the cabinet are free of any airflow obstructions.
Leave at least 5.1 cm (2 inches) free on each side.
3. Check that you have the proper electrical connections. The OI2125 O/E
Receiver requires 100 to 240 VAC
4. Connect the proper power cord from the rear-panel power connector (see
Figure 9 on page 18) to the power system.
CAUTION. To prevent damage to your
while the receiver is powered on. Do not apply a voltage outside the Maximum
Nondestructive Input Voltage for the
handling the module and front panel electrical connectors.
"10%, 47 Hz to 63 Hz, and 40 W.
RMS
module, do not install or remove a module
module. Observe static precautions when
5. Verify that the power is off by ensuring the rear-panel rocker power switch is
in the off position.
6. Plug a clock recovery or slot cover module into the receiver: Slowly insert
the module into the slot in the front panel until it meets the connector at the
back of the module slot.
7. Firmly push the module in to seat it in the connector.
8. Once the module is seated, turn the hold-down screw clockwise to lock the
module into place.
If you are not going to use a clock recovery module, install the slot cover module
in the receiver to limit stray EMI emissions and to protect the receiver from
ambient RF noise.
Power on
Power off
OI2125 O/E Receiver Instruction Manual
To power on the receiver, push the rear-panel rocker power switch to toggle it on
(see Figure 9 on page 18).
To power off the receiver, push the rocker power switch to the off position.
5
Page 18

Getting Started
Functional Check
To perform a functional check of the OI2125 O/E Receiver, you must connect a
setup as shown in Figure 2. This setup creates an optical data source by
combining a pattern generator with an electrical-to-optical transmitter (with an
internal laser source). This optical data source is fed into the optical input of the
receiver, and the converted data output is displayed as an electrical eye pattern on
the oscilloscope. This is the method that is used in the Eye Pattern Test Matrix
on page 45 of the Performance Verification procedures.
The equipment required, besides the receiver and the optical and electrical cables
supplied as standard accessories, is listed below:
H A pattern generator capable of producing data rates from 2.48 Gb/s to
12.50 Gb/s, with output levels at about 1.0 V
p-p
.
H An electrical-to-optical transmitter capable of providing single-mode optical
signals in the 1550 nm band at data rates up to 12.50 Gb/s.
H A 50 W SMA cable to connect the pattern generator divided-clock output as
an oscilloscope trigger signal.
Pattern generator
Clock
/32
Data
OI1125
Laser out
Low-loss SMA cable
Figure 2: Functional test setup
H A 50 W low-loss SMA cable to connect the receiver output to the oscillo-
scope input.
H A 5 dB optical attenuator to limit the input power to the receiver to less than
0 dBm.
CSA8000/TDS8000 w/80E01
PMF fiber
Modulator
Data in
Modulator
out
Laser in
Single mode fiber
Optical in
(FC/PC)
OI2125
Data out
5 dB Optical
attenuator
Low loss SMA cable
Trigger
Direct In
SMA cable
Follow the Displaying an Eye Pattern procedure on the next page to do a
functional check of the OI2125 O/E Receiver. If you are unfamiliar with making
fiber optic connections, refer to Connecting Signals on page 9.
6
OI2125 O/E Receiver Instruction Manual
Page 19

Getting Started
Displaying an Eye Pattern
To display an eye pattern, do the following:
1. Connect the test setup as shown in Figure 2, and power on the equipment.
2. Set the BERT bit rate to 9.953280 Gb/s.
3. Set the pattern to PRBS-31.
4. Disable the adjustable duty cycle.
5. Set the mark ratio to 1/2.
6. Set the trigger to 1/32 clock.
7. Set the output mode to AC.
8. Turn the data output on and set the data amplitude to 1.0 V
p–p
.
9. Enable the transmitter laser by turning the keyswitch clockwise (to the
unlocked position). The Laser On LED and Laser Output Active LED light.
10. On the oscilloscope, press Autoset and then adjust the horizontal scale to
display an eye pattern (see Figure 3).
The oscilloscope displays an eye pattern as shown in Figure 3. This indicates
that the receiver is functioning correctly—it is converting the modulated input
optical signal to an electrical eye pattern that represents the data stream from the
BERT.
Figure 3: Oscilloscope display of an eye pattern
OI2125 O/E Receiver Instruction Manual
7
Page 20

Getting Started
8
OI2125 O/E Receiver Instruction Manual
Page 21

Operating Basics
Handling
This section describes the connectors and controls on the front and rear panels of
the OI2125 O/E Receiver. Figures 5 and 9 illustrate the front and rear panels of
the instrument.
Handle the OI2125 O/E Receiver carefully at all times. The instrument contains
sensitive optical and electrical components that can be damaged by physical
shocks.
WARNING. To prevent eye injury, do not look directly into any optical output
port. Laser light can be harmful to your eyes. Optical signals in the wavelength
range used by the OI2125 O/E Receiver are in the infrared band and are
invisible to the human eye.
CAUTION.To protect the module and instrument inputs, always use a wrist strap
when handling the module and when making electrical signal connections.
Always replace the terminators on the receiver and module when not in use.
Connecting Signals
Electrical Connectors
Optical Connector
The OI2125 O/E Receiver has two types of connectors for inputs and outputs.
The OI2125 O/E Receiver electrical outputs use high-performance SMA
connectors. Never attach a cable if the cable has a worn or damaged connector
because this may damage the OI2125 connector.
Use extra care when attaching or removing a cable from the connectors. Turn
only the nut, not the cable. Use light finger pressure to make this initial
connection. Then tighten the nut lightly with a wrench.
For best repeatability and to prolong the life of both cable and instrument
connectors, use a torque wrench and tighten the connection to the range of 79 to
112 N-cm (7 to 10 lb-in).
If the connectors will receive heavy use, such as in a production environment,
you should install connector-saver adapters on the OI2125 O/E Receiver to make
connections to the device under test.
The optical input connector of the OI2125 O/E Receiver is a Universal-Style
physical contact (PC) type that can couple to optical fibers with a core diameter
of up to 9 mm. An FC/PC adapter is supplied as a standard accessory for use with
the Universal-Style input connector. Alternative optical connector types can be
OI2125 O/E Receiver Instruction Manual
9
Page 22

Operating Basics
coupled by using the optional accessory adapters. (Refer to Optional Accessories
on page 4.)
If you connect fiber cores larger than 9 mm, the receiver may still couple light,
but the mismatch in core diameter will result in significant optical attenuation.
To attach a fiber optic cable with an FC/PC connector to the FC/PC input
receptacle, refer to Figure 4 on page 11 and do the following:
1. Remove the dust cover from the optical receptacle.
CAUTION. Use care when making optical connections. If you are not using an
optical connection, either on the receiver, cable or associated optical equipment,
always leave the protective dust cover on the connector. The glass surface of the
fiber optic core is easily contaminated by airborne dust particles.
Treat all optical connectors as you would a camera lens or other precision
optical equipment.
2. Clean the connector on the fiber optic cable using the procedure on page 60.
3. Carefully align the keyway on the receptacle with the key on the connector.
4. Tighten the nut lightly with finger pressure only. If you overtighten an
optical connector, you may get inconsistent optical signal performance.
10
OI2125 O/E Receiver Instruction Manual
Page 23

Keyway
Key
Operating Basics
Tighten
FC/PC
Receptacle
FC/PC
connector
Fiber optic cable with
FC/PC connector
Figure 4: Connecting a fiber optic cable
OI2125 O/E Receiver Instruction Manual
11
Page 24

Operating Basics
Front Panel Description
The front panel is functionally divided into two sections: the O/E receiver
section and the clock recovery module port. Use Figure 5 and the following
descriptions to help you connect and operate the receiver.
Input detected on
LED
Optical
input
Power
on
LED
Figure 5: OI2125 front panel
O/E Receiver
Data out (2)
Remote
enable
switch
Remote
enabled
LED
Clock Recovery
Module
The O/E receiver section is described here.
OPTICAL INPUT. The optical input port is designed to accept modulated optical
signals over a range of digital data rates and optical wavelengths. The port has a
single-mode fiber, universal optical input connector. To preserve the optical
integrity of the connector, keep the dust cover on the connector when not in use.
12
POWER ON. This green LED illuminates when the receiver is powered on.
INPUT DETECTED ON. This green LED illuminates when the optical input signal
on the input connector is above the optical power threshold of the internal
photodetector.
REMOTE ENABLE. This switch toggles the remote mode of the receiver (and the
LED indicator) on and off when the switch is pressed. All front-panel controls
and status indicators, including Clock Recovery Module functions are accessible
through the Remote Interface when in remote mode.
OI2125 O/E Receiver Instruction Manual
Page 25

Operating Basics
Remote Enabled. When power is first applied to the receiver, this green LED is
off, unless the remote interface Front Panel Unlock signal is low (active). If the
Front Panel Unlock signal is low, the LED is on, and will flash briefly when the
Remote Enable switch is pressed.
When the Front Panel Unlock signal is high at power-on, pressing the Remote
Enable switch toggles the LED on, indicating that the receiver is in remote
mode. Pressing the switch again returns the receiver to local (front panel) mode,
and the LED extinguishes.
DATA OUT (2). Two electrical data out connectors output the converted electrical
data signal. One of the outputs provides a signal to the Clock Recovery Module
Data input port, and the other output is available for measuring the quality of the
input optical signal with an oscilloscope or BERT. Generally, the Attenuated
Data Out signal from the receiver is connected to the Data In connector on the
Clock Recovery Module to keep from exceeding the maximum input voltage of
the module.
Clock Recovery
Module Port
The receiver has a front panel slot that accepts optional clock recovery modules.
A connector at the rear of the slot provides power and a control interface for the
modules. A slot cover module is a standard accessory for the receiver that should
remain installed in the receiver until a clock module is needed, to limit RF noise
and stray EMI emissions.
OI2125 O/E Receiver Instruction Manual
13
Page 26

Operating Basics
Clock Recovery Modules
Clock Recovery Modules are available for the OI2125 O/E Receiver:
H The OM1420 clock recovery module provides clock recovery at one of two
The slot cover module is a standard accessory that plugs into the receiver module
slot when a clock recovery module is not used. See Figure 6.
selectable rates–OC-192 data rate (9.95328 Gb/s), and an OC-192 Forward
Error Correction data rate (10.66423 Gb/s).
Clock Recovery
Module Features
Data in Clock out
Data rate
indicator LEDs
Select rate
pushbutton
Hold-down screw
Figure 6: Clock Recovery Modules for the receiver
The Clock Recovery Module features are described as follows:
DATA IN. This SMA connector accepts electrical input from either the OI2125
O/E Receiver Attenuated Data Out port or from an external signal source. Use
the short SMA cable included with the module to connect to the receiver
Attenuated Data Out connector.
14
CLOCK OUT. The recovered clock from the input signal is output on this SMA
connector.
SELECT RATE. A pushbutton switch selects between the data rates available in
the module. When you repeatedly push this momentary pushbutton switch, the
clock recovery module cycles through the data rates available in the module.
OI2125 O/E Receiver Instruction Manual
Page 27

Operating Basics
Data Rate Indicators. LEDs located to the left of the Data Rate Select switch
indicate which data rate is selected.
Hold-Down Screw. The hold-down screw locks the module into place once the
module is seated.
OI2125 O/E Receiver Instruction Manual
15
Page 28

Operating Basics
Installing a Clock
Recovery Module
The OI2125 O/E Receiver will operate without a clock recovery module.
However, if you do not need clock recovery in your application, you should
install the slot cover module in the receiver to limit stray EMI emissions and to
protect the receiver from ambient RF noise.
CAUTION. To prevent damage to your
module, do not install or remove the
module while the receiver is powered on. Do not apply a voltage outside the
Maximum Nondestructive Input Voltage for the
module. Observe static precau-
tions when handling the module and front panel electrical connectors.
To install a module, refer to Figure 7 and do the following:
1. Power off the receiver.
2. Slowly insert the module into the slot in the front panel until it meets the
connector at the back of the module slot.
When the module contacts the connector in the back of the module slot, the
front of the module is about an eighth-inch away from being flush with the
front panel of the receiver.
3. Firmly push the module into the receiver to seat it in the connector.
4. Once the module is seated, turn the hold-down screw clockwise to lock the
module into place.
5. Attach the short SMA cable from the attenuated data output of the receiver to
the input of the module. This step is not necessary when using the module as
a standalone instrument or when installing a slot cover module.
Insert the module
After module is seated,
tighten the hold-down
screw.
16
Figure 7: Installing a Clock Recovery Module
OI2125 O/E Receiver Instruction Manual
Page 29
Operating Basics
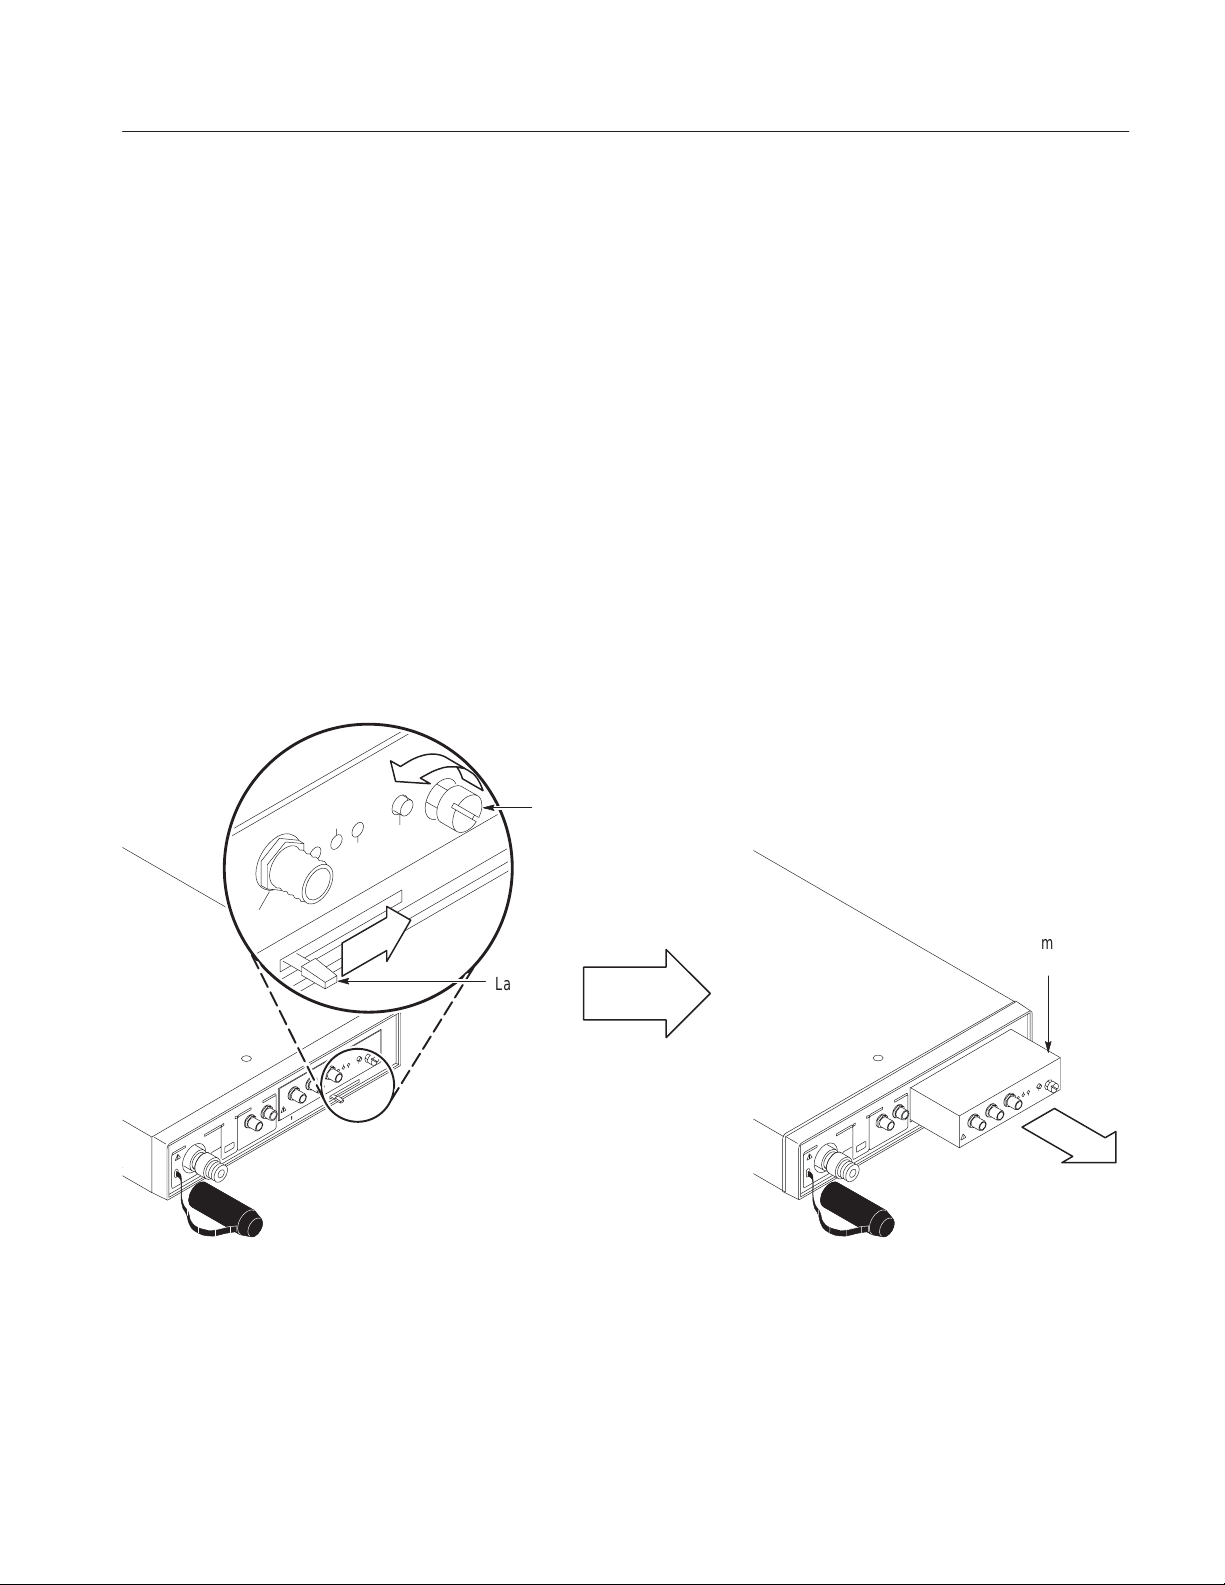
Removing a Clock
Recovery Module
Releasing the latch
To remove a module, refer to Figure 8 and do the following:
1. Power off the receiver.
2. Remove any external cables from the the input of the module. This step is
not necessary when removing a slot cover module.
3. Remove the short SMA cable from the output of the receiver and the input of
the module, if necessary.
4. Turn the hold-down screw counterclockwise to unlock the module.
5. Move the latch to the right to release the module from the connector.
6. Pull the module out of the receiver, and store it in a safe location.
7. If you are not going to use another clock recovery module, install the slot
cover module in the receiver to limit stray EMI emissions and to protect the
receiver from ambient RF noise.
Figure 8: Releasing the module with the latch
Hold-down
screw
Removing the CR module
Remove
module
Latch
OI2125 O/E Receiver Instruction Manual
17
Page 30

Operating Basics
Rear Panel Connections and Controls
There are two connectors on the rear panel of the OI2125: Remote Interface and
AC Power In. Use Figure 9 and the following descriptions to connect the
transmitter to your system.
R
Figure 9: OI1125 rear panel
Remote Interface
Power In
On/Off Switch
The remote interface allows for remote control of the instrument. See Using the
Rear-Panel Remote Interface on page 19 for details.
Plug the power cord into this connector. The connector accepts 90–240 VAC,
50–60 Hz, using any of the power cords available for the receiver. The connector
contains an integral AC power line filter.
The on/off switch connects the line voltage from the power in connector to the
power supply in the instrument.
18
OI2125 O/E Receiver Instruction Manual
Page 31

Using the Rear-Panel Remote Interface
This section describes using the rear-panel remote interface to select the
transmitted signal.
Operating Basics
Controlling Operation
Remotely
Remote Interface
Input Optical Power
When the REMOTE pushbutton switch on the front panel is in the disabled
mode, the Enable LED is not illuminated, and you can select the optional clock
recovery module data rate from the front-panel controls.
When the REMOTE pushbutton switch on the front panel is in the enabled
mode, the Enable LED is illuminated, and you select the optional clock recovery
module data rate through the rear-panel remote interface. Refer to Figure 10 and
Table 6 on page 20 for the connector pinout and signal descriptions.
In remote mode when no TTL signal is applied at the rear-panel connector, the
default state of all remote control inputs is high due to internal pull-up resistors.
The remote interface is implemented with a 25-pin, male D connector on the rear
panel. Figure 10 illustrates the pinout. The remote interface provides access to all
of the front-panel control features using a TTL control interface. The remote
interface also allows access to some status indicators and control features not
available from the front panel.
Mod ID3
Opt In Detect
GND
GND
GND
Mod ID1
Clk_Rate1
GND
Rate_Sel1
Not used
Not used
GND
GND
Not used
GND
Mod-Sig
Mod ID4
Mod ID2
Figure 10: Rear Remote Interface connector pinout
Table 6 lists the signal descriptions for the Remote Interface connector. Unless
otherwise noted, the signals are active in both local and remote operating modes.
OI2125 O/E Receiver Instruction Manual
13
25
1
14
GND
Front Panel Unlock
Not used
Rate_Sel2
Not used
Clk_Rate2
19
Page 32

Operating Basics
T able 6: Remote Port signals
Pin
number
4 Rate_Sel1 Digital
17 Rate_Sel2 Digital
19 Clk_Rate2 Digital
6 Clk_Rate1 Digital
22 Mod_Sig Digital
15 Front Panel
9 Optical Input
11 Input Optical
7 Mod ID1 Digital
20 Mod ID2 Digital
8 Mod ID3 Digital
21 Mod ID4 Digital
Several Not used 2, 3, 16, 18, 24
Several Ground Analog,
Signal
name
Unlock
Detect
Power
Signal
type
input
input
output
output
output
Digital
input
Digital
output
Analog
output
output
output
output
output
digital
Description
These inputs work together to select up to four different clock recovery rates.
See Table 7 for the OM1420 clock rates.
These inputs are only active in remote mode.
These status signals work together to communicate up to four different clock recovery rates to
the remote port. See Table 7 for the OM1420 clock rates.
These inputs are active in either local or remote mode.
This output is not used by the OM1420 module.
When driven low, this input locks out access to the front-panel local mode control. Default mode
is unlocked when the instrument is powered on .
This output is driven high when the photodetector senses a valid threshold power level.
This pin outputs an analog voltage that corresponds to the optical power incident on the
photodetector.
Mod_ID1 to ID4 digital outputs form a four-bit binary code used to identify the clock recovery
modules. See Table 8 for the identification codes.
1, 5, 10, 12, 14, 23, 25
Table 7 shows the data rate select inputs and status outputs for the OM1420
module.
T able 7: OM1420 Module data rate select and status logic
Data Rate Rate_Sel2 Rate_Sel1 Clk_Rate2 Clk_Rate1
Data rate select (digital inputs) Data rate status (digital outputs)
OC-192 X 0 0 0
OC-192 FEC X 1 1 1
20
OI2125 O/E Receiver Instruction Manual
Page 33

Table 8 shows the four-bit identification codes on the Mod_ID outputs, used to
identify what type of clock recovery module is in the receiver.
T able 8: Clock recovery module type select logic
Data Rate Mod ID1 Mod ID2 Mod ID3 Mod ID4
Operating Basics
OC-192/OC-192 FEC
(OM 1420)
0 0 0 0
OI2125 O/E Receiver Instruction Manual
21
Page 34

Operating Basics
22
OI2125 O/E Receiver Instruction Manual
Page 35

Specifications
This section contains the specifications of the OI2125 O/E Receiver. All
specifications are guaranteed unless noted as “typical”. Typical specifications are
provided for your convenience but are not guaranteed. Specifications marked
with the n symbol have corresponding checks in the Performance Verification
section on page 35.
T able 9: OI2125 Receiver specifications
Specification Description
Photodetector Optical Input
Wavelength 1530 nm to 1565 nm (verified range), 1100nm to 1650nm (extended range)
n
Input Power – Operating –16dBm to 0dBm; 0dBm (1mW) maximum
n
Loss of Signal Threshold –25 dBm to "2 dBm
n
Input Return Loss u28 dB
Input Connector Single mode fiber (9/125 mm) Universal/PC with protective boot
Data Output
Data Rate 2.488Gb/s to 12.50 Gb/s (verified range), 622 Mb/s (extended range)
n
Jitter Transfer t1.5 ps
n
Eye Crossing % 50% "5%
n
Mask Testing No mask hits with 5% mask margin for OC-48, OC-192, and scaled 12.50 Gb/s SONET
n
masks, with 0 dBm to –8 dBm input power
BER Testing BER t10
BER t10
Data Output Voltage 0.5V
n
0.2 V
Attenuated Data Output Voltage 6 dB attenuation of the Data Output Voltage
Optical Power Bandwidth 50MHz to 7.5 GHz
Output Impedance 50 W AC coupled
Output Return Loss (Data Out) u12 dB, 50 MHz to 5 GHz; u5 dB, 5 GHz to 12 GHz
(Attenuated Data Out) u14 dB, 50 MHz to 2.5 GHz; u10 dB, 2.5 GHz to 20 GHz
, 2.488 Gb/s to 12.50 Gb/s
RMS
–12
for data rates up to OC-192
–10
for data rates above OC-192
p-p
p-p
- 1.5 V
- 1.5 V
, input power –8 dBm to 0 dBm
p-p
, input power –16 dBm to –8 dBm (See Figure 11 on page 25.)
p-p
Remote Port Interface Connector
TTL remote control logic control
voltage levels
Optical input power monitor
output voltage level (analog)
Input HIGH voltage (VIH): 2.0 V minimum
Input LOW voltage (V
Output HIGH voltage (VIH): 2.4 V minimum
Output LOW voltage (V
Voltages are relative to GND on the 25-pin remote connector
Optical conversion gain is 1 V/mW "20%
OI2125 O/E Receiver Instruction Manual
): 0.8 V maximum
IL
): 0.5 V maximum
IL
23
Page 36

Specifications
T able 9: OI2125 Receiver specifications (Cont.)
Specification Description
Remote Port ESD Protection Each pin on the DB25 connector is protected with a 100 W series resistor followed by
protection diodes tied to ground and +5 V
Power Supply
External AC levels 100 V to 240 V "10%, 50 to 60 Hz, t40 W ; CAT II
T able 10: OM1420 Clock Recovery Module specifications
Specification Description
Clock Recovery Rate 9.953280Gb/s in OC-192 mode
n
10.66423Gb/s in OC-192-FEC mode
Input Voltage – Operating 0.15V
n
Output Voltage 1.0 V to 2.5 V
n
Jitter Generation – Clock t2.0 ps
n
Input Voltage – Maximum 0.75V
Input Return Loss u10 dB, 100 MHz to 10 GHz
Output Return Loss u8 dB @ OC-192 and OC-192 FEC clock frequencies
Clock Recovery Data Rate Range Clock Out voltage u0.5 V
Clock Out voltage u0.5 V
Input Connector SMA connector, 50 W, AC coupled
Output Connector SMA connector, 50 W, AC coupled
to 0.75 V
p-p
RMS
p-p
p-p
, AC coupled
p-p
from 9.943 Gb/s to 9.963 Gb/s (OC-192)
p-p
from 10.654 Gb/s to 10.674 Gb/s (OC-192-FEC)
p-p
24
OI2125 O/E Receiver Instruction Manual
Page 37
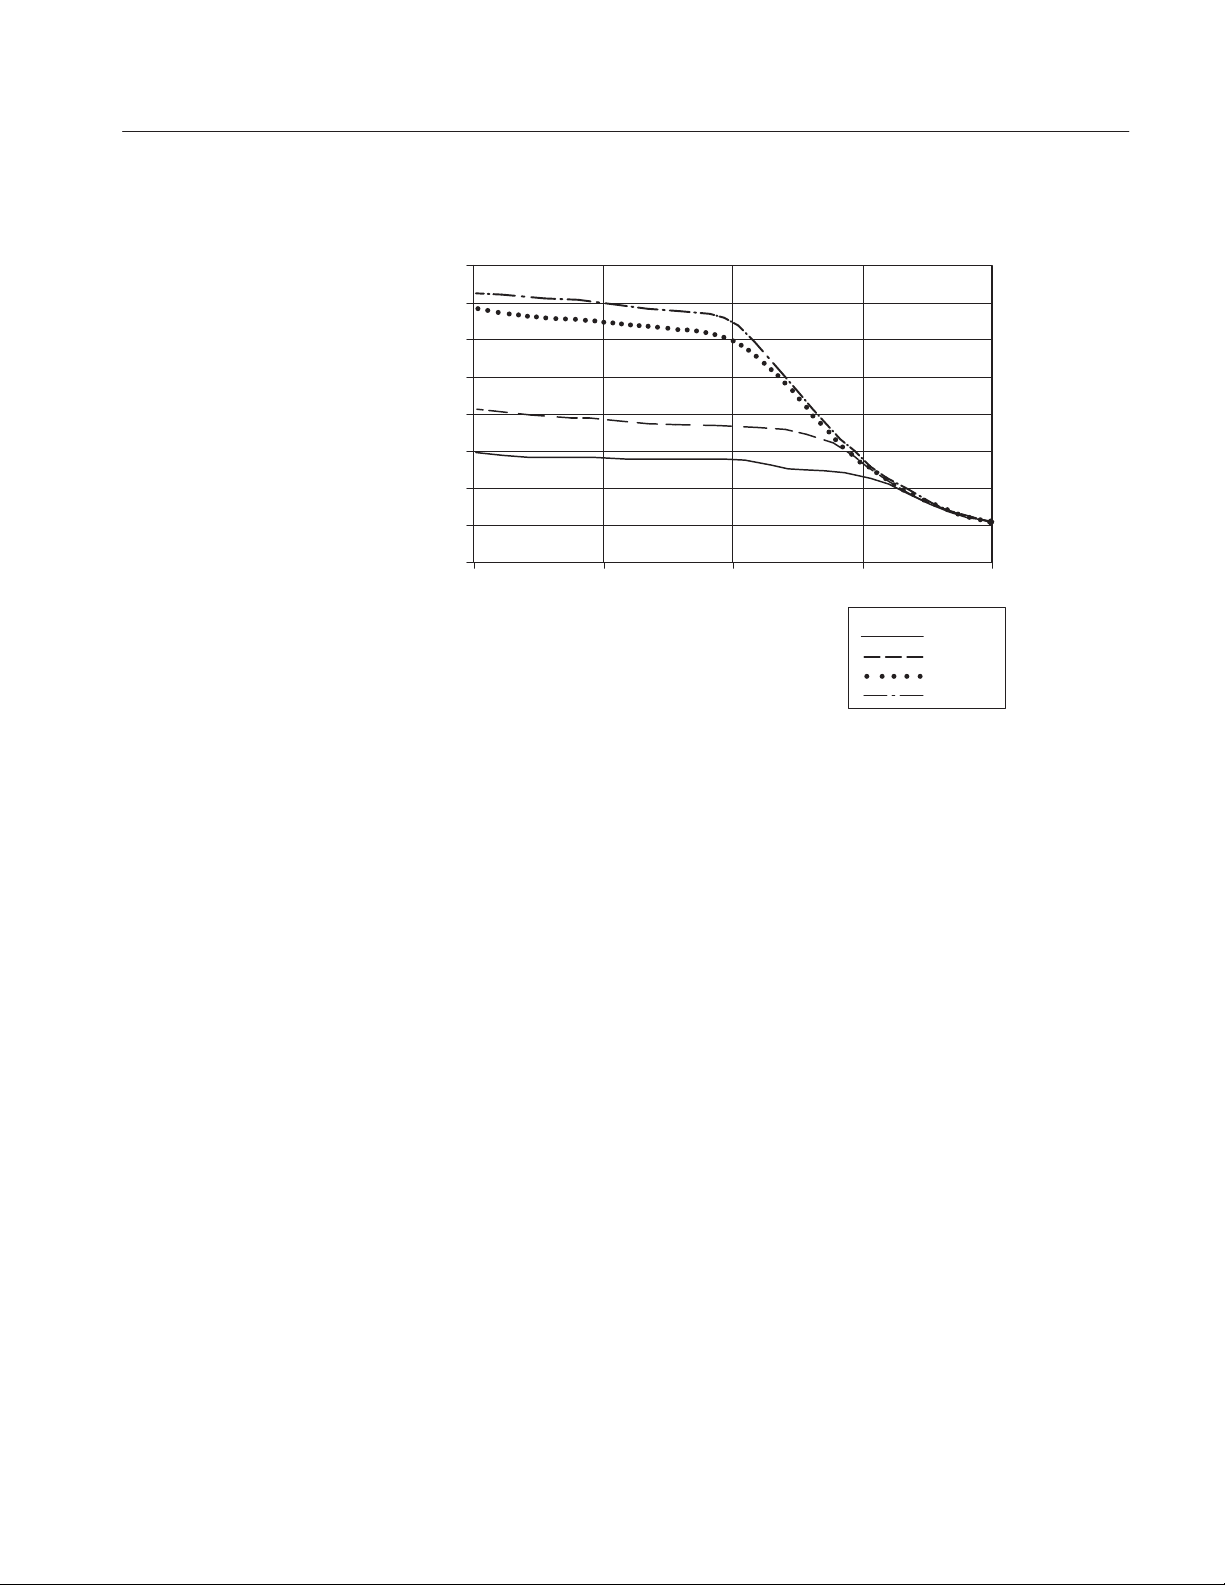
Voltage vs. Optical Power
1.6
1.4
1.2
1
0.8
0.6
Voltage (V)
0.4
0.2
0
0 –5 –10 –15 –20
Optical Power (dBm)
Key
Specifications
OC12
OC48
OC192
12.5Gb/s
Figure 11: OI2125 Output Voltage versus Input Optical Power
OI2125 O/E Receiver Instruction Manual
25
Page 38

Specifications
T able 11: Environmental characteristics
Specification Description
Temperature, nonoperating (–55 _C to +75 _C)
The environmental exposure is the procedure stated in Tektronix Design Standard
062-2847-00 for Class 6 equipment.
T emperature, operating 0 _C to +40 _C (32 to 104 _F)
This procedure conforms to the temperature portion of the test in MIL-T-28800E for
Type III, Class 6 equipment, using the limits above.
Humidity , nonoperating 0% to 75% relative humidity from +30_C to +60_C.
Humidity , operating 0% to 80% relative humidity to +31 _C, decreasing at a linear rate to 50% at +40 _C,
minimum.
Random vibration, nonoperating 2.46 g
Tektronix Standard 062-2858-00 rev . B modified, Random V ibration, Tektronix Class 3
with power spectral density break-points as follows:
, from 5 to 500 Hz, 10 minutes each axis.
RMS
Constant 0.020 g2/Hz from 5 Hz to 100 Hz, then falls at –3 dB/octave from 100 to
2
200 Hz, then constant 0.010 g
350 to 500 Hz to 0.007 g
Random vibration, operating 0.31 g
, from 5 to 500 Hz, 10 minutes each axis.
RMS
/Hz from 200 to 350 Hz, then falls at –3 dB/octave from
2
/Hz @ 500 Hz.
Tektronix Standard 062-2858-00 rev. B, Random Vibration, Tektronix Class 3
Packaged product vibration and shock The packaged product qualifies under the Distribution Cycle 1 Assurance Level II for
packaged products 0 to 20 lbs. Test 2 for Warehouse and Vehicle Stacking (compression)
is omitted.
Tektronix standard 062-2858-00, Rev. B.
Altitude, operating and nonoperating Operating: 3000 m (10,000 ft)
Nonoperating: 12200 m (40,000 ft)
MIL-T-2880E modified for more exposure time and more severe test levels than required
for any Type III equipment regardless of Class.
Weight instrument
1.72 kg (3.79 lb)
only
shipping
5.22 kg (11.5 lb), including standard accessories
Dimensions 45 mm x 204 mm x 331 mm (1.75 in x 8.0 in x 13 in) (H x W x D)
1
The humidity limits are derived from a psychrometric chart using a maximum wet bulb temperature of 29 _C. The highest
RH (20%) at the maximum temperature (+60 _C) diverges from the psychrometric chart (which would indicate 6%). The
20% number is a practical limit. Test chambers cannot be set below this number.
26
OI2125 O/E Receiver Instruction Manual
Page 39

T able 12: Certifications and compliances
Category Standards or description
Specifications
EC Declaration of
Conformity—EMC
Australia / New Zealand Complies with EMC provision of Radiocommunications Act per the following standard(s):
Declaration of Conformity—EMC
FCC Compliance Emissions comply with FCC Code of Federal Regulations 47, Part 15, Subpart B, Class A Limits.
1
Emissions which exceed the levels required by this standard may occur when this equipment is connected to a test object.
Meets intent of Directive 89/336/EEC for Electromagnetic Compatibility. Compliance was
demonstrated to the following specifications as listed in the Official Journal of the European
Communities:
EN 61326 EMC requirements for Class A electrical equipment for
measurement, control and laboratory use.
IEC 61000–4–2 Electrostatic discharge immunity (Performance criterion B)
IEC 61000–4–3 RF electromagnetic field immunity (Performance criterion A)
IEC 61000–4–4 Electrical fast transient / burst immunity (Performance criterion B)
IEC 61000–4–5 Power line surge immunity (Performance criterion B)
IEC 61000–4–6 Conducted RF immunity (Performance criterion A)
IEC 61000–4–11 Voltage dips and interruptions immunity (Performance criterion B)
EN 61000–3–2 AC power line harmonic emissions
AS/NZS 2064.1/2 Industrial, Scientific, and Medical Equipment: 1992
1
T able 13: Safety characteristics
Specification Description
Safety certifications UL31 11-1, CAN/CSA-C22.2 No. 1010.1
EC Declaration of Conformity –
Low Voltage
Compliance was demonstrated to the following specification as listed in the Official Journal of the
European Communities:
Low Voltage Directive 73/23/EEC, amended by 93/68/EEC
EN 61010-1/A2:1995 Safety requirements for electrical equipment for measurement control and
laboratory use.
OI2125 O/E Receiver Instruction Manual
27
Page 40

Specifications
28
OI2125 O/E Receiver Instruction Manual
Page 41

WARNING
The following servicing instructions are for use only by qualified personnel. To
avoid injury, do not perform any servicing other than that stated in the operating
instructions unless you are qualified to do so. Refer to all safety summaries before
performing any service.
Page 42

Page 43
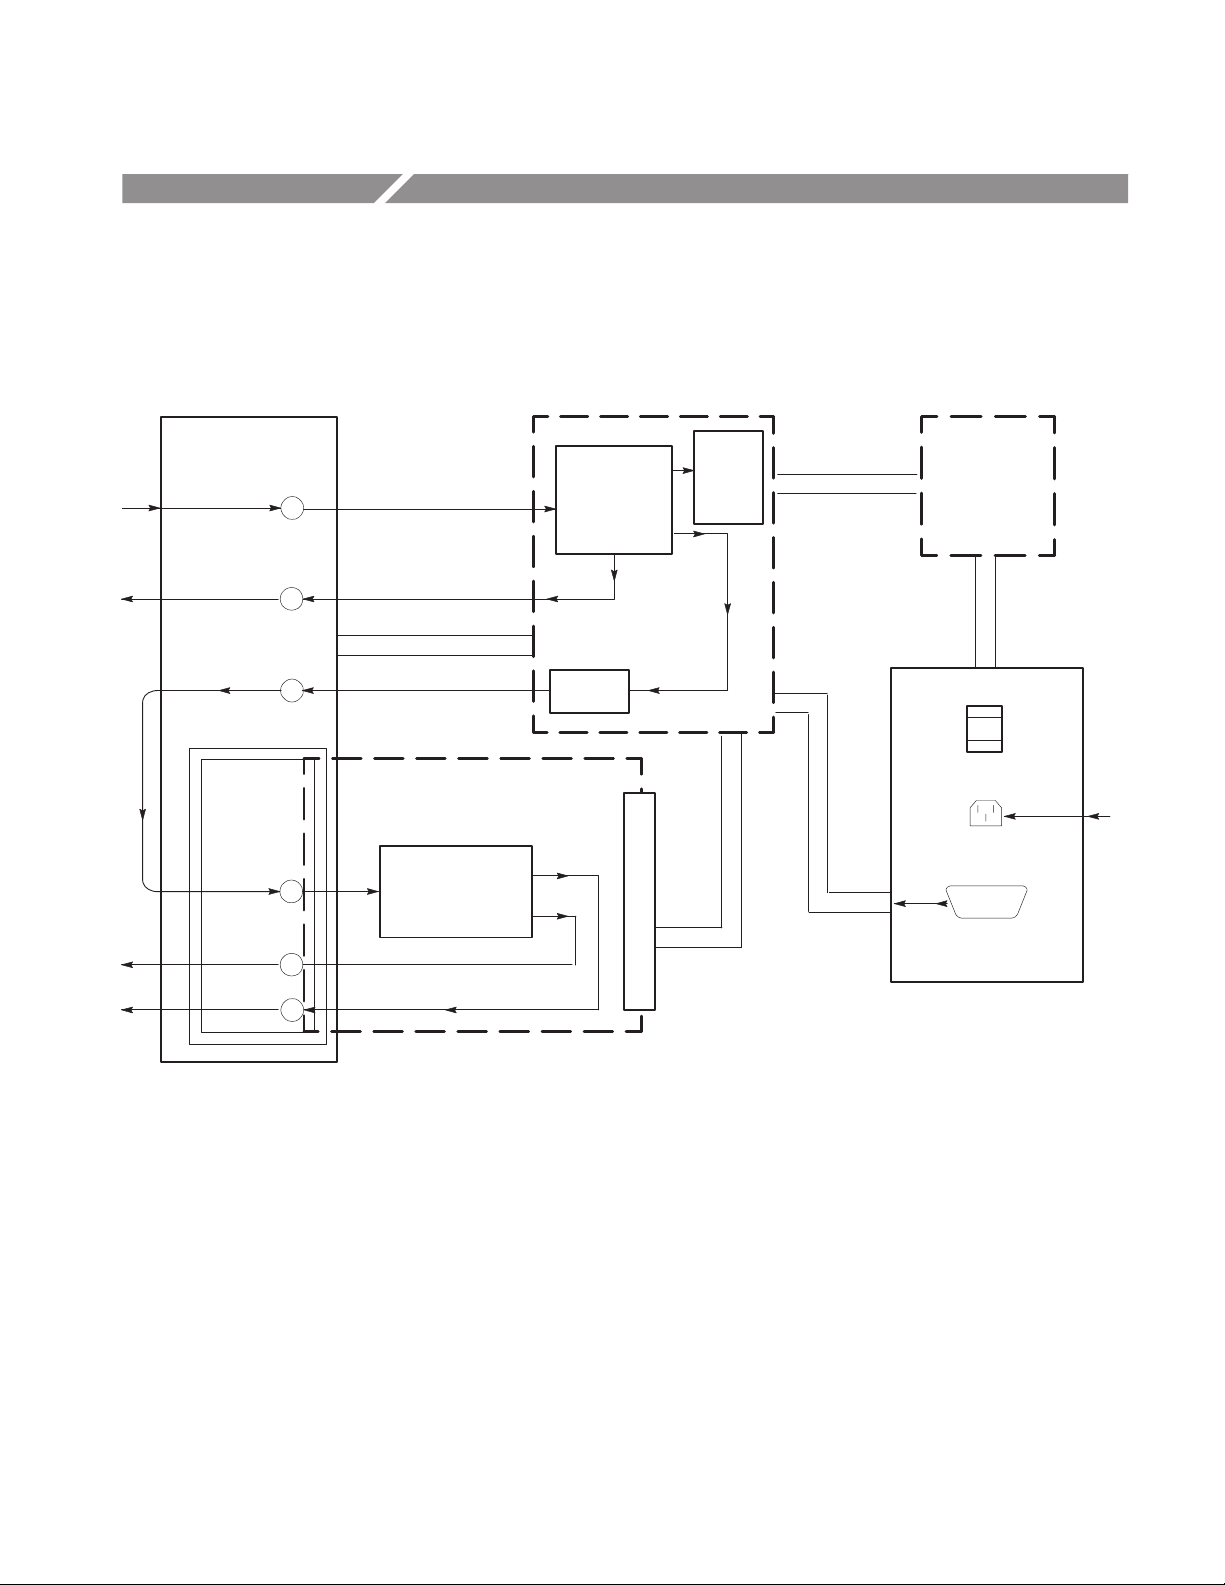
Theory of Operation
This section describes the electrical and optical circuit operation of the receiver
at the block diagram level. Refer to Figure 12 as you read the circuit description.
Front Panel
Optical Data in
Electrical
Data Out
Attenuated
Electrical
Data Out
Module
Front Panel
Electrical
Data In
Retimed
Data Out
Clock Out
F.P. Standard/Control Cable
Clock Recovery Module
Clock Recovery
O/E Rx Board
Photo
Detector
6 dB
attenuator
Optical
Input
Power
Monitor
Power Communication Cable
Module Interconnect
Power Cable
Control Cable
Power Supply
AC Line
On/Off Switch
AC Line In
Remote Interface
Rear Panel
Figure 12: O/E Receiver interconnect diagram
OI2125 O/E Receiver Instruction Manual
31
Page 44

Theory of Operation
O/E Receiver
The OI2125 O/E Receiver is made up of four interconnected assemblies: the
front and rear panels, the receiver board, and the DC power supply.
Front Panel
Rear Panel
The front panel of the receiver is divided into two sections: the receiver and the
clock recovery module slot.
Receiver. The receiver uses a single-mode fiber, universal FC/PC optical input
connector to couple external optical signals to the receiver board. An Input
Threshold Detected LED is driven by the internal optical power monitor. The
converted electrical data is output from the receiver board to the front panel via
two SMA connectors.
The SMA connector (Attenuated Data Out) closest to the clock recovery module
slot is intended for coupling the signal to one of the optional clock recovery
modules available for the OI2125 O/E Receiver. The output from the other SMA
connector (Data Out) can be used to monitor the quality of the converted
electrical data.
Clock Recovery Module Slot. The clock recovery module slot accepts optional
clock modules and provides DC power through a 32-pin connector at the rear of
the slot. A short SMA cable (standard module accessory) couples the converted
electrical data from the receiver to the module. SMA connectors on the clock
module provide a data input, a recovered clock output, and for some modules, a
retimed data output.
The rear panel of the receiver has three components—the AC line cord connector, the power on/off switch, and the remote interface connector. When any of the
international power cords available for the receiver are connected to the AC
connector, the power is passed through to the power on/off switch. When the
switch is turned on, the AC line is connected to the power supply input.
32
Receiver Board
The remote interface is a 25-pin D-connector that provides direct control of the
receiver board and the clock recovery module. Remote mode can be enabled
from either a front panel toggle switch or by pulling the front-panel unlock pin
(pin #15) low, which enables the other pins of the connector to pass through
TTL-level logic signals to control the receiver.
External optical signals that are applied to the front panel are directly coupled to
a high-speed, InGaAs photodiode module on the receiver board. The photodiode
converts the optical energy into electrical current, which is then converted into a
voltage by a fixed-gain transimpedance amplifier (TIA). The photodiode is
biased by a current source on the receiver circuit board. Monitoring the
photodetector bias current allows the average optical power to be detected and
output as an analog signal to the remote port connector.
OI2125 O/E Receiver Instruction Manual
Page 45

Theory of Operation
The output of the TIA is fed into an automatic gain control (AGC) amplifier,
which is part of the photodiode module. Gain control for the amplifier is
provided by feedback from a peak detector that monitors the optical signal in the
photodiode module. The AGC amplifier adjusts the gain of the photodetector
module to provide a uniform output swing over some range of input optical
power. See Figure 11 on page 25 for the typical AGC amplifier response to
varying data rate and input optical power.
The photodetector module output is AC-coupled to two 50 W connectors. One
output is brought directly out to the front-panel SMA connector (data output).
The other output (attenuated data output) passes through a 6 dB attenuator. This
is the data output that is used for the optional clock modules. The data output is
attenuated to ensure that the input limit on the modules is not exceeded.
DC Power Supply
The AC line voltage from the rear panel is fed to the power supply input,
through the rear-panel power switch. The DC power supply is a switching supply
that converts the line voltage (90 – 240 VAC) to +15 V, –15 V, and +5 V.
A six-conductor cable connects the power supply output to the receiver board.
Clock Recovery Modules
The clock recovery modules for the receiver are described below:
OM1420
The clock recovery of the dual-rate OM1420 module is done with a resonant
filter technique, which provides both low jitter and narrow bandwidth. The two
data rates selectable with the OM1420 are OC-192 (9.953280 Gb/s) and
OC-192 FEC (10.66423 Gb/s). The output amplifier of the clock recovery
module provides a large output voltage signal.
OI2125 O/E Receiver Instruction Manual
33
Page 46

Theory of Operation
34
OI2125 O/E Receiver Instruction Manual
Page 47

Performance Verification
Use the following procedures to verify the warranted specifications of the
OI2125 O/E Receiver. Before starting these procedures, photocopy the test
record beginning on page 55 to record the performance test results.
The recommended calibration interval is one year.
If you are doing a Performance Verification on a Clock Recovery Module,
photocopy the appropriate test record to record the performance test results.
Clock Recovery Module test records begin on page 57.
These procedures test the following specifications:
T able 14: OI2125 Receiver PV checks
Circuit Specification
Photodetector Optical Input Loss of Signal Threshold
Data Output Bandwidth
Eye Pattern Test Matrix
Photodetector Optical Input Input Wavelength
Data Output Data Output Voltage
Input Power
Data Rate
% Crossing
Mask Hits
T able 15: Clock Recovery Module PV checks
Circuit Specification
Input Clock Recovery Rates
Output Output Voltage
OI2125 O/E Receiver Instruction Manual
Input Voltage
Jitter Generation
35
Page 48

Performance Verification
Prerequisites
Equipment Required
The tests in this section comprise an extensive, valid confirmation of performance and functionality when the following requirements are met:
H The instrument must have been last calibrated/adjusted at an ambient
temperature between +20 _C and +30 _C, must have been operating for a
warm-up period of at least 30 minutes, and must be operating in an
environment with temperature, altitude, humidity, and vibration within the
operating limits described in Environmental Characteristics on page 26.
H All test equipment listed in Table 16 must be operating for a warm-up period
of at least 30 minutes.
Table 16 lists the equipment required to perform the performance verification
procedure. The types and quantities of connectors may vary depending on the
specific equipment you use.
CAUTION. To prevent damage to your equipment and cables, use the proper type
optical connectors. The optical connection styles shown in the test setups are
correct for the equipment called out in Table 16 below. If you use alternative
equipment, verify the connection style of the equipment, and use the appropriate
cable or adapter.
T able 16: Test equipment
Description Minimum requirements Example product
Controller PC/Macintosh/W orkstation w/FFT software and GPIB
interface
GPIB cable 2 m length Tektronix part number 012-0991-00
Sampling oscilloscope Bandwidth: 20 GHz
Jitter: t1 ps at minimum sampling delay
Optical sampling module Bandwidth: 20 GHz T ektronix 80C01
Electrical sampling head Bandwidth: 20 GHz T ektronix 80E01
Pattern Generator t2.4 Gb/s to u12.5 Gb/s Advantest D3186
Wavemeter 1530 nm to 1565 nm Burleigh WA-1100
Optical Power Meter
and Power Head
1550 nm, +15 dBm to –40 dBm, 0.01 dBm resolution,
±5% accuracy
PC w/Labview
T ektronix TDS8000
Advantest Q8221 with Q82227
power head
Optical Transmitter 1530 nm to 1565 nm Tektronix OI 1125
36
OI2125 O/E Receiver Instruction Manual
Page 49

Performance Verification
T able 16: Test equipment (cont.)
Description Example productMinimum requirements
Tunable Laser 10 dBm output power over 1530 nm to 1565 nm range,
PMF-style output connector
Optical pulse generator 1550 nm impulse w/trigger out Calmar FPL-01
Variable optical attenuator 1530 nm to 1565 nm range Tektronix OA5002
Optical attenuator 30mm, 10 dB, single-mode, FC to FC, female to male Tektronix part number 119-5118-00
Optical cable, PM FC-APC Single mode, 2 m Tektronix part number 174-4725-00
Optical cable FC-APC to FC/PC, Single mode, 2m Tektronix part number 174-4727-00
Optical cable, PM FC-APC Single mode, 18 cm Tektronix part number 174-4664-00
Optical cable (2) FC/PC to FC/PC, Single mode, 2 m Tektronix part number 174-3922-00
Cable, low-loss coax 50 W, SMA male each end, ~1m Tektronix part number 015-0561-00
Cable, coax 50 W, SMA male each end, 1m Tektronix part number 174-1341-00
Cable, coax
Attenuator, electrical
Attenuator, electrical
1
1
1
50 W, SMA male each end, 10cm Tektronix part number 174-4699-00
2 X, 50 W, SMA Tektronix part number 015-1001-00
5 X, 50 W, SMA Tektronix part number 015-1002-00
NetTest Tunics BT-1560 w/high
power option
Torque wrench 5/16-in, 7-10 in-lb. (8 mm, 79 to 112 N-cm) Pasternack Enterprises PE 5011-1
1
Only required for Clock Recovery Module tests
OI2125 O/E Receiver Instruction Manual
37
Page 50

Performance Verification
Photodetector Optical Input
This section includes one optical input check: the Loss of Signal Threshold test.
NOTE. To optimize performance, make sure that all optical connections are clean
and secure and that all components of the system are in good condition.
1/32
Clock
LOS Threshold
D3186
Data
Laser out
(FC/APC)
The loss of signal threshold test checks the minimum level of the incoming
optical signal that the receiver will recognize.
T est Overview.
1. Connect the test circuit.
2. Set the BERT parameters (store the bit rates for other tests).
3. Set the optical attenuator parameters.
4. Set the power meter parameters.
5. Take measurements.
T est Setup.
1. Connect the equipment as shown in Figure 13. Use a torque wrench to secure
the SMA connections to 7 to 10 lb-in (79 to 112 N-cm).
OI1125
Laser in
(FC/APC)
Modulator data in
Modulator out
(FC/APC)
Variable optical
attenuator
Optical in
(FC/PC)
Optical out
(FC/PC)
Optical power meter
Optical in
(FC/PC)
SMA cable
015-0561-00
Optical cable
174-4664-00
Figure 13: Setup for the LOS threshold test
38
Optical cable
Optical cable
174-4725-00
Optical in
(FC/PC)
174-3922-00
OI2125
OI2125 O/E Receiver Instruction Manual
Page 51

Performance Verification
BERT. Set the BERT settings as follows:
NOTE. Store the bit rate settings so that you can recall them when completing
other tables in the PV procedure.
1. Set the BERT bit rate to 2.488320 Gb/s (SONET OC-48 rate):
a. In the CLK ADJ section, select Memory # to assign a number to the bit
rate. This is the memory number you will use to recall this bit rate.
Suggestion: Use 1 for 2.488320, 2 for 9.953280, and 3 for
12.500000 Gb/s.
b. Press Edit, and use the dial or arrow keys to input the bit rate.
The left and right arrow keys select the digit to be changed. An
annunciation dot appears to the left of the digit to be changed.
c. The up and down arrow keys select the value of the digit selected.
d. When you have the correct bit rate entered (2.48832 GB/s), press Store
and Edit to assign this bit rate to the memory number you selected in
step a.
2. Repeat steps 1a through 1d for 9.953280 Gb/s and 12.500000 Gb/s bit rates.
3. Recall the 2.488320 Gb/s bit rate.
4. Set the trigger output to 1/32 clock.
5. Set the output mode to AC.
6. Turn the data output on and set the data amplitude to 1.5 V
p–p
.
Optical Attenuator. Set the optical attenuator settings:
1. Set the wavelength to 1550 nm.
2. Set the mode control to attenuation.
3. Set the attenuation to –20 dB.
Optical Power Meter. Set the optical power meter settings:
1. Set the wavelength to 1550 nm.
2. Set the units of measure to dBm.
3. Set the range to Auto.
4. If necessary, select the channel you will use.
OI2125 O/E Receiver Instruction Manual
39
Page 52

Performance Verification
T ake Measurements.
1. Enable the transmitter laser by turning the keyswitch clockwise (to the
unlocked position). The Laser On and Output Active LEDs both light.
2. Using the fine adjust on the optical attenuator, gradually decrease the output
power from the transmitter until the Input Detected LED on the front panel
of the receiver extinguishes. Note: The internal power monitor filter in the
receiver slows the optical power threshold detector response.
3. Disconnect the cable from the optical input of the receiver, and connect it to
the optical power meter.
4. Check the displayed power level on the optical power meter against the
limits in Table 17 of the test record. Record the results in Table 17.
5. Disable the transmitter laser by turning the keyswitch counterclockwise (to
the locked position). The Laser On and Output Active LEDs both extinguish.
40
OI2125 O/E Receiver Instruction Manual
Page 53

Data Output
Performance Verification
This section checks specifications of the data output signal.
Rear
trigger
Optical impulse
generator
Bandwidth
Variable optical
Check the bandwidth of the data output signal by doing the following:
T est Overview.
1. Connect the test circuit.
2. Set the optical attenuator parameters.
3. Set the oscilloscope scale factors.
4. Compensate the oscilloscope.
5. Preview the waveform.
6. Capture and process the impulse response waveform.
Connect the Test Circuit.
1. Connect the equipment as shown in Figure 14. Use a torque wrench to secure
the SMA connections to 7 to 10 lb-in (79 to 112 N-cm).
CSA8000/TDS8000 w/80E01
Optical in
attenuator
(FC/PC)
GPIB
cable
Output
direct
10dB Optical
attenuator
Optical cable
Optical
input
174-3922-00
Optical cable
174-3922-00
Figure 14: Setup for the bandwidth test
OI2125 O/E Receiver Instruction Manual
Optical
output
OI2125
Data out
SMA cable
015-0561-00
50 W coaxial cable
Trigger direct in
Controller
41
Page 54

Performance Verification
Optical Attenuator. Set the optical attenuator settings as follows:
1. Set the wavelength to 1550 nm.
2. Set the mode control to attenuation.
3. Set the attenuation to about 30 dB.
Oscilloscope. Set the TDS8000 settings as follows:
1. Press the SELECT ON/OFF button on the 80E01 so that the adjacent
indicator lights.
2. From the toolbar, select Setup→Acquire.
a. Select Average as the acquisition mode.
b. Set the number of samples to 64 Samples.
3. Select the Trig tab to set the trigger parameters.
a. Select External Direct for the trigger source.
b. Select Auto for Mode.
c. Select the rising edge for Slope.
d. Click the Set to 50% button to set the trigger point midway on the rising
signal.
4. Select the Horiz tab to set the horizontal parameters.
a. Set the Scale to 1.000 ns/div. (This setting will make it easier to initially
locate the optical pulse later in the procedure.)
b. Set the Position to 18.000 ns. (This setting will make it easier to locate
the first optical pulse later in the procedure.)
c. Set the Record Length to 2000.
5. Select the Disp tab to set the display parameters.
a. In the Style section, select Normal.
b. Check Show Vectors.
42
NOTE. If the Scale, Position, and Channel Offset control boxes are not displayed
in the following step, click the Basic>> button in the lower left part of the Vert
Setup dialog box.
6. Select the Vert tab to set the vertical parameters.
OI2125 O/E Receiver Instruction Manual
Page 55

Performance Verification
a. Set the Scale to 1 mV/div.
b. Set Position to 0.0 div.
c. Set Channel Offset to 0.0 V.
7. Close the Setup box.
Compensate the Oscilloscope.
1. Run a Signal Path Compensation from the Utilities menu.
Preview the Waveform. Refer to Figure 15 on page 44 as you do the following:
1. Adjust the attenuation of the variable optical attenuator until it produces an
impulse pulse amplitude of 2 mV
to 3 mV
p-p
p-p
.
2. Use the Horizontal Position control to position the impulse at the first
horizontal division. (This ensures that postimpulse aberrations are included
in the record.)
You may experience signal jitter if you try to display a signal that is not the
first impulse and is late in relation to time zero.
3. Adjust the Horizontal Scale control so that the width of the impulse at its
base is approximately 1/4 to 3/4 of a horizontal division on the display.
NOTE. If the width of the impulse is much greater than 3/4 of a horizontal
division, the resulting Fourier transform will not have enough frequency
resolution; if the width is much smaller than 1/4 of a horizontal division, the
amount of samples that fall on the impulse may be too coarse, resulting in
quantum errors in the resulting Fourier transform.
OI2125 O/E Receiver Instruction Manual
43
Page 56

Performance Verification
Figure 15: Proper positioning of the impulse for optimum curve download
Capture and Process the Impulse Response Waveform.
1. Using a controller (such as a PC, Macintosh, or workstation) attached to the
TDS8000 or CSA8000 instrument via GPIB, download the waveform.
NOTE. Alternatively, you can use the Save Waveform, Copy Waveform, or a
network connection to transfer a waveform curve to a spreadsheet, ASCII file, or
other application. Refer to the CSA8000 Communications Signal Analyzer &
TDS8000 Digital Sampling Oscilloscope User Manual for more information
about these methods of transferring waveform data.
2. Using the available controller software, such as Labview, perform a Fourier
Transform on the waveform; this transforms the time-domain impulse
response to a scalar frequency response.
3. Normalize the Fourier Transform result such that DC or low frequency is
0 dB.
4. Plot the frequency response.
44
5. Check that the OI2125 O/E Receiver meets the performance requirement
bandwidth. Record the result on the test record.
OI2125 O/E Receiver Instruction Manual
Page 57

Eye Pattern Test Matrix
Performance Verification
These procedures direct you to set up the equipment to display an eye pattern.
Use the eye pattern to measure the parameters listed in Tables 18 through 20 in
the test record.
Test Overview
To prepare the test matrix, do the following setups:
1. Connect the test circuit.
2. Set the BERT parameters.
3. Set the tunable laser parameters.
4. Set up the optical attenuator.
5. Set up the optical power meter.
6. Preview the eye pattern.
7. Set the oscilloscope measurement parameters.
8. Calibrate the oscilloscope.
9. Take measurements.
The following parameters are set up to measure the data for the first row in
Table 18 in the test record. As you progress through the tables, you must change
the bit rate of the BERT, the laser wavelength, the attenuator settings, and the
signal conditioning mode in the oscilloscope, according to the table and row you
are completing.
Test Circuit
OI2125 O/E Receiver Instruction Manual
Connect the equipment as shown in Figure 16 on page 46. A torque wrench is
recommended for securing the SMA connections to 7 to 10 lb-in (79 to
112 N-cm).
45
Page 58

Performance Verification
External
tunable laser
Trig
SMA cable
015-0561-00
1/32
Clock
D3186
Data
Opt
Out
Optical in
(FC/PC)
Modulator data in
Laser in
(FC/APC)
OI1125
Modulator out
(FC/APC)
Optical in
(FC/PC)
Optical cable
Optical cable
174-4727-00
(Connect to receiver input after setting optical level to 0 dBm)
Data out
174-4725-00
CSA8000/TDS8000 w/80E01/80C01
Optical attenuator
Optical out
(FC/PC)
Optical power meter
Optical in
(FC/PC)
Optical cable
174-3922-00
OI2125
Figure 16: Setup for the eye pattern test matrix
BERT
Set the BERT parameters as follows:
1. Recall the 2.48832 Gb/s bit rate.
2. Set the pattern to PRBS-31.
3. Disable the adjustable duty cycle.
4. Set the mark ratio to 1/2.
5. Set the trigger to 1/32 clock.
6. Set the output mode to AC.
7. Turn the data output on and set the data amplitude to 1.0 V
SMA cable
015-0561-00
2X attenuator
p–p
.
46
OI2125 O/E Receiver Instruction Manual
Page 59

Performance Verification
Tunable Laser
Optical Attenuator
Optical Power Meter
Set the tunable laser parameters:
1. Enable the tunable laser.
2. Set the wavelength to 1530 nm.
3. Set the amplitude to 10 dBm.
Set the optical attenuator settings:
1. Set the wavelength to 1530 nm.
2. Set the mode control to attenuation.
3. Set the attenuation to 0 dB.
Set the optical power meter settings:
1. Set the wavelength to 1530 nm.
2. Set the units of measure to dBm.
3. Set the range to Auto.
4. If necessary, select the channel you are using.
Preview the Eye Pattern
Scale the optical signal to 0 dBm on the power meter, and then connect the
optical signal to the receiver to preview the electrical eye pattern:
1. Enable the transmitter laser by turning the keyswitch clockwise (to the
unlocked position). The Laser On LED and Laser Output Active LED light.
2. Adjust the attenuator to get a 0 dBm reading on the optical power meter.
3. Disable the transmitter laser by turning the keyswitch counterclockwise.
4. Disconnect the optical cable from the power meter, and connect it to the
receiver. (See dashed line in Figure 16 on page 46).
5. Enable the transmitter laser by turning the keyswitch clockwise.
6. On the oscilloscope, press Autoset.
7. Press the Clear Data button, and then the Run/Stop button.
The oscilloscope displays an eye pattern similar to Figure 17 on page 49. The
oscilloscope setup in the next section sets up the mask parameters.
OI2125 O/E Receiver Instruction Manual
47
Page 60

Performance Verification
Oscilloscope
Set the TDS8000 settings as follows:
NOTE. Due to differences in oscilloscope firmware, your setup steps may differ
slightly.
1. From the toolbar, select Setup→Horz.
In the All Timebases box, set the Mode field to Short Term Jitter from the
drop-down menu.
2. Select the Vert tab to set the vertical parameters:
In the External Attenuation box, enter 2.00 and select Linear.
3. Select the Trig tab to set the trigger parameters:
In the Trigger Source box, select External Direct.
4. Select the Mask tab to set the mask parameters:
a. Set Source to the oscilloscope channel you are using.
b. Check the Enable Mask Counts box.
c. Check the Use Waveform Database box.
d. In the Display box, check the Mask box.
e. Set Communication Standard to SONET→OC-48.
5. Select the Meas tab to set the measurement parameters:
a. In the Meas x field, select Meas 1.
b. In the source tab, in the Signal Type box, click NRZ.
c. In the source tab, set CH x to the measurement channel you are using.
d. Click Select Meas.
e. From the drop-down menus, select NRZ Amplitude→Amplitude.
f. Repeat steps a through e for Meas 2. When doing step e, select NRZ
Amplitude→Crossing %.
6. Close the Setup window.
Compensate the Oscilloscope.
1. Run a Signal Path Compensation from the Utilities menu.
48
OI2125 O/E Receiver Instruction Manual
Page 61

Performance Verification
Take Measurements
The equipment is now set up for recording measurements in Table 18:
1. From the toolbar, select Setup→Acq to set the acquisition parameters:
a. In the Stop After box, select Condition.
b. In the Condition field, select Number of Acquisitions from the drop-
down menu.
c. Enter 300 (# of acquisitions) in the field below the Condition field.
d. In the Stop Action box, select None.
2. Close the Setup window.
3. Press the Autoset button.
4. Press the Clear Data button, and then the Run/Stop button on the oscillo-
scope to begin a measurement.
The oscilloscope displays an eye pattern as shown in Figure 17.
Figure 17: Measurements taken from the eye pattern
5. Verify that the eye pattern does not violate the mask boundaries.
6. Record the measurement data (see Figure 17) in the first row of Table 18.
OI2125 O/E Receiver Instruction Manual
Check
mask
hits
Measurement
data
49
Page 62

Performance Verification
7. Disable the transmitter laser, disconnect the optical cable from the input of
the receiver, and connect the cable to the optical power meter.
8. Set the wavelength on the attenuator and power meter, and adjust the laser
power and wavelength to record the measurements for the remaining rows in
Table 18.
NOTE. Disregard mask hits when you take measurements at the –16 dBm power
levels.
9. Recall the 9.95328 Gb/s bit rate.
10. From the Mask tab on the oscilloscope setup menu, set the Communication
Standard to SONET→OC-192.
11. Repeat steps 4 through 8 for Table 19, beginning with the optical settings
from the last row you completed in the previous table. (This saves a few
steps and connect/disconnect cycles for the optical connectors.)
12. Recall the 12.50000 Gb/s bit rate.
13. Press Autoset.
14. Using the keypad in the horizontal menu, adjust the horizontal scale to
12 ps/div. This scales the OC-192 mask to the 12.50000 Gb/s data rate.
15. If necessary, adjust the horizontal position to center the crossing points of the
eye around the center mask boundary.
16. Repeat steps 4 through 8 and step 15, if necessary, for Table 20, beginning
with the optical settings from the last row you completed in the previous
table.
This concludes the performance verification for the receiver. If you need to
perform the Clock Recovery Module Tests, see page 51.
50
OI2125 O/E Receiver Instruction Manual
Page 63

Clock Recovery Module Tests
This section contains procedures for checking the output voltage and RMS jitter
specifications on the OM1420 clock recovery module. To take these measurements, you set up a histogram display of the clock output signal to extract a jitter
measurement, and use the Measurement feature of the oscilloscope to automatically measure and display the peak to peak voltage of the clock output signal.
Performance Verification
BERT
Clock/32 Data out
OM1420
5X attenuator
(0.2V test only)
Check the RMS jitter and output voltage of the OM1420 clock output signal:
T est Overview.
1. Connect the test circuit.
2. Set the BERT parameters.
3. Preview the waveform to scale the waveform in amplitude and time.
4. Set up and adjust the histogram measurement on the oscilloscope.
5. Take measurements.
Connect the Test Circuit.
1. Connect the equipment as shown in Figure 18.
CSA8000/TDS8000 w/80E01
OM1420 Clock
Recovery Module
OI2125
Data in
SMA cable
015-0561-00
SMA cable
174-1349-00
Figure 18: OM1420 Clock Recovery Module test setup
OI2125 O/E Receiver Instruction Manual
Clock out
SMA cable
015-0561-00
Direct
trigger in
2X attenuator
51
Page 64

Performance Verification
BERT. Set the BERT parameters as follows:
1. Recall the 9.953 Gb/s bit rate.
2. Set the pattern to PRBS-31.
3. Disable the adjustable duty cycle.
4. Set the mark ratio to 1/2.
5. Set the trigger to 1/32 clock.
6. Set the output mode to AC.
7. Turn the data output on and set the data amplitude to 0.75 V
p–p
.
Oscilloscope. Set the TDS8000 settings as follows:
NOTE. Due to differences in oscilloscope firmware, your setup steps may differ
slightly.
1. From the toolbar, select Setup→Horizontal.
a. In the All Timebases box, set the Mode field to Short Term Jitter from
the drop-down menu.
b. Set Units to seconds.
2. Select the Vert tab to set the vertical parameters:
In the External Attenuation box, enter 2.00 and select Linear.
3. Select the Trig tab to set the trigger parameters.
a. In the Trigger Source box, select External Direct.
4. Select the Hist tab to set the histogram parameters.
52
a. In the source box, set Source to the channel that you are using.
b. Check the Enable Histogram box.
c. Check the Horizontal box.
d. Check the Use Waveform Database box.
e. In the Display box, check Histogram and Linear Mode.
5. Select the Meas tab to set the measurement parameters:
a. In the Meas x field, select Meas 1.
OI2125 O/E Receiver Instruction Manual
Page 65

Performance Verification
b. In the source tab, set CH x to the measurement channel that you are
using.
c. In the Signal Type box, click Pulse.
d. Click Select Meas.
e. From the drop-down menus, select Pulse Amplitude→Pk-Pk.
6. Close the Setup window.
Preview the Waveform.
1. Turn on the receiver and select OC-192 on the OM1420 module.
2. Press Autoset.
3. Press the Clear Data button and then the Run/Stop button on the oscilloscope
to display a waveform as shown in Figure 19 on page 53.
Set up the Measurements. Refer to Figure 19 as you align the waveform.
1. Align the rising edge of the waveform with the center of the oscilloscope
graticules.
2. Reduce the vertical size of the histogram box as small as possible.
Histogram box
Use this
value
Figure 19: RMS Jitter measurement
OI2125 O/E Receiver Instruction Manual
Rising edge
Measurement window
53
Page 66

Performance Verification
3. From the toolbar, select Setup→Acq to set the acquisition parameters:
a. In the Stop After box, select Condition.
b. In the Condition field, select Number of Acquisitions from the drop-
down menu.
c. Enter 300 (# of acquisitions) in the field below the Condition field.
d. In the Stop Action box, select None.
4. Close the Setup window.
T ake Measurements.
1. Press the Autoset button.
2. Press the Clear Data button, and then the Run/Stop button on the oscillo-
scope to begin a measurement.
3. Check that the voltage and jitter measurements from the measurement
window on the oscilloscope meet the limits in the test record.
4. Record the measurements in the 9.953 Gb/s, 0.75 V row in Table 22.
5. Set the bit rate on the BERT to 10.66423 Gb/s.
6. Select the OC-192 FEC rate on the OM 1420 module.
7. Repeat steps 1 to 4 for the 10.66423 Gb/s, 0.75 V row in Table 22.
8. Disconnect the SMA cable from the BERT and connect the 5X attenuator to
the BERT. Connect the SMA cable to the 5X attenuator.
9. Repeat steps 1 to 4 for the 10.66423 Gb/s, 0.15 V row in Table 22.
10. Recall the 9.953 Gb/s bit rate on the BERT.
11. Select the OC-192 rate on the OM 1420 module.
12. Repeat steps 1 to 4 for the 9.953 Gb/s, 0.15 V row in Table 22.
This completes the performance verification for the OM1420 module.
54
OI2125 O/E Receiver Instruction Manual
Page 67

Performance Verification
OI2125 O/E Receiver Test Record
Photocopy this form and use it to record the performance test results.
Table 17: OI2125 O/E Receiver test record
Instrument Serial Number: Certificate Number:
Temperature: Relative Humidity %:
Date of Calibration: Technician:
Performance Test Minimum Measured Maximum
<Circuit> <Test name>
Optical Input Loss of Signal Threshold –27dBm –23 dBm
Bandwidth Lower Limit –––––––– 50 MHz
Upper Limit 7.5 GHz ––––––––
Data Output Voltage –8 dBm to 0 dBm 0.5 V
–16 dBm to –8 dBm 0.2 V
% Crossing 45%
p-p
p-p
Use the Min/Max values 1.5V
as limits for the test results in Tables 18
through 20.
1.5 V
55%
p-p
p-p
T able 18: BERT input @2.48832 Gb/s bit rate
Wavelength Optical Input Power Data Output Voltage % Crossing Mask Hit
1530 nm 0 dBm
-8 dBm
-16 dBm Not measured
1565 nm 0 dBm
-8 dBm
-16 dBm Not measured
T able 19: BERT input @9.95328 Gb/s bit rate
Wavelength Optical Input Power Data Output Voltage % Crossing Mask Hit
1530 nm 0 dBm
-8 dBm
-16 dBm Not measured
OI2125 O/E Receiver Instruction Manual
55
Page 68

Performance Verification
T able 19: BERT input @9.95328 Gb/s bit rate (Cont.)
Wavelength Mask Hit% CrossingData Output VoltageOptical Input Power
1565 nm 0 dBm
-8 dBm
-16 dBm Not measured
T able 20: BERT input @12.50000 Gb/s bit rate
Wavelength Optical Input Power Data Output Voltage % Crossing Mask Hit
1530 nm 0 dBm
-8 dBm
-16 dBm Not measured
1565 nm 0 dBm
-8 dBm
-16 dBm Not measured
56
OI2125 O/E Receiver Instruction Manual
Page 69

Performance Verification
Clock Recovery Module Test Records
The following pages contain test records for the optional clock recovery
modules. Photocopy the appropriate test record and use it to record the performance test results.
T able 21: OM1420 test record
Instrument Serial Number: Certificate Number:
Temperature: Relative Humidity %:
Date of Calibration: Technician:
Performance Test Minimum Measured Maximum
<Circuit> <Test name>
Clock Output Output Voltage 1.0 V
Jitter Generation ––––––––
p-p
Use the Min/Max values as 2.5 V
limits for the test results in
Table 22.
2 ps rms
p-p
T able 22: OM1420 clock output data
BERT Data Rate (Gb/s) Input Voltage, V
9.95328 0.15
0.75
10.66423 0.15
0.75
p–p
Jitter, V
p–p
Clock Output Voltage, V
p–p
OI2125 O/E Receiver Instruction Manual
57
Page 70

Performance Verification
58
OI2125 O/E Receiver Instruction Manual
Page 71

Maintenance
Inspection and Cleaning
This section contains the information needed to do periodic and corrective
maintenance on the instrument. The following subsections are included:
H Inspection and Cleaning — information and procedures for inspecting and
cleaning the instrument and connectors.
H Repackaging Instructions — information on returning an instrument for
service.
Inspection and Cleaning describes how to inspect for dirt and damage. It also
describes how to clean the exterior of the instrument. Inspection and cleaning are
done as preventive maintenance. Preventive maintenance, when done regularly,
may prevent instrument malfunction and enhance its reliability.
Preventive maintenance consists of visually inspecting and cleaning the
instrument and using general care when operating it.
General Care
Exterior Cleaning
The cabinet helps keep dust out of the instrument and should be in place when
operating the instrument.
Always keep the connectors on the instrument and optical cables covered with
the protective caps when not in use. Treat optical connections the same as you
would a camera lens or other precision optical gear.
Clean the exterior surfaces of the chassis with a dry lint-free cloth or a softbristle brush. If any dirt remains, use a cloth or swab dipped in a 75% isopropyl
alcohol solution. Use a swab to clean narrow spaces around controls and
connectors. Do not use abrasive compounds on any part of the chassis that may
damage the chassis. Do not attempt to clean the interior of the instrument.
Clean the On/Off switch using a dampened cleaning towel. Do not spray or wet
the switch directly.
CAUTION. Avoid the use of chemical cleaning agents which might damage the
plastics used in this instrument. Use only deionized water when cleaning the
menu buttons or front-panel buttons. Use a 75% isopropyl alcohol solution as a
cleaner and rinse with deionized water. Before using any other type of cleaner,
consult your Tektronix Service Center or representative.
OI2125 O/E Receiver Instruction Manual
59
Page 72

Maintenance
Inspection
Inspect the outside of the instrument for damage, wear, and missing parts, using
Table 23 as a guide. Immediately repair defects that could cause personal injury
or lead to further damage to the instrument.
T able 23: Inspection check list
Item Inspect for Repair action
Cabinet, cabinet feet,
front panel, and cover
Front-panel knobs Missing, damaged, or loose
Connectors Broken shells, cracked insulation,
Accessories Missing items or parts of items,
Cleaning Optical Connectors
Cracks, scratches, deformations,
damaged hardware
knobs
and deformed contacts. Dirt in
connectors
bent pins, broken or frayed
cables, and damaged connectors
Repair or replace defective
module
Repair or replace missing or
defective knobs
Repair or replace defective
connectors. Clear or blow out
dirt. See Cleaning Optical Con-
nectors
Repair or replace damaged or
missing items, frayed cables, and
defective modules
Equipment Required
To prolong the life of the optical connectors on your instrument, observe the
following handling and cleaning instructions.
Small dust particles and oils can easily contaminate optical connectors and
reduce or block the signal. Take care to preserve the integrity of your connectors
by keeping them free of contamination.
CAUTION. To prevent loss of optical power or damage to the optical connectors,
keep the connectors clean at all times.
Always keep the connectors covered with protective caps when not in use.
Use only high-quality cleaning supplies that are nonabrasive and leave no
residue.
Use the following items to clean the optical connectors:
H Cleaner tape dispenser (standard accessory included with the transmitter)
H Canned compressed gas (Do not use compressed air from an in-house
facility, as oil in the system may contaminate the connector.)
60
OI2125 O/E Receiver Instruction Manual
Page 73

Maintenance
Procedure
To clean the optical connectors, refer to Figure 20 and follow these steps:
1. Advance the tape by grasping the tape and pulling in a new section to the
wiping surface.
2. Grasp the connector to be cleaned with one hand, being careful not to touch
the fiber core.
3. Hold the cleaner tape dispenser firmly with your other hand.
4. Wipe the connector tip once across the exposed tape surface, being careful to
use a firm, steady motion without tearing the tape. The tip should be
perpendicular to the tape surface for optimal results. When the tip is
perpendicular to the tape, the tip will move smoothly and easily across the
tape without tearing it.
Cleaner tape dispenser
Connector tip
Tape
Cleaner tape
Advance
Figure 20: Cleaning an optical connector
5. If you cannot use the cleaner tape dispenser, apply a short burst of com-
pressed gas to the connector.
6. Carefully attach the connector to the instrument or cable, and check for
proper operation.
NOTE. Cleaning kits for optical connectors are available from a number of
suppliers.
OI2125 O/E Receiver Instruction Manual
61
Page 74

Maintenance
Repackaging Instructions
This section contains the information needed to repackage the instrument for
shipment or storage.
Packaging
Shipping to the Service
Center
When repacking the instrument for shipment, use the original packaging. If the
packaging is unavailable or unfit for use, contact your local Tektronix representative to obtain new packaging.
Seal the shipping carton with an industrial stapler or strapping tape.
Contact the Service Center to get an RMA (return material authorization)
number, and any return or shipping information you may need.
If the instrument is being shipped to a Tektronix Service Center, enclose the
following information:
H The RMA number
H The owner’s address
H Name and phone number of a contact person
H Type and serial number of the instrument
H Reason for returning
H A complete description of the service required
Mark the address of the Tektronix Service Center and the return address on the
shipping carton in two prominent locations.
62
OI2125 O/E Receiver Instruction Manual
Page 75

Replaceable Parts
Figure 21: Standard accessories
Standard accessories
1
2
3
4
5
6
7
Fig. &
index
number
21–1 161–0066–00 1 CA ASSY,PWR:3,18 AWG,250V/10A,98
–2119–6690–00 1 MODULE ASSY:CLOCK RECOVER Y,SLOT
–3 015–1022–00 1 TERMINATOR,COAX:50 OHM, 0.5W ,SMA 26805 2001–4401–00
–4 015–0561–00 1 CABLE,DLY,COAX:50
–5119–4516–00 1 CONNECTOR,OPTO:ADAPTER,FC–PC,ATTEN
–6 174–3922–00 1 CA ASSY,FBR OPT:SINGLE MODE,3 METER
–7 006–8217–00 1 CONN CLEANER:FIS CONNECTOR CLEANER 0CKD9 F1–7111
Tektronix
part number
071–1053–XX 1 MANUAL,TECH:INS,O/E RECEIVER, OI2125 TK2548 071–1053–XX
Serial no.
effective
Serial no.
discont’d
Qty Name & description Mfr. code Mfr. part number
INCH,STR,IEC320,RCPT X NEMA 5–15P,US
COVER,OI2125
OHM,4NS,W/CONN,SMA,MALE,EACH END
0.6DB,RTN LOSS 35DB,RPTB+/–0.2DB,TFS3030
LONG,FC–PC TO FC–PC
0B445 ECM–161–0066–00
80009 119–6690–00
0GZV8 SF104PE,920MM,2X1
1SMA–451
TK2491 APC–10
0R0U6 8814–3M–SB
OI2125 O/E Receiver Instruction Manual
63
Page 76

Replaceable Parts
Optional accessories (not pictured)
Tektronix
part number
119–4517–00 1 ADAPTER,SMA:TFS3030,2.5MM,AMT–10 TK2491 AMT–10
119–4556–00 1 ADAPTER,HP–PC:OPTICAL
119–4557–00 1 ADAPTER,UNIV:SMA 905/906,ASM–90 TK2491 ASM–90
119–4558–00 1 ADAPTER,UNIV:DIAMOND
119–5115–00 1 ADAPTER,FC/APC:OPTICAL CONNECTOR,APC–108 TK2491 APC–108
119–5116–00 1 ADAPTER,SC/APC:OPTICAL CONNECTOR,ASC–108 TK2491 ASC–108
119–5887–00 1 ADAPTER,UCI:OPTICAL CONNECTOR,UNIVERSAL
119–5888–00 1 ADAPTER,UCI:OPTICAL CONNECTOR,UNIVERSAL
131–7368–00 1 CONN,FIBER OPT:A TTENUATOR,OAF
TVGF13 SIDE BY SIDE INSTRUMENT RACK ADAPTER 80009 TVGF13
Serial no.
effective
Serial no.
discont’d
Qty Name & description Mfr. code Mfr. part number
CONNECTOR,UNIVERSAL CONNECTOR
INTERFACE,AHP–10(HMS–10/HP)
3.5MM,AMS–00(DIAMOND–PC,HMS–0)
CONNECTOR INTERFACE,
ADT–UNI.S8/DIN.2,TOP160
CONNECTOR INTERFACE,ADT–UNI/ST,TOP160
FC–PC,SINGLE MODE,5 DB,2.14 MM OD
TK2491 AHP–10
PROPRIETAR Y INFO
PROPRIETAR Y INFO
TK2491 AMS–00
PROPRIETAR Y INFO
TK2491 AD–108, DIN/APC
80009 119–5880–00
80009 131–7368–00
64
OI2125 O/E Receiver Instruction Manual
Page 77

Replaceable Parts
1
2
3
Figure 22: Optional power cords
Optional power cords
Fig. &
index
number
22–1 161–0066–09 1 CA ASSY,PWR:3,0.75MM SQ,250V/10A,99
–2 161–0066–10 1 CA ASSY,PWR:3,1.0 MM SQ,250V/10A,2.5
–3 161–0066–11 1 CA ASSY,PWR:3,1.0MM SQ,250V/10A,2.5
–3 161–0304–00 1 CA ASSY,PWR:3,1.0MM SQ,250V/10A,2.5
–4 161–0154–00 1 CA ASSY,PWR:3,1.0MM SQ,250V/10A,2.5
Tektronix
part number
Serial no.
effective
Serial no.
discont’d
Qty Name & description Mfr. code Mfr. part number
INCH,STR,IEC320,RCPT,EUROPEAN
METER,STR,IEC320,RCPT X 13A,FUSED UK
PLUG(13A FUSE),UNI
METER,STR,IEC320,RCPT,AUSTRALIA
METER,STR,IEC320,RCPT,CHINA
METER,STR,IEC320,RCPT,SWISS
4
2W733 ORDER BY DESC
TK2541 ORDER BY DESC
80126 ORDER BY DESC
0B445 E13.900.098.A01
5F520 86515030
OI2125 O/E Receiver Instruction Manual
65
Page 78

Replaceable Parts
Manufacturers cross index
Mfr.
code
26805 M/A COM OMNI SPECTRA INC MICROWAVE CONNECT OR DIV
2W733 BELDEN WIRE & CABLE COMPANY 2200 US HWY 27 SOUTH
5F520 PANEL COMPONENTS CORP PO BOX 115 OSKALOOSA, IA 52577–0115
80009 TEKTRONIX INC 14150 SW KARL BRAUN DR
80126 PACIFIC ELECTRICORD CO 747 WEST REDONDO BEACH
0B445 ELECTRI–CORD MFG CO INC 312 EAST MAIN STREET WESTFIELD, P A 16950
0CKD9 FIBER INSTRUMENT SALES INC 161 CLEAR ROAD ORISKANY, NY 13424
0GZV8 HUBER & SUHNER INC 19 THOMPSON DRIVE ESSEX JUNCTION, VT 05452–3408
0R0U6 FICO INC 2 BRIDGEVIEW CIRCLE TYNGSBORO, MA 01879
TK2491 TEMPO–CAMARILLO 1340 FLYNN RD CAMARILLO, CA 93012
TK2541 AMERICOR ELECTRONICS LTD UNIT–H
TK2548 XEROX CORPORATION 14181 SW MILLIKAN WAY BEAVERTON, OR 97005
Manufacturer Address City , state, zip code
140 4TH AVE
PO BOX 1980
PO BOX 500
PO BOX 10
2682 W COYLE AVE
WAL THAM, MA 02254
RICHMOND, IN 47374
BEAVERT ON, OR 97077–0001
GARDENA, CA 90247–4203
ELK GROVE VILLAGE, IL 60007
66
OI2125 O/E Receiver Instruction Manual
Page 79

Glossary
Accuracy
The closeness of the indicated value to the true value.
Attenuation
A decrease in magnitude of current, voltage, or power of a signal.
Attenuator
A transducer that reduces the amplitude of a signal.
Bandwidth
The difference between the high and low frequencies of a transmission band.
The range of frequencies handled by a device or system. Bandwidth is a
measure of network capacity. Analogue bandwidth is measured in cycles per
second. Digital bandwidth is measured in bits of information per second.
BER
An acronym for Bit Error Ratio (or Rate). The principal measure of quality
of a digital transmission system. BER is defined as:
BER = Number of Errors/Total Number of Bits
BER is usually expressed as a negative exponent. For example, a BER of
–7
10
means that on average 1 bit out of 107 bits is in error.
BER Floor
A limiting of the bit-error-ratio in a digital system as a function of received
power due to the presence of signal degradation mechanisms or noise.
Bit Error
An incorrect bit. Also known as a coding violation.
Bit Rate
The number of bits transmitted in a specified (usually 1 second) time.
Channel
A communications path or the signal sent over a channel.
Channel capacity
The maximum usable data rate for a given channel.
Chirp
Optical frequency chirp is a transient change in optical frequency (wavelength) when a laser or optical modulator is transitioned quickly between
zero and one power levels.
OI2125 O/E Receiver Instruction Manual
67
Page 80

Glossary
Clock
A signal that provides a timing reference.
Clock recovery
Recovering the clock from the incoming data.
dB
Decibel: a method of expressing power or voltage ratios. The decibel scale is
logarithmic. It is often used to express the efficiency of power distribution
systems when the ratio consists of the energy put into the system divided by
the energy delivered (or in some cases, lost) by the system. One milliwatt is
usually the reference for 0 decibels. The formula for decibels is:
level
(level/reference)
ǒ
dB
= 10@log
level
dB
level
+ 10log
reference
Ǔ
In the electrical domain:
P
out
ǒ
Ǔ
P
dB
dB
power
power
2
V
50ohm
V2
/50 W=1 mW
ref
+ 10log
= 10@log(P
ref
+ 1mW
ref
out/Pref
= 10@log(V
= 20 log(V
+ 10log
)
2
out/Vref
out
V
ǒ
V
/R/V
)
2
out
R
Ǔ
2
ref
R
+ 20log
2/R)
ref
V
out
ǒ
Ǔ
V
ref
In optical:
P
o
ǒ
dBm
dBm
P
ref
= 10@log(Po/P
power
+ 10log
power
= 1 mW = 0 dBm
P
+ 1mW + 0dBm
ref
Ǔ
)
ref
P
ref
dBm
The symbol for power level in decibels relative to 1 mW.
DFB laser
Distributed Feedback Laser-a type of laser designed for stable single-mode
operation. Internal waveguides select one of several possible laser modes and
suppress all others.
Demodulation
A process whereby a modulated signal is returned to its original form.
68
DWDM
Dense Wavelength Division Multiplexing-a higher capacity version of
WDM, which is a way to increase the capacity of fiber optic transmission
systems through multiplexing up to 40 wavelengths of light.
Deterministic jitter
The difference between the maximum and minimum deviations from the
expected timing positions of data after removing the random jitter.
OI2125 O/E Receiver Instruction Manual
Page 81

Digital Signal
A signal made up of a series of on and off pulses.
Digital Transmission System
A transmission system where information is transmitted in a series of on and
off pulses.
Dispersion (example in fiber)
In an optical system, the broadening and distortion of a pulse due to
multipath waveform propagation.
Electro-optic effect
A change in the refractive index of a material under the influence of an
electric field.
ES
An acronym for Errored Second. A second with at least one error.
Error Detection
Checking for errors in data transmission. A calculation is made on the data
being sent and the results are sent along with it. The receiving station then
performs the same calculation and compares its results with those sent. Each
data signal conforms to specific rules of construction so that departures from
this construction in the received signals can be detected. Any data detected
as being in error is either deleted from the data delivered to the destination,
with or without an indication that such deletion has taken place, or delivered
to the destination together with an indication that it is in error.
Glossary
Extinction Ratio
The ratio of the high-level optical power to the low-level optical power in a
transmission system.
Error Rate
The ratio of the number of data units in error to the total number of data
units.
Fiber optics
A method of transmitting information in which light is modulated and
transmitted over high-purity filaments of glass. The bandwidth of fiber optic
cable is much greater than that of copper wire.
Fiber Optics Transmission System (FOTS)
A transmission system transmitting light through thin glass fibers.
FEC: Forward Error Correction
Additional bits and/or coding added to a data stream to allow for automatic
error detection and correction at the receiving end. These extra bits and/or
coding tend to increase a serial data rate above the original non-FEC data
stream in order to accommodate the extra information added by the FEC.
OI2125 O/E Receiver Instruction Manual
69
Page 82

Glossary
Insertion Loss
The loss of power in a system as a result of inserting a coupler or cable.
Index of Refraction
The ratio of the speed of light in a vacuum to the speed of light in a material.
Laser Safety Class IIIb
Laser light that can emit dangerous radiation is classified IIIb. Requirements
for equipment employing a Class IIIb laser include having a keyswitch with
a removable key to control the laser power. Also required is a means for
remotely disabling the laser output, and labels indicating the location of the
laser aperture.
Link
A transmission path between two stations, channels, or parts of a system.
Long wavelength
The spectrum from 1200 to 1600 nanometers.
LOS
An acronym for Loss of Signal.
Mach-Zehnder Interferometer
A method of measurement optical interference by splitting an optical signal
into two branches and manipulating one. The two branches are then
recombined, producing variable optical interference for analysis.
Modulation
A process of varying the frequency, phase, or amplitude of a signal so it is
suitable for transmission over the medium between the transmitter and the
receiver.
Multimode
A fiber that has a larger core than single mode, it allows light to enter from
several angles, enabling it to connect to broader light sources such as LEDs.
However, the multiple paths that the light takes through multimode fiber
causes dispersion.
Multiplexer
Equipment that combines two or more signals into one.
Multiplexing
Combine several communications signals into one.
Noise
Any unwanted energy that interferes with a signal or measurement.
70
NRZ
No Return to Zero-When a digital data pattern that has zeroes as lows and
ones as highs, does not return to zero when the pattern has consecutive ones.
OI2125 O/E Receiver Instruction Manual
Page 83

Optical coupler/splitter
A device that couples or splits power from fiber optic cables.
Photocurrent
The current that flows through a photosensitive device as the result of
exposure to radiant power.
Photodiode
An electro-optic component that converts optical energy to electrical current.
PMF
Polarization maintaining fiber-fiber optic cable with a core that has been
pre-stressed to create two independent optical axes. Light is transmitted
through these two optical axes without exchanging energy with each other.
PRBS
Pseudo-random binary-pulse sequence. A repeating bit pattern that appears
to be random. The bit pattern is used for telecommunications system testing.
Protocol
Formal conventions that govern the format and control of signals in a
communication process.
Glossary
Pulse modulation
The modulation of a series of pulses to represent the information.
Random jitter
Abrupt, spurious variations in the timing or amplitude of a signal, whose
value at a future instant cannot be predicted.
Recovered Clock
A clock signal derived from and synchronous with a received data sequence.
Refraction
The bending of light as it passes between materials having different
refractive indices.
Residual Error Rate
The error rate remaining after attempts at correction are made.
RZ
Return to Zero-When a digital data pattern that has zeroes as lows and ones
as highs, returns to zero when the pattern has consecutive ones.
Rx
An abbreviation for receiver.
Short wavelength
The spectrum from 800 to 1000 nanometers.
OI2125 O/E Receiver Instruction Manual
71
Page 84

Glossary
Single mode
A fiber, designed to carry light of a single wavelength, that confines the light
to a single path.
SONET
Synchronous Optical Network-a standard for fiber optic transmission.
Boundary masks are used to define eye pattern limits generated by the
optical waveforms..
Telecommunications
The transmission or reception of signals by wire, radio, optical, or other
system.
Transmission system
Facilities to transfer information from one location to another using copper
conductors, fiber, or microwave radio.
Tunable Laser
A laser that has a variable wavelength and power output level.
Tx
An abbreviation for transmitter
72
OI2125 O/E Receiver Instruction Manual
Page 85

Index
A
Accessories
Optional, 4
Standard, 3, 63
Accuracy, 67
Address, Tektronix, viii
Attenuation, 67
Attenuator, 67
B
Bandwidth, 67
BER, 67
BER Floor, 67
Bit error, 67
Bit error rate, 67
Bit error ratio, 67
Bit rate, 67
C
Calibration Test Record, 55
Channel, 67
Channel capacity, 67
Chirp, 67
Cleaning and inspection, exterior, 59
Clock, 68
Clock recovery, 68
Clock Recovery Modules, 14
Features, 14
Installing, 16
Removing, 17
Theory of Operation, 33
Connecting signals, 9
Contacting Tektronix, viii
Controlling operation remotely, 19
E
Electro-optic effect, 69
Error detection, 69
Error rate, 69
Errored second, 69
ES, 69
Extinction Ratio, 69
F
FEC, 69
Fiber optics, 69
Fiber optics transmission system, 69
Forward Error Correction, 69
FOTS, 69
Front Panel Connections and Controls, 12
Functional Check, 6
H
Handling, 9
I
Index of Refraction, 70
Insertion Loss, 70
Inspection and cleaning, exterior, 59
Installation, 5
L
Laser Safety Class IIIb, 70
Link, 70
Long wavelength, 70
LOS, 70
D
dB, 68
dBm, 68
Decibel, 68
Demodulation, 68
Deterministic jitter, 68
DFB laser, 68
Digital signal, 69
Digital transmission system, 69
Dispersion, 69
OI2125 O/E Receiver Instruction Manual
M
Mach-Zehnder Interferometer, 70
Maintenance
Cleaning Optical Connectors, 60
Inspection and Cleaning, 59ć62
Modulation, 70
Multimode, 70
Multiplexer, 70
73
Page 86

Index
Multiplexing, 70
N
Noise, 70
NRZ, 70
O
O/E Receiver, Theory of Operation, 32
Operating basics, 9
Optical coupler/splitter, 71
Optional accessories, 4
Options, 2
P
Packaging, 62
Parts, Replaceable, 63, 65
Performance Verification
Prerequisites, 36ć38
Test Record, 55
Performance verification, 35
Bandwidth, 41
Clock Recovery Module Tests, 51
OM 1420, 51
Equipment required, 36
Eye Pattern Test Matrix, 45
LOS Threshold, 38
Test record
OI 2125, 55
OM 1420, 57
Phone number, Tektronix, viii
Photocurrent, 71
Photodiode, 71
PMF, 71
Power connector, 5
Power cord, optional, 65
Power off, 5
Power on, 5
PRBS, 71
Product support, contact information, viii
Protocol, 71
Pulse modulation, 71
Remote Interface, Pinout, 19
Remote interface, 19
Remote operation, 19
Repackaging Instructions, 62
Repackaging instructions, 62
Replaceable parts, 63, 65
Residual error rate, 71
RMA, 62
Rx, 71
RZ, 71
S
Service, returning for service, 62
Service support, contact information, viii
Short wavelength, 71
Single mode, 72
SONET, 72
Specifications, 23
Environmental characteristics, 26
Standard accessories, 3
T
Technical support, contact information, viii
Tektronix, contacting, viii
Telecommunications, 72
Test Record, 55
Performance Verification, 55
OI 2125, 55ć58
OM 1420, 57
Theory of Operation
Clock Recovery Modules, 33
O/E Receiver, 32
Transmission system, 72
Tunable laser, 72
Tx, 72
U
URL, Tektronix, viii
V
R
Random jitter, 71
Rear Panel Connections and Controls, 18
Recovered, clock, 71
Refraction, 71
74
Ventilation, 5
W
Web site address, Tektronix, viii
OI2125 O/E Receiver Instruction Manual
 Loading...