

Page 1

NRZ-M4 Application
Printable Application Help
*P077154500*
077-1545-00
Page 2

Page 3

NRZ-M4 Application
Printable Application Help
www.tek.com
077-1545-00
Page 4

Copyright © Tektronix. All rights reserved. Licensed software products are owned by Tektronix or its subsidiaries
or suppliers, and are protected by national copyright laws and international treaty provisions. Tektronix products
are covered by U.S. and foreign patents, issued and pending. Information in this publication supersedes that in all
previously published material. Specifications and price change privileges reserved.
TEKTRONIX and TEK are registered trademarks of Tektronix, Inc.
Contacting Tektronix
Tektronix, Inc.
14150 SW Karl Braun Drive
P.O. Box 500
Beaverton, OR 97077
USA
For product information, sales, service, and technical support:
■
In North America, call 1-800-833-9200.
■
Worldwide, visit www.tek.com to find contacts in your area.
Page 5

Table of Contents
Welcome ............................................................................................................................................. iii
Getting help and support
Conventions .................................................................................................................................... 1
Related documentation ................................................................................................................... 2
Technical support ........................................................................................................................... 2
Getting started
Computer requirements .................................................................................................................. 3
Instruments and accessories required ............................................................................................. 4
TekVISA software .......................................................................................................................... 4
Installing the software .................................................................................................................... 5
File name extensions ...................................................................................................................... 5
View software version .................................................................................................................... 6
Application directories ................................................................................................................... 6
Operating basics
Launch the application .................................................................................................................... 7
Application panels overview .......................................................................................................... 8
File menu ...................................................................................................................................... 13
Scope menu ................................................................................................................................... 13
Results elements ........................................................................................................................... 14
Programmatic interface
Remote control introduction ......................................................................................................... 17
Handshaking protocol ................................................................................................................... 17
Setting up the PI environment ...................................................................................................... 18
Syntax ........................................................................................................................................... 19
Variable name arguments and queries .......................................................................................... 20
Programming examples ................................................................................................................ 26
Perl program example: configure and operate NRZ-M4 ......................................................... 26
Python example ....................................................................................................................... 28
NRZ-M4 Application Help i
Page 6

Table of Contents
Guide to connect the oscilloscope
Check network access ................................................................................................................... 29
TekVISA setup and troubleshooting ............................................................................................ 29
Firewall exceptions ....................................................................................................................... 32
ii NRZ-M4 Application Help
Page 7

Welcome
The Tektronix NRZ-M4 application provides NRZ signaling analysis, including
TDEC (Transmitter and Dispersion Eye Closure) measurement. The application
brings together NRZ optical measurements in a simple and easy to use
application. This application is designed to minimize the computation time of
waveform analysis which suits the manufacturing environment.
This application is intended to be installed on a PC and works by connecting to
the sampling scope. Application allows you to acquire signal directly from the
connected DSA8300 sampling oscilloscope and analyze the acquired waveform
data.
NOTE. NRZ-M4 application requires the installation of an option key on the
target DSA8300 oscilloscope to enable establishing a connection from the NRZM4 application to the DSA8300. Refer to the documentation provided with the
DSA8300 for instructions of adding a new option key.
NRZ-M4 Application Help iii
Page 8

Welcome
Key features
The NRZ-M4 application performs comprehensive analysis of optical NRZ
signals, including TDEC, Mask margin and other optical measurements.
NRZ-M4 application provides the following features:
■
Simultaneously analyze up to 4 optical channels
■
Characterization of 100Gbps Optical transceivers (SR4, LR4) devices with
Mask margin measurements. Perform optimal mask fitting for better margin.
■
Supports TDEC (Transmitter and Dispersion Eye Closure)
■
Signal characterization measurements such as Amplitude and Timing
measurements
■
Support for Phase reference characterization clock for more accurate results.
■
Support for measurements at various population limits.
■
Show results as numeric and graphical display.
■
Display 2D eye diagrams with embedded mask
■
Save the analysis results to a file.
■
Run multiple instances of the application and connect each of them to
different DSA8300s' and perform parallel analysis of multiple channels.
iv NRZ-M4 Application Help
Page 9

Getting help and support
Conventions
Help uses the following conventions:
■
The term "Application" and "Software" refers to the Tektronix NRZ-M4
application.
■
The term “select” is a generic term that applies to the different methods of
choosing a screen item (button, control, list item): using a mouse or using the
touch screen.
Table 1: Icon descriptions
Icon Meaning
This icon identifies important information.
This icon identifies conditions or practices that could result in loss
of data.
This icon identifies additional information that will help you use
the application more efficiently.
NRZ-M4 Application Help 1
Page 10

Getting help and support
Related documentation
The following documentation is available as part of the NRZ-M4 application.
Table 2: Product documentation
Item Purpose Location
Help Application operation
and User Interface help
PDF of the help Printable version of the
compiled help
PDF file that ships with the NRZ-M4 application.
You can download the PDF version of the
manual from the Tektronix website.
www.tek.com
See also:
Technical support
General information
Technical support
Tektronix values your feedback on our products. To help us serve you better,
please send us your suggestions, ideas, or comments on your application or
oscilloscope. Contact Tektronix through mail, telephone, or the Web site. See
Contacting Tektronix at the front of this document for contact information.
When you contact Tektronix Technical Support, please include the following
information (be as specific as possible):
■
All instrument model numbers
■
Hardware options, if any
■
Modules used
■
Your name, company, mailing address, phone number, FAX number
■
Please indicate if you would like to be contacted by Tektronix about your
suggestion or comments.
■
Application specific
information
Software version number
■
Description of the problem such that technical support can duplicate the
problem
■
If possible, save the setup files for all the instruments used and the
application
2 NRZ-M4 Application Help
Page 11

Getting started
Computer requirements
The NRZ-M4 application is designed to run on a PC running Windows operating
system. A high performance PC is recommended to minimize the computation
time of waveform analysis.
These are the minimum requirements to successfully run the NRZ-M4
application. A PC with higher performance results in faster measurements.
■
Operating system: Microsoft Windows 10 (64 bit) operating system.
■
Screen resolution: 1920 x 1080.
NOTE. Installing the NRZ-M4 application directly on a DSA8300 sampling
oscilloscope is not permitted.
Software requirements
The NRZ-M4 application requires the following software to be installed on the
PC.
■
TekVISA: TekVISA version 4.2.0.10 is recommended. Installation is
available during NRZ-M4 installation.
■
Matlab runtime: Matlab 2017b version 9.3 is required. The Matlab runtime is
available from MathWorks® (www.mathworks.com).
NRZ-M4 Application Help 3
Page 12

Getting started
Instruments and accessories required
The following are the instruments and accessories required.
Table 3: Instruments and accessories required
Instrument/Accessory Model number Quantity
Mainframe DSA8300 1
Optical modules 80C17, 80C18, 80C20, 80C21,
80C10C
Phase reference module 82A04B 1 (Optional)
NOTE. Optical module 80C10C has performance limitation. The overall
execution time of the measurement with this module is greater than the other
modules.
2 (Min 1 Qty)
TekVISA software
TekVISA is preinstalled on the DSA8300 sampling oscilloscopes, but to use this
protocol to connect and communicate with a DSA8300 sampling oscilloscope,
TekVISA must also be installed on the PC (where the NRZ-M4 application
resides).
TekVISA is available with the NRZ-M4 application installation file or can be
downloaded for free from the Tektronix website (www.tek.com). Search for
TekVISA Connectivity software.
4 NRZ-M4 Application Help
Page 13

Getting started
Installing the software
Complete the following steps to download and install the latest NRZ-M4
application. See Computer requirements for compatibility.
1. Go to www.tek.com.
2. Click Downloads. In the Downloads menu, select DOWNLOAD TYPE as
Software and enter NRZ-M4 in the MODEL OR KEYWORD field and click
SEARCH.
3. Select the latest version of software and follow the instructions to download.
File name extensions
4. Double-click the executable and follow the on-screen instructions. The
software is installed at C:\Program Files\TekApplications\NRZ-M4\.
5. Double-click NRZ-M4 icon in the desktop to Launch the application.
The TekExpress NRZ-M4 application uses the following file name extensions:
File name extension Description
.gm4 Setup file format
.pl Perl example for PI commands
.py Python example file for PI commands
.csv Results saving file format
.jpg Plots image file format
.pdf Test result reports
Application help document
.chm Application help file
NRZ-M4 Application Help 5
Page 14

Getting started
See also
View software version
Application directories
Use the following instructions to view the version information for the application.
To view version information for NRZ-M4, click Help > About.
Application directories
TekExpress NRZ-M4
application
NOTE. This example shows a typical Version Details dialog box, and may not
reflect the actual values as shown when you open this item in the application.
The TekExpress NRZ-M4 application files are installed at the following location:
C:\Program Files\TekApplication\NRZ-M4
6 NRZ-M4 Application Help
Page 15

Operating basics
Launch the application
Double-click the NRZ-M4 icon in the desktop to launch the application.
NRZ-M4 Application Help 7
Page 16
Operating basics
See also
Application panel overview
Application panels overview
8 NRZ-M4 Application Help
Page 17

Operating basics
Measurement selections
The measurement selection includes all the available optical measurements.
Table 4: Measurement selections
Measurements Description
Amplitude Includes the following amplitude measurements to the results section.
■
AOP: The average optical power of a NRZ optical signal.
■
ER: The extinction ratio of the highest and lowest optical power levels of a NRZ optical
signal.
■
Cross%: The height of eye crossing as a percentage of eye height measured in the
Eye Aperture.
■
+Overshoot: The ratio of the maximum value of the measured signal to its amplitude,
expressed as a percentage. The waveform is scanned for the maximum value within
the measurement region, while the amplitude is measured in the Eye Aperture.
■
-Overshoot: The ratio of the minimum value of the measured signal to its amplitude,
expressed as a percentage. The waveform is scanned for the minimum value within
the measurement region, while the amplitude is measured in the Eye Aperture.
■
NRZHigh: The logical 1 of the NRZ signal.
■
NRZLow: The logical 0 of the NRZ signal.
■
NRZAmplitude: The difference between the logical 1 level (High) and the logical 0 level
(Low) of the NRZ signal. Both High and Low levels are measured within the Eye
Aperture.
■
OMA: An approximation defined as the difference of the logical power 1 and
0 determined a vertical slice through the eye crossing. The levels are determined as
the means of the histograms of the vertical data slice through the High (logical 1) and
Low (logical 0) levels
■
NRZHigh_Histogram: Mean of the vertical histogram above the threshold, around the
center 20% of the eye(40% to 60% of the eye opening).
■
NRZLow_Histogram: Mean of the vertical histogram below the threshold, around the
center 20% of the eye(40% to 60% of the eye opening).
NOTE. NRZHigh_Histogram and NRZLow_Histogram are performed using the exported
waveform database file from sampling oscilloscope.
Timing Includes the following timing measurements to the results section.
■
Jitter RMS: Jitter is the measure of time variance on the rising and falling edges at the
NRZ eye crossing or at the mid-reference level.
■
Jitter Pk2Pk: The delta between the minimum and maximum of time crossings, with
the mean of the histogram being Tcross.
■
RiseTime: Computes the time interval between the mean crossings of the low
reference level and the high reference level to characterize the positive slope of the
eye.
■
FallTime: NRZ Fall Time characterizes the negative slope of the NRZ eye by
computing the time interval between the mean crossings of the high reference level
and the low reference level.
NRZ-M4 Application Help 9
Page 18
Operating basics
Measurements Description
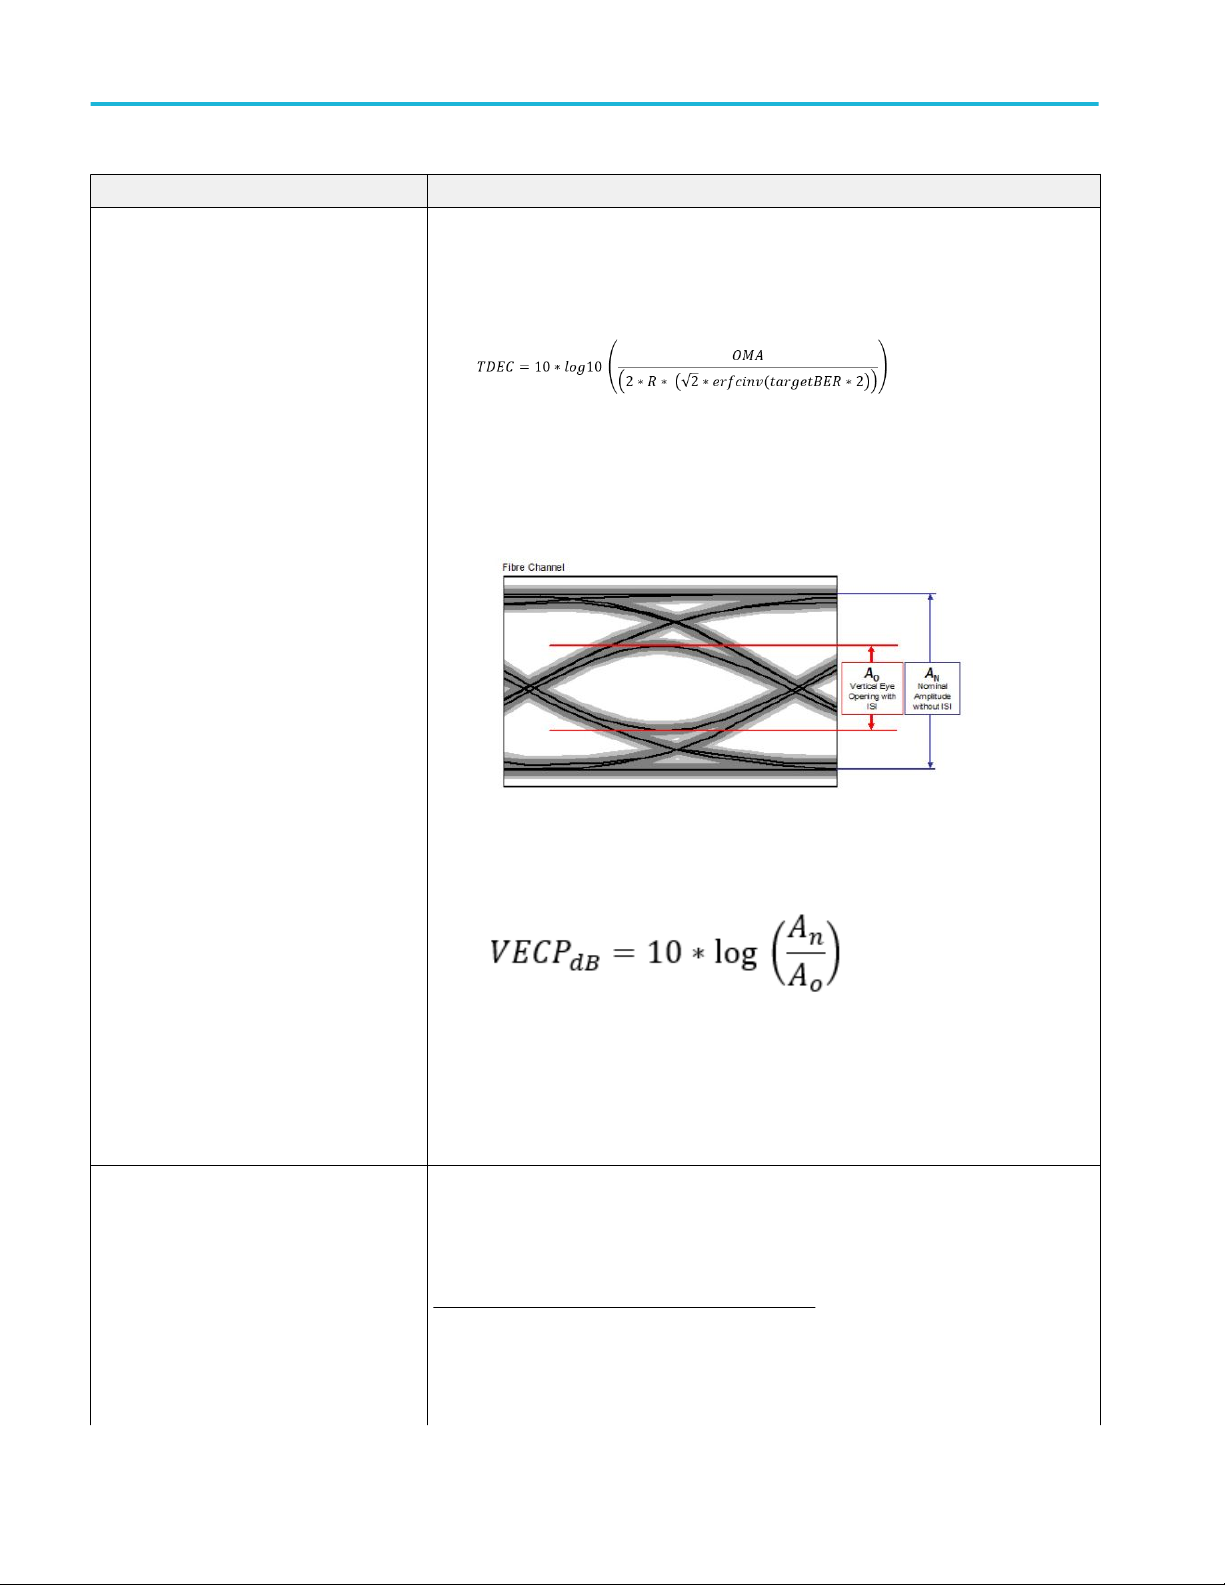
TDEC, VECP Includes the following measurements to the results section.
■
TDEC: Transmitter and Dispersion Eye Closure (TDEC) of a NRZ signal.
■
VECP: Vertical Eye Closure Penalty (VECP), a measure of the closure.
Where,
An - Normalized amplitude without ISI
Ao - Vertical eye opening with ISI
Mask Includes the following measurements to the results section.
Mask margin explores the design margins of the signal. It measures the margin in
percentage by expanding the mask on the NRZ eye until the mask hit ratio crosses the
target hit ratio. User has to input the target hit ratio and mask to be used for the
measurement.
Following are the steps to calculate the Mask Margin:
1. Find the eye center. Place the mask and measure the mask margin.
■
If the Margin is positive, the mask is well inside the open eye and mask has to be
blown out to measure the positive mask margin.
10 NRZ-M4 Application Help
Page 19

Operating basics
Measurements Description
■
If the Margin is negative, the eye is already stressful and mask has to be blown-in
to measure the negative mask margin.
2. Binary search method is followed to come across results faster.
3. Mask will be expanded/shrunk until the actual hit ratio exceeds the target hit ratio.
Mask margin will be measured at the point where the actual hit ratio is just below the
target hit ratio. Both Mask margin and actual hit ratio are given in results.
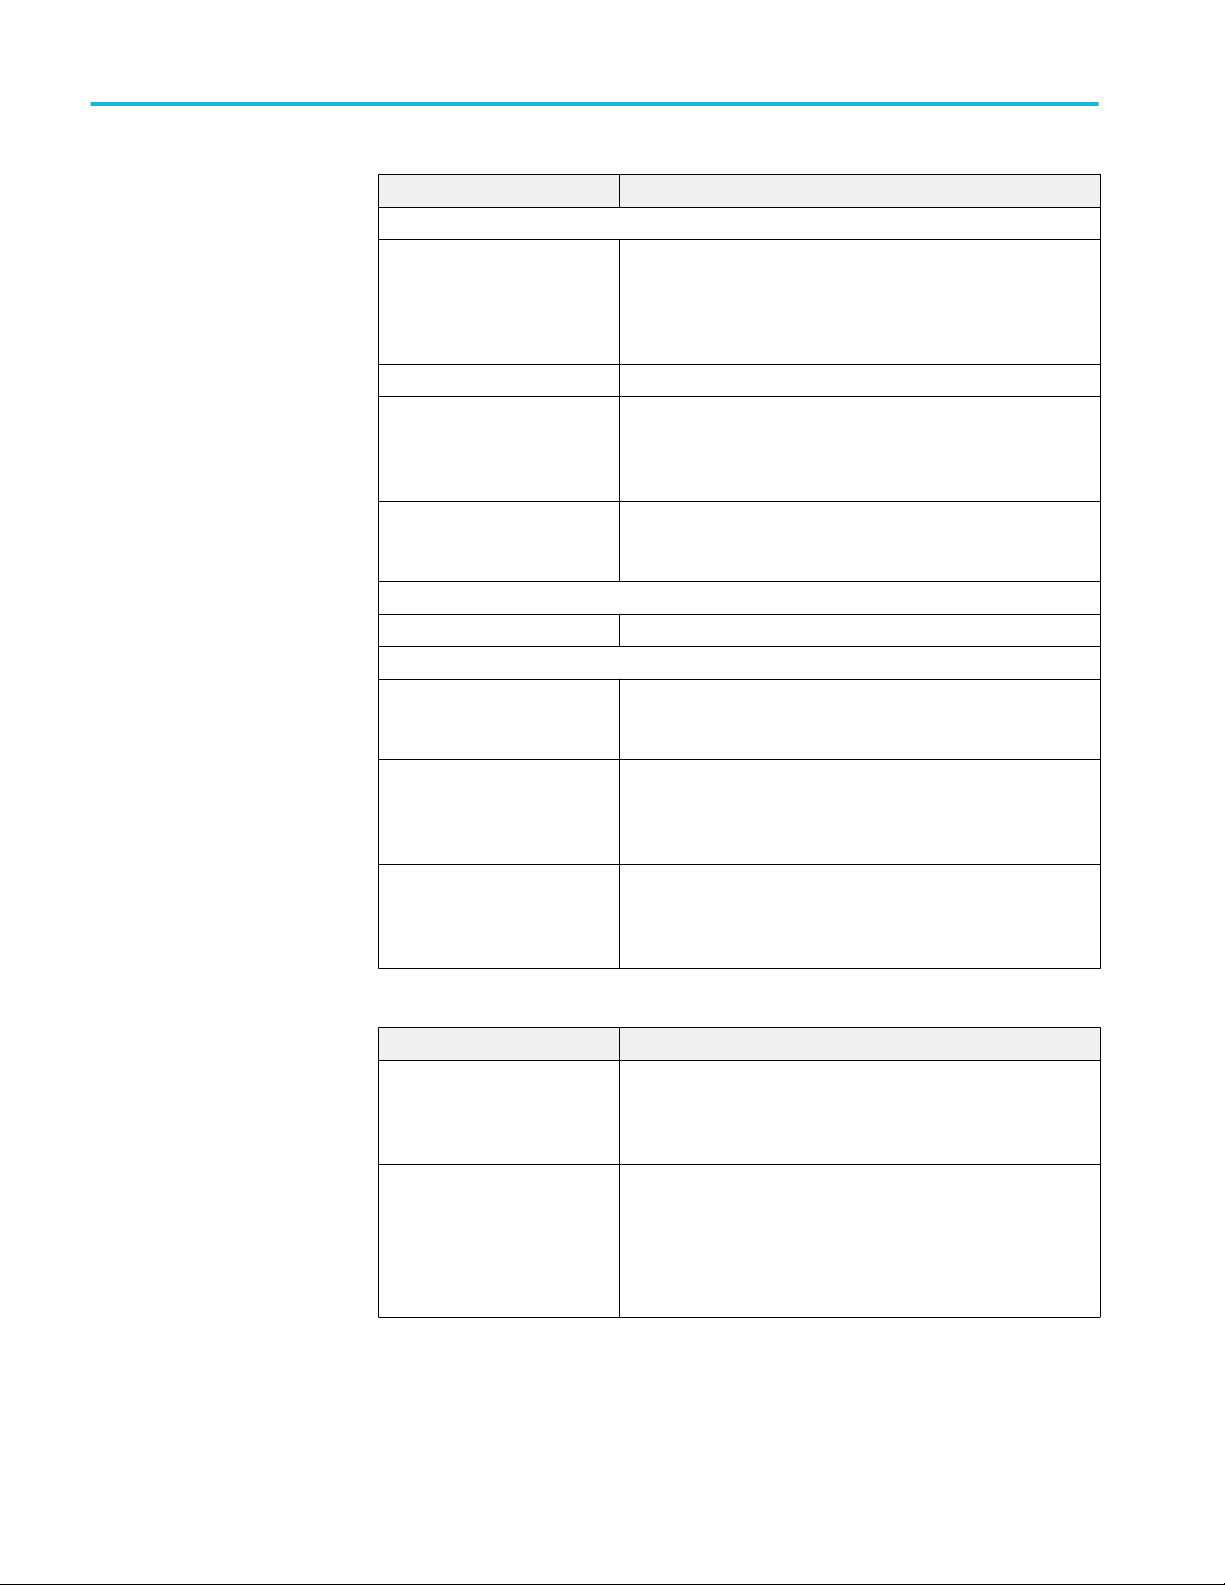
Measurement
configuration
The measurement configuration applies to the NRZ measurement selection to
further define the measurement parameters.
NRZ-M4 Application Help 11
Page 20
Operating basics
Measurements Description
Mask Configurations
Select Mask File
Target Hit Ratio Enter the target hit ratio.
Optimize Mask Filtting (takes
more time)
Enable Plots This is enabled by default.
Eye Configurations
TDEC BER Enter the TDEC BER value.
General Configurations
Population Specify the acquisition population. Specify number of samples
Save Results to File This is disabled by default.
Use Phase Reference module. This is disabled by default.
■
100GBaseSR4
■
100GBaseLR4
■
10GBaseR
This is disabled by default.
When enabled, the mask will be shifted in all directions (up,
down, right and left) and best mask fitting is done to get the
better margin.
When enabled, displays the 2D Eye diagram plot with the
embedded mask in it.
per each acquisition and number of acquisitions. Total population
will be product of these two values.
When enabled, this option saves the results to a .csv file at C:
\Users\<username> \AppData\Local\Temp. File name format is
"<AppInstance>_<ChannelName>_Results.csv".
Select to enable the phase reference clock connected to
channels. Also, select the clock ratio given to the phase
reference module.
Mode selection
Measurements Description
Enable This is disabled by default.
Enable the channel to analyze the signal. Channel can be
enabled only if the supported module (CH1 to CH4) is installed
and the option key is installed in the oscilloscope.
Scope Noise Enter the scope noise value for the corresponding channel.
Oscilloscope noise values are automatically read while
connecting to the oscilloscope or while doing Autosync.
Oscilloscope noise characterization tool has to be run on the
oscilloscope to measure the oscilloscope noise for each channel
before running the NRZ-M4 application.
12 NRZ-M4 Application Help
Page 21
Operating basics
File menu
Clear button
Run button
The Clear button removes all measurement results, including the plot display.
Press the Run button to start the analysis cycle. At least one measurement must
be selected.
The file menu provides the following operations:
Setting Description
Save Setup Use the dialog screen to navigate to a location to save the setup
file to recall at a later time. Setup files use .gm4 file extension.
Recall Setup Use the dialog screen to navigate to a saved setup file to restore
the application to a known setup.
Default Use to configure the default settings in the application.
Exit Exits the application.
The File menu operations are unavailable if an analysis is currently running.
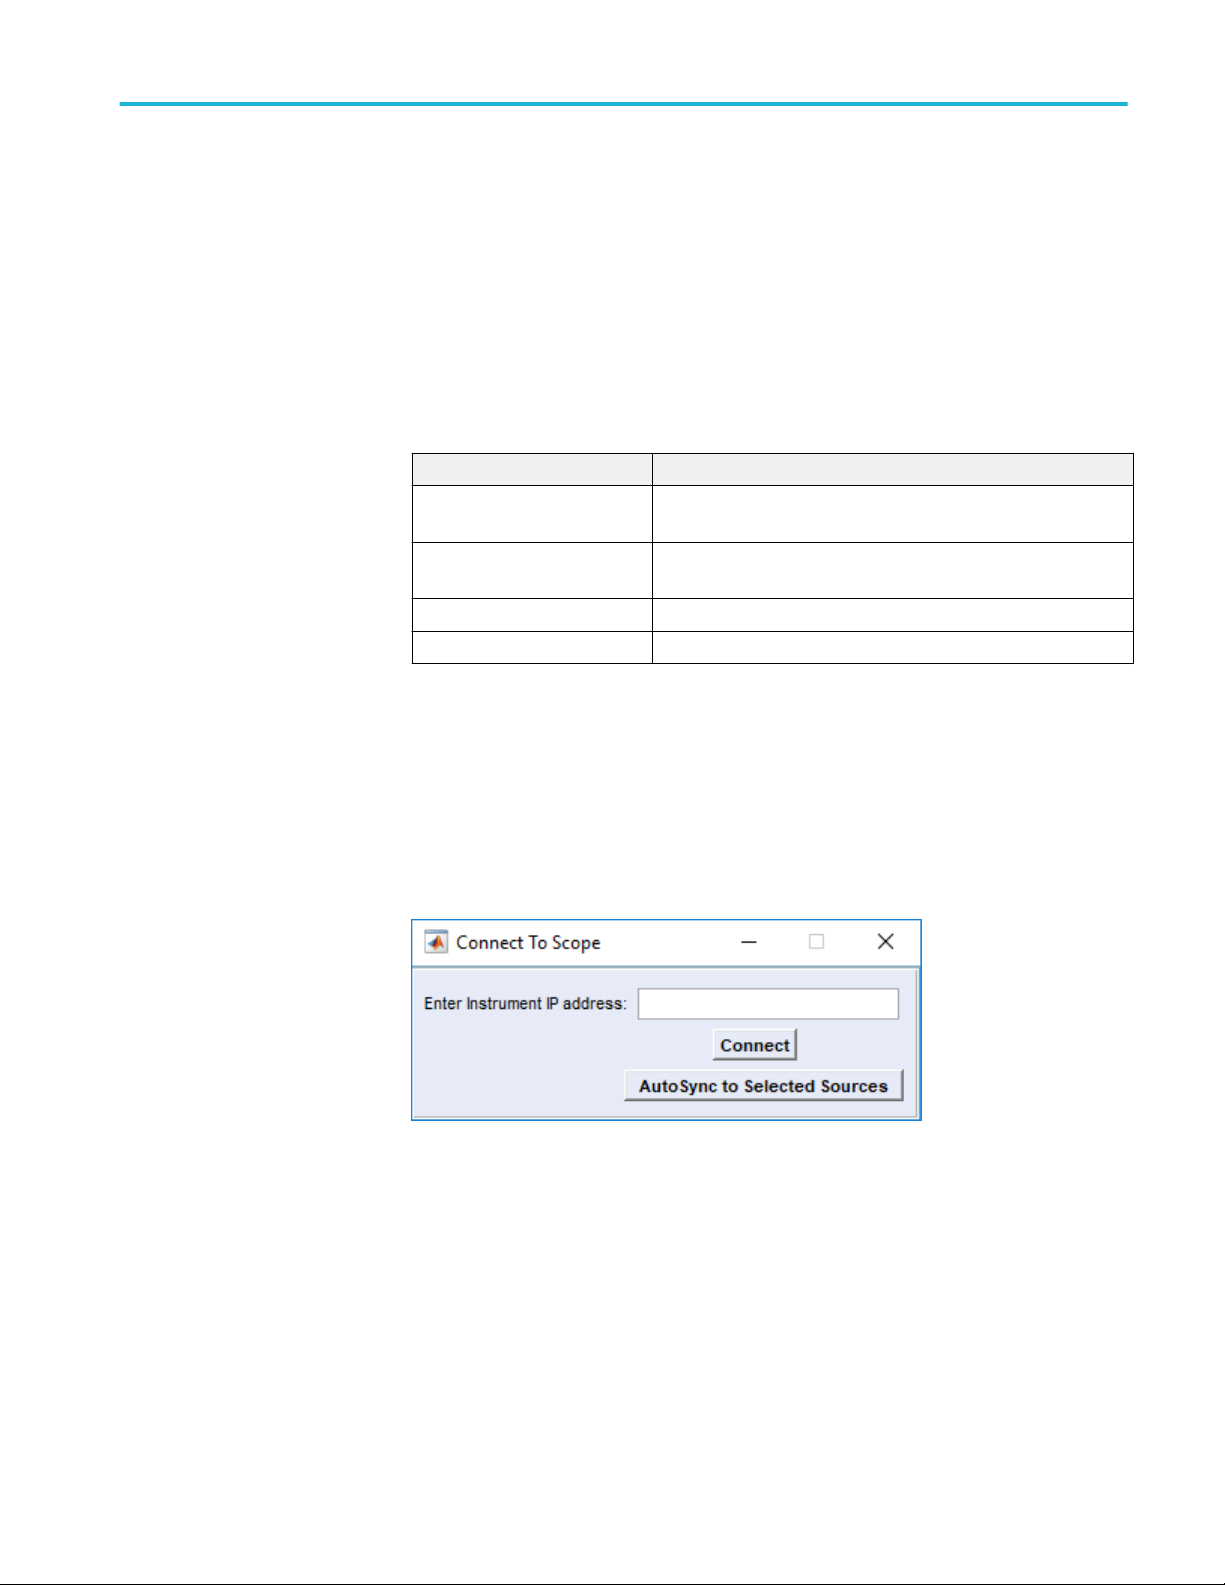
Scope menu
Selecting Scope opens the Connect To Scope dialog screen.
NRZ-M4 Application Help 13
Page 22
Operating basics
Item Description
Enter Instrument IP address Enter the IP address of the oscilloscope you want to connect.
Connect Select the Connect button to make the connection. The Connect
button changes to Disconnect if a connection is established.
During the connection process, the NRZ-M4 application detects
the modules installed in the oscilloscope along with their
characteristics (such as the module type, serial number, filters or
bandwidth).
AutoSync to Selected Sources Click to update the NRZ-M4 application, when you change any
module or the characteristics. The NRZ-M4 application detects
the modules installed in the oscilloscope along with their
characteristics (such as the module type, serial number, filters or
bandwidth).
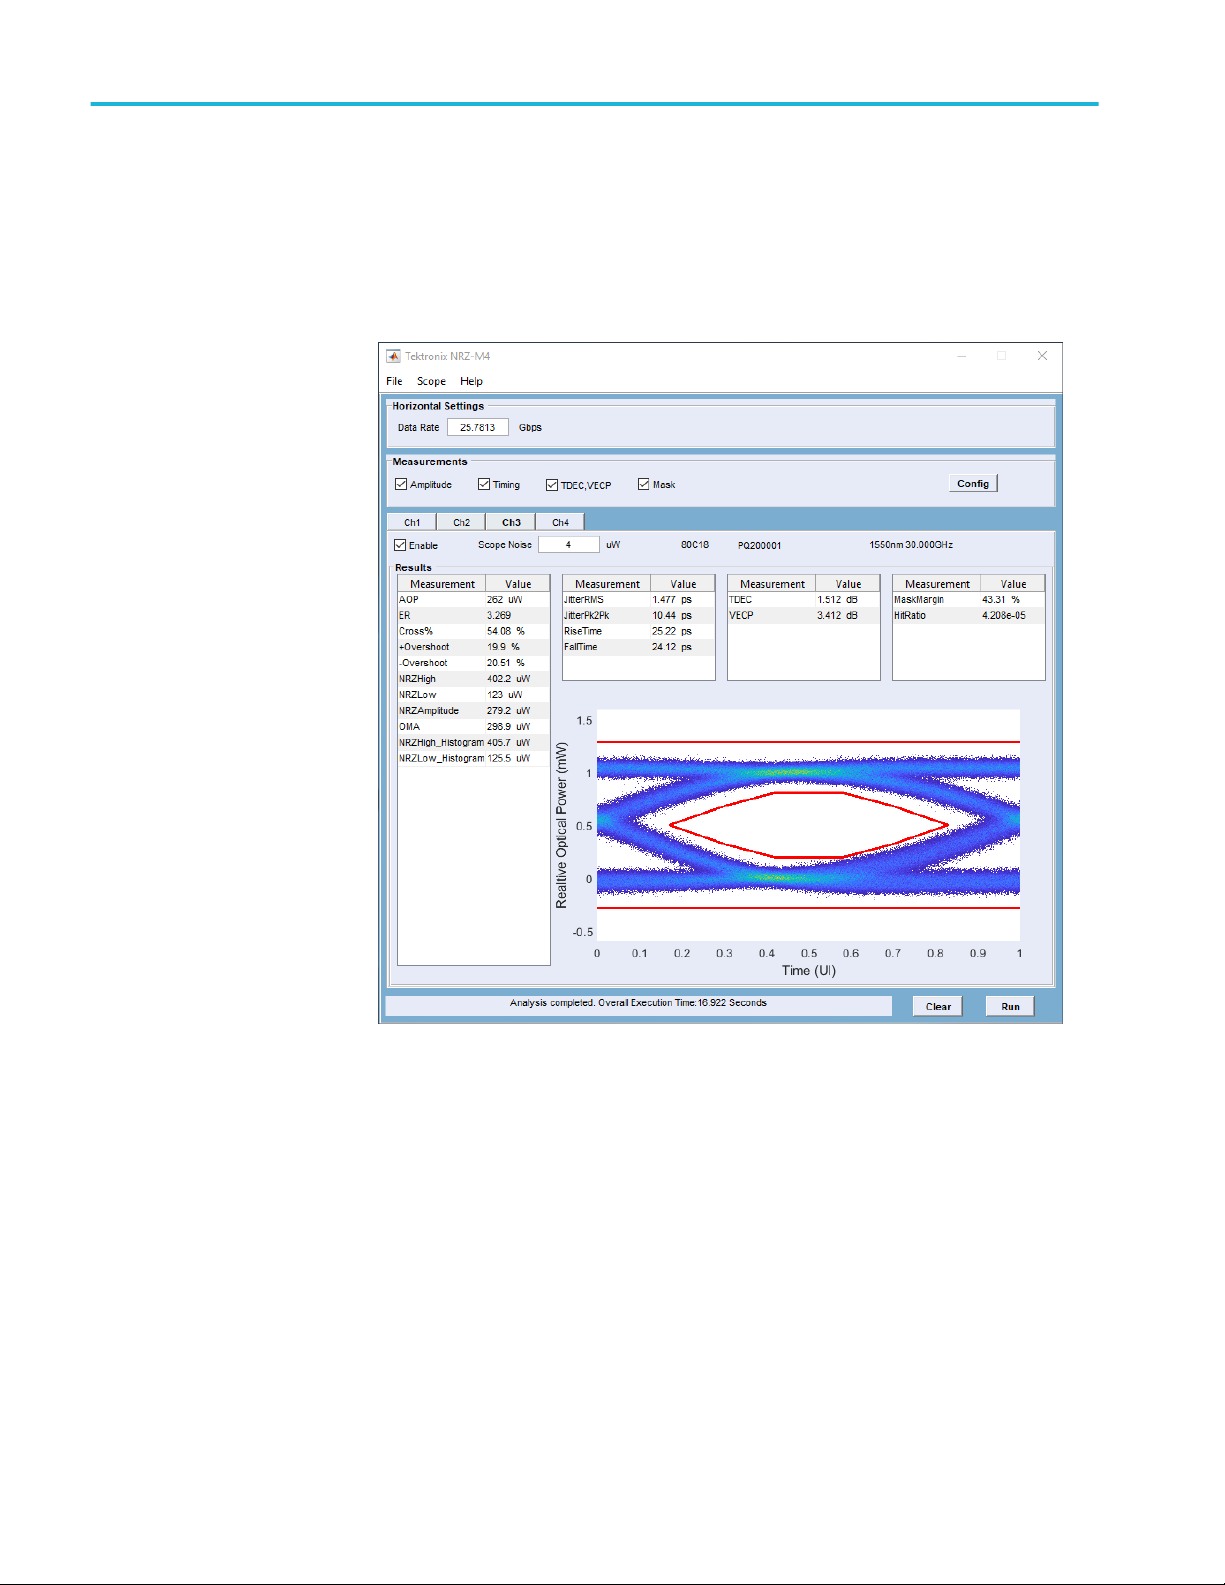
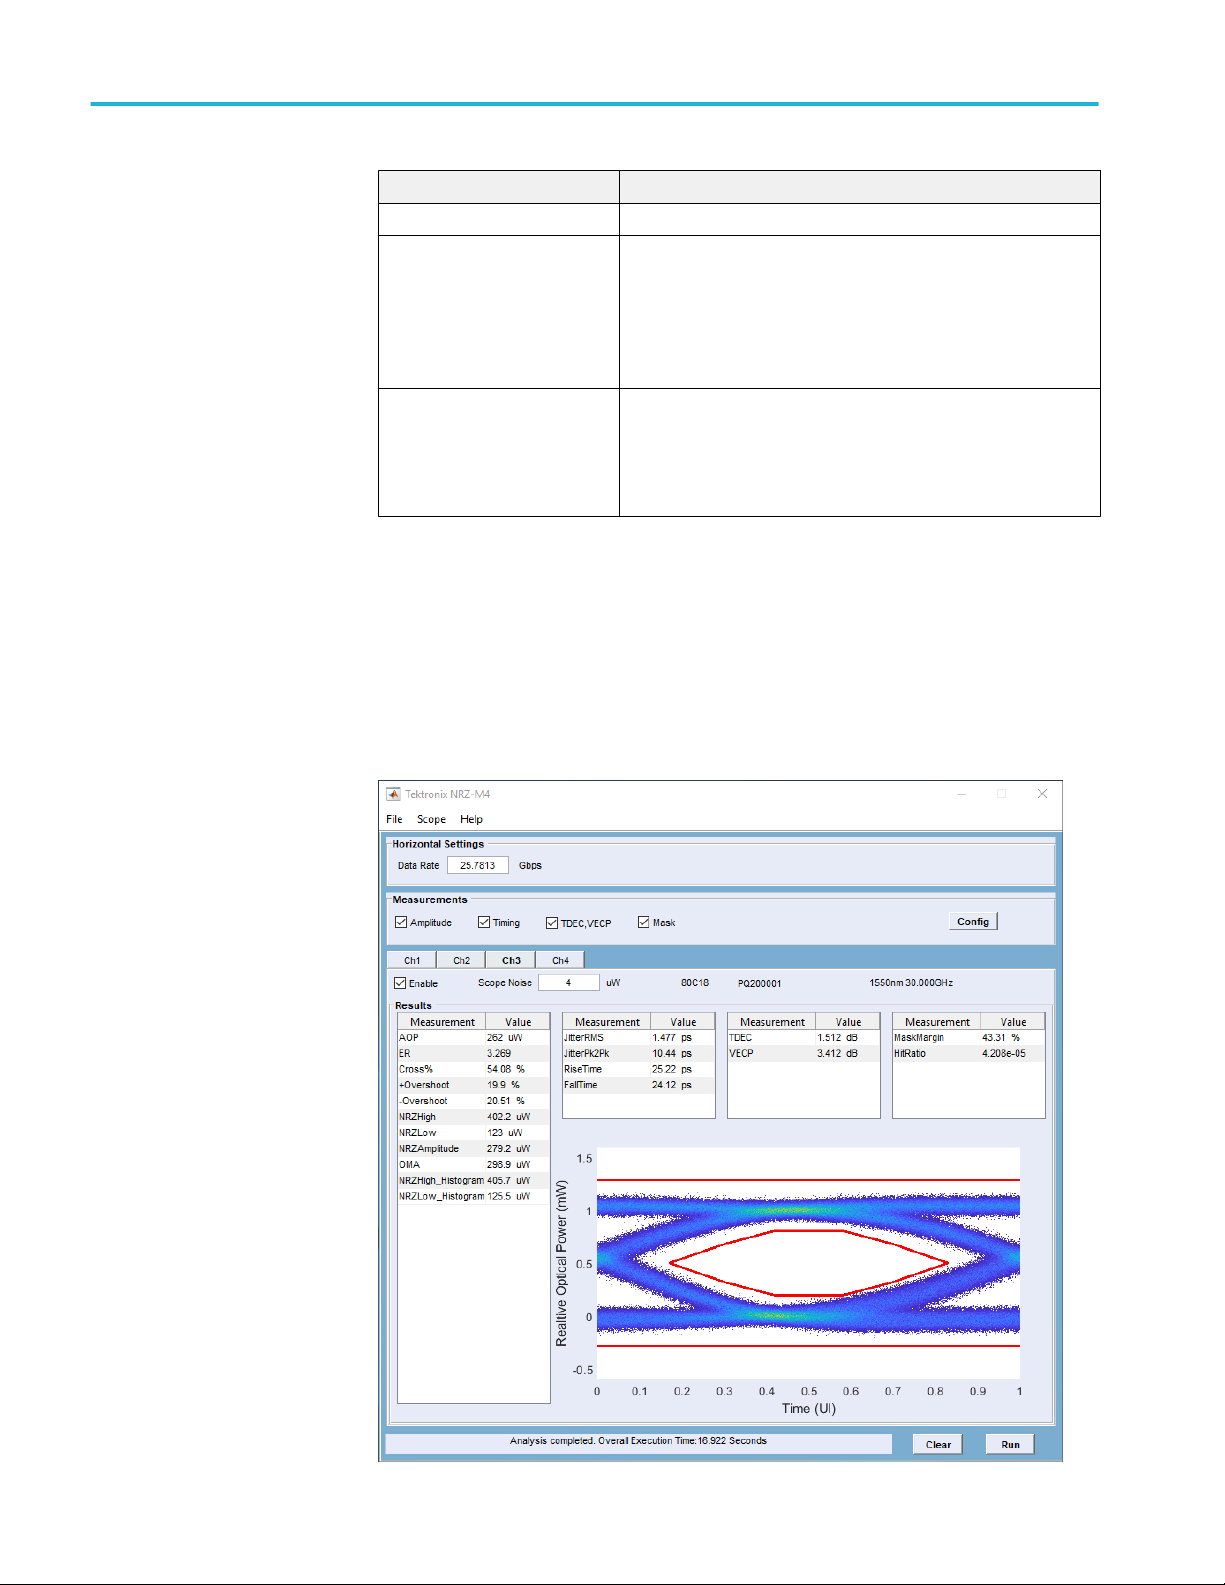
Results elements
The results area is populated with the latest measurements from the latest
analysis. The areas populated with results depend on the selected measurements
to make during analysis.
14 NRZ-M4 Application Help
Page 23

Operating basics
NRZ-M4 Application Help 15
Page 24

Operating basics
16 NRZ-M4 Application Help
Page 25

Programmatic interface
Remote control introduction
The NRZ-M4 software application can be controlled programmatically through
the programmatic interface. Communication with the application is accomplished
using VARIABLE:VALUE remote GPIB commands.
For information on how to operate the sampling oscilloscope and use its
application-specific GPIB commands, refer to the programmers guide for your
sampling oscilloscope.
Your program should comply with the following guidelines:
1. The application startup must complete before sending additional GPIB
commands to the application.
2. The measurements cycle must complete before you query data.
Handshaking protocol
The application handles GPIB communications through its own protocol
handshaking.
The requirements for GPIB communications with a controller are as follows:
1. Once the application has started, it writes an "OK" status to the application
handshake variable. This tells the controller that it may now write a valid
commands into the "NRZ" variable.
2. The GPIB controller polls the handshake variable (VARIABLE:VALUE?
"NRZ") until it detects the OK status.
3. The GPIB controller writes a command string into the application handshake
variable. For example, sending the command VARIABLE:VALUE "NRZ",
"single" writes the string "single" into the variable "NRZ".
4. The application GPIB function polls the handshake variable, reads the
command string and interprets it as a command. If the command is not
understood, it writes an ERROR handshake value to the variable.
5. A good command is parsed and executed. On successful execution, the
application writes an OK to the handshake variable. When the GPIB
controller reads the OK status, it may send a new command string.
NRZ-M4 Application Help 17
Page 26

Programmatic interface
Setting up the PI environment
To help users get started with using GPIB commands to operate the NRZ-M4
Analysis application, examples of automatic testing script written in Perl and
Python 3.7 is included. These are examples only. Users are free to use any
programming language of their choice as long as the handshaking protocol is
followed.
Start Client with Perl
The prerequisites are:
■
Matlab runtime needs to be installed and in the user’s path
■
Perl v5.24.3 or later needs to be installed and in the user’s path
When the NRZ-M4 is running, you can start the client with the following Perl
script.
perl NRZ-M4_PI_Client.pl
When the NRZ-M4 is not running, the script needs to start the NRZ-M4 as well
as set up the environment by using:
perl NRZ-M4_PI_Client.pl –startApp
NOTE. You may need to use the –filePath “<NRZ-M4>” to tell the client where
to connect to the currently running Applications’ process.
Start Client with Python
The prerequisites are:
■
Matlab runtime needs to be installed and in the user’s path
■
Python 3.7 or above needs to be installed and in the user’s path
When the NRZ-M4 is running, you can start the client with the following Python
script.
python NRZ-M4_PI_Client.py
When the NRZ-M4 is not running, the script needs to start the NRZ-M4, as well
as set up the environment by using:
NOTE. You may need to use the -filePath “<NRZ-M4.exe>” to tell the client
where to connect to the currently running Applications’ process.
Running Multiple Instances
Use the following to start the main UI program with assigned instance id of
<instanceId>. The default <instanceId> is 1. See the Example Main Program
Execution for more details and examples.
NRZ-M4.exe <instanceId>
Running Using TCP/IP Address
18 NRZ-M4 Application Help
Page 27

Programmatic interface
For an IP connect, use the following command
perl NRZ-M4_PI_Client.pl -cmdfilepath=\\ip address\c$\Program Files
\TekApplications\NRZ-M4
This starts NRZ-M4.exe at C:\Program Files\TekApplications\NRZ-M4\NRZM4.exe. The TCPIP
requires that the C: drive on the target running the NRZ-M4 application is
publicly accessible. In the example, it shares as "c$".
Syntax
The VARIABLE:VALUE command accepts string arguments for a control or
data variable and a value to which to set the argument.
To set a variable to a value, use the syntax:
VARIABLE:VALUE "NRZ”,"<variableName>:<variableValue>"
To query the value in a variable:
VARIABLE:VALUE? "NRZ","<variableName>"
NOTE.
■
The arguments <variableName> and <variableValue> are required in the
order indicated, no spaces, and use of proper capitalization.
■
Your program will not operate correctly if you do not follow these
requirements.
NRZ-M4 Application Help 19
Page 28

Programmatic interface
Variable name arguments and queries
Table 5: Control commands and queries
Commands Description
:VARIABLE:VALUE:
"NRZ","CONNECT:<ip_address>"
Syntax :VARIABLE:VALUE: "NRZ","CONNECT:<ip_address>"
Example :VARIABLE:VALUE: "NRZ","CONNECT:134.62.9.4" connects to the instrument with the
Return Example Returns: $response = ’134.62.9.4'
The set form provides the IP address or the computer name of the oscilloscope to connect
to the application.
The query form returns the IP address of the connected oscilloscope if it exists.
Make sure TekVISA is turned on and the instrument can be found via the TekVisa before
setting the IP address.
For help with connection issues, refer to Oscilloscope connection tips.
given IP address.
:VARIABLE:VALUE:? "NRZ","CONNECT" returns the IP address of a connected
instrument.
:VARIABLE:VALUE: "NRZ","DISCONNECT" Disconnects the application from the oscilloscope.
Syntax :VARIABLE:VALUE: "NRZ","DISCONNECT"
:VARIABLE:VALUE: "NRZ","CLEAR" Command only.
Clears all measurement results.
Syntax :VARIABLE:VALUE: "NRZ","CLEAR"
:VARIABLE:VALUE "NRZ","EXIT" Command only.
Exits the application.
Syntax :VARIABLE:VALUE "NRZ","EXIT"
:VARIABLE:VALUE "NRZ", "ANALYZE" Command only.
Starts the measurement execution.
Syntax :VARIABLE:VALUE "NRZ", "ANALYZE"
:VARIABLE:VALUE? "NRZ", "STATUS" Query only.
Returns the status of measurement execution.
Syntax :VARIABLE:VALUE? "NRZ", "STATUS"
:VARIABLE:VALUE "NRZ","AUTOSYNC" Command only.
Synchronizes the noise value and module detail with the connected oscilloscope.
Syntax :VARIABLE:VALUE "NRZ","AUTOSYNC"
:VARIABLE:VALUE? "NRZ","INSTANCEID" Query only.
Returns the instance id of the application.
Syntax :VARIABLE:VALUE? "NRZ","INSTANCEID"
:VARIABLE:VALUE "NRZ", "ACTIVATE:5" Command only.
Sets the instance id for the application window.
Syntax :VARIABLE:VALUE "NRZ", "ACTIVATE:5"
20 NRZ-M4 Application Help
Page 29

Programmatic interface
Commands Description
:VARIABLE:VALUE "NRZ",
"DEFAULTSETUP"
Syntax :VARIABLE:VALUE "NRZ", "DEFAULTSETUP"
Command only.
Sets the oscilloscope to default configuration.
:VARIABLE:VALUE "NRZ",
"SAVESETUP:<FILEPATH>"
Syntax :VARIABLE:VALUE "NRZ", "SAVESETUP:<FILEPATH>"
Example :VARIABLE:VALUE "NRZ", "SAVESETUP:D:\test1.gm4" saves the setup file.
:VARIABLE:VALUE "NRZ",
"RECALLSETUP:<FILEPATH>"
Syntax :VARIABLE:VALUE "NRZ", "RECALLSETUP:<FILEPATH>"
Example :VARIABLE:VALUE "NRZ", "RECALLSETUP:D:\test1.gm4" recalls the setup file.
:VARIABLE:VALUE? "NRZ", "ONLINE" Query only.
Syntax :VARIABLE:VALUE? "NRZ", "ONLINE"
Command only.
Saves the setup in the path.
<FILEPATH> = File name with the path.
Command only.
Recalls the setup in the path.
<FILEPATH> = File name with the path.
Returns the status of the application license.
Returns 0 if the application license is disabled
Returns 1 if the application license is enabled
Table 6: Horizontal settings commands and queries
Commands Description
:VARIABLE:VALUE:
"NRZ","DATARATE:<INTEGER>"
Syntax :VARIABLE:VALUE: "NRZ","DATARATE:<INTEGER>"
Example :VARIABLE:VALUE: "NRZ","DATARATE:10e9" sets the datarate as 10e9.
Return Example Returns: $response = ’10e9'
Sets or returns the data rate value.
<INTEGER> = 10 to 55
:VARIABLE:VALUE:? "NRZ","DATARATE" returns the IP address of a connected
instrument.
Table 7: Measurement select commands and queries
Commands Description
:VARIABLE:VALUE: "NRZ",
"eyemeasurements:1|0"
Syntax :VARIABLE:VALUE: "NRZ", "eyemeasurements:1|0"
Example :VARIABLE:VALUE: "NRZ", "eyemeasurements:1" enables the TDEC measurement.
Return Example Returns: $response = ’1'
Sets or returns the Enabled stated (enables or disabled) for eye measurement.
1 enables the TDEC measurement.
0 disables the TDEC measurement.
:VARIABLE:VALUE:? "NRZ", "eyemeasurements" returns 1 if TDEC measurement is
selected.
NRZ-M4 Application Help 21
Page 30

Programmatic interface
Commands Description
:VARIABLE:VALUE: "NRZ",
"amplitudemeasurements:1|0"
Syntax :VARIABLE:VALUE: "NRZ", "amplitudemeasurements:1|0"
Example :VARIABLE:VALUE: "NRZ", "amplitudemeasurements:1" enables the amplitude
Return Example Returns: $response = ’1'
Sets or returns the Enabled stated (enables or disabled) for amplitude measurement.
1 enables the amplitude measurement.
0 disables the amplitude measurement.
measurement.
:VARIABLE:VALUE:? "NRZ", "amplitudemeasurements" returns 1 if amplitude
measurement is selected.
:VARIABLE:VALUE: "NRZ",
"timingmeasurements:1|0"
Syntax :VARIABLE:VALUE: "NRZ", "timingmeasurements:1|0"
Example :VARIABLE:VALUE: "NRZ", "timingmeasurements:1" enables the timing measurement.
Return Example Returns: $response = ’1'
:VARIABLE:VALUE: "NRZ",
"maskmeasurements:1|0"
Syntax :VARIABLE:VALUE: "NRZ", "maskmeasurements:1|0"
Example :VARIABLE:VALUE: "NRZ", "maskmeasurements:1" enables the mask measurement.
Return Example Returns: $response = ’1'
:VARIABLE:VALUE: "NRZ",
"SELECT:CH<X>:1|0"
Syntax :VARIABLE:VALUE: "NRZ", "SELECT:CH<X>:1|0"
Example :VARIABLE:VALUE: "NRZ", "SELECT:CH1:1" selects the channel CH1.
Return Example Returns: $response = ’1'
Sets or returns the Enabled stated (enables or disabled) for timing measurement.
1 enables the timing measurement.
0 disables the timing measurement.
:VARIABLE:VALUE:? "NRZ", "timingmeasurements" returns 1 if timing measurement is
selected.
Sets or returns the Enabled stated (enables or disabled) for mask measurement.
1 enables the mask measurement.
0 disables the mask measurement.
:VARIABLE:VALUE:? "NRZ", "maskmeasurements" returns 1 if mask measurement is
selected.
Sets or enables the selected channel.
<X> = 1 to 4
:VARIABLE:VALUE:? "NRZ", "SELECT:CH1" returns 1 if CH1 is selected.
:VARIABLE:VALUE: "NRZ",
"CHANNEL:CH<X>"
Syntax :VARIABLE:VALUE: "NRZ", "CHANNEL:CH<X>"
<X> = 1 to 4
Example :VARIABLE:VALUE: "NRZ", "CHANNEL:CH1" enables the mask measurement.
:VARIABLE:VALUE:? "NRZ", "CHANNEL" returns 1 if mask measurement is selected.
Return Example Returns: $response = ’1'
22 NRZ-M4 Application Help
Page 31

Programmatic interface
Commands Description
:VARIABLE:VALUE: "NRZ",
"NOISE:CH<X>:<INTEGER>"
Syntax :VARIABLE:VALUE: "NRZ", "NOISE:CH<X>:<INTEGER>"
Example :VARIABLE:VALUE: "NRZ", "NOISE:CH1:0.00002" sets the scope noise value as 0.00002.
Return Example Returns: $response = ’0.00002'
Sets or returns the scope noise value.
<X> = 1 to 4
<INTEGER> = 0 to 100
:VARIABLE:VALUE:? "NRZ", "NOISE:CH1" returns returns the scope noise value.
:VARIABLE:VALUE:? "NRZ",
"MODULE:CH<X>"
Syntax :VARIABLE:VALUE:? "NRZ", "MODULE:CH<X>"
Example :VARIABLE:VALUE:? "NRZ", "MODULE:CH1" returns the module number for configured
:VARIABLE:VALUE:? "NRZ",
"SERIALNUM:CH<X>"
Syntax :VARIABLE:VALUE:? "NRZ", "SERIALNUM:CH<X>"
Example :VARIABLE:VALUE:? "NRZ", "SERIALNUM:CH1" returns the serial number for configured
:VARIABLE:VALUE:? "NRZ",
"MODFILTER:CH<X>"
Syntax :VARIABLE:VALUE:? "NRZ", "MODFILTER:CH<X>"
Example :VARIABLE:VALUE:? "NRZ", "MODFILTER:CH1" returns the module filter for configured
:VARIABLE:VALUE:? "NRZ",
"MODBW:CH<X>"
Syntax :VARIABLE:VALUE:? "NRZ", "MODBW:CH<X>"
Example :VARIABLE:VALUE:? "NRZ", "MODBW:CH1" returns the module bandwidth for configured
Returns the module number for configured optical module for the specified channel.
<X> = 1 to 4
optical module of the specified channel.
Returns the serial number for configured optical module for the specified channel.
<X> = 1 to 4
optical module of the specified channel.
Returns the module filter for configured optical module for the specified channel.
<X> = 1 to 4
optical module of the specified channel.
Returns the module bandwidth for configured optical module for the specified channel.
<X> = 1 to 4
optical module of the specified channel.
Table 8: Configuration commands and queries
Commands Description
:VARIABLE:VALUE: "NRZ",
"CONFIG:TDECBER:<NR3>"
Syntax :VARIABLE:VALUE: "NRZ", "CONFIG:TDECBER:<NR3>"
Example :VARIABLE:VALUE: "NRZ", "CONFIG:TDECBER:6e-7" sets the TDEC BER value as 6e-7
Return Example Returns: $response = ’6e-7'
Sets or returns the TDEC BER value.
<NR3> (Floating point value with an exponent) = 0.000000001 to 1
:VARIABLE:VALUE:? "NRZ", "CONFIG:TDECBER" returns the TDEC BER value.
NRZ-M4 Application Help 23
Page 32

Programmatic interface
Commands Description
:VARIABLE:VALUE: "NRZ",
"CONFIG:HITRATIO:<NR3>"
Syntax :VARIABLE:VALUE: "NRZ", "CONFIG:HITRATIO:<NR3>"
Example :VARIABLE:VALUE: "NRZ", "CONFIG:HITRATIO:4e-7" sets the TDEC BER value as 4e-7
Return Example Returns: $response = ’4e-7'
Sets or returns the hit ratio value.
<NR3> (Floating point value with an exponent) = 0.000000001 to 1
:VARIABLE:VALUE:? "NRZ", "CONFIG:HITRATIO" returns the TDEC BER value.
:VARIABLE:VALUE: "NRZ",
"CONFIG:SELECTMASK:<FILENAME>"
Syntax :VARIABLE:VALUE: "NRZ", "CONFIG:SELECTMASK:<FILENAME>"
Example :VARIABLE:VALUE: "NRZ", "CONFIG:SELECTMASK:100GBaseSR4" selects the mask file
Return Example Returns: $response = ’100GBaseSR4'
:VARIABLE:VALUE: "NRZ",
"CONFIG:ENABLEPLOT:ON|OFF"
Syntax :VARIABLE:VALUE: "NRZ", "CONFIG:ENABLEPLOT:ON|OFF"
Example :VARIABLE:VALUE: "NRZ", "CONFIG:ENABLEPLOT:ON" enables the enable plots in
Return Example Returns: $response = ’1'
:VARIABLE:VALUE: "NRZ",
"CONFIG:OPTIMIZEMASKFITTING:ON|
OFF"
Syntax :VARIABLE:VALUE: "NRZ", "CONFIG:OPTIMIZEMASKFITTING:ON|OFF"
Example :VARIABLE:VALUE: "NRZ", "CONFIG:OPTIMIZEMASKFITTING:ON" enables the Optimize
Return Example Returns: $response = ’1'
Sets or returns the mask file name.
as 100GBaseSR4.
:VARIABLE:VALUE: "NRZ", "CONFIG:SELECTMASK:100GBaseSR4" returns the selected
mask file name.
Sets or returns the enable plot (enabled or disabled) in configuration settings.
ON enables the enable plot in configuration settings.
OFF disables the enable plot in configuration settings
configuration settings.
:VARIABLE:VALUE:? "NRZ", "CONFIG:ENABLEPLOT" returns 1 if enable plots is enabled.
Sets or returns the optimize mask fitting (enabled or disabled) in configuration settings.
ON enables the optimize mask fitting in configuration settings.
OFF disables the optimize mask fitting in configuration settings
Mask Fitting in configuration settings.
:VARIABLE:VALUE: "NRZ", "CONFIG:OPTIMIZEMASKFITTING" returns 1 if Optimize
Mask Fitting is enabled.
:VARIABLE:VALUE: "NRZ",
"CONFIG:USEPHASEREF:ON|OFF"
Syntax :VARIABLE:VALUE: "NRZ", "CONFIG:USEPHASEREF:ON|OFF"
Example :VARIABLE:VALUE: "NRZ", "CONFIG:USEPHASEREF:ON" enables the Use Phase
Sets or returns the use phase reference (enabled or disabled) in configuration settings.
1 enables the use phase reference in configuration settings.
0 disables the use phase reference in configuration settings.
Reference in configuration settings.
:VARIABLE:VALUE: "NRZ", "CONFIG:USEPHASEREF" returns 1 if Use Phase Reference
is enabled.
24 NRZ-M4 Application Help
Page 33

Programmatic interface
Commands Description
Return Example Returns: $response = ’1'
:VARIABLE:VALUE: "NRZ",
"CONFIG:PHASEREFCLOCKRATIO:1|2|4|8"
Syntax :VARIABLE:VALUE: "NRZ", "CONFIG:PHASEREFCLOCKRATIO:1|2|4|8"
Example :VARIABLE:VALUE: "NRZ", "CONFIG:PHASEREFCLOCKRATIO:1" sets the phase
Return Example Returns: $response = ’1'
:VARIABLE:VALUE: "NRZ",
"CONFIG:SAMPLESPERACQ:1000|2000|
4000|8000|16000"
Syntax :VARIABLE:VALUE: "NRZ", "CONFIG:SAMPLESPERACQ:1000|2000|4000|8000|16000"
Example :VARIABLE:VALUE: "NRZ", "CONFIG:SAMPLESPERACQ:1000" sets the samples per
Return Example Returns: $response = ’1000'
:VARIABLE:VALUE: "NRZ",
"CONFIG:NOOFACQS:<INTEGER>"
Syntax :VARIABLE:VALUE: "NRZ", "CONFIG:NOOFACQS:<INTEGER>"
Example :VARIABLE:VALUE: "NRZ", "CONFIG:NOOFACQS:64" sets the acquisitions value as 64.
Return Example Returns: $response = ’64'
Sets or returns the phase reference clock ratio.
reference clock value as 1.
:VARIABLE:VALUE: "NRZ", "CONFIG:PHASEREFCLOCKRATIO" returns the phase
reference clock value as 1.
Sets or returns the samples per acquisition.
acquisition value as 64.
:VARIABLE:VALUE:? "NRZ", "CONFIG:SAMPLESPERACQ" returns the samples per
acquisition value as 1000.
Sets or returns the number of acquisitions value.
<INTEGER> = 50 to 1000
:VARIABLE:VALUE:? "NRZ", "CONFIG:NOOFACQS" returns the acquisitions value as 64.
:VARIABLE:VALUE "NRZ",
"CONFIG:SAVERESULTSTOFILE:ON|OFF"
Syntax :VARIABLE:VALUE "NRZ", "CONFIG:SAVERESULTSTOFILE:ON|OFF"
Example :VARIABLE:VALUE "NRZ", "CONFIG:SAVERESULTSTOFILE:ON" enables the save
Sets or disables the save results to file.
ON | 1 enables the save results to file.
OFF | 0 disables the save results to file.
results to file.
Table 9: Results commands and queries
Commands Description
:VARIABLE:VALUE? "NRZ",
"RESULT:CH<X>:<MeasurementList>"
Syntax :VARIABLE:VALUE? "NRZ", "RESULT:CH<X>:<MeasurementList>"
Example :VARIABLE:VALUE? "NRZ", "RESULT:Ch2:ALLMEAS" returns the measurement result for
Returns the measurement result for the selected channel.
<X> = 1 to 4
<MeasurementList> = ALLMEAS | AOP | ER | TDEC | +Overshoot
channel 2
NRZ-M4 Application Help 25
Page 34

Programmatic interface
Programming examples
Perl program example:
configure and operate
NRZ-M4
With available offline analysis, NRZ-M4 offers a programmatic interface similar
to that of TekScope, JNB, or other on-scope applications. A client needs to know
how to interface and synchronize with the application. The Perl script below
gives an example of such a client (similar clients could be implemented in
Python, .NET, etc.). A file interface is used to communicate between NRZ-M4
and the client.
NOTE.
■
The examples presume that you are familiar with designing GPIB programs.
■
All words within quotes are case sensitive and must be entered exactly as
shown, including spaces and quotes.
Prerequisites
■
Matlab runtime needs to be installed and in the user’s path
■
Perl needs to be installed and in the user’s path
■
The client expects to be able to write “NRZ_CommandFile.txt” and “NRZM4_LogFile.txt” to the current working directory (C:\Users\<user>\AppData
\Local\Temp) for communication and logging. For multiple instances, the
files "NRZ_CommandFile<instanceId>.txt" and "NRZM4_LogFile<instanceId>.txt" are used. See below for examples.
The measurement results are captured in NRZ-M4_ResultsFile.txt at the
same directory.
■
The client by default enters an ‘interactive’ mode, reading from STDIN
(which times out and exits after 5 minutes). At this point you can send any of
the specified commands and queries.
Example Main Program Execution
NRZ-M4.exe <instanceId>
Starts the main UI program with assigned instance id of <instanceId>. The
default instanceId is 1. For each instance other than 1, a separate client may
connect to each unique instance. Each separate client for instanceIds other than
1 can connect to that particular <instanceId> via the corresponding
"NRZ_CommandFile<instanceId>.txt". e.g., upon execution of the following:
NRZ-M4.exe 1
NRZ-M4.exe 2
NRZ-M4.exe 3
, client 1 may connect to instance 1 via %TEMP%\NRZ_CommandFile.txt, and
client 2 may connect to instance 2 via %TEMP%\NRZ_CommandFile2.txt, and
client 3 may connect to instance 3 via %TEMP%\NRZ_CommandFile3.txt.
26 NRZ-M4 Application Help
Page 35

NOTE. For the Example Client Execution below, you would need to use the "–
appInstance=<instanceId>" to tell the client to connect to the specific
<instanceId> UI execution. See the example using the "-appInstance" flag below.
Example Client Execution
perl NRZ-M4_PI_Client.pl
Starts the client in interactive mode, which reads the commands/queries from
stdin. This is ideal if the UI is already running.
NOTE. You may need to use the –filePath “<pathToTDECQexe>” to tell the
client where to connect to the currently running Appplication’s process).
perl NRZ-M4_PI_Client.pl –startApp
Starts the client and the main application (ideal if the UI is not running yet)
which in turn reads the set of commands/queries from stdin.
Programmatic interface
Once stdin is ready to read commands, an example set to send is:
:VARIABLE:VALUE "NRZ", "ACTIVATE"
:VARIABLE:VALUE "NRZ", "CONNECT:134.64.245.72"
:VARIABLE:VALUE "NRZ", "eyemeasurements:1"
:VARIABLE:VALUE "NRZ", "amplitudemeasurements:1"
:VARIABLE:VALUE "NRZ", "timingmeasurements:1"
:VARIABLE:VALUE "NRZ", "maskmeasurements:1"
:VARIABLE:VALUE "NRZ", "ANALYZE"
:VARIABLE:VALUE? "NRZ", "STATUS"
:VARIABLE:VALUE? "NRZ", "RESULT:ALLCHANNELS:ALLMEAS"
perl NRZ-M4_PI_Client.pl –startApp < NRZM4_PI_Client_Example_CmdSet.txt
Starts the client which in turn reads the set of commands/queries from the .txt
file.
Example output from similar commands is:
...
> :variable:value? "NRZ","NRZ" $response = ‘NRZ:
5.8421’
> :variable:value "NRZ","exit" Beginning shutdown...
...shutdown complete.
perl NRZ-M4_PI_Client.pl –startApp -appInstance=2
NRZ-M4 Application Help 27
Page 36

Programmatic interface
Starts the client and the main application with the instance ID 2, which in turn
reads the set of commands/queries from stdin. A query of :var:val?
"tdecq","instanceid" at this point should return the value of "2".
NOTE.
■
The log file at “%TEMP%\NRZ-M4_LogFile.txt” will contain trace and
debug information from any client run, including the NRZ-M4 MatLab
processing output after exiting the client.
■
Many other behaviors may be configured by the client, such as file paths and
run modes. See the “$configParams” section for details.
Python example
A simple Python programming example file is provided.
The example establishes a connection to the NRZ-M4 application and provides a
simple interface to send commands to the application.
NOTE. Python is required to be installed on the PC.
1. Open a DOS command window.
2. Enter the Python example file name “NRZ-M4_PIClient.py”.
3. Wait for the program to run and for the UI window to open to send
commands.
The actual Python example file is located at C:\Users\Public\Tektronix
\TekApplications\NRZ-M4\ PIExamples.
28 NRZ-M4 Application Help
Page 37

Guide to connect the oscilloscope
Check network access
The first step to troubleshoot a connection problem is to check the network
access.
Ensure that the DSA8300 is connected to the network, and the TekScope
application is running.
TekVISA setup and troubleshooting
■
Verify that TekVISA is installed on the PC.
■
TekVISA is required to be running on both the PC and the target
oscilloscope.Look for the TekVISA icon in task bar.
■
If other VISA software is installed on the PC, verify that TekVISA is the
default VISA. Use the OpenChoice VISA64 Conflict Manger (available in
the list of applications under the TekVISA program folder).
NRZ-M4 Application Help 29
Page 38
Guide to connect the oscilloscope
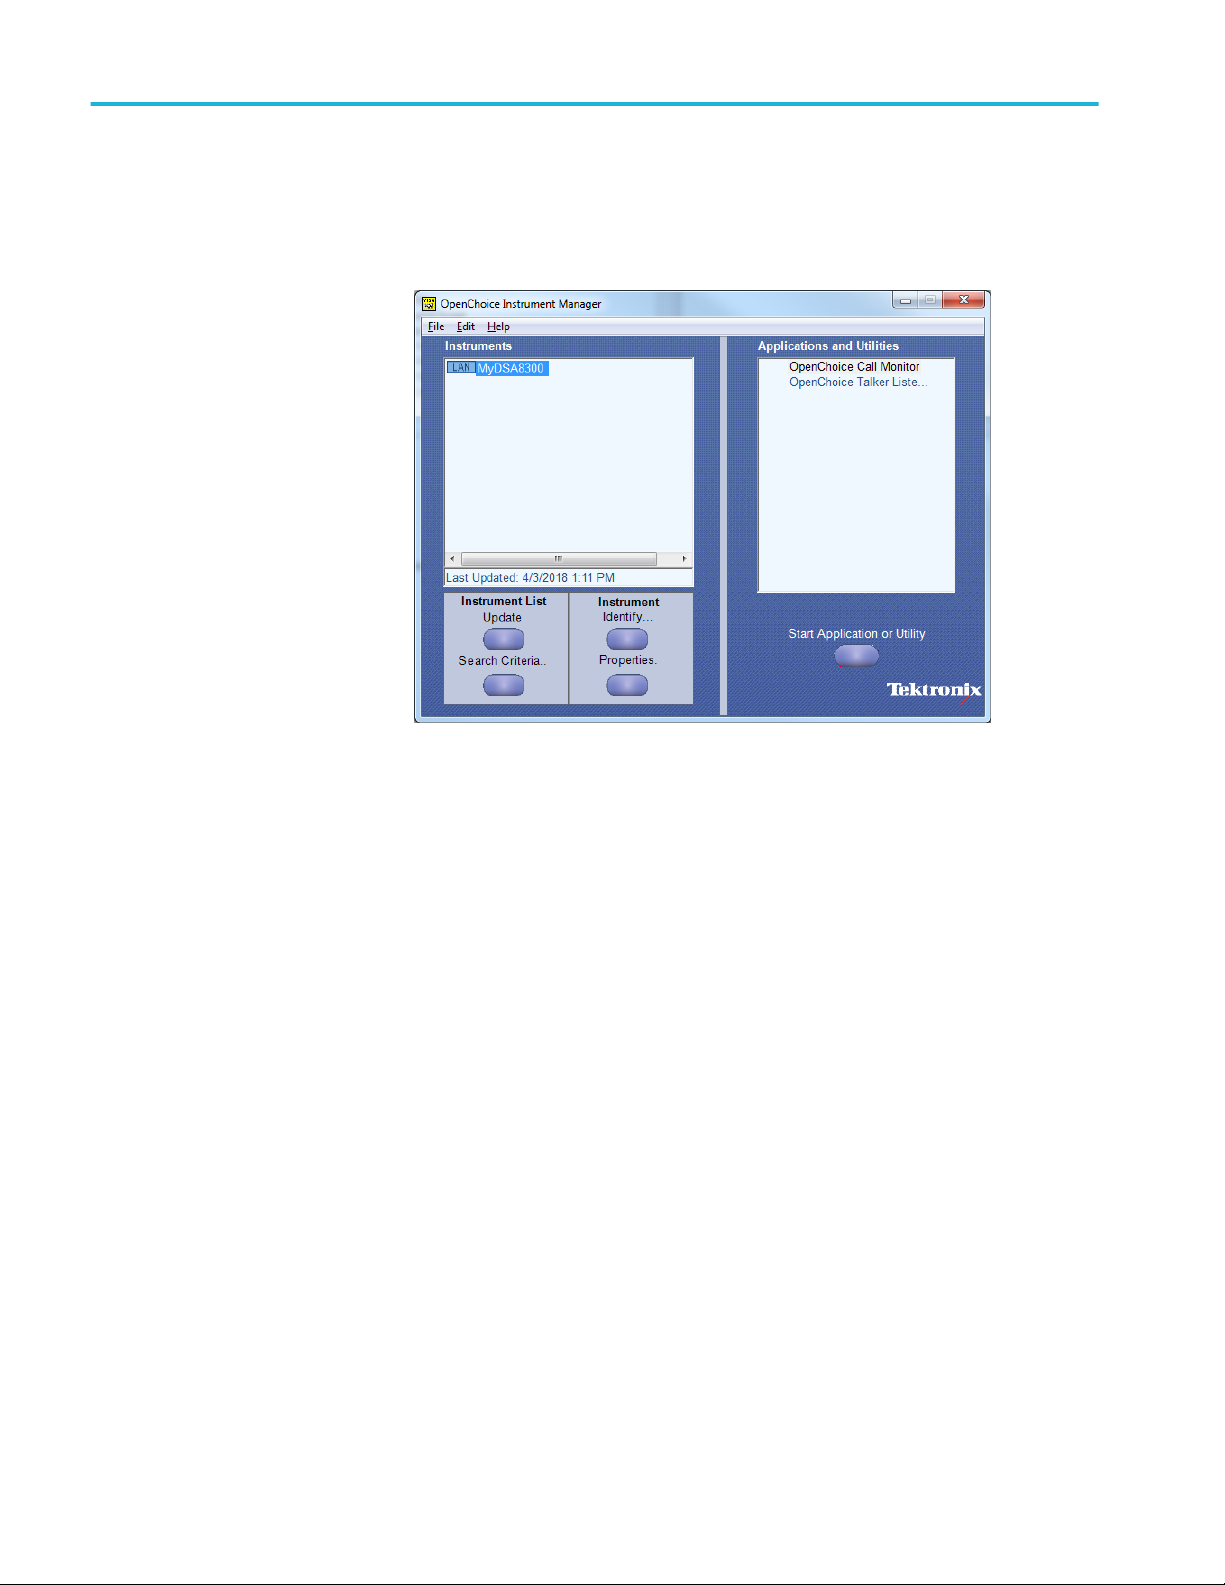
■
Make sure that the instrument is detected in the TekVISA Open Choice
Instrument Manager (available in the list of applications under the TekVISA
program folder).
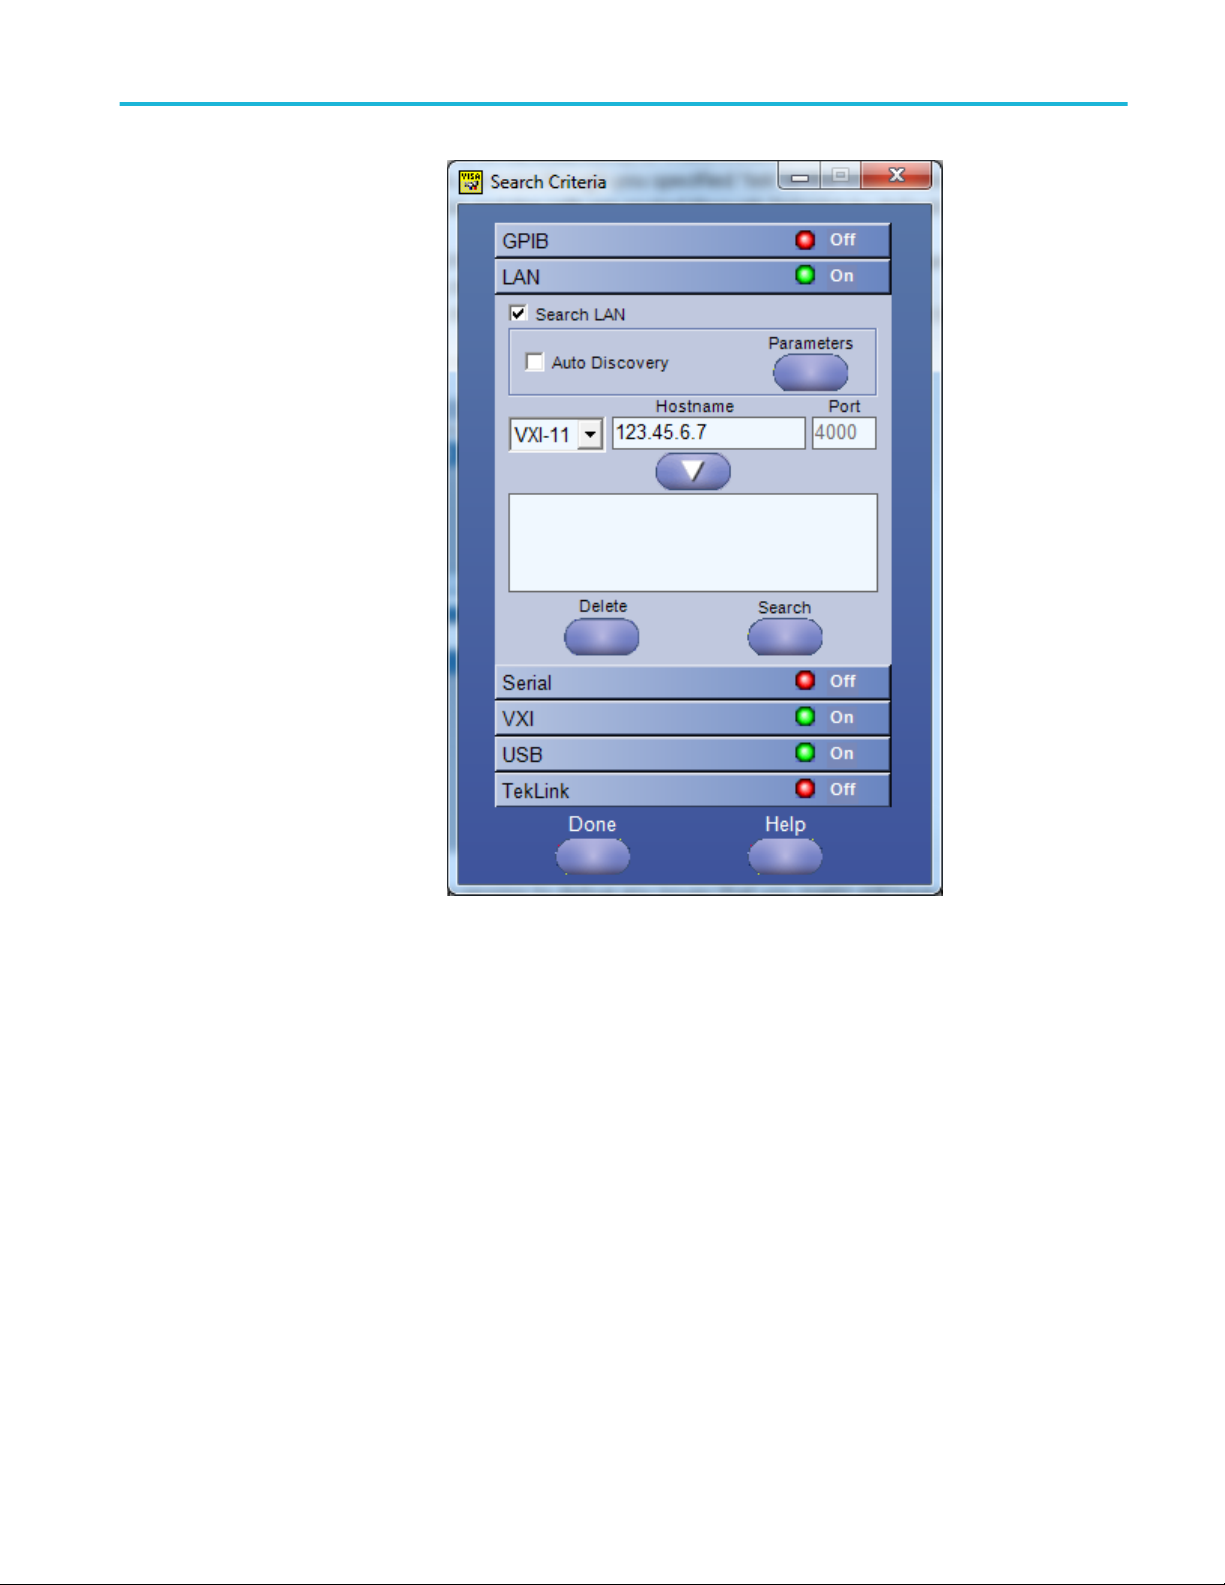
To detect an instrument for through TekVISA, select the Search Criteria
button and then select LAN. Search on the IP address.
30 NRZ-M4 Application Help
Page 39
Guide to connect the oscilloscope
NRZ-M4 Application Help 31
Page 40

Guide to connect the oscilloscope
■
Make sure that the VXI-11 server under TekVISA LAN Server is started on
the DSA8300. The server is turned off after the instrument is rebooted, so
user needs to start it manually.
Firewall exceptions
■
Make sure that TekVISA inbound and outbound traffic are allowed through
the Windows Firewall on both the DSA8300 instrument and the PC running
NRZ-M4 application.
■
Make sure that NRZ-M4 application is added to the Windows Firewall
exception list on the PC.
Open the "Windows Firewall" from "Control Panel", and follow instructions
under "Allow an app or feature through Windows Firewall".
32 NRZ-M4 Application Help
Page 41

Index
A
Application directories, 6
Application panels
measurement configuration, 11
measurement selections, 9
C
Computer requirements, 3
Contacting Tektronix, 2
E
Extensions, file names, 5
F
File menu, 13
File name extensions, 5
P
Programmatic interface
handshaking protocol, 17
perl program example, 26
python example, 28
remote control introduction, 17
setting up the PI environment, 18
syntax, 19
variable name arguments and queries, 20
R
Related documentation, 2
Results elements, 14
S
H
Help conventions, 1
I
Installing the software, 5
Instruments and accessories required, 4
L
Launch the application, 7
N
Names, file extensions, 5
Scope menu, 13
Software requirements, 3
Support, 2
T
Technical support, 2
TekVISA software, 4
V
View software version, 6
NRZ-M4 Application Help 33
Page 42

Index
34 NRZ-M4 Application Help
 Loading...