

Page 1

MTS4EAV7
xx
ZZZ
HEVC / AVC Video and Compressed Audio Analyzer
Tutorials
*P001165001*
001-1650-01
Page 2

Page 3

xx
MTS4EAV7
ZZZ
HEVC / AVC Video and Compressed Audio Analyzer
Tutorials
www.tektronix.com
001-1650-01
Page 4

Copyright © Tektronix. All rights reserved. Licensed software products are owned by Tektronix or its subsidiaries
or suppliers, and are protected by national copyright laws and international treaty provisions.
Tektronix products are covered by U.S. and foreign patents, issued and pending. Information in this publication
supersedes that in all previously published material. Specifications and price change privileges rese rved.
TEKTRONIX and TEK are registered trademarks of Tektronix, Inc.
Contacting Tektronix
Tektronix, Inc.
14150 SW Karl Braun Drive
P.O . B ox 5 0 0
Beaverto
USA
For product information, sales, service, and technical support:
n, OR 97077
In North America, call 1-800-833-9200.
World w i de, v i sit www.tektronix.com to find contacts in your area.
Page 5

Table of Contents
Getting started........................ ............ . . . . . . . . . . . . . . . . . . ............................ . . . . . . . . . . . . . . . . . . ... 1
Basic functions.......... .................................. ................................ ..................... 2
How to begin a tutorial................... ................................ .................................. ... 2
Tutorial 1: H.261 ................................................................................................... 3
Procedure ....................................................................................................... 3
Conclusion...................................................................................................... 9
Tutorial 2: H.263 compliance and motion vectors............................................................. 10
Procedure ...................................................................................................... 10
Conclusion..................................................................................................... 15
Tutorial 3: MPEG-4 compliance........................... ................................ ...................... 16
Procedure ...................................................................................................... 16
Conclusion..................................................................................................... 22
Tutorial 4: MPEG-4 optimization ... ................................ ................................ ............ 23
Procedure ...................................................................................................... 23
Conclusion..................................................................................................... 30
Tutorial 5: MP4 compliance basics........................ ................................ ...................... 31
Procedure ...................................................................................................... 31
Conclusion..................................................................................................... 36
Tutorial 6: MP4 optimization .................................................................................... 37
Procedure ...................................................................................................... 37
Conclusion..................................................................................................... 41
Tutorial 7: 3GPP/MPEG-4 compliance ............................. .................................. .......... 42
Procedure ...................................................................................................... 43
Conclusion..................................................................................................... 47
Tutorial 8: H.264/AVC syntax error................................. ................................ ............ 48
Procedure ...................................................................................................... 48
Conclusion..................................................................................................... 50
Tutorial 9: MPEG-4 and H.264/AVC buffer analysis ................. .................................. ...... 52
Procedure ...................................................................................................... 53
Conclusion..................................................................................................... 64
Tutorial 10: MPEG-2 compliance ................. ................................ .............................. 65
Procedure ...................................................................................................... 65
Conclusion..................................................................................................... 74
Tutorial 11: Fidelity analysis................. ................................ ................................ .... 75
Procedure ...................................................................................................... 75
Conclusion..................................................................................................... 84
Tutorial 12: HEVC analysis...................................................................................... 85
Procedure ...................................................................................................... 85
Conclusion..................................................................................................... 96
MTS4EAV7 HEVC / AVC Video and Compressed Audio Analyzer Tutorials i
Page 6

Table of Contents
Tutorial 13: Cl
osed caption and AFD analysis............................. ................................ .... 97
Procedure ...................................................................................................... 98
Conclusion................................................................................................... 105
ii MTS4EAV7 HEVC / AVC Video and Compressed Audio Analyzer Tutorials
Page 7

Getting started
This set of eleven tutorials helps you learn more about operating the Tektronix
MTS4EAV7 HEVC / AVC Video and Compressed Audio Analyzer. Perform
tutorials 1 t
hrough 11 in the order they are presented, regardless of the video
standard of interest. Tutorial 10 relates only to MPEG-2 and interlaced video.
NOTE. Although the order code for this product is MTS4EAV7, the product is
generally referred to as the MTS4EA throughout the software and documentation.
The tutorials will help you answer the following questions:
How do you know that your video compression complies with the standards
If your c
odec doesn't work well with other vendors' codecs, where is the
problem — is it w ith your codec or theirs
Are you
optimizing your Codec
Are you making the best use of available bandwidth
Which frames and movement types use the most bits and why
What changes to your codec software give the best reductions in bits used for
the least reduction in visual quality
What types of video content does your codec work poorly with and why
A description for each tutorial follows. (See Table 1.)
Table 1: Tutorial descriptions
Tutorial Name Standard Areas Covered
1 H.261 H.261
2 H.263 compliance and motion
vectors
3
4
5
6 MP4 optimization
7
MPEG-4 compliance MPEG-4 Simple Profile Common errors; searching for areas
MPEG-4 optimization MPEG-4 Adv. Simple Profile Common errors; HexView
MP4 compliance basics
3GPP/MPEG-4 compliance 3GPP/MPEG-4 Simple Profile/ L1 Common errors; searching for areas
H.263 Baseline Errors and error log; motion vectors.
MP4/ Simple Profile/ L1(2) Extract and examine container files;
MP4/ Simple Profile/ L1(2)
Syntax error; compression
optimization; graph analysis
of codec optimization.
bitstream analysis; video navigator;
synchronize views; project files
level conformance error.
Using MB type overlays and
searching for areas of optimization.
for optimization
MTS4EAV7 HEVC / AVC Video and Compressed Audio Analyzer Tutorials 1
Page 8

Getting started
Table 1: Tutorial descriptions (cont.)
Tutorial Name Standard Areas Covered
8
9
10
11 Fidelity analysis
12
13
H.264/AVC syntax error H.264/AVC Extended Profi le/ L3 Syntax error in PPS; trace analysis
of syntax
MPEG-4 and H.264/AVC buffer
analysis
MPEG-2 compliance MPEG-2 Main Profile / Main Level Syntax errors; MPEG structure
HEVC analysis H.265/HEVC HEVC tooltips and analysis
Closed caption and AFD analysis MPEG-2 Closed caption tooltips and analysis;
MPEG-4 ASP and H.264/AVC Buffer analysis in MPEG-4 and
H.264/AVC; fixing problems.
analysis; interlace.
MPEG-4, MPEG-2, and H.264 Fidelity analysis; visual difference.
AFD analysis
Basic functions
To complete the tutorial procedures, you must be familiar with the following basic
functions. (See Table 2.) To perform the desired function, click the associated
icon or type the appropriate keyboard shortcut.
le 2: Basic functions
Tab
ction
Fun
Play video
Stop video Ctrl + S Ctrl + S
Pause/step one frame Ctrl + A Ctrl + Shift + A
Fast forward/backward Ctrl + F Ctrl + Shift + F
Pause on frame
Skip to next frame
type/number/time
ward
For
Icon Keyboard shortcut Icon Keyboard shortcut
Ctrl + P Ctrl + Shift + P
Ctrl + K Ctrl + Shift + K
Bac
kward
How to begin a tutorial
1. After starting MTS4EA, click anywhere to remove the splash screen. If you
do nothing, the splash screen will disappear after 4 seconds.
2. Load the desired tutorial stream. Note that the demo version of the MTS4EA
will only play the provided example video files.
2 MTS4EAV7 HEVC / AVC Video and Compressed Audio Analyzer Tutorials
Page 9

Tutorial 1: H.261
Procedure
This tutorial shows non-compliance issues with the H.261 standard using temporal
references and graphical analysis.
1. To load the H.261 tutorial, click File > Example files > H.261 stream >
Conference Room. The window title changes to MTS4EA-H.261 Example
- Conference Room, and a warning message appears. (See Figure 1.)
Figure 1: Initial warning message
NOTE. The H.261 standard states that the temporal reference (TR) value is the
previous TR value + 1 + the number o f skipped or non-reference pictures at the
picture c lock frequency (PCF). TR is 8 bits only, 0–255, at the standard PCF of
97 frames per second. However, if a custom PCF is used, then TR is 10 bits: 8
29.
LSBs are denoted as TR and 2 MSBs are ETR, but they are taken together as a
single 10-bit number.
2. View the warning message elements:
arning - Indicates that two consecutive temporal references are zero.
W
Summary - Gives summary information about the stream.
MTS4EAV7 HEVC / AVC Video and Compressed Audio Analyzer Tutorials 3
Page 10

Tutorial 1: H.261
Skip this Warni
ng only in the future - elects to skip this particular
warning in the future (recommended).
Skip ALL Warni
ng alerts in the future -electstoskipthisalertand
all other alerts in the future.
3. Select Skip
4. Click the
this Warning only in the future, and then click Continue.
toolbar icon or type CTRL + P to resume playing the video.
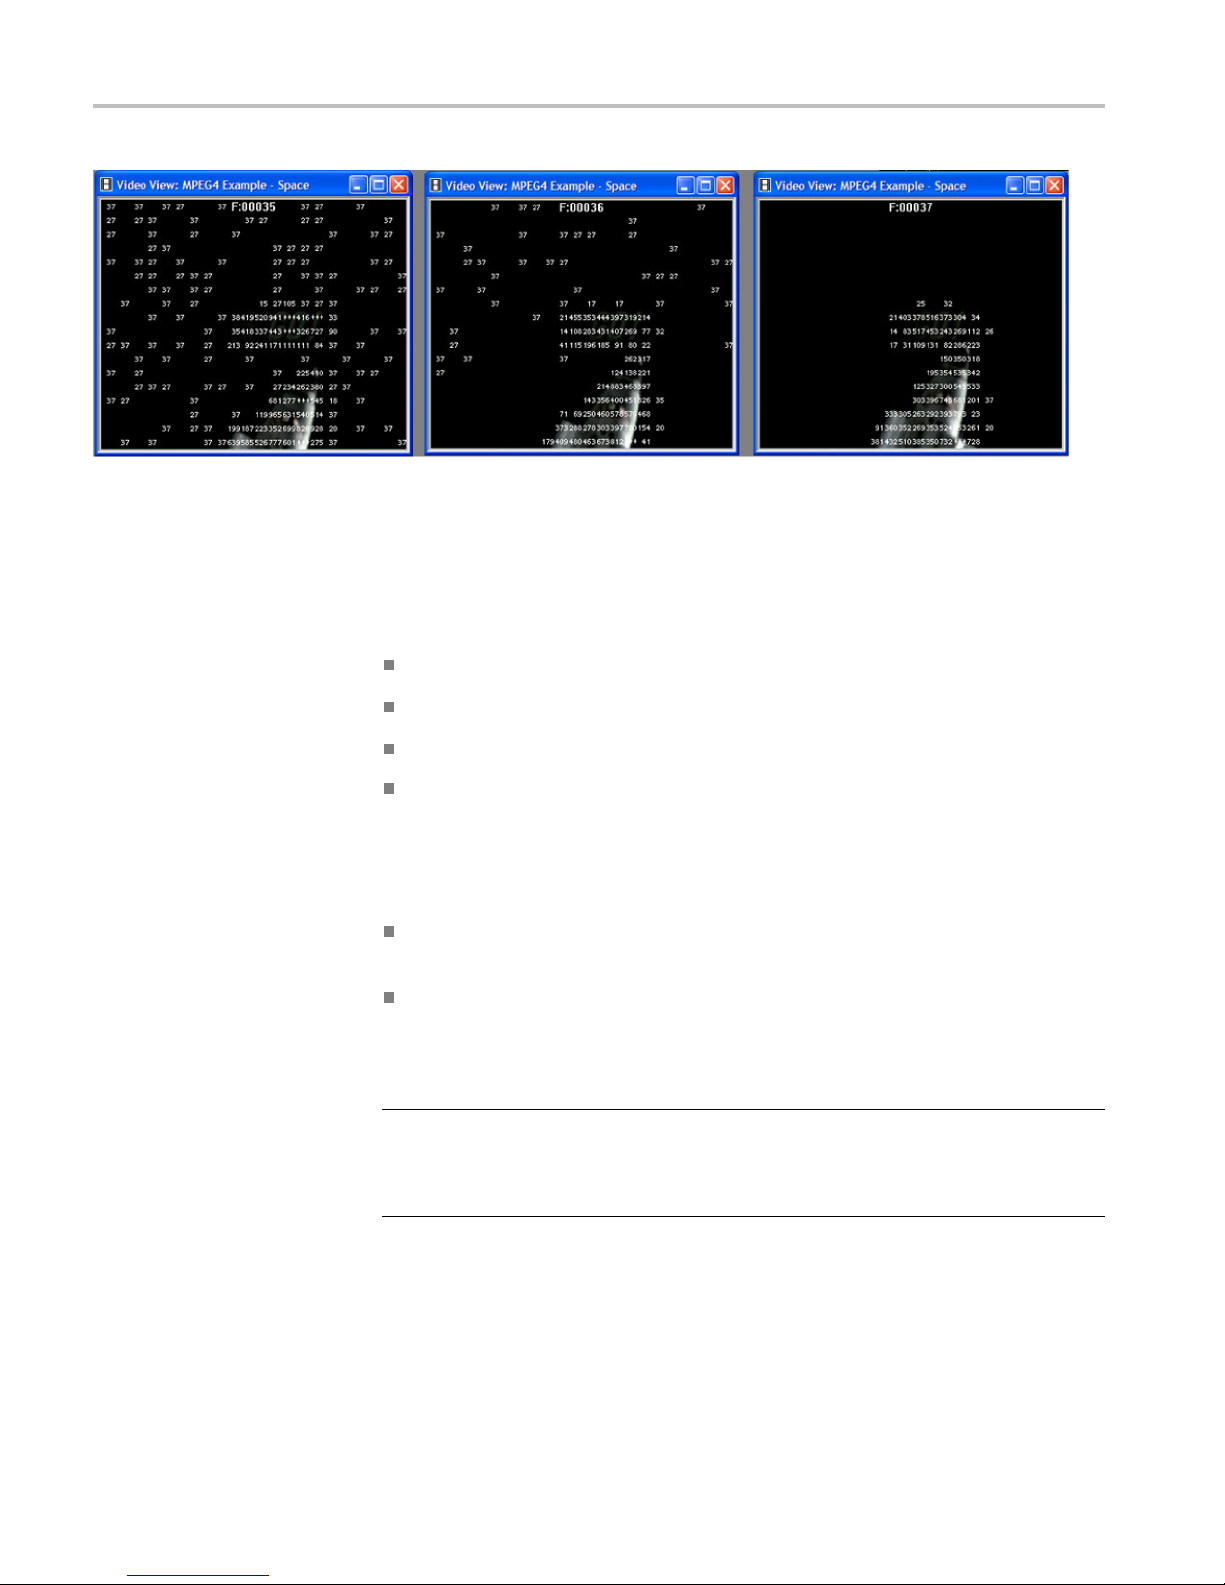
5. As you view the video, notice the following: (See Figure 2.)
Movement in the video is too quick (requires PC with processing speed
of greater than or equal to 1 GHz)
Unwanted noise (visual artifacts) is visible when the man waves his arm
(starting around frame 128, continuing into frame 161, with some artifacts
remaining until frame 203)
Status bar notes that one alert is disabled
Although the video stream will play and will probably be decoded by other
H.261 decoders, the H.261 sequence was incorrectly e ncoded, showing
temporal issues.
Figure 2: Visual artifacts
4 MTS4EAV7 HEVC / AVC Video and Compressed Audio Analyzer Tutorials
Page 11

Tutorial 1: H.261
6. Click Overlay o
on the toolbar
n the menu and select MB Types, or click the Overlay icon
. MB (macroblock) Types are color coded and can be
undocked, resized, or switched off. (See Figure 3.)
NOTE. The H.261 standard has 10 MB types. For more information on using
these, see the user manual.
Figure 3: MB overlay
7. Check that the video is in either Play or Pause mode.
8. Click the MB Tooltip icon
on the toolbar. The Tooltip typically docks at
the left edge of the window, but you can undock it by pressing <CTRL> on
your keyboard while dragging the Tooltip with your mouse.
9. Move the mouse over the video. A white box will display around the MB
from which data is being read. The Tooltip shows information about that
MB.(SeeFigure4.)
MTS4EAV7 HEVC / AVC Video and Compressed Audio Analyzer Tutorials 5
Page 12

Tutorial 1: H.261
Figure 4: MB types and data
10. Advance through the video frame by frame, noting many green Intra MBs in
the back
ground wall. These block types use the most bits. (See Figure 5.)
Figure 5: Intra MBs in the background wall and MB data
11. Stop the video sequence.
12. To analyze the MB data, select Analysis from the menu and select Video
6 MTS4EAV7 HEVC / AVC Video and Compressed Audio Analyzer Tutorials
graph enable. A dialog box will appear. (See Figure 6.)
Page 13

Tutorial 1: H.261
Figure 6: Analysis dialog box
13. Check the Enable, Spatial bits/MB,andIntra coded frequency boxes in the
Analysis dialog box.
14. Select the output filename: h261.xls.
15. Click
OK andthenplaythevideo.
16. When play ends, the data is exported to the .xls file and MS Excel will open.
k Enable macros. The screen will flash as the macros run.
Clic
17. Click Spatial Bits per MB to view a graph of the spatial bits per MB. (See
ure 7.)
Fig
MTS4EAV7 HEVC / AVC Video and Compressed Audio Analyzer Tutorials 7
Page 14

Tutorial 1: H.261
Figure 7: Spatial bits per MB
NOTE. Notice that many bits are used in the center (by the man), top left (too
many), and along the bottom edge (too many). These last two are errors.
18. Click the Intra Coded Frequency tabtoviewagraphoftheIntraCoded
Frequency. (See Figure 8.)
8 MTS4EAV7 HEVC / AVC Video and Compressed Audio Analyzer Tutorials
Page 15

Tutorial 1: H.261
Conclusion
Figure 8
NOTE. Notice that there are many Intra-coded MBs at the top left of the graph.
This indicates that there is an error with Intra-coding in the encoder.
This tutorial demonstrated that the H.261 bitstream is not standard compliant and
that
TR errors and frequency of playing. Coding inefficiencies were discovered
through graphical analysis.
: Intra coded frequency
there were coding inefficiencies. These problems were discovered through
MTS4EAV7 HEVC / AVC Video and Compressed Audio Analyzer Tutorials 9
Page 16

Tutorial 2: H.263 compliance and motion vectors
Tutorial 2: H.263 compliance and motion vectors
This tutorial covers the standards and compliance issues in H.263 and also
demonstrates the proper functioning of the motion vectors.
Procedure
1. To load the H.263 tutorial, click File > Example files > H.263 stream >
Rally (250K
Rally (250k), and a warning message appears. (See Figure 9.)
). The window title changes to MTS4EA-H.263 Example -
Figure 9: Initial warning message
2. View the warning message elements:
10 MTS4EAV7 HEVC / AVC Video and Compressed Audio Analyzer Tutorials
Warning - Indicates that the PSUPP field is being sent and ignored.
mmary - Gives summary information about the stream.
Su
Page 17

Tutorial 2: H.263 compliance and motion vectors
Skip this Warni
ng only in the future -electstoskipthisparticular
warning in the future (recommended).
Skip ALL Warni
ng alerts in the future -electstoskipthisalertand
all other alerts in the future.
3. Select Skip
4. Click the
this Warning only in the future, and then click Continue.
toolbariconortypeCTRL + P to resume playing the video.
Another error message appears. (See Figure 10.)
5. View the error information provided, which indicates a more serious error that
occurs at bitstream byte address 0x0c9cfa, bit 3, after frame 326.
Figu
6. Cli
7. Note that it was an MBCPC error that resulted in the Out of Sync alert
MTS4EAV7 HEVC / AVC Video and Compressed Audio Analyzer Tutorials 11
re 10: Initial error message
ck Continue. Another error message will appear. (See Figure 11.)
ssage. This often occurs when one syntax error triggers a series of alerts.
me
Page 18

Tutorial 2: H.263 compliance and motion vectors
Figure 11: Out of sync error message
8. Select the Skip ALL Error alerts in the future check box, and then click
Continue.
9. To open the Alert Log, click the Alert Log icon
. The Alert log window
will appear. (See Figure 12.)
10. Note the active filter button in the toolbar. Because Skip ALL error alerts in
the future was selected, the alert log view is fi ltered and the filter button is
active. The status bar indicates that 23 of 24 alerts are hidden.
11. Click the Filter icon to deactivate the filter and view all alerts. (See Figure 13.)
12 MTS4EAV7 HEVC / AVC Video and Compressed Audio Analyzer Tutorials
Page 19

Figure 12: Alert Log window, filtered
Tutorial 2: H.263 compliance and motion vectors
Figure 13: Alert Log and Alert Details
MTS4EAV7 HEVC / AVC Video and Compressed Audio Analyzer Tutorials 13
Page 20

Tutorial 2: H.263 compliance and motion vectors
12. Double-click a
n alert to view the alert details and then click Close.View
the columns that appear in the alert log and note the column descriptions
that follow. (See Figure 14.)
Level - the severity level for the alert. Levels include Info, War ning,
Error,andFatal.
ID - MTS4EA unique alert ID number.
Class - Syntax area where the alert occurs.
Title - Alert title.
Decode and Display - Frame numbers where the alert is decoded and
displayed (can vary).
Address - The address of the alert in the bitstream.
Details - Alert details.
Figure 14: Alert Log, unfiltered
13. Close the Alert log and return to the main page of the application.
14. Click the
icon to play the video again with the Motion Vectors (MVs)
visible. (See Figure 15.)
15. Note the following about the image:
The white dots are at the center of each MacroBlock.
The white lines indicate motion vectors. The arrows for each MV point to
the position in the previous frame that contains the data for the current
MacroBlock.
16. Click the color transfer icon
17. To play the video again, click the
to change the overlay from white to black.
icon or type CTRL + A. Note that the
motion vectors are clear and accurate.
14 MTS4EAV7 HEVC / AVC Video and Compressed Audio Analyzer Tutorials
Page 21

Tutorial 2: H.263 compliance and motion vectors
Conclusion
Figure 15
This tutorial demonstrated where there is a standards-compliance issue in the
H.263 bitstream, but also showed that other aspects of the H.263 bitstream, such
as the motion vectors, are implemented properly.
:Videoimage
MTS4EAV7 HEVC / AVC Video and Compressed Audio Analyzer Tutorials 15
Page 22

Tutorial 3: MPEG-4 compliance
Tutorial 3: MP
Procedure
EG-4 compliance
This tutoria
Basic functions
Alerts for syntax errors
Video summary tooltip
MacroBlock overlay MB types
Optimization
Frequenc
1. To l oad t
Streams > Space. An error message will appear. (See Figure 16.)
2. View th
l covers the following:
y of intra-coding
he H.263 tutorial, click File > Example files > MPEG-4 Elementary
e error details:
The error occurs at bitstream byte address 0x11, bit 3, before VOP 1.
The error is present in the header, and MTS4EA does an initial check of
the file header when it loads the file.
The error indicates that method 1 quantization is in use, which is not
allowed because the stream is Simple Profile.
3. Click Continue. MTS4EA loads the stream, and the window title changes to
MTS4EA-MPEG4 Example-Space.
4. Click the
error message will appear. (See Figure 16.)
5. Click Continue. A warning message will appear. (See Figure 17.)
icon or type CTRL + P to resume playing the stream. The same
16 MTS4EAV7 HEVC / AVC Video and Compressed Audio Analyzer Tutorials
Page 23

Figure 16: Initial error message
Tutorial 3: MPEG-4 compliance
Figure 17: Initial warning message
6. Click Goto, andthenclickHex. (See Figure 17.) The Hex view appears with
7. Close the Hex view and again view the initial error shown message. The error
MTS4EAV7 HEVC / AVC Video and Compressed Audio Analyzer Tutorials 17
the error location highlighted. (See Figure 18.)
occurs because modulo_time_base was set to 1 after a whole second elapsed
Page 24

Tutorial 3: MPEG-4 compliance
since the modul
o_time_base was last 1 (at which time vop_time_increment
should be reset, although not necessarily to zero).
8. Click the
icon or type CTRL + P to resume playing the stream. An alert
appears again. (See Figure 17.)
9. In the alert dialog box, select Skip this Warning only in the future,and
then click Continue.
10. Complete the video and observe whether it works properly.
Figure 18: Hex view with error location
11. From the Overlay menu, click Video summary tooltip to enable the Video
12. View t he Final Video Summary Tooltip and note these field descriptions.
ary tooltip.
Summ
eFigure19.)
(Se
Image size: 352 pixels high x 288 pixels wide (CIF).
Stream size: 976 kBytes.
Total frames: 175.
Total play time of the sequence: 13.920 seconds.
Total bits: 7,998,576.
Bandwidth required to transmit this: 574 kbits/second.
Frame play rate: 12.50 frames per second (Hz).
Clip is MPEG-4 Simple Profile with Resync markers & Method 1
quantification.
18 MTS4EAV7 HEVC / AVC Video and Compressed Audio Analyzer Tutorials
Page 25

Tutorial 3: MPEG-4 compliance
13. Observe how the
window.
sequence looks, and then close the Final Video Summary
Figure 19: Final video summary tooltip
14. To see if the codec makes the best use of the MPEG-4 standard, open the
Overlay menu, and then click MB Types (youcanalsotypeCTRL+ Y).
The MB Types key appears.
15. Move forward 3 frames. The MB types are color-coded. (See Figure 20.)
MTS4EAV7 HEVC / AVC Video and Compressed Audio Analyzer Tutorials 19
Page 26

Tutorial 3: MPEG-4 compliance
Figure 2
16. Move for
0: MB Types color key
ward to frame 34. Note that there are several green (intra) coded
MacroBlocks in the static black background (intra coded MBs g enerally use
the most bits). (See Figure 21.)
17. View frames 35, 36 and 3 7, and o bserve that the MacroBlocks disappear.
(See Figure 22.)
18. Go back to frame 34.
19. From
the Overlay menu, click MB Statistics, and then click Bits.Notethat
the black background uses a high number of bits. (See Figure 23.)
20. Vie
w frames 35, 36 and 37, and observe that the background uses
progressively fewer bits. (See Figure 24.)
21.Co
mpare frame 34 with frame 37. Observe that the black background in
frame 34 is coded and uses many bits, while the black background in frame
37 is not coded, and it uses no bits.
20 MTS4EAV7 HEVC / AVC Video and Compressed Audio Analyzer Tutorials
Page 27

Figure 21: Frame 34, color key
Tutorial 3: MPEG-4 compliance
Figure 22: Frames 35, 36, and 37, color key
Figure 23: Frame 34
MTS4EAV7 HEVC / AVC Video and Compressed Audio Analyzer Tutorials 21
Page 28
Tutorial 3: MPEG-4 compliance
Figure 24: Frames 35, 36 and 37
Conclusio
n
Additional information
covered
This tutorial demonstrated how to:
Use and interpret the alert pop-up messages.
Use the Video summary tooltip and understand the information provided.
Use the MacroBlock overlays: MB types and motion vectors.
Use the
It appears that the encoder chooses MB types less than optimally by using intra
MBs for the background, which wastes many bits.
Consider whether there are software bugs, such that the encoder is too
sensitive to minor changes in the gray level.
Check the encoder part of the codec that decides when to use Intra MBs and
Inter MBs, and when to not code the MB.
Fixing this problem would save many wasted data bits.
NOTE. The MPEG-4 standard provides more data bits for intensity-gray level
an for color information, so it is naturally more sensitive to changes in gray
th
level (this mimics the human visual system). However, it appears that the
sensitivity to gray in this example is too great.
hexview bitstream viewer.
22 MTS4EAV7 HEVC / AVC Video and Compressed Audio Analyzer Tutorials
Page 29

Tutorial 4: MPEG-4 optimization
Tutorial 4: MP
EG-4 optimization
This tutoria
Use of the video navigator view.
Use o f trace.
Common error: stuffing bits; using HexView to examine bitstream data.
Synchronizing views.
Saving a setup in project files.
This tuto
you can perform the following tasks:
Play, st
Use and interpret the alert messages.
Use the Video summary tooltip and understand the provided information.
Use the MacroBlock overlays: MB types and motion vectors.
Use the MacroBlock and Summary tooltips.
l covers the following:
rial requires that you have completed the previous tutorials and that
op, step forward, and fast forward a video.
Procedure
Use the hexview bitstream viewer.
Trace files: Parse bitstream and interpret.
View
1. To l
2. Check the box next to Skip this, and then click Continue when the
oad the MPEG-4 tutorial, click File > Example files > MPEG-4
Elementary streams> Window Car.Astuffing_bits error occurs at stream
address 0x9, bit 1, when the file is loaded. (See Figure 25.)
stuffing_bits alert appears.
MTS4EAV7 HEVC / AVC Video and Compressed Audio Analyzer Tutorials 23
Page 30

Tutorial 4: MPEG-4 optimization
Figure 25: Stuffing_bits alert
3. Play the video to the end. Select Skip this and then click Continue when the
VCV overflow alert appears. (See Figure 26.)
Figure 26: VCV overflow alert
4. Click the Video Navigator icon
. The Video Navigator window will appear
in either Detail (See Figure 27.) or Thumbnail view. (See Figure 28.)
Figure 27: Video Navigator window, detail view
24 MTS4EAV7 HEVC / AVC Video and Compressed Audio Analyzer Tutorials
Page 31

Tutorial 4: MPEG-4 optimization
Figure 28: Video Navigator window, thumbnail view
5. To synchronize the video window and the video navigator, start by selecting
Tile Hor
izontally on the Window menu to view the tiles horizontally. The
following views can also be synchronized:
Buffer
analysis
HexView
Alert log
Fidelity analysis
Trace/Parse bitstream and Trace/Interpret
Figure 29: Horizontal view
6. Click the synchronize views icon. (See Figure 30.)
MTS4EAV7 HEVC / AVC Video and Compressed Audio Analyzer Tutorials 25
Page 32

Tutorial 4: MPEG-4 optimization
Figure 30: Synchronizing views
7. Play through the entire sequence again. This time, the video navigator and the
video views are synchronized.
8. Click the icon at the top left corner of the video navigator window to see the
thumbnail view. Each thumbnail is labeled with the frame type, display frame
number, and the display time (in seconds). (See Figure 31.)
26 MTS4EAV7 HEVC / AVC Video and Compressed Audio Analyzer Tutorials
Page 33

Tutorial 4: MPEG-4 optimization
Figure 31: Video Navigator window, thumbnail view
NOTE. Th
e last frame should now be displayed in the video window.
9. Double-click on frame 57. Decoding restarts from the beginning and stops at
frame 5
7. (See Figure 32.)
Figure 32: Synced navigator and video window views of frame 57 and frame 51
MTS4EAV7 HEVC / AVC Video and Compressed Audio Analyzer Tutorials 27
Page 34
Tutorial 4: MPEG-4 optimization
10. Double-click o
n frame 51 and note that the view immediately changes and
does not start from the beginning again. (See Figure 32.)
NOTE. MTS4EA has a cache of data, the size of which is selectable in the Play
menu under Decoder Options and then the General tab. However, if the video is
stopped (for example, played to the end), then the cache must be refilled.
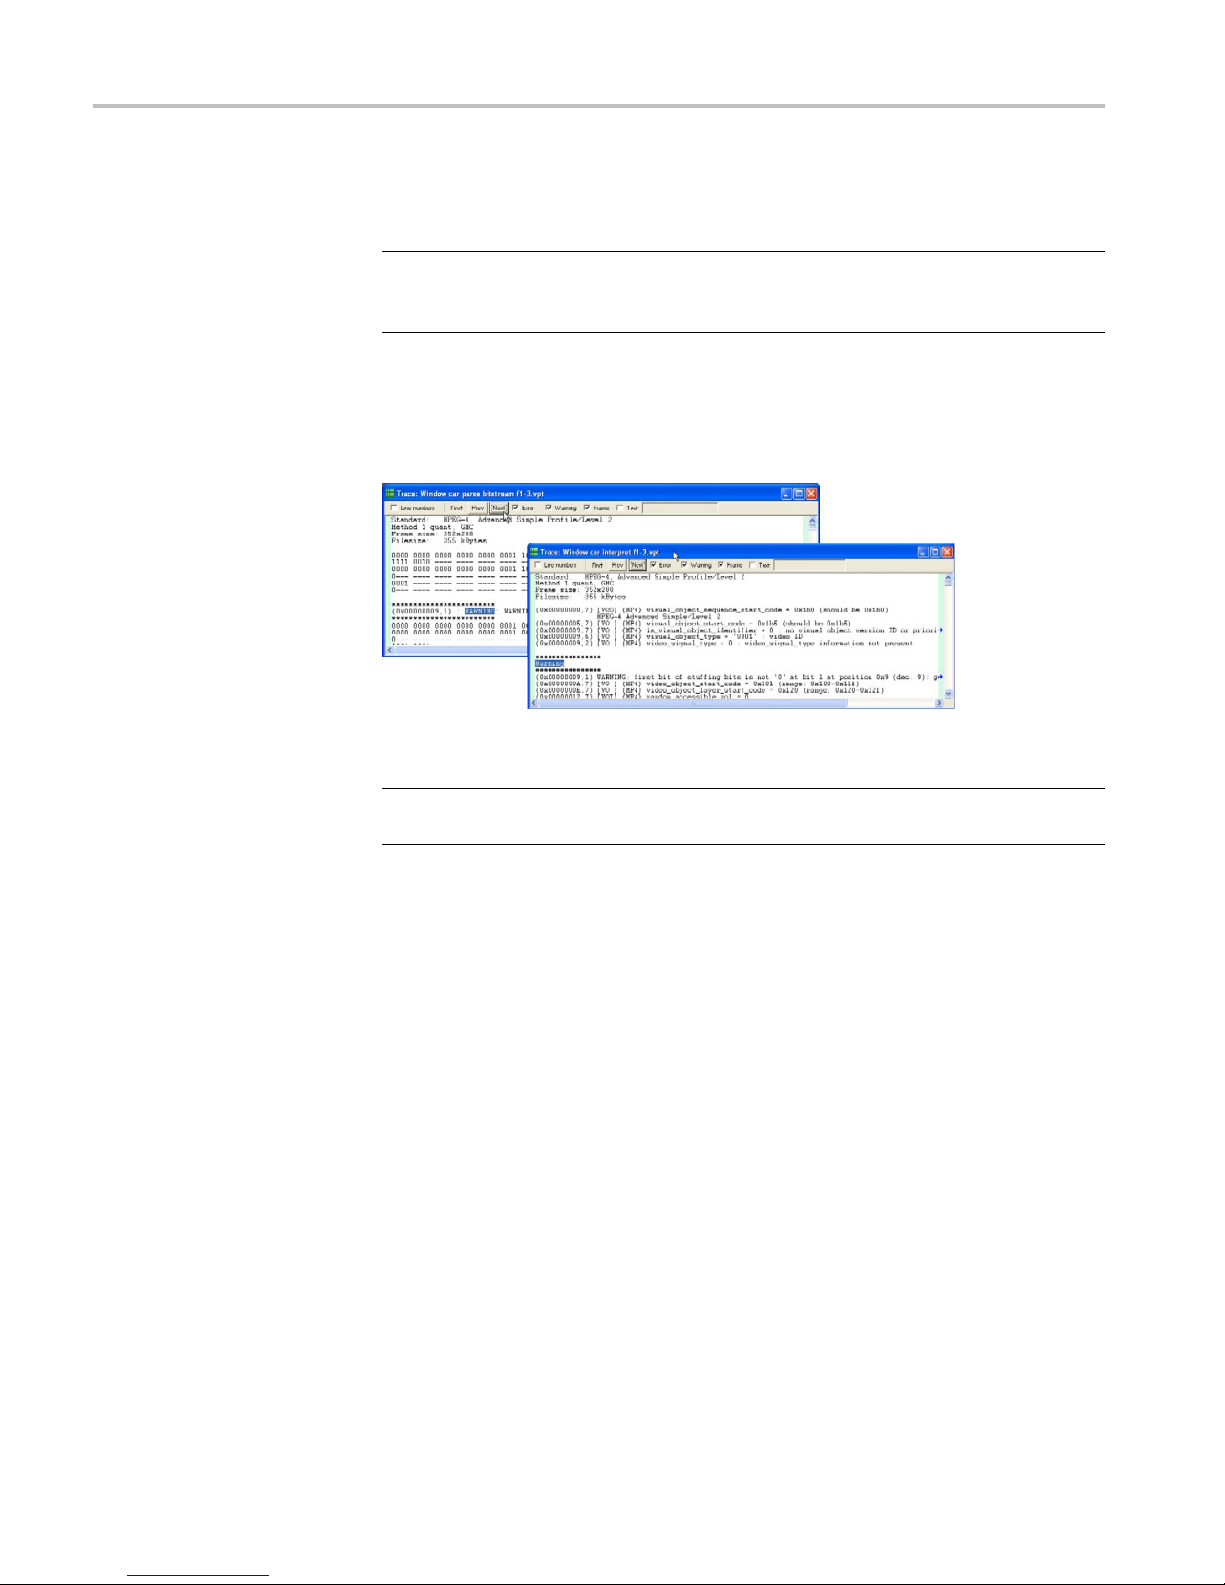
11. Right-click on any view. Select Goto view, and then select Trace/Interpret
from the drop-down menu. View the Trace files, frames 1–3. An alert will
appear. (See Figure 33.)
Figure 33: Trace files warning, frames 1–3
NOTE. Warnings, errors, and fatals are always shown in the Trace/Parse
bitstream and Trace/Interpret files, whether or not the pop-up alerts are enabled.
12. In the Trace/Interpret window, select the address 0x00000009,1 and
right-click. Select Goto view and then Hex. The HexView will open with
the selected location highlighted. MTS4EA shows exactly where the problem
is: bits 1 and 0 of byte 9 are both 1, but for stuffing bits, they should be 01.
(See Figure 34.)
28 MTS4EAV7 HEVC / AVC Video and Compressed Audio Analyzer Tutorials
Page 35

Tutorial 4: MPEG-4 optimization
Figure 34
13. View the
: Selecting Hex from the Trace window
HewView window and its information. You can search for items
using “.” as a wildcard characte r. For example, you can enter the start code
0001b. to find 0001b1, 0001b5, and 0001b6. (See Figure 35.)
Figure 35: HexView window
14. Save your setup by clicking File andthenselectingSave project.Youcan
ange the filename. (See Figure 36.)
ch
MTS4EAV7 HEVC / AVC Video and Compressed Audio Analyzer Tutorials 29
Page 36

Tutorial 4: MPEG-4 optimization
Figure 36: Saving a project file
15. Close MTS4EA completely.
16. Restart MTS4EA.
17. Select the project file that you saved previously from the File drop-down
menu. An alert will pop up when the video file is loaded. Dismiss it by
selecting Skip this and Continue. (SeeFigure37.)
Figure 37: Opening the project file
Conclusion
This tutorial demonstrated how to:
30 MTS4EAV7 HEVC / AVC Video and Compressed Audio Analyzer Tutorials
View different video data and navigate between different views.
Store setups.
Identify stuffed bit errors.
Page 37

Tutorial 5: MP4 compliance basics
This tutorial covers the following:
Opening an MP4 file and viewing the tracks.
Syntax error: not obeying Profile/Level restrictions.
Extracting and saving the video track.
Tutorial 5: MP4 compliance basics
Procedure
Viewing MP 4
This tutorial requires that you have completed the previous tutorials and that
you can pe
Play, stop, step forward, and fast forward a video.
Use and interpret the alert messages.
Use the Video summary tooltip and understand the provided information.
Use the MacroBlock overlays: MB types and motion vectors.
Use the hexview bitstream viewer.
1. To load the MP4 tutorial, click File > Example files > MP4 Files> Packet
Woman. A list of tracks included in the MP4 appears in a dialog box. (See
Figure 38.)
2. View the track information included in the dialog box. The video track ID,
for example, is 001. Although there can be multiple tracks, the first video
track is selected automatically.
rform the following tasks:
file structure.
3. Click OK. The video track is analyze d, and an error message appears. (See
4. View the error message details: (See Figure 39.)
MTS4EAV7 HEVC / AVC Video and Compressed Audio Analyzer Tutorials 31
Figure 39.)
The VOP has more MacroBlocks (396) than allowed in MPEG-4 / Simple
Profile / Level 1: the maximum number allowed is 99.
This is likely an error with the level. It is stated as Level 1 in the encoded
file, but it is actually the size of a Level 2 .
Page 38

Tutorial 5: MP4 compliance basics
Figure 38: Track list
Figure 39: Initial error message
32 MTS4EAV7 HEVC / AVC Video and Compressed Audio Analyzer Tutorials
Page 39

Tutorial 5: MP4 compliance basics
5. Select Skip thi
s Error only in the future, and then click Continue.
MTS4EA will continue, by using the actual size. A buffer conformance
warning message appears. (See Figure 40.)
6. View the warning message details: (See Figure 40.)
Overflow by 2
97 MB.
This error is to be expe cted, because the Level is incorrectly given as
L1 (which ha
s a limit of 99 MBs) whereas it s hould be L2 (which has
a limit of 396 MBs).
Figure 40: VCV overflow warning message
7. Select Skip this Warning only in the future, and then click Continue.
Another buffer conformance warning message appears. (See Figure 41.)
8. Select Skip this Warning only in the future, and then click Continue.
9. To ensure that the application window is active, click the Title bar.
10. From the analysis menu, select View video stream structure.TheStructure
window appears. (See Figure 42.)
11. View the top-level atoms in the MP4 file. Click the + next to each atom to
view the data for the atom.
MTS4EAV7 HEVC / AVC Video and Compressed Audio Analyzer Tutorials 33
Page 40

Tutorial 5: MP4 compliance basics
Figure 41: VBV underflow warning
Figure 42: Structure window
12. From the File menu, click Close stream, and then reopen the stream.
13. When the track list appears, click Extract. (See Figure 43.) The Save stream
34 MTS4EAV7 HEVC / AVC Video and Compressed Audio Analyzer Tutorials
file as dialog box appears. (See Figure 44.)
Page 41

Tutorial 5: MP4 compliance basics
Figure 43:
Track list
Figure 44: Save stream file as dialog box
14. In the Save stream fi le as dialog box, type a different file name if required.
The track ID and video file type has been automatically appended to the file
name.
NOT
extracted at the time the MP4 file was first opened, open the File menu and then
click Save stream file as.
MTS4EAV7 HEVC / AVC Video and Compressed Audio Analyzer Tutorials 35
E. To open this dialog box in the future for a video track that was not
Page 42

Tutorial 5: MP4 compliance basics
Conclusion
This tutorial demonstrated how to:
View the tracks in an MP4 file.
Extract and play a video, while checking for errors.
Identify and locate the Level conformance error.
Identify t
analysis).
wo buffer conformance errors (see Tutorial 5 for details about buffer
36 MTS4EAV7 HEVC / AVC Video and Compressed Audio Analyzer Tutorials
Page 43

Tutorial 6: MP4 optimization
This tutorial covers the following:
Opening an MP4 file and viewing the video track.
Using the Video summary tooltip and the MB types overlay.
Performing optimization checks that could reduce bit usage by 45% in this
sequence.
This tutorial requires that you have completed the previous tutorials, and that
you know how to:
Play, stop, step forward, and fast f orward the video.
Tutorial 6: MP4 optimization
Procedure
Use and in
Use the Video summary tooltip and understand the information provided.
Use the MacroBlock overlays: MB types and motion vectors.
Use the hexview bitstream viewer.
Open MP4 files, view/extract the v ideo, and view the MP4 file structure.
1. To load the MP4 tutorial, click File > Example files > MP4 Files > Picadilly
Circus. A list of tracks included in the MP4 appears in a dialog box. (See
Figure 45.)
2. View the track information included in the dialog box. The video track ID,
for example, is 001. Although there can be multiple tracks, the first video
track is selected automatically.
3. Click OK.
4. To view the Video Summary tooltip, click the
5. To view the MB types overlay, click the
terpret the pop-up alerts.
icon or type CTRL + U.
icon or type CTRL + M.
6. Click the
MTS4EAV7 HEVC / AVC Video and Compressed Audio Analyzer Tutorials 37
icon. A VCV buffer conformance warning message appears.
(See Figure 46.)
Page 44

Tutorial 6: MP4 optimization
Figure 45: Track list
ure 46: VCV buffer conformance warning message
Fig
7. Sel
ect Skip this Warning only in the future, and then click Continue.
8. View the progression of frames, and note that the first frame is green, as is
38 MTS4EAV7 HEVC / AVC Video and Compressed Audio Analyzer Tutorials
ery third frame ( I ntra MBs). (See Figure 47.) Another buffer conformance
ev
warning message appears. (See Figure 48.)
Page 45

Figure 47: Progression of f rames
Tutorial 6: MP4 optimization
Figure 48: VBV underflow warning
9. Select Skip this Warning only in the future, and then click Continue.
10. To replay the video file, click Pause, step forward. Note that the first frame
MTS4EAV7 HEVC / AVC Video and Compressed Audio Analyzer Tutorials 39
takes 32,456 bits. (See Figure 49.)
Page 46

Tutorial 6: MP4 optimization
Figure 49: Frame 1
11. Click the red close button to remove the MB Types Key window.
12. Click the
icon twice to reopen the MB Types Key window.
13. To undock the MB Types Key window, hold the CTRL key, while dragging
it with the mouse pointer.
14. View the next six frames, including Frame 2. (See Figure 50.)
15. For each frame, view the details, which are outlined in Table 3.
40 MTS4EAV7 HEVC / AVC Video and Compressed Audio Analyzer Tutorials
Page 47

Tutorial 6: MP4 optimization
Conclusion
Figure 50: Frame 2
Table 3: Frame details
Frame Frame type Bits used
2
3
4
5
6
7
P-VOP
P-VOP
I-VOP
P-VOP
P-VOP
I-VOP
7,208
7,792
33,152
7,216
8,776
34,344
This tutorial demonstrated the following:
e I-VOPs require about 4.5 times as many bits as the P-VOPs.
Th
There are I-VOPs every 3rd frame.
There is no need to have I-VOPs so often. If the frequency of I-VOPs were
reduced to 1 in 30, the bits used for the sequence would reduce by ~45%.
MTS4EAV7 HEVC / AVC Video and Compressed Audio Analyzer Tutorials 41
You can reduce the number of bits used.
Page 48

Tutorial 7: 3GPP/MPEG-4 compliance
Tutorial 7: 3G
PP/MPEG-4 compliance
This tutoria
Opening a 3GPP file and viewing the tracks.
Viewing syntax errors using reserved Profile/Level indication.
Performing optimization checks that may or may not be applicable in a
wireless environment.
This tutorial requires that you have completed the previous tutorials, and that
you know how to:
Play, stop, step forward, and fast forward the video.
Use and interpret the pop-up alerts.
Use the Video summary tooltip and understand the information provided.
Use the
Use the hexview bitstream viewer.
Open MP4 files, view/extract the video, and view the MP4 file structure.
l covers the following:
MacroBlock overlays: MB types and motion vectors.
42 MTS4EAV7 HEVC / AVC Video and Compressed Audio Analyzer Tutorials
Page 49

Procedure
Tutorial 7: 3GPP/MPEG-4 compliance
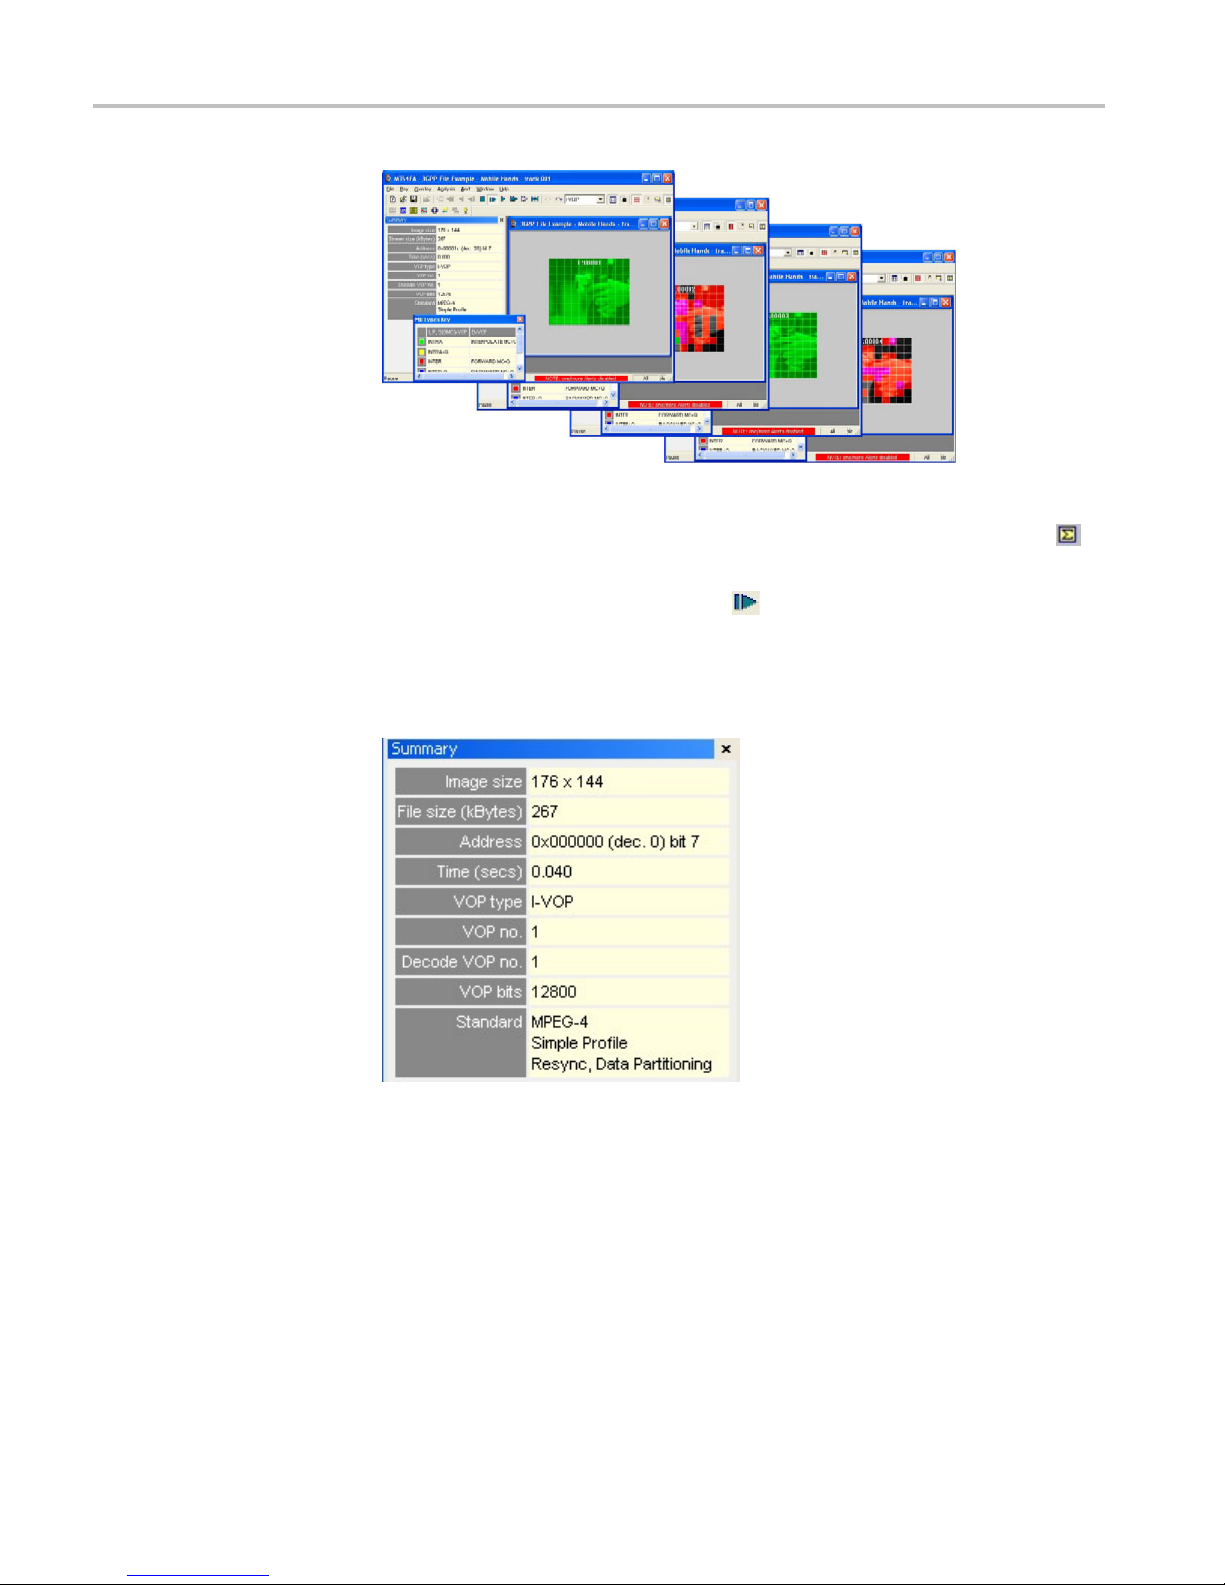
1. To load the 3GPP tutorial, click File > Example files > 3GPP File > Mobile
Hands. A list of tracks included in the 3GPP appears in a dialog box. The
first video track is automatically selected. (See Figure 51.)
Figure 51: 3GPP track list
2. Click OK.
3. An alert will appear for a syntax error. This error shows as a reserved value
(0) for profile_and_level_indication. (See Figure 52.)
4. Click Continue anddonotenableSkip.
MTS4EAV7 HEVC / AVC Video and Compressed Audio Analyzer Tutorials 43
Page 50

Tutorial 7: 3GPP/MPEG-4 compliance
Figure 52: Syntax error alert
5. Run Trace/Interpret (frame 1) and look at the error at address 4, bit 7. (See
Figure 5
3.)
Figure 53: Trace/Interpret error at address 4, bit 7
6. Play the video again and at the error, click Goto andthenselectHex from the
drop-down menu. (See Figure 54.)
44 MTS4EAV7 HEVC / AVC Video and Compressed Audio Analyzer Tutorials
Page 51

Tutorial 7: 3GPP/MPEG-4 compliance
Figure 5
7. The Hex
4:SelectingHexfromtheGotodropdownmenu
View window will appear with the location of the error bits
highlighted. (See Figure 55.)
Figure 55: HexView window with error locations highlighted
8. To look at the VOP types, first stop the stream if it is playing.
9. Click the Summary tooltip icon
10. Click the MB Types Overlay icon
to turn on the tooltip.
to turn on the overlay.
11. Play or Pause/Step forward through the sequence to the end. Notice that the
MTS4EAV7 HEVC / AVC Video and Compressed Audio Analyzer Tutorials 45
first frame and every second frame are Intra-MBs. (See Figure 56.)
Page 52
Tutorial 7: 3GPP/MPEG-4 compliance
Figure 56: Viewing VOP types
12. Now examine the error resilience by clicking the Summary tooltip icon
to turn the tooltip on again, if it is not already on.
13. Click the Pause/Step Forward icon
to move to frame 1.
14. Notice in the Summary window that resync markers and data partitioning
are both on. This is vital for good error resilience in a mobile environment.
(See Figure 57.)
ure 57: Summary window data
Fig
46 MTS4EAV7 HEVC / AVC Video and Compressed Audio Analyzer Tutorials
Page 53

Conclusion
Tutorial 7: 3GPP/MPEG-4 compliance
This tutorial demonstrated the following:
Using the Summary tooltip allows you to look at VOP types.
Reducing the frequency of I-VOPs can allow for better quality video in the
same bit-rate.
With error resilience tools in use, the frequency of I-VOPs can be reduced,
reducing the bit-rate by approximately 15%.
MTS4EAV7 HEVC / AVC Video and Compressed Audio Analyzer Tutorials 47
Page 54

Tutorial 8: H.264/AVC syntax error
Tutorial 8: H.
Procedure
264/AVC syntax error
This tutoria
Opening an H.264/AVC byte stream.
Syntax error in PPS
Finding the frame number of the error.
Examining the byte stream syntax and finding the error using Trace/Parse
bitstream and Trace/Interpret.
1. To load the tutorial, click File > Example files > H.264/AVC Byte Streams>
Canary Wharf.
2. An incorrect direct_8x8_inference_flag error will occur at address 0x0, bit 7,
when the file is loaded. (See Figure 58.)
l covers the following:
Figure 58: Direct_8x8_inference_flag error alert
3. Notice that the syntax error occurs before frame 1. This is the displayed frame
48 MTS4EAV7 HEVC / AVC Video and Compressed Audio Analyzer Tutorials
number. Check the Skip this box and then click Continue.(SeeFigure58.)
Page 55

Tutorial 8: H.264/AVC syntax error
4. An invalid Pict
ure Parameter Set ID error will occur during the decode of
frame 1. Use the scroll bar to view all of the information in the error dialog
box. (See Figure 59.)
Figure 59: Invalid Picture Parameter Set ID error
5. Click on Analysis in the menu. Select Trace enable and then select Frame
range from the drop-down menu.
6. Set the frame range from 1 to 2. This will run the Trace/Interpret and
Trace/Parse bitstream on frames 1 and 2.
7. View the Trace file and clear the Frame box. Click Find Next three times.
An error alert will appear. (See Figure 60.)
Figure 60: Trace/Parse bitstream error
MTS4EAV7 HEVC / AVC Video and Compressed Audio Analyzer Tutorials 49
Page 56

Tutorial 8: H.264/AVC syntax error
8. View the Trace/
Find Next twice. An error alert will appear. (See Figure 61.)
Figure 61: Trace/Interpret error alert
9. To determine if the pic_parameter_set_id number 1 has been set, search for
it in the Trace/Interpret file that is already open (frames 1 and 2).
10. Select the Text box in the Trace/Interpret window and type
pic_parameter_set_id= in the text box.
11. Click Find Prev to search for an occurrence of pic_parameter_set_id before
the error. Note that it does not occur before the location of the PPS ID error
(at 0x1c, 7). (See Figure 62.)
Interpret for the same range. Clear the Frame box and click
Figure 62: Pic_parameter_set_id error location search
Conclusion
is tutorial demonstrated the following:
Th
50 MTS4EAV7 HEVC / AVC Video and Compressed Audio Analyzer Tutorials
The pic_parameter_set_id=1 did not occur before the slice header tried to use
his in frame 1, and therefore caused an error.
t
It is an error to set the PPS ID to 1 at stream address 0x1c, bit 7.
Page 57

Tutorial 8: H.264/AVC syntax error
With this error
, the MTS4EA decoder uses the data from the last known good
pic_parameter_Set_id (ID 0) and continues decoding.
NOTE. This may not always be possible and could generate other consequential
errors.
THE MTS4EA showed what the error was and where it occurred.
MTS4EAV7 HEVC / AVC Video and Compressed Audio Analyzer Tutorials 51
Page 58

Tutorial 9: MPEG-4 and H.264/AVC buffer analysis
Tutorial 9: MP
EG-4 and H.264/AVC buffer analysis
This tutoria
Buffer analysis in real-time (VBV, VCV, VMV of MPEG-4 ES).
Buffer conformance errors/alerts.
Achieving conformance.
HRD buffer analysis in H.264/AVC.
This tutorial requires that you have completed the previous tutorials, and that
you know how to:
Play, stop, step forward, and fast forward a video.
l covers the following:
Information provided - values, overflow/underflow indications.
Icon controls for navigation through the graphs.
Graphs.
Error dialog boxes.
Altering the buffer parameters and seeing the effect in the graph.
Adjusting values to prevent overflow.
Use and interpret the alert messages.
This tutorial also requires that you already understand the principles of buffer
analysis/conformance (VBV, VCV, VMV)inMPEG-4andH.264/AVC(HRD).
The following table provides the functions of each Buffer Analysis toolbar icon.
(See Table 4.)
Table 4: Buffer analysis icons
Icon Function
Zoom in (+) and zoom out (-) centered on the window; affected by the
Lock X / Y icons.
Fit all data into window.
Go to origin (zero), which is the start of the video sequence.
Lock X/Y zoom in/out and scrolling/panning. When the Lock Y button is
pressed, zoom in and zoom out and scroll/pan only affect the X-direction.
This allows you to keep a useful vertical scale, while still viewing the length
of the video sequence.
Autoscroll; fill the analysis data in real time as the video is being decoded
and scroll the window to the right.
52 MTS4EAV7 HEVC / AVC Video and Compressed Audio Analyzer Tutorials
Page 59

Procedure
Tutorial 9: MPEG-4 and H.264/AVC buffer analysis
Table 4: Buffer analysis icons (cont.)
Icon Function
Measure the data at the cursor. The data values are reported on the status
line at the bottom of the analysis window. Offsets and angles/slopes of
lines can also be measured by holding the mouse and dragging.
Scroll/pan (the cursor changes to show the scroll/pan direction); this is
affected by the Lock X-Y icons.
Zoom in/zoom out centered on the location of this cursor; this is affected by
the Lock X-Y icons. Press the <shift> key to zoom out.
1. To load th
e tutorial, click File > Example files > MPEG-4 Elementary
Streams> Man Walking. Ensure that the video is not playing.
2. From the
Analysis menu, click View buffer analysis.TheBuffer Analysis
window appears. (See Figure 63.)
3. View th
e buffer analysis graph example, as well as the descriptions in the
table. (See Table 5.)
Figure 63: Buffer analysis window, example graph
MTS4EAV7 HEVC / AVC Video and Compressed Audio Analyzer Tutorials 53
Page 60

Tutorial 9: MPEG-4 and H.264/AVC buffer analysis
Table 5: Buffer
Area Description
1
2 Frame type, number.
3
4
5
6
7
8
9
10
11
12
analysis descriptions
Graph window c
Graph window.
List of analyses for VBV, VCV, and VMV.
Location of overflows and underflows in stream.
Scroll bar for sequence.
Time through sequence.
Vertical blue line at time=0; vertical gray lines at each VOP decode time.
Status lines.
Custom values.
Switch on/off VBV, VCV, VMV graphs.
Source of buffer analysis values.
ontrol toolbar.
4. Observe the VBV, VCV and VMV values that appear beside the graph. (See
Figure 64.) These parameters are specified in the stream, or from the implied
values from the Profile/Level, as given in the standard, or the implied values
the Object Type (Simple or Advanced Simple), at the highest level for
from
each. You can enter them manually by selecting Use custom parameters.
Figure 64: VBV, VCV and VMV values
5. Click the Pause/ Step Forward icon
6. Click the Pause/ Step Forward icon
54 MTS4EAV7 HEVC / AVC Video and Compressed Audio Analyzer Tutorials
three times. Nothing appears in
the window because the Man Walking sequence contains B-VOPs, and the
buffer analysis cannot start until there is sufficient data for the calculations
(this will not occur until frame 4).
one more time. The graph appears.
Page 61

Tutorial 9: MPEG-4 and H.264/AVC buffer analysis
7. Click the Fit to Window icon for a more detailed view of the graph.
(See Figure 65
.)
8. Click the Fast forward icon
.Awarningmessageoccurs.(SeeFigure66.)
9. Note that the VBV overflow occured while decoding frame 55 (the display
frame number is 54).
Figure 65: Buffer analysis graph, detailed view
MTS4EAV7 HEVC / AVC Video and Compressed Audio Analyzer Tutorials 55
Page 62

Tutorial 9: MPEG-4 and H.264/AVC buffer analysis
Figure 66: VBV overflow warning
10. Select Skip this Warning only in the future, and then click Continue.
11. Observe that the red VBV line goes above the Buffer limit line. (See
Figure 67.)
12. Observe that when the decoding stops, the graph looks like the section that
appears between 75% and 105% buffer occupancy. Note also that the number
of frames with VBV overflow appears at the bottom of the screen. In this
the number of frames with VBV overflow is 106.
case,
56 MTS4EAV7 HEVC / AVC Video and Compressed Audio Analyzer Tutorials
Page 63

Tutorial 9: MPEG-4 and H.264/AVC buffer analysis
Figure 6
13. To fitth
7: Buffer limit graph
e graph to the window, click the
icon on the Buffer Analysis
toolbar. The red line displays the VBV overflow. (SeeFigure68.)
MTS4EAV7 HEVC / AVC Video and Compressed Audio Analyzer Tutorials 57
Page 64

Tutorial 9: MPEG-4 and H.264/AVC buffer analysis
Figure 68: Comparative video verifier graph
14. Consider the information presented by the graph. The standard values used
for a frame result in a VBV overflow, which means that the decoding rate
cannot keep up with the input data rate, and frames will drop, beginning with
frame 54.
Solutions include:
Increase the vbv_buffer_size so that it does not overflow.
Decrease the bit-rate, which is the rate at which the encoder sends the
data to the decoder.
Increase the displayed frame rate, so that the decoder removes bits more
quickly.
Increase the number of bits per frame by changing the quantizer or
increasing the frame size.
Change the Profile/Level indication, so that it stays within the set limits
(for example, change to ASP at Level 2).
Use custom values in the vbv_parameters in the sequence header.
15. Clear the check boxes for VCV and VMV s o that only the VBV check box
is selected. Note that the vertical scale is now measured in bits, not %. (See
Figure 69.)
58 MTS4EAV7 HEVC / AVC Video and Compressed Audio Analyzer Tutorials
Page 65

Tutorial 9: MPEG-4 and H.264/AVC buffer analysis
16. Observe that th
e VBV line has disappeared because it is beyond the s cale
set for the VBV.
17. Click the
icon on the Buffer Analysis toolbar, and then click the icon
three times for a detailed view of the graph. (See Figure 70.)
Figure 69: Frame 2
MTS4EAV7 HEVC / AVC Video and Compressed Audio Analyzer Tutorials 59
Page 66

Tutorial 9: MPEG-4 and H.264/AVC buffer analysis
Figure 7
18. Note th
0: Graph details
e following details about the graph:
The Y scale of the graph is locked, which keeps the graph at a useful
zoom l
evel.
The VBV graph is higher at the end of every frame than at the start, which
s that the VBV buffer is filling faster than the decoder can empty it.
show
19. Click the
icon to zoom out.
20. Select the Use custom parameters option button. (See Figure 71.) The word
BUF appears in a yellow box in the main MTS4EA status bar, indicating that
custom buffer parameters are in use. (See Figure 72.)
60 MTS4EAV7 HEVC / AVC Video and Compressed Audio Analyzer Tutorials
Page 67

Tutorial 9: MPEG-4 and H.264/AVC buffer analysis
Figure 71: Buffer analysis configurations
Figure 72: Buffer parameter indicator
21. View the video buffer verifier. (See Figure 73.) The default vbv_buffer_size
for ASP L0 is 163,840 bits = 20,480 bytes, which is not very large.
22. Enter 655,360 bits = 80 kbytes, click Apply, and then click the Fit to window
on
ic
. Observe that the graph stays below the limit and there are no
overflows or underflows.
MTS4EAV7 HEVC / AVC Video and Compressed Audio Analyzer Tutorials 61
Page 68

Tutorial 9: MPEG-4 and H.264/AVC buffer analysis
23. Consider the fo
What if your mobile device cannot spare 80 KBs of memory, and can only
spare 20 KBs, a
By how much does the input data rate need to be reduced?
Does this comply with the specifications of the network on which your
device will operate?
llowing:
sspecified by the standard?
Figure 73: Video buffer verifier graph
24. Reset the parameters by clicking Use parameters from stream header,and
25. Reduce the bit rate to 121072 bits, and then click Apply. (SeeFigure74.)
62 MTS4EAV7 HEVC / AVC Video and Compressed Audio Analyzer Tutorials
then reselect the Use custom parameters check box. The VBV graph shows
t the decoder is being supplied with data faster than it can decode .
tha
e graph goes up slightly and there are fewer frames with overflow. (See
Th
Figure 75.)
Page 69

Tutorial 9: MPEG-4 and H.264/AVC buffer analysis
Figure 74: Bit rate configurations
Figure 75: Video buffer verifier graph
26. Reduce the bit rate to 111072 bits and then click Apply.(SeeFigure76.)
27. Observe that the graph line now stays below the buffer limit. (See Figure 77.)
28. Con
sider whether the maximum rate of 111,072 bits meets your network's
specifications.
MTS4EAV7 HEVC / AVC Video and Compressed Audio Analyzer Tutorials 63
Page 70

Tutorial 9: MPEG-4 and H.264/AVC buffer analysis
Figure 76: Video buffer verifier configurations
Figure 77: Video buffer verifier graph
Conclusion
This tutorial demonstrated that the bufferanalysisoftheMPEG-4example,Man
Walking, showed that the stream does not comply with the buffer constraints. The
tutorial recommended ways to resolve this issue.
The tutorial also b rought up the following considerations:
64 MTS4EAV7 HEVC / AVC Video and Compressed Audio Analyzer Tutorials
How much memory needs to be allocated? Can your hardware allow this
much memory usage?
Is the input data rate limit appropriate for your network?
Page 71

Tutorial 10: MPEG-2 compliance
Tutorial 10: M
Proce
dure
PEG-2 compliance
This tutoria
Opening an MPEG-2 program stream.
Interpreting syntax errors:
Using the HexView:
Looking at the MPEG-2 program stream structure.
Looking at MacroBlock types in an interlaced video.
l covers the following:
Person track: invalid VLC for dct_differential.
Grenadier guards: frame_rate_extension denominator and numerator
equal but not zero.
Going from the alert pop-up to the HexView.
Examini
ng the bitstream in the HexView.
1. To load this tutorial, click File > Example files > MPEG-2 Program
Streams> Person Track. A list of tracks included in the MPEG-2 program
am appears in a dialog box. (See Figure 78.)
stre
2. View the track information included in the dialog box. The video track ID,
example, is 0xe0. Although there can be multiple tracks, the first video
for
track is selected automatically.
MTS4EAV7 HEVC / AVC Video and Compressed Audio Analyzer Tutorials 65
Page 72

Tutorial 10: MPEG-2 compliance
Figure 78: Track list
3. Click OK. The video track is analyzed and an error appears. (See Figure 79.)
4. View th
e error message details, which provide a summary of the stream up to
the point of the error.
5. Click
Continue. Ensure that the Skip this Error only in the future check
box is not sele cted. Another buffer conformance error message appears.
(See Figure 80.)
66 MTS4EAV7 HEVC / AVC Video and Compressed Audio Analyzer Tutorials
Page 73

Figure 79: Initial error message
Tutorial 10: MPEG-2 compliance
Figure 80: Invalid VLC error message
6. View the error message details. An invalid VLC has been used for the
7. Click Continue. Ensure that the Skip this Error only in the future check box
8. Resume playing the video. Observe that the error is visible in frame 1. (See
MTS4EAV7 HEVC / AVC Video and Compressed Audio Analyzer Tutorials 67
dct_differential field at bitstream byte address 0x1000, bit 5.
is not selected. Repeat this step for an additional error message t hat appears.
Figure 81.)
Page 74

Tutorial 10: MPEG-2 compliance
Figure 81
9. Click th
: Error in image
e Pause, Step forward icon
. An error message appears.
10. Click Continue. An Invalid VLC error message appears. (See Figure 82.)
11. From the Goto menu, click Hex.
12. Click Continue, and then view the HexView window. Note that the error is
highlighted automatically. (See Figure 83.)
13. Observe the bits surrounding the error and consider whether it is a start code
emulation.
68 MTS4EAV7 HEVC / AVC Video and Compressed Audio Analyzer Tutorials
Page 75

Tutorial 10: MPEG-2 compliance
Figure 83: HexView window
Figure 82: Invalid VLC error message
14. To open the Grenadier Guards program stream, Click File > Example files
> MPEG-2 Program Streams> Grenadier Guards. An error message
appears. (See Figure 84.)
MTS4EAV7 HEVC / AVC Video and Compressed Audio Analyzer Tutorials 69
Page 76

Tutorial 10: MPEG-2 compliance
15. View the detail
s of the error message: the value of the denominator of
frame_rate_extensionis1,butitmustbe0inMainProfile.
Figure 84: Error message
16. Select Skip this Error only in the future, and then click Continue.The
barindicatesonedisabledalert.(SeeFigure85.) Anerrormessage(See
status
Figure 86.) and a warning message (See Figure 87.) appear.
e 85: Disabled alert indicator
Figur
17. For b
oth error messages , select Skip this Error or Warning in the future,
andthenclickContinue. Do not resume playing the video.
70 MTS4EAV7 HEVC / AVC Video and Compressed Audio Analyzer Tutorials
Page 77

Figure 86: Error message
Tutorial 10: MPEG-2 compliance
Figure 87: Warning message
18. From the Analysis menu, select View video stream structure.TheStructure
19. View the top-level atoms in the MPEG-2 program stream. Click the + next to
MTS4EAV7 HEVC / AVC Video and Compressed Audio Analyzer Tutorials 71
dow appears. (See Figure 88.)
win
ch atom to view the data for the atom.
ea
Page 78

Tutorial 10: MPEG-2 compliance
Figure 88: Structure window
20. Resume playing the video. The Interlace toolbar appears. (See Figure 89.)
re 89: Interlace toolbar
Figu
21. Cli
ck the Pause, Step Forward icon
22. On the Interlace toolbar, click the Split fields view icon
to view frame 2.
. The top and
bottom fields are displayed separately. (See Figure 90.)
72 MTS4EAV7 HEVC / AVC Video and Compressed Audio Analyzer Tutorials
Page 79

Tutorial 10: MPEG-2 compliance
Figure 90
:Frame2
23. Maximiz
24. Click th
(See Figure 91.)
e the video window.
e
icon. Different MB types appear in the top and bottom fields.
Figure 91: Varied MB types
MTS4EAV7 HEVC / AVC Video and Compressed Audio Analyzer Tutorials 73
Page 80

Tutorial 10: MPEG-2 compliance
Conclusion
This tutorial demonstrated the following:
There is one error in the Person Track stream:
The error is in frame 1, at bitstream location 0x1000, bit start 5.
This error affects the visual quality.
There are t
stream:
The error
bit sta rt 6.
The warn
This does not appear to affect the visual quality.
You can see the different MacroBlock types in the top and bottom fields.
wo errors and one warning message in the Grenadier Guards
s are in the header (before frame 1), at bitstream location 0x15,
ing message highlights the same error.
74 MTS4EAV7 HEVC / AVC Video and Compressed Audio Analyzer Tutorials
Page 81

Tutorial 11: Fidelity analysis
This tutorial covers the following:
Fidelity analysis in real-time (PSNR).
Using a YUV source reference file.
Fidelity metrics.
Tutorial 11: Fidelity analysis
Procedure
Graph navig
Comparing the fidelity of the same bitstream compressed with either MPEG-2
or H.264/
Viewing the visual difference between the compressed bitstream and the YUV
source re
This tutorial requires that you have completed the previous tutorials and that
you can:
Open example streams.
Play, stop, step forward, and rewind a video.
Use and interpret alert pop-up messages.
Use the icons and controls on the buffer analysis graphical display.
This tutorial also requires that you already understand the principles of fidelity
analysis (this topic is not covered in this tutorial; however, the user manual
contains descriptions of the fidelity metrics).
ference video.
ation.
AV C .
1. To load the tutorial, click File > Example files > MPEG-4 Elementary
2. From the Analysis menu, click Enable fidelity analysis.TheVideo analysis
3. Set the Frame rate to 30. (See Figure 92.)
MTS4EAV7 HEVC / AVC Video and Compressed Audio Analyzer Tutorials 75
Streams> Man Walking. Ensure that the video is not playing.
options dialog box appears f or theYUV reference file. This file will later be
used for comparison with the compressed video file. The YUV reference
file is provided as an example, as indicated by the text under the Reference
filename field. (See Figure 92.)
Page 82

Tutorial 11: Fidelity analysis
Figure 92: Video analysis options
4. From the Metric drop-down menu, select PSNR (full signal range),and
then cli
ck OK. (A detailed description of each fidelity metric is available
in the user manual).
5. From th
e Analysis menu, click Enable fidelity trace.
6. On the Trac e tab, select the Enable check box, choose the filename
mp4as
p_1_video and then, under Options, select VOP Fidelity.(See
Figure 93.)
7. On th
e Frame range tab, select the All frames check box and then click
OK. The video window appears with the fidelity analysis icon
Views toolbar. (See Figure 94.)
the
enabled in
76 MTS4EAV7 HEVC / AVC Video and Compressed Audio Analyzer Tutorials
Page 83

Tutorial 11: Fidelity analysis
Figure 93: Video analysis options
Figure 94: Frame range tab
8. Click the Fidelity analysis icon
.TheFidelity analysis graph view
appears. Observe that the graph is empty because a video has not been played.
(See Figure 95.)
9. Click the
icon four times. A graph appears. (See Figure 96.)
MTS4EAV7 HEVC / AVC Video and Compressed Audio Analyzer Tutorials 77
Page 84

Tutorial 11: Fidelity analysis
10. Observe the fol
lowing about the graph:
The graph area is not filled with each click because the bitstream includes
B-VOPS, and a c
ertain number of frames must be decoded before each
frame can be displayed.
Some of the Y
auto-scales with the first few values. You can click the
UV PSNR values are not visible. This is because the graph
icon to rescale
the graph.
The thumbnail bar view shows that the fidelity data has been collected.
11. View the descriptions of the Fidelity analysis window in the figure and the
table. (See Figure 97.) (See Table 6.)
Figure 95: Fidelity analysis graph
78 MTS4EAV7 HEVC / AVC Video and Compressed Audio Analyzer Tutorials
Page 85

Tutorial 11: Fidelity analysis
Figure 9
6: Fidelity analysis graph
MTS4EAV7 HEVC / AVC Video and Compressed Audio Analyzer Tutorials 79
Page 86

Tutorial 11: Fidelity analysis
Figure 97: Fidelity analysis window descriptions
Table 6: Fidelity analysis window descriptions
Area Description
1
2YUVcolorkey
3
4 Time through sequence
5
6 Thumbnail bar line; displays overview
7
8 Frame type, number
9
Graph window
Scroll bar; appears and disappears according to zoom scale
Status line; display measurements
Vertical blue line at time=0; vertical gray lines at each VOP decode time
Graph window control toolbar
12. To open the Grenadier Guards program stream, Click File > Example files
> MPEG-2 Program Streams> Grenadier Guards. An error message
appears.
13. Select Skip this Error only in the future, and then click Continue.
14. From the Analysis menu, select View analysis options.
80 MTS4EAV7 HEVC / AVC Video and Compressed Audio Analyzer Tutorials
Page 87

Tutorial 11: Fidelity analysis
15. On the Visual di
fference/ Fidelity tab, set the YUV frame rate to 25, and
then click OK.
16. An error messa
ge appears because there are only 10 frames of YUV data.
Click OK, and then view the graph result. (See Figure 98.)
17. Load the MPE
G-2 program stream example, Grenadier Guards. (See
Figure 99.)
18. Compare the
first MPEG-2 program stream with the H.264/AVC PSNR
example. (See Figure 99.) (See Figure 10 0.) Note that the PSNR is higher for
H.264/AVCinY,U,andV.
Figure 98: Graph result, YUV frame rate 25
MTS4EAV7 HEVC / AVC Video and Compressed Audio Analyzer Tutorials 81
Page 88

Tutorial 11: Fidelity analysis
Figure 99: MPEG-2 program stream, Grenadier Guards
Figure 100: H.264/AVC stream, Grenadier Guards
19. Click the View trace icon. (See Figure 101.)
82 MTS4EAV7 HEVC / AVC Video and Compressed Audio Analyzer Tutorials
Page 89

Tutorial 11: Fidelity analysis
Figure 101: View trace icon
20. The trace view gives the numerical values for the pictures' PSNR. (See
Figure 102.)
21. Consider the following:
What encoder parameters, such as frame type, were used for H.264/AVC
and MPEG-2?
Could the H.264/AVC or the MPEG-2 encoding parameters be changed to
improve the areas of lower PSNR?
Compare other fidelity analyses; do the same k inds of differences occur?
Although the PSNR is better for the H.264/AVC sequence, it does not
necessarily look better. Consider the visual differences.
Figure 102: H.264/AVC sequence
22. Load the MPEG-2 stream, Grenadier Guards.
23. From the Overlay menu, click Visual difference, and then select the Enable
24. Set the Frame rate to 25, and then click OK.TheVisual difference toolbar
25. Use the following icons to view the visual difference.
MTS4EAV7 HEVC / AVC Video and Compressed Audio Analyzer Tutorials 83
check box.
appears.
Page 90

Tutorial 11: Fidelity analysis
Conclusion
Table 7: Visual
Icon Function
difference icons
View encoded
View YUV reference
View difference
View luma only (not U or V)
26. Load the H.264/AVC stream, Grenadier Guards. Consider whether there is a
difference in visual quality between the two streams.
This tutorial demonstrated the following:
A method for assessing v isual quality through:
The use of metrics such as PSNR.
ying the visual difference between the encoded video and the
Identif
reference (source) video that is used for the encoding.
Visual
quality analysis and visual quality improvement require that you
consider encoding parameters (such as frame type s and motion vectors) and
bit-rates of encoding.
This tutorial provided the tools to help you begin your visual analysis in a
quantifiable and logical fashion.
84 MTS4EAV7 HEVC / AVC Video and Compressed Audio Analyzer Tutorials
Page 91

Tutorial 12: HEVC analysis
Tutorial 12: H
EVC analysis
This tutoria
HEVC stream analysis
Using the bits overlay to check for coding efficiency
This tuto
you can:
Open exa
Play, stop, step forward, and rewind a video.
Use and interpret alert pop-up messages.
Use the icons and controls on the buffer analysis graphical display.
l requires software version 7.0 or higher and covers the following:
Using HEVC tooltips
Using predicted, decoded and residual images
Using the CU size distribution graph
rial requires that you have completed the previous tutorials and that
mple streams.
Procedure
1. To load the tutorial, click File > Example files > HEVC Byte Streams>
Forbidden City.
2. As the stream is recognized as H.265/HEVC and opened in the Video View,
the HEVC tooltips are enabled.
gure 103: HEVC tooltips
Fi
lick the Pause the stream or step forward on frame button
3.C
the HEVC analysis frame by frame.
ove the mouse over the Video View and click on any portion of the video to
4.M
select a Coding Tree Unit (CTU). The selected CTU is shown with an outline.
to start
MTS4EAV7 HEVC / AVC Video and Compressed Audio Analyzer Tutorials 85
Page 92

Tutorial 12: HEVC analysis
5. Click the Coding Tree Unit (CTU) tooltip and click the Coding Unit
(CU) tooltip
. The CTU and CU details are displayed.
When you select a CTU, the CTU is highlighted as shown below. The white
delineation box shows the selected CTU. The red box shows the locked CU,
whose detai
ls will be updated in the CU tooltip. The teal color grids show the
Prediction unit partitions in the selected CTU.
Figure 104: CTU and CU tooltips for HEVC streams
6. Use the wheel on the mouse to zoom in on a CTU when the size is too small
to view the individual CUs. Click different CUs within a CTU to view the
parameters of each CU.
7. Click another portion of the video to observe that the tooltips update the CTU
and CU statistics respectively for the newly selected portion of the video.
8. Close the CTU and CU tooltips.
86 MTS4EAV7 HEVC / AVC Video and Compressed Audio Analyzer Tutorials
Page 93

Tutorial 12: HEVC analysis
9. Click the Coding Unit type (CU) tooltip to view the Coding Unit types
as shown below.
This tooltip allows you to v isually see the Coding Unit (CU) types used while
encoding the frame. The data in each of the CUs is partially visible and the
chroma component is modified to indicate the CU Type.
The colors used are displayed in the CU types key tooltip. The CUs that
are displayed grey implies that they are skipped (Skip flag-true; this can be
checked in
the Coding Unit tooltip).
The grid lines shown below are displayed only when the video is either in
pause or s
top mode. In all other modes, only the CU overlay colors are
displayed.
Figure 105: Coding Unit type (CU) tooltip for HEVC streams
MTS4EAV7 HEVC / AVC Video and Compressed Audio Analyzer Tutorials 87
Page 94

Tutorial 12: HEVC analysis
10. Click the Partition type (PU) tooltip to view the Partition types as shown
below.
This tooltip allows you to visually see the partition types (PU types) used
while encoding the frame. The data in each of the PUs is partially visible and
the chroma component is modified to indicate the PU Type.
The colors used are displayed in the PU key tooltip. The PUs that are
displayed grey implies that they are skipped (Skip flag-true; this can be
checked in
the Coding Unit tooltip).
The grid lines shown below are displayed only when the video is either in
pause or s
top mode. In all other modes, only the PU overlay c olors are
displayed.
Figure 106: Partition type (PU) tooltip for HEVC streams
88 MTS4EAV7 HEVC / AVC Video and Compressed Audio Analyzer Tutorials
Page 95

Tutorial 12: HEVC analysis
11. Click the Luma Transform Unit (TU) tooltip toviewtheLumaTU
types as shown below.
Unlike the other HEVC tooltips, where the types are primarily based on the
type of encoding (inter/intra etc), the Luma TU tooltip provides a picture of
TU types based on their sizes (4x4, 8x8, etc).
The colors used are displayed onscreen in the TU types color key tooltip. TUs
that are displayed grey imply that they are skipped (Skip flag-true; this can be
checked in
the Coding Unit tooltip).
The grid lines shown below are displayed only when the video is either in
pause or s
top mode. In all other modes, only the TU overlay colors are
displayed.
Figure 107: Luma Transform Unit (TU) tooltip for HEVC streams
MTS4EAV7 HEVC / AVC Video and Compressed Audio Analyzer Tutorials 89
Page 96

Tutorial 12: HEVC analysis
12. Click the Chroma Transform Unit (TU) tooltip to view the Chroma
TU types as shown below.
Unlike the other HEVC tooltips, where the types are primarily based on the
type of encoding (inter/intra etc), the Chroma TU overlay gives a picture of
TU types based on their sizes (4x4, 8x8, etc).
The colors used are displayed onscreen in the TU types color key tooltip. TUs
that are displayed grey imply that they are skipped (Skip flag-true; this can be
checked in the Coding Unit tooltip).
The grid lines shown below are displayed only when the video is either in
pause or stop mode. In all other modes, only the TU overlay colors are
displaye
d.
In the case of a Chroma TU, a 8x8 CU can be colored yellow completely
marking
4x4 (as per color key tooltip). This implies that only a 4x4 region of
the 8x8 CU has been transform coded (4:2:0 subsampling).
Figure 108: Chroma Transform Unit (TU) tooltip for HEVC streams
90 MTS4EAV7 HEVC / AVC Video and Compressed Audio Analyzer Tutorials
Page 97

Tutorial 12: HEVC analysis
13. Click the Slice tooltip to view the slice partitions in the frame as shown
below.
In cases where the frame has a single slice, the Slice tooltip does not show
any slice boundaries. The number of slices in the frame can be found from the
“Number of slices” field in the Video-frame summary tooltip.
Slice grids are available even while the video is being played (unlike the CU,
PU, and TU tooltips).
Figure 109: Slice partitions tooltip for HEVC streams
MTS4EAV7 HEVC / AVC Video and Compressed Audio Analyzer Tutorials 91
Page 98

Tutorial 12: HEVC analysis
14. Click the Tile tooltip to view the tile partitions in the frame as shown
below.
In cases where the frame has just a single tile, the selection of the Tile tooltip
does not put up any tile boundary. The number of tiles in the frame can be
found from the “Number of tiles” field in the Video-frame summary tooltip.
Tile grids are available even while the video is being played (unlike the CU,
PU, and TU tooltips).
Figure 110: Tile partitions tooltip for HEVC streams
92 MTS4EAV7 HEVC / AVC Video and Compressed Audio Analyzer Tutorials
Page 99

Tutorial 12: HEVC analysis
15. Click the CU Size Distribution Graph tooltip to view the Coding Unit
Size Distribu
tion graph for the stream you are analyzing. The graph shows
the total count of the different sizes of Coding Units chosen by the encoder on
a frame-by-frame basis. The key on the right side shows the color code for
each of the different CU size types.
16. At this point in the tutorial, you are viewing only the first frame in the Video
View. Therefore the graph initially shows only the CU sizes for the first
frame. Click the Pause the stream or step forward on frame button
a
couple of times to advance the HEVC analysis frame by frame. As shown
below, the graph fills in data for each frame as you advance the video.
Figure 111: CU Size Distribution Graph tooltip for HEVC streams
17. Close the CU Size Distribution Graph window.
MTS4EAV7 HEVC / AVC Video and Compressed Audio Analyzer Tutorials 93
Page 100

Tutorial 12: HEVC analysis
18. On the left side
of the display, you can use the drop-down list to select the
type of view shown in the Video View: Decoded, Predicted, or Residual.
19. Select Resi
dual from the drop-down list to display the residual video
information in the Video View.
e 112: Residual display in the Video View
Figur
20. Sele
ct Decoded from the drop-down list to return the Video View to the
decoded video information display.
94 MTS4EAV7 HEVC / AVC Video and Compressed Audio Analyzer Tutorials
 Loading...