


x
MTM400A
DTV Monitor
ZZZ
Quick Start User Manual
*P071249205*
071-2492-05


xx
MTM400A
DTV Monitor
ZZZ
Quick Start User Manual
This document supports firmware version 4.5 and above.
www.tektronix.com
071-2492-05

Copyright © Tektronix. All rights reserved. Licensed software products are owned by Tektronix or its subsidiaries or suppliers, and are
protected by na
tional copyright laws and international treaty provisions.
Tektronix pro
previously published material. Specifications and price change privileges reserved.
TEKTRONIX and TEK are registered trademarks of Tektronix, Inc.
FlexVuPlus and VQNet are a registered trademarks of Tektronix, Inc.
ducts are covered by U.S. and foreign patents, issued and pending. Information in this publication supersedes that in all
Contacting Tektronix
Tektronix, Inc.
14200 SW Karl Braun Drive
P.O. Box 500
Beaverton, OR 97077
USA
For product information, sales, service, and technical support:
In North America, call 1-800-833-9200.
Worldwide, visit www.tektronix.com to find contacts in your area.

This warranty is for the hardware.
Warranty
Tektronix warrants that this product will be free from defects in materials and workmanship for a period of one (1) year from the date of
shipment. If a
product without charge for parts and labor, or will provide a replacement in exchange for the defective product. Parts, modules and
replacement products used by Tektronix for warranty work may be new or reconditioned to like new performance. All replaced
parts, modul
ny such product proves defective during this warranty period, Tektronix, at its option, either will repair the defective
es and products become the property of Tektronix.
In order to ob
and make suitable arrangements for the performance of service. Customer shall be responsible for packaging and shipping the
defective product to the service center designated by Tektronix, with shipping charges prepaid. Tektronix shall pay for the return of the
product to C
be responsible for paying all shipping charges, duties, taxes, and any other charges for products returned to any other locations.
This warranty shall not apply to any defect, failure or damage caused by improper use or improper or inadequate maintenance and
care. Tektronix shall not be obligated to furnish service under this warranty a) to repair damage resulting from attempts by personnel
other than
connection to incompatible equipment; c) to repair any damage or malfunction caused by the use of non-Tektronix supplies; or
d) to service a product that has been modified or integrated with other products when the effect of such modification or integration
increase
THIS WARR
EXPRESS OR IMPLIED. TEKTRONIX AND ITS VENDORS DISCLAIM ANY IMPLIED WARRANTIES OF MERCHANTABILITY OR
FITNESS FOR A PARTICULAR PURPOSE. TEKTRONIX’ RESPONSIBILITY TO REPAIR OR REPLACE DEFECTIVE PRODUCTS
IS THE SO
AND ITS VENDORS WILL NOT BE LIABLE FOR ANY INDIRECT, SPECIAL, INCIDENTAL, OR CONSEQUENTIAL DAMAGES
IRRESPECTIVE OF WHETHER TEKTRONIX OR THE VENDOR HAS ADVANCE NOTICE OF THE POSSIBILITY OF SUCH
DAMAGES
[W2 – 15
tain service under this warranty, Customer must notify Tektronix of the defect before the expiration of the warranty period
ustomer if the shipment is to a location within the country in which the Tektronix service center is located. Customer shall
Tektronix representatives to install, repair or service the product; b) to repair damage resulting from improper use or
s the time or difficulty of servicing the product.
ANTY IS GIVEN BY TEKTRONIX WITH RESPECT TO THE PRODUCT IN LIEU OF ANY OTHER WARRANTIES,
LE AND EXCLUSIVE REMEDY PROVIDED TO THE CUSTOMER FOR BREACH OF THIS WARRANTY. TEKTRONIX
.
AUG04]

This warranty is for the software media.
Warranty
Tektronix warrants that the media on which this software product is furnished and the encoding of the programs on the media will be
free from defe
encoding proves defective during the warranty period, Tektronix will provide a replacement in exchange for the defective medium.
Except as to the media on which this software product is furnished, this software product is provided “as is” without warranty of any
kind, either
requirements or that the operation of the programs will be uninterrupted or error-free.
In order to obtain service under this warranty, Customer must notify Tektronix of the defect before the expiration of the warranty
period. If Tektronix is unable to provide a replacement that is free from defects in materials and workmanship within a reasonable
time therea
materials for credit or refund.
THIS WARRANTY IS GIVEN BY TEKTRONIX WITH RESPECT TO THE PRODUCT IN LIEU OF ANY OTHER WARRANTIES,
EXPRESS OR IMPLIED. TEKTRONIX AND ITS VENDORS DISCLAIM ANY IMPLIED WARRANTIES OF MERCHANTABILITY OR
FITNESS FO
CUSTOMER’S PAYMENT IS THE SOLE AND EXCLUSIVE REMEDY PROVIDED TO THE CUSTOMER FOR BREACH OF
THIS WARRANTY. TEKTRONIX AND ITS VENDORS WILL NOT BE LIABLE FOR ANY INDIRECT, SPECIAL, INCIDENTAL, OR
CONSEQUE
POSSIBILITY OF SUCH DAMAGES.
[W9b – 15AUG04]
cts in materials and workmanship for a period of three (3) months from the date of shipment. If any such medium or
express or implied. Tektronix does not warrant that the functi ons contained in this software product will meet Customer ’s
fter, Customer may terminate the license for this software product and return this software product and any associated
R A PARTICULAR PURPOSE. TEKTRONIX’ RESPONSIBILITY TO REPLACE DEFECTIVE MEDIA OR REFUND
NTIAL DAMAGES IRRESPECTIVE OF WHETHER TEKTRONIX OR THE VENDOR HAS ADVANCE NOTICE OF THE

IMPORTANT
READ BEFORE OPERATING EQUIPMENT
This software is provided under license from Tektronix, Inc. Retention of this program for more than thirty (30) days or use of the
program in any
manner constitutes acceptance of the license terms.
CAREFULLY READ THE ENCLOSED SOFTWARE LICENSE AGREEMENT. If you cannot agree to the license terms,
promptly contact the nearest Tektronix Field Office for return assistance.
TEKTRONIX SOFTWARE LICENSE AGREEMENT
THE PROGRAM, OR PROGRAMS, ENCODED OR INCORPORATED WITHIN EQUIPMENT, IS FURNISHED SUBJECT TO
THE TERMS AND CONDITIONS OF THIS AGREEMENT. RETENTION OF THE PROGRAM FOR MORE THAN THIRTY DAYS
OR USE OF TH
THESE TERMS ARE NOT ACCEPTABLE, THE UNUSED PROGRAM AND ANY ACCOMPANYING DOCUMENTATION SHOULD
BE RETURNE D PROMPTLY TO TEKTRON IX FOR A FULL REFUND OF THE LICENSE FEE PAID. (FOR INFORMATION
REGARDING
TEKTRONIX SALES OFFICE.)
DEFINITIONS. "Tektronix" means Tektronix, Inc., an Oregon corporation, or local Tektronix’ legal entity that is supplying the
equipment.
"Program" means the Tektronix software product (executable program and/or data) enclosed with this Agreement or included within the
equipment with which this Agreement is packed.
E PROGRAM IN ANY MANNER WILL BE CONSIDERED ACCEPTANCE OF THE AGREEMENT TERMS. IF
THE RETURN OF PROGRAMS ENCODED OR INCORPORATED WITHIN EQUIPMENT, CONTACT THE NEAREST
"Customer" means the person or organization in whose name the Program was ordered.
E.
LICENS
1. Use the
2. If the P
the user is authorized, and the total number of users at any one time does not exceed the total number of licensed concurrent users;
3. Modify the Program or merge it with another for use on the single machine; and
4. Copy the Program for archival or backup purposes, provided that no more than one (1) such copy is permitted to exist at any one
time. If the Program is provided in connection with a floating-user license, the Program may be copied onto multiple machines
for u
Each
in or on the copy of the Program as received from Tektronix.
Customer may not:
1. Use the Program on more than one machine at any one time, unless covered by a floating-user license or separate site license;
2. Transfer the Program to any person or organization outside of Customer or the corporation of which Customer is a part without
the prior written consent of Tektronix, except in connection with the transfer of the equipment within which the programs are
enc
3. Ex
which such export or reexport is restricted by law or regulation of the United States or any foreign government having jurisdiction
without the prior authorization, if required, of the Office of E xport Administration, Department of Commerce, Washington, D.C.
an
Customer may:
Program on a single machine at any one time;
rogram is provided in connection with a floating-user license, the Program may be used on multiple machines provided that
se by authorized users.
copy of the Program made by Customer must include a reproduction of any copyright notice or restrictive rights legend appearing
oded or incorporated;
port or reexport, directly or indirectly, the program, any associated documentation, or the direct product thereof, to any country to
d the corresponding agency of such foreign government;

4. For object-code Programs only, reverse compile or disassemble the Program for any purpose; or
5. Copy the documentation accompanying the Program.
For Programs designed to reside on a single-machine and support one or more additional machines, either locally or remotely, without
permitting th
within the definition of "single machine". For programs permitting the Program to be transferred to an additional machine for local
execution, a separate license shall be required for each such machine with which the Program may be used, or each concurrent user
authorized u
e Program to be transferred to an additional machine for local execution, the additional machines shall be considered
nder a floating-user license.
TitletotheP
Tektronix or others for whom Tektronix has obtained a respective licensing right.
Customer shall pay when due all property taxes that may now or hereafter be imposed, levied or assessed with respect to the
possession or use of the Program or this license and shall file all reports required in connection with such taxes.
Any portion of the Program modified by Customer or merged with another program shall remain subject to these terms and conditions.
If the Program is acquired by or for an agency of the U.S. Government, the Program shall be considered computer software developed
at private
documentation as de fined in the applicable acquisition regulation.
THE PROGRAM MAY NOT BE USED, COPIED, MODIFIED, MERGED, OR TRANSFERRED TO ANOTHER EXCEPT AS
EXPRESSLY PERMITTED BY THESE TERMS AND CONDITIONS.
UPON TRANSFER OF ANY COPY, MODIFICATION, OR MERGED PORTION OF THE PROGRAM, THE LICENSE GRANTED
HEREIN IS
rogram and all copies thereof, but not the media on which the Program or copies may reside, shall be and remain with
expense and the license granted herein shall be interpreted as granting Customer restricted rights in the Program and related
AUTOMATICALLY TERMINATED.
TERM. The license granted herein is effective upon acceptance by Customer, and shall remain in effect until terminated as provided
herein. The license may be terminated by Customer at any time upon written notice to Tektronix. The l icense may be terminated
by Tektronix or any third party from whom Tektronix may have obtained a respective licensing right if Customer fails to comply with
any term or condition and such failure is not remedied within thirty (30) days after notice hereof from Tektronix or such third party.
Upon termination by either party, Customer shall return to Tektronix or destroy, the Program and all associated documentation,
together with all copies in any form.
LIMITED WARRANTY. Tektronix warrants that the media on which the Program is furnished and the encoding of the Program
media will be free from defects in materials and workmanship for a period of three (3) months from the date of shipment. If
on the
any such medium or encoding proves defective during the warranty period, Tektronix will provide a replacement in exchange for the
defective medium. Except as to the media on which the Program is furnished, the Program is provided "as is" without warranty of
nd, either express or implied. Tektronix does not warrant that the functions contained in the Program will meet Customer’s
any ki
requirements or that the operation of the Program will be uninterrupted or error-free.
In order to obtain service under this warranty, Customer must notify Tektronix of the defect before the expiration of the warranty period. If
Tektronix is unable to p rovide a replacement that is free from defects in materials and workmanship within a reasonable time thereafter,
omer may terminate the license for the Program and return the Program and any associated materials for credit or refund.
Cust
WARRANTY IS GIVEN BY TEKTRONIX WITH RESPECT TO THE PROGRAM IN LIEU OF A NY OTHER WARRANTIES,
THIS
EXPRESS OR IMPLIED. TEKTRONIX AND ITS VENDORS DISCLAIM ANY IMPLIED WARRANTIES OF MERCHANTABILITY OR
FITNESS FOR A PARTICULAR PURPOSE. TEKTRO NIX ’ RESPONSIBILITY TO REPLACE DEFECTIVE MEDIA, OR R EFUND
TOMER’S PAYMENT IS THE SOLE AND EXCLUS IVE REMEDY PROVIDE D TO THE CUSTOMER FOR BREACH OF THIS
CUS
WARRANTY.
LIMITATION OF LIABILITY, IN NO EVENT SHALL TEKTRONIX OR OTHERS FROM WHOM TEKTRONIX HAS OBTAINED A
LICENSING RIGHT BE LIABLE FOR ANY INDIRECT, SPECIAL, INCIDENTAL, OR CONSEQUENTIAL DAMAGES ARISING OUT
OR CONNECTED WITH CUSTOMER’S POSSESSION OR USE OF THE PROGRAM, EVEN IF TEKTRONIX OR SUCH
OF
OTHERS HAS ADVANCE NOTICE OF THE POSSIBILITY OF SUCH DAMAGES.

THIRD-PARTY DISCLAIMER. Except as expressly agreed otherwise, third parties from whom Tektronix may have obtained a
licensing righ
support or information relating thereto.
t do not warrant the program, do not assume any liability with respect to its use, and do not undertake to furnish any
GENERAL. This Agreement contains the entire agreement between the parties with respect to the use, reproduction, and transfer of
the Program.
Neither this Agreement nor the license granted herein is assignable or transferable by Customer without the prior written consent
of Tektronix.
This Agreement and the license granted herein shall be governed by the laws of the state of Oregon.
All questions regarding this Agreement or the l icense granted herein should be directed to the nearest Tektronix Sales Office.
ADDITIONAL
video test sequences and video clips (together “Video Test Sequences”). If so, the following terms describe Your rights to the
Video Test S equences:
You may use, copy and modify the Video Test Sequences and display or distribute copies of individual Video Test Sequences in
connectio
You are no
1. You may no
the Video Test Sequences, without prior written permission from Tektronix.
2. You may not permit third parties to distribute copies of the Video Test Sequences.
3. You may not sell, license or distribute copies of the Video Test Sequences on a standalone basis or as part of any collection,
product, or service where the primary value of the product or service is the Video Test Sequences.
You must indemnify, hold harmless, and defend Tektronix from and against any claims or lawsuits, including attorneys’ fees, that arise
from or
You mus
LICENSE GRANT FOR V IDEO TEST SEQUENCES.
n with Your video testing activity.
t licensed to do any of the following:
t distribute the collection of Video Test Sequences, except in connection with the sale of original equipment containing
result from the use or distribution of Video Test Sequences as modified by You.
t include a valid copyright notice o n Your products and services that include copies of the Video Test Sequences.
The Software Product may include certain test patterns,


Table of Contents
General Safety Summary . . .. . .. . .. . .. . ... . .. . .. . .. . .. . .. . ... ... . .. . .. . .. . .. . .. . ... ... . .. . .. . .. . .. . .. . ... . .. . .. . .. . .. . .. . ... ... . .. . .. . iii
Compliance Information ............................................................................................................... v
EMC Compliance................................................................................................................. v
Safety Compliance.............................................................................................................. vii
Environmental Considerations................................................................................................... ix
Preface................................................................................................................................. x
Documentation ...................................................................................................................xi
Related Products. . .. . .. . .. . .. . ... ... . .. . .. . .. . .. . .. . .. . . .. . .. . .. . .. . .. . .. . ... ... . .. . .. . .. . .. . .. . .. . ... ... . .. . .. . .. . .. . .. . .. . . .. . xii
Firmware Upgrades . . .. . ... ... . .. . .. . .. . .. . . .. . .. . .. . .. . ... ... . .. . .. . .. . .. . ... . .. . .. . .. . .. . ... . .. . .. . .. . ... ... . .. . .. . .. . .. . ... . xiii
Manual Conventions .. . .. . .. . .. . .. . ... ... . .. . .. . .. . .. . .. . ... ... . .. . .. . .. . .. . .. . . .. . .. . .. . .. . .. . ... ... . .. . .. . .. . .. . .. . ... ... . .. . xiii
Installation.............................................................................................................................. 1
Before Installation ................................................................................................................ 1
Operating Considerations........................................................................................................ 2
Hardware Installation ............................................................................................................3
Connecting to the Instrument ... . .. . .. . .. . .. . ... ... . .. . .. . .. . .. . .. . ... . .. . .. . .. . .. . ... ... . .. . .. . .. . .. . .. . ... ... . .. . .. . .. . .. . .. . . 10
Powering the Instrument On and Off ........................................................................................... 13
Network Installation .............................................................................................................13
Setting Up the Network ......................................................................................................... 17
RUI Platform Requirements . . .. . ... ... . .. . .. . .. . .. . .. . ... . .. . .. . .. . .. . ... ... . .. . .. . .. . .. . .. . ... ... . .. . .. . .. . .. . .. . . .. . .. . .. . .. . 18
Installing Japanese Font Extensions on your PC . .. . ... ... . .. . .. . .. . . .. . .. . .. . ... ... . .. . .. . .. . ... ... . .. . .. . .. . . .. . .. . .. . ... ... 19
Video Thumbnail Support .. . ... . .. . .. . ... ... . .. . .. . ... . .. . .. . .. . . .. . .. . .. . ... . .. . .. . ... ... . .. . .. . ... . .. . .. . ... . .. . .. . .. . ... . .. . . 21
Licensing ........................................................................................................................ 22
Operation.............................................................................................................................. 25
Getting Acquainted with Your Instrument .. . .. . ... ... . .. . .. . .. . .. . .. . ... . .. . .. . .. . .. . .. . ... ... . .. . .. . .. . .. . .. . ... ... . .. . .. . .. . . 25
RUI Displays.....................................................................................................................28
VQS1000 Video Quality Software Configuration .............................................................................. 32
Procedures............................................................................................................................ 33
Starting the RUI ................................................................................................................. 33
Setting Up the FlexVuPlus™ Display .......................................................................................... 36
Saving and Using Configuration Files.......................................................................................... 41
uring a Recording.......................................................................................................... 45
Capt
Applications ........................................................................................................................... 50
Configuring an RF Interface Card .............................................................................................. 51
Monitoring RF Stream Quality .................................................................................................. 55
Configuring an IP Video Interface Card ........................................................................................ 58
Monitoring IP Session Bit Rates................................................................................................ 61
RF Off-Air Performance Monitoring ............................................................................................ 64
Product Options and Upgrades . . . .. . .. . .. . .. . ... ... . .. . .. . .. . ... ... . .. . .. . .. . ... . .. . .. . .. . ... ... . .. . .. . .. . ... ... . .. . .. . .. . ... . .. . .. . 70
Options .......................................................................................................................... 70
Field Upgrade Kits .............................................................................................................. 72
Upgrading the Firmware Version ............................................................................................... 73
Index
Table of Content
s
MTM400A DTV Monitor Quick Start User Manual i

Table of Content
s
ii MTM400A DTV Monitor Quick Start User Manual

General Safety S
ummary
General Safet
Review the following safety precautions to avoid injury and prevent damage to this product or any products connected to it.
To avoid potential hazards, use this product only as specified.
Only qualified personnel should perform service procedures.
To Avoid Fire or Personal Injury
Use proper power cord. Use only the power cord specified for this product and certified for the country of use.
Ground the product. This product is grounded through the grounding conductor of the power cord. To avoid electric
shock, the grounding conductor must be connected to earth ground. Before making connections to the input or output
terminals
Observe al
product manual for further ratings information before making connections to the product.
The inputs are not rated for connection to mains or Category II, III, or IV circuits.
Power disconnect. The power cord disconnects the product from the power source. Do not block the power cord; it
must remain accessible to the user at all times.
Do not operate without covers. Do not operate this product with covers or panels removed.
Do not operate with suspected failures. If you suspect that there is damage to this product, have it inspected by
qualifie
of the product, ensure that the product is properly grounded.
lterminalratings.
d service personnel.
y Summary
To avoid fire or shock hazard, observe all ratings and markings on the product. Consult the
Avoid e
Use pro
xposed circuitry.
per fuse.
Use only the fuse type and rating specified for this product.
Do not touch exposed connections and components when power is present.
Do not operate in wet/damp conditions.
Do not operate in an explosive atmosphere.
Keep product surfaces clean and dry.
ide proper ventilation.
Prov
proper ventilation.
Refer to the manual’s installation instructions for details on installing the product so it has
MTM400A DTV Monitor Quick Start User Manual iii
General Safety S
Terms in This Manual
These terms may appear in this manual:
WARNING. Warning s tatements identify conditions or practices that could result in injury or loss of life.
CAUTION. Caution statements identify conditions or practices that could result in damage to this product or other property.
Symbols and Terms on the Product
These terms may appear on the product:
DANGER indicates an injury hazard immediately accessible as you read the marking.
WARNING indicates an injury hazard not immediately accessible as you read the m arking.
CAUTION indicates a hazard to property including the product.
The following symbol(s) may appear on the product:
ummary
iv MTM400A DTV Monitor Quick Start User Manual

Compliance Info
rmation
Compliance In
This section lists the EMC (electromagnetic compliance), safety, and environmental standards with which the instrument
complies.
EMC Compliance
EC Declarati
Meets intent of Directive 2004/108/EC for Electromagnetic Compatibility. Compliance was demonstrated to the following
specifications as listed in the Official Journal of the European Communities:
EN 55103:1996. Product family standard for audio, video, audio-visual and entertainment lighting control apparatus for
professio
Environme
Part 1 Emi
Part 2 Im
on of Conformity – EMC
nal use.
EN 55022:
EN 55103-
12
nt E4 – controlled EMC environment
ssion
1987 Class A radiated and conducted emissions
1:1996 Annex A. Radiated magnetic field emissions
munity
formation
IEC 6100
IEC 6100
IEC 610
IEC 610
IEC 610
IEC 61
EN 551
EN 551
0-4-2:2001. Electrostatic discharge immunity
0-4-3:2006. RF electromagnetic field immunity
00-4-4:2004. Electrical fast transient / burst immunity
00-4-5:2005. Power line surge i mmunity
00-4-6:2003. Conducted RF Immunity
000-4-11:2004. Voltage dips and interruptions immunity
03-2:1996 Annex A. Radiated magnetic field immunity
03-2:1996 Annex B. Balanced ports common mode immunity
EN 61000-3-2:2006. AC power line harmonic emissions
EN 61
000-3-3:1995.
Voltage changes, fluctuations, and flicker
European Contact.
Tektronix UK, Ltd.
Western Peninsula
Western Road
Bracknell, RG12 1RF
United Kingdom
1
is product is intended for use in nonresidential areas only. Use in residential areas may cause electromagnetic interference.
Th
2
Inrush current not to exceed 7 A.
MTM400A DTV Monitor Quick Start User Manual v

Compliance Info
Australia / New Zealand Declaration of Conformity – EMC
EN 55022:1987. Radiated and conducted emissions, Class A, in accordance with EN 55103-1:1996.
CISPR 11:2003. Radiated and Conducted Emissions, Group 1, Class A, in accordance with EN 61326-1:2006.
rmation
vi MTM400A DTV Monitor Quick Start User Manual

Safety Compliance
EC Declaration of Conformity – Low Voltage
Compliance was demonstrated to the following specification as listed in the Official Journal of the European Communities:
Low Voltage Directive 2006/95/EC.
EN 61010-1: 2001. Safety requirements for electrical equipment for measurement control and laboratory use.
Compliance Info
rmation
U.S. Nation
UL 61010-1:2004, 2nd Edition. Standard for electrical measuring and test equipment.
ally Recognized Testing Laboratory Listing
Canadian Certification
CAN/CSAlaboratory use. Part 1.
C22.2 No. 61010-1:2004. Safety requirements for electrical equipment for measurement, control, and
Additional Compliances
IEC 61010-1: 2001. Safety requirements for electrical equipment for measurement, control, and laboratory use.
Equipment Type
Test and measuring equipment.
y Class
Safet
Class 1 – grounded product.
MTM400A DTV Monitor Quick Start User Manual vii

Compliance Info
Pollution Degree Desc ription
A measure of the contaminants that could occur in the environment around and within a product. Typically the internal
environment inside a product is considered to be the same as the external. Products should be used only in the environment
for which they are rated.
Pollution Degree 1. No pollution or only dry, nonconductive pollution occurs. Products in this category are generally
encapsulated, hermetically sealed, or located in clean rooms.
Pollution Degree 2. Normally only dry, nonconductive pollution occurs. Occasionally a temporary conductivity that is
caused by condensation must be expected. This location is a typical office/home environment. Temporary condensation
occurs only when the product is out of service.
Pollution Degree 3. Conductive pollution, or dry, nonconductive pollution that becomes conductive due to condensation.
These are sheltered locations where neither temperature nor humidity is controlled. The area is protected from direct
sunshine, rain, or direct wind.
Pollution Degree 4. Pollution that generates persistent conductivity through conductive dust, rain, or snow. Typical
outdoor locations.
Pollution Degree
Pollution Degree 2 (as defined in IEC 61010-1). Note: Rated for indoor use only.
rmation
viii MTM400A DTV Monitor Quick Start User Manual

Environmental Considerations
This section provides information about the environmental impact of the product.
Product End-of-Life Handling
Observe the following guidelines when recycling an instrument or component:
Equipment Recycling. Production of this equipment required the extraction and use of natural resources. The
equipment may contain substances that could be harmful to the environment or human health if improperly handled at the
product’s end of life. In order to avoid release of such substances into the environment and to reduce the use of natural
resources, we encourage you to recycle this product in an appropriate system that will ensure that most of the materials are
reused or recycled appropriately.
This symbol indicates that this product c omplies with the applicable European Union requirements according
to Directives 2002/96/EC and 2006/66/EC on waste electrical and electronic equipment (WEEE) and
batteries. For information about recycling options, check the Support/Service section of the Tektronix Web
site (www.tektronix.com).
Compliance Info
rmation
Perchlor
of California, CR lithium batteries are classified as perchlorate materials and require special handling. See
www.dtsc.ca.gov/hazardouswaste/perchlorate for additional information.
Restric
This product has been classified as Monitoring and Control equipment, and is outside the scope of the 2002/95/EC RoHS
Directive.
ate Materials.
tion of Hazardous Substances
This product contains one or more type CR lithium batteries. According to the state
MTM400A DTV Monitor Quick Start User Manual ix

Preface
Preface
This manual describes the MTM400A DTV (Digital Television) Monitor, firmware version 4.0, which provides a complete
solution for transmission monitoring of MPEG transport streams over RF, IP, and ASI interfaces. The MTM400A uses a
single transport stream processor platform packaged in a 1 RU rackmount chassis to provide monitoring of a transport
stream at data rates up to 155 Mbps.
The MTM400A monitor provides extended confidence monitoring, which, with the addition of software options, provides
comprehensive diagnostic monitoring capabilities. The extended confidence monitor provides key MPEG tests; this basic
level of functionality and low cost enables widespread deployment throughout a transmission network, facilitating rapid fault
isolation. The diagnostic monitoring options provide more in-depth analysis of the MPEG transport stream, including
recording capability, PSI/SI/PSIP/ARIB analysis, and unique user-defined template tests to ensure the right content in
the right place at the right time. Deployed at key network nodes, the MTM400A monitor enables the cause of faults to
be pinpointed and solved.
MTM400A Key F eatures
FlexVuPlus™ uniquely empowers operations staff with the simplest information necessary to prove that their service is
delivering above their defined thresholds for superior quality of service (QoS)
Powerful diagnostic user interface provides intelligent hierarchical views of network information, media, and data,
allowing
engineers to rapidly identify the root cause of underlying service problems
Unique d
visible to the viewer
Multilayer, multichannel, remote monitoring, and measurement at IP, RF, and transport layers for DVB (TR 101 290),
ATSC (including A78 and SCTE142 variants), DigiCipher® II (DCII), ISDB-T (terrestrial and mobile), and ISDB-TB
(Brazi
Compre
8PSK, and QPSK (L-band) interfaces. These RF Interfaces allow the MTM400A to receive RF inputs and display k ey
RF monitoring parameters, including MER, BER and constellation displays to provide an early indication of signal
degra
Uniqu
by eliminating alarms, which do not impact the customer, and focussing resources only on critical activities
Comprehensive user-defined template monitoring ensures the right content at the right place at the right time. Checking
content ratings ensures that only appropriate content is broadcast
Simultaneous connection of multiple remote users and network management systems (NMS) provides early visibility of
prob
Embe
minimizes cost of customer complaints and equipment maintenance (disk free operation)
Video and Audio backhaul for content checking and verification with remote recording allows capture and analysis of
stream events for expert offline analysis to diagnose difficult and intermittent problems, without requiring engineer
sit
ual-level alarm and seven-day trend information proactively identifies impending problems before they become
l) standards
hensive confidence monitoring at the RF modulated layer with optional COFDM, 8VSB, DVB-S2, Turbo
dation before any picture impairment is visible to the user w ithout additional costly RF test equipment
e learning capability creates a true “monitor by exception” mode of operation. This reduces operational expenditure
lems to key individuals throughout the organization to support quicker corrective action
dded architecture designed specifically for continuous 24×7 operation. This maximizes service assurance, and
evisits
hly scalable and field upgradeable monitoring solution to tailor capital expenditure with operational growth
Hig
x MTM400A DTV Monitor Quick Start User Manual

Standard Accessories
The standard accessories supplied with this product are listed. (See page 1, Standard Accessories.) Product options and
upgrades are also listed. (See page 70, Product Options and Upgrades.)
Applications
Preface
Contributio
Terre s t ria
Cable heade
DTH or netwo
IPTV
Edge netwo
ASI to RF
IP to RF (r
IP to ASI
Documentation
The following table lists the product documentation for the MTM400A DTV monitor and shows the location(s) where you can
find the documents: printed manual, p roduct documentation CD-ROM, or the Tektronix Web site.
Table i: MTM400A product documentation
Item (Tektronix part number) Purpose Location
MTM400A DTV Monitor Quick Start
User Manual (071-2492-XX English,
071-2493-XX Japanese, 071-2632-XX
German)
MTM400A, IPM400A, QAM400A,
and RFM300 Technical Reference
(077-0175-XX)
n and primary distribution
l distribution
nd monitoring
rk operator satellite uplink monitoring
rk monitoring
equires two MTM400A Units)
Provides installation and high-level
operational overviews (this manual)
Provides in-depth operating
information
MTM400A, IPM400A, QAM400A,
and RFM300 Specifications and
Performance Verification Technical
Reference (077-0176-XX)
MTM400A, IPM400A, QAM400A,
and RFM300 Read This First
(071-2654-XX)
MTM400A, IPM400A, QAM400A,
and RFM300 Test Parameter
and Configuration File Technical
Reference (077-0177-XX)
MTM400A DTV Monitor Quick Start User Manual xi
Provides complete product
specifications and a procedure
for verifying the operation of the
instrument
Describes late breaking product
information and operational issues
Provides information about using test
parameters and configuration files
Preface
Table i: MTM400A product documentation (cont.)
Item (Tektronix part number) Purpose Location
MTM400A, IPM400A, QAM400A,
and RFM300 Programmer Manual
(077-0178-XX)
MTM400A, IPM400A, QAM400A, and
RFM300 Declassification and Security
Instructions (077-0179-XX)
MTM4UP Upgrade Instructions
(075-0973-XX)
Provides information about remote
command syntax
Provides instructions for removing
your proprietary information from the
instrument
Provides instructions for installing
software and hardware upgrades
MTM400 and MTM400A RUI v3.x
Upgrade Technical Reference
74-XX)
(077-01
WebMSM Web Monitoring System
Manager User Manual (077-0116-XX)
Related Products
IPM400A DTV Monitor
The IPM400A DTV Monitor is a powerful solution for remote monitoring of IP video national and regional headends. The
IPM400A simultaneously veri fies both IP and TS integrity on all IP Video flows (sessions) on a GbE link. It is ideal for
monitoring networks which carry both Multi-Program Transport Streams (MPTS) or Single-Program Transport Streams
(SPTS), at either constant bit rate (CBR) or variable bit rate (VBR). An in-depth, real-time MPEG analysis option allows
diagnostics to be performed on live payload without having to use deferred-time analysis of captured streams.
Refer to the IPM400A DTV Monitor Quick Start User Manual, Tektronix part number 071-2698-XX.
RFM300 DTV Monitor
The RFM3
comprehensive 8VSB RF and PSIP confidence-monitoring capabilities provide a powerful and cost-effective solution for
monitoring DTV transmitter sites, including contribution and distribution feeds at local and national operation centers for FCC
compli
having to use deferred-time analysis of captured streams.
00 DTV Monitor provides a complete solution for remote real-time DTV monitoring of ATSC signals. The
ance. An in-depth, real-time MPEG analysis option allows diagnostics to be performed on live ATSC signals without
Describes the RUI changes introduced
with the MTM400A monitor and
s instructions for changing the
provide
RUI version
Provides instructions for using the
WebMSM software to monitor multiple
DTV mon
itors
Refer to the RFM300 DTV Monitor Quick Start User Manual, Tektronix part number 071-2700-XX.
QAM400A DTV Monitor
The QAM400A DTV Monitor provides a complete solution for remote real-time monitoring of cable broadcast signals. The
comprehensive QAM RF and SI/PSI and PSIP confidence-monitoring capabilities provide a powerful and cost-effective
solution for monitoring HFC (hybrid fibre-coaxial) cable headends. An in-depth, real-time MPEG analysis option allows
diagnostics to be performed on live ATSC signals without having to use deferred-time analysis of captured streams.
Refer to the QAM400A DTV Monitor Quick S tart User Manual, Tektronix part number 071-2784-XX.
xii MTM400A DTV Monitor Quick Start User Manual

Preface
VQNet™ Element Management System
VQNet is a Tektronix Video Monitoring EMS that supports all Tektronix IP Video and DTV Monitor probe types to alert,
locate and diagnose video network problems. It is a software product which will run on a server (not Tektronix supplied) to
aggregate and report on the status of broadcast signals m easured by up to 500 distributed probes across a video distribution
network, providing alarms, logs, trending and reporting of key performance metrics.
For further information, refer to the VQNet Quick Start User Manual, Tektronix part number 071-2699-XX.
VQS1000 Video Quality Software
VQS1000 is a Video Quality Software application for single ended objective QoE analysis of video content. It is designed
for use with
standalone for file analysis. Combined with physical transport alarms from the Tektronix probes, operators can determine if
the source of a problem is in the content (for example, over-compression) or in network distribution layers.
Refer to the VQS1000 Video Quality Software Quick Start User Manual, Tektronix part number 077-0489-XX.
all current Tektronix IP Video and DTV Monitor probes using private backhaul video and can also be used
Product D
You can fi nd a complete list of product related user documentation in the DTV Monitor Technical Reference, Tektronix
part number 077-0175-XX.
ocumentation
Firmware Upgrades
Updates to the M TM400A monitor fi rmware are r eleased to the Tektronix Web site when software problems are fixed or when
new product features are introduced. (See page 73, Upgrading the Firmware Version.)
To check for firmware upgrades, go to the Tektronix Web site (www.tektronix.com/products/video_test/mtm400_support.html).
If you have an MTM400 monitor with firmware version 2.6.1 or earlier, you must upgrade the instrument with MTM400A
re version 3.0 before upgrading to higher numbered versi ons. Instructions are included in the MTM4UP Upgrade
firmwa
instructions.
The Sun Java RTE (run time environment) Version 1.6.0_18 or later must be installed on your PC for the MTM400A monitor
RUI v3.1 to operate successfully. If Java is not present on the PC, an opportunity to download it is offered when the
s first opened.
RUI i
Manual Conventions
The term "RUI" will appear throughout the MTM400A monitor product documentation. The controls of the DTV monitor are
accessed using a PC connected to the same network as the instrument. Since the instrument does not have a front-panel
display device, the DTV monitor display shown on the PC is referred to as the Remote User Interface (RUI).
MTM400A DTV Monitor Quick Start User Manual xiii

Preface
xiv MTM400A DTV Monitor Quick Start User Manual

Installation
This section includes instructions for installing the DTV monitors, connecting signal cables to the instruments, powering the
instruments on and off, connecting the instruments to a network, and applying the Option Key.
Some of the installation instructions require you to use the DTV monitor RUI. If you are unfamiliar with the RUI, refer to the
following sections in this manual before installing the instrument:
Getting Acquainted with Your Instrument (See page 25.)
Starting the RUI (See page 33.)
Before Installation
Unpack the instrument and check that you have r eceived all of the standard accessories. (See page 1, Standard
Accessories.) If you ordered software or hardware options with your instrument, any accessories shipped with those options
are listed at the end of this manual. (See page 70, Product Options and Upgrades.) Check the DTV monitor pages of th
Tektronix Web site (www.tektronix.com) for the most current product accessory information.
Standard Accessories
Installation
e
The following table l ists the standard accessories that are shipped with the DTV monitor.
Table 1: MTM400A standard accessories
Tek t ronix part
Accessory
External grounding kit 020-2852-XX
Tektronix authorization key certificate
MTM400A, IPM400A, QAM400A, and RFM300 DTV Monitor Product Documentation CD-ROM
MTM400A, IPM400A, QAM400A, and RFM300 DTV Monitor Application Firmware CD-ROM
MTM400A DTV Monitor E nglish Quick Start User Manual (Option L0 only)
MTM400A DTV Monitor Japanese Quick Start User Manual (Option L5 only)
MTM400A DTV Monitor German Quick Start User Manual (Option L3 only)
Rackmount slide assembly 351-0751-XX
number
063-3158-XX
063-4135-XX
063-4136-XX
071-2492-XX
071-2493-XX
071-2632-XX
Power cords. DTV monitors are shipped with one of the following power cord options. Power cords for use in North
America are UL listed and CSA certified. Cords for use in areas other than North America are approved by at least one
authority acceptable in the country to which the product is shipped.
Opt. A0 - North America
Opt. A1 - Universal EURO
Opt. A2 - United Kingdom
Opt. A3 - Australia
Opt. A4 - 240 V, North America
Opt. A5 - Switzerland
MTM400A DTV Monitor Quick Start User Manual 1

Installation
Opt. A6 - Japan
Opt. A10 - China
Opt A11 - India
Opt. A99 - No power cord or AC adapter
Options
Licensed software options and hardware upgrades are available for the DTV monitors. (See page 70, Product Options
and Upgrades.)
Operating Considerations
The following table lists the electrical operating requirements for the DTV monitors. The complete electrical operating
requirements of the DTV monitors are listed in the MTM400A, IPM400A, QAM400A, and RFM300 DTV Monitor Specifications
and Perfor
Table 2: Electrical operating requirements
mance Verification Technical Reference.
Requirem
Temperature, operating
Altitude, operating
Source
Power
Peak inrush current
Fuse rating
Overvoltage category II (as defined in IEC61010-1)
Pol
ent
voltage
consumption (maximum)
lution degree
Specifica
+5 °C to +
0 m to 300
100 VAC
1A
7.2 A p
Main
qualified service personnel
2 (as defined in IEC61010-1) Rated for indoor use only
tion
40 °C
0 m (9800 ft)
to 240 VAC, 50 Hz/60 Hz
eak at 240 VAC, 50 Hz
s fuse i s 3.15 A, 250 V, Fast; Not operator replaceable. Refer servicing to
2 MTM400A DTV Monitor Quick Start User Manual
Hardware Installation
This section provides instructions for installing a DTV monitor in an equipment rack and installing an SFP module on the
optional Gigabit Ethernet interface card. The instructions for installing an optional interface card in the MTM400A are located
in the MTM400A, IP M400A , QAM400A, and RFM300 DTV Monitor Technical Reference.
Central Office Installation
CAUTION. The intra-building interfaces of this platform, including the Gigabit Ethernet interface, are suitable for connection
to intra-building or unexposed wiring or cabling only with shielded and grounded cables at both ends. The intra-building ports
or the equipment must not be metallically connected to interfaces that connect to the outside plant or its wiring.
A grounding and bonding strap for use in Central Office RBOC applications is supplied as a standard accessory with each
DTV monitor. The instructions for installing the grounding strap are included in the rack mounting instructions.
Rack Mounting the DTV Monitor
CAUTION. To avoid fire hazard, the monitor must be installed in the rack only as specified, and proper ventilation must be
maintained. The right side rack slide must be mounted correctly so that it does not obstruct the adjacent air vent.
Installation
Efficient cooling will be maintained in a rack-mounted instrument only if the air temperature at all intake air vents (inside
the equipment rack) does not exceed 40 ºC.
The DTV monitor is designed to be mounted in a standard 19-inch equipment rack: a rack-mounting kit is shipped as a
standard accessory with each instrument. The chassis components of the rack slides are shipped from the factory attached
to the instrument as shown in the following figure.
Perform the following steps to install the instrument in an equipment rack.
1. Install the rack-mounting brackets in a desired location in the equipment rack as shown in the following figure. You
can adjust the position of the rear rack mounting to suit the depth of the rack. Approximately six inches of clearance
is required between the rear panel of the instrument and any rear cabinet panel to allow for connector space and
adequate air circulation.
MTM400A DTV Monitor Quick Start User Manual 3
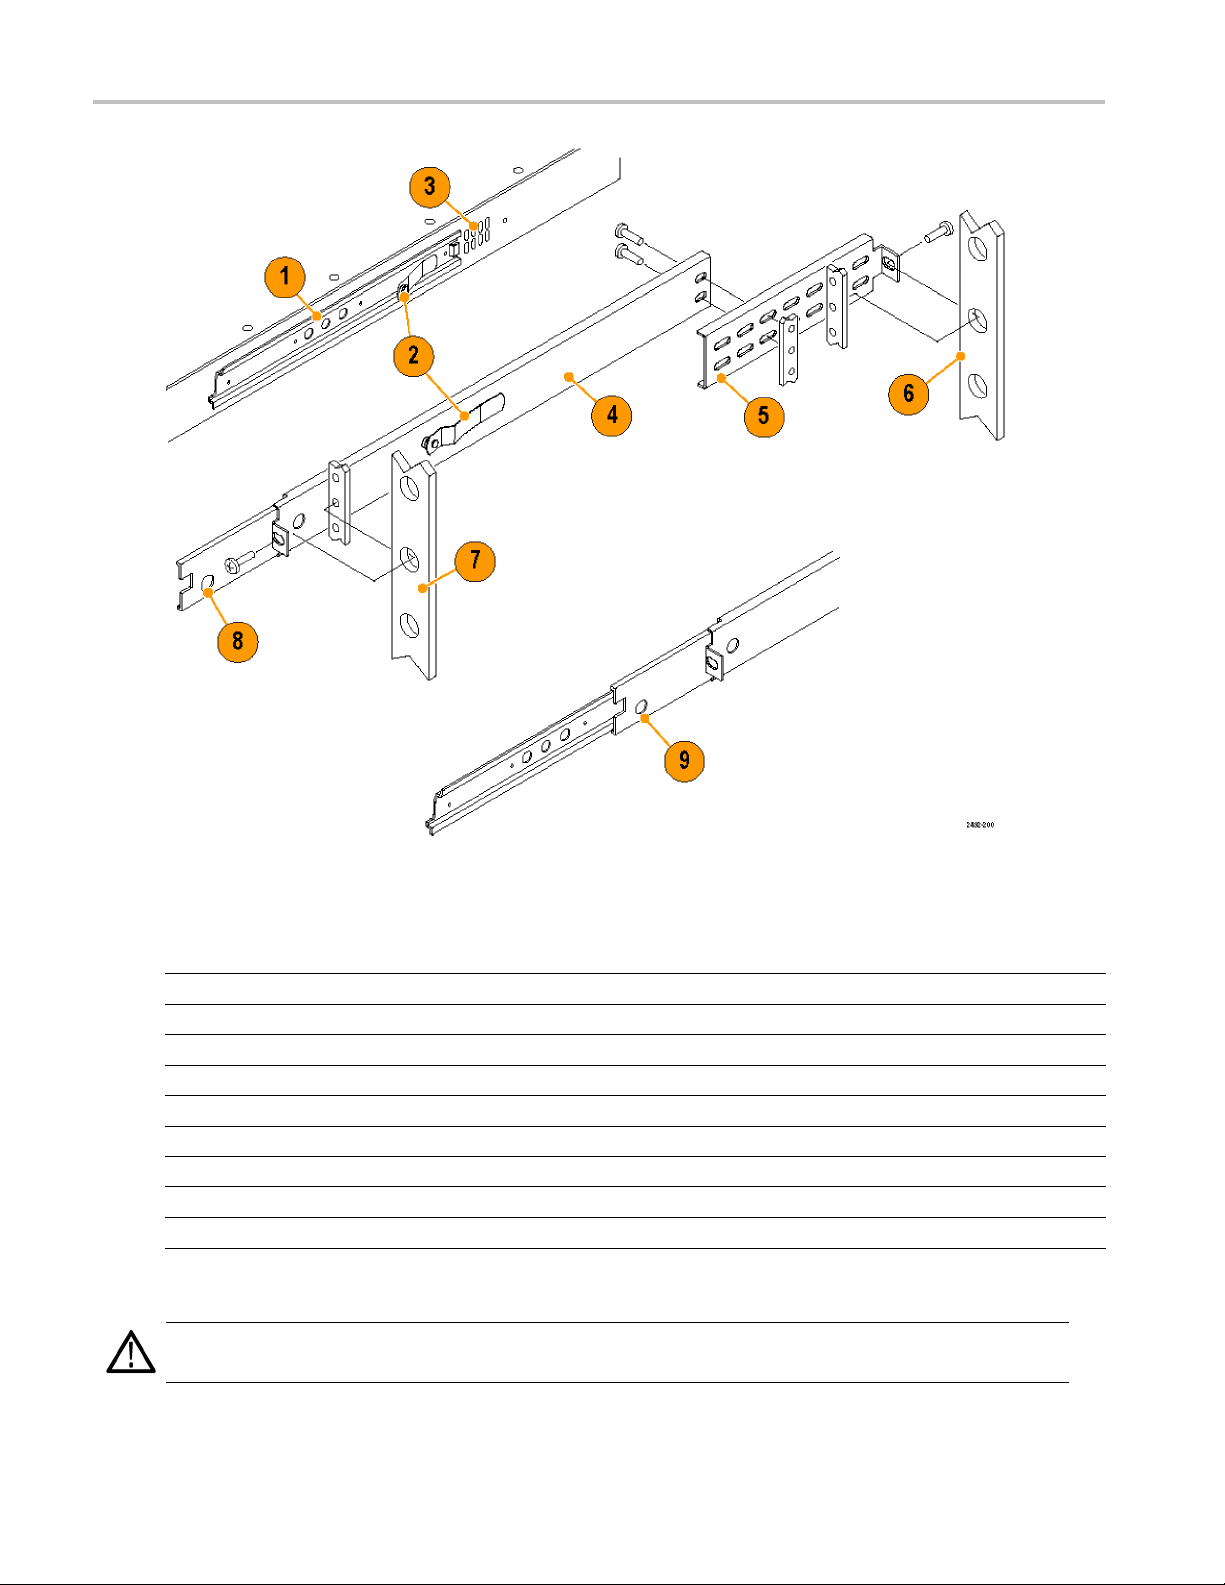
Installation
Table 3: Rack a dapter components
Figure
element Item Description
1
2 Latches
3 Air vents Do not block the air vent holes
4
5
6 Rear rack upright
7
8
9
2. After you install the rack-mounting hardware, pull the slide-out tracks out to the fully extended position.
WARNING. To prevent the instrument from falling and causing personal injury and damage to the instrument, support
the instrument until it is secured in the equipment rack.
Chassis section Mounted to chassis of monitor
-
Stationary section
Rear rack mounting
Front rack upright
Stop latch hole
Stop latch
-
-
-
-
-
-
4 MTM400A DTV Monitor Quick Start User Manual
3. Insert the rack slides on the DTV monitor chassis into the extended slide-out tracks.
4. Press the stop latches shown in the following figure, and then push the instrument toward the equipment rack until
the latches sn
ap into their holes.
Installation
5. Press the stop
6. Adjust the rac
7. If you are ins
Installing the grounding strap.)
8. Tighten the retaining screw on the right side of the front-panel to secure the instrument in the equipment rack.
latches again and push the instrument fully into the equipment rack.
k slides as necessary. (See page 7, Adjusting the rack slides.)
talling the instrument in a Central Office RBOC application, install the grounding strap. (See page 5,
Installing the grounding strap. A grounding and bonding strap kit (Tektronix part number 020-2852-XX) for use in
Central Office RBOC applications is supplied as a standard accessory with each DTV monitor.
CAUTION. The intra-building interfaces of this platform, including the Gigabit Ethernet interface, are suitable for connection
to intra-building or unexposed wiring or cabling only with shielded and grounded cables at both ends. The intra-building ports
or the equipment must not be metallically connected to interfaces that connect to the outside plant or its wiring.
Perform the following steps to install the grounding strap:
1. After you install the instrument in an equipment rack, pull the instrument out to the extended position on the rack slides.
Depending on your installation location, it may be necessary to remove the instrument from the rack to remove the screw
in the following step. (See page 7, Removing the DTV monitor from the equipment rack.)
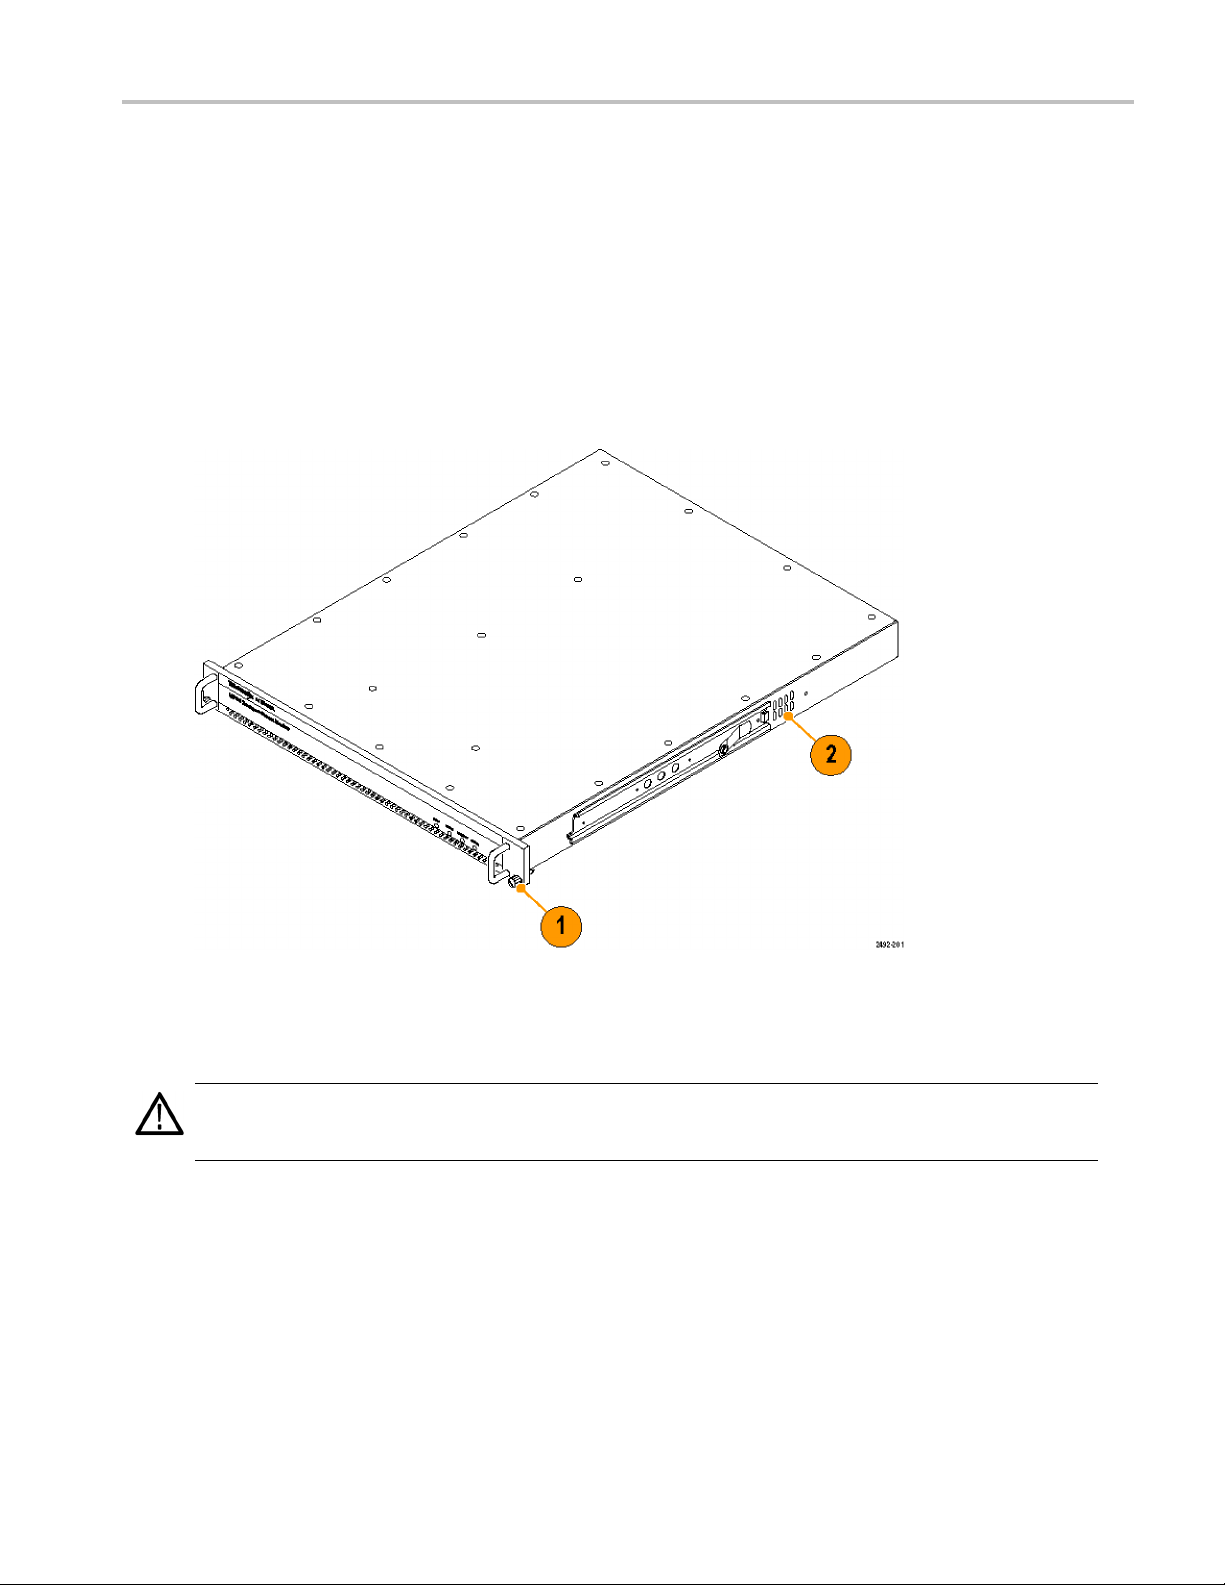
2. Use a screwdriver with a T-15 TORX tip to remove the top, front-left handle retaining screw (6-32 x 0.375) as shown in
the following figure.
MTM400A DTV Monitor Quick Start User Manual 5

Installation
CAUTION. To limit corrosion, all mating surfaces must be cleaned and treated with an antioxidant before being joined.
In an isolated bonding network (IBN), the requirements of Telcordia document TR-NWT-000295, Isolated and Mesh
Bonding Networks, apply.
3. Using the screw that was removed in step 1, attach the smaller #6 ring terminal of the grounding strap to the top,
front-left handle position as shown in the following figure. Torque the screw to 10 in-lbs to so that the terminal provides
good ground contact.
4. If necessary, reinstall the instrument in the equipment rack. (See page 3, Rack Mounting the DTV Monitor.)
6 MTM400A DTV Monitor Quick Start User Manual

CAUTION. All mating surfaces must be cleaned and treated with an antioxidant before being joined. In an (IBN), the
requirements
5. Using the Phillips thread-forming screw (10-32 x 0.500) supplied in the grounding strap kit, attach the larger #10 ring
terminal of the grounding strap to the frame of the equipment rack as shown in the following figure (a DTV monitor is
shown). Attach the gr
DTV monitor as possible. Torque the screw to 10 in-lbs to so that the terminal provides good ground contact.
of Telcordia document TR-NWT-000295, Isolated and Mesh Bonding Networks, apply.
ounding strap to the equipment-rack frame at an open unused hole in the frame as close to the
Installation
Adjusting the rack slides. After installation, if the slide tracks are not properly adjusted, they may bind. Perform
the following steps to adjust the slide tracks:
1. Slide the instrument out of the equipment rack about 10 inches.
2. Slightly loosen the screws holding the slide tracks to the front rails, and allow the tracks to seek an unbound position.
3. Retighten the screws and check the slide tracks for smooth operation by sliding the instrument in and out of the
equipment rack several times.
4. Once the i nstrument is in place within the rack, tighten the knurled retaining screw to secure the instrument in the
equipment rack.
Removing the DTV monitor from the equipment r ack. Perform the following steps to remove the instrument
from the equipment rack:
1. Disconnect all signal and power cables from the instrument.
2. Loosen the
3. If installed, remove the retaining screw for the grounding strap from the front of the equipment rack.
4. Pull the instrument out of the equipment rack until the stop latches snap into the holes on the rack slides.
5. Press the stop l
retaining screw on the right side of the front panel that secures the instrument to the equipment rack.
atches, and then remove the instrument from the rack slides.
Maintaining the rack slides. The slide tracks do not require lubrication. The dark gray finish on the tracks is
a permanent, lubricated coating.
MTM400A DTV Monitor Quick Start User Manual 7

Installation
Installing the SFP Module (GbE I nterface Only)
The optional IP Video Gigabit Ethernet (GbE) interface card allows you to remotely monitor and measure the quality of video
over copper and optical IP networks. SFP (Small Format Pluggable) modules are available for different optical wavelengths.
WARNING. To avoid exposure to hazardous laser radiation, use only Class 1 lasers as defined in the USA Federal
Regulations CDRH 21 CFR 1040 and IEC/EN 60825/A2:2001.
CAUTION. To prevent static discharge damage, service the product only in a static-free environment. Observe standard
handling precautions for static-sensitive devices while installing this module. Always wear a grounded wrist strap, grounded
foot strap, and static resistant apparel while installing this m odule.
The following figure shows an SFP module with the optical port plug removed. Use the plug to protect the optical interface
when no cable is connected or the module is not in use.
NOTE. The optical port plug m ust be in place when no cable is connected.
Installing an SFP module. Perform the following steps to install an SFP module into the GbE interface card:
CAUTION. To avoid damage to the SFP module, remove power from the DTV monitor before removing or inserting an
SFP module.
1. Disconnect the power cord from the instrument.
2. Insert the SFP module into the connector labeled SFP 1000 on the rear panel of the GbE interface card. When pushed in
fully, the module latches into position.
3. Remove the optical port plug and insert the optical fiber cable into the SFP module as shown in the following figure.
When pushed in fully, the cable connector latches into position. Retain the optical port plug for later use when you
need to remove the SFP module from the instrument.
4. Reconnect the power cord to the instrument.
8 MTM400A DTV Monitor Quick Start User Manual

Removing an SFP module. Perform the following steps to remove an SFP m odule from the GbE interface card:
1. Disconnect the power cord from the instrument.
2. Press the top of the SFP module connector to unlatch the optical fiber cable, and then disconnect and withdraw the
cable fro
m the SFP m odule.
Installation
3. Flip down
figure.
4. Install an optical port plug into the removed SFP module to protect the optical port interface.
5. Reconnect the power cord to the instrument.
the SFP module retaining latch, and then remove the module from the instrument as shown in the following
MTM400A DTV Monitor Quick Start User Manual 9

Installation
Connecting to the Instrument
The external connectors are all located on the rear panel of the instrument. See the MTM400A, RFM300, IPM400A, and
QAM400A DTV Monitor Specifications and Performance Verification Technical Reference for more detailed information about
each connector and the associated signal requirements.
Perform the following procedure to make electrical, signal, and network connections to the DTV monitor:
1. After you install the DTV monitor in an instrument rack, connect the power cord that was provided with the instrument to
the power connector on the rear panel. Connect the power cord plug to a properly grounded electrical outlet.
CAUTION. To be sure of compliance with specified EMC standards and directives, use only high quality shielded cables
with this product. Equipment performance can be affected. Typically, the cables are braid and foil types that have a low
impedance connection to shielded connectors at both ends.
2. Use the following figure and table to make the necessary transport stream, network, and peripheral device connections
using the standard connectors at the rear of the instrument.
Table 4: Standard external connectors
Figure
element Item Description
1
2
3 Power Power input
4 Ethernet
5
6 Transport stream input
7
8Alarms
1
ASI/SMPTE Input/Output are software selectable.
Transport Stream
Standard hardware
Processor card
Interface card Optional hardware
10/100Base-T; RJ-45
LTC In
Longitudinal time code input
75 Ω, transformer coupled, BNC connectors for the following signal formats:
(ASI/SMPTE)
Transport stream output
(ASI/SMPTE)
1
Accepts Burst and Packet mode ASI formats and M2S
1
An active loop-through of the corresponding input
Compliant with SMPTE310M (19.392 Mbps only)
An active loop-through of the corresponding input
(Digital input/output) 26-pin, D-type connector for five alarm relays, three
TTL outputs, and a recording trigger input. The relays and the TTL outputs
are triggered by test failures. The triggers are set using the RUI.
10 MTM400A DTV Monitor Quick Start User Manual

3. When an interface card is installed, use the following figure and table to m ake the necessary transport stream
connections at
the rear of the instrument.
Installation
Table 5: RF interface card external connectors
Interface card
1
QAM (Annex A)
QAM (Annex C)
QAM (Annex B2)
8PSK/QPSK
DVB-S2
8VSB
COFDM
GbE
1
Only one optional interface card is installed at a time.
Figure
Connector
element
1
2
3
ASI/SMPTE310M input/output
ASI/SMPTE310M input BNC connector
ASI/SMPTE310M output BNC connector
4 RF input Type F connector
5
6
7
8
SFP 1000 Small Pluggable Format module
RJ-45 10/100/1000 RJ-45; 10/100/1000BASE-T IEEE
ASI/SMPTE310M input BNC connector
ASI/SMPTE310M output BNC connector
Description
Type F connector
802.3
MTM400A DTV Monitor Quick Start User Manual 11

Installation
Installing the A SI Cable
The QAM (Annex B2), 8PSK/QPSK, DVB-S2, 8VSB, and COFDM interface cards are each shipped with an ASI cable that
enables you to monitor ASI and RF signals (for example, both the input and output of a modulator). To make transport stream
measurements on an RF input, the RF signal must be made available to the Transport S tream Processor card by looping
the interface card ASI output to the Transport Stream Processor card ASI input.
The optional GbE interface card is shipped with an ASI cable that enables you to monitor ASI and IP signals. To make
transport stream measurements on an IP input, the IP signal must be made available to the Transport Stream Processor card
by looping the interface card ASI output to the Transport Stream Processor card ASI input.
NOTE. The QAM (Annex A) and QAM (Annex C ) interface cards do not need an external cable connection because these
interface cards are connected to the Transport Stream Processor card inside the instrument.
Perform the following procedure to install the ASI cable:
1. For the QAM (Annex B2), 8PSK/QPSK, DVB-S2, 8VSB, and COFDM interface cards only, perform the following steps:
a. Connect an ASI signal to th
b. Connect the output from a modulator to the interface card RF In connector.
c. Connect the ASI cable supplied with the interface card between the ASI/SMPTE310M Out connector on the interface
card and the ASI In connector on the Transport Stream Processor card.
2. For GbE interface cards only, perform the following steps:
a. Connect an ASI signal to the interface card ASI/SMPTE310M In connector.
b. Connect the ASI cable supplied with the interface card between the ASI/SMPTE310M Out connector on the interface
card and the ASI In connector on the Transport Stream Processor card as shown in the following figure.
e interface card ASI In connector as shown in the following figure.
c. Connect an IP signal to the interface card as follows:
12 MTM400A DTV Monitor Quick Start User Manual

NOTE. You can connect both an electrical (copper) and an optical IP signal input to the interface card.
Installation
Connect an IP o
Connect an IP o
installed in that connector.
3. Use the Interface dialog box to confi gure the instrument to use the installed interface card and to select which signal
input to monitor.
Powering th
The DTV monitors do not have external power switches. To power on the instrument, connect the power cord that was
provided with the instrument to the power connector on the rear panel. Connect the power cord plug to a properly grounded
electrical outlet. To power off the instrument, remove the power cord from the instrument.
e Instrument On and Off
Network Installation
A major feature of a DTV monitor is its configuration versatility. Although the monitor always operates within a client-server
ture, the following configuration options are available as shown in the following figure:
architec
You can l
monitoring test failures.
You can monitor the instrument from a PC over an Ethernet network or the Internet using the RUI.
eave the instrument unattended. The front panel LEDs and any configured external alarms will indicate
ver electrical (copper) signal to the RJ-45 10/100/1000 connector.
ver optical signal to the SFP 1000 connector if one of the optional SFP optical modules is
The RUI software is downloaded and accessed from the DTV monitor using a browser (Microsoft Internet Explorer with
Sun Java 1.6.0_18 or later software installed) on any networked personal computer.
MTM400A DTV Monitor Quick Start User Manual 13

Installation
The provided HTML file allows you to open the RUI by typing in the URL http://<IP address> or network identity on a
Web Browser on a
and a User to have read-only permissions.
When logging in, the default password for the Administrator is "tek"; by default, the User does not require a password.
Before proceeding, make sure that the following information is available:
DTV monitor MAC address: xx-XX-xx-xx-xx-xx
Location 1: rear panel label adjacent to the E thernet connector
Location 2: main circuit board (internal)
ation 3: instrument top cover (optional)
Loc
DTV monitor IP address: yyy.yyy.yyy.yyy
Assigned by network administrator
DTV monitor software license: zzzzz-zzzzz-zzzzz-zzzzz
Location 1: instrument top cover (optional)
client PC. The user permissions are set up to allow an Administrator to have read-write permissions
MAC Address
The Transport Stream Processor card in the DTV monitor is ass igned a unique MAC (Media Access Control) address; this is
also used as the unique address of the complete instrument. The MAC address is printed on labels attached to the Transport
Stream Processor card and the instrument.
The MAC address i s written as six pairs of hex digits separated by hyphens, for example, 00-01-F8-A7-33-CC. The MAC
address must be associated with an IP address for the instrument to be able to function within a network.
IP Address
An IP address is assigned to each DTV monitor and acts as a unique identifier within a network. An IP address will be
assigned by the Network A dministrator. IP addresses are written as four groups of up to three digits, with the groups
separated by periods, for example, 119.183.115.11. The IP address must be associated with a MAC address for the
instrument to be able to function within a network.
New DTV monitors are shipped with the IP address set to 0.0.0.0; this is because the IP address that you will use is unknown
at that time. In this situation, follow the steps below to associate the proper IP address with the MAC address. (See
page 17, Setting Up the Network.)
If the IP address is unknown, it must be reset to 0.0.0.0 and set up with a new IP addre
ss before the instrument can be used.
Resetting the IP Address
Reset the IP address of a DTV monitor to 0.0.0.0 (factory default) in one of the following two ways:
Method 1. If the current IP address of the instrument is known, you can reset the address using the DTV monitor user
interface.
Method 2. If the current IP address of the instrument is unknown, reset the address by clearing the nonvolatile RAM on
the Transport Stream Processor card. Clearing the RAM resets all configuration data, including the IP address and the
software option license (option key), to the factory defaults.
14 MTM400A DTV Monitor Quick Start User Manual

Installation
Resetting the IP address using the user interface. Perform the following steps after you power on the DTV monitor
and connect to a
know how to start the RUI. (See page 33, Starting the RUI.)
1. Start the RUI, select the administrator
login type, enter the administrator
password, and click Run.
2. Select Configuration (toolbar) >Device
>NetworkSettings.
3. Make the necessary changes.
If necessary, obtain the Gateway and
Subnet Mask values from the Network
Administrator.
4. When you complete the changes, click
Apply.
network that recognizes the current IP address of the monitor. The following procedure assumes you
5. In the Network Settings have changed
message box, click Apply and Reboot.
The DTV monitor is rebooted. This may
take up to two minutes.
When the DTV monitor emits a beep,
the instrument will respond to the new
network settings. The Connect to MTM
Device dialog box is displayed.
6. Enter the new IP address.
7. Enter your Login Type and Password.
Click Connect.
The DTV monitor will download and
display the RUI, indicating that you are
connected to the instrument using the
new IP address.
MTM400A DTV Monitor Quick Start User Manual 15

Installation
Resetting the IP address by clearing the NVRAM. If the IP address of a DTV m onitor is unknown, you can reset the
IP address to th
card. When you clear the NVRAM, all configuration data is reset to the factory default values, including the IP address.
CAUTION. When you reset the NVRAM, the software licensing information for the instrument is lost. You will not be able to
access all of t
Perform the following steps to reset the NVRAM:
WARNING. To avoid electric shock, disconnect the power cord from the mains power before removing the cover. Failure to
do so could result in
1. If necessary, disconnect the power cord and remove the instrument from the equipment rack. (See page 7, Removing
the DTV monitor from the equipment rack.)
2. Remove the 21, T-10 TORX retaining screws from the instrument cover, and then lift the cover from the instrument.
3. Use the following figure to locate SW111, and then reset the NVRAM by pressing the NVRAM Reset switch. This action
clears the current configu
e factory default value (0.0.0.0) by resetting the battery-backed, NVRAM on the Transport Stream Processor
he options that you purchased until you re-enter the software license (option key) after you reset the IP address.
injury or death.
ration and resets the instrument IP address to 0.0.0.0.
4. After you reset the NVRAM, make sure that all components are in place and that all connections are secure, and then
position the cove
5. Set up a static ARP
Static ARP Entry.)
16 MTM400A DTV Monitor Quick Start User Manual
r in place and install the 21 retaining screws. Tighten the screws uniformly.
(Address Resolution Protocol) entry and test the reset IP address. (See page 17, Setting Up a

6. Assign the instrument a desired IP address using the user interface. (See page 15, Resetting the IP address using
the user interf
7. Re-enter the software license (option key) that was provided with the instrument or upgrade. (See page 22, Entering an
Option Key.)
ace.)
Setting Up the Network
Setting up a DTV monitor for use on a network requires that the instrument and the PC are powered on and attached to the
same Ethernet network. They should also be a ttached to the same subnet, if p rese
SettingUpaStaticARPEntry
To associate the MAC address with the IP address, perform the following steps to make an entry in the ARP (Address
Resolution Protocol) table:
1. On the client PC, open a Command Prompt window (Start > All Programs > Accessories > Command Prompt).
Installation
nt.
2. Enter:
3. If the command is successful, the prompt is redisplayed with no message.
C:\> ARP -s <IP address> <Ethernet MAC address>
for example, C:\> A RP -s 192.168.201. 19 00-01- F8-A7-33-CC
Testing the IP Addre s s
NOTE. The DTV monitor must receive a ping packet before the instrument will configure and store a new IP address.
The ARP command cannot be used if the instrument already has an IP address; it will only work if the IP address of
the DTV monitor is 0.0.0.0.
Perform the following steps to test that the network recognizes the IP address of the instrument:
1. On the client PC, in the Command Prompt window, enter:
C:\> ping <I P address >
for example, C:\> ping 192.168.201.19
2. The response should take the following form:
Pinging 192.168.201.19 with 32 bytes of data:
Reply from 1 92.168.201.19: bytes=32 time<10ms TTL=128
Reply from 1 92.168.201.19: bytes=32 time<10ms TTL=128
Reply from 1 92.168.201.19: bytes=32 time<10ms TTL=128
Reply from 1 92.168.201.19: bytes=32 time<10ms TTL=128
3. The IP setup is now complete. Close the Command Prompt window.
4. With the IP address successfully set up, the network settings can be completed. (See page 15, Resetting the IP
address using the user interface.)
MTM400A DTV Monitor Quick Start User Manual 17

Installation
Network Naming
If a DTV monitor is to be accessed by a network name rather than the IP address, the relationship between the IP address
and the network name must be set up on a DNS (domain name server) server on the network. This is not the name that is
set up in the Configuration screen. Contact your Network Administrator for assistance.
When the IP address has been set up, if the DTV monitor is to be accessed from a different net or subnet, the Gateway IP
address and the Subnet Mask must be set up. Contact your Network Administrator for assistance. The Gateway IP address
and the Subnet Mask values are set up in the Configuration (toolbar) > Stream > Network Settings page. The DTV
monitor must be restarted for the settings to take effect.
Network Latency
Where access to a remote DTV monitor uses several internet/intranet links of varying speeds, the initial RUI download may be
initiated successfully, but occasionally the process stops. The network speed is outside of the control of Tektronix, but it may
be possibl
e to change some of the local network settings to alleviate the problem. Contact Tektronix Support for assistance.
RUI Platform Requirements
You can run the RUI on any personal computer (PC) that meets the following requirements. (See Table 6.)
Table 6: RUI platform requirements
Characteristic Description
Minimum Specification 1.2 GHz Intel Pentium Processor (Preferred: 2 GHz)
Operating System Microsoft Windows operating systems Windows 2000, Windows XP, and Windows
Vista (Recommended: Windows XP Pro)
Disk space
Ethernet
Installed software Microsoft Internet Explorer, Version 7.0 minimum; Sun Java Runtime Environment
RAM
CD-ROM Drive
Display
2 GB free disk space
10/100-base T
Version 6 Update 7 minimum (1.6.0_18)
1GB
8x
1024 x 768 pixel video monitor with 16 bit (65000) available colors
18 MTM400A DTV Monitor Quick Start User Manual

Installing Japanese Font Extensions on your PC
The ARIB specifications for the ISDB standard make use of private extensions to the standard Unicode character set
[0xE000-0xF8FF]. These extensions allow you to add additional characters and nonstandard proprietary characters to an
existing font, or as a system-wide default. The extension sets are provided as TrueType Extension files (*.tte). Any extension
sets should be installed using the Private Character Editor, which is supplied as part of the standard Microsoft Windows
operating system.
The RUI can display these private character extensions when the operating system on the PC is correctly configured. If the
operating system on your PC was not configured to display private character extensions, perform the following steps:
1. Open the Control Panel on your PC and select Regional and Language Options.
2. Select the Advanced tab in the Regional and Language Options dialog box, and select Japanese from the drop-down
list as shown in the following figure.
Installation
3. Click Apply to accept the setting change. After you apply the language setting change, Windows might display a
message stating it must reboot. If this message appears, allow the PC to reboot.
4. Rename the TrueType Extension file (*.tte) file that you want to use to eudc.tte, and then copy the file to the following
directory: C:\WINDOWS\Fonts.
5. Select Run from the Start menu, type eudcedit in the Run dialog box, and click OK to run the Microsoft Windows Private
Character Editor. The editor window will appear briefly and then exit. This action makes the appropriate changes to the
registry to register eudc.tte as the system default character extension font.
6. Launch the DTV monitor RUI on your PC.
7. Open the Font Configuration page shown in the following figure by selecting Configuration > Preferences > Font from
the toolbar.
MTM400A DTV Monitor Quick Start User Manual 19

Installation
8. If necessary, set the Font Name for Log Entries and Stream Content to <<default>>. The RUI will now display private
characters correctly by getting them from the font supplied in the eudc.tte file.
20 MTM400A DTV Monitor Quick Start User Manual

Video Thumbnail Support
Before thumbnails can be viewed using the RUI, thumbnail support software must be installed on the client PC and the
feature must be enabled in the RUI. If thumbnail support is not installed, a message is displayed when you attempt to view
thumbnails.
The thumbnail support software for the DTV monitor is based on modified open source material. The modified code is
included in the executable file, and can be copied to the client PC and inspected if required.
Perform the following steps to install the thumbnail support software:
1. Close the RUI and any instance of Internet Explorer.
2. Locate the Thumbnail Support Package on the DTV Monitor Application Firmware CD-ROM that was supplied with the
instrument (Tektronix part number 063-4136-XX). You can also download the software package from the Tektronix Web
site (Tektronix part number 066-0945-XX).
3. Open the executable file (Tektronix part number 066-0945-XX). The Welcome screen of the thumbnail support installation
wizard is displayed. Click Next and follow the instructions given in the subsequent screens.
4. In the Setup Type screen, select Typical.
NOTE. To inspect the open source code that forms the thumbnail support package, select the C ustom setup type and enable
the Source Code option in the Select Components screen. Click Next to continue.
Installation
5. When all stages of the thumbnail support installation wizard are completed, the thumbnail display feature will be available
when the RUI is opened.
6. To enable the thumbnail display, use the RUI Configuration (toolbar) > Stream page, or click Enable Thumbnails on
any of the thumbnail views as shown in the following figure.
MTM400A DTV Monitor Quick Start User Manual 21

Installation
Licensing
Software options on DTV monitors are enabled using an Option Key. The Option Key is an encrypted code that unlocks and
enables software and hardware functions that are installed on the instrument. Each option key is unique and is generated
for a specific DTV monitor using the serial number and MAC address of that monitor. An option key that is generated for
one monitor w ill not work when applied to another monitor.
The serial number identifies a specific DTV monitor. The MAC address identifies the Transport Stream Processor board that
is installed in the monitor. If there is a hardware failure and the Transport Stream Processor board is replaced, a new option
key must be issued because the monitor will then have a different MAC address. The MAC address is printed on the label
on the top cover of the monitor and above the network port on the rear panel.
The DTV monitor is shipped from the factory with the appropriate Option Key already applied to support all of the functions
that were ordered. The Option Key is documented on the Tektronix Authorization Key Certificate that is shipped with the
instrument and on the top cover label of the instrument.
NOTE. If the battery-backed RAM in your DTV monitor is reset, you must reapply the option key to reenable any of the
software options that were purchased for your monitor.
When you purchase an upgrade to add software options to your instrument, a new Option Key is supplied with the
upgrade kit. You must apply the new Option Key to enable the additional functions you purchased. The original Option
Key that was shipped with the instrument will still be valid. However, it will only enable the functions originally purchased
with the instrument.
Entering an Option Key
Use the
1. Close any Web browser windows that
2. Open a Web browser and enter the IP
3. In the Connect to MTM Device dialog
following procedure if you need to update or re-enter the Option Key on your DTV monitor.
are connected to the DTV monitor.
ss or network name of the DTV
addre
monitor that you are updating in the
browser address line.
select Administrator as the login
box,
type, enter the password, and then click
Upload License.
22 MTM400A DTV Monitor Quick Start User Manual

Installation
4. In the Upload Li
the license string that was supplied with
your instrument or upgrade, and then
click Up load .
5. Click Yes in th
confirmation dialog box.
6. The instrument will now reboot. The
reboot process takes approximately two
minutes to co
7. Click Clo s e in the Upload License dialog
box after
appears.
cense dialog box, enter
e Upload License
mplete.
the Reboot complete message
8. In the Connect to MTM Device dialog
elect Administrator as the login
box, s
type, enter the password, and then click
Connect.
MTM400A DTV Monitor Quick Start User Manual 23

Installation
9. Read the Tektro
License Agreement and click I Accept.
10. The RUI will now appear.
nix MTM400A End User
24 MTM400A DTV Monitor Quick Start User Manual

Operation
This section describes the front-panel indicators on the DTV monitor, the RUI display elements, and the various views
that are available within the RUI.
Getting Acquainted with Your Instrument
Operation
Front Panel I
Since the DTV monitors are designed to be operated remotely, the local interface is limited to four front-panel LEDs as shown
in the following figure. The LEDs indicate the instrument status. (See Table 7.)
ndicators
Table 7: Front panel LEDs
Figure element LED name Description
1
2
3ETHERN
4
SYNC Indicates that a valid MPEG transport stream is connected to the unit.
STATUS Indicates the combined state of the tests currently being performed on the
. The test reported by the STATUS LED corresponds to the Stream
stream
Tests status in the Analysis > Tests view.
ET
SYSTEM State of all nonstream items (hardware, time sources). The test reported
Indicates the state of the Ethernet physical link.
by the SYSTEM LED corresponds to the Device Tests status in the
ysis>Testsview.
Anal
Each LED can display one of the following three colors, except the Ethernet LED, which never displays yellow.
Green indicates that the monitor is passing the test.
Red indicates that the monitor is failing the test.
Yellow indicates that the monitor is passing the test, but has failed since the last system reset.
MTM400A DTV Monitor Quick Start User Manual 25

Operation
RUI Display Elements
You can use the RUI to monitor real-time transport streams from your networked PC. (See page 33, Starting the RUI.) The
following figure and table describe the main RUI display elements. The display elements are described in more detail in the
MTM400A, IPM400A, QAM400A, and RFM300 DTV Monitor Technical Reference.
26 MTM400A DTV Monitor Quick Start User Manual

Table 8: RUI display elements
Figure
element Item Description
1 Title bar
2 Menu bar
3 Toolbar
4 Top-level t
5
6Treeview
7
8
9Mainapp
10 Button bar
11 Primar
12 Monitoring group
Summary tabs Selects which Analysis view to display. The Summary tabs are displayed in
Detail view(s)
Status bar Provides a summary of the monitoring status.
butto
abs
lication view
y buttons
ns
Displays the s
address or network name of the DTV monitor.
Provides access to a selection of system options using drop-down menus.
Provides shortcuts to often-used menu options.
Selects between the two major display views: FlexVuPlus™ and Analysis.
Analysis mode.
-
-
-
es shortcuts to major monitoring functions. You can hide the button bar if
Provid
required.
-
-
Operation
tream name (if specified) that is being monitored followed by the IP
Color coding. The buttons and icons in the RUI use the color-coding described in the following table to indicate their
status.
Table 9: Color coding
Color Meaning
Green Operation normal - no error detected
Red Error detected and still present
Blue Warning detected and still present
Yellow
Gray The corresponding test is disabled (or is unavailable). All buttons gray
White Test not applicable
Black Maintenance mode
Transient error, which has now corrected itself
indicates that connection to a device has been lost
MTM400A DTV Monitor Quick Start User Manual 27

Operation
RUI Displays
FlexVuPlus™ Display
The FlexVuPlus™ display enables the
instrument to perform like a 4-in-1 monitor
on a single incoming stream. The display
allows you to select up to four concurrent
views of a monitored stream and provides
the ability to configure each of the four views
independently. Each of the FlexVuPlus™
views is selected from views that are
available under the Analysis tab.
Refer to Setting up the FlexVuPlus ™ Display
for information about selecting views for the
FlexVuPlus™ display. (See page 36.)
28 MTM400A DTV Monitor Quick Start User Manual

Analysis View
The Analysis view provides a single main program summary window with different context sensitive views contained
within tabbed frames. This view is intended to provide the maximum amount of useful information while keeping the
screen from appearing cluttered. From the Analysis view window, you can access the following views: P rograms, Tests,
Tables, PID, Packets, and Interface.
Analysis - Programs View. The Programs
view provides a fast overview of the transport
stream contents in terms of program content,
bit rate use by each program, and TR 101
290 test results.
Red, amber, and green LEDs highlight errors
associated with each program, or element of
a program, within the transport stream. Red
LEDs indicate that there are errors occurring
in the stream, amber LEDs indicate that
errors have occurred but are now clear, and
green LEDs indicate that no errors have
been detected.
Errors that are detected at lower levels in the
program stream hierarchy propagate up to
the highest level. This allows you to monitor
all of the programs in the stream at a high
level, and then quickly go to lower levels as
necessary to locate a problem.
Operation
Analysis - Tests View. The Tests view
allows you to identify the tests that are
indicating errors in a monitored s tream.
The error log is automatically filtered by the
selected test, and can also be filtered by the
Packet Identifier (PID).
In addition to the standard first, second,
and third priority tests included in the
TR 101 290 standard, tests are available
for Program Clock Reference (PCR) jitter
and program/PID bit rate. A variability test
enables you to test the changes in the bit
rate of a specific PID, and there are many
tests that are specific to ISDB-T and ISDB-S
streams.
Also disp layed in the Tests view are the
results of tests related to the DTV monitor
hardware. One example is the temperature
of the system card.
MTM400A DTV Monitor Quick Start User Manual 29

Operation
Analysis - SI/PSI (Tables) View. The SI/PSI
(Tables) view displays the service information
tables from th
with the selected digital video standard.
This includes MPEG-specific program
information
ATSC, ISDB program, and system protocol
information.
The tables ar
and hyperlinks enable you to quickly access
related information within other tables.
e analyzed stream that comply
, DVB service information, and
e grouped together by function
Analysis -
displays information about all of the PIDs
found in the transport stream. When you
select th
summary view provides a PID-oriented
overview of the transport s tream, displaying
the rela
contained within the stream.
The information can be displayed either as
a bar cha
enable limit selection and links.
Each PID is associated with several tests.
When on
will be listed under the relevant PID. Select
a specific PID to display a summary of all
the ass
display the E vent Log and Parameters for
only that test.
PIDs View. The PIDs view
e transport stream, the associated
tive data rates of all of the PIDs
rt or as a pie chart. Pop-up menus
e or more tests fail, each failed test
ociated tests. Select a specifictestto
30 MTM400A DTV Monitor Quick Start User Manual

Operation
Analysis - Pack
displays SFN data when available in DVB
mode, and information packets (IIPs) and
TMCCdatainIS
Analysis - Interface View. The Interface
view tab a
displayed only when the instrument detects
that one of the optional RF interface c ards or
the IP vid
an interface card is not installed, you can
use the Interface toolbar button to access the
d interfaces.
standar
The Interface view provides a central location
for information related to the RF and IP
ace cards. The display includes the
interf
following information:
ets View. The Packets view
DB-T mode.
nd the Interface toolbar button are
eo interface card is installed. When
Test results
Graphical representation of specificRF
or IP card measurements
RF or IP card readings and control
ngs
setti
The graphical views display a selection of
graphs of instantaneous measurements and
urement trends. Also available are an
meas
Event Log and a Parameter view.
MTM400A DTV Monitor Quick Start User Manual 31

Operation
VQS1000VideoQualitySoftwareConfiguration
VQS1000 is a Video Quality Software application for single-ended, objective QoE analysis of video content. It is used with all
current Tektronix IP Video and DTV Monitor probes that use private backhaul video. It can also be used standalone for file
analysis. Combined with physical transport alarms from the Tektronix probes, operators can determine if the source of a
problem is in the content (for example, over-compression) or in network distribution layers.
For the VQS1000 application to work in conjunction with the DTV Monitor, the VQ S1000 player must be set up correctly
in the DTV Monitor.
Setting Up the VQS1000 Player in the DTV Monitor
1. Open the DTV
2. Select Con
3. In the dial
4. In the Sel
If the VQS
number 077-0489-00, for installation instructions.
5. Select OK to enable the VQ S1000 player.
Monitor remote user interface (RUI).
figuration on the Toolbar to open the Configuration dialog box.
og box, select Preferences > Decode.
ect Player panel, select the Tektronix VQS1000 player.
1000 player is not present in the player list, refer to the VQS1000 Quick Start User Manual, Tektronix part
Selecting a Stream for Analysis
Use the following steps to set up backhauling of a stream from a DTV Monitor.
1. Open the DTV Monitor Remote User Interface (RUI).
2. Select the Analysis > Programs > Thumbnails tabs to display thumbnails of the stream content.
3. Select the Play (►) button below the thumbnail. The VQS1000 application will be opened and display analysis of
the selected stream.
32 MTM400A DTV Monitor Quick Start User Manual

Procedures
This section provides you w ith example procedures for performing basic instrument operations. You can find detailed
operational information in the MTM400A, IPM400A, QAM400A, and RFM300 DTV Monitor Technical Reference.The
following procedures are provided:
Starting the RUI
Setting up the FlexVuPlus™ Display
Saving and Using Configuration Files
Capturing a Recording
Starting the RUI
Using the RUI, you can monitor real-time transport streams from your networked personal computer (PC). The RUI software
is downloaded from the DTV monitor to the PC each time the instrument is accessed. You can run the RUI on any PC that
has networ
k access to the DTV monitor and meets the minimum specifications.
Procedures
If your PC
Web site (www.java.com). When the instrument detects an older version, this process is started automatically during the
RUI start-up. If necessary, consult your IT Administrator for further guidance. At the end of the Java update, you may need
to close I
Perform
1. On a networked PC, launch M icrosoft
2. In the browser address bar, enter the
does not have the minimum version of Java Virtual Machine, you must download the latest version from the Java
nternet Explorer and restart the RUI download.
the following procedure to start the DTV monitor RUI:
Internet Explorer.
k identity or IP address of the DTV
networ
monitor, for example: http://TSMonitor01
or http://192.201.121.231.
ou press the Enter key, a Java
When y
applet is downloaded from the DTV
monitor and launched. The file size is
ximately 1.5 MB; the download
appro
time will depend on the network speed
and traffic.
MTM400A DTV Monitor Quick Start User Manual 33

Procedures
CAUTION. The Java applet will not run unless a temp directory is properly configured on the PC. A temp directory is set up
by default in t
he Windows XP operating system; previous operating systems may require operator action.
The Java apple
to verify that it is installed and that the version is 1.6.0_18 or greater. If it is not installed, you can download the latest
version from the Sun Web site, www.java.com/getjava.
If you have to update the Java version on the PC, restart this procedure at step 2.
3. In the Connect to MTM Device dialog
box, select
or User, from the drop-down list.
Administrator: Gives full read/write
access to a
options where installed.
User: Gives read only access to all views
and settin
installed. You can also reset alarms.
4. Enter the password. The default
password for Administrator is tek; no
password
change the passwords; refer to the DTV
Technical Reference manual.
5. Select Connect to accept the details.
Select C
and exit the start process.
t will not run unless the Sun Java Virtual Machine is installed. Type java -version at the command prompt
the Login Type, Administrator
ll views and settings, including
gs, including options where
is allocated to User. You can
ancel to close the dialog box
34 MTM400A DTV Monitor Quick Start User Manual

Procedures
6. Read the End Use
scroll to the bottom of the document and
click I Accept.
7. On starting, the FlexVuPlus™ view is
displayed. For first use, a default set of
views are displayed.
When you exit the RUI, your arrangement
of views will be remembered the next
time you access the RUI.
After you access the RUI, the PC
remembers the connection and makes
an entry in the Start > All Programs >
Tektronix menu. The default name of
the Start menu entry takes the following
form: MTM Viewer - <IP Address>,
where IP Address is the IP address of
the DTV monitor to which you connected.
You can change the default name of the
Start menu entry by right-clicking on the
menu entry and selecting Properties.
r License Agreement,
MTM400A DTV Monitor Quick Start User Manual 35

Procedures
Setting Up the FlexVuPlus™ Display
Using FlexVuPlus™, you can select up to four views from the analysis detail views to be displayed together to facilitate basic
transport stream monitoring or more detailed diagnostic monitoring, for example, monitoring the quality of an R F stream.
For this exercise, close each of the displayed
FlexVuPlus™ panels by clicking the X in the
top right corner of each panel.
This is not necessary, but it may help you
visualize the following procedure more easily
as each panel is populated. Note that each of
the four FlexVuPlus™ panels are numbered.
36 MTM400A DTV Monitor Quick Start User Manual

Set Up Panel 1
1. Select the Analysis tab and then the
Tests tab.
In the top right corner of all detail views
is a FlexVuPlus™ panel select button.
You c an use this button to display a
replica of the detail view in the selected
FlexVuPlus™ panel.
2. In the Test Summary view, use the
FlexVuPlus™ panel select button to
replicate the view in panel 1.
Procedures
3. The FlexVuPlus™ display now contains
the Test Summary view in panel 1.
MTM400A DTV Monitor Quick Start User Manual 37

Procedures
Set Up Panel 2
4. Click the Analysis tab, and then click
the Programs tab.
5. In the Thumbnails view, use the
FlexVuPlus™ panel select button to
replicate the view in panel 2.
6. The FlexVuPlus™ display now contains
the Thumbnail view in panel 2.
38 MTM400A DTV Monitor Quick Start User Manual

Set Up Panel 3
7. Select the Analysis tab, and Tests tab.
8. In the Test Failures view, use the
FlexVuPlus™ panel select button to
replicate the view in panel 3.
9. The FlexVuPlus™ display now contains
the Test Failures view in panel 3.
Procedures
MTM400A DTV Monitor Quick Start User Manual 39

Procedures
Since only three panels are used in this
example, you can expand the thumbnails
view to fill the
right side of FlexVuPlus™.
You can expand panel 2 vertically by
selecting the panel expand button.
(Similarly, you can expand panels
horizontal
ly using the horizontal panel
expand button.)
10. Expand panel 2 to display the complete
FlexVuPlus™ basic monitoring view.
To summarize, in this view you can immediately see the following:
Tests that have failed, in the Tests Summary view (FlexVuPlus™ panel 1)
Tests that have failed most recently, in the Test Failures view (FlexVuPlus™ panel 3)
Elementary streams that are currently carrying video content, in the Thumbnails view (FlexVuPlus™ panel 2)
40 MTM400A DTV Monitor Quick Start User Manual

Saving and Using Configuration Files
Configuration files provide a means of implementing and storing different monitoring configurations of the instrument. For
example, you can save a specific setup on one instrument and subsequently upload it to other instruments. Refer to the
MTM400A, IPM400A, QAM400A, and RFM300 DTV Monitor Test Parameter and Configuration File Technical R eference
for more information.
In the DTV monitor, configuration settings files are held in storage slots; eight storage slots are available for each stream.
Storage slots can be filled by either storing the current configuration or by uploading a configuration file from the client PC.
To implement the setting held in a storage slot, the configuration file must be activated. The following diagram illustrates
the handling of configuration files.
Procedures
In the following procedure, you will complete the following steps:
Save the current configuration
Download a saved configuration file to your PC
How to upload a configuration file from your PC
Howtoactivateaconfiguration file
MTM400A DTV Monitor Quick Start User Manual 41

Procedures
1. Click Configuration on the toolbar to
open the Configuration dialog box.
2. In the Configuration dialog box, select
Stream > Slot M anagement.
The remainder of this procedure uses
controls on the Configuration Slot
Management page.
3. To s a ve t h e
active (current) c onfi guration,
highlight the slot that the file is to be
saved into, for example, Slot 7.
(If you wa
nt to save the Current
configuration, you must c opy it to a slot
first.)
4. Click Copy Current .
42 MTM400A DTV Monitor Quick Start User Manual

5. To download a configuration file from
a slot to your PC (or the network),
highlight the
downloaded.
6. Click Download.
7. In the Save dialog box, specify the name
and location of the saved file and click
Save.
The name displayed in the Current and
Slot fields is contained in the file header
and does not
with the file name.
You can modify downloaded
configurat
an XML editing program.
8. To upload a configuration file from your
PC (or the network), highlight the slot
containi
example, Slot 7.
slot containing the file to be
necessarily correspond
ion files using a text editor or
ng the file to be uploaded, for
Procedures
9. Click Upload.
10. In the Open dialog box, locate the
configuration file to be uploaded and
click Open.
The file has been uploaded to the
highlighted slot, that is, Slot 7.
MTM400A DTV Monitor Quick Start User Manual 43

Procedures
11. Tomakeaconfiguration file active,
highlight the slot containing the file to be
activated, fo
rexample,Slot 7.
12. Click Activat
e.
Note that the name in the highlighted
slot, Slot 7, has been copied to the
Current slot. The DTV monitor will be
reconfigured in accordance with the
activated configuration file.
44 MTM400A DTV Monitor Quick Start User Manual

Capturing a Recording
To be able to examine transport stream events in detail, you can make recordings. The onset of recording can be triggered
by any of the following events:
Manual - you start the recording
External rising or falling signal edges - supplied using an external signal connection
Test failures - you can specify which test failure will trigger recording
In this procedure, you will set up the DTV monitor to make a recording of the stream around the failure of a test, for example,
the TR101 290, Priority 1, Continuity test.
Set a Record trigger action flag on the
TR101 290, Priority 1, Continuity test.
1. Select Analysis tab, and the Tests tab.
2. In the Test tree view, highlight the
Continuity test: Stream Tests > TR101
290> Priority 1> 1 .4 Continuity.
3. From the context menu, (hover the
mouse over the test name and click the
right mouse button) select the Record
trigger action.
Procedures
The Record trigger action icon is adjacent
to the test name.
MTM400A DTV Monitor Quick Start User Manual 45

Procedures
Open the Confi guration dialog box and
set the recording parameters.
4. On the toolbar, select Configuration to
open the Config
uration dialog box.
5. Select Strea
open the Recording Settings panel.
6. In the Recording Buffer panel, you can
set the size of the recording and the
proportion
be made before the trigger event occurs.
For this example, set the Buffer Size
to 100000 p
value to 20% of the final recording.
Setting the pretrigger value ensures that
a percenta
made before the trigger event occurs.
You can then view the trigger event in
context.
7. Select Te
trigger. Any test with a r ecord trigger
action set will initiate recording on failure.
8. Click Arm to arm the recording function.
From th
kept constantly full in readiness for true
recording to start when a trigger action
(test f
m > Recording Settings to
of the total recording that is to
ackets and the Pre Trigger
ge of the final recording is
st Failure as the recording
is point, the pretrigger buffer is
ailure) occurs.
46 MTM400A DTV Monitor Quick Start User Manual

The Trigger State has changed from
Idle to Waiting. T he toolbar recording
icons indicat
e the trigger state.
Recording will start when the trigger
event occurs. You can close the
Configuration dialog box. The toolbar
recording icons will indicate the recording
status.
Procedures
9. When the trigger event occurs, the
recording will be made.
MTM400A DTV Monitor Quick Start User Manual 47

Procedures
Save the recording when it is complete.
10. On the toolbar, select Configuration to
open the Configuration dialog box.
11. Select Stream > Recording Settings to
open the Reco
rding Settings panel.
The Trigger State is now Recording
Complete.
12. Click Download to save the recording to
your PC (or the network).
48 MTM400A DTV Monitor Quick Start User Manual

Procedures
13. In the Download
Recording dialog box,
specify the name and location of the
recording.
You must clear the recording from the
recording buffer. You cannot make any
ecordings until this is done.
further r
14. Click Cle
ar to clear the recording buffer.
The Trigger State will return to Idle and
the Progress bar will be cleared.
MTM400A DTV Monitor Quick Start User Manual 49

Applications
Applications
This section provides you with some applications that the DTV monitor can be used for and example procedures for
performing basic operations. Detailed operational information can be found in the MTM400A, IPM400A, QAM400A, and
RFM300 DTV Monitors Technical Reference.
You can use the instrument to monitor signals at any point in the distribution network. The following figure shows two real-life
applications of the MTM400A DTV monitor.
NOTE. The MTM4UP G E option, the IP Video Gigabit Ethernet interface card, must be installed before the IP procedures
describe below can be performed. Refer to the MTM4UP Upgrade Instructions, Tektronix part number 075-0973-XX.
In this example, instrument A is monitoring the RF ingest signal at a local or national head-end. Following ingest, this
ple-program transport stream may be de-multiplexed, transcoded, and encapsulated into single-program transport
multi
stream flows. Instrument B is set up to monitor the IP flow before it is transmitted across the network.
Procedures cited and described in this section for the DTV monitor designated as (A) include the following:
Selecting and configuring an RF interface card, for example, COFDM
Monitoring RF stream quality
Procedures cited and described in this section for the DTV monitor designated as (B) include the following:
Setting up an IP video interface card
Monitoring IP session bit rates
In addition, a further practical example of setting up the DTV monitor RUI for RF off-air performance monitoring is also
provided.
50 MTM400A DTV Monitor Quick Start User Manual

Configuring an RF Interface Card
If your instrument has one of the optional RF interface c ards installed, use the following procedure to configure the RF
interface card and save the settings for future use. Interface settings can be saved as Presets. Each Preset can contain a
different set of interface values. In the Interface dialog box, the Preset name associated with the active set of values is
displayed in bold text. The Preset can be directly modified or duplicated, modified and made active.
The following procedure uses a COFDM interface card as an example. The s ettings used should be supplied by your
network planner.
Make sure that the interface card is selected
Duplicate the currently active Preset
Rename preset and enter settings
Make preset active
Select Interface Card
1. Check that the RF interface card is
selected. This will be confirmed in the
Status bar, for example, COFDM. If the
interface card is not active, either ASI or
SMPTE will be shown in the Status bar.
Applications
2. On the toolbar, select Interface to open
the Configure Interface dialog box.
The ASI
always be present in the Interface dialog
box. The RF interface selection will
appea
interface cards is installed.
3. If the COFDM interface card is not active,
select COFDM from the Interfaces
drop
box.
4. Allow the display to stabilize; this can
take up to 30 seconds. An indication
that
correct interface name is displayed in the
RUI Status bar.
and SMPTE selections will
r only when one of the optional
-down menu in the Interfaces dialog
the display has stabilized is that the
MTM400A DTV Monitor Quick Start User Manual 51

Applications
Duplicate the Preset
5. Click Add to duplicate the active preset.
An Interface Settings Preset is a
collection of preset values. The Preset
name in bold text contains the active
settings. The active preset is modified
directly or a duplicate preset can be
made.
For this example procedure, you are
going to duplicate the active preset,
rename it, modify the settings, and make
it the active preset.
Rename Preset and Enter Changed Settings
6. The dupl
select and highlight the newly created
preset.
7. In the Preset Name field, change the
name fr
8. Change
values supplied by your network planner.
icated preset is named P reset;
om Preset to Test Preset.
the rest of the settings; use the
52 MTM400A DTV Monitor Quick Start User Manual

9. Click Apply to confirm the changed
settings.
Applications
MTM400A DTV Monitor Quick Start User Manual 53

Applications
Activate Preset
10. Highlight the Preset (TestPreset) and
click Apply, to implement the newly
created settings (or any of the other
presets).
The selec
Test Preset, is bolded.
11. Click OK to close the Interface dialog
box. Verify that monitoring is continuing
satisfa
ted and active preset name,
ctorily.
54 MTM400A DTV Monitor Quick Start User Manual

Monitoring RF Stream Quality
The process of populating FlexVuPlus™ is similar, whichever views you choose. This procedure uses elements from the
Interface views. The selection and placement techniques are similar to those described previously. (See page 36, Setting Up
the FlexVuPlus™ Display.)
This procedure assumes that a COFDM RF interface card is installed in the DTV monitor. The Analysis Interface tab
will not be displayed if an interface card is not installed.
Select the Analysis tab and then the
Interface tab.
1. In the Readings section of the Graphs
view, use the FlexVuPlus™ panel select
button to replicate the view in panel 1.
Applications
2. In the Graphs view, select RF
Constellation from the Ad d Graph
drop-down list.
3. Repeat the previous step, selecting the
Signal-to-Noise Ratio Trend graph.
MTM400A DTV Monitor Quick Start User Manual 55

Applications
4. In the Graphs view, use the
5. Select the FlexVuPlus ™ tab to display
FlexVuPlus™ panel select button
to replicate t
FlexVuPlu
he view in panel 2.
s™.
Expand FlexVuPlus™ panels 1 and 2
vertically to provide a full display.
56 MTM400A DTV Monitor Quick Start User Manual

In FlexVuPlus™ panel 2, Graphs and
Readings form a single panel.
6. Hide the readings panel in FlexVuPlus™
panel 2 by hori
zontally expanding the
Graphs panel.
Applications
The final l
ayout should appear as shown.
To summarize, in this view you can see the following:
Interface error values and error states in the Interface Readings view (FlexVu™ panel 1)
The RF constellation and signal-to-noise trends in the Interface Graphs view (FlexVu™ panel 3)
MTM400A DTV Monitor Quick Start User Manual 57

Applications
Configuring an IP Video Interface Card
Using the example in the following figure, this section describes the p rocedure for selecting and setting up the IP Video
interface card.
In this example, instrument B is set up to monitor the IP flow before it is transmitted across the network. The IP Video
Ethernet Interface card must b e already installed.
Gigabit
Procedu
IP netw
set up information. You should consult your network administrator for the values that you should use.
The remainder of the settings that may be present in the Configure Interface dialog box (Session Settings Criteria) will be
automatically set up when the session is selected in the next steps.
Sett
1. Check that the IP Video Interface card is
res cited for the DTV monitor designated as (B) include the following:
gupanIPVideointerfacecard
Settin
ring IP session bit rates
Monito
ork configurations vary widely. When describing how to monitor such networks, assumptions have been made for the
ingUpanIPVideoInterfaceCard
selected. This will be confirmed in the
Status bar, for example, GigE. If an
RUI
interface card is not active, either ASI or
SMPTE will be shown in the Status bar.
58 MTM400A DTV Monitor Quick Start User Manual

2. On the toolbar, select Interface to open
the Configure Interface dialog box.
Applications
The ASI and SMPTE selections will
always be present in the interface dialog
box. The GbE interface selection will
appear only when one of the optional
interface cards is installed.
3. If the IP Video Interface card is not
active, select GigE from the Interfaces
drop-down menu in the Interfaces dialog
box.
4. Allow the display to stabilize; this can
take up to 30 seconds. An indication
that the display has stabilized is that the
correct interface name is displayed in the
RUI Status bar.
MTM400A DTV Monitor Quick Start User Manual 59

Applications
5. If you need to set up the interface
card, use the settings supplied by your
Network Plann
Here is a brief summary of each of the
Interface Card Configuration settings:
Connection T
Select the line speed and type of the
physical connection from the drop-down
list.
MAC Address:
Enter the MAC address of the GbE card.
You can find t
the cover of the instrument.
Network Interaction:
Select the
interacts with the connected network.
IPv4 Address:
Enter the
IPv6 Addressing:
If active IPv6 network interaction has
been sele
select the means by which the IP address
of the instrument is to be discovered by
the netw
ASI Output:
Set the ASI output format.
(You ca
of these setting in the DTV Monitor
Technical Reference.)
t Apply after each setting is
Selec
entered. Finally select OK to accept all
of the settings and close the dialog box.
To set
process is as described previously for
the RF card. (See page 51, Configuring
an RF
er.
ype:
his on the label affixed to
way that the interface card
IP address of the GbE card.
cted, you must use this field to
ork.
n find detailed descriptions
up a preset configuration, the
Interface Card.)
60 MTM400A DTV Monitor Quick Start User Manual

6. Select the Analysis tab and then the
Interface tab.
7. In the Detail view, select the IP Tables
tab.
In this example, the Multicast Database
and IP Traffic views are displayed.
8. Make sure that at least one multicast
session is jo
flow is selected.
Join a multicast session by selecting the
Join button
view.
Select a traffic flow by double-clicking
in the first
This view provides a summary of all of
the subscribed sessions.
Indicati
stream include:
Status bar: The TS Availability and
the Sync LEDs are green or yellow.
ined and that an IP traffic
in the Multicast Database
column in the IP Trafficview.
ons that you are locked onto a
Applications
Button bar: The Interface button is
green or
words GigE: Locked.
yellow and displays the
Monitoring IP Session Bit Rates
1. You have now set up and are receiving
e stream or flow from a multicast
a singl
session.
You can start monitoring the program
nt of that session using the Analysis
conte
tab views or you can monitor the IP
content in detail using the Analysis
rface tab view.
Inte
MTM400A DTV Monitor Quick Start User Manual 61

Applications
2. For example, to
monitor measurements
of the incoming packets, select the
Graphs tab in the Interface detail view.
3. And from the Add Graph drop-down
menu, select S
elected session bitrate.
Repeat and select Total session bitrate.
62 MTM400A DTV Monitor Quick Start User Manual

A feature of the RUI is “tear-off” windows,
which let you display elements of the
RUI in separat
windows can be resized as required.
4. Select the tear-off icon of the Graphs
window.
5. The graphs window is displayed in a
separate window. Resize it to your own
requirements.
6. The bit rate graphs in this screen capture
give the measured values for the last
minute.
7. Use the Trend Timescale drop-down list
to select longer measurement periods.
You can see the instantaneous bit rates
and other measurements in the adjacent
Readings screen.
e windows. The tear-off
Applications
If these views prove useful, remember that you can set them up in the F lexVuPlus view. (See page 36, Setting Up
the FlexVuPlus™ Display.)
MTM400A DTV Monitor Quick Start User Manual 63

Applications
RF Off-Air Performance Monitoring
Scenario
Heavy rain is forecast in your area. Previous experience suggests that this may cause problems with the RF performance.
The power dro
can be an increase in bit error rate and the resultant continuity count errors in the transport stream.
With this in mind, you can set up FlexVuPlus™ to display views that will indicate any deterioration in the RF performance.
The following procedure shows you how to set up FlexVuPlus™ to monitor this scenario.
Procedure
1. Select the Analysis tab, and the
Interface tab.
p can cause the modulation error ratio (MER) and error vector magnitude (EVM) to increase. The net result
2. In the Interface view, select the Readings
nd use the FlexVuPlus™ panel
view a
select button to replicate the view in
panel 1.
64 MTM400A DTV Monitor Quick Start User Manual

3. In the Interface view, select the Graphs
view.
4. From the Add Graph drop-down list,
select the RF constellation (all data
carriers).
Applications
5. Repeat the action twice more,
selecting the Input Power Trend and
Signal-to-Noise Ratio Trend graphs.
MTM400A DTV Monitor Quick Start User Manual 65

Applications
6. Use the FlexVuP
lus™ panel select
button to replicate the graphs view in
panel 2.
7. In the Interface view, select the IF
Error Col
lection view and use the
FlexVuPlus™ panel select button to
replicate the view in panel 3.
66 MTM400A DTV Monitor Quick Start User Manual

8. Select the FlexVuPlus™ tab to display
the assembled views.
9. You can expand panel 2 vertically by
selecting the panel expand button.
Applications
MTM400A DTV Monitor Quick Start User Manual 67

Applications
10. To see a possibl
e deterioration in the
selected trend graphs, you can change
the sampling period (X axis).
For this scena
rio, select a sampling
period of one day.
11. The trend graphs (Input Power Trend
and Signal-to-Noise Ratio Trend) now
show values for the last 24 hours; note
the change in the X-axis values.
12. To examine the graphs more closely,
click the tear-off icon.
You can resize the tear-off window to
make viewing the graphs easier.
68 MTM400A DTV Monitor Quick Start User Manual

13. For this example, add the following
graphs to the tear-off view: Modulation
Error Ratio Tr
end and Error Vector
Magnitude Trend.
Applications
14. Open the Analysis > Tests view and
examine the Event Log for the Priority 1
test 1.4 Continuity.
For the period that input power was
low, you might see a corresponding
increase in the continuity count caused
by out-of-order packets.
MTM400A DTV Monitor Quick Start User Manual 69

Product Options
and Upgrades
Product Optio
Options
The following tables list the software and hardware options that you can order with MTM400A DTV m onitors. Included are
the part numbers of any accessories shipped with the options.
Table 1 0: MTM400A options and optional accessories
Option Description
Software options
MTM400A
ns and Upgrades
01
03
04
05 Bit-rate testing including PID groups and PID variability
06
07
DIAG
Recording Capability
Template Testing w ith Template Scheduling (for user-defined service plan testing)
PCR Analysis w ith Graphical Results views
Service logging
Automatic channel changing for polling multiple streams
Diagnostic option; includes options 01, 03, 04, 05, 06, and 07
70 MTM400A DTV Monitor Quick Start User Manual

Table 10: MTM400A options and optional accessories (cont.)
Option Description
Hardware options
MTM400A
QB2
QC QAM Annex C interface
VS
CF
EP
S2
SX Optical gigabit Ethernet/fibre channel 850 nm SFP SFF, 1.25/1.0625 Gbaud, 3.3 V,
LX
ZX
QAM Annex B2 interface, level 1 and level 2
Cable assembly, RF, BNC to BNC, 75 Ω (Tektronix part number 174-5135-XX)
Cable assembly, RF, Coaxial, RFD, 1, 75 Ω, RG179, 8.0 L (Tektronix part number
174-5063-XX)
8VSB interface
Adapter, RF, BNC Jack to F Plug (Tektronix part number 015-0688-XX)
Cable assembly, RF, BNC to BNC, 75 Ω (Tektronix part number 174-5135-XX)
Cable assembly, RF, Coaxial, RFD, 1, 75 Ω, RG179, 8.0 L (Tektronix part number
174-5063-XX)
COFDM interface
Adapter, RF, BNC Jack to F Plug (Tektronix part number 015-0688-XX)
Cable assembly, RF, BNC to BNC, 75 Ω (Tektronix part number 174-5135-XX)
Cable assembly, RF, Coaxial, RFD, 1, 75 Ω, RG179, 8.0 L (Tektronix part number
174-5063-XX)
8PSK/QPSK interface
Cable assembly, RF, BNC to BNC, 75 Ω (Tektronix part number 174-5135-XX)
Cable assembly, RF, Coaxial, RFD, 1, 75 Ω, RG179, 8.0 L (Tektronix part number
174-5063-XX)
DVB-S2 interface
Cable assembly, RF, BNC to BNC, 75 Ω (Tektronix part number 174-5135-XX)
Cable assembly, RF, Coaxial, RFD, 1, 75 Ω, RG179, 8.0 L (Tektronix part number
174-5063-XX)
safety controlled; for GigE interface (Tektronix part number 131-7834-XX)
Optical gigabit Ethernet/fibre channel 1310 nm SFP SFF, 1.25/1.0625 Gbaud, 3.3 V,
safety controlled; for GigE interface (Tektronix part number 131-7957-XX)
Optical gigabit Ethernet/fibre channel 1550 nm SFP SFF, 1.25/1.0625 Gbaud, 3.3 V,
safety controlled; for GigE interface (Tektronix part number 131-7958-XX)
Product Options
and Upgrades
MTM400A DTV Monitor Quick Start User Manual 71

Product Options
and Upgrades
Field Upgrade Kits
Field upgrade kits are hardware and software upgrades that you can install after you purchase an MTM400A DTV monitor.
Table 11: MTM400A field upgrade kits
Option Description
Licensed software options
MTM4UP
Hardware options
MTM4UP
01
03
04
05 Field upgrade to add Bit rate testing including PID groups and PID v ariability
06
07
DIAG
QB2 Field upgrade to add QAM Annex B (Level 1 and Level 2 interleave) Interface
QC Field upgrade to add QAM Annex C Interface
VS Field upgrade to add 8VSB Interface
CF Field upgrade to add COFDM Interface
EP
S2 Field upgrade to add DVB-S2 Interface
GE Field upgrade to add Gigabit Ethernet components
SX Field upgrade to add 1000BASE-SX Short Wavelength Optical port with LC
LX
ZX
IFC One-time installation of all selected options and functional verification for one product
Field upgrade to add Recording Capability
Field upgrade to add Template Testing With Template Scheduling (for user-defined
service plan testing)
Field upgrade to add PCR Analysis with Graphical Results views
Field upgrade to add Service Logging
Field upgrade to add automatic channel changing for polling multiple streams
Diagnostic option; includes options 01, 03, 04, 05, 06, and 07
Field upgrade to add 8PS K/QPSK Interface
connector (Multi Mode 850nm) to GigE interface
Field upgrade to add 1000BASE-LX Long Wavelength Optical port with LC connector
(Single Mode 1310 nm) to GigE interface
Field upgrade to add 1000BASE-ZX Optical port with LC connector (Single Mode
1550 nm) to GigE interface
72 MTM400A DTV Monitor Quick Start User Manual

Upgrading the Firmware Version
NOTE. The following procedure is only for MTM400A DTV monitors or for MTM400 monitors that have been previously
upgraded to fir
CAUTION. Do not use this procedure to upgrade from version 2.6.1; the process will fail and the software will revert to
version 2.6.1. To upgrade from version 2.6.1 or earlier, refer to the MTM4UP Instructions, Tektronix part number 075-0973-XX.
mware version 3.1 or higher.
Product Options
and Upgrades
Updates to the DTV mo
problems are fixed or when new product features are introduced. Perform the following steps to upgrade the firmwa re on
your instrument from version 3.1 or higher to the latest version.
NOTE. It is recomme
appears before the MTM400 or MTM400A monitor RUI is launched. Only advanced users should use the Connect to MTM
Device dialog box accessed from the Connect button in the MTM400A monitor RUI toolbar.
1. Download the latest version of the DTV
monitor firmware
site and save the file to a PC that is
connected to the same network as the
DTV monitor and m
requirements.
The name of the firmware file should be
of the followin
number>.zip. This file contains a binary
upgrade file (*.hex) and documentation
files.
2. Unzip the upgr
to your PC. The name of the unzipped
upgrade file should be of the following
form: MTM400
Take note of the location of the unzipped
files.
nitor firmware are r eleased to the Tektronix Web site (www.tektronix.com/software) when software
nded that you initiate the fi rmware upgrade process from the Connect to MTM Device dialog box that
from the Tektronix Web
eets the RUI platform
g form: MTM400 <version
ade file that you copied
<version number>.hex.
CAUTION. To prevent upgrade problems that might require the monitor to be r eturned to Tektronix service for reprogramming,
disconnect
MTM400A DTV Monitor Quick Start User Manual 73
all transport stream inputs and outputs from the monitor before performing the firmware upgrade procedure.

Product Options
and Upgrades
3. Remove all tran
outputs from the DTV monitor.
4. On the PC, launch the Microsoft Internet
Explorer Web browser.
5. In the address bar of the Web browser,
enter the net
the DTV monitor that you are upgrading,
for example: http://TSMonitor01 or
http://192.
6. Press Enter
downloaded from the DTV monitor and
launched. The file size is approximately
1.5 MB; the d
on the network speed and traffic.
CAUTION. The Java applet will not run unless a temp directory is properly configured on the PC. A temp directory is set up
by default in the Windows XP operating system; previous operating systems may require operator action.
The Java applet will not run unless the Sun Java Virtual Machine is installed. Type java -version at the command prompt
to verify
version from the Sun Web site, www.java.com\getjava.
If you have to update the Java version on the PC, you must restart this procedure at step 4.
that it is installed and that the version is 1.6.0_18 or greater. If it is not installed, you can download the latest
sport stream inputs and
work name or IP address of
158.201.105.
. A Java applet is
ownload time will depend
7. In the Connect to MTM Device dialog
box, select the Administrator Login
om the drop-down list, and
Type fr
then enter the password. The default
password is “tek" for Administrator.
NOTE. You must log in to the DTV monitor using the Administrator login type. The User login type does not have sufficient
permissions to upgrade the instrument firmware.
74 MTM400A DTV Monitor Quick Start User Manual

Product Options
8. Click Connect tologintothemonitor
and display the RUI window.
9. Click Device in the button bar of the RUI
window to disp
view.
CAUTION. To prevent upgrade problems that might require the monitor to be returned to Tektronix service for
reprogramming, you must clear the Device Log immediately before uploading the firmware.
lay the Device Information
and Upgrades
10. Clear the device log by clicking the X in
the Device Event
11. Select File > Exit to close the RUI and, if
necessary,
window.
12. Repeat steps 4 to 7 to reopen the
Connect to MTM Device dialog box and
enter the a
Log window.
close the associated Explorer
dministrator’s password.
13. Click Uplo
Upload Device Firmware dialog box.
MTM400A DTV Monitor Quick Start User Manual 75
ad Firm ware to open the

Product Options
and Upgrades
14. In the Upload De
box, enter the path and name of the
firmware file you saved in step 2 or use
theBrowsebut
the firmware file. Click Start to initiate
the firmware installation.
15. When the firmware upload to the
instrument is complete, a Firmware
upload co
the Upload Device Firmware dialog box.
vice Firmware dialog
ton to locate and select
mplete message is displayed in
16. As sta
CAUT
reprogramming, the instrument might be rendered unable to reboot, which will require that the instrument be returned to
Tektronix for repair.
76 MTM400A DTV Monitor Quick Start User Manual
ted in the message, the uploaded
firmware will be checked, and if valid,
reprogramming of the instrument and
nstalled interfaces will start.
any i
ION. Do not remove power from the instrument during the reprogramming process. If power is removed during
 Loading...