

Page 1

Instruction Sheet
Phaser® 340
Adding extended features to a Phaser
®
340 —
Upgrade Kit Z340FX
This kit provides the 16-Mbyte RAM SIMM and print engine ROM necessary to provide additional
on-board fonts and imaging capabilities to a Phaser 340 Color Printer. This kit also includes diskettes
containing PostScript screen fonts; these allow you to use the additional on-board fonts available in the
Phaser 340 Plus. The PostScript Code ROM SIMM and engine ROM replaced by this upgrade kit must be
returned to Tektronix; otherwise, you will be invoiced for the unreturned ROM SIMM. Instructions for
returning the ROM SIMM are provided at the end of this instruction sheet.
Printer serial-numbered up to and including BBxxxxx require Z340FX Option 01 which includes a
PostScript ROM SIMM upgrade. Printers serial-numbered BCxxxx and above require the Z340FX Option
02 Upgrade Kit. Make sure you have the correct kit by checking your printer’s serial number and the
labeling on this kit’s box.
Kit contents
■
Print engine ROM
16-Mbyte RAM SIMM
■
■
■
■
■
■
■
On-site installation
Professional, on-site installation is just a phone call away. Productivity is
important to your business success – so when you need it done right – the first
time – call Tektronix. Tektronix’ on-site installation delivers what you’ve been
looking for: expert service technicians who provide quality, on-site product
installation. In the United States and Canada, call 1 800-835-6100.
Don’t install this upgrade, if you are not comfortable modifying electronic
equipment.
Additional Adobe PostScript fonts (on diskette)
Anti-static wrist strap
ROM puller tool
PostScript Code ROM SIMM -- Option 01 only
User and driver manuals, disks and CD-ROM -- Z340FX Option 01
only
Return shipping packaging and label (for the ROMs)
Copyright
1996 by Tektronix, Inc.. All rights reserved. 063-2375-AA
©
Page 2

2
1.
2.
3.
1.
2.
Adding extended features to a Phaser® 340 — Upgrade Kit Z340FX
Important! About the printer’s IP address (Z340FX Option 1 only)
Upgrading the printer’s PostScript ROM will erase the printer’s IP address from
the printer’s non-volatile memory. Therefore you should print the printer’s
configuration page, which lists the printer’s IP address, before upgrading the
printer.
While the printer is idle, press the Menu button to display the Help
menu item.
pages
Press the arrow button to scroll to the item Configuration pag e. Press
Print button to print the Configuration page.
the
Note the IP address on the print and save the print for later reference.
Static electricity precautions
■
Leave the printer plugged into its power outlet; this preserves a
ground path for static discharges.
■
Touch the printer's bare metal frame often to discharge static
electricity from your body.
■
Handle the circuit board(s) by their edges only.
Do not lay the board(s) on a metal surface.
■
■
Make the least possible movements to avoid generating static
electricity.
■
Avoid wearing wool, nylon or polyester clothing; they generate static
electricity.
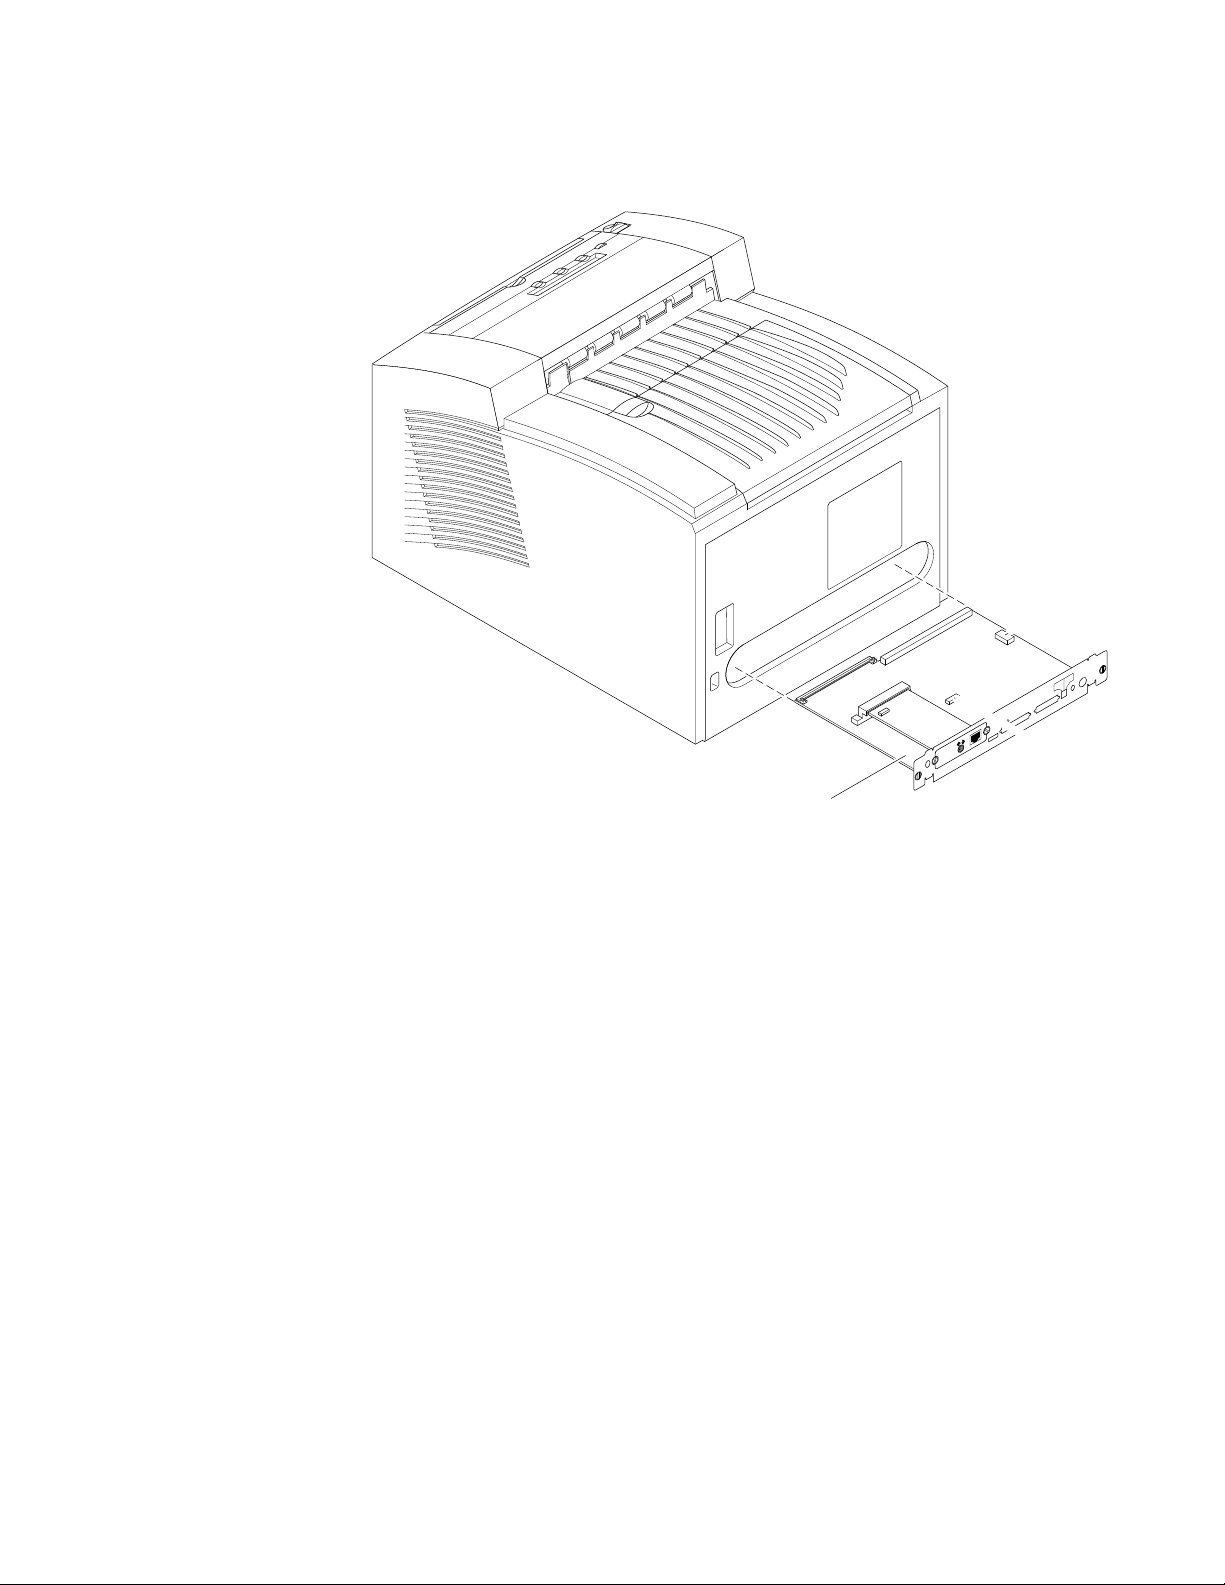
Upgrading the printer
Removing the main board
Caution
Do not tilt the printer. If you must move the printer to access the
rear of the printer to install the upgrade, be careful not to tip or tilt
the printer. Hot, liquid ink in the printer could spill and damage
the printer. Once the printer is turned off, it takes 30 minutes for
the ink to cool to its solid state. Wait and allow the ink to cool.
Power down the printer. Leave the power cord plugged in to provide
a ground path for static discharges. Remove the interface cables.
Loosen the two rear panel securing screws.
Page 3
3
3.
Adding extended features to a Phaser® 340 — Upgrade Kit Z340FX
Slide out the main board.
NV RAM
chip
Main board
Second
2
Feeder
Reset
1
Service
Parallel
SCSI Disk
PHASER 340
Service
Only
Ethernet®
Smart Card
Printer ID
chip
9100-63
Page 4

4
4.
5.
a
b
Adding extended features to a Phaser® 340 — Upgrade Kit Z340FX
Installing the PostScript Code ROM SIMM (Z340FX Option 1 only)
The PostScript Code ROM SIMM is only included as a part of the upgrade if you
have a printer serial-numbered BBxxxx or below. Otherwise, proceed to Step 6.
Remove the currently installed PostScript code ROM SIMM from
image processor board (connector P71) by spreading apart the
hook-like metal pawls securing each end of the SIMM in its connector.
Remove the ROM SIMM and set it aside; do not discard it.
Insert the replacement PostScript code ROM SIMM, included with this
kit, in connector P71 (
). The part number 671-3809-00 is printed on the back of the ROM
(
), and tilt the SIMM down until it locks in place
SIMM to identify it.
When properly inserted, a tab on each end of the connector slips into a
hole on each end of the code ROM SIMM. Also, a pawl on each end of
the connector latches around each end of the SIMM to lock it in place.
Code ROM SIMM
ab
P71
Main board
9100-79
Page 5

5
6.
7.
a
8.
Adding extended features to a Phaser® 340 — Upgrade Kit Z340FX
Installing the 16-Mbyte SIMM
If a 4-Mbyte RAM SIMM is already installed in the RAM SIMM
connector J20, it must be removed. You can identify a 4-Mbyte RAM
SIMM by the part number 671-1561-01 or 671-3574-00 printer on its
underside. To remove the RAM SIMM, carefully spread the hook-like
metal pawls securing each end of the SIMM into the connector.
Insert the 16-Mbyte RAM SIMM (part number 671-3133-00) in
connector J20 (
When properly inserted, a tab on each end of the connector slips into a
hole on each end of the RAM SIMM. Also, a pawl on each end of the
connector latches around each end of the RAM SIMM to lock it in
place.
), and tilt the module down until it locks in place ( b ).
ab
Main board
RAM SIMM
9100-64
Page 6

6
9.
Adding extended features to a Phaser® 340 — Upgrade Kit Z340FX
Replacing the print engine ROM
Locate the print engine ROM.
Note
10.
Some products may use a standard ROM IC chip while others may
use an adaptor circuit board. Either part type can be substituted for
the other on this main board.
Insert the IC removal tool between the ROM (or adaptor board ROM)
and the socket.
being careful to not damage the main board. When the near end of the
part begins to lift from the socket, gently lift the other end of the part
with your fingers to prevent damage to the ROM’s pins.
Carefully pry ROM up
with IC removal tool
Print engine
ROM
GENTLY remove the old part by prying upward,
Orientation
Notch
11.
Install the new engine ROM (it can be identified by the number
163-0646-00 printed on it). Check for proper orientation and
alignment of the pins; pin 1 should be oriented toward the network
card end of the main board. Press the ROM firmly into its socket.
Note
12.
13.
Pin 1 end of the adaptor board is identified by the square pads on the
upper surface of the board; alternately, the pin 1 end can be identified
by the notch in the pin array on the bottom-side of the board.
Reinstall the main board into the printer.
Reconnect the host interface cables. Turn on the printer and print the
startup page; it indicates the amount of RAM and fonts installed in the
printer. Refer to the
startup page.
Phaser 340 User Manual for details on printing the
Z340-1-01
Page 7

7
Adding extended features to a Phaser® 340 — Upgrade Kit Z340FX
1.
2.
a.
b.
a.
b.
c.
14.
Follow the instructions included with the font disks shipped with this
upgrade to install the fonts on your computer.
Setting the printer’s IP address
If you replaced the PostScript code ROM SIMM — Upgrade kit Z340FX
Option 01 you will have to set the printers IP address.
address in your printer depends on a number of factors such as the protocol
used by your host TCP/IP network, whether or not you use a boot server, and
the types of PCs or workstations available to you. The topic of setting the
printer’s IP address is fully explained in the Chapter 9 topic “Configuring your
printer” in the
instructions for setting the printer’s IP address are also available on the
Tektronix web page: http://www.tek.com/Color_Printers/userdoc.
PhaserShare Network Cards and Software User Manual . The
Return the old ROMs to Tektronix
How you set the IP
Repack the old PostScript code ROM SIMM (if replaced) and the print
engine ROM in the anti-static bags. Place them in the shipping box.
In the U.S.A.:
Write the printer’s original serial number on the shipping return
label.
Securely tape the box closed and mail it to the pre-addresses
location. Postage is prepaid.
Outside the U.S.A.:
Affix the special international shipping return label, included with
this update kit, to conceal the original U.S. shipping label.
Write the printer’s serial number on the shipping return label.
Tape the box closed and ship the box to Tektronix.
Page 8

 Loading...