


DAS-1800AO Series
Register-Level
Programming
USER’S GUIDE

DAS-1800AO Series
Register-Level Programming
User’s Guide
Revision A - September 1994
Part Number: 91290

New Contact Information
Keithley Instruments, Inc.
28775 Aurora Road
Cleveland, OH 44139
Technical Support: 1-888-KEITHLEY
Monday – Friday 8:00 a.m. to 5:00 p.m (EST)
Fax: (440) 248-6168
Visit our website at http://www.keithley.com

The information contained in this manual is believed to be accurate and reliable. However, Keithley
Instruments, Inc., assumes no responsibility for its use or for any infringements of patents or other rights
of third parties that may result from its use. No license is granted by implication or otherwise under any
patent rights of Keithley Instruments, Inc.
KEITHLEY INSTRUMENTS, INC., SHALL NO T BE LIABLE FOR ANY SPECIAL, INCIDENTAL,
OR CONSEQUENTIAL DAMAGES RELATED TO THE USE OF THIS PRODUCT. THIS
PRODUCT IS NOT DESIGNED WITH COMPONENTS OF A LEVEL OF RELIABILITY
SUITABLE FOR USE IN LIFE SUPPORT OR CRITICAL APPLICATIONS.
Refer to your Keithley Instruments license agreement for specific warranty and liability information.
MetraByte is a trademark of Keithley Instruments. All other brand and product names are trademarks or
registered trademarks of their respective companies.
© Copyright Keithley Instruments, Inc., 1994.
All rights reserved. Reproduction or adaptation of any part of this documentation beyond that permitted
by Section 117 of the 1976 United States Copyright Act without permission of the Copyright owner is
unlawful.
Keithley MetraByte Division
Keithley Instruments, Inc.
440 Myles Standish Blvd. Taunton, MA 02780
FAX: (508) 880-0179
Telephone: (508) 880-3000
●

Preface
The DAS-1800AO Series Register-Level Programming User’s Guide
provides a description of the I/O addresses in DAS-1800AO Series
boards.
The manual is intended for experienced programmers whose applications
require operational control that is not provided by the software packages
currently available for DAS-1800AO Series boards. It is assumed that
users have read the DAS-1800AO Series User’s Guide to familiarize
themselves with the boards’ functions, that they have completed the
appropriate hardware installation and configuration, and that they are
familiar with data acquisition principles.
Note:
using the DAS-1800 Series Function Call Driver or a menu-driven
software package. If you are using the DAS-1800 Series Function Call
Driver, refer to the DAS-1800AO Series Function Call Driver User’s
Guide . If you are using a menu-driven software package, refer to the
documentation supplied with the package.
The DAS-1800AO Series Register-Level Programming User’s Guide is
organized as follows:
●
●
●
This manual is not intended for application programmers who are
Chapter 1 contains a description of the I/O addresses in
DAS-1800AO Series boards.
Chapter 2 contains guidelines you should follow when programming
certain operations of DAS-1800AO Series boards.
Appendix A contains a summary of the bits in the DAS-1800AO
Series registers.
v

Throughout the manual, references to DAS-1800AO Series boards apply
to DAS-1801AO and DAS-1802AO boards; references to DAS-1800
Series boards apply to all members of the DAS-1800 family of data
acquisition boards. When a feature applies to a particular board, that
board’s name is used.
vi

Table of Contents
Preface
1
I/O Addresses
A/D Data, A/D CNVRT, or A/D QRAM Data. . . . . . . . . . . . . . .1-4
A/D Data . . . . . . . . . . . . . . . . . . . . . . . . . . . . . . . . . . . . . . . . .1-5
A/D CNVRT . . . . . . . . . . . . . . . . . . . . . . . . . . . . . . . . . . . . . .1-9
A/D QRAM Data . . . . . . . . . . . . . . . . . . . . . . . . . . . . . . . . . .1-9
A/D Data Select Register . . . . . . . . . . . . . . . . . . . . . . . . . . . . .1-11
Digital I/O Register . . . . . . . . . . . . . . . . . . . . . . . . . . . . . . . . . .1-12
A/D Control Register A . . . . . . . . . . . . . . . . . . . . . . . . . . . . . . .1-13
A/D Control Register B . . . . . . . . . . . . . . . . . . . . . . . . . . . . . . .1-16
A/D Control Register C . . . . . . . . . . . . . . . . . . . . . . . . . . . . . . .1-20
A/D Status Register . . . . . . . . . . . . . . . . . . . . . . . . . . . . . . . . . .1-22
Burst Length Register . . . . . . . . . . . . . . . . . . . . . . . . . . . . . . . .1-29
Burst Mode Conversion Rate Register. . . . . . . . . . . . . . . . . . . .1-30
A/D QRAM Address Start Register. . . . . . . . . . . . . . . . . . . . . .1-31
A/D Counter Registers. . . . . . . . . . . . . . . . . . . . . . . . . . . . . . . .1-33
D/A Data . . . . . . . . . . . . . . . . . . . . . . . . . . . . . . . . . . . . . . . . . .1-34
D/A Data Select Register. . . . . . . . . . . . . . . . . . . . . . . . . . . . . .1-36
D/A Recycle Count Register . . . . . . . . . . . . . . . . . . . . . . . . . . .1-38
D/A Control Register A . . . . . . . . . . . . . . . . . . . . . . . . . . . . . . .1-39
D/A Control Register B . . . . . . . . . . . . . . . . . . . . . . . . . . . . . . .1-42
D/A Control Register C . . . . . . . . . . . . . . . . . . . . . . . . . . . . . . .1-45
D/A Status Register . . . . . . . . . . . . . . . . . . . . . . . . . . . . . . . . . .1-47
D/A Conversion Counter Register . . . . . . . . . . . . . . . . . . . . . . .1-53
2
Programming Information
Setting Up the Board for Software-Initiated A/D Conversions . .2-1
Programming the A/D QRAM. . . . . . . . . . . . . . . . . . . . . . . . . . .2-2
Setting Up the Board for Software-Initiated D/A Conversions . .2-3
Setting Up the Board for D/A Conversions in Recycle Mode . . .2-4
Using SSH . . . . . . . . . . . . . . . . . . . . . . . . . . . . . . . . . . . . . . . . . .2-5
Summary of Trigger and Gate Functions for A/D Conversions. .2-6
Summary of Trigger and Gate Functions for D/A Conversions. .2-7
Pin Assignments. . . . . . . . . . . . . . . . . . . . . . . . . . . . . . . . . . . . .2-10
iii

iv
Summary of I/O Address Bits
A
List of Figures
Figure 2-1. Main I/O Connector. . . . . . . . . . . . . . . . . . . . . . .2-10
List of Tables
Table 1-1. I/O Address Map . . . . . . . . . . . . . . . . . . . . . . . . . .1-1
Table 1-2. Data Format for A/D Conversions (Bipolar). . . . .1-6
Table 1-3. Data Format for A/D Conversions (Unipolar). . . .1-7
Table 1-4. A/D Gain Codes. . . . . . . . . . . . . . . . . . . . . . . . . .1-10
Table 1-5. A/D Data Select Register Bit. . . . . . . . . . . . . . . .1-11
Table 1-6. Interrupt Level Select Bits. . . . . . . . . . . . . . . . . .1-18
Table 1-7. A/D DMA Channel Select Bits . . . . . . . . . . . . . .1-19
Table 1-8. A/D Pacer Clock Select Bits . . . . . . . . . . . . . . . .1-22
Table 1-9. Summary of A/D Status Register Bits. . . . . . . . .1-28
Table 1-10. Data Format for D/A Conversions. . . . . . . . . . . .1-35
Table 1-11. Digital-to-Analog Converters . . . . . . . . . . . . . . .1-37
Table 1-12. D/A DMA Channel Select Bits . . . . . . . . . . . . . .1-44
Table 1-13. D/A Gain Codes. . . . . . . . . . . . . . . . . . . . . . . . . .1-46
Table 1-14. D/A Pacer Clock Select Bits . . . . . . . . . . . . . . . .1-47
Table 1-15. Summary of D/A Status Register Bits. . . . . . . . .1-53
Table 2-1. Trigger/Gate Functions
(Internal A/D Pacer Clock) . . . . . . . . . . . . . . . . . .2-6
Table 2-2. Trigger/Gate Functions (External Pacer Clock) . .2-7
Table 2-3. Trigger/Gate Functions
(Internal D/A Pacer Clock) . . . . . . . . . . . . . . . . . .2-8
Table 2-4. Trigger/Gate Functions (External Pacer Clock) . .2-9
Table 2-5. Pin Assignments . . . . . . . . . . . . . . . . . . . . . . . . .2-11
Table A-1. Summary of I/O Address Bits . . . . . . . . . . . . . . . A-1

1
I/O Addresses
DAS-1800AO Series boards require a total of 26 8-bit locations in the I/O
space of your host computer: 16 locations starting at the base address and
10 locations starting at the base address plus 400h. You assign the base
address by setting switches on the DAS-1800A O Series board; refer to the
DAS-1800AO Series User’s Guide for more information on setting the
base address.
Since the base address is variable, the individual I/O addresses are
described as offsets from the selected base address, as shown in Table 1-1.
The write and read functions of the registers are also summarized in
Table 1-1.
Table 1-1. I/O Address Map
Location Name Type Function
Base + 0h
Base + 2h A/D Data Select R/W Specifies the register at Base Address + 0h that you
1
A/D Data
A/D CNVRT
A/D QRAM Data
2
2
Read A/D conversion data stored in the A/D FIFO. Refer
to page 1-5.
Write Initiates an A/D conversion. Refer to page 1-9.
2
R/W Specifies the channel and gain code at the currently
selected location in the A/D QRAM. Refer to
page 1-9.
want to access. Refer to page 1-11.
1-1

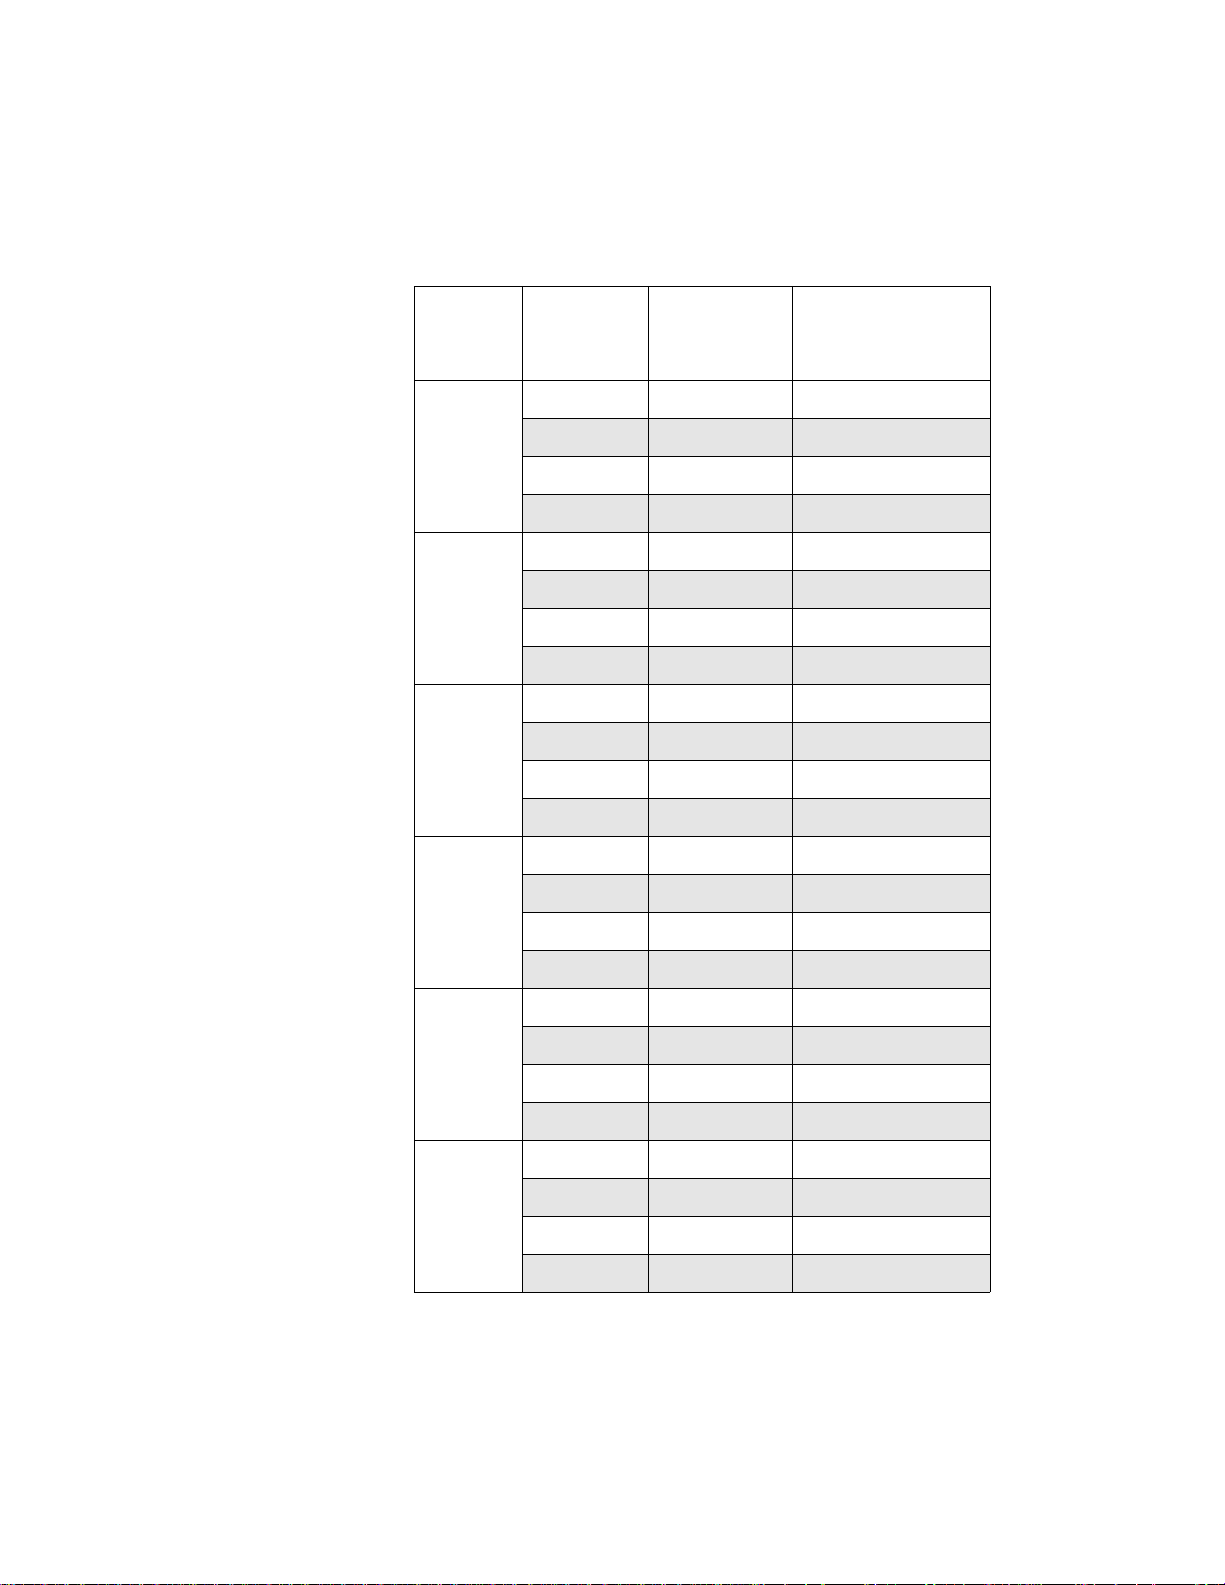
Table 1-1. I/O Address Map (cont.)
Location Name Type Function
Base + 3h Digital I/O Read Returns the v alue of the four digital input lines (DI0
to DI3) and the board identification. Refer to
page 1-12.
Write Writes a value to the four digital output lines (DO0
to DO3). Refer to page 1-12.
Base + 4h A/D Control A R/W Controls the trigger/gate and A/D FIFO enable
functions for A/D conversions. Refer to page 1-13.
Base + 5h A/D Control B R/W Controls interrupt mode and DMA mode for A/D
conversions and controls the interrupt level for D/A
conversions. Refer to page 1-16.
Base + 6h A/D Control C R/W Controls the input range type (unipolar or bipolar),
the input configuration (single-ended or
differential), the A/D pacer clock source, and
burst-mode A/D conversions. Refer to page 1-20.
Base + 7h A/D Status Read Allows you to monitor the status of eight onboard
signals. Refer to page 1-22.
Write Enables/disables A/D conversions and clears/masks
the event-driven interrupt bits. Refer to page 1-22.
Base + 8h Burst Length R/W Specifies the number of channels in the scan when
performing burst-mode A/D conversions. Refer to
page 1-29.
Base + 9h Burst Mode
Conversion Rate
R/W Specifies the burst mode conversion rate when
performing burst-mode A/D conversions. Refer to
page 1-30.
Base + Ah A/D QRAM Address
Start
R/W Specifies the starting address of the channel-gain
queue within the A/D QRAM. Refer to page 1-31.
Base + Bh Not used - - - - - Base + Ch A/D Counter 0 R/W Allow you to program the three counters of the
Base + Dh A/D Counter 1 R/W
82C54 Programmable Counter/Timer. Refer to
page 1-33.
Base + Eh A/D Counter 2 R/W
Base + Fh A/D Counter Control Write
1
Base + 400h
D/A Data Write The output value to load into the D/A FIFO. Refer
to page 1-34.
1-2 I/O Addresses
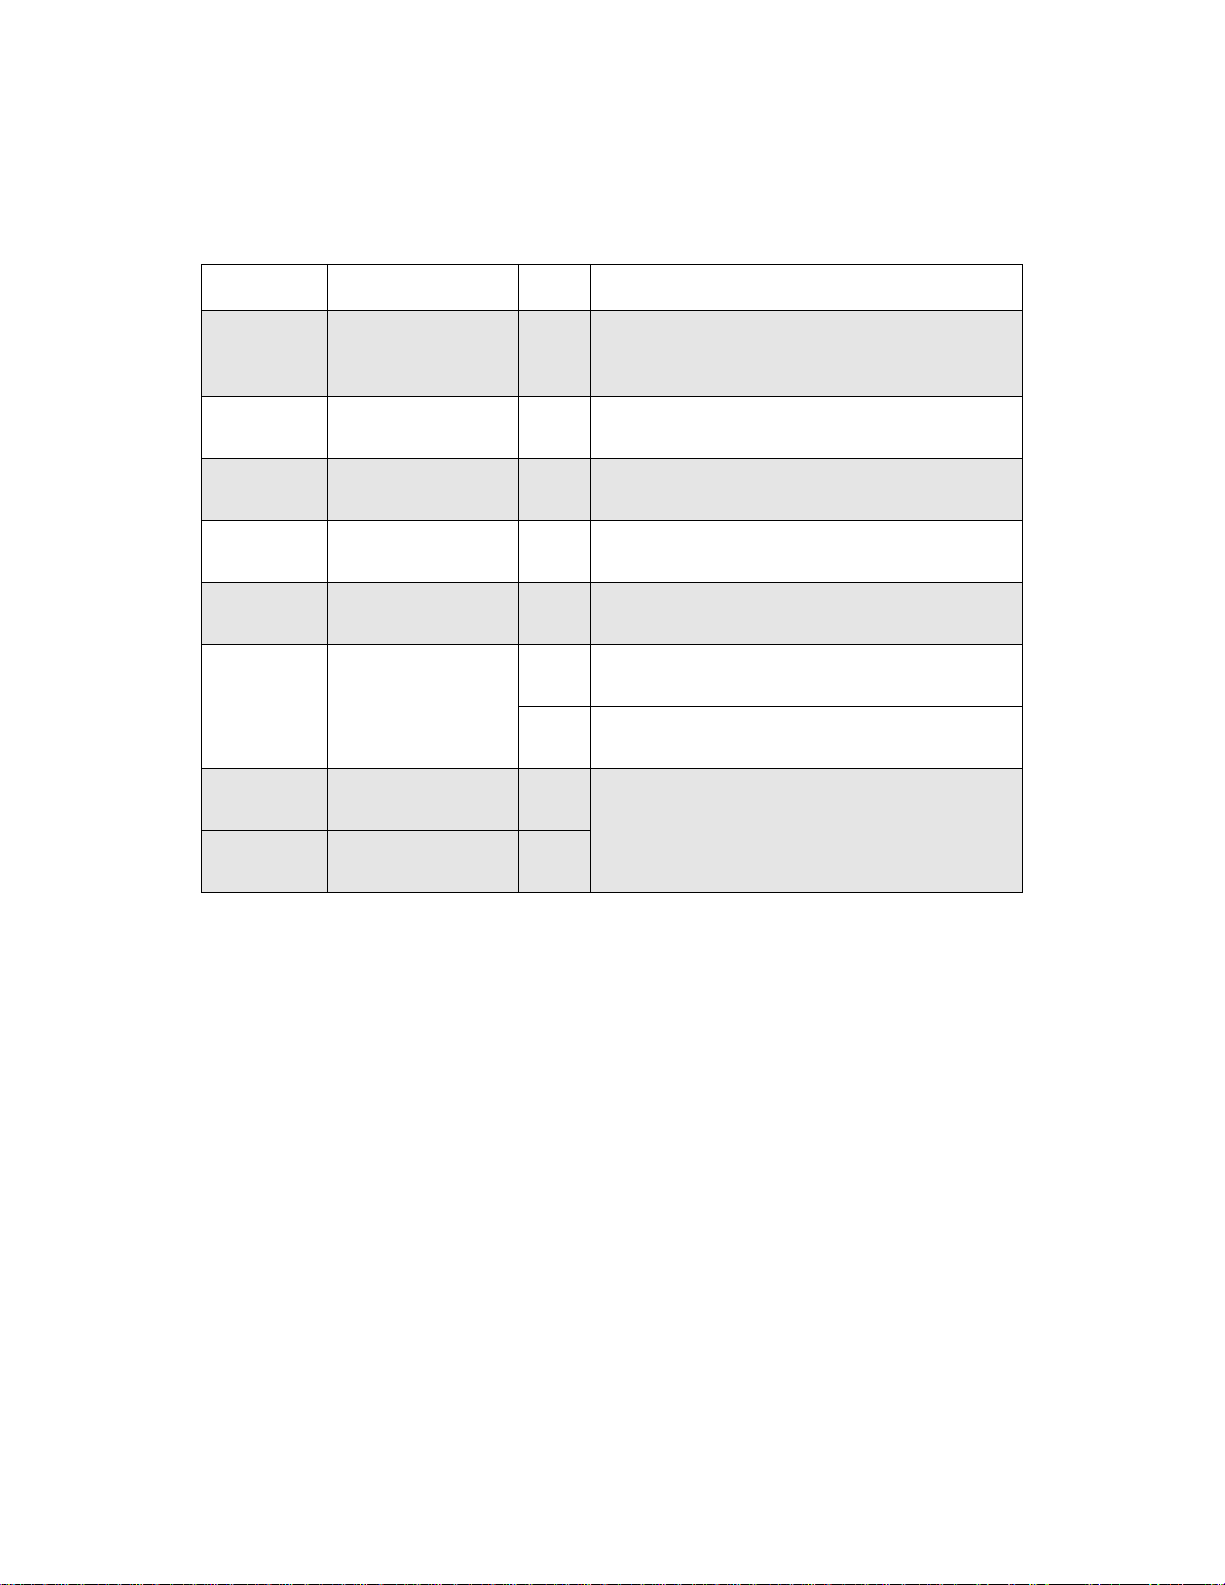
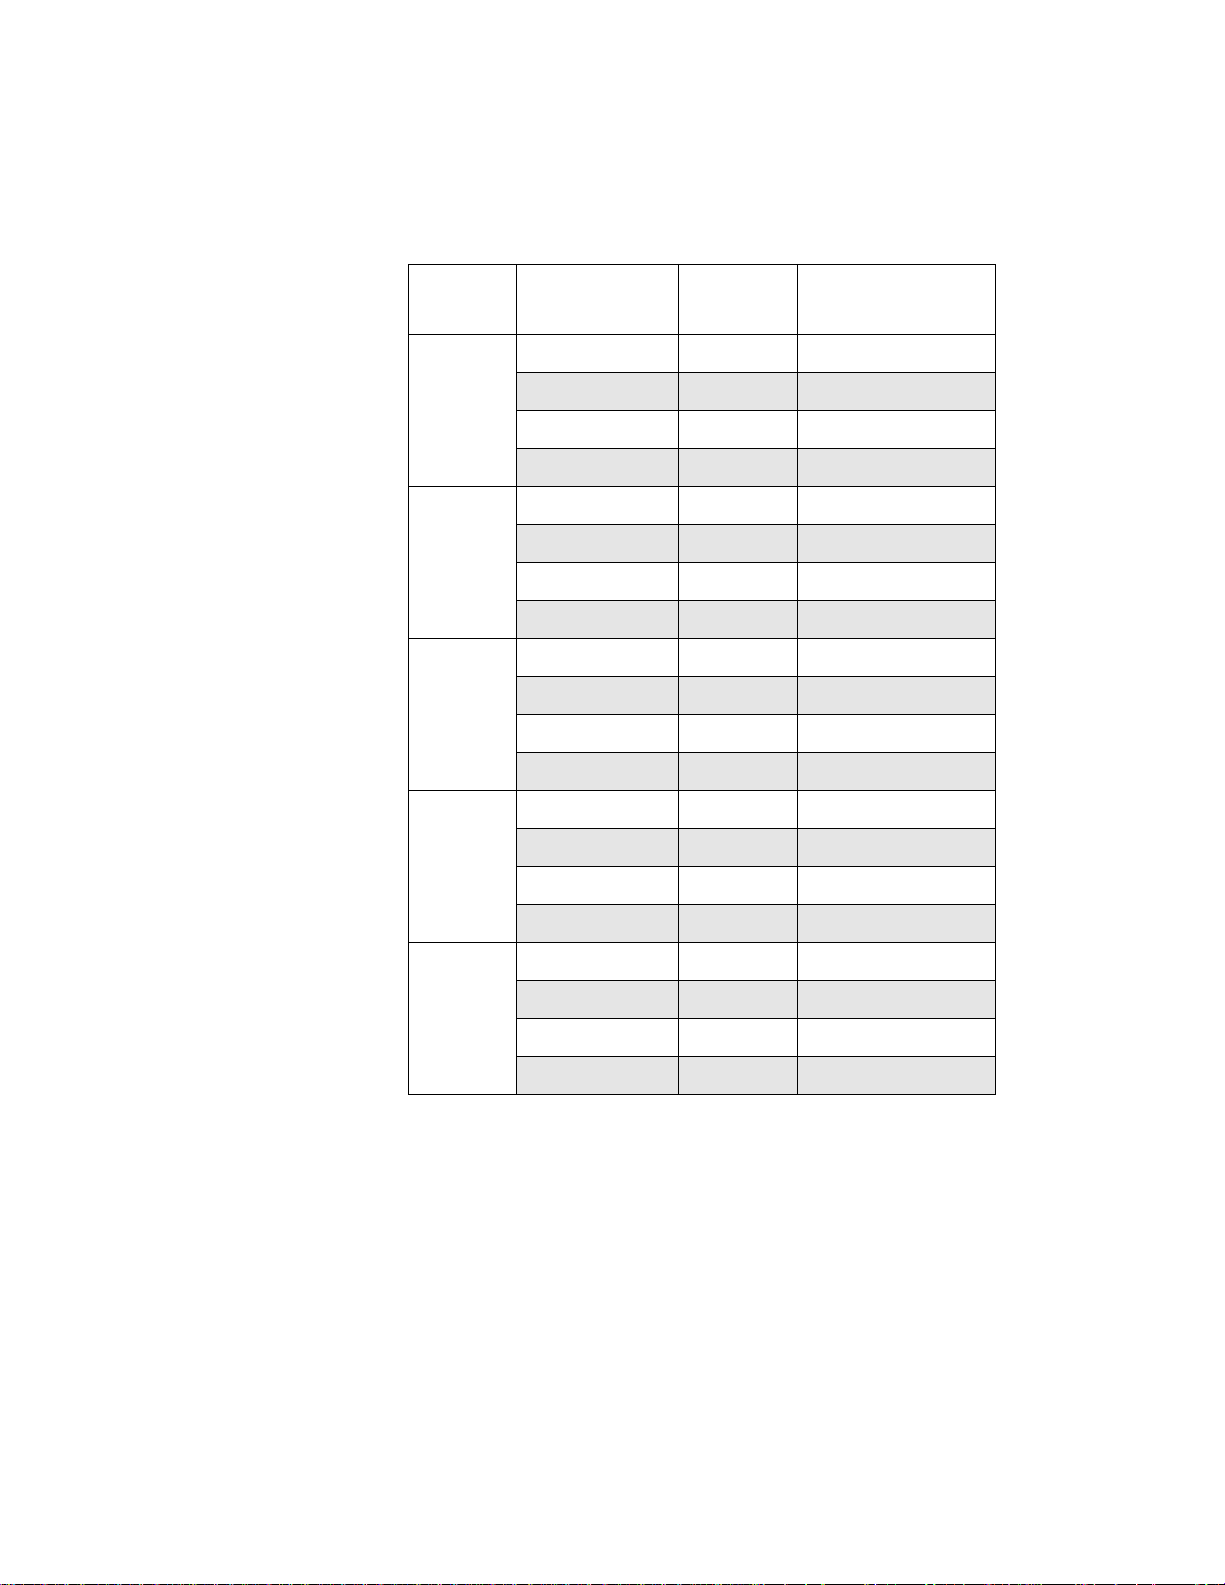
Table 1-1. I/O Address Map (cont.)
Location Name Type Function
Base + 402h D/A Data Select R/W Specifies the DACs you want to update and the
three most significant bits of the D/A recycle count
value. Refer to page 1-36.
Base + 403h D/A Recycle Count R/W Specifies the eight least significant bits of the D/A
recycle count value. Refer to page 1-38.
Base + 404h D/A Control A R/W Controls the trigger/gate and D/A FIFO enable
functions for D/A conversions. Refer to page 1-39.
Base + 405h D/A Control B R/W Controls interrupt mode and DMA mode for D/A
conversions. Refer to page 1-42.
Base + 406h D/A Control C R/W Controls the output range and the D/A pacer clock.
Refer to page 1-45.
Base + 407h D/A Status Read Allows you to monitor the status of eight onboard
signals. Refer to page 1-47.
Write Enables/disables D/A conv ersions and clears/masks
the event-driven interrupt bits. Refer to page 1-47.
Base + 408h D/A Conversion
Counter LSB
Base + 409h D/A Conversion
R/W Specify the count to load into the D/A Counter.
Refer to page 1-53.
R/W
Counter MSB
Notes
1
A read from or a write to base address + 0h or base address + 400h is a 16-bit operation; therefore, the
locations at base address +1h and base address +401h are not available.
2
An indirect addressing technique is used to determine which of these registers is accessed. Refer to
page 1-4 for more information.
1-3

Note:
All register bits shown with a value of 0 (except the board
identification bits) are reserved for internal use and are subject to change
without notice. Do not use these bits.
The board identification bits, which are in the upper nibble of the Digital
I/O register (Base Address +3h, Read), are fixed at a value of 0101 (5h)
for DAS-1800AO Series boards. These bits will never change.
All register bits shown with a value of X are not implemented for
DAS-1800AO Series boards.
The following sections describe the I/O map in more detail.
A/D Data, A/D CNVRT, or A/D QRAM Data
(Base Address + 0h, Read/Write)
The location at Base Address + 0h is used for three different purposes,
depending on the state of the DSL0 bit of the A/D Data Select register
(Base Address + 2h, Write) and whether you are reading or writing to the
location at Base Address + 0h.
The location at Base Address + 0h is used as follows:
A/D Data (DSL0 = 0, Read) - A/D Data contains analog-to-digital
●
(A/D) conversion data stored in the A/D FIFO. Refer to the next
section for more information about A/D Data.
A/D CNVRT (DSL0 = 0, Write) - A/D CNVRT initiates an A/D
●
conversion. Refer to page 1-9 for more information about A/D
CNVRT.
A/D QRAM Data (DSL0 = 1, Read/Write) - A/D QRAM Data
●
specifies the channel and gain code at the currently selected location
in the A/D QRAM (the A/D QRAM is the onboard RAM storage for
the channel-gain queue). Refer to page 1-9 for more information
about A/D QRAM Data.
Refer to page 1-11 for more information about DSL0 .
1-4 I/O Addresses

A/D Data (Base Address + 0h, Read)
A/D Data is the A/D conversion data stored in the A/D FIFO. A/D Data is
accessed when DSL0 of the A/D Data Select register is set to 0.
Bit assignments for A/D Data in DAS-1800AO Series boards set for a
bipolar input range are as follows:
1514131211109876543210
D11D11D11D11D11D10 D9 D8 D7 D6 D5 D4 D3 D2 D1 D0
Bit assignments for A/D Data in DAS-1800AO Series boards set for a
unipolar input range are as follows:
1514131211109876543210
0000D11D10 D9 D8 D7 D6 D5 D4 D3 D2 D1 D0
A/D Data uses 16-bit data transfers on the computer bus; howe ver, data in
DAS-1800AO Series boards is 12-bits long and right-justified.
When reading data in a bipolar input range, data is represented in twos
complement format; D11 is the sign bit and bits 15 through 12 are
sign-extender bits that are always equal to D11. A code of 1111 1000
0000 0000 represents negative full scale, a code of 0000 0111 1111 1111
represents positive full scale, and a code of 0000 0000 0000 0000
represents 0 V. Table 1-2 lists the appropriate codes for several analog
input ranges.
1-5
−
−
−
−
−
−
−
−
−
−
−
−
−
−
−
−
−
−
−
−
Table 1-2. Data Format for A/D Conversions (Bipolar)
Twos
Input
Range
±20 mV +19.999 mV +2047 0000 0111 1111 1111
Voltage
0.000 mV 0 0000 0000 0000 0000
Complement
Code Value of D15 to D0
9.7 µ V
20.000 mV − 2048 1111 1000 0000 0000
±0.1 V +99.951 mV +2047 0000 0111 1111 1111
0.000 mV 0 0000 0000 0000 0000
48.83 µ V − 1 1111 1111 1111 1111
0.1000 V
±1 V +0.9995 V +2047 0000 0111 1111 1111
0.000 mV 0 0000 0000 0000 0000
0.488 mV − 1 1111 1111 1111 1111
1.0000 V
±1.25 V +1.2494 V +2047 0000 0111 1111 1111
0.000 V 0 0000 0000 0000 0000
0.61 mV
1.2500 V
±2.5 V +2.4988 V +2047 0000 0111 1111 1111
0.0000 V 0 0000 0000 0000 0000
1 1111 1111 1111 1111
2048 1111 1000 0000 0000
2048 1111 1000 0000 0000
1 1111 1111 1111 1111
2048 1111 1000 0000 0000
1.221 mV − 1 1111 1111 1111 1111
2.5000 V
±5 V +4.9976 V +2047 0000 0111 1111 1111
0.0000 V 0 0000 0000 0000 0000
2.44 mV
5.0000 V
1-6 I/O Addresses
2048 1111 1000 0000 0000
1 1111 1111 1111 1111
2048 1111 1000 0000 0000

−
−
−
Table 1-2. Data Format for A/D Conversions (Bipolar) (cont.)
Twos
Input
Range
±10 V +9.9951 V +2047 0000 0111 1111 1111
Voltage
0.0000 V 0 0000 0000 0000 0000
Complement
Code Value of D15 to D0
4.88 mV
10.0000 V − 2048 1111 1000 0000 0000
1 1111 1111 1111 1111
When reading data in a unipolar input range, the data represents the
positive magnitude of the measured v alue; bits 15 through 12 are always 0
to indicate positive magnitude. A code of 0000 0000 0000 0000
represents 0 V and a code of 0000 1111 1111 1111 represents positive full
scale. Table 1-3 lists the appropriate codes for several analog input
ranges.
Table 1-3. Data Format for A/D Conversions (Unipolar)
Positive
Range Input Voltage
0 to 20 mV 19.995 mV 4095 0000 1111 1111 1111
10.000 mV 2048 0000 1000 0000 0000
4.88 µ V 1 0000 0000 0000 0001
Magnitude Value of D15 to D0
0.000 mV 0 0000 0000 0000 0000
0 to 0.1 V 99.976 mV 4095 0000 1111 1111 1111
50.000 mV 2048 0000 1000 0000 0000
24.414 mV 1 0000 0000 0000 0001
0.000 mV 0 0000 0000 0000 0000
1-7
1
5
Table 1-3. Data Format for A/D Conversions (Unipolar) (cont.)
Positive
Range Input Voltage
0 to 1 V 0.9995 V 4095 0000 1111 1111 1111
0.5000 V 2048 0000 1000 0000 0000
0.244 mV 1 0000 0000 0000 0001
0.000 mV 0 0000 0000 0000 0000
0 to 1.25 V 1.2497 V 4095 0000 1111 1111 1111
0.6250 V 2048 0000 1000 0000 0000
0.305 mV 1 0000 0000 0000 0001
0.0000 V 0 0000 0000 0000 0000
Magnitude Value of D15 to D0
0 to 2.5 V 2.4994 V 4095 0000 1111 1111 1111
.2500 V 2048 0000 1000 0000 0000
0.610 mV 1 0000 0000 0000 0001
0.0000 V 0 0000 0000 0000 0000
0 to 5 V 4.9988 V 4095 0000 1111 1111 1111
2.5000 V 2048 0000 1000 0000 0000
1.22 mV 1 0000 0000 0000 0001
0.0000 V 0 0000 0000 0000 0000
0 to 10 V 9.9976 V 4095 0000 1111 1111 1111
.0000 V 2048 0000 1000 0000 0000
2.44 mV 1 0000 0000 0000 0001
0.0000 V 0 0000 0000 0000 0000
1-8 I/O Addresses

A/D CNVRT (Base Address + 0h, Write)
Writing any value to A/D CNVRT initiates an A/D conversion; the actual
value written is ignored. A/D CNVRT is accessed when DSL0 of the A/D
Data Select register is set to 0.
An A/D conversion is initiated only if the following conditions exist:
●
The software A/D pacer clock is selected ( S1 and S0 of A/D Control
register C are set to 00). Refer to page 1-22 for information.
Conversions are enabled ( CVEN of the A/D Status register is set
●
to 1). Refer to page 1-22 for information.
●
A/D CNVRT is selected ( DSL0 of the A/D Data Select register is set
to 0). Refer to page 1-11 for information.
A/D QRAM Data (Base Address + 0h, Read/Write)
A/D QRAM Data specifies the channel and gain code at the currently
selected location in the A/D QRAM. A/D QRAM Data is accessed when
DSL0 of the A/D Data Select register is set to 1.
Note:
starting address specified in the A/D QRAM Address Start register and
the number of times the starting address has been decremented. Refer to
page 1-31 for more information.
Bit assignments for A/D QRAM Data are as follows:
1514131211109876543210
XXXXXGEXT GN1 GN0 MUX7 MUX6 MUX5 MUX4 MUX3 MUX2 MUX1 MUX0
The location currently selected in the A/D QRAM depends on the
1-9

The bits are described as follows:
GEXT (External Gain Control) - Controls the GEXT pin (pin 39)
●
of the main I/O connector. The GEXT pin can be used for such things
as setting the gain of a DAS-1800AO Series accessory board.
GN1 and GN0 (Gain Code Select) - Specifies the gain code for the
●
currently selected location in the A/D QRAM. The gain codes are
shown in Table 1-4.
.
Table 1-4. A/D Gain Codes
Gain Code A/D Gain Value
GN1 GN0 DAS-1801AO DAS-1802AO
001 1
0 1 5 2
1050 4
1 1 250 8
MUX7 to MUX0 (Analog Input Multiplexer Control) - Specifies
●
the channel number for the currently selected location in the A/D
QRAM. For a single-ended input configuration, you can specify
channels 0 to 15 without expansion or channels 0 to 255 with
expansion; for a differential input configuration, you can specify
channels 0 to 7 without expansion or channels 0 to 127 with
expansion.
Before reading data from or writing data to A/D QRAM Data, you must
do the following:
●
Specify the starting address of the A/D QRAM in the A/D QRAM
Address Start register. Refer to page 1-31 for more information.
Disable A/D conversions by setting CVEN of the A/D Status register
●
to 0. Refer to page 1-22 for more information.
Select A/D QRAM Data by setting DSL0 of the A/D Data Select
●
register to 1. Refer to the next section for more information.
1-10 I/O Addresses

A/D Data Select Register
(Base Address + 2h, Read/Write)
The A/D Data Select register is a read/write register that specifies the
16-bit register at Base Address + 0h that you w ant to access. This register
is set to 00h during power-up reset.
Bit assignments for the A/D Data Select register are as follows:
76543210
0000000DSL0
The DSL0 (Data Select) bit specifies the register at Base Address + 0h
that you want to access, as shown in Table 1-5.
Table 1-5. A/D Data Select Register Bit
DSL0 Read Register Write Register
0 A/D Data A/D CNVRT
1 A/D QRAM Data A/D QRAM Data
1-11

Digital I/O Register (Base Address + 3h, Read/Write)
The Digital I/O register is a read/write register that allows you to read the
state of the four digital input lines (DI0 to DI3) on DAS-1800AO Series
boards or write to the four digital output lines (DO0 to DO3) on
DAS-1800AO Series boards.
Bit assignments when reading the Digital I/O register are as follows:
76543210
0101DI3DI2DI1DI0
Bit assignments when writing to the Digital I/O register are as follows:
76543210
XXXXDO3DO2DO1DO0
Notes: Although the digital input lines (DI0 to DI3) use the same I/O
locations as the digital output lines (DO0 to DO3), these lines are
independent. The data read from the Digital I/O register is not the same as
the data written to the Digital I/O register unless the digital output lines
are externally connected to the digital input lines.
When reading the Digital I/O register, the value of bits 4 through 7 is
fixed at 0101 (5h) for DAS-1800AO Series boards; these bits are used for
board identification.
1-12 I/O Addresses

A/D Control Register A
(Base Address + 4h, Read/Write)
A/D Control register A is a read/write register that controls the
trigger/gate and A/D FIFO enable functions for A/D conversions. This
register is set to 00h during power-up or system reset.
Bit assignments for A/D Control Register A are as follows:
76543210
ATEN TGPL TGSL TGEN CGSL CGEN SHEN FFEN
The bits are described as follows:
● ATEN (About-Trigger Enable) - Enables/disables about-trigger
mode, as follows:
– ATEN = 0 disables about-trigger mode.
– ATEN = 1 enables about-trigger mode.
About-trigger mode uses A/D Counter 0 as a post-trigger counter.
A/D Counter 0 must be programmed for Interrupt On T erminal Count
(82C54 Mode 0). Conversions can be started by software (TGEN of
this register is set to 0) or by an external trigger (TGEN of this
register is set to 1).
At the first active edge at the TGIN pin (pin 46) of the main I/O
connector (if TGEN = 0) or at the next activ e edge at the TGIN pin (if
TGEN = 1), A/D Counter 0 is loaded with the number of post-trigger
conversions you want to perform and begins counting down. When
A/D Counter 0 counts down to zero (A/D Counter 0 Terminal Count),
A/D conversions stop. If interrupts are enabled (IL2 to IL0 of A/D
Control register B are set to an appropriate level), an interrupt is
generated when A/D Counter 0 reaches zero.
You specify the number of post-trigger conversions in the A/D
Counter registers; refer to page 1-33. You specify the active polarity
of the TGIN signal in TGPL of this register.
1-13

● TGPL (A/D Trigger/Gate Input Polarity Select) - Specifies the
active polarity of the external trigger/gate signal (the signal at the
TGIN pin (pin 46) of the main I/O connector) for A/D conversions, as
follows:
– If TGPL = 0, A/D conversions begin at a negative edge of the
external trigger signal or A/D conversions occur whenever the
external gate signal is low.
– If TGPL = 1, A/D conversions begin at a positive edge of the
external trigger signal or A/D conversions occur whenever the
external gate signal is high.
Note: The TGSL bit of this register determines whether the signal at
the TGIN pin of the main I/O connector is used as an external trigger
signal or an external gate signal.
● TGSL (Trigger/Gate Select) - Specifies whether the signal at the
TGIN pin (pin 46) of the main I/O connector is used as an external
trigger signal or an external gate signal for A/D conversions, as
follows:
– TGSL = 0 selects an external trigger (edge-sensitive).
– TGSL = 1 selects an external gate (level-sensitive).
Notes: This bit has no function if an external trigger/gate is disabled
(TGEN of this register is set to 0).
In about-trigger mode, make sure that TGSL = 0.
● TGEN (A/D Hardware Trigger/Gate Enable) - Enables/disables
the TGIN pin (pin 46) of the main I/O connector as an external trigger
or gate for A/D conversions, as follows:
– TGEN = 0 disables an external trigger/gate.
– TGEN = 1 enables an external trigger/gate.
1-14 I/O Addresses

Notes: The TGSL bit of this register determines whether the signal
at TGIN is used as an external trigger signal or an external gate
signal.
TGEN does not enable/disable TGIN as the gate source for the
cascaded A/D Counter 1/Counter 2; to do this, set CGSL of this
register to 1.
If TGEN = 1 and about-trigger mode is enabled (ATEN of this
register is set to 1), the first external trigger starts con v ersions and the
second external trigger loads the post-trigger counter
(A/D Counter 0). If TGEN = 0 and about-trigger mode is enabled,
conversions start immediately and the first active edge at the TGIN
pin loads the post-trigger counter.
● CGSL (A/D Counter 1/Counter 2 Gate Source Select) - Specifies
the gate source for the cascaded A/D Counter 1/Counter 2 (the
internal A/D pacer clock), as follows:
– CGSL = 0 selects the CGEN bit of this register as the internal
gate source; A/D Counter 1/Counter 2 counts down only when
CGEN is set to 1.
– CGSL = 1 selects the TGIN pin (pin 46) of the main I/O
connector as the external gate source; A/D Counter 1/Counter 2
counts down only when the signal at TGIN is active (the active
polarity is determined by TGPL of this register).
● CGEN (A/D Counter 1/Counter 2 Gate Enable/Disable) - This bit
is the internal gate source for the cascaded A/D Counter 1/Counter 2.
It is set as follows:
– CGEN = 0 disables the internal gate source.
– CGEN = 1 enables the internal gate source.
Note: This bit has no function unless CGSL of this register is set to
0.
1-15

● SHEN (Sample and Hold Enable/Disable) - Enables/disables the
capability of a DAS-1800AO Series boards to work with an external
sample-and-hold source, as follows:
– SHEN = 0 disables the sample-and-hold capability.
– SHEN = 1 enables the sample-and-hold capability.
Refer to page 2-5 for more information about using a
sample-and-hold source with DAS-1800AO Series boards.
● FFEN (A/D FIFO Enable) - Enables/resets the A/D FIFO's read and
write address pointers, as follows:
– FFEN = 0 resets the A/D FIFO's address pointers.
– FFEN = 1 enables the A/D FIFO's address pointers.
Note: To ensure proper FIFO operation, it is recommended that you
reset the A/D FIFO's read and write address pointers (set FFEN to 0)
before you enable the A/D FIFO (set FFEN to 1).
Refer to page 2-6 for a summary of the trigger and gate functions
specified in A/D Control register A.
A/D Control Register B
(Base Address + 5h, Read/Write)
A/D Control register B is a read/write register that controls interrupt
mode and DMA mode for A/D conversions. This register is set to 00h
during power-up or system reset.
Bit assignments for A/D Control register B are as follows:
76543210
CIEN FIMD IL2 IL1 IL0 DL2 DL1 DL0
1-16 I/O Addresses

The bits are described as follows:
● CIEN (Interrupt Enable/Disable on A/D Counter 1/Counter 2
Terminal Count) - Enables/disables the generation of an interrupt
when A/D Counter 2 of the cascaded A/D Counter 1/Counter 2 (the
internal A/D pacer clock) reaches terminal count, as follows:
– CIEN = 0 disables the interrupt on A/D Counter 2 terminal count.
– CIEN = 1 enables the interrupt on A/D Counter 2 terminal count.
● FIMD (A/D FIFO Interrupt Mode Select) - Specifies the A/D FIFO
interrupt mode, as follows:
– FIMD = 0 generates an interrupt on an A/D FIFO Not Empty
event. (An A/D FIFO Not Empty event occurs when at least one
sample has been stored in the A/D FIFO.)
– FIMD = 1 generates an interrupt on an A/D FIFO Half Full ev ent.
(An A/D FIFO Half Full event occurs when the A/D FIFO
becomes half full of data.)
Note: This bit has no function unless interrupts are enabled (IL2 to
IL0 of this register are set to an appropriate level) and DMA is
disabled (DL2 to DL0 of this register are set to 000 or 100).
● IL2 to IL0 (Interrupt Level Select) - Specifies the interrupt lev el for
both A/D and D/A conversions, as shown in Table 1-6. Specifying an
interrupt level automatically enables interrupt mode for A/D
conversions.
1-17

Table 1-6. Interrupt Level Select Bits
IL2 IL1 IL0 Interrupt Level
0 0 0 Interrupts disabled
0 0 1 Level 3
010Level 5
0 1 1 Level 7
1 0 0 Interrupts disabled
1 0 1 Level 10
110Level 11
1 1 1 Level 15
Note: DAS-1800AO Series boards use pulsed interrupts; this allows
a DAS-1800AO Series board to share an interrupt level with another
DAS-1800AO Series board. However, sharing an interrupt level with
an I/O device other than another DAS-1800AO Series board may
cause a bus conflict.
If IL2 to IL0 are set to an appropriate level and DMA is disabled for
A/D conversions (DL2 to DL0 of this register are set to 000 or 100),
any of the following events generates an interrupt:
– A/D FIFO Not Empty (only if FIMD of this register is set to 0)
– A/D FIFO Half Full (only if FIMD of this register is set to 1)
– A/D FIFO Overflow
– A/D DMA Terminal Count
– A/D Counter 0 Terminal Count
– A/D Counter 2 Terminal Count (only if CIEN of this register is
set to 1)
Refer to the description of the A/D Status register on page 1-22 for
more information about these interrupt events.
1-18 I/O Addresses

If IL2 to IL0 are set to an appropriate level and DMA is enabled for
A/D conversions (DL2 to DL0 of this register are set to an
appropriate channel or channels), an interrupt is generated on
terminal count from the computer’s DMA controller.
● DL2 to DL0 (A/D DMA Channel Select) - Specifies the DMA
channel (or channels) for A/D conversions, as shown in Table 1-7.
Specifying a DMA channel (or channels) automatically enables
DMA mode for A/D conversions.
Caution: Make sure that the DMA channel you select for A/D
conversions is different from the DMA channel you select for D/A
conversions (DL1 and DL0 of D/A Control register B). If the DMA
channels are the same, a hardware conflict will exist. Refer to
page 1-44 for information on selecting a DMA channel for D/A
conversions.
Table 1-7. A/D DMA Channel Select Bits
DL2 DL1 DL0 A/D DMA Channel
0 0 0 DMA disabled
0 0 1 Channel 5
0 1 0 Channel 6
0 1 1 Channel 7
1 0 0 DMA disabled
1 0 1 Channels 5 and 6
1 1 0 Channels 6 and 7
1 1 1 Channels 7 and 5
1-19

Notes: As long as the A/D FIFO contains data, a DMA request
remains active on the PC bus.
If D2 to D0 are set to an appropriate channel or channels and
interrupts are enabled for A/D con v ersions (IL2 to IL0 of this register
are set to an appropriate level), an interrupt is generated on terminal
count from the computer’s DMA controller.
The DMA controller must be programmed for DEMAND mode.
In dual DMA mode, the first DMA channel in the pair is used for the
first data transfer. For example, if DL2 to DL0 = 101, DMA
channel 5 is used for the first data transfer and DMA channel 6 is
used for the next data transfer.
A/D Control Register C
(Base Address + 6h, Read/Write)
A/D Control Register C is a read/write register that controls the input
range type (unipolar or bipolar), the input configuration (single-ended or
differential), the A/D pacer clock source, and burst-mode A/D
conversions. This register is set to 00h during power-up or system reset.
Bit assignments for A/D Control register C are as follows:
76543210
U/B S/D 0 UQEN CMEN BMDE S1 S0
The bits are described as follows:
● U/B (Unipolar/Bipolar Select) - Specifies the input range type, as
follows:
– U/B = 0 specifies bipolar mode.
– U/B = 1 specifies unipolar mode.
1-20 I/O Addresses

● S/D (Single-ended/Differential Select) - Specifies the input
configuration, as follows:
– S/D = 0 specifies differential mode.
– S/D = 1 specifies single-ended mode.
● UQEN (Upper QRAM Addr ess Bits Enable) - Enables/disables the
QAS6 and QAS7 bits of the A/D QRAM Address Start register, as
follows:
– UQEN = 0 disables QAS6 and QAS7.
– UQEN = 1 enables QAS6 and QAS7.
Caution: For DAS-1800AO Series boards, this bit must always be
set to 1.
● CMEN (Common Mode Input Enable) - Enables/disables
common-mode input. Common-mode input allows you to connect
your analog input return signal to the low side of the analog input
instrumentation amplifier instead of to analog ground.
The CMEN bit is set as follows:
– CMEN = 0 disables common-mode input.
– CMEN = 1 enables common-mode input.
Note: Set this bit to 1 only when your board is in single-ended mode.
● BMDE (Burst Mode Enable/Disable) - Enables/disables
burst-mode A/D conversions, as follows:
– BMDE = 0 disables burst mode.
– BMDE = 1 enables burst mode.
Note: If you are using a sample-and-hold accessory board with your
DAS-1800AO Series board, you must enable burst mode.
1-21

● S1 and S0 (A/D Pacer Clock Source Select) - Specifies the pacer
clock source for A/D conversions, as shown in Table 1-8.
Table 1-8. A/D Pacer Clock Select Bits
S1 S0 A/D Pacer Clock Source
0 0 Software clock
0 1 Internal A/D pacer clock
1 0 External pacer clock (rising edge)
1 1 External pacer clock (falling edge)
A/D Status Register (Base Address + 7h, Read/Write)
Reading the A/D Status register allows you to monitor the status of eight
onboard signals. Writing to the A/D Status register enables/disables A/D
conversions and clears/masks the e v ent-dri v en interrupt bits. This re gister
is set to a value of 00h during power-up or system reset.
Bit assignments for the A/D Status register are as follows:
765432 10
CVEN FNE FHF OVF C0TC C2TC DMATC INT
The bits are described as follows:
● CVEN (Enable/Disable A/D Conversions) - Enables/disables A/D
conversions, as follows:
– CVEN = 0 disables A/D conversions; no A/D conversions take
place.
– CVEN = 1 enables A/D conversions; A/D conversions take place
depending on the states of triggers, gates, and pacer clocks.
1-22 I/O Addresses

The board automatically disables A/D con v ersions (CVEN = 0) in the
following situations:
– An A/D FIFO Overflow event occurs (OVF of this register is set
to 1).
– In about-trigger mode, an A/D Counter 0 Terminal Count event
occurs (C2TC of this register is set to 1).
Note: You can write to CVEN only if you also write a 0 to bit 6
(FNE) of this register; this prevents your overwriting CVEN when
you clear other bits in this register. Since the state of FNE comes
directly from the A/D FIFO, writing a 0 to bit 6 does not set FNE to
0.
● FNE (A/D FIFO Not Empty) - The state of this bit comes directly
from the A/D FIFO and indicates whether the A/D FIFO contains at
least one sample, as follows:
– FNE = 0 indicates that the A/D FIFO is empty.
– FNE = 1 indicates that the A/D FIFO contains data.
If the following conditions are true when the A/D FIFO Not Empty
event occurs (FNE is set to 1), the board automatically generates an
interrupt and sets INT of this register to 1:
– Interrupts are set to occur on A/D FIFO Not Empty (FIMD of
A/D Control register B is set to 0).
– Interrupts are enabled (IL2 to IL0 of A/D Control register B are
set to an appropriate level).
– DMA is disabled (DL2 to DL0 of A/D Control register B are set
to 000 or 100).
Note: Since the state of FNE comes directly from the A/D FIFO, you
cannot manually change FNE.
1-23

● FHF (A/D FIFO Half Full) - The state of this bit comes directly
from the A/D FIFO and indicates whether the A/D FIFO is at least
half full of data, as follows:
– FHF = 0 indicates that the A/D FIFO is not yet half full of data
(less than 512 words).
– FHF = 1 indicates that the A/D FIFO is at least half full of data
(512 words or more).
If the following conditions are true when the A/D FIFO Half Full
event occurs (FHF is set to 1), the board automatically generates an
interrupt and sets INT of this register to 1:
– Interrupts are set to occur on A/D FIFO Half Full (FIMD of A/D
Control register B is set to 1).
– Interrupts are enabled (IL2 to IL0 of A/D Control register B are
set to an appropriate level).
– DMA is disabled (DL2 to DL0 of A/D Control register B are set
to 000 or 100).
Notes: Since the state of FHF comes directly from the A/D FIFO,
you cannot manually change FHF.
The generated interrupt is useful in conjunction with the Intel INSW
instruction to move large blocks of data.
● OVF (A/D FIFO Overflow) - Indicates whether an A/D FIFO
Overflow event occurred. An A/D FIFO Overflow event occurs when
the A/D FIFO contains the maximum amount of data it can hold
(1024 words) and is about to overflow.
The OVF bit is set as follows:
– OVF = 0 indicates that an A/D FIFO Overflow event did not
occur.
– OVF = 1 indicates that an A/D FIFO Overflow e v ent occurred; to
prevent data loss, the board automatically disables A/D
conversions (CVEN = 0).
1-24 I/O Addresses

If interrupts are enabled (IL2 to IL0 of A/D Control register B are set
to an appropriate level) when the A/D FIFO Overflow event occurs
(OVF is set to 1), the board automatically generates an interrupt and
sets INT of this register to 1.
Notes: This bit is enabled only if the A/D FIFO is enabled (FFEN of
A/D Control register A is set to 1).
You cannot manually write a 1 to this bit. However , you can clear this
bit by writing a 0 to bit 4 of this register. To prevent this bit from
being cleared unintentionally, make sure that you mask bit 4 with a 1
whenever you write to this register.
● C0TC (A/D Counter 0 Terminal Count) - Indicates whether an A/D
Counter 0 Terminal Count event occurred. An A/D Counter 0
Terminal Count event occurs when A/D Counter 0 (the post-trigger
counter) reaches terminal count.
The C0TC bit is set as follows:
– C0TC = 0 indicates that an A/D Counter 0 Terminal Count event
did not occur.
– C0TC = 1 indicates that an A/D Counter 0 Terminal Count event
occurred.
If interrupts are enabled (IL2 to IL0 of A/D Control register B are set
to an appropriate level) when the A/D Counter 0 Terminal Count
event occurs (C0TC is set to 1), the board automatically generates an
interrupt and sets INT of this register to 1.
Notes: This bit is enabled only if about-trigger mode is enabled
(ATEN of A/D Control register A is set to 1) and A/D Counter 0 is
programmed for Interrupt On Terminal Count (82C54 Mode 0).
You cannot manually write a 1 to this bit. However , you can clear this
bit by writing a 0 to bit 3 of this register. To prevent this bit from
being cleared unintentionally, make sure that you mask bit 3 with a 1
whenever you write to this register.
1-25

● C2TC (A/D Counter 2 Terminal Count) - Indicates whether an A/D
Counter 2 Terminal Count event occurred. An A/D Counter 2
Terminal Count event occurs when A/D Counter 2 of the cascaded
A/D Counter 1/Counter 2 (the internal A/D pacer clock) reaches
terminal count.
The C2TC bit is set as follows:
– C2TC = 0 indicates that an A/D Counter 2 Terminal Count event
did not occur.
– C2TC = 1 indicates that an A/D Counter 2 Terminal Count event
occurred; to prevent data loss, the board automatically disables
A/D conversions (CVEN = 0).
If interrupts are enabled (IL2 to IL0 of A/D Control register B are set
to an appropriate level) when the A/D Counter 2 Terminal Count
event occurs (C2TC is set to 1), the board automatically generates an
interrupt and sets INT of this register to 1.
Notes: This bit is enabled only if an interrupt on A/D Counter 2
Terminal Count is enabled (CIEN of A/D Control register B is set to
1); the bit is set when the board detects a falling-edge terminal count
pulse (82C54 Mode 2).
You cannot manually write a 1 to this bit. However , you can clear this
bit by writing a 0 to bit 2 of this register. To prevent this bit from
being cleared unintentionally, make sure that you mask bit 2 with a 1
whenever you write to this register.
● DMATC (A/D DMA Terminal Count) - Indicates whether an A/D
DMA Terminal Count event occurred. An A/D DMA Terminal Count
event occurs when DMA terminal count is reached for A/D
conversions.
The DMATC bit is set as follows:
– DMATC = 0 indicates that an A/D DMA Terminal Count event
did not occur.
– DMATC = 1 indicates that an A/D DMA Terminal Count event
occurred.
1-26 I/O Addresses

If interrupts are enabled (IL2 to IL0 of A/D Control register B are set
to an appropriate level) when the A/D DMA Terminal Count event
occurs (DMATC is set to 1), the board automatically generates an
interrupt and sets INT of this register to 1.
Notes: This bit is enabled only if DMA is enabled (DL2 to DL0 of
A/D Control register B are set to an appropriate channel or channels).
You cannot manually write a 1 to this bit. However , you can clear this
bit by writing a 0 to bit 1 of this register. To prevent this bit from
being cleared unintentionally, make sure that you mask bit 1 with a 1
whenever you write to this register.
● INT (A/D Interrupt Set) - Indicates whether one of the following
interrupt events has occurred:
– A/D DMA Terminal Count (DMATC = 1)
– A/D Counter 2 Terminal Count (C2TC = 1)
– A/D Counter 0 Terminal Count (C0TC = 1)
– A/D FIFO Overflow (OVF = 1)
– A/D FIFO Half Full (FHF = 1)
– A/D FIFO Not Empty (FNE = 1)
The INT bit is set as follows:
– INT = 0 indicates that no interrupt event has occurred.
– INT = 1 indicates that at least one of the interrupt events has
occurred; to determine which interrupt event(s) occurred, read
bits 1 to 6 of this register.
Notes: This bit has no function unless interrupts are enabled (IL2 to
IL0 of A/D Control register B are set to an appropriate level).
You cannot manually write a 1 to this bit. However , you can clear this
bit by writing a 0 to bit 0 of this register. To prevent this bit from
being cleared unintentionally, make sure that you mask bit 0 with a 1
whenever you write to this register.
1-27

Table 1-9 summarizes the ways that you can manipulate the bits in the
A/D Status register. Note that writing a 0 to a clearable bit sets the bit to
0; writing a 1 to a settable bit sets the bit to 1; writing a 1 to a maskable
bit preserves the bit’s value and prevents the bit from being cleared
unintentionally.
Table 1-9. Summary of A/D Status Register Bits
Write Operations
Read
Bit
Operation
Clear Set Mask
CVEN ✔✔✔
FNE ✔
FHF ✔
OVF ✔ ✔ ✔
C0TC ✔✔ ✔
C2TC ✔ ✔ ✔
DMATC ✔✔ ✔
INT ✔ ✔ ✔
Notes
1
This bit is masked with the FNE bit (bit 6); you can
write to CVEN only if you write a 0 to bit 6 (FNE)
at the same time.
✔
1
1-28 I/O Addresses

Burst Length Register
(Base Address + 8h, Read/Write)
The Burst Length register is a read/write register that specifies the number
of channels in the scan when performing burst-mode A/D conversions.
The number of channels in the scan is the same as the number of
conversions performed for each tick of the A/D pacer clock. This register
is set to 00h during power-up or system reset.
Bit assignments for the Burst Length register are as follows:
76543210
BLV7 BLV6 BLV5 BLV4 BLV3 BLV2 BLV1 BLV0
The BLV7 to BLV0 (Burst Length Value) bits represent one less than
the number of channels in the scan (Burst Length Value = BLV + 1). For
example, if your scan consists of five channels, set BLV7 to BLV0 to 4
(0000 0100). The value of BLV7 to BLV0 can range from 0 to 255.
Note: These bits have no function unless burst mode is enabled (BMDE
of A/D Control register C is set to 1).
If you are using SSH (simultaneous sample-and-hold) mode, one extra
A/D pacer clock pulse is required to allow the SSH accessory board to
sample and hold the values; therefore, in SSH mode, set BLV7 to BLV0
to exactly the number of channels in the scan. For example, if your scan
consists of five channels, set BLV7 to BLV0 to 5 (0000 0101). In SSH
mode, the number of channels in the scan is limited to 255.
1-29

Burst Mode Conversion Rate Register
(Base Address + 9h, Read/Write)
The Burst Mode Conversion Rate register is a read/write register that
specifies the burst mode conversion rate when performing burst-mode
A/D conversions. The burst mode conversion rate is the number of burst
mode conversion clock ticks between the con v ersion of one channel in the
scan and the conversion of the next channel in the scan (each burst mode
conversion clock tick represents 1
power-up or system reset.
Bit assignments for the Burst Mode Conversion Rate register are as
follows:
76543210
0 0 BRV5 BRV4 BRV3 BRV2 BRV1 BRV0
The BRV5 to BRV0 (Burst Rate Value) bits represent one less than the
number of 1
between conversions (33.33 ksamples/s), set BRV5 to BRV0 to 29
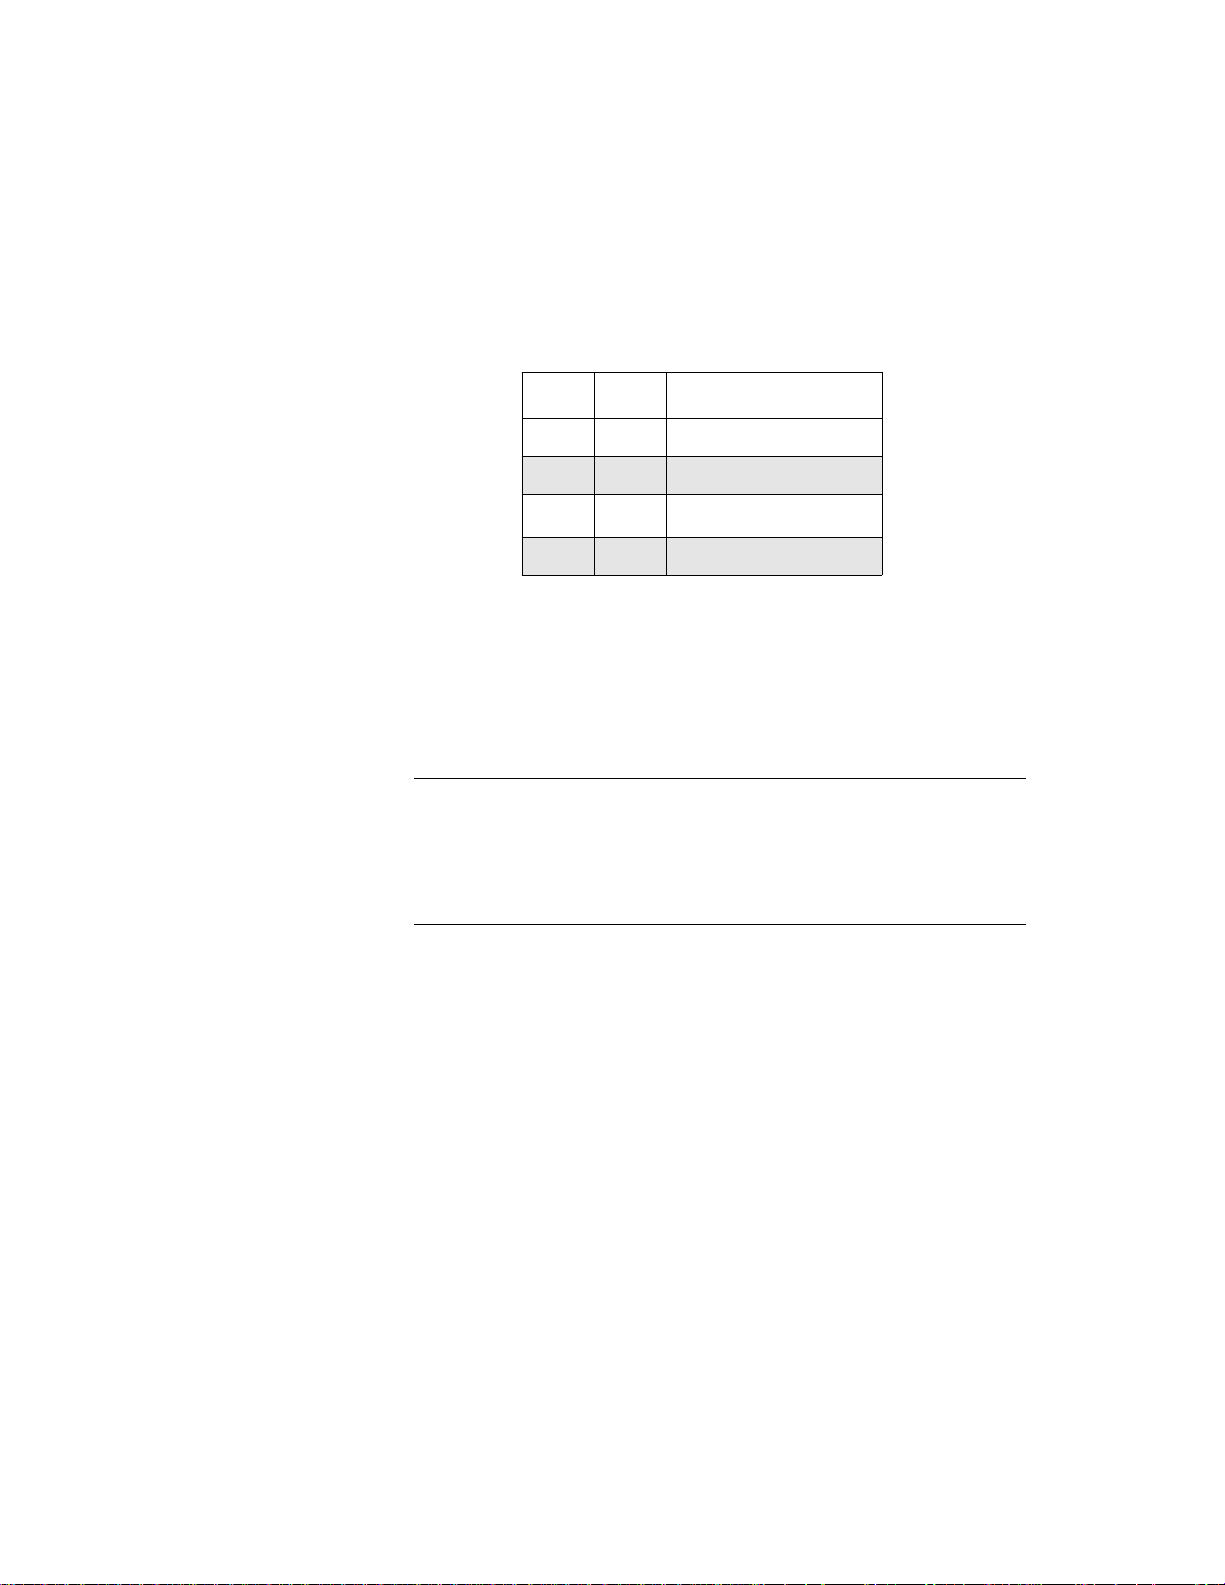
(0001 1101). The value of BR V5 to BRV0 can range from 2 to 63 (3
64
µs).
µs clock ticks. For example, if you want to specify 30 µs
µs). This register is set to 00h during
µs to
Use the following formula to determine the value to specify for BRV:
Burst mode conversion rate
For example, if you want a burst mode conversion rate of 10 ksamples/s,
specify 99 clock ticks.
Note: These bits have no function unless burst mode is enabled (BMDE
of A/D Control register C is set to 1).
1-30 I/O Addresses
1 MHz
---------------------=
BRV 1+

A/D QRAM Address Start Register
(Base Address + Ah, Read/Write)
The A/D QRAM Address Start register is a read/write register that
specifies the starting address of the channel-gain queue within the A/D
QRAM (the 256-location onboard RAM storage for the channel-gain
queue). The A/D QRAM Address Start register is set to 00h during
power-up and system reset.
Bit assignments for the A/D QRAM Address Start register are as follows:
76543210
QAS7 QAS6 QAS5 QAS4 QAS3 QAS2 QAS1 QAS0
The QAS7 to QAS0 (QRAM Address Start) bits represent the starting
address of the channel-gain queue within the A/D QRAM.
To set up your channel-gain queue, you first specify the starting address
of the channel-gain queue (using this register) and then load the
channel-gain data into the A/D QRAM (using A/D QRAM Data); refer to
page 1-9 for more information.
The A/D QRAM address counter is a down counter. If n is the number of
channels in the channel-gain queue, you specify a starting address of
(n
− 1). You load the first channel-gain data at A/D QRAM address
(n
− 1), the next channel-gain data at A/D QRAM address (n − 2), and so
on down to the last channel-gain data, which you load at address 0. For
example, if your channel-gain queue consists of five channels, specify a
starting address of 4, and then load the channel-gain data at address
locations 4, 3, 2, 1, and 0 of the A/D QRAM.
After you load channel-gain data at a location in the A/D QRAM, the A/D
QRAM address counter automatically decrements. Therefore, you do not
have to load the new A/D QRAM address each time you load
channel-gain data.
1-31

You specify the starting address once before you load the first
channel-gain data and then again after you have loaded all the
channel-gain data. This second address write selects the first channel in
the channel-gain queue and places the channel-gain data into the
sample-and-hold circuitry of the analog-to-digital converter (ADC) in
preparation for the start of A/D conversions.
Note: After you set up the A/D QRAM, make sure that you do not begin
A/D conversions until the A/D circuitry has had time to settle. The time
depends on the gain of the first channel in the channel-gain queue; refer to
the DAS-1800AO Series User’s Guide for more information.
During operation, about 500 ns after the board starts a conversion (while
the sample-and-hold circuitry of the ADC is holding the previous
channel), the A/D QRAM address counter decrements in preparation for
the next conversion. After the board performs conversions on all the
channels in the channel-gain queue, the cycle repeats, starting with the
starting address of the channel-gain queue.
Notes: Writing to the A/D QRAM Address Start register automatically
loads the A/D QRAM address counter with the specified starting address.
To perform conversions on a single channel, use this register to set the
A/D QRAM start address to 00h and use A/D QRAM Data to load the
A/D QRAM with the appropriate channel number and gain code.
1-32 I/O Addresses

A/D Counter Registers
(Base Address +Ch, +Dh, +Eh, +Fh)
The A/D Counter re gisters allow you to program the three counters of the
82C54 Programmable Counter/Timer. Refer to the Intel 82C54 data sheet
for a full description of features. (You can obtain the data sheet from Intel
by calling 800-548-4725).
On DAS-1800AO Series boards, A/D Counter 0 of the 82C54 is used as
the post-trigger counter in about-trigger mode. The value loaded into A/D
Counter 0 can range from 1 to 65,535; this value represents the number of
samples you want to acquire after an about-trigger event. An about-trigger
event occurs when the first active edge at the TGIN pin (pin 46) is
detected (if TGEN of A/D Control register A is set to 0) or when the ne xt
active edge at the TGIN pin is detected (if TGEN of A/D Control register
A is set to 1).
A/D Counter 0 is enabled only if about-trigger mode is enabled (A TEN of
A/D Control register A is set to 1) and an about-trigger event has
occurred. You must program A/D Counter 0 for 82C54 Mode 0.
On DAS-1800AO Series boards, A/D Counter 1 and A/D Counter 2 of the
82C54 are used as the internal A/D pacer clock, as the synchronized A/D
and D/A pacer clock, or as a programmable interrupt generator. A/D
Counter 1 and A/D Counter 2 are cascaded, with the output of A/D
Counter 2 as the source of A/D pacing, D/A pacing, and programmed
interrupts. You must program A/D Counter 1/Counter 2 for 82C54
Mode 2.
The relationship between A/D Counter 1 and A/D Counter 2 is illustrated
as follows:
A/D Counter 1 count value
A/D Counter 2 count value
5 MHz
--------------------------------------------- -=
A/D Counter 1 rate
A/D Counter 1 rate
--------------------------------------------- -=
A/D Counter 2 rate
1-33

Therefore, you can use the following formulas to determine the count
values to load into A/D Counter 1 and A/D Counter 2. The value loaded
into each counter can range from 2 to 65,535.
Total count value
------------------------------------------------=
A/D conversion rate
A/D Counter 1 count value A/D Counter 2 count value× Total count value=
For example, if you want to sample A/D data at a rate of 10 kHz, the total
count value must be 500 (5,000,000
÷ 10,000 = 500). Y ou can choose one
of several count value combinations for A/D Counter 1 and
A/D Counter 2, such as the following:
● A/D Counter 1 count value = 2, A/D Counter 2 count value = 250
● A/D Counter 1 count value = 10, A/D Counter 2 count value = 50
Note: Before loading A/D Counter 1 and A/D Counter 2, make sure that
the internal gate source for the counters is disabled (CGSL and CGEN of
A/D Control register A are both set to 0).
D/A Data (Base Address + 400h, Write)
5 MHz
D/A Data is the output value to load into the D/A FIFO.
D/A Data uses 16-bit data transfers on the computer bus; howe ver, data in
DAS-1800AO Series boards is 12-bits long, right-justified, and in twos
complement format.
Bit assignments for D/A Data are as follows:
1514131211109876543210
XXXXDD11 DD10 DD9 DD8 DD7 DD6 DD5 DD4 DD3 DD2 DD1 DD0
1-34 I/O Addresses

Table 1-10 lists the appropriate codes for several analog output ranges.
Table 1-10. Data Format for D/A Conversions
Output V oltage Tw os
Complement
±5 V Range ±10 V Range
+4.9976 V +9.9951 V +2047 0111 1111 1111
0.0000 V 0.0000 V 0 0000 0000 0000
−2.44 mV −4.88 mV −1 1111 1111 1111
−5.0000 V −10.0000 V −2048 1000 0000 0000
Note: You specify a single digital-to-analog converter (DAC) or both
Code
Value of DD11 to
DD0
DACs in the D/A Data Select register; refer to the next section. If D/A
software conversions are disabled (S1 and S0 of D/A Control register C
are not set to 00), the DACs are updated with the values in the D/A FIFO
at the next pacer clock pulse. If D/A software con versions are enabled (S1
and S0 of D/A Control register C are set to 00), you must first load the
D/A FIFO by writing values to D/A Data and then set CNVT of the D/A
Status register to 1 to update the DACs.
1-35

D/A Data Select Register
(Base Address + 402h, Read/Write)
The D/A Data Select register is a read/write register that specifies the
DACs you want to update and the three most significant bits of the D/A
recycle count value. The D/A Data Select register is set to 00h during
power-up and system reset.
Bit assignments for the D/A Data Select register are as follows:
76543210
RCV10 RCV9 RCV8 0 0 0 DSL1 DSL0
The bits are described as follows:
● RCV10 to RCV8 (Recycle Count Value) - Three most significant
bits of the recycle count value. Along with the eight least significant
bits of the recycle count value (in the D/A Recycle Count register),
these bits specify the size of the waveform stored in the 2048-location
D/A FIFO. Refer to page 1-38 for more information about the D/A
Recycle Count register.
Note: These bits have no function unless D/A recycle mode is
enabled (RCEN of D/A Control register A is set to 1).
When you write to these bits, make sure that you do not inadvertently
change the DACs selected by DSL0 and DSL1 of this register. It is
recommended that you always read this register before writing a new
value to it.
1-36 I/O Addresses
● DSL1 and DSL0 (Data Select) - Specifies the DAC or DACs to
update, as shown in Table 1-11.
Table 1-11. Digital-to-Analog Converters
DSL1 DSL0 DACs to Update
0 0 DAC 0
0 1 DAC 1
10
DAC 0 and DAC 1
1
1 1 Not used
Notes
1
DAC 0 and DAC 1 are updated
simultaneously. DAC 0 is updated with the
first value in the D/A FIFO; DAC 1 is
updated with the next value in the D/A
FIFO.
Note: When you write to these bits, make sure that you do not
inadvertently change the three most significant bits of the recycle
count value (selected by RCV10 to RCV8 of this register). It is
recommended that you always read this register before writing a new
value to it.
1-37

D/A Recycle Count Register
(Base Address + 403h, Read/Write)
The D/A Data Select register contains the eight least significant bits of the
D/A recycle count value. The D/A Recycle Count register is set to 00h
during power-up and system reset.
Bit assignments for the D/A Recycle Count register are as follows:
76543210
RCV7 RCV6 RCV5 RCV4 RCV3 RCV2 RCV1 RCV0
Note: These bits have no function unless D/A recycle mode is enabled
(RCEN of D/A Control register A is set to 1).
Along with the three most significant bits of the recycle count value (in
the D/A Data Select register), the eight bits in this register specify the size
of the waveform stored in the 2048-location D/A FIFO. The RCV10 to
RCV0 (Recycle Count Value) bits represent one less than the number of
output values required to produce the waveform, as shown in the
following equation:
Recycle waveform size RCV 1+=
For example, if the waveform requires 1,500 output values in the D/A
FIFO, set RCV10 to RCV0 to 1,499 (RCV10 to RCV8 = 101; RCV7 to
RCV0 = 1101 1011). The size of the waveform can range from 2 samples
to 2048 samples; therefore, the value of RCV10 to RCV0 can range from
1 to 2047.
1-38 I/O Addresses

Note: If you specify both DACs (DSL1 and DSL0 of the D/A Data
Select register are set to 10), the D/A FIFO contains two interleaved
waveforms (one for each DAC). The first value loaded in the D/A FIFO is
written to DAC 0, the second value is written to DAC 1, the third value is
written to DAC 0, and so on.
Each waveform must be the same size. The recycle count value (RCV10
to RCV0) is one less than the size of the wav eform for a single D AC (2 to
1024 samples); therefore, the value of RCV10 to RCV0 can range from 1
to 1023.
D/A Control Register A
(Base Address + 404h, Read/Write)
D/A Control Register A is a read/write register that controls the
trigger/gate and D/A FIFO enable functions for D/A conversions. This
register is set to 00h during power-up or system reset.
Bit assignments for D/A Control Register A are as follows:
76543210
RTEN TGPL TGSL TGEN CGSL CGEN RCEN FFEN
The bits are described as follows:
● R TEN (D/A Retrigger Enable) - Enables/disables retrigger mode, as
follows:
– RTEN = 0 disables retrigger mode.
– RTEN = 1 enables retrigger mode.
In retrigger mode, each time an external trigger event occurs, the
board resets the D/A FIFO’s read pointer and starts generating the
waveform stored in the D/A FIFO from the beginning. Retrigger
mode allows you to synchronize the generation of the wav eform to an
external trigger event.
1-39

Note: This bit has no function unless D/A recycle mode is enabled
(RCEN of this register is set to 1) and an external trigger/gate is
enabled (TGEN of this register is set to 1).
● TGPL (D/A Trigger/Gate Input Polarity Select) - Specifies the
active polarity of the external trigger/gate signal (the signal at the
TGIN pin (pin 46) of the main I/O connector) for D/A conversions, as
follows:
– If TGPL = 0, D/A conversions begin at a negative edge of the
external trigger signal or D/A conversions occur whenever the
external gate signal is low.
– If TGPL = 1, D/A conversions begin at a positive edge of the
external trigger signal or D/A conversions occur whenever the
external gate signal is high.
Note: The TGSL bit of this register determines whether the signal at
the TGIN pin is used as an external trigger signal or an external gate
signal.
● TGSL (Trigger/Gate Select) - Specifies whether the signal at the
TGIN pin (pin 46) of the main I/O connector is used as an external
trigger signal or an external gate signal for D/A conversions, as
follows:
– TGSL = 0 selects an external trigger (edge-sensitive).
– TGSL = 1 selects an external gate (level-sensitive).
Note: This bit has no function unless an external trigger/gate is
enabled (TGEN of this register is set to 1).
● TGEN (Hardware Trigger/Gate Enable) - Enables/disables the
TGIN pin (pin 46) of the main I/O connector as an external trigger or
gate for D/A conversions, as follows:
– TGEN = 0 disables an external trigger/gate.
– TGEN = 1 enables an external trigger/gate.
1-40 I/O Addresses

Note: The TGSL bit of this register determines whether the signal at
TGIN is used as an external trigger signal or an external gate signal.
● CGSL (D/A Counter Enable Source Select) - Specifies the source
that enables the D/A Counter (the internal D/A pacer clock), as
follows:
– CGSL = 0 selects the CGEN bit of this register as the internal
enable source; the D/A Counter counts down only when CGEN
is set to 1.
– CGSL = 1 selects the TGIN pin (pin 46) of the main I/O
connector as the external enable source; the D/A Counter counts
down only when the signal at TGIN is active (the active polarity
is determined by TGPL of this register).
● CGEN (D/A Counter Enable/Disable) - This bit is the internal
enable source for the D/A Counter. It is set as follows:
– CGEN = 0 disables the internal enable source.
– CGEN = 1 enables the internal enable source.
Note: This bit has no function unless CGSL of this register is set to
0.
● RCEN (D/A Recycle Mode Enable/Disable) - Enables/disables
recycle mode, as follows:
– RCEN = 0 disables D/A recycle mode.
– RCEN = 1 enables D/A recycle mode.
In recycle mode, after you load the waveform into the D/A FIFO (by
multiple writes to D/A Data) and specify the size of the waveform (in
RCV10 to RCV0 of the D/A Data Select and D/A Recycle Count
registers), D/A conversions take place depending on the states of
triggers, gates, and pacer clocks. Once D/A conversions begin, the
DA Cs are continually updated with the v alues stored in the D/A FIFO
to generate a continuous waveform.
1-41

The waveform continues to be generated in its entirety unless D/A
conversions are terminated by software (CVEN of the D/A Status
register is set to 0) or (if retrigger mode and an external trigger/gate
are both enabled) another external trigger event occurs. If another
external trigger event occurs, the board starts generating the
waveform again from the beginning.
If retrigger mode is enabled (RTEN of this register is set to 1) and an
external trigger/gate is enabled (TGEN of this register is set to 1),
you can synchronize the waveform to an external trigger event.
● FFEN (D/A FIFO Enable) - Enables/resets the D/A FIFO's read and
write address pointers, as follows:
– FFEN = 0 disables (resets) the D/A FIFO.
– FFEN = 1 enables the D/A FIFO.
Note: To ensure proper FIFO operation, it is recommended that you
reset the D/A FIFO (set FFEN to 0) before you enable the D/A FIFO
(set FFEN to 1).
Refer to page 2-7 for a summary of the trigger and gate functions
specified in D/A Control register A.
D/A Control Register B
(Base Address + 405h, Read/Write)
D/A Control register B is a read/write register that controls interrupt
mode and DMA mode for D/A conversions. This register is set to 00h
during power-up or system reset.
Bit assignments for D/A Control register B are as follows:
76543210
0 FIMD DIEN 0 0 DDEN DL1 DL0
1-42 I/O Addresses

The bits are described as follows:
● FIMD (D/A FIFO Interrupt Mode Select) - Specifies the D/A FIFO
interrupt mode, as follows:
– FIMD = 0 generates an interrupt on a D/A FIFO Not Half Full
event. (A D/A FIFO Not Half Full event occurs when the D/A
FIFO goes from 1025 words to 1024 words.)
– FIMD = 1 generates an interrupt on a D/A FIFO Not Full event.
(A D/A FIFO Not Full event occurs when the D/A FIFO is no
longer full.)
Note: This bit has no function unless interrupts are enabled (DIEN
of this register is set to 1) and DMA is disabled (DL1 and DL0 of this
register are set to 00).
● DIEN (D/A Interrupt Enable) - Enables/disables interrupt mode for
D/A conversions, as follows:
– DIEN = 0 disables D/A interrupts.
– DIEN = 1 enables D/A interrupts.
The interrupt level for D/A conversions is specified in IL2 to IL0 of
A/D Control register B; refer to page 1-17.
If DIEN = 1 and DMA is disabled for D/A conversions (DDEN of
this register is set to 0), any of the following events generates an
interrupt:
– D/A FIFO Not Full (only if FIMD of this register is set to 1)
– D/A FIFO Not Half Full (only if FIMD of this register is set to 0)
– D/A FIFO Underflow
– D/A DMA Terminal Count
Refer to the description of the D/A Status register on page 1-47 for
more information about these interrupt events.
If DIEN = 1 and DMA is enabled for D/A conversions (DDEN of this
register is set to 1), an interrupt is generated on terminal count from
the computer’s DMA controller.
1-43

● DDEN (D/A DMA Enable) - Enables/disables DMA mode for D/A
conversions, as follows:
– DDEN = 0 disables DMA mode.
– DDEN = 1 enables DMA mode.
The DMA channel for D/A conversions is specified in DL1 and DL0
of this register.
If DDEN = 1 and interrupts are enabled for D/A conversions (DIEN
of this register is set to 1), an interrupt is generated on terminal count
from the computer’s DMA controller.
● DL1 and DL0 (D/A DMA Channel Select) - Specifies the DMA
channel for D/A conversions, as shown in Table 1-12.
Caution: Make sure that the DMA channel you select for D/A
conversions is different from the DMA channel you select for A/D
conversions (DL2 to DL0 of A/D Control register B). If the DMA
channels are the same, a hardware conflict will exist. Refer to
page 1-19 for more information about selecting a DMA channel (or
channels) for A/D conversions.
Table 1-12. D/A DMA Channel Select Bits
DL1 DL0 D/A DMA Channel
0 0 DMA disabled
0 1 Channel 5
1 0 Channel 6
1 1 Channel 7
1-44 I/O Addresses

Notes: As long as the D/A FIFO has room to store at least one more
value, a DMA request remains active on the PC bus.
If DL1 and DL0 are set to an appropriate channel and interrupts are
enabled (DIEN of this register is set to 1), an interrupt is generated on
terminal count from the computer’s DMA controller.
The DMA controller must be programmed for DEMAND mode.
Dual DMA mode is not supported for D/A conversions.
D/A Control Register C
(Base Address + 406h, Read/Write)
D/A Control Register C is a read/write register that controls the output
range and the D/A pacer clock. This register is set to 00h during power -up
or system reset.
Bit assignments for D/A Control register C are as follows:
76543210
GN1 GN0 0 0 PSEN XCPL S1 S0
1-45

The bits are described as follows:
● GN1 and GN0 (D/A Gain Select) - Specifies the gain code that
determines the output range for both DACs, as shown in Table 1-13.
.
Table 1-13. D/A Gain Codes
Gain Code Output Range
GN1 GN0 DAC 1 DAC 0
0 0 ±5 V ±5 V
0 1 ±5 V ±10 V
1 0 ±10 V ±5 V
1 1 ±10 V ±10 V
● PSEN (D/A Prescaler Enable) - Enables/disables the divide-by-ten
prescaler of the D/A internal pacer clock, as follows:
– PSEN = 0 disables the prescaler; the D/A Counter is clocked at
5 MHz (the time between updates is equal to the D/A Counter
value multiplied by 200 ns).
– PSEN = 1 enables the prescaler; the D/A Counter is clocked at
500 kHz (the time between updates is equal to the D/A Counter
value multiplied by 2
● XCPL (External Pacer Clock Polarity) - Specifies the active
µs).
polarity of the external pacer clock when used for D/A conversions,
as follows:
– XCPL = 0 indicates positive polarity (rising edge).
– XCPL = 1 indicates negative polarity (falling edge).
1-46 I/O Addresses

● S1 and S0 (D/A Pacer Clock Source Select) - Specifies the pacer
clock source for D/A conversions, as shown in Table 1-14.
Table 1-14. D/A Pacer Clock Select Bits
S1 S0 D/A Pacer Clock Source
0 0 Software clock
0 1 Internal D/A pacer clock
1 0 External pacer clock
1 1 Internal A/D pacer clock
D/A Status Register
(Base Address + 407h, Read/Write)
Reading the D/A Status register allows you to monitor the status of eight
onboard signals. Writing to the D/A Status register enables/disables D/A
conversions and clears/masks the e v ent-dri v en interrupt bits. This re gister
is set to a value of 30h during power-up or system reset.
Bit assignments for the D/A Status register are as follows:
765432 10
CVEN CNVT FNH FNF FNE FUF DMATC INT
1-47

The bits are described as follows:
● CVEN (Enable/Disable D/A Conversions) - Enables/disables D/A
conversions, as follows:
– CVEN = 0 disables D/A conversions; no D/A conversions take
place.
– CVEN = 1 enables D/A conversions; D/A con v ersions take place
depending on the states of triggers, gates, and pacer clocks.
If interrupts are enabled (DIEN of D/A Control register B is set to 1)
when a D/A FIFO Underflow ev ent occurs (FUF of this register is set
to 1), the board automatically disables D/A conversions (CVEN = 0).
Note: You can write to CVEN only if you also write a 0 to bit 5
(FNH) of this register; this prevents your overwriting CVEN when
you clear other bits in this register. Since the state of FNH comes
directly from the D/A FIFO, writing a 0 to bit 5 does not set FNH to
0.
● CNVT (Software-Initiated Conversion) - The meaning of this bit
depends on whether you are writing to it or reading it.
Writing to this bit determines whether to perform a single,
software-initiated D/A conversion, as follows:
– CNVT = 0 performs no action.
– CNVT = 1 initiates a single D/A conversion; the DAC or DACs
specified in DSL1 and DSL0 of the D/A Data Select register are
immediately updated with the next one or two output values in
the D/A FIFO.
Note: Writing a 1 to this bit performs a D/A conversion only if D/A
software conversions are enabled (S1 and S0 of D/A Control register
C are set to 00).
If both DACs are selected in the D/A Data Select register (DSL1 and
DSL0 = 10), both DACs are simultaneously updated with a single
write to CNVT.
1-48 I/O Addresses

Reading this bit indicates whether the DACs are still converting data,
as follows:
– CNVT = 0 indicates that the DACs are not converting data; you
can initiate another D/A conversion, if desired.
– CNVT = 1 indicates that the DACs are still converting data; do
not initiate another D/A conversion at this time.
● FNH (D/A FIFO Not Half Full) - The state of this bit comes directly
from the D/A FIFO and indicates whether the D/A FIFO is less than
half full of data, as follows:
– FNH = 0 indicates that the D/A FIFO is at least half full of data
(1025 words or more).
– FNH = 1 indicates that the D/A FIFO is less than half full of data
(less than 1025 words).
If the following conditions are true when a D/A FIFO Not Half Full
event occurs (FNH is set to 1), the board automatically generates an
interrupt and sets INT of this register to 1:
– Interrupts are set to occur on D/A FIFO Not Half Full (FIMD of
D/A Control register B is set to 0).
– Interrupts are enabled (DIEN of D/A Control register B is set to
1).
– DMA is disabled (DL1 and DL0 of D/A Control register B are
set to 00).
Note: Since the state of FNH comes directly from the D/A FIFO,
you cannot manually change FNH.
● FNF (D/A FIFO Not Full) - The state of this bit comes directly from
the D/A FIFO and indicates whether the D/A FIFO is no longer full
of data, as follows:
– FNF = 0 indicates that the D/A FIFO is full of data.
– FNF = 1 indicates that the D/A FIFO is no longer full of data.
1-49

If the following conditions are true when a D/A FIFO Not Full event
occurs (FNF is set to 1), the board automatically generates an
interrupt and sets INT of this register to 1:
– Interrupts are set to occur on D/A FIFO Not Full (FIMD of D/A
Control register B is set to 1).
– Interrupts are enabled (DIEN of D/A Control register B is set to
1).
– DMA is disabled (DL1 and DL0 of D/A Control register B are
set to 00).
Note: Since the state of FNF comes directly from the D/A FIFO, you
cannot manually change FNF.
● FNE (D/A FIFO Not Empty) - The state of this bit comes directly
from the D/A FIFO and indicates whether the D/A FIFO contains at
least one value, as follows:
– FNE = 0 indicates that the D/A FIFO contains no data.
– FNE = 1 indicates that the D/A FIFO contains data.
Note: Since the state of FNE comes directly from the D/A FIFO, you
cannot manually change FNE.
● FUF (D/A FIFO Underflow) - Indicates whether a D/A FIFO
Underflow event occurred. A D/A FIFO Underflow event occurs
when the D/A FIFO runs out of data.
The FUF bit is set as follows:
– FUF = 0 indicates that a D/A FIFO Underflow event did not
occur.
– FUF = 1 indicates that a D/A FIFO Underflow event occurred.
If interrupts are enabled (DIEN of D/A Control register B is set to 1)
when a D/A FIFO Underflow event occurs (FUF is set to 1), the
board automatically does the following:
– Generates an interrupt and sets INT of this register to 1.
– Disables D/A conversions (CVEN = 0).
1-50 I/O Addresses

Notes: This bit is enabled only if the D/A FIFO is enabled (FFEN of
D/A Control register A is set to 1).
You cannot manually write a 1 to this bit. However , you can clear this
bit by writing a 0 to bit 2 of this register. To prevent this bit from
being cleared unintentionally, make sure that you mask bit 2 with a 1
whenever you write to this register.
● DMATC (D/A DMA Terminal Count) - Indicates whether a D/A
DMA Terminal Count event occurred. A D/A DMA Terminal Count
event occurs when DMA terminal count is reached for D/A
conversions.
The DMATC bit is set as follows:
– DMATC = 0 indicates that a D/A DMA Terminal Count event
did not occur.
– DMATC = 1 indicates that a D/A DMA Terminal Count event
occurred.
If interrupts are enabled (DIEN of D/A Control register B is set to 1)
when the D/A DMA Terminal Count event occurs (DMATC is set to
1), the board automatically generates an interrupt and sets INT of this
register to 1.
Note: This bit is enabled only if DMA is enabled (DDEN of D/A
Control register B is set to 1).
You cannot manually write a 1 to this bit. However , you can clear this
bit by writing a 0 to bit 1 of this register. To prevent this bit from
being cleared unintentionally, make sure that you mask bit 1 with a 1
whenever you write to this register.
1-51

● INT (D/A Interrupt Set) - Indicates whether one of the following
interrupt events has occurred:
– D/A DMA Terminal Count (DMATC = 1)
– D/A FIFO Underflow (FUF = 1)
– D/A FIFO Not Full (FNF = 1)
– D/A FIFO Not Half Full (FNH = 1)
The INT bit is set as follows:
– INT = 0 indicates that no interrupt event has occurred.
– INT = 1 indicates that at least one of the interrupt events has
occurred; to determine which interrupt event(s) occurred, read
bits 1, 2, 4, and 5 of this register.
Note: This bit has no function unless interrupts are enabled (DIEN
of D/A Control register B is set to 1).
You cannot manually write a 1 to this bit. However , you can clear this
bit by writing a 0 to bit 0 of this register. To prevent this bit from
being cleared unintentionally, make sure that you mask bit 0 with a 1
whenever you write to this register.
Table 1-15 summarizes the ways that you can manipulate the bits in the
D/A Status register. Note that writing a 0 to a clearable bit sets the bit to
0; writing a 1 to a settable bit sets the bit to 1; writing a 1 to a maskable
bit preserves the bit’s value and prevents the bit from being cleared
unintentionally.
1-52 I/O Addresses
Table 1-15. Summary of D/A Status Register Bits
Write Operations
Read
Bit
Operation
Clear Set Mask
CVEN ✔✔✔
CNVT ✔ ✔
FNH ✔
FNF ✔
FNE ✔
FUF ✔ ✔ ✔
DMATC ✔✔ ✔
INT ✔ ✔ ✔
Notes
1
This bit is masked with the FNH bit (bit 5); you can
write to CVEN only if you write a 0 to bit 5 (FNH)
at the same time.
✔
1
D/A Conversion Counter Register
(Base Address + 408h, Base Address + 409h,
Read/Write)
The D/A Conversion Counter re gisters specify the count you want to load
into the D/A Counter (the 16-bit, down counter of the internal D/A pacer
clock). This register is set to 00h during power-up reset.
The D/A Counter is loaded in two 8-bit writes. The eight least significant
bits are written first and are stored in the D/A Conversion Counter LSB
register (Base Address + 408h); the eight most significant bits are written
last and are stored in the D/A Conversion Counter MSB register (Base
Address + 409h).
1-53

Bit assignments for the D/A Conversion Counter LSB register (Base
Address + 408h) are as follows:
76543210
DRV7 DRV6 DRV5 DRV4 DRV3 DRV2 DRV1 DRV0
Bit assignments for the D/A Conversion Counter MSB register (Base
Address + 409h) are as follows:
76543210
DRV15 DRV14 DRV13 DRV12 DRV11 DRV10 DRV9 DRV8
The DRV15 to DRV0 (D/A Counter Value) bits represent one less than
the count you want to load into the D/A Counter. For example, if you
want to load a count of 1,000 into the D/A Counter, specify a v alue of 999
(0000 0011 in the D/A Conversion Counter LSB register; 1110 0111 in
the D/A Conversion Counter MSB register). The D/A Counter count can
range from 2 to 65,536; therefore, the value of DRV15 to DRV0 can
range from 1 to 65,535.
After the D/A Counter counts down to zero, it is automatically reloaded.
1-54 I/O Addresses

If you are using the D/A internal pacer clock (S1 and S0 of D/A Control
register C are set to 01), the update rate depends on whether the
divide-by-ten prescaler of the internal D/A pacer clock is enabled or
disabled, as follows:
● If the prescaler is disabled (PSEN of D/A Control register C is set to
0), the update rate is determined by the following formula:
Update rate
● If the prescaler is enabled (PSEN of D/A Control register C is set to
------------------------------------------------------------ -=
D/A Counter Value 1+()
5 MHz
1), the update rate is determined by the following formula:
Update rate
------------------------------------------------------------ -=
D/A Counter Value 1+()
500 kHz
For example, if the prescaler is enabled and you specify a D/A Counter
Value of 999, the internal D/A pacer clock performs D/A conversions at a
rate of 500 Hz (2 ms between updates).
1-55

2
Programming Information
This chapter contains some information you may find useful when
programming various functions of DAS-1800AO Series boards.
Setting Up the Board for Software-Initiated
A/D Conversions
To set up a DAS-1800AO Series board for software-initiated A/D
conversions on four analog input channels, perform the following steps:
1. Reset the A/D FIFO by writing the value 00h to A/D Control register
A (Base Address + 4h).
2. Set up the A/D operation by writing to A/D Control register C
(Base Address + 6h). For example, to set up a unipolar input range
type, a single-ended input configuration, a software pacer clock, and
an internal trigger, write the value D0h. Note that the UQEN bit
(bit 4) must be set to 1.
3. Program the A/D QRAM with the channel and gain data for the four
analog input channels. Refer to the next section for information.
4. Point to A/D Data by writing the value 00h to the A/D Data Select
register (Base Address + 2h).
5. Enable the A/D FIFO by writing the value 01h to A/D Control register
A (Base Address + 4h).
6. Enable A/D conversions by writing the value 80h to the A/D Status
register (Base Address + 7h).
7. Initiate an A/D con version by writing an y word value to A/D CNVR T
(Base Address + 0h).
2-1

8. Monitor the status of the A/D FIFO by continuously reading the A/D
Status register (Base Address + 7h) until bit 6 ( FNE ) equals 1.
9. When FNE = 1 (indicating that the A/D FIFO is not empty), read the
A/D Data (Base Address + 0h).
10. Repeat steps 7, 8, and 9 until values from all four channels have been
read.
11. Disable A/D conversions by writing the value 00h to the A/D Status
register (Base Address + 7h).
12. Reset the A/D FIFO by writing the value 00h to A/D Control register
A (Base Address + 4h).
Programming the A/D QRAM
This section assumes that you are programming the A/D QRAM with
channel and gain data for four analog input channels (channels 0 to 3) on
a DAS-1802AO board. Channels 0 and 1 have a gain of 2; channels 2 and
3 have a gain of 4.
To program the A/D QRAM, perform the following steps:
1. Point to the A/D QRAM by writing the value 01h to A/D Data Select
register (Base Address + 2h).
2. Specify the starting address of the channel-gain queue within the A/D
QRAM (the number of channels in the scan minus one) by writing the
value 03h to the A/D QRAM Address Start register
(Base Address + Ah).
3. Load the A/D QRAM with the channel and gain data, as follows:
a.Write the value 0100h (channel 0, gain of 2) to the A/D QRAM
(Base Address + 0h).
b.Write the value 0101h (channel 1, gain of 2) to the A/D QRAM
(Base Address + 0h).
c.Write the value 0202h (channel 2, gain of 4) to the A/D QRAM
(Base Address + 0h).
d.Write the value 0203h (channel 3, gain of 4) to the A/D QRAM
(Base Address + 0h).
2-2 Programming Information

4. Reinitialize the A/D QRAM to the starting address of the
channel-gain queue by again writing the value 03h to the A/D QRAM
Address Start register (Base Address + Ah).
5. Wait for the ADC circuitry to settle before starting A/D conversions.
Setting Up the Board for Software-Initiated
D/A Conversions
To set up a DAS-1800AO Series board for software-initiated D/A
conversions on DAC 0 and DAC 1, perform the following steps:
1. Reset the D/A FIFO by writing the value 00h to D/A Control register
A (Base Address + 404h).
2. Set up the D/A operation by writing to D/A Control register C
(Base Address + 406h). For example, to set up a ±5 V output range
for DAC 0, a ±10 V output range for DAC 1, and software
conversions, write the value 80h.
3. Specify both DACs by writing the value 02h to the D/A Data Select
register (Base Address + 402h).
4. Enable the D/A FIFO by writing the value 01h to D/A Control
register A (Base Address + 404h).
5. Enable D/A conversions by writing the value 80h to the D/A Status
register (Base Address + 407h).
6. Specify the output value for DAC 0 by writing the appropriate data
word to the D/A FIFO (Base Address + 400h).
7. Specify the output value for DAC 1 by writing the appropriate data
word to the D/A FIFO (Base Address + 400h).
8. Initiate a D/A conversion by writing the value 60h to the D/A Status
register (Base Address + 407h). Note that writing a 1 to the FNH bit
(bit 5) prevents the CVEN bit (bit 7) from being overwritten.
9. Monitor the status of the DACs by continuously reading the D/A
Status register (Base Address + 407h) until bit 6 ( CNVT ) equals 0.
10. When CNVT = 0 (indicating that the DACs are no longer converting
data), repeat steps 6, 7, 8, and 9 for additional D/A conversions.
2-3

11. Disable D/A conversions by writing the value 00h to the D/A Status
register (Base Address + 407h).
12. Reset the D/A FIFO by writing the value 00h to D/A Control register
A (Base Address + 404h).
Setting Up the Board for D/A Conversions in
Recycle Mode
This section assumes that you are setting up a DAS-1800AO Series board
to perform D/A conversions on DAC 0 and DAC 1 in recycle mode. The
D/A FIFO will contain two waveforms, each 16 samples long.
To set up the board, perform the following steps:
1. Reset the D/A FIFO by writing the value 00h to D/A Control register
A (Base Address + 404h).
2. Set up the D/A operation by writing to D/A Control register C
(Base Address + 406h). For example, to set up a ±10 V output range
for both DACs and the internal D/A pacer clock with the prescaler
enabled, write the value C9h.
3. Specify both DACs by writing the value 02h to the D/A Data Select
register (Base Address + 402h). Note that since each w a v eform in the
D/A FIFO is 16 samples long, you can set the upper three bits of the
recycle count value to 0.
4. Load the D/A Conversion Counter registers (Base Address + 408h
and Base Address + 409h) with one less than the appropriate D/A
Counter Value. For example, to program an update rate of 1 kHz, load
the D/A Conversion Counter registers with 499, as follows:
a.Write the value F3h to the D/A Conversion Counter LSB register
(Base Address + 408h).
b.Write the value 01h to the D/A Conversion Counter MSB register
(Base Address + 409h).
5. Specify one less than the size of the waveform (16 samples) by
writing 0Fh to the D/A Recycle Count register
(Base Address + 403h).
2-4 Programming Information

6. Enable the D/A FIFO and recycle mode by writing the value 03h to
D/A Control register A (Base Address + 404h).
7. Specify an output value for DAC 0 by writing the appropriate data
word to the D/A FIFO (Base Address + 400h).
8. Specify an output value for DAC 1 by writing the appropriate data
word to the D/A FIFO (Base Address + 400h).
9. Repeat steps 7 and 8 until you have loaded the D/A FIFO with all 32
waveform v alues (16 samples for DAC 0 and 16 samples for DAC 1).
10. Enable D/A conversions by writing the value 80h to the D/A Status
register (Base Address + 407h).
11. After all the D/A conversions are complete, disable D/A conversions
by writing the value 00h to the D/A Status register
(Base Address + 407h).
Using SSH
12. Reset the D/A FIFO by writing the value 00h to D/A Control register
A (Base Address + 404h).
DAS-1800AO Series boards provide the SSHO signal, which allows you
to interface with a generic SSH (simultaneous sample-and-hold) device.
The SSHO signal is an output from the DAS-1800AO Series board. The
signal is initiated either by the internal A/D pacer clock or by an external
pacer clock. You specify the pacer clock source in SL1 and SL0 of A/D
Control register C; refer to page 1-22 for more information.
The SSHO signal is normally low, putting the SSH device into sample
mode. About 50 ns after a pacer clock pulse, the SSHO signal goes high,
putting the SSH device into hold mode. A/D conversions begin one burst
mode conversion clock period after the pacer clock pulse. The SSHO
signal remains high until 200 ns after the ADC starts converting the last
channel in the scan. At that point, the SSHO signal goes low and remains
low until the next pacer clock pulse.
To ensure enough sample time for the SSH device, make sure that the
minimum pacer clock period is as follows:
Number of channels in scan 1+()Burst mode conversion clock period×
2-5

You specify the number of channels in the scan in the Burst Length
register (Base Address + 8h); refer to page 1-29 for more information.
You specify the burst mode conversion clock period in the Burst Mode
Conversion Rate re gister (Base Address + 9h); refer to page 1-30 for more
information.
Summary of Trigger and Gate Functions for
A/D Conversions
Table 2-1 summarizes the trigger and gate functions specified with A/D
Control register A when using the internal A/D pacer clock (the cascaded
A/D Counter 1/Counter 2). Table 2-2 summarizes the trigger and gate
functions specified with A/D Control register A when using an external
pacer clock (the XPCLK pin (pin 44) of the main I/O connector).
Table 2-1. Trigger/Gate Functions (Internal A/D Pacer Clock)
Trigger/Gate
Function ATEN TGSL TGEN CGSL CGEN
Internal trigger/gate 0 X 0 0
External gate 0 1 1 1 X TGIN pin
External post-trigger 0011XTGIN pin
External pre-trigger
or about-trigger (with
internal start trigger)
External pre-trigger
or about-trigger (with
external start trigger)
Notes
1
It is assumed that conversions are enabled ( CVEN of the A/D Status register is set to 1) when
the trigger/gate event occurs.
2
The state of this bit determines whether A/D conversions can occur. If CGEN = 0, A/D
conversions are disabled; if CGEN = 1, A/D conversions are enabled.
1 0 0 0
1011X 1st = TGIN pin
0 or 1
0 or 1
Source
2
CGEN bit
2
1st = CGEN bit
2nd = TGIN pin
2nd = TGIN pin
1
2-6 Programming Information

Table 2-2. Trigger/Gate Functions (External Pacer Clock)
Trigger/Gate
Function ATEN TGSL TGEN CGSL CGEN
Internal trigger/gate 0 X 0 0
External gate 0 1 1 0
External post-trigger 0010
External pre-trigger
or about-trigger (with
internal start trigger)
External pre-trigger
or about-trigger (with
external start trigger)
Notes
1
Except for the internal trigger/gate, it is assumed that conversions are enabled ( CVEN of the A/D
Status register is set to 1) when the trigger/gate event occurs.
2
When an external clock is used for A/D conversions, A/D Counter 1/Counter 2 is available for
interrupt generation for digital I/O operations.
1 0 0 0
1010
Available
Available
Available
Available
Available
Source
2
CVEN bit
2
TGIN pin
2
TGIN pin
2
1st = CVEN bit
2nd = TGIN pin
2
1st = TGIN pin
2nd = TGIN pin
Summary of Trigger and Gate Functions for
D/A Conversions
1
Table 2-3 summarizes the trigger and gate functions specified with D/A
Control register A when using the internal D/A pacer clock (the D/A
Counter). Table 2-4 summarizes the trigger and gate functions specified
with D/A Control register A when using an external pacer clock (the
XPCLK pin (pin 44) of the main I/O connector).
2-7

Note:
When using the internal A/D pacer clock to pace D/A conversions,
use Table 2-4 to program trigger and gate functions for D/A conversions.
In this case, D/A conversions do not begin until A/D conversions begin.
Therefore, you would typically program an external trigger for A/D
conversions and an internal gate for D/A conversions. You would not
program an external trigger for A/D conversions and an internal gate for
D/A conversions if you are using retrigger mode or if you are triggering
A/D conversions and D/A conversions with opposite trigger edges.
Table 2-3. Trigger/Gate Functions (Internal D/A Pacer Clock)
Trigger/Gate
Function RTEN TGSL TGEN CGSL CGEN
Internal trigger/gate 0 X 0 0
0 or 1
2
Source
CGEN bit
External gate 0 1 1 1 X TGIN pin
External trigger
Notes
1
It is assumed that conversions are enabled ( CVEN of the D/A Status register is set to 1) when
the trigger/gate event occurs.
2
The state of this bit determines whether D/A conversions can occur. If CGEN = 0, D/A
conversions are disabled; if CGEN = 1, D/A conversions are enabled.
3
The state of this bit determines whether the board resets the D/A FIFO’s read pointer and starts
0 or 1
3
011XTGIN pin
generating the waveform stored in the D/A FIFO from the beginning each time an external
trigger event occurs. If RTEN = 0, the board does not reset the D/A FIFO’s read pointer; if
RTEN = 1, the board resets the D/A FIFO’s read pointer.
1
2-8 Programming Information

Table 2-4. Trigger/Gate Functions (External Pacer Clock)
Trigger/Gate
Function RTEN TGSL TGEN CGSL CGEN
Internal trigger/gate 0 X 0 0 X
Source
CVEN bit
1
External gate 0 1 1 0 X TGIN pin
External trigger
Notes
1
Except for the internal trigger/gate, it is assumed that conversions are enabled ( CVEN of the D/A
Status register is set to 1) when the trigger/gate event occurs.
2
The state of this bit determines whether the board resets the D/A FIFO’s read pointer and starts
0 or 1
2
010X TGIN pin
generating the waveform stored in the D/A FIFO from the beginning each time an e xternal trigger
event occurs. If RTEN = 0, the board does not reset the D/A FIFO’s read pointer; if RTEN = 1,
the board resets the D/A FIFO’s read pointer.
2-9

Pin Assignments
Figure 2-1 shows the main I/O connector and its pin assignments on a
DAS-1800AO Series board; Table 2-5 contains a more detailed
description of the pins.
USER_COMMON_MODE - 01
CH00 LO or CH08 HI - 02
CH01 LO or CH09 HI - 03
CH02 LO or CH10 HI - 04
CH03 LO or CH11 HI - 05
CH04 LO or CH12 HI - 06
CH05 LO or CH13 HI - 07
CH06 LO or CH14 HI - 08
CH07 LO or CH15 HI - 09
Not connected - 10
Not connected - 11
+15 V - 12
PGND - 13
DGND - 14
DI 1 - 15
DI 3 - 16
DO 1 - 17
DO 3 - 18
DOSTRB - 19
TGOUT - 20
MUX 03 - 21
MUX 05 - 22
MUX 07 - 23
+5V - 24
DGND - 25
Figure 2-1. Main I/O Connector
26 - CH00 HI
27 - CH01 HI
28 - CH02 HI
29 - CH03 HI
30 - CH04 HI
31 - CH05 HI
32 - CH06 HI
33 - CH07 HI
34 - LL GND
35 - ODAC 0
36 - ODAC 1
37 - −15V
38 - PGND
39 - GEXT
40 - DI 0
41 - DI 2
42 - DO 0
43 - DO 2
44 - XPCLK
45 - SSHO
46 - TGIN
47 - MUX 04
48 - MUX 06
49 - +5 V
50 - DGND
2-10 Programming Information

Table 2-5. Pin Assignments
Pin Name Function
1
2 CH00 LO / CH08 HI Analog input
3 CH01 LO / CH09 HI Analog input
4 CH02 LO / CH10 HI Analog input
5 CH03 LO / CH11 HI Analog input
6 CH04 LO / CH12 HI Analog input
7 CH05 LO / CH13 HI Analog input
8 CH06 LO / CH14 HI Analog input
9 CH07 LO / CH15 HI Analog input
10 Not connected 11 Not connected 12 +15 V +15 regulated voltage output (30 mA maximum)
13 PGND ±15 V power return
14 DGND Digital ground
15 DI 1 Digital input
USER_COMMON_MODE
User input for connecting to the low side of the
instrumentation amplifier in single-ended mode
16 DI 3 Digital input
17 DO 1 Digital output
18 DO 3 Digital output
19 DOSTRB Digital output latch strobe (output)
20 TGOUT Trigger/gate output
21 MUX 3 Upper analog input channel output (from A/D QRAM)
22 MUX 5 Upper analog input channel output (from A/D QRAM)
23 MUX 7 Upper analog input channel output (from A/D QRAM)
24 +5 V +5 V power supply (1 A maximum)
25 DGND Digital ground
2-11

Table 2-5. Pin Assignments (cont.)
Pin Name Function
26 CH00 HI Analog input
27 CH01 HI Analog input
28 CH02 HI Analog input
29 CH03 HI Analog input
30 CH04 HI Analog input
31 CH05 HI Analog input
32 CH06 HI Analog input
33 CH07 HI Analog input
34 LL GND Low-level analog return
−
−
35 ODAC 0 Analog output
36 ODAC 1 Analog output
37
38
15 V
PGND
15 regulated voltage output (30 mA maximum)
±15 V power return
39 GEXT External gain control output (from A/D QRAM)
40 DI 0 Digital input
41 DI 2 Digital input
42 DO 0 Digital output
43 DO 2 Digital output
44 XPCLK External pacer clock input
45 SSHO Simultaneous sample-and-hold output to SSH device
1
46 TGIN External trigger/gate input
47 MUX 4 Upper analog input channel output (from A/D QRAM)
48 MUX 6 Upper analog input channel output (from A/D QRAM)
49 +5 V +5 V power supply (1 A maximum)
50 DGND Digital ground
Notes
1
For non-SSH applications, you can use this pin as internal A/D pacer clock output.
2-12 Programming Information
A
Summary of I/O Address Bits
T able A-1 contains an alphabetical list of the bits at the I/O addresses used
by DAS-1800AO Series boards, a brief description of the bits, and the
pages you can refer to for additional information.
Table A-1. Summary of I/O Address Bits
Bit Name Operation Description Page
Reference
ATEN
BLV7 to BLV0 A/D Specify the number of channels in the scan when
BMDE
BRV5 to BRV0 A/D Specify the burst mode conversion rate. page 1-30
C0TC
C2TC
CGEN
CGSL
A/D Enables/disables about-trigger mode. page 1-13
page 1-29
using burst mode.
A/D Enables/disables burst mode. page 1-21
A/D Indicates whether A/D Counter 0 has reached
terminal count.
A/D Indicates whether A/D Counter 2 has reached
terminal count.
A/D Enables/disables the cascaded A/D Counter 1/
Counter 2.
D/A Enables/disables the D/A Counter. page 1-41
A/D Specifies the gate source for the cascaded
A/D Counter 1/Counter 2.
D/A Specifies the enable source for the D/A Counter. page 1-41
page 1-25
page 1-26
page 1-15
page 1-15
CIEN
CMEN
A/D Enables/disables an interrupt on A/D Counter 2
terminal count.
A/D Enables/disables common-mode input. page 1-21
page 1-17
A-1

Table A-1. Summary of I/O Address Bits (cont.)
Bit Name Operation Description Page
Reference
CNVT
CVEN
D11 to D0
DD11 to DD0
DDEN
DI3 to DI0
DIEN
DL2 to DL0
DL1 and DL0
DMATC
D/A Performs a single D/A conversion; determines
whether the DAC(s) are still converting data.
A/D Enables/disables A/D conversions. page 1-22
D/A Enables/disables D/A conversions. page 1-48
A/D Contain A/D conversion data stored in the A/D
FIFO.
D/A Specify an output value to load into the D/A FIFO. page 1-34
D/A Enables/disables DMA mode for D/A conversions. page 1-44
DIO Contain the state of the digital input lines. page 1-12
D/A Enables/disables interrupt mode for D/A
conversions.
A/D Specify the DMA channel for A/D conversions and
enables DMA mode for A/D conversions.
D/A Specify the DMA channel for D/A conversions. page 1-44
A/D Indicates whether DMA terminal count has been
reached for A/D conversions.
D/A Indicates whether DMA terminal count has been
reached for D/A conversions.
page 1-48
page 1-5
page 1-43
page 1-19
page 1-26
page 1-51
DO3 to DO0
DRV15 to DRV0 D/A Specify the value to load into the D/A Counter. page 1-54
DSL0
DSL1 and DSL0 D/A Specify the DAC(s) to update. page 1-37
FFEN
FHF
A-2 Summary of I/O Address Bits
DIO Specify the values to write to the digital output
lines.
A/D Specifies the register at Base Address + 0h that you
want to access.
A/D Enables/resets the read/write address pointers of the
A/D FIFO.
D/A Enables/resets the read/write address pointers of the
D/A FIFO.
A/D Indicates whether the A/D FIFO is half full. page 1-24
page 1-12
page 1-11
page 1-16
page 1-42

Table A-1. Summary of I/O Address Bits (cont.)
Bit Name Operation Description Page
Reference
FIMD
FNE
FNF
FNH
FUF
GEXT
GN1 and GN0 A/D Specify the gain code for A/D conversions. page 1-10
IL2 to IL0
INT
A/D Specifies the A/D FIFO interrupt mode. page 1-17
D/A Specifies the D/A FIFO interrupt mode. page 1-43
A/D Indicates whether the A/D FIFO contains data. page 1-23
D/A Indicates whether the D/A FIFO contains data. page 1-50
D/A Indicates whether the D/A FIFO is not full. page 1-49
D/A Indicates whether the D/A FIFO is not half full. page 1-49
D/A Indicates whether the D/A FIFO has run out of data. page 1-50
A/D Controls the GEXT pin (pin 39) of the main I/O
connector.
D/A Specify the gain code for D/A conversions. page 1-46
A/D Specify the interrupt level for A/D conversions and
enables interrupt mode for A/D conversions.
D/A Specify the interrupt level for D/A conversions. page 1-17
A/D Indicates whether an interrupt event occurred for
A/D conversions.
D/A Indicates whether an interrupt event occurred for
D/A conversions.
page 1-10
page 1-17
page 1-27
page 1-52
MUX7 to MUX0 A/D Specify the channel number for A/D conversions. page 1-10
OVF
PSEN
QAS7 to QAS0 A/D Specify the starting address of the channel-gain
RCEN
RCV10 to RCV0 D/A Specify the size of the waveform stored in the D/A
RTEN
A/D Indicates whether the A/D FIFO is about to
overflow.
D/A Enables/disables the prescaler of the D/A internal
pacer clock.
queue.
D/A Enables/disables recycle mode. page 1-41
FIFO.
D/A Enables/disables retrigger mode. page 1-39
page 1-24
page 1-46
page 1-31
page 1-36
page 1-38
A-3

S1
Table A-1. Summary of I/O Address Bits (cont.)
Bit Name Operation Description Page
Reference
and S0
S/D
SHEN
TGEN
TGPL
TGSL
A/D Specify the pacer clock source for A/D conversions. page 1-22
D/A Specify the pacer clock source for D/A conversions. page 1-47
A/D Specifies the input configuration (single-ended or
differential).
A/D Enables/disables the sample-and-hold capability. page 1-16
A/D Enables/disables the TGIN pin as an external trigger
or an external gate for A/D conversions.
D/A Enables/disables the TGIN pin as an external trigger
or an external gate for D/A conversions.
A/D Specifies the active polarity of the external
trigger/gate signal for A/D conversions.
D/A Specifies the active polarity of the external
trigger/gate signal for D/A conversions.
A/D Specifies whether the signal at the TGIN pin is used
as an external trigger signal or an external gate
signal for A/D conversions.
D/A Specifies whether the signal at the TGIN pin is used
as an external trigger signal or an external gate
signal for D/A conversions.
page 1-21
page 1-14
page 1-40
page 1-14
page 1-40
page 1-14
page 1-41
U/B
UQEN
XCPL
A-4 Summary of I/O Address Bits
A/D Specifies the input range type (unipolar or bipolar). page 1-20
A/D Enables the QAS6 and QAS7 bits of the A/D
QRAM Address Start register.
D/A Specifies the active polarity of the external pacer
clock when used for D/A conversions.
page 1-21
page 1-46
 Loading...