

Page 1

xx
CTRL7100UP X-RAID-B and X-RAID-C
Option B. 10 1-TB drives and
Option C.16 2-TB drives
for the CTRL7100A RSA7100A
ZZZ
Real-Time Spectrum Analyzer
Upgrade Kit Instructions
www.tek.com
P071355300*
*
071-3553-00
Page 2

Copyright © Tektronix. All rights reserved. Licensed software products are owned by Tektronix or its subsidiaries
or suppliers, and are protected by national copyright laws and international treaty provisions.
Tektronix products are covered by U.S. and foreign patents, issued and pending. Information in this publication
supersedes that in all previously published material. Specifications and price change privileges reserved.
TEKTRONIX and TEK are registered trademarks of Tektronix, Inc.
Contacting Tektronix
Tektronix, Inc.
14150 SW Karl Braun Drive
P.O. Box 5 0 0
Beaverto
USA
For product information, sales, service, and technical support:
n, OR 97077
In North America, call 1-800-833-9200.
Worldwide, visit www.tek.com to find contacts in your area.
Page 3

Safety summary
Only qualified personnel should perform these installation procedures. Read this
Safety Summary and the General Safety Summary locatedintheRSA7100A Quick
Start User Ma
Disconnect power. To avoid electric shock, switch off the product power and
disconnect the power cord from the mains pow er before removing any covers or
panels, or opening the case for service.
nual before performing the procedures in this installation document.
Do not oper
removed, or with case open. Hazardous voltage exposure is possible.
ate without covers. Do not operate this product with covers or panels
CTRL7100UP X-RAID-B and X-RAID-C Instructions 1
Page 4

Kit description
Kit description
Products
Option B kit parts list
This document provides instructions for installation of the following options for
the RSA7100A Real-Time Spectrum Analyzer into the CTRL7100A controller:
CTRL7100UP X-RAID-B: Option B includes 12 1 TB drives
CTRL7100UP X-RAID-C: Option C includes 16 2 TB drives
These options provide additional or replacement drives.
This kit contains replacement/additional solid-state drives for the Tektronix
CTRL7100A controller used with the RSA7100A Real-Time Spectrum Analyzer.
ion C kit parts list
Opt
Quantity Part number Description
12 116-1227-00
12 119-8
1 071-3
Quantity Part number Description
16 116-1227-00
16 119-8813-00
1 071-3553-XX
248-XX
553-XX
REPLAC
SWAP 2.5 IN DRIVE CARRIE R FOR INTEL
SERVER CHASSIS, 1 EA, FXX25HSCAR
DISK DRIVE; SOLID STATE, 1 TB, 2.5 IN, SATA
III, 6.0 GB/S, MLC, 7 MM, SAFETY CONTROLLED
MANUAL, TECH: CTRL7100UP X-RAID-B and
X-RAID-C INSTALLATION INSTRUCTIONS (this
manu
REPLACEMENT PART FOR CTRL7100A, HOT
SWAP 2.5 IN DRIVE CARRIE R FOR INTEL
SERVER CHASSIS, 1 EA, FXX25HSCAR
DISK DRIVE; SOLID STATE, 1.92TB, 2.5 IN, SATA
III, 6.0 GB/S, 7 MM, SAFETY CONTROLLED
MANUAL, TECH: CTRL7100UP X-RAID-B and
X-RAID-C INSTALLATION INSTRUCTIONS (this
manual)
EMENT PART FOR CTRL7100A, HOT
al)
2 CTRL7100UP X-RAID-B and X-RAID-C Instructions
Page 5

Install the RAID
Install the RAID
Required equipment
Remove installed RAID
No equipment is required to remove and install the included drives into the
CTRL7100A.
The RAID drives are located in trays in the CTRL7100A. Once you have located
them, perform the following procedures to remove them.
1. Turn off power to controller (PC). This will also power off the RSA7100A,
if connected.
2. Pressinonthebluetabtofreethelockinglever.
3. Pull the locking lever to the right and toward you to remove the tray.
CTRL7100UP X-RAID-B and X-RAID-C Instructions 3
Page 6

Install the RAID
4. For X-RAID-B, r
10, but you can remove 12.) For X-RAID-C, see step 5.
5. For X-RAID-C, remove all 16 trays as shown in the following image.
emove all 12 trays. (The following image shows removal of
4 CTRL7100UP X-RAID-B and X-RAID-C Instructions
Page 7

Install the RAID
Install the new RAID
Once the instal
the following procedures to install the new RAID. The drives supplied in this
kit come preinstalled in trays.
1. Insert the tray with new drive installed into the CTRL7100A chassis and
push in the locking lever until it clicks.
led drives have been removed from the CTRL7100A, perform
2. Power on the controller. If the drives have been previously initialized in a
system, you will need to wait 5 to 10 minutes after powering on for the new
RAID to be rebuilt.
If the drives have not been previously initialized, go to the Configure the
RAID procedure. (See page 6.)
CTRL7100UP X-RAID-B and X-RAID-C Instructions 5
Page 8

Configure the RAID
Configure the R
AID
After you hav
the drives have not previously been initialized in a system or there is some
problem with the drives or performance
the drives have been swapped around with another set (the automatic
reconstitution only works if the drives have previously been initialized in a
system and are traveling together as a set)
Perform the following procedures if either of the above situations applies.
1. Press the power button on the controller and, as the system powers up, watch
for the Press <CTRL> A for Adaptec
e installed the new RAIDs, y ou only need to configure them if:
RAID Configuration Utility message.
2. Press CTRL + A to enter the Adaptec RAID configuration utility.
3. Select Logical Device Configuration andthenpressEnter.
4. Select Initialize Drives andthenpressEnter.
6 CTRL7100UP X-RAID-B and X-RAID-C Instructions
Page 9
Configure the RAID
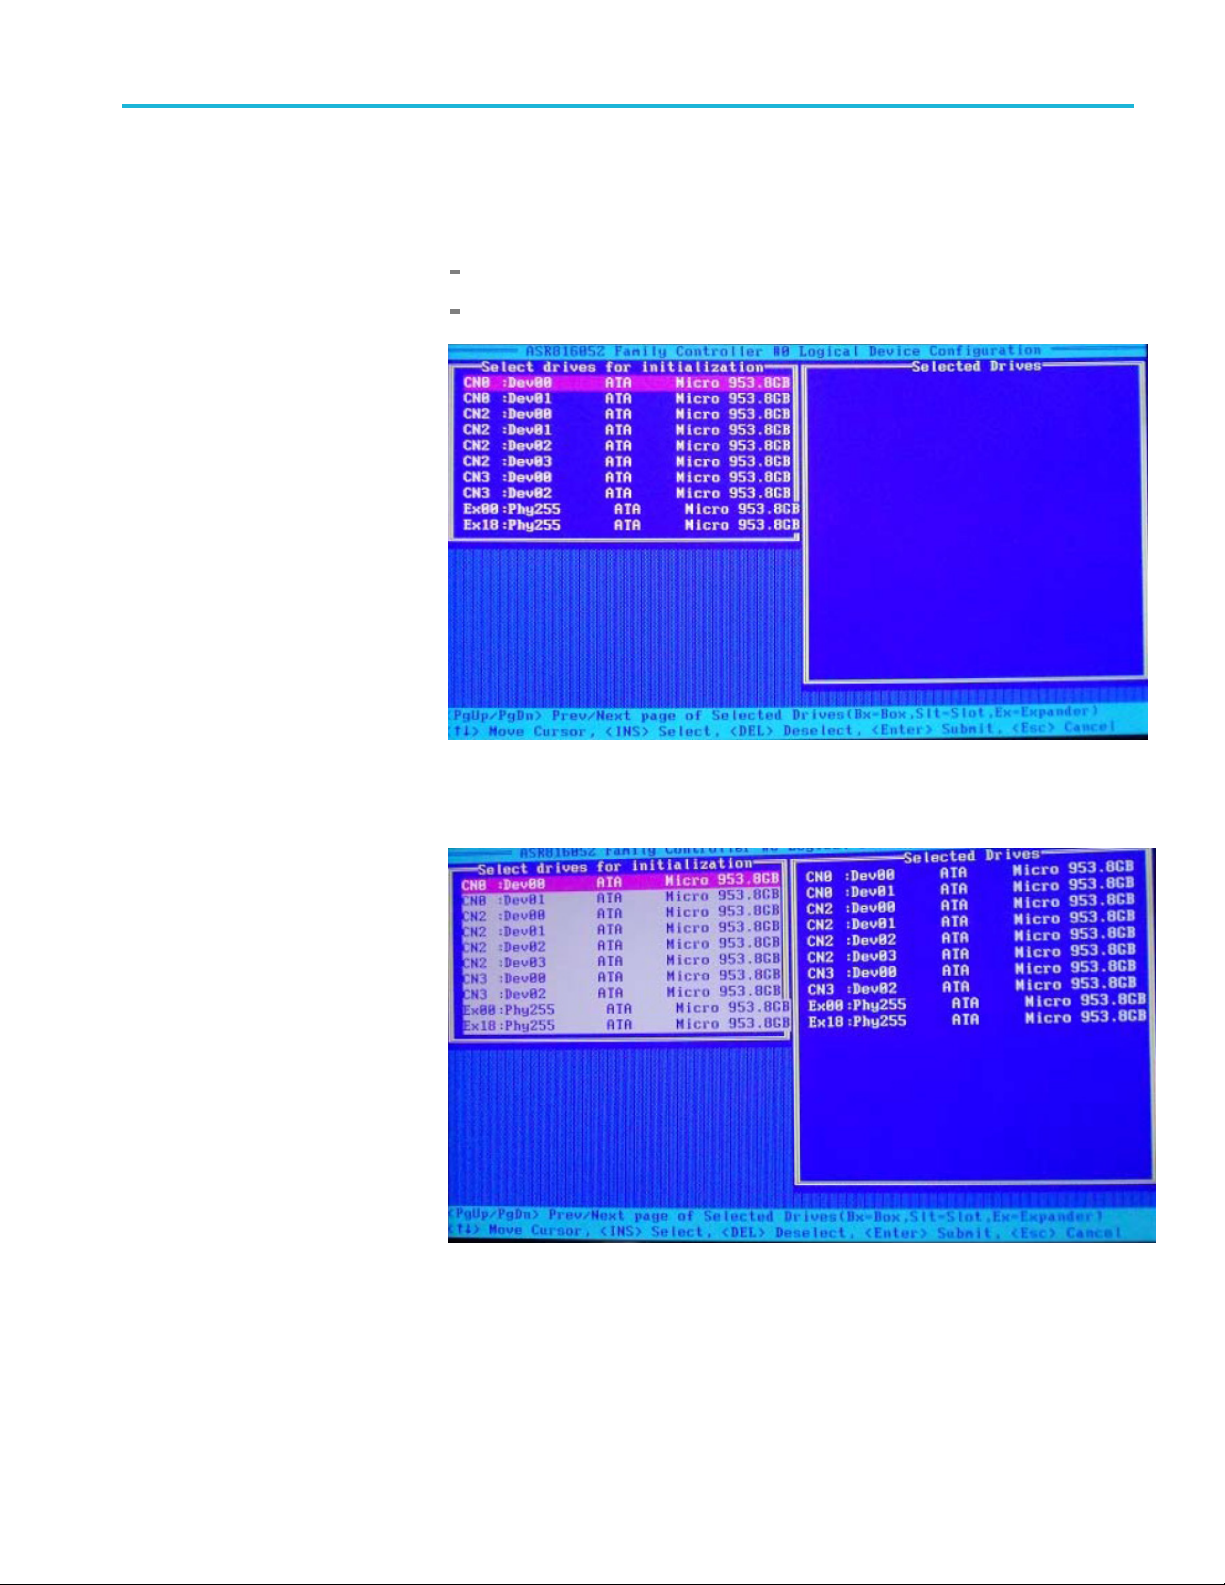
5. In the Select dr
one entry for each physical RAID drive you installed. There should be the
following numbers for the given options:
OptionB:12entries
Option C: 16
ives for Initialization panel, count the entries. There must be
entries
6. Use the
appear on the right side of the screen in the Selected Drives panel. Press Enter
to submit the drives for initialization.
Insert key to select all entries to be initialized. Selected entries will
CTRL7100UP X-RAID-B and X-RAID-C Instructions 7
Page 10

Configure the RAID
7. When the follow
8. Wait until the Initializing drives.....Done message appears and then press
any key to return to the Main menu.
9. Use the arrow and Enter keys to select Create Array.
10. Use the Insert key to select all entries to be added to the array and then press
Enter.
ing Warning message appears, press Y to continue.
11. Use t
12. When you receive the following warning, press Y to accept. You may receive
8 CTRL7100UP X-RAID-B and X-RAID-C Instructions
he arrow and Enter keys to set the Array Properties as follows:
Leave "Array Size" at Default (MAX) setting, (this max size will differ
ending on the option: Option B is 11.1xx and Option C is 27.8xx).
dep
Set all other Array Properties to match the settings shown in the following
age.
im
second warning about a ZMM/battery. If you do, press Y to accept that also.
a
Page 11

Configure the RAID
13. Continue to set
following image.
14. When [Done] is highlighted (at the bottom of the screen), press Enter to
accept all entries and exit the menu.
the array properties to match all settings as shown in the
15. When you receive the following warning, press Y to accept.
16. Press N when asked is you want to disable all cache settings.
17. Press the Esc key to return to the O ptions menu.
CTRL7100UP X-RAID-B and X-RAID-C Instructions 9
Page 12

Configure the RAID
18. Use the up/down
Enter.
19. Use the up/down arrow keys to select Controller Configuration and then
press Ent
er.
arrow keys to select Controller Settings and then press
10 CTRL7100UP X-RAID-B and X-RAID-C Instructions
Page 13

Configure the RAID
20. In the Controll
the following image.
21. Use the arrow and Enter keys to select and change any settings if necessary.
22. Press the Esc key once.
er Configuration menu, confirm that all settings are shown as in
23. Select Ye s in the Save Changes Made? dialog and then press Enter.
24. Return to the Main menu and select Manage Arrays.
25. Confirm that the array size is between 11.0 to 11.4 TB for Option B; between
27.8to30.2TBforOptionC.
CTRL7100UP X-RAID-B and X-RAID-C Instructions 11
Page 14

Configure the RAID
26. Press Enter to e
Array #000: RAID ARRAY
Array Status: OPTIMAL
Type: RAID 0
Stripe size: 1MB
Scroll down and count the drive entries. There should be 1 2 entries for Option
B and 16 entries for Option C.
xpand the menu and confirm the following:
27. Press Esc three times until you see the Exit Utility message, and then select
Yes .
28. Now follow the Initiate RAID procedure and complete it. (See page 13.)
12 CTRL7100UP X-RAID-B and X-RAID-C Instructions
Page 15

Initiate RAID
Initiate RAID
1. Right click on My Computer from the Windows Desktop, and then select
Manage to open the Computer Management window.
2. Select Disk Management to open the Initialize Disk window.
3. Confirm that Disk 1 is checked in the Select disks panel and that GPT (GUID
Partition Table is selected.
4. Click OK.
CTRL7100UP X-RAID-B and X-RAID-C Instructions 13
Page 16

Initiate RAID
5. Once initializ
(item 1 in following image). In the menu that appears, select New Simple
Volume... (item 2 in following image).
ation is complete, right click on the Unallocated area of Disk 1
6. Click Next in the New Simple Volume Wizard window.
14 CTRL7100UP X-RAID-B and X-RAID-C Instructions
Page 17

Initiate RAID
7. Confirm (or set i
Next. The following image shows the maximum for Option B (>11 TB).
Option C will be > 27 TB.
f necessary) that volume size is at maximum, and then click
8. Select D as the drive (Assign the following drive letter) and then click Next.
CTRL7100UP X-RAID-B and X-RAID-C Instructions 15
Page 18

Initiate RAID
9. Select Format t
File system: NTFS
Allocation unit size: 64k
Volume label: RAID ARRAY (type in all capital letters)
Check the Perform a quick format box
his volume with the following settings and set as follows:
10. Click Next.
11. Click Finish in the Completing the New Simple Volume Wizard window.
16 CTRL7100UP X-RAID-B and X-RAID-C Instructions
Page 19

Initiate RAID
12. Confirm that the
Healthy (Primary Partition).
13. Yo u can n
complete. You can now use the new RAID.
ow close the Computer Management window. Initialization is
Disk 1 drive labeled RAID ARRAY (all caps) and is noted as
CTRL7100UP X-RAID-B and X-RAID-C Instructions 17
 Loading...