

Page 1

xx
Cerify CYSW
ZZZ
Automated Video Content Verification System
User Manual
*P077035205*
077-0352-05
Page 2

Page 3

Cerify CYSW
Automated Video Content Verification System
ZZZ
User Manual
www.tektronix.com
077-0352-05
Page 4

Copyright © Tektronix. All rights reserved. Licensed software products are owned by Tektronix or its
subsidiaries or suppliers, and are protected by national copyright laws and international treaty provisions.
Tektronix products are covered by U.S. and foreign patents, issued and pending. Information in this
publication supersedes that in all previously published material. Specifications and price change privileges
reserved.
TEKTRONIX and TEK are registered trademarks of Tektronix, Inc.
Cerify is trademark of Tektronix, Inc.
Online Help part number 076-0198-05
This document supports software version 7.2 and above.
Contacting Tektronix
Tektronix, Inc.
14150 SW
P. O . B o x 5 0 0
Beaverton, OR 97077
USA
For product information, sales, service, and technical support:
In Nor
Worldwide, visit www.tektronix.com to find contacts in your area.
Karl Braun Drive
th America, call 1-800-833-9200.
Page 5

Warranty
Tektronix warrants that the media on which this software product is furnished and the encoding of the programs
on the media will be free from defects in materials and workmanship for a period of three (3) months from the
date of shipment. If any such medium or encoding proves defective during the warranty period, Tektronix will
provide a rep
product is furnished, this software product is provided “as is” without warranty of any kind, either express or
implied. Tektronix does not warrant that the functions contained in this software product will meet Customer's
requirements or that the operation of the programs will be uninterrupted or error-free.
In order to obtain service under this warranty, Customer must notify Tektronix of the defect before the
expiration of the warranty period. If Tektronix is unable to provide a replacement that is free from defects in
materials and workmanship within a reasonable time thereafter, Customer may terminate the license for this
software product and return this software product and any associated materials for credit or re fund.
THIS WARRANTY IS GIVEN BY TEKTRONIX WITH RESPECT TO THE PRODUCT IN LIEU OF ANY
OTHER WARRANTIES, EXPRESS OR IMPLIED. TEKTRONIX AND ITS VENDORS DISCLAIM ANY
IMPLIED
TEKTRONIX' RESPONSIBILITY TO REPLACE DEFECTIVE MEDIA OR REFUND CUSTOMER'S
PAYMENT IS THE SOLE AND EXCLUSIVE REMEDY PROVIDED TO THE CUSTOMER FOR
BREACH OF THIS WARRANTY. TEKTRONIX AND ITS VENDORS WILL NOT BE LIABLE FOR
ANY INDIRECT, SPECIAL, INCIDENTAL, OR CONSEQUENTIAL DAMAGES IRRESPECTIVE OF
WHETHER TEKTRONIX OR THE VENDOR HAS ADVANCE NOTICE OF THE POSSIBILITY OF
SUCH
lacement in exchange for the defective medium. Except as to the media on which this software
WARRANTIES OF MERCHANTABILITY OR FITNESS FOR A PARTICULAR PURPOSE.
DAMAGES.
Page 6

Page 7

Table of Contents
Acknowledgements
Acknowledgements................................................................................................. 1
Preface
Preface ............................................................................................................... 3
Contents
Related Documentation ....................................................................................... 3
Getting Started
Product Description ............................. ................................ ................................ ... 5
System Components.................................. ................................ ......................... 5
System Installation ................................................................................................. 9
Prerequisites ....................... .................................. ................................ ........... 9
Software Installation.......................................................................................... 12
Software Uninstallation ...................................................................................... 18
Software Reinstallation ...................................................................................... 18
Software Upgrade......................... .................................. ................................ .. 19
Network Settings.................. ................................ .................................. .......... 20
Accessing the Application........................................................................................ 21
Starting the Application...................................................................................... 21
Cerify Windows Service ..................................................................................... 22
Starting a Cluster.............................................................................................. 22
Accessing the Web User Interface .... ................................ .................................. .... 23
Logging in to the Application ......................... ................................ ...................... 23
Logging Out ................................. ................................ ................................ .. 23
of this Manual........................ ................................ ............................... 3
Table of Contents
Operating Basics
Concepts .................. .................................. ................................ ........................ 25
Users ......... .................................. ................................ ................................ 25
MediaLocations............................................................................................... 26
MediaSets...................................................................................................... 26
Templates...................................................................................................... 26
Profiles ................................. ................................ ................................ ........ 27
Jobs............................................................................................................. 27
Alerts ........................................................................................................... 27
Reports......................................................................................................... 28
Archiving ...................................................................................................... 28
Clustering.................... .................................. ................................ ................ 28
Cerify Automated Video Content Verification System User Manual i
Page 8

Table of Contents
Functional Overview .............................................................................................. 28
System Tray Icon ............................................................................................. 28
Web User Interface ........................................................................................... 29
Error Handling ................................................................................................ 35
Tutorials ............................................................................................................ 36
Work Flow..................................................................................................... 37
Before You Begin ............................................................................................. 38
Creating a MediaLocation ....... ................................ ................................ ............ 40
Creating a MediaSet.................. ................................ ................................ ........ 41
Creating a Template ............................ ................................ .............................. 44
Creating a Profile ............................................................................................. 46
Creating a Job. ................................ ................................ ................................ 47
Inspecting Job Results................................ .................................. ...................... 47
Generating a Report .. .................................. ................................ ...................... 48
Archiving ...................................................................................................... 48
Exporting Templates............................ ................................ .............................. 49
Importing Templates............................ ................................ .............................. 49
Reference
Introduction ........................................................................................................ 51
Jobs................ .................................. ................................ ................................ 51
Jobs Monitor .................................................................................................. 51
New Job................ ................................ ................................ ........................ 52
Modifying Jobs................................ ................................ ................................ 53
Job Details..................................................................................................... 54
Processing Result ............................................................................................. 55
Alert Levels ................... ................................ ................................ ................ 56
Alert Details................................................................................................... 57
Start and End Positions of Quality Alerts .... .... . .... . .... ..... .... . .... . .... . .... .... . .... . .... . .... ..... 58
Frame View.................................................................................................... 59
Profiles.............................................................................................................. 60
Profile Details ................................................................................................. 61
Edit Profile..................................................................................................... 61
New Profile............ .................................. ................................ ...................... 62
Templates ....................... ................................ .................................. .................. 63
Template Details ............................ ................................ ................................ .. 66
Edit Template.............. ................................ ................................ .................... 67
New Template ................... ................................ .................................. ............ 68
Exporting Templates............................ ................................ .............................. 69
Importing Templates............................ ................................ .............................. 70
Container Templates............................................................................................... 71
Checks Common to All Container Layers ......................... ................................ ........ 72
ii Cerify Automated Video Content Verification System User Manual
Page 9

Table of Contents
Container Checks Specific to MPEG-2 Transport Stream Standard .................................... 73
Container Checks Specific to MPEG-2 Program Stream Standard...................................... 73
Container Checks Specific to SMPTE 377M / MXF Standard .. .................................. ...... 74
Video Templates ................................................................................................... 74
Common Video Configuration Checks ..................... .................................. .............. 74
Video Quality. . .... . .... . .... ..... ..... ... . . .... . .... . .... . .... . .... . .... . .... . .... ..... ..... .... . .... . .... . ... 78
Video Checks Specific to MPEG-4 Standard.... ................................ .......................... 80
Video Checks Specific to MPEG-2 Standard.... ................................ .......................... 81
Video Checks Specific to VC-1 Standard .................................................................. 83
Video Checks Specific to H.264/AVC Standard........................................... ................ 83
Video Checks Specific to the DV50/100/DVCPro Standard................................. ............ 84
Video Checks Specific to the ProRes Standard .............................. .............................. 85
Video Checks Specific to Generic QuickTime Video..................................................... 85
Video Checks Specific to JPEG 2000 ...................... ................................ ................ 86
Audio Templates................................................................................................... 86
Common Audio Configuration Checks................. ................................ .................... 87
Audio Quality Checks .... . .... . .... ... . . .... . .... . .... . .... ..... ... . . .... . .... . .... ..... ... . . .... . .... . .... .. 88
Audio Checks Specific to MPEG1 and MPEG-2 Audio Standards ..................................... 90
Audio Checks Specific to Dolby-E Audio Standard .............. .................................. ...... 91
Audio Checks Specific to AC-3 Audio Standard.................. .................................. ...... 91
Audio Checks Specific to AAC Audio Standard .......................................................... 92
Audio Checks Specific to PCM Audio Standard .......................................................... 92
Audio Checks SpecifictoDVAudioS
Action Templates .............................. ................................ .................................. .. 93
MediaSets .......................................................................................................... 97
New MediaSet............................... .................................. ................................ 97
Edit MediaSet ................................................................................................. 98
Configure DropBox........................................................................................... 99
DropBox Filters ... ..... ..... ..... ..... .... . ..... .... . .... . .... . .... . .... . .... . .... . .... . .... . .... . .... ..... . 102
Reports.... .................................. ................................ ................................ ...... 103
Options.......................... ................................ ................................ .................. 103
Change Password ........................................................................................... 103
Records per Page.................... ................................ .................................. ...... 104
Jobs View ................................ .................................. ................................ .. 104
Admin..................................... .................................. ................................ ...... 104
User Management ................ ................................ .................................. ........ 105
Modify User ................................................................................................. 105
New User .................................................................................................... 105
MediaLocation Management.............................................................................. 106
Mail Settings . . .... ..... ..... .... . .... . .... . .... . .... ..... ..... .... . .... . .... . .... . .... . .... . .... ..... ..... .. 110
Processing Settings ... . ..... .... . .... . .... . .... . .... . .... . .... . .... . .... . .... . .... . .... . .... . .... . .... . .... . 110
Database Backup.......................... ................................ ................................ .. 111
tandard ............ .................................. .............. 93
Cerify Automated Video Content Verification System User Manual iii
Page 10

Table of Contents
Schedule Job Deletion...................................................................................... 112
Report File Settings. ... . . .... . .... . .... . .... . .... . .... ..... ..... .... . .... . .... . .... . .... ..... ..... ... . . .... . 112
Stream Information........... ................................ ................................ .............. 113
VLC playback ............................................................................................... 113
Application Log............................................................................................. 115
Media Test Units Page ..................................................................................... 115
Help ............................................................................................................... 116
Accessing the Online Help................................... .................................. ............ 116
Using the Online Help.............. ................................ .................................. ...... 117
Appendices
Appendix A: Alerts........................................ ................................ ...................... 119
List of Alerts .................................. .................................. ............................ 119
Appendix B: Supported Compression Standards ............................................................ 176
Supported Video Compression Standards................................................................ 176
Supported Audio Compression Standards . .................................. ............................ 180
File Types and Container Formats ...................... ................................ .................. 182
Supported Wrapper and Codec Combinations........................................................... 183
Standards References....................................... ................................ ................ 184
Appendix C: Software Maintenance........... ................................ ................................ 186
Configuring the Cerify Application..................... ................................ .................. 186
Reinitializing the Cerify Application ... ... . . .... . .... .... . .... . .... .... . .... ... . . .... ..... .... . .... .... . . 187
Database Backup/Restore Utility . . .... . .... . .... . .... ..... ... . . .... . .... . .... . .... . .... ... . . .... . .... . ... 187
Loading Example Jobs ..................................................................................... 189
Capturing Cerify Status Information Using the Support Monitor Script . ............................ 190
Upgrading Dongle Options ...... .................................. ................................ ........ 192
Using NFS Client on Windows ..................... ................................ ...................... 194
Appendix D: CeriTalk........................................................................................... 196
CeriTalk XML Reports..................................................................................... 196
CeriTalk SOAP API ........................................................................................ 199
Appendix E: Configuring Your Cerify Installation .......................................................... 204
Number of Channels........................................ ................................ ................ 204
Modes of Operation ........................................................................................ 205
Configuring Your Cerify Installation for Best Performance ........................................... 208
Commercial off-the-Shelf Recommendations ........................................................... 212
Glossary
Glossary Terms .................................................................................................. 213
Index
iv Cerify Automated Video Content Verification System User Manual
Page 11

Acknowledgements Acknowledgements
Acknowledgements
Apache. This product uses software developed by the Apache Software Foundation, www.apache.org.
This includes the following software: Andariel, Ant, Apache Commons, Axis, Castor, Log4j, Struts,
Spring and Xe
Apple. This product uses parts of the Darwin Streaming Server s ource code covered by the Apple Public
Source Lice
software license notices and source code provided with Cerify.
rces.
nse. For copies of this license and modifications made to the source code please refer to the
Apple and Q
Dolby. Manufactured under license from Dolby Laboratories. "Dolby", "Pro Logic", and the double-D
symbol ar
Dolby Laboratories. All rights reserved.
Expat. T
FFmpeg. This product uses software developed by the FFmpeg project, ffmpeg.mplayerhq.hu.
Specifi
HTMLUNIT. This product includes software developed by Gargoyle Software Inc.
/www.GargoyleSoftware.com/
http:/
Java This product uses Java™ technology. The TM and technology are explicitly required by Sun
://www.sun.com/policies/trademarks
(http
JBoss. Modifications have been made to the source code of the JBoss application server. This source
is available on request.
code
JCIFS. This product uses the Java CIFS Client Library, jcifs.samba.org.
JDIC This product uses the JDIC Java integration components. jdic.dev.java.net
JPEG. This product uses free JPEG software from the Independent JPEG Group.
JUnit. This product uses the JUnit regression testing framework, www.junit.org.
uickTime are trademarks of Apple Inc., registered in the United States and other countries.
e trademarks of Dolby Laboratories. Confidential unpublished works. Copyright 1992-1999
his product uses the Expat XML Parser, expat.sourceforge.net.
cally, support for DV is provided by some components of the libavcodec and libavutil libraries.
).
MXF. This product uses MXF software developed by and used under license from OPENCUBE
Technologies SAS, www.mxftk.com
MySQL. This product is powered by the MySQL database. MySQL is written and distributed under
the GNU General Public License which means the source code is freely distributed and available to
the general public.
Neko. This product includes software developed by Andy Clark.
Rhino. This product uses the Rhino implementation of JavaScript, http://www.mozilla.org/rhino/
Saxon. This product uses Saxon XSLT processor, saxon.sourceforge.net.
Windows Media. This product is protected by certain intellectual property rights of Microsoft. Use or
distribution of such technology outside of this product is prohibited without a license from Microsoft.
Cerify Automated Video Content Verification System User Manual 1
.
.
Page 12

Acknowledgements Acknowledgements
WinDump. This product uses the WinDUMP network diagnostic utilities www.winpcap.org/windump
WinPcap. This product uses the WinPcap packet capture libraries www.winpcap.org
7-Zip. This product uses the 7-ZIP file archiver. www.7-zip.org
2 Cerify Automated Video Content Verification System User Manual
Page 13

Preface Preface
Preface
Cerify is an automated system for testing compressed digital media before transmission or use. Through a
Web-based interface, users can create Jobs, which will perform a sequence of checks on a set of media
files, and vie
Contents of this Manual
This manual describes the system in detail, provides procedures for using the system, and includes full
reference documentation.
Getting Started describes the system capabilities, configuration, and first time operation.
w the results.
Operatin
Reference provides detailed information about each page (or window, or menu item) in the user
interfa
Appendix A: Alerts lists and defines all the stream compliance and integrity checks that can be
carrie
Appendix B: Supported Compression Standards describes compression standards and file formats
that th
Appendix C: Software Maintenance details the procedure to reinitialize the Cerify application and to
upgra
Appendix D: CeriTalk provides information about an XML-based API that lets you interact with Cerify
from
broadcast automation, and workflow systems.
App
configuring your installation for best performance and commercial off-the-shelf platform
recommendations.
gBasicsprovides a functional overview, basic concepts, and tutorials for using the system.
ce.
d out.
e system recognizes.
de the license dongle options.
within other applications, making it possible to integrate Cerify with other content management,
endix E: Configuring Your Cerify Installation provides information on modes of operation,
Related Documentation
The following related documents support the product:
Cerify Online Help (Tektronix part number, 076-0198-xx)
Cerify Release Notes
Cerify Third Party Software License Notice Document (Tektronix part number, 001-1513-xx)
Cerify Quick Start User Manual (Tektronix part number, 071-2680-xx)
Read This First (Tektronix part number, 061-4355-xx)
Cerify Automated Video Content Verification System User Manual 3
Page 14

Preface Preface
4 Cerify Automated Video Content Verification System User Manual
Page 15
Getting Started Product Description
Product Description
This is a media testing product which runs either on a single computer or on a cluster of two or more
dedicated computers connected on a network running Microsoft Windows. This automated video content
verification
parameters. It provides both broadcast and production operations with a fast, cost effective QC solution.
Cerify can be integrated with your existing infrastructure using the CeriTalk API to interface with asset
management systems and provide a completely automated workflow. A Web based user interface allows
test results to be viewed from any network connected workstation.
System Components
Cerify accesses digital media from local storage, such as a local hard drive or DVD, as well as network
storage, such as a Windows file s erver or FTP server.
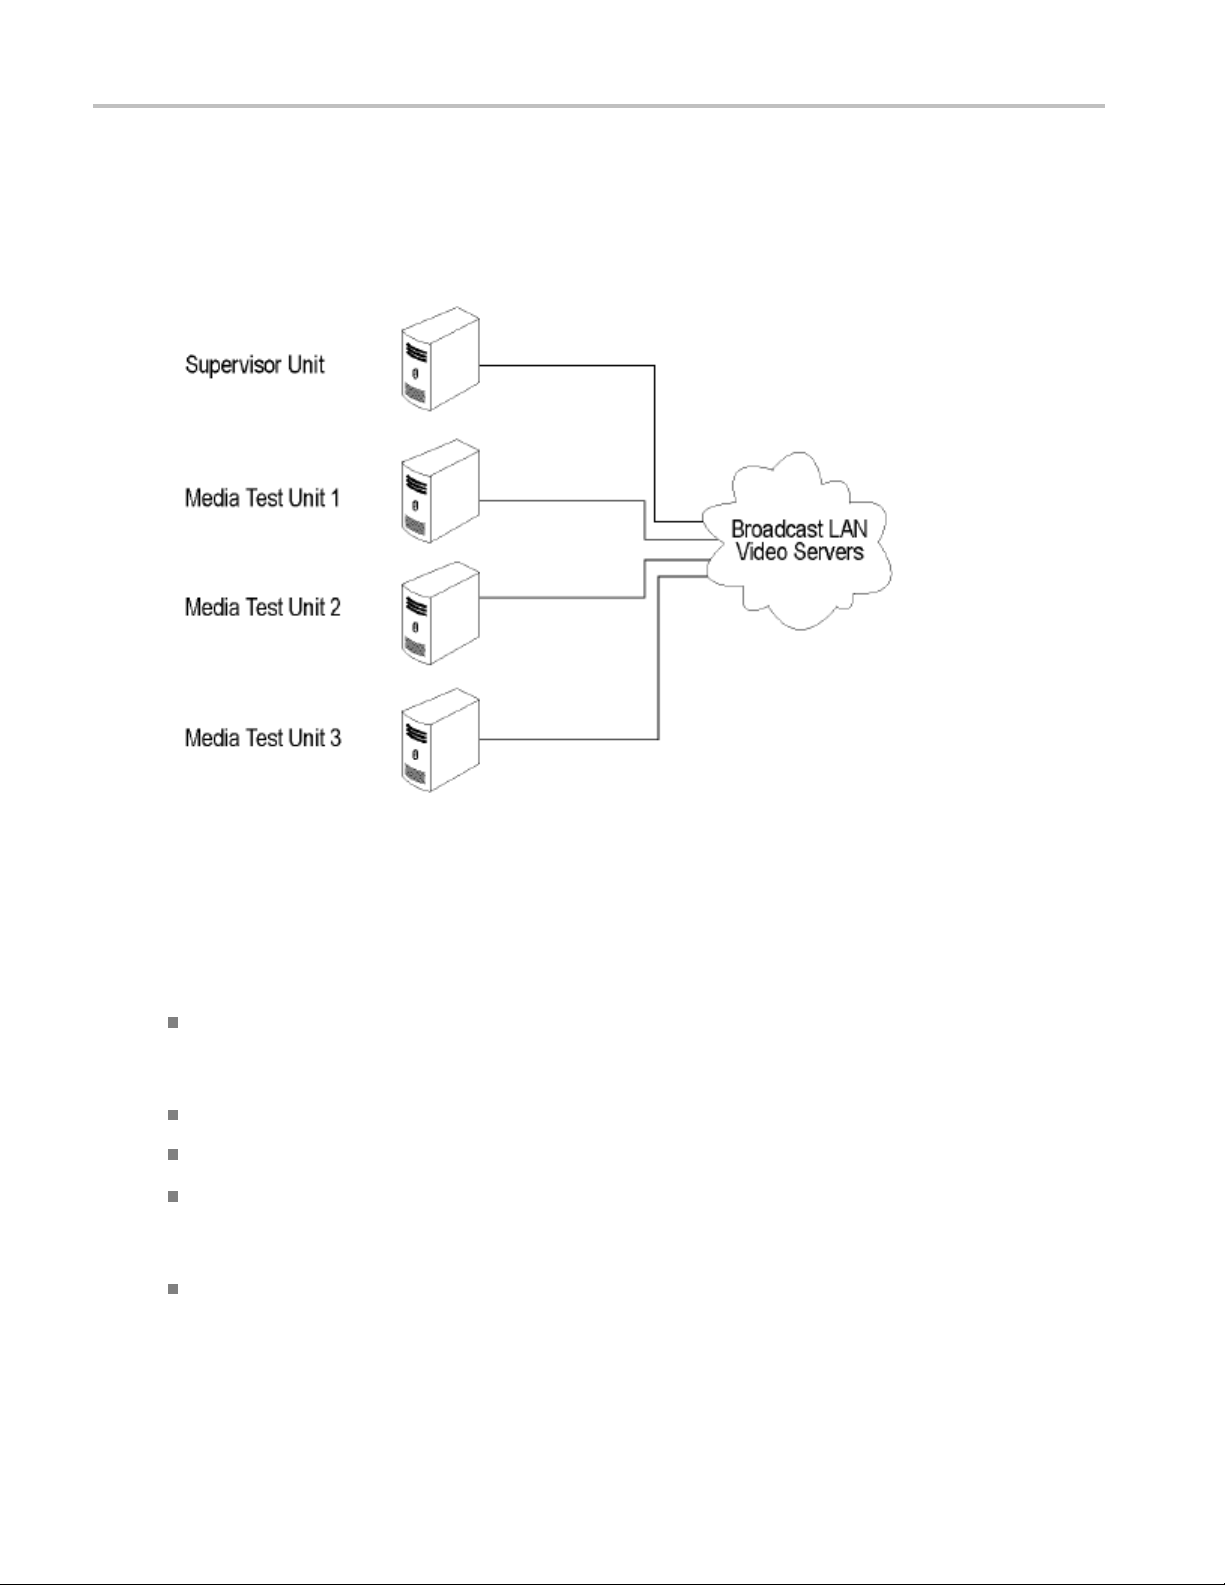
A Cerify system can be set up in two basic ways:
The first consists of a single self-contained unit which runs all the management and testing processes
of the system.
system can be used to check for correct digital encoding and against baseband quality
The second consists of a networked cluster of three or more units, which enables simultaneous
processing of a greater number of files. The networked cluster contains a single Supervisor and one
or more Media Test Units.
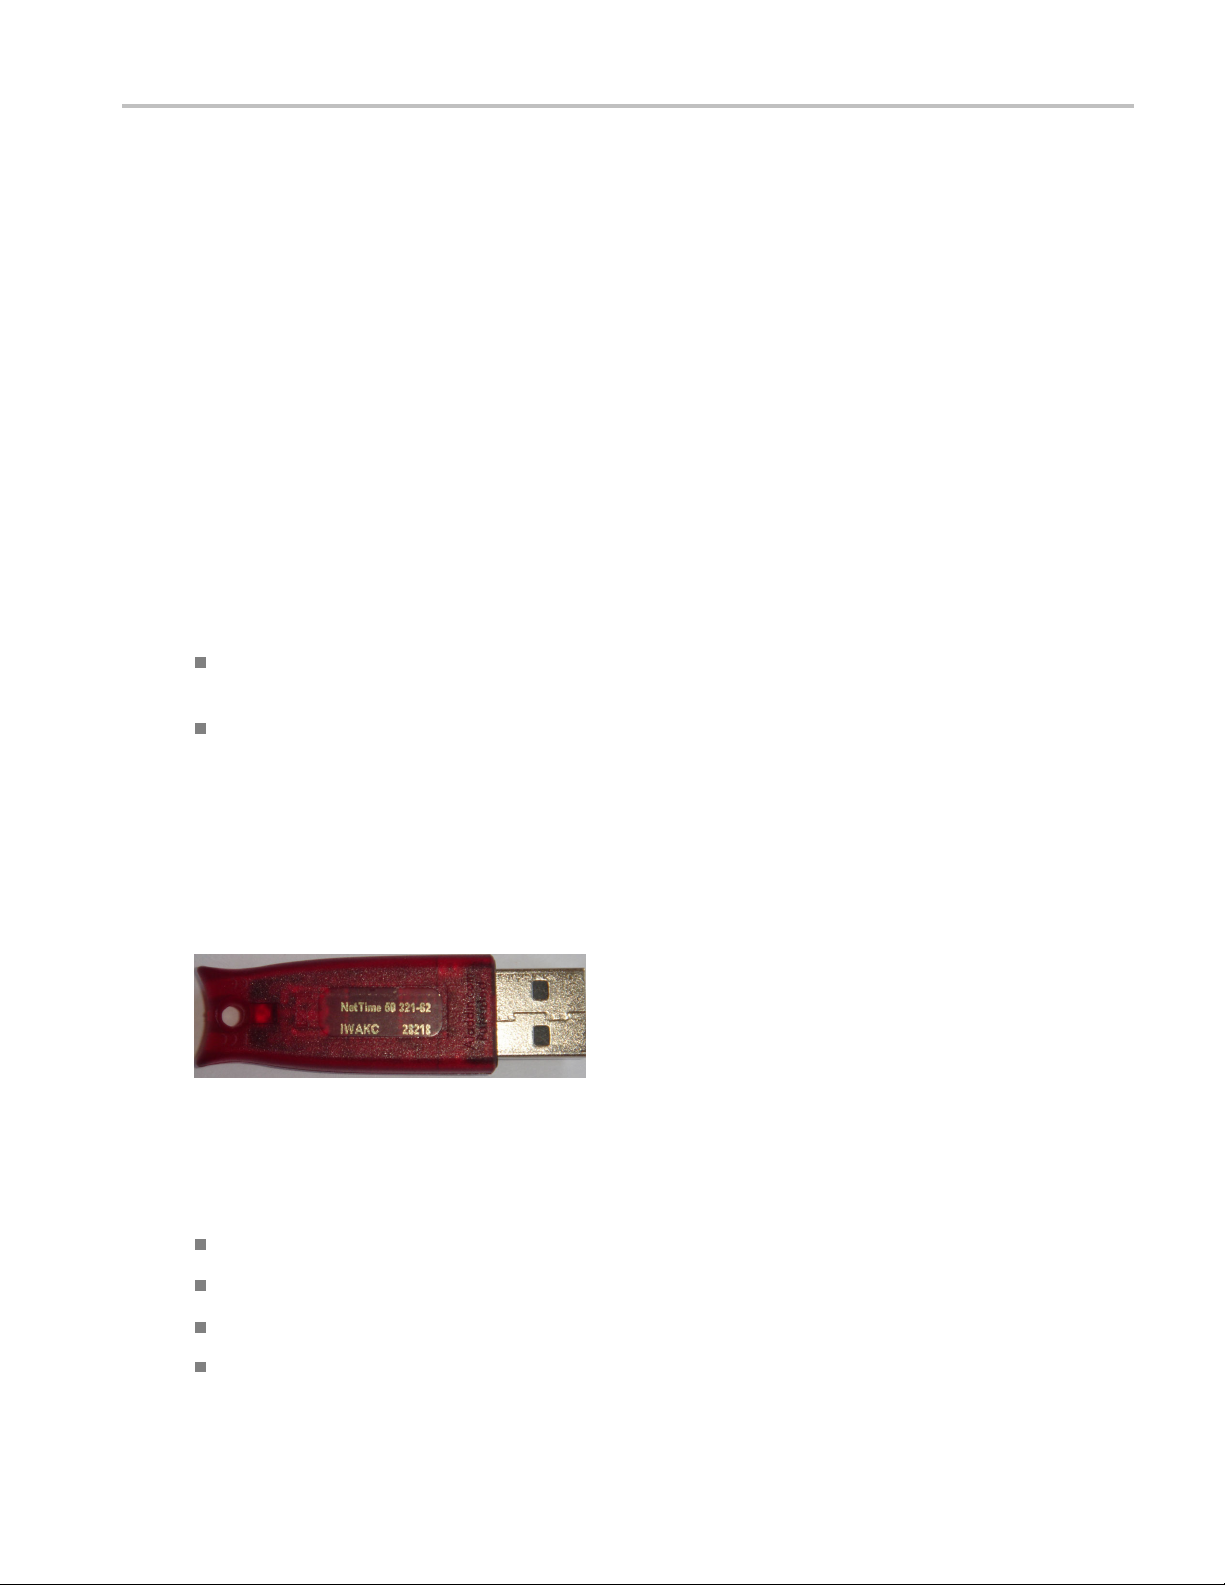
License Dongle
he license dongle must be plugged into the USB port on your computer to run the application. In a
T
clustered system, Media Test Units acquire their licenses from the Supervisor.
License dongle
It is possible to navigate the user interface and see previous results when no dongle is installed, but it is not
possible to carry out new checks of digital media fil
The types of codecs and file formats that can be checked.
The number of channels that can be used.
es. The license dongle controls:
For demo dongles, when the license will expire.
Server configuration (there can only be one Supervisor unit in a cluster)
Cerify Automated Video Content Verification System User Manual 5
Page 16
Getting Started Product Description
Networking
In a clustered configuration, network interface on all of the units, including the Supervisor and Media Test
Units, should be connected to the local area network. This connection is used to access media files, to
service Web clients, and to carry cluster control traffic.
Clustering topology
are Components
Softw
Software components include:
A Web-based user interface, which allows users to create and control Jobs, and to view or report
the results of these Jobs. This interface is accessed over the network by using a Web browser. All
need to know is the IP address of your unit.
you
Media test service, which performs media file verificationaccordingtotheruleschosenbytheuser.
A database, which provides robust storage of the system entities, including users, Jobs, and Job results.
An XML-based control and reporting API known as CeriTalk. CeriTalk allows interaction with Cerify
from within other applications, making it possible to integrate Cerify with other content management,
broadcast automation, and workflow systems.
A Web application server that provides access to the Web interface and runs the core services for
the application.
6 Cerify Automated Video Content Verification System User Manual
Page 17
Getting Started Product Description
A license server, which controls the types of files that can be verified.
The system tray icon and menu, which provides access to the Cerify Web-based user interface and
allows the application to be started and stopped.
Cerify as a Standalone System
A standalone system is a single machine that combines the functions of a Supervisor unit and a Media Test
Unit. The process that carries out the media file testing is known as the Media Test Client (MTC).
Cerify Cluster
The Supervisor unit controls the cluster system. It hosts the database and the Web server, allowing
multiple users to set up and view Jobs. It is responsible for locating the media files from the network, but
delegates a ctual transfer and processing of these files to one or more Media Test Units. The Supervisor
unit organizes and stores the resulting outputs.
Each Media Test Unit is responsible for processing the digital media files in a networked cluster. It
applies the user-specified tests, and reports back the results. The Supervisor can also be configured to
process the files.
Local area networking
Clustering Requirements.
Two or more PCs with 64-bit Windows Server 2008 SE OS installed.
Administrator privileges on all the machines on which the Cerify software will be installed.
Meet the minimum Hardware specifications.
Cerify Automated Video Content Verification System User Manual 7
Page 18

Getting Started Product Description
All the clustering PCs should be in the same network with correctly configured Static IP addresses.
All of the PCs in the cluster should be able to route to each other. The Supervisor unit is given a
network name that is recognized and resolved by all the Media Test Units.
You should know the fully qualified name of the Supervisor unit and provide this when Media Test
Units installer asks for the name of the Supervisor unit.
All the Media Test Units should reside on the same network as the Supervisor unit.
If the Supervisor or Media Test Units have more than one network interfaces, it is better to bridge
all the network interfaces together. For instructions on configuring the network bridge, refer to
Configuring a Network Bridge
Synchronization between all the units in cluster must be maintained. For example, use an NTP server
to synchronize the units in a cluster.
(see page 16).
Cluster
Clusters may not work in the following scenarios:
ing Scenarios Which may not Work
If the Supervisor and the Media Test Unit are in different subnets wherein the switch blocks the
multicast or UDP traffic.
If any of Supervisor or Media Test Unit systems has Windows firewall running.
If a Media Test Unit cannot resolve Supervisor host name.
If the Supervisor does not have a host name or if the Supervisor has a host name with Japanese
or Chinese characters.
If a network has another system with the same host name as the Supervisor system.
If the host name of the Supervisor changes after cluster installation.
the http port on the Supervisor is configured to a different port number after cluster installation (In
If
this case, Media Test Unit cerify.properties, the property cerify.supervisor.httpport must be changed to
the new port number).
If either the Supervisor or the Media Test Unit has multiple network interfaces and the IP addresses
change after the installation. In this case, the property cerify.jboss.bindaddress must to be changed to
the current IP address.
If the Supervisor has multiple network interfaces connected to the same network and if DNS/WINS
are not configured properly, troubleshoot this problem by doing either of the following:
By adding an entry containing the Supervisor host name and the IP address used by Cerify on
Supervisor in "hosts" file, which can be found in
the Media Test Units.
By bridging all the network interfaces together.
Clusters might not work correctly if there is momentary network outage in which case the clusters
have to be restarted.
8 Cerify Automated Video Content Verification System User Manual
C:\WINDOWS\system32\drivers\etc in all
Page 19

Getting Started System Installation
System Installation
This section provides details of hardware, software and user prerequisites for the system and instructions
on performing the software installation.
Prerequisites
Hardware Prerequisites
Cerify is designed to be run on a variety of PC hardware. Consequently, the choice of hardware is
determined by performance and throughput requirements for your installation.
This section recommends hardware configuration for some situations in which Cerify is typically used.
Single Channel Installation. A single channel installation of Cerify is one that is licensed to test a single
media file at a time. Such installations are normally performed on a PC or a laptop computer and are
e for situations where a low throughput is sufficient and performance is not critical.
suitabl
It is recommended that you use a computer that meets the following minimum requirements for such
lations:
instal
Processor speed: 2 GHz
Cerify is a CPU-intensive application. For b etter results, choose a dual core system with a clock speed
of 3 GHz and as much on-chip memory cache as possible.
Memory: 2 GB RAM
It is recommended to use a minimum of 1 GB to a maximum of 3 GB per channel and an
additional 1 GB for the operating system and the application. For best performance on a single channel
install, this would be:
1channelx3GB+1GB=4GB
Hard disk drive: 50 GB of free space
The amount of hard disk storage necessary depends on the average size of the files that you will be
testing and the mode of operation of Cerify that applies to the file formats that you are testing.
Refer to Modes of Operation
they impact disk space requirements.
A network interface
A DVD drive (used for installing the software)
(see page 205) for details on the different modes of operation and how
A USB port for connecting the license dongle
A license dongle (provided with the product)
Cerify Automated Video Content Verification System User Manual 9
Page 20

Getting Started System Installation
Multi-channel Enterprise Installation. A typical multi-channel installation of Cerify tests 4-8 media files at a
time on a single unit. Due to the high throughput and performance requirements that are expected from such
installation
In addition to the throughput required, the hardware requirements for such installations also depend
heavily on th
Cerify can operate in two modes:
Streaming mode
In this mode, media files are read directly from the media server hosting the file and are not copied
to the local hard disk of the Cerify system. This is the default mode of operation and is also the
preferred one.
Copying mode
Media files are copied to the local hard disk of the Cerify system before processing can begin. By
default, Cerify will not copy files to the local hard disk, but it is possible to force Cerify to operate in
this mode.
The mode of operation that applies to your Cerify installation depends on the file formats you would like to
test and other work flow and connectivity related constraints that might apply to your situation. See the
Modes
s, it is recommended that server class hardware and operating systems be used in such cases.
e mode of operation that will be used.
of Operation
(see page 205) for a detailed discussion on the factors that influence this.
The functional differences between these two modes of operation impact primarily on the disk space
ability and disk configuration requirements. Specifically, the copying mode requires a greater amount
avail
of disk space and high levels of concurrent read/write performance from the hard drives in order for best
overall performance while the streaming mode can derive comparable overall performance with a lesser
amount of disk space and lower read/write efficiency. Consequently, when possible, the streaming mode
should be used in preference to copying mode.
For multi-channel installations, the general guidelines that should be followed when selecting hardware
(the values given are the minimum recommended for a 4-channel installation) are:
Processor: 3 GHz
Ensure you have twice as many cores as the number of channels. For a 4-channel installation, this
means that you should have eight cores available. It is also recommended that for best performance,
you choose as much on-chip memory cache as possible.
NOTE. The ProRes decoder is capable of using as many processors as available to improve processing
performance. If you are processing ProRes media fi les, having more processor cores than the recommended
two per channel might improve performance.
Memory: 6 GB RAM
Recommend a minimum of 1 GB to a maximum of 3 GB per channel and an additional 1 GB to 4 GB
for the operating system and the Cerify database. For the best performance with 4 channels, this
would be:
4-channelsx3GB+4GB=16GB
10 Cerify Automated Video Content Verification System User Manual
Page 21

Getting Started System Installation
Hard disk drive: 100 GB x 3
For an enterprise installation, Tektronix recommends using a RAID on which to place the MS
Windows and Cerify installation (including database) to achieve fault tolerance in case of disk failure.
This logical drive should be at least 100 GB in size. For systems that are expected to support high
levels of thr
The amount of additional storage you need depends on the mode of operation that applies to your
installati
will be running.
oughput, it is recommended that you have 500 GB of space on this logical drive.
on, the average size of the files you will be processing and the number of channels you
Streaming
Due to the minimal hard disk utilization when operating in the streaming mode, it is sufficient to
provide a
Copying mode
The minimum hard disk space provided must be greater than the average file size being processed
multiplied by the number of channels. It is recommended that the temporary storage be RAID-ed
for bet
For help choosing the optimal number of hard disks for your installation and the best RAID levels to
ee Configuring Your Cerify Installation for Best Performance
use, s
Network interface: 1 Gbit/s
You might use multiple network interfaces to improve available network bandwidth.
Integrated RAID controller
A DVD drive (used for installing the software)
A USB port, for connecting the license dongle
icense dongle (provided with the product)
Al
Redundant power supply
mode
single dedicated hard disk of 100 GB in size as temporary storage for Cerify.
ter performance.
(see page 208).
For more detailed specification of a validated enterprise PC platform, see Commercial off-the-Shelf
Recommendations (see page 212).
Cerify Automated Video Content Verification System User Manual 11
Page 22

Getting Started System Installation
Supported Platforms
Windows XP - 32 bit and 64 bit
Windows Vista - 32 bit and 64 bit
Windows7-32bitand64bit
Windows Ser
Windows Server 2008 64-bit
NOTE. Appl
Microsoft Windows XP 64 bit and Windows Server 2003 because the QuickTime Player is not supported on
these platforms.
ver 2003 64-bit
e ProRes, Generic QuickTime and JPEG 2000 Video decoding functions are not available on
Software Prerequisites
The computer on which the application is installed will need the following:
To run one of the Supported Platforms.
To access the system through its Web user interface from another computer on the network, the client
computer must have a Web browser installed.
NOTE. To access the application, the preferred Web browser is Microsoft Internet Explorer
7.0 and above). The application has also been tested with Mozilla Firefox. There may be minor visual
differences in the appearance of the user interface in different Web browsers.
(version
Software Installation
Before installing the Cerify application, your PC must be correctly connected to your local network.
This allows:
The Cerify application to test the files that are available on other machines on the network.
Other machines to interact with Cerify automatically (for example, using CeriTalk automation clients,
or copying of report files to network locations).
Multiple users to connect to the Cerify Web user interface from remote computers.
For the last two cases, you need to know the IP address or the network name of the machine that Cerify
is installed on. Network settings on the PC are configured in the usual manner using Windows. If your
machine is not properly configured or you do not know the name or IP address information, contact your
system administrator.
12 Cerify Automated Video Content Verification System User Manual
Page 23

Getting Started System Installation
Installing Cerify
The installation of the Cerify takes several minutes; typically between 5 and 15 minutes depending on
the speed of your PC. To install Cerify, perform the following steps:
1. Run the Cerify Installer.
2. Insert the Cerify dongle.
3. Optional: Install Apple QuickTime Player.
Before inst
1. Cerify relies on third-party software applications that are packaged and installed with it: JBoss and
MySQL. If t
to install the Cerify.
2. The Cerif
along with it. It is recommended that other applications that rely on HASP licenses not be used with
Cerify on the same machine.
3. Cerify uses a number of network services that are local to the host PC. These services can sometimes
be blocked by personal firewall software, in which case an error mes sage will be displayed when C erify
starts. For example, on Cerify start up, a check is made to verify that communication with HASP can
be established. If the Cerify application is unable to communicate with HASP, an error message,
Unable to connect to HASP License Manager (port 1947). Please check if the HASP License
Manag
In such situations, configure the firewall to allow the service on the appropriate port, or alternatively
disa
4. It is recommended that the Cerify application should be installed on a machine where it can be
use
will considerably degrade the performance of other running applications. Similarly, running other
applications or services simultaneously w ill degrade the performance of Cerify and increase the time
taken to process a media fi le.
alling the Cerify , you should be aware of the following issues:
hese applications are already used on the PC, you should remove them before attempting
y license server relies on Aladdin HASP SRM drivers, which are installed and configured
er service is running and is not blocked by a firewall is displayed and Cerify is stopped.
ble the firewall entirely.
d as the sole running application. Cerify makes intensive use of both CPU and memory and
Cerify Automated Video Content Verification System User Manual 13
Page 24

Getting Started System Installation
Running the Cerify Installer.
Ensure that you are logged in as a user with administrator privileges.
NOTE. If you try to install the Cerify application without administrator privileges, the following message
appears: “The Cerify application can be installed or uninstalled only by a system administrator. Please
loginasadmi
Insert the Cerify DVD provided by Tektronix. The Cerify Application Browser opens. Click the Install
Cerify lin
NOTE. If you try to install the Cerify application on an unsupported platform
(refer to Supported Platforms
Windows operating system. Cerify will probably operate correctly but has not been validated on this OS.
Do you wish to continue installation?”
If the browser does not open, or if the Install Cerify link does not work, navigate to the Exec folder on
the DVD and double-click CerifySetup<version>.exe. Follow the on-screen instructions to perform
the installation.
nistrator and try again”.
k to launch the Cerify installer. Follow the on-screen instructions to perform the installation.
(see page 12)), then the following message appears: “This is not a supported
A number of third party software applications are installed during the installation process. Most of these
are not visible, but you will be notified as the WinPcap and HASP drivers are installed.
. WinPcap is not used in the normal operation of the Cerify application. It is used when you collect
NOTE
support diagnostics to troubleshoot networking issues with Cerify. For more information on support
diagnostics, refer to Capturing Cerify Status Information Using the Support Monitor Script
(see page 190).
Installation Options
Cerify can be installed in the following ways:
Standalone
Supervisor: The Supervisor unit controls the cluster system. It hosts the database and the Web server,
allowing multiple users to set up and view Jobs.
Media Test Unit: Each Media Test Unit is responsible for processing the digital media files in a
networked cluster.
NOTE. During the installation of Cerify, if there are multiple network interfaces in the system, the installer
provides the list of IP addresses and asks the user to select an IP address to be used by Cerify.
14 Cerify Automated Video Content Verification System User Manual
Page 25

Getting Started System Installation
Installing Cerify as a Supervisor. Follow the steps described in Run Cerify Installer (see page 14) and
Installing Cerify
with the list o
installation options dialog box. Sometime during the installation, a dialog box appears where you must:
(see page 13) to install Cerify as a Supervisor. During the installation, a dialog box appears
f installation options. To continue with the Supervisor installation, select Supervisor in the
Enable or dis
Enter the number of channels if you have selected the file processing option on the Supervisor.
Choose the IP address to be used by C erify.
At the end of the installation, the installer prompts you with an option to load the demo content. If you
choose this option, Cerify will be loaded with a demo database, which will contain some sample jobs
with results.
Installing Cerify as a Media Test Unit. Follow the steps described in Run Cerify Installer
Installing Cerify
box appears with the list of installation options. To continue with an Media Test Unit installation, select
Media Test Unit in the installation options dialog box. Sometime during the installation, a dialog box
appears where you must:
Enter the host name of the Supervisor.
Choose the IP address to be used by C erify.
Enter the number of channels.
Configuring a Cluster. To co nfigure a cluster, you must:
Install Cerify as a Supervisor on the system which must be configured as supervisor of the cluster.
able file-processing option on the Supervisor.
(see page 14) and
(see page 13) to install Cerify as a Media Test Unit. During the installation, a dialog
Install Cerify as a Media Test Unit on one or more systems.
When installing Cerify as a Media Test Unit, the installer prompts you to enter the supervisor host name.
The i nstaller checks whether the Media Test Unit can reach the Supervisor system using the host name
entered. If the Supervisor system cannot be reached, a message appears whether you still want to continue
the installation.
You can also configure multiple clusters on the same network. To configure multiple clusters on the same
network, you need to install multiple Supervisors. During a Media Test Unit installation, in the Cerify
System Settings dialog box, you must enter the respective Supervisor host name.
NOTE. To c onfigure a cluster, the versions of Cerify on the Supervisor and the Media Test Unit should be
the same. Once the installation is complete, Cerify will be started on both the Supervisor and the Media
Test Unit. Access Supervisor using Cerify Web UI and navigate to the Admin page, click the Media Test
Units link to the page containing the list of Media Test Units.
Cerify Automated Video Content Verification System User Manual 15
Page 26

Getting Started System Installation
Upgrading and Uninstalling a Cluster. Insert the installer CD and follow the on-screen instructions. To
upgrade a cluster, do the following:
Upgrade Cerify on the Supervisor by running the latest version of installer and choosing Supervisor
as installer type.
Upgrade Cerify on all of the Media Test Units by running the latest version of installer and choosing
Media Test Unit as the installer type.
Refer to the Software Upgrade
To uninstall a cluster, do the following:
Uninstall Cerify on the Supervisor.
Uninstall Cerify on all of the Media Test Units.
Refer to t
Configuring a N etwork Bridge. If the system has multiple network adapters, it is recommended that you
bridge all the network adapters.
1. From the Start menu, select Control P anel > Network Connections.
2. Select two network adapters at the same time, right-click and select Bridge Connections. Windows
3. Select the Network Bridge and configure a new IP address in the Properties menu for LAN
Installation Folders. During the installation process, select the following locations:
he Software Uninstallation
will build up a network bridge automatically. When the bridge is built successfully, the IP address of
the two adapters disappears.
connections.
Installation Location: The folder where the application is installed.
(see page 19) section for instructions on upgrading.
(see page 18) section for instructions on uninstallation.
Temporary Storage Location: Before processing media files from an external server, Cerify may
need to copy the remote files to the PC on which the Cerify application is installed. This folder is
used as the location to store such temporary copies. Cerify copies the file only when operating in copy
ode an d accesses the file using the ftp://, smb://, or gvg:// protocols. See Modes of Operation
m
page 205) for help determining the mode that applies to your installation.
NOTE. Thereshouldbesufficient free space in the temp folder to store large video files. The location for
this temp folder can be on any drive on the computer.
If you would like multiple users to be able to run the Cerify application on the PC, make sure to select
a location that has read and write permissions for those users. A temporary directory located within a
users private directory is not suitable in this case.
16 Cerify Automated Video Content Verification System User Manual
(see
Page 27

Getting Started System Installation
Insert the Cerify Dongle.
Insert the Cer
ify license dongle supplied with the system in any of the available USB ports of your
computer.
NOTE. Do not insert the dongle before the Cerify installation. Insert the dongle only when the installer
prompts you.
NOTE. If Cerify reports license failures a fter the dongle has been installed, it is possible that firewall
software is interfering with the license service. Please ensure that port 1947 is open in any firewall
software that is in use.
The number of files that can be simultaneously processed by Cerify will be the number of allowed c hannels
specified in the dongle. If a time-expiry dongle is connected, the default number of files processed is 1.
Sometimes, you will need to change the number of files that can be simultaneously processed by
Cerify. You can change the number of parallel processing channel setting by changing the value
of the property “cerify.processorsperbox” in “cerify.properties” file located at
Direct
ory>/Cerify/JBoss/server/all/conf
.
<Installation
The following lists the different situations for standalone installation:
When Cerify is started with no dongle connected, then (irrespective of whether a value has been
specified in the “cerify.processorsperbox” property or not) the number of allowed channels is zero.
When Cerify is started with a perpetually licensed dongle and if the “cerify.processorsperbox” property
is not set then the number of allowed channels is controlled by the dongle.
When Cerify is started with any valid dongle and a valid number of channels is specified for the
“cerify.processorsperbox” property, then this value would be used if it is less than or equal to the
mber of channels controlled by the dongle. If the value is greater than the number of channels
nu
controlled by the dongle then the number of channels controlled by the dongle takes precedence.
hen Cerify is started with any valid dongle and the number of channels specified for the
W
“cerify.processorsperbox” property is -1, then the number of allowed channels is controlled by the
dongle
When Cerify is started with a time-expired dongle a nd if the “cerify.processorsperbox” property is not
set, then the number of allowed channels is set to 1
Install Apple QuickTime Player.
To process Apple ProRes files or to process files using the Generic QuickTime Video template or to process
files using the JPEG 2000 Video template, you have to install QuickTime Player. You can download
QuickTime player from the link http://www.apple.com/quicktime/download/
.
NOTE. If QuickTime Player is already installed, make sure that it is version 7.5.5 or later.
Cerify Automated Video Content Verification System User Manual 17
Page 28

Getting Started System Installation
Software Unin
Before uninstallation, ensure that you have administrator privileges. If you try to uninstall Cerify without
administrato
Cerifycanbeuninstalledintwoways:
Through Start > Control Panel > Add or Remove Programs.
By rerunning the CerifySetup<version>.exe that you used to install the current version and following
the on-screen instructions.
NOTE. If the Cerify installer version is higher than the currently installed version, the installation will be
upgraded
If the Cerify installer version is lower than the current installed version, the installer will abort without
taking a
NOTE. The Cerify installation process places the WinPCap and HASP utilities in the Add or Remove
Progra
programs or you want to continue to use it for other purposes. The HASP drivers are uninstalled. If you
want to uninstall WinPCap, this can be done in the usual way from the Add or Remove Programs list.
ms list. The uninstallation process does not remove WinPCap in case it is being used by other
stallation
r privileges, the uninstallation process will be aborted.
to the newer version.
ny action.
NOTE. If you select the Backup database option during uninstallation, the current database will be
backed up to
sion>_<timestamp>
back up the database. All relevant configuration files will be backed up to
Settings\<username>\Cerify\CerifyConfig_<version>_<timestamp>
abase" option will not be available if you are uninstalling the Media Test Unit, as the Media Test
dat
Unit does not have its own database.
NOTE. If Cerify6.0 is uninstalled using Add or Remove Programs option or using Cerify6.0 installer, there
will be no “backup” option. The Cerify database and configuration files will always be backed up at the
location
installed, the installer will change the directory name “CerifyBackup” to “CerifyBackup_6.0”.
C:\Documents and Settings\<username>\Cerify\CerifyBackup_<ver-
C:\Documents and Settings\<username>\Cerify\CerifyBackup
Software Reinstallation
To reinstall Cerify, you must uninstall Cerify, and then rerun the installer. Rerunning the installer that
was used to install the current version of Cerify will cause Cerify to be uninstalled. It does not repair
the existing installation.
. You are given the option to change the directory where you want to
C:\Documents and
. The "Backup
. When Cerify7.2 is
18 Cerify Automated Video Content Verification System User Manual
Page 29

Getting Started System Installation
Software Upgr
To upgrade the current version of Cerify to Cerify version 7.2, run the setup file for version 7.2 and
follow the on-
It is possible to upgrade in any of the following ways:
Standalone > Supervisor
Standalone > Standalone
Standalone > Media Test Unit
Supervisor > Supervisor
Supervis
Supervisor > Media Test Unit
Media Test Unit > Supervisor
Media Test Unit > Standalone
Media Test Unit > Media Test Unit
If you would like to back up the current database while you are upgrading from Supervisor
or Standalone Cerify, choose the Backup database option during the upgrade process.
The current database is backed up to the location
name>\Cerify\CerifyConfig_<version>_<timestamp>
by choosing a different folder for backing up the files.
ade
screen instructions.
or > Standalone
C:\Documents and Settings\<User
by default. You may change this location
The upgrade process also backs up relevant configuration files from the current installation. These files
are backed up to
n>_<timestamp>
sio
When you are upgrading to a Supervisor or standalone Cerify, the database is upgraded automatically after
e installation. If the database upgrade fails, the installer will install Cerify with a clean database and
th
inform you about the failure. The Backup database option will not be available while upgrading from
Media Test Units, as they do not have their own database.
C:\Documents and Settings\<User name>\Ceri fy\CerifyBackUp_<ver-
.
Cerify Automated Video Content Verification System User Manual 19
Page 30

Getting Started System Installation
Reverting to the previous version of Cerify
In some circumstances, such as a failed software upgrade,youmightwanttoreverttoanolderversionof
Cerify. To do this, follow these steps:
NOTE. You should have a database backup and a copy of configuration files from the version you would
like to rever
1. Uninstall the current version of Cerify. While uninstalling, back up the database by selecting the
Backup database option.
2. Install the older version of Cerify.
3. Restore the database of older version using CerifyDatabase Utility tool. For help on how to use this
tool, refer to Database Backup/Restore Utility
t to as a pre-condition.
(see page 187).
Network
In most circumstances, the PC on which Cerify is installed requires only one network interface. There are
two sce
the Web clients will access the Web user interface needs to be physically separate from the network that
stores the media file assets. The second scenario is when the Cerify system is to access media files from a
Grass Valley Profile or K2 server. In this case, the additional network interface should be connected to the
control network that runs the Grass Valley A MP service. This enables Cerify to list the contents available
on the Grass Valley servers. The first network interface on the PC should continue to be connected to
the v
For a K2, it is possible to use direct FTP connectivity, in the same fashion as other video servers. In this
case, the AMP control network does not need to be accessed and no additional network interface is needed.
Settings
narios where it is necessary to have two network interfaces. The firstiswhenthenetworkonwhich
ideo server network as follows:
On a standalone Profile XP, to either the Media Ethernet card, if present, or the Ethernet interface of a
versal Interface Module (UIM), if present
Uni
On a SAN-based Profile XP network, to the Gigabit Media network provided by a Universal Interface
dule, if present
Mo
On a SAN-based K2 network or a standalone K2 Media Client, to the Media/FTP network
20 Cerify Automated Video Content Verification System User Manual
Page 31

Getting Started Accessing the Application
Accessing the Application
Starting the A
Before accessing the Web user interface, it is necessary to start the application. The Cerify application
is typically
mightneedtobeprocessedduetotheuseofdropboxesorCeriTalk.
To sta rt th e
Windows Start menu.
NOTE. Cerify will fail to start if any other Web services using port 80 are running on the system where
Cerify is installed. You can run Cerify once you shut down other Web services running on port 80 on
the system.
The startup time of the Cerify application can be up to 3 minutes. The application has started and is ready
to use when you see a Cerify login page in your Web browser.
To run Cerify, the user should have administrator rights.
You can change the port number used by Cerify by updating the Cerify system property “cerify.http.port”.
See Configuring the Cerify Application
properties.
NOTE. On start up, Cerify reads this port number from “cerify.properties” and checks to ensure that this
is not used by any other application. If it finds the port number specified to be in use, an error
port
message detailing the failure is displayed and startup operation is aborted. If the system cannot find any
value set to this system property, it will use the default port number 80.
pplication
left running for long periods, even when there are no active users, because new jobs or fi les
application, click the Start Cerify icon. Alternatively, the application may be started from the
(see page 186) for details on how to update Cerify system
Once the application has started, you can access the Cerify Web user interface from any computer
on the same network. You can access the Web user interface using the URL
Address>:<http port>
Cerify Automated Video Content Verification System User Manual 21
where <http port> is the value set for the property cerify.http.port.
http://<Cerify IP
Page 32

Getting Started Accessing the Application
Cerify Window
Installation
1. Stop Cerify if it is running by right clicking on the Cerify system tray icon and clicking on Stop Cerify.
2. Install the
directory: CerifyService.bat install.
3. This will i
Services utility. To access the utility, select Control Panel > Administrative Tools > Services.
After Ceri
from the Cerify installation directory:
To stop th
To st art t he Cerify service, run CerifyService.bat start.
To uninstall the Cerify service, run CerifyService.bat uninstall.
Alternatively, after you have installed the service, you can control the Cerify service using the Windows
Services utility.
ations
Limit
s S ervice
Cerify Windows service by running the following command from the Cerify installation
nstall and start Cerify as a service. You can see the new service called Cerify in the Windows
fy is running as a service, you can control the service by running the following commands
e Cerify service, run CerifyService.bat stop.
1. To install and control the service on Windows Vista, Windows 7, and Windows server 2008, you will
to login as a user Administrator. If you login as a different user with administrative privileges,
need
you will have to do the following:
a. Ope
b. Right-click on cmd.exe and select Run as administrator.
c. In the resulting command window, change directory to the Cerify installation directory.
d. Run the instructions given in the previous section for installing and controlling the Cerify service.
2. If a MediaLocation is configured with a mapped network drive, then Cerify cannot access the files in
this MediaLocation until the user is logged into the system.
Starting a Cluster
Perform the following steps to start a Cluster:
1. Start Cerify on Supervisor unit by clicking Start > All Programs > Tektronix > Cerify > Start Cerify.
2. Start Cerify on Media Test Units by clicking Start > All Programs > Tektronix >Cerify Media Test
Unit > Start Cerify.
3. Enter the URL http:// <Cerify host name> into your Web browser where Cerify host name is the
Supervisor host name.
n Windows explorer and navigate to
C:\WINDOWS\system32.
22 Cerify Automated Video Content Verification System User Manual
Page 33

Getting Started Accessing the Application
Accessing the
To access the application, you will need a Web browser installed on your computer.
To access the Web user interface from a remote computer, you need to know the IP address of the PC on
which Cerify is installed in Standalone or Supervisor mode.
Enter the URL http://<Cerify IP address> into your Web browser where "Cerify IP address"
is the IP address of the system, where Cerify is installed in Standalone or Supervisor mode.
NOTE. For cluster configuration, Tektronix recommends that both the Supervisor and Media Test Units
are configured with a static IP Address.
To access the Web user interface in a more convenient fashion on the PC on which Cerify is installed,
click Start > All Programs > Tektronix > Cerify > Launch Cerify Web UI. This will automatically
launch your default Web browser and take you to the correct Cerify Web page. Alternatively, you can
do this by right clicking on the Cerify system tray icon and selecting Launch Cerify Web UI.
NOTE. To access the Web user interface on a Media Test Unit, click Start > All Programs > Tektr o nix >
Cerify Media Test Unit >Launch Cerify Web UI.
Web User Interface
Logging in to the Application
When you access the Cerify Web page, you are presented with the Cerify application login screen.
1. Enter your Username and Password in the login page. Once these credentials have been correctly
supplied, the Cerify Web browser will display the top level Jobs page
2. Use your mouse and keyboard to navigate this Web interface and enter information in the usual way.
NOTE. The default user name is “admin” and password is “admin”.
NOTE. If the user name and password are invalid, an error message appears, and you will remain on
the login page. There is no limit to the number of times you can attempt to log in. User names are case
sensitive, so if you have trouble logging in, check the Caps Lock key. If you forget your password, contact
the Cerify administrator.
CAUTION. If a session is inactive for a period, you will automatically be logged out. Any attempt to
resume the session will redirect you to the login page.
Logging Out
(see page 27).
Click the text that reads Log out in the page header to log out of the application. This returns you to the
login page.
Cerify Automated Video Content Verification System User Manual 23
Page 34

Getting Started Accessing the Application
24 Cerify Automated Video Content Verification System User Manual
Page 35

Operating Basics Concepts
Concepts
This section introduces the central concepts and entities used within the system. These entities and their
relationships are shown in the following figure.
NOTE. The fol
shows one of each type of entity. In practice, there can be many instances of each type of entity, with each
child entity potentially being used by multiple parent entities.
lowing figure indicates the basic relationships between the entities. For simplicity, the figure
Entities
Users
Before using the system, you must log in with your username and password credentials. These credentials
will have been assigned by a user who has administrator access.
By default, the system is installed with a single predefined user whose name and password are both set
to admin. This user has administrator access. It is recommended that this password is changed the first
time the administrator logs into the system. Administrator access rights allow a user to modify system
properties, and in particular to create and modify MediaLocations
You can find more information about users in the Modify User
page 105) sections.
Cerify Automated Video Content Verification System User Manual 25
(see page 26) and Users.
(see page 105) and New User (see
Page 36

Operating Basics Concepts
MediaLocations
A MediaLocation is a local or network file storage location from which the system can access media files.
Typically, this would be a directory on the hard drive or a video server that provides FTP or Windows file
share access. To create a MediaLocation, a user must supply its URL and the username and password
required to access this URL. In addition, you must supply a unique name to be used within the system to
identify the MediaLocation.
Only users with administrator access are able to create or modify MediaLocations.
Refer to Admin Page
MediaSets
A MediaSet is a collection of media files that you want to check.
A MediaSet can be a DropBox. A DropBox is a directory that is continually monitored for new media
files. A MediaSet that is not a DropBox is simply a static collection of media files manually selected from
one or more of the MediaLocations.
If a Job is associated with a DropBox, every file that appears in the DropBox over time will be processed.
For additional information, refer to MediaSets
Templates
To check a media file, you must define which checks should be applied when the file is tested. A
Template is a collection of such checks chosen to perform specific tests that you require. The four types
of Te
(see page 104) and MediaLocation Management (see page 106) for more information.
(see page 97).
mplates are:
Container Templates, which apply to the transport/container layer of a media file
Video Templates, which apply to the digital video content of a media file
Audio Templates, which apply to the digital audio content of a media file
Action Templates, which specify actions to be performed as a result of processing a media file
You can create multiple Templates of the same type for different purposes. For example, you might create
a "Movies" Template, which contains a set of rules appropriate for HD MPEG-2 content, and an "on-line
content" Template, which contains a set of rules appropriate for lower resolution H.264/AVC content.
For additional information, refer to Templates
26 Cerify Automated Video Content Verification System User Manual
(see page 63).
Page 37

Operating Basics Concepts
Profiles
AProfile gathers together a container, video, audio, and action Template, providing a complete set of
checks that can be applied when you want to test one or more media files. Any of the component Templates
can be omitted, depending on your requirements. For example, it makes no sense to apply any container or
audio checks to a media file that consists solely of a video elementary stream.
You can define multiple Profiles for different purposes. Following on from the previous example, you
might create an "on-line c ontent" Profile, which specifies a QuickTime Mov file wrapper in the container
Template, H.264/AVC checks for the video Template, and AAC checks for the audio Template.
Jobs
For additional information, refer to Profiles
A Job is the term given to an individual testing process that can be run by the system. Each Job can
process multiple media filesorasinglemediafile, depending on the requirements of the user. The set of
files processed by a Job is defined by its MediaSet.
By creating a Job, you request the checks defined b y a particular Profile be applied to the files in a
particular MediaSet. In addition, you must specify the name and priority of the Job. The system can queue
multiple
The system processes one media file at a time.
How long it takes to process a Job depends upon a number of factors:
Jobs to be run, whereby each Job is scheduled to be processed according to its priority.
The resolution of the video being processed (the larger the picture, the slower the processing)
The video standard concerned (some standards, such as H.264/AVC, take more time to process)
The number o f tests selected (performing all the video quality checks can be processor intensive,
because it requires the analysis of every pixel in each frame of video)
The b it rate (in general, the higher the bit rate, the slower the processing)
(see page 60).
Hardware performance of the PC on which Cerify is installed
For additional information, refer to Jobs
(see page 51).
Alerts
Alerts announce any checks that fail as a Job executes. Each alert indicates the severity of the failure,
as well as where and why the check failed. The system gathers alerts associated with a particular Job,
so that you can access the results from the top level and easily navigate to the details, such as which
individual frames have Alerts.
The system organizes and summarizes any alerts raised against a particular Job, so that, at the top level, a
single processing result status can be assigned to the Job. To view more detailed information, you can
drill down through the interface, revealing (for example) which individual frames have raised alerts.
For additional information, refer to Alert Details
Cerify Automated Video Content Verification System User Manual 27
(see page 57).
Page 38

Operating Basics Functional Overview
Reports
Reports provide you with a way to query the system database and obtain information in a predefined
format. A Job report presents the results of a particular Job in tabular form.
For additional information, refer to Reports
Archiving
The system a llows you to archive entities that are no longer required. MediaSets, Templates, Profiles,
and Jobs can all be archived.
When an entity is archived, it remains present in the database, and can be recovered if necessary. Archived
entities are inactive and usually hidden from view. Inactive entities cannot be used to construct new
entities. So, for example, if a Job is archived before completion, it will not process any pending media files.
For additional information, refer to Active/Archive View Control
Control (see page 32).
Cluster
ing
To increase processing throughput, units can be clustered. Each cluster consists of a single Supervisor
unit an
In a clustered configuration, the Supervisor unit hosts the database and the Web server. The Supervisor
unit c
interface. The Media Test Units are allocated media files to process by the Supervisor unit. The results of
this processing are stored by the Supervisor unit into a single database.
(see page 103).
(see page 32) and Archive/Restore
d one or more Media Test Units.
ommunicates with the rest of the local network, accessing media files and serving the Web user
Functional Overview
This section gives an overview of the Cerify user interface.
System Tray Icon
The Cerify system tray icon appears in the system tray, near the clock, once the application is started. The
system tra y icon provides menu items that allows easy control of the application.
Cerify system tray icon
28 Cerify Automated Video Content Verification System User Manual
Page 39

Operating Basics Functional Overview
Left-click the icon to launch the default Web browser and load the Cerify page showing the list of
jobs in it.
Right-click the icon to bring up the system tray icon menu, which provides four options:
Launch Cerify Web UI, which launches the default Web browser and loads the Cerify page
showing the list of jobs in it.
About, which shows the About Box of the application. The About Box displays product details
such as product name, version and copyright information. The About Box can be closed by
simply clicking on it.
Stop Cerify, which stops all job processing and shuts down the application completely. The
application takes about 2 to 3 minutes to shut down completely. Note that shutting down the Web
browser when using the Web user interface does not stop Cerify or stop any jobs running.
CAUTION. Do not stop the application or its component services using the Microsoft Windows Task
Manager. Always use the system tray menu for shutting down the application.
Launch Cerify User manual, which launches the user manual PDF.
Cerify system tray menu
Web User Interface
The user interface consists of a structured collection of various types of pages accessed using a Web
browser. The pages contain a page header, page body, and footer. The pages can contain the following
elements:
Icons (see page 30)
Navigation bar (see page 31)
Login Details and AutoRefresh links (see page 31)
Trail widget (see page 32)
Active/archive view control (see page 32)
Archive/restore control (see page 32)
Tables (see page 33)
Footer (see page 34)
Cerify Automated Video Content Verification System User Manual 29
Page 40

Operating Basics Functional Overview
Icons
The following table lists the icons used in the interface.
Icon Description
Collapse this section
Expand this s
ection
Copy this item
Remove this item
Edit this item
Directory
Fileinadirectory
Obtain co
Status un
ntext sensitive help
known
Failed with fatal error status
Failed with error status
Failed with warning status
Succeeded with no errors or warnings
eated through the Cerify Web user interface
Item cr
Item created through CeriTalk API
ems in this column in descending order
Sort it
tems in this column in ascending order
Sort i
Press this button to trigger the selected action
Add another set of values to the rules
Removes any set of values from the rule
xxx
30 Cerify Automated Video Content Verification System User Manual
Page 41

Operating Basics Functional Overview
Page Header
Navigation Ba
r. The navigation bar provides a quick route to the top level of any of the pages. The
selected button on this header indicates which top-level page is selected. In the following example,
the Jobs page
Navigation
(see page 51) is selected.
bar
Login Details and AutoRefresh links.
The login details, located below the navigation bar at the top-right section of the screen, show who you are
logged in as and provide a link enabling you to log out.
cense status of Cerify is also reported in this section. The license information can be one of the
The li
following:
License status Details
Licensed
Licensed - # day(s) remaining Cerify is licensed for the next # number of days and Jobs
Licensed - expires today
License expired
Unlicensed
xxx
Cerify is fully licensed. Jobs can be processed.
can be processed.
Cerify is licensed for today and Jobs can be processed.
The license for Cerify has expired. The Web interface
may be used but no new Jobs can be started and Jobs in
progress will stop.
Cerify is unlicensed. This may be because a suitable dongle
cannot be found. The Web interface may be used but no
new Jobs can be started and Jobs in progress will stop.
If Cerify cannot find a license when it starts up, Jobs will
remain in the waiting state until a license can be found. An
additional message will be displayed in the Jobs Monitor
page, above the list of Jobs in this case.
If Cerify finds a license when it starts up and later becomes
unlicensed, Jobs will be processed, but will fail because
no license is available.
Cerify Automated Video Content Verification System User Manual 31
Page 42

Operating Basics Functional Overview
Breadcrumb. The breadcrumb allows you to see your position in the hierarchy and to navigate from this
position. For example, the following figure shows that you have navigated three levels down from the
Jobs Monitor
Monitor, Job Details, Processing Result, and Alert Details fields are all links that allow you to quickly step
up one or more levels.
The breadcrumb
see page
(
51) to view the Alert Details (see page 57) for a particular media file. The Jobs
Page Body
The body of the page holds the buttons, forms, tables, and reports that are used to query and control
the system.
The Jobs Monitor page body
Active/Archive View Control. Jobs
MediaSets
entities of a particular type to view. Using this control, you can view Active, Archived, or All entities of a
given type. For example, the preceding figure shows a page of Active Jobs.
NOTE. When an entity is archived, it is not removed from the database, but it becomes inactive. Inactive
entities cannot be used to construct new entities.
For example, a new Job
active Profiles
Archive/Restore Control. The Archive/Restore control allows you to archive and restore entities. This
control appears below the tables of items on the Jobs Monitor
32 Cerify Automated Video Content Verification System User Manual
(see page 97) can all be archived. The Active/Archive view c
(see page 51) can only be constructed from active MediaSets (see page 97) and
(see page 60).
(see page 51), Profiles (see page 60), Templates (see page 63) and
ontrol allows you to choose which
(see page 51) page for example.
Page 43

Operating Basics Functional Overview
To archive entities, select the corresponding check boxes in the left column of the table, and then click the
Go button on the Archive/Restore Control. The preceding figure shows a user ready to archive three Jobs.
To restore entities from archive, set the Active/Archive View Control
whichallowsyoutoselectarchivedobjects. A
fter selecting the items that you would like to restore, set the
(see page 32) to All or Archived,
Archive/Restore Control to Restore from archive, and then click the Go button o n the Archive/Restore
Control. You can also delete, stop, and resume entities. For more information, refer to Modifying Jobs
(see page 53).
Select All Control. The Select All control is presented as a checkbox input associated with the Sel column
header in entity tables in the Cerify Web user interface. This control can be used to select/deselect all
items in the associated table before performing actions on them using the Archive/Restore control.
This control is available on the tables that list Jobs
(see page 51), Profiles (see page 60), Templates (see
page 63) and MediaSets (see page 97).
Tables.
The system displays collections of entities in the form of tables. These tables share a number of common
features.
The leftmost column of the table allows you to select the item.
The arrow icons and allow you to sort the table based on values in a particular column (for
example, sort a table of J obs base d on their Start Time).
The white arrow shows the currently active sort order.
Sorting the table deselects all items.
Clicking the help icon provides information on a particular column.
In the preceding figure, since you have selected to view a maximum number of five rows in a table and
there are more than five active Jobs, table p
changing the table display preferences, refer to the Options
aging controls appear below the table. For information on
(see page 103) page.
The highlight indicates that page 1 is the current page.
To se lect a different page, use the numbered links or the prev and next links.
The following table describes each column in the tables.
Column heading Description
Channel
Shows if a Job or MediaSet was created by a user through the Web user interface
or by an automation system through the CeriTalk API
Copy
Click the copy icon
Creator Shows which user created an item
Creation Time Shows when this Job was created
Description
Edit
Shows the description of an item, as originally entered by the user
Click on the edit icon
to copy an item and edit the copy
to edit an item
Cerify Automated Video Content Verification System User Manual 33
Page 44

Operating Basics Functional Overview
Column heading Description
End Time
Files
File Size Shows the tot
Job Status Shows the status of a Job (for example, Processing)
MediaSet Shows the MediaSet name for this Job
Name
Priority
Profile Shows the Pro file name for this Job
Progress
Result
Sel Check the box in this column to select an item to be archived or restored
Start Time Shows when a Job or media file started processing
Status Shows the Active/Archive status of an item
DropBox
xxx
ty Tables. When you navigate to the Jobs page, if no Jobs
Emp
Shows when a J o
Shows the tota
"GB" to represent 1024 bytes, 1048576 bytes, and 1073741824 bytes, respectively; a
1000 based system is not used.
Shows the name of an item, as originally entered by the user
Shows a Job priority (for example, High)
Shows the percentage progress of a Job
Shows a Job processing result
Indicates if a given MediaSet is a DropBox
b or media file finished executing
l number of files in a MediaSet
al size of all the files in a MediaSet. Note that Cerify uses "kB", "MB" and
(see page 51) have been created, or all Jobs
are archived, the page body will appear as shown in the following figure.
No Jobs
Collapsing Headings. Some pages contain sections that can be expanded or collapsed to control how much
information is displayed on the page. Click anywhere on a line containing the collapse icon
information. Click on a line containing the expand icon
to view more information.
to hide
Footer
The footer displays a copyright notice and version information.
34 Cerify Automated Video Content Verification System User Manual
Page 45

Operating Basics Functional Overview
Error Handling
Form Input Errors
The system informs you if a mistake is made while filling an input form. For example, if you attempt
to create a New Job
be redisplayed with a n error message. The error message i s in red text, next to the invalid fieldonthe
form as show
ninthefollowingfigure.
(see page 52) without supplying any text in the Job Name field, the form will
Input errors
Cerify Automated Video Content Verification System User Manual 35
Page 46

Operating Basics Tutorials
Work Flow Errors
The system informs you if an attempt is made to perform an operation out of the correct sequence. For
example, if you attempt to create a Job
page 97) has been created, an error page will appear, as shown in the following figure:
Work flow error page
(see page 51) before a Profile (see page 60) or MediaSet (see
Application Errors
Occasionally the application is unable to handle a request, in which case it will display the message: An
internal Cerify Error has occurred. You should be able to continue using the application as normal after
this. If the problem persists, c ontact your local Tektronix representative.
Tutorials
The following tutorials start from a clean installation and step through the process of creating a new Job
andcheckingonitsprogress. Torunthesetutorials, you will need the following:
The tutorials are as follows:
Access to a computer with Cerify installed
A Cerify user account with administrator privileges (see page 104)
Before You Begin (see page 38): How to start using the system
Creating a MediaLocation (see page 40): How to create a MediaLocation
Creating a MediaSet (see page 41): How to create a MediaSet by selecting files from a MediaLocation
Creating a Template (see page 44): How to create a Video Template
Creating a Profile (see page 46): HowtocreateaProfile from your Video Template
Creating a Job (see page 47): How to create a Job from your Profile and MediaSet
36 Cerify Automated Video Content Verification System User Manual
Page 47

Operating Basics Tutorials
Inspecting Job Results (see page 47): How to review the progress of a Job and inspect the Job results
Creating a Report (see page 48): How to create a printable report on the Job
Archiving (see page 48): How to archive the MediaSet and the Job
Exporting Templates (see page 49): How to export the Video Template
Work Flow
The following figure indicates the dependencies between the entities that make up a Job. It shows,
for example, that a MediaSet requires a MediaLocation; any attempt to create a MediaSet when no
MediaLocations exist will generate a Work Flow Error
attempt to create a Job when there are no active MediaSets or Profiles.
Importing T
emplates
(see page 49): How to import the Video Template previously exported
(see page 36). Similarly, it is a work flow error to
Entity relationships
Cerify Automated Video Content Verification System User Manual 37
Page 48

Operating Basics Tutorials
Before You Beg
1. Start the Cerify application by clicking the Start Cerify icon on your desktop or by using the Start
menu. For info
NOTE. To run this tutorial, you must log in with administrator access. Note that the system comes with a
single user already set up as administrator. The Username and Password are both set to admin.
If a session is inactive for a certain period of time, you will be logged out. If this happens during the
tutorial, you will be redirected to the login page. Log back in to continue.
2. On suc cessful start up, Cerify presents you the login page using your default browser. The following
login page shows a u ser about to log in to the system at
TIP. On any Web page you can click the help icon
obtain context-sensitive help.
in
rmation about accessing the application, see Accessing the Application
http://134.64.235.216.
(shown below on the right side of the login page) to
(see page 21).
3. En
38 Cerify Automated Video Content Verification System User Manual
ter your user name and password into the appropriate fields in the login page and click the Enter
button. After you have logged in, you will be taken to the Jobs Monitor
(see page 51).
Page 49

Operating Basics Tutorials
The following figure shows what this page looks like when n o Jobs are active, which will be the case if
this tutorial is being run from a clean installation.
Jobs Monitor page
The header contains the Navigation Bar
the m ajor areas of the user interface. In this case, the Jobs button is selected, indicating you are on one
of the Jo
In addition, the header shows that you are logged in as admin.
The body of the page contains:
bs pages.
A line of text informing you that there are no Jobs in this view
An Active/Archive View Control (see page 32), allowing you to view any archived Jobs (see page 27)
A New Job button. Clicking this button w ill generate a workflow error, because you have not yet
created a Profile and a MediaSet. For additional information, refer to Work Flow Errors
(see page 31), which allows you to quickly navigate between
(see page 36).
Cerify Automated Video Content Verification System User Manual 39
Page 50

Operating Basics Tutorials
Creating a Med
A MediaLocation is a network location from which the system can access media files. Users with
adminis
1. Click the Admin buttonontheNavigation Bar
Creating a MediaLocation
trator access can create and modify MediaLocations
ge, as shown in the following figure.
pa
iaLocation
(see page 26).
(see page 31) to access the Admin (see page 104)
2. Start creating a new MediaLocation by clicking the Go button next to the text that reads Create
new MediaLocation. You should see a form.
3. Fill in the fields in the form as shown in the following table, and then click Create to create the
MediaLocation.
Field Value
MediaLocation Name
URL
Username
Password
xxx
Cerify example content
c:\Program Files\Tektronix\Cerify\cerify_demo
-
-
New MediaLocation
40 Cerify Automated Video Content Verification System User Manual
Page 51

Operating Basics Tutorials
NOTE. The system validates the MediaLocation details when you click the Create button, checking that the
MediaLocation name is unique, the URL exists, and that the specified user can access files at that URL.
If any of these
to the screen with an error message indicating what the problem is.
checks fail, the MediaLocation will not be created; instead, the form will be posted back
For addition
page 106)
al information on creating MediaLocations, refer to MediaLocation Management
Creating a MediaSet
Now that you have created a MediaLocation, you can create a MediaSet that collects together some of
the files at this location.
1. Click the MediaSets button o n the Navigation Bar
2. Start creating a new MediaSet by clicking the New MediaSet button. You will see a page like the one
shown in the following figure.
New mediaset
(see
(see page 31) to visit the MediaSets page.
3. Select no for the DropBox mode.
Cerify Automated Video Content Verification System User Manual 41
Page 52

Operating Basics Tutorials
4. Enter a suitable name for the MediaSet and click Create to create the MediaSet and continue to the
Edit MediaSet
(see page 98), as shown in the following figure.
Edit MediaSet
The Edit MediaSet page provides details of the files already in the MediaSet (there should be none
yet). It shows directories with a
for you to add new files.
5. Add files to the MediaSet using the directory and file browser.
To reveal the contents of a directory, double-click the directory.
close the directory and go up a level, open the drop-down menu control at the top right of the
To
file browser to provide a selection of recent directories.
To select a file, double-click the file icon (it will appear in the Files table).
icon, and files with a icon. The page also provides the controls
42 Cerify Automated Video Content Verification System User Manual
Page 53

Operating Basics Tutorials
The following figure shows a MediaSet to which three files have been added.
MediaSet containing files
6. You can also add a file to the MediaSet by entering the full path to the file in the File name text
field at the bottom of the page.
This path must include the full URL of the file. For example,
tronix\Cerify\cerify_demo\news\airport_interview.ts
c:\Program Files\Tek-
.
Cerify Automated Video Content Verification System User Manual 43
Page 54

Operating Basics Tutorials
Creating a Tem
To test the files in your new MediaSet, you need to decide which checks to a pply. Checks can be applied
to the container or wrapper layer, the video stream, and the audio stream, using container, video, and
audio Templates, respectively.
In addition, using an Action Template, you can define actions to take when files have been checked.
1. Click the Templ a tes button on the Navigation Bar
see a page listing the Templates that are present in your current Templates view.
Select Video Template Type
1. Click the New Video Template button to create a new Video Template. You will be prompted to select
a Template type, as shown in the following figure.
plate
(see page 31) to start creating a Template. You will
Select Template type
The Template type you choose depends on the type of video content you want to check.
be the Video Standard used when the video was encoded: for example, MPEG-2 or H.263.
2. Use the drop-down menu to select MPEG-2, and then click th
Video Templ ate page. The New Video Template page is where you define which checks to include in
your Video Template.
e Select button to take you to the New
This type will
New Video Template
CAUTION. The new Template will not be saved until you click the Create button at the bottom of the
page. When you click Create, the system will check th
prompt you to fix any problems. If there are no problems, the new Template will be created and stored
in the database.
1. EnteranamefortheTemplate,“NewsVideo”, and optionally a description.
2. Configure the checks to be applied by selecting the check boxes and entering values into the text fields.
(See the following figure for a typical Video Template configuration.) Use the Add / Remove buttons
to configure the Resolution rule with multiple sets of valid values
of the checks performed by each rule, click on the
at the fields you have filled contain valid data, and
(see page 69). For a full explanation
icon next to each rule name.
3. Click the Create button at the bottom of the page to create the new Video Template.
44 Cerify Automated Video Content Verification System User Manual
Page 55

Operating Basics Tutorials
The following figure shows a typical MPEG-2 Video Template configuration. When this Template
is used to check a video stream, it will check:
The video is MPEG-2 encoded.
The video is encoded using MPEG-2 Main Profile, Main Level.
The video bit stream syntax conforms with the MPEG-2 Standard, but any alerts relating to Buffer
analysis and alert number 22209 will be suppressed.
A maximum of 500 alerts will be displayed.
Each alert type will be displayed a maximum of 20 times.
The video r
esolution is 720 by 480 pixels or 1280 by 1080 pixels.
Video Template configuration
For additional information, refer to Video Templates
Cerify Automated Video Content Verification System User Manual 45
(see page 74).
Page 56

Operating Basics Tutorials
To create an Audio Template, the process is very similar as described i n the following steps.
1. Return to the Templates page by clicking the Te m plate s link on the navigation bar.
2. Click the New Audio Template button to create a new Audio Template. Select MPEG-1 /
MPEG-2 Audio from the select box, and then click the Select button.
3. Enter the name "News Audio" for the Template, and optionally a description.
4. Configure the checks to be applied by selecting the check boxes and entering values into the text fields.
The precise choice of rules and parameters does not matter for the purposes of this tutorial.
5. Click the Create button at the bottom of the page to create the new Audio Template.
Create a Container Template using the same steps. When prompted to select the Template type, choose
MPEG-2 Transport Stream; otherwise follow the same steps as for the other Templates. The precise
choice of rules and parameters does not matter for the purposes of this tutorial.
Creating a Profile
To use your new template in a Job, you must include it in a Profile.
1. Click the Profiles buttonontheNavigation Bar
2. Click the New Profile button.
3. Enter a name and optionally a description for the Profile, as shown in the following figure.
4. Select the Container Template, Audio Template, and Video Template you just created. If you created
more than one audio template, click the Plus icon to display another audio template selection field.
5. Click the Create button to create a Profile.
(see page 31) to go to the top-level Profiles page.
For additional information, refer to Profiles (see page 60).
46 Cerify Automated Video Content Verification System User Manual
Page 57

Operating Basics Tutorials
Creating a Job
Having created a MediaSet and a Profile, you can now create a Job.
1. Click the Jobs button on the Navigation Bar
2. Click the New Job button.
3. Enter a name for the Job. Set the Job priority to "Low", and select the Profile and MediaSet that
you previously created.
4. Click Create to create the Job.
Creating a Job
Inspecting Job Results
(see page 31) to go to the top-level Jobs page.
1. Access the Jobs Monitor page by clicking the Jobs buttonontheNavigation Bar (see page 31).This
page gives feedback on the status of all running Jobs (unless the Job view has been set to Archived).
This feedback includes:
A processing result summary for each Job
Status and progress information for each Job
mmary information about the entities associated with each Job
Su
Timing information for each Job
2. Click the AutoRefresh button in the page header to arrange for the page to refresh periodically
with no further intervention. This is useful when you are monitoring the progress of a large Job that
ight take several minutes to complete.
m
3. Wait for the Job Status to show complete before continuing with this tutorial. This may take several
minutes.
4. From the Jobs Monitor, you can drill down for more details about a Job result. For additional
information on Inspecting Job Results, refer to Job Details
page 55) and Alert Details (see page 57).
(see page 54), Processing Result (see
Cerify Automated Video Content Verification System User Manual 47
Page 58

Operating Basics Tutorials
Generating a R
1. Access the Reports page by clicking the Reports buttonontheNavigation Bar (see page 31).This
page allows yo
2. In the Enter Jobname field, enter the name of the job that you created.
3. Click the Generate button to generate a report on your Job. For detailed description, refer to Reports
(see page 103).
Archiving
1. To a rch ive
Jobs buttonontheNavigation Bar
a. Select th
b. Make sure that the action drop-down menu under the table reads Archive, and then click Go to
archive
eport
u to generate Job processing reports.
your Job (refer to Archiving
e Job to archive by selecting the checkbox in the left column of the Jobs Monitor table.
the Job.
(see page 28)), go to the Jobs Monitor page by clicking the
(see page 31).
Archiving a Job
2. To view archived Jobs, set the Active/Archive view control to All or Archived. The table will
be updated to reflect your choice. You can restore archived Jobs from this new view, if required.
iaSets, Templates, Profiles, and Jobs can all be archived.
Med
48 Cerify Automated Video Content Verification System User Manual
Page 59

Operating Basics Tutorials
Exporting Templates
1. To export your Templates, go to the Templates page by clicking the Te mpla tes buttononthe
Navigation Bar
2. Select the Templates to export by selecting the checkbox in the left column of the appropriate
Template table.
3. ClickontheExport button at the bottom of the page to export the selected Template.
(see page 31).
4. When prompt
the location you select.
Importing Templates
1. To import the XML Template file generated by Exporting Templates (see page 49),gototheTemplates
page by clicking the Templ a tes buttonontheNavigation Bar
2. Click the Browse button at the bottom of the page to access the Open File dialog.
3. Navigate to the location where the file is, select it, and click Open.
4. Click o
the option If a template of the same name already exists, replace it, and then import the template.
5. The Te
displayed on the Te m plat e s page.
NOTE. There is a range of example templates in the
Templates
canviewthemintheTemplates page.
ntheImport button to import the selected file. A template with the same name will exist, select
mplates definedinthefile will be successfully imported, and a success message will be
directory that may be useful to you. The example templates are preloaded onto Cerify and you
ed, select a location to save the Templates file, and click Save.Thefile will be saved to
(see page 31).
<installation dire ctory>/Example
Cerify Automated Video Content Verification System User Manual 49
Page 60

Operating Basics Tutorials
50 Cerify Automated Video Content Verification System User Manual
Page 61

Reference Introduction
Introduction
This chapter provides a reference guide for users. Itisorganizedinmuchthesamewayastheuser
interface is organized, with sections for each main page and subsections for the subpages.
Jobs
A Job applies the various checks in a Profile (see page 60) against the media files in a MediaSet (see
page 97).
A Job is identified by its unique name. In addition, a Job is assigned a Priority upon creation.
The top-level Jobs page is accessed by selecting the Jobs button from the navigation bar. When you open
this page, you will be presented with a Table
the Archive/Restore Control
will be d
isplayed.
(see page 32). If no Jobs match the current filter, an informative message
(see page 33) displaying Jobs that are filtered according to
Jobs Monitor
The Jobs Monitor page provides a top-level view of the status of Jobs. The following figure shows the
status of three Jobs. One Job is succeeded with no errors or warnings; the remaining two have raised errors.
NOTE. In this example, the user has limited both how many rows and which columns of the Jobs Monitor
are displayed.
The Jobs Monitor page
Cerify Automated Video Content Verification System User Manual 51
Page 62

Reference Jobs
From this page it is possible to:
View Job Details (see page 54) for a Job by clicking on the Job name.
View the details for the Job MediaSet (see page 97) and Profile (see page 60) by clicking on the
MediaSet or Profile name.
Create a New Job (see page 52) by clicking the New Job button.
Create a New Job (see page 52) by clicking the copy icon.
Modifying Jobs (see page 53) by clicking the jobs to be modified, selecting the required action from
the Archive/Restore control and clicking the Go button.
New Job
The New Job page is accessed either by copying an existing Job (see page 51), or by creating a new Job.
TheNewJobpage
You should enter a Job Name,setthePriority, and choose a Profile and a MediaSet, before clicking the
Create button to create the Job.
TION. Jobs cannot be created unless one or more MediaSets
CAU
are active. If this is not the case, then any attempt to create a Job will generate a Work Flow Error
(see page 36).
(see page 97) and Profiles (see page 60)
52 Cerify Automated Video Content Verification System User Manual
Page 63

Reference Jobs
Modifying Job
It is possible to modify the state of existing Jobs in a number of ways, using the same Archive/Restore
control (see p
To modify a Job, do the following:
1. Select the Jobs you want to modify by selecting the checkbox in the left column of the Jobs M onitor
table.
2. Select the desired action from the action drop-down menu under the table.
3. Click Go to carry out the action.
It is possible to select the following actions:
Archive, Restore from archive. Used to remove from view or restore to view the selected Jobs. Note
that archiving processing Jobs will automatically cause those Jobs to be immediately stopped. When
the Job is removed from the archive, it will remain in the stopped state until the user chooses to resume
the Job. This is to prevent unwanted processing of Jobs occurring when the Job was complete at the
point of archive, but could restart processing when removed from the archive because the a ssociated
MediaS
Stop (finish current files), Stop (immediately). Stop processing the Job. Results of media files
that h
resumed when desired. The first option allows media files that are currently being processed to run to
completion, whereas the second option will immediately terminate all processing. In the latter case,
all results from the currently processing media files for that Job will be removed, and if the Job is
resumed, processing will restart from the beginning of the media fi le.
s
age
32) that is described in the Archiving Tutorial (see page 48).
et has had new files placed in it.
ave already been completed will be re tained and processing of unprocessed media files can be
Resume. Resume the processing of a stopped Job. Any media files that have not yet been processed
will begin processing.
Setprioritytohigh, Setprioritytomedium, Setprioritytolow. Change the priority of the
selected Jobs to the new priority. This will affect waiting Jobs and the priority which are assigned to
unprocessed media files in currently processing Jobs. Changing Job priorities never causes a currently
unning media test process to be stopped.
r
Delete. Delete the selected Jobs from the database. All the results associated with that Job, including
stream information, alert details and thumbnails, will be permanently deleted. Use the archive
functionality if you want to remove the Job from view, but be able to revisit the results in future.
Cerify Automated Video Content Verification System User Manual 53
Page 64

Reference Jobs
Job Details
The Job Details page is accessed from the Jobs Monitor (see page 51) page. It provides summary details
for a ll the media files in the Jobs MediaSet as shown in the following figure.
This page also provides an option to playback the media files in the Jobs MediaSet. This option becomes
available only when the VLC playback
(see page 113) feature is enabled.
The Jobs
To see exactly which errors caused the Job to fail, click either the
file name. This will take you to the Processing Result
Clicki
To play back the media file, it must satisfy the following conditions:
Details page
processing result icon or the media
(see page 55) page.
ng the
The media file has not moved from the original location from where it was analyzed
The media file has an encoding scheme that is supported by the VLC media player
play button starts the playback of the m edia file using t he VLC media player.
54 Cerify Automated Video Content Verification System User Manual
Page 65

Reference Jobs
Processing Result
The Processing Result page provides information on the alerts raised by a particular media file. This page
also displays the stream information for the media file concerned. Stream information is grouped into three
separate sections: Container Info, Video Info, and Audio Info. Where there are multiple audio tracks in
the s tream, all track information is displayed. You can select the extent of stream information that gets
displayed on this page u sing the stream information display
Stream information is updated as processing progresses. Many properties (such as "Picture size" or "Video
standard") will be available shortly after processing begins, and others (such as "Length") will only be
available
processing. The values displayed will always be the most recent values encountered in the stream.
If the VLC player has been installed and enabled, you can also play back the media file from this page
by selecting the play button that is available against eligible alerts.
after processing is complete. Some properties may be output and subsequently updated during
(see page 113) setting.
The P rocessing Results page
Cerify Automated Video Content Verification System User Manual 55
Page 66

Reference Jobs
You can drill down for more Alert Details (see page 57) on a particular alert by clicking either the
processing result icon or the title of the alert.
Alert Levels
Four different levels of alerts can be reported by Cerify according to the severity of the issue: fatal,
error, warning, and info.
Fatal
A fatal alert occurs when it is not possible for the system to complete processing of a media file and the
processin
syntax error that makes that stream completely unintelligible or an option being present in the bitstream
that is not supported by the decoder. Alternatively, the alert might be caused by a system problem, such
as a license error, or failure to copy a media file off a video server.
Error
g is terminated. This might be caused by something in the media file bitstream, such as a severe
An error alert occurs where the media file fails a check specified by one of the Templates that the media
is being checked against. Alerts raised by syntax checking will be given an error status if they have the
ial to prevent correct decoding of the stream. An example of this is where an out of range value
potent
has been used in a bit stream.
Warning
A warning alert indicates that there is some issue with the stream, but that this is not necessarily a problem.
This might be that a certain number of alerts has been exceeded or that the bitstream is non-compliant in
some minor way that almost certainly will not affect the decoding of the stream.
fo
In
Info alerts are relatively rare, and are used to inform users of additional useful information that will not
use a problem.
ca
56 Cerify Automated Video Content Verification System User Manual
Page 67

Reference Jobs
Alert Details
The Alert Details page provides more information on an individual alert, including thumbnail images of
surrounding frames (where appropriate). The thumbnail images link to full Frame View
of these frames.
(see page 59)
The Alert Details page
The table within the details section provides specific details about the alert. Each of the table columns is
outlined below.
Column Description
Level
Alert ID
Location
Start Optional column, only present for quality alerts. For more information, refer to, sta
End
Channel Index Optional column, only present for audio quality alerts (see page 88).Whenprocessing
Channel Name Optional column, only present for audio quality alerts (see page 88). The name of the
Title
You can r efer to alert levels
for detailed description.
Unique alert ID. See alert IDs
This is the position relative to the start of the stream where the alert was generated.
For quality alerts, a more detailed description is given i n start and end positions of
quality alerts (see page 58).
end positions of quality alerts (see page 58).
Optional column, only present for quality alerts. You can refer to start and end positions
of quality alerts (see page 58) for detailed description.
a multi-channel audio stream, this index will indicate the channel to which the ale
applies. Channel indices start from 1.
channel to which the alert applies, as given by the audio standard.
Description of alert type. This will always be the same for a given alert ID.
(see page 56) and their associated icons (see page 119)
(see page 119).
rt and
rt
Cerify Automated Video Content Verification System User Manual 57
Page 68

Reference Jobs
Column Description
Details
Thumbnail
xxx
Details of the
the test failed.
Thumbnail of the video frame (if available) at the a lert location. Click the image to
view the full Frame View
alert specific to this occurrence. This should provide a reason as to why
(see page 59)
Start and End Positions of Quality Alerts
The quality alerts ( video quality (see page 78) and audio quality (see page 88) ) are special in that they can
apply to a range of video or audio. This is in contrast to most alerts, which have an instantaneous position.
Because of
The start position of the error condition
The location at which the error condition exceeded its permitted length
The end position of the error condition
Only one alert will be raised for a given error condition sequence, regardless of length.
Example: A rule is set up to disallow more than 5 seconds of black during video. A video clip has an
unwanted sequence of 30 seconds of black beginning at 1m 20s. Cerify will generate a single video quality
alert with the following information:
this, quality alerts within Cerify contain the following additional information:
Start: 1m 20s - the start of the black sequence
Location: 1m 25s - the point at which 5 second limit was exceeded
1m 50s - the end of the black sequence
End:
58 Cerify Automated Video Content Verification System User Manual
Page 69

Reference Jobs
Frame View
The Frame View Page shows a larger thumbnail image of the Frame. This thumbnail is based upon a down
sampled version of the full frame, using the top field only for interlaced content, so in some cases the
detected artifact may not be visible. Red rectangles highlight any areas of the frame that generated alerts.
The "next" and "prev" links at the bottom of the frame image allow navigationacrossframesinthe
film-strip display for the alert. These links are displayed based on the position of the current frame in
the film-str
frame has only the "prev" link on it.
ip. The first frame of the film-strip has only the "next" link associated with it and the last
The Frame View page
Cerify Automated Video Content Verification System User Manual 59
Page 70

Reference Profiles
Profiles
AProfile gathers together a Container (see page 71), Video (see page 74), Audio (see page 86) and
Action
page 97).Anyof
The top-level Profiles page is accessed by selecting the Profiles button from the navigation bar. When
you open thi
to Active/Archive View Control
message will be displayed.
(see page 93) Template, providing a complete set of checks that can be applied to a MediaSet (see
the component Templates can be omitted, depending on user requirements.
s page, you are presented with a table
(see page 32).IfnoProfiles match the current filter, an informative
(see page 33) displaying Profiles filtered according
ofiles page
The Pr
the top-level Profiles page
From
Archive and restore Profiles
View Pro file details (see page 61) by clicking the Profile name in the ProfileName column.
Edit a Profile (see page 61) by clicking the edit icon.
Create a new Profile (see page 62) by clicking the New Profile button.
Create a new Profile from an existing one (see page 62) by clicking the copy icon.
(see page 60), it is possible to:
60 Cerify Automated Video Content Verification System User Manual
Page 71

Reference Profiles
Profile Detail
The Profile Details page shows detailed information about a Profile.
s
The Profile Details page
Edit Profile
AProfile can be edited to change its constituent Templates:
ainer
Cont
Vid eo (see page 74)
Audio (see page 86)
Action (see page 93)
(see page 71)
Cerify Automated Video Content Verification System User Manual 61
Page 72

Reference Profiles
The Profile name and description cannot be changed.
Edit Profile page
Click the Update button to submit changes to the Profile
New Profile
The New Profile page is accessed either by copying an existing Profile or by creating a new Profile.
(see page 60).
The New Profile page
To create a new Profile,enteranamefortheProfile and, optionally, a description, and select the desired
Templates
next to the audio field. Click the Create buttontocreatetheProfile.
62 Cerify Automated Video Content Verification System User Manual
(see page 63) from the drop-down menus. To add a second audio template, click the plus icon
Page 73

Reference Templates
Templates
Templates allow you to collect together rules to be used or actions to be taken when checking files in a
MediaSet
The four types of Templates are:
(see page 97).
Container Templates (see page 71), which gather rules applying to the container layer
Video Templates (see page 74), which gather rules applying to video elementary streams
Audio Templates (see page 86), which gather rules applying to audio elementary streams
plates
Action Tem
events
(see page 93), which gather actions to be performed when generating Job processing
The top-l
When you open this page, you are presented with tables
and Action Templates filtered according to Active/Archive View Control
match the current filter, an informative message will be displayed. The following figure shows a Container
Template, a Video Template, an Audio Template, and an Action Template.
evel Templates page is accessed by selecting the Templa t es button from the navigation bar.
(see page 33) displaying Container, Video, Audio,
(see page 32). If no Templates
Cerify Automated Video Content Verification System User Manual 63
Page 74

Reference Templates
64 Cerify Automated Video Content Verification System User Manual
Page 75

Reference Templates
NOTE. Some example templates are preloaded onto Cerify. These templates can be used, copied, edited,
and archived in the same way as those created by users. The XML files containing these templates can be
found in <Inst
From the top-level Templates page (see page 63) it is possible to:
Archive and restore Templates (see page 32)
View details of a Template (see page 66) by clicking its name in the Template Name column
Edit a Template (see page 67) by clicking the edit icon
Create a new Template (see page 68) by clicking the New Template button for the type of Template
(see page 63) required
Create a new Template from an existing one (see page 68) by clicking the copy icon
Export Templates (see page 69)
Import Templates (see page 70)
allation directory> /Example Templates.
Cerify Automated Video Content Verification System User Manual 65
Page 76

Reference Templates
Template Details
The Template Details page shows detailed information about a Template, but does not allow the details to
be changed.
The Template Details page
66 Cerify Automated Video Content Verification System User Manual
Page 77

Reference Templates
Edit Template
A Template can be edited to change the Template Name, Description, and Template rule parameters. In
the following figure, the user has entered a Te mpla t e Name and description, and has enabled some rules.
Not all of the rules for the Template are shown.
The Edit Template page
Click the Update button at the bottom of the page to submit changes to the Template. This will also update
the version of the Template.
Cerify Automated Video Content Verification System User Manual 67
Page 78

Reference Templates
New Template
The New Templa te page is accessed either by copying an existing Template, or by creating a new Template
(see page 63).
To create a new Template, determine the type of Template you want to create and click the corresponding
New Container Template, New Video Template, New Audio Template,orNew Action Template
button.
In the following screen, select the standard for the Template you want to create. For a Video Template,
this might be MPEG-2, MPEG-4 or some other video standard. The resulting New Template page is very
similar to the Edit Template
Enter a name for the Template and, optionally, a description. Finally, you must set up the Template
rule definitions.
Template rules specify precisely what to check when processing content. For example, a Template rule
might require that video content has a certain resolution, or that the audio stream has a certain bit rate. The
Template rules that can be defined depend upon the type of Template and its standard.
For more details on each rule, refer to the descriptions in the following sections on Container Templates
(see page 71), Video Templates (see page 74), Audio Templates (see page 86) and Action Templates
ge
(see pa
93).
(see page 67) page.
To find more information about a rule when defining a Template, click the
Template rules are enabled and disabled by clicking the checkbox on the left side of the Edit Template
page. A Template can contain a single enabled rule or many enabled rules. Different rules require different
parameters to be defined, depending on the type of rule. For example, a rule that specifies video resolution
l require you to enter the expected number of pixels.
wil
When you have finished defining all of the rules, click the Create button at the bottom of the page
reate the Template.
to c
If you are uncertain as to what rules and parameter values to use, try looking at one of the preloaded
ample templates and gradually adjust the rules until you are comfortable with the operation of the
ex
template.
f you have imported a database from an earlier version of Cerify (before 6.x), the pre-loaded example
I
templates will not be available. In this case, they can be imported as described in the Importing Templates
(see page 49) section.
next to the rule name.
68 Cerify Automated Video Content Verification System User Manual
Page 79

Reference Templates
Multiple Sets of Values
Some of the rules in Container, Video and Audio Templates accept multiple sets of values. You can define
these rules like any other - with a single set of values, or you can define multiple set valid values. If you
use multiple sets, the test will pass if the value matches any of the sets.
These rules can be recognized by the add/remove buttons to the right of the rule.
Rules that accepts multiple sets of values
To add another set of valid values to the rule, click on the
at the bottom of the rule. You can add as many new rows as you need.
To remove any set of values from the rule, click on the
row will disappear from the rule. You can remove all rows but one.
Exporting Templates
Templates can be exported from the top-level Templates page. Once exported, Templates can be imported
into any Cerify system running a compatible version of Cerify. Any numbe
(Container, Video, Audio and Action) and status (Active or Archived), can be exported to a single file.
NOTE. When exporting Action Templates, passwords used by rules to access remote locations are not
exported.
To export a set of Templates, select the templates you want to export by checking the corresponding check
boxes in the leftmost column of the Templates tables and pressing the Export button at the bottom of the
page. Choose a location to save the Templates export file to when prompted. Exported Template files use
XML to store template information, following the Template Information schema definition.
If you are v iewing this page from the Help pages in the Cerify Web interface, you can click the following
link to view the Template Information schema definition
Add button. A new row of inputs will appear
Remove button to the right of that row. The
rofTemplates,ofanytype
To download the Template information XML schema:
In Microsoft Internet Explorer, right-click the above link and select the Save Target As option from
the pop-up menu.
In Mozilla Firefox, right-click the above link and select the Save Link As option from the pop-up
menu.
If you are viewing this page from a printed or a PDF version of the Cerify use
http://your_cerify_host/TemplateInformation.xsd,replacingyour_cerify_host with the
IP address or host name of your Cerify system, to view the Template Information Schema definition.
When a table contains too many Templates to fit on a single page, the system will split it to be displayed
over a number of pages. If you cannot see all the Templates you want to export in the tables, you may
Cerify Automated Video Content Verification System User Manual 69
r manual, access the URL
Page 80

Reference Templates
need to change the number of Records per page (see page 104) to allow more Templates to be shown on
each page. You may also need to change the Active/Archive view
and/or Archiv
ed Templates.
(see page 32) to display both Active
Importing Templates
Any Template file generated by exporting Templates as described in Exporting Templates (see page 49)
can be imported into any Cerify system running a compatible version of Cerify. This is done from the
top-level Templates page
NOTE. There are some example template XML files in the directory "Example Templates" inside the
directory where the Cerify application is installed. These templates are preloaded into Cerify when it
is first in
stalled.
NOTE. After importing Action Templates, it is necessary to edit them and re-enter the appropriate
passwor
ds for rules that access local/remote locations.
(see page 63).
To import a set of templates, click the Browse button at the bottom of the Templates page to access the
Open Fi
le dialog box. Using this dialog box, navigate to the location of the template file to import, select
it, and click Open. Select the “If template of the same name already exists, replace it” checkbox to
update the templates of the same name and standard which already exist in Cerify. If you do not select
this option, templates in the file with a name that already exists in Cerify will not be imported. Finally,
click the Import button to import templates from the selected file.
If all Templates in the file are successfully imported, a success message will be displayed on the Templates
page. More detailed messages, listing all imported Templates, can be found in the Admin Log
(see
page 115).
If any of the Templates in the file cannot be imported, an error message will be displayed on the Templates
page. More detailed error messages, listing all imported Templates and all individual errors, can be
und in the Admin Log.
fo
There are three groups of errors that can prevent a Template from being successfully imported:
System Level Errors
System Level errors are raised when the file being imported does not conform to the Template Information
schema definition. If you are viewing this page from the Help pages in the Cerify Web interface, you can
click the following link to view t he Template Information schema definition
Message in Adm in Log Cause
Error importing templates: File does not validate against
schema.
xxx
The file being imported does not conform to the schema.
.
70 Cerify Automated Video Content Verification System User Manual
Page 81

Reference Container Templates
Template Level Errors
Template Level errors are raised when a Template in the file being imported is not valid, and cannot be
imported. Other valid templates within the XML file will still be imported. There are three types of
Template Level Errors:
Error message Cause
Error in Template "X": Template could not be imported.
A Template w ith that name already exists. Select the "If
template already exists, replace it" option when importing
to overwrite the existing version.
Error in Template "X": Template could not be imported.
Attempt has been made to create a template for an
unrecognized standard.
Error in Template "X": Template could not be imported.
Mandatory rules Y, Z not present.
xxx
There is a Template in the file to be imported named "X",
but a Template named "X" already exists in Cerify. If the "If
template already exists, replace it" option is not selected,
this error will be raised. If it is selected, Template "X" will be
updated with the new version being imported.
There is a Template in the file to be imported named "X". The
standard defined in the file for this Template is not one of the
Video, Audio, or Container standards recognized by Cerify.
There is a Template in the file to be imported named "X".
Rules Y and Z, which are mandatory for the standard of
that Template, are not present in that Template. Mandatory
rules are those that always appear checked when creating a
Template using the Web UI and cannot be unchecked. For
example, Alert Limit and Particular Alert Limit.
Rule Level Errors
Rule Level errors are raised when a Template in the file being imported includes an invalid rule; in this case,
the Template is partially imported, excluding the invalid rule. There are four types of Rule Level Errors:
Error message Cause
Error in Template "X": Rule "Y" could not be imported. A
rule ID submitted has not been recognized.
Error in Template "X ": Rule "Y" could not be imported. The
rule input name submitted ("A") is not recognized.
Error in Template "X": Rule "Y" could not be imported. "A"
is required.
Error in Template "X": Rule "Y" could not be imported.
The value "x" submitted for the rule input "A" is not a valid
option.
OR
Error in Template "X": Rule "Y" could not be imported. "A"
is not a number.
xxx
Container Templates
Rule "Y" defined in Template "X" is not recognized as a valid
rule.
Rule "Y" defined in Template "X" is invalid as one of the
inputs defined for it, "A", is not recognized as belonging to
that rule.
Rule "Y" defined in Template "X" is invalid as one of the
inputs defined for the rule, named "A", must have a valid
value but is either empty or not present in the import file.
Rule "Y" defined in Template "X" is invalid as the value "x"
supplied for input "A" is not valid.
Container Templates collect together rules applying to the wrapper or container layer.
Cerify Automated Video Content Verification System User Manual 71
Page 82

Reference Container Templates
Checks Common
Check Description
Standard Confirms that
Integrity c
Suppress
Alerts
Alert li
Indiv
limit
File
Play time
Bit rate
Video streams
Audio streams
A
duration
Skip First Few
Alerts
Skip Last Few
Alerts
xxx
hecks
mit
idual Alert
size
udio/video
to All Container Layers
the container layer is of the type indicated in the Template (for example, MPEG-2
Transport Stream). This check is mandatory and cannot be disabled.
Trying to treat a container format wrongly, for example processing an MPEG-2 Transport Stream
as MXF, will a
immediately in the event of a mismatch between observed and expected container format.
Checks the syntax and integrity of the container layer; that is, the problems in the wrapper fi le, but not
in the elementary streams.
NOTE. Ceri
serious errors that prevent the correct interpretation of the stream. This check is mandatory and cannot
be disabled.
Alerts may be suppressed individually by entering the alert ID into the text field titled Suppress alert
IDs.Note
alert limits set by the Alert limit or Individual Alert limit.
This rule can be used to limit the number of container alerts raised. It is not possible to switch off this
check; however the value can be set to a maximum of 10,000.
Clickin
alert limit is exceeded. In this case, certain stream properties that require the whole file to be processed
(such as length of stream) are not reported. Similarly, end of stream test cases will not be executed. If
the che
be suppressed and not shown. In either case, an alert will be raised, indicating that further alerts have
been suppressed. If the alert limit has been exceeded, fatal alerts will still be displayed.
Note t
container alert.
This rule can be used to limit the number of container alerts with the same ID number. This prevents
the results being swamped by a particular container alert. It is not possible to switch off this check;
ver, the value can be set to a maximum of 10,000. This value should be kept lower than the Alert
howe
limit value, since the latter takes precedence.
Checks the size of the input file in bytes. For container layers that support external references (for
example MXF and QuickTime files) this does not include the sizes of the external files.
Checks the stream play time, defined as the maximum play time of all decoded audio and video streams.
This tests the bit rate for the stream, calculated as the file size divided by the play time, as defined above.
ltiple sets
Mu
is tests the number of video elementary streams contained within the container layer.
Th
his tests the number of audio elementary streams contained within the container layer.
T
hecks that the audio stream duration is longer than the video stream duration by a minimum amount
C
but not by more than the maximum specified amount.
This rule can be used to suppress the audio and video alerts for the first few frames or milliseconds
of the file.
This rule can be used to suppress the audio and video alerts for the last few frames or milliseconds
of the file.
lmost certainly lead to spurious alerts. Cerify will raise an alert and cease analysis
fy does not perform full syntax checks for container layers, and is limited to reporting
that fatal alerts can never be suppressed. Suppressed alerts will not count towards any of the
g the "Terminate processing if limit is exceeded" checkbox causes file processing to stop if the
ckbox is not checked, processing will proceed to completion but any further container alerts will
hat the Individual Alert limit can be used to prevent the results being swamped by a particular
(see page 69) of valid values can be defined for this rule.
72 Cerify Automated Video Content Verification System User Manual
Page 83

Reference Container Templates
Container Che
Check Description
Packet size
CableLabs
VOD
DVB Closed
Caption
DVB Telet
Video PID
Audio PID
xxx
cks Specific to MPEG-2 Transport Stream Standard
cket size used by the MPEG-2 Transport Stream. This can be 188, 192, 204, or 208
ll be reported as a synchronization error.
gainst some of the requirements of CableLabs Video-On-Demand Content Encoding Profiles
ams must have stream_type equal to 0x02 (MPEG-2); that an MPEG-2 video stream is on
ption data. Such a PID must include a VBI_data_descriptor (as described in ETSI EN 301
ing a txt_data_field() element.
that the decoded video stream was found on a specific PID or PIDs. Multiple PIDS can
yusingthe'0x'prefix.
s that the decoded audio stream was found on a specific PID or PIDs. Multiple PIDS can be
ext
Checks the pa
bytes. Packet size is defined as the separation between sync_bytes in the MPEG-2 transport stream.
This is a check on the separation of the first pair of sync_bytes only. If the packet size varies later in the
stream, it wi
This tests a
Specification (MD-SP-VOD-CEP-l01-040107). The checks are: that the transport stream contains a
single Program only; that audio streams must have stream type equal to 0x81 (Dolby Digital); that
video stre
PID 0x1E1; that a Dolby Digital audio stream is on PID 0x1E2, and any other audio streams follow on
consecutive PIDs; that the Program Clock Reference (PCR) occurs in PID 0x1E1 (the video stream).
Checks that the Program Map Table associated with the decoded video stream includes a PID with
Closed Ca
775) containing a c losed_captioning_data_ field() element.
Checks that the Program Map Table associated with the decoded video stream includes a PID with
Teletext data. Such a PID must include a VBI_data_descriptor (as described in ETSI EN 301 775)
contain
Checks
be specified using a comma-separated list, and/or PID ranges. For example, "128-130,481" checks
that the video stream is on any of PIDs 128, 129, 130 or 481. Hexadecimal PID numbers can be
given b
Check
specified using a comma-separated list, and/or PID ranges. For example, "482-484,4098" checks that
the video stream is on any of PIDs 482, 483, 484 or 4098. Hexadecimal PID numbers can be given
ng the '0x' prefix.
by usi
If this rule used on a file which contains no audio stream, an alert will not be generated. To catch this
case, use the "Number of audio streams" rule.
Container Checks Specific to MPEG-2 Program Stream Standard
Check Description
VBI
Video
Audio
Pack header
System header Checks for the presence of a system_header PS packet type as indicated by the presence of packets
Program
Stream Map
Checks for the presence of Pinnacle Vertical Blanking Information, as indicated by the use of Pinnacle
proprietary syntax in private_stream_2
Checks for the presence of at least one video stream as indicated by the presence of packets with
a stream_id in the range 0xE0 - 0xEF inclusive
Checks for the presence of at least one audio stream as indicated by the presence of packets with a
stream_id in the range 0xC0 - 0xDF inclusive
Checks for the presence of a pack_header PS packet type as indicated by the presence of packets with
the start code 0x000001BA
with the start code 0x000001BB
Checks for the presence of a program_stream_map PS packet type as indicated by the presence of
packets with the start code 0x000001BC
Cerify Automated Video Content Verification System User Manual 73
Page 84

Reference Video Templates
Check Description
Program
Stream
Directory
Private Stream1Checks for the presence of private_stream_1 as indicated by packets with stream_id = 0xBD
Private Stream2Checks for the presence of private_stream_2 as indicated by packets with stream_id = 0xBF
Checks for the
packets with the start code 0x000001FF
presence of a program_stream_directory PS packet type as indicated by the presence of
Padding stream
xxx
Checks for t
he presence of padding_stream as indicated by packets with stream_id = 0xBE
Container Checks Specific to SMPTE 377M / MXF Standard
Check Description
Operational
Pattern
Footer Partition
Clip Duration Compares the duration of the decoded video stream against the duration of the material package
Clip Start
Timecode
xxx
Checks the Operational Pattern reported by the MXF file.
Tests that a footer partition pack is present at the end of the MXF file. A missing footer partition often
indicates that a file has been truncated, and might cause problems for editing software and other
systems.
defined in the MXF file, and alerts if they are different. There is a tolerance of 1 video frame duration.
A failure of this test might mean that the MXF file has been badly packaged or truncated.
Tests the start timecode of the MXF file material package. It is possible to specify a minimum, a
maximum, or both. Timecodes must be given in the format HH:MM:SS:FF (where FF is frame number).
Video Templates
Video Templat es gather rules applying to video elementary streams.
Common Video Configuration Checks
Check Description
Standard Checks that the input file is encoded to the expected standard. Without this check, an MPEG-2 file
(for example) could pass an MPEG-4 Video Template provided that the Template did not test any
MPEG-4 specific features.
Since treating an MPEG-2 stream as MPEG-4 will almost certainly lead to spurious alerts, Cerify will
raise an alert and cease analysis immediately in the event of a mismatch between observed and
expected standard.
If the media file does not contain a video stream, a n alert will be raised and processing will terminate
immediately.
Syntax Checks Enables strict testing for compliance to the detected standard. This will generate alerts for corrupted
streams, and streams generated by misconfigured or noncompliant encoders. Each type of alert has a
numeric ID, which is shown in the Alert Details page.
74 Cerify Automated Video Content Verification System User Manual
Page 85

Reference Video Templates
Check Description
Suppress
Alerts
Quick Check Enabling the
Alerts can be s
alert IDs) as well as in a predefined group selected from the list. Note that fatal alerts can never be
suppressed. Suppressed alerts will not count towards any of the alert limits set by the Alert limit or
Individual Al
rule lets you quickly gather basic stream information and perform checks on them without performing a
full decode of the asset. S tream information thus gathered can also be used by automation clients using
the CeriTal
based on stream attributes. The following tests will not be run when performing a Quick Check:
Container Templates:
uppressed individually (by entering the alert ID into the text field titled Plus ad dition al
ert limit.
Quick Check rule prompts Cerify to run a partial check of the media file being tested. This
k API to select an appropriate Profile to apply to the media file or to perform content sorting
File size
Play time
Bitrate
Has Pinnacle VBI (MPEG-2 Program S tream)
Has Video Stream (MPEG-2 Program Stream)
Has Audio Stream (MPEG-2 Program Stream)
Has System Header (MPEG-2 Program Stream)
Has Program Stream Map (MPEG-2 Program Stream)
Has Program Stream Directory (MPEG-2 Program Stream)
Has Private Stream 1 (MPEG-2 Program Stream)
Has Private Stream 2 (MPEG-2 Program Stream)
Has Padding Stream (MPEG-2 Program Stream)
Packet size (MPEG-2 Transport Stream)
Has DVB Closed Caption Information (MPEG-2 Transport Stream)
Has DVB Teletext Information (MPEG-2 Transport Stream)
Operational Parameter (MXF)
Cerify Automated Video Content Verification System User Manual 75
Page 86

Reference Video Templates
Check Description
Quick Check
(continued)
Video Templates:
Play time
Frame rate
Bitrate
Data partitioning (MPEG-4, H.264)
AC Prediction (MPEG-4)
Forward Prediction (VC1 and MPEG-4)
Bidirectional Prediction (VC1 and MPEG-4)
Loop Filter (VC1)
Copyright extension (MPEG-2)
First GOP closed
GOP interval
All quality tests:
Black fra
Freeze frame
Loss of Chroma
Letterb
Pillarbox
Blockiness
Luma Li
RGB Component Violation
Quantization
mes
ox
mit Violation
Audio Templates:
Play time
Bitrate
All quality tests:
nce
Sile
Mute
Peak level maximum
level minimum
Peak
Clipping
Test tone
76 Cerify Automated Video Content Verification System User Manual
Page 87

Reference Video Templates
Check Description
Alert limit
Individual Alert
limit
Field Ord
er
This rule can b
however the value can be set to a maximum of 10,000.
Selecting the "Terminate processing if limit is exceeded" checkbox causes fi le processing to stop if the
alert limit is
(such as length of stream) are not reported. Similarly, end of stream test cases will not be executed. If
the checkbox is not cleared, proces sing will proceed to completion but any further video alerts will be
suppressed a
raised. If the alert limit has been exceeded, fa tal alerts will still be displayed.
Note that the Individual Alert limit canbeusedtopreventtheresults being swamped by a particular
video alert
This rule ca
being swamped by a particular video alert. It is not possible to turn off this check; however, the value
can be set to a maximum of 10,000. This value should be kept lower than the Alert limit value, since
the latter
This rule
is consistent with a given field order.
Top field first will check that the coded stream is flagged as such and that the bottom field does
not appear to be from an earlier point in time than the top field.
Bottom field first for the opposite of Top field first.
e used to limit the number of video alerts raised. It is not possible to turn off this check;
exceeded. In this case, certain stream properties that require the whole file to be processed
nd not shown. In either case, an alert will be raised, indicating that further alerts will not be
.
n be used to limit the number of video alerts with the same ID. This prevents the results
takes precedence.
checks that the field dominance indicated by the coded stream and the decoded video
Consistent with stream flags checks that the decoded video field o rder is the same as the field
dicated by the coded stream.
order in
In the case where pulldown is achieved through the use of stream flags, or any stream where the coded
field order is expected to change, Consistent with stream flags is the only appropriate check to use.
eams that have already had pulldown applied in the source video (so that the coded field order is
For str
constant), any of these three checks may be suitable.
lace
Inter
ime
Play t
Encoded
ure Size
Pict
Color depth Tests the color depth (bits per sample) of the decoded video. This is usually 8, but may be higher in
Frame rate
This check will either require or prohibit interlaced coding (not available for H.263).
Used to check the play time of the video elementary stream. Defined as the presentation time of the last
video frame in display order.
iple sets
Mult
s the video resolution (frame width by frame height) in pixels. The size reported is used to encode
Test
the picture. For some codecs, this size may be different to the intended display size of the picture.
Frame width is defined as the coded video frame width reported by the first stream header only. Frame
ght is defined as the coded video frame height reported by the first stream header only. For interlaced
hei
video, encoded picture size is the height of the reconstructed frame (twice the field height).
Multiple sets
me standards (not available for H.263, MPEG-2 or DV25).
so
ests the average frame rate (calculated as <frames- 1>/<duration>) of the video sequence. This check
T
does not use any declared frame rate in the stream header.
Multiple sets
(see page 69) of valid values can be defi ned for this rule.
(see page 69) of valid values can be defi ned for this rule.
(see page 69) of valid values can be defi ned for this rule.
Cerify Automated Video Content Verification System User Manual 77
Page 88

Reference Video Templates
Check Description
Bit rate
Tests the aver
age bit rate of the video elementary stream, calculated as <stream_size>/<duration>.
This check does not apply buffer analysis rules.
Display Aspect
Ratio
Multiple sets
Tests the aspect ratio of the intended display dimensions of the video stream. According to the codec
being used, t
(see page 69) of valid values can be defined for this rule.
his depends upon a combination of the indicated display aspect ratio in the stream, the
indicated pixel aspect ratio, and the frame size (in pixels). Consequently, this will not necessarily
correspond to the actual resulting aspect ratio on all display devices. The mechanism used for detecting
the MPEG-2 d
isplay aspect ratio is documented in more detail in the section Video Checks Specific
to MPEG-2 Standard (see page 81).
Multiple sets
xxx
(see page 69) of valid values can be defined for this rule.
Video Quality
For interlaced content, all quality checks consider each frame to contain the top field and the bottom field
in a single picture. It is not possible to apply these checks on each field.
Check Description
Black frames
at start, end, or
during video
Freeze frame
sequence
Loss of Chroma This check ensures that the video has color information. It will cause an alert if the color signal is lost
These checks enforce or prohibit a certain duration of black at the beginning and end of the sequence,
or to prohibit periods of black in the middle. The Black level tolerance field determines what luma level
is considered to be black by the test. If the Black level tolerance is N, then any pixels in the bottom N %
of the signal range are considered to be black. An N value of 0% corresponds to a luma value of 16 and
100% corresponds to a luma value of 235. The Ignore failures for up to...% of picture area parameter
allows a percentage of the screen area to exceed the threshold yet for the frame to still be considered
black. This is typically used to disregard small amounts of analog noise and/or channel logos.
This check can detect a sequence of repeated frames. The Maximum allowed duration parameter
gives the length of a frozen sequence above which an alert will be generated. Sequences of frozen
frames equal to or shorter than this duration will not lead to an alert. For example: entering "2 identical
frames" will allow two c onsecutive identical frames to pass, but will generate an alert if three consecutive
identical frames are encountered.
The Ignore monochromatic frames option allows frames which are predominantly a single color (such
as black) to be ignored and so not cause freeze frame alerts.
Frames are considered "repeated" if every 16x16 block of luma s amples differs by less than a given
root mean square error from the corresponding block in a previous frame. The Frames differ at ...%
or more of luma range parameter controls this sensitivity. If you are getting frozen frame alerts for
sequences with significant movement, lower this value. If frozen sequences are not leading to an alert
being raised when you think they should, raise this value.
(if the chroma components of the decoded video fall to zero or nearly so). The Maximum allow ed
duration parameter gives the maximum number of video frames or seconds that are permitted to be
monochrome before an alert is triggered. The parameter Ignore failures for first...at start allows the
test to skip over a certain amount at the beginning of the video stream, without generating alerts.
Similarly, the Ignore failures for last...at end parameter skips over a given amount at the end. These
parameters are typically used to skip over monochrome title and credit sequences. The Chroma level
tolerance percentage gives the signal level below which the check will trigger an alert. 0% will alert on
Cr and Cb values of 128, while 100% will alert on any value from 16 to 240. The Ig no re failures for
up to...% of picture area specifies the amount of the picture area that may contain color information
without causing the check to trigger an alert. These last two parameters are typically used to disregard
small amounts of analog noise and/or channel logos.
78 Cerify Automated Video Content Verification System User Manual
Page 89

Reference Video Templates
Check Description
Letterbox
and Pillarbox
checks
Blockiness
These checks e
pillarboxing) altogether. If the Disallow Letterboxing or Disallow Pillarboxing check boxes are
selected, the Desired Aspect Ratio parameters are ignored. In this case, no black bars are allowed at
the top and bot
check will calculate the correct sizes of the black bars for the given aspect ratio, and trigger an alert if
the video does not comply. The parameter Ignore failures for first...at start allowsthetesttoskipover
a certain amo
failures for last...at e nd parameter skips over a given amount at the end. The Maximum allowed
duration parameter gives the maximum number of video frames or seconds that are permitted to have
improper bl
the luma level that the check regards as "black", with 0% corresponding to the value 16, and 100%
corresponding to 235. This tolerance is typically used to disregard small amounts of analog noise in
the otherw
black bars, the Out-of-position tolerance parameter specifies the number of scan lines (or pixel
columns) by which a black bar may be out of place, without an alert being triggered. Two further
parameter
for skipping frames that are too dark to reliably detect the black bars. Once again, 0% corresponds
to 16 and 100% corresponds to 235.
This is a subjective measure of video quality. Each frame is assigned a quality metric (based on
compress
of poor quality (such as fast camera pans) to be disregarded if required. An alert is generated if the
video quality drops below the given threshold.
The imag
on each frame. A rolling average is calculated for a sequence of frames, and if the rolling average
for one or more of the four quadrants exceeds the user-specified threshold an alert is raised. The
ding" frame reported will be the last frame in the sequence of N.
"offen
Blockiness measurements will continue to be taken after an alert is raised, but another alert will not
be raised until at least another N consecutively blocky frames have passed. So if you were averaging
over 10
an alert at frame 10 and an alert at frame 20.
The blockiness score that is reported in an alert is the lowest of the four quadrants rolling average if
han one quadrant exceeds the threshold. The averaged score is rounded to the nearest integer.
more t
nforce a certain aspect ratio in the active picture area, or to prohibit letterboxing (or
tom of the frame (Letterboxing) or at the left and right sides (Pillarboxing). Otherwise, this
unt at the beginning of the video stream, without generating alerts. Similarly, the Ignore
ack bars, before an alert is triggered. The Black level tolerance parameter specifies
ise black borders of the frame. To allow for small variations in the detected position of the
s, Black level tolerance and accounting for...% of picture area not black specify a rule
ion artifacts) in the range 0-99, and a moving average is calculated to allow for brief periods
e is divided into four quadrants and blockiness measurement is re corded for each quadrant
frames and your stream had contained a sequence of 22 blocky frames, you would expect
Cerify Automated Video Content Verification System User Manual 79
Page 90

Reference Video Templates
Check Description
Luma Limit
Violation
RGB
Component
Violation
xxx
This tests tha
Duration parameter gives the maximum number of video frames or seconds that are permitted to have
violations before an alert is triggered. The Low Limit and High Limit fields allow for more strict or more
lenient rules
Tech Rec. R103-2000. These limits may be specified in mV, %, or 8 bit decimal values where values
in mV or % are first converted to 8 bit decimal. For example, the ranges 0-700mV and 0-100% are
converted to
Tolerance F ilter applies a low pass filter to the video before checking the limits to remove brief limit
violations that are only a small amount over the limit. The default 50% filter setting complies with EBU
Tech Rec. R1
brief violations, which cause small dots on the video image to be out-of-limit, are not a problem in
practice. The lower the percentage entered here, the less likely a brief violation is to cause an alert.
Values of 6
Apply tolerance filter check box is checked. The Ignore failure... field allows an illegal signal for a
given percentage of the screen area to not cause an alert. If the area of the screen in violation is greater
than this p
This test
given by ITU-R BT.601-5 or ITU-R BT.709-5. The Maximum duration parameter gives the maximum
number of video frames or seconds that are permitted to have violations, before an alert is triggered.
The Color
If Auto is selected, then ITU-R BT.709-5 is used if the frame has more than 1000x648 pixels, otherwise,
ITU-R BT.601-5 is used. The Low Limit and High Limit fields allow for more strict or more lenient rules
for when
R103-2000. These limits may be specified in mV, % or 8 bit decimal values where values in mV or %
are first converted to 8 bit decimal. For example, the ranges 0-700mV and 0-100% are converted to
16-235
Filter applies a low pass filter to the video before checking the limits to remove brief limit violations that
are only a small amount over the limit. The default 50% filter setting complies with E BU Tech Rec.
R103-2
violations, which cause small dots on the video image to be out-of-limit, are not a problem in practice.
The lower the percentage entered here, the less likely a brief violation is to cause an alert. Values of
64 and
tolerance filter check box is checked. The Ignore failure... field allows an illegal signal for a given
percentage of the screen area to not cause an alert. If the area of the screen in violation is greater
than t
t the luma component (Y') of the Y'CbCr signal is within valid limits. The Maximum
for when a pixel is considered a violation. The defaults of -1% to 103% comply with EBU
16-235 decimal, similarly, -7-721 mV or -1%-103% = 14-242 decimal. The Out-of-Limits
03-2000 and IEEE Standard 205 for SD signals. This video standard recognizes that very
4 and above are not recommended. The Out-of-Limits Tolerance Filter is only applied if the
ercentage, an alert will be generated.
ensures that the Y', Cb and Cr components of the decoded video lie within the legal range
space Conversion allows for the selection of the method for conversion from Y'CbCr to RGB.
a pixel is considered a violation. The defaults of -35mV to 735mV comply with EBU Tech Rec.
decimal, similarly, -35-735mV or -5%-105% = 5-246 decimal. The Out-of-Limits Tolerance
000 and IEEE Standard 205 for SD signals. This video standard recognizes that very brief
above are not recommended. The Out-of-Limits Tolerance Filter is only applied if the Apply
his percentage, an alert will be generated.
Video Checks Specific to MPEG-4 Standard
Check Description
Profile and level Checks whether the video conforms to the MPEG-4 Part 2 Pro file and Level specified by the user.
GOVHeader Tests whether a Group Of VOP (GOV) header exists anywhere in the stream. This test is based on
detecting the group_of_vop_start_code syntax element in the stream.
Visual object
sequence
header
Video object
header
80 Cerify Automated Video Content Verification System User Manual
Tests whether a VisualObjectSequence() header exists anywhere in the stream. This test is based on
detecting the visual_object_sequence_start_code syntax element in the stream.
Tests whether a video_object_start_code is present in the stream.
Page 91

Reference Video Templates
Check Description
AC prediction Tests whether
on detecting the ac_pred_flag syntax element.
Forward
prediction
Bidirectional
Tests whether the video sequence contains any frames that use forward motion prediction (P-VOPs,
B-VOPs and S-VOPs).
Tests whether the video sequence contains any B-VOPS.
prediction
Quarter sample
MV
4MV block
Tests whether quarter sample motion compensation is used, as determined by the quarter_sample
element in the VideoObjectLayer() header.
Tests whet
modes
Global mo
tion
compensation
Data
partitioning
Resync
markers
Test s w he
test whether GMC S-VOPs are actually ever used.
Tests the value of the data_partitioned element in the VideoObjectLayer() header. Macroblocks in Data
partitioned streams have motion vectors coded separately from texture (DCT) information.
Tests for the presence of resync markers in coded VOPs, as determined by the resync_marker_disable
element
RVLC Tests w
element in the VideoObjectLayer() header. Reversible VLCs give greater opportunity for error correction
at the expense of slightly lower coding efficiency.
xxx
the video sequence contains any macroblocks that use AC Prediction. This test is based
her the inter4v macroblock type is ever used in a P-VOP.
ther the sprite_enable element in the VideoObjectLayer() header is set to GMC. This does not
in the VideoObjectLayer() header.
hether Reversible Variable Length Codes are in use, as determined by the reversible_vlc
Video Checks SpecifictoMPEG-2Standard
Check Description
Standard This Template can be used to process both MPEG-2 and MPEG-1 video. If the video is MPEG-1 an alert
will be raised, and this can be suppressed by selecting the checkbox.
Cerify supports the decoding of MPEG-2 constrained bitstreams with Main profile or 4:2:2 profile.
MPEG-1 constrained bitstreams are not fully supported and will be treated as MPEG-2 bitstreams. This
can lead to various issues when processing MPEG-1 constrained bitstreams, typically including spurious
alerts, but also possible picture corruption and failure to decode the stream. For a more complete
description of the differences between MPEG-1 and MPEG-2 bitstreams please refer to section D.9 of
the ITU-T H.262 or ISO/IEC 13818-2 specification.
Since trying to process a video format which is not MPEG-1 or MPEG-2 will almost certainly lead to
spurious alerts, Cerify will raise an alert and cease analysis imm ediately if the video is not either of
these types.
Profile Detects whether the stream conforms to the Main or 4:2:2 profile.
Level
Display Aspect
Ratio
Color Format Tests the c olor sub sampling of the decoded video.
Detects whether the stream conforms to the Main, High 1440 or High level, or to some level below
the one specified by the user.
For MPEG-2 streams the system examines the aspect_ratio_information field(seeTable6-3inISO/IEC
13818-2). If this value is 0010, 0011, or 0100 then this directly represents a Display Aspect Ratio and
the corresponding value will be used to carry out the check. If the value is 0001 then the Sample Aspect
Ratio is 1 and the Display Aspect ratio will be deduced from the frame height and width. Selecting
the value "Unspecified" for this check, will check that the aspect_ratio_information field has not been
set to any of the above four values.
Cerify Automated Video Content Verification System User Manual 81
Page 92

Reference Video Templates
Check Description
Indicated bit
rate
Test s t he v a lu
the stream sequence header and used in VBV calculations.
Only one failure of this test will be reported for any single incorrect value.
Sequence
display
Tests for the presence or absence of an MPEG-2 sequence_display_extension following every sequence
header. Ever
extension
Copyright
extension
This test will check that an MPEG-2 copyright_extension structure occurs at least once in the stream,
and (optionally) that its contents match the given values. The Identifier and Copyright Number fields
each accept
Every copyright_extension present in the stream is tested.
VBV buffer size Tests on the value of vbv_buffer_size given in the sequence header (and sequence extension for
MPEG-2). This is expressed in units of 16K (16384 bytes).
Only one f
First GOP
closed
Checks th
check that the first GOP header occurs at the beginning of the stream; see the GOP Interval check.)
GOP interval Checks the frequency of GOP headers, expressed in terms of the number of pictures between
successive headers. For example, specifying min=2 and max=2 would require a GOP header on
every o
a GOP header.
CC standard Checks for the presence of closed caption standard data in the entire duration of the stream. You
can select one or a combination of the closed caption standards (CEA 608, CEA 708 and SCTE 20
SCTE 2
ent
CC abs
CEA 6
caption
08
Check
ks for the presence of closed caption services for CEA 608. You can select one or a combination of
Chec
CEA 608 caption services, which are CC1, CC2, CC3, and CC4.
services
CEA 608 text
vices
ser
A 708
CE
caption
Checks for the presence of text services for CEA 608. You can select one or a combination of CEA
text services, which are T1, T2, T3, and T4.
608
ecks for the presence of closed caption services for CEA 708. You can select one or a combination of
Ch
CEA 708 caption services, which are Service 1, Service 2, Service 3, Service 4, Service 5, and Service 6.
services
SCTE 20 line
umber
n
CTE 21 line
S
Checks for line number where the SCTE 20 closed caption data is carried.
hecks for line number where the SCTE 21 closed caption data is carried.
C
number
Quantization This ensures that the quantizer_scale never exceeds the user supplied values for inter and intra blocks
for more than a given duration in seconds/frames. If the combined percentage of inter and intra blocks in
a frame exceeding their threshold is greater than the percentage entered then that frame will fail the test.
The quantizer scale can be any number in the range of 1 to 112.
xxx
e of the bit rate (in bits per second) indicated by the MPEG-2 bit_rate element, as given in
y sequence header is tested, but repeated failures are not shown.
values in decimal, or may be left empty if no check is to be performed.
ailure of this test will be reported for any single incorrect value.
at the first GOP header encountered in the stream has closed_gop set to 1. (This does not
ther picture. It is also possible to check that the first picture in the sequence is preceded by
1) for the Closed Caption Presence test.
s for the absence of closed caption data in the entire duration of the stream/file.
82 Cerify Automated Video Content Verification System User Manual
Page 93

Reference Video Templates
Video Checks S
Check Description
Profile Checks wheth
Sample aspec
ratio
Range
mapping
Loop filter Tests whether loop filtering has been enabled for the sequence. For Advanced profile, this value
Intensity
compensation
Forward
prediction
Bidirectional
tion
predic
Quantization This ensures that the quantizer scale (MQUANT) never exceeds the user supplied value for more than a
ed
Dropp
frames
xxx
pecific to VC-1 Standard
er the video conforms to the Simple, Main or Advanced profile.
t
Tests the sam
intended horizontal distance between the columns and the intended vertical distance between the rows
of the luma sample array in a frame.
Tests whether the video stream makes use of range mapping in Advanced profile to scale luma and
color-dif
This does not test range reduction (as used in Main profile).
is tested at each entry point header.
Tests whether any pictures in the video stream use intensity compensation.
Tests whether the video sequence contains any frame types (for example, P pictures, B pictures)
which us
Test s w
bidirectional motion prediction.
given duration in seconds/frames. If the percentage of macroblocks in a frame exceeding the threshold
ater than the percentage entered then that frame will fail the test. The quantizer scale can be
is gre
any number in the range of 1 to 31.
This test ensures that the time difference between frames never exceeds the user supplied duration in
seconds/frames.
nputs specified in seconds, if the gap in presentation times for consecutive frames exceeds the
For i
threshold then the later frame will fail the test.
For inputs specified in frames, the most recent frame timings are used to calculate the probable intended
me rate and a frame whose timing exceeds the frame threshold will fail the test. Setting a maximum
fra
gap of one frame will give an alert for any dropped frames.
ple aspect ratio of the video stream. The sample aspect ratio is the ratio between the
ference values. Every entry point header is checked.
e forward motion prediction.
hether the video sequence contains any frame types (for example, B pictures) which use
Video Checks Specific to H.264/AVC Standard
Check Description
Profile Checks whether the H.264/AVC level and profile match or conform to those selected by the user.
AVC-Intra
restrictions
Sample aspect
ratio
Entropy coding
Data
partitioning
xxx
Cerify Automated Video Content Verification System User Manual 83
Enforces the AVC Intra restrictions as per the "SMPTE RP 2027-2007 AVC Intra-Frame Coding
Specification" standard.
Tests the sample aspect ratio of the video stream. The sample aspect ratio is the ratio between the
intended horizontal distance between the columns and the intended vertical distance between the rows
of the luma sample array in a frame.
Tests whether the entropy coding is CABAC (exclusively) or CAVLC (exclusively), as determined by the
entropy_coding_mode flag in the picture parameter set(s) of the video stream.
Data partitioning is used for error resilience. This rule can either check that data partitioning is used
throughout the stream, or that it is never used at all.
Page 94

Reference Video Templates
Video Checks S
Check Description
DV Profile Checks wheth
Field Order This rule checks that the field dominance indicated by the coded stream and the decoded video is
Standards body Checks that the file conforms to either the IEC (DV) or the S MP TE (DVCPRO) standards.
Closed
ns
captio
(Standard)
Closed
captions (GVG
9)
Line 1
xxx
pecific to the DV50/100/DVCPro Standard
er the DV profile (video system) matches or conforms to that selected by the user. The
Profiles show the number of lines and field rate, color sampling, and video bit rate:
1. 525/60 4:1:1 25Mb/s
2. 625/50 4:1:1 25Mb/s
3. 625/50 4:2:0 25Mb/s
4. 525/60 4:2:2 50Mb/s
5. 625/50 4:2:2 50Mb/s
6. 1080/60i 4:2:2 100Mb/s
7. 1080/50i 4:2:2 100Mb/s
8. 720/60p 4:2:2 100Mb/s
9. 720/50p 4:2:2 100Mb/s
consistent with a “Bottom Field fi rst” field order.
Checks if closed caption data is present in the first frame of the stream as defined by the IEC DV
rd.
standa
Checks if alternate closed caption data is present in VAUX pack 38 throughout the stream as defined
by Grass Valley for Line 19 closed caption data. If closed captions are required, it can be specified
he closed caption data must not be null (four bytes of 0x80 in the closed caption pack) for more
that t
than the supplied duration.
84 Cerify Automated Video Content Verification System User Manual
Page 95

Reference Video Templates
Video Checks S
Check Description
Profile Checks that the video stream is one of the following formats:
Display picture
size
Alpha channel
xxx
pecific to the ProRes Standard
Apple Prores 422
Apple Prores 422 (HQ)
Apple Prores 422 (LT)
Apple Prores 422 (Proxy)
Apple Prores 4444
Tests the video display resolution (frame width by frame height), in pixels. The display picture size is
not necessarily the same as the encoded picture size.
Multiple sets of valid values can be defined for this rule.
Checks for the presence of an encoded alpha channel. Cerify will ignore any Alpha channels when
performing baseband checks.
Video Checks Specific to Generic QuickTime Video
The Generic QuickTime Video template uses the QuickTime Player to decode a video stream contained
within a QuickTime MOV, MP4, or 3GPP container file. It does not support all of the container formats
thataresupportedbyQuickTimePlayer,suchasAVI.CreatingaProfile using this template with a
container template which is not "QuickTime" or "MP4 / 3GPP" results in an error. Unlike other video
templates which are specific to a particular video codec, any video stream that can be decoded by
QuickTime Player can be decoded using this template. Additional video codec capability may be acquired
by installing an appropriate third-party plug-in for QuickTime Player.
The stream properties returned when using this template are those reported by QuickTime, which in some
circumstances might not be consistent with analogous information carried in the elementary stream.
Check Description
QuickTime This check causes the video stream to be decoded using the QuickTime framework rather than Cerify’s
internal video decoders. It also checks that the container format of the media file is QuickTime MOV,
MP4, or 3GPP.
Standard This checks that the standard of the decoded video stream matches the entered value. If you are
unsure of the value to enter in this field, process a candidate media file using a Generic QuickTime
Video template without the standard rule enabled and with the QuickCheck rule enabled. The standard
of the video stream will be reported in the Video Info of the job result. Use this value in the standard
rule to ensure that all subsequent files are of the correct video standard.
Display picture
size
Alpha channel
xxx
Tests the video display resolution (frame width by frame height), in pixels. The display picture size is
not necessarily the same as the encoded picture size.
Multiple sets of valid values can be defined for this rule.
Checks for the presence of an encoded alpha channel. Cerify will ignore any Alpha channels when
performing baseband checks.
Cerify Automated Video Content Verification System User Manual 85
Page 96

Reference Audio Templates
NOTE. When using the Generic QuickTime Video template, it generally results in significant performanc e
gains over other video template types as it uses multi-core processors and no syntax checking.
For example, H.264 decoding is approximately five times faster.
Video Checks Specific to JPEG 2000
The JPEG 2000 Video template uses the QuickTime Player to decode JPEG 2000 video streams contained
within a QuickTime MOV, MP4, or 3GPP container file. It does not support all of the container formats
that are supported by QuickTime Player, such as AVI. Creating a Profile using this template with a
container template which is not "QuickTime" or "MP4 / 3GPP" results in an error. The stream properties
returned when using this template are those reported by QuickTime, which in some circumstances might
not be con
sistent with analogous information carried in the elementary stream.
Check Descript
me
QuickTi
Display p icture
size
hannel
Alpha c
xxx
NOTE. When using the JPEG 2000 template, syntax checking is not supported.
Audio Templates
Audio Templates collect together rules applying to audio elementary streams.
ion
This che
internal video decoders. It also checks that the container format of the media file is QuickTime MOV,
MP4, or 3GPP.
Tests the video display resolution (frame width by frame height), in pixels. The display picture size is
not nec
for this rule.
Checks for the presence of an encoded alpha channel. Cerify will ignore any Alpha channels when
performing baseband checks.
ck causes the video stream to be decoded using the QuickTime framework rather than Cerify’s
essarily the same as the encoded picture size. Multiple sets of valid values can be defined
86 Cerify Automated Video Content Verification System User Manual
Page 97

Reference Audio Templates
Common Audio C
Check Description
Standard Checks that t
Track
Syntax checks Enables strict testing for compliance to the detected standard. This will generate alerts for corrupted
ppress
Su
Alerts
onfiguration Checks
he input file is encoded to the expected standard. This check is mandatory and cannot
be disabled.
Because improper handling of an audio format file, such as processing PCM as AAC, will almost
certainly le
a mismatch between observed and expected audio format.
If the media file does not contain an audio stream, an alert will be raised and processing will terminate
immediatel
You c an c ho
Track Index: Specifies the index of the audio track that is to be processed. The index is relative to
the natural ordering of the audio tracks within the container layer, such as PIDs for MPEG-2 Transport
Streams. T
the rule is not used, the first audio stream found of the appropriate codec type is processed.
For example, for an MPEG-2 Transport stream containing two MPEG-1 Audio streams and one Dolby
Digital s
and in order to process the second MPEG-1 Audio stream, a track Index of 1 should be specified. To
process the Dolby Digital stream, the rule is not required since there is only one Dolby Digital stream.
Track Id
depend on the id used to identify the audio track in the container. The following table gives the values
used in the track id field for different containers.
You c a
can be in either decimal or hexadecimal format; hexadecimal indexes must be preceded by '0X'. You
can use the following formats to specify multiple tracks:
streams, and streams generated by misconfigured or noncompliant encoders. Each type of syntax alert
s a numeric ID which is shown in the Alert Details page.
ha
erts can be suppressed individually by entering the alert ID into the text field titled Suppress alert IDs.
Al
Note that fatal alerts can never be suppressed. Suppressed alerts will not count toward any of the alert
limits set by the Alert limit or Individual Alert limit.
ad to spurious alerts, Cerify will raise an alert and cease analysis immediately in the event of
y.
ose the track using either Track Index or Track Id (Identity).
he index only takes in to account the tracks using the codec of the current audio template. If
tream, in order to process the first MPEG-1 Audio stream, a track index of 0 should be specified
: Specifies the identity of the audio track that is to be processed. The track id value used will
MOV/MP4
MPEG-2 PS – Stream id of the audio track
MPEG-2 TS – PID of the audio track
MXF – Tr
ASF – Stream number of the audio track
GXF – Track ID of the audio track
a–b
a–b,c
a,b–c
a–b,
a,b,c,d
* (This applies to all the track in that standard)
–1 (
track id or track index is not selected)
/3GPP – Track ID of the audio track
ack ID of the audio track
n also specify multiple tracks to be processed in a s ingle template. Track indexes and Track Ids
c–d
Default track. The result of processing will be similar to the case where the rule for choosing
Cerify Automated Video Content Verification System User Manual 87
Page 98

Reference Audio Templates
Check Description
Alert limit
Individual Alert
limit
Sample ra
te
Number of
s
channel
Play time
te
Bit ra
xxx
This rule limi
the value can be set to a maximum of 10,000.
Clicking the "Terminate processing if limit is exceeded" checkbox causes file processing to stop if the
alert limit is
(such as length of stream) are not reported. Similarly, end of stream test cases will not be executed. If
the checkbox is not selected, processing will proc eed to completion but any further audio alerts will be
suppressed a
have been suppressed. If the alert limit has been exceeded, fatal alerts will still be displayed.
Note that the Individual Alert limit can be used to prevent the results being swamped by a particular
audio alert
This rule li
swamped by a particular audio alert. It is not possible to switch off this check; however, the value can
be set to a maximum of 10,000. This value should be kept lower than the Alert lim it value, since
the latter
This test
if you are expecting 48 kHz 2-channel audio then you need to enter 48000 here.
Multiple sets
This tests how many audio channels are present in the decoded audio elementary stream (the
system o
elementary streams in a transport stream (each with 2-channel audio), the system will only decode one
of the three streams; therefore, this test will see only 2 channels.
Multip
This te
Multiple sets
Tests the average bit rate of the audio elementary stream, calculated as <stream_size>/<duration>.
Multiple sets
ts the number of audio alerts raised. It is not possible to switch off this check; however
exceeded. In this case certain stream properties that require the whole file to be processed
nd not shown to the user. In either case an alert will be raised indicating that further alerts
.
mits the number of audio alerts with the same ID number. This prevents the results being
takes precedence.
s the sample rate of decoded audio. It is independent of the number of channels, so for example
(see page 69) of valid values can be defined for this rule.
nly decodes one audio elementary stream at a time). For example: even if there are 3 audio
le sets
(see page 69) of valid values can be defined for this rule.
sts the length, in seconds, of the decoded audio stream.
(see page 69) of valid values can be defined for this rule.
(see page 69) of valid values can be defined for this rule.
Audio Quality Checks
Check Description
Ignore alerts for
null tracks
Silence at start,
end, or during
video
This rule is used to ignore the audio quality alerts when there is no data in the track.
These checks require or disallow a period of silence at the beginning and end of the audio sequence,
or to disallow periods of silence in the middle. Silence detection can be enabled or disabled on a
per-channel basis. No alerts will be raised if silence detection is requested for a channel that does not
exist (the "number of channels" test can be used in conjunction if necessary to detect missing channels).
Cerify analyzes the decoded audio stream for a given channel and tests each sample, deciding whether
or not the sample is silent. Cerify considers a sample to be silent if:
OR
The sample value differs from the previous sample by less than 0.5% of the sample range
The sample value difference from the last non-silent sample by less than 0.5% of the sample range
88 Cerify Automated Video Content Verification System User Manual
Page 99

Reference Audio Templates
Check Description
Mute at start,
end, or during
video
Peak level
maximum
Peak level
minimum
g
Clippin
ne at
Test to
start and end
These checks e
the sequence, or to prohibit periods of muted audio in the middle. Mute detection can be enabled or
disabled on a per-channel basis. No alerts will be raised if mute detection is requested for a channel
that does not e
considered muted if its value is zero. Duration may be expressed in seconds, v ideo frames or audio
frames. The latter will only be useful if the duration of an audio frame is known beforehand.
This test ensures that the peak level in the stream does not exceed a given maximum level. The level
may be expressed in linear terms (from 0.0 to 1.0) or in dBFS (decibels full scale: any negative value,
where 0.0 re
a per-channel basis.
Alerts generated by this test represent instantaneous violations, so their start and end times are the
same.
Thistestcanbeconfigured as either “Peak Level” test or “True Peak Level” test. When “True Peak
Level” test is selected, the input stream is over-sampled appropriately (depending on the sampling
rate), bef
This test ensures that the peak level in the stream reaches a given minimum level. The level may
be expres
where 0.0 represents the maximum sample value). Peak level tests can be enabled or disabled on
a per-channel basis.
This test
This tes
but non-silent. This definition permits the detection of clipping at non-peak values (which is possible
if the audio has been processed since the original clipping occurred). This test can be configured to
occasional clips; a threshold frequency must be given, below which a lerts w ill not be generated.
ignore
Clipping tests can be enabled or disabled on a per-channel basis.
These checks enforce or prohibit a period of a single frequency tone at the beginning and end of
the sequence. Test tone checks can be enabled or disabled on a per-channel basis. If the test is
biting a test tone, then the duration field specifies a maximum duration (this will typically be 0).
prohi
If the test is enforcing a test tone, then the duration is a minimum length. Duration can be expressed
in seconds, video frames or audio frames. The latter will only be useful if the duration of an audio
is known beforehand.
frame
nforce or prohibit a certain period of digital audio muting at the beginning and end of
xist (use in conjunction with the "number of channels" test if necessary). A sample is
presents the maximum sample value). Peak level tests can be enabled or disabled on
ore testing it for peak.
sed in linear terms (from 0.0 to 1.0) or in dBFS (decibels full scale: any negative value,
canbeconfigured as either “Peak Level” test or “True Peak Level” test.
t detects audio clipping, as defined by a run of successive samples whose value is very similar
Cerify Automated Video Content Verification System User Manual 89
Page 100

Reference Audio Templates
Check Description
Long Loudness
Long loudness
The average is computed for each audio sample in the stream. This test measures the long audio
loudness in the stream according to ITU-R BS.1770 standard and ensures that the long loudness
level in the st
levels are expressed in LKFS units (Loudness, K weighted, relative to nominal scale). The range for
both maximum and minimum threshold levels is from -60 LKFS to 0 LK FS. Loudness is measured and
averaged ove
with the start and end times. Sometimes the alerts might represent instantaneous violations, so their
start and end times are same.
Multiple se
rule, you can define different minimum and maximum threshold levels for different group of channels.
(See also Multiple Sets of Values
Short Loudness Short loudness is a moving window average loudness for the user selected channels. The average
is compute
moving window duration is user configurable. This test measures the short audio loudness in the
stream and ensures that the short loudness level in the stream does not go beyond given minimum and
maximum l
to nominal scale). The range for both maximum and minimum threshold levels is from -60 LKFS to 0
LKFS. The range for moving window duration is 0.5 seconds to 30 seconds. Alerts generated by this
test repr
instantaneous violations, so their start and end times are same.
Multiple sets of valid values can be defined for this rule. By defining multiple sets of values for this rule,
you can d
Multiple Sets of Values
xxx
is a running average loudness for the user selected channels over the entire stream.
ream does not go beyond given minimum and maximum threshold levels. The loudness
r the selected channels. Alerts generated by this test represent periods of violations,
ts of valid values can be defined for this r ule. By defining multiple sets of values for this
(see page 69).)
d for all audio samples in the moving window, according to ITU-R BS.1770 standard. The
evels. The loudness levels are expressed in LKFS units (Loudness, K weighted, relative
esent periods of violations, with the start and end times. Sometimes the alerts might represent
efine different threshold levels and window duration for different group of channels. (See also
(see page 69).)
Audio C hecks SpecifictoMPEG1andMPEG-2AudioStandards
Check Description
Standard A single Template is used to check MPEG-1 and MPEG-2 part 3 standard audio streams since they
are so closely related. If the user needs to explicitly check that the audio stream conforms to just
one of these standard, this check can be used.
Since trying to process an audio format that is not MPEG-1 or MPEG-2 will almost certainly lead to
spurious alerts, Cerify will raise an alert and cease analysis immediately if the audio is not either of
these types.
If the media file does not contain an audio stream, an alert will be raised and processing will terminate
immediately.
Layer Used to check whether this is a Layer I or Layer II audio stream.
Error protection
Stereo Coding This tests that a given stereo coding mode is (or is not) used in the first audio frame header.
Variable bit rate
xxx
This tests for the presence or absence of error protection. This corresponds to the protection_bit
element in the first audio frame header.
This tests whether the value of the bit_rate_index element ever varies over the course of the stream.
90 Cerify Automated Video Content Verification System User Manual
 Loading...