


x
Cerify
Automated Video Content Verification System
ZZZ
Quick Start User Manual
*P071268007*
071-2680-07


xx
Cerify
Automated Video Content Verification System
ZZZ
Quick Start User Manual
This document supports software version 7.6 and above.
www.tektronix.com
071-2680-07

Copyright © Tektronix. All rights reserved. Licensed software products are owned by Tektronix or its subsidiaries or suppliers, and are
protected by na
tional copyright laws and international treaty provisions.
Tektronix pro
previously published material. Specifications and price change privileges reserved.
TEKTRONIX and TEK are registered trademarks of Tektronix, Inc.
Cerify is trademark of Tektronix, Inc.
Cerify Technical Support
To obtain technical support for your Cerify system, send an e-mail to the following address: cerify-support@tek.com
ducts are covered by U.S. and foreign patents, issued and pending. Information in this publication supersedes that in all
Contacting Tektronix
Tektronix, Inc.
14150 SW Karl Braun Drive
P.O. Box 500
Beaverton, OR 97077
USA
For product information, sales, service, and technical support:
In North America, call 1-800-833-9200.
Worldwide, visit www.tektronix.com to find contacts in your area.
.

Warranty
Tektronix warrants that the media on which this software product is furnished and the encoding of the programs on the media will be
free from defects in materials and workmanship for a period of three (3) months from the date of shipment. If any such medium or
encoding proves defective during the warranty period, Tektronix will provide a replacement in exchange for the defective medium.
Except as to the media on which this software product is furnished, this software product is provided “as is” without warranty of any
kind, either express or implied. Tektronix does not warrant that the functions contained in this software product will meet Customer's
requirements or that the operation of the programs will be uninterrupted or error-free.
In order to obtain service under this warranty, Customer must notify Tektronix of the defect before the expiration of the warranty
period. If Tektronix is unable to provide a replacement that is free from defects in materials and workmanship within a reasonable
time thereafter, Customer may terminate the license for this software product and return this software product and any associated
materials for credit or refund.
THIS WARRANTY IS GIVEN BY TEKTRONIX WITH RESPECT TO THE PRODUCT IN LIEU OF ANY O TH ER WARRANTIES,
EXPRESS OR IMPLIED. TEKTRONIX AND ITS VENDORS DISCLAIM ANY IMPLIED WARRANTIES OF MERCHANTABILITY OR
FITNESS FOR A PARTICULAR PURPOSE. TEKTRONIX' RESPONSIBILITY TO REPLACE DEFECTIVE MEDIA OR REFUND
CUSTOMER'S PAYMENT IS THE SOLE AND EXCLUSIVE REMEDY PROVIDED TO T HE CUSTOMER FOR BREACH OF
THIS WARRANTY. TEKTRONIX AND ITS VENDORS WILL NOT BE LIABLE FOR ANY INDIRECT, SPECIAL, INCIDENTAL, OR
CONSEQUENTIAL DAMAGES IRRESPECTIVE OF WHETHER TEKTRONIX OR THE VENDOR HAS ADVANCE NOTICE OF THE
POSSIBILITY OF SUCH DAMAGES.
[W9b – 15AUG04]


Table of Contents
Environmental considerations......................................................................................................... ii
Product end-
Preface................................................................................................................................. iii
Product description. . .. . . . . . . .. . .. . .. . .. . .. . . . .. . .. . .. . .. . .. . .. . .. .. . .. . .. . .. . .. . .. . . . .. . .. . .. . .. . .. . .. .. . .. . .. . .. . .. . .. . .. .. . .. . . iii
System comp
System requirements .. . .. . .. . .. .. . .. . .. . .. . .. . .. . . . . . . .. . .. . .. . .. . .. . .. .. . .. . .. . .. . .. . .. . .. . .. .. . .. . .. . .. . .. . .. . .. . . . .. . .. . .. . viii
Clustering requirements . . .. . .. . .. . .. . . . . . . .. . .. . .. . .. . .. . .. ... .. . .. . .. . .. . .. . .. . .. . .. .. . .. . .. . .. . .. . .. . .. . . . . . . .. . .. . .. . .. . .. . .. x
Related do
Installation.............................................................................................................................. 1
Before installation................................................................................................................ 1
Software i
Software uninstallation........................................................................................................... 9
Software reinstallation ........................................................................................................... 9
Software
Network settings ................................................................................................................ 11
Configuring the Cerify installation .............................................................................................. 11
on..............................................................................................................................12
Operati
Getting acquainted . . .. . .. . .. . .. . .. . . . . . . .. . .. . .. . .. . .. . .. . .. .. . .. . .. . .. . .. . .. . .. . .. . .. .. . .. . .. . .. . .. . .. . . . . . . .. . .. . .. . .. . .. . .. . . 12
Concepts ........................................................................................................................14
Proced
of-life handling . . .. . .. . .. . .. .. . .. . .. . .. . . . .. . .. . .. .. . .. . .. . .. . .. .. . .. . .. . . . . . . .. . .. . .. .. . .. . .. . .. . .. .. . .. . .. . . . . . . .. ii
onents . .. . .. .. . .. . .. . . . .. . .. . .. . . . .. . .. . .. . . . .. . .. . . . . . . .. . .. . .. .. . .. . .. . .. .. . .. . .. . . . .. . .. . .. .. . .. . .. . .. .. . .. . .. . . iii
cumentation .......................................................................................................... xi
nstallation.............................................................................................................. 2
upgrade ............................................................................................................... 10
ures...................................................................................................................... 16
Table of Content
s
Cerify Quick Start User Manual i

Environmental c
onsiderations
Environmental considerations
Product end-of-life handling
Observe the following guidelines when recycling an instrument or component:
This section provides information about the environmental impact of the product.
Equipment recycling
Production of this equipment required the extraction and use of natural resources. The equipment may contain s ubstances that
could be harmful to the environment or human health if improperly handled at the product’s end of life. In order to avoid release of
such substances into the environment and to reduce the use of natural resources, we encourage you to recycle this product in an
appropriate system that will ensure that most of the materials are reused or recycled appropriately.
This symbol indicates that this product complies with the applicable European Union requirements according
to Directives 2002/96/EC and 2006/66/EC on waste electrical and electronic equipment (WE EE) and
batteries. For information about recycling options, check the Support/Service section of the Tektronix Web
site (www.tektronix.com).
Perchlorate materials. This product contains one or more type CR lithium batteries. According to the state
of California, CR lithium batteries are classified as perchlorate materials and require special handling. See
www.dts
c.ca.gov/hazardouswaste/perchlorate for additional information.
ii Cerify Quick Start User Manual

Preface
The Cerify application is an automated system for testing compressed digital media. This manual provides installation
instructions and a high-level operational overview of this product.
Product description
The Cerify software checks file-based digital audio/video content in a consistent and configurable m anner. Files can
be checked f
production operations with a fast, cost effective QC solution.
The Cerify system can be integrated with your existing infrastructure using the CeriTalk API to interface with asset
management systems and provide a completely automated workflow. A Web-based user interface allows test results
to be viewe
System components
Cerify accesses digital media from local storage, such as a local hard drive or DVD, as well as network storage, such as a
Windows file server or FTP server.
or correct digital encoding and against baseband quality parameters. Cerify provides both broadcast and
d from any network connected workstation.
Preface
A Cerify system can be set up in three basic ways:
The first consists of a single self-contained unit which runs all the management and testing processes of the system.
The second consists of a networked cluster of two or more units, which enables simultaneous processing of a greater
number of files. The networked cluster contains a single Supervisor and one or more Media Test Units.
The third consists of a cluster of three or more units with high availability (HA) support. Cerify Enterprise Cluster with
high availability (also referred to as an HA cluster) is a Cerify cluster enabled with support in the case of a S upervisor
system failure.
Cerify Quick Start User Manual iii

Preface
License dongle
The license dongle must be plugged into the USB port on your computer to run the application. In a clustered system,
Media Test Units acquire their licenses from the Supervisor.
In the case of an HA cluster, two identical license dongles are supplied. The two dongles need to be inserted in the USB
ports of the primary and secondary supervisors. Media Test Units will acquire licenses from the active primary Supervisor.
Figure i: License dongle
It is possible to navigate the user interface and see previous results when no dongle is installed, but it is not possible to carry
out new checks of digital media files. The license dongle controls:
The types of codecs and file formats that can be checked
The number of channels that can be used
For demo dongles, when the license will expire
Server configuration (Supervisor, Secondary Supervisor or Media Test Unit, High Availability cluster or not, etc.)
NOTE. If you unplug a dongle and plug in another dongle, or if the connected dongle is upgraded with a new v2c file, a
restart of Cerify is necessary for the license dongle to work correctly.
When you install a new version of the Cerify software for a high availability (HA) cluster, both of the dongles connected to the
primary and secondary Supervisors must be upgraded.
iv Cerify Quick Start User Manual
Preface
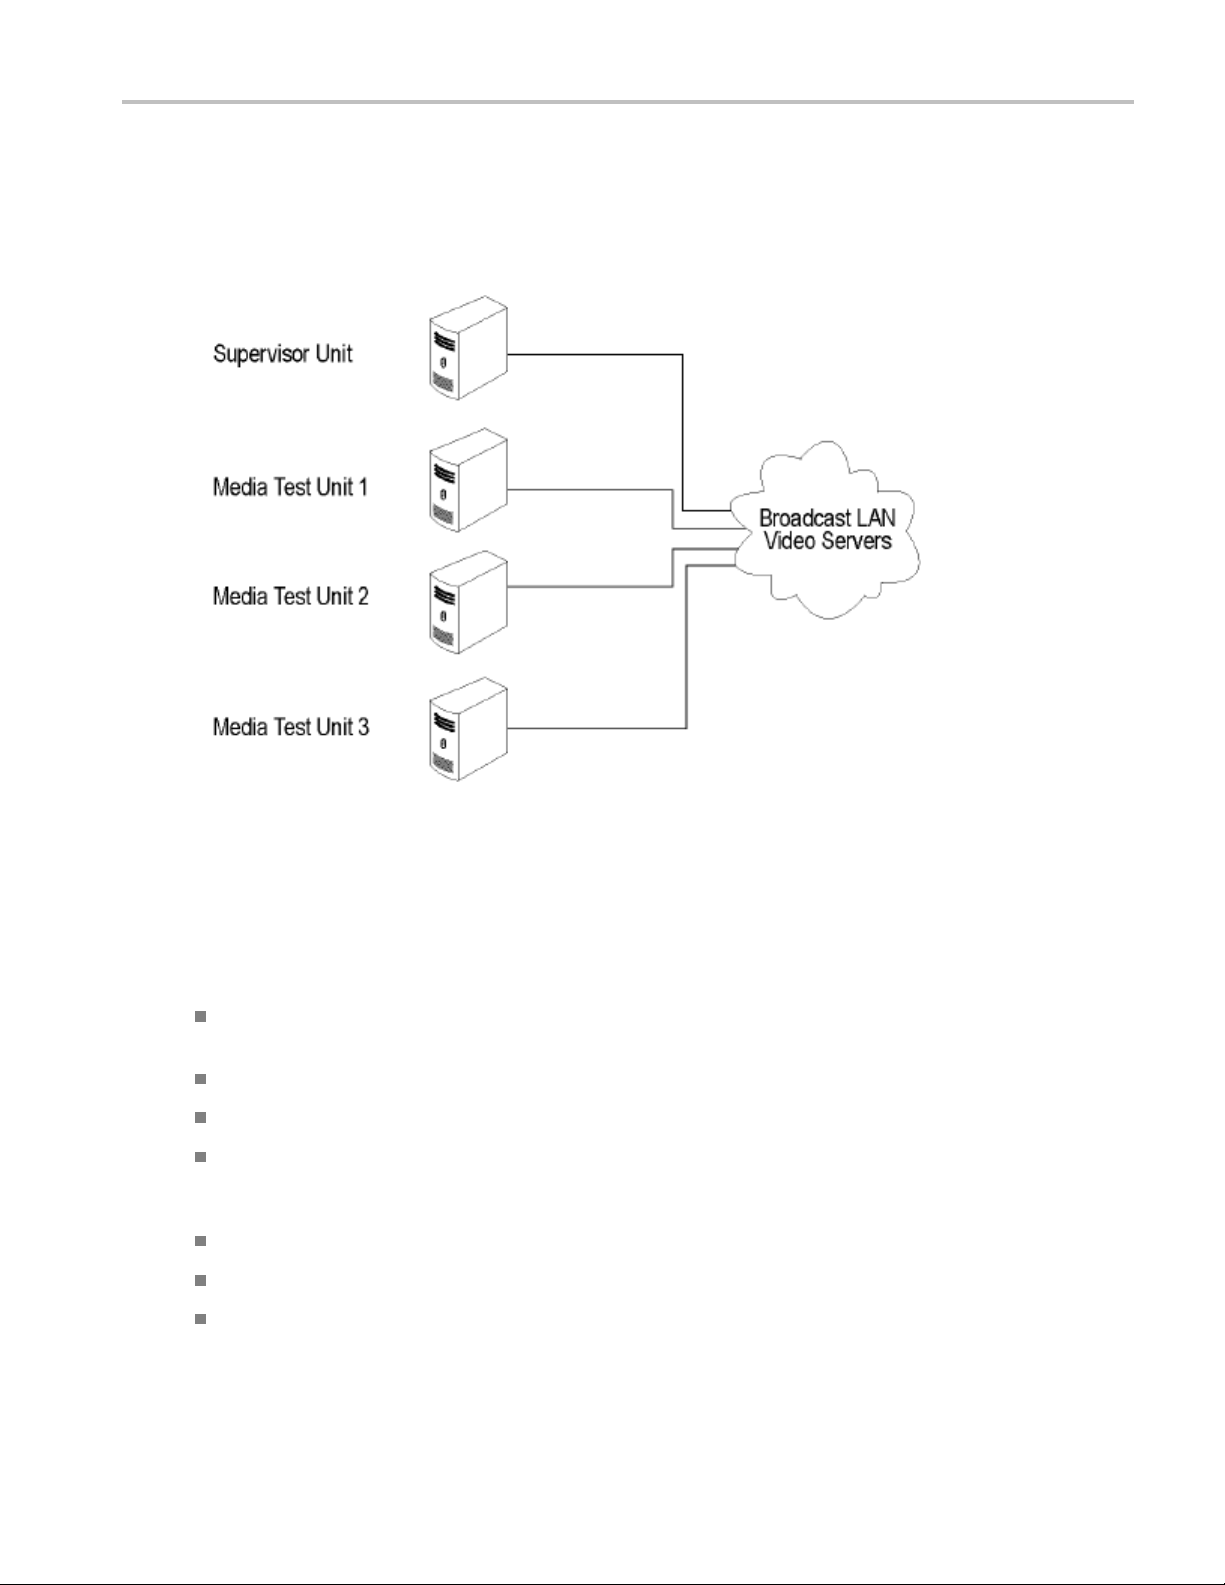
Networking
In a clustered configuration, network interface on all of the units, including the Supervisor, secondary Supervisor (HA cluster
only) and Media Test Units, should be connected to the local area network. This connection is used to access media files, to
service Web clients, and to carry cluster control traffic.
Figure ii: Clustering topology
Software components
Software components include:
A Web-based user interface, which allows users to create and control Jobs, and to view or report the results of these Jobs.
This interface is accessed over the network by using a Web browser. All you need to know is the IP address of your unit.
Media test service, which performs media file verification according to the rules chosen by the user.
A database, which provides robust storage of the system entities, including users, Jobs, and Job results.
An XML-based control and reporting API known as CeriTalk. CeriTalk allows interaction with C erify from within other
lications, making it possible to integrate Cerify with other content management, broadcast automation, and workflow
app
systems.
A Web application server that provides access to the Web interface and runs the core services for the application.
A license server, which controls the types of files that can be verified.
The s ystem tray icon and menu, which provides access to the Cerify Web-based user interface and allows the application
to be started and stopped. The system tray icon is not available when Cerify is installed as a Windows service.
Cerify Quick Start User Manual v
Preface
Cerify as a standalone system
A standalone system is a single machine that combines the functions of a Supervisor unit and a Media Test Unit. The process
that carries out the media file testing is known as the Media Test Client (MTC).
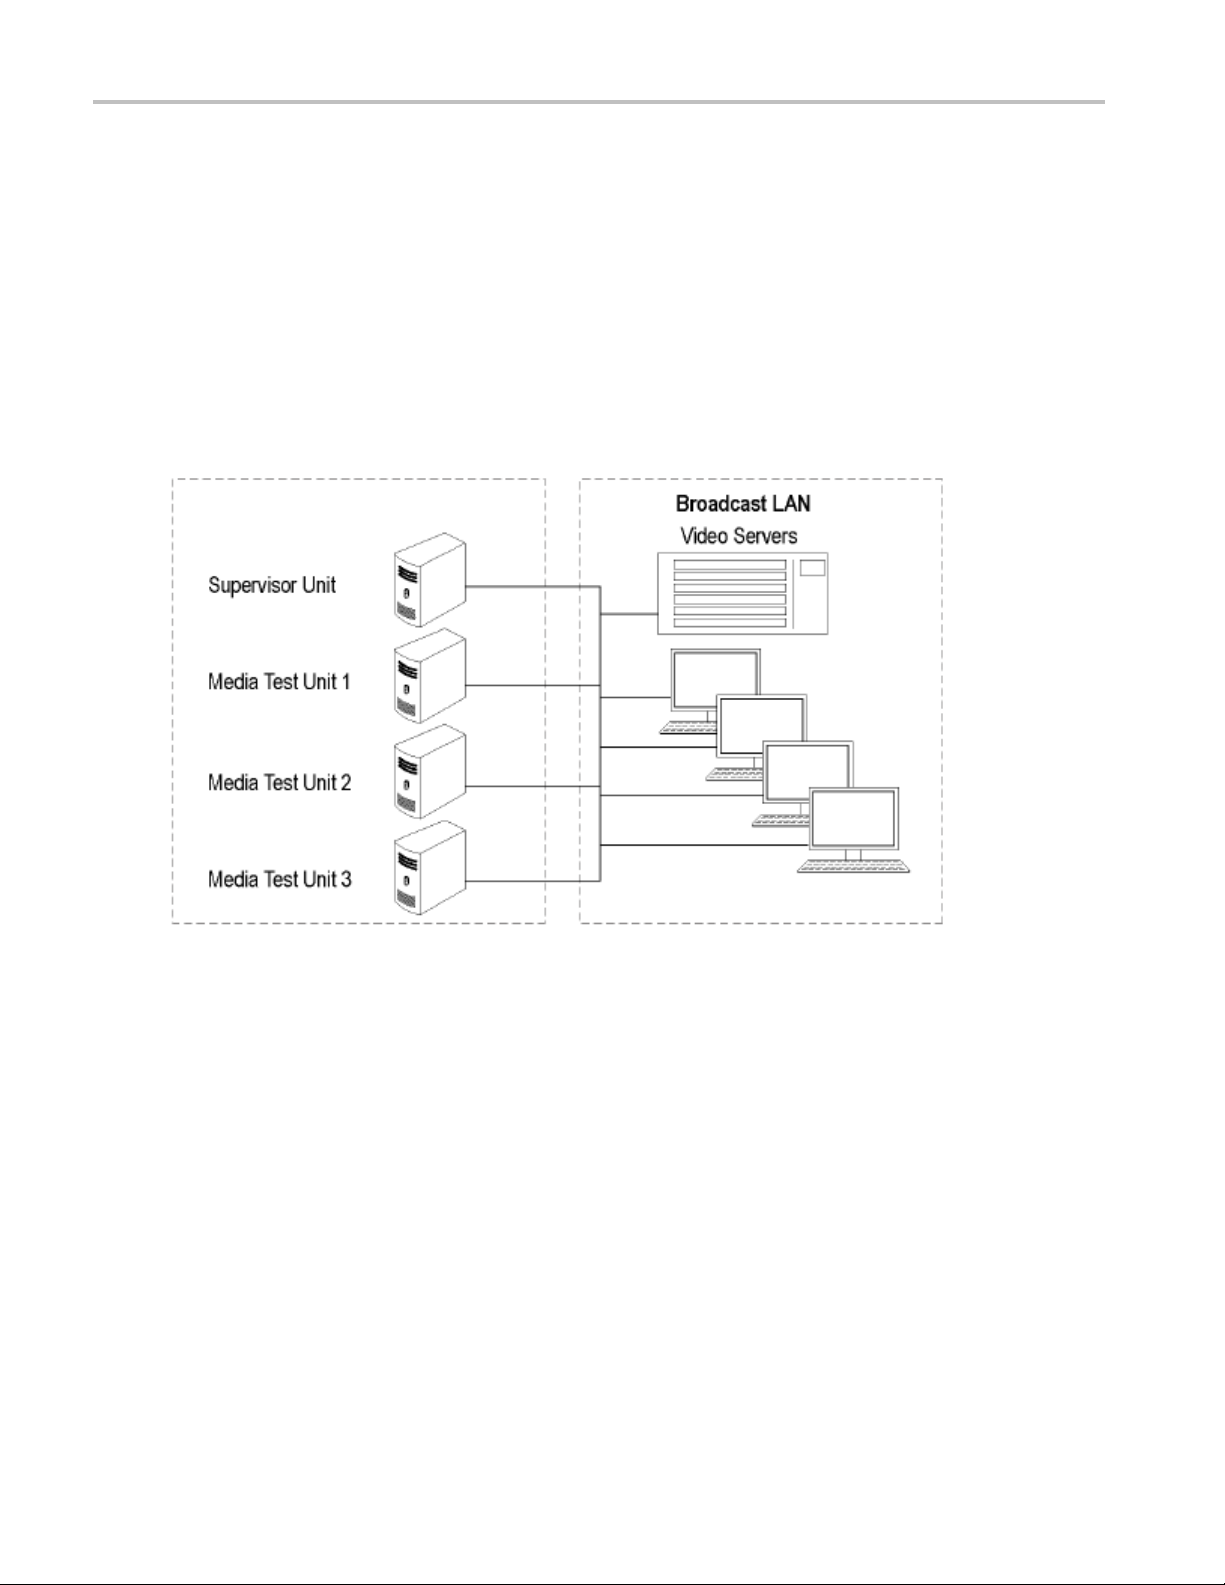
Cerify enterprise cluster
The Supervis
and view Jobs. It is responsible for locating the media files from the network, but delegates actual transfer and processing of
these files to one or more Media Test Units. T he Supervisor unit organizes and stores the resulting outputs.
Each Media Test Unit is responsible for processing the digital media files in a networked cluster. It applies the user-specified
tests, and r
or unit controls the cluster system. It hosts the database and the Web server, allowing multiple users to set up
eports back the results. The Supervisor can also be confi gured to process the files.
Figure iii: Local area networking
vi Cerify Quick Start User Manual

Preface
Cerify high availability enterprise cluster
The Cerify high availability enterprise cluster (also referred to as an HA cluster) is a Cerify cluster enabled with support in the
case of a Supervisor system failure. In an HA cluster, one of the member units of the cluster is configured as a backup to the
Primary Supervisor and is called the Secondary Supervisor.
If Cerify on the Primary Supervisor goes down for any reason (for example, due to a machine crash), the Secondary
Supervisor automatically takes over and manages the cluster. All other units (MTUs) now form a cluster with the Secondary
Supervisor. Once the Primary Supervisor recovers, it will assume the role of the Secondary Supervisor and will be ready to
take over when the current Supervisor goes down.
The Secondary Supervisor is a part of the HA cluster and can also process files like the Primary Supervisor and the MTUs in
the cluster while performing the job of a Secondary Supervisor.
In an HA cluster, it is mandatory for the Primary Supervisor and Secondary Supervisor to have two network interface cards
on the system. One will be used for the cluster function and the other for c ommunication (Ceritalk/Web). Also, it is mandatory
to use static IP addresses for all the units forming the HA cluster.
In an HA cluster, identical dongles must be connected to the Primary Supervisor and Secondary Supervisor. When starting
an HA cluster, the cluster units should be started in the following order:
1. The Primary Supervisor should be started first with one of the two HA dongles installed. At the time the Primary
Supervisor is s tarted, the system with the Secondary Supervisor installed should be up and have the matching HA dongle
installed. Otherwise, the Primary Supervisor will not start.
2. The Secondary Supervisor should be started next.
3. The Media Test Units should be started one by one after both the Primary Supervisor and Secondary Supervisor
are started.
Cerify Quick Start User Manual vii

Preface
System requirements
The system must meet the following hardware and software prerequisites:
Hardware prerequisites
Cerify runs on a variety of PC hardware. Consequently, the choice of hardware is determined by performance and
throughput
in which Cerify is typically used.
Cerify can be installed as either of the following two configurations on a given computer:
requirements for your installation. This section recommends hardware configuration for some scenarios
Single channel. A single channel installation is one that is licensed to test a single media file at a time. Such installations
are normally performed on a PC or a laptop computer and are suitable for situations where a low throughput is sufficient
and perfor
mance is not critical.
Multichan
throughput and performance requirements that are expected from such installations, it is recommended that server class
hardware and operating systems be used in such cases.
In addition to the throughput required, the hardware requirements for such installations also depend heavily on the mode
of operat
section in the Cerify User Manual.
The general guidelines that should be followed when selecting hardware are:
Processor: 3 GHz
Cerify is capable of using as many processor cores as available for improved processing performance. While the
minimum required configuration is 2 cores per channel, for optimum performance, it is recommended to allocate between
4 and 6 p
on-chip memory cache as possible.
NOTE. Cerify is optimized for Intel processor architectures, and therefore it is recommended that you use an Intel based
serve
Memo
It is
and the Cerify database. For optimum performance for 4 channels, the recommended memory therefore is: 4 x 4 GB
(per channel) + 4 GB = 20 GB. When the expected load in Cerify is likely to be largely composed of huge media files,
mor
nel. A typical multichannel installation of Cerify tests 4-8 media files at a time on a single unit. Due to the high
ion that will be used. For more information on the modes of operation of Cerify, refer to the Modes of Operation
rocessor cores per Cerify channel. It is also recommended that for best performance, you c hoose as much
r platform.
ry:
recommended to use a minimum of 4 GB of RAM per channel and an additional 4 GB for the operating system
e memory per channel may be necessary.
viii Cerify Quick Start User Manual

Hard disk drive: 100 GB x 3
For an enterprise installation, we recommend using a RAID on which to place the MS Windows and Cerify installation
(including da
size. For systems that are expected to support high levels of throughput, it is recommended that you have 500 GB of
space on this logical drive.
The amount of additional storage you need depends on the mode of operation that applies to your installation, the
average size
tabase) to achieve fault tolerance in case of disk failure. This logical drive should be at least 100 GB in
of the files you will be processing, and the number of channels you will be running.
Preface
Streaming mo
Duetothemi
dedicated hard disk of 100 G B in size as temporary s torage for Cerify.
Copying mode
The minimum hard disk space provided must be greater than the average file size being processed multiplied by the
number of channels. It is recommended that the temporary storage be RAID-ed for better performance.
Choose the optimal number of hard disks for your installation and the best RAID levels to use. For help in choosing
the optima
Installation for Best Performance” section in the Cerify user manual.
Network interface: 1 Gbit/s
You might use multiple network interfaces to improve available network bandwidth
Integrated RAID controller
A DVD drive (used for installing the software)
A USB port for connecting the license dongle
A license dongle (provided with the product)
Redundant power supply
For more detailed specification of a validated enterprise PC platform, see “Commercial off-the-Shelf Recommendations”
section under Appendix E: Configuring Your Cerify Installation of the Cerify user manual.
de
nimal hard disk utilization when operating in the streaming mode, it is sufficient to provide a single
l number of hard disks for your installation and the best RAID levles to use, see the “Configuring Your Cerify
Suppo
NOTE. Cerify is expected to operate correctly on other variants of Windows as well, but it has been qualified only on
the ones specified above.
Apple ProRes, Generic QuickTime and JPEG 2000 Video decoding functions are not available on Microsoft Windows XP 64
bit and Windows Server 2003 because of known compatibility issues with QuickTime Player.
Cerify Quick Start User Manual ix
rted platforms
Windows 7 - 64 bit
Windows Server 2008 64-bit
Windows Server 2008 R2 64-bit

Preface
Software prerequisites
The computer on which the application is i nstalled will need the following:
To run one of the supported platforms.
To access the s ystem through its Web user interface from another computer on the network, the client computer
must have a Web browser installed.
NOTE. To access the application, the preferred Web browser is Microsoft Internet Explorer (version 7.0 and above). The
application has also been tested with Mozilla Firefox. There may be minor visual differences in the appearance of the user
interface in different Web browsers.
Clustering requirements
Aclusteri
networked cluster contains a single Supervisor and one or more Media Test Units.
The Supervisor unit controls the cluster system. It hosts the database and the Web server, allowing multiple users to set up
and view Jobs. It is responsible for locating the media files from the network, but delegates actual transfer and processing of
these file
canalsobeconfigured to process the media files.
The Media Test Unit is responsible for processing of the digital media files in a cluster. It applies the user-specified tests and
reports results the back to the Supervisor unit.
To set up a cluster, install Media Test Units and Supervisor on the respective nodes.
Cluste
s a network of two or m ore units, w hich enables simultaneous processing of a greater number of files. The
s to one or more Media Test Units. The Supervisor unit organizes and stores the resulting outputs. The Supervisor
r system requirements
Two or more PCs with 64-bit Windows Server 2008 SE OS installed.
Administrator privileges on all the machines on which the Cerify software will be installed.
All of the systems with Cerify installed need to meet the minimum hardware specifications.
All of the clustering PCs, Media Test Units, and Secondary Supervisor unit should reside on the same network as the
Supervisor unit. It is recommended that each cluster unit be configured with Static IP addresses.
All of the PCs in the cluster should be able to route to each other. The Supervisor unit and the Secondary Supervisor
unit (in the case of an HA cluster) each need to be given a network name that is recognized and resolved by all of the
units in the cluster.
You s hould know the fully qualified name of the Supervisor unit and the Secondary Supervisor unit and provide these
when the installer of the other units in the cluster asks for the names of the Supervisor and Secondary Supervisor units.
In the case of a normal cluster (non-HA cluster), if the Supervisor or Media Test Units have more than one network
interfaces, it is better to bridge all the network interfaces together. (See page 6, Configuring a network bridge.)
Synchronization between all the units in cluster must be maintained. For example, use an NTP server to synchronize
the units in a cluster.
All the units in the cluster should be c onfigured to be in the same time zone.
x Cerify Quick Start User Manual

Clustering scenarios which may not work
Clusters may not work in the following scenarios:
If the Supervisor, the Secondary Supervisor (in the case of a n HA cluster), and the Media Test Unit are in different
subnets wherein the switch blocks the multicast or UDP traffic.
If any of Supervisor, Secondary Supervisor, or Media Test Unit systems has Windows firewall running, the Firewall may
need some additional configurations for the cluster to work. Contact your Tektronix representative for more information
on how to set up this configuration.
If a Media Test Unit or Secondary Supervisor cannot resolve Supervisor host name.
In the case o f an HA cluster, if the Supervisor can not resolve the host name of the Secondary Supervisor and vice versa.
If the Supervisor does not have a host name or if the Supervisor has a host name with Japanese or Chinese characters.
If a network has another system with the same host name as the Supervisor (or Secondary Supervisor) system.
If the host name of the Supervisor (or Secondary Supervisor) changes after cluster installation.
If the http port on the Supervisor is configured to a different port number after cluster installation. In this case, the property
cerify.supervisor.httpport in the cerifysystem.properties on the Media Test Units must be changed to the new port number.
If the http port on the Supervisor is configured differently than that of the Secondary Supervisor.
Preface
If the IP addresses of any units in the cluster change after the installation. In this case, the property
cerify.jboss.bindaddress must to be changed to the current IP address.
In the case of a normal (non-HA) cluster, if the Supervisor has multiple network interfaces connected to the same network
and if DNS/WINS are not configured properly, troubleshoot this problem by doing either of the following:
By adding an entry containing the Supervisor host name and the IP address used by Cerify on Supervisor in "hosts"
file, which can be found in
By bridging all the network interfaces together.
Clusters might not work correctly if there is m omentary network outage in which case the clusters have to be restarted.
Related documentation
llowing documents are available:
The fo
y Online Help
Cerif
fy User Manual (Tektronix part number, 077-0352-xx)
Ceri
fy Release N otes (Tektronix part number, 077-0752-xx)
Ceri
fy Third Party Software License Notice D ocument (Tektronix part number, 001-1513-xx)
Ceri
ify Upgrades Read This First (Tektronix part number, 061-4355-xx)
Cer
C:\WINDOWS\system32\drivers\etc in all the Media Test U nits.
Cerify Quick Start User Manual xi

Preface
xii Cerify Quick Start User Manual

Installation
Before installation
Network connection
Before installing the C erify application, your PC must be correctly connected to your local network.
This allows the following:
The Cerify application to test the files that are available on other machines on the network.
Other machines to interact with Cerify automatically (for example, using CeriTalk automation clients, copying of report
files to net
work locations, or using email).
Installation
Multiple u
For the las
Network settings on the PC are configured in the usual manner using Windows. If your machine is not properly configured or
you do not know the name or IP address information, contact your system administrator.
Install
Before installing Cerify, you should be aware of the following information:
It is recommended that the Cerify application be installed on a machine where it can be used as the sole running
application. Cerify makes intensive use of both CPU and memory and will considerably degrade the performance of
other running applications. Similarly, running other applications or services simultaneously will degrade the performance
of Cerify and increase the time taken to process a media file.
Cerify relies on third-party software applications that are packaged and installed with it: JBoss and MySQL. If these
applications are already used on the PC, you should remove them before attempting to install the Cerify.
The Cerify license server relies on Sentinel HASP (formerly Aladdin HASP SRM) drivers, which are installed and
configured along with it. It is recommended t hat other applications that rely on HASP licenses not be used with Cerify on
the same machine.
Cerify uses a number of network services that are local to the host PC. These services can sometimes be blocked by
personal firewall software, in which case an error message will be displayed when Cerify starts. For example, on Cerify
start up, a check is made to verify that communication with HASP can be established. If the Cerify application is unable to
communicate with HASP, an error message, Unable to connect to HASP License Manager (port 1947). Please check
if the HASP License Manager service is running and is not blocked by a firewall is displayed and Cerify is stopped.
sers to connect to the Cerify Web user interface from remote computers.
t two cases, you need to know the IP address or the network name of the machine that Cerify is installed on.
ation considerations
In such situations, configure the firewall to allow the service on the appropriate port, or alternatively disable the firewall
entirely.
An installation log is written to the "%userprofile%\Cerify\CerifyInstallationLogs_<Timestamp>" folder. This log gives
details of selections you made during the install and any errors encountered in case of failure to install.
If you would like multiple users to be able to run the Cerify application on the PC, make sure you select a location that
has read and write permissions for those users as the temporary video folder. A directory located within a user's
private directory is not suitable in this case.
While choosing the location for storing temporary video files during installation, make sure that there is sufficient free
space in this folder to store large video files
Cerify Quick Start User Manual 1

Installation
Cerify uses the computer name (as stored in the environment variable named "COMPUTERNAME") to uniquely identify
some of its netw
ork services. This will not work if non-ASCII characters are used in the computer name.
Cerify will fa
example, the IIS Admin service, Skype or Apache). You can run Cerify once y ou shut down the other port 80 services
running on the system. Alternatively, you can confi gure the Cerify Web port to use a port other than 80.
It is not possible to i nstall a lower version of Cerify when you have a higher version of Cerify already installed. For
example, if y
uninstall Cerify 6.1 and then install Cerify 6.0.
il to run if any other Web services using port 80 are running on the system where the Cerify is installed (for
ou install C erify version 6.1 and then you want to go back to Cerify version 6.0, you will need to first
Software installation
The installation o f the Cerify application takes several minutes; typically between 5 and 15 minutes depending on the
speed of your PC.
CAUTION. To prevent installation problems, be sure to read about the known installation limitations. (See page 1,
Installation considerations.)
To install Cerify, you need to perform the following steps:
1. Run the Cerify Installer.
2. Insert the Cerify dongle(s).
3. Optional: Install Apple QuickTime Player.
Running the Cerify installer
To run the Ceri
Ensure that yo
NOTE. If you try to install the Cerify application without administrator privileges, the following message appears: “The Cerify
application can be installed or uninstalled only by a system administrator. Please log in as administrator and try again”.
Insert the C
the Cerify installer. Follow the on-screen instructions to perform the installation.
NOTE. If you try to install the Cerify application on an unsupported platform (See page ix, Supported platforms.), then the
following
has not been validated on this OS. Do you wish to continue installation?”
The Cerify installation will not continue on a Windows XP platform. The installer displays a message saying Windows XP is
not supported and the installation is aborted.
fy installer, do the following:
u are logged in as a user with administrator privileges.
erify DVD provided by Tektronix. The Cerify Application Browser opens. Click the Install Cerify link to launch
message appears: “This is not a supported Windows operating system. Cerify will probably operate c orrectly but
2 Cerify Q uick Start User Manual

Installation
If the browser does not open automatically, or if the Install Cerify link does not work, navigate to the Exec folder located
on the Cerify So
to perform the installation.
A number of third party software applications are installed during the installation process. Most of these are not visible, but
youwillbenotified as the WinPcap and HASP drivers are installed.
ftware Installation DVD and double-click CerifySetup<version>.exe. Follow the on-screen instructions
NOTE. WinPca
to troubleshoot networking issues with Cerify.
Installati
Cerify can be ins talled in the following ways:
Standalone
Supervisor (for an Enterprise cluster): The Supervisor unit controls the cluster system. It hosts the database and the
Web server, allowing multiple users to s et up and view Jobs. Use this option to install the Supervisor for a normal cluster
(without high availability support).
Media Test Unit (for an Enterprise cluster): Each Media Test Unit is responsib le for processing the digital media files in a
networked cluster. Use this option to install Media Test Units for a normal cluster (without high availability support).
Supervisor (for an HA cluster): Use this option to install the Primary Supervisor for an HA (high availability) cluster.
Secondary Supervisor (for an HA cluster): Use this option to install a Secondary Supervisor for an HA (high availability)
cluster, which will act as the Primary Supervisor if the Primary Supervisor system goes down.
Media Test Unit (for an HA cluster): Use this option to install Media Test Units for an HA (high availability) cluster.
NOTE. During the installation of Cerify, if there a re multiple network interfaces in the system, the installer provides the list of
network interfaces and asks the user to select a network interface to be used by C erify.
p is not used in the normal operation of the Cerify application. It is used when you collect support diagnostics
on options
While installing the Supervisor and the Secondary Supervisor (in the case of an HA cluster), the installer also provides the
option to select the network interface for communication (i.e. the interface used for communicating with Cerify via either
Ceritalk or the Web user interface).
The installer also provides an option to install Cerify as a service. This option is s elected by default. If you want to install
Cerify in application mode, this option needs to be deselected.
Cerify Quick Start User Manual 3

Installation
Installing Cerify as a Supervisor. To install Cerify as a Supervisor, follow the steps described in Running the C erify
installer.(Se
e page 2.) During the installation, a dialog box appears with the list of installation options.
To continue wi
Cluster” in the installation options dialog box.
To install the Supervisor for an HA cluster, select Supervisor under the option “High Availability Enterprise Cluster” in
the installation options dialog box.
During the installation, a dialog box appears where you must:
Enable or disable file-processing option on the Supervisor.
Enter the number of channels if you have selected the file processing option on the Supervisor.
Choose the network interface to be used by Cerify.
Choose the network interface to be used for all Cerify communication. This option is a vailable only while installing
the Superv
Enter the h
HA cluster.
Enter the host names for all the Media Test Units if you want to install the cluster based on unicast communication since
most of the switches drop multicast packets.
At the end of the installation, the installer prompts you with an option to load the demo content. If you choose this option,
Cerify wi
th the Supervisor installation for a normal Enterprise cluster, select Supervisor under the option “Enterprise
isor for an HA cluster.
ost name of the Secondary Supervisor. This option is available only while installing the Supervisor for an
ll be loaded with a demo database, which will contain some sample jobs with results.
Installing Cerify as a Secondary Supervisor. Follow the steps described in Running the Cerify installer (See
page 2.) to install Cerify as a Secondary Supervisor for an HA cluster. During the installation, a dialog box appears with the
list of installation options.
To continue with the Secondary Supervisor installation, select Secondary Supervisor under the option “High Availability
Enterprise Cluster” in the installation options dialog box.
During the installation, a dialog box appears where you must:
Enable or disable the file-processing option on the Secondary Supervisor.
Enter the number of channels if you have selected the fi le processing option on the Secondary Supervisor.
Choose the network interface to be used by Cerify.
Choose the network interface to be used for all Cerify communication.
Enter the host name of the Supervisor.
Enter the host names for all of the Media Test Units if you want to install the HA cluster based on unicast communication
since most of the switches drop multicast packets.
4 Cerify Q uick Start User Manual

Installing Cerify as a Media Test Unit. Follow the steps described in Running the Cerify installer sectiontoinstall
Cerify as an Med
ia Test Unit.(See page 2.) During the installation, a dialog box appears with the list of installation options.
Installation
To continue wi
Cluster” option in the installation options dialog box.
To continue with the Media Test Unit installation for an HA cluster, select Media Test Unit under the “High Availability
Enterprise Cluster” option in the installation options dialog box.
During the installation, a dialog box appears where you must:
Enter Host name of the Supervisor.
Enter the host name of the Secondary S upervisor. This option is a vailable only while installing Media Test Unit for an
HA cluster.
Choose the n
Enter the n
th the Media Test Unit installation for a normal Enterprise cluster, select Media Test Unit under the “Enterprise
etwork interface to be used by Cerify.
umber of channels.
Configuring a non-HA cluster. To con figure a non-HA cluster, you must:
Install Cerify as a Supervisor on the system which must be configured as supervisor of the cluster.
Install Cerify as a Media Test Unit on one or more systems.
When installing Cerify as a Media Test Unit, the installer prompts you to enter the Supervisor host name. The installer checks
whether the Media Test Unit can reach the Supervisor system using the host name entered. If the Supervisor system cannot
be reached, a message appears whether you still want to continue the installation.
You can also configure multiple clusters on the same network. To configure multiple clusters on the same network, you need
to install multiple Supervisors. During a Media Test Unit installation, in the Cerify System Settings dialog box, you must
enter the respective Supervisor host name.
NOTE. To co n figure a cluster, the versions of Cerify on the Supervisor and the Media Test Unit should be the same. Once the
installation is complete, Cerify will be started on both the Supervisor and the Media Test Unit. Access Supervisor using Cerify
Web UI and navigate to the Admin page, click the Media Test Units link to the page containing the list of Media Test Units.
Cerify Quick Start User Manual 5

Installation
Configuring an HA Cluster. To con figure an HA (high availability) cluster, you must:
Install Cerify as a Supervisor by choosing Supervisor under the “High Availability Enterprise Cluster” option on the
system that is
to be configured as the Primary Supervisor of the cluster.
Install Cerif
Cluster” option on the system that is to be configured as the Secondary Supervisor of the cluster.
Install Cerify as a Media Test Unit by choosing Media Test Unit under the “High Availability Enterprise Cluster” option
on one or more systems.
When installing Cerify as a Media Test Unit for an HA cluster, the installer prompts you to enter the host names of the
Supervisor
and Secondary Supervisor systems using the host names that you entered. If either the Supervisor or Secondary Supervisor
system cannot be reached, a message appears asking whether you still want to continue the installation.
NOTE. To c o
Media Test Units should be the same. Once the installation is complete, Cerify w ill be started on the Supervisor, Secondary
Supervisor, and the Media Test Units. Access the Supervisor using the Cerify Web UI and navigate to the Admin page.
Click the M
y as a Secondary Supervisor by choosing Secondary Supervisor under the “High Availability Enterprise
and Secondary Supervisor systems. The installer checks whether the M edia Test Unit can reach the Supervisor
nfigure an HA c luster, the version o f Cerify that is installed on the Supervisor, Secondary Supervisor, and the
edia Test Units link to the page containing the list of Media Test Units.
Configuring a network bridge
If the system has multiple network adapters, it is recommend that you bridge all the network adapters.
1. From the Start menu, select Control Panel > Network Connections.
2. Select two network adapters at the same time, right-click and select Bridge Connections. Windows will build up a
network bridge automatically. When the bridge is built successfully, the two adapters’ IP address disappears.
3. Select the Network Bridge and configure a new IP address in the Properties menu for LAN connections.
NOTE. To co nfigure a cluster, the versions of the supervisor and the Media Test Unit should be the same. Once the
installation is complete, Cerify will be started on both Supervisor and Media Test Unit. You can access Supervisor using
Cerify Web UI and navigate to the Admin page on Web UI, Click the Media Test Unit Details link to the page containing
the list of Media Test Units.
6 Cerify Q uick Start User Manual

Installation
Installation folders
During the installation process, s elect the following locations:
Installation Location: The folder where the application is installed.
Temporary Storage Location: Before processing media files from an external server, Cerify may need to copy the
remote files to the PC on which the Cerify application is installed. This folder is used as the location to store such
temporary copies. Cerify copies the file only when operating in copy mode and accesses the file using the ftp://, smb://,
or gvg:// protocols. See Modes of Operation in Appendix E of the Cerify User Manual for help determining the mode
that applies to your installation.
NOTE. There should be sufficient free space in the temp folder to store large video files. The location for this temp folder
can be on any drive on the computer.
If you would like multiple users to be able to run the Cerify application on the PC, make sure to select a location that has
read and write permissions for those users. A temporary directory located within a users private directory is not suitable
in this case.
Inserting the Cerify dongle
e Cerify license dongle s upplied with the system in any of the available U SB ports of your computer. In the case of
Insert th
normal Enterprise cluster, the dongle should be inserted in the USB port of the Supervisor system. In the case of an HA
cluster, you will be supplied with two identical dongles. The two dongles should be inserted in the USB port of both the
sor and Secondary Supervisor systems.
Supervi
NOTE. Do not insert the dongle before the Cerify installation. Insert the dongle only when the installer prompts you.
NOTE. If Cerify reports license failures after the dongle has been installed, it is possible that firewall software is interfering
e license service. Please ensure that port 1947 is open in any firewall software that is in use. See Licensing limitations
with th
for a list of other possible causes of license failures. (See page 8.)
The number of files that can be simultaneously processed by C er ify will be the number of allowed channels specified in the
le. If a time-expiry dongle is connected, the default number of files processed is 1.
dong
times, you will need to change the number of files that can be simultaneously processed by Cerify. You can change
Some
the number of parallel processing channel setting by changing the value of the property “cerif y.processorsperbox” in the
“cerifysystem.properties” file located at
The following lists the different situations for standalone installation:
When Cerify is started with no dongle connected, then (irrespective of whether a value has been specified in the
rify.processorsperbox” property or not) the number of allowed channels is zero.
“ce
n Cerify is started with a perpetually licensed dongle and if the “cerify.processorsperbox” property is not set then the
Whe
number of allowed channels is controlled by the dongle.
When Cerify is started with any valid dongle and a valid number of channels is specified for the “cerify.processorsperbox”
property, then this value would be used if it is less than or equal to the number of channels controlled by the dongle.
the value is greater than the number of channels controlled by the dongle then the number of channels controlled
If
by the dongle takes precedence.
<Installation Directory>/Cerify/JBoss/server/all/conf.
Cerify Quick Start User Manual 7

Installation
When Cerify is started with any valid dongle and the number of channels specified for the “cerify.processorsperbox”
property is -1,
then the number of allowed channels is controlled by the dongle.
When Cerify is
number of allowed channels is s et to 1.
started with a time-expired dongle and if the “cerify.processorsperbox” property is not set, then the
Installing Apple QuickTime Player
To process Apple ProRes files using the Generic QuickTime Video template or to process files using the
JPEG 2000 Video templates, you have to install QuickTime Player. Download QuickTime player from the link:
www.apple.com/quicktime/download/.
NOTE. If you already have QuickTime Player installed, make sure that it is version 7.5.5 or later.
Licensing limitations
The follo
wing limitations may affect the ability to license Cerify:
The Cerif
(as used with Cerify 5.x and earlier) without updating the dongle firmware. G reen HASP Max dongles (as used with
CerifyLite) are no longer supported.
When multiple HASP license servers are available on the network, there is a chance that the Cerify unit will try to retrieve
its lice
It is pos
might be desirable if the Cerify hardware does not have a USB port - e.g. blade hardware. Contact your Tektronix
representative for m ore information on how to do this.
y 6.0 or later software requires the use of a HASP NetTime dongle. It is not possible to use a HASP Net dongle
nse from a wrong server and fail to obtain the required features, resulting in licensing errors.
sible to insert the HASP license dongle into a different machine from that on which Cerify is installed. This
It is possible for the license server to retain handles to license features that were being used by a Cerify machine that
denly lost power or otherwise failed. As a result of this the Cerify application will not be able to obtain a license
has sud
until the license server is restarted. This will only be a problem when the license dongle is not on the Cerify machine, so
in this configuration we recommend that the license server machine is restarted when the C erify application is restarted.
If Cerify reports license failures after the dongle has been installed, it is possible that firewall software is interfering with
cense service. P lease ensure that port 1947 is open in any firewall software that is in use.
the li
8 Cerify Q uick Start User Manual

Software uninstallation
Before uninstallation, ensure that you have administrator privileges. If you try to uninstall Cerify without administrator
privileges, the uninstallation process will be aborted.
Cerify can be uninstalled in two ways:
Through Start > Control Panel > A dd or R em ove Programs.
By rerunning the CerifySetup<version>.exe that you used to install the current version and following the on-screen
instructions.
NOTE. If the Cerify installer version is higher than the currently installed version, the installation will be upgraded to
the newer version.
If the Cerify installer version is lower than the current installed version, the installer will abort without taking any action.
NOTE. The C erify installation process places the WinPCap and HASP utilities in the Add or Remove Programs list. The
uninstallation process does not remove WinPCap in case it is being used by other programs or you want to continue to use
it for other purposes. The HASP drivers are uninstalled. If you want to uninstall WinP Cap, this can be done in the usual
way from the Add or Rem ove Programs list.
Installation
NOTE. If you select the Backup database option during uninstallation, the current database will be backed up to
uments and Settings\<username>\Cerify\CerifyBackup_< version>_<timestamp>
the option to change the directory where you want to back up the database. All relevant configuration files w ill be backed up
to
C:\Documents and Settings\<username>\Cerify\CerifyCo nfig_<version>_<timestamp>
The "Backup database" option will not be available if you are uninstalling the Media Test Unit, as the Media Test Unit
does not have its own database.
NOTE. If Cerify 6.0 i s uninstalled using Add or Remove Programs option or using Cerify 6.0 installer, there will be no
“backup” option. The Cerify database and configuration files will always be backed up at the location
and Settings\<username>\Cerify\CerifyBackup
the directory name “CerifyBackup” to “CerifyBackup_6.0”.
Uninstalling a cluster
To uninstall a cluster, do the following:
Uninstall Cerify on the Supervisor.
Uninstall Cerify on the Secondary Supervisor (in the case of an HA cluster).
Uninstall Cerify on all of the Media Test Units.
Software reinstallation
C:\Doc-
. You are given
.
C:\Documents
. When Cerify 7.x is installed, the installer will change
To reinstall Cerify, you must uninstall Cerify, and then rerun the installer. Rerunning the installer that was used to install the
current version of Cerify will cause Cerify to be uninstalled. It does not repair the existing installation.
Cerify Quick Start User Manual 9

Installation
Software upgrade
To upgrade your existing version of Cerify to the latest version, run the setup file for the latest version of Cerify and fol low
the on-screen instructions.
NOTE. Dongles used with previous versions of Cerify need to be reprogrammed to be used w ith version 7.2 or above. If an
existing version of Cerify is being upgraded to version 7.2 or above, then it is recommended that users send in their c2v files
to Tektronix to obtain a new corresponding v2c file before installing the upgrade. This will allow users to program the dongle
with the new v2c file before using Cerify version 7.2 or above.
If you want to upgrade Cerify in an HA cluster installation, the HA dongles on the Supervisor and Secondary Supervisor
systems both need to be upgraded.
It is possible to upgrade any type of Cerify installation to any other Cerify installation type (for example, upgrading a Media
Test Unit to a Supervisor).
If you would like to back up the current database while you are upgrading from Supervisor, Secondary
Supervisor, or Standalone Cerify, choose the Backup database option during the upgrade process.
The current database is backed up to the location
name>\Cerify\CerifyConfig_<version>_<timestamp>
a different folder for backing up the files.
C:\Documents and Settings\<User
by default. You may change this location by choosing
The upgrade process also backs up relevant configuration files from the current installation. These files are backed up to
C:\Documents and Settings\<User name>\Cerify\CerifyBackUp_<version>_<ti mestamp>.
When you are upgrading to a Supervisor or standalone Cerify, the database is upgraded automatically after the installation.
If the database upgrade fails, the installer will install Cerify with a clean database and inform you about the failure. The
Backup database option will not be available while upgrading from Media Test Unit as they do not have their own database
and process the files from the Supervisor's database.
Upgrading a cluster
t the installer CD and follow the on-screen instructions. To upgrade a cluster, do the following:
Inser
de Cerify on the Supervisor by running the latest version of installer and choosing Supervisor as installer type.
Upgra
You can upgrade to either Supervisor for a normal Enterprise cluster or to Supervisor for an HA cluster by choosing
the appropriate options.
Upgrade Cerify on the Secondary S upervisor by running the latest version of installer and choosing Secondary
rvisor as the installer type.
Supe
rade Cerify on all of the Media Test Units by running the latest version of installer and choosing Media Test Unit
Upg
as the installer type. You can upgrade to either Media Test U nit for a normal Enterprise cluster or to Media Test Unit
for an H A cluster by choosing the appropriate options.
Refer to the Software upgrade section for instructions on upgrading. (See page 10.)
10 Cerify Quick Start User Manual

Installation
Reverting to the previous version of Cerify
In some circumstances, such as a failed software upgrade, you may wish to revert to an older version of Cerify. To do this,
follow these steps:
NOTE. Before proceeding, you should have a database backup and a copy of configuration files from the version you
would like to revert to.
1. Uninstall the current version of Cerify. While uninstalling, back up the database by selecting the Backup database option.
2. Install the older version of Cerify.
3. Restore the database of older version using the CerifyDatabase Utility tool. For help on how to use this tool, re
“Database Backup/Restore U tility” section in the user manual.
Network settings
NOTE. The Cerify software does no particular configuration of any network interfaces - IP address, netmask, DNS, Net
BIOS, etc. These should be set using the usual Windows methods.
Two network interfaces
In most circumstances, the PC on which Cerify is installed requires only one network interface. There are three scenarios
where it is necessary to have two network interfaces:
When the network on which the Web clients will access the Web user interface needs to be physically separate from the
network that stores the media file assets.
When the Cerify system is to access media filesfromaGrassValleyProfile or K2 server. In this case, the additional
network interface should be connected to the control network that runs the Grass Valley AMP service. This enables
Cerify to list the contents available on the Grass Valley servers. The first network interface on the PC should continue to
be connected to the video server network as follows:
On a standalone Pro file XP, to either the Media Ethernet card, if present, or the Ethernet interface of a Universal
Interface Module (UIM), if present
fer to the
On a SAN-based Profile X P network, to the Gigabit Media network provided by a U niversal Interface Module, if
present
On a SAN-based K 2 network or a standalone K2 Media C lient, to the Media/FTP network
For a K2 network, it is possible to use direct FTP connectivity, in the same fashion as other video servers. In this case,
the AMP control network does not need to be accessed and no additional network interface is needed.
When installing a Super
network is used for communication to Cerify via C eritalk or Web user interface.
visor or Secondary Supervisor for an HA (high a vailability) cluster. In this case, the second
Configuring the Cerify installation
See Appendix E: Configuring Your Cerify Installation in the Cerify User Manual for information about how to configure your
Cerify installation for the best performance.
Cerify Quick Start User Manual 11

Operation
Operation
Getting acquainted
User interface
The user interface consists of a structured collection of pages accessed using a Web browser. The following figure shows
the elements that are common to most of the pages in the Cerify Web user interface. The Jobs Monitor page will not contain
any jobs whe
the tutorial. The elements of the Job Monitor p age are shown and described in the following figure and table.
n you login to Cerify for the first time after the installation, but will look similar to the following after you perform
Item Descri
1. Navigation bar
2. Auto-
3. Tables
4. Footer
5. Archive/Restore
6. Ac
7. Trail widget
8. Icon
Refresh and
login details link
ntrol
Co
tive/Archive
View Control
The na
Click
the navigation bar at the top-right section of the screen, show who you are logged in as and
provide a link enabling you to log out. T he license status of Cerify is also reported in this section.
The system displays a co llec tion of entities in the form of tables. Several types of entities can be
ted, edited, and displayed, such as Jobs, Profiles, Templates, MediaSets, MediaLocations,
crea
and Users. The role of these entities and the relationship between them is explained later in this
manual. (See page 16, Overview.)
The footer displays a copyright notice and version information.
The Archive/Restore control allows you to archive and restore entities.
e Active/Archive view control allows you to choose which entities of a particular type to view.
Th
NOTE. When an entity is archived, it is not removed from the database, but it becomes inactive.
You cannot construct new entities from inactive entities.
The trail widget allows you to see your position in the hierarchy and navigate from this position.
The following table lists the icons used in the interface. (See Table 1.)
ption
vigation bar provides a quick route to the top level of any of the pages.
Auto-Refresh to On to view update progress and job status. The login details, located below
12 Cerify Quick Start User Manual

Table 1: U ser interface icons
Icon Description
Collapse this section
Expand this section
Operation
Copy this ite
Remove this item
Edit this item
Directory
Fileinadirectory
Open a context-sensitive help topic
Status unknown
Failed wi
Failed with an error status
Failed with a warning status
Succeed
Item created through the Cerify Web user interface
m
th a fatal error status
ed with no errors or warnings
ated through CeriTalk API
Item cre
Sort items in this column in descending order
Sort items in this column in ascending order
Click this button to trigger the selected action
Adds another set of values to the rules
Removes any set of values from the rule
Accessing the online help
You can access help topics by clicking Help on the N avigation bar or clicking the icon.
Cerify Quick Start User Manual 13

Operation
Concepts
Users
Before using the system, you must log in with your user name and password credentials. These credentials are assigned by
a user who has
administrator access.
By default, t
should change the password after you log in for the first time. Administrator access rights allow you to modify system
properties, and in particular to create and modify MediaLocations and Users.
MediaLocat
A MediaLocation is a local or network file storage location from which the system can access media files. Typically, this is a
directory on the hard drive or a video server that provides FTP or Windows file share access. To create a MediaLocation, you
must supply its URL and the user name and password required to access this URL. In addition, you must supply a unique
name to be used within the system to identify the MediaLocation.
Only users with administrator access are able to create or modify MediaLocations.
he system is installed with a single predefined user whose name and password are both set to admin.You
ions
MediaSets
A MediaS
A MediaS
not a DropBox is simply a static collection of media files manually selected from one or more of the MediaLocations.
If a Job is associated with a DropBox, every file that appears in the DropBox over time will be processed.
et is a collection of media files that you want to check.
et can be a DropBox. A DropBox is a directory that is continually monitored for new media files. A MediaSet that is
Templates
To check a media file, you must define which checks should be applied when the file is tested. A Template is a collection of
such checks chosen to perform specific tests required by you. The four types of Templates are:
Container Templates, which apply to the transport/container layer of a media file
Video Templates, which apply to the digital video content of a media file
Audio Templates, which apply to the digital audio c ontent of a media file
Action Templates, which specify actions to be performed as a result of processing a media file
You can create multiple Templates of the same type for different purposes. For example, you might create a Movies
Template, which contains a set of rules appropriate for HD MPEG-2 content, and an on-line content Template, which contains
a set of rules appropriate for lower resolution H.264/AVC content.
NOTE. Some example templates are preloaded onto C erify. These templates can be used, copied, edited, and archived in
the same way as those created by users. The XML files containing these templates can be found in
directory>/Example Templates
.
<Installation
14 Cerify Quick Start User Manual

Operation
Profiles
AProfile gathers together a container, video, audio, and action Template, providing a complete set of checks that can be
applied when you want to test one or more media files. Any of the component Templates can be omitted, depending on
your requirements. For example, it makes no sense to apply any container or audio checks to a media file that consists
solely of a video elementary stream.
Jobs
A Job is the term given to an individual testing process that ca n be run by the system. Each Job can process multiple media
files or a sin
gle media file, depending on your requirement. The set of files processed by a Job is defined by its MediaSet.
By creating
addition, you must specify the name and priority of the Job. The system can queue multiple Jobs to be run, whereby each
Job is scheduled to be processed according to its priority.
The system processes one media file at a time.
How long it takes to process a Job depends upon a number of factors:
a Job, you request the checks defined by a particular Profile be applied to the files in a particular MediaSet. In
The resolution of the video being processed
The video standard concerned (some standards, such as H .264/AVC, take more time to process)
The number of tests selected (performing all the video quality checks can be processor intensive, because it requires the
s of every pixel in each frame of video)
analysi
The bit r
Hardwar
ate
e performance of the PC on which Cerify is installed
Alerts
Alerts announce any checks that fail as a Job executes. Each alert indicates the severity of the failure, as well as w here and
why the check failed. The system gathers alerts associated with a particular Job, so that you can access the results from the
top level and easily navigate to the details, such as which individual frames have Alerts.
The system organizes and summarizes any alerts raised against a particular Job, so that, at the top level, a single processing
result status can be assigned to the Job. To view more detailed information, you can drill down through the interface,
revealing (for example) which individual frames have raised alerts.
Reports
Reports provide you with a way to query the system database and obtain information in a predefined format. A Job report
sents the results of a particular Job in tabular form.
pre
Cerify Quick Start User Manual 15

Operation
Procedures
Overview
The following figure shows the dependencies between the entities that make up a Job. For example, a MediaLocation must
exist to create a MediaSet and a MediaSet must exist to create a Job.
NOTE. AProfil
e requires at least one type of Template, not necessarily all four types.
How to start the Cerify application
Perform the following procedure to start the Cerify application.
1. Click the Start Cerify icon on the desktop
to Launch the Cerify application.
2. Enter your Username and the Password
in the login page. The default Username
and Password are admin.
3. Once you are logged in, you can see the
Jobs Monitor page.
16 Cerify Quick Start User Manual

How to s tart a cluster
Perform the following steps to start a cluster.
Operation
1. Start Cerify o
2. Start Cerify o
3. Enter the URL
<Cerifyhost name>
Web browser where Cerify host name is
Supervisor'
NOTE. By selecting the Media Test Units
link on the Admin page, it is possible to view
the status o
in a cluster. Since a standalone system does
not connect to any Media Test Units, this link
is unavail
system. After clicking the link, you will be
taken to the Media Test Units page which
the Media Test Units that are in the
lists all
cluster.
How to cr
You can create and modify MediaLocations only if you have administrator access to Cerify.
1. Click the Admin button on the Navigation
bar to access the Admin page.
n Supervisor unit first.
n Media Test Units.
http://
into your
s host name.
f the Media Test Units connected
able in the Web UI of a standalone
eate a MediaLocation
2. In the Cerify Administration page,
click the Go button to create a new
MediaLocation.
Cerify Quick Start User Manual 17

Operation
3. In the New MediaLocation page, fi ll in
the fields as follows:
MediaLocation Name:Cerify
example conte
nt
URL: c:\Prog
Files\Tektronix\
Cerify\cerify_demo
NOTE. The UR
ram
L used above assumes that
you have installed Cerify in the location,
C:\Program Files\Tektronix\Cerify.
NOTE. Leav
etheUsername and Password
fields blank.
4. Click Cre
ate.
How to create a MediaSet
Once you
1. Click the MediaSets button on the
2. In the MediaSets page, click the New
have created a MediaLocation, you can create a MediaSet that collects the files at this location.
tion bar.
Naviga
MediaSet button to create a new
MediaSet.
3. In the New MediaSet page, do the
following:
Fill in the Name field.
Set the DropBox field to no.
4. Click Create.
18 Cerify Quick Start User Manual

5. In the Edit MediaSet page, you can do
the following:
Add files to the MediaSet by browsing
through the ne
twork or by entering
the full path of the file in the File name
text field at the bottom of the page
(the path mus
the file, for example,
Files\Tektronix\
Cerify\cer
airport_interview.ts
t include the full URL of
c:\Program
ify_demo\news\
).
NOTE. Only files that exist within
folders/s
ub-folders of an existing
MediaLocation can be added to a
MediaSet
View the contents of a directory by
double-clicking the directory icon.
Close the directory and go up a level,
open the d
rop-down menu control
at the top right of the file browser
to provide a selection of recent
ries.
directo
Operation
Select a
(
) icon.
file by double-clicking the file
Cerify Quick Start User Manual 19

Operation
How to create a Template
To test the files in the MediaSet that you have created, you need to decide the checks to apply. You can apply checks to the
container or wrapper layer, the video stream, and the audio stream, using container, video, and audio Templates, respectively.
1. Click the Te mplates buttononthe
Navigation bar.
2. In the Templates page, scroll down to
view the Vide
click the New Video Template button.
o Templates section and
3. In the Select Template Type page, do the
following:
Select the type of Template from
the Please select a type for the
template drop-down menu.
Click Select.
NOTE. The Template type you choose
depends on the type of video content you
want to check. This type will be the Video
Standard used when the video was encoded,
for example, MPEG-2 or H.263.
20 Cerify Quick Start User Manual

Operation
4. In the New Templ
ate page, enter a name
for the Template.
5. Configure the checks to be applied by
selecting the check boxes and entering
values into the text fields.
6. Use the buttons to configure
olution rule w ith multiple sets of
the Res
valid values. For a full explanation of the
checks performed by each rule, click the
ext to each rule name.
icon n
Cerify Quick Start User Manual 21

Operation
7. Click the Create button at the bottom of the page to create the new Video Template.
NOTE. The new T
Create, the system will check that the fields you have filled contain valid data, and prompt you to fix any problems. If there
are no problems, the new Template will be created and stored in the database.
When this MPEG-2 Video Template is used to check a video stream, it will check the following:
The video is MPEG -2 encoded.
The video is encoded using MPEG-2 Main Profile, Main Level.
The video bit stream syntax conforms with the MPE G-2 Standard, but any alerts relating to Buffer analysis and alert
number 22209 are suppressed.
A maximum of 500 alerts are displayed.
Each alert type is displayed a maximum of 20 times.
The video resolution is 720 by 480 pixels or 1280 by 1080 pixels.
You can also create an Audio Template and a Container Template similarly.
To create an Audio Template, select New Au dio Template and select MPEG-1 / MPEG-2 Audio as the template type. For
the Cont
NOTE. In this example, you will not create an Action Template. If you want to check a different video format, you should
select a different codec type in step 3 of the Creating a Template procedure.
ainer Template, select MPEG-2 Transport Stream as the Template type.
emplate will not be saved until you click the Create button at the bottom of the page. When you click
22 Cerify Quick Start User Manual

How to create a Profile
To use your new Video Template in a Job, you must include it in a Profile.
Operation
1. Click the Profi
navigation bar.
2. In the Pro fi les page, click the New
Profile button.
3. In the New Profile page, enter a name
and a desc
4. Select th
from the drop-down menu.
You can select multiple audio templates,
if requi
5. Click Cr
les button on the
ription for the Profile.
e Templates you have created
red.
eate to create the Pro file.
How to create a Job
Once you create a M ediaSet and a Profile, you can create a Job.
1. Click the Jobs button on the navigation
bar.
2. Click the New Job button.
Cerify Quick Start User Manual 23

Operation
3. In the New Job page, do the following:
Enter a name for the Job.
Set the Job Priority to Low.
4. Select the Profile and MediaSet that you
have created.
5. Click Create to create the job.
How to insp e
1. Click the Jobs button on the Navigation
bar.
2. In the Job Monitor page, click the
AutoRefr
3. In the Job
results. The
Job has succeeded.
ct Job results
esh button in the page header.
s Monitor page, view the Job
icon indicates that the
How to generate a Report
1. Click the Reports buttononthe
Navigation bar.
2. In the Reports page, enter the name of
ob that you created in the Enter
the j
Jobname field.
3. Click the Generate button to generate a
report of your Job.
24 Cerify Quick Start User Manual

How to archive the Job
Operation
1. Click Jobs on t
2. In the Job Monitor page, select the Job
you want to archive by selecting the
check box in t
Monitor table.
3. Ensure that the action drop-down menu
under the table shows Archive.
4. Click Go to archive the Job.
5. To view archived Jobs, set Show Jobs
to Archived.
he Navigator bar.
he left column of the Jobs
Cerify Quick Start User Manual 25
 Loading...