

Page 1

AWG70001A and AWG70002A
Arbitrary Waveform Generators
Installation and Safety Instructions
*P071311004*
071-3110-04
Page 2

Page 3

AWG70001A and AWG70002A
Arbitrary Waveform Generators
Installation and Safety Instructions
www.tek.com
071-3110-04
Page 4

Copyright © Tektronix. All rights reserved. Licensed software products are owned by Tektronix or its subsidiaries or suppliers, and are
protected by national copyright laws and international treaty provisions. Tektronix products are covered by U.S. and foreign patents, issued
and pending. Information in this publication supersedes that in all previously published material. Specifications and price change privileges
reserved.
TEKTRONIX and TEK are registered trademarks of Tektronix, Inc.
Contacting Tektronix
Tektronix, Inc.
14150 SW Karl Braun Drive
P.O. Box 500
Beaverton, OR 97077
USA
For product information, sales, service, and technical support:
■
In North America, call 1-800-833-9200.
■
Worldwide, visit www.tek.com to find contacts in your area.
Page 5

Warranty
Tektronix warrants that this product will be free from defects in materials and workmanship for a period of one (1) year from the date of
shipment. If any such product proves defective during this warranty period, Tektronix, at its option, either will repair the defective product
without charge for parts and labor, or will provide a replacement in exchange for the defective product. Parts, modules and replacement
products used by Tektronix for warranty work may be new or reconditioned to like new performance. All replaced parts, modules and
products become the property of Tektronix.
In order to obtain service under this warranty, Customer must notify Tektronix of the defect before the expiration of the warranty period and
make suitable arrangements for the performance of service. Customer shall be responsible for packaging and shipping the defective
product to the service center designated by Tektronix, with shipping charges prepaid. Tektronix shall pay for the return of the product to
Customer if the shipment is to a location within the country in which the Tektronix service center is located. Customer shall be responsible
for paying all shipping charges, duties, taxes, and any other charges for products returned to any other locations.
This warranty shall not apply to any defect, failure or damage caused by improper use or improper or inadequate maintenance and care.
Tektronix shall not be obligated to furnish service under this warranty a) to repair damage resulting from attempts by personnel other than
Tektronix representatives to install, repair or service the product; b) to repair damage resulting from improper use or connection to
incompatible equipment; c) to repair any damage or malfunction caused by the use of non-Tektronix supplies; or d) to service a product
that has been modified or integrated with other products when the effect of such modification or integration increases the time or difficulty
of servicing the product.
THIS WARRANTY IS GIVEN BY TEKTRONIX WITH RESPECT TO THE PRODUCT IN LIEU OF ANY OTHER WARRANTIES, EXPRESS
OR IMPLIED. TEKTRONIX AND ITS VENDORS DISCLAIM ANY IMPLIED WARRANTIES OF MERCHANTABILITY OR FITNESS FOR A
PARTICULAR PURPOSE. TEKTRONIX' RESPONSIBILITY TO REPAIR OR REPLACE DEFECTIVE PRODUCTS IS THE SOLE AND
EXCLUSIVE REMEDY PROVIDED TO THE CUSTOMER FOR BREACH OF THIS WARRANTY. TEKTRONIX AND ITS VENDORS WILL
NOT BE LIABLE FOR ANY INDIRECT, SPECIAL, INCIDENTAL, OR CONSEQUENTIAL DAMAGES IRRESPECTIVE OF WHETHER
TEKTRONIX OR THE VENDOR HAS ADVANCE NOTICE OF THE POSSIBILITY OF SUCH DAMAGES.
[W2 – 15AUG04]
Page 6

Page 7

Table of Contents
Important safety information ................................................................................................................................ iii
General safety summary ................................................................................................................................ iii
Terms in the manual ...................................................................................................................................... iv
Terms on the product ..................................................................................................................................... v
Symbols on the product .................................................................................................................................. v
Preface ............................................................................................................................................................... vii
Key features .................................................................................................................................................. vii
Documentation .............................................................................................................................................. vii
Conventions used in this manual ................................................................................................................. viii
Install the instrument
Standard accessories ..................................................................................................................................... 1
Product options .............................................................................................................................................. 2
Product upgrades ........................................................................................................................................... 3
ReplaceableParts ........................................................................................................................................... 3
Operating requirements ................................................................................................................................. 4
Environmental requirements .................................................................................................................... 4
Power supply requirements ...................................................................................................................... 4
Cleaning ................................................................................................................................................... 4
Power on the instrument ................................................................................................................................ 5
Power off the instrument ................................................................................................................................ 6
Inspect the instrument .................................................................................................................................... 6
Self calibration ................................................................................................................................................ 7
Connecting to the instrument ......................................................................................................................... 8
Connecting to a network ........................................................................................................................... 8
Connecting peripheral devices ................................................................................................................. 9
Controlling the instrument using a remote PC ............................................................................................... 9
Preventing instrument damage ...................................................................................................................... 9
Overheat protection .................................................................................................................................. 9
Connectors ............................................................................................................................................... 9
Options and upgrades .................................................................................................................................. 10
View installed options ............................................................................................................................. 10
Install a new option key .......................................................................................................................... 11
Windows interface guidelines ....................................................................................................................... 11
AWG70000A Series Installation and Safety Instructions i
Page 8

Table of Contents
Operating basics
Front-panel connectors ................................................................................................................................ 13
Rear-panel connectors ................................................................................................................................. 15
Getting acquainted with your instrument ...................................................................................................... 16
Touchscreen interface ............................................................................................................................ 16
Front-panel controls ............................................................................................................................... 16
AWG mode general overview ................................................................................................................ 18
Functions mode general overview .......................................................................................................... 20
Run state control .................................................................................................................................... 21
Run mode ............................................................................................................................................... 22
Changing control settings ....................................................................................................................... 22
Preferences .................................................................................................................................................. 23
Basic guidelines to play a waveform ............................................................................................................ 23
Restoring instrument operating system and product software ..................................................................... 24
Operating system restore ....................................................................................................................... 24
Internal recovery utility ........................................................................................................................... 24
AWG7000A Series product software and TekVISA installation ................................................................... 24
Specifications
General characteristics ................................................................................................................................ 25
Sample clock generator characteristics ....................................................................................................... 26
Analog output characteristics ....................................................................................................................... 26
Analog AC output (AWG70001A with Option AC) ........................................................................................ 27
Marker outputs ............................................................................................................................................. 28
Flag outputs ................................................................................................................................................. 28
Auxillary outputs ........................................................................................................................................... 29
Auxiliary inputs ............................................................................................................................................ 29
Computer outputs ......................................................................................................................................... 30
Power characteristics ................................................................................................................................... 30
EMC, environment, and safety ..................................................................................................................... 30
Compliance Information
EMC compliance .......................................................................................................................................... 31
Safety compliance ........................................................................................................................................ 32
Environmental compliance ........................................................................................................................... 33
ii AWG70000A Series Installation and Safety Instructions
Page 9

Important safety information
This manual contains information and warnings that must be followed by the user for safe operation and to keep the product in a
safe condition.
To safely perform service on this product, see the Service safety summary that follows the General safety summary.
General safety summary
Use the product only as specified. Review the following safety precautions to avoid injury and prevent damage to this product or
any products connected to it. Carefully read all instructions. Retain these instructions for future reference.
Comply with local and national safety codes.
For correct and safe operation of the product, it is essential that you follow generally accepted safety procedures in addition to
the safety precautions specified in this manual.
The product is designed to be used by trained personnel only.
Only qualified personnel who are aware of the hazards involved should remove the cover for repair, maintenance, or adjustment.
This product is not intended for detection of hazardous voltages.
Use personal protective equipment to prevent shock and arc blast injury where hazardous live conductors are exposed.
While using this product, you may need to access other parts of a larger system. Read the safety sections of the other
component manuals for warnings and cautions related to operating the system.
When incorporating this equipment into a system, the safety of that system is the responsibility of the assembler of the system.
To avoid fire or personal injury
Use proper power cord. Use only the power cord specified for this product and certified for the country of use.
Ground the product. This product is grounded through the grounding conductor of the power cord. To avoid electric shock, the
grounding conductor must be connected to earth ground. Before making connections to the input or output terminals of the
product, ensure that the product is properly grounded. Do not disable the power cord grounding connection.
Power disconnect. The power cord disconnects the product from the power source. See instructions for the location. Do not
position the equipment so that it is difficult to disconnect the power cord; it must remain accessible to the user at all times to allow
for quick disconnection if needed.
Connect and disconnect properly. Do not connect or disconnect probes or test leads while they are connected to a voltage
source. Use only insulated voltage probes, test leads, and adapters supplied with the product, or indicated by Tektronix to be
suitable for the product.
Observe all terminal ratings. To avoid fire or shock hazard, observe all rating and markings on the product. Consult the product
manual for further ratings information before making connections to the product.
Do not apply a potential to any terminal, including the common terminal, that exceeds the maximum rating of that terminal.
Do not float the common terminal above the rated voltage for that terminal.
Do not operate without covers. Do not operate this product with covers or panels removed, or with the case open. Hazardous
voltage exposure is possible.
Avoid exposed circuitry. Do not touch exposed connections and components when power is present.
Do not operate with suspected failures. If you suspect that there is damage to this product, have it inspected by qualified
service personnel.
AWG70000A Series Installation and Safety Instructions iii
Page 10

Important safety information
Disable the product if it is damaged. Do not use the product if it is damaged or operates incorrectly. If in doubt about safety of the
product, turn it off and disconnect the power cord. Clearly mark the product to prevent its further operation.
Before use, inspect voltage probes, test leads, and accessories for mechanical damage and replace when damaged. Do not use
probes or test leads if they are damaged, if there is exposed metal, or if a wear indicator shows.
Examine the exterior of the product before you use it. Look for cracks or missing pieces.
Use only specified replacement parts.
Do not operate in wet/damp conditions. Be aware that condensation may occur if a unit is moved from a cold to a warm
environment.
Do not operate in an explosive atmosphere.
Keep product surfaces clean and dry. Remove the input signals before you clean the product.
Provide proper ventilation. Refer to the manual's installation instructions for details on installing the product so it has proper
ventilation.
Slots and openings are provided for ventilation and should never be covered or otherwise obstructed. Do not push objects into
any of the openings.
Provide a safe working environment. Always place the product in a location convenient for viewing the display and indicators.
Avoid improper or prolonged use of keyboards, pointers, and button pads. Improper or prolonged keyboard or pointer use may
result in serious injury.
Be sure your work area meets applicable ergonomic standards. Consult with an ergonomics professional to avoid stress injuries.
Use care when lifting and carrying the product. This product is provided with handles for lifting and carrying.
WARNING. The product is heavy. To reduce the risk of personal injury or damage to the device get help when lifting or carrying
the product.
Use only the Tektronix rackmount hardware specified for this product.
Terms in the manual
These terms may appear in this manual:
WARNING. Warning statements identify conditions or practices that could result in injury or loss of life.
CAUTION. Caution statements identify conditions or practices that could result in damage to this product or other property.
iv AWG70000A Series Installation and Safety Instructions
Page 11

Important safety information
Terms on the product
These terms may appear on the product:
■
DANGER indicates an injury hazard immediately accessible as you read the marking.
■
WARNING indicates an injury hazard not immediately accessible as you read the marking.
■
CAUTION indicates a hazard to property including the product.
Symbols on the product
When this symbol is marked on the product, be sure to consult the manual to find out the nature of the potential
hazards and any actions which have to be taken to avoid them. (This symbol may also be used to refer the user to
ratings in the manual.)
The following symbols may appear on the product:
AWG70000A Series Installation and Safety Instructions v
Page 12

Important safety information
vi AWG70000A Series Installation and Safety Instructions
Page 13

Preface
This manual describes the installation and basic operation of AWG70000A series instruments. For additional operating
information, refer to the instrument help on your instrument. The following instruments are supported by this document:
■
AWG70001A single channel Arbitrary Waveform Generators
■
AWG70002A two channel Arbitrary Waveform Generators
Key features
The following list describes some of the key features of the AWG70000A series instruments:
■
Two modes of operation:
■
■
■
Sample rates:
■
■
■
Waveform memory
■
AWG mode (Arbitrary Waveform Generator) to play any waveshape from a file
Functions mode to play basic waveshapes
Up to 50 GS/s for one channel instruments
Up to 25 GS/s for two channel instruments
Up to 16 GSamples for one channel instruments
■
Up to 8 GSamples for two channel instruments
■
Sequencing with Option 03
■
–80 dBc Spurious Free Dynamic Range
■
10 bit vertical resolution
■
An intuitive, graphical user interface
■
Removable hard disk drive
■
Supports USB 2.0 interface
■
LAN (1000/100/10 Base-T)
■
Capacitive touchscreen user interface
■
Microsoft Windows 7 Ultimate 64-bit operating system
Documentation
Review the following table to locate more information about this product.
AWG70000A Series Installation and Safety Instructions vii
Page 14
Preface
To read about Use these documents
Installation and operation (overviews) Safety and Installation manual.
Operation and user interface Instrument help from the Help menu.
Programmer commands Programmer manual. This manual is available on the Tektronix
Web site (www.tektronix.com/manuals).
Specifications and performance verification procedures Specifications and Performance Verification Technical
Reference. This manual is available on the Tektronix Web site
(www.tektronix.com/manuals).
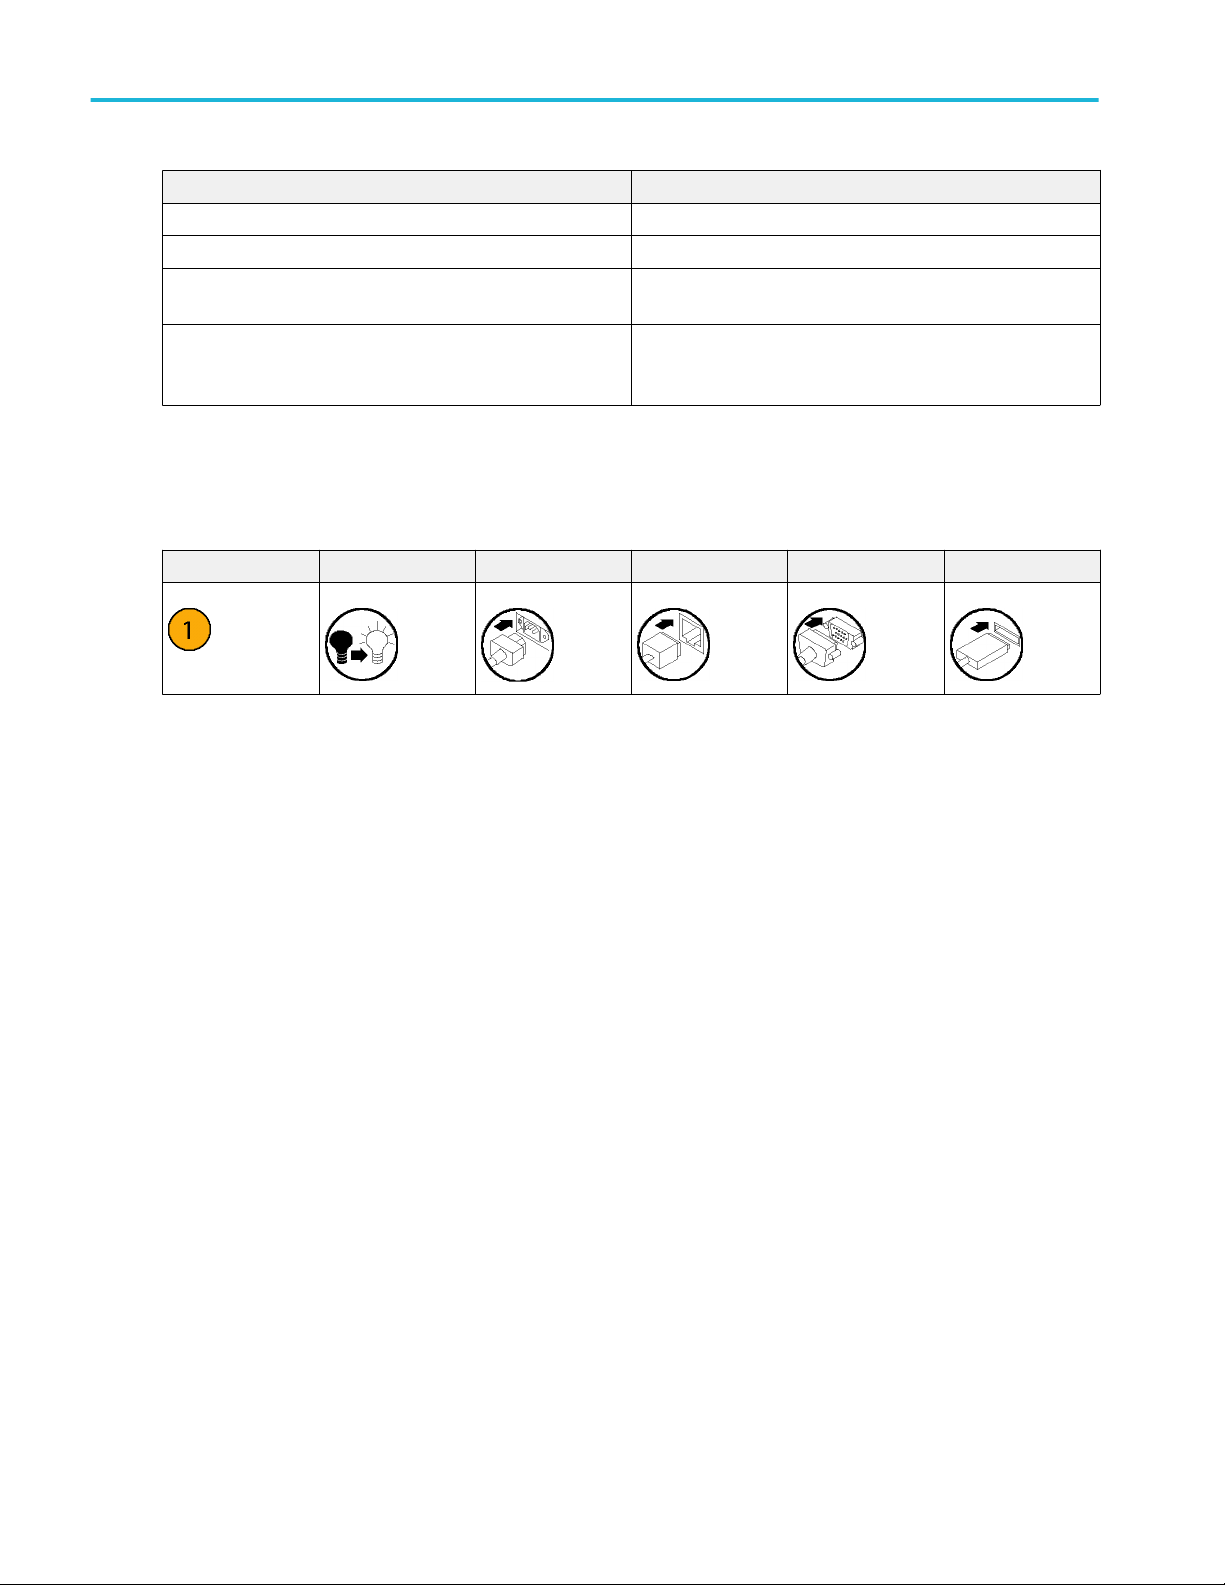
Conventions used in this manual
The following icons are used throughout this manual.
Step Front panel power Connect power Network SVGA USB
viii AWG70000A Series Installation and Safety Instructions
Page 15

Install the instrument
Unpack the instrument and check that you received all items listed as Standard Accessories. Check the Tektronix Web site
(www.tektronix.com) for the most current information.
Standard accessories
Accessory Tektronix part number
AWG70000A Series Installation and Safety Manual
English (Option L0) 071-3110-xx
Japanese (Option L5) 071-3111-xx
Simplified Chinese (Option L7) 071-3112-xx
Traditional Chinese (Option L8) 071-3113-xx
Russian (Option L10) 071-3114-xx
Windows compatible keyboard 119-7083-xx
Windows compatible mouse 119-7054-xx
Capacitive touch stylus 119-8131-xx
Analog output SMA adapters
(Pre-installed on outputs)
50 Ω SMA Termination, Male, DC to 18 GHz 015-1022-xx
Power cord – one of the following:
North America (Option A0)
Universal Euro (Option A1)
United Kingdom (Option A2)
Australia (Option A3)
Switzerland (Option A5)
Japan (Option A6)
China (Option A10)
India (Option A11)
No power cord or AC adapter (Option A99)
131-8689-xx
Two with the AWG70001A (Three with Option AC)
Four with the AWG70002A
One with the AWG70001A
Two with the AWG70002A
AWG70000A Series Installation and Safety Instructions 1
Page 16

Install the instrument
Product options
Option Description
Opt. 01 Waveform record length expansion
AWG70001A: from 2 GSamples to 16 GSamples
AWG70002A: from 2 GSamples to 8 GSamples for each channel
Opt. 03 Adds sequencing
Opt. 150 Adds 50 GS/s sampling rate (AWG70001A only)
Opt. 208 Adds 8 GS/s sampling rate (AWG70002A only)
Opt. 216 Adds 16 GS/s sampling rate (AWG70002A only)
Opt. 225 Adds 25 GS/s sampling rate (AWG70002A only)
Opt. AC Adds a single-ended AC coupled output connector with additional amplification and attenuation
(AWG70001A only)
Opt. RFX Adds RFXpress (RFX100) software to the AWG
Opt. RDR
Opt. SPARA
Opt. OFDM
Opt. ENV
Opt. ENV01
Opt. ENV02
Opt. ENV03
Opt. ENV04
Opt. UWBCF
Opt. UWBCT
1
1
1
1
1
1
1
1
1
1
Adds radar signal generation to RFXpress
Adds S-parameter emulation to RFXpress
Adds OFDM signal generation to RFXpress
Adds environment signal generation to RFXpress
Bundling option - Opt. ENV + Opt. RDR
Bundling option - Opt. ENV + Opt. RDR + Opt. OFDM
Bundling option - Opt. ENV + Opt. RDR + Opt. OFDM + Opt. SPARA
Bundling option - Opt. ENV + Opt. RDR + Opt. OFDM + Opt. SPARA + Opt. UWBCT
Adds UWB-WiMedia conformance signal generation to RFXpress
Adds UWB-WiMedia custom and conformance signal generation to RFXpress (includes Opt.
UWBCF)
1
Requires Opt. RFX
2 AWG70000A Series Installation and Safety Instructions
Page 17

Install the instrument
Product upgrades
AWG70001A ugrades Description
AWG701AUP Opt. 01 Increases the waveform record length to 16 Gsamples
AWG701AUP Opt. 03 Adds sequencing
AWG701AUP Opt. SSD Provides an additional (or replacement) preprogrammed solid state drive
AWG701AUP Opt. AC Adds a single-ended AC coupled output connector with additional amplification and attenuation
AWG70002A upgrades Description
AWG702AUP Opt. 01 Increases the waveform record length to 8 GSamples for each channel
AWG702AUP Opt. 03 Adds sequencing
AWG702AUP Opt. 0816 Increases the sampling rate from 8 GS/s to 16 GS/s
AWG702AUP Opt. 0825 Increases the sampling rate from 8 GS/s to 25 GS/s
AWG702AUP Opt. 1625 Increases the sampling rate from 16 GS/s to 25 GS/s
AWG702AUP Opt. SSD Provides an additional (or replacement) preprogrammed solid state drive
ReplaceableParts
Item Tektronix part number
Rear panel foot (four per instrument) 348-2037-xx
Screw 211-1459-xx
Front bottom flip-foot (two per instrument) 348-1950-xx
Screw 211-1459-xx
Foot cushion 348-1947-xx
Rear bottom foot (two per instrument) 348-1948-xx
Screw 211-1459-xx
Foot cushion 348-1947-xx
Handle (two per instrument) 367-0570-xx
Foam 348-2067-xx
Screw (two per handle) 211-1459-xx
AWG70000A Series Installation and Safety Instructions 3
Page 18

Install the instrument
Operating requirements
Place the instrument on a cart or bench, observing clearance requirements:
■
Top and bottom: 0 cm (0 in)
■
Left and right side: 5.08 cm (2 in)
■
Rear: 0 cm (0 in)
CAUTION. To ensure proper cooling, keep sides of the instrument clear of obstructions.
Environmental requirements
The environmental requirements for your instrument are listed in the following table. For instrument accuracy, ensure that the
instrument has warmed up for 20 minutes and meets the environmental requirements listed in the following table.
Requirement Description
Temperature (operating) 0 °C to 50 °C (+32 °F to +122 °F)
Humidity (operating) 5% to 90% relative humidity at up to 30 °C (86 °F)
5% to 45% relative humidity above 30 °C (86 °F) up to +50 °C
(122 °F) noncondensing
Altitude (operating) Up to 3,000 m (9,843 feet)
Power supply requirements
The power supply requirements for your instrument are listed in the following table.
WARNING. To reduce the risk of fire and shock, ensure that the mains supply voltage fluctuations do not exceed 10% of the
operating voltage range.
Source Voltage and Frequency Power Consumption
100 VAC to 240 VAC, 50/60 Hz 500 W
Cleaning
Inspect the arbitrary waveform generator as often as operating conditions require. Follow these steps to clean the exterior
surface.
WARNING. To avoid personal injury, power off the instrument and disconnect it from line voltage before performing any of the
following procedures.
CAUTION. To avoid damage to the surface of the instrument, do not use any abrasive or chemical cleaning agents.
Use extreme care when cleaning the surface of the display. The display is easily scratched if excessive force is used.
1. Remove loose dust on the outside the instrument with a lint-free cloth. Use care to avoid scratching the front-panel display.
2. Use a soft cloth dampened with water to clean the instrument. If needed, use a 75% isopropyl alcohol solution as a cleaner.
Do not spay liquids directly on the instrument.
4 AWG70000A Series Installation and Safety Instructions
Page 19

Install the instrument
Power on the instrument
1. Connect the AC power cord to the rear of the instrument.
2. Use the front-panel power button to switch the instrument on.
The power button indicates four instrument power states:
■
No light – no power applied
■
Yellow – standby mode
■
Green – powered on
■
Flashing Red – over heat condition (instrument shuts down and cannot restart until internal temperature returns to a
safe level)
AWG70000A Series Installation and Safety Instructions 5
Page 20

Install the instrument
Power off the instrument
1. Press the front-panel power button to shut down the instrument.
The shutdown process takes approximately 30 seconds to complete, placing the instrument in standby mode. Alternatively,
use the Windows Shutdown menu.
NOTE. You can force an immediate shutdown by pressing and holding the power button for four seconds. Unsaved data is
lost.
2. To completely remove power to the instrument, perform the shutdown just described, and then remove the power cord from
the instrument.
Inspect the instrument
Two types of diagnostics are provided to verify the functionality of your instrument:
■
Power-on self test (POST) – Every time you power on the instrument, the instrument automatically performs the POST
internal diagnostics.
■
Diagnostics from the System menu – You can run the internal diagnostics from the System menu. Use the following
procedure:
1. Select Utilities from the workspace tabs, then select Diag & Cal.
2. Click Diagnostics & Calibration.
3. In the Diagnostics and Calibration screen, click Diagnostics.
4. Choose the set of diagnostics you want to run.
6 AWG70000A Series Installation and Safety Instructions
Page 21

Install the instrument
■
POST Only: Offers a set of tests that automatically run at power on (Power On Self Test). These diagnostic selections
verify such things as internal device communications, system memory, and real-time clock.
■
Full diagnostics: Provides access to all diagnostic self tests the instrument is able to run.
5. Select and deselect each test individually or use the Select all tests and Unselect all tests buttons.
6. Select the desired Loop function.
■
Single makes one pass through the selected tests.
■
Continuous continually runs through the selected tests until aborted.
■
Times lets you define how many times to run the selected tests.
■
Stop on Fail stops the diagnostics if a selected test fails, regardless of the Loop selection.
7. Click Start to run the diagnostics. The Start button changes to Abort while tests are actively running.
Verify that the instrument passes all tests. If diagnostic failures occur, contact your local Tektronix service personnel.
Self calibration
The self calibration uses internal calibration routines that adjust the internal calibration constants as necessary.
If the instrument detects an internal temperature difference of more than 5 °C from its previous calibration, a message is
displayed in the status area (at the bottom of the screen), recommending a self calibration. You can perform the self calibration at
anytime.
NOTE. Always power on the instrument for at least 20 minutes before performing a self calibration. See Operating requirements
on page 4.
1. Confirm that there is no output signal. The front-panel Play/Stop button indicator is off.
2. Click Utilities from the workspace tabs, then click Diag & Cal.
AWG70000A Series Installation and Safety Instructions 7
Page 22

Install the instrument
3. Click Diagnostics & Calibration.
4. In the Diagnostics and Calibration screen, click Calibration.
All calibration routines are selected by default and cannot be deselected.
5. Click Start.
The Start button changes to Abort once the calibration has started. Clicking Abort stops the calibration process and
restores all values to their previous state. All calibration items should indicate Pass. If not, contact your local Tektronix
service personnel.
Connecting to the instrument
Connecting to a network
You can connect your instrument to a network for file sharing, printing, Internet access, and other functions. Consult your network
administrator and use the standard Windows utilities to configure the instrument for your network.
8 AWG70000A Series Installation and Safety Instructions
Page 23

Install the instrument
Connecting peripheral devices
You can connect peripheral devices to your instrument, such as the keyboard and mouse (provided). A mouse and keyboard are
particularly helpful for opening and saving files.
Controlling the instrument using a remote PC
Use your PC to control the arbitrary waveform generator through a LAN using the Windows Remote Desktop function. If your PC
has a larger screen, it will be easier to see details such as zooming waveforms or making cursor measurements. You can also
use a third party software application (installed on your PC) to create a waveform and import it through a network.
Preventing instrument damage
Overheat protection
The instrument is protected against overheating damage by continuously monitoring the internal temperature. If the internal
temperature exceeds the maximum rated operating range, two actions occur.
■
The instrument shuts down.
■
The Power button flashes red.
NOTE. An indication that the internal temperature is escalating is continual calibration warnings due to temperature change.
If an overheat condition was detected, the power button will continue to flash red, even after the instrument cools (unless power
is disconnected). This is done to indicate that an overheat condition has occurred, regardless of how much time has passed.
Restarting the instrument (or removing and reapplying power) will stop the power button from flashing red. But if the overheat
condition still remains while attempting to restart the instrument, the power button may immediately (or in a short time) start
flashing red again and the instrument will shut down.
Common causes of overheating include:
■
The ambient temperature requirement is not being met.
■
The required cooling clearance is not being met.
■
One or more instrument fans are not working properly.
Connectors
The arbitrary waveform generator has both output and input connectors. Do not apply external voltage to any output connector
and ensure proper restrictions are met for any input connector.
CAUTION. Always turn off the signal outputs when you connect or disconnect cables to/from the signal output connectors. If you
connect a (Device Under Test) DUT while the instrument signal outputs are in the On state, it may cause damage to the
instrument or to the DUT.
AWG70000A Series Installation and Safety Instructions 9
Page 24

Install the instrument
Options and upgrades
Options purchased with your instrument are pre-installed. You can view installed options by going to Utilities > About my AWG.
If you purchase an upgrade (new option) from Tektronix for your instrument, you may need to install an option key to activate the
new option. Use the Install Upgrades dialog box to enable the upgrades that you purchased from Tektronix for your instrument.
For the most current list of upgrades, go to www.tektronix.com or contact your local Tektronix representative.
View installed options
1. Select Utilities from the workspace tabs.
2. Select About my AWG to display the current option information and system information.
3. Click Install Options to start the upgrade installation process.
10 AWG70000A Series Installation and Safety Instructions
Page 25

Install the instrument
Install a new option key
1. Click Continue from the Install Upgrades introduction screen.
2. Enter the option key provided by Tektronix, and follow the on-screen instructions to install the option.
NOTE. Some upgrades may require updating the product software. Refer to the instructions provided with your upgrade for
proper installation.
NOTE. After entering a new option key, you must restart the instrument application to activate the option.
Windows interface guidelines
Because the instrument uses the Microsoft Windows interface, you have open access to the Windows operating system. You can
access the Windows desktop to load and run other Windows-based applications such as Microsoft Excel.
Follow these guidelines to avoid making operating system changes that might cause problems while using the instrument:
■
Be careful when making changes in the Control Panel. Avoid making changes to any controls with which you are unfamiliar.
■
Do not delete or change any system fonts; this can affect the quality of the display.
■
Be careful when making changes to the system Display properties. Changing settings such as resolution, text size, fonts,
and orientation affects the usability of the display and the touchscreen.
■
Do not change the contents of the Windows folder or the Program Files\Tektronix\AWG70000\ folder.
■
Do not change the BIOS settings; this can affect the overall operation of the instrument.
AWG70000A Series Installation and Safety Instructions 11
Page 26

Install the instrument
12 AWG70000A Series Installation and Safety Instructions
Page 27

Operating basics
Front-panel connectors
AWG70000A Series Installation and Safety Instructions 13
Page 28

Operating basics
Table 1: Front-panel connectors
Connector Description
Analog outputs (+ and –)
AWG70001A – CH1
AWG70002A – CH1 and CH2
AC output (Option AC, AWG70001A
only)
These connectors supply analog signals.
The channel LEDs light to indicate when the channel is enabled and the output is electrically
connected. The LED color matches the user defined waveform color.
The output connector utilizes the Planar Crown® Universal Connector System providing you
the ability to easily replace a damaged connector.
You also have the ability to use a variety of different types of connectors.
The AWG70000A series products ship with SMA type adapters installed.
This connector supplies a single-ended analog signal. The AC output provides for additional
amplification and attenuation of the output signal.
The AC output LED lights to indicate when the AC output is enabled and the output is
electrically connected. The LED color matches the user defined waveform color.
The output connector utilizes the Planar Crown® Universal Connector System providing you
the ability to easily replace a damaged connector.
You also have the ability to use a variety of different types of connectors.
Marker outputs
AWG70001A – CH1 Markers
AWG70002A – CH1 and CH2 Markers
USB Two USB connectors. When OFF is lighted, the front USB connectors have been disabled from
Removable hard disk drive (HDD) The HDD contains the operating system, product software and all user data. By removing the
Chassis ground Banana type ground connection.
CAUTION. Always turn off the signal outputs when you connect or disconnect cables to/from the signal output connectors. Use
the All outputs off button (either the front-panel button or the screen button) to quickly disable the Analog, Marker, and Flag
outputs. When the All outputs off is enabled, the output connectors are electrically disconnected from the instrument.
Do not connect a DUT to the front-panel signal output connectors when the instrument signal outputs are on.
Do not power on or off the DUT when the arbitrary waveform generator signal outputs are on.
These SMA type connectors supply marker signals, two markers for each channel.
The marker LEDs light when the corresponding channel is enabled and the outputs are
electrically connected. Marker LEDs are always white.
the Utilities > Preferences menu.
HDD, user information such as setup files and waveform data is removed from the instrument.
14 AWG70000A Series Installation and Safety Instructions
Page 29

Operating basics
Rear-panel connectors
Table 2: Rear-panel connectors
Connector Description
Flag Outputs SMB connectors to supply output flags to mark the state of sequences.
eSATA eSATA port to connect external SATA devices to the instrument.
Sync Clock Out SMA type connector to provide a synchronization signal to external devices.
LAN RJ-45 connector to connect the instrument to a network.
VGA VGA video port to connect an external monitor to view a larger copy of the instrument display (duplicate) or
to extend the desktop display. To connect a DVI monitor to the VGA connector, use a DVI-to-VGA adapter.
USB Host Four USB Host connectors (type A) to connect devices such as a mouse, keyboard, or other USB devices.
Tektronix does not provide support or device drivers for USB devices other than the supplied mouse and
keyboard.
USB Device USB Device connector (type B) interfaces with the TEK-USB-488 GPIB to USB adapter and provides
connectivity with GPIB based control systems.
Pattern Jump In 15-pin DSUB connector to provide a pattern jump event for Sequencing (Option 03).
Sync to Hub Connector for use with the AWGSYNC01 Synchronization Hub, providing the ability to synchronize the
outputs of up to four AWG70000A Series instruments.
Clock In SMA type connector to provide an external clock signal.
Clock Out SMA type connector to provide a high speed clock that is related to the sample rate.
Reference In SMA type input connector to provide a reference timing signal (variable or fixed).
10MHz Reference Out SMA type output connector to provide a 10 MHz reference timing signal.
Trigger Inputs A and B SMA type input connectors for external trigger signals.
Power Power cord input.
AWG70000A Series Installation and Safety Instructions 15
Page 30

Operating basics
Getting acquainted with your instrument
Touchscreen interface
The arbitrary waveform generator offers a touchscreen interface that you can use to access all features and controls.
Enable or disable the touchscreen interface by pushing the front-panel Touchscreen button.
When the touchscreen is in the Off state, the LED is lighted. On-screen menus are then operated via the front panel, keyboard,
or mouse.
Front-panel controls
The following illustration and table describe the front panel controls.
Buttons/Keys Description
Home The Home button returns the graphical interface to the home screen of the current mode (AWG or
Functions).
Play/Stop The Play button starts or stops playing the waveform.
The Play button changes to indicate the waveform play out status.
When a waveform is playing, it is only present at the output connectors if the following conditions are met.
■
The channel is enabled.
■
The All Outputs Off is not active (outputs are connected).
16 AWG70000A Series Installation and Safety Instructions
Page 31

Operating basics
Buttons/Keys Description
General purpose knob The general purpose knob is used to increment or decrement values when a setting is enabled (selected) for
change.
Push the knob to toggle the Fine mode on and off, increasing or decreasing the change resolution of the
general purpose knob.
NOTE. The general purpose knob operation mimics the actions of the up and down arrow keys on a
keyboard as defined by the Windows operating system. Because of this, rotating the knob when a desired
control is not selected may result in seemingly odd behavior of the control or accidental changes to some
other control.
Fine The Fine button increases the resolution of the general purpose knob.
Numeric keypad The numeric keypad is used to directly enter a numeric value into a selected control setting.
Units prefix buttons (T/p, G/n, M/μ, and k/m) are used to complete an input with the numeric keypad. You
can complete your entry by pushing one of these prefix buttons (without pressing the Enter key).
If you push the units prefix buttons for frequency, the units are interpreted as T (tera-), G (giga-), M (mega-),
or k (kilo-). If you push the buttons for time or amplitude, the units are interpreted as p (pico-), n (nano-), μ
(micro-), or m (milli-).
Touchscreen Off The Touchscreen Off button enables or disables touchscreen control. When disabled, the button lights.
When the touchscreen is enabled, you can use your finger or the stylus to control all operations of the
instrument from the display. The touchscreen can be used alone or in combination with the mouse and frontpanel controls.
When the touchscreen is disabled, you can still access the on-screen menus with a mouse or keyboard.
NOTE. The stylus must be of the conductive type designed for projected-capacitance screens, such as
commonly used with smart phones and tablets.
NOTE. If the instrument is powered on in Windows Safe Mode, the touchscreen is inoperative. You may
need to use a mouse or keyboard to restore normal operation.
Force Trigger (A or B) The A or B Force Trigger buttons generate a trigger event. This is only effective when the Run mode is set
to Triggered or Triggered Continuous.
All Outputs Off The All Outputs Off button provides a quick disconnect of the Analog, Marker, and Flag outputs, whether
those outputs are enabled or not. (All Outputs Off overrides the output enable controls.)
When activated, the button lights, the outputs are electrically disconnected, and the channel and marker
output front-panel lights are turned off.
When the All Outputs Off is deactivated, the outputs return to their defined state.
AWG70000A Series Installation and Safety Instructions 17
Page 32

Operating basics
AWG mode general overview
The following illustration and table provide a high-level overview of the AWG mode.
Screen element Description
1. Play/Stop button Starts and stops playing the waveform. The Play button icon changes to indicate the play status of the
waveform. See Run state control on page 21. When a waveform is playing, it is only present at the output
connectors if the following conditions are met.
■
The channel is enabled.
■
The All Outputs Off is not active (outputs are connected).
2. Workspace tabs The workspace tabs provide access to all of the instrument functions.
■
Home returns the workspace area to the channel plot display.
■
Setup displays the setup controls for channel, clocks, triggers, and system synchronization using the
AWGSYNC01.
■
Waveform displays the waveform editor controls to create and edit waveforms.
■
Sequence displays the workspace area to create waveform sequences (Option 03).
■
Capture/Playback displays the workspace area to import baseband I/Q data files (captured from an
instrument such as a spectrum analyzer or oscilloscope) and compile them into a waveform for playout.
■
Utilities displays controls for system information (including diagnostics and calibration), preferences,
help and support. Utilities are global instrument settings that are maintained in non-volatile memory
when the application is closed or the instrument powered off. These settings are not saved and recalled
with setup files nor are they impacted by restoring the default setup.
3. Channel enable Enables the channel output. Internally connects the channel and marker output connectors to the
instrument. The All Outputs Off feature overrides the channel enable control.
18 AWG70000A Series Installation and Safety Instructions
Page 33

Operating basics
Screen element Description
4. Mode selection Switches the instrument mode between AWG (arbitrary waveform generator) and Functions (basic
waveshape generator). Mode selection is available from the Home tab in both the AWG mode and the
Functions mode.
5. Workspace The workspace area shows the contents of the selected tab (such as: Home, Settings).
6. All outputs off The All Outputs Off button provides a quick disconnect of the analog, marker, and flag outputs, whether
those outputs are enabled or not. (All Outputs Off overrides the channel output enable controls.)
The outputs are electrically disconnected. When the All Outputs Off is disabled, the outputs return to their
defined state.
7. Trigger controls The Trigger controls provide access to the trigger settings.
■
Use Run mode to set the trigger type.
■
Use Trigger source for external triggering.
■
Select Coupled to couple the trigger settings for two-channel instruments.
8. Status bar The status bar displays various user messages and status indicators.
9. Waveforms and
sequences
Contains all waveforms and sequences available for playout. Touch and hold (or right-mouse click) a
waveform or sequence name to display menu selections to manage the lists. Sequencing requires
Option 03.
10. Toolbar Tools are used to:
■
Display the instrument help.
■
Restore the display to the default layout.
■
Restore the default setup.
■
Restore the most recently used setup.
■
Open files (setup files, waveform files, sequence files).
■
Save the current setup.
AWG70000A Series Installation and Safety Instructions 19
Page 34

Operating basics
Functions mode general overview
The Functions interface provides you with a quick and easy way to generate simple types of waveforms. Refer to the following
illustration and table for information on the key screen elements.
Screen element Description
1. Play/Stop button Starts and stops waveform play out. The Play button icon changes to indicate the waveform play out status.
See Run state control on page 21.
2. Workspace tabs The workspace tabs provides access to all instrument functions.
■
Home returns the workspace area to the Function mode setup display.
■
Utilities displays controls for preferences, system information, help and support. Utilities are global
instrument settings.
3. Channel enable Enables the channel output. Internally connects the channel and marker output connectors to the
instrument. The All Outputs Off feature overrides the channel enable control.
4. Mode selection Switches the instrument mode between AWG (arbitrary waveform generator) and Functions (basic
waveshape generator). Mode selection is available from the Home tab in both the AWG mode and the
Functions mode.
5. Workspace The workspace area shows the contents of the selected tab (such as, Home).
6. All outputs off The All Outputs Off button provides a quick disconnect of the analog, marker, and flag outputs, whether
those outputs are enabled or not. (All Outputs Off overrides the output enable controls.) The outputs are
electrically disconnected. When the All Outputs Off is disabled, the outputs return to their defined state.
20 AWG70000A Series Installation and Safety Instructions
Page 35

Operating basics
Screen element Description
7. Status bar The status bar displays various user messages and status indicators.
8. Toolbar Tools are used to:
■
Display the instrument help.
■
Restore the display to the default layout.
■
Restore the default setup.
■
Restore the most recently used setup.
■
Open files. While in the Functions mode, only Setup files impact the Functions mode. You can open
waveform and sequence file types, and the Waveform and Sequence lists will be populated, but these
are only available for use when in the AWG mode.
■
Save the current setup.
Run state control
Start and stop the waveform play out (run state) using the Play button. Start the waveform play out using the Play button, but no
signal is output through the Analog Output connectors unless the Channel output is enabled.
Run state status indicators (screen Play/Stop button). The play button in the graphical interface changes appearance to
indicate the waveform play out status. Below are the various indicators.
Indicator Description
Not lighted – stopped (or idle) with no waveforms being played.
Green with sine wave – currently playing a waveform.
Green with T symbol – waiting for a trigger event to begin
waveform play out.
Yellow with clock symbol – the instrument is busy and play out
is temporarily inhibited.
Red – An error is preventing waveform play out.
AWG70000A Series Installation and Safety Instructions 21
Page 36

Operating basics
Run state status indicators (front-panel Play/Stop button). The front-panel play button changes appearance to
indicate the waveform play out status. Below are the various indicators.
Indicator Description
Not lighted Stopped (or idle) with no waveforms being played.
Green Currently playing a waveform.
Flashing green Waiting for a trigger event to begin waveform play out.
Amber The instrument is busy and play out is temporarily inhibited.
Red An error is preventing the waveform play out.
Run mode
The AWG supports the following Run modes:
Continuous. Waveform play out starts when the Play button is pressed, without the need for a trigger event.
Triggered. Waveform play out starts when a proper external trigger event occurs or a Force Trig ( A or B) button is pressed.
Waveform play out stops after one complete waveform cycle.
Waveform play out can not be retriggered until the current waveform play out completes an entire cycle. For two channel
instruments, both waveforms must complete a cycle.
Pressing a Force Trig ( A or B) button has no effect if play out is in process.
Triggered Continuous. Waveform play out starts when a proper external trigger event occurs or a Force Trig (A or B) button is
pressed. Once a trigger event occurs, waveform play out continues until stopped by the user.
Changing control settings
As you configure the instrument, you might need to set a numerical parameter such as an amplitude level or offset. To set these
parameters in a screen window, touch or click the parameter to select it. Once the parameter is selected, the general purpose
knob is assigned to the parameter.
Use the general purpose knob to change parameters, although the following methods are generally available.
■
Some parameters supply a pop-up keyboard that you can use to enter a new value.
Touch or click the keyboard icon to display the keyboard.
■
Enter the desired value using the numeric keypad on the front panel or with an attached USB keyboard.
22 AWG70000A Series Installation and Safety Instructions
Page 37

Operating basics
Preferences
Use the Preferences to set certain instrument characteristics that are retained for each subsequent power on. The Preferences
screen also contains the instrument’s security settings.
In the toolbar, go to Utilities > Preferences to access user preferences.
Brightness controls. Adjust the brightness levels of the display and front panel LEDs.
NOTE. Marker front panel LEDs are not adjustable.
Security. Adjust the security settings for the instrument.
■
Lock Instrument displays the Windows lock screen. The programmable interface is not affected.
■
You can choose to disable the USB host ports (front and rear).
Basic guidelines to play a waveform
The Arbitrary Waveform Generator provides many controls and options that you can use when preparing to play a waveform.
Here are some basic guidelines and tips to help obtain your goal of playing a waveform. Refer to the instrument’s help system for
more detail about instrument controls and functions.
■
Load a waveform (or waveforms) into the waveform list.
■
Assign a waveform (from the waveform list) to a channel.
■
Set the Run mode, see Run mode on page 22. If using a triggered run mode, supply the necessary trigger event.
■
Enable the channel output.
■
Make sure All Channels Off control is not active.
■
Press the Play button (front-panel or screen).
■
To deal with problems or errors, refer to the instrument help system.
AWG70000A Series Installation and Safety Instructions 23
Page 38

Operating basics
Restoring instrument operating system and product software
You can restore the instrument’s Windows Operating System directly from the instrument. The instrument does not ship with an
operating system restore disc.
To restore or update the AWG product software, you need to download the current version from the Tektronix web site.
NOTE. Restoring or updating the AWG product software does not require that you restore the Windows operating system.
Operating system restore
CAUTION. Restoring the operating system reformats the hard disk drive. The product software and all user data will be lost. (The
Acronis Recovery partition and the related data are not destroyed.)
The Windows operating system installed is designed for this instrument’s hardware and product software. Installing a version
other than the one provided will not function properly.
After the operating system is installed, you need to download the AWG70000A Series Product Software installation package from
the Tektronix web site and reinstall the software.
Internal recovery utility
This is the preferred method to restore a damaged Windows Operating System. This method restores the Windows Operating
System using the Acronis Startup Recovery Manager. The Acronis software reinstalls the operating system using restore images
preinstalled on the hard drive.
This method retains the restore images, providing the ability to repeat the restore process.
1. Attach the keyboard to the instrument.
2. Restart the instrument. During the boot-up process you will see the following message at the top of the screen:
Starting Acronis Loader... press F5 for Acronis Startup Recovery Manager
3. Repeatedly press the F5 key until the Acronis True Image Tool opens. There is a 15-second time period from when the
message appears until the instrument proceeds with the normal instrument startup. If the instrument does not open the
Acronis application, power off the instrument, then power on the instrument and try again.
4. Within the Acronis TrueImage window, click Restore.
5. In the Confirmation dialog box, click Yes to restore the instrument operating system, or No to exit the restore process.
AWG7000A Series product software and TekVISA installation
1. Download the AWG70000A Series product software installation package. The installation package contains:
■
Instructions
■
AWG70000A Series product software installer
■
TekVISA Connectivity software installer
NOTE. Tektronix recommends using the version of TekVISA supplied with the product software installation package. This is
the version verified for use.
2. Install the AWG70000A Series product software following all on-screen prompts.
3. Install the TekVISA Connectivity software, following all on-screen prompts.
24 AWG70000A Series Installation and Safety Instructions
Page 39

Specifications
This section contains an abbreviated list of instrument characteristics. For a complete list of all instrument characteristics, refer to
the Specifications and Performance Verification manual.
General characteristics
Waveform memory
AWG70001A 2,000,000,000 points
AWG70001A (Option 01) 16,000,000,000 points
AWG70002A 2,000,000,000 points, each channel
AWG70002A (Option 01) 8,000,000,000 points, each channel
Minimum waveform size
AWG70001A 4800 points
AWG70002A 2400 points
Waveform granularity
AWG70001A 2 points
AWG70002A 1 point
Waveform interleaving
AWG70001A Non-interleaved when ≤ 25 GS/s
Interleaved when ≥ 25 GS/s
AWG70002A Non-interleaved at all sample rates
DAC resolution 8-bit, 9-bit, or 10-bit
AWG70000A Series Installation and Safety Instructions 25
Page 40

Specifications
Sample clock generator characteristics
Sample rate
Range AWG70001A (Option 150) 1.49 kS/s to 50 GS/s
AWG70002A (Option 225) 1.49 kS/s to 25 GS/s
AWG70002A (Option 216) 1.49 kS/s to 16 GS/s
AWG70002A (Option 208) 1.49 kS/s to 8 GS/s
Resolution 3 digits, low-jitter mode
8 digits, high-resolution mode
Phase adjustment Used to manually align the outputs with other generators or instruments
Range -10,800° to +10,800°
Resolution 1°
Analog output characteristics
Output connector Aeroflex/Weinschel Planar Crown Universal Connector System with SMA female adapter
Number of analog outputs
AWG70001A 1 channel
AWG70002A 2 channels
Type of outputs (+) and (-) complementary
ON/OFF control Independent control for each analog output complementary pair
Output impedance 50 Ω
Output amplitude characteristics Independent control for each channel
Range 0.25 V
0.5 V
Resolution 1.0 mV
Accuracy ±(2% of amplitude + 1 mV)
DC accuracy ±(2% of amplitude + 1 mV)
Interleave adjustment Applies to AWG70001A only
Phase adjustment range -180° to +180°
Phase adjustment resolution 1°
Amplitude matching range ±10% of amplitude setting
to 0.5 V
p-p
to 1.0 V
p-p
into 50 Ω single-ended
p-p
into 100 Ω single-ended
p-p
Inter-channel skew control Applies to AWG70002A only
Range -100 ps to +100 ps
Resolution 1 ps
26 AWG70000A Series Installation and Safety Instructions
Page 41

Specifications
Analog AC output (AWG70001A with Option AC)
Output connector Aeroflex/Weinschel Planar Crown Universal Connector System with SMA female adapter
Number of analog AC outputs AWG70001A: 1
Type of outputs single ended
Output impedance 50 Ω
Amplitude
Range (for a CW signal at
specified frequencies in each
path)
Filter path Description
No filter 25 dBm to -70 dBm at 1 GHz
18 dBm to -77 dBm at 13 GHz
Low pass 25 dBm to -70 dBm at 1 GHz
Band pass (10 GHz to 14.5 GHz) 18 dBm to -77 dBm at 11 GHz
Band pass (13 GHz to 18 GHz) 20 dBm to -90 dBm at 14 GHz
18 dBm to -90 dBm at 18 GHz
Accuracy (at calibration
frequency)
Resolution 0.01 dB
Filter path Description
No filter ±0.5 dB at 1 GHz, ambient 16 °C to 26 °C
Low pass ±0.5 dB at 1 GHz, ambient 16 °C to 26 °C
Band pass (10 GHz to 14.5 GHz) ±1.5 dB at 11 GHz, ambient 16 °C to 26 °C
Band pass (13 GHz to 18 GHz) ±1.5 dB at 14 GHz, ambient 16 °C to 26 °C
±1.5 dB at 1 GHz, ambient 0 °C to 50 °C
±1.5 dB at 1 GHz, ambient 0 °C to 50 °C
±3.0 dB at 11 GHz, ambient 0 °C to 50 °C
±3.5 dB at 14 GHz, ambient 0 °C to 50 °C
AWG70000A Series Installation and Safety Instructions 27
Page 42

Specifications
Marker outputs
Output connector SMA (front panel)
Number of outputs
AWG70001A 2
AWG70002A 4
Type of outputs (+) and (-) complementary
ON/OFF control Independent control for each marker
Impedance 50 Ω
Output voltage Independent control for each marker
Amplitude range 0.5 V
Amplitude resolution 10 mV
Offset range 1.4 V – (amplitude ÷ 2) to –1.4 V + (amplitude ÷ 2) into 50 Ω
Offset resolution 10 mV
DC accuracy ±(10% of |output high or low setting| + 50 mV) into 50 Ω
to 1.4 V
p-p
into 50 Ω
p-p
External termination voltage range –2.8 V to +2.8 V
Variable delay control Independent control for each marker
Range 0 to 100 ps
Resolution 1 ps
Flag outputs
Output connector SMB (rear panel)
Number of outputs
AWG70001A 4
AWG70002A 8
Impedance 50 Ω
Output voltage
High 3.3 V into 50 Ω
Low 0 V
28 AWG70000A Series Installation and Safety Instructions
Page 43

Specifications
Auxillary outputs
10 MHz reference out
Connector SMA (rear panel)
Output impedance 50 Ω, AC coupled
Amplitude +4 dBm ±2 dBm
Frequency 10 MHz ±(1 ppm + aging)
Synchronization clock output
Frequency 1/80 of the clock output
Amplitude 1.0 V ±150 mV
Connector SMA (rear panel)
Output impedance 50 Ω, AC coupled
External clock output
Connector SMA (rear-panel)
Output impedance 50 Ω AC coupled
Frequency range 6.25 GHz to 12.5 GHz
Output amplitude +5 dBm to +10 dBm
into 50 Ω
p-p
Auxiliary inputs
External Clock in
Connector SMA (rear panel)
Input impedance 50 Ω, AC coupled
Frequency range 6.25 GHz to 12.5 GHz
Input amplitude 0 dBm to +10 dBm
Trigger
Number of inputs 2 (A and B)
Slope/Polarity Positive or negative selectable
Connector SMA (rear panel)
Input impedance 50 Ω or 1 kΩ selectable
Input voltage range 50 Ω: <5 V
1 kΩ: ±10 V
Threshold range -5.0 V to 5.0 V
Threshold resolution 0.1 V
Reference in
Fixed frequency range 10 MHz, ±10 ppm
Variable frequency range 35 MHz to 240 MHz
rms
Acceptable frequency drift while the instrument is operating is ±0.1 %.
AWG70000A Series Installation and Safety Instructions 29
Page 44

Specifications Auxiliary inputs (cont.)
Connector SMA (rear panel)
Input impedance 50 Ω, AC coupled
Computer outputs
Computer outputs
Video output 1 VGA port on rear panel
eSATA 1 port on rear panel, 1.5 Gbps
USB 2.0 ports Type A, (6 total: 2 on front panel, 4 on rear panel)
GPIB Interface Available as an optional accessory that connects to the USB device and USB Host ports with the
TEK-USB-488 GPIB to USB Adapter
LAN RJ-45 LAN connector on rear panel supporting 10/100/1000 Ethernet
Display characteristics LED backlit touch screen display, 132 x 99 mm (165 mm diagonal), 1024 × 768 pixels
Power characteristics
Power supply
AC line input 100 to 240 V AC, 50/60 Hz
Consumption 500 Watts
EMC, environment, and safety
Temperature
Operating 0 ºC to +50 ºC (32 ºF to +122 ºF)
Non-operating -20 ºC to +60 ºC (140 ºF to +50 ºF)
Humidity
Operating 5% to 90% relative humidity (% RH) at up to 30 °C
5% to 45% relative humidity above 30 °C up to 50 °C
Non-condensing
Non-operating 5% to 90% relative humidity (% RH) at up to 30 °C
5% to 45% relative humidity above 30 °C up to 60 °C
Non-condensing
Altitude
Operating Up to 3,000 meters (9,843 feet)
Derate maximum operating temperature by 1 °C per 300 meters above 1500 meters.
Non-operating Up to 12,000 meters (39,370 feet)
30 AWG70000A Series Installation and Safety Instructions
Page 45

Compliance Information
This section lists the EMC (electromagnetic compliance), safety, and environmental standards with which the instrument
complies.
EMC compliance
EC Declaration of Conformity – EMC
Meets intent of Directive 2004/108/EC for Electromagnetic Compatibility. Compliance was demonstrated to the following
specifications as listed in the Official Journal of the European Communities:
EN 61326-1. EMC requirements for electrical equipment for measurement, control, and laboratory use.
■
CISPR 11. Radiated and conducted emissions, Group 1, Class A
■
IEC 61000-4-2. Electrostatic discharge immunity
■
IEC 61000-4-3. RF electromagnetic field immunity
■
IEC 61000-4-4. Electrical fast transient / burst immunity
■
IEC 61000-4-5. Power line surge immunity
■
IEC 61000-4-6. Conducted RF immunity
■
IEC 61000-4-11. Voltage dips and interruptions immunity
1 2
3
EN 61000-3-2.. AC power line harmonic emissions
EN 61000-3-3.. Voltage changes, fluctuations, and flicker
Mfr. Compliance Contact.
Tektronix, Inc. PO Box 500, MS 19‐045
Beaverton, OR 97077, USA
www.tek.com
Australia / New Zealand Declaration of Conformity – EMC
Complies with the EMC provision of the Radiocommunications Act per the following standard, in accordance with ACMA:
■
CISPR 11. Radiated and conducted emissions, Group 1, Class A, in accordance with EN 61326-1.
1
This product is intended for use in nonresidential areas only. Use in residential areas may cause electromagnetic interference.
2
Emissions which exceed the levels required by this standard may occur when this equipment is connected to a test object.
3
For compliance with the EMC standards listed here, high quality shielded interface cables should be used.
AWG70000A Series Installation and Safety Instructions 31
Page 46

Compliance Information
Safety compliance
This section lists the safety standards with which the product complies and other safety compliance information.
EU declaration of conformity – low voltage
Compliance was demonstrated to the following specification as listed in the Official Journal of the European Union:
Low Voltage Directive 2006/95/EC.
■
EN 61010-1. Safety Requirements for Electrical Equipment for Measurement, Control, and Laboratory Use – Part 1: General
Requirements.
U.S. nationally recognized testing laboratory listing
■
UL 61010-1. Safety Requirements for Electrical Equipment for Measurement, Control, and Laboratory Use – Part 1: General
Requirements.
Canadian certification
■
CAN/CSA-C22.2 No. 61010-1. Safety Requirements for Electrical Equipment for Measurement, Control, and Laboratory Use
– Part 1: General Requirements.
Additional compliances
■
IEC 61010-1. Safety Requirements for Electrical Equipment for Measurement, Control, and Laboratory Use – Part 1:
General Requirements.
Equipment type
Test and measuring equipment.
Safety class
Class 1 – grounded product.
Safety certification of plug-in or VXI modules
The safety certification is valid only when installed in an appropriately approved (by a USA NRTL or a Canada Certified
Organization) mainframe.
Pollution degree
Pollution Degree 2 (as defined in IEC 61010-1). Note: Rated for indoor, dry location use only.
IP rating
IP20 (as defined in IEC 60529).
32 AWG70000A Series Installation and Safety Instructions
Page 47

Compliance Information
Measurement and overvoltage category descriptions
Measurement terminals on this product may be rated for measuring mains voltages from one or more of the following categories
(see specific ratings marked on the product and in the manual).
■
Measurement Category II. For measurements performed on circuits directly connected to the low-voltage installation.
■
Measurement Category III. For measurements performed in the building installation.
■
Measurement Category IV. For measurements performed at the source of low-voltage installation.
NOTE. Only mains power supply circuits have an overvoltage category rating. Only measurement circuits have a measurement
category rating. Other circuits within the product do not have either rating.
Mains overvoltage category rating
Overvoltage Category II (as defined in IEC 61010-1)
Environmental compliance
This section provides information about the environmental impact of the product.
Product end-of-life handling
Observe the following guidelines when recycling an instrument or component:
Equipment recycling. Production of this equipment required the extraction and use of natural resources. The equipment may
contain substances that could be harmful to the environment or human health if improperly handled at the product’s end of life.
To avoid release of such substances into the environment and to reduce the use of natural resources, we encourage you to
recycle this product in an appropriate system that will ensure that most of the materials are reused or recycled appropriately.
This symbol indicates that this product complies with the applicable European Union requirements according to
Directives 2012/19/EU and 2006/66/EC on waste electrical and electronic equipment (WEEE) and batteries. For
information about recycling options, check the Tektronix Web site (www.tek.com/productrecycling).
Perchlorate materials. This product contains one or more type CR lithium batteries. According to the state of California, CR
lithium batteries are classified as perchlorate materials and require special handling. See www.dtsc.ca.gov/hazardouswaste/
perchlorate for additional information.
Restriction of hazardous substances
This product is classified as an industrial monitoring and control instrument, and is not required to comply with the substance
restrictions of the recast RoHS Directive 2011/65/EU until July 22, 2017.
AWG70000A Series Installation and Safety Instructions 33
Page 48

Compliance Information
34 AWG70000A Series Installation and Safety Instructions
Page 49

Index
10 MHz Reference Output
rear-panel, 15
A
About my AWG, 10
AC output
front-panel connector, 14
Accessories, 1
All outputs off, 19, 20
All Outputs Off button, 17
Analog output
front-panel connector, 14
front-panel connectors, 14
Analog outputs
LED color, 14
AWG mode overview, 18
AWG mode selector, 19, 20
B
Basic guidelines, 23
C
Calibration, 7
Channel enable, 18, 20
Chassis ground
front-panel connector, 14
Cleaning, 4
Clock Out
rear-panel, 15
Connectors
rear-panel, 15
Continuous
Run mode, 22
Control panel, 16
Control settings
how to change, 22
Controls
touchscreen, 17
Disable outputs, 19, 20
Disconnect outputs, 19, 20
Display properties, 11
Documentation, vii
E
Enable channel, 18, 20
Environmental requirements, 4
error indication, 21
eSATA port
rear-panel, 15
External Clock Input
rear-panel, 15
External monitor, 15
External SATA, 15
F
Fine button, 17
Force Trig, 22
Force Trigger buttons, 17
Forced shutdown, 6
Front-panel
connectors, 14
Functions mode overview, 20
Functions mode selector, 19, 20
G
General purpose knob, 17
H
Hard drive
front-panel, 14
Help button, 19, 21
Home button, 16
I
D
Diagnostics, 6
AWG70000A Series Installation and Safety Instructions 35
Incoming inspection, 6
Install
options, 10
Page 50

Index
upgrades, 10
L
LAN connector
rear-panel, 15
LED color
Analog outputs, 14
marker outputs, 14
Lock screen, 23
M
Marker output
front-panel connector, 14
Marker outputs
LED color, 14
Menu bar
Screen interface, 20
Menu tabs
Screen interface, 18
Mode selection
AWG, 19, 20
Functions, 19, 20
N
Network connection, 8
Numeric keypad, 17
O
Open, 19
Open setup, 19, 21
Operating requirements, 4
Operating system restore, 24
Option
installation, 10
list, 10
Output on/off, 21
Outputs disabled, 19, 20
Overheat protection, 9
Overview
AWG mode, 18
Functions mode, 20
P
Pattern Jump In
rear-panel, 15
Play a waveform, 18
Play button, 18, 20
Play/Stop button, 16, 18, 20
Play/Stop button (screen)
green with sine wave, 21
green with T symbol, 21
no light, 21
red, 21
yellow with clock symbol, 21
Play/Stop front-panel button
amber, 22
flashing green, 22
green, 22
no light, 22
red, 22
Playing a waveform
guidelines, 23
Pop-up keypad, 22
POST
Power-on self test, 6
Power button
flashing red, 5, 9
green, 5
indicators, 5
no light, 5
yellow, 5
Power cord
rear-panel, 15
Power cord input, 15
Power supply requirements, 4
Power-on self test
POST, 6
Powering off, 6
Powering on, 5
Preferences, 23
Product software installation, 24
R
Rear-panel
connectors, 15
Reference Clock Input
rear-panel, 15
Remote desktop, 9
Remote PC
Controlling the instrument, 9
Removable hard drive, 14
36 AWG70000A Series Installation and Safety Instructions
Page 51

Index
Replaceable parts, 3
Requirements
environmental, 4
operating, 4
power supply, 4
Restore
AWG product software, 24
Windows operating system, 24
Restore Default Layout, 19, 21
Restore default setup, 19, 21
Restore last setup, 19, 21
Run Mode
Continuous, 22
Triggered, 22
Triggered Continuous, 22
Run state control, 21
S
Save, 19
Save setup, 19, 21
Screen interface, 19
Security, 23
Self calibration, 7
Sequences, 19
Setup
default, 19, 21
open, 21
save, 21
Shutdown
forced, 6
Software installation, 24
Standard accessories, 1
Status bar
Screen interface, 21
Status indicators (Play/Stop button), 22
Status indicators (screen), 21
Status message
calibration recommended, 7
Stop button, 18, 20
Sync Clock Out
rear-panel, 15
Sync to Hub
rear-panel, 15
T
TekVISA installation, 24
Tools panel, 19, 21
Touch screen, 16
Touchscreen button, 17
Trigger controls
Screen interface, 19
Trigger Inputs A and B
rear-panel, 15
Triggered
Run mode, 22
Triggered Continuous
Run mode, 22
U
Upgrade installation, 10
USB connector
front-panel connector, 14
rear-panel, 15
USB Device
rear-panel, 15
USB ports
disable, 23
V
VGA port
rear-panel, 15
Video port, 15
View installed options, 10
W
Waveform
screen interface, 19
Waveform color, 14
Windows remote desktop, 9
Windows shutdown, 6
AWG70000A Series Installation and Safety Instructions 37
Page 52

Index
38 AWG70000A Series Installation and Safety Instructions
 Loading...