

Page 1

Aurora
Automated File-based Quality Control System
User Manual
*P077111107*
077-1111-07
Page 2

Page 3

Aurora
Automated File-based Quality Control System
User Manual
This document supports software version 6.6.
www.tek.com
077-1111-07
Page 4
Copyright © Tektronix. All rights reserved. Licensed software products are owned by Tektronix or its subsidiaries
or suppliers, and are protected by national copyright laws and international treaty provisions. Tektronix products
are covered by U.S. and foreign patents, issued and pending. Information in this publication supersedes that in all
previously published material. Specifications and price change privileges reserved.
TEKTRONIX and TEK are registered trademarks of Tektronix, Inc.
Aurora technical support
Aurora technical support is available on business days from 6:00 AM to 5:00 PM Pacific time and 9:00 AM to
5:00 PM Indian Standard time using the following numbers:
US/Canada toll-free 1-844-219-5329
India toll-free 1800 3000 4835
Russia toll-free 810800-22554411
United Kingdom 44 1344 39 2541
Europe 1 toll-free
1
Austria, Belgium, France, Germany, Ireland, Italy, Netherlands,
Spain, Sweden, Switzerland, and UK.
00800-22554411
Alternatively, you can send an e-mail request for support to videosupport@tektronix.com.
Contacting Tektronix
Tektronix, Inc.
14150 SW Karl Braun Drive
P.O. Box 500
Beaverton, OR 97077
USA
For product information, sales, service, and technical support:
■
In North America, call 1-800-833-9200.
■
Worldwide, visit www.tek.com to find contacts in your area.
Page 5

Warranty
Tektronix warrants that this software product will conform to the specifications in the documentation provided
with the product, when used properly in the specified operating environment, for a period of three (3) months. The
warranty period begins on the date of shipment, except that if the program is installed by Tektronix, the warranty
period begins on the date of installation or one month after the date of shipment, whichever is earlier. If this
software product does not conform as warranted, Tektronix will provide remedial services as described in the
documentation provided with the product. Tektronix does not warrant that the functions contained in this software
product will meet Customer's requirements or that operation of the programs will be uninterrupted or error-free or
that all errors will be corrected.
In order to obtain service under this warranty, Customer must notify Tektronix of the defect before the expiration
of the warranty period and make suitable arrangements for such service in accordance with the instructions
received from Tektronix. If Tektronix is unable, within a reasonable time after receipt of such notice, to provide
remedial services, Customer may terminate the license for this software product and return this software product
and any associated materials to Tektronix for credit or refund.
This warranty shall not apply to any software product that has been modified or altered by Customer. Tektronix
shall not be obligated to furnish service under this warranty with respect to any software product a) that is used in
an operating environment other than that specified or in a manner inconsistent with the User's Manual and
documentation or b) when the software product has been integrated with other software if the result of such
integration increases the time or difficulty of analyzing or servicing the software product or the problems ascribed
to the software product.
THIS WARRANTY IS GIVEN BY TEKTRONIX WITH RESPECT TO THE PRODUCT IN LIEU OF ANY
OTHER WARRANTIES, EXPRESS OR IMPLIED. TEKTRONIX AND ITS VENDORS DISCLAIM ANY
IMPLIED WARRANTIES OF MERCHANTABILITY OR FITNESS FOR A PARTICULAR PURPOSE.
TEKTRONIX' RESPONSIBILITY TO PROVIDE REMEDIAL SERVICE WHEN SPECIFIED, REPLACE
DEFECTIVE MEDIA, OR REFUND CUSTOMER'S PAYMENT IS THE SOLE AND EXCLUSIVE REMEDY
PROVIDED TO CUSTOMER FOR BREACH OF THIS WARRANTY. TEKTRONIX AND ITS VENDORS
WILL NOT BE LIABLE FOR ANY INDIRECT, SPECIAL, INCIDENTAL, OR CONSEQUENTIAL
DAMAGES IRRESPECTIVE OF WHETHER TEKTRONIX OR THE VENDOR HAS ADVANCE NOTICE OF
THE POSSIBILITY OF SUCH DAMAGES.
[W9a – 15AUG04]
Page 6

Page 7

Table of Contents
Getting started
Installation ...................................................................................................................................... 1
Installation prerequisites ............................................................................................................ 1
How to install the Aurora software ........................................................................................... 1
How to install additional verification units on additional machines ......................................... 8
Activate the software license ..................................................................................................... 9
Aurora technical support ......................................................................................................... 10
Aurora software license upgrades ........................................................................................... 11
First time operation ....................................................................................................................... 12
Login as administrator ............................................................................................................. 12
Set up new users ...................................................................................................................... 12
Testuser login .......................................................................................................................... 13
Aurora tray application ............................................................................................................ 14
Log out of Aurora .................................................................................................................... 15
Before you start ............................................................................................................................ 16
File access permissions ........................................................................................................... 16
Test template customization .................................................................................................... 17
Audio service configuration .................................................................................................... 18
Operating basics
Product overview .......................................................................................................................... 19
Main user interface .................................................................................................................. 19
Tab descriptions ...................................................................................................................... 20
Optional features ..................................................................................................................... 21
Dashboard view ....................................................................................................................... 22
Dashboard job categories ........................................................................................................ 23
Dashboard columns and sorting .............................................................................................. 23
Dashboard buttons ................................................................................................................... 24
View older jobs ....................................................................................................................... 25
QC jobs ......................................................................................................................................... 26
Add new job tab ...................................................................................................................... 26
Aurora shell extension ............................................................................................................. 32
How to add jobs with referenced essence container files ........................................................ 33
How to add jobs for frame-wrapped sequence files ................................................................ 34
How to add jobs with the DXW generic container to group mono essence files .................... 34
Aurora Automated File-based Quality Control System User Manual i
Page 8

Table of Contents
Other job add methods ............................................................................................................ 35
Template Editor ............................................................................................................................ 36
File read .................................................................................................................................. 38
Default .................................................................................................................................... 40
Audio layout ........................................................................................................................... 43
QC tests .................................................................................................................................. 50
Template Manager ........................................................................................................................ 70
How to create templates or use default templates ........................................................................ 71
How to create a custom test template ...................................................................................... 72
Default templates ..................................................................................................................... 74
Smart Test plans ........................................................................................................................... 75
How to build a new Smart Test plan ....................................................................................... 75
How to use a Smart Test plan .................................................................................................. 77
How to import and export Smart Test plans ............................................................................ 77
How to import or export templates ............................................................................................... 78
How to import Aurora legacy templates ................................................................................. 79
Reports .......................................................................................................................................... 82
Options for accessing and viewing job reports ....................................................................... 82
How to understand a Job Report ............................................................................................. 83
Help files from the report ........................................................................................................ 88
How to open the file in Hydra Player from an error report location ....................................... 89
How to use the Hydra Review Bar to view results and edit QC events .................................. 89
How to print job reports .......................................................................................................... 91
How to automate the QC process ................................................................................................. 93
Hot folders-Watch folders ....................................................................................................... 93
Email notifications .................................................................................................................. 96
Application Programming Interface (API) .............................................................................. 97
Aurora analytics ............................................................................................................................ 98
Search ...................................................................................................................................... 98
Trends ...................................................................................................................................... 99
Result comparison ................................................................................................................. 101
Other Aurora settings .................................................................................................................. 102
Manage Credentials ............................................................................................................... 103
Automatic clean-up of old jobs ............................................................................................. 106
Growing file settings ............................................................................................................. 106
Manage multi-core testing (set CPU cores per VU) .............................................................. 107
Report Options ...................................................................................................................... 107
Set a quarantine file location ................................................................................................. 110
Change the browse control (file selector type) ...................................................................... 110
ii Aurora Automated File-based Quality Control System User Manual
Page 9

Table of Contents
Check template compatibility for upgrades ........................................................................... 110
MD5 hash creation ................................................................................................................ 111
Sequence file settings ............................................................................................................ 111
Change how QC event locations are reported ....................................................................... 112
Toggle EBU test codes on-off ............................................................................................... 112
Analytics comparison settings ............................................................................................... 113
Analytics search index settings ............................................................................................. 113
Custom language setting ....................................................................................................... 113
Custom theme setting ............................................................................................................ 114
Decryption settings ................................................................................................................ 114
LDAP settings ....................................................................................................................... 115
Multi-tenant mode ................................................................................................................. 116
Aurora Automated File-based Quality Control System User Manual iii
Page 10

Table of Contents
iv Aurora Automated File-based Quality Control System User Manual
Page 11

Getting started
Installation
Installation prerequisites
How to install the Aurora
software
Before installing the Aurora software, do the following:
■
Set your Power Plan to High Performance (Power Options in Control Panel).
■
Disable CPU/Core Parking options in Windows (a free utility to perform this
operation is located here).
■
Disable User Account Control (if possible in your environment).
■
Open the firewall port necessary to ‘Allow Incoming HTTP Traffic’ on the
default HTTP ports (Windows Firewall disables this or has this rule set to
‘Not Set’ by default).
Perform the following steps to install the Aurora software.
1. The several components of the Aurora software suite are as follows:
a. Aurora Controller: This component runs as a Windows Service (Aurora
Master Controller), and includes IIS registration to host the web GUI and
API service. This component is only installed with the Full Application
option.
b. Aurora Verification Unit: This component runs as both a Windows
Service (Aurora Slave Controller) and an executable (VU.exe) and is the
main QC engine. This component is installed with both the Full
Application and with the Add-On VU options.
c. Aurora Tray: This component monitors a hot folder and service status
and is installed only with the Full Application option.
d. Aurora Shell Extension: This optional component is downloaded
separately from the Aurora installer, and allows client machines to add
jobs to the Aurora queue from Windows Explorer.
e. Java: This optional component is downloaded separately from the
Aurora installer and is necessary only on client machines that want to use
the client-side browse control (by default, the Aurora’s web GUI will
uses server-side browse control). Java installation procedure is fairly
straightforward, as no options are needed.
f. SOAP API Demo & Documentation: These are the WSDL and sample
C# project to exercise the API as a guide for integration of Aurora into
Aurora Automated File-based Quality Control System User Manual 1
Page 12
Getting started
higher level processes. They are installed at c:\Program Files\Tektronix
\Aurora in a ZIP file during the Full Application option.
g. Hydra Player: Aurora Professional VU and Premium products include a
Hydra Player license, which is downloaded separately from the Aurora
installer. Hydra can play any asset that Aurora can test, and Aurora report
thumbnails are linked to open container files at error locations directly in
Hydra. Hydra player installation is covered in the Hydra player manual.
2. Turn off Windows User Account Control. Installation can continue with it on
but we recommend it be turned off.
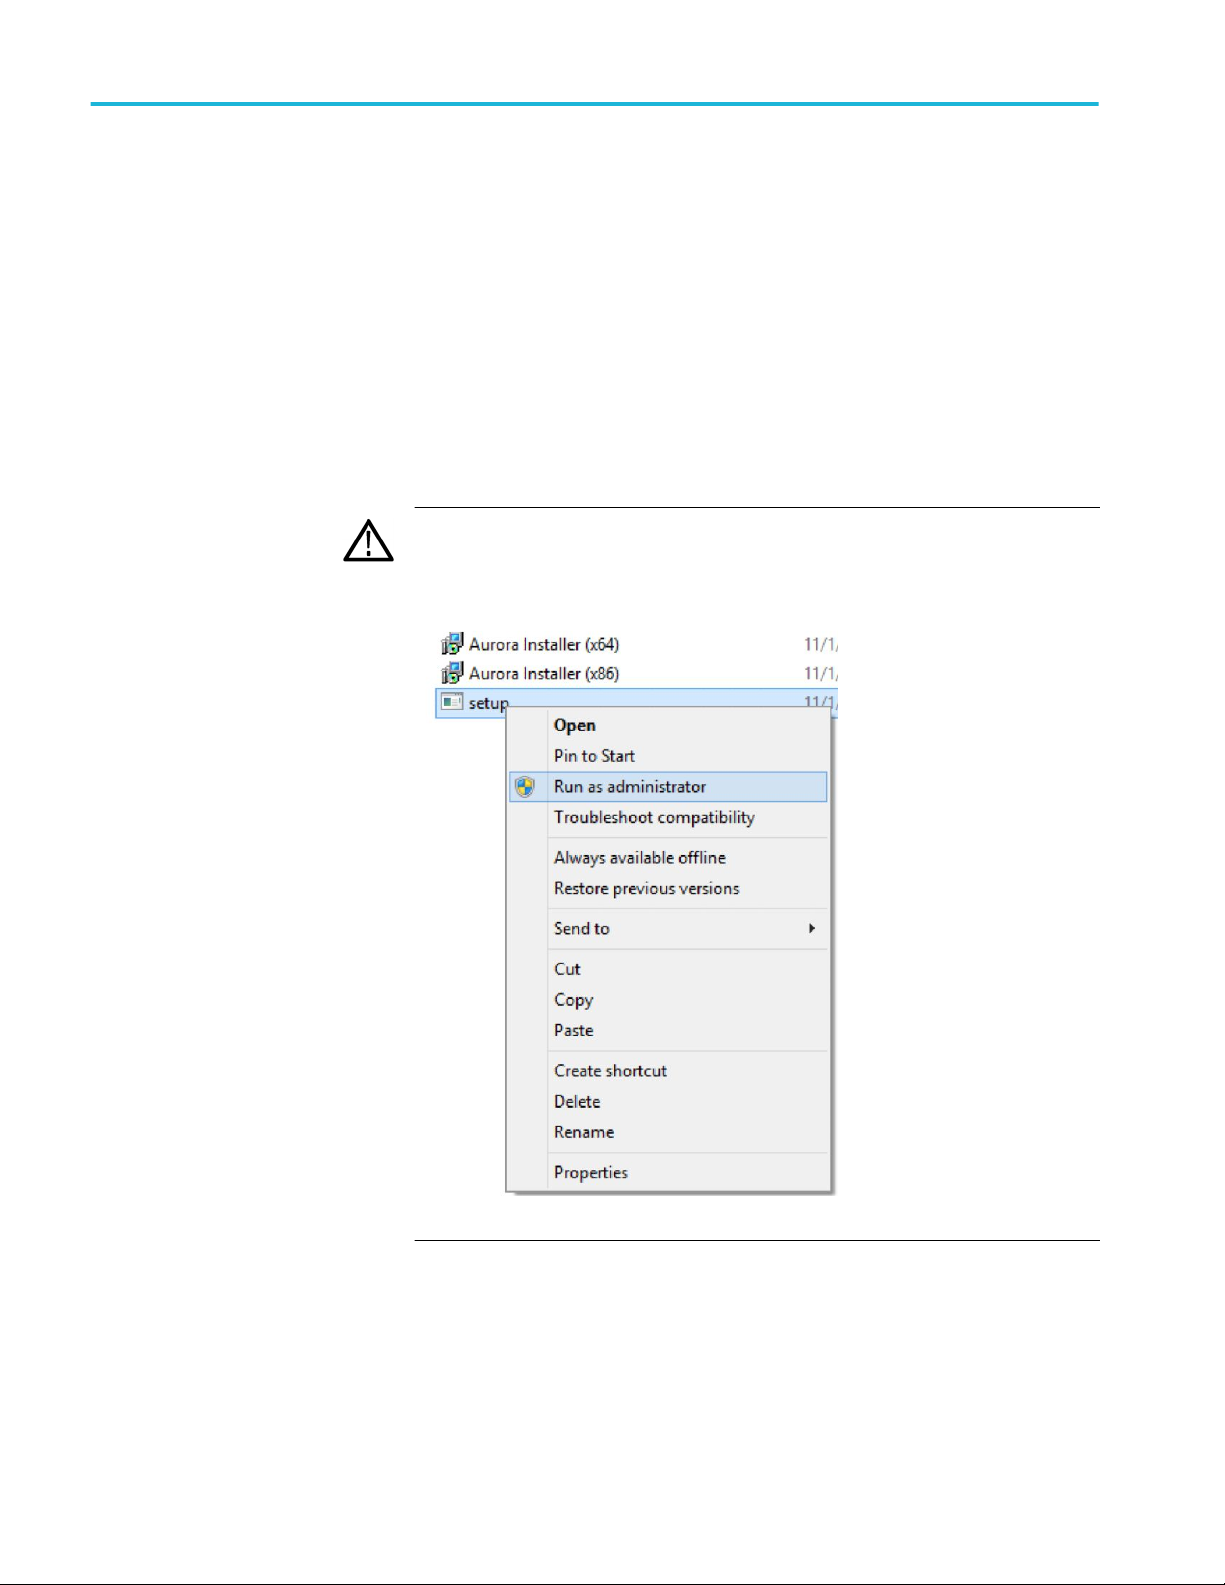
3. Run Setup.exe.
CAUTION. If you are installing on Windows 8 or Server 2012, right-click
setup.exe and select Run as Administrator.
2 Aurora Automated File-based Quality Control System User Manual
Page 13
Getting started
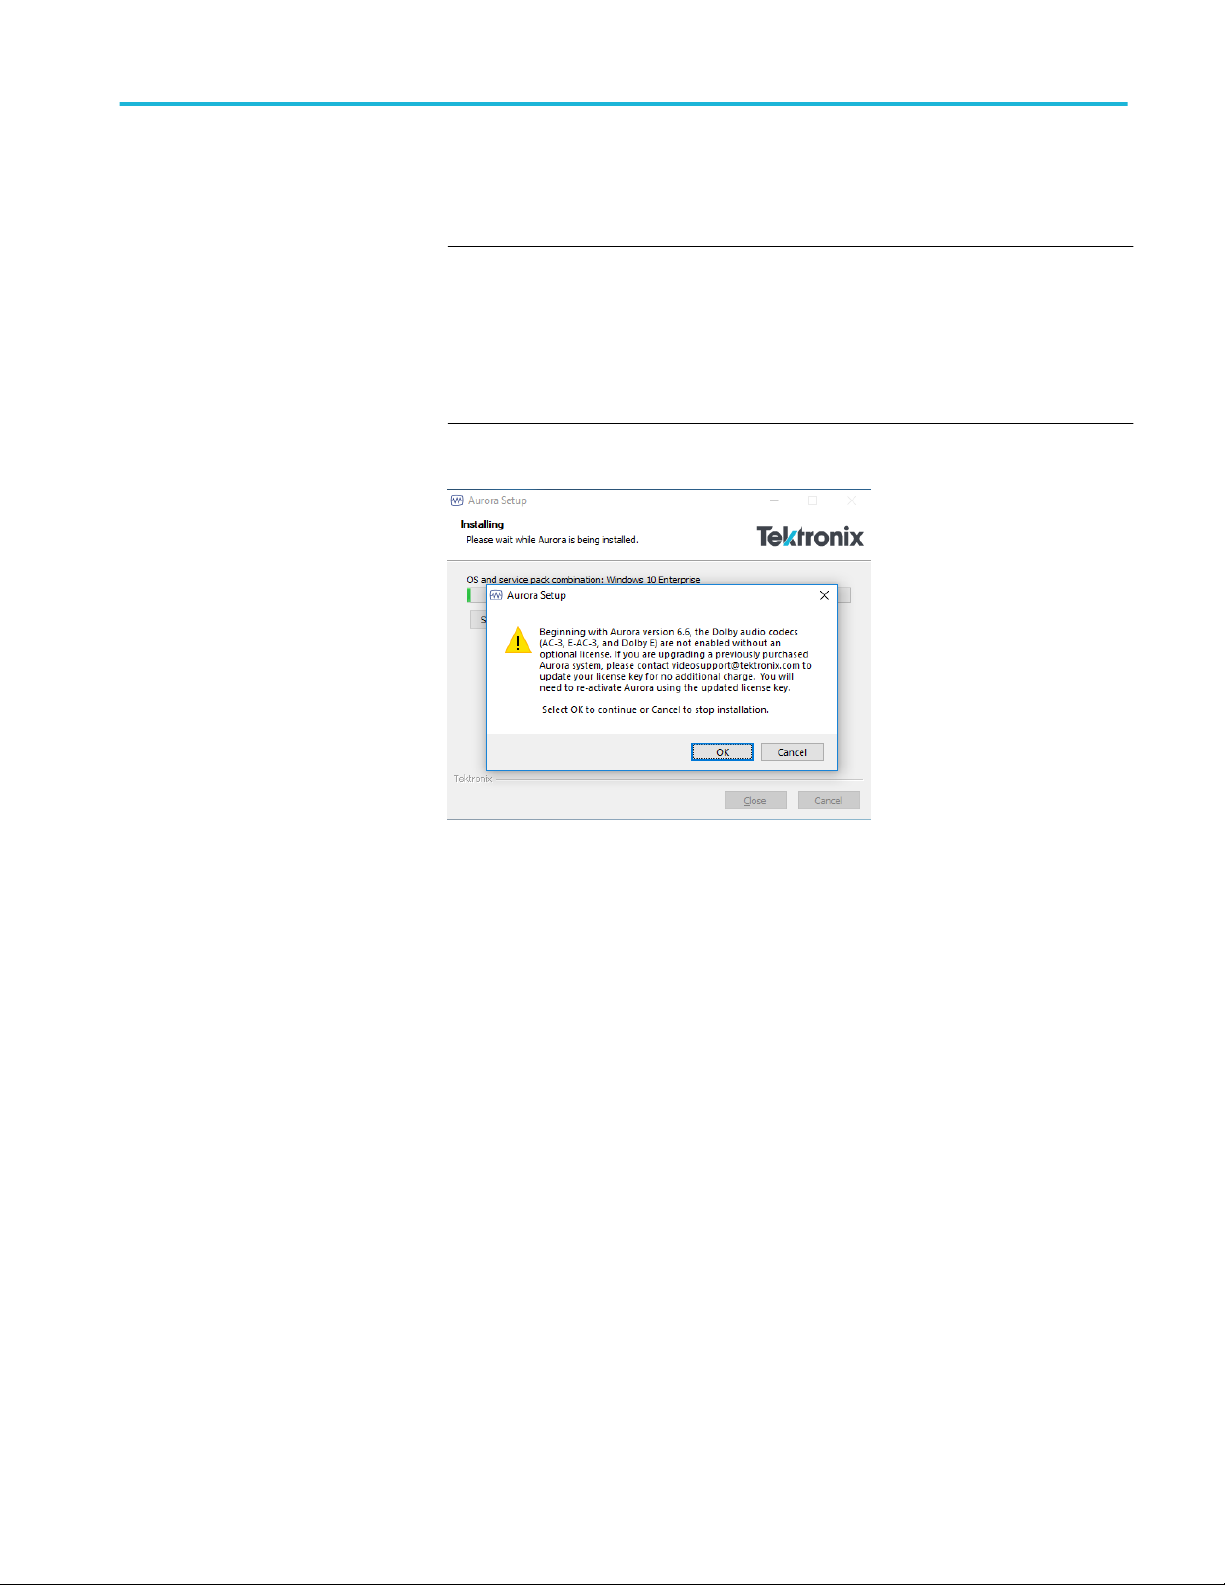
4. If you are installing on Windows 10, double-click on the .exe. The following
pop-up appears. Click OK.
NOTE. Beginning with Aurora version 6.6, the Dolby audio codecs (AC-3, EAC-3, and Dolby E) are not enabled without an optional license. If you are
upgrading a previously purchased Aurora system, please contact
videosupport@tektronix.com to update your license key to include the Dolby
audio codecs for no additional charge. You will need to reactivate Aurora
using the updated license key.
Aurora Automated File-based Quality Control System User Manual 3
Page 14

Getting started
5. The following screen will appear, and is required that you accept the license
terms by selecting the I agree check box to continue installation. You can
open and save the license terms as a PDF file from the license agreement
screen.
6. After agreeing to the terms of the EULA and clicking Next, you will be asked
to select an installation profile. Selecting “Full Application” will install the
controller and verification units on the same machine (you can always use
verification units installed anywhere on your network). Selecting “Add-on
Verification Unit” will install only the verification units (this option will
prompt you for the location of your controller server, so you must run Full
Application install first on a separate computer). Select your desired option
and click “Next.” If you are installing the Full Application, continue this
process. Otherwise, for Add-On Verification Unit installs, proceed to that
section.
4 Aurora Automated File-based Quality Control System User Manual
Page 15
Getting started
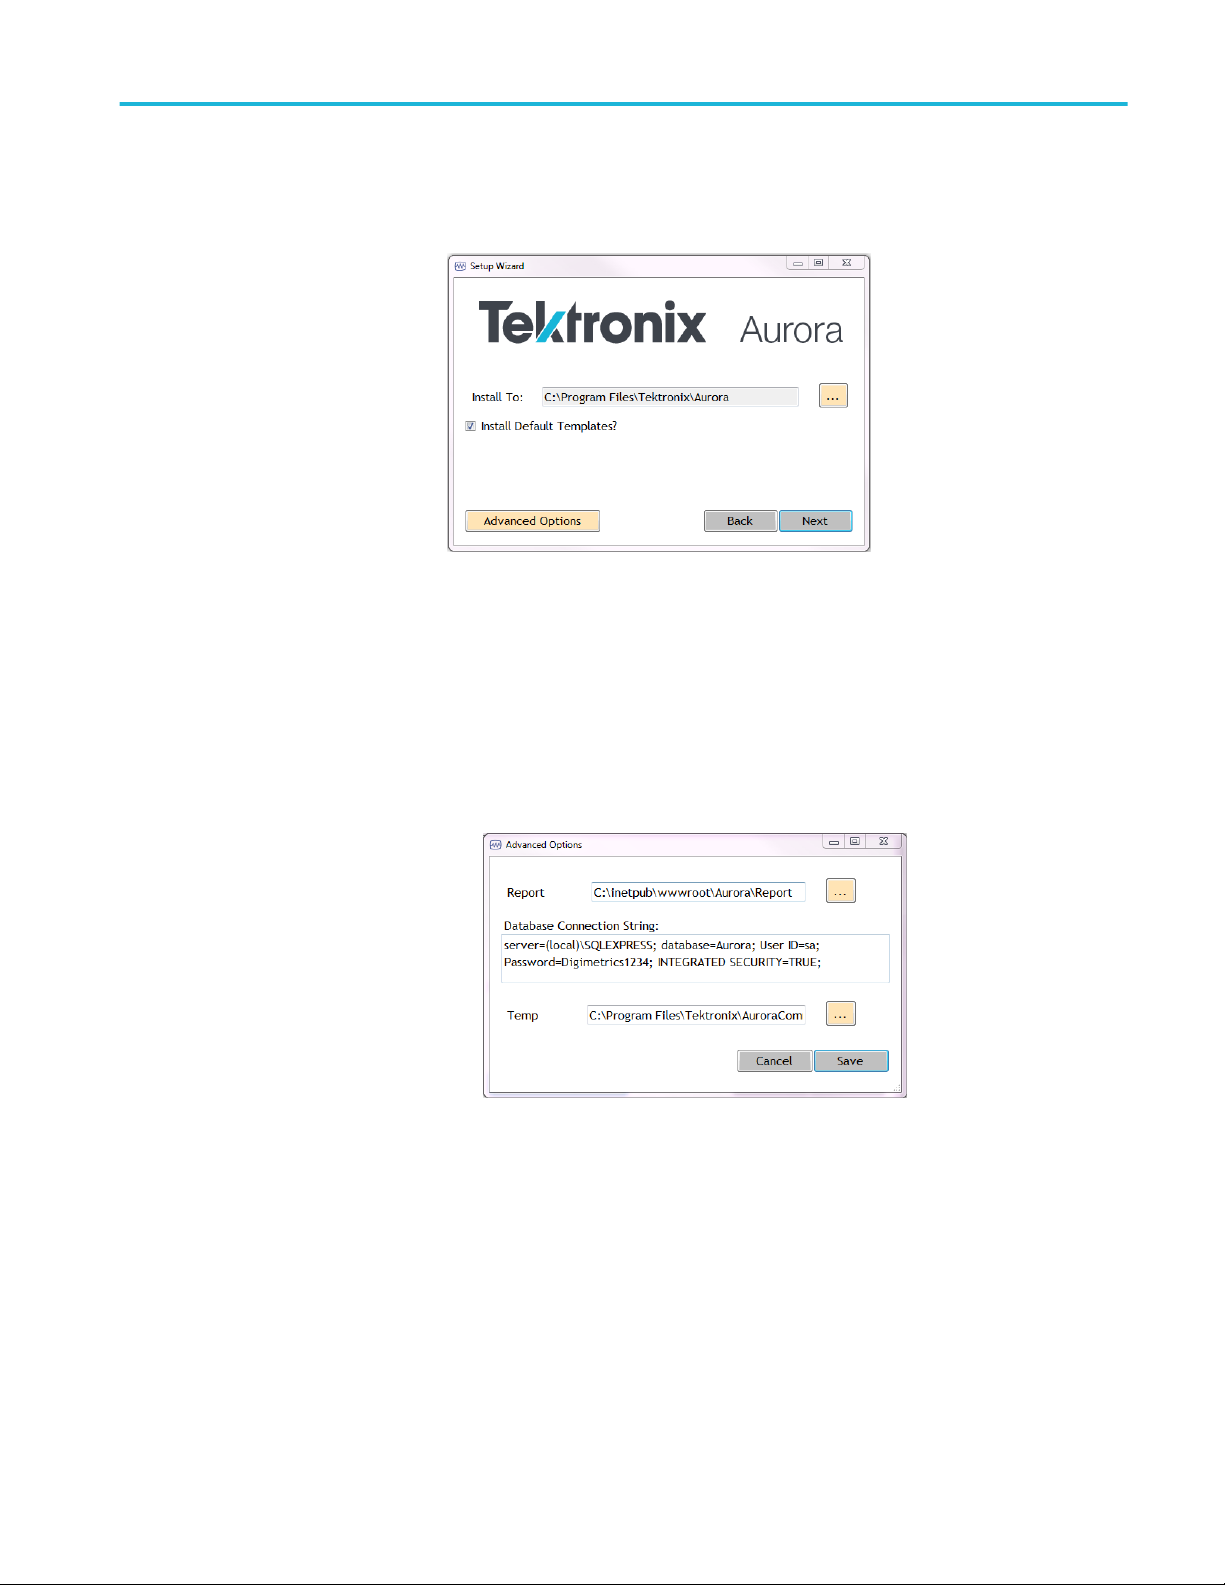
7. The following configuration screen will appear:
■
Install To: Browse to the location where you would like to install Aurora
or just use the default location. C:\Program Files\Tektronix\Aurora for
64-bit operating systems
■
Install Default Templates: Check box to install a set of pre-configured
templates.
■
Advanced Options: Click to see advanced options.
■
Report: Enter the path to the folder where Aurora will save job reports.
The default location is: C:\inetpub\wwwroot\Aurora\Report.
■
Database connection string: The database connection string displays
here. The default should be enough for most systems. For assistance,
contact Tektronix Technical Support.
■
Temp: Enter the path for the working directory. This is the temporary
location of your report while the job is in progress. The default path is
typically used.
■
Click Save when finished.
8. Click Next to begin installation.
Aurora Automated File-based Quality Control System User Manual 5
Page 16
Getting started
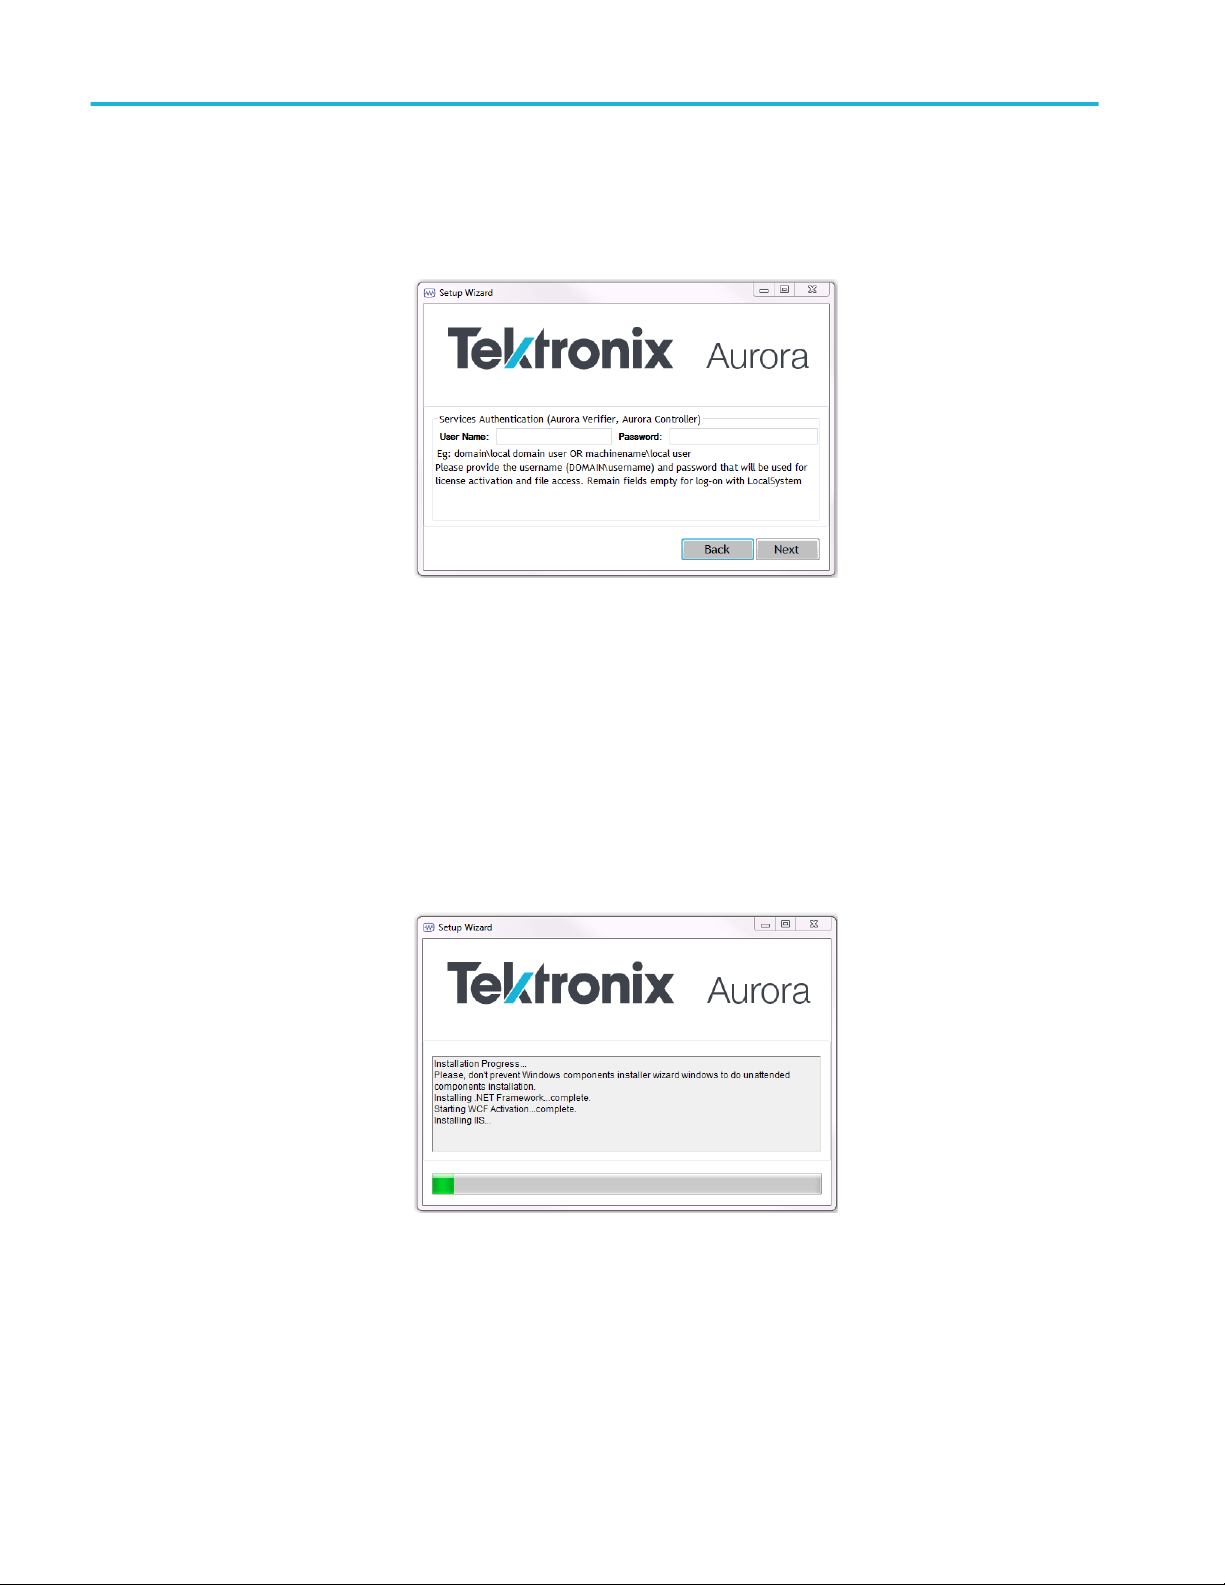
9. Services Authentication: This step is CRITICAL. Aurora services must
have authentication to reach the path your files for QC are stored at.:
Services Authentication: Enter the domain\user or machinename\local user
and password to allow the Aurora Controller and Aurora Verifier services to
access files on your network. Leave the fields empty to log-on with the
LocalSystem account.
Click Next when finished.
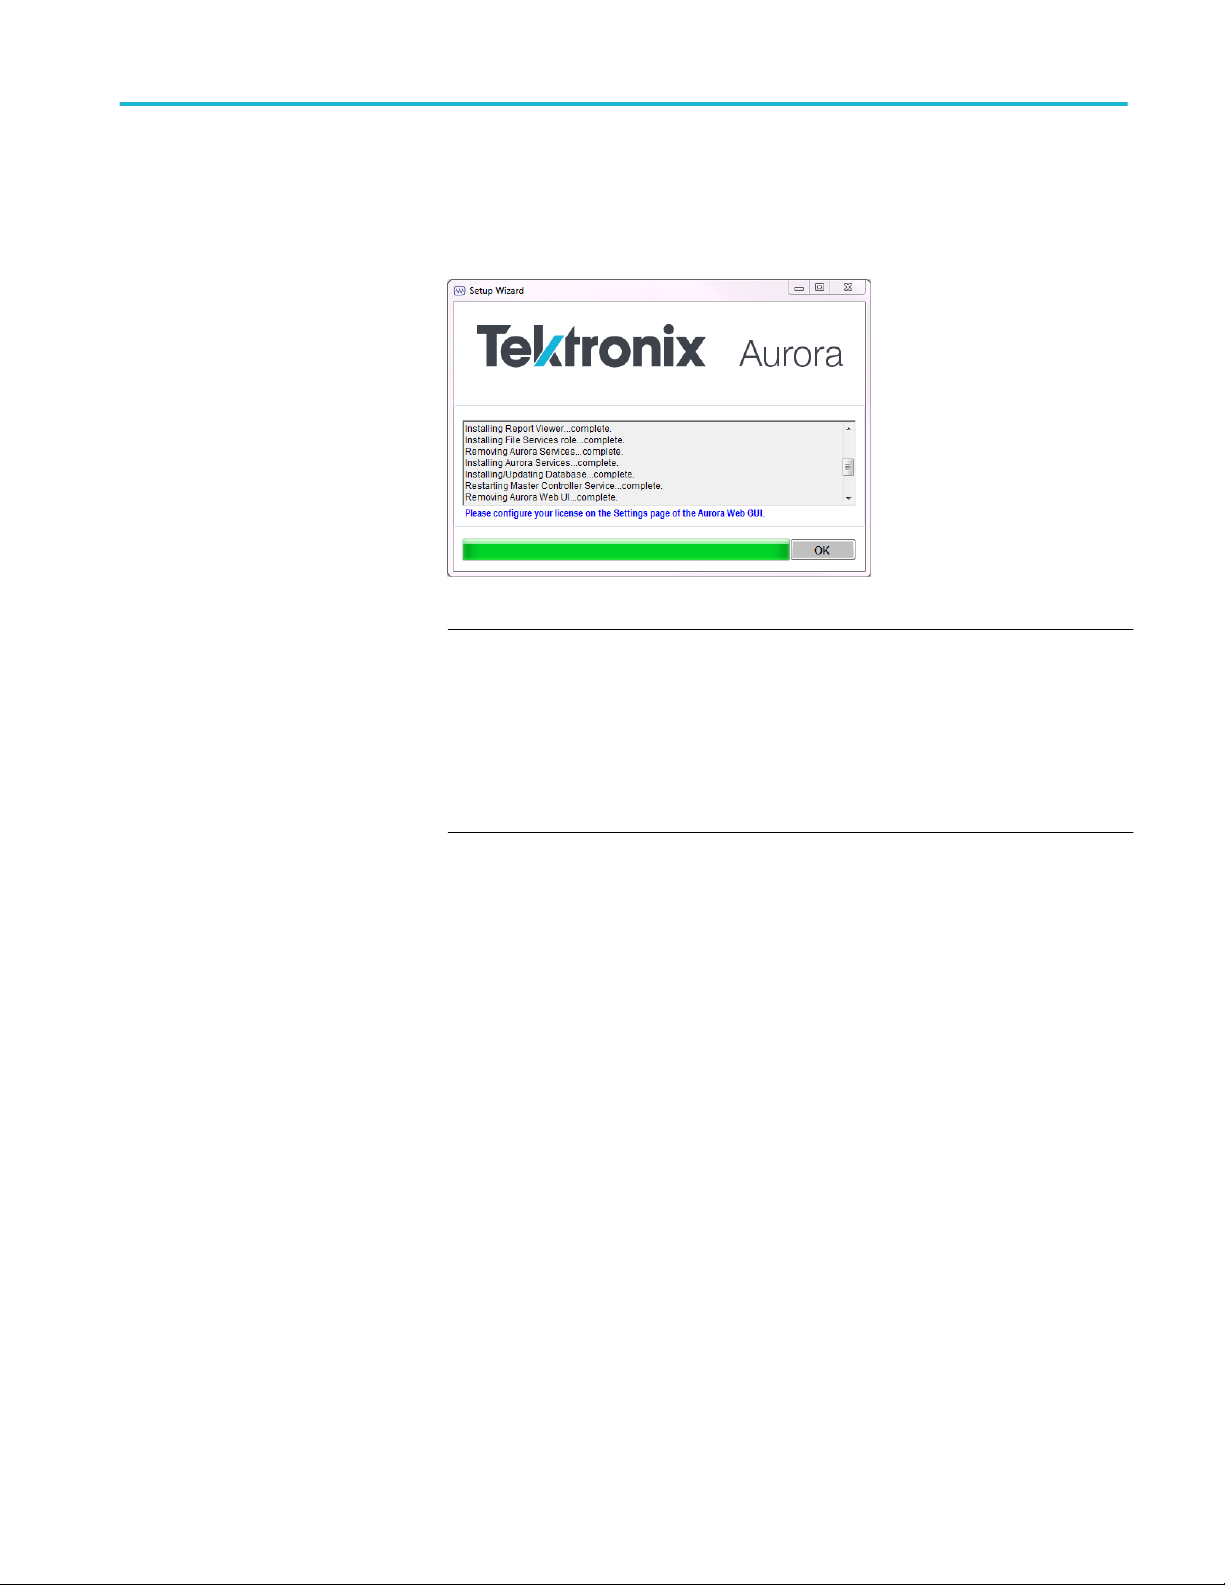
10. All necessary prerequisites are installed in addition to the Aurora software.
The setup wizard displays a progress window showing the status of the
installation processes.
6 Aurora Automated File-based Quality Control System User Manual
Page 17
Getting started
11. Once the initial installation is complete, restart the workstation. Subsequent
upgrades or updates will not require a restart:
NOTE. User Account Control may prevent the Aurora installer from installing
certain components. We highly recommend you turn User Account Control
OFF (from Control Panel/Users) for the machine running Aurora. If any
components fail installation, you may attempt to install these from C:
\Program Files\Tektronix\Aurora\Pre-requisites. If you still have problems
installing components with User Account Control turned on, please contact
Tektronix Technical Support.
12. Open a web browser on the local machine and go to http://localhost/Aurora/
(or from a remote computer, open a web browser and go to http://
[Aurora_Machine_IP_Address]/Aurora.
13. Enter admin as the login and password for your Aurora evaluation.
14. Configure your license received from Tektronix fulfillment using the process
found here.
15. You are now ready to begin using Aurora. Create a template and add a job to
get started. If you have any questions please contact Tektronix Technical
Support.
Aurora Automated File-based Quality Control System User Manual 7
Page 18

Getting started
How to install additional
verification units on
additional machines
Installing additional verification units on additional machines is similar to
installing Aurora on your controller machine.
1. Select Additional Verification Unit (VU).
2. The next step asks you for the IP address of the master controller machine, so
that setup can configure the master controller to use the verification units on
the remote machine.
3. After installing the majority of components, the Aurora installer will check
the status of your license. If you do not have an Aurora license present, it will
prompt you for a license key, which you should have received from
Tektronix fulfillment. You can configure the license using the Settings tab of
the Aurora web GUI from the master controller machine.
8 Aurora Automated File-based Quality Control System User Manual
Page 19

4. The Aurora installer will take care of everything else. To confirm that
everything is setup correctly, browse to the Aurora application on your
master machine and check that the total number of VUs is as you expect by
clicking on System Information in the top right (this number must include the
number of VUs on the controller machine plus the number of VUs on your
new add-on machine).
Getting started
Activate the software
license
If it does not, check the Settings page (under Options) to be sure that the addon machine is correctly listed.
1. License configuration: From the Web GUI click the Options tab and select
Settings. Expand the Manage License section.
2. Online activation (trials or commercial licenses): Enter the 28-character
license key provided by Tektronix fulfillment (include dashes) and click the
Activate button in the Activate section.
3. Offline Trial activation: Enter the 380-character offline activation key
provided by Tektronix fulfillment, and then click the Activate button under
the Activate section. It is not necessary to use the Offline request button for
an offline trial.
Aurora Automated File-based Quality Control System User Manual 9
Page 20

Getting started
4. Offline Commercial License activation: Enter the 28-character license key
provided by Tektronix fulfillment (include dashes) and click Request under
the Offline Request heading. Save the resulting file to your computer and
send that file to videosupport@tektronix.com. You will receive a response
file, which you will need to Browse to under the Offline Activation heading,
and then click the Activate button in that section.
5. Upon successful license activation the “License Status” section will display
the number of days remaining if you are using a trial license or the
Commercial License state if using that type of license.
Aurora technical support
Aurora technical support is available on business days from 6:00 AM to 5:00 PM
Pacific time and 9:00 AM to 5:00 PM Indian Standard time using the following
numbers:
US/Canada toll-free 1-844-219-5329
India toll-free 1800 3000 4835
Russia toll-free 810800-22554411
United Kingdom 44 1344 39 2541
Europe 1 toll-free
1
Austria, Belgium, France, Germany, Ireland,
Italy, Netherlands, Spain, Sweden, Switzerland,
and UK.
00800-22554411
Alternatively, you can send an email request for support to
videosupport@tektronix.com.
10 Aurora Automated File-based Quality Control System User Manual
Page 21
Getting started
Aurora software license
upgrades
When you want to upgrade your Aurora software license, you will need to
provide Tektronix with information about your existing Aurora system as
described in the following procedure.
To upgrade the license for Aurora, do the following:
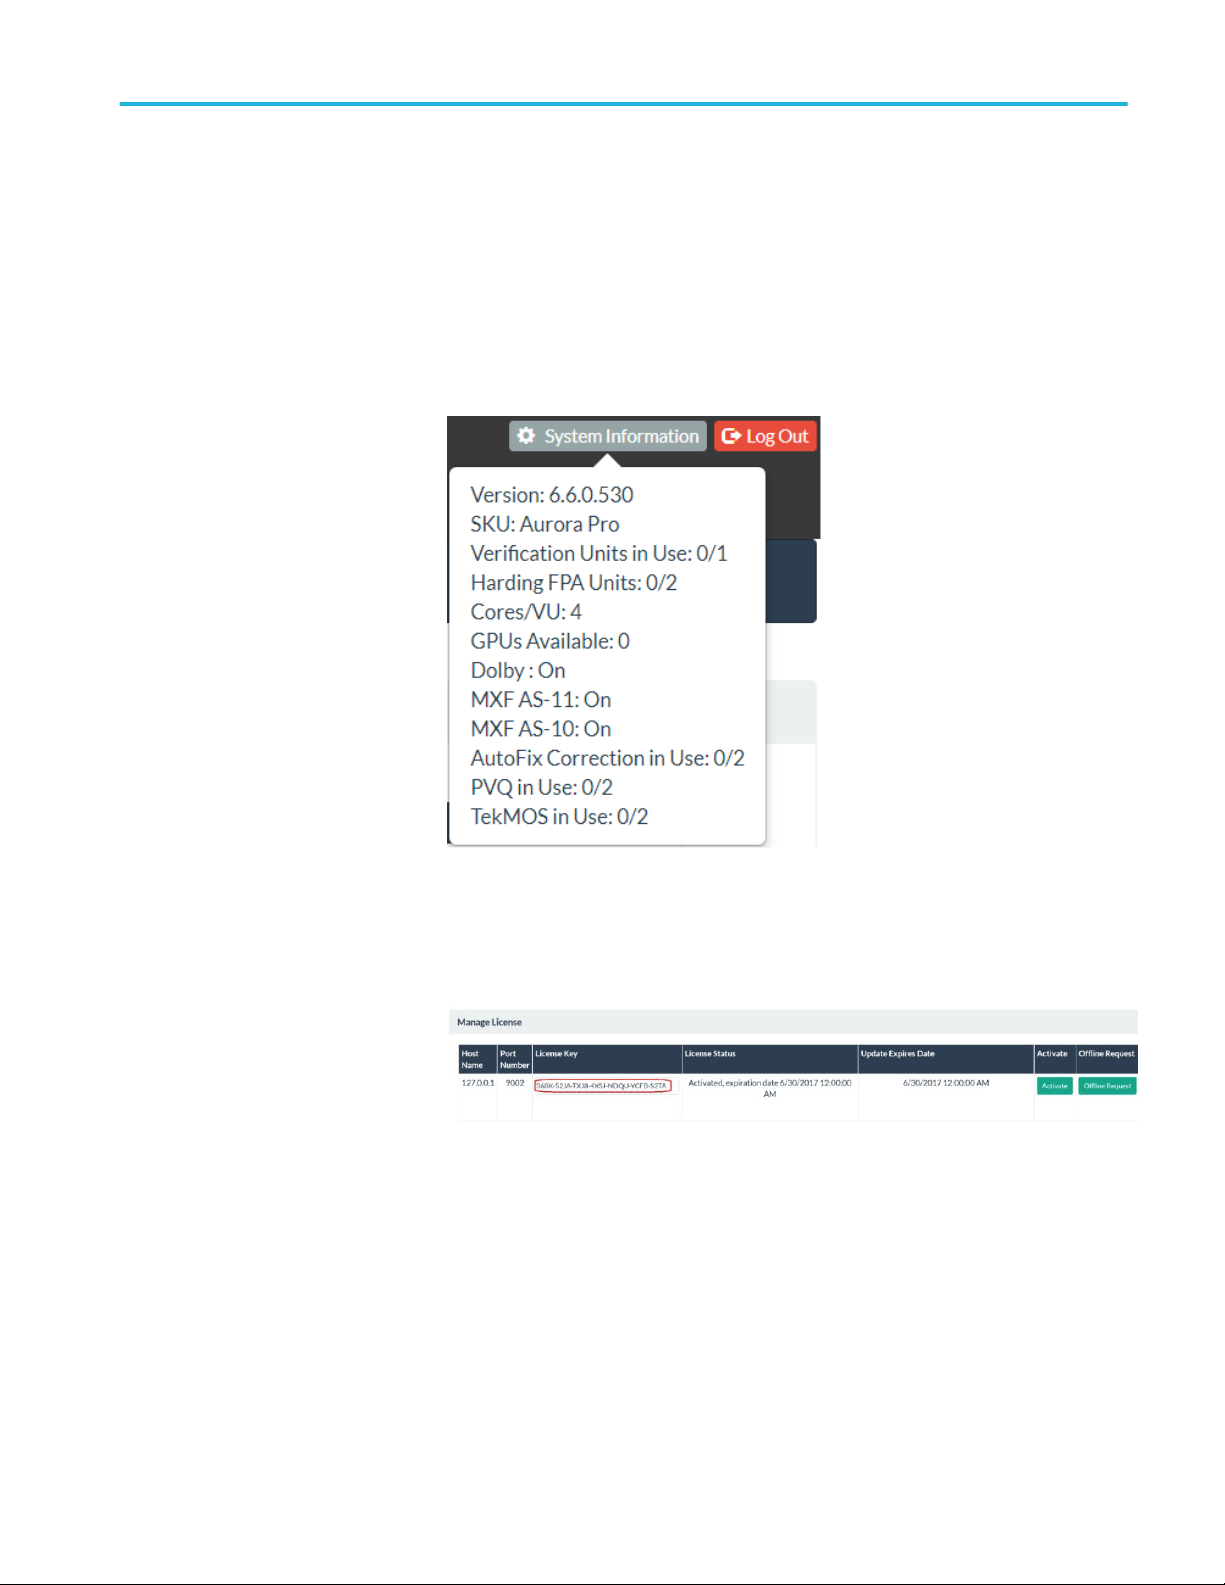
1. Click System Information, on the top right of the home page. Make a note
of the Version and SKU values or capture a screenshot of the System
Information window.
2. Click Options > Settings > Manage License. Make a note of the License
Key string or capture a screenshot of the Manage License window.
3. When you are ready to order an upgrade to your Aurora system, send the two
screenshots or send the software version number, SKU value, and license key
string to a Tektronix sales representative.
Aurora Automated File-based Quality Control System User Manual 11
Page 22

Getting started
First time operation
Login as administrator
Set up new users
Open any web browser and enter the IP address of the machine Aurora is
installed on followed by /Aurora (example: http://192.168.150.10/Aurora or
http://localhost/Aurora if you are on the local Aurora machine).
Enter the username and password as admin.
Aurora is ready for your use.
Perform the following steps to set up new Aurora users:
1. Select the Options tab at the top of the Aurora interface.
2. In the Options tab, select Settings, and then select Manage Users to open the
Manage Users control shown below.
3. Use the Manage Users controls to enter the user privileges for Aurora
described below:
a. Enter the User Name that you will use to login each time to the Aurora
Verification Unit.
b. Enter the Password that you will use to login. Passwords can be
composed of symbols, letters, or numbers or a combination of all three.
c. Enter the First Name of the user.
d. Enter the Last Name of the user.
e. Enter the Email address of the user.
f. Select Email PDF?Yes or No depending on whether the user wants to
receive a PDF attachment of the job report on notification of the job.
g. Use the Notification drop-down list to select how the user will be
notified on job completion:
■
None
■
Every Job
■
Only Jobs with Errors
■
Only Jobs with Warnings
12 Aurora Automated File-based Quality Control System User Manual
Page 23
h. Use the User Type drop-down list to select the type of Aurora user:
a. Select Admin to allow the user all administrative privileges for
Aurora, including setting up the Aurora Verification Units and
managing users.
b. Select Super user to allow the user to view and reorder jobs for all
users, but to restrict the user from modifying other user's application
settings and templates.
c. Select General to limit the user to adding jobs and viewing reports
related to that user only (additional user jobs and settings are not
accessible.)
i. The Active column is for information only and indicates whether the user
is currently an active user. There are two Active status options – True or
False. To change the Active status, you must click Edit (see below).
j. Use the Edit control to edit all of the user information, including the
Active status of the user.
k. After completing all fields for the new user, clicking Add to change the
user to the Active status.
Getting started
Testuser login
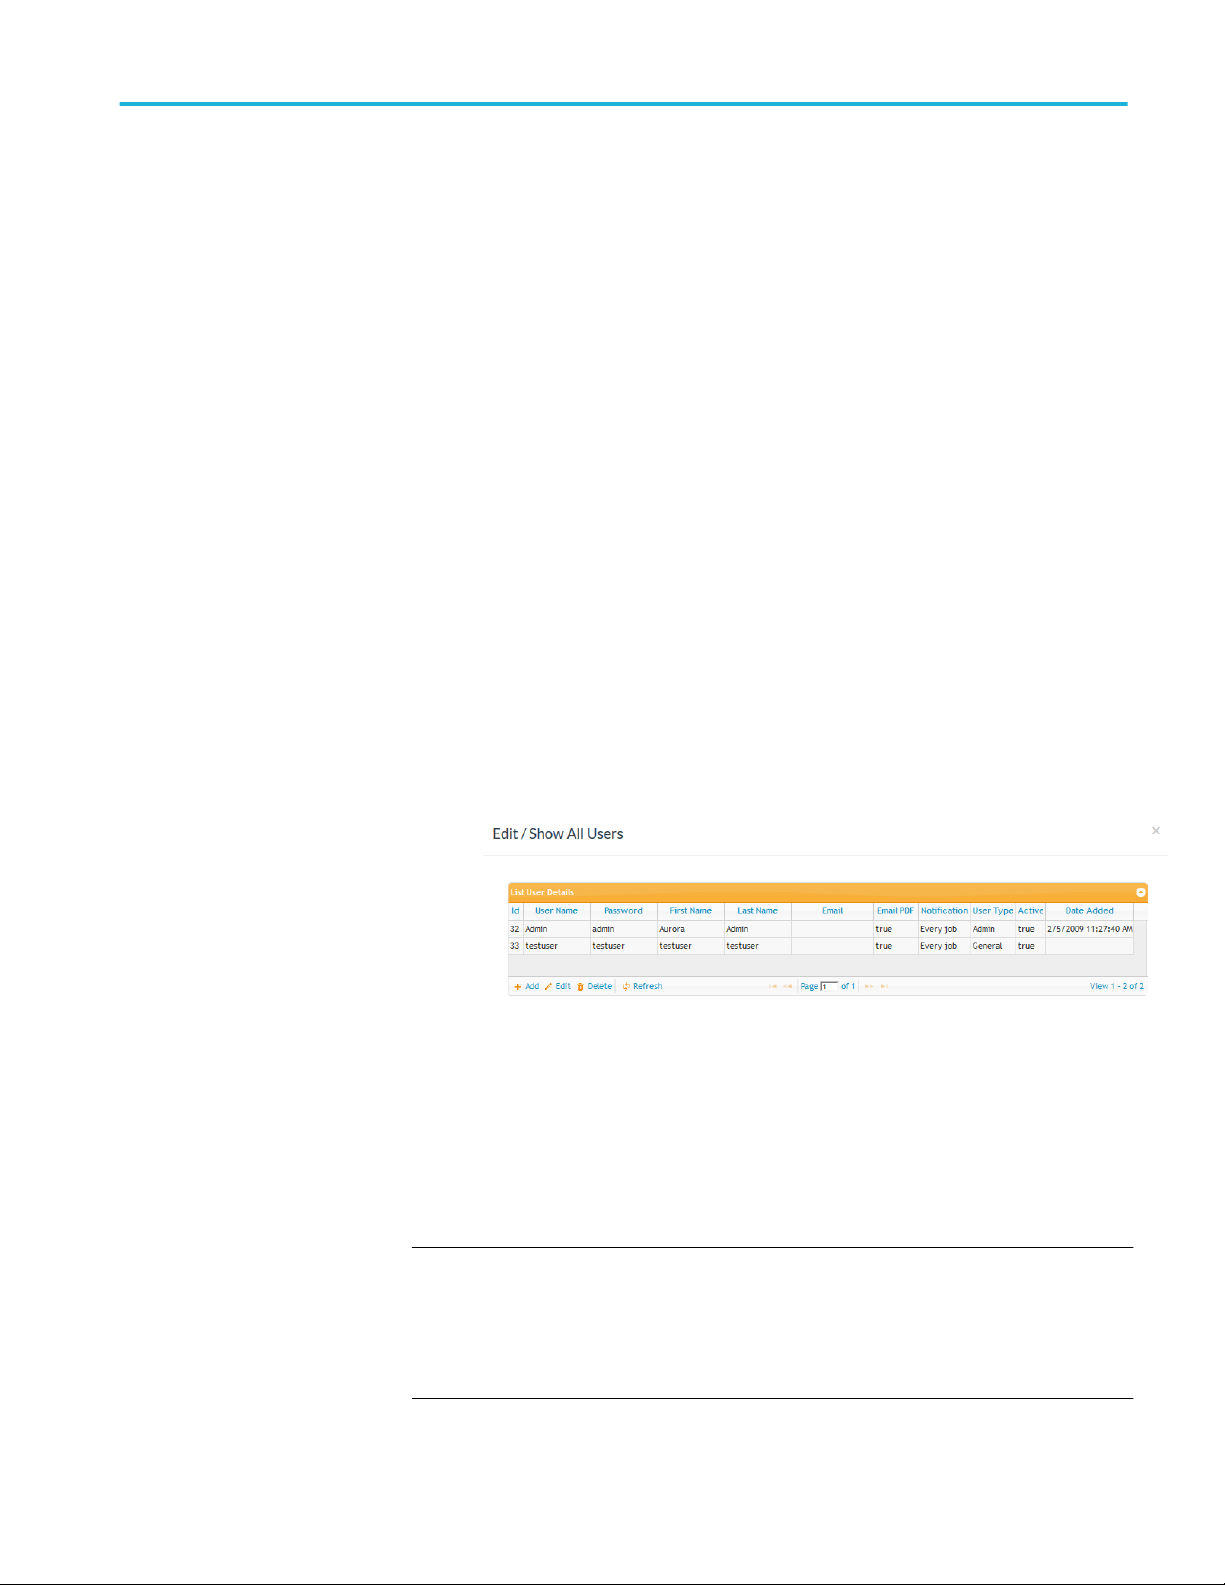
l. Use the Edit / Show All Users control to view all users and edit all the
user information, including the ability to delete users.
Testuser: There are benefits to being logged in as testuser. Testuser can be used
to debug issues with files or QC tests. When logged in as the test user, CSV files
are created for each checked test in your template. You can retrieve these CSV
files from C:\AuroraTemp on the master controller machine. The default
password is testuser.
NOTE. When you log in as testuser it may take longer as Aurora will create CSV
dump files for every template test ran. These are files that give support for the
errors that Aurora finds in every frame of the test. CSV dump files also show
what was measured in order to report the error. This file will add time
(sometimes substantially) to each job.
Aurora Automated File-based Quality Control System User Manual 13
Page 24
Getting started
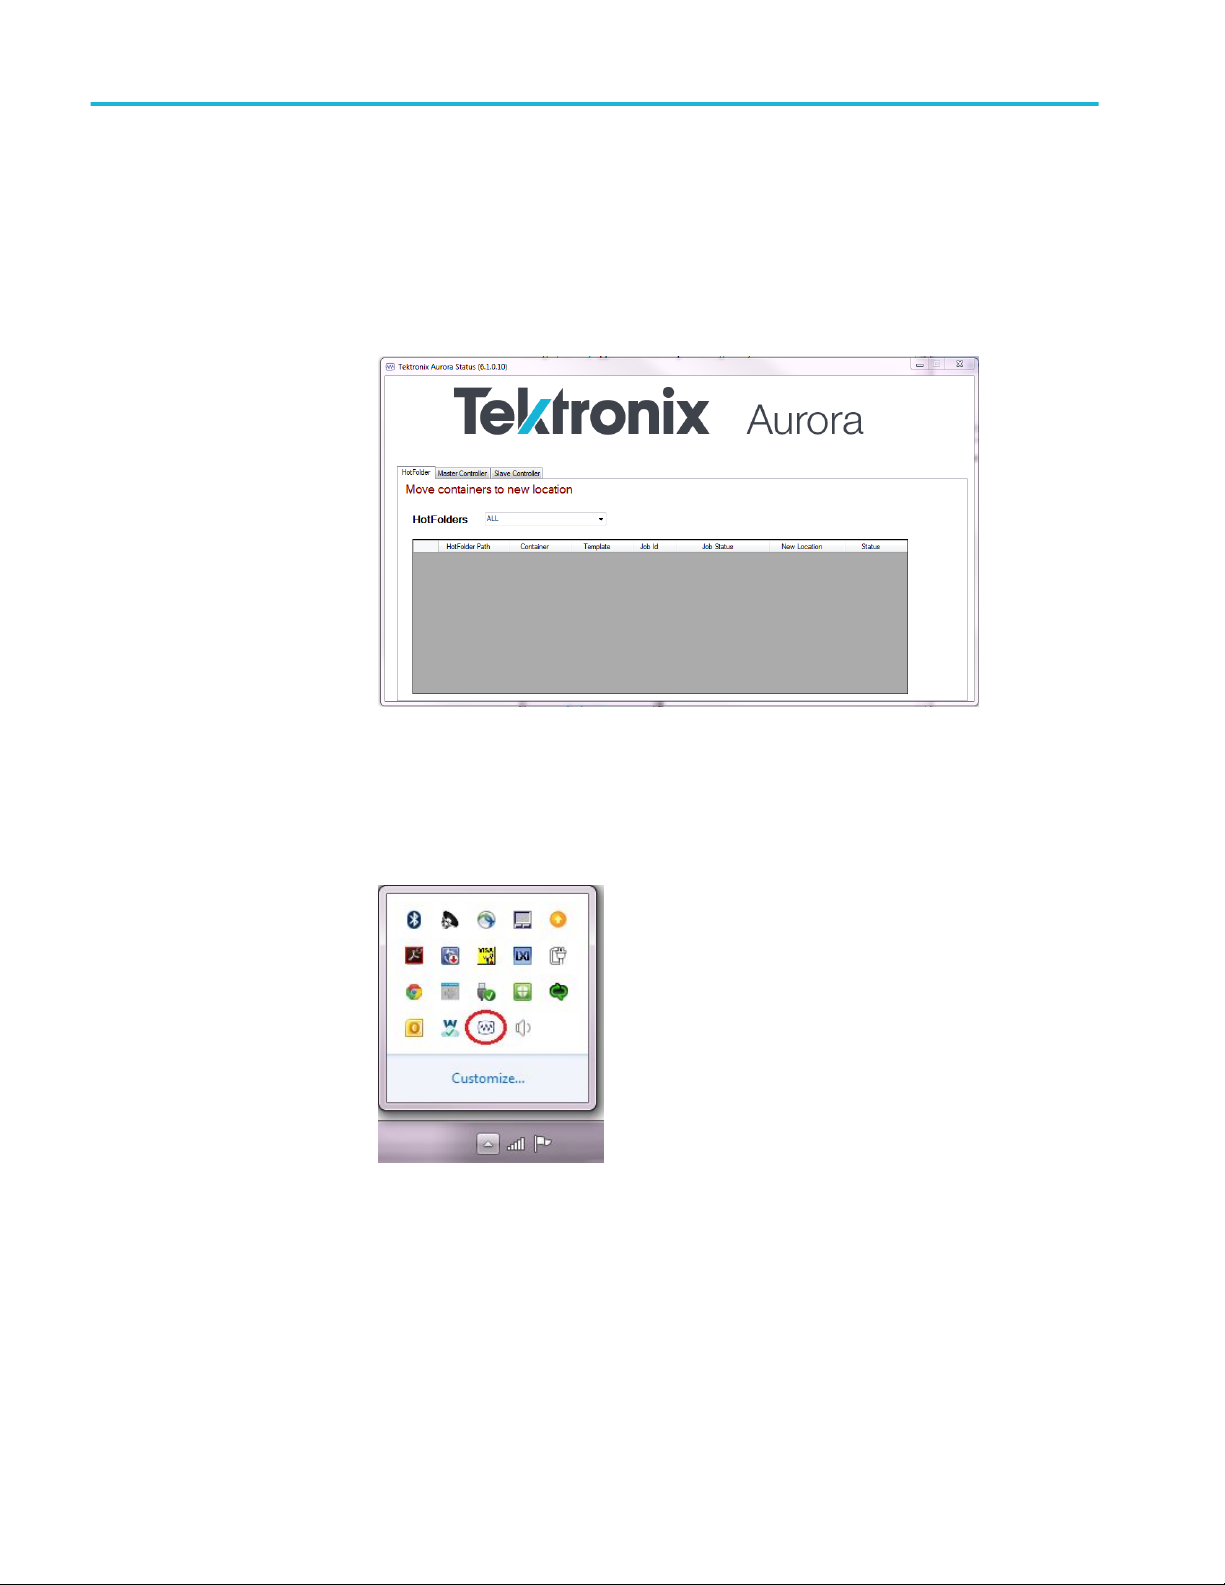
Aurora tray application
The Aurora tray application is mainly a diagnostic tool for use with Tektronix
Technical Support. Additionally, this application ensures that the Aurora services
(Controller and Verifier) stay running, even in the event of job or machine
problems. If you need to stop the services for some reason, you must stop them
with the tray application (stopping Aurora services with the Windows service
manager, the tray application will keep restarting them).
You can access the Aurora Tray Application by double clicking on the icon at the
bottom right of your screen. The Tray Application icon may be hidden in your
tray, and can be found by clicking the up arrow.
14 Aurora Automated File-based Quality Control System User Manual
Page 25

Getting started
Log out of Aurora
Aurora is designed to be running constantly. When you no longer need to interact
with Aurora, click on the Log Out tab on the Aurora interface and close the
browser window or tab.
Aurora Automated File-based Quality Control System User Manual 15
Page 26
Getting started
Before you start
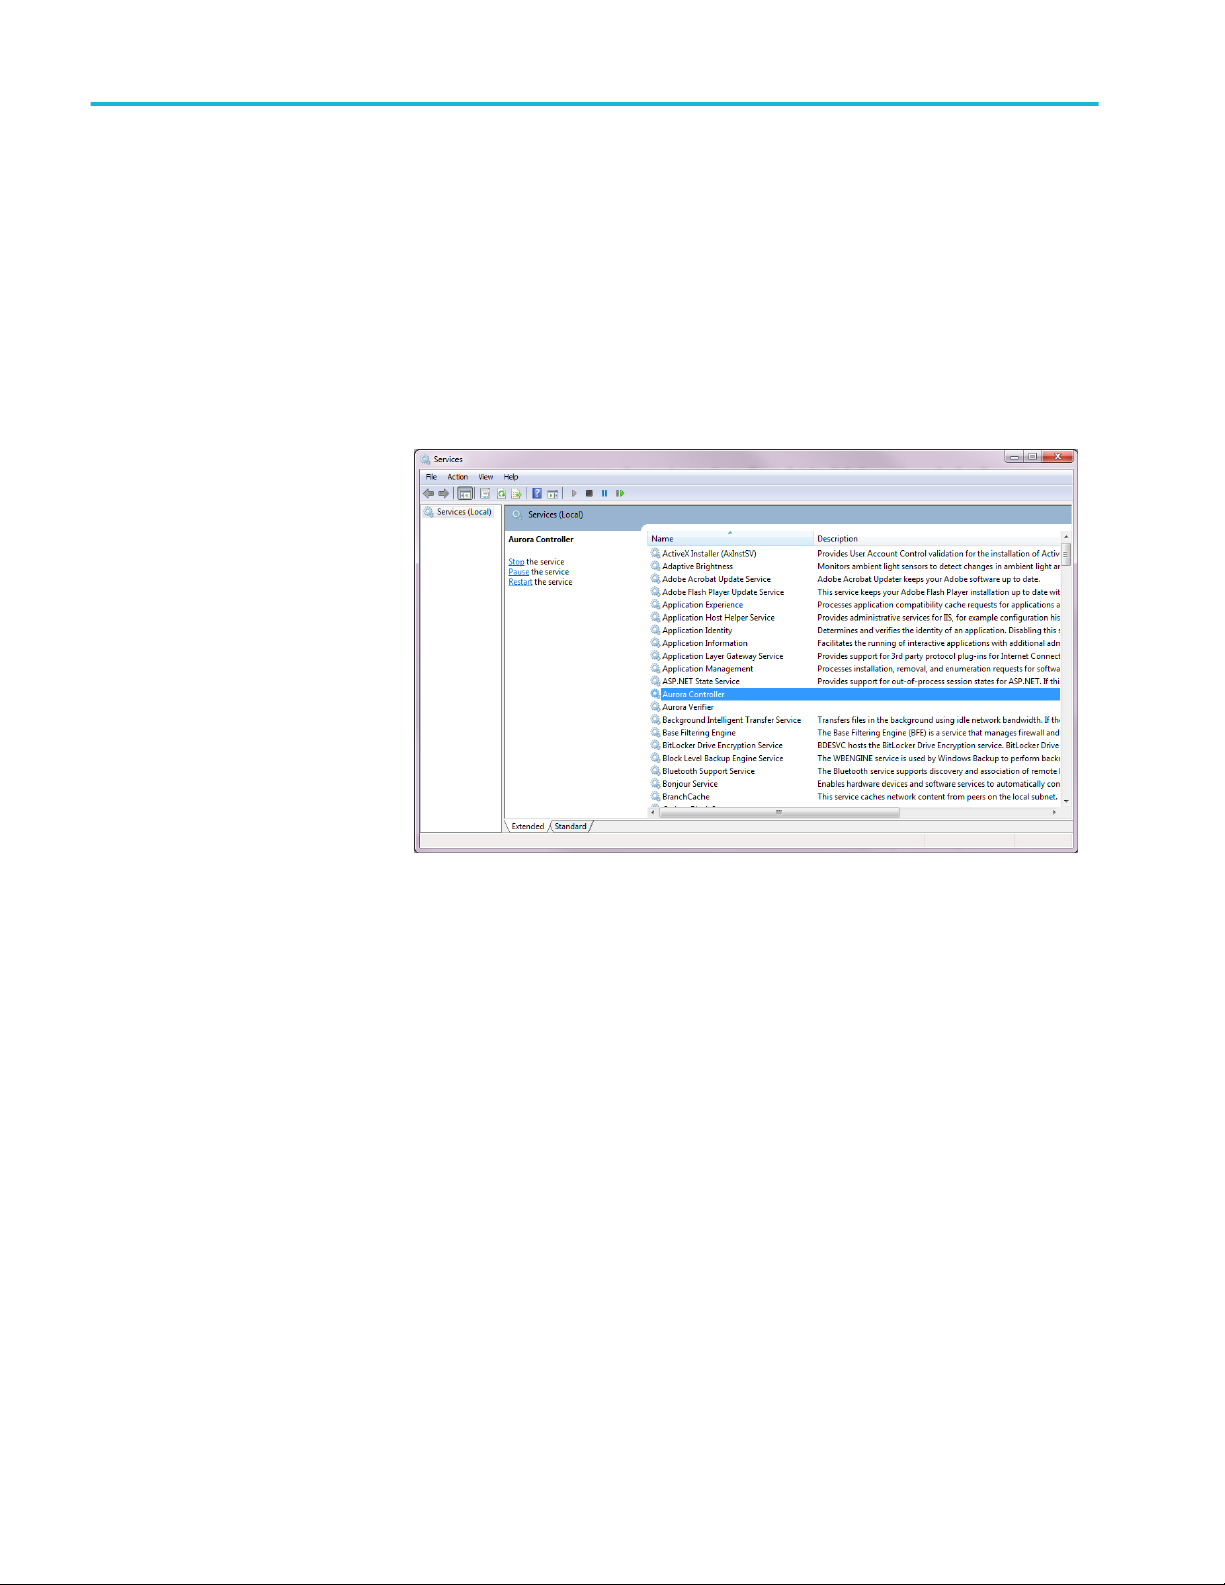
File access permissions
Both Aurora services must have file access permissions to the network storage
you will use within your workflow. If you did not set this during installation, you
must manually configure file access for both Aurora services.
■
Open the Services manager by pressing Windows Key + R and typing
services.msc.
■
Locate Aurora Controller and right click the service and select Properties.
16 Aurora Automated File-based Quality Control System User Manual
Page 27
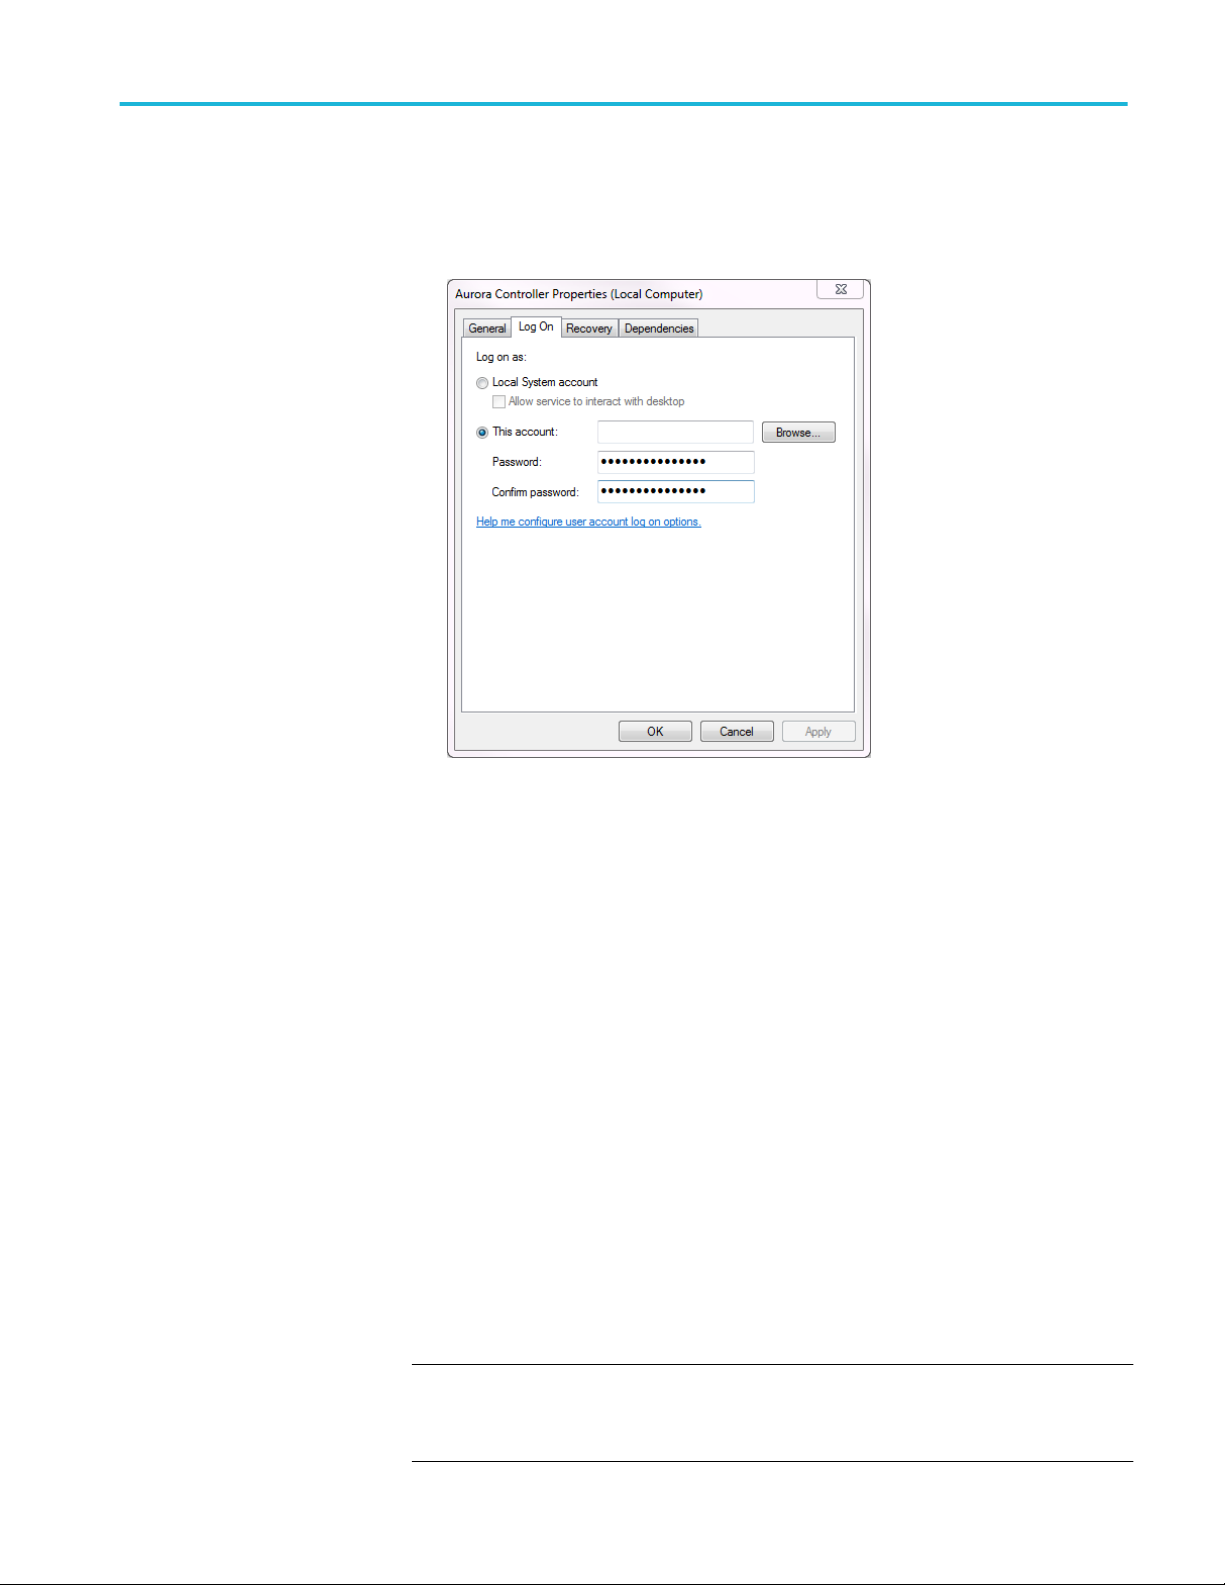
■
In the Log On tab of the service properties, assign an account and password
Getting started
that has permissions to access your shared storage.
Test template
customization
■
Click Apply, and then restart the service.
■
Repeat these steps for Aurora Verifier service.
Set your service logon credentials in the Aurora Installer, so that these credentials
are saved during future software updates. If you do not set your logon credentials
in the Aurora Installer, you will have to reset service permissions after each
software update.
Aurora includes several default test templates, but you can also customize the
templates. Before running your first job, you should do one of the following:
■
Use the Template Editor to modify a default template to match your QC
needs
■
Use the Template Editor to create a new test template
■
Use the Template Editor to make a new template from a known good/bad
file.
Aurora has many adjustments in the template editor, and the results you receive
on the report could vary based on how each test is configured.
NOTE. Customizing your test template is the most important step in having QC
results that will efficiently help you make automated or assisted decisions in your
workflow.
Aurora Automated File-based Quality Control System User Manual 17
Page 28

Getting started
If you need assistance, your reseller can help you configure test templates. If you
purchased the Annual Service and Maintenance (ASM) agreement for Aurora,
you can contact Tektronix Technical Support to help configure your test template.
Audio service
configuration
If you process AES wrapped tracks or have mono channel audio essence tracks
that need to be grouped together and tested/played as a single audio service, use
the Audio layout to ensure that your tracks are tested correctly.
For each track count, you need to define how the tracks map into services, and
then which services should actually be tested. The unchecked services will be
assumed to be ‘pad’ and will not be tested.
18 Aurora Automated File-based Quality Control System User Manual
Page 29

Operating basics
Product overview
Main user interface
Aurora is designed for ease of use. The straight-forward and logical interface is
divided into several areas that simplify and streamline the entire verification
process.
You can view several items in the top of the browser user-interface when you
first access Aurora:
■
Product Information Area: Displays the product name: Tektronix Aurora.
■
System Information button: Displays the license options and available VUs
for the Aurora system.
■
Tab Bar: Toolbar is the main navigation for Aurora, which allows you to
add jobs, edit test templates & plans and modify application settings.
■
Log Out button: At the top right, this red button logs you out of the Aurora
system.
Aurora Automated File-based Quality Control System User Manual 19
Page 30

Operating basics
■
Tab descriptions
Dashboard: Displays the dashboard view of the system, and is the first page
displayed when logging into Aurora.
■
Add New Job: This tab, helps you to complete a simple three-step process.
Select
■
Template for a job
■
Container for the job
■
Streams to be verified
■
Templates: You can use the options you define in your templates to setup
how files to be tested by Aurora.
■
Template Editor: You can create or edit a template that specifies the
parameters that you want the verification process to identify as errors or
warnings. At the right side of the page, you can select an existing
template and modify its parameters as desired or you can simply create a
new template from scratch. File Read, Defaults, Audio Layout and QC
tests help you to add tests to the template. QC test parameters include
Stream Summary, Syntax Check, Container Parameter, Video Parameter,
Video Quality, Audio Parameter, Audio Quality, Distribution/Broadcast
Restrictions, and System Specific Distribution Restrictions. You may
need to experiment with the several tests to determine the most
appropriate settings for these parameters for your particular needs.
■
Template Manager: Displays all the saved templates. You can select any
template to edit, delete, rename, copy, export, and import them. If you
select more than one template, you can only delete, copy, export, and
import them.
■
Smart Test Plan: You can build rules that will automatically select test
templates for your incoming files.
■
Compatibility Check: Allows you to check whether the templates on
your Aurora system require any modifications after updating to the
current release of Aurora. You can also use this page to force existing
templates to use new options available in new Aurora releases.
■
Analytics: Includes standard features to search for older jobs and view trends
for the most common occurring QC events. If you have the Result
Comparison add-on, you can also use the Analytics tab.
■
Options: You can set up verification units, manage users, manage hot folders,
and modify any other application settings. You can also access API
documentation and view the Help, About information box, including support
contact information from this tab.
20 Aurora Automated File-based Quality Control System User Manual
Page 31

Operating basics
Optional features
Aurora includes the vast majority of features shown in this manual at no
additional cost. However, some features that are not used universally are only
available with a product add-on. You can see the status of these optional features
in the top right hand corner of the Aurora User Interface window.
GPU Acceleration: This features is only available in Aurora Professional
(Aurora Core users must upgrade to Aurora Professional to turn this feature on).
Aurora used the NVIDIA professional series (Quadro K5000 or better and any
Tesla series) cards to accelerate tests shown in the template editor with the
NVIDIA icon next to them.
■
Tape Hit Detection: With the GPU acceleration, there should be no
noticeable impact to your QC performance. Without this feature, you may
notice slowdowns between 5-20x.
■
Perception-Based Video Artifact Detection (PVAD): With the GPU
acceleration, there should be no noticeable impact to your QC performance.
Without this feature, you may notice slowdowns between 3-5x.
■
Subliminal Shot Detection: With the GPU acceleration, there should be no
noticeable impact to your QC performance. Without this feature, you may
notice slowdowns of 25-50%.
■
JPEG 2000 decoding acceleration: With the GPU acceleration, you’ll be able
to decode JPEG 2000 files up to 4x faster than without this feature. This
option is available with the Advanced Codec Pack.
Harding FPA: Aurora includes its’ own photo-sensitive epilepsy test, but some
customers will prefer to have the Cambridge Research Systems (CRS) Harding
logo on their report.
Advanced Codecs: For customers requiring the use of Canopus or HEVC, these
codecs are available as a plugin to Aurora Core or Professional. GPU
acceleration of JPEG 2000 is also available as an option. Customers requiring the
use of Dolby E can add it as a plugin to Aurora Core.
Aurora Automated File-based Quality Control System User Manual 21
Page 32

Operating basics
Result Comparison: This analytics plugin enables you to compare QC reports
from two different points in the workflow and have Aurora highlight only the
differences created by the second process.
Dashboard view
After logging into the application, Aurora's browser window opens to the
Dashboard tab, which is the main view of the entire system.
All jobs are color coded as described below.
■
Blue: Not started yet.
■
Green: No Problems or only Information items generated by template events.
■
Orange-Yellow: Warnings generated by template events.
■
Red: Errors, either generated by template events or from an abort condition.
22 Aurora Automated File-based Quality Control System User Manual
Page 33

Operating basics
Dashboard job categories
Different job categories are listed below:
■
You can view an unlimited number of jobs In Process. When jobs are in
process, you can view the report for events generated up to that point or abort
the job. Aborting the job will move it to Aborted, User.
■
You can view an unlimited number of jobs In Queue. The jobs in this list are
always blue, and you can use the controls on the left side to re-order or pause
these jobs. You can also use the controls above this category to cancel or
pause all the jobs in the queue.
■
You can view the most recent twenty Completed Jobs. These jobs
successfully finished the QC process and you can now view the report in
HTML or PDF, reschedule the same file for another QC pass, or delete the
job from the system.
■
You can view the most recent twenty Aborted, Template jobs. This list
displays the jobs that have been aborted, due to a threshold in the template.
■
You can view the most recent twenty Aborted, User jobs. This list displays
the jobs that have been cancelled by a user on the web interface or via the
API.
■
You can view the most recent twenty Aborted, Application jobs. This list
displays the jobs that Aurora was unable to process (and whose reports will
contain the error for what caused the abort).
Dashboard columns and
sorting
■
Job ID : Aurora assigns Job IDs to every container file that is presented to the
system, sequentially, starting at 1
■
Date/Time: Presented in MM/DD/YYYY HR:MIN:SEC AM/PM format.
■
Container Name: The file name (exclusive of path) of the container file for
the job
■
Template: The test template in use for that particular job. Clicking an entry in
this column will open the Template Editor with that test template loaded
■
E: The Error count for that job
■
W: The Warning count for that job
You can sort any of these dashboard job categories by clicking on the section
titles (such as Job ID, Date/Time Complete, Container, Template, E, W and
User). Sorting will sort the twenty jobs that are in view.
Aurora Automated File-based Quality Control System User Manual 23
Page 34

Operating basics
Dashboard buttons
■
: Opens the HTML report view in a new browser tab. For In Process
jobs, this report may be incomplete or have template events that exceed your
defined thresholds (some events are cleaned up in a post-job process).
■
■
: Opens the HTML report view in a pop-up window.
: Opens the PDF report view (only available for jobs that are no longer In
Process). An exact duplicate of the HTML report view in an offline viewable
format.
■
: Opens the Add New Job tab with the Container File and Template
loaded, allowing for simple requeuing of files.
■
: In Queue jobs, moves the selected job up one spot in the queue.
■
■
: In Queue jobs, moves the selected job down one spot in the queue.
: In Queue jobs, toggles the selected job between Pause and Available
for Processing status.
■
: In Process or In Queue jobs, this button aborts the job. For jobs already
complete, this button removes the job from the system.
■
: For Complete Jobs, Opens the Container File in the Hydra Player for
Review (additionally, populates the Review Bar with the Aurora QC events).
■
: For Complete Jobs, starts a comparison Job (if you have the Analytics
add-on for Result Comparison license) using the currently selected job’s
container file as the reference.
24 Aurora Automated File-based Quality Control System User Manual
Page 35

Operating basics
View older jobs
There are three methods to find older jobs:
1. Click the Older Jobs link to the right of the Dashboard Job Category.
Displays the list of all completed jobs on the system.
2. Use the Custom Reports section at the bottom of the Dashboard to run predefined searches for common categories of older jobs.
■
Reports from today
■
Reports from the last 5 days
■
Reports from the last 7 days
■
Reports from the last 30 days
■
Reports with more than 10 errors
■
Long running jobs
■
Stream-summary only reports
■
All comparison jobs
■
Comparison jobs with errors
Aurora Automated File-based Quality Control System User Manual 25
Page 36

Operating basics
3. Use the Search feature on the Analytics tab to perform natural language and
complex searches
QC jobs
Add new job tab
You can set up new jobs manually from the Add new job tab. Perform the
following steps to add a job to the QC queue.
1. From the Aurora Homepage, click Add New Job.
2. Use the Step 1 controls to select a template:
26 Aurora Automated File-based Quality Control System User Manual
Page 37

a. Use the Template drop-down list to select a saved template. In addition
to the default templates, the template list contains your Smart Test plans
(at the top preceded by ST_) as well as your user-created Templates (in
the middle of the list).
NOTE. You can also type any portion of the template name to search for a
template.
Operating basics
b. As shown below, the test parameters of the selected template are shown
below the Step 1 Template section.
3. Use the Step 2 controls to select the container of files you want to verify:
a. Click the Browse button to navigate to the location of the file(s) to be
tested.
Aurora Automated File-based Quality Control System User Manual 27
Page 38

Operating basics
By default, Aurora will show a server-side browse control, which shows
only the files that the Aurora server has access to. You can choose to use
a client-side browse control, which requires Java. When using the clientside browse control, the files you select that are not accessible to the
Aurora server will not be able to be added as a Job.
Figure 1: Server-side browse control
Figure 2: Client-side browse control
If you want to access files from FTP, AWS S3 or from Network share
(CIFS), you have to use server-side browse control. Select server-side
Browse, specify a default browse path that the control will start in.
Provide file server Credentials in Settings Page > Manage Credentials
section. Alternately you can provide credentials in the URL for FTP and
S3.
28 Aurora Automated File-based Quality Control System User Manual
Page 39

Operating basics
Example for using a different protocol:
■
FTP: ftp://<servername>/<sharedfolder>/ or ftp://
<username>:<password>@<servername>/<sharedfolder>/
■
Windows Network Share (CIFS): \\<servername>\ <sharedfolder>\
■
S3: http://s3-<region>.amazonaws.com/<bucketname>/
NOTE. For S3, the protocol can be http or https.
Alternately, you can specify the complete file path including file name in
the Container text field as shown below.
http://s3-<region>.amazonaws.com/<bucketname>/<folder>/
<filename.ext>
Or
http://<AccessKey>:<SecretKey>@s3-<region>.amazonaws.com/
<bucketname>/<folder>/<filename.ext>
NOTE. Both http and https are supported.
Aurora Automated File-based Quality Control System User Manual 29
Page 40

Operating basics
You can use the above steps for Hot Folder configuration and add job via
Web service API.
b. If you want to compare the results of this job against a previous job, use
the Provide JobID drop-down list to select an existing job file.
c. Click Next to continue. As shown below, the Step 3 controls appear
below the Step 2 section.
30 Aurora Automated File-based Quality Control System User Manual
Page 41

4. Use the Step 3 controls to select the streams to be verified and opt whether to
return to the Dashboard or create another job:
a. Use the check-boxes in the first column of the streams list to select the
desired streams to be verified or choose the Select/Deselect All checkbox
(by default, all the streams in the container are selected).
b. After you’ve selected the streams to be verified, click one of the two
buttons below the streams list to add the job to the QC queue:Add Job &
Return to Dashboard or Add Job & Start New Job.
Operating basics
5. After you have added the job, you can view the jobs In Queue from the
dashboard.
Aurora Automated File-based Quality Control System User Manual 31
Page 42

Operating basics
Aurora shell extension
You can to install the Aurora shell extensions (this is a separate download and
installer that you execute on a client machine, not the Aurora server), that utilize
the SOAP API to send jobs to the Aurora queue. You must configure the shell
extension prior to using it the first time.
1. To set up shell extensions, go to the Aurora folder of your Start Menu or
navigate to C:\Program Files\Tektronix\Aurora\Aurora Shell Extension.
2. Run DCA.Aurora.ShellExtension.exe.
3. Set the API service location by changing the machine name to be the
machine name or IP Address of the machine where the Aurora application is
installed. The highlighted area below is where you should make this change.
4. Set the username and password that shell extension jobs should be logged as.
5. Select which template the shell extension jobs should be checked against.
6. Set the file extensions the shell extensions will monitor.
7. To test the connection, click the Test Connect button.
Once the shell extension configuration is saved, Windows Explorer enables
the right-click option with monitored extension to send the file to Aurora.
NOTE. Make sure that the file you right click on to automatically send to the
Aurora queue is the file that Aurora server has access.
8. Once you have right clicked on a file that is shared with the host, choose the
Verify with Aurora option.
32 Aurora Automated File-based Quality Control System User Manual
Page 43

9. The file will then be sent to the Aurora queue.
Operating basics
How to add jobs with
referenced essence
container files
When dealing with referenced essence containers, always point Aurora to the toplevel container. By using the top-level container (usually the one with the
smallest file size, since there is no embedded essence), Aurora will automatically
test all reference audio, video and ancillary data referenced as a single asset, even
if they exist in disparate physical or virtual locations, such as a subfolder or
separate network path.
MXF. In an MXF environment, such as Omneon MediaGrid, this will be the
OP-1b container file in the root folder.
MOV. In MOV environments, such as Avid ISIS, use the publicly available MOV
container file (this file will be quite small in size, usually under 100KB).
P2. For P2 media, select the XML file in Contents/Clip subfolder.
SxS. For SxS media, select the Index.xml file in the root of the SxS folder.
HLS (HTTP Live Streaming). For Apple HLS files, select the *.m3u8 playlist/
manifest file.
Smooth Streaming. For Microsoft Smooth Streaming files, select the *.ism
playlist/manifest file.
MPEG DASH. For MPEG DASH files, select the *.mpd playlist/manifest file.
HDS (HTTP Dynamic Streaming). For Adobe HDS files, select the *.f4m playlist/
manifest file.
DCP. For unecrypted DCP files, select the ASSETMAP.xml.
IMF. Select CPL XML file for tests. The CPL files must have the extension
as .xml. For CPL files, the asset details will be always read from the file named
"ASSETMAP.xml". The "ASSETMAP.xml" file should be placed in the same
folder where the CPL file is located.
Aurora Automated File-based Quality Control System User Manual 33
Page 44

Operating basics
How to add jobs for frame-
wrapped sequence files
For frame-wrapped sequences of files, including RED, DPX, EXR, AVC Intra,
PNG and J2K, Aurora will automatically look for the next frame in the sequence
after a job has been started with any the first frame of the sequence. Aurora will
look for a numeric value just prior to the file extension to determine sequence
positioning (such as frame00001.dpx or render00320.r3d, where the frame #
would be 1 and 320, respectively). You can set the timeout value to complete the
job (how long Aurora will wait for the next frame in the sequence before
finalizing the job) on the Settings page of the Options tab. In this same location,
you can set the frame rate Aurora will use for calculating duration (and Hydra
will use for playback).
How to add jobs with the
DXW generic container to
group mono essence files
When running a sequence file job, Aurora QC events will show a frame file name
in addition to time values. Additionally, sequence files will play back in Hydra as
a single video stream.
If you have multiple mono essence files that you would like to aggregate for
testing purposes (such as several DPX files or an H.264 video essence with mono
channel audio track files), the DXW generic container offers the ability to group
these files together so that Aurora will test them as a single, continuous source.
The advantages of this method include being able to test:
■
an entire feature length set of renders
■
multiple sets of audio & video essence combinations together prior to a final
transcode/wrap
■
test multiple mono essence audio tracks as a single audio service (using the
Aurora Service Map feature of the Template Editor)
The DXW container is a simple XML file that can be generated by hand-editing
or scripting up file locations and referencing them with clip entries. As long as
this file has the DXW file extension. Aurora will parse the contents and test all
listed clips together.
Example DXW file contents (for motion video content) - notice the multiple clips
<?xml version="1.0" encoding="UTF-8"?>
<indexFile xmlns="urn:digimetrics-xml-wrapper"
xmlns:xsi="http://www.w3.org/2001/XMLSchema-instance"
xsi:schemaLocation="urn:digimetrics-xml-wrapper
34 Aurora Automated File-based Quality Control System User Manual
Page 45

Operating basics
DXWschema.xsd">
<clip file="media/Desperado+L21_inAS02_v0.mxf"
type="video"/>
<clip file="media/Desperado+L21_inAS02_a0.mxf"
type="audio"/>
<clip file="media/Desperado+L21_inAS02_a1.mxf"
type="audio"/>
<clip file="media/Desperado+L21_inAS02_vbi0.mxf"
type="data"/>
</indexFile>
Example DXW file contents (for single frame content, such as DPX or EXR) –
one clip, multiple frames
<?xml version="1.0" encoding="UTF-8" ?>
<indexFile xmlns="urn:digimetrics-xml-wrapper"
xmlns:xsi="http://www.w3.org/2001/XMLSchema-instance"
xsi:schemaLocation="urn:digimetrics-xml-wrapper
DMSCLIP.XSD">
<clip type="video" framerate="25">
<frame file="Sequence 01_90000.dpx" />
<frame file="Sequence 01_90001.dpx" />
<frame file="Sequence 01_90002.dpx" />
</indexFile>
Other job add methods
In all DXW cases, point Aurora to the DXW file to start a job.
You may also add jobs to the Aurora queue via the hot folder/watch folder
monitor or via the SOAP API.
Aurora Automated File-based Quality Control System User Manual 35
Page 46

Operating basics
Template Editor
Use the Template Editor to create and to edit the custom verification processes
for your particular production needs. You can create/ edit an entire suite of
templates, one for each type of file that you may need to verify.
While the process of creating a template is simple and straight-forward, making
the appropriate selections for your particular process is one that may take a bit of
experimentation until you find the right mix.
Aurora uses the template editors, which separates sections of the test template
into smaller portions to allow simpler template organization. You can create a
template using the following:
■
File Read: Defines the portion of the file to be tested.
■
Default: Defines parameters such as how you want errors reported, the
default white and black levels, and the location where you want the test
report to be delivered.
■
Audio Layout: Defines audio parameters such as the loudness standard, how
to handle mono essence audio tracks, and the location where you want the
corrected audio files to be delivered.
■
QC Tests: Defines which QC tests will be used and the parameters to be
used for each QC test.
To create a test template, select Template > Template Editor to select a
combination of default or user-created tests and combine them into a template to
be used during testing.
36 Aurora Automated File-based Quality Control System User Manual
Page 47

Operating basics
NOTE. While most of your editing and tune up process will involve defining the
QC tests, it is important to also define and use the File Read, Default and Audio
Layout so that your content is tested appropriately.
NOTE. Complete details on the tests available in Aurora are available by clicking
the Test Index Number next to each test in the Web browser interface.
Aurora Automated File-based Quality Control System User Manual 37
Page 48

Operating basics
File read
The File read allows you to set the following file read conditions:
■
Pre Roll: Sets the period of time from the start of the clip that you want to
exclude from verification tests. You can set the time in hours, minutes, and
seconds.
NOTE. The Pre Roll parameter counts from the beginning of the clip. The
Post Roll parameter counts from the end of the clip.
■
Post Roll: Sets the period of time at the end of the clip that you want to
exclude from verification tests. You can set the time in hours, minutes, and
seconds.
■
Spot Check: Selects the portion of the clip to be tested and the period of time
to test the defined section(s) of the clip. You can set the time in hours,
minutes, and seconds. You can select the following portions of the clip to
spot check:
■
Read Entire File
■
Start, Mid & End
■
Start Only
■
Mid Only
■
End only
■
Start & End Only
38 Aurora Automated File-based Quality Control System User Manual
Page 49

Operating basics
■
SOM/EOM: Sets the start of material and the end of material.
NOTE. Tests will run during the time defined between the SOM and the EOM.
SOM: The SOM parameter sets the start timing of material in the clip. You
can set the time in hours, minutes, and seconds.
EOM: The EOM parameter sets the end timing of material in the clip. You
can set the time in hours, minutes, and seconds.
MSC: Enter the frame number as per the TCR.
Aurora Automated File-based Quality Control System User Manual 39
Page 50

Operating basics
Default
The default allows you to set the default conditions:
■
Threshold Type: Select the option to set the severity of an alert. You can
select the severity of the alerts based on number of occurrences of an alert or
duration of an alert.
■
Test Report as Information Until [x] (then Warnings): Sets the number of
test events that will report as Information, after which additional test events
will be reported as Warning. Set this value to -1 to have test events always
report as Information.
■
Test Report as Warning Until [x] Instances (then Errors): Sets the
number of test events that will report as Warnings, after which additional test
events will be reported as Errors. Set this value to -1 to have test events
always report as Warnings.
40 Aurora Automated File-based Quality Control System User Manual
Page 51

■
Test Report as Error Until [x] Instances (then Abort): Sets the number of
Operating basics
test events that will report as Errors, after which additional test events will
cause the test to abort. Set this value to -1 to have test events always report as
Errors.
NOTE.
The value you provide in Test Report As Error Until should be greater than
Test Report As Warning Untilvalue.
The value you provide in Test Report As Warning Until should be greater
than Test Report As Information Until value.
■
Abort Report After [x] Instances: Sets the number of test events that will
be reported before the test aborts.
■
Test Stop Reporting After [x] Instances: Sets the number of verification
errors that will be listed in the Test Report before the test stops reporting
errors.
■
Default Black Level: Sets the default black level for the clip. The values are
measured in 8-bit steps (0-255).
■
Default White Level: Sets the default white level for the clip. The values are
measured in 8-bit steps (0-255).
NOTE. Any of the above defaults can be overridden at the individual test level
by adding the test using the Add and Override Defaults button. Other defaults
apply to the entire template, and may not be modified per test.
■
Passed Test Move Location: When set, any time this template is used and
all tests pass or create only information items, the container and essence files
will be moved to this location.
NOTE. The Passed and Failed Test Move Locations specified here take
precedence over the locations specified in the Hot Folder configuration. If no
locations are specified here, the normal Hot Folder pass/fail locations will
be used.
■
Failed Test Move Location: When set, any time this template is used and
any test creates a warning or error item, the container and essence files will
be moved to this location.
■
Email Options: When set, email is sent to the configured email address after
the file is processed. Email will be sent based on the selected email event
type:
Aurora Automated File-based Quality Control System User Manual 41
Page 52

Operating basics
■
Send email for each file
■
Send email when file has error
■
Send email when file has warning
■
Send email when file aborted by template
When the Attach report in PDF Format option is:
■
Selected, the email will be sent with the pdf report along with the link to
HTML report
■
Not selected, only the link to HTML report is sent in emails
Multiple Emails can be configured by adding email Ids separated by ‘;’ or ‘,’.
When an email ID is configured for “To address” in both the template and
User settings, then one email will be sent and duplicate emails will be
avoided.
To configure the Email Ids in “CC address”, prefix the email id with “(CC)”.
To configure the Email Ids in “BCC address” then prefix the email id with
“(BC)”.
Email Id(s) without the prefix “(CC)” and “(BC)” will be in the “To
address”.
42 Aurora Automated File-based Quality Control System User Manual
Page 53

Operating basics
■
Title Card Location: This optional parameter captures a thumbnail of the
title card and displays this visual metadata next to the digital metadata on the
report. You can use the drop-down list to select from the following options:
■
No Title Card
■
Frame Count From Beginning
■
PTS Location
■
TCR Location
■
Dump Caption Text: When checked, creates a CSV time-aligned file of the
caption text placed in the same folder as the top level container file.
■
Include Luma and RGB Histograms in the QC Report: When selected,
displays Luma and RGB histograms in the QC report.
Audio layout
The default audio layout page displays the default conditions. You can add,
remove, and edit the audio service combinations.
Aurora Automated File-based Quality Control System User Manual 43
Page 54

Operating basics
You can also set the audio layout conditions:
■
Audio Service Map (ASM): Audio service map, enables you to configure
the output audio services based on the input audio having number of channels
in it. This section describes various steps involved in Configuring the ASM
table and creating Audio Layout template.
■
Average Loudness for Report Summary: Selects the standard for loudness
that will be shown in the stream summary section of the report. Setting this
value does not automatically add the loudness test to your template – it only
adds a report item for the one program value. Use the drop-down list to select
from the following loudness standards:
■
ATSC A/85
■
R128 Program
■
ARIB TR-B32
■
FTVA OP-59
■
NONE
44 Aurora Automated File-based Quality Control System User Manual
Page 55

Operating basics
■
Corrected Audio Files Location: Sets the location where the corrected audio
file will be placed, from the following options:
■
Put corrected file in report folder
■
Put corrected file in subfolder of original file location
■
User defined location: Click the Browse button to select a location on
your computer or network
Aurora Automated File-based Quality Control System User Manual 45
Page 56

Operating basics
Configuring the ASM table. Complete the following steps to configure the ASM
table:
1. Start Aurora Web-UI.
2. From Template > Template Editor, select Audio Layout, and click New.
3. Select OK, to open the New Audio Layout. You can now configure the audio
service map.
4. As part of ASM configuration, the first step is to add Channel Count.
Channel Count is the total number of channels input audio which would be
used to configure channel mapping. e.g., If input file has 12 channels audio
46 Aurora Automated File-based Quality Control System User Manual
Page 57

Operating basics
track(s), then you can map these channels to various services consisting of
Stereo, EMCA, 5.1Mix etc.
Below figure shows Adding Chanel count of channels for mapping.
Once an appropriate value is entered, click Add button to update.
5. After Channel Count is updated, UI provides an option to add various
Services for mapping. In the below image you can find 12 Channels which
indicates that the Channel count that is added in the previous point is
included.
6. You can select Services for mapping by clicking the drop-down list next to
SERVICES (CHANNEL COUNT). The drop-down list displays various
services.
7. After selecting a service from the drop-down, press the right arrow to add the
selected service to the Audio Service list.
Aurora Automated File-based Quality Control System User Manual 47
Page 58

Operating basics
8. Repeat the steps 6 and 7 till all the services are added as shown in the
following image.
9. To remove/edit any service from the Audio Services list, click the cross mark
at the end of each service.
10. Repeat steps 4 to 8 to add multiple maps for various channel Count values
viz., 8, 12, 16 etc. The Configuration is shown as below.
11. To remove/edit the Channels, click the cross mark at the end of the respective
Channels. This removes the entire mapping including the related Audio
Service Configuration for that Channel Count option.
12. Click Save to save the audio layout configuration.
48 Aurora Automated File-based Quality Control System User Manual
Page 59

Operating basics
Creating the Audio Layout & Reporting Template. Complete the following steps to
create the Audio Layout & Reporting template:
1. After the Audio Service Map is configured, select Save / Save As option to
save the template.
2. Provide an appropriate template name and click Save to save the template.
Complete the following steps to create the Audio Layout & Reporting template:
1. After the Audio Service Map is configured, select Save / Save As option to
save the template.
2. Provide an appropriate template name and click Save to save the template.
Creating the Audio Layout & Reporting Template. Complete the following steps to
create the Audio Layout & Reporting template:
1. After the Audio Service Map is configured, select Save / Save As option to
save the template.
2. Provide an appropriate template name and click Save to save the template.
Aurora Automated File-based Quality Control System User Manual 49
Page 60

Operating basics
QC tests
The QC tests allows you to set the QC test conditions. Select a QC category on
the left to display related tests in the middle of the page.
For details on each specific test available in the Aurora template, click on the
icon next to each test.
NOTE. When you click the Template Index Number hyperlink, a new window
appears providing you with a help file explaining the specific test.
Quick tests are denoted by icon located next to the Template Index Number.
For these tests, the verification unit will check for the metadata within a couple of
seconds and provide instants results.
1. Select the following tests:
■
Stream Summary: You can opt to run a full Stream Summary, or a
short, QuickScan summary. QuickScan disables all other tests, only scans
the container and codec headers to return a simple stream summary (the
advantage of this QuickScan is very fast identification of large volumes
of content, generally under 5 seconds per file).
■
Test(s) Added: Displays all the tests which are added to the template.
■
Syntax Checks: These tests pertain to syntax conformance for
containers, codecs and caption data.
■
Container Metadata: These tests are related to container metadata,
including total bit rates, included codecs and comparing container
metadata to the streams.
■
Video Metadata: These tests pertain to video metadata, generally found
in the sequence layer/header.
50 Aurora Automated File-based Quality Control System User Manual
Page 61

Operating basics
■
Video Quality: These tests actually decode the video frames to check for
items such as macroblocking artifacts, interlacing artifacts, embedded
black bars, freeze frames and color bars.
■
Audio Metadata: These tests pertain to audio metadata from the header.
■
Audio Quality: These tests actually decode the audio samples/frames to
check for items such as silence, levels and clicks/pops/snaps.
■
Distribution & Broadcast: These are grouped tests for the most
common distribution or broadcast constraints, such as ATSC, DVB-T,
CableLabs VOD, and iTunes.
■
Slate/Head Format: These tests allow you to define items that must
exist in your content (black, freeze, color bars, silence, tones) and have
Aurora issue an event if the item is missing.
2. Click Add Test to add the test. The selected tests are displayed on the right
side.
Aurora Automated File-based Quality Control System User Manual 51
Page 62

Operating basics
3. Click Save to save all the selected tests to a template.
NOTE. You can also add the selected tests to the default template available in
the drop-down list.
4. QC Test Preview: You can view all the tests which are saved to the selected
template in the drop-down list.
52 Aurora Automated File-based Quality Control System User Manual
Page 63

Operating basics
How to edit QC tests in an existing template. The following procedure describes
how to edit, add, or delete tests in an existing template.
1. From the Aurora dashboard, click Templates > Template Editor.
2. In the predefined templates drop-down list, select the template you want to
edit.
Aurora Automated File-based Quality Control System User Manual 53
Page 64

Operating basics
3. After you select the template, the current tests for that template appear on the
right side. The example below displays the tests which were added to the
template.
4. Select any of the tests on the right side. All the added tests will be displayed
as shown below.
5. You can now edit, add, or delete tests from the template.
6. After you are done modifying the tests in the template, click Save to save the
updated template.
54 Aurora Automated File-based Quality Control System User Manual
Page 65

How to add QC tests to a new template. The following procedure describes how to
add QC tests to create a custom test template.
1. From the Aurora dashboard, click Templates > Template Editor.
Operating basics
2. Select a QC test category on the left to display related tests. To change the
default settings for a test, click Modify Test Defaults to open a dialog where
you can customize the test. Click Save to save the test changes to the Test
Defaults.
3. To add tests to the template, click Add Test button below each selected test.
The added tests are displayed on the right hand side of the Template Editor.
Aurora Automated File-based Quality Control System User Manual 55
Page 66

Operating basics
4. To save the test after you have completed modifying and adding tests to the
template, click Save As and enter a name for the template in the Save dialog.
After the new template is saved, the name of the template appears on the
display. The example below shows the added template name as Metadata.
5. The new template you created will now be available in the list of templates in
the drop-down list of the Template Editor and in the Template Manager.
56 Aurora Automated File-based Quality Control System User Manual
Page 67

Operating basics
How to add Video Quality test to the template. The following procedure describes
how to add, a Video Quality test to the template.
1. From the Aurora dashboard, click Templates > Template Editor.
Aurora Automated File-based Quality Control System User Manual 57
Page 68

Operating basics
2. Select Video Quality.
3. After you select the Video Quality, the tests for video quality are displayed.
Select TekMOS Video Quality test.
58 Aurora Automated File-based Quality Control System User Manual
Page 69

Operating basics
4. Enter the required values and click Add Test. The added test is displayed on
the right hand side.
5. Click Save to save the test to a template.
Aurora Automated File-based Quality Control System User Manual 59
Page 70

Operating basics
How to ignore specific errors or warnings in Aurora. As a part of QC test default
configuration, you can specify that certain errors or warnings (which could be
resulting from the test execution) need to be ignored, in either of the following
ways:
■
Report the errors or warnings at reduced level of severity, viz. Information
■
Completely suppress the errors or warnings by not reporting them in Aurora
To edit the default settings for a test and specify this configuration, do the
following:
1. Specify the ID's of the errors or warnings to be ignored in Modify Test
Defaults > Test Severity Report Thresholds > Ignore these Errors Or
Warnings text box. If more than one error or warning is to be suppressed for
a test, then specify the IDs separated by a comma.
2. In the adjoining drop-down list, choose either REPORT AS
INFORMATION or SUPPRESS COMPLETELY depending on the way
the error or warning needs to be ignored.
60 Aurora Automated File-based Quality Control System User Manual
Page 71

Operating basics
How to recall default and saved condition. Aurora provides default condition that
you can use with their default configuration, or you can use them as the basis to
create custom configuration for the tests.
When you create and save a new default configuration for the test, that
configuration will be available in the drop-down list at the top of the test.
File Read, Defaults, and Audio Layout has a separate drop-down menu on the
top, allowing you to select from default and custom configuration. When you
select a default or custom configuration from the drop-down list, the template
editor displays the current settings for the selected condition. The example below
shows the custom condition for the File Read condition.
Aurora Automated File-based Quality Control System User Manual 61
Page 72

Operating basics
How to exclude QC tests from a group in a template. Several QC tests are offered
in the Aurora Template editor as groups of tests. These include the Codec &
Container Syntax tests and Broadcast/Distribution Constraint tests. There may be
times when you want to disable specific tests within a pre-existing test group, or
times when you want to change the severity of a specific test in that group. This
is possible by exporting the template to XML, modifying the XML, and then reimporting the template.
1. Export a template that has your test group that you wish to modify already in
the template. Exporting a template is possible by going to the Template
Editor and clicking the Export button.
2. Edit the XML source using an XML editor, or use a text editor such as
Notepad or WordPad.
■
Change the Template Name (at the top of the XML file in <Template
name =” “/> tag. This will prevent your edited template from replacing
the original template.
■
Search for the ID of the test group you want to modify. You can find the
Test ID located next to the test name in the template editor, or by looking
up the test in the Aurora Help File Manual. This ID will be listed as:
<Test type="Static">
<Setup id="7603">
- where 7603 will be the test ID.
■
Modify subtest within the group using the <Subtest/> tag
■
Example 1 – Excluding a subtest
<Test type="Static">
<Setup id="7603">
<Subtest id="7603.002" Exclude="Yes" />
</Setup>
</Test>
■
Example 2 – Redefine a subtest to be a Warning, rather than Error
<Test type="Static">
<Setup id="7603">
<Subtest id="7603.004">
<TestWarningUntilOccurences>500</
TestWarningUntilOccurences>
<TestStopTestAfterOccurences>500</
TestStopTestAfterOccurences>
</Subtest>
</Setup>
</Test>
3. Save your XML template file.
4. Import your modified XML template into Aurora using the Import button in
the Template editor.
62 Aurora Automated File-based Quality Control System User Manual
Page 73

Operating basics
How to add audio QC tests with corrective options. Aurora uses Dolby audio
loudness for correcting the dolby channels. In the QC tests, AutoFix for Audio
Loudness is a correction option. AutoFix for Audio Loudness is designed to
accept an input container file, demux, and decode the audio, correct the audio for
the user-selected ITU-R BS.1770-2 specification (1770-3 is used for True Peak
measurement and limits), re-encode and replace the audio track into a copy of the
original container file, without modifying the original file’s mux parameters or
metadata.
By default, AutoFix for Audio Loudness will correct audio to a target threshold
LU and also apply a makeup gain (AGC) to ensure that corrected audio is not too
quiet after correction. You may modify the audio specification used, the
correction methodology and the AGC parameters to ensure that output audio will
meet your requirements.
AutoFix for Audio Loudness measures and automatically corrects audio against
ITU-R BS.1770-2 compliant specifications, including:
■
ATSC A/85
■
EBU R128
■
ARIB TR-B32
■
Free TV Australia OP-59
■
Generic 1770-3
Each of these implementations of the BS.1770 series of standards has their own
requirements for the following values:
■
Target LU: It is the target loudness unit, measured on a negative infinite
scale, with 0 being the loudest possible audio. A single loudness unit is
functionality equivalent in volume/amplitude to a single dB (decibel).
■
Measure Window: It is the length of time that audio will be measured for the
target LU. In many standards, the measure window overlaps for a period of
time, which is not user-modifiable.
■
Gate/Range dB: It is the noise gate threshold, which is the maximum increase
in loudness occurring in a measure window that must occur for the loudness
measurement to create a correctable event. The use of the noise gate in
average loudness prevents sudden and expected changes, such as explosions,
from creating dramatic impacts on the overall measured or perceived
loudness.
Complete the following steps to add AutoFix audio correction to a template:
Aurora Automated File-based Quality Control System User Manual 63
Page 74

Operating basics
1. From the dashboard, click Templates > Templates Editor.
2. Select Audio Quality.
64 Aurora Automated File-based Quality Control System User Manual
Page 75

Operating basics
3. Select Average Loudness with the test id 6003.005
4. From Audio Specification drop-down select ATSC A/85.
Aurora Automated File-based Quality Control System User Manual 65
Page 76

Operating basics
5. Click Add Test button to add audio specification to the template editor. The
selected audio specification to measure the audio loudness is added to the test
6003.005.
6. Once the audio specification is added to the audio loudness feature, you need
to add Autofix options to the test. Click the options to be set for Dolby
Loudness Metering and Dolby Loudness Correction. Dolby
ATSC
7. Autofix Options for Dolby: Dolby codec support is available with a separate
option to AutoFix. Since Dolby codecs have different sets of metadata
available for correction, Dolby correction options are exposed in the Dolby
tab as shown below.
66 Aurora Automated File-based Quality Control System User Manual
Page 77

Operating basics
The Dolby options are separated into Dolby Loudness Metering and Dolby
Loudness Correction.
Dolby Loudness Metering:
■
Mode - You can select from
■
ITU-R BS.1770-2 Plus Dialogue Intelligence (the default)
■
ITU-R BS.1770-1 Plus Dialogue Intelligence (for legacy
measurements)
■
ITU-R BS.1770-2 (no dialogue intelligence will be applied, making
this measurement match the non-Dolby AutoFix measurement mode)
■
LEQ(A) plus Dialogue Intelligence (not recommended, and only for
legacy purposes)
■
Speech Threshold – default at 20%, not recommended to modify
■
True Peak DC Block – default to OFF, not recommended to modify
■
True Peak Emphasis – default to OFF, not recommended to modify
Dolby Loudness Correction:
Bitstream Loudness Correction – will adjust the Dolby dialnorm and DRC
words and adjust the CRCs to account for the new values
For all Dolby correction, you can set the Dynamic Range Compression
(DRC) Profile, which is default to Predict from Input, as well as the
Aurora Automated File-based Quality Control System User Manual 67
Page 78

Operating basics
correction threshold (spread) around the Target LU. If selecting Loudness
Normalization, you can set the Normalization Target and True Peak limit.
8. Once you have completed making your adjustments and are ready to save
those settings, click Save As button on the bottom of the dialog window,
which will open a save dialog box. Provide a name for the AutoFix settings,
such as “ATSC A85 defaults”.
9. Click on the down arrow in the AutoFix Options box, and you should now
see the AutoFix template you just saved, “ATSC A_85 DEFAULT”, select
this template to add to your test 6003.005.
68 Aurora Automated File-based Quality Control System User Manual
Page 79

Operating basics
10. Once you add the AutoFix template to your test, you can view the AutoFix
summary to the test, as shown below.
11. Scroll up to the top of the page and click Save As button to save the template.
Aurora Automated File-based Quality Control System User Manual 69
Page 80

Operating basics
Template Manager
Aurora ships with several predefined default templates. The Template Manager
helps you to view all the templates.
You can view all the templates including the default templates and the userdefined templates.
You can edit, delete, rename, copy, export, and import any selected template.
NOTE. If more than one template is selected, you can only delete, copy, export,
and import the template.
70 Aurora Automated File-based Quality Control System User Manual
Page 81

Operating basics
How to create templates or use default templates
You can use the Template Editor to create user-defined templates or to use the
default templates supplied with Aurora. Aurora templates are created using File
Read, Default, Audio Layout, and QC tests. The created template is then used to
submit a job for Aurora QC.
Aurora Automated File-based Quality Control System User Manual 71
Page 82

Operating basics
How to create a custom
test template
Perform the following steps to create a custom test template.
1. From the dashboard, click the Templates tab and select Template Editor.
You can view:
■
File Read
■
Default
■
Audio Layout
■
QC tests
2. By default the File Read, Defaults, and Audio Layout displays the default
configurations.
72 Aurora Automated File-based Quality Control System User Manual
Page 83

3. Use the drop-down list at the top, to select the configuration you want to use.
Operating basics
NOTE. You need to select the condition for QC tests as it does not have the
condition for its own. You can select an existing configuration under each of
the sections of File Read, Defaults, and Audio Layout and save them as part
of the template. If no selection is made under any\all of these sections, then
the default configuration will be selected for that section(s).
4. Select the tests in QC section.
5. When you are done selecting the sections, click Save to open the Save dialog.
6. In the Save dialog, enter a name for the template and click Save to store the
template in the Aurora database for use in jobs, Smart Test plans or hot folder
operations. The example below shows a template being saved, named
Custom template.
You can view the custom test template in the drop-down list of the Template
Editor and in the Template Manager.
Aurora Automated File-based Quality Control System User Manual 73
Page 84

Operating basics
Default templates
Aurora ships with several predefined default templates. The figure below shows
the drop-down list of default templates.
Aurora includes the following default template templates:
■
AS-10 MXF French PAD Restrictions: Tests for AS-10 MXF Container
restrictions, checks for Scan order changes, Macro blocking Artifacts, Tape
Hits, Freeze / Blur frames, measures R128 Loudness, detects test tones,
Audio dropout, detects Hum / Wow / Flutter, Phase reversal, and Channel
correlation.
■
AS10 Restrictions: Tests for the AMWA AS-10 compliance of the MXF file.
■
ATSC Broadcast: Tests for ATSC audio & video distribution constraints and
measures A/85 loudness
■
Codec and Container Syntax: Checks for Codec and Container bitstream
syntax, timecode syntax and discontinuities and Closed Caption syntax
checks.
■
DPP: Checks for the AS-11/DPP distribution compliance of the MXF file for
SD/HD profiles.
■
DVB-T Broadcast: Tests for DVB-T (including ETSI 101 290) distribution
constraints and measures R128 loudness
■
Film/Analog Ingest: Reports stream summary and checks for most common
film/analog ingest artifacts (full functionality for Professional version users
only)
■
Japan Broadcast: Tests for ISDB-T distribution constraints (ARIB B-10) and
measures ARIB TR-B32 loudness
■
Netflix: Tests specific to Netflix content distribution & packaging
74 Aurora Automated File-based Quality Control System User Manual
Page 85

Smart Test plans
Operating basics
■
Quality Test: Will report stream summary and check for most of the artifacts
listed in Video Quality and Audio Quality sections (full functionality for
Professional version users only)
■
Quick Scan: Just scans the file and codec headers to report basic stream
summary information
■
Stream Summary Only: Scans the file heads and decodes the streams to
report full stream information
■
Tape Ingest: Reports stream summary and checks for the most common tape
ingest artifacts (full functionality for Professional version users only)
■
XDCAM: Will confirm compliance to SMPTE RDD-9 for XDCAM
interchange.
Smart Test plans allow rule-based selection of a Template based on the metadata
characteristics of the incoming media file for each job. After you have defined
several test templates for several different file or delivery scenarios, Smart Test
plans allow you to build IF/THEN or IF-AND/THEN statements to select
templates. You can also define an OTHERWISE case to provide a method to
process an incoming file that does not meet any of the Smart Test plan criteria.
How to build a new
Smart Test plan
Perform the following steps to build a new Smart Test plan:
1. From the Templates tab, select Smart Test Plan. To build a plan, you will
select items from the drop-down lists and enter a value for the test operator.
2. Choose a test from the Test Name drop-down list. You can select any piece
of metadata regarding the file that is shown on the Aurora Stream Summary
section of the report.
3. Select a test operator from the Operator drop-down list. The operator types
will change dynamically based on the type of test you selected.
4. Select or enter a value for the test operator. If the selected test has predefined
values (such as codec names or container types), the Value list will
Aurora Automated File-based Quality Control System User Manual 75
Page 86

Operating basics
automatically populate with those values. If the test does not have predefined
values, you need to enter a valid test value (the editor will prompt you if you
enter an out of range value, such as an alphabetic value in a test that is
measured with an integer).
5. Select a Stream Scope (ALL or ANY) from the drop-down list to define
which streams within the container this test should apply to. For most tests,
ALL is the proper selection, unless you specifically want to constrain the test.
6. Select a test action from the Action drop-down list:
■
AND IF: Uses the current test AND the next test to make a determination
on which template to use.
■
OR IF: Uses the current test OR the next test to make a determination on
which template to use.
■
USE TEMPLATE: Use the results of the tests up to this point to
determine which template to use.
■
MOVE: Sets a location to move the incoming file if the rules ahead of
this action are met.
7. If you select AND IF or OR IF as the Action, a new test row appears to allow
you to define an additional test. Repeat steps 2-6 as necessary to add tests
until you have a test chain that adequately describes the file you want to test.
8. In the last test of the plan, select USE TEMPLATE as the action. An
additional drop-down list appears that allows you to select which Template to
use from the list of default and saved test templates.
9. After selecting the test template to use for that test or group of tests, an
additional drop-down list appears that allows you to select a post-test action:
■
Select NEW IF to start a new group of tests. In this case repeat
steps 2-9 to define the additional tests.
■
Select OTHERWISE, to select a test template to use when none of the
test criteria in the plan are met.
10. Once your test criteria for the Smart Test plan is complete, click Save As and
enter a template name to save the new Smart Test plan.
76 Aurora Automated File-based Quality Control System User Manual
Page 87

Operating basics
How to use a
Smart Test plan
The Smart Test plans you create are displayed in the Template lists of the Add
New Job, Hot Folders and the SOAP API displays. The names of the Smart Test
plans are preceded by ST_.
In the preceding procedure for creating a new test plan, the test plan name was
entered as "Master Plan." The example template list shown below displays that
Smart Test plan as "ST_Master Plan."
User created Smart Test plans are always displayed at the top of the Template
list. When you select a Smart Test plan for a job or hot folder, the correct
template from your rules/tests will automatically be selected and used by Aurora.
How to import and export
Smart Test plans
You can import or export Smart Test plans as XML files, using the Import/Export
buttons on the Smart Test plan page. This allows you to build a test plan at one
site and use it at any other site.
Aurora Automated File-based Quality Control System User Manual 77
Page 88

Operating basics
How to import or export templates
Aurora allows you to import and export test templates in the form of XML files
for use with other Aurora installations or to send them to
videosupport@tektronix.com for analysis. Perform the following steps to import
or export a template file:
To import the templates
To export the templates
1. On the Template Manager page, click the Import to import.
2. Click Browse to browse to the desired file location.
3. Click OK to proceed.
1. In Template Manager page, select one or more templates.
2. Click Export to export the templates.
3. In the dialog box, click OK to export the selected templates to XML/Zip file.
78 Aurora Automated File-based Quality Control System User Manual
Page 89

Operating basics
How to import Aurora
legacy templates
The following procedure is an example of how to convert an Aurora legacy
templates from the dashboard into the template:
1. From the dashboard, click the Templates tab and select Legacy Aurora
Template Import.
The window displays the list of templates. The templates displayed are the
legacy templates Aurora found during the query.
2. Click Import All Templates Automatically button present at the upper left
hand side of the window, to convert all the templates.
Aurora Automated File-based Quality Control System User Manual 79
Page 90

Operating basics
3. To import only the selected templates, select the check box beside the
template and click Import Selected Branches button present at the bottom
left side of the window.
A pop up appears displaying the start of conversion process from legacy
template to new Aurora templates.
■
Click OK button, after all the templates are converted.
80 Aurora Automated File-based Quality Control System User Manual
Page 91

Operating basics
4. From Template tab, select Template Editor.
5. In the Template Editor page, click the drop-down list and select any
template.
Aurora Automated File-based Quality Control System User Manual 81
Page 92

Operating basics
6. For example, if you select Quality Test, the default condition of the template
is displayed for that template.
Reports
Options for accessing and
viewing job reports
You have three options when accessing a job report:
■
First Option: Click the HTML icon , which will open the report in a
new tab or window. The HTML report has dynamically adjustable sections
that allow for events to be collapsed and expanded.
■
Second Option: Click the PDF icon (located next to the Globe icon).
When you choose to view the report as PDF, all links that you would
normally click on are expanded to include all details.
■
Third Option: Click the Player icon, which will open the file in the
Hydra Player if installed and populate the Aurora QC events from the report
in the Review Bar of the player.
82 Aurora Automated File-based Quality Control System User Manual
Page 93

Operating basics
How to understand a Job
Report
Aurora Job Reports are designed to provide all relevant stream summary and QC
results in as few pages as possible, as well as be viewable online and offline in
the same view.
General Header Information: At the top of the report, basic information about
the product, versions, server locations, VU mode and GPU availability are
shown. The Job ID displays below the Job Report heading and Tektronix contact
information displays on the right-hand side of the header. Depending on which
contact link is clicked, you may visit the Tektronix website or email
videosupport@tektronix.com.
Status: The Status bar is on the left of the report. Here are what the colors mean:
Green, indicates that the job completed with no errors identified; Yellow,
indicates that the job was completed with warnings; Red indicates that errors
were detected.
Below the Status header, the time that the job began and ended is listed as well as
the length of time it took to complete the job.
Aurora Automated File-based Quality Control System User Manual 83
Page 94

Operating basics
Input Parameter: The general input parameters are listed under this heading on
the right of the report, including the Container and Template used for the job.
Container Metadata Summary: You can find the results for Stream Essence
Count, Stream Storage (Embedded or Referenced), File Size, Total Size,
Timecode Essence, Runtime, and Dark Metadata (if present, a link will be
shown) can be found under this heading in the report.
Video Stream Metadata Summary: The information listed under this heading
in the report includes: Frame Count, Runtime, Interlaced Mode, Color Space,
Chroma Profile, Color Depth, GOP Type, GOP Min/Max, Cadence, Closed
Captions, Profile/Level, Frame Resolution, Frame Rate, Bit Rate, Display Aspect
Ratio, Quantization (Avg), Quantization (Min/Max), Buffer Size, and AFD.
The luma histogram is also shown (the template defaults for black/white points
are the red lines on the histogram), and if a Title Card is required by the template,
this will be shown next to the luma histogram.
Measurement Results: Displays the graphs for PVQ and TekMOS.
NOTE. When PVQ test and TekMOS video quality test are included in the
measurement, the following graphs are displayed in the report.
84 Aurora Automated File-based Quality Control System User Manual
Page 95

Operating basics
The following graphs are displayed for PVQ:
■
PVQ Score vs Timecode graph - This graph plots the PVQ Scores of the
frames in the entire span of the file over time.
■
PVQ Distribution Histogram graph (Percentage of Frames vs PVQ
Score graph) - This graph plots the frequency distribution of PVQ Scores in
the file. It also plots the cumulative graph of PVQ Score over the percentage
of frames.
Aurora Automated File-based Quality Control System User Manual 85
Page 96

Operating basics
The following graphs are displayed for TekMOS:
■
TekMOS Score vs Timecode graph- This graph plots the TekMOS scores
of the frames in the entire span of the file. The shaded (light blue) area
displays the maximum and minimum TekMOS scores in the time segment.
The darker blue line (within the shaded area) displays the average TekMOS
score.
■
Distribution Histogram graph (TekMOS Score vs Percentage of Frames)
-The amount of frames with its range. This graph plots the frequency
distribution of the TekMOS scores in the file. It also plots the cumulative
graph of TekMOS Score over the percentage of frames. The darker line in
this graph is the cumulative function, which helps us to tune the template.
■
Distortion map: For a full quality perfect frame the TekMOS score is
5 (maximum value). This map helps you to understand the reason for the
score to drop down based on the distortions. The distortion histogram shows
the contribution of the artifact for the dip in the TekMOS score. The
TekMOS score can drop below the perfect score of 5 due to various artifacts
present within the file such as noise, tiling artifacts, and blurriness. Different
colors depicts the probability of different kinds of distortions that is being
measured. The Teal greenish at the top represents the noise artifact. The
darker blue represents the tiling artifacts. The golden color represents the
blurriness. The grey color represents the unscored frames with invalid score.
Audio Stream Metadata Summary: Under this heading in the job report, you
will find: Sample Count, Runtime, Bit Depth, Number of Channels, Language
ID, Sample Rate and Bit Rate.
86 Aurora Automated File-based Quality Control System User Manual
Page 97

Operating basics
Peak & average audio levels are shown (average levels display the standard used
in that measurement, as defined in the defaults section of the template), as well as
the dynamic range. Dolby Metadata will only be shown if a Dolby codec is in
use.
Analysis Results/QC Summary: The results of the analysis include the template
used for the job, the template species, and a list showing a breakdown of the
number of errors, warnings, information, and passed tests. Clicking the category
of any QC events will expand that category to show the list of QC events
generated, as well as the number of occurrences and the percent of the clip they
appear in. Clicking the Test Index Number next to the Test Description will
launch the help file for that test. You can also click the link to Jump To First
Occurrence of that event in the details.
Error/Warnings/Info/QC Details: This list appears just below the QC Summary
Clicking Show All will bring up the entire list of the reported error, warning, or
information tests. In this list, the Item ID, Test Performed, Instances and Rule
Type are provided and the Item ID number is a clickable link to the actual
applicable rule. To hide the detailed list, click Hide Details Only.
Aurora Automated File-based Quality Control System User Manual 87
Page 98

Operating basics
Clicking the thumbnail from these events will launch the Hydra Player (if
installed) on your client machine with the event frame on pause in full resolution.
Template Details: At the bottom of every Aurora report, there is a link to show
the Details of the template used for the job, which will show the exact list of tests
used.
Help files from the report
To see further explanation on the root cause of a QC event, or to understand how
the test is working, click the Test Index Number next to any of the Test Names in
the report. This shows a help file from the Aurora server.
88 Aurora Automated File-based Quality Control System User Manual
Page 99

Operating basics
How to open the file in
Hydra Player from an error
report location
To jump to the exact location of an error in the Hydra Player:
1. Ensure that Hydra Player is installed on the Windows PC you are viewing the
Aurora error report from.
2. Ensure that the local Windows PC has access to the file location (same file
permissions as the Aurora server).
3. Click on the thumbnail associated with the error.
How to use the Hydra
Review Bar to view results
and edit QC events
4. The Hydra Player will open the file, paused at the error location. You can use
the standard Hydra toolbar controls or keyboard shortcuts to play the file
from there. Refer to the Hydra User Manual for more details on the Hydra
Player.
The Review Bar (available in Hydra Player version 3.0 and later) will populate
and be available for use when you start playback using one of the following
methods:
■
By clicking a thumbnail link in an Aurora Report, or
■
By clicking the Play
button on the Home/Dashboard view next a file.
Aurora Automated File-based Quality Control System User Manual 89
Page 100

Operating basics
In either case, the selected container file will open in Hydra Player and the
Review Bar button (to the bottom right of the video window) will become active.
Click this button to open the Review Bar, and the Aurora QC events will be
automatically populated for you to use.
As you play through the video, the closest artifact (warning, error, or
information) to your current location will be highlighted. You can also use the
Next and Prev buttons to go directly to the next artifact.
90 Aurora Automated File-based Quality Control System User Manual
 Loading...