

Page 1

Addendum to the AOMI Manual
The following information covers changes to the manual for the AOM1/2 and AOM1/5
modules:
ERROR IN DESCRIPTION OF STROBE OPERATION
The topics “D/A DATA” and “STROBE” on pages 6 and 7 of the AOMl manual imply that
the mechanism of updating an output channel depends on the strobe feature, which may be
enabled or disabled. This information is in error. The strobe operation is always enabled. A
channel will update & after the strobe line has been sent an “ISSUE DATA” command,
Several channels may be loaded with data and an ISSUE DATA sent to the strobe line, or
channel data may be updated individually, each followed by an ISSUE DATA,
This information is relevant only if you are writing your own low-level drivers for the AOMl
module. High-level software such as KDACSOO, ASYST, or Labtech Notebook handle
updating of output channels automatically.
Document SOO-929-02B Addendum to the AOMl Manual
(c) Keithley Instruments, Inc. Cleveland, OH April 2.5, 1991
Page 2
AOMl
Analog Output Module 1
The AOMl Analog Output Module is available in two versions. The AOM1/2 provides
two channels, while the AOM1/5 provides 5 channels of high-speed analog output.
Each channel has an independent D/A converter.
The D/A converters offer true l2-bit resolution with a maximum nonlinearity of
~0.012%. Five switch-selected output ranges are available for each converter: 0 to +lOV,
0 to +5V, unipolar; *lOV, f5V, *2.5V, bipolar.
A system strobe feature, supported by two levels of data latching in the D/A converter,
allows any number of D/A channels to be updated simultaneously.
Signals are connected directly to the module via screw terminals mounted on the right-
hand side of the module board.
The AOMl module may be placed in any available slot in the system. To install the
module, first turn off the power and remove the top cover of the mainframe. Insert the
module in the desired slot with the component side facing the power supply. Generally, analog modules should be placed in the low-numbered slots to isolate them from
power supply thermal and noise effects.
CAUTION: Always turn off the system power before installing or removing modules.
To avoid possible EM1 radiation, never operate the system with the top cover removed.
User-Configured Components
Each D/A converter installed on the AOMl offers five output ranges: 0 to +5V, 0 to
+lOV, -5 to +5V, -10 to +lOV, and -2.5 to +2.5V. Switch Sets SlOES105 on the
AOM1/5 independently select the output ranges for channels O-4, respectively. On the
AOM1/2, SlOl and S102 select output ranges for channels 0 and 1.
All output connections are made to screw terminals. Two terminals are provided for
each channel: signal output and a common ground. All terminals accept 16-24 gauge
wire stripped to 3116 of an inch. See Table 1 and Figure 1 for a list of AOMl userconfigured components.
Document Number: 500-929-01 Rev. B
AOMl-1
Page 3
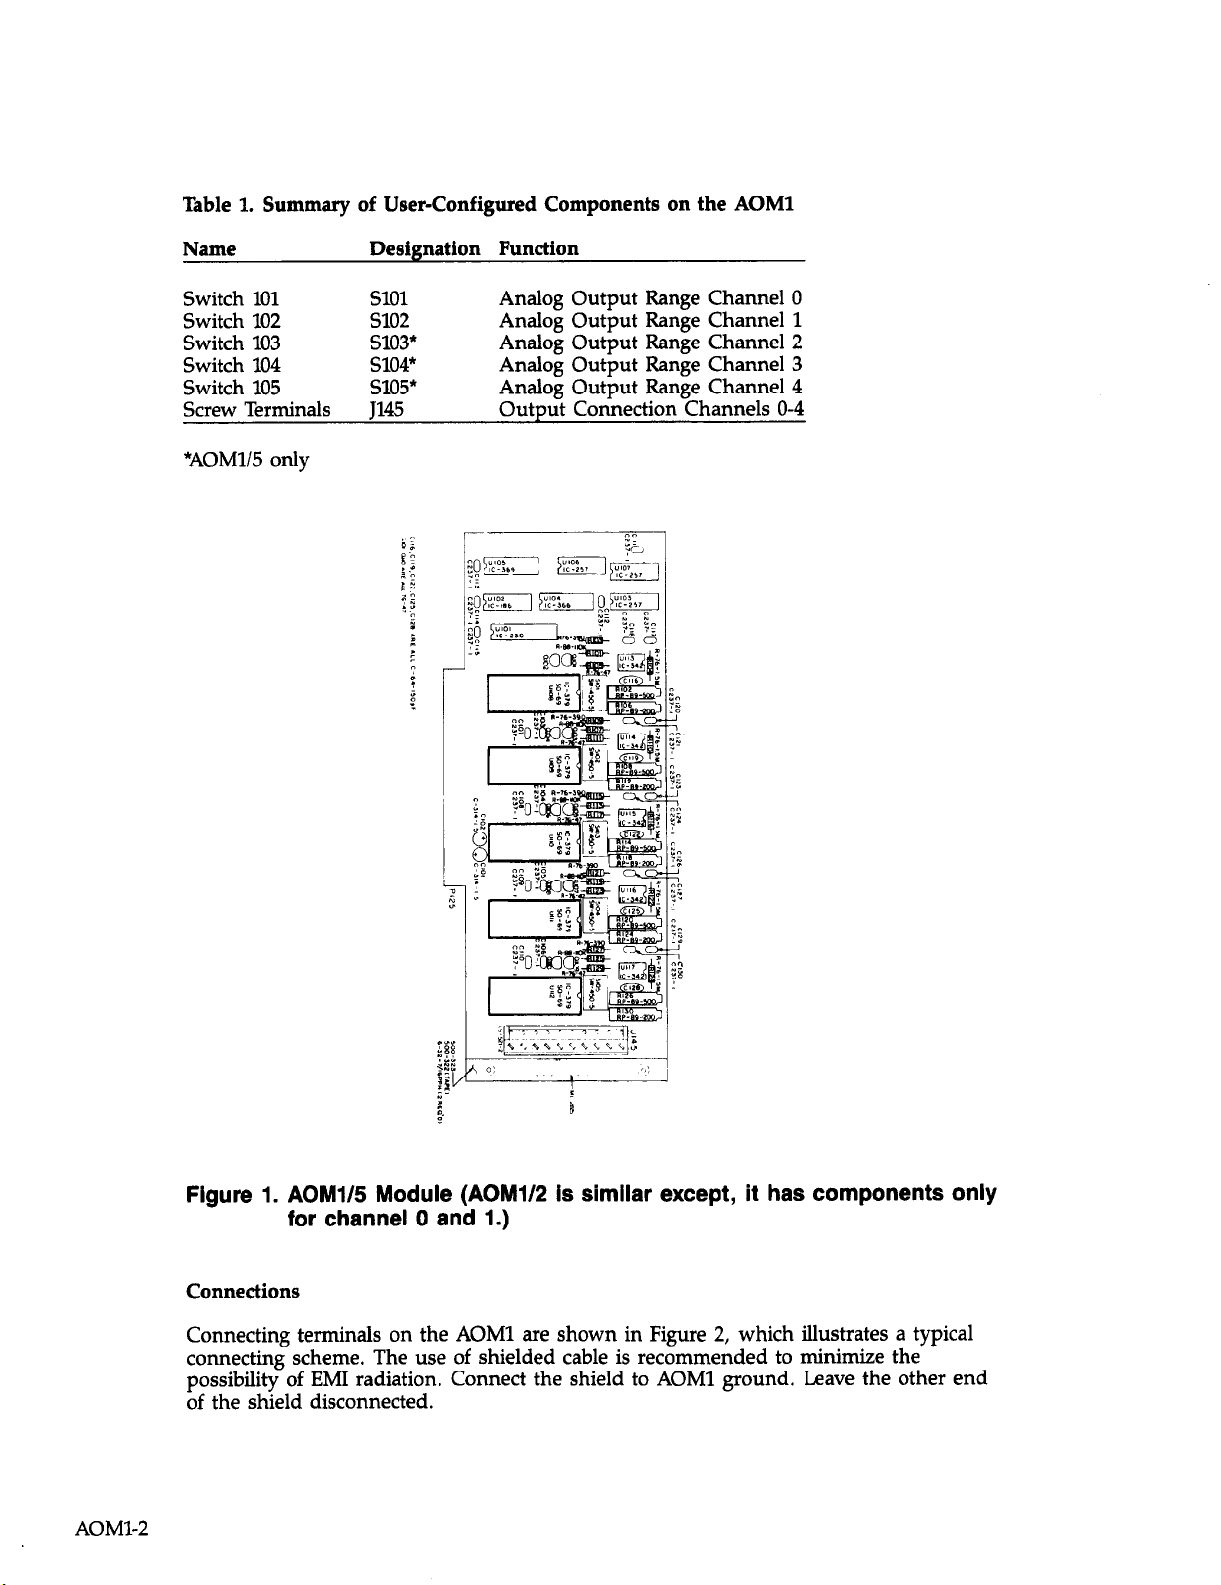
Table 1. Summary of User-Configured Components on the AOMl
Name
Switch 101 SlOl
Switch 102 s102
Switch 103
Switch 104
Switch 105
Screw Terminals J145
*AOM1/5 only
Designation Function
s103*
s104*
s105*
Analog Output Range Channel 0
Analog Output Range Channel 1
Analog Output Range Channel 2
Analog Output Range Channel 3
Analog Output Range Channel 4
Output Connection Channels O-4
AOMl-2
Figure 1. AOM1/5 Module (AOMV2 is similar except, it has components only
for channel 0 and 1.)
Connections
Connecting terminals on the AOMl are shown in Figure 2, which illustrates a typical
connecting scheme. The use of shielded cable is recommended to minimize the
possibility of EM1 radiation. Connect the shield to AOMl ground. Leave the other end
of the shield disconnected.
Page 4

LOAD
Figure 2. Typical AOMl Output Connections (Channel 0 shown)
Range Switches
The AOM1/2 has two switch sets, SlOl and S102 that control the output range of chan-
nels 0 and 1. The AOM1/5 has five switch sets, SlOlS105 that control the output range
of channels O-4 respectively. Each switch set has five individual DlP switches that control the range for that channel. The settings for these five individual switches are
shown in Table 2. Each channel is identical in operation. Note that changing ranges will
require calibrations described in the servicing section of this manual.
Table 2. DIP Switch Settings for Switch sets SlOl and S105
Output Range DIP Switches
0 to +5v
0 to +loV
*2.5V
*5v
*1OV*
1 2
Closed Open
3 4
Closed Closed Open
Closed Open Open Closed Closed
Open Closed Closed Closed Open
Open
Closed Open Closed Closed
Open Closed Open Open Closed
5
*Factory default settings
Note: DIP Switch settings are the same for all switch sets.
AOMl-3
Page 5

Output Limitations
There are certain restrictions as to the output capabilities of each channel on the AOMl
module. Generally, there is an upper limit on the amount of capacitance and a lower
limit to the resistance that can be connected across the output. To avoid possible oscillation, output capacitance must be less than lOOOpF. Similar restrictions apply to the output current, which is determined largely by the resistive component of the load connected across the output. If the resistance is too small, accuracy will suffer. To maintain
rated accuracy, the load resistance should be no smaller than 5kQ with a maximum of
output of *NV. Output current limit is 2-3mA.
Figure 3 shows a simplified diagram of an AOMl output stage. Because the output is
directly sensed, a certain amount of voltage drop across the internal resistance is
tolerated.
0
FROM A/D
CONVERTER
Figure 3. AOMl Output Stage
Commands
AOMl module commands are listed in Table 3. Table 4 summarizes the locations for
slot-dependent commands.
Table 3. Command Used with the AOMl Module
Command Location
D/A CONTROL
D/A DATA
STROBE: CFF9D
AOMl-4
SIGNAL
GROUND
Slot-dependent CMDA
Slot-dependent CMDB
Page 6

Table 4. Locations for Slot-Dependent Commands
Slot
Slot 1
Slot 2
Slot 3
Slot 4
Slot 5
Slot 6
Slot 7
Slot 8
Slot 9
Slot 10
D/A CONTROL
Location: Slot-dependent CMDA
D/A CONTROL always precedes D/A DATA, indicating to the AOMl module which
channel of analog output to update, and which byte of data to load. Table 5 lists values
written to the D/A CONTROL locations.
The high and low bytes of data may be updated independently and in any order; there
is no hardware reason that both bytes must be updated at the same time. Similarly,
channels can be updated independently and in any order.
CMDA
CFFSO
CFF82
CFF84
CFF86
CFF88
CFF8A
CFF8C
CFFSE
CFF90
CFF92
CMDB
CFF81
CFF83
CFF85
CFF87
CFF89
CFFSB
CFFSD
CFFSF
cFF91
CFF93
The location assigned to D/A CONTROL varies depending on which baseboard slot
holds the D/A converter being addressed (see Table 4).
Table 5. Values Written to D/A CONTROL
Function
Channel 0 Low Byte
Channel 0 High Byte
Channel 1 Low Byte
Channel 1 High Byte
Channel 2 Low Byte
Channel 2 High Byte
Channel 3 Low Byte
Channel 3 High Byte
Channel 4 Low Byte
Channel 4 High Byte
Note: AOM1/2 has only channels 0 and 1.
DIA DATA
Location: Slot-dependent CMDB
.Binary
0000
0001
0010
0011
0100
0101
0110
0111
1000
1001
HeX
HO
Hl
H2
H3
H4
H5
H6
H7
iii
Decimal
0
1
2
3
4
5
6
7
8 9
D/A DATA is used to load data values into the D/A converter. This command should
AOMl-5
Page 7

always be preceded by D/A CONTROL, which selects the channel and the byte to be
loaded. The data must be separated into low and high bytes prior to loading, and each
byte must be prefaced by D/A CONTROL.
When the strobe feature is not enabled, the output of the converter is updated immediately. Thus, when the strobe is not used, the low and high bytes are updated independently. When the strobe is enabled, outputs are not updated until the STROBE
command is issued with the value 1 (to issued data).
The digital value loaded into the converter varies according to the output range selected
via the range switch set, To determine the digital value to input for a given voltage, it is
necessary to know the output range of the D/A converter. With a K&bit digital converter, there are 4096 possible voltage levels, specified with digital values o-4095.
Therefore the actual full scale value is the nominal f.s. value minus 1 LSB. The
voltage
of each step equals the range divided by 4095. For an input range of 0 to +lOV, for example, the voltage of each step is lo/4095 or 0.002441: hence, a formula for each voltage
range can be derived (See Tables 6 and 7).
Where V is volts and D is the digital value loaded into the converter. Similarly, the
following equations determine the digital value to use when a particular voltage is
required.
Table 6. Digital Values to Volts
Output Range
0 to +lOV
0 to +5v
-10 to +lov
-5 to +5v
-2.5 to +2.5V
Voltage
V = D * 0.002441
V = D * 0.001221
-10 + (D * 0.004882)
vv =-5 + (-II * 0.002441)
V = -2.5 + (D * 0.001221)
Table 7. Volts to Digital Values
Output Range
Digital Value
0 to +lov D = INT(V10.002441)
0 to +5v
D = INT(V/O.OOl221)
-10 to +lOV D = INT(V10.004882) + 2048
-5 to +5v D = INT(V/O.O02441) + 2048
-2.5 to +2.5V D = INT(V/O.OOl221) + 2048
STROBE
Location: CFF9D
The STROBE command is used to make possible the synchronous updating of two or
more analog output channels. STROBE is issued in three modes: strobe enable, strobe
disable, and issue data. The STROBE feature must either be enabled or disabled at the
start of any Program, or the converters will not function (see Table 8).
AOMl-6
Page 8

When any strobe feature is disabled, all data given to a D/A converter is immediately
placed in that converters primary data latch, and the voltage output updated. The low
byte and high byte are thus updated asynchronously.
When the strobe is enabled, no data is updated until the STROBE command has been
issued in the issue data mode. Instead, new data is placed in a secondary data latch
within the D/A converter. When the STROBE command (to issue data) is given, the
new data is released to the primary data latch, updating the voltage output, and old
data in other channels is reissued, leaving the voltage output of these channels un-
changed. The strobe is completely flexible. Any amount of data--from a single byte to
any number of channels--can be updated when the strobe is enabled.
To use the strobe, issue the strobe enable command early in the program. Use the D/A
CONTROL and D/A DATA commands to load the secondary latches of the appropriate
converters, This can be done as far in advance as required. To issue the new data, load
STROBE with 1 (to issue data), releasing all data loaded since the last issue data com-
mand and leaving unchanged the outputs of other channels.
The STROBE feature is global, affecting all D/A modules installed in the HTMS 1000.
Table 8. Values Written to STROBE
Function Binary
Strobe Enable
Strobe Disable
Issue Data
AOMl Module Calibration
The AOM modules should be calibrated whenever the range is changed. Because a considerable amount of programming is necessary, a program is presented in this manual
as an aid in calibrating these modules. Program 1 is designed for the AOMl. Use the
following procedure when calibrating this module.
1. Place the AOM module to be calibrated in slot 5. Set the output range as indicated in
Table 9.
2. Enter the program into the computer.
3. Connect the DMM high input lead to the signal terminal of the channel being
calibrated. Connect the DMM low lead to module ground. For maximum accuracy,
connect the usual load resistance between the signal terminal and ground.
4. Run the program and follow its instructions. Refer to Figure 4 for adjustment locations. Make sure the output range of the module is set correctly. The program will
prompt with the correct range switch settings.
5. Repeat the procedure as necessary with the remaining channels.
01ooooO0
10000000
00000001
HeX Decimal
H40 64
H80 128
HO1 1
AOMl-7
Page 9

CHAN 0 OFFSET
CHAN 0 GAIN
CHAN 1 OFFSET
CHAN 1 GAIN
1
;!?
:Y
CHAN 2 OFFSET
CHAN 2 GAIN
CHAN 3 OFFSET
CHAN 3 GAIN
CHAN 4 OFFSET
CHAN 4 GAIN
AOMl-8
Figure 4. AOMl Module Calibration Adjustments
Page 10

Table 9. AOMl Output Range
Output Range
0 to +5v
0 to +lov
k2.5V
*5V
*loV
1
Closed
2 3
Open Closed
Closed Open
Open Closed
Open Closed
Open Closed
DIP Switches
4 5
Closed
Open Closed Closed
Closed
Closed Open
Open Closed Closed
Open Open Closed
Open
Program 1. AOMl Calibration
10 DEF SEG = &HCFFO:CLS
20 CA=&H88:CB=&H89:ST=&H9D
30 POKE ST, 64
40 PRINT “INSERT AOMl INTO SLCYT 5”
50 PRINT: INPUT ‘XOMl CHANNEL (O-4)“; CH
60 IF CHcO OR CH>4 THEN 50
70 PRINT: PRINT “CONNECT DMM To CHANNEL”; CH
80 PRINT: PRINT “RANGE SWlTCH POSITIONS”
9OPRINT”12345”
1ooPRlNlYom +5vcocco”
110PRINT’20To +1ovcoocc”
120 PRINT”3 +2.5V 0 C C C 0”
130 PRINT”4 +5v 0 c 0 c c”
14OPRINT”5 +1ovocooc”
150 PRINT: INPUT “RANGE (l-5)“; R
160l’RINT:IfR < 1OR > 5THENl.50
170 ON R GOSUB 300, 310, 320, 330, 340
180 POKE CA, TCH: POKE CB, 0
190 POKE CA, TCH + 1; POKE CB, 0
200 POKE ST, 1
210 PRINT: PRINT ‘ADJUST CHANNEL”; CH;“OFFSET FOR”; L$;“VOLT READlNG ON
DMM”
220 INPUT “PRESS RETURN TO CONTINUE”; A!§
230 POKE CA, 2*CH: POKE CB, 255
240 POKE CA, 2*CH + 1: POKE CB, 15
250 POKE ST, 1
260 PRINT: PRINT “ADJUST CHANNEL”; CH;“GAIN FOR”; H$;“VOLT READING ON
DMM”
270 INPUT “PRESS RETURN TO CONTINUE”; A$
280 PRINT: INlWT’AGAIN”; A!§
290 IF LEFl?$ (A!t,l) = “Y” THEN 50
295 END
300 L!$ =“O.OOO”: H$ =X999”: RETURN
310 L$ =“O.OOO”: H$ =“9.996”: RETURN
320 I$=“-2.500”: H$ =“2.500”: RETURN
330 L$=“-
5.000”: H$ =X996”: RETURN
340 I$=“-10.000”: H$ =“9.992”: RETURN
AOMl-9
Page 11

Theory of Operation
The AOMl schematic is located on drawing number 500-216.
The circuitry on the AOMl module can be divided into three groups: D/A conversion
circuitry for each channel, command development circuitry, and data buffering circuitry.
The primary components of the D/A conversion circuitry are complete, 12 bit D/A converters (AD567 JN) for each channel on the module. The converters contain precision
voltage references, highspeed analog switches, two levels of data latching, and a preci-
sion resistor ladder. The D/A converters for channels O-4 are designated U108-Ull2,
respectively. Each AD567 converter is supplemented by a high-speed, high accuracy,
output operational amplifier, UlBUll.7 for channels O-4.
Two potentiometers calibrate the gain and offset of each D/A converter: potentiometers
RlO6, Rl’l.2, Rll8, Rl.24 and Rl30 calibrate the gain for channels O-4 respectively; potentiometers R102, R107, 114, Rl.20 and Rl26 calibrate the offset for channels O-4. Five fiveswitch DIP switches (SlOl-S105) set the output range for the five D/A converters.
Components U102-UlO7 comprise the command development circuitry. A quad
transparent data latch, U104 (74LS75), stores the 4 bit command-select data (a number
between 0 and 9). This latch is refreshed by a negative pulse of the D/A CONTROL
command line (CMDA). CMDA is buffered and inverted by a hex inverter segment of
U102 (74LSO4). U105 a binary-to-decimal decoder (74LS42), generates 10 separate command lines based on the 4 bit binary word from U104. The 10 command lines are then
gated by quad OR gate segments of U103, U106 and U107 (74LS32).
The 8 data lines are buffered by UlOl, a bus transceiver (74LS244), configured as a
buffer.
AOMl Specifications
Output channels: 5 (2 on the AOM1/2)
Output ranges: +2.5V, *5V, *lOV, 0 to +5V, 0 to +lOV, switch selectable for each
channel
Resolution: 12 bits, 1 part in 4096
Nonlinearity: *0.0X?% of ES. (*l/2 lsb) max
Output impedance: 0.112
Load characteristics: 5kQ min, 1OOOpf max short circuit protected
Slew rate: l5Vlflec
Settling time: 5msec to 0.01% of fulI scale transition
Temperatune coefficient:
Gain:
0.0016%/°C of ES., unipolar ranges
0.0023%/°C of ES: bipolar ranges
Offset:
O.O006%l”C of ES., unipolar ranges;
O.OOlO%/“C of ES?, bipolar ranges
*Full scale for bipolar ranges is defined as -V, to +V,
AOMl-10
Page 12

AOMl COMPONENT LAYOUT
AOMl-llIAOM142
 Loading...