

Page 1

User Manual
AD007
GPIB-LAN Adapter
071-0245-03
www.tektronix.com
Page 2

Copyright © Tektronix, Inc. All rights reserved. Licensed software products
are owned by Tektronix or its suppliers and are protected by United States
copyright laws and international treaty provisions.
Use, duplication, or disclosure by the Government is subject to restrictions as
set forth in subparagraph (c)(1)(ii) of the Rights in Technical Data and
Computer Software clause at DFARS 252.227-7013, or subparagraphs (c)(1)
and (2) of the Commercial Computer Software -- Restricted Rights clause at
FAR 52.227-19, as applicable.
Tektronix products are covered by U.S. and foreign patents, issued and
pending. Information in this publication supercedes that in all previously
published material. Specificat ions and price change privileges reserved.
Tektronix, Inc., P.O. Box 500, Beaverton, OR 97077
TEKTRONIX and TEK are registered trademarks of Tektronix, Inc.
WaveStar is a trademark of Tektronix, Inc.
Page 3

WARRANTY
Tektronix warrants that the products that it manufactures and sells will be free from defects
in materials and workmanship for a period of one (1) year from the date of purchase from
an authorized Tektronix distributor. If any such product proves defective during this
warranty period, Tektronix, at its option, either will repair the defective product without
charge for parts and labor, or will provide a replacement in exchange for the defective
product. Batteries are excluded from this warranty.
In order to obtain service under this warranty, Customer must notify Tektronix of the defect
before the expiration of the warranty period and make suitable arrangements for the
performance of service. Customer shall be responsible for packaging and shipping the
defective product to the service center designated by Tektronix, shipping charges prepaid,
and with a copy of customer proof of purchase. Tektronix shall pay for the return of the
product to Customer if the shipment is to a location within the country in which the
Tektronix service center is located. Customer shall be responsible for paying all shipping
charges, duties, taxes, and any other charges for products returned to any other locations.
This warranty shall not apply to any defect, failure or damage caused by improper use or
improper or inadequate maintenance and care. Tektronix shall not be obligated to furnish
service under this warranty a) to repair damage resulting from attempts by personnel other
than Tektronix representatives to install, repair or service the product; b) to repair damage
resulting from improper use or connection to incompatible equipment; c) to repair any
damage or malfunction caused by the use of non-Tektronix supplies; or d) to service a
product that has been modified or integrated with other products when the effect of such
modification or integration increases the time or difficulty of servicing the product.
THIS WARRANTY IS GIVEN BY TEKTRONIX WITH RESPECT TO THE
LISTED PRODUCTS IN LIEU OF ANY OTHER WARRANTIES, EXPRESS OR
IMPLIED. TEKTRONIX AND ITS VENDORS DISCLAIM ANY IMPLIED
WARRANTIES OF MERCHANTABILITY OR FITNESS FOR A PARTICULAR
PURPOSE. TEKTRONIX’ RESPONSIBILITY TO REPAIR OR REPLACE
DEFECTIVE PRODUCTS IS THE SOLE AND EXCLUSIVE REMEDY
PROVIDED TO THE CUSTOMER FOR BREACH OF THIS WARRANTY.
TEKTRONIX AND ITS VENDORS WILL NOT BE LIABLE FOR ANY
INDIRECT, SPECIAL, INCIDENTAL, OR CONSEQUENTIAL DAMAGES
IRRESPECTIVE OF WHETHER TEKTRONIX OR THE VENDOR HAS
ADVANCE NOTICE OF THE POSSIBILITY OF SUCH DAMAGES.
Page 4

Page 5

Table of Contents
General Safety Summary vii............................
Preface ix............................................
Related Manuals and Information ix.......................
Contacting Tektronix x.................................
Getting Started 1.....................................
Product Description 1..................................
Features 1........................................
Applications 1.....................................
WaveStar for Oscilloscopes 2.........................
Tektronix VISA and VISA Configuration Utility 2........
System Requirements 3..............................
Network Protocols 3................................
Accessories 4........................................
External Features 5....................................
PowerOnSelfTest 5..................................
Quick Setup 7........................................
Setting up a DHCP/BOOTP Server 8......................
Setting up DNS 9.....................................
Installing the Adapter on the Network 10...................
Contacting the Network Administrator 10................
A Note on Configuring the Network 12..................
Before You Proceed 13...............................
Setup Procedure 1 -- Complete Factory Reset, Set
DHCP On 14....................................
Setup Procedure 2 -- Stand-Alone Operation 15............
Setup Procedure 3 -- No DHCP Server, Static IP Setup
and Operation 18.................................
Setup Procedure 4 -- DHCP Server, Dynamic IP Setup
or Operation 21..................................
Setup Procedure 5 -- DHCP Server and Static IP 25........
Accessing the Web Page Interface 26....................
Password Protection 26...............................
Connecting the GPIB 27.................................
Installation Options 29...............................
AD007 User Manual
i
Page 6

Table of Contents
Installing TekVISA Software 29..........................
Configuring TekVISA Resource s 30.......................
Verifying Network Access to the Adapter 32.................
Web Browser 32....................................
Network Ping 32....................................
Operating Basics 33...................................
Home 34.............................................
Adapter Information 35...............................
Adapter Password 35.................................
Reboot Adapter 35..................................
Network Setup 36......................................
Host Configuration 36................................
Networking 36......................................
Name Service 37....................................
Time Protocol 37....................................
GPIB Communications 38...............................
GPIB Devices 38....................................
Talk/Listen 38......................................
Network Connections 38..............................
Printer Setup 39.......................................
Printer Setup 39.....................................
Print Status 40......................................
Statistics 41...........................................
Network Statistics 41................................
GPIB Statistics 41...................................
System Log 41.....................................
Reset 41...........................................
Help 42..............................................
Support 42............................................
Reference 43.........................................
Interpreting the Status Indicators 44.......................
Power On 45.......................................
Normal Operation 46................................
Confirming a Hardware/Firmware Failure 47................
Resetting the Adapter 48................................
Bypass DHCP/BOOTP and Reset to Last Configuration 49..
Reset the Password and Read the IP Address 50...........
Reset to the Factory Defaults 51........................
ii
AD007 User Manual
Page 7

Table of Contents
Appendix A: Specifications 55...........................
Appendix B: Power Cord Options 59.....................
Appendix C: Network Protocols 61.......................
Appendix D: Troubleshooting 63.........................
Power On and Status 63.................................
Network and Print Configurat ion 65.......................
GPIB 67.............................................
Glossary 69..........................................
Index 73.............................................
AD007 User Manual
iii
Page 8

Table of Contents
List of Figures
Figure 1: AD007 GPIB-LAN Adapter, RJ-45 cable,
and power supply 4................................
Figure 2: External features 5...........................
Figure 3: Location of Status Indicators 6.................
Figure 4: Network information card 10...................
Figure 5: Ethernet hardware address 11..................
Figure 6: Decoding the adapter IP address 23..............
Figure 7: Typical GPIB Network Configuration 27.........
Figure 8: Connecting to the GPIB 28.....................
Figure 9: AD007 GPIB-LAN Adapter home page 34........
Figure 10: Status Indicators 44..........................
Figure 11: RESET button 48............................
iv
AD007 User Manual
Page 9

List of Tables
Table 1: Power on Self Test 6..........................
Table 2: AD007 status indicators for power on 45..........
Table 3: AD007 status indicators during normal
operation 46......................................
Table 4: Using the RESET button 49.....................
Table 5: Binary-to-decimal conversion chart for
IP address 50.....................................
Table 6: Factory default settings 52......................
Table 7: General specifications 55.......................
Table 8: AD007 certifications and compliances 55..........
Table 9: Power supply certifications and compliances 57....
Table 10: Power cord identification 59...................
Table 11: IP and Ethernet protocols 61...................
Table 12: Power on and status problems 63...............
Table 13: Network and print problems 65.................
Table 14: GPIB problems 67............................
Table of Contents
AD007 User Manual
v
Page 10

Table of Contents
vi
AD007 User Manual
Page 11

General Safety Summary
Review the following safety precautions to avoid injury and prevent
damage to this product or any products connec ted to it. To avoid
potential hazards, use this product only as specified.
Only qualified personnel should perform service procedures.
To Avoid Fire or Personal Injury
Observe All Terminal Ratings. To avoid fire or shock hazard, observe all
ratings and markings on the product. Consult the product manual for
further ratings information before making connections to the product.
Use Proper AC Adapter. Use only the AC adapter specified for this
product.
Do Not Operate Without Covers. Do not operate this product with
covers or panels removed.
Avoid Exposed Circuitry. Do not touch exposed connections and
components when power is present.
Do Not Operate With Suspected Failures. If you suspect there is damage
to this product, have it inspected by qualified service personnel.
Do Not Operate in Wet/Damp Conditions.
Do Not Operate in an Explosive Atmosphere.
Keep Product Surfaces Clean and Dry.
AD007 User Manual
vii
Page 12

General Safety Summary
Safety Terms and Symbols
Terms in This Manual. These terms may appear in this manual:
WARNING. Warning statements identify conditions or practices that
could result in injury or loss of life.
CAUTION. Caution statements identify conditions or practices that
could result in damage to this product or other property.
Terms on the Product. These terms may appear on the product:
DANGER indicates an injury hazard immediately accessible as you
read the marking.
WARNING indicates an injury hazard not immediately accessible as
you read the marking.
CAUTION indicates a hazard to property including the product .
Symbols on the Product. These symbols may appear on the product:
viii
CAUTION
Refer to Manual
Double
Insulated
Protective Ground
(Earth) Terminal
Not suitable for
connection to
the public telecom-
munications network
AD007 User Manual
Page 13

Preface
This manual contains information about installing and configuring
the AD007 GPIB-LAN Adapter. This manual is also in Acrobat
format on the CD-ROM disc.
H Getting Started describes the AD007 adapter and how to install
the adapter on 10/100Base-T Ethernet.
H Operating Basics contains information on how to use the web
pages in the adapter to monitor, reconfigure, or test the flow of
communications through the adapter, and how to set up a network
printer.
H Reference provides special diagnostic and setup procedures.
H Appendices contains specifications, applicable network protocols,
and troubleshooting information.
H A Glossary and Index appear at the e nd of the manual .
Related Manuals and Information
Refer to the following manuals for information regarding related
products, manuals, and programming specifications.
H The Read This First guide (071-0246-XX) contains information
to give to your network administrator for setting up the adapter
on the network.
H The WaveStar User Manual (071-0220-XX) is also in Acrobat
PDF format on the CD-ROM disc.
General information and specifications for Virtual Instrument
Software Architecture (VISA) i s avai lable from the web site of the
VXIplug&play Systems Alliance at:
http://www.vxipnp.org
AD007 User Manual
ix
Page 14

Preface
Contacting Tektronix
Phone 1-800-833-9200*
Address Tektronix, Inc.
Department or name (if known)
14200 SW Karl Braun Drive
P.O. Box 500
Beaverton, OR 97077
USA
Web site www.tektronix.com
Sales
support
Service
support
Technical
support
* This phone number is toll free in North America. After office
hours, please leave a voice mail message.
Outside North America, contact a Tektronix sales office or
distributor; see the Tektronix web site for a list of offices.
1-800-833-9200, select option 1*
1-800-833-9200, select option 2*
Email: techsupport@tektroni x.com
1-800-833-9200, select option 3*
6:00 a.m. -- 5:00 p.m. Pacific time
x
AD007 User Manual
Page 15

Getting Started
This section contains an overview of the AD007 GPIB-LAN Adapter
and provides instructions on how to install the adapter and the
accompanying software.
Product Description
The AD007 adapter allows GPIB devices to talk or listen to
networked computers and peripherals through a 10/100BaseT
Ethernet connection.
Features
H GPIB (IEEE 488.2) and 10/100BaseT Ethe rnet (IEEE 802.3)
compatible
H Easy setup with DHCP/BOOTP server
H LED status indicators for power, LAN, and GPIB connections
H Web page interfac e for configura tion and statistics
H Virtual Instrument Software Architecture (TekVISA) software
with language interface libraries for programmers using
Microsoft Visual Basic or Microsoft Visual C/C++
H Configuration utility for setting up additional VISA resources
H Software installation allowed on any number of PCs
H Free firmware updates over the Internet with the AD007 Update
Utility
Applications
H Print directly from GPIB devices to a network printer
H Control up to 14 GPIB devices over an Ethernet connection
H Capture waveforms with optional WaveStar for Oscilloscopes
software from Tektronix
AD007 User Manual
1
Page 16

Getting Started
WaveStar for Oscilloscopes
The AD007 adapter together with the optional WaveStar for
Oscilloscopes software provides a complete solution for users with
Tektronix TDS Series oscilloscopes with GPIB interfaces. The
software provides a powerful, easy-to-use interface for controlling
instruments, displaying data and waveforms, and sending print jobs
to any local or network printer. See System Requirements on page 3
for information on what systems can run WaveStar for Oscilloscopes.
A free 30-day demo of WaveStar for Oscilloscopes is included on the
Tektronix Software Solutions installation CD.
Tektronix VISA and VISA Configuration Utility
The Virtual Instrument Software Architecture (VISA) standard,
developed by the VXIplug&play Systems Alliance, provides a
common Input/Output (I/O) library for software developers so that
software from different ve ndors can run on the same platform.
Except for direct GPIB-to-network printing, all applications that
communicate over the network to the AD007 adapter must use the
Tektronix version of VISA (TekVISA). See the AD007 section in the
Tektronix Software Solutions Installation manual (Tektronix part
number 071--1140--01) for instructions on loading TekVISA on
your PC.
The TekVISA software includes a utility to help you configure the
Virtual Instrument Software Architecture (VISA) resources. The
TekVISA Resource Manager Configuration utility allows you to add
or remove remote hosts (such as one or more AD007 adapters). For
more information about using the configuration utility, see page 30.
2
AD007 User Manual
Page 17

Getting Started
System Requirements
See the AD007 section in the Tektronix Software Solutions Installation manual (Tektronix part number 071--1140--01) for system
requirements.
Network Protocols
Firmware in the AD007 adapter supports the following network
protocols:
H BOOTP
H DHCP
H LPD
H DNS
H HTTP
H FTP
H Time Protocol
AD007 User Manual
3
Page 18
Getting Started
Accessories
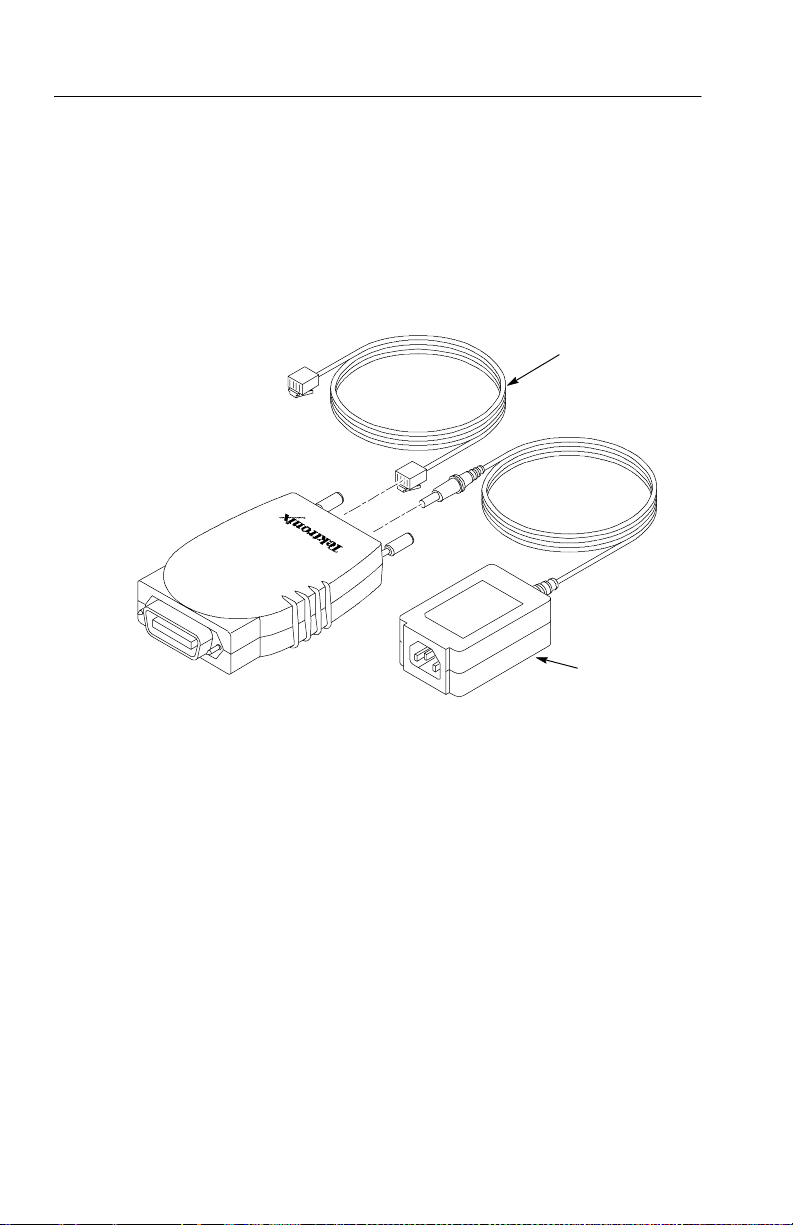
Figure 1 shows the AD007 GPIB-LAN Adapter, RJ-45 UTP cable,
and universal power supply (100 -- 240 VAC). Use the part numbers
when ordering replacements.
RJ-45 cable
(174-4024-00)
Universal
power supply
(119-5883-00)
Figure 1: AD007 GPIB-LAN Adapter, RJ-45 cable, and power supply
Also included (but not shown) are the following accessories:
H Power cord (varies with power cord option, see Table 10 on
page 59)
H GPIB connector hardware (129-1502-00)
H CD-ROM disc
H AD007 Read This First instructions
H AD007 User Manual (071-0245-XX)
H Registration form and mailing envelopes
4
AD007 User Manual
Page 19

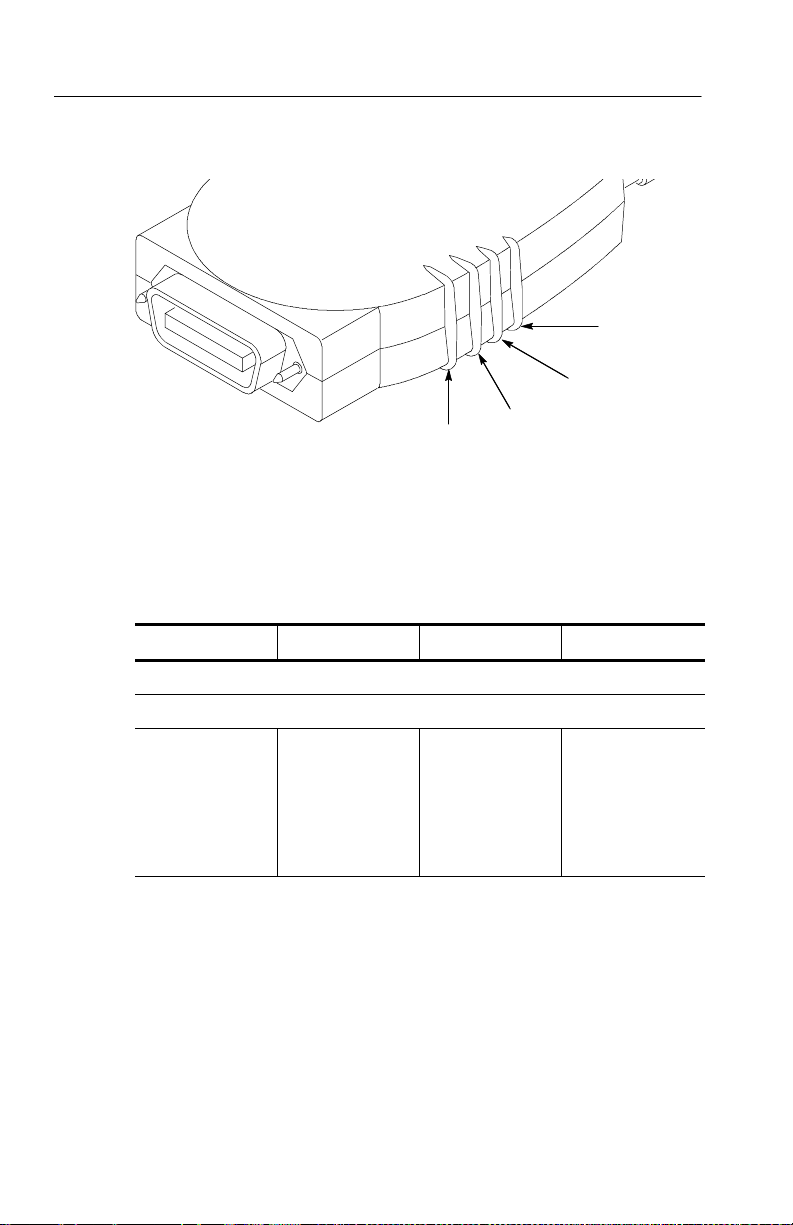
External Features
Figure 2 shows the external feature s of the AD007 GPIB-LAN
Adapter
Status indicators
DC jack
RJ-45 port
Figure 2: External features
Getting Started
GPIB connector
Power On Self Test
NOTE. Do not connect the adapte r to the network or GPIB at this
time.
1. Connect the power supply to the DC jack of the AD007 adapter.
2. Plug the power supply into a 100 to 240 VAC (± 10%) power
source with the appropriate line cord.
3. During the 30-second power on routine which follows, the status
indicators blink amber to indicate a self test in progress.
AD007 User Manual
5
Page 20
Getting Started
Figure 3: Location of Status Indicators
4. As the self test runs, the states shown in Table 1 apply.
Table 1: Power on Self Test
GPIB LAN LAN-Link POWER
-- -- -- -- -- -- -- -- -- ( 3 0 se c o n d s e l f - t e s t , i n d i c a t o r s b l i n k a m b e r ) -- -- -- -- -- -- -- -- --
Power
LAN-Link
LAN
GPIB
-- -- -- -- -- -- -- (Self test pass, indicators momentarily blink green) -- -- -- -- -- -- --
Off Off Red
RJ-45 cable not
connected
No IP address
loaded
Green
5. If the adapter indicates any other conditions, refer to Table 2 on
page 45 for a complete list of the status indicators.
6. To repeat the power on self test, simply unplug the DC connec-
tion, wait a couple of seconds, and reconnect.
6
AD007 User Manual
Page 21

Quick Setup
If the following conditions apply, you can go directly to the
appropriate setup procedure to install the adapter:
1. You have followed the instructions in the Read This First guide
and communicated the Ethernet hardware address of your adapter
to your network administrator.
2. Your network administrator has returned the card to you with an
IP address. (This means that the network administrator has
prepared the network by assigning a static IP address that is
mapped to the Ethernet Hardware address of the adapter.)
Note the information from the Network Information Card and
proceed as follows:
H If there is a DHCP/BOOTP server that is configured to allocate a
static IP address, go to page 25.
H If the DHCP/BOOTP server only allocates a dynamic IP address
(whether or not the administrator has assigned a fixed IP
address), go to page 21.
Getting Started
H If there is no DHCP/BOOTP server and the network administra-
tor has assigned a static IP address to the adapter, go to page 18.
H If you want to set up the adapter on a stand alone PC, go to
page 15.
H If the adapter was previ ously configured on anothe r net work and
you wish to reset it to factory defaults and turn DHCP on, go to
page 14.
H If you wish to know more about DHCP/BOOTP servers and
installing the adapter on a network, continue reading on to the
next section.
AD007 User Manual
7
Page 22

Getting Started
Setting up a DHCP/BOOTP Server
The purpose of a DHCP (Dynamic Host Configuration Protocol) or
BOOTP (Boot Protocol) server is to issue IP addresses to devices or
clients on the network that request them. Once the IP addresses are
properly assigned, the network servers can then allow other
communications to take place.
A DHCP or BOOTP server can also provide all the other network
parameters to the AD007 adapter including time servers, DNS,
gateway, netmask, and so on.
When the server receives a DHCP/BOOTP request from the AD007
adapter, it recognizes the hardware Ethernet address of the adapter,
maps the Ethernet address to an IP address, and then offers this IP
address back to the adapter.
The factory default settings of the AD007 Adapter enable the
DHCP/BOOTP request. This greatly simplifies the initial operation,
but requires some network configuration.
The process for configuri ng the DHCP or BOOTP server varies from
system to system. Adding the AD007 to the server’s list of clients is
usually just a matter of making an entry in a file or using a manager
utility.
There are two ways that the server can be configured to give the
AD007 adapter an IP address:
H Static. The server assigns the same IP address each time the
adapter makes a DHCP/BOOTP request
H Dynamic. The server offers a different IP address each time the
adapter makes a DHCP/BOOTP request
If possible, use the static configuration. This makes it easier to
access the AD007 adapter with a known IP address. If DNS is set up,
however, you can access the AD007 by using the host name instead
and it is not as important to have a static IP address.
8
AD007 User Manual
Page 23

In addition to the IP address, the server can offer the AD007 adapter
additional network information. The additional information is not
necessary for simple communication with the AD007, but may
permit automatic configuration of network settings that would
otherwise have to be manually configured. For a list of the se network
settings, see Network Setup on page 36.
To find out how to configure your server for DHCP, contact your
network administrator or consult the server manual.
Setting up DNS
DNS (Domain Name Service) allows you to access your AD007
adapter via a host name rather than an IP address. It is not necessary
to use DNS, but a host name is more meaningful and easier to
remember than an IP address. DNS simply associates a host name to
an IP address. Once this association is made, DNS converts the
requested host name to an IP address and forwards the request to the
device at the IP address. This process is invisible to the end user.
Like DHCP servers, there are many different DNS servers and
configuring each type is unique. Contact your ne twork administrator
to set up this service.
Getting Started
AD007 User Manual
9
Page 24

Getting Started
Installing the Adapter on the Network
Use the procedures in this section to install the AD007 GPIB-LAN
Adapter on a network.
Contacting the Network Administrator
Please contact your local network administrator or network services
before connecting the AD007 adapter. For your convenience, use the
network information card included in the Read This First guide, or
make two photocopies of the form shown in Figure 4.
Network Information Card
AD007 GPIB-LAN Adapter
Ethernet Hardware Address____:____:____:____:____:____
(User: copy address from the label on the back of the AD007 adapter)
Internet (IP) Address____.____.____.____ Host Name______________
(Network Administrator: for ease of set up, a static IP address is preferred)
10
Does network support DHCP or BOOTP? Yes - No If no, please note:
Subnet mask ____.____.____.____
Router address ____.____.____.____
(Enter these numbers on network setup page of the adapter, refer to user
manual)
Network drop (subnet) number and/or physical location
___________________________________________________________
(assigned by network technician)
Comments
___________________________________________________________
___________________________________________________________
(Network Administrator: Keep one copy and give one copy to the user.)
Figure 4: Network information card
AD007 User Manual
Page 25
Getting Started
To contact your network administrator or network services, do these
steps:
1. Find the Ethernet hardware address on the back of the AD007
adapter (Figure 5) and copy it onto the card. Ea ch AD007 adapter
has a unique Ethernet hardware address.
Ethernet hardware address
Figure 5: Ethernet hardware address
2. Give both copies of the card to the network administrator who
will assign an IP Address and fill out any other necessary
information.
3. For ease of setup, request that the Network Administrator assign a
static IP address. The Ethernet hardware address should be
mapped to this static IP address. If there is a DHCP/BOOTP
server, it should serve the same (static) IP address each time it is
requested.
4. If for some reason you cannot get a static IP address assigned, use
a dynamic IP address that is allocated by the DHCP/BOOTP
server. However, note that additional setup time is required if the
server allocates a different IP address to the adapter and you do
not have DNS.
The network administrator should retain one copy of the card and the
user should retain the other.
AD007 User Manual
11
Page 26

Getting Started
A Note on Configuring the Network
To establish communications with the AD007 GPIB-LAN Adapter
over the Ethernet, the network administrator must perform the
following tasks:
H Identify the Ethernet hardware address of the adapter
H Assign an IP address, subnet mask, default router for the adapter
H Configure the DHCP or BOOTP server
NOTE. A network technician should determine the network subnet
that the AD007 adapter connects to. (This is the connection point for
the RJ-45 cable.) It is not unusual for several drops at a particular
location to be on different network subnets, so it is important to have
the one that is designated for the adapter.
At power on, the AD007 adapter performs a self test and initiates
DHCP/BOOTP. The DHCP/BOOTP server then communicates with
the AD007 adapt er to give it the proper network settings. For more
information about setting up a DHCP/BOOTP server, see page 8.
on the network
12
If there is no DHCP/BOOTP server, you can use the reset button to
bypass the DHCP/BOOTP request and manually set the network
parameters.
For more detailed information about the applicable network
protocols, see Appendix C: Network Protocols on page 61.
AD007 User Manual
Page 27

Getting Started
Before You Proceed
Before you proceed with the rest of the installation, make sure you
can answer yes to the following questions:
H Does the network administrator have the Ethernet Hardware
address of the AD007 adapter?
H Do you have the IP address and/or host name that the network
administrator has assigned to the AD007 adapter?
H Do you have a DHCP/BOOTP server that has been set up to serve
a static IP address --or-- do you have the IP address, subnet mask,
and default router address that the network administrator has
assigned for manually configuring the AD007 adapter?
H Do you know where the assigned network connection is?
NOTE. If you answered “no” to any of the previous questions, contact
your local network administrator or network services before
continuing.
AD007 User Manual
13
Page 28

Getting Started
Setup Procedure 1 - Complete Factory Reset, Set DHCP On
If the following conditions are true, you may want to completely
reset the adapter to the factory default settings.
H The adapter has been used be fore and is configured with
H DHCP is off and the adapter does not request an IP address from
H You a r e not able to access the web pages of the adapter because
H YouwanttoturnDHCPon.
To reset to the factory default settings (and turn DHCP on), do these
steps:
1. Power the AD007 adapter off.
2. Use a small tool or end of a paper clip to push in and hold the
3. Power on the AD007 adapter and hold the reset button in until all
unknown settings.
the network.
the adapter is configured with unknown settings.
reset button.
status indicators go to a steady amber (approximately 30 se-
conds), then release the button. The AD007 adapter automatically
reboots with the factory defaults.
14
4. For a complete list of the factory default settings, see Table 6 on
page 52.
AD007 User Manual
Page 29

Getting Started
Setup Procedure 2 - Stand-Alone Operation
If the following conditions are true, you can manually set up the
adapter to work wit h a stand-al one PC.
H You want to set up the adapt er apart from a network.
H The stand-alone PC does not have the appropria te settings and
connections to access the web pages on the adapt er.
NOTE. Stand-alone operation requires a PC 10/100BaseT Ethernet
card and an Ethernet hub, crossover cable, or crossover adapter.
(The crossover cable or adapter is specifically designed for
connecting two nodes without a hub.)
To set the IP address in the adapter, do these steps:
1. Disconnect any cable that is currently connected to the adapter.
2. Power on the adapter and wait for the self test to complete. After
the self test is complete, the following states apply:
GPIB LAN LAN-Link POWER
-- -- -- -- -- -- -- -- -- -- ( 3 0 s e c o n d se l f - t e s t , li g h t s b l i n k a m b e r ) -- -- -- -- -- -- -- -- -- -- --
-- -- -- -- -- -- -- (Self test pass, indicators momentarily blink green) -- -- -- -- -- -- --
Off Off Red Green
3. Locate the reset button on the bottom of the adapter. (For the
location of the reset button, see Figure 11 on page 48.)
4. Using a small tool or end of a paper clip, momentarily push in the
reset button. This action loads the last known IP address. (For a
new adapter, the last known address is the factory default IP
address of 192.168.1.1.)
AD007 User Manual
15
Page 30

Getting Started
5. When the LAN-Link indicator turns from red to off, the AD007
GPIB LAN LAN-Link POWER
Off Off Off Green
NOTE. If your Internet web browser is configured to use the dialup
adapter, go into the Internet configuration dialog and change the
browser to use the local network. For more information, refer to the
documentation for your particular system.
6. In Windows, open the Network Properties window by right-click-
7. If TCP/IP is not listed as one of the protocols, you must install it
8. Highlight the TCP/IP and click on Properties. This opens the
adapter has successfully loaded the IP address:
ing on the Network icon in the Control Panel. (In Windows NT,
select the Protocols tab.)
from the Windows installation CD-ROM disc.
TCP/IP properties dialog box.
16
9. Click on all the tabs and write down all the settings. This allows
you to restore them l ater if necessary.
10. Set the IP address of the PC to work with the currently configured
settings of the adapter, or use the following settings that will
work with the factory default settings of the AD007 adapter. (You
mayhavetoclickonSpecifyanIPaddress.)
a. Assign the PC an IP address with the first three numbers
that are the same as the current AD007 IP address. (For
example, the IP address 192.168.1.2 is acceptable if you
are using the factory default 192.168.1.1 address of the
adapter).
b. Assign the numbers for the subnet mask. (For example,
assign the subnet mask 255.255.255.0 if you are using the
factory default settings).
AD007 User Manual
Page 31

Getting Started
c. If you are using the factory default settings to access the
adapter, the PC settings are now as follows:
IP address: 192.168.1.2
Subnet Mask: 255.255.255.0
11. For Windows, while you have this box open, click on the DNS
configuration tab and click on Disable DNS.
12. Click on the WINS tab and disable WINS.
13. Reboot the PC for these changes to take affect.
NOTE. After you change the network se ttings on your PC, you will no
longer have access to your network files until you restore the network
settings on your PC. Remember to reboot your PC for any changed
settings to take affect.
14. Connect the RJ-45 connector of the AD007 ada pter to the
Ethernet port of the PC with a crossover cable or use an Ethernet
hub.
15. The LAN-Link light should now turn from off to green:
GPIB LAN LAN-Link POWER
Off Off Green Green
16. Using a web browser, enter the adapter’s currently configured IP
address. For example, if your curre nt c onfigured IP address is
192.168.1.1, you would enter the following:
17. If you are prompted for a user name and password, you can
ignore the user name and enter the password. The factory default
password is ad007 (lowercase a, lowercase d, zero, zero, 7).
18. On the network configuration web page of the a dapter, enter the
correct IP address, subnet ma sk, and router (gateway) address.
AD007 User Manual
http://192.168.1.1
17
Page 32

Getting Started
19. Turn DHCP off or on as necessary for the new configuration.
20. Click on Submit. The new IP address is now in nonvolatile
21. Power off the adapter.
22. Connect the adapter to the proper network drop or Ethernet port.
23. Power on the adapter to boot up the adapt er with the new settings.
Setup Procedure 3 - No DHCP Server, Static IP Setup and Operation
If the following conditions are true, you must manually set up the
adapter on the network with a static IP address.
H The network administrator verifies that you do not have a
H The network administrator has prepared the network for the
To set the assigned IP address in the adapter, do these steps:
memory.
DHCP/BOOTP server on your network.
adapter by assigning a static IP address and mapping it to the
Ethernet Hardware address of the adapter.
18
1. Connect one end of the RJ-45 cable to the RJ-45 connector on the
back of the AD007 adapter. Push the connector in until it clicks.
2. Connect the other end of the RJ-45 cable to the network drop
assigned by the network technician.
3. Power on the adapter. The following states apply:
GPIB LAN LAN-Link POWER
-- -- -- -- -- -- -- -- -- -- ( 3 0 s e c o n d se l f - t e s t , li g h t s b l i n k a m b e r ) -- -- -- -- -- -- -- -- -- -- --
-- -- -- -- -- -- -- (Self test pass, indicators momentarily blink green) -- -- -- -- -- -- --
Off Green/Amber/Off Amber Green
Status: The adapter is requesting an IP address from the network, but is not
receiving one because there is no DHCP server.
AD007 User Manual
Page 33

Getting Started
4. Locate the reset button on the bottom of the adapter. (For the
location of the reset button, see Figure 11 on page 48.)
5. Using a small tool or end of a paper clip, momentarily push in the
reset button. This action bypasses the DHCP address request and
loads the last known IP address. (For a new adapter, the last
known address is the factory default IP address of 192.168.1.1.)
6. When the LAN-Link indicator turns from amber to green, the
AD007 adapter has successfully loaded the IP address.
NOTE. A static setup on the network requires that you are connected
through an Ethernet Hub to the same sub-network as the adapter.
7. Connect the RJ-45 adapter to the proper network outlet
(sub-network).
NOTE. If your Internet web browser is configured to use the dialup
adapter, go into the Internet configuration dialog and change the
browser to use the local network. For more information, refer to the
documentation for your particular system.
8. In Windows, open the Network Properties window by right-click-
ing on the Network icon in the Control Panel. (In Windows NT,
select the Protocols tab.)
9. If TCP/IP is not listed as one of the protocols, you must install it
from the Windows OS CD-ROM disc.
10. Highlight the TCP/IP and click on Properties. This opens the
TCP/IP properties dialog box.
11. Click on all the tabs and write down all the settings. This allows
you to restore them l ater.
12. Set the IP address of the PC to work with the currently configured
settings of the adapter, or use the following settings that will
work with the factory default settings of the AD007 adapter. (You
mayhavetoclickonSpecifyanIPaddress.)
AD007 User Manual
19
Page 34

Getting Started
13. For Windows, while you have this box open, click on the DNS
14. Click on the WINS tab and disable WINS.
15. Reboot the PC for these changes to take affect.
a. Assign the PC an IP address with the first three numbers
that are the same as the current AD007 IP address.
(For example, the IP address 192.168.1.2 is acceptable if
you are using the factory default 192.168.1.1 address of
the adapter).
b. Assign the numbers for the subnet mask.
(For example, assign the subnet mask 255.255.255.0 if
you are using the fact ory defa ult settings).
c. If you are using the factory default settings to access the
adapter, the PC settings are now as follows:
IP address: 192.168.1.2
Subnet Mask: 255.255.255.0
configuration tab and click on Disable DNS.
20
NOTE. After you change the network se ttings on your PC, you will no
longer have access to your network files until you restore the network
settings on your PC. Remember to reboot your PC for any changed
settings to take affect.
16. Using a web browser, enter the adapter’s currently configured IP
address. For example, if your adapter’s IP address is configured
to 192.168.1.1, you would enter the following:
http://192.168.1.1
17. If you are prompted for a user name and password, you can
ignore the user name and enter the password. The factory default
password is ad007 (lowercase a, lowercase d, zero, zero, 7).
18. On the network configuration web page of t he adapter, enter the
correct IP address, subnet ma sk, and router (gateway) address.
AD007 User Manual
Page 35

Getting Started
19. Click on Submit. The new IP address is now in nonvolatile
memory.
20. Power off the adapter.
21. Power on the adapter to boot up the adapt er with the new settings.
22. Restore the previous network settings on your PC and reboot
your PC.
23. To verify that the network installation is complete, perform the
procedure to access the web page interface on page 26.
24. After you have verified access to the web pages, continue with
the rest of the proce dures in the Getting Started section.
Setup Procedure 4 - DHCP Server, Dynamic IP Setup or Operation
If the following conditions are true, the network has automatically
configured the network settings of your adapter, but you must
determine the IP address allocated by the server in order to use or
manually reconfigure the adapter.
H The network administrator verifies that you have a DHCP/
BOOTP server on your network.
H The network administrator has indicated that the DHCP/BOOTP
server is configured to allocate a dynamic IP address to the
Ethernet hardware address of your adapter.
H The network administrator has not assigned you a static IP
address -- or -- you must determine the dynamically allocated IP
address in order to acce ss and set the static IP address of your
adapter.
H One end of the RJ-45 cable is connected to the RJ-45 connector
on the back of the AD007 adapter. Push the connector in until it
clicks.
H The other end of the RJ-45 cable is connecte d to the network
drop assigned by the network technician.
H After the 30-second power on routine, the following states apply.
AD007 User Manual
21
Page 36

Getting Started
GPIB LAN LAN-Link POWER
-- -- -- -- -- -- -- -- -- -- ( 3 0 s e c o n d se l f - t e s t , li g h t s b l i n k a m b e r ) -- -- -- -- -- -- -- -- -- -- --
-- -- -- -- -- -- -- (Self test pass, indicators momentarily blink green) -- -- -- -- -- -- --
Off Green/Amber/Off Green
(unknown IP address acquired)
Green
To read and decode the IP address, do these steps:
1. Photocopy the chart on page 23. Get a pencil and prepare to fill
out the chart.
2. Locate the reset button on the bottom of the adapter. (For the
location of the reset button, see Figure 11 on page 48.)
3. Make sure status indicators are in the states listed above.
4. Using a small tool or end of a paper clip, momentarily push in the
reset button. This initiates the adapter to display the IP address.
5. Mark a 1 for each red indicator in the appropriate spaces (leave
spaces for green indicators blank). When the indicators are all
amber, the value is a decimal point separator. Leading zeros are
ignored in each field.
6. Repeat the test as necessary by pressing the reset button again.
7. After you have written the binary values down, convert the binary
values to decimal and write the decimal values in the spaces
provided.
22
AD007 User Manual
Page 37

Getting Started
Binary-to-decimal
conversion chart
(red=1green=0)
GPIB LAN Lan-Link Power
0000 0
0001 1
0010 2
0011 3
0100 4
0101 5
0110 6
0111 7
1000 8
1001 9
Amber .
Momentarily press the reset
button to read the current IP
address of adapter:
GPIB LAN Lan-Link Power GPIB LAN Lan-Link Power
____ __
____ __
____ __
____ __
____ __
____ __
____ __
____ __
____ __
____ __
____ __
____ __
____ __
____ __
____ __
IP address
Example:
Factory default IP
address
___1 1
1__1 9
__1_ 2
Amber .
___1 1
_11_ 6
1___ 8
Amber .
___1 1
Amber .
___1 1
____ __
____ __
____ __
____ __
192.168.1.1_____._____._____._____
IP address
Figure 6: Decoding the adapter IP address
NOTE. If you do not have a static IP address assigned by your
network administrator, after a period of being disconnected from the
network, the server may assign the AD007 adapter a different IP
address. You may have to use the above procedure again to decode
the IP address of your adapter.
If the network administrator has requested that you bypass DHCP
and use a static IP address at power up, continue with the rest of this
procedure.
8. Start the web browser on your computer.
AD007 User Manual
23
Page 38

Getting Started
9. Open the location of the AD007 adapter using the IP address that
10. Go to the Network Setup page
11. If you are prompted for a user name and password, you can
12. Enter the static IP address assigned by your network administra-
13. Set DHCP off.
14. Click on Submit.
15. Reboot your adapter by disconnecting and reconnecting the
16. To verify that the network installation is complete, perform the
17. After you have verified access to the web pages, continue on with
you decoded:
http://AD007 IP address/
ignore the user name and enter the password. The factory default
password is ad007 (lowercase a, lowercase d, zero, zero, 7).
tor.
power, or go to the Home page and click on Reboot.
procedure to access the web page interface on page 26.
the rest of the proce dures in the Getting Started section.
24
AD007 User Manual
Page 39

Getting Started
Setup Procedure 5 - DHCP Server and Static IP
If the following conditions are true, the network has automatically
configured the network settings of your adapter.
H The network administrator verifies that you have a DHCP/
BOOTP server on your network.
H The network administrator has assigned you a static IP address.
H The network administrator has indicated that the DHCP/BOOTP
server is configured to serve the stati c IP address to the Ethernet
hardware address of your adapter.
H One end of the RJ-45 cable is connected to the RJ-45 connector
on the back of the AD007 adapter. Push the connector in until it
clicks.
H The other end of the RJ-45 cable is connecte d to the network
drop assigned by the network technician.
H After the 30-second power on routine, the following states apply.
GPIB LAN LAN-Link POWER
-- -- -- -- -- -- -- -- -- -- ( 3 0 s e c o n d se l f - t e s t , li g h t s b l i n k a m b e r ) -- -- -- -- -- -- -- -- -- -- --
-- -- -- -- -- -- -- (Self test pass, indicators momentarily blink green) -- -- -- -- -- -- --
Off Green/Amber/Off Green
H You are able to access the web pages of the adapter using the IP
address assigned by your network administrator.
(The procedure to access the web page interface and continue on
with the rest of the installation is on page 26.)
AD007 User Manual
Green
(IP address is
known)
25
Page 40

Getting Started
Accessing the Web Page Interface
The AD007 adapter has a built-in web server with online forms that
allow you to te st the net work connec tion, configure a printer, and
make various network or GPIB settings. Use the following procedure
to access the web pages:
1. Start the web browser on your computer.
2. Open the location of the AD007 adapter assigned by your
3. Use the settings on your browser to save or bookmark this
If you successfully access the Home web page, the network portion
of the installation is now c omplete. For more information about the
web page interface, see Operating Basics on page 33.
If you only access a diagnostic web page, there is a problem with the
firmware in the adapter. See the AD007 section in the Tektronix
Software Solutions Installation manual (Tektronix part number
071--1140--01) for instructions on updating the AD007 firmware.
network administrator:
http://AD007 host name or IP address/
location.
26
NOTE. If you cannot access any web page of the adapter, contact
your network administrator or network technician.
Do not change any parameters on the Network Setup without
contacting your network administrator. A password protection utility
is available on the Home page to protect these settings. See page 35.
Password Protection
The settings on the web pages are password protected. If you try to
make changes to the settings, the browser will prom pt you for a user
name and password. By default, the user name is ignored and the
password is ad007 (lowercase a, lowercase d, zero, zero, 7). To set a
new password, see page 35. To re set the password to the default
setting, see Resetting the Adapter on page 48.
AD007 User Manual
Page 41

Connecting the GPIB
Observe these rules when you set up the AD007 GPIB-LAN Adapter
with a GPIB system:
H Connect only one AD007 GPIB-LAN Adapter on a given GPIB.
H Each device on the bus ne eds a unique devic e address. No two
devices can share the same device address.
H Do not connect more than 15 devices to any one bus.
H Connect one device for every 2 m (6 ft) of cable used.
H Do not use more than 20 m (65 ft) of cable to connect devices to
a bus.
H Turn on at least two-thirds of the devices on the GPIB system
while you use the system.
H Configure the devices on the system as shown in Figure 7. Do not
use loop or parallel configurations.
Getting Started
GPIB Device
GPIB Device
AD007
GPIB Device
Figure 7: Typical GPIB Network Configuration
AD007 User Manual
GPIB Device
GPIB Device
GPIB Device
27
Page 42

Getting Started
To connect the AD007 GPIB-LAN Adapter to the GPIB, do these
steps:
1. Connect the GPIB port of the adapter to the GPIB port(s) or
connector(s) for the instrument(s) that you wish to control. If
necessary, use the GPIB connector hardware provided. (See
Figure 8.)
GPIB port on
instrument
28
GPIB cable
129-1502-00
Figure 8: Connecting to the GPIB
2. Turn on all devices connected to the GPIB. Wait for all power on
routines to finish.
3. Access the web page on the AD007 adapter.
4. Click GPIB Communications.
5. Click Poll to refresh the list of active talk/listen instruments.
6. Verify that the devices on the bus are listed.
7. If you change which devices are ac tive on the bus or device
parameters, click Poll to rediscover the active addresses on the
GPIB.
AD007 User Manual
Page 43

8. Another way to test the connection is to enter the query *idn? or
similar query in the GPIB Communications web page and click
Send. The Response field should indicate an appropriate
response.
Installation Options
After the AD007 GPIB-LAN Adapter is set up on the network and
connected to the GPIB you may proceed with either one, or both, of
the following installation options:
H Enable direct GPIB-to-network printing. Proceed to Operating
Basics section that begins on page 33 and access the Printer Setup
web page.
H Enable full GPIB-LAN communication. Proceed to the next
section, Installing TekVISA Software.
Installing TekVISA Software
Except for direct GPIB-to-network printing, all applications that
communicate over the network to the AD007 adapter must use the
Tektronix version of VISA (TekVISA). See the AD007 section in the
Tektronix Software Solutions Installation manual (Tektronix part
number 071--1140--01) for instructions on installing the TekVISA
software. You can install TekVISA on any number of PCs.
Getting Started
NOTE. If you have installed Tektronix WaveStar for Oscilloscopes,
then you do not need to install TekVISA separately; TekVISA is
automatically installed when WaveStar for Oscilloscopes is installed.
NOTE. Do not install the TekVISA software if you do not want to
overwrite your present VISA. The program detects any previous
versions of VISA and overwrites them with TekVISA.
AD007 User Manual
29
Page 44

Getting Started
Configuring TekVISA Resources
Run the TekVISA Resource Manager Configuration program to
configure TekVISA preferences, locate, and add instruments.
1. Right-mouse click on the yellow VISA icon in the Taskbar
notification area to display a pop--up menu. This icon was
installed as part of the TekVISA installation. If this icon is not
present, select Start > Programs > Te k V I SA > Te kV I S A
Configuration and wait for the icon to appear in the Taskbar
notification area.
2. Select Preferences to display the TekVISA Resource Manager
Preferences dialog. Use the dialog to specify which communication ports and how often you want TekVISA to search for
instruments. The search preferences have different settings
depending on whether TekVISA is installed on a Windows-based
oscilloscope or a PC. Pressing the Default Preferences button on
the Preferences dialog will set the configuration utility to
automatically search for instruments on RS-232, LAN and GPIB
ports.
30
Once the appropriate selections are made on this dialog, select
OK to close the Preferences dialog.
3. From the yellow TekVISA icon pop-up menu, select Refresh to
refresh connected instrument information.
4. From the yellow TekVISA icon pop-up menu, select
Configure... t o display the TekVISA Resource Manager
Configuration dialog. Wait until the message Status: Ready is
displayed in the lower left corner.
5. Check that the instrument you want to communicate with is listed
in the TekVISA Resources field. If the LAN-connected
instrument with which you want to communicate is not listed, do
the following steps to add an instrument to the Remote Host List:
AD007 User Manual
Page 45

Getting Started
NOTE. If you are attempting to communicate with a Tektronix
Windows-based oscilloscope, mak e sure the VXI--11 server is running
on the oscilloscope before doing the following procedure.
a. Select the Add button in the Remote Host List area. This
opens the Add Remote Host dialog.
b. Enter the IP address or location name (some instruments use
the VXI-11 server to define a name) in the Host Name field.
c. Select OK. The di alog closes, returns to the main TekVISA
window, and adds the IP address or location name to the
Remote Host field.
d. Select the Find button. The utility attempts to locate the
specified remote host address and lists it in the TekVISA
Resources field. It may take the program a few moments to
locate instruments, depending on network speed and load.
e. Repeat steps a through d to continue adding instrument
addresses.
f. Select the X button in the upper-right corner to save your
changes and exit the TekVISA Resource Manager Configuration utility program.
NOTE. The TekVISA Resource Manager Configuration program must
be able to locate and register an instrument before you can set up
communications with connected instruments.
If the TekVISA Configuration utility cannot locate an instrument,
verify that the AD007 is correctly configured: Refer to Appendix D:
Troubleshooting, and work with your system administrator to resolve
the problem. Also see the TekVISA Release Notes (Start > Programs
> TekVISA > Release Notes) and the online help file (Start >
Programs > TekVISA > TekVISA Resource Manager Help)for
TekVISA-specific information.
AD007 User Manual
31
Page 46

Getting Started
Verifying Network Access to the Adapter
Once the AD007 adapte r is configured on the network or configured
in a stand-alone setup, you should be able to browse to, or ping, the
IP address of the adapter.
Web Browser
Using a web browser, go to the currently configured IP address of the
adapter (i.e. http://IP_address). For the factory default address,
this entry would be
http://192.168.1.1
Network Ping
If you are unable to use the web browser, do these steps to ping the
IP address:
1. Open a DOS window and type the currently-configured IP
address of the adapter (i.e. ping IP address). For the factory
default address, this entry is
ping 192.168.1.1
32
If the DNS is configured, you should also be able to ping the host
name:
ping hostname
2. You should see a series of replies or an indication that the link is
valid. If the IP ping succeeded and the host name ping failed,
there is a problem with the DNS configuration. Contact your
network administrator.
3. If you were able to ping the AD007 adapter, you should also be
able to access the web pages with a web browser. If not, contact
your network administrator.
AD007 User Manual
Page 47

Operating Basics
This section contains information on how to use the web pages in the
adapter to monitor, reconfigure, or test the flow of communications
through the adapter, and how to set up a printer.
The adapter contains the following web pages:
H Home
H Network Setup
H GPIB Communications
H Print Setup
H Statistics
H Help
H Support
AD007 User Manual
33
Page 48

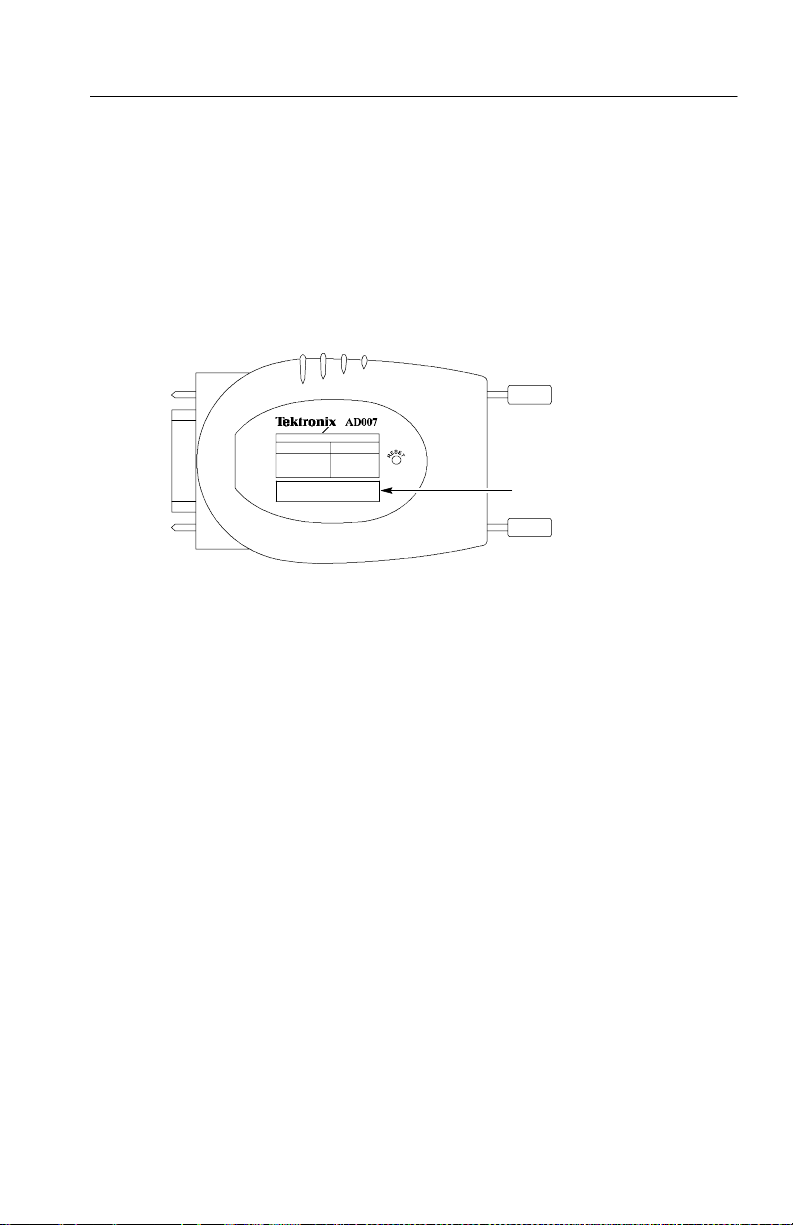
Operating Basics
Home
The home page reports general information about the particular
AD007 adapter that you are accessing, allows you to set the
password, and provides links to the other web pages on the adapter.
To access the home page of the adapter, use the following procedure:
1. Start the web browser on your computer.
2. Open the location of the AD007 adapter assigned by the network
administrator:
http://ad007hostname or IP address
3. From the home page of the adapt er, click on the links to view the
other pages on the adapter.
34
Links to other pages on
the adapter
Figure 9: AD007 GPIB-LAN Adapter home page
Adapter
Name of
current
page
host name
AD007 User Manual
Page 49

Operating Basics
Adapter Information
Adapter Information displays the following general information
about the AD007 adapter you are currently accessing.
H Host name
H IP address
H Ethernet address
H Firmware revision number and last update
H BootROM revision number and last update
H Time (if the time server is configured)
Adapter Password
Adapter Password prevents unauthorized changes to the adapter and
allows a firmware upgrade to proceed. By default, both the user
name and password are set to ad007 (lowercase a, lowercase d, zero,
zero, 7). To reset the password to the default setting, see Resetting
the Adapter on page 48.
To set a new password, do these steps:
1. Enter the old password.
2. Enter the new password twice, once in eac h box provided.
3. Click Submit.
Reboot Adapter
To reboot the adapter remotely and perform all power up functions,
click on Reboot.
AD007 User Manual
35
Page 50

Operating Basics
Network Setup
At power on, the AD007 automatically configures its entire Network
Setup from a Dynamic Host Configuration Protocol (DHCP) or Boot
Protocol (BOOTP) server. If you do not have a server that supports
DHCP/BOOTP, you may have to access the Network Setup page to
examine and change one or more of t he fol lowing network settings.
Host Configuration
If your server does not support the DHCP/BOOTP protocols, do
these steps to bypass the protocols:
1. If you have access to the web pages, go the the Network Setup
page and select DHCP Off.
2. If you do not have access to the web pages, momentarily press
the reset button during power on to bypass the DHCP/BOOTP
request and reset to the last configuration. (For the location of the
reset button, see Figure 11 on page 48.)
Networking
To allow the adapter to talk to other hosts on the local network, enter
the appropriate IP numbers for Adapter IP Address and Subnet Mask.
36
To allow the adapter to talk to hosts on other networks, enter the
appropriate IP number for Router Address.
AD007 User Manual
Page 51

Operating Basics
Name Service
If the Domain Name Service (DNS) parameters are correctly
configured, you can set the Time Server and Print Server to domain
names instead of numeric IP addresses.
To configure DNS, do these steps:
1. Set the Adapter Host name to the network host name of the
AD007.
2. Set the DNS Domain to the domain name of the AD007.
3. Enter the IP a ddress of at least one DNS server host. When listing
more than one DNS server, use a space or comma between each
IP address.
Time Protocol
Time Protocol, if set, synchronizes the AD007 to the current
Universal Coordinated Time supplied by the time server during boot.
If DNS is correctly configured for a time server, enter the IP address
or domain name of at least one time server.
AD007 User Manual
37
Page 52

Operating Basics
GPIB Communications
The GPIB communications page allows you to monitor and test
communications to various devices on the GPIB.
GPIB Devices
General Purpose Interface Bus (IEEE 488) provides a means for
several devices to communicate data through a parallel communications bus. Each device on the bus has a device address.
To identify what devices are present on the bus, click Poll.
Talk/Listen
A GPIB bus may contain only one controller device; all other
devices are talkers, listeners, or talker/listeners. AD007 serves as a
controller device any time an active GPIB control session is open.
To send a command string to the specific address of a device on the
bus, do these steps:
1. Click Poll to identify what devices are on the GPIB.
2. Select the specific address of the device from the pull-down
menu of polled addresses.
38
3. Enter the command in the box provided.
4. Click Send.
Network Connections
A network client control application can leave control sessions alive
on the AD007 adapter. The adapter cannot automatically clear
inactive connections. To clear all active and inactive network control
sessions, select VXI-11 Reset.
AD007 User Manual
Page 53

Printer Setup
The Print Setup page allows you to establish or change the
connection to a network printer.
H Printer setup
H Print status
Printer Setup
Under Printer Setup, enabling the Print Redirection feature allows
GPIB hard copy to go directly to a network printer. If Print
Redirection is on and there are no open GPIB device control
sessions, the AD007 will intercept all traffic on the GPIB bus and
send it as a print job to a networked printer. The AD007 adapter uses
the LPD print server protocol (RFC1179). To enable this feature,
select Print Redirection On.
NOTE. To avoid GPIB conflicts, make sure that only one device at a
time is in the hardcopy mode (EOI high). Do not leave instruments in
the hard copy mode after the print job is finished.
Operating Basics
To connect to a network printer, do these steps:
1. Verify that your print server supports LPD network printing.
2. Identify the server name or IP address of your LPD print server.
3. Identify the print queue of the desired print device.
4. Identify print format supported by the printer (e.g. Postscript,
Laserjet, Deskjet).
AD007 User Manual
39
Page 54

Operating Basics
5. Set the hardcopy format of your GPIB equipment to the
corresponding format.
6. Use the forms on the web page to enter the required settings
(Print Redirection must be on) and click Submit.
7. Verify operation with the Test Print button. The adapter will send
a test page to the network printer. If the printer understands how
to print plain text, it will print the test page.
Print Status
If the print server al lows you to examine the print queue or cancel
print jobs, you can perform the following operations:
H To examine the status and contents of the print queue, click
Refresh.
H To cancel a print job, enter the Job Number and click Cancel.
40
AD007 User Manual
Page 55

Statistics
The Statistics page allows you to view the activity of the network
and GPIB communications interfaces and to view a system log of
data.
Network Statistics
The Network Statistics shows the following counts:
H Tx -- packets transmitted successfully
H Rx -- packets received successfully
H Collisions -- collisions detected
H Tx Errors -- packets transmitted with error
H Rx Errors -- packets received with error
GPIB Statistics
The GPIB Statistics shows the following counts:
H Rx -- data received
Operating Basics
H Rx Errors -- data received with errors
H Tx -- data transmitted
H Tx Errors -- data transmitted with errors
H Cmd --commands sent
H Cmd Errors -- errors resulting from commands
H Print -- print data received
H Print Errors --print data with errors
System Log
To identify more technic al system issues, view the System Log
Reset
To reset the statistics to zero, click Reset.
AD007 User Manual
41
Page 56

Operating Basics
Help
This page contains a summary of helpful information about the
adapter web pages.
Support
This page contains the same information found under Contacting
Tektronix in the preface to this manual along with active links to the
Tektronix Home page and the e-mail addre ss for customer support.
42
AD007 User Manual
Page 57

Reference
This section provides these special diagnostic and setup procedures
for the AD007 GPIB-LAN Adapter:
H Interpreting the Status Indicators, page 44
H Confirming a Hardware/Firmware Failure, page 47
H Resetting the Adapter, page 48
AD007 User Manual
43
Page 58

Reference
Interpreting the Status Indicators
The status indicators on the AD007 adapter report the progress and
condition of power on self tests, network boot, and the normal traffic
to and from the network and GPIB. To determine the operating state
of the adapter, see Tables 2 and 3 to interpret the blinking patterns
and colors of the indicators.
Power
LAN-Link
LAN
GPIB
44
Figure 10: Status Indicators
AD007 User Manual
Page 59

Reference
Power On
Table 2 shows the sequence of status indications for power on. To
perform or repeat the power on sequence, unplug the power to the
adapter, wait a couple of seconds, then connect the power agai n.
Table 2: AD007 status indicators for power on
Power on status GPIB LAN L-Link Power
1. Off or power failure Ø Ø Ø Ø
2. Self testing (hardware) G/A G/A G/A G/A
3. Self test failure R/Ø R/Ø R/Ø A
A A A A
4. Self test pass G/Ø G/Ø G/Ø G
5. LAN Discovery loop
(DHCP/BOOTP request)
Note: By default, the DHCP/BOOTP
request continues to loop until serviced. To
exit the loop, momentarily press the reset
button. The adapter will load the last
configuration from memory.
6. LAN OK Ø
Ø
Ø↔G/A
Ø↔G/A
A G
G G
G = Green R = Red A = Amber Ø = Off/Idle
G/A = Toggles between green and amber
Ø↔G/A = for LAN and GPIB, G indicates sending data, A indicates receiving
data,
Ø indicates idle
AD007 User Manual
45
Page 60

Reference
Normal Operation
Table 3 shows the possible status indications during normal
operation.
Table 3: AD007 status indicators during normal operation
Operating and idle states GPIB LAN L-Link Power
Disconnected from the LAN with no IP
address
Disconnected from the LAN after getting IP
address
Idle Ø G/Ø G G
LAN collision
GPIB spooling to AD007 A
AD007 printing to LAN printer
VXI-11 traffic
Ø Ø R G
Ø Ø Ø G
Ø↔G/A Ø↔G/A
Ø↔G/A
Ø↔G/A
Ø↔G/A Ø↔G/A
A G G
G/A G
G G
G G
G = Green R = Red A = Amber Ø = Off/Idle
G/A = Toggles between green and amber
Ø↔G/A = for LAN and GPIB, G indicates sending data, A indicates receiving
data,
Ø indicates idle
46
AD007 User Manual
Page 61

Confirming a Hardware/Firmware Failure
Defective hardware or firmware can cause the adapter to indicate a
self-test failure as follows:
H No indicators light during power on
H The indicators light and remain amber
H The LAN-Link, LAN, a nd GPIB indicators blink red after the
self-test at power on.
To confirm a hardware or firmware failure, do these steps:
1. Supply power to the AD007 adapter.
2. If no indicators light, check power connections at the following
components:
a. line source to powe r cord
b. power cord to power supply
c. power supply to the DC input jack on the back of the
AD007 adapter
Reference
3. If indicators light, wait 30 seconds for the self-test to complete.
Blinking indicators at the beginning of power on indicate that the
hardware self-test is in progre ss.
4. To indicate a successful self test, the LAN-Link, LAN, and GPIB
indicators simultaneously blink green before automatically
starting the LAN discovery (DHCP/BOOTP request) loop. See
Table 2.
5. To indicate a hardware failure in the adapter, the adapter will
indicate one or more of the following
a. The LAN-Link, LAN, a nd GPIB indicators simultaneously
b. All indicators light and remain amber.
c. The LAN-Link, LAN, and GPIB indicators do not
AD007 User Manual
blink red after the 30-second self test is complete.
simultaneously blink green before beginning the LAN
discovery.
47
Page 62

Reference
If you experience a hardware or firmware failure, contact your local
Tektronix Service Center. See the numbers under Contacting
Tektronix on page x.
Resetting the Adapter
Because the adapter stores the current configuration settings in
nonvolatile memory (flash ROM), it may be necessary to use the
reset button to bypass the normal power on routine. The reset button
is located inside a small recess on the bottom of the AD007 adapter.
See Figure 11.
Reset button
48
Figure 11: RESET button
Table 4 summarizes the results of using the reset button and actions
necessary to achieve each result. Detailed procedures follow the
table.
AD007 User Manual
Page 63

Table 4: Using the RESET button
Reference
Desired Result
Bypass DHCP/BOOTP
request and reset to last
configuration
Reset only the password
to factory default (ad007)
Read the binary code of
the adapter IP address
on the status indicators
Reset entire configuration to factory defaults
When to push the
RESET button
During LAN discovery
loop (DHCP/BOOTP
request) when LAN-Link
is amber
During normal operation momentarily
During normal operation
or from power on
How long to hold the
RESET button in
momentarily
Until all indicators are
steady amber (~10
seconds)
Bypass DHCP/BOOTP and Reset to Last Configuration
To bypass DHCP/BOOTP and reset to the last configuration, do these
steps:
1. Power off the AD007 adapter and wait a few seconds.
2. Power on the AD007 adapter and wait until the adapter tries to
discover the LAN (the LAN light begins to blink green/amber
after the self test).
3. Using a small tool or end of a paper clip, momentarily push in the
reset button. This bypasses the LAN discovery (DHCP request).
4. When the LAN-Link indicator turns from amber to green, the
AD007 adapter has successfully loaded the last configuration.
AD007 User Manual
49
Page 64

Reference
Reset the Password and Read the IP Address
With the adapter in the normal mode, press the RESET button
momentarily. The password resets to ad007 and begins to display the
the IP address of the adapter. Each flash indicates the binary code of
the digits of the IP address left to right. (Leading zeros in each field
of the address are ignored.)
xxx.xxx.xxx.xxx
Refer to Table 5 to decode the binary value of each decimal in the IP
address.
Table 5: Binary-to-decimal conversion chart for IP address
Value of IP
GPIB LAN LAN--Link Power
Green Green Green Green 0
Green Green Green Red 1
Green Green Red Green 2
address
50
Green Green Red Red 3
Green Red Green Green 4
Green Red Green Red 5
Green Red Red Green 6
Green Red Red Red 7
Red Green Green Green 8
Red Green Green Red 9
Amber Amber Amber Amber .
AD007 User Manual
Page 65

Reference
Reset to the Factory Defaults
The procedure to reset to factory defaults overrides current setti ngs
and sets the adapter to known settings. This makes it possible to
access the adapter from the known settings or to turn DHCP on. You
may reset to Factory defaults either at power on or during normal
operation.
NOTE. If you are not using DHCP, use the factory default settings
only if you are sure they do not conflict with other settings on the
network. If the settings conflict, use the procedure for stand-alone
operation to access the adapte r.
To reset at power on, do these steps:
1. Power the AD007 adapter off.
2. Use a small tool or end of a paper clip to push in and hold the
reset button.
3. Power on the AD007 adapter and hold the reset button in until all
status indicators go to a steady am ber (approximately 30 seconds), then release the button. The AD007 adapter automatically
reboots with the factory defaults.
AD007 User Manual
51
Page 66

Reference
Table 6: Factory default settings
Page Name Setting
Home Host name ad007
Password ad007
Network Setup DHCP On
IP address 192.168.1.1
Subnet mask 255.255.255.0
Router (Gateway) <empty>
DNS Domain <empty>
DNS Servers <empty>
Time Servers <empty>
Printer Setup Print Redirection Off
Print Server lphost
Print Queue lp
52
To reset during normal operation, do these steps:
1. Check that the self tests are complete (POWER and LAN-Link
are Green).
2. If the adapter is looping on the DHCP/BOOTP request,
momentarily press the reset button to bypass the request and
begin normal operation.
AD007 User Manual
Page 67

Reference
3. Using a web browser, enter the factory default IP address:
http://192.168.1.1
If you cannot access this address, you many need to reset to the
factory default settings at power on.
4. On the network configuration web page of the adapte r, enter the
correct IP address, subnet ma sk, and router (gateway) address.
The following settings are the most important:
H IP address: 192.168.1.1
H Subnet mask: 255.255.255.0
5. Turn DHCP off if there is no DHCP/BOOTP server.
6. Click Submit. The new information is now in nonvolatile
memory.
7. Power off the adapter.
8. Power on the adapter to boot up the adapter with the new se ttings.
AD007 User Manual
53
Page 68

Reference
54
AD007 User Manual
Page 69

Appendix A: Specifications
All specifications listed in Table 7 are warranted unless marked as
typical.
Table 7: General specifications
AD007 input voltage and current 5 VDC, 300 mA typical
Power supply output 5 VDC, use only the power supply provided
DC connector polarity Center terminal, +
Outer ring, --
Tables 8 through 9 list the certifications and compliances for the
AD007 adapter and standard accessory power supply.
Table 8: AD007 certifications and compliances
EC Declaration of
Conformity -- EMC
AD007 User Manual
Meets intent of Directive 89/336/EEC for Electromagnetic
Compatibility. Compliance was demonstrated to the following
specifications as listed in the Official Journal of the European
Union:
EN 55011 Class A Radiated and Conducted Emissions
EN 1000-3-2 AC Power Line Harmonic Emissions
EN 50082-1 Immunity:
IEC 1000-4-2 Electrostatic Discharge Immunity
IEC 1000-4-3 RF Electromagnetic Field Immunity
IEC 1000-4-4 Electrical Fast Transient/Burst Immunity
IEC 1000-4-5 Power Line Surge Immunity
IEC 1000-4-6 RF Conducted Immunity
IEC 1000-4-11 Line Dropout/Dips Immunity
55
Page 70

Appendix A: Specifications
Table 8: AD007 certifications and compliances (cont.)
Australia/New Zealand
Declaration of
Conformity -- EMC
FCC Compliance Emissions comply with FCC Code of Federal Regulations 47, Part
Pollution Degree A measure of the contaminates that could occur in the
Complies with EMC provision of Radiocommunications Act
per the following standard(s):
AN/NZS 2064.1/2 Industrial, Scientific, and Medical
Equipment:1992
15, Subpart B, Class A Limits.
environment around and within a product. Typically the internal
environment inside a product is considered to be the same as the
external. Products should be used only in the environment for
which they are rated.
Pollution Degree 1
No pollution or only dry, nonconductive pollution occurs.
Products in this category are generally encapsulated,
hermetically sealed, or located in clean rooms.
Pollution Degree 2
Normally only dry, nonconductive pollution occurs.
Occasionally a temporary conductivity that is caused by
condensation must be expected. This location is a
typical office/home environment. Temporary
condensation occurs only when the product is out of
service.
56
AD007 User Manual
Page 71

Table 9: Power supply certifications and compliances
(
)
Appendix A: Specifications
EC Declaration of
Conformity -- Low
Voltage
U.S. Nationally
Recognized Testing
Laboratory Listing
Canadian Certification CAN/CSA C22.2 No. 950
Additional Compliance Dentori (T mark)
Installation
(Overvoltage)
Category
Compliance was demonstrated to the following specification as
listed in the Official Journal of the European Union:
Low Voltage Directive 73/23/EEC, amended by 93/69/EEC
EN 60950/A3:1995
Safety of information technology equipment, including
electrical business equipment.
UL1950/3rd edition
IEC 60950
Terminals on this product may have different installation
(overvoltage) category designations. The installation categories
are:
CAT II Local-level mains (wall sockets). Equipment at this level
includes appliances, portable tools, and similar
products. Equipment is usually cord-connected.
CAT I Secondary (signal level) or battery operated circuits of
electronic equipment.
AD007 User Manual
57
Page 72

Appendix A: Specifications
Table 9: Power supply certifications and compliances (cont.)
Pollution Degree A measure of the contaminates that could occur in the
environment around and within a product. Typically the internal
environment inside a product is considered to be the same as the
external. Products should be used only in the environment for
which they are rated.
Pollution Degree 1
No pollution or only dry, nonconductive pollution occurs.
Products in this category are generally encapsulated,
hermetically sealed, or located in clean rooms.
Pollution Degree 2
Normally only dry, nonconductive pollution occurs.
Occasionally a temporary conductivity that is caused by
condensation must be expected. This location is a typical
office/home environment. Temporary condensation occurs
only when the product is out of service.
Safety Certification Compliance
Temperature,
operating
Altitude (maximum
operating)
Equipment Type Test and measuring
Safety Class Class 1 (as defined in IEC 1010-1, Annex H) -- grounded product
Overvoltage Category Overvoltage Category II (as defined in IEC 1010-1, Annex J)
Pollution Degree Pollution Degree 2 (as defined in IEC 1010-1). Note: Rated for
+5 to +45_ C
2000 meters
indoor use only.
58
AD007 User Manual
Page 73

Appendix B: Power Cord Options
The power cords in Table 10 may be ordered as options at the time of
purchase or they may be ordered separately.
Table 10: Power cord identification
Option number
Plug configuration Normal usage
and part number
North America
125 V/15 A Plug
NEMA 5-15P
Europe
230 V
United Kingdom
230 V
Australia
230 V
Switzerland
230 V
Standard
(161-0230-01)
A1
(161-0104-06)
A2
(161-0104-07)
A3
(161-0104-05)
A5
(161-0167-00)
AD007 User Manual
59
Page 74

Appendix B: Power Cord Options
Table 10: Power cord identification (cont.)
Plug configuration
Option number
and part numberNormal usage
Not shown
Not shown
Japan
100 V
China
250 V
A6
(161-0298-00 with 3--2 wire
adapter 013-0310-00)
A10
(161--0306--00 )
60
AD007 User Manual
Page 75

Appendix C: Network Protocols
The AD007 GPIB-LAN Adapter uses the network IP and Ethernet
protocols listed in Table 11.
Table 11: IP and Ethernet protocols
Name RFC Role When Purpose
ARP 826 Peer As needed Maps IP address to Ethernet address
BOOTP 951 Client Power-up AD007 requests IP configuration informa-
tion
DHCP 2131,
2132
DNS 1035 Client As needed AD007 resolves DNS names to IP
TIME 868 Client Power-up AD007 requests current time
FTP 959 Server Upgrade Downloads new firmware into AD007
HTTP 1945
2068
ICMP 792 Server As needed AD007 answers ECHO requests (ping)
LPD 1179 Client Printing AD007 transmits print jobs to other LPDs
RPC 1831,
1832,
1833
Client Power-up
lease renew
Server User setup Web pages/forms for AD007 configura-
Server User Controls GPIB instruments using VXI-11
AD007 requests IP configuration information
addresses
tion
A definition of each of these protocols appears in the glossary at the
end of the manual.
AD007 User Manual
61
Page 76

Appendix C: Network Protocols
62
AD007 User Manual
Page 77

Appendix D: Troubleshooting
If you experience communication problems to and from the adapter,
use the information in this section to help identify the nature of the
problem before calling for service.
Power On and Status
The power on and status indicators can help identify problems with
the hardware, firmware, physical connections, or network settings.
See Table 12 for a list of possible problems.
Table 12: Power on and status problems
Symptom Possible cause(s) Corrective action(s)
No indicators light No AC power connection to
the power supply
No DC power from the
power supply
Defective AC adapter
Power supply failure in
AD007 adapter
POWER indicator is green,
LAN-Link indicator is red,
LAN indicator is off,
GPIB indicator is off
POWER, GPIB, LAN, and
LAN LINK indicators are all
amber
AD007 User Manual
No network connection Check for missing or loose
Hardware Failure Contact service and return
Recheck connections to DC
input, AC adapter, and AC
power
Contact service and return
defective module(s)
LAN connection
Check LAN connection for
traffic
defective adapter
63
Page 78

Appendix D: Troubleshooting
Table 12: Power on and status problems (cont.)
Symptom Corrective action(s)Possible cause(s)
POWER indicator is green,
GPIB, LAN, and LAN LIN K
indicators simultaneously
blink red
POWER indicator is green,
LAN-LINK indicator is amber
For a complete list of power up and status indications, See
Interpreting the Status Indicators on 44.
Hardware or Firmware
Failure
No service to DHCP/
BOOTP request
Try to reboot the adapter by
disconnecting and reconnecting the power to the
adapter
If rebooting the adapter does
not correct the problem,
Contact Tektronix service
and return defective adapter
Check that DHCP/BOOTP
server exists
Check DHCP server on LAN
for requests from this
AD007’s Ethernet address
Bypass DHCP/BOOTP by
momentarily pressing the
Reset button
64
AD007 User Manual
Page 79

Appendix D: Troubleshooting
Network and Print Configuration
Use the list of symptoms in Table 13 to help diagnose problems with
the network and print c onfiguration.
Table 13: Network and print problems
Symptom Possible cause(s) Corrective action(s)
No access to web pages in
the adapter
Can only access diagnostic
web page
No password Unknown or forgotten pass-
Slow web page response to
network printing
No print server status, print
job list, or failure in cancelling jobs
Improper network installation
Missing or improper set up
of network addresses:
--Ethernet address
--IP address
--Subnet mask
--Default router (gateway)
Problem with AD007 adapter
firmware
word
Server not responding Check server
Print server does not implement these requests
Check network installation or
contact network administrator.
Check that the LAN network
is set up for the Ethernet
hardware address of AD007
adapter (from label on back)
Reload firmware using the
Update program, see Tekt r o -
nix Software Solutions
Installation Manual
(Tektronix part number
071--1140--01) that came
with the TSS CD (also located in the Documents
directory on the TSS CD)
Reset the password to the
factory default (ad007), see
page 50
Check print server address
and queue name
Use print server that has
support for these requests
AD007 User Manual
65
Page 80

Appendix D: Troubleshooting
Table 13: Network and print problems (cont.)
Symptom Corrective action(s)Possible cause(s)
Nothing prints
Prints garbage
Test print does not work, but
direct (from instrument) print
does
Direct print from a device on
the GPIB does not work
AD007 print configuration is
not set correctly
Print format unrecognized by
printer
Print server discards data
from unknown IP address
Print server does not support
LPD connections
Printer does not support text
printing
Print redirection is not on
Device is not in the hard
copy mode
More than one device on the
GPIB is in the hard copy
mode
Check print redirection is on
in the AD007 Print Setup
web page
Check that the instrument is
directing the print to the
GPIB port
Check server address and
queue name
Attempttestprint
Check that no more than
one device on the GPIB is in
the hard copy mode
In the GPIB instrument,
select a print format which
matches the capability of the
printer
Configure the print server to
accept connections from the
AD007
Use a different print server
which supports LPD
Select a different print server
address queue which supports ASCII text printing
Check print redirection is on
in the AD007 Print Setup
web page
Check that no more than
one device on the GPIB is in
the hard copy mode
66
AD007 User Manual
Page 81

Appendix D: Troubleshooting
GPIB
Problems with setting up devices on the GPIB appear in Table 14.
Table 14: GPIB problems
Symptom Possible cause(s) Corrective action(s)
Cannot send commands to
one or more devices on the
GPIB
Slow response to GPIB poll
on GPIB Communications
web page
No password Unknown or forgotten pass-
Intermittent or missing GPIB
connection
Power to GPIB device not
on
VISA not configured Use configuration utility
No instruments on the GPIB
bus or instruments not
turned on. Poll timeout is
about 60 seconds
word
Verify or test GPIB connection(s)
Verify all GPIB devices are
turned on and operating
properly
Connect instruments to the
GPIB and power them on
Reset the password to the
factory default (ad007), see
page 50
AD007 User Manual
67
Page 82

Appendix D: Troubleshooting
68
AD007 User Manual
Page 83

Glossary
10/100BaseT
ARP
BOOTP
DHCP
DNS
Ethernet (IEEE 802.3) architecture that uses twisted-pair
cabling.
Address Resolution Protocol. Internet protocol used to map the
IP address to the Ethernet hardware address.
Boot Protocol. Protocol that enables a network client to
automatically discover its networking paramet ers on power up
from a BOOTP server.
Dynamic Host Configuration Protocol. Protocol that enables a
net client to automatically discover its networking parameters
on power up from a DHCP server and refresh those param eters
periodically.
Domain Name Service. A protocol that maps Internet hostnames
(e.g. www.tek.com) to IP addresses.
Ethernet address
The unique, six-byte address assigned by the product manufacturer that distinguishes each talk/listen device on the LAN. The
address consists of hexadecima l numbers separated by colons
(hh:hh:hh:hh:hh:hh).
FTP
File Transfer Protocol. Enables a client host to send or receive
files to and/or from an FTP server host.
GPIB
General Purpose Interface Bus (IEEE-488).
AD007 User Manual
69
Page 84

Glossary
HTTP
Hyper Text Transfer Protocol. Protocol for requesting data files
from a World Wide Web server.
ICMP
Internet Control Message Protocol. Protocol for status messages
from a router (gateway) indicating errors or unusual c onditions.
IP address
Internet Protocol address. The address assigned by the network
administrator to a talk/listen device that distinguishes it from the
other devices on the LAN.
LAN
Local Area Network.
LPD
Line Printer Daemon. Protocol which enables print files to be
sent to print servers and (if implemented by server) get status of
the remote print queue, examine print jobs, and cancel print
jobs.
70
protocol
An evolving set of rules that governs the format and transmission of data in a network.
RFC
Request for Comments. Working notes on evolving Internet
research and development available from the Defense Data
Network (DDN) NIC at SRI International.
RPC
Remote Procedure Call. Protocol to transmit procedure call data
across a network to a server and return to the calling client.
Used in the AD007 adapter to implement VXI-11 function calls.
TCP/IP
Transmission Control Protocol/Internet Protocol. An Internet
protocol for two-way stream da ta transfer between programs o n
two Internet hosts.
AD007 User Manual
Page 85

Time Protocol
Enables an Internet host to request the current time of day from
a time server host.
VISA
Virtual Instrument Software Architecture. Provides a common
Input/Output (I/O) library for software deve lopers so that
software from different ve ndors can run on the same platform.
VXI-11
Protocol for instrument control over a network interface.
Glossary
AD007 User Manual
71
Page 86

Glossary
72
AD007 User Manual
Page 87

Index
Numbers
10BaseT, 1
A
accessories, 4
ARP, 61
B
BOOTP, 3, 8, 12, 49, 61
C
configuring TekVISA, 30
contacting Tektronix, x
D
DHCP, 3, 8, 12, 49, 61
server, 8
DNS,3,9,61
FTP, 3, 61
G
GPIB, 1
network configuration, 27
H
hardware failure, 47
HTTP,3,61
I
ICMP, 61
installation
GPIB, 27–32
network, 10
TekVISA, 29
IP address, assigning, 11
L
LPD, 3, 61
E
Ethernet, hardware address, 11
external features, location of, 5
F
factory defaults, resetting, 51
AD007 User Manual
N
network
administrator, 10
information card, 10
installation, 10, 12
protocols, 61
73
Page 88

Index
server(s), 12
verifying access to, 32
P
password, 26
resetting factory default, 48
setting new, 35
phone number, Tektronix, x
power cords, 59
power supply, shown, 4
printing, GPIB, 29
product support, contacting, x
protocols, 3, 61
Q
quick setup, 7
R
rebooting, 35
requirements, system, 3
RESET button
bypassing DHCP/BOOTP, 49
last configuration, 49
shown, 48
Reset button, functions, 49
RJ--45, shown, 4
RPC, 61
S
safety, vii
self test, power on, 5
server, DHCP/BOOTP, 8, 12
service support, contact informa-
tion, x
specifications, 55
status indicators
at power on, 45
during normal operation, 46
shown, 6, 44
T
technical support, contacting, x
Tektronix, contacting, x
TekVISA configuration, 30
Time Protocol, 3, 61
troubleshooting, 63
U
URL, Tektronix, x
user name, 26, 35
V
VISA
configuration, 30
W
WaveStar for Oscilloscopes, 2
web page, diagnostic, 26
web page interface
accessing, 26, 34
GPIB communications page, 38
Help page, 42
Home page, 34
Network Setup page, 36
Printer Setup page, 39
Statistics page, 41
Support page, 42
web site address, Tektronix, x
74
AD007 User Manual
 Loading...