

Page 1
■
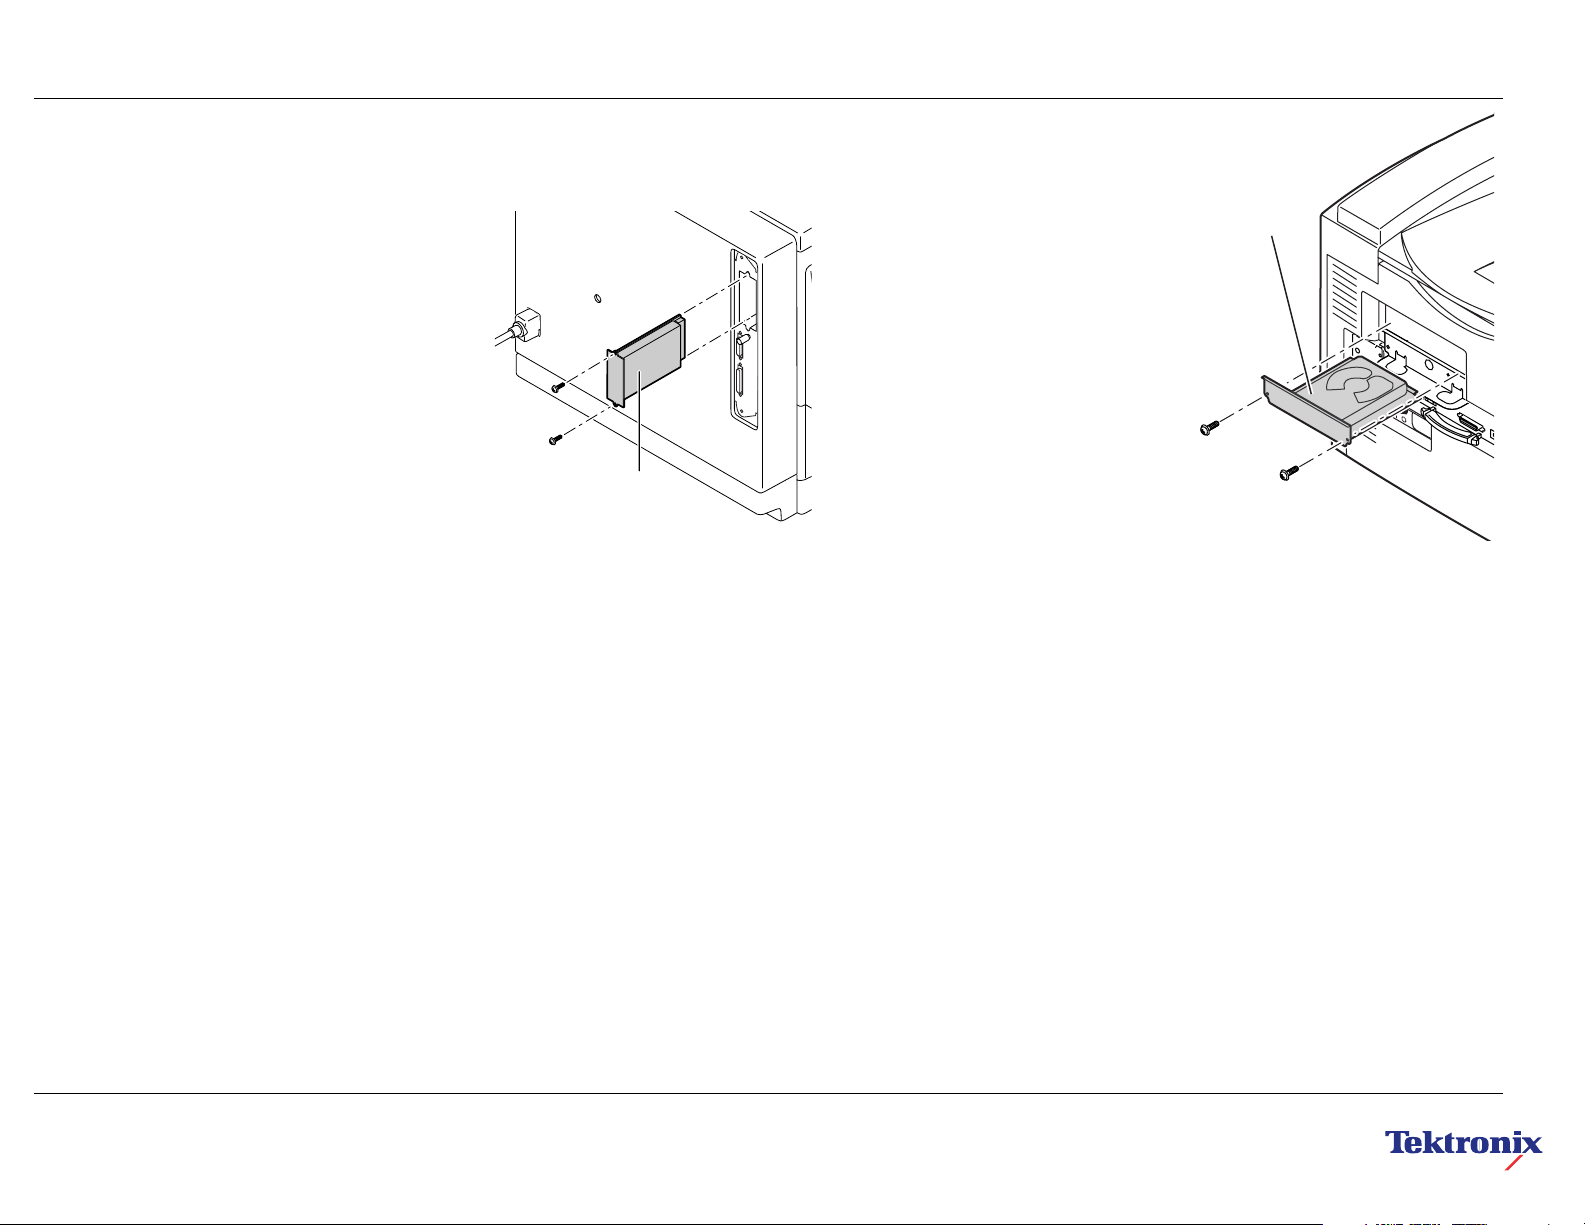
Installing an Internal Hard Drive
Phaser 740 Printer
The internal hard drive installs in the printer’s network card
slot. If a network card is installed in the printer, it must be
removed.
1.
Power down the printer. Do not unplug the printer;
this preserves a ground path to dissipate static
charges.
2.
Remove the network card cover plate from the rear
panel of the printer. The cover plate is held in place
with two screws.
Alternatively, you will have to remove the network
card by pulling it out of the network card slot.
3.
Slide the internal hard drive into the network card
slot. Ensure that it seats in place and secure it with
two screws.
4.
Turn on the printer.
5.
Print a Configuration Page to check its listing of the
internal hard drive.
At your computer, reconfigure the printer driver.
6.
Refer to “Configuring the driver” in the Phaser 740
Color Printer Setup Guide .
Internal
hard drive
Phaser 840 and 850 Printers
1.
Power down the printer. Leave the
power cord plugged in to provide a
ground path for static discharges.
2.
Remove the network card or the network
card slot cover plate. Of the two
interlocking rear panel slots, the network
card fits in the bottom slot; the hard drive
fits into the top slot.
Remove the internal hard drive cover
3.
plate from the rear panel of the printer,
the cover plate is held in place with two
screws.
Slide in the internal hard drive and
4.
tighten the two screws to secure it in
place. Reinstall the network card or
network card slot cover plate.
Turn on the printer and print the
5.
Configuration Page; it lists information
regarding the internal hard drive.
6.
At your computer, reconfigure the printer
driver. Refer to “Configuring the driver” in
the Phaser 840 Color Printer Setup
Guide or refer to the Phaser 850
Advanced Features and Troubleshooting
Manual on the printer’s CD-ROM.
Internal
hard
drive
Copyright
1999 by Tektronix, Inc. All rights reserved. 075-0377-AC
©
The internal drive for the Phaser 850
printer contains information you can
access using PhaserLink and a web
browser. Refer to the Phaser 850
Printer Advanced Features and
Troubleshooting Manual . The manual is
available on the printer’s CD-ROM as a
PDF file as well as at the Tektronix
website www.tek.com/Color_Printers/
support/welcome.html
Caution
■
Leave the printer plugged into its power
outlet; this preserves a ground path for
static discharges.
■
Touch the printer's bare metal frame often
to discharge static electricity from your
body.
■
Avoid wearing nylon or polyester clothing;
they generate static electricity.
Page 2

■
Installation d’un disque dur interne
Imprimante Phaser 740
Le disque dur interne s’installe dans la fente pour carte
réseau de l’imprimante. Si une carte réseau est en place
dans l’imprimante, veuillez la retirer.
1.
Mettez l’imprimante hors tension. Ne débranchez
pas l’imprimante du secteur car elle est ainsi
protégée des décharges électrostatiques.
2.
Dégagez le cache de la carte réseau situé sur le
panneau arrière de l’imprimante. Le cache est
maintenu par deux vis.
Vous pouvez également retirer la carte réseau en
l’extrayant par la fente.
3.
Faites glisser le disque dur interne dans la fente
pour carte réseau. Assurez-vous qu’il est
correctement en place et fixez-le à l’aide de
deux vis.
4.
Mettez l’imprimante sous tension.
Imprimez la page de configuration pour vérifier si le
5.
disque dur interne est indiqué.
6.
Au niveau de votre ordinateur, reconfigurez le pilote
de l’imprimante. Consultez la section
« Configuration du pilote » dans le Guide
d’installation de l’imprimante couleur Phaser 740.
Disque
dur interne
Imprimantes Phaser 840 et 850
1.
Mettez l’imprimante hors tension. Veillez à
laisser le cordon d’alimentation branché
sur le secteur pour éviter toute décharge
électrostatique.
Retirez la carte réseau ou le cache de
2.
protection de la fente de la carte réseau.
Remarquez les deux fentes solidaires sur le
panneau arrière. La carte réseau s’insère
dans la fente du bas et le disque dur dans
celle du haut .
3.
Dégagez le cache du disque dur interne
situé sur le panneau arrière de l’imprimante.
Le cache est maintenu par deux vis.
Faites glisser le disque dur dans la fente et
4.
fixez-le à l’aide des deux vis. Réinstallez la
carte réseau ou le cache de protection de
la fente de la carte réseau.
Mettez l’imprimante sous tension et
5.
imprimez la page de configuration ; elle
contient des informations sur le disque
dur interne.
Au niveau de votre ordinateur, reconfigurez
6.
le pilote de l’imprimante. Consultez la
section « Configuration du pilote » dans le
Guide d’installation de l’imprimante couleur
Phaser 840 ou le Phaser 850 Advanced
Features and Troubleshooting Manual
(Manuel des caractéristiques avancées et
dépannage Phaser 850) sur le CD-ROM
de l’imprimante.
Disque
dur
interne
Le disque interne de l’imprimante Phaser
850 contient des informations auxquelles
vous pouvez accéder à l’aide du
programme PhaserLink et d’un explorateur
Web. Reportez-vous au Phaser 850
Advanced Features and Troubleshooting
Manual (Manuel des caractéristiques
avancées et dépannage Phaser 850). Ce
manuel est disponible sur le CD-ROM de
l’imprimante au format PDF et sur le site
Web de Tektronix à l’adresse
www.tek.com/Color_Printers/support/
welcome.html.
Attention
■
Veillez à laisser le cordon d’alimentation
de l’imprimante branché sur le secteur
pour éviter toute décharge
électrostatique.
■
Touchez régulièrement le cadre
métallique de l’imprimante pour vous
décharger de l’électricité statique.
■
Evitez de porter des vêtements en nylon
ou en polyester, car ils génèrent de
l’électricité statique.
Page 3

■
Installazione di un disco fisso interno
Stampante Phaser 740
Il disco fisso interno viene installato nello slot della scheda
di rete della stampante. Se nella stampante è installata
una scheda di rete, è necessario rimuoverla.
1.
Spegnere la stampante, senza staccarne la spina.
In questo modo si predispone un percorso di
messa a terra per dissipare le scariche
elettrostatiche.
Rimuovere la piastra di copertura della scheda di
2.
rete dal pannello posteriore della stampante. La
piastra di copertura è bloccata in posizione da
due viti.
In alternativa, sarà necessario rimuovere la scheda
di rete estraendola dal relativo slot.
3.
Far scorrere il disco fisso interno nello slot della
scheda di rete. Assicurarsi che sia posizionato
correttamente e fissarlo con due viti.
4.
Accendere la stampante.
5.
Stampare una pagina di configurazione per
verificare che il disco fisso interno sia riportato
in elenco.
6.
Riconfigurare il driver stampante sul computer. Fare
riferimento alla sezione relativa alla configurazione
del driver nella Guida all’installazione della
stampante a colori Phaser 740.
Disco
fisso interno
Stampanti Phaser 840 e 850
1.
Spegnere la stampante. Lasciare
collegato il cavo di alimentazione per
fornire un percorso di messa a terra per le
scariche elettrostatiche.
2.
Rimuovere la scheda di rete o la piastra di
copertura del relativo slot. La scheda di
rete viene inserita nello slot inferiore del
pannello posteriore di protezione, mentre
il disco fisso viene inserito in quello
superiore.
3.
Rimuovere la piastra di copertura del
disco fisso interno dal pannello posteriore
della stampante, la piastra di copertura è
bloccata in posizione da due viti.
Far scivolare il disco fisso interno e
4.
stringere le due viti per fissarlo in
posizione. Reinstallare la scheda di rete o
la piastra di copertura del relativo slot.
5.
Accendere la stampante e stampare la
pagina di configurazione che contiene
informazioni relative al disco fisso interno.
6.
Riconfigurare il driver stampante sul
computer. Fare riferimento alla sezione
relativa alla configurazione del driver
nella Guida all’installazione della
stampante a colori Phaser 840 oppure
alla documentazione relativa alle
funzioni avanzate e alla risoluzione dei
problemi della Phaser 850 presente nel
CD-ROM della stampante.
Disco
fisso
interno
L’unità interna della stampante
Phaser 850 contiene informazioni a cui
è possibile accedere utilizzando
PhaserLink e un browser Web. Fare
riferimento alla documentazione relativa
alle funzioni avanzate e alla risoluzione
dei problemi della Phaser 850
disponibile nel CD-ROM della
stampante in formato PDF e sul sito
Web di Tektronix all’indirizzo:
www.tek.com/Color_Printers/
support/welcome.html
Attenzione
■
Lasciare inserita la spina della stampante
nella presa di alimentazione. In questo
modo si predispone un percorso di messa
a terra per le scariche elettrostatiche.
■
Toccare spesso la struttura di metallo
della stampante per scaricare l’elettricità
statica dal proprio corpo.
■
Evitare di indossare indumenti in nylon o
in poliestere, in quanto generano
elettricità statica.
Page 4

■
Installieren eines internen Festplattenlaufwerks
Drucker Phaser 740
Das interne Festplattenlaufwerk wird im Steckplatz für die
Netzwerkkarte des Drucker installiert. Ist im Drucker bereits eine Netzwerkkarte installiert, muß diese entfernt
werden.
1.
Schalten Sie den Drucker aus. Trennen Sie das
Gerät nicht vom Netz; dadurch bleibt eine Erdung
zur Ableitung statischer Elektrizität aufrecht
erhalten.
2.
Entfernen Sie an der Rückseite des Druckers die
Abdeckung für die Netzwerkkarte. Die Abdeckung
ist mit zwei Schrauben befestigt.
Ist bereits eine Netzwerkkarte installiert, müssen
Sie diese aus ihrem Steckplatz herausziehen.
3.
Schieben Sie das Festplattenlaufwerk in den
Steckplatz hinein. Überprüfen Sie den
ordnungsgemäßen Sitz, und befestigen Sie es mit
zwei Schrauben.
4.
Schalten Sie den Drucker ein.
Drucken Sie eine Konfigurationsseite und
5.
überprüfen Sie, ob das interne Festplattenlaufwerk
aufgelistet ist.
6.
Konfigurieren Sie am Computer den Druckertreiber
neu. Sehen Sie hierzu im Installationshandbuch für
den Drucker Phaser 740 im Abschnitt für die
Treiberkonfiguration nach.
Internes
Festplattenlaufwerk
Drucker Phaser 840 und 850
1.
Schalten Sie den Drucker aus. Trennen
Sie das Gerät nicht vom Netz; dadurch
bleibt eine Erdung zur Ableitung statischer
Elektrizität aufrecht erhalten.
2.
Entfernen Sie die Netzwerkkarte oder die
Abdeckung des Steckplatzes für die Netzwerkkarte.
Von den beiden zusammenhängenden Steckplätzen an der Rückseite
ist der untere für die Netzwerkkarte und
der obere für das Festplattenlaufwerk.
3.
Entfernen Sie an der Rückseite des Druckers
die Abdeckung vom Steckplatz für das interne
Festplattenlaufwerk. Die Abdeckung ist mit
zwei Schrauben befestigt.
4.
Schieben Sie das interne Festplattenlaufwerk
hinein, und befestigen Sie es mit den beiden
Schrauben. Installieren Sie die Netzwerkkarte
wieder, oder befestigen Sie die Abdeckung für
den Netzwerkkarten-Steckplatz wieder.
5.
Schalten Sie den Drucker ein, und drucken
Sie die Konfigurationsseite. Dort finden Sie
Informationen über das interne Festplattenlaufwerk.
6.
Konfigurieren Sie am Computer den
Druckertreiber neu. Sehen Sie hierzu im
Installationshandbuch für den Drucker Phaser
840
im Abschnitt für die Treiberkonfiguration
nach oder für den Drucker Phaser 850 im
Handbuch
and Troubleshooting Manual
Phaser 850 Advanced Features
(Erweiterte
Funktionen und Fehlerbehebung) auf der
Drucker-CD-ROM.
Das interne Laufwerk für das Druckermodell
Phaser 850 enthält Informationen, auf die
Sie über PhaserLink und einen WebBrowser zugreifen können. Sehen Sie im
Handbuch
and Troubleshooting Manual
Phaser 850 Advanced Features
(Erweiterte
Funktionen und Fehlerbehebung) nach. Das
Handbuch befindet sich auf der CD-ROM
des Druckers als PDF-Datei oder auf der
Website von Tektronix unter
www.tek.com/
Color_Printers/support/welcome.html
Internes
Festplattenlaufwerk
Vorsicht
■
Trennen Sie das Netzkabel des Druckers
nicht von der Steckdose. Über das Kabel
ist stets eine Erdung gegen statische
Elektrizität vorhanden.
■
Berühren Sie beim Arbeiten öfter den
Metallrahmen des Druckers, um die in
Ihrem Körper aufgebaute statische
Elektrizität abzuleiten.
■
Vermeiden Sie Kleidungsstücke aus
Nylon oder Polyester, da sich in diesen
statische Elektrizität aufbaut.
Page 5

■
Instalación de un disco duro interno
Impresora Phaser 740
La unidad de disco duro interno se instala en la ranura de
la tarjeta de red de la impresora. Si hay una tarjeta de red
instalada en la impresora, será necesario extraerla.
1.
Apague la impresora. No la desconecte. De esta
manera, se mantiene una vía a tierra para disipar
las cargas estáticas.
Retire la placa que cubre la ranura de la tarjeta de
2.
red del panel posterior de la impresora. La placa está
sujeta con dos tornillos.
O bien, retire la tarjeta de red tirando de ella para
sacarla de la ranura de la tarjeta de red.
3.
Deslice la unidad de disco duro interno en la ranura
de la tarjeta de red. Compruebe que esté asentada
en su sitio y sujétela con los dos tornillos.
4.
Encienda la impresora.
5.
Imprima una página de configuración y asegúrese de
que liste la unidad de disco duro interno.
En el ordenador, vuelva a configurar el controlador
6.
de la impresora. Consulte la sección de
configuración del controlador en Guía de instalación
de la impresora a color Phaser 740 .
Unídad de
disco duro
interno
Impresoras Phaser 840 y 850
1.
Apague la impresora. Deje el cordón de
alimentación conectado para proporcionar una vía a tierra para las
descargas estáticas.
2.
Retire la tarjeta de red o la placa que
cubre la ranura de la tarjeta de red. De las
dos ranuras entrelazadas del panel
posterior. La tarjeta de red se acopla a la
ranura inferior y la unidad de disco duro
se acopla a la ranura superior.
Retire la placa que cubre la ranura de la
3.
unidad de disco duro interno del panel
posterior de la impresora. La placa está
sujeta con dos tornillos.
4.
Inserte la unidad de disco duro interno y
apriete los dos tornillos para sujetarla.
Vuelva a colocar la tarjeta de red o la
placa que cubre la ranura de la tarjeta de
red.
Encienda la impresora e imprima la
5.
página de configuración. Debe mostrar
información relacionada con la unidad de
disco duro interno.
En el ordenador, vuelva a configurar el
6.
controlador de la impresora. Consulte la
sección de configuración de la impresora en Guía de instalación de la impre-
sora a color Phaser 840 o consulte
Phaser 850 Advanced Features and
Troubleshooting Manual (Manual de
características avanzadas y solución de
problemas) en el CD-ROM de la
impresora.
Unídad de
disco duro
interno
La unidad interna de la impresora
Phaser 850 contiene información a la
que puede acceder utilizando
PhaserLink y un explorador web. Consulte Phaser 850 Advanced Features
and Troubleshooting Manual (Manual de
características avanzadas y solución de
problemas). Este manual está disponible
en formato PDF en el CD-ROM de la
impresora y en el sitio web de Tektronix
www.tek.com/Color_Printers/support/
welcome.html
Precaución
■
Deje la impresora conectada a la toma de
alimentación. De esta manera, se
mantiene una vía a tierra para las
descargas estáticas.
■
Toque con frecuencia el bastidor de metal
al descubierto de la impresora para
descargar la electricidad estática de su
cuerpo.
■
Evite utilizar ropa de nylon o poliéster, ya
que genera electricidad estática.
Page 6

■
■
■
■
Page 7

Page 8

■
 Loading...