

Page 1

W
This is the home page of the Phaser 600 Color Printer User Manual.
ELCOME
!
See Tips on using this guide
Phaser® 600 Wide-Format Color Printer
, or go immediately to the Contents.
Page 2

Tips on using this guide
■
Use the navigation buttons in Acrobat Reader to move through the document:
1 23 4 5 6
1
and 4 are the
First Pa ge
and
Last Page
buttons. These buttons move to the
first or last page of a document.
2
and 3 are the
Previous Page
and
Next Page
buttons. These buttons move
the document backward or forward one page at a time.
5
and 6 are the
Go Back
and
Go Forward
buttons. These buttons let you
retrace your steps through a document, moving to each page or view in the
order visited.
Page 3

■
For best results, use the Adobe Acrobat Reader v ersion 2.1 to read this guide.
Version 2.1 of the Acrobat Reader is supplied on your printer’s CD-ROM.
■
Click on the page numbers in the Contents on the following pages to open the
topics you want to read.
■
You can click on the page numbers following keywords in the Index to open
topics of interest.
■
You can also use the Bookmarks provided by the Acrobat Reader to navigate
through this guide. If the Bookmarks are not already displayed at the left of the
window, select
■
If you have difficultly reading any small type or seeing the details in any of the
Bookmarks and Page
from the
View
menu.
illustrations, you can use the Acrobat Reader’s Magnification feature. Select a
Magnification value from the
Magnification
field in the
Status bar
at the
bottom of the window.
■
Words or phrases in this manual in blue underlined type are hypertext links;
click on the link to go immediately to information on that topic.
Page 4

I
NTRODUCTION
Features
Information roadmap
2
C
1
7
ONTENTS
G
ETTING SET UP
At a glance
Setting up the printer
What you get with your printer
Registering your printer
Unpacking instructions
Moving the printer to its operating location
Removing adhesive tape and cable tie
Removing the transit restraint
Removing the shipping blocks
Attaching the ink loader
Loading the ink
Attaching the output bin
Attaching the Quick Reference Guide
Connecting the printer
Printer ports
Adjust the leveling legs and lock the wheels
Turning on the printer
Selecting a language for the front panel
Installing the starter paper roll
Loading the paper roll
Feeding roll paper
Software installation
Overview for all PC and Macintosh platforms
10
9
11
24
28
46
11
14
15
16
17
18
21
23
26
27
28
32
33
37
39
40
43
47
Page 5

PC/Windows software
Which Windows driver to install?
Custom Install or Easy Install?
Macintosh software
Which Macintosh driver to install?
Custom Install or Easy Install?
Workstation software
48
69
78
50
71
49
70
P
RINTING BASICS
Printing overview
Printing from a PC
Print features quick reference: Windows printer
drivers
Using the Microsoft PostScript driver with Windows
95
Using the AdobePS 4 driver with Windows 95
Using the Tektronix printer driver for Windows 3.1
Using the Adobe PostScript driver for Windows
3.1
Using the Windows NT 3.5 and 3.51 PostScript
driver
Using the Windows NT 4.0 PostScript driver
Printing from a Macintosh
Print features quick reference: Macintosh printer
drivers
Using the Phaser 600 driver
Using the Adobe PSPrinter driver
Using the Apple LaserWriter 8.x driver
Using the Phaser 600 GX driver
Printing from a workstation
Overview
UNIX workstations
VMS workstations
For more information
Printing from specific applications
General hints and tips
83
101
115
118
125
143
80
81
82
124
138
139
140
141
143
145
147
148
149
149
105
109
119
Page 6

Selecting print features
Methods of selection
Print quality modes
Color corrections
All about media
Selecting media by size
Margins and print area
Page size, print area, and margins
Media attributes
Image orientation
Page Rotation
Manual Feed: using cut-sheet media
Image manipulation
Printer languages: PostScript, HP-GL
Fonts
182
Resident typefaces (PostScript)
Printer’s Extended Features option
Downloading fonts
Macintosh screen fonts
Using fonts with Windows
Printing font samplers
157
150
151
154
155
157
158
169
173
174
179
185
187
189
190
183
161
181
184
176
P
RINTING
Working with color
Color corrections — making the best selection
Deciding which color correction to use
Color correction descriptions
Special considerations
Printing and using the color sampler charts
Special printing features
Fusing Mode / Media Fusing
Advance Media
Cut Media
Mirror Print
Page Centering
Page Rotation
Image Smoothing
Fast Preview
Print Preview
Color Control Strip
Reprint 240
Custom page sizes 241
Phaser Copystation 242
Requirements and suggested memory
configuration 243
Connecting the Copystation 244
Setting the print quantity 245
Scaling images from the Copystation 246
Media size interactions 248
Laminating your Phaser 600 prints 251
Tips on laminating prints 252
: B
EYOND THE BASICS
195
221
224
226
228
229
230
232
234
235
238
201
215
222
193
197
200
219
Page 7
PRINTING THE COLOR SAMPLER CHARTS 253
Available color charts 256
Setting up the printer 257
If you are using manual feed media 258
If you are using roll media 259
Printing from a Macintosh 260
Installing the files 261
Important preparations 262
Printing the color charts 264
Printing from a PC 268
Installing the files 269
Important preparations 270
Printing the color charts 272
COLOR MATCHING 275
Select your computer type 276
Using ColorSync on a Macintosh 277
Using host color correction in Windows 95 282
Page 8
USING PANTONE® COLOR FILES 285
Pantone overview 286
Installing Pantone files 287
Installing the Macintosh files 288
Installing the PC files 289
Using the PANTONE Color templates 290
Using the Macintosh templates 291
Using the PC library files 297
Printing the PANTONE Color sampler chart 301
Printing individual pages from Acrobat 302
Printing the entire chart 309
Printing Pantone Colors from an application 313
Printing Pantone Colors from a Macintosh
application 314
Printing PANTONE Colors from a
PC/Windows application 316
USING THE PHASERPRINT™ PLUG-IN FOR
P
HOTOSHOP 318
Overview 319
Compatibility 320
Installing the PhaserPrint plug-in for Photoshop 321
Installing the plug-in for Macintosh 322
Installing the plug-in for Windows 323
Using the plug-in 325
Starting the PhaserPrint plug-in 326
Selecting options in the PhaserPrint dialog box 328
Page 9

USING THE PHASER 600 GX DRIVER 364
System requirements 367
Installing the Phaser 600 GX printer driver 368
Creating a desktop printer 369
Setting up unique desktop printers 371
Printing with a desktop printer 372
Using the Printing menu 373
Setting up a shared printer 382
Using a shared printer 383
Printing from QuickDraw GX applications 384
Printing from non-QuickDraw GX applications 388
Viewing printer status 390
Disabling QuickDraw GX 391
PRINTING FROM DOS 393
Setting up ports 395
Setting up the parallel port 396
Setting up optional interface ports 397
Printing from DOS 398
Using color corrections 399
Using a Tektronix driver 400
Using a non-Tektronix driver 401
Page 10
PRINTING FROM UNIX AND VMS
W
ORKSTATIONS 402
Overview 403
Printing from UNIX workstations 405
Printing from VMS workstations 407
Using the printer’s software 408
Obtaining the PC utility files 409
Using the Phaser 600 printer’s CD-ROM 410
Using the utility files 411
Mounting the PC/DOS diskette on a workstation 414
SGI IRIX versions 4.0.x and 5 415
Sun running Solaris 2.3 417
Sun running SunOS 4.1.3 420
Extracting files from unix.tar 421
USING PRINTER UTILITIES 424
Installing the utility files 426
Installing the Macintosh utility files
from the printer’s CD-ROM 427
Installing the PC utility files 428
Downloading files from the Tektronix World Wide Web
site 429
Downloading files from the Tektronix ftp server 430
Downloading files to the printer 432
Downloading files from a Macintosh 433
Downloading files from a PC 438
Changing the printer's name 442
Changing the printer’s name from a Macintosh 443
Changing the printer's name from a PC 445
Resetting the printer 447
Resetting the printer from a Macintosh 448
Resetting the printer from a PC 450
Using the color rendering intents 451
Descriptions 451
Selecting 456
Enabling and disabling job pipelining 459
Enable/disable job pipelining from a Macintosh 460
Enable/disable job pipelining from a PC 462
Modifying the Advance Media default 463
Modifying Advance Media from a Macintosh 464
Modifying Advance Media from a PC 466
Setting page offset 467
Setting page offset from a Macintosh 468
Setting page offset from a PC 470
Adding Control-D characters to PC files 471
Page 11

Configuring a printer’s serial port 473
Other utilities 477
The following utility files are described in other
locations: 479
USING SCSI HARD DISKS 480
SCSI peripheral devices 482
Selecting a SCSI hard disk 483
Ordering information 484
Connecting a SCSI hard disk 485
Required items 486
Important guidelines 487
Connecting one disk 490
Connecting multiple disks 491
Formatting a SCSI hard disk 493
Initializing a formatted SCSI hard disk 497
Enabling and disabling SysStart Job execution 500
Page 12

USING THE PRINTER’S PARALLEL PORT 505
Overview 506
Disabling timeouts 507
Bi-directional status reporting 508
Parallel port pin signals 510
USING DIFFERENT PRINTER LANGUAGE
M
ODES 513
Installing the files 516
Setting PostScript and HP-GL job
and wait timeouts 517
Changing the printer’s language mode 522
Printing PostScript files 524
Printing HP-GL files 525
Enabling automatic language selection 526
Testing printer language mode changes 527
Testing HP-GL mode 528
Testing PostScript mode 529
Setting default HP-GL pen colors 530
Page 13

CARING FOR YOUR PRINTER 535
Overview 536
Cleaning hints 537
Quick cleaning 539
Feed rollers and paper guides 540
Transport rollers 542
Drum 544
Occasional cleaning 545
Back tension blade and paper clamp 546
Clamp rollers 552
Fuser shuttle and exit rollers 553
Ink loader 565
Cleaning the printhead 567
Emptying the waste bin 569
Front panel displays Empty Waste Bin 570
Before moving the printer 571
Repacking and moving the printer 573
TROUBLESHOOTING 580
If you need help 581
Downloading files from the Tektronix
Color Printer Information Server 583
Using the automated fax systems 585
Use HAL in the U.S.A. and Canada 586
Use EuroHAL in Europe 588
Front panel messages 592
Symptoms and solutions 596
Diagnostic tools 596
Maintaining print quality 597
Printing hints 618
Improving print speed 620
Relative port speed 621
Fastest print time 622
Printing bitmapped images 624
PostScript printing errors 630
Using a PostScript error handler 632
Fixing timeout problems in Windows 638
Printed colors are not what you expected 642
In general 642
Printing PANTONE Colors 644
Blue colors look too purple 645
Using the Tektronix halftone screens 646
Selecting page sizes in Windows applications 650
Fonts printing incorrectly from Windows 653
Sharing the printer on a network 655
If the LaserWriter Utility does not work
(AppleTalk) 657
Page 14

Media hints and tips 658
Cutting roll media 660
Startup page prints even though it is disabled 669
Clearing a media jam 670
At a glance 670
Overview 671
Clearing a media jam 673
Clearing an ink jam 676
USING THE FRONT PANEL 681
Front panel 683
Front panel overview 684
Front panel indicators 685
Front panel buttons 686
Two-line display 689
Printer information 690
Front panel menu map 691
Pause menu 693
Help Pages overview 695
Printing the front panel menu map 696
Printing the menu map from the front panel 697
Printing the menu map with PhaserLink software 698
Printing the configuration page 699
Printing the configuration page from the front
panel 700
Printing the configuration page with
a downloadable utility file 701
Printing the configuration page with PhaserLink
software 705
Printing the startup page 706
Printing the startup page from the front panel 707
Printing the startup page with a downloadable utility
file 708
Printing the startup page with PhaserLink
software 712
Page 15

Enabling and disabling the startup page 713
Enabling and disabling the startup page
from the front panel 714
Enabling and disabling the startup page with a
downloadable utility file 716
Enabling and disabling the startup page with
PhaserLink software 719
Enabling and disabling front panel menus 720
ORDERING INFORMATION 726
Tektronix Printer and Tektronix Supplies:
Made For Each Other® 727
Customizing your printer 728
Ordering printer supplies 729
Ordering Interface cables and adapters 732
Expanding your printing system 734
Upgrade kits 735
Extended Features upgrade 736
Memory upgrade 738
PhaserShare network cards 740
Phaser Copystation 741
PhaserPrint 742
PhaserSym 743
SCSI hard disk 744
Page 16

REGULATORY INFORMATION 745
Overview 746
Canadian EMC (Electromagnetic Compatibility)
regulatory standards 747
Declaration of conformity (for 220-230 VAC
equipment) 748
FCC Class B device (for 100-120 VAC equipment) 750
Material Safety Data Sheets 752
MSDS for ink 753
Specifications 759
Copyrights/Trademarks 762
Phaser® 600 Warranty 765
Users safety summary 766
INDEX 769
Page 17

INTRODUCTION
Phaser® 600 Wide-Format Color Printer
Page 18

Features
The Phaser® 600 Wide-Format Color Printer is a Tektronix solid-ink printer that is
capable of printing brilliant colors on a variety of media: paper, clear and white
polyester film, sign vinyl, image-transfer film, newsprint, and canvas, to name a few.
The printer is capable of printing on sheet-fed media, in a variety of sizes up to
Architectural E-size (36 x 48 inches), as well as roll-fed media for printing posters,
large banners and signage.
Standard configuration. In its standard configuration, the printer provides
8 Mbytes of memory, a total of 17 fonts, support for PhaserMatch™ custom
color-matching profiler, and PhaserLink™, Tektronix’ online control of printer features
and access to printer information through a standard web browser. Additional
memory (16 Mbytes or 32 Mbytes) for improved performance is optionally available.
Extended Features option. The Extended Features option adds 22 fonts (for a
total of 39) and support for the Phaser Copystation, Print Preview and Reprint
features. Additional memory (16 Mbytes or 32 Mbytes) for improved performance is
optionally available.
2
Page 19

Some of the Phaser 600 printer’s features include:
■ Wide format
■ Networking
■ Internal RIP (Raster Image Processor)
■ Tektronix proprietary ColorStix® ink sticks
■ Automatic high-capacity ink loader
■ Media flexibility and independence
■ TekColor™ Dynamic Correction
Tektronix’ exclusive color-control technology makes it easy to pr int the
colors you want.
■ PhaserMatch™ application
For creating custom color profiles.
3
Page 20

■
Special printing features that make your job easier:
■ Reprint, accessible from the printer’s front panel, allows you to reprint
a previously printed PostScript image at a different scale and copy
count. Available with the Extended Features option.
■ Print Preview is a driver-selectable option that lets you preview an
image by printing it at a reduced scale, which takes less time and
media than printing a full-scale image. Available with the Extended
Features option.
■ Easy to connect
Bi-directional parallel port with plug-and-play support; PhaserShare™
cards provide optional network interfaces for the following:
■ Ethernet (EtherTalk, Novell NetWare, and TCP/IP)
■ Token Ring (TokenTalk, Novell NetWare, and TCP/IP)
■ LocalTalk and serial
4
Page 21
■
PhaserLink™ software — printer control and information access
PhaserLink software provides a breakthrough in printer control and
information access. Rather than use vendor-proprietary, printer-specific,
and platform-specific management utilities, PhaserLink software provides
this function using HTTP (Hypertext Transfer Protocol, the basis for World
Wide Web browsers). This allows you to use a standard web browser to
view printer status, control printer configuration, and link to online
documentation via the World Wide Web.
NOTE
To use PhaserLink software, the printer must be connected to a network running
TCP/IP. Refer to PhaserShare netw
■ Internal 1-Gbyte disk drive
ork cards for ordering information.
5
Page 22

■
Font capacity
In its standard configuration, the printer Color Printer has 17 resident
PostScript fonts; additionally, it accepts Adobe Type 1, Type 3, and
TrueType downloadable fonts. For additional font storage, the printer
provides an internal 1-Gbyte SCSI (Small Computer System Interface) disk
drive as well as a SCSI port that allows you to attach an external hard disk.
With the Extended Features option, the printer has a total of 39 resident
PostScript fonts.
■ Phaser Copystation
The Phaser Copystation accessory enables your printer to be used as a
color copier; you can scale an image to automatically fit the media that is
loaded in the printer, up to Architectural E-size (36 x 48 inches). Requires
the Extended Features option. Refer to Extended F
ordering information.
eatures upgrade for
6
Page 23

INFORMATION ROADMAP
Information roadmap
Tektronix provides information on the Phaser 600 printer in several ways:
Phaser 600 User
(This manual); includes information on setting up and using the printer:
Manual
■ Hardware and software set up
■ Selecting print features in a driver
■ Caring for your printer
■ Troubleshooting
Quick Reference
Designed for handy access of the information you need at the printer:
Guide
■ Supplies information
■ Loading media and ink
■ Cleaning procedures
■ Troubleshooting
■ Online access information
Diskettes Contain printer drivers, printer description files, color sampler charts,
and utility files.
7
Page 24

INFORMATION ROADMAP
CD-ROM Contains the contents of this user manual, the Adobe® Acrobat® Reader,
and supplemental information in Acrobat (PDF) format:
■ Using the printer’s downloadable utility files
■ Printing HP-GL files
■ Printing from workstations
■ Using PANTONE Colors
For instructions on installing and using the Adobe Acrobat Reader to
view PDF files, refer to the
README
files on the CD-ROM.
W orld Wide Web If you have access to the Internet, you can view documentation topics
and answers to Frequently Asked Questions available at Tektronix’ web
site:
http://www.tek.com/Color_Printers/userdoc/introduction.html
PhaserMatch User
Manual
PhaserShare
manuals
Phaser Copystation
User Manual
Contains information on using the PhaserMatch software to create
custom color profiles.
Contains complete information on setting up and using the PhaserShare
ports.
Includes information for setting up and using the copystation with your
printer.
8
Page 25

GETTING
SET UP
Phaser® 600 Wide-Format Color Printer
Page 26

At a glance
Installation of your printer involves these tasks:
1 Unpacking the printer
Use the
it from the shipping pallet. The
cover of the printer.
2 Setting up the printer
Removing the transit restraint, attaching the ink loader, loading the ink,
installing the output bin, attaching the
applicable, installing the optional Phaser Copystation.
3 Connecting power and interface cables
4 Changing the default language for the front panel, if applicable
Phaser 600 Quick Start Instructions
Quick Start Instructions
Quick Reference Guide
to unpack the printer and remove
are attached to the top
, and, if
5 Installing media
6 Installing printer software on your computer
Using the Printer Software diskettes or CD-ROM to install the printer software
(drivers, PPDs, and utility files).
10
Page 27
SETTING UP THE PRINTER
Setting up the printer
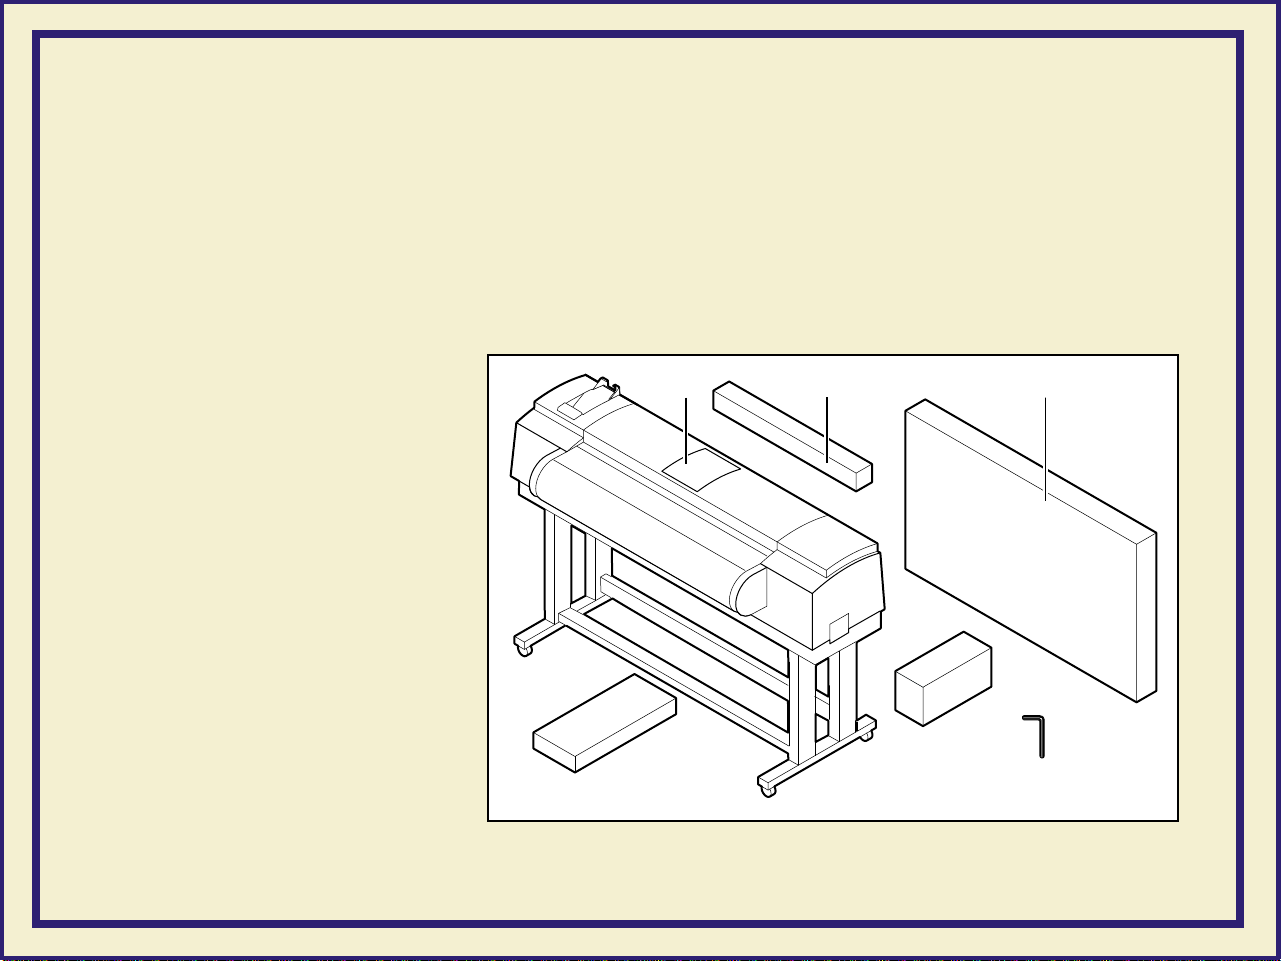
What you get with your pr inter
The printer and its accessories are shipped in a single box on a pallet. If you
ordered an optional Phaser Copystation, it is shipped separately.
The following items are
shipped with the printer:
21
3
1 Quick-Start Instructions
2 Starter roll of Tektronix
Smooth White Bond
paper
3 Output bin
4 Accessories box
(contents described on
the next page)
5 Ink loader
6 Allen wrench
Accessories
4
11
Quick
Start
Output Bin
5
Ink Loader
6
9480-02
Page 28

Accessories box contents
1
Phaser 600 Color Printer Quick
Reference Guide
1
Quick
Reference
SETTING UP THE PRINTER
2
User
Manual
3
2
Phaser 600 User Manual
3 Phaser 600 CD-ROM and diskettes
4 Registration card and license
agreement
5 Optional PhaserShare manuals
and diskettes
6 Power cord
7 Parallel adapter
®
8 ColorStix
ink sticks
9 Supplies information sheet
10 PhaserMatch manual
11 Cleaning kit
12 Fuser kit
4
Registration
License
Agreement
786
910 11
Supplies
12
PhaserShare
PhaserMatch
5
Ink
ColorStix
13
9480-98
13 Media cutting knife
12
Page 29

Optional Phaser Copystation accessory
Phaser CopyStation
User
Manual
SETTING UP THE PRINTER
9480-40
13
Page 30

SETTING UP THE PRINTER
Registering your printer
1 Find the customer registration card that is appropriate for you (U.S. or
international versions).
2 Fill out the card and mail it.
By registering your printer with Tektronix, you are validating the product warranty
and ensuring that you will be sent information about upgrades, service, and
accessories as it becomes available.
14
Page 31

SETTING UP THE PRINTER
Unpacking instructions
The
Phaser 600 Color Printer Quick-Start Instructions
printer from its shipping pallet and prepare it for setup. It is an overview of the
printer installation for experienced users. For detailed instructions, refer to the
setup procedures in this user manual.
NOTE
Save all packing material in case you need to move or ship the printer.
If you have not already removed the printer from its shipping pallet, follow the
instructions in the
Quick Start Installation
booklet before continuing with the
hardware setup described in this chapter.
describes how to remove the
15
Page 32
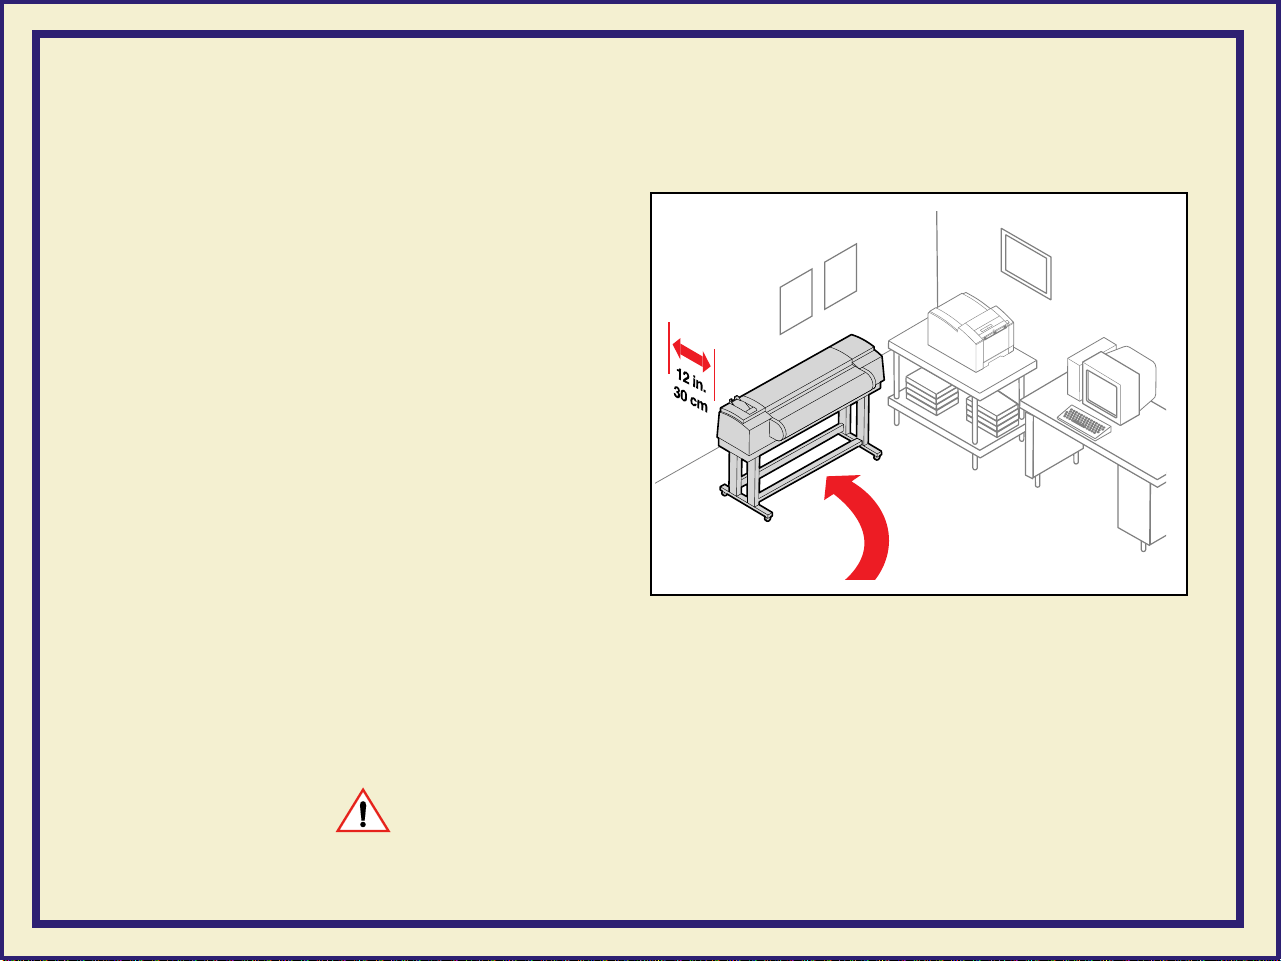
Moving the printer to its operating location
After removing the printer from the
shipping pallet, you can wheel it to its
operating location. When doing so,
follow these guidelines:
■ To move the printer, make sure that
the casters are unlocked (the
locking lever should be
■ The casters on the printer are
designed for rolling on smooth,
up
).
SETTING UP THE PRINTER
inside
■ Make sure that you have access to
surfaces.
all sides of the printer while you are
setting it up.
■ Allow 30 cm (12 in.) from the wall to accommodate the ink loader.
CAUTION
To reduce the possibility of damage to the ink loader, position the rear of the printer
against a wall, rather than an aisleway.
16
9498-99
Page 33
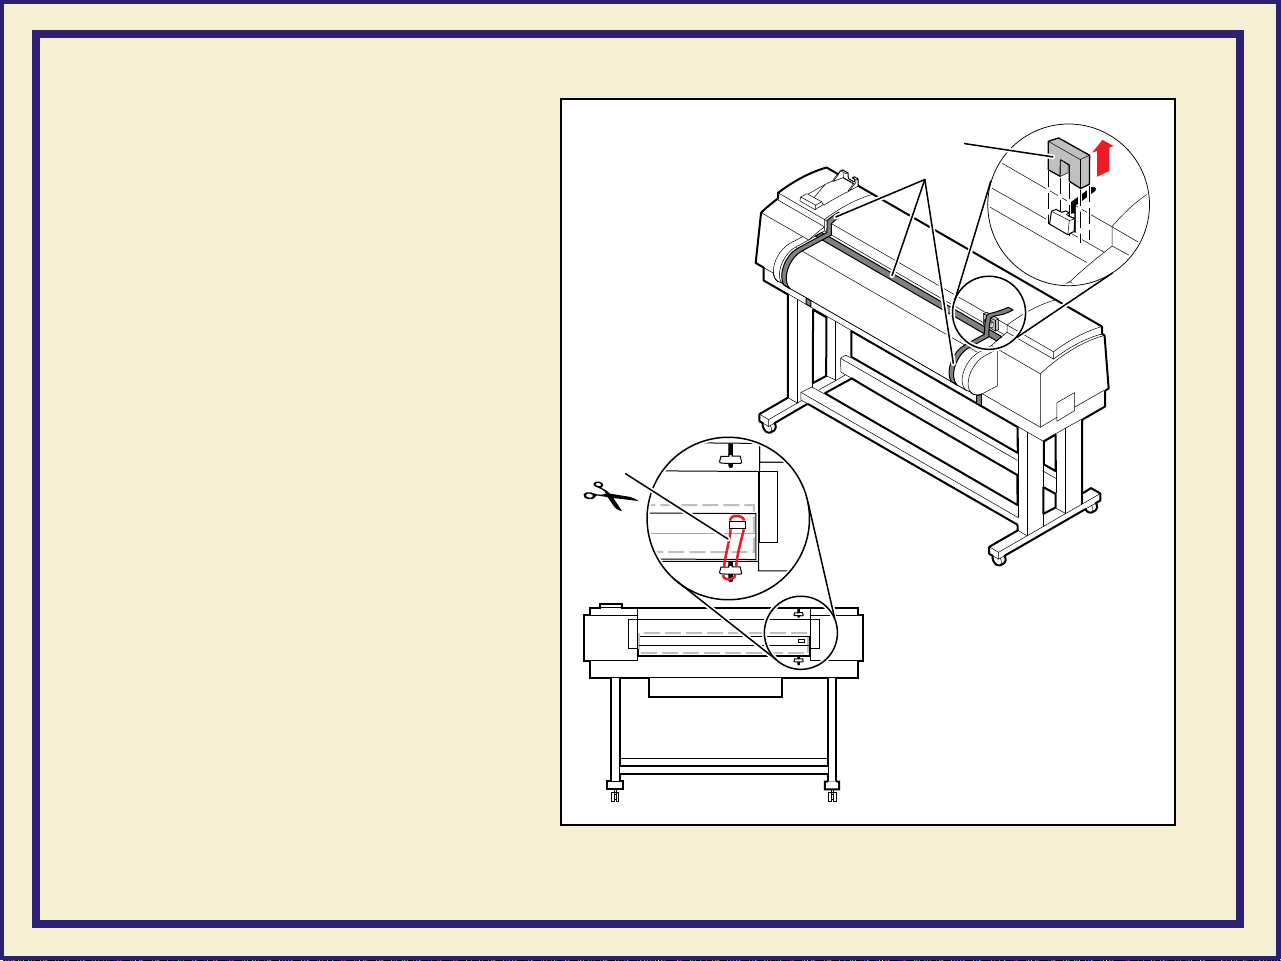
Removing adhesive tape and cable tie
1 Remove the adhesive tape
from the top cover.
2 Remove the styrofoam block
from the top cover latch.
3 Cut and remove the cable tie
from the exit cover latch.
SETTING UP THE PRINTER
2
1
3
17
9480-03
Page 34
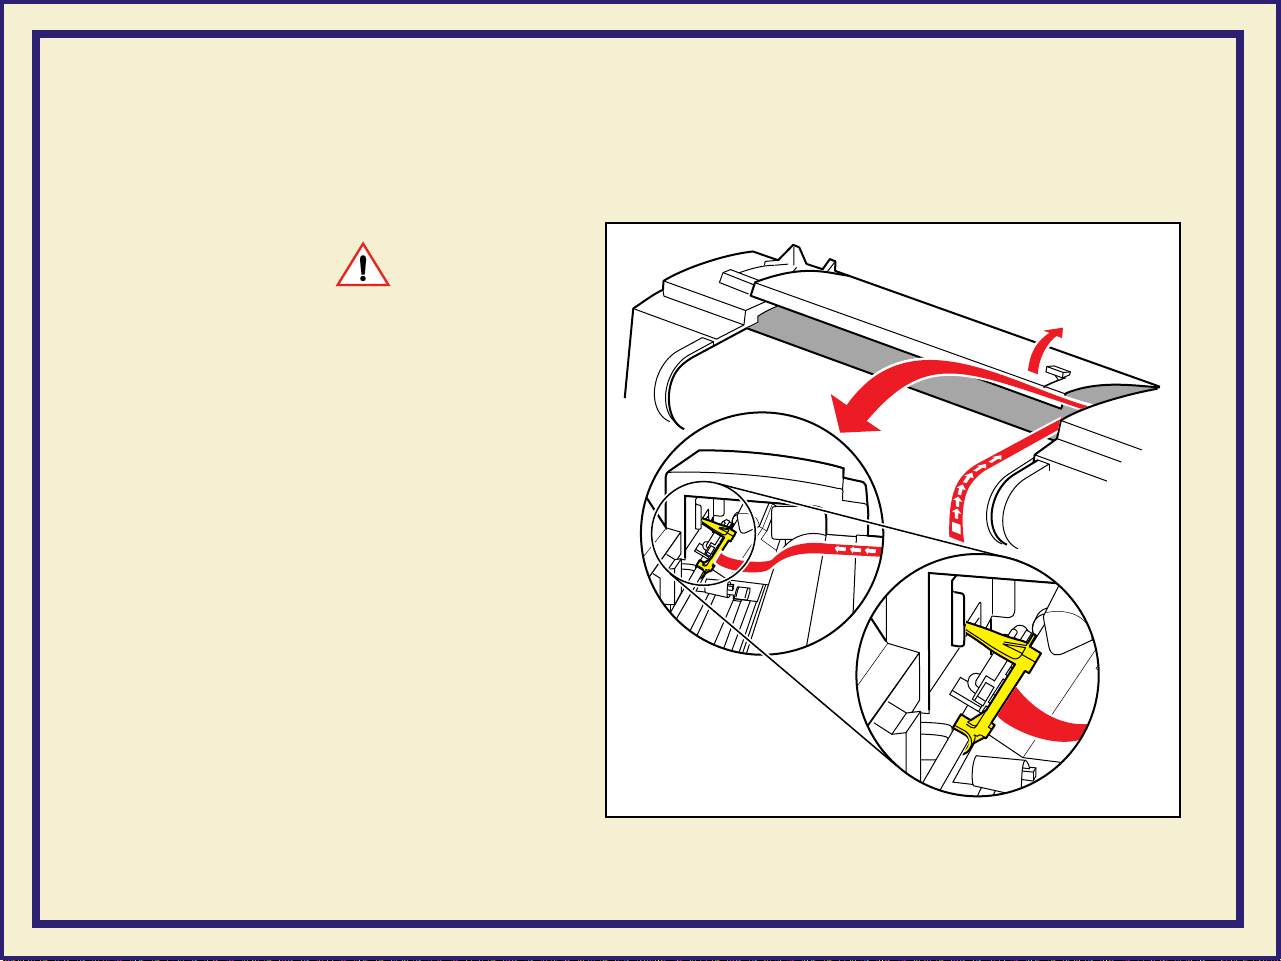
Removing the transit restraint
CAUTION
The transit restraint must be removed
before turning on the power;
otherwise you will damage the
printhead.
1 To open the top cover, lift the latch
and then lift the cover to an
upright position.
The yellow transit restraint
(attached to the red warning
ribbon), protects the printhead
during shipment. It is visible
inside on the far right of the
printer.
SETTING UP THE PRINTER
9480-06.CD
18
Page 35
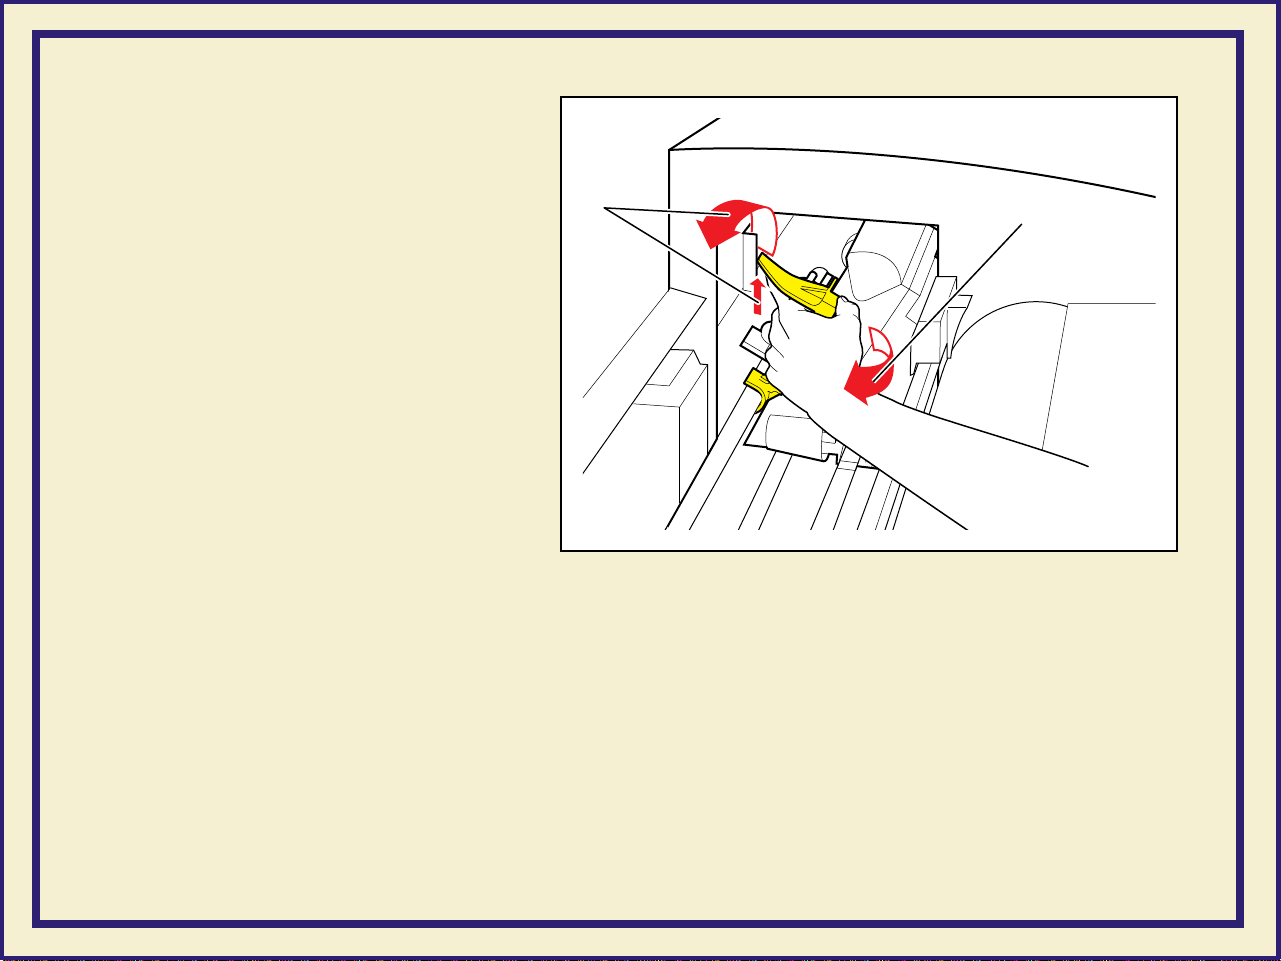
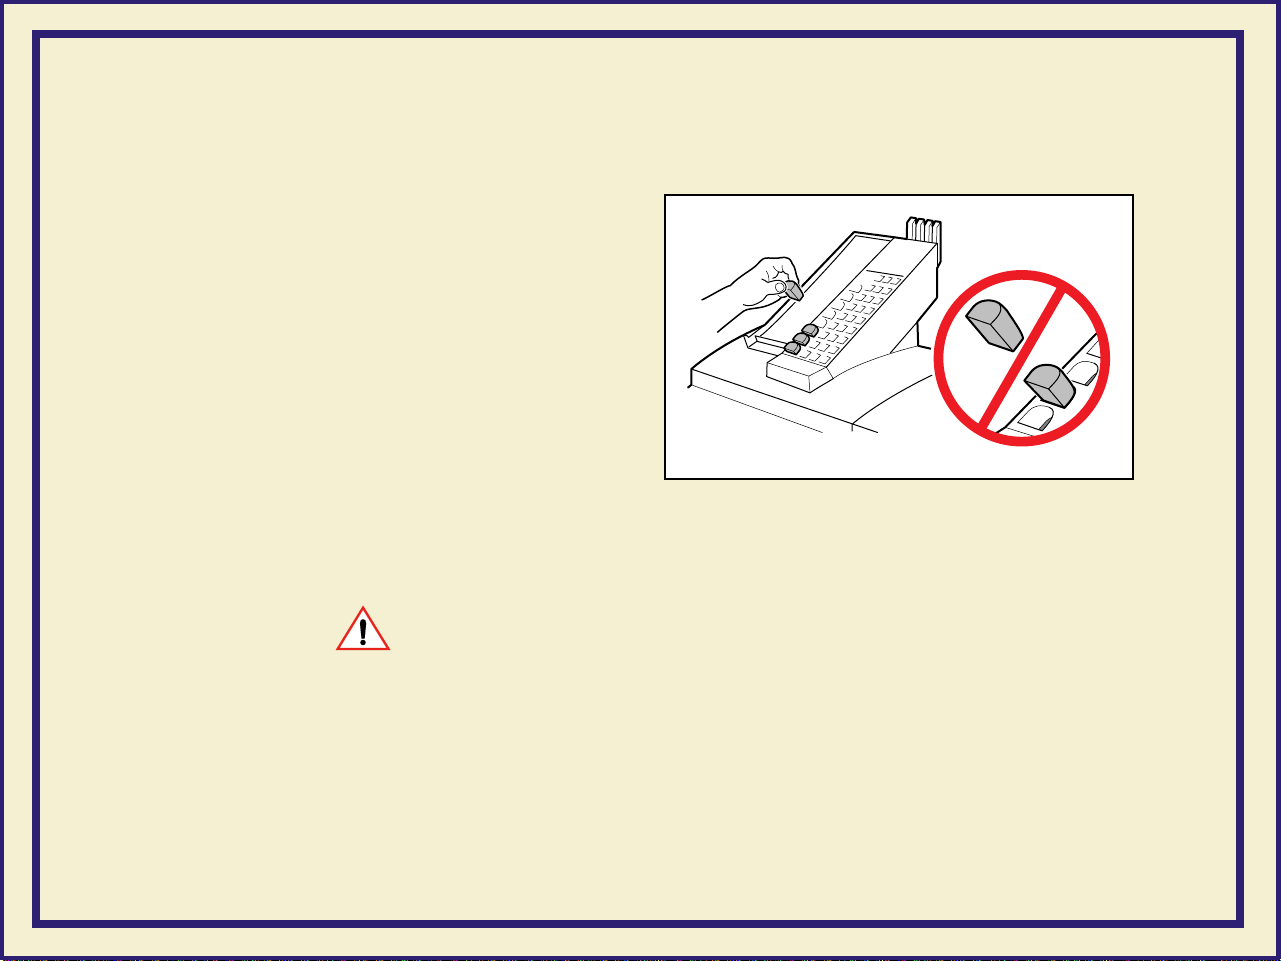
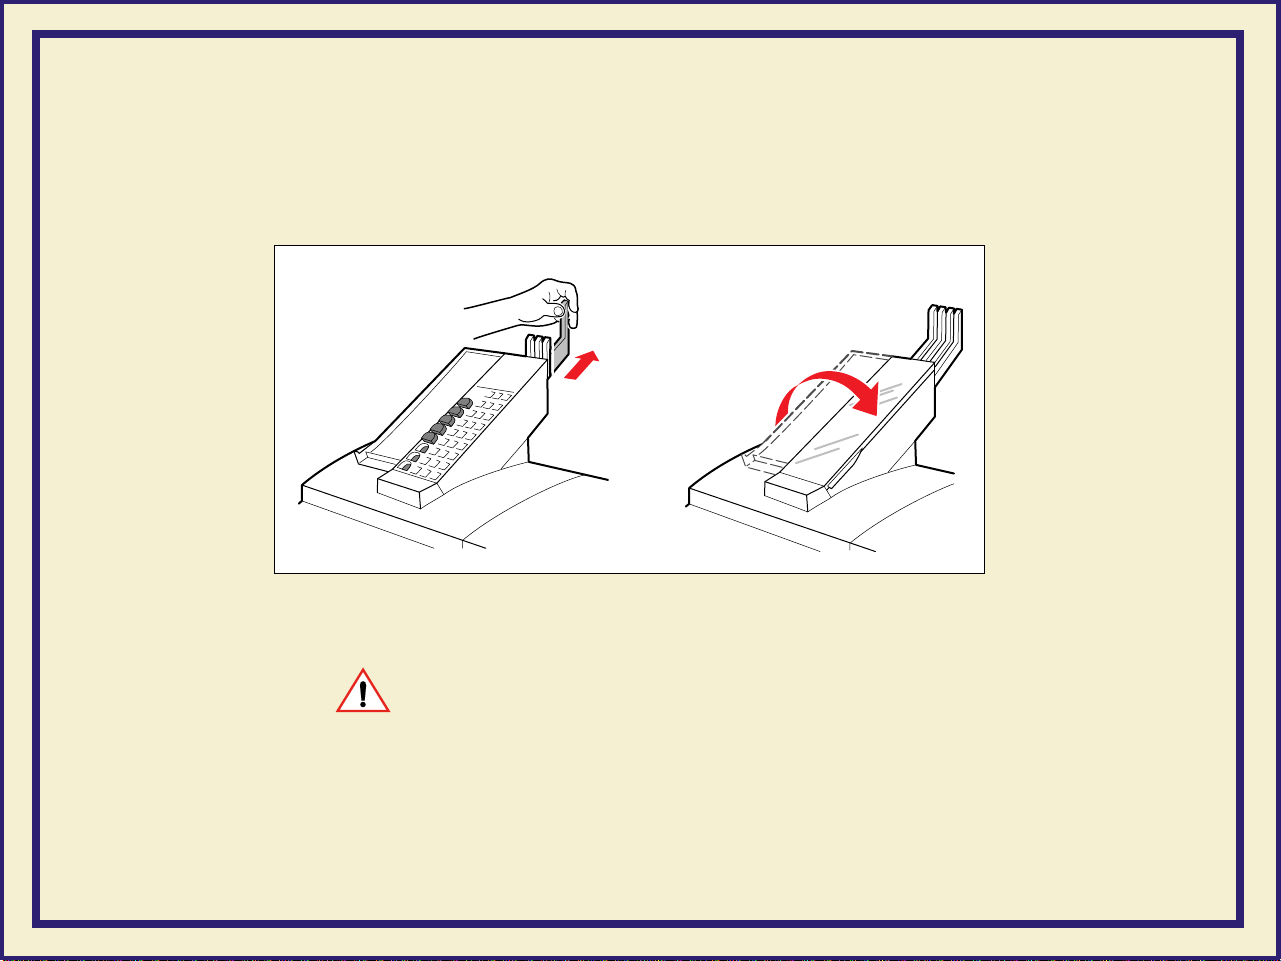
2 Using your left hand, grasp
the transit restraint, as
shown. Use your index
finger to lift the end of the
restraint over the metal plate.
3 Rotate the restraint toward
you to release it from the
printer. Save the restraint for
future use.
SETTING UP THE PRINTER
2
3
9480-04.CD
19
Page 36
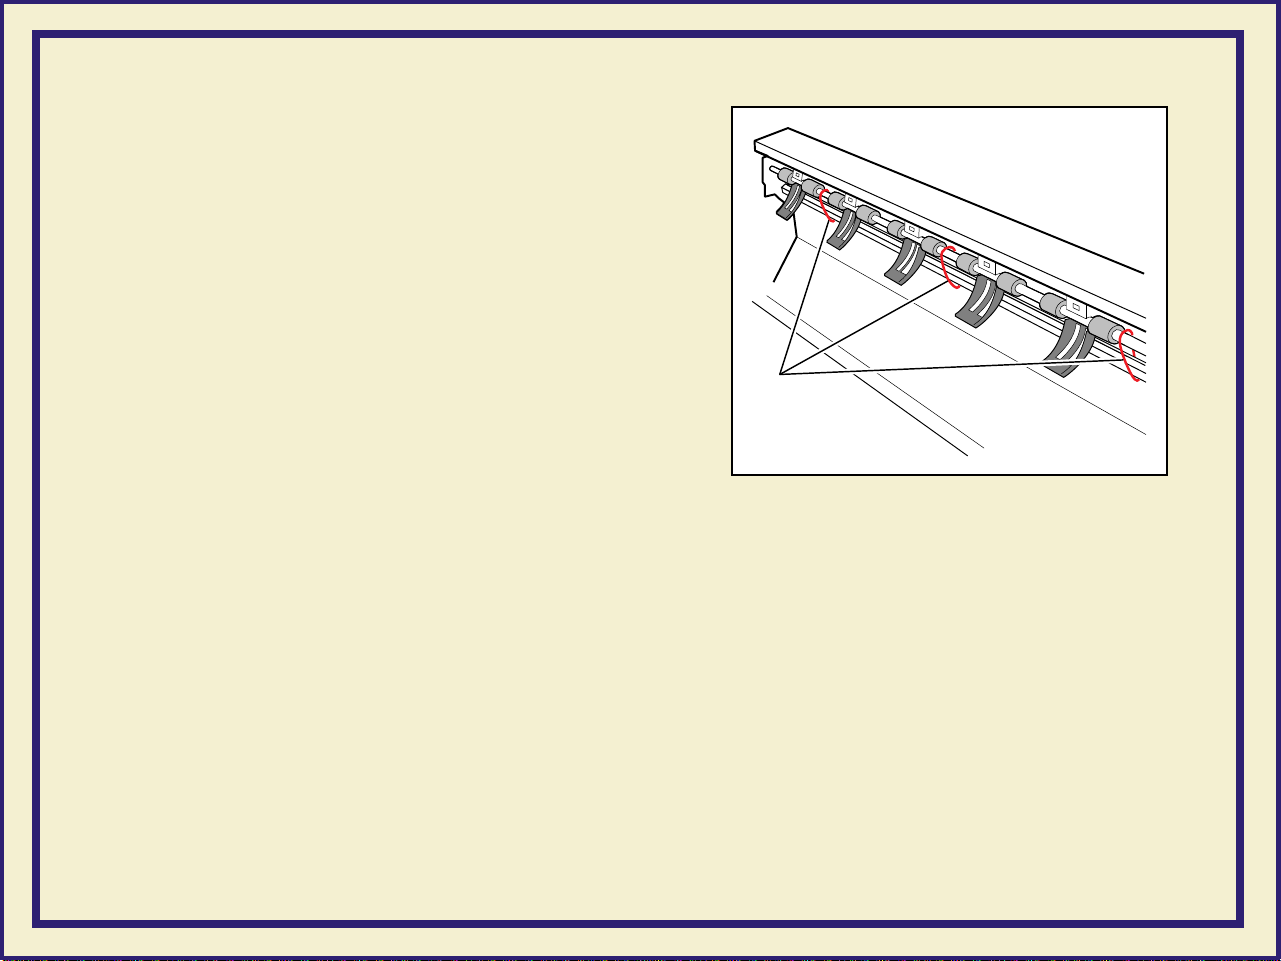
4 Cut and remove the three cable ties that
secure the rollers.
5 Close the top cover, making sure that the
latch is pressed down.
SETTING UP THE PRINTER
4
9480-121
20
Page 37

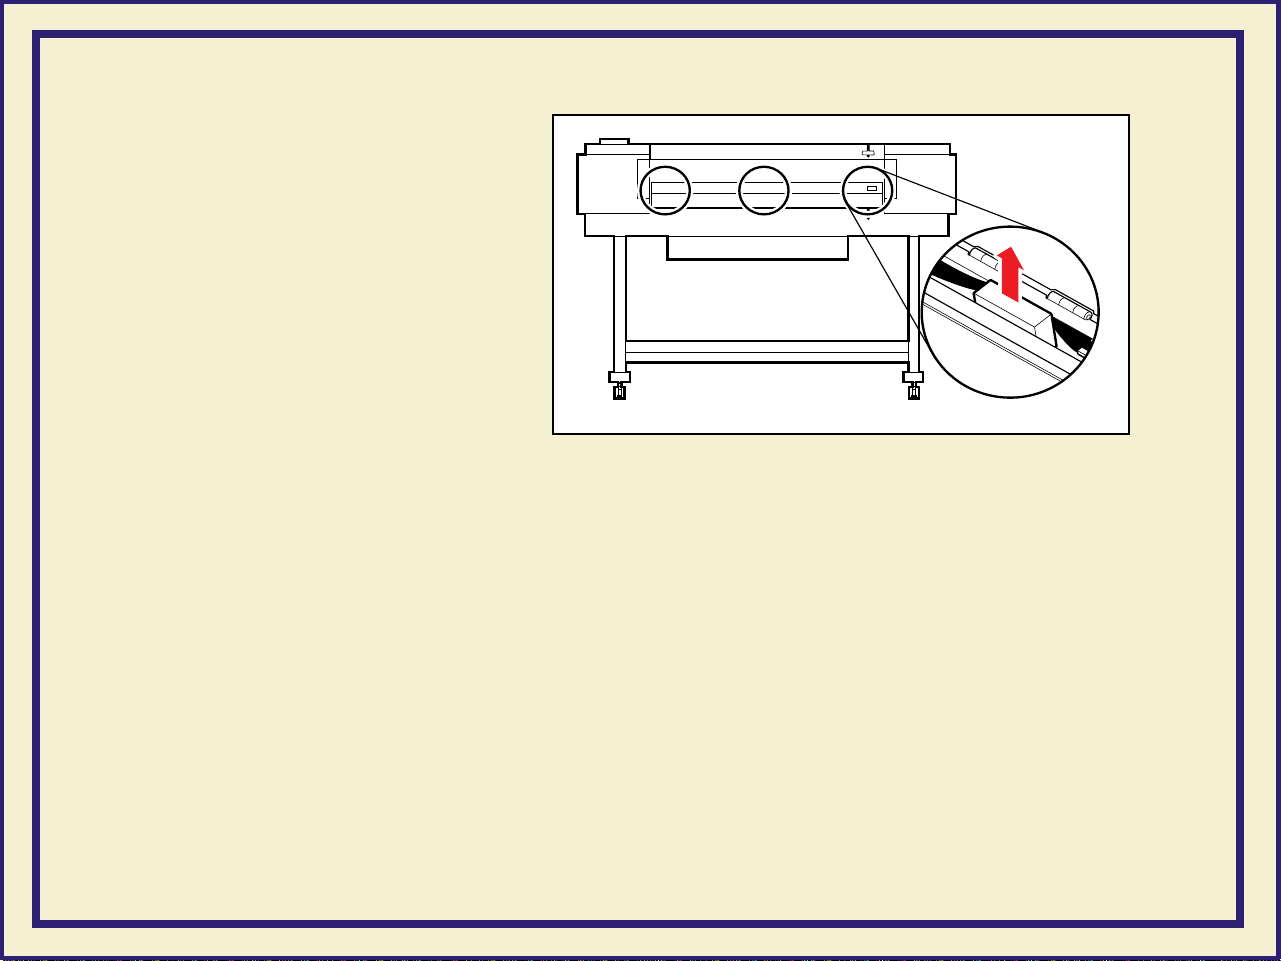
Removing the shipping blocks
CAUTION
The shipping blocks inside the exit cover must be removed before turning on the
power; otherwise you will damage the printer.
1 Open the exit cover:
a Push down on the latch.
SETTING UP THE PRINTER
b Use the exit cover handle to
rotate the cover down.
WARNING
When lowering the exit cover, be careful not to pinch your hand between the paper
roll cover and the exit cover.
b
a
9480-116
21
Page 38
2 Remove the blocks.
3 Close the exit cover.
SETTING UP THE PRINTER
9480-134
22
Page 39
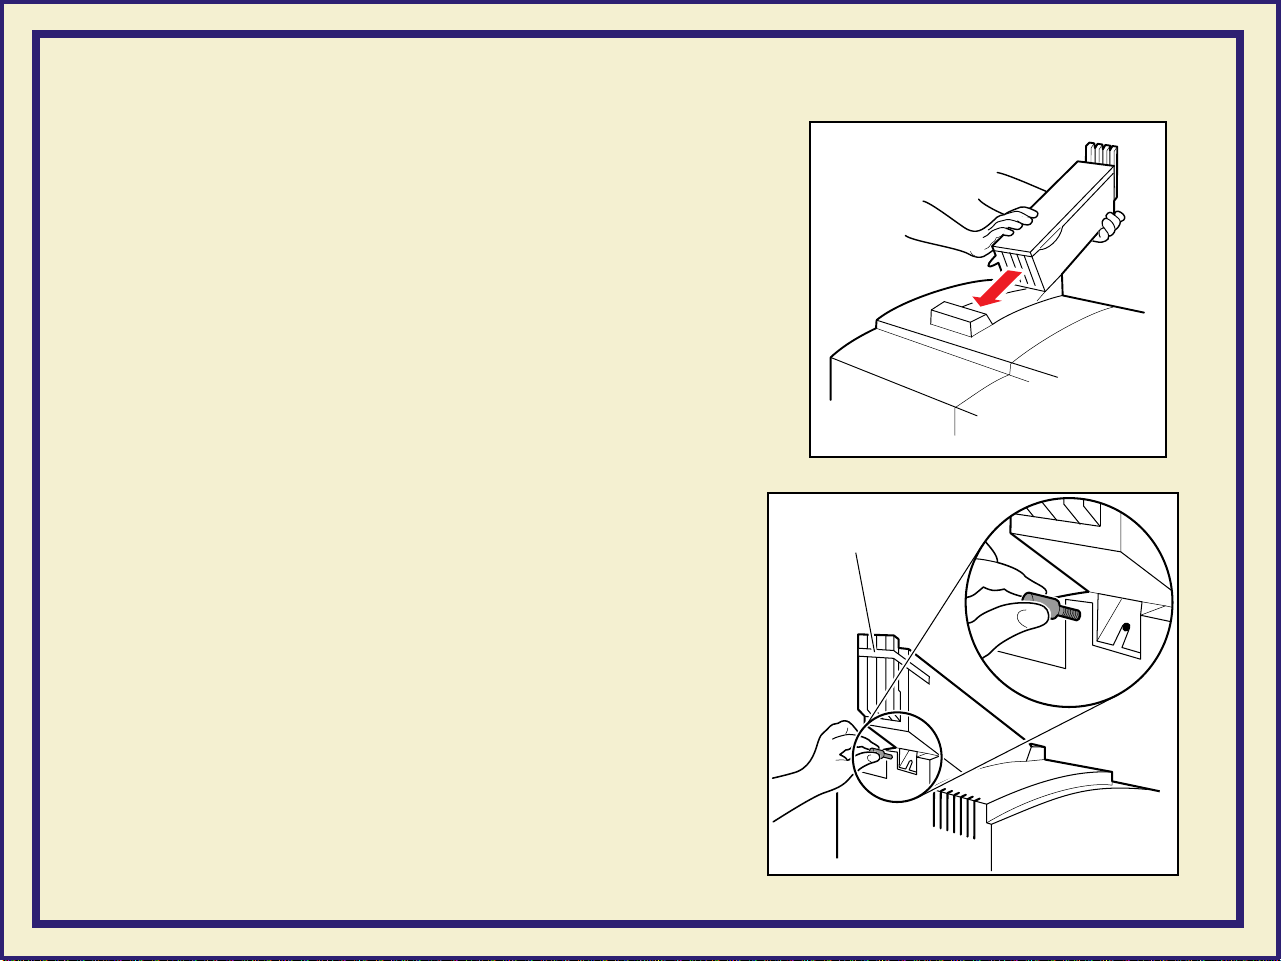
Attaching the ink loader
1 Remove the ink loader and the screw from
the packaging.
SETTING UP THE PRINTER
2 Slide the ink loader into the printer as shown.
3 Insert the screw into the opening (on the rear
side of the ink loader and printer) to secure
the ink loader to the printer; tighten the screw
by hand; no tools are necessary.
4 Remove the adhesive tape that secures the
four sliders.
2
9480-42
4
3
23
9480-55
Page 40
Loading the ink
1 Remove the ColorStix ink sticks
from their packaging by peeling off
the paper cover.
2 Open the ink loader cover.
3 Insert the ColorStix ink sticks into
the appropriate holes for each
color. Each color ink stick is
uniquely shaped to make ink
loading easy. Load the ink sticks from the bottom of the ink loader to the top.
CAUTION
SETTING UP THE PRINTER
9480-05
Load only one ink stick in each slot; otherwise the ink sticks might jam and the cover
will not close.
Do not load more than eight ink sticks of any color at one time.
Open only the ink sticks you will immediately use; exposure to dust and overhandling
can cause an ink jam.
24
Page 41
SETTING UP THE PRINTER
4 Slowly pull back each ink’s slider to release the ink sticks into the printer.
5 Close the ink loader cover.
CAUTION
Make sure that the ink loader cover is completely closed; otherwise, the printer will
not power up.
9480-56
9480-57
25
Page 42

Attaching the output bin
1 Remove the output bin
from its packing box.
Also remove the small
plastic bag that contains
two bolts and an Allen
wrench.
2 With the output bin
folded at its joint, hook
the short end (a) over
the back (upright) rail
(b) of the printer.
SETTING UP THE PRINTER
2
3
a
3 Align the openings of
the long end of the
output bin with the
openings in the front
legs of the printer. Insert
a bolt into the opening on
each front leg; tighten them with the Allen wrench.
b
9480-124
26
Page 43

SETTING UP THE PRINTER
Attaching the Quick Reference Guide
The
Phaser 600 Quick Reference Guide
the front panel.
1 Remove the reference guide from the accessories box.
2 Peel the backing from the double-sided tape.
3 Press the booklet onto the top right side of the printer, above the front panel.
is designed to attach to the printer above
R
R
3
27
2
9480-123
Page 44

CONNECTING THE PRINTER
Connecting the printer
NOTE
Make all printer connections before you turn on the printer.
Printer ports
The printer is shipped with a SCSI port and parallel port on the printer’s rear panel.
Additionally, the printer can support one optional PhaserShare™ network card. All
ports and network protocols are simultaneously active. The printer accepts print
jobs on a first-come, first-served basis.
NOTE
See Order
the printer.
ing Interface cables and adapters about ordering cables for connecting
28
Page 45

CONNECTING THE PRINTER
1 SCSI (
For connecting these optional peripheral
devices:
■ Phaser Copystation To set up and
connect the Phaser Copystation to your
printer, refer to Chapter 2 of the
Copystation User Manual
ID numbers are 5 and 6. Refer to Phaser
Copystation for ordering information.
■ External SCSI hard disk Provides
additional storage for downloadable fonts
(the printer has an internal 1-Gbyte SCSI
hard disk). You can connect one or more
SCSI external hard disks to the printer;
available SCSI ID numbers are 0, 1, 2, 3.
standard)
Phaser
. Required SCSI
12
SCSI Disk
Parallel
Service
only
3
Status
PhaserShare™
Token Ring Card
PhaserShare™ LocalTalk/Serial Card
PhaserShare™
Ethernet Card
Serial
10Base2 10Base-T
TX
RX
Link
9480-09
29
Page 46

2 Parallel (standard)
The printer supports a standard (uni-directional) parallel port. The port can
also be set for bi-directional communications using downloadable utility files
(available on the printer’s CD-ROM, diskettes, or from your World Wide Web
browser).
■ Use a high-density bi-directional parallel cable, available from most
computer cable vendors; or order a 36-pin high-density printer to
25-pin DSUB PC cable from Tektronix (order number: 012-1468-00).
Otherwise, you can use a 36-pin to 36-pin parallel cable and the
parallel adapter supplied with the printer.
■ Connect a parallel interface cable to your computer and to the printer’s
parallel port:
CONNECTING THE PRINTER
SCSI Disk
Parallel
Status
Service
only
9480-58
30
Page 47

CONNECTING THE PRINTER
3 PhaserShare card (
The printer accepts one of the following:
■ PhaserShare Ethernet card supporting Novell NetWare, EtherTalk,
TCP/IP, Telnet and FTP protocols.
■ PhaserShare Token Ring card supporting Novell NetWare, TCP/IP,
TokenTalk, Telnet and FTP protocols.
■ PhaserShare LocalTalk/serial card.
The
PhaserShare Network Cards and Software System Administrator
Manual
contains all the information necessary for configuring and using
the optional network interfaces. Refer to PhaserShare netw
ordering information.
optional)
ork cards for
31
Page 48
Adjust the leveling legs and lock the wheels
It is very important that the printer be set up
on a level, secure surface for the best print
quality.
1 Remove the adhesive tape that protects
the leveling legs and the bottom of the
printer.
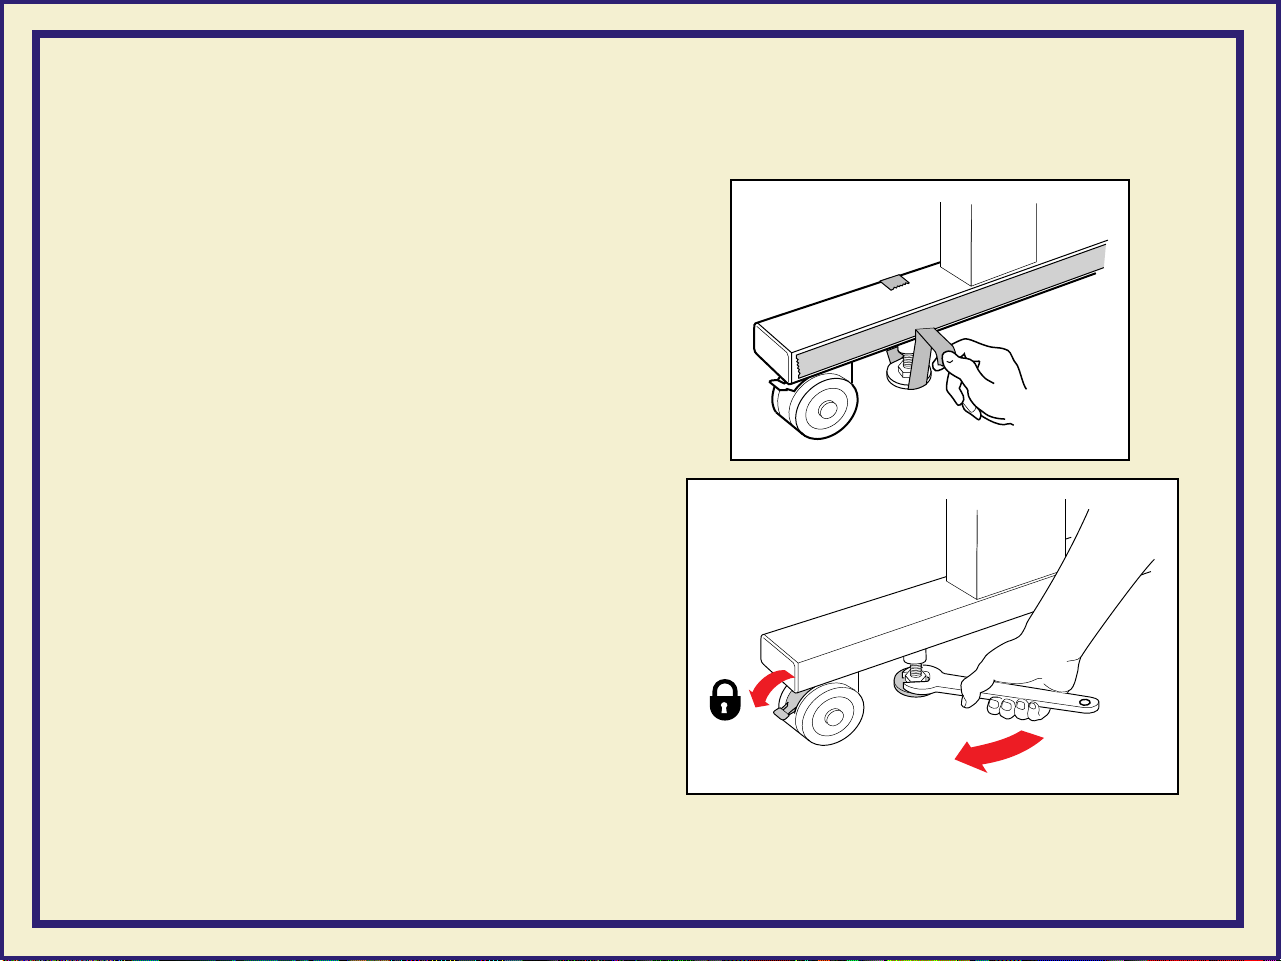
2 To adjust the four leveling legs under
the printer, use a small, adjustable
wrench to turn the nut on each leg to the
desired height. If the floor is a smooth,
non-carpeted surface, the leveling legs
keep the printer from sliding.
CONNECTING THE PRINTER
1
9480-128
3 Lock the front casters by pressing down
on the locking lever. If the floor is a
carpeted surface, the casters alone
keep the printer steady.
32
3
2
9480-43
Page 49
Turning on the pr inter
CAUTION
Before turning on the power to the printer, make sure that you have removed all
shipping material from inside the printer; otherwise, you can damage the printer.
See Remo
tape and cable tie.
❏ Transit restraint: (printhead) inside the printer’s top cover.
❏ Cable ties: inside the printer’s top cover.
❏ Shipping blocks: (fuser) inside the exit cover.
Make sure that you have attached the ink loader to the printer and that its cover is
closed; otherwise, the printer will not start up.
ving the transit restraint, Removing the shipping blocks, and Removing adhesive
CONNECTING THE PRINTER
CAUTION
To protect your printer from a power surge, make sure that the power switch on the
printer is in the off position before plugging in the cord. You can also use a surge
protector that is designed for computer equipment.
Make sure that you use the power cord that is shipped with the printer. If you need a new
power cord, contact your local Tektronix dealer.
33
Page 50
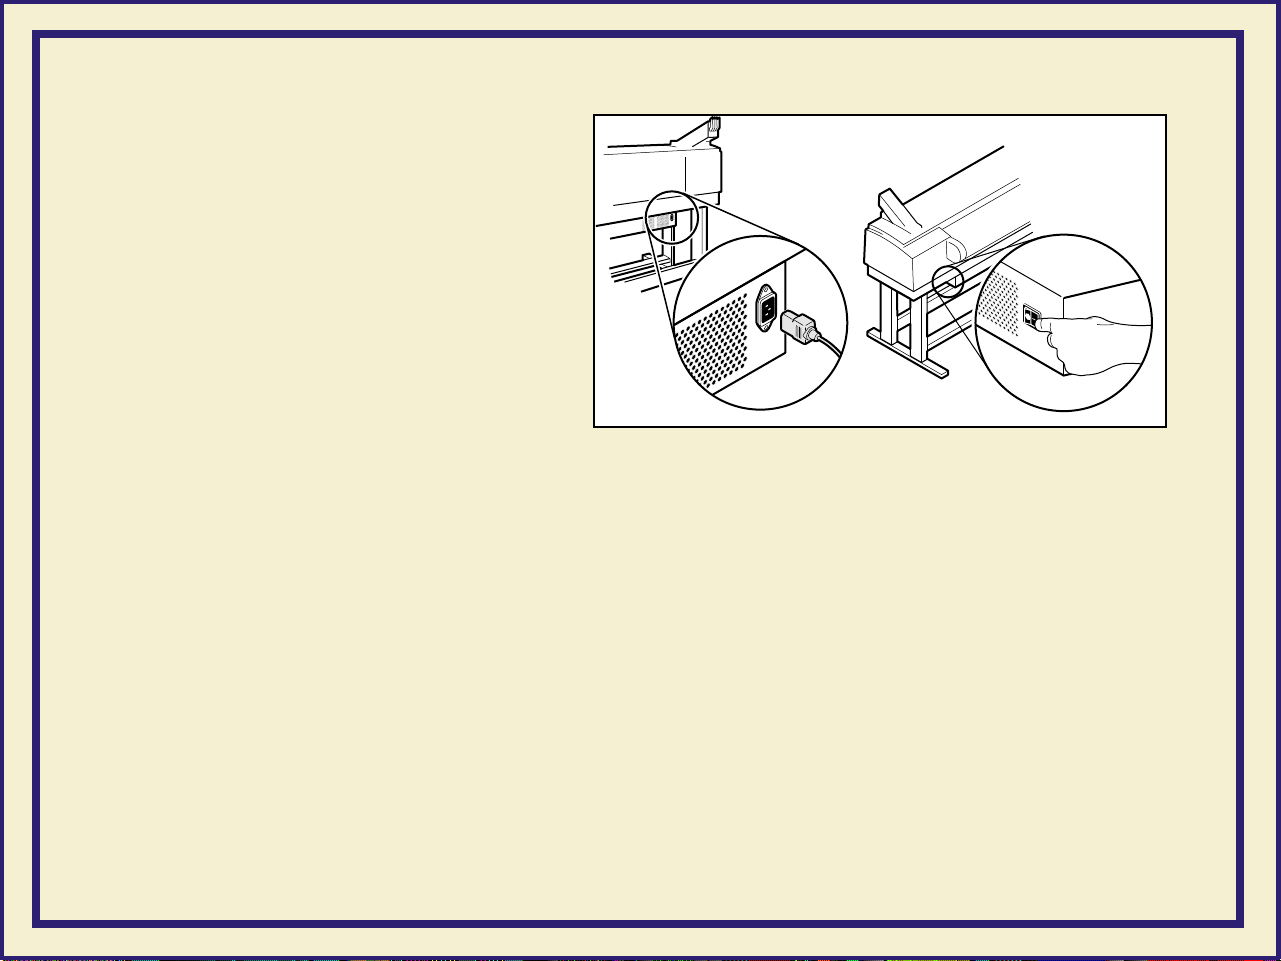
1 Plug the power cord into the
printer and into a grounded
outlet.
2 Turn on the power to any
peripherals you have
connected (i.e., an external
SCSI disk or the Phaser
Copystation).
CONNECTING THE PRINTER
1
3
3 Wait 1 minute, then turn on the
printer.
9480-140
34
Page 51
CONNECTING THE PRINTER
What happens at power-up
■ Both status indicators (power and error ) on the printer’s front panel
light briefly. Messages appear in the display panel (LCD) as the printer
goes through a series of self-tests.
Initializing...
9480-12.CD.2
■ While initializing, the printer makes various mechanical sounds; the front
panel displays this message as it performs an automatic head cleaning
procedure:
Cleaning...
9480-12.CD.3
The printer takes about 10-12 minutes to warm up and complete the self-tests
(depending on the amount of memory installed).
35
Page 52
CONNECTING THE PRINTER
NOTE
The printer’s memory includes a startup page that is disabled by default. You can
turn on the startup page using either the front panel menu or a software utility file
provided on the CD-ROM or World Wide Web. Refer to Enab
ling and disabling the
startup page for details.
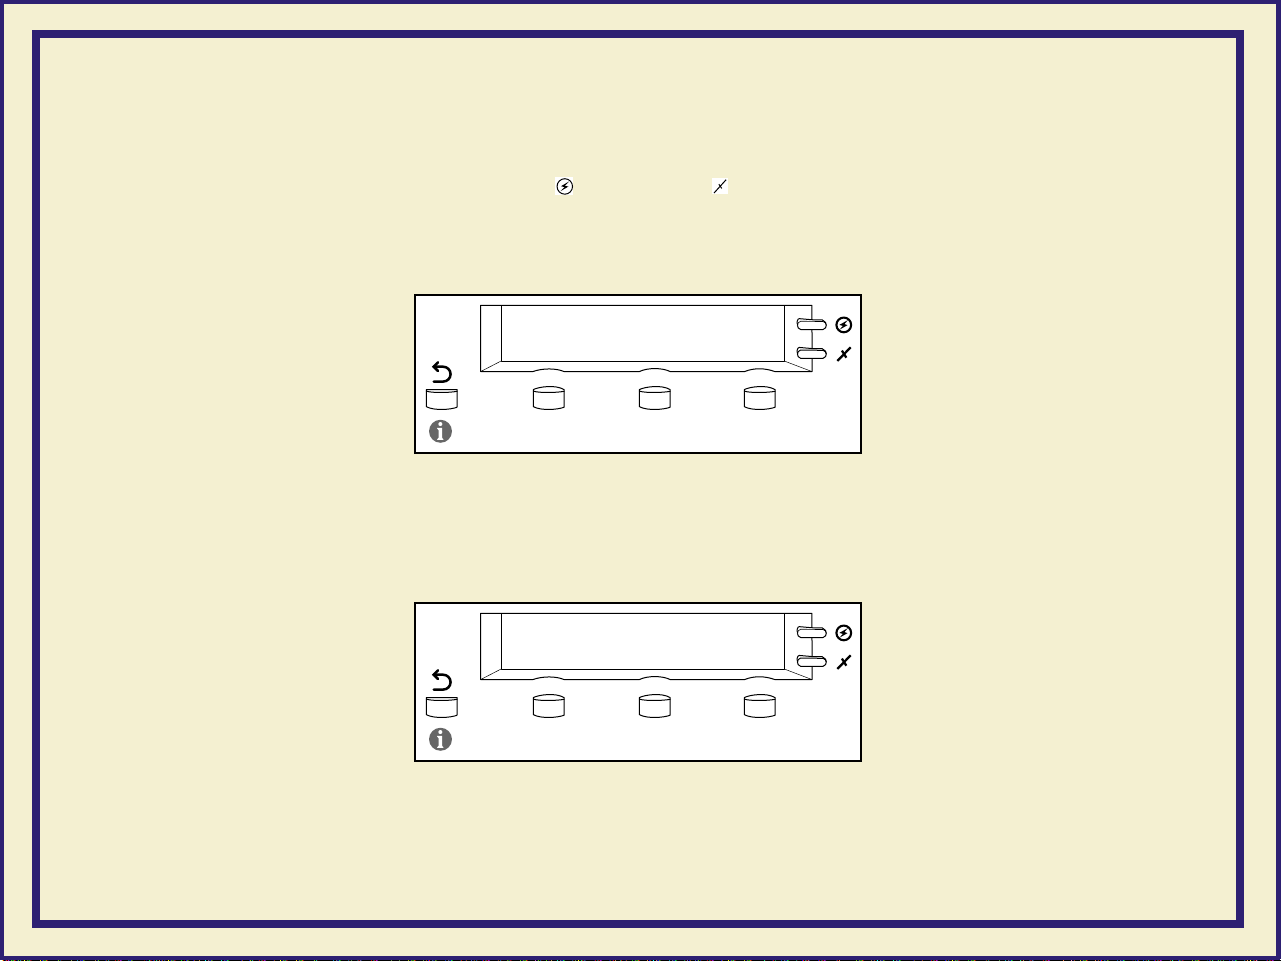
When the printer is ready for operation
When the power-up sequence is complete, the green indicator is on steady (not
blinking), the red indicator is off, and the front panel displays this message:
Ready
Pause Menu
9480-12.CD
36
Page 53

SELECTING A LANGUAGE FOR THE FRONT PANEL
Selecting a language for the front panel
Messages that appear in the front panel window are in English. To change the
language to French, German, Spanish, Italian, or Japanese, follow these steps.
1 When the printer is on and the Ready message appears, press and release
the Menu button (the button labels appear in the front panel display, above
each corresponding button). You see this message:
Help Pages
<--- ---> Menu
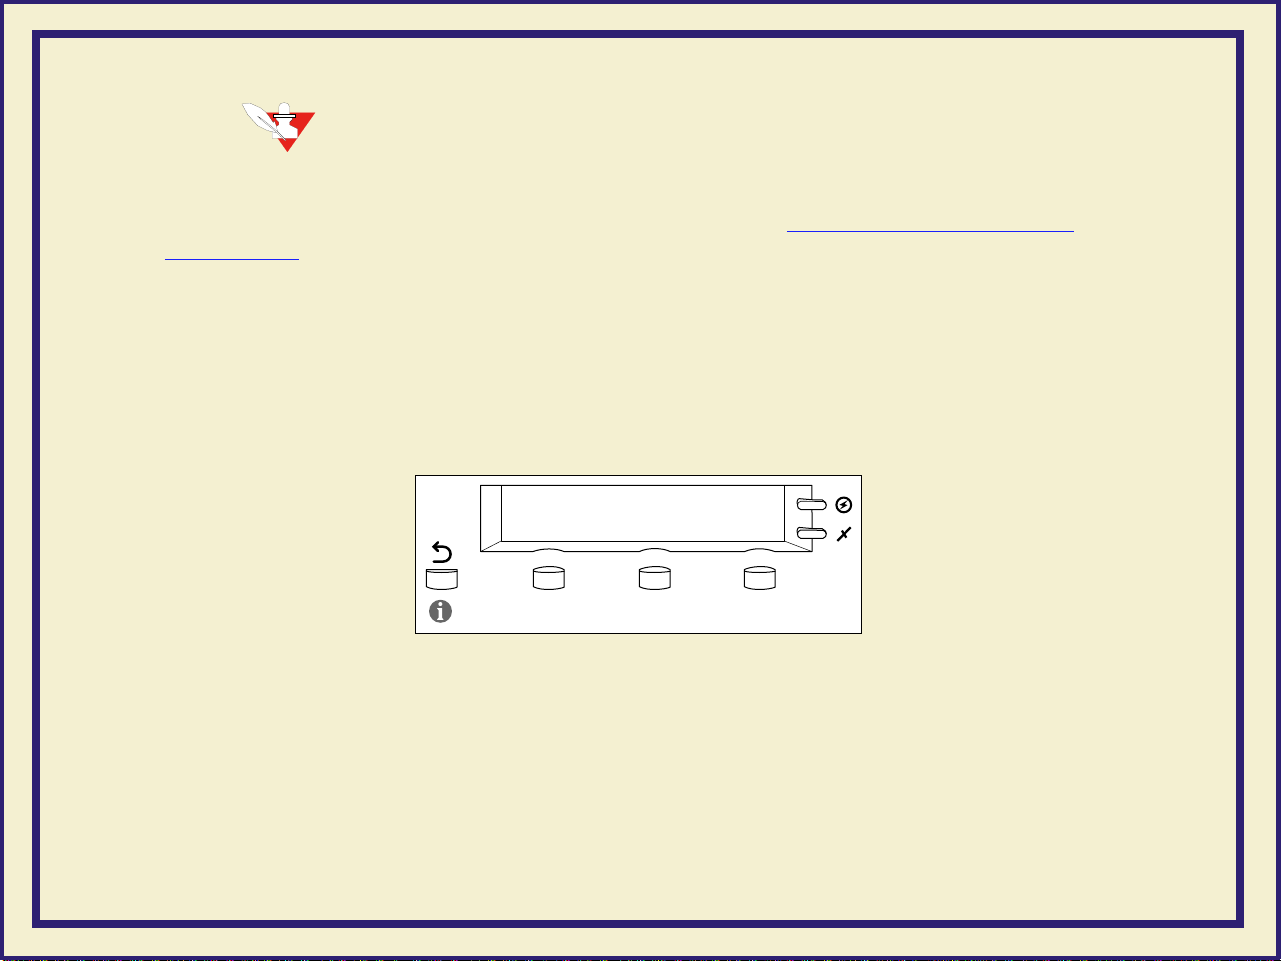
Pressing the left arrow button (<---) scrolls backward through the
selections; pressing the right arrow button (--->) scrolls forward through
the selections; pressing Menu enters the currently displayed menu.
2 Using the left (<---) or right (--->) arrow buttons, scroll through the
selections until you see this message:
Language
<--- ---> Menu
37
Page 54
SELECTING A LANGUAGE FOR THE FRONT PANEL
3 Press the Menu button to enter the language selection menu. You see this
message:
Language:English*
<--- ---> Select
where the asterisk (*) indicates the currently selected language.
4 Press the right arrow button until the display shows the language you want
from these selections:
Language:English
Language:Español
Language:Français
Language:Deutsch
Language:Italiano
Language:(Japanese)
5 Press Select to choose the language. Press the button until Ready is
displayed in the selected language.
38
Page 55

INSTALLING THE STARTER PAPER ROLL
Installing the star ter paper roll
Click on the following instructions for loading the starter paper roll:
■ Loading the paper roll
■ Feeding roll paper
39
Page 56
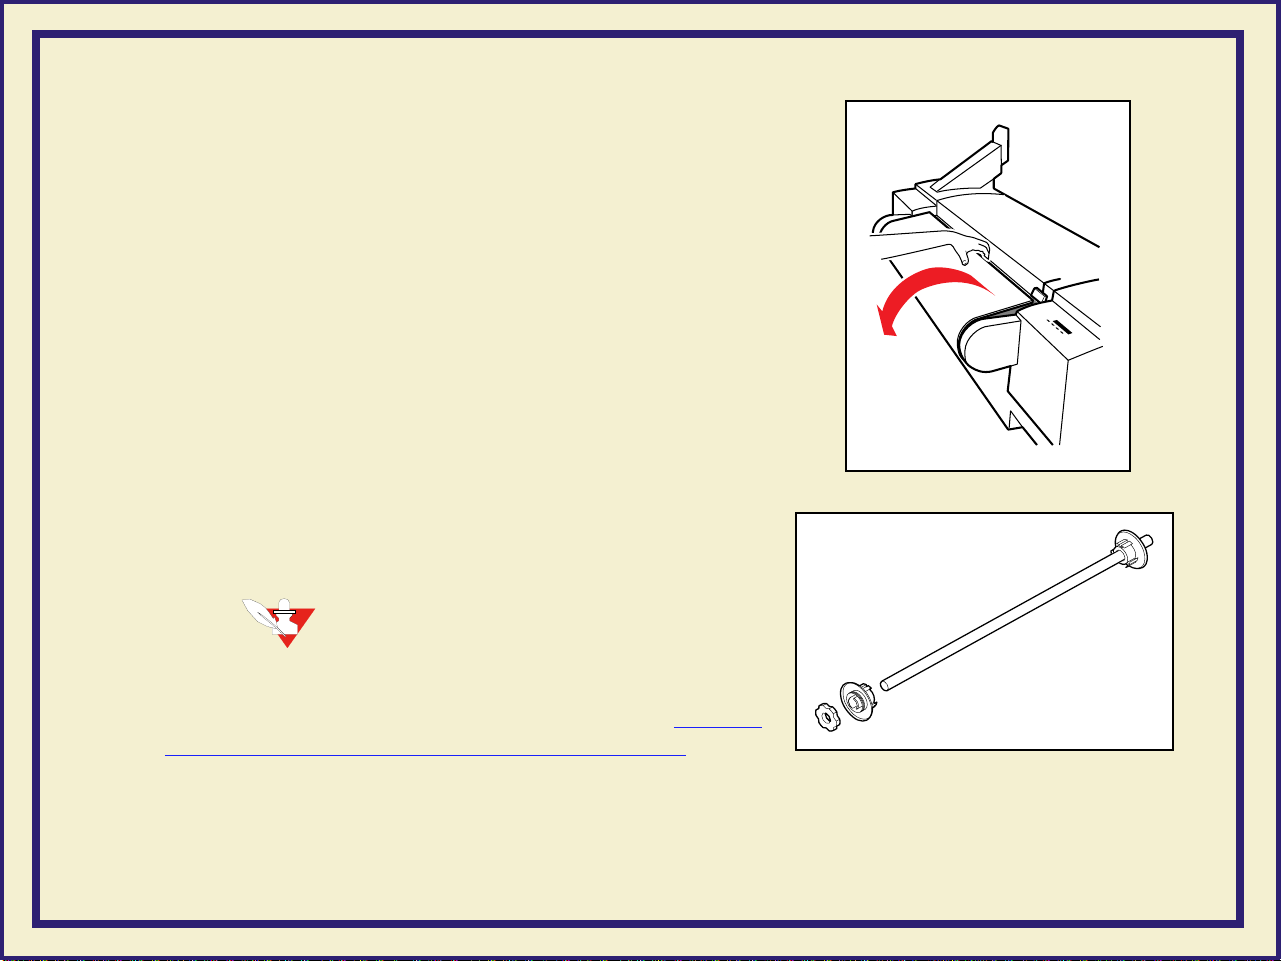
Loading the paper roll
1 Open the paper roll cover.
2 Lift the paper roll holder out of the printer. Notice
that each end of the holder is unique:
a The left side of the holder (closest to the ink
loader) has a removable plastic nut and
endcap.
b The right side of the holder (closest to the
front panel) has a fixed endcap.
NOTE
INSTALLING THE STARTER PAPER ROLL
9480-07
b
The endcaps are set up for media rolls with a
three-inch core; if you are using media on a two-inch
core, the endcaps can be adjusted. Refer to Using a
2-inch core media roll: removing the core adapter for
instructions.
40
a
9480-66
Page 57

3 Loosen the plastic nut by turning it
until the endcap slides freely.
4 Slide the removable endcap from the
shaft.
INSTALLING THE STARTER PAPER ROLL
5 Slide the paper roll onto the shaft
(make sure that the leading edge of
the paper comes off the roll from
behind, as shown); center the roll
over the fixed endcap.
CAUTION
Gently slide the paper roll onto the shaft;
do not let it drop onto the shaft or it can
damage the fixed endcap.
9480-35
4
5
9480-36
41
Page 58

6 Replace the removable endcap; it
fits
inside
the core of the
paper roll.
7 Tighten the plastic nut to secure
the endcap.
8 Insert the paper roll holder into
the printer as shown, with the
fixed end (a) closest to the front
panel (b).
INSTALLING THE STARTER PAPER ROLL
6
7
9480-37
a
b
42
9480-38
Page 59

INSTALLING THE STARTER PAPER ROLL
Feeding roll paper
1 When the printer is in the Ready state, the front panel displays this message:
Ready
Pause Menu
9480-12.CD
2 Make sure that the paper’s leading edge is straight and smooth.
If it is not, use the cutting tool that was shipped with the printer to cut a
smooth edge along the printer’s cutting guide. Refer to Cutting roll media
for complete instructions on getting a straight leading edge.
43
9480-69
Page 60

3 With the paper roll cover open,
use the guide on the right side of
the printer to ensure that the
paper enters straight.
INSTALLING THE STARTER PAPER ROLL
4
4 Holding the paper by the outside
edges, guide the paper evenly
into the slot between the top
cover and printer body until it
stops (about two or three inches)
and buckles slightly.
5 The printer picks the paper and
advances it, and the front panel displays a series of messages (Loading...;
Unloading...); when the media is successfully loaded, the Ready
message appears.
NOTE
The printer advances the paper to measure the paper and calibrate for its width
Loading...). Once the paper is measured, the printer reverses the paper
(
Unloading...) so that it is aligned and ready to print.
(
3
9480-72
44
Page 61

6 Close the paper roll cover.
INSTALLING THE STARTER PAPER ROLL
9480-95
45
Page 62

SOFTWARE INSTALLATION
Software installation
Packaged with your printer is a CD-ROM and a set of diskettes that contain the
software you need to use the printer. Included are automatic installer applications,
drivers, printer description files (PPDs), color sampler charts, and utility files.
Click on Ov
erview for all PC and Macintosh platforms for more information.
46
Page 63

SOFTWARE INSTALLATION
Overview for all PC and Macintosh platforms
These are the basic steps to software installation:
1. Decide which driver you want to install:
Windows See Which Windows driver to install?
Macintosh See Which Macintosh driver to install?
2. Decide which installation option (Easy or Custom) you want.
Windows See Custom Install or Easy Install?
Macintosh See Custom Install or Easy Install?
3. Install the printer’s software according to your platform-specific procedures.
a. Select one:
Easy Install A pre-defined list of drivers, PPDs, utility files
Custom Install A custom-selected list of drivers, PPDs, utility files, software applications
b. Follow the on-screen prompts.
4. Set up a driver for use with your printer.
a. Follow the instructions for the driver you installed.
To begin the platform-specific installation procedures:
PC/Windows Turn to PC/Windows software now.
Macintosh Turn to Macintosh software now.
47
Page 64

PC/Windows software
Click on the following topics for more information:
■ Which Windows driver to install?
■ Custom Install or Easy Install?
PC/WINDOWS SOFTWARE
48
Page 65

Which Windows driver to install?
Operating system Driver Features Notes
Windows 3.1
Tektronix (Microsoft 3.58)
■ Simple, familiar interface for
Windows 3.1 users
■ Supports PhaserMatch custom
profiles
■ Custom page sizes
AdobePS 3 PostScript driver ■ Includes all features of the Tektronix
driver, and more
■ Similar to Windows 95 driver
■ Supports PhaserMatch custom
profiles
■ Fewer features than Adobe
■ Harder to use than the Tektronix
PC/WINDOWS SOFTWARE
PostScript 3.0.1
driver
Windows 95
Windows NT
Microsoft PostScript
AdobePS 4 PostScript driver
Windows NT 3.5, 3.51
PostScript drivers
Windows NT 4.0 PostScript
driver
■ Standard driver for Windows 95
■ ColorSync support
■ Includes all features of the Microsoft
driver
■ Supports PhaserMatch custom
profiles
■ Includes N-Up and Watermark
■ Includes printer-specific features
49
■ No support for PhaserMatch
custom profiles
■ No support for PhaserMatch
custom profiles
Page 66

PC/WINDOWS SOFTWARE
Custom Install or Easy Install?
Installer options Software Description Installed directory
Custom
Install
Easy
Install
Windows 95 Microsoft Windows 95 PostScript driver
Windows 3.1 Tektronix PostScript driver
Samplers Color sampler charts and a font sampler
QuarkXPress PDF File Installs
present
PhaserPrint PhaserPrint plug-in for Adobe Photoshop
for Windows
Pantone Files Pantone color charts
Windows 95 AdobePS 4 PostScript driver
Windows NT Files for using a Windows NT 3.5, 3.51,
4.0 PostScript driver
Windows 3.1* AdobePS 3 PostScript driver
Pantone Files* Color charts and color library files
Printer Utilities Printer-specific utility files
Network Utilities* Utility files for using the printer on a
network
PhaserMatch* Application for creating custom profiles
Manuals* Adobe Acrobat PDF versions of the
printers manuals
tkph6001.pdf
, if application is
phsrtool\samplers
\pdf
inside application
directory
phsrtool\photoshp
\plugins
directory)
phsrtool\pantone
phsrtool\pantone
phsrtool\phsr600
phsrtool\net_util
phsrtool\phsrmtch
phsrtool\manuals
inside application
(move to
Adobe Acrobat Reader* Application for viewing on-line manuals
* Available only on the printer’s CD-ROM.
50
Page 67
PC/WINDOWS SOFTWARE
Installing printer software for Windows
1. Insert either the printer’s CD-ROM or the Windows Disk 1 into the appropriate drive on
your computer.
For Windows 95 For Windows 3.1
2. Click the Start icon in the
2. Select Run from the File menu.
taskbar. Click Run.
3. Type in the drive (for either the CD-ROM or diskette) and type
4. Click Next in the next two screens.
5. Select Easy or Custom Install and click Next.
51
SETUP.EXE
. Click OK.
Page 68
Installing printer software for Windows (cont'd.)
For Windows 95 and Windows 3.1
Easy Install Custom Install
Go to Step 6. Follow the on-screen prompts to select items in the
dialog boxes.
Note The Tektronix driver for Windo ws 3.1 must be installed in the
Windows directory (default Destination Directory). Do
not change the Destination Directory when installing the
Tektronix driver unless you are installing the driver on a
network and you know the location of the Windows
directory on the network drive.
■ If you use QuarkXPress: In the QuarkXPress
Installation Selections dialog box, select
Automatic Search or Choose Destination. (If
you are using a network copy of QuarkXPress,
select Choose Destination
then click Next.
PC/WINDOWS SOFTWARE
).
Follow the prompts,
■ To bypass:
■ The next dialog box lists the items you have
Select Do not install.
selected to install. Click Back to change any
selections. Click Next when you have the
selections you want.
52
Page 69

PC/WINDOWS SOFTWARE
Installing printer software for Windows (cont'd.)
6. Another installer program is launched that installs or sets up the drivers (except for the
Tektronix driver for Windows 3.1). Each driver has a unique installation procedure; follow the
steps, then return to Step 7 on this page.
Setting up the drivers for Windows 95 ■ Microsoft PostScript driver ■ Adobe PostScript driver
Setting up the drivers for Windows 3.1 ■ Tektronix driver ■ Adobe PostScript driver
Setting up a PostScript driver for Windows NT 3.5 and 3.51 ■ PostScript driver
Setting up the printer on a network for Windows NT 3.5 and 3.51 ■ Setting up on a network
Setting up a PostScript driver for Windows NT 4.0 ■ PostScript driver
Setting up the printer on a network for Windows NT 4.0 ■ Setting up on a network
7. If you are using the printer’s CD-ROM,
and
you selected Easy Install or PhaserMatch under
the Custom Install, select a location to install the PhaserMatch icon. Click Next to continue.
8. After the Installation Completed dialog box appears, click Yes to view the
README.TXT
then click Finish.
End
53
file;
Page 70
PC/WINDOWS SOFTWARE
Setting up the drivers for Windows 95
Microsoft PostScript driver Adobe PostScript driver
1. Follow
Installing printer software for Windows, through Step 6.
2. Click Next in the Add Printer
Wizard dialog box.
3. Select your printer’s connection:
■ Local Printer printer connected to your computer
■ Network Printer printer accessed through a network
4. Type in the drive you are using.
Click OK.
2. In the driver setup dialog box,
click Read for driver instructions;
click Next.
4. Select the drive you are using;
select the directory for
ADOBEPS4
.
54
Page 71
PC/WINDOWS SOFTWARE
Setting up the drivers for Windows 95 (cont'd.)
Microsoft PostScript driver Adobe PostScript driver
5. Select your printer:
■ Tektronix Phaser 600 Standard configuration
■ Tektronix Phaser 600 with Extended Features
Extended Features option
Note Press and hold down the front panel’s button for configuration information.
6. Select the port your printer is connected to and click Next.
7. Select the Phaser 600 as the default printer; click Next.
8. Return to Installing printer software for Windows to perform Step 7 and Step 8 of the
installation procedure.
Note See the
End
55
Adobe PostScript Printer Driver
User Guide
(
USRGUIDE.PDF
AdobePS 4 driver.
on the printer’s CD-ROM
) for detailed information on the
Page 72

Setting up the drivers for Windows 3.1
Tektronix driver Adobe PostScript driver
PC/WINDOWS SOFTWARE
1. Follow
Installing printer software for Windows, through Step 6.
2. Type in the drive you are using and
click OK.
3. Select your printer and click Next:
■ Tektronix Phaser 600 - Base
version (standard configuration)
■ Tektronix Phaser 600 -
Extended Features
(Extended Features option)
Note Press and hold down the front panel’s
button for configuration information.
2. The Adobe installer automatically starts.
Click Continue.
3. Click Restart Windows (Windows is not
restarted yet; the Adobe installer
completes and the printer installer
continues).
4. Return to
Windows to perform Step 7 and Step 8 of
Installing printer software for
the installation procedure. Then go on to
Step 1 of the next procedure.
Windows is automatically restarted.
56
Page 73

Setting up the drivers for Windows 3.1 (cont'd.)
Tektronix driver Adobe PostScript driver
PC/WINDOWS SOFTWARE
4. Return to Installing printer software for
Windows to perform Step 7
and Step 8 of the installation procedure.
Then go on to Step 1 of the next
procedure, below.
1. In the Control Panel, double-click Printers.
2. Select the Tektronix Phaser 600 printer you installed in the above procedure;
click Connect.
3. Select the port the printer is connected to; click OK.
5. Select your printer and click Install:
■ Tektronix Phaser 600
(standard configuration)
■ Tektronix Phaser 600 - Extended
(Extended Features option)
Note Press and hold down the front panel’s
button for configuration information.
6. Click OK; click Close; click OK.
Note See the
User Guide
(
USRGUIDE.PDF
on the AdobePS 3 driver.
Adobe PostScript Printer Driver
on the printer’s CD-ROM
) for detailed information
End
57
Page 74

PC/WINDOWS SOFTWARE
Setting up a PostScript driver for Windows NT 3.5 and 3.51
Note The Windows NT driver does not support the PhaserMatch application. Refer to Which Windows driver to
install? for information on drivers that do.
You may need your original Windows NT setup diskettes (or CD-ROM) to complete this procedure.
1. If your computer has an Intel-compatible processor, such as the Intel I386, go on to Step 2.
If your computer is a MIPS, Alpha, or PowerPC, edit the
WIN95_95
a. Copy these files to a new, formatted diskette,
directory on the printer’s CD-ROM or in the top level of the Windows 95/NT diskette).
placing them at the top (root) level of the
PRINTER.INF
file (located in the
new diskette.
TEK1
PRINTER.INF
TKPH6001.PPD
TKP600P1.PPD
Note Press and hold down the printer’s button on the front panel for configuration information.
b. Open the copy of the
PRINTER.INF
c. Locate the following section in the
Standard configuration
Extended Features option
file on the new diskette in a text editor such as Notepad.
PRINTER.INF
file:
[ProductType]
STF_PLATFORM = I386
58
Page 75

Setting up a PostScript driver for Windows NT 3.5 and 3.51 (cont'd.)
d. Replace I386 with one of the following depending on your computer type:
■ MIPS for a MIPS platform
■ Alpha for an Alpha platform
■ ppc for a PowerPC
PC/WINDOWS SOFTWARE
e. Save the
PRINTER.INF
file.
2. Double-click on the Print Manager icon in the Main window.
3. If you have a PostScript printer driver installed, go on to Step 4.
If not, install one now. Driver files are required to complete the Tektronix printer installation.
a. From the Printer menu, select Create Printer; the Create Printer dialog box appears.
b. Under Driver, scroll through the list and select a PostScript printer, such as the Apple
LaserWriter NT, and click OK.
c. Follow the on-line instructions to install the driver files from your Windows NT CD-ROM or
diskettes.
4. In the Printer menu, select Create Printer; under Driver, select Other.
5. When prompted, type in the CD-ROM or diskette drive location; click OK.
59
Page 76

Setting up a PostScript driver for Windows NT 3.5 and 3.51 (cont'd.)
6. Select your printer and click OK:
■ Tektronix Phaser 600 (standard configuration)
■ Tektronix Phaser 600 with Extended features (Extended Features option)
Note Press and hold down the printer’s button on the front panel for configuration information.
7. Type in the drive’s path from Step 5; click Continue.
PC/WINDOWS SOFTWARE
8. Click Ignore when prompted for the location of the
PSCRPTUI.DLL
and
PSCRIPT.DLL
9. In the Create Printer dialog box, fill in the other fields as desired, then click OK.
10. Select options in the PostScript Printer Setup dialog box. Click OK.
Recommended:
enable the Use Printer Halftoning option.
11. If you installed a PostScript printer in Step 3, delete it now:
a. Select the printer you want to remove.
b. Select Remove Printer in the Printer menu. Click OK.
End
60
files.
Page 77

PC/WINDOWS SOFTWARE
Setting up the printer on a network for Windows NT 3.5 and 3.51
TCP/IP Connection AppleTalk Connection
Note Windows NT 3.5 and 3.51 include network software called Services for Macintosh (AppleTalk) and
TCP/IP print services (for TCP/IP; lpr print services). Refer to your Windows NT manual for instructions
on installing this network software. After this software is loaded, follow these steps:
1. Select Create a new printer in the Print Manager; select the appropriate
printer driver.
2. Select Other in the Print to field of the From the Printer Properties
dialog box.
3. Select LPR Port for Available Print
Monitors; click OK.
3. Select AppleTalk Printing
Devices for Available Print
Monitors; click OK.
61
Page 78

PC/WINDOWS SOFTWARE
Setting up the printer on a network for Windows NT 3.5 and 3.51 (cont'd.)
TCP/IP Connection AppleTalk Connection
4. For Name or address of host providing
lpd, type your printer’s IP address
(or Host name if known to the network).
Note The printer’s IP address may be availab le on the
printer’s configuration page. If not, ask your
network administrator.
5. For Name of printer on that machine,
type in one of the following:
PS for PostScript
AUTO for automatic selection;
use capital letters
6. Click OK to complete the
installation.
4. Double-click on the appropriate
zone (if there are multiple
AppleTalk zones).
Select your Tektronix pr inter and
click OK.
5. At the prompt
Do you want to
capture this AppleTalk Printing
Device?
Note Clicking Yes hides the printer from
, click No.
regular Macintosh users, forcing them
to use NT Server as a spooler, as long
as NT Server allows sharing of this
printer.
6. Click OK to complete the
installation.
End
62
Page 79

PC/WINDOWS SOFTWARE
Setting up a PostScript driver for Windows NT 4.0
Note The Windows NT driver does not support the PhaserMatch application. Refer to Which Windows driver to
install? for information on drivers that do.
You must have your original Windows NT setup diskettes (or CD-ROM) to complete this procedure.
For information on installing a driver for a Windows NT 4.0 client on a Windows NT 3.51 server, refer to the
Tektronix on-line services. See If you need help for instructions on using the on-line services.
1. In the Printers Folder, double-click the Add Printer icon.
2. From the Add Printer menu, follow the Add Printer Wizard instructions until the
Manufacturers/Printers window appears. Click on Have Disk.
3. In the Install From Disk dialog box, do the following:
a. Click Browse.
b. In the Open dialog box select the Drive for the printer's CD-ROM.
c. Select the \WIN95_NT directory under Folders; click OK.
63
Page 80
PC/WINDOWS SOFTWARE
Setting up a PostScript driver for Windows NT 4.0 (cont'd.)
4. Select your printer from the list that appears, then click Next:
■ Tektronix Phaser 600 (standard configuration)
■ Tektronix Phaser 600 Extended Features (Extended Features option)
Note Press and hold down the printer’s button on the front panel for configuration information.
5. Select the appropriate settings in Add Printer Wizard, then click Finish.
6. In the Files Needed dialog box, click Browse and locate the printer’s CD-ROM or installation
diskette; click OK.
7. Select the appropriate settings in Add Printer Wizard, then click Finish.
8. In the Files Needed dialog box, click Browse and locate the printer’s CD-ROM or installation
diskette; click OK.
9. When you are returned to the Properties dialog box, fill in the other fields as desired, then
click OK.
End
64
Page 81
PC/WINDOWS SOFTWARE
Setting up the printer on a network for Windows NT 4.0
To add or update the driver on a Windows NT 4.0 Ser ver or Workstation
Note The Windows NT driver does not support the PhaserMatch application. Refer to Which Windows driver to
install? for information on drivers that do.
You must have your original Windows NT 4.0 diskettes (or CD-ROM) to complete this procedure.
You will need the printer’s IP address for this procedure; it may be available on the printer’s configuration
page. If not, ask your network administrator.
1. Log-in as Administrator or a user with administrator rights.
2. Click on the Start button. Select Settings, then select Printer from the sub menu.
3. Double-click on the Add Printer icon In the Printers dialog box.
4. Select one of these options, then click Next:
■ My Computer Locally installed and managed printer
■ Network Networked printer
65
Page 82

PC/WINDOWS SOFTWARE
Setting up the printer on a network for Windows NT 4.0 (cont'd.)
5. If this is a locally connected printer, click on the port that the printer is connected to:
■ LPTx Parallel-printer connection
■ COM Serial-connected printer
■ Add Port Networked printer
Recommended:
Note If the LPR port is not listed in this box, the Microsoft TCP/IP Printing Services needs to be added to the NT
machine. The original Windows NT distribution diskettes are needed during installation. Click Start,
Settings, Control Panel, Network. Click on the Services tab, then click Add. Select Microsoft TCP/IP
Printing, then click OK and install this service.
If Microsoft TCP/IP Printing Services are not listed in the options box, install the TCP/IP protocol on the
server. This is done from the Control Panel/Network box. Click on the Protocols tab and lick on Add.
Select TCP/IP Protocol and click OK. To apply these changes, restart the Windows NT 4.0 server.
connect via TCP/IP by double-clicking on the LPR Port.
6. Enter the printer’s IP address in the box labeled Name or address of server pro viding lpd.
66
Page 83
PC/WINDOWS SOFTWARE
Setting up the printer on a network for Windows NT 4.0 (cont'd.)
7. In the box marked Name of printer or print queue on that server , enter PS (for PostScript)
in uppercase, then click OK.
8. Click Close in the Printer Ports box.
9. In the Add Printer Wizard dialog box, click the box next to this new port; then click Next.
10. In the Add Printer Wizard dialog box, click Have Disk to add a new Tektronix driver.
11. Type in the path name (CD-ROM or diskette) to the driver files, then click OK.
12. Select the printer model and click Next.
13. If prompted that a driver is already installed for this printer, select Replace existing
driver, then click Next.
14. Type in the printer’s name (any name you want). Click the appropriate box to use this
printer as the default. Then click Next.
67
Page 84
PC/WINDOWS SOFTWARE
Setting up the printer on a network for Windows NT 4.0 (cont'd.)
15. Check one of the following options, then click Next:
■ Shared To share the printer on the network (Click on all platforms that may use
this printer.)
■ Not shared If the printer is a local printer only
16. Select one of these options, then click Finish:
■ Yes Print a test page
■ No Do not print a test page
Recommended
17. Insert the original Windows NT distribution CD-ROM into your computer’s CD-ROM drive.
18. Type in the path name to the requested files, then click OK.
(The files are usually in the
1386
directory for Intel-based Windows NT servers.)
19. If you printed a test page, check if it printed; then click OK.
End
68
Page 85

Macintosh software
Click on the following topics for more information:
■ Which Macintosh driver to install?
■ Custom Install or Easy Install?
MACINTOSH SOFTWARE
69
Page 86

Which Macintosh driver to install?
Macintosh Driver Features Notes
MACINTOSH SOFTWARE
Phaser 600 (Apple 7.1.2) ■ Simple, familiar interface for 7.1.2 users
■ Faster foreground printing
■ Supports PhaserMatch custom profiles
■ Lets you to disable background printing for
printing large files.
LaserWriter 8 (Apple 8.3.2) ■ Required by some applications (PageMaker)
■ Slower foreground printing
■ Custom page sizes
■ ColorSync support
PSPrinter (Adobe 8.3.1) ■ Includes all features of the LaserWriter 8 driver
■ Supports PhaserMatch custom profiles
■ ColorSync support
■ Includes N-Up and Watermark
Phaser 600 GX ■ For use with QuickDraw GX
■ Supports PhaserMatch custom profiles
■ No support for custom page
sizes
■ No support for PhaserMatch
custom profiles
■ Slower foreground printing
70
Page 87

MACINTOSH SOFTWARE
Custom Install or Easy Install?
Installer options Software Description Installed folder
Custom
Install
Easy
Install
Adobe PSPrinter
Driver 8.3.1
Phaser 600 Driver
Phaser 600 GX Driver
Printer Descriptions
Screen Fonts
ColorSync Profile
Samplers
QuarkXPress PDF File
PhaserPrint
Photoshop Plug-in
Adobe Acrobat Reader
LaserWriter 8.3.2
Driver
Manuals *
Printer Utilities *
Network Utilities *
PANTONE Files *
Driver for use with all (non-GX) Macintosh
systems.
Custom driver based on the LaserWriter 7.1.2
printer driver.
Driver for use with QuickDraw GX.
PPDs for use with drivers and applications.
Screen fonts to match the printer’s fonts.
Printer profile for use with ColorSync 2.0.
Color sampler charts and a fonts sampler.
File for use with the QuarkXPress application.
Custom plug-in for printing from Adobe
Photoshop.
Installs the alias to the Acrobat Reader installer
onto your hard disk.
Installs the alias to the Apple LaserWriter driver
installer onto your hard disk.
Acrobat Reader PDF files of the printer’s
manuals.
Printer utility files for controlling printer features.
Utility files for using the printer on a network.
PANTONE Color library files and sampler chart.
System Folder:Extensions
System Folder: Extensions
System Folder: Extensions
System Folder:Extensions:
Printer Descriptions
System Folder:Fonts
System Folder: Preferences:
ColorSync™ Profiles
PhaserTools:Samplers
QuarkXPress
folder:
PDF
Photoshop application folder:
Plugs-ins: Acquire/Export
Installs alias to Acrobat Reader
installer in
Installs alias to the LaserWriter
installer in
PhaserTools
PhaserTools
PhaserTools:Manuals
PhaserTools: Printer Utilities
PhaserTools:Network Utilitie
PhaserTools:PANTONE Files
application
folder.
folder.
s
* Available only on the printer’s CD-ROM.
71
Page 88

MACINTOSH SOFTWARE
Installing printer software for Macintosh
Note Use the installer application on the printer’s CD-ROM or diskettes to install the printer’s standard software. Then,
continue with driver-specific setup instructions for the driver you are using.
1. Insert either the printer’s CD-ROM or Macintosh diskette into the appropriate drive on your
computer.
2. Double-click the Phaser 600 Installer icon. Click Continue until the Easy Install window
appears.
3. Select Easy Install or Custom Install (see Custom Install or Easy Install?
each):
■ Easy Install: Click Install.
■ For details on each item, click Read Me.
■ Custom Install:Select Custom Install (CD-ROM only).
■ Select individual items to install.
■ Click the
■ Click Install when to install the selected items.
I
buttons for infor mation on each item.
72
for the list of files in
Page 89

MACINTOSH SOFTWARE
Setting up the Phaser 600 printer driver
Note Phaser 600 driver is a Tektronix-modified version of Apple’s LaserWriter 7.1.2 printer driver. Use it if you are
using System Software 6.0.7, or 7.0 and later. It is the easiest driver to use.
1. After installing the printer’s software, including the Phaser 600 Driver (Installing printer
software for Macintosh), select Chooser from the Apple menu.
2. Click on the Phaser 600 printer driver icon on the left side of the Chooser.
3. Click on the Zone for your printer. See your network administrator if you have questions.
4. Click on your Phaser 600 printer in the list of printers on the right side of the Chooser. If it
is not in the list, check your hardware connections and which zone you have selected in the
Chooser.
5. Close the Chooser.
73
Page 90

MACINTOSH SOFTWARE
Setting up the Adobe PSPrinter driver
Note The Adobe PSPrinter driver uses printer-specific PPD (PostScript Printer Description) files for information on a
printer’s page sizes and printing options. Follow these steps to use the Adobe PSPrinter driver with a Phaser 600
printer. If the printer is busy, it may take some time to complete this set-up procedure; do this when the printer is
idle. You only have to set up a printer once.
For more information on this driver, refer to the Adobe PSPrinter Manual on the printer’s CD-ROM for more
detailed information on the Adobe PSPrinter driver.
1. After installing the printer’s software, including the Adobe PSPrinter Driver and Printer
Descriptions (Installing pr
2. Select the PSPrinter driver icon.
3. Click on the Zone for your printer. See your network administrator if you have questions.
4. Click on your printer in the list of printers in the Chooser.
5. Click Setup.
inter software for Macintosh), open the Chooser.
6. Click on the PPD for your printer, then click Select:
■ TKPH6001.PPD Standard configuration
■ TKP600P1.PPD Extended Features option
Note Press and hold down the printer’s button on the front panel for configuration information.
7. Close the Chooser.
74
Page 91

MACINTOSH SOFTWARE
Setting up the Phaser 600 GX driver
Note Use the Phaser 600 GX driver if you are using Apple Macintosh QuickDraw GX.
QuickDraw GX does not work with non-QuickDraw GX printer drivers. To print from non-QuickDraw GX
applications with a driver such as the LaserWriter 8, disable QuickDraw GX.
For more information on this driver, refer to Using the Phaser 600 GX Driver.
1. After installing the printer’s software, including the Phaser 600 GX Driver (Installing printer
software for Macintosh), open the Chooser from the Apple menu.
2. Select the Phaser 600 GX driver icon.
3. Click on the Zone for your printer. See your network administrator if you have questions.
4. Click on your printer in the list of printers in the Chooser.
5. In the Connect via field’s pop-up menu, select your printer’s communication method:
■ AppleTalk optionStandard network connection
■ Servers option Selects a shared desktop printer
6. Click the Phaser 600 printer in the list of printers in the Chooser.
7. Click Create (to create a desktop printer). An icon of the printer appears on the desktop with
the same name as the printer selected in the Chooser.
8. Close the Chooser.
75
Page 92

MACINTOSH SOFTWARE
Setting up the Apple LaserWriter 8 driver
Note The LaserWriter 8 driver, available only on the printer’s CD-ROM, uses printer-specific PPD (PostScript Printer
Description) files for information on a printer’s page sizes and printing options. Follow these steps to use the
LaserWriter 8 driver with a Phaser 600 printer.
If the printer is busy, it may take some time to complete this set-up procedure; do this when the printer is
idle. You only have to set up a printer once.
During installation, the LaserWriter 8 driver leaves other versions of the LaserWriter driver (such as 7.x and
6.x) intact, but overwrites an earlier version of the LaserWriter 8 driver.
1. Follow the software installation on Installing printer software for Macintosh. At Step 3, choose
Custom Install; then select LaserWriter 8.x Driver and Printer Descriptions.
2. Install the driver:
a. In the
LaserWriter 8.x Installer
PhaserTools
folder on your hard disk, locate the alias to the
.
b. Double-click on the alias to open the installer application on the printer’ s CD-ROM (the CD-ROM
must be inserted to be accessed).
c. Follow the on-screen instructions to install the driver.
3. Open the Chooser; select the LaserWriter 8 driver icon.
76
Page 93

MACINTOSH SOFTWARE
Setting up the Apple LaserWriter 8 driver (cont'd.)
4. Click on the Zone your printer is in. See your network administrator if you have questions.
5. Select your printer from the list.
6. Still in the Chooser, click the Setup button to see a list of options.
7. The correct PPD file is automatically selected. If it is not, click on the PPD for your printer, then
click Select:
■ TKPH6001.PPD Standard configuration
■ TKP600P1.PPD Extended Features option
Note Press and hold down the printer’s button on the front panel for configuration information.
8. Select the appropriate items under Installable Options, then click OK.
9. Close the Chooser.
End
77
Page 94

WORKSTATION SOFTWARE
Workstation software
Downloadable printer utility files
Note Refer to Printing from UNIX and VMS Workstations for more information on printing from a workstation.
These utility files on the printer’s CD-ROM and diskettes can be used with UNIX and VMS
workstations; they let you set up your spooling system to select the following:
■ Print-quality mode
■ Color correction mode
■ Media size
■ Other printer features
UNIX workstation users can access utility files in any of the following ways:
■ If your system includes a CD-ROM drive, install the files from the printer’s CD-ROM.
Look in the
■ Mount the printer’s diskette and copy the files.
■ Access the Tektronix anonymous ftp site on the Internet at ftp.tek.com.
.bin
direction for workstation-specific files.
■ Download utility files from the Tektronix Bulletin Board Service (BBS); refer to If you need
help for information.
■ Access the Tektronix World Wide Web server on the Internet:
http://www.tek.com/Color_Printers/ Home page
ftp://ftp.tek.com/bbs/<
■ Access sample scripts that are available on-line; refer to If you need help for information.
platform
>/600Utility files
78
Page 95

WORKSTATION SOFTWARE
PhaserPrint software for UNIX (demo)
Optional PhaserPrint™ for UNIX software provides:
■ Driver-selectable printer options
■ Fast raster file printing to Tektronix color printers
■ Fast screen-copy printing to Tektronix color printers
Note The printer’s CD-ROM contains a demonstration copy of the PhaserPrint for UNIX software and an on-line
instruction guide in the
UNIXDEMO
directory. For order information, refer to PhaserPrint.
79
Page 96

PRINTING
BASICS
Phaser® 600 Wide-Format Color Printer
Page 97

PRINTING OVERVIEW
Printing overview
You can print to your printer from Windows-based PCs (personal computers),
Macintosh computers, and workstations. Make sure that your printer is set up with
the appropriate interface port; refer to Connecting the pr
installed the printer’s software, refer to Softw
are installation for instructions before
continuing.
Refer to the following topics for specific information:
■ Printing from a PC
■ Printing from a Macintosh
■ Printing from a workstation
inter. If you haven’t already
81
Page 98

PRINTING FROM A PC
Printing from a PC
You can print from a PC with or without a printer driver. The supported drivers allow
you to select printing features right from your computer. Without a supported driver,
you can make some printing selections from the printer’s front panel; refer
to Using the F
Click on the following topics for more information:
■ Print features quick reference: Windows printer drivers
■ Using the Microsoft PostScript driver with Windows 95
■ Using the AdobePS 4 driver with Windows 95
■ Using the Tektronix printer driver for Windows 3.1
ront Panel.
■ Using the Adobe PostScript driver for Windows 3.1
■ Using the Windows NT 3.5 and 3.51 PostScript driver
■ Using the Windows NT 4.0 PostScript driver
■ Printing From DOS
82
Page 99
PRINTING FROM A PC
Print features quick reference: Windows printer dr ivers
Click on the following topics for individual print feature tables for each driver:
■ Driver for Windows 3.1: AdobePS 3 PostScript Driver
■ Driver for Windows 3.1: Tektronix PostScript Driver
■ Driver for Windows 95: AdobePS 4 and Microsoft PostScript Drivers
■ Driver for Windows NT 4.0
83
Page 100

Driver for Windows 3.1: AdobePS 3 PostScript Driver
Feature Description Driver selection
PRINTING FROM A PC
Media size
■ ANSI A, B, C, D, E
■ ISO A4, A3, A2, A1, A0
■ JIS B1, B2, B3, B4
■ Arch. A, B, C, D, E
■ 30 x 42 in.
■ Custom sizes
Media source
■ Manual Feed
■ Roll Feed
Print-quality modes
■ Standard
■ Enhanced
Selecting media
by size
Selecting media
by size
Pr
int quality
modes
Paper tab
➥ Paper Size
Paper tab
➥ Paper Source
Features tab
➥ Print Quality
84
 Loading...