


Model 515A
Megohm Bridge
Instruction Manual
Contains Operating and Servicing Information
WARRANTY
We warrant each of our products to be free from defects in material and workmanship. Our obligation under this warranty is to repair
or replace any instrument or part thereof which, within a year after
shipment, proves defective upon examination. We will pay domestic surface freight costs.
To exercise this warranty, call your local field representative or the
Cleveland factory, 440-248-0400. You will be given assistance and
shipping instructions.
REPAIRS AND RECALIBRATION
Keithley Instruments maintains a complete repair service and stan-
dards laboratory in Cleveland, and has an authorized field repair
facility in Los Angeles and in all countries outside the United States
having Keithley field representatives.
To insure prompt repair or recalibration service, please contact your
local field representatives.
To insure prompt repair or recalibration service, please contact your
local field representative or the plant directly before returning the
instrument.
Estimates for repairs, normal recalibrations, and calibrations traceable to the National Bureau of Standards are available upon request.

Model 515A Megohm Instruction Manual
0Keithley Instruments, Inc
All rights reserved.
Cleveland, Ohio, U.S.A.


MODEL 515A MEGOHM BRIDGE
CONTENTS
CONTENTS
Section
1.
2.
3.
4.
5.
Page
ii
1
4
15
17
20
29
31
1072R

SPECIFICATIONS
MODEL 515A MEGOHM BRIDGE
SPECIFICATIONS
RANGE: 105 to d5
ACCURACY: (when bridge is operated es described below):
Range, ObnlS
105
co lo7 .012%
107
to 108
to 109
100
109
1o1o ;: :$
1011 eo
1012
1012 to 1013
1013 to 1014
1014 to 1015
ohms with a 7-dial in-line readout.
Standard Deviation (lr)r* Bridge Voltage
10 "
.02%
.03%
.06%
.08%
.16%
.25%
.3%
1.5%
10 "
10 "
10 "
10 "
10 "
100 Y
500 "*
500 v*
Decade
105 to 106
107
10;
lOlO
$1
$f
INPUT: Built-in comparfmenf or optional Remote Test Chamber with Teflon-insulated tri-
axial cable.
GROUNDING: One terminal of unknown is at ground potential.
NULL DETECTOR: Electrometer with sen*itivity of 100 microvoles per division to 1 volt
per division in five decade steps.
Meter is non-linear past l/3 of full scale for
ease in determining null.
BRIDGE POTENTIAL:
Internal: Prom 0 to + 110 volts dc in l-volt steps. External
With Keithley Model 240A or 241 High Voltage Supply, 1000 volts maximum, positive
only.
INTERNAL CHECKS: Built-in zero check anu leatige (guard fo ground) check. Test jacks
for checking wirewound standard resistors.
Bootstrap calibration from wirewound
standards for the 10' through 1012 decades.
ENVIRONMENT:
CONNECTORS: External Operate:
Any i O.S°C span between 20 and 3OOC, 20-50% relative humidity.
Teflon-insulated triaxial panel jack, Gremar 56328.
External Bridge-Potential Input: UHF.
POWER: 105-125 or 210-250 volts, SO-60 Hz, 10 "atts.
DIMENSIONS, WEIGHT:
Standard 19" wide x 14" high rack mounting, 11-l/2" behind front
panel (483 x 356 x 292 m), total depth, 12-314" (324 mm); net weight, 28 pounds
(12,s kg).
13
NOTES : *External supply required above
**Based an theoretical analysis of bridge errors.
10
ohms.
See Instrucrion
Manual
for details on obtaining specified performance.
ii
1072R

GENERAL DESCRIPTION
SECTION 1.
1-l. GENERAL. The Model 515A Megohm Bridge is an
instrument
for measuring resistance from lo4 ohms to
GENERAL DESCRIPTION
Source spans a range from 1 to 110 volts in l-volt
steps.
lOI5 ohms with a limit of error from .05 to 1%. Ie
comprises a solid-state, guarded, electrometer null
detector; an ultra-stable, highly-regulated dc voleage ~o”rce, and B Wheatstone bridge.
c.
Shielded Compartment: Connection to the bridge
is made using a guarded terminal in the shielded
compartment which minimizes noise pickup.
1-2. FEATURES
d. Standardize Mode: This mode can be selected
a. Accuracy Verification: Accuracy is traceable
to the National Bureau of Standards by use of the
Model 5155 resistance standards available as an
for quick calibration of bridge elements eo correct
for slight changes in the standard high megohm
resistors.
optional accessory.
e. Guard Leakage Check: A quick self check of the
b. Selectable Bridge Volcage: An internal voltage guard to ground resistance can be made using test
jacks on the front panel (inside the measuring cow
pWCme”t.
1070
1
GENERAL DESCRIPTION MODEL 515A MEGOHM BRIDGE
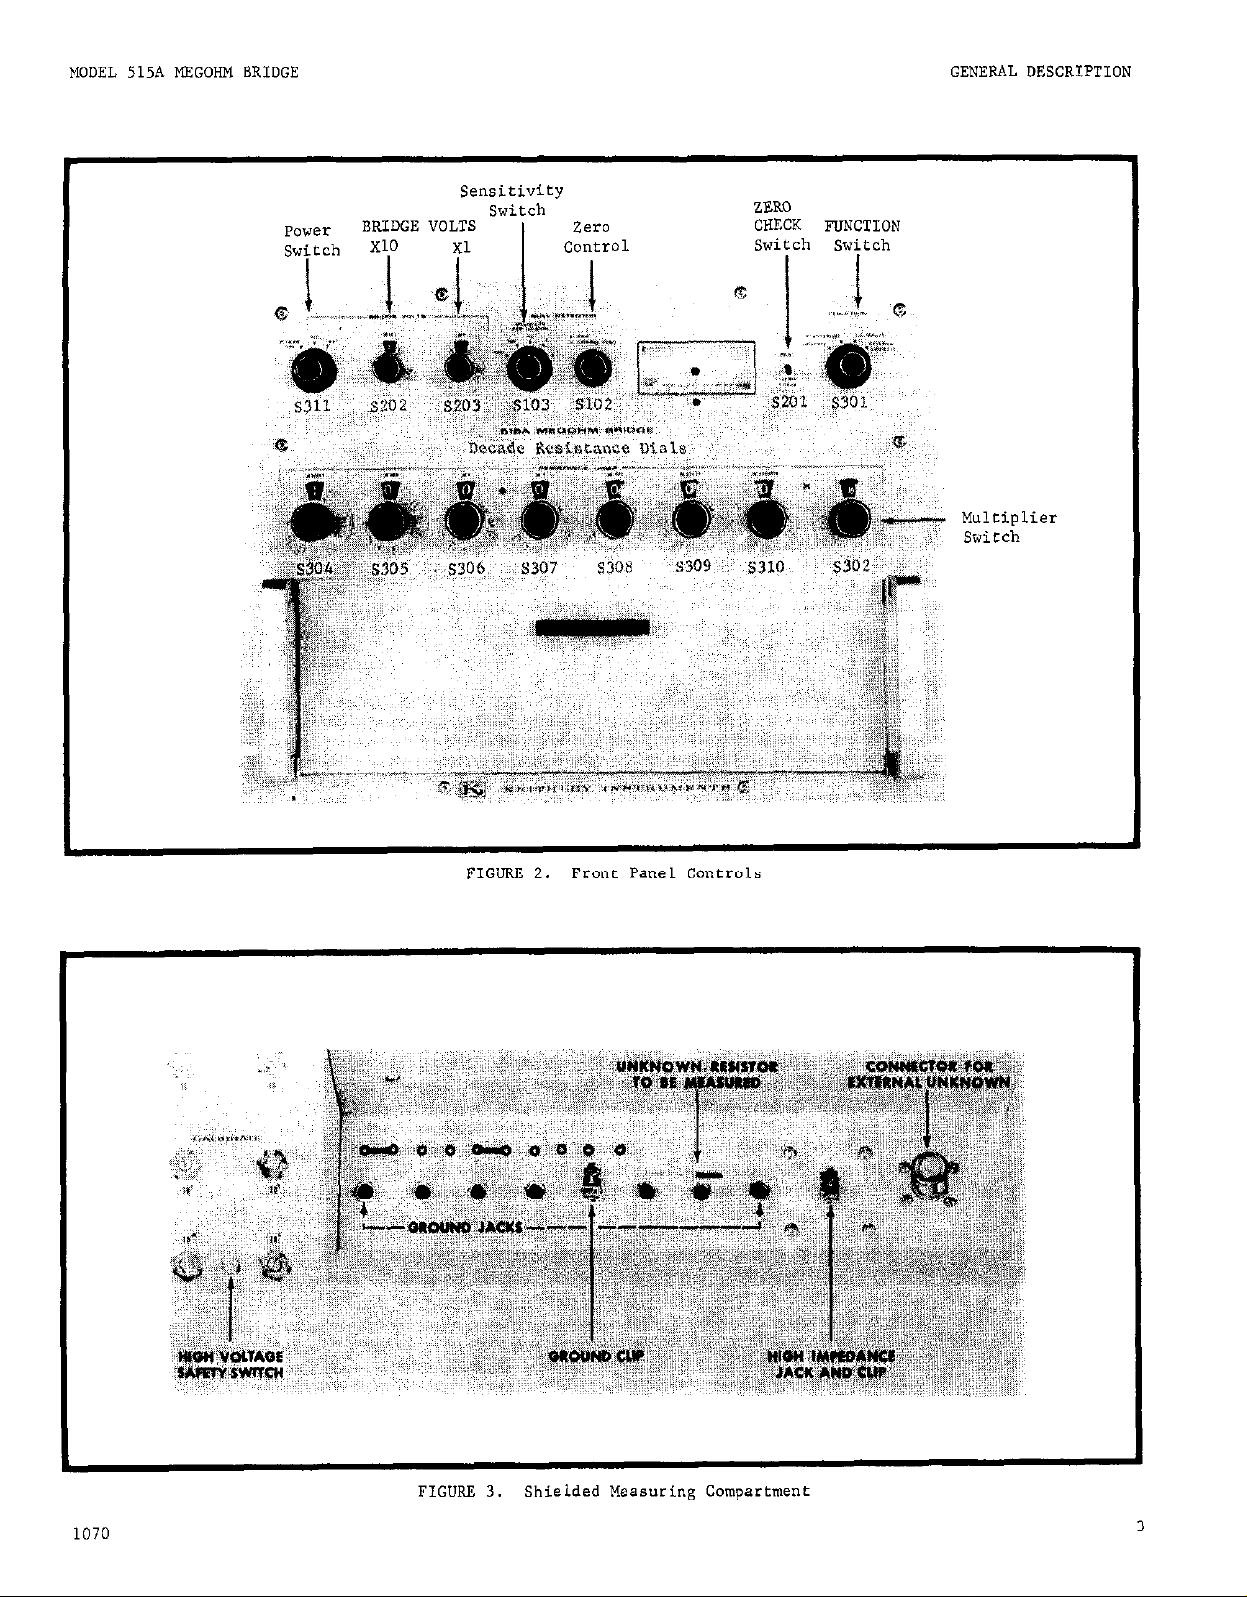
TABLE 1-l.
Front Panel Controls.
Control
Functional Description Paragraph
BRIDGE VOLTS
Power Switch (S311)
Controls power to bridge; Selects INT or EXT.
Xl Switch (S203) Sets voltage in l-volt steps.
X10 Switch (5202) sets vo1rage in IO-volt steps.
NULL DETECTOR
Sensitivity Switch (S103)
FINE ZERO Control (R120)
CO*RSE ZERO Control (5102)
READ/ZERO CHECK (S201)
FUNCTION Switch (S301)
RESISTANCE
x100 (5304)
X10 (5305)
Xl
X.1
X.01 (5308)
x.001
(5306)
(5307)
(S309)
x.0001 (S310)
Selects null detector sensitivity, .I to'lOOOmV/div.
Adjusts meter zero (inner knob).
Adjusts meter zero (outer knob).
Selects READ or ZERO CHECK operation.
Selects mode of operation; 4 positions.
Adjusts bridge balance in steps of 100.
Adjusts bridge balance in steps of 10.
Adjusts bridge balance in steps of 1.
Adjusts bridge balance in steps of .I.
Adjusts bridge balance in steps of .Ol.
Adjusts bridge balance in steps of ,001.
Adjusts bridge balance in steps of .OOfll.
Multiplier Switch (S302) Sets multiplier ratio from lo5 to 1012,
2-2,
al
2-2, a2
2-2, a3
2-2, a4
2-2, a5
2-2, a6
2-2, a,
2-2, as
2-2, a9
2-2, a10
2-2, all
2-2, al2
2-2, a13
2-2, a14
2-2, a15
2-2, a16
Controls and Connections,
TABLE 1-2.
Front Panel Measuring comparement.
Control Functional Description Paragraph
CALIBRATE Controls
106 (R319)
107 (R320)
108 (R321)
109 (R322)
1010
1011 (R324)
(R323)
Safety Switch (~3303)
Adjusts bridge elements in CALIBRATE mode‘.
Provides a safety interlock; rernow~ bridge power when the
2-2,
2-2,
compartment door is open.
INPUT Terminal (5302) Provides a guarded connection to INPUT high.
EXT. INPUT Terminal (5303)
Provides a guarded connection using a triaxial cable
2-1, a
2-1, a
for external inpllts.
Low Terminals Provides a connection to INPUT low when using the guarded 2-1, a
INPUT high terminal.
Tesr Jacks X01-210 Provide various circuit test paints for checkout.
bl
b2
2
1070
MODEL 515A MEGOHM BRIDGE
GENERAL DESCRIPTION
Power
Swftch
Sensitivity
“RIO”,, VOLTS Switch Zero
Control
I Y1
I
ZERO
CHECK FUNCTION
Switch
S”:rch
Multiplier
Switch
FIGURE 2. FronC Panel Controls
FIGURE 3. Shielded Measuring Compartment
OPERATION
MODEL 515A MEGOHM BRIDGE
SECTION 2.
2-1. MEASUREMENT CONSIDERATIONS.
a. Connections.
Shielded Test Compartment. The Test Compart-
1.
ment shown in Figure 3 permits measurement of high
resistance while minimizing noise pickup and the
effects of leakage paths. Input connections can be
made using a triaxial receptacle (EXTERNAL INPUT
5303) or a guarded INPUT high receptacle (5302).
a.) High Megohm Resistors.
can be easily measured by connecting TV the INPUT
receptacle and any one of eight INPUT low resep-
tacles. The receptacles are designed for use with
test clips such as Grayhill 82-l which have a banana plug on one end and a spring clip on the other.
The INPUT low receptacles are spaced one inch
apart for resistors up to 8 inches long. A typical
resistor connection is shown in Figure 3.
b.) External Connections. A teflon-insulated,
guarded, triaxial receptacle (EXTERNAL INPUT 3303)
is provided for external connections. The receptacle is a Gremar Type 56328 triaxial connector
which mates with a Gremar Type 7991-1 triaxial
plug (Keithley CS-69). A? optiQna1 accessory
cable is available (Keithley MaJel 5153) for external connections; a 60" triaxial cable with CS-
69 connector on one end. The Keithley Model 5152
Remote Test Chamber permits external shielded
measurements (with a 60" triaxial cable and CS-69
connector).
Discrete resistors
OPERATION
External Voltage Source. An external voltage
2.
source can be connected to the bridge using the
rear panel UHF coaxial receptacle (5211). This
connector is a Gremar Type 6804 UHF receptacle
(Keithley CS-64) which mates with a Gremar Type
5127 plug (Keithley CS-49).
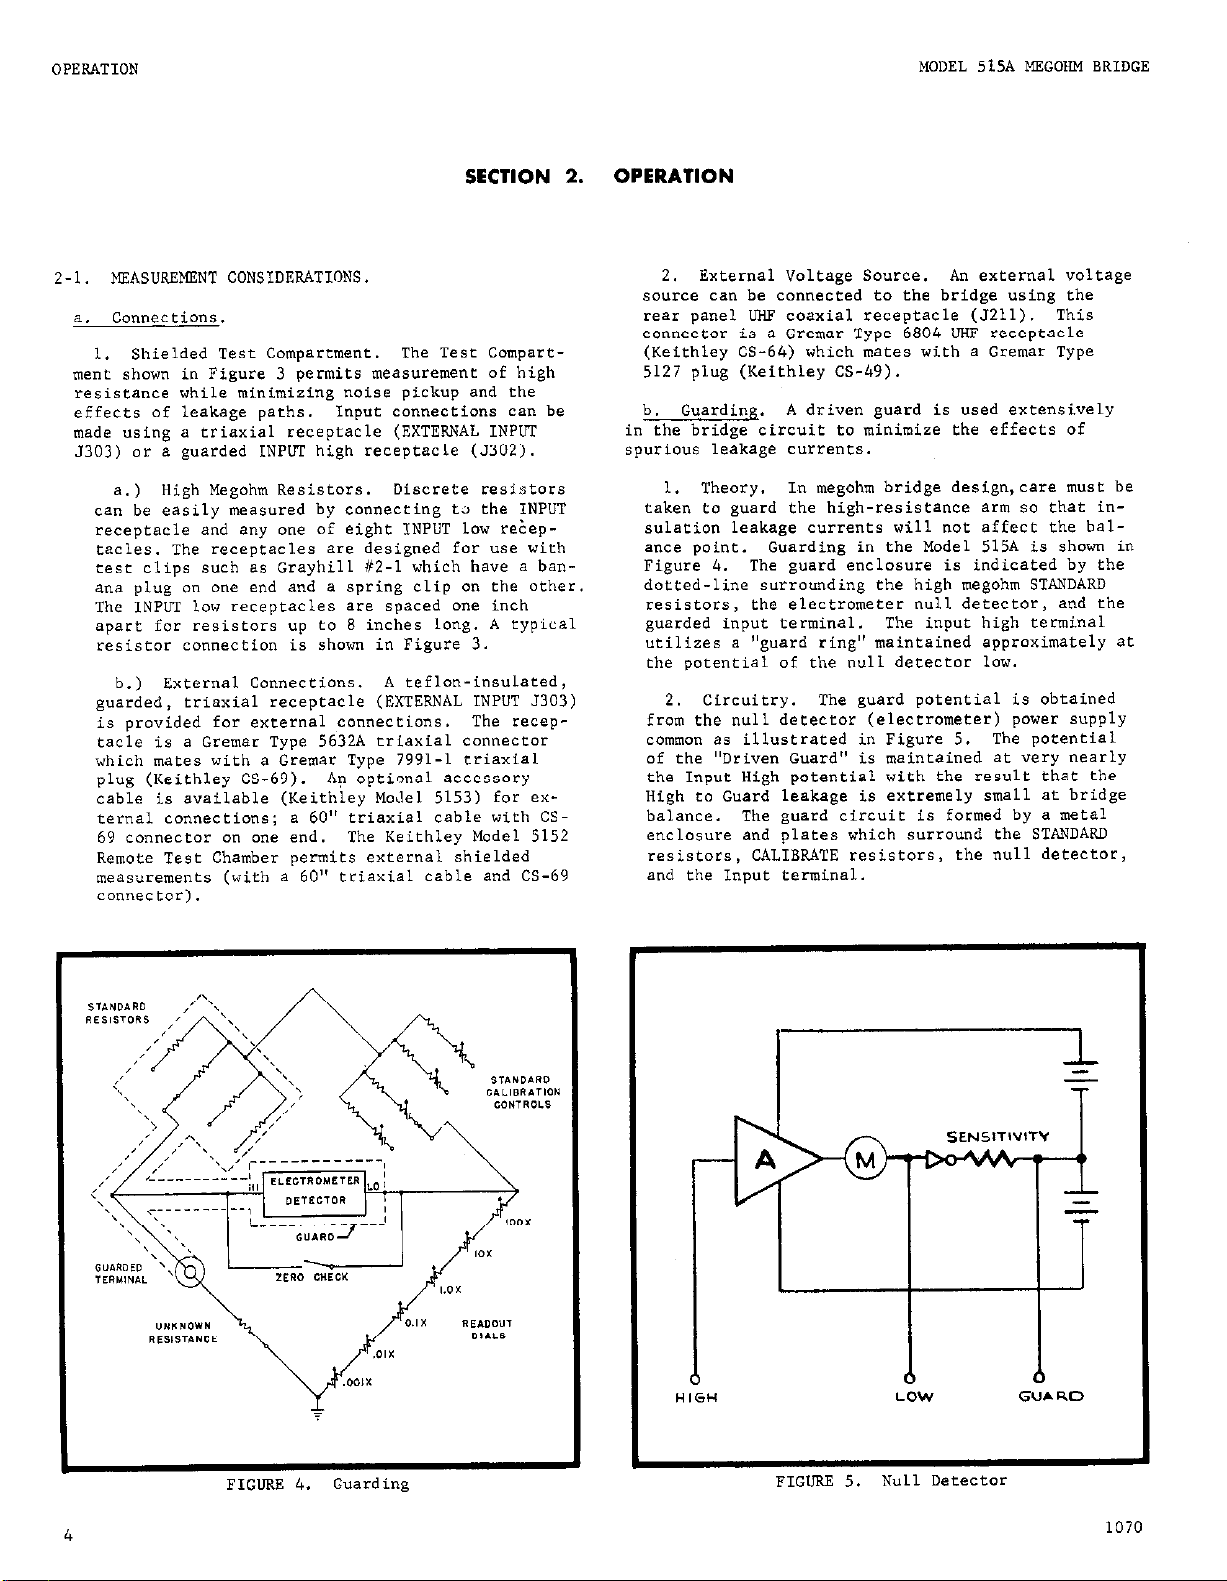
Guarding. A driven guard is used extensively
b.
in the bridge circuit to minimize the effects of
spurious leakage currents.
1. Theory.
taken to guard the high-resistance arm so that insulation leakage currents will not affect the balance point. Guarding in the Model 51% is shown in
Figure 4. The guard enclosure is indicated by the
dotted-line surrounding the high megohm
resistors, the electrometer null detector, and the
guarded input terminal. The inpur high terminal
utilizes a "guard ring" maintained approximately at
the potential of the null detector law.
2. Circuitry. The guard potential is obtained
from the null detector (electrometer) power supply
common as illustrated in Figure 5.
of ehe "Driven Guard" is maintained at very
the Input High potential with the result that the
High to Guard leakage is extremely small at bridge
balance. The guard circuit is formed by a metal
enclosure and plates which surround the STANDARD
resistors, CALIBRATE resistors, the null detector,
and the Input terminal.
In megohm bridge design,care must be
STANDARD
The potential
nearly
FIGURE 5.
Null Detector
1070

OPERATION
3. "se of the Guard.
a.) connections to guard.
(5302) is a guarded receptacle (Gremar, Type
The INPUT terminal
6804)
with a center High contact and an outer Guard
ring. The EXTERNAL INPUT terminal (5303) is a
guarded rriaxial receptacle (Gremar, Type
5632A)
with a center High cmtact, an inner Guard confact
and an outer Low confact. A drawing of the connector construction is shown in Figure
b.) Applications.
The driven guard can be used
6.
for external measurements when it is necessary to
minimize the effects of spurious leakage currents
across the insulation. A rypical external
measurement can be accomplished using Keiehley
Model 5152 Remote Test Chamber and teflon-insulated
triaxial cable. The “se of the Model 5152 is
complerely described in Section 4, Accessories.
c.) Guard to Ground Leakage. The design of the
guard circuit in the Model 515A maintains the Guard
fo Low (ground) resistance greater than 1011 ohms.
The Guard to Ground resistance should be high with
respect to the resistance from floating low to
ground so that the shunting effects across the
Readout Resistance will not be significant. Far
example the worst-case condition would be a Readout Resistance of 10 megohms or lo7 ohms with a
0.02%
tolerance.
If the Guard to Ground fe.sistaxe were 1011 ohms, an additional error of 0.01
% would result.
c. Leakage. The Input terminals of the Model 515A
have been designed using teflon insulation between
High and Guard and Guard and Ground. In order eo
maintain the high insularion resistance, the terminals
must be kept clean and dry.
Preferred cleaning materials include: Chemically pure alcohol, sterile
cotton swabs (to prevent contamination of alcohol),
and a drying agent such as nitrogen. Leakage paths
across the terminal can create intermitrant errors or
difficult bridge balance. The user should also take
care to insure that the unknown resistor, holding
fixtures and case are insulated properly. Glass
envelopes (high.megohm resistors) can be contaminated
by oil and salts from improper handling. Paper base
bakeliee insulation can be degraded by improper
handling and exposure to moisture. The humidity of
the laboratory environment can also affect the measurement of very high resistances. See Specificarians.
d. Noise. Noise pickup from ac electric and mag-
netic fields is minimized by the unit construction
of rhe chassis and the use of a closed, shielded
measuring compartment. When using an external unknown
resistance, care should be taken to:
1. Use shielded cables such as Keithley Model
5153 triaxial cable.
2.
Fasten dawn the cables so that flexure noise
is minimized.
3. Maintain Guard to Ground insulation using
teflon insulation.
FIGURE 6. Triaxial Receptacle
4. Use an external shielded test box such as
Keithley Model 5152 Remote Test Chamber.
e. Accuraw.
1. Specification. The specified accuracy for
measurements on various ranges is valid for the
following conditions.
a.) Minimum Bridge Potential. This potential
is the minimum voltage required for resolution.
b.) Environment. The ambient temperature and
relative humidity must be controlled within
limits stated.
c.) Standardization. The Standardization
procedure should be performed prior to very
critical measurements.
d.) Proper Operating Technique. Care must be
taken when connecting the unknown (See Measure-
ment Considerations, Paragraph 2-1) and balancing
the bridge (See Accuracy Considerations, Para-
graph Z-7).
2. Verification. The Model 515A accuracy can
be verified using the Model 5155 Megohm resistance
standards.
1072R
5

OPERATION
10
3.
Technique for Measuring 10
to 1015 Ohm
Resisrances.
Set Canrrols as Indicated:
BRIDGE VOLTS: 0
FUNCTION SWITCH:
MULTIPLIER:
OPERATE OR EXTERNAL OPERATE
1010, 1011, or 1012
RESISTANCE DECADE DIAL X100: lo
READ/ZERO SWITCH:
Insert unknwn resistor.
ZERO
Set READ/ZERO Switch m
READ and note offset of null deeector with MULTIPLIER
setring to be used in measurement. Allow approx-
imately 15 minutes for reading t” stabilize. The
affser of the null detector is due to offset current
from the null derecror and from stressing of Teflon
insulation surrounding the Hi terminal of the bridge.
Use the offset reading as null for measuring the
unknown.
Ser READ/ZERO Switch to ZERO.
Select the Bridge
potential for the measurement based on desired
accuracy as described in derail in the OPERATION
secfion af the manual. Set READ/ZERO Switch m
READ and balance bridge using Resistance decade
dials.
?IETER NOISE: I” balancing the bridge when measuring
resistances greater than lolo ohms there is meter
noise present due to l/f noise, alpha particle noise,
It may be noted fhat the meter indication has
etc.
a base-line from which meter fluctuations diverge.
The actual null detector reading is this base-line
when balancing the bridge.
NOTE
Care should be taken m allow enaugh time for
bridge to stabilize fc, a reading. This rime will
vary from one measurement to another however, a
minimum time of 15 minures is advisable to decermine final null reading.
2-2. CONTROLS AND SWITCHES.
a. Front Panel.
1. Power Switch (5311). This switch controls
the power to the bridge including the bridge
porenrial and null detector supplies. The INT
position permits a setting of the bridge potential
from 1 to 110 volts using the Xl and X10 BRIDGE
VOLTS switches.
The EXT position connects the
external voltage input (5211) so that a bridge
potential up to 1000 V can be applied “sing an
external voltage supply such as Keithley Model
241.
2.
Xl Switch (S203). This switch permits a set-
ting af the bridge p@zential in l-volt increments
up to 10 volts.
3. X10 Switch (S202). This switch permits a
setting of the bridge potential in lo-volt incre-
nle*tS up to 100 volts.
4. Sensitivity Switch (S103). This switch se-
lects the null detector sensitivity from .l to 1000
milliu0lts per division.
MODEL 515A
5. FINE Control (Rl20).
This control is the
inner knob af a dual-concentric canerol. The FINE
Control permits adjustment of the meter zero.
6.
COARSE ZERO Switch (S102). This switch is
the Outer knob af a dual-concentric control. The
COARSE Switch permits adjustment of the meter zero
in 10 steps.
7.
READ/ZERO CHECK Switch (S201). This switch
selects READ or ZERO CHECK operation for the meter
circuit. In ZERO CHECK position the null deeecmr
High and Low ‘are shorted together.
8. FUNCTION Switch (5301). This switch selects
the mode of Operation in 4 position,
OPERATE,
STANDARDIZE, CALIBRATE, and EXTERNAL OPERATE. A complete
discussion of these modes is given in paragraph 2-3.
9. Xl00 Resistance Switch (5304). This switch
adjusts the “Readout” am of the bridge in steps
of 100.
10. X10 Reeietance Switch (S305). This switch
adjusts the “Readout” am of the bridge in seeps
of 10.
11. Xl Resistance Switch (5306). This switch
adjusts the “Readout” arm of the bridge in steps
of 1.
12. X.1 Resistance Switch (5307). This switch
adjusts the “Readout” arm of the bridge in steps
of .l.
13. X.01 Resistance Switch (S308). This switch
adjusts the “Readaut” am of the bridge in steps
of .Ol.
14.
X.001 Resistance Switch (S309). This switch
adjusts the “Readout” am of the bridge in steps
Of .OOl.
15. X.0001 Resistance Switch (S310). This switch
adjusts the “Reabou:” arm of the bridge in steps
Of .OOOl.
16.
Multiplier Switch (S302). This switch sets
the multiplier ratio from 105 to 1012.
b. Measuring Cmpartment.
1. CALIBRATE Confmls. These controls are used
to adjust the bridge when the FUNCTION Switch is
set to CALIBRATE. The use of these controls is de-
scribed in paragraph 2-4, d (Standardization pro-
cedure).
2.
Safety Switch (5303). This switch is a normally-open interlock which remwee bridge power
when the compartment door is open. The safety in-
terlock is defeated when the FUNCTION switch is set
to EXTERNAL OPERATE.
c. Rear Panel.
117-234V Line Switch (5312). This
switch sets the Model 515A far either 117V or 234V
rms line power,
50-60
Hz.
6
1072R

MODEL 515A
OPERATION
2-3. MODES OF OPERATION.
a. operate.
This mode of operation permits meas-
urements of high megohm resistances when connected to
the INPUT receptacle.
FUNCTION switch to OPERATE.
To select this mode, set the
Either the internal voltage source (bridge potential) or an external voltage
source up to 1000 volts can be used. The safety
interlock switch prevents operation of the bridge
whenever the compartment door is open.
If the unknown
resisCa”ce must he measured externally, “se the External Operate mode.
b. External operate.
This mode of operation permits resistance measurements the same as for the
Operate mode.
To select this mode set the FUNCTION
switch to EXTERNAL OPERATE.
WARNING
When the FUNCTION Switch is set to
EXTERNAL OPERATE the safety inter-
lock feature is defeated. Therefore
the bridge voltage (up to 1000 volts)
is present at ehe Guard circuit at
receptacle 5303.
The user should be
ca”tio”s when “sing very high bridge
voltages. For maximum safety, the
Power Swifch (S311) should be set to
INT when not making a measurement.
c.’ Standardize/Calibrate. These modes of operation permit adjustment of the bridge elements to
compensate for slight variations of the standard high
megohm resistors. To select either made set the
FUNCTION Switch to STANDARDIZE or CALIBRATE as described in paragraph 2-4, d.
2-4.
PRELIMINARY PROCEDURES
1. COARSE ZERO Switch (S102) (Outer Knob). This
switch has eleven positions for adjustment of meter
zero.
2. FINE ZERO Control (R120).
This control provides fine (potentiometer) adjustment of the meter
zero.
c. Warmup. The instrument should be allowed to
stabilize with power on (at least 30 minutes). If
the instrument has been exposed to an extreme ambient
temperature change the warmup time should be extended
fo
24
hours or more.
Standardize Procedure. For critical measure-
d.
ments the instrument should be standardized prior to
each measuremene to compensate for slight changes of
the standard high megohm resistors due to temperature
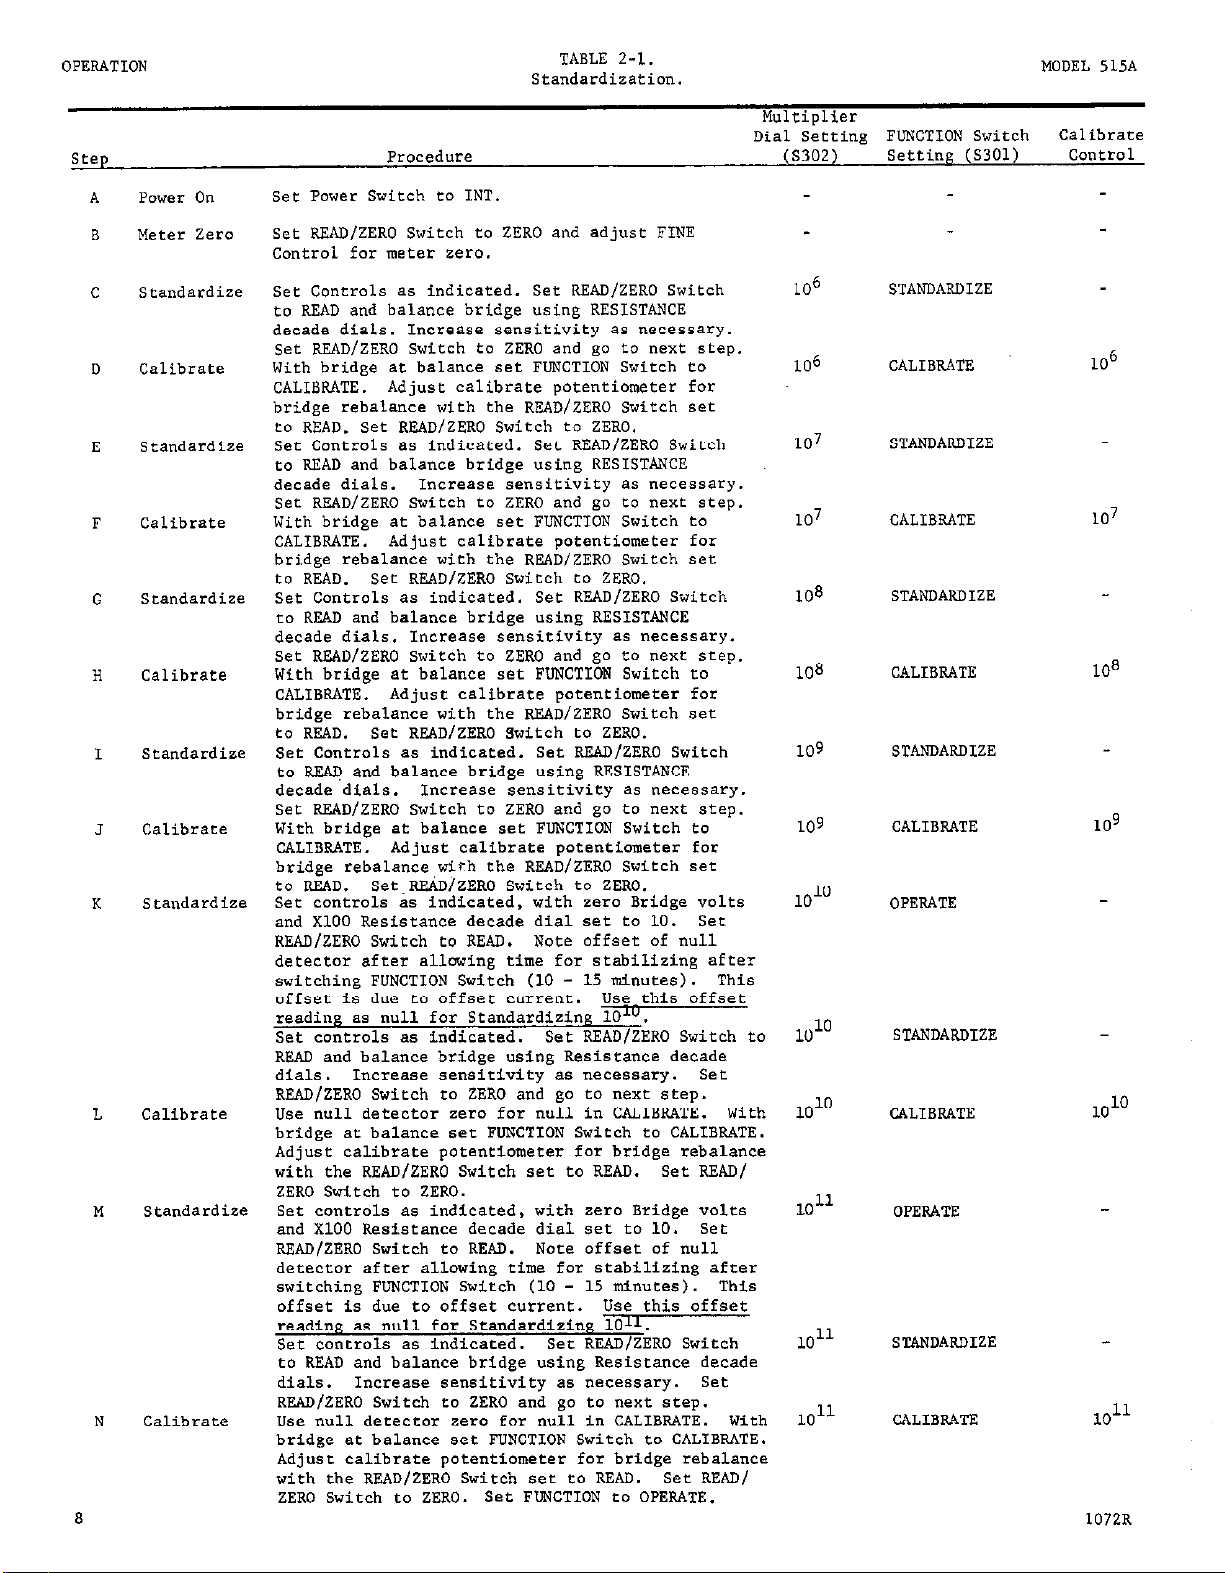
variations and aging with time. The Standardize procedure should be performed as described in Table 2-l.
A complete discussion of the Standardization technique
is given in paragraph 2-5.
2-5. MEASUREMENT PROCEDURE
a. Connect Unknown Resistance. Determine the method of connection to the unknown as discussed in paragraph 2-l.
b. Select the Bridge Potential. The minimum Bridge
Potential should be determined for rated acc”racv as
stated in the specifications. The voltage can b; applied internally (with Power Switch set to INT) or
externally as described in paragraph 2-l.
c. Standardize Bridge. For measurements where the
effects of variations of the bridge elements must be
minimized, the Standardization procedure should be
performed as described in paragraph 2-3, d.
a. Power.
1. Line Voltage. This inscrumenc can be connect-
ed to 117 volt, 50-60 Hz line power when the Line
Voltage Switch (on the rear panel) is set to 117”.
The fuse should be a type 3AG, 1/4A, SLO-BLO. When
using
234V
power, set the Line Voltage Switch to
234V and replace fuse with a type 3AG, 1/8A, SLO-BLO.
2. Accessory Outlet. A three terminal power
outlet (5301) is provided on the rear panel far
operation of an accessory such as an external power
S”PPlY.
and is not controlled by the Power Switch.
3.
This outlet is wired to rhe line power cord
Power Cord. A three wire power cord is supplied (6 feet long). A third prong is used far
earth ground connection for the chassis. An adapter is supplied for converting to a two prong outlet,
but should only be used when a solid, earth-connec-
tion is made by some other means.
b. Meter Zero. The meter circuit can be zeroed by
adjustment of COARSE ZERO and FINE ZERO Controls. The
READ/METER ZERO Switch (S201) should be -et to METER
ZERO.
1072R
d. Meter Zero. Adjust meter zero as necessary.
iiridge Balance.
e.
With the FUNCTION Switch set
to OPERATE, proceed to balance the bridge (set the
READ/ZERO Switch ea READ).
Increase the null sensi-
riviey as necessary to obtain a precise bridge balance.
f. External Operate. If the unknown resistance is
connected externallv the FUNCTION Switch should be set
to
EXTERNAL
2-6.
a.
OPERATE before bridge balance is attempfed.
STANDARDIZE.
Purpose of Standardization Technique. Wirewound
resistors have the greatest accuracy and keep their
calibrations over long periods of time. Values greater
than about one megohm, however, are too large and coo
expensive to be widely used. Film type resistors pravide values up to lOI ohms and higher with reasonable
SUCCESS and this type resistor is used in rhe Model
515A. B”t the value of these resistors changes with
time, sometimes one percenr per year.
The Keithley
Model 51% Megohm Bridge has been designed so that
frequent compensations can be made for variations of
its high-megohm standard resistors. This process is
called Standardization and is carried out as in paragraph 2-4, d.
7
OPERATION
TABLE 2-l.
Standardization.
MODEL 515A
Step
A
B
c
D
E
F
G
H
I
J
K
L
M
N
8
Power On
Meter Zero
Standardize
Calibrate
Standardize
Calibrate
Standardize
Calibrate
Standardize
Calibrate
Srandardize
Calibrate
Standardize
Calibrate
Procedure
Set Power Switch to INT.
Set READ/ZERO Switch to ZERO and adjust FINE
control for meter zero.
Set Controls as indicated. Set READ/ZERO Switch
to READ and balance bridge using RESISTANCE
decade dials. Increase sensitivity as necessary.
Set READ/ZERO Switch to ZERO and go to next step.
With bridge at balance set FUNCTION Switch to
CALIBRATE. Adjust calibrate potentiometer for
bridge rebalance with the READ/ZERO Switch set
to READ. Set READ/ZERO Switch to ZERO,
Set Controls as indicated. Set READ/ZERO Switch
to READ and balance bridge using RESISTANCE
decade dials. Increase sensitivity as necessary.
Set READ/ZERO Switch to ZERO and go to next step.
With bridge at balance set FUNCTION Switch to
CALIBRATE. Adiust calibrate potentiometer for
bridge rebalance with the R&/ZERO Switch set
to READ.
Set Controls as indicated. Set READ/ZERO Switch
to READ and balance bridge using RESISTANCE
decade dials. Increase sensitivity as necessary.
Set READ/ZERO Switch to ZERO and go to next step.
With bridge at balance set FUNCTION Switch to
CALIBRATE. Adjust calibrate potentiometer for
bridge rebalance with the READ/ZERO Switch set
to WAD. Set READ/ZERO Switch to ZERO.
Set controls as indicated, with zero Bridge volts
and Xl00 Resistance decade dial set to 10. Set
READ/ZERO Switch to READ. Note offset of null
detector after allowing time for stabilizing after
switching FUNCTION Switch (10 - 15 minutes). This
offset is due to offset current. Use this offset
reading as null for Standardizing 10'".
Set controls as indicated. Set READ/ZERO Switch to
READ and balance bridge using Resistance decade
dials. Increase sensitivity as necessary. Set
READ/ZERO Switch to ZERO and go to next step.
Use null detector zero for null in CALIBRATE. With
bridge at balance set FUNCTION Switch to CALIBRATE.
Adjust calibrate potentiometer far bridge rebalance
with the READ/ZERO Switch set to READ. Set READ/
ZERO Switch to ZERO.
Set conrrals as indicated, wirh zero Bridge volts
and Xl00 Resistance decade dial set to 10. set
READ/ZERO Switch to READ. Note offset of null
detector after allowing time for stabilizing after
switching FUNCTION Switch (10 - 15 minutes). This
offset is due to offset current. Use this offset
reading as null for Standardizing 1011.
Set controls as indicated. Set READ/ZERO Switch
to READ and balance bridge using Resistance decade
dials. Increase sensitivity as necessary.
READ/ZERO Switch co ZERO and go to next step.
Use null detector zero for null in CALIBRATE. With
bridge at balance set FUNCTION Switch to CALIBRATE.
Adjust calibrate potentiometer for bridge rebalance
with the READ/ZERO Switch set to READ. Set READ/
ZERO Switch to ZERO. Set FUNCTION to OPERATE.
Set READ/ZERO Switch to ZERO.
Set READ/ZERO Switch to ZERO.
Dial Seefing FUNCTION Switch
Set
Multiplier
(S302) Setting (S301)
10’5
106
107
107
108
108
109
109
lOlO
1010
lOlO
loll
loll
loll
STANDARDIZE
CALIBRATE
STANDARDIZE
CALIBRATE
STANDARDIZE
CALIBRATE
STANDARDIZE
CALIBRATE 109
OPERATE
STANDARDIZE
CALIBRATE
OPERATE
STAND*RDIZE
CALIBRATE
Calibrate
Control
106
107
108
lOlO
loll
1072R

MODEL 51524
b. Description of circuit and technique.
I. A simplified bridge circuit with FUNCTION
switch in ST*NDARoIZE is shown in Figure 9.
2. With Resistance Multiplier Switch eef et lo6,
then the bridge null is obtained for the condition
s6,S, = B6/A, where “S,j”, s’S7’1, “B6”, and “A” are
defined as follows:
= Standard resistor (lo6 ohm, .02%) selected
"'6"
“ST?<
"'6"
,,*,,
by resistance multiplier switch set at 106.
= Standard resistor (lo7 ohm, 1.0%).
= 105 ohm, .02%.
= Resistance decade potentiometer adjusted
for null (106 ohms).
NOTE
This technique is used ta determine the ratio of
r?,611 to ‘37” accurately as read by resistance
decade dials.
3. A simplified bridge circuit with FUNCTION
switch in CALIBRATE is shown in Figure 10
4. In the CALIBRATE position, a resistance ratio
network of 1:lO is connected in place of “56” and
*‘S7”. The bridge null is obtained far the condition R = +/A, where “R”, “S7”, and “A” are defined
as follaws:
“Ru
= Ratio network of ‘I:10 with .005% accuracy.
OPERATION
2-7.
THEORY OF OPERATION.
Bridge Theory. The Megohm Bridge has been de-
a.
signed to measure very high resistances using a
Wheatstone Bridge and a sensitive null detector. The
Wheatstone Bridge circuit basically consists of four
arms, identified as A, 8, S, and X as shown in Figure
11. (A
thorough
discussian of bridge meaeurement is
available in Electrical Measurement, F. K. Harris,
Wiley, New York, 1952). The equation for the bridge
at balance can be described by the equation:
x = s x A/B
b. Null Detector Sensitivity. The sensitivity of
the bridge can be described by the equation:
e = Sd
OL
xE
e = sensitivity in volts
d = incremental unbalance (in terme of the unknown)
E = bridge potential
S = standard resistance
X = unknown resistance.
C. Voltage Across the Unknown. The Voltage acr~se
the unknown resistance can be determined for a given
set of conditions where:
E =
bridge potential (bridge volts setting)
standard resistance (multiplier setting)
s =
x =
unknown resistance (approximate value of the
“IlkFlOWn )
“87” = Calibrate potentiometer.
= Resistance decade p@zentiometer adjusted
“A”
previously in b2.
NOTE
This technique is used to set the calibrate
paentiometer “8,”
such that errcx in “57”
is compensated.
5. A simplified bridge circuit with FUNCTION
switch in OPERATE is shown in Figure 11.
6.
In the OPERATE position, the bridge null is
obtained for the condition ST/X = 07/A. when resistance decade potentiometer “A” is properly
adjusted.
7. A simplified bridge circuit with FUNCTION
Switch in OPERATE and resistance multiplier 106
is shown in Figure 8.
TEST JACKS
5201 2 3 4 5 6
oegoouooo
7 8 9 10
JUMPERS (NORMAL POSITION)
FIGURE 7.
Test Jack Identification.
“, =
voltage across x = E x
X+S
2-a. GuARo LEAKAGE CHECK.
The fallowing procedure should be used to verify the
guard to ground resistance. The teet jacks are identified in Figure 7.
Procedure :
1. Connect power cord to line voltage.
2. Place
3.
iumers
3203
and j204
5205
and 5206
set 515‘4 controls
between the followine
as foliows.
test
iacks.
BRIDGE POWER - EXT
MILLI"0l.T PER DIVISION
- 1000
FUNCTION - OPERATE
MULTIPLIER - 105
READ/ZERO CHECK
- ZERO CHECK
Xl00 DIAL - 1
DOOR
4.
Connect Keithley Model 240A Power Supply to
- CLOSED
EXTERNAL INPUT on the rear panel.
Set Model 240A to 1000 volts with
5.
6.
Set READ/ZERO CHECK switch to READ.
Allow
7.
five minutes for the Made1 515A reading to
OUTPUT to +.
stabilize. Reading shall be less than 1000 mV.
NOTE.
The meter indicates the voltage drop acrcse
a 108 resistox in series with the leakage path.
Leakage resistance from GUARD to
GROUND
is deter-
mined as fallows.
Leakage current = (Voltage drop : lo* ohms)
Leakage resistance = (1OOOV + leakage current)
Typical GUARD to GROUND resistance is greater
than 1011 ohms.
9

OPERATION
MODEL 515A MEGOHM BRIDGE
Calibrate Position, lo6 Multiplier.
10
. _ _ _ .._
Operate Position, lo7 Multiplier.

MODEL 515A
OPERATION
2-9. ACCURACY
Standard Deviation.
a.
the bridge eiven in the Soecifications is defined as
the “standard deviation” br lo-level.
- I
CONSIDERATIONS.
The overall accuracy of
In a system
where several components of error make up the total
error, it is grossly unfair (when specifying the
system) to use worst-case limits in describing accuracy.
In many cases, the error so described may have
a probability of less than one in a billion while
human error (usually neglected in such an analysis)
can easily contribute gross errors on the order of
one in a thousand.
It is far more reasonable to use
a limit between one in a thousand (99.9% or 3.3) and
one in ten thousand (99.99% or 3.9) as a specification
of system accuracy.
If the 3rlimits of two or more
normally distributed (n) randomly occurring corn-
poqents of error are summed in quadrature (G12T
1 ) the sum is the 3Uerrar for the group. If
=2
three uniformly distributed (-) randomly occurring
components of error have equal limits, the arithmetic
sum of these limits will closely represent the 30
points of the near normal error distribution generated
by the interaction of these error components. These
TABLE 2-2.
3 r Error Computation.
(All numbers in % of Reading with minimum bridge potential specified and dials between 1 and 10).
31r limits may then be used to sum in quadrature with
the 3s limits of other normally distributed error
components. The effect of error components which are
not randomly distributed but are fixed or have a fixed
rate of change (systematic errors) must be added
directly to the random errors. If one component Of
error occurs more than once and does not have random
change to have changed, it must be summed directly
far the number of times occurred before being added
in quadrature to other errors.
b. Error Analysis. The various factors which can
be identified as sources of error include the follow-
ing .
1. Bridge Arm. The errors pertaining to the
bridge arm consist of the decade dial errors and
the fixed arm to decade ana ratio.
a.) Decade Dial. The decade dial errors include the worst case dial setting within the
decade span used, the inherent resistor error,
the temperature and time stability of the resistors, and the effect of leakage resistance.
Range zero
ohms
105 - 10’
107 108
108
- 109
Check Null
,006 .006 - .03 .OOl .031
,006 ,006 .02 .04 .002 ,009 ,005 .03
.006 .006 .03 .08 ,004 .012
109 - lOlo ,006 .012
1010 - 1011
1011 - 1012 ,006
1012 - 1013
1013 - 1014 .006
1014 - 1015 .06 0.6 .07 .72 .064 .04 .030 .03 0.1
.006 .012 .04 .24
.03 .05 .48 ,022
.006 .12 .07 .72 .064
.24 .07 .72 .064 .04 ,030 .03 .Ol .77 500 *
Temp. volt
Coef.
Coef. Coef.
Temp.
Null
R&b
Bridge
AKIllS
.OlO .03 .OOl
.03 .16 ,006 .015 .015 .03
.OlO
.020
,024 .025 .03 ,001 .49
.04 .030 .03
.020 .03 .OOl .25
Leakage %
Ladderinn
Total
Error
Minimum
Bridge
Potential
10
,001
.056 10
,085
10
.OOl .17 10
10
10
.OOl .74 100
1.1
500 *
* ~a obtain this accuracy specification an external voltage supply is required. Accuracy (30) for
1015
range would be + 6% at a bridge potential of 110 V.
1072R
11

OPERATION
MODEL 515A
b.) Fixed arm to decade arm ratio. The errors
associated with the ratio accuracy include the
basic Standard resistance error, the accumulative
laddering error and the temperature and voltage
coefficient of the Standard resistor.
2. Null Uncertainty. The errors pertaining to
null uncertainty include the null detector sensi-
tivify, the bridge voltage, the bridge ratio, and
the l/f noise.
c. Error Computation. The computation of total
error at rhe 3D-level is sham in Table 2-2 far each
NOTE
The assumptions made to simplify the error
analysis include the following.
individual resistors are within their tolerance limits and have a uniform random
distribution between these limits.
temperature coefficient and voltage coefficient an wirewound resistors are negligible in the face of other errors.
to-peak null detector meter excursions
observed over several fime constants represent
the +3Ulimit of a normally distributed random
null certainty.
1. All
2. The
3. Peak-
d. Error Factors.
1. Worst Case Dial Setting. Far the "optimumuse range" between 1.0000 to 9.9999, the worse
case dial setting would be 1.0999. Since each dial
setting of 9 represents 3 resistors, the total
contribution of dial settings .0999 would be:
3uerror =~(.005)2+(.0025)2+(.001)2 : +.006%.
If this error is added to the base tolerance of .OI%
and divided by the higher resistor value (1.0999),
the result is:
% error = * - .015%
If this error is separated into components, then
the uniformly distributed error = .Ol% while the
normally distributed error = .005%.
2. Resistor Accuracy.
the various dials is given in Table 2-3.
Dial
Resistance Xl00 10 1 .1 .Ol .OOl
TDleratKe
I
1
3. Temperature Coefficient. The temperature coefficients for the Standard resistors are given in
Table 2-4 (assuming a +.5'C temperature).
1.0999
The resistor accuracy for
TABLE 2-3.
Dial Resistor Accuracy.
.OOOl
. 5% .Ol% .Ol% .Ol% .05% .25% 1%
I
I
12
1072R

MODEL 515A MEGOHM BRIDGE
OPERATION
TABLE 2-4.
Leakage Resistance.
4.
since the Readout Dials are shunted by approximately
1011 ohms. The error should be added directly since
it is a relatively fixed systematic errm.
VOltage Coefficient. The valtage coefficient
5.
for each Standard resista is given in Table 2-5.
Voltage Coefficient (l-lOV)/V. in %.
IResistance lo7 1OB lo9 lOlo 1011 101’1
Coefficient -.005
I
6. Null Resolution. Null uncertainty is approxirately the ratio of the smallest voltage drop eceoss
the bridge arm to the null resolution. AS the bridge
ratio departs from 1:l the null uncertainty becomes
mre significant.
-.005
Leakage causes an error
TABLE 2-5.
-.Ol
-.Ol
-.03 -.03
7. Laddering. Laddering is the process of using
the bridge Co calibrate itself. Several errars
compound during this process to increase the error
of the bridge at higher resistances. The process
consists of two modes:
I* CALIBRATE Mode: ~6 = &
where R6 is the 106 miltiplier (20.01%) and R7 is
the 107 multiplier resistor (+O.Ol%), B6 is the
“fixed” arm associated with the 106 multiplier and
D is the dial setting.
In STANDARDIZE Mode: R, =
where
Ra/Rb
is the 1:lO ratio pair (20.005%) and B7
I
I
is the “fixed” arm associated with the lo7 multi-
plier (adjusted for proper ratio).
Thus, B7 = ~6 R,
laddering. The
tion and only 3 resistive error factors ere included,
~6, R6
ey at 106
(use 0.006%) muef be included.
If can be shown that further nullings give
and Ra/Rb. In addition, a nulling uncertain-
x r at the end of the first
diai accuracy
and a nulling uncertainty at low impedance
STANDARDIZE and CALIBRATE.
7 D
87
K
b
0
a
drops from considera-
Teble 2-6 gives the null uncertainty for the caee
where the ratio is 1O:l and the bridge voltage is
10”. (1OO:l @ 100” for lOI4 range and 1OOO:l @ SOOV
for 1015 range).
Null Uncerrainey-Null Detecmr Resolution.
105 106
Range
% Error ,006 .006
N.D. Resolution
In” f<
+
I
*With a 10” bridge potential.
to to to to to
106 107
.05 .05
107
108 109
,006 .006 ,012 ,012
.05 .05 .lO .10
108
TABLE 2-6.
109
1o1o $11
thue adding one mme Ra/Rb uncerraincy, one mre
low impedance null uncertainty and an additional
null uncertainty at IO7 ohms. The voltage acmes
1010
1011
;;12 $3
.03 .12 .24 .6
.25 1.0
1012
1013 1014
:;14 ;;15
1070
13

OPERATION
MODEL 515A MEGOHM BRIDGE
the hi-meg changes from about 10 volts in “STAND-
ARDIZE” pcxition to about 1 volt in ehe next “CAL-
ISRATE” position. Since the voltage coefficiene is
always negative, these errors must be added together
prior to the sunning procedure in quadrature wieh
ocher random variable. The effect of voltage co-
I
Range
Range Time to Calibrate Temp. Change
W/V
,005
,005
.Ol
.Ol
.03
.03
Temperature Errors During Laddering.
TABLE 2-7.
TABLE 2-8.
efficient need only be accounted for one time.
Table 2-7 shows the sum of the voltage coefficienr
errors on each range during laddering. For ladder-
ing the meaaamnent time can be assumed short with
respect to ineernal temperature changes. (The
thermal time constant for the Model 515A is about
10 minutes). Table 2-S shows the total error for
temperature changes
v “C Error “C ErT-21
8”
8V
8”
8”
av
8V
TC Total Error TC *
.04
.04
.08
.08
.24
.24
107
108
Jt
TC represents the “root square sum” or total error for each range due to temperature coefficient errors
during laddering.
1 min
1 min
1 min
2 min
5 min
10 min
Range
r
107
108
109
(a) Normal Distribution.
(b) Uniform Distribution.
(c) Ra/Rb will not change so addition of subsequent errors is direct, not in quadrature.
,:;
.04 ,002 1x.006%
.08 ,004 2x.006
16
124
.48 ,022 5x.006
.72 .064 6x.006
(a;
.006 3x.006
.OlO
o,05°c
0.05%
0.05oc
O.lOC
0.2QC 10 .02% ,022
0.4OC :15 .06% .064
TABLE 2-9.
Lo 2 nulls
4x.006
Hi
3x.006-.012 =.020
3x.006-2x.012 =.024 2x.01 5x.005 = .025
3x.006-2x.012-.03 =.040 2x.01 6x.005 = ,030
.04
.06 .003%
.Ol .0035% ,006
.08 .008%
7. nulls
.006 =.009 2x.01 lx.005 = .005
2x.006 =.012 2x.01 2x.005 = ,010
3x.006 =.015 2x.01 3x.005 = ,015
.002%
nulls ~61~6
(a) (b)
2x.01
RaIRb
4x.005 = ,020
,002
,004
.OlO
RI
9 (a) cc
14 1070

MODEL 515A MEGOHM BRIDGE
CIRC”rf DESCRIPTION
SECTION 3.
3-1. GENERAL. The Model 515A comprises a solid-state,
guarded, electrometer null detector; an ultra-stable,
highly-regulated dc voltage source, and a Wheatstone
Bridge.
3-2. N”LL DETECTOR. A simplified diagram of the
null detector circuit is shown in Figure 12. The null
detector utilizes a Keithley Model 302 Electrometer
Amplifier and a 3 &/division meter (MlOl). Power is
supplied by 212 volt regulated supplies.
graph 3-4.) The Sensitivity Switch (5103) has five
positions which provide sensitivity from 1000 mVi
division to 0.1 mVldivision. The meter will indicate
a center scale (zero) if there is no potential across
the Sensitivity Switch resistors. With switch 5201
set to ZERO CHECK, any offset indicated by the meter
is due to the Model 302 offset voltage.
COARSE (5102) and FINE (R120) zero canrrols the meter
can be adjusted for center scale indication (thus the
zero controls can be used to compensate for amplifier
offset). With switch S201 set to READ, the potential
difference between High and Low causes a current flow
through the meter. A voltage is developed across the
sensitivify resistor such that Ifl= e/Y+, where I, =
meter current, RS = sensitivity resistor and e = unbalance potential.
the meter, and diodes 0103 and DlO4 are used to ob-
tain a non-linear meter response beyond five divisions.
The voleane developed across RlO2 will forward bias
either diode so thet diode so that diode conduction
occurs.
giving a logarithmic meter sensitivity.
The current is shunted around meter thus
Resistor. R102, in series with
(See para-
By use of fhe
The null de-
CIRCUIT DESCRIPTION
tector ‘rDriven Guard” is the Cownon of the 212 volt
supplies. The ac potential of the “Driven Guard”
follows the ac poeential of the input High so that
guarding of rhe input High can be used.
3-3. WHEATSTONE BRIDGE. The bridge circuit utilizes
four resistance’arms identified as Standard Resistor
Arm “S”, Unknown Resistor Arm “X”, Calibrated Resistance Arm “Cl’, and Read-out Re?,isCance Arm “A”.
a. Standard Resistor Arm. The Standard resistors
R304 through R311 are connected to the Multiplier
Switch S302. Resistors R304 and R305 are 0.01% wirewound eypes; resistors R306 and R307 are 1% deposifed
carbon types; resistors R308 through R311 are specially
selected High-Meg types. A 1O:l (.005%) ratio divider composed of R301 and R302 is used in the Stand-
ardization procedure. (See paragraph 2- 4).
b. Unknown Resistor Arm. The unknow,, resistance
“X” is connected at the Input connector (5302 or 3303).
Calibrated Resistance Arm.
C.
resistance arm consists of a 94.5 kilohm, 1% deposited
carbon type in series with a 10 kilohm, wirewound
variable resistor. Resistors R313 through R318 and
potentiometers R319 through R324 are connected to the
Multiplier Switch 5302. The Calibration potentiometers
can be adjusted during the Standardization procedure
and are accessible an the front panel (inside the
shielded enclosure).
d. Readour Resistance Arm.
composed of Resistance Dials S304 through 5310
The calibrated
The Readout Arm is
1070
t*
0
HIGH
READ
ZERO
CHECK
0
LOW
FIGURE 12. Null Detector.
.
DRIVEN
GUARD
15

POWER SUPPLY. ,The payer supply consists of a
3-4.
series regulated supply for Bridge Voltage and a
floating 212 V supply for the null detector circuitry.
T-201 is the power transformer operating from power
line, switch selectable for 117V-234V operation. One
secondary is center-tapped and supplies a floating
plus and minus voltage for the regulator amplifier.
This secondary also drives the isolation transformer
T101. The other secondary is full wave rectified to
supply the unregulated voltage to series pass trans-
istor Q206. Q201 and Q202
form a difference amplifier
which compares the regulated output voltage to a reference voltage supplied by 0203 in a resistance programable power supply with the Bridge volts Adjustment setting a ha current ehru the reference divider
string. Q203 and Q204 are used as amplifier and
driver for Q206, correcting far any change in load
current or line voltage.
The secondary of TlOl is
center-tapped and full-wave rectified to supply unregulated plus and minus voltage to QlOl and Q102 re-
spectively which supply a constant load current. Zener
diodes D103 and D104 set the null detector supply
voltages to a nominal i12 volts respectively. TlOl
is especially well insulated to provide the necessary
insulation of guard to ground in the bridge circuit.
MODEL 515A MEGOHM BRIDGE
External Voltage mode only. Thus if both dials are
set to zero the diode is directly across the bridge.
For an external voltage greater than 100 volts, the
zener will conduct. When using a current-limited
voltage supply (such as Keithley Models 240A or 241)
the diode will limit the voltage to 100 volts and
prevent over-heating of the Dial resistors.
WARNING
If the voltage supply used does not have current
limiting (1O~mA approximately), the zener pro-
tection diode could be overheated causing possible
damage co the Dial resistors.
3-5.
OVER-VOLTAGE PROTECTION CIRCUIT.
The Model 51%
utilizes a zoner diode (D301) eo prevent damage ea the
readout resiseors (Xl and lower) from excessive bridge
voltage from an external voltage source.
The diode is
connected (through auxiliary.contacts on the Xl00 and
X10 dials) across the bridge voltage terminals when in
,
I
C203 -
i 101
R220
r j
’ L-
I
- K218
0201 -, ,.
___ D220
J ---*02,6 R224-
~ 0219
-
FIGURE 13. Null Detector, K-233.
*
.
.
~7201
(““4 .
/D223\
c21:
R230
D2t6 - :.
f
R231 --~
0212 T----- ‘0
+
Cl21?
ivl0
c201
0205
l --
C206 -‘-
FIGURE 14. Bridge Voltage Supply, PC-244
- ‘* D213
1070

MODEL 515A MEGOHM BRIDGE
SECTION 4.
4-l. GEl33UL. The fallowing Keithley accessories can
be used with the Model 515A to provide additional convenience and versatility.
Mndel 5151
Description:
The Node1 5151 is a bench mounting kit. The end frames
provide convenience when carrying the instrument.
End Frames
ACCESSORIES
4-2.
OPERATING INSTRUCTZONS. A separate Insrruction
Manual is supplied with each accessory giving complete
operating information.
Model 5152 Remote Test Chamber
The Model 5152 is a shielded test chamber for remote
resistance measurements. A 60 inch triaxial cable is
provided.
Application:
The Model 5152 can be used for resistance measurements
when the self-contained test compartmenr on the Model
515A is not useable. A separate GUARD eerminal is
provided an the Test Chamber.
Model 5153 Triaxial Cable
Description:
the Model 5153 is a triaxial cable 60” long which
mates with the EXT. INPUT connector on the Model 515.4.
Application:
The Model 5153 can be used for external measurements
which require a shielded and guarded cable.
1070
17

ACCESSORIES
MODEL 515A MFGOHM BRIDGE
Model 241 Regulated High Voltage SUDP~V
he Node1 241 is a very stable, accurate high voltage
over supply especially useful as a laboratory refer-
rice.
,pplication:
'he Model 241 can be used as an external voltage supply
or the Model 515.4 when applications require a bridge
otential from 110" to 1000". The Model 241 can be
asily rack mounted with the Model 515A by use of the
.odel 5154 Cabinet.
pecifications:
Voltage: 0 to 1000 volts dc in O.Ol-volt steps.
CUrrelIt: 20 milliamperes dc maximum.
Polarity: Positive 01 negative.
Floating: 50 volts maximum off chassis ground.
.CCUlUCY: ~0.05% of dial setting or +l millivolt,
whichever-is greater.
*SOLUTION: A "Trim" potentiometer permits interpola-
tion between steps with a reso1urion of better than
100 “icro”olts.
ESETABILITY: ~0.025%.
TABILITY: +0.005% per hour with constant load, line
and ambient temperature.
EMPERATURE COEFFICIENT OF REFiRENCE: 210 ppm/OC.
,INE REGULATION: +0.003% or 1 millivolt far 10% line
change.
,OAD REGULATION: +O.OOS% from no load to full load.
,IPPLE AND NOISE: Less than 1 millivolt rms above 5
HZ.
"'PUT IMPEDANCE: Less than 0.05 ohm at dc.
.ECO"ERY TIME: No load eo full load, less than 1 sec-
ond to raced accuracy.
8VERLOAD PROTECTION: Output is disconnected within
50 milliseconds if current exceeds approximately
24 milliamperes.
:ONNECTORS: Output: Teflon-insulated type UHF type.
'OWER:
IIMENSIONS, WEIGHT:
CCESSORIES SUPPLIED: Mating connectors.
105-125 or 210-250 volts, 50-60 Hz, 105 watts.
7" high x 19" wide x 12" deep,
net weight, 26 pounds.
Model 5154 Cabinet
Description:
The Model 5154 is a rack style cabinet with dimensions
25" high x 21" wide x 16-l/2" deep.
Application:
The Model 5154 can be used to rack mount the Model
515.4 with an auxilliary power supply such as the
Keithley Model 241.
18
Parts List:
Item
NO.
1
2
3
Description
Cabinet 14343c
Panel, Blank 14203B
Cable, UHF-UHF 166398
Part No.
1070

MODEL 515.4 MEGOHM BRIDGE
ACCESSORIES
Model 5155 High Meg&m Resiseance Standards
!scripeion:
ie Model 5155 has been developed t0 verify rhe cali-
cation of the Keithley 515A Meg&m Bridge with trace~ility to rhe Nafionai Bureau of Scanda;ds. These
lits are convenient LO use, since they plug directly
I~O the 515A. The 5155 consists of six individually
leased high megohm resistors with values af 108 thro:h 1013 ahms in decade steps. A certificate is inLuded showing the actual value af each resistor with
I accuracy limited by the maximum accuracy certified
i Naeional Bureau of Standards.
Each resistor’s
mperature coefficient, voltage coefficient and hisfry of measured values is also given.
,ecifications:
3SISTOR V*LUES: Sin resistors 100, 109, lOlO, loll,
1012, 1013 ohms 215%.
:CUPJ.CY: ~0.2% af certified value except 1013 ohms
which is ~0.5% (relative to I1.B.S. certified stanCiZlL-dS).
CABILITY: Less than ~0.1% change in value per thou-
sand haurs.
ILTAGE COEFFICIENT: -.
<MPERAT”RE COEFFICIENT:
03% per volt, nominal.
-0.1% per OC, nominal.
JARDING: Case is a~ guard potential when the resist-
or Standard is used in a Keithlev Model 515A Mee~hm
Bridge.
OS”LATION: Teflon.
DIMENSIONS: Each resistor standard is 4” long x 2”
deep x 1” wide.
WEIGHT: Each resistor Standard is approximately 6
ounces. Six Standards in carrying case, 3-l/2 lbr
SERVICE AVAILABLE: Recertification traceable t0
National Bureau of Standards.
Resistor Installation:

REPLACEABLE PARTS
MODEL 515A MEGoHM BRZDGE
SECTION 5.
5-1. REPLACEABLE PARTS LIST: This section contains
a list of componenets used in this instrument for
user reference. The Replaceable Parte List describes
the individual parts giving Circuit Designation,
Descriptian, Suggested Manufacturer (Code Number),
Abbreviations end Svmbols
A
Cb”ar Carbon Variable
CerD Ceramic Disc
Cer Trinnner Ceramic Trimmer
camp Cmnp0sifion
DCb
Desig.
EAL
ETB
ETT
ampere
Deposited Carbon
Designaeion
Electrolytic, Aluminum
Electrolytic, tubular
Electrolytic, tantalum
F
Fig
GCb
k
P
M
Mfr.
MS
MY
REPLACEABLE PARTS
Manufacturer’s Part
Number. Also included is a Figure Reference Number
where applicable. The complete name and address of
each Manufacturer is listed in the CODE-TO-NAME
Listing following the parts list.
TABLE 5-1.
farad
Figure
Glass enclased Carbon
kilo (10 3,
micro (10-6)
Meg (106)
Manufacturer
Metal Film
Mylar
Number
Number,
end the Keithley Parr
a
P
PC
j ohm
: PlCO (lo-l2)
i Printed Circuit
Paly : Polystyrene
Ref.
i Refere”ce
TC” i Tinner Copperweld
v ; volt
w
ww
i watt
: Wirewound
WWVar i Wirewound Variablt
5-2. ELECTRICAL SCHEMATICS AiW DIAGRAMS. Schematics
and diagrams ere included to describe the electrical
circuits as discussed in Sectian 3. Table 5-2
idenfifies all schematic part numbers included.
5-3. HOW To USE THE REPLACEABLE PARTS LIST. This
Parts List is arranged such that the individual types
of components are listed in alphabetical order. Main
Chassis pares are listed followed by printed circuit
boards and ocher subassemblies.
HOW TO ORDER PARTS.
5-4.
a. Replaceable parts may be ordered through the
TABLE 5-2.
Circuit Designation
Description
t
Description
I
Megohm Bridge Megohm Bridge
Circuit Designation Schematic
PC-233, PC-244 PC-233, PC-244
* *
Sales Service Department, Keithley Instruments, Inc.
or yaur nearest Keithley representative.
b. When ordering parts, include the following
infarmetion.
1. Instrument Model Number.
2. Instrument Serial Number.
3. Part Description.
Schema+zif Circuit Designation.
4.
5. Keithley Part Number,
c. All parts listed are maintained in Keithley
Spare Parts Stock. Any part not listed can be made
available upon request. Parts identified by the
Keithley Manufacturing Cade Number 80164 should be
ordered directly from Keithley Instruments, Inc.
I
Schematic
24820E 24820E
1
I I
20
1070

MODEL 515A MEGOHM BRIDGE
REPLACEABLE PARTS
NULL DETECTOR PARTS LIST
(X-233)
CAPACITORS
Keithley
Value
Rating Type
Mfr.
Code
Mfr.
Part NO. Pare No.
Cl01 .02 &F 1000 " cerLl 56289 loss-s20 C64-.02M
__
Cl02 Not Used --
Cl03 100 pF 40 EAI. 73445 C437ARIGlOO C15O-1OOM
Cl04 100 &F 40 SAL 73445 C437ARIGlOO C150-100M 13
Circuit
Desig.
0101
D102
D103
0104
D105
D106
D107
D108
Type
Transistor, NPN, Case TO-106
Transistor, NW, Case TO-106
Silicon
Silicon
zener
Ze"er
Si1iC.X'
Silicon
-- -- --
Mfr. Mfr.
Keithley
Code Part NO. Part No.
07263 2N3565 TG-39
07263 2N3565 TG-39
01295 1N645 RF-14
01295 lN645 RF-14
12954 lN706 LIZ-1
12954 lN706 02-l
01295 lN645 RF-14
01295 lN645 RF-14 13
0109 Silicon 01295 1N645 RF-14 13
Ill10
0111
0112
Silicon 01295 lN645 RF-14 13
(TG-39*) Transistor, NPN, Case TO-106
(TG-39*)
Transistor, NPN, Case
TO-106
07263
07263
2N3565
2N3565
24220‘4"
24220A*
Fig.
Ref.
1;
Fig.
Ref.
13
13
13
13
13
*Selected. Order from factory.
Circuit
oesig.
TlOl
Ml01
s102
s103
PlOl
JlOl
5102
P102
Transformer
Meter
Rotary Switch, COARSE ZERO
Rotary Switch, Null Detector
Connector,
Connector, Female, 15 Pins
Comector, Female, 15 Fins
Connector, Male, 15 Pins
Type
Male,
Circuit
oesig.
Value
RlOl 10 MO
R102
RI03
R104
R105
12.1 kQ
333 kn
33.3 k!l
3.33 kll
MlSCELwEO"S PARTS
Sensivity ---
15 Fins
Rating Type
lO%, l/Z W CO"P
l%, l/8 w MCF
l%, l/2 w MCF
l%, l/2 w MtF
l%, l/2 w
MtF 07716
Mfr.
Code Part NO.
80164 ___ m-121
80164 ___ ME-86
--- --- SW-294
27264 1625-15P CS-227
27264 1625-15R CS-228
27264 1625-15R B-228
27264 1625-15P CS-227
RESISTORS
Mfr.
Code
01121 EB-1OM
07716
07716
07716
Mfr.
Keithley
Part No.
___
Mfr.
Part No.
SW-292
Keithley
Part No.
RI-10"
CEA-lZ.lkn-1% R88-12.1K
CEC-333kR-1%
R94-333K
CEC-33.3k+1% R94-33.3K
CEC-3.33kQ-1% R94-3.33K
Fig.
Ref.
14
Fig.
Ref.
1072R
21

P.EPLACF.ABLE PARTS
MODEL 515A MEGOHM BRIDGE
RESISTORS (cont'd)
Circuie
Lksip.
R106
RI07
R108
R109
RllO
Rlll
R112
Value
33.3
33.3
2.7
1 kfi
1 k0
1 ki2
1 kfl
R113 1 k*
R114 1
R115 1 kR
RI16
R117
R118
R119
R120
R121
R122
RI23
R124
R125
R126
R127
1 kD
1 kfi
1 k0
1 k0
10 kR
4.7
2.7
700
4.99
4.99
700
15k n 1%. l/8 w
0
n
k#
kfl
kfi
kR*
n
kn
k0
a l%, l/2 w
Rating Type
1%,
l/2
l%,
l/2
1%,
l/2
l%, l/2 w
l%, 112 GI
l%, l/2 w
l%, l/2 w
l%, l/2 w
l%, l/2 w
l%, l/2 w
l%,
If2
1%,
l/2
l%,
l/2
l%,
l/2
5%,2
l%, l/2 w
l%, l/2 w
l%,
l/2
l%, l/2 w
l%, l/2 w
*Nominal value, selected in final test.
w
w
w
w
w
w
w
W
w
Mfr.
Code
McF
07716
MtF 07716
DCb
MtF
91637
07716
MCF 07716
MtF
MtF
07716
07716
MtF 07716
MtF 07716
M-LF
MfF 07716
MtF 07716
MeF 07716
MtF
wwvar
07716
07716
12697
DCb 91637
DCb
DCb 91637
MtF
MtF
DCb
MtF
91637
07716
07'716
91637
07716
TRANSISTORS
Mfr. Keithley Fig.
Part No. Part NO. Ref.
CEC-33.3kR
CEC-33.3k0
R94-33.3K
R94-33.3K
DCF-l/2-2.7kn RlZ-2.7K
CRC-lkn R94-1K
CEC-lkll R94-1K
CEC-1kQ
CEC-lk0
R94-1K
R94-1K
CEC-lkn R94-1K
CEC-lkn
R94-1R
CRC-1kR R94-1K
CEC-1kQ
CRC-lkn
CEC-lk&i
CRC-lkR
62JA-10kR
R94-1K
R94-1K
R94-1K
R94-1K
RP42-10K
DCF-l/2-4.7k0 RlZ-4.7K
DCF-l/2-2.7kR RlZ-2.7K
DCF-l/2-700~7
RlZ-700
CEC-4.99k0 R94-4.99K
CEC-4.99kn
R94-4.99K
DCF-l/2-700D RlZ-700
cm-15&l%
R88-15K
13
Circuit
tIesip.
QlOl
Q102
Circuit
Desip.
c201
c202 .0015 LlF 600
C203 0.1 pF 400
C204
C205
C206
C207
C208
C209
c210
c211
Type
PNP, Case R-110
NFN, Case
TO-106
Value RafinR
0.5
UF
100 UF
100 b
100 p3
100 p
Not Used
20
z
100
0.047
"F
BRIDGE VOLTAGE SUPPLY PARTS LIST
(PC-244)
CAPACITORS
400
v
” CAD 72982
v MY 13050
40
v
40
” EAL 73445
40
” F.AL 73445
40
”
450
v EMC 37942
40
v
100 v
MY
EAL
EAL
EAL
P&y
Mfr.
Code
07263
07263
Mfr.
Code
13050
73445
73445
73445
Mfr. Keithley
Part NO.
S17638
2N3565
Mfr.
Part: NO.
Pal-e NO.
TG-33
TG-39
Keifhley
Part NO.
SMlA-0.5uF C117-.5M
ED-.0015 CZZ-.OOlSM 14
Fig.
Ref.
13
13
Fig.
Ref.
14
SMlA-O.lpF C73-.lM 14
C437AR/GlOO C150-100M
14
C437ARfGlOO C150-100M 14
C437AR/GlOO c150-1OOM 14
C437ARiGlOO C150-1OOM
FP144-20uF
C36-20M 14
14
C437ARfGlOO c150-1OOM 14
Mw9410473
C67-0.047M
22
1072R

MODEL 515A MEGOHM BRIDGE
REPLACEABLE PARTS
DIODES
CirC”it
Desig.
Type
D201 SiliCO”
D202 Silicon
D203 Zt!"er
0204 zener
0205 zener
D206 zener
D207 Silicon
0208 Silicon
0209 Silicon
0210 Silicon
0211 Not Used
0212 Silicon
0213 SiliCO"
D214 Silicon
0215 zener
Mfr.
Code
Mfr.
Part NO.
02735 IN3255
02735 lN3255
04713 lN936
12954 lN718
12954 lN706
12954 lN718
01295 lN645
01295 lN645
01295 lN645
01295 113645
-_
__
01295 IN645
01295
01295
lN645
1~645
12954 lN723 DZ-17
D216 zener 12954 lN723
D217
Silicon 02735
lN3255
D218 Silicon 02735 lN3255
D219
Silicon 02735
lN3255
D220 Silicon 02735 lN3255
0221 Silicon 01295 113645
D222 Silicon 01295
lN645
0223 Silicon 01295 lN645
0224 Silicon 01295 1~645
Keithley
Part NO.
Fig.
Ref.
RF-17
m-17
D7.-5
DZ-18
m-1
DZ-18
RF-14
RF-14
w-14
RF-14
14
14
14
-_
w-14
RF-14
RF-14
14
14
14
14
m-17 14
RF-17 14
RF-17 14
RF-17 14
RF-17 14
RF-14 14
RF-14 14
w-14 14
RF-14 14
Circuit
Lksig.
5211
s201
5201
5202
5203
5204
J205
3206
3207
5208
5209
5210
SL201
SL201
s203
s202
K201a
K201b
T201
K202
Type
Kecepcacle, UHF
'Toggle Switch, ZERO CHECK
Test Jack
Test Jack
Test Jack
Test Jack
Test Jack
Test Jack
Test Jack
Test Jack
Test Jack
Text Jack
Shorting Link
Shorting Link
votary Switch, X1 BRIDGE VOLTS
Rotary Switch, Xl0 BRIDGE VOLTS
Solenoid, ZERO CHECK
Reed Relay, SPST
Tl-a"SfO~~X
Relay, INTERLOCK
MISCELLANEOUS PARTS
Mfr.
Code
91737
80164
71279
71279
71279
71279
71279
71279
71279
71279
71279
71279
71279
71279
80164
80164
-_95348
SO164
_--
Mfr.
*art No.
6804
-__
4352-l-0319
4352-l-0319
4352-l-0319
4352-l-0319
4352-l-0319
4352-l-0319
4352-l-0319
4352-I-0319
4352-l-0319
4352-l-0319
3771-20310
3771-20310
El55
"R406
TR-120
KAllDY
Keithley
Part No.
Fig.
Ref.
CS-64
SW-236 2
TJ-9 3
TJ-9 3
TJ-9 3
TJ-9 3
TJ-9 3
TJ-9 3
TJ-9 3
TJ-9 3
TJ-9 3
TJ-9 3
TJ-10
TJ-10 3
SW-291 2
SW-291 2
SOL-2
RL-25B
TR-120 14
RL-36
3
7.3
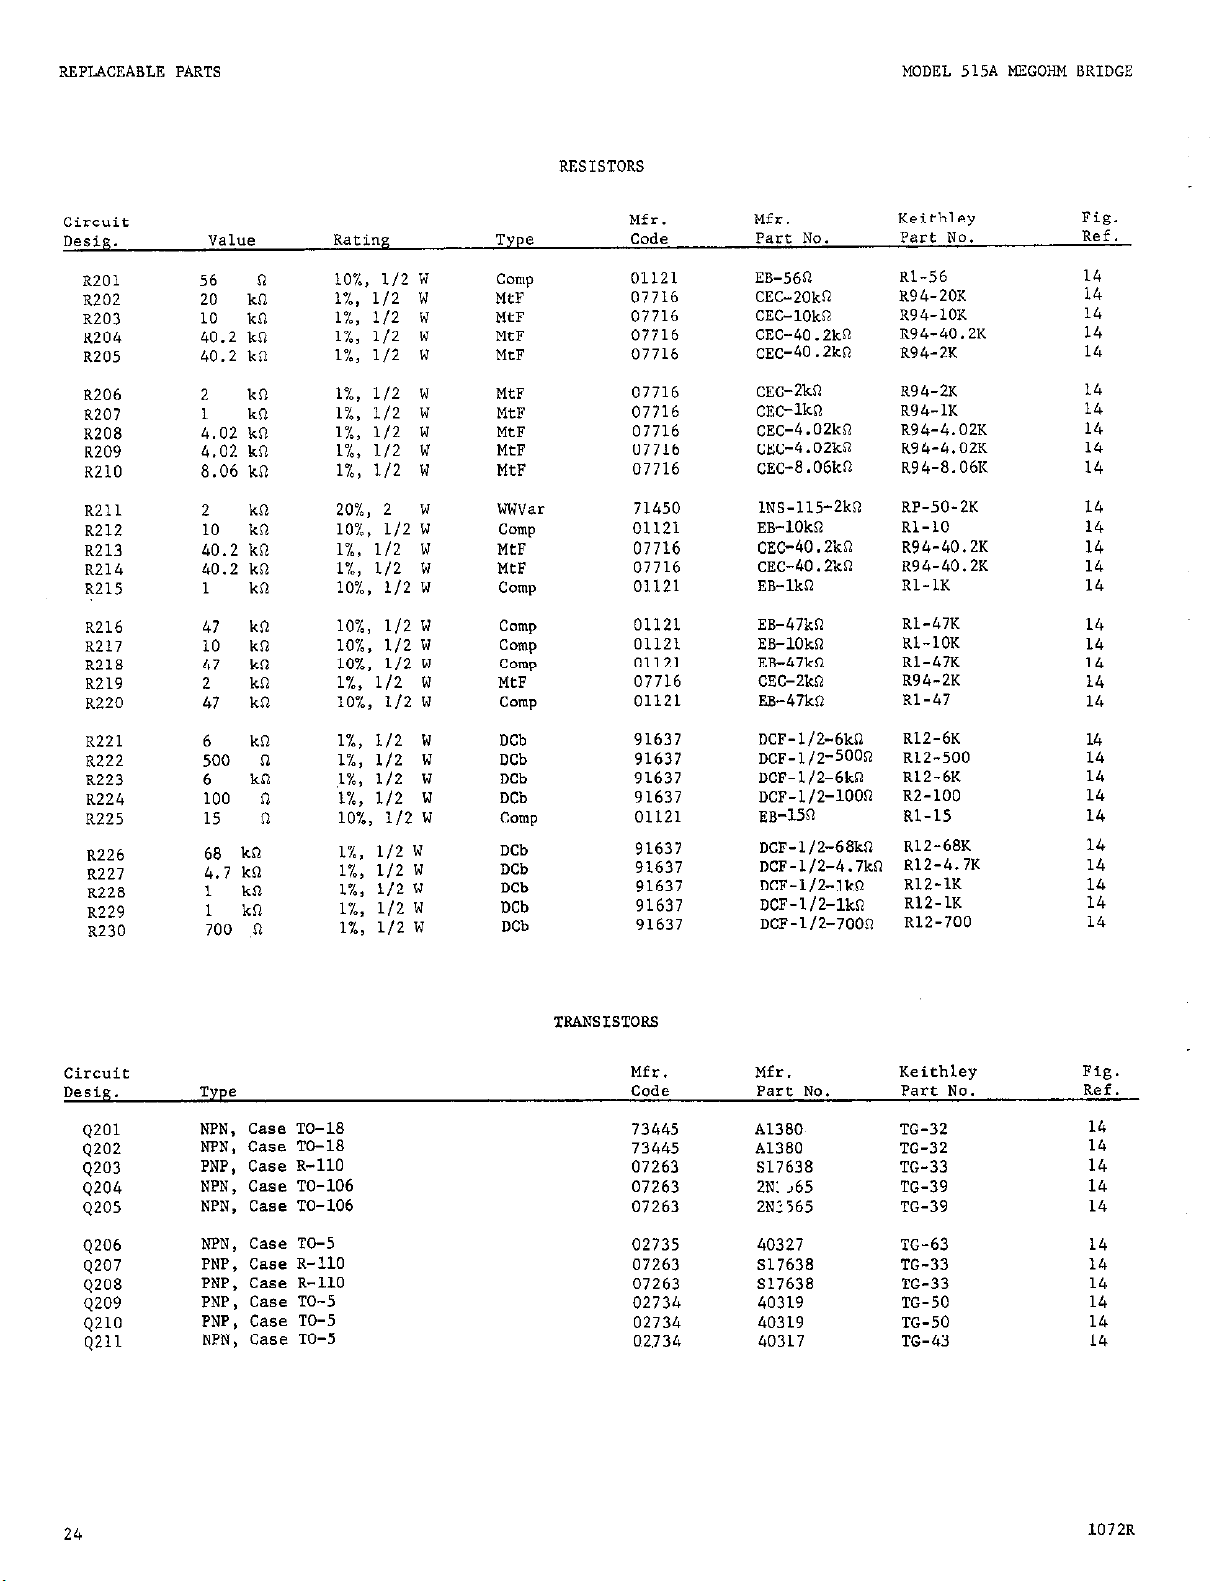
REPLACEABLE PARTS
MODEL 515A MEGOHM BRIDGE
RESISTORS
CitTUif
Desig.
R201
R202
R203
R204
R205
R206
R207
R208
R209
R210
R211
R212
R213
R214
R2l5
R216
R217
R218
R2l9
R220
R221
R222
R223
R224
R225
R226
R227
R228
R229
R230
Value Rating
56 0
20 k.Q
10 kc2
40.2 k0
40.2 kfi
2
kR
1
kfl
4.02 kfl
4.02 k.0
8.06 kfl
2 kI2
10 kn
40.2 kR
40.2 kfi
1
kil
47 k0
10 kfi
47 kR
2 kn
47 kR
6
kn
500 n
6 kR
100 0
15 n
68 k!?
4.7 k0
1
k,?
1
kfl
700 ,n
lO%, l/2 w
l%, l/2 w
l%, l/2 w
l%, 112 w
1%, l/2 w
1%. 112 w
l$ I;* w
l%, l/2 w
l%, l/2 w
l%, l/2 w
20%, 2 w
lO%, l/2 w
1%, l/2 w
l%, l/2 w
lo%, 112 w
lO%, l/2 w
lO%, l/2 w
lO%, l/2 w
l%, l/2 w
lO%, l/2 w
l%, l/2 w
l%, l/2 w
L%, l/2 w
l%, l/2 w
lO%, l/2 w
l%, l/2 w
l%, l/2 w
1%, l/2 w
l%, l/2 w
l%, l/2 w
Type
camp
MtF
MtF
MCF
MfF
MtF
MtF
MtF
MtF
MtF
WWVW
conlp
MtF
MeF
Camp
Camp
camp
camp
MtF
camp
DCb
DCb
DCb
DCb
Camp
DCb
DCb
Deb
DCb
Mfr. Mfr.
Code Part No.
01121
07716
07716
07716
07716
ES-560
CEC-20kn
CRC-lOkQ
CEC-40.2kn
CEC-40.2kO
07716 cm?-2kQ
07716 CEC-lkn
07716
07716
07716
CEC-4.02kn R94-4.02K
CEC-4.02kO
CEC-8.06kO R94-8.06K
71450 lNS-115-2kn
01121
07716
07716
RB-1OkQ RI-10
CRC-40.2kQ R94-40.2K
CEC-40.2kn R94-40.2K
01121 EB-lkn
01121
01121
01121
07716
01121
91637
EB-47kn
EB-1Okn
EB-47kR
CEG2kR
BB-47kn
DCF-l/2-6k0
91637 ~~~-112-50On
91637 DCF-l/2-6kn
91637 DCF-l/2-1000
01121
91637
EB-15n
DCF-l/2-68kR
91637 DCF-l/2-4.7kn
91637 DCF-l/2-lkn
91637 DCF-l/2-1kQ
91637 DCF-l/2-7000
Keiehley
Part No.
RI-56
R94-20K
R94-10K
R94-40.2K
R94-2K
R94-2K
R94-1K
R94-4.02K
RP-50-2K
Rl-1K
Rl-47K
Rl-1OK
RI-47K
R94-2K
Rl-47
RlZ-6K
RlZ-500
RlZ-6K
R2-100
Rl-15
R12-68K
RlZ-4.7K
R12-1K
Rl2-1K
R12-700
Fig.
Ref.
14
14
14
14
14
14
14
14
14
14
14
14
14
14
14
14
14
14
14
14
14
14
14
14
14
14
14
14
14
14
Q201
Q202
Q203
Q204
Q205
Q206 NPN,
0207 PNP,
0208 PNP,
Q209 PNP,
4210
Q211
24
NPN, Case TO-18
WN, Case TO-18
PNP, case R-110
NPN, Case TO-106
NPN, Case TO-106
Case TO-5
Case R-110
case R-110
case TO-5
PNP,
Case
Case
TO-5
TO-5
NW,
TRANSISTOQ
Mfr.
Code
73445
73445 Al380 TC-32
07263
07263
07263
02735
07263
07263
02734
02734
02,734
Mfr.
Part NO.
A1380
Keithley Fig.
Part No. Ref.
TG-32
14
14
S17638 TG-33
14
2N:,65 TG-39 14
2N1565 TG-39
40327 TG-63
S17638 TG-33
S17638 m-33
40319 TG-50
40319
TG-50
40317 TG-43
14
14
14
14
14
14
14
1072R

MODEL 515A MlxOHM BRIDGE
SWITCHING ASSEMBLIES
MISCELLANEOUS PARTS
Mfr. Keithley
Pat? NO.
Part NO.
REPLACEABLE FART8
0301 Diode, zener, loo", SW 04713
OS301
F301
F301
5301
Lamp, 24v, clear
Fuse, SLO-BLO, .25A, 3AC
Fuse, SLO-BLO, l/8.4, 3AG
Receptacle, 3-Prong
03508
75915
71400
___
3302 Receptacle, INPUT Hieh, UHF 91737
3303
P301
Recebtacle; Triaxial; EXT. INPUT
Power Cord, b ft.
RESISTORS
CiPC”it Mfr.
wsig.
It301
R302
R303
R304
R305
R306
R307
R308
R309
R310
R311
R312
R313
R314
R315
Value Rating
10 kR
1O:l Divider Network, .005% 80164
100 kR
10 kn
100 kfl
1
Mn
10
MD
100 MR
109 n
1010
1011 :
1ol2 n
100 kn
94.5 kn
94.5 kR
94.5 kn
I%, 112 w
.Ol%, 1 w
.Ol%, 1 w
l%, l/2 w
1%,2 w
Selected
Selected
Selected
SekCWd
.Ol%, 1 w
1%, l/2 w
l%, l/2 w
l%, l/2 w
Type
Code
MEF 07716
ww 15909
ww 15909
DCb 91637
DCb 91637
-__ 80164
___
___
80164
80164
___ 80164
ww 15909
DCb 91637
DCb 91637 DCF-l/2-94.5k0 R12-94.W
DCb 91637
lN5378-8 DZ-46
1450
PL-53
313.250 FU-17
MDL
1604
6804
5632Al5321Alh CS-67
-__
F"-20
CS-248
CS-64
CO-5
Mfr. Keithley
Part NO. Part NO.
__
2365:;s
CEC-1OkR R94-10K
1252-100kR
1252-lMQ
DCF-l/tlOMI1
DC-2-lOOMi?
___
R154-100K
R154-1M
R12-10M
R14-100M
241598
24160~4
241618
___
241628
1252-lOOk R154-100K
DCF-l/2-94.5kn R12-94.5K
DCF-t/2-94.5kQ RlZ-94.5K
R316
R317
R318
R319
R320
R321
R322
R323
R324
R325
R326
R327
R328
R329
R330
R331
R332
R333
R334
R335
1072R
94.5 kfi
94.5 ks-I
94.5 k0
10
kn
10 kR
10 kR
10 kR
10 k0
10 kR
20 MO
4 MO
4 M*
200 kR
100 ki,
400 k0
l%, l/2 w
l%, l/2 w
l%, l/2 w
20%, 114 w
20%, l/4 w
al%, l/4 w
20%, l/4 w
20%, l/4 w
2o%, l/4 w
.5%, 2 w
.5%, 2 W
.5%,2 w
.5%, 2 w
.Ol%, 2 w
.Ol%, 2 w
.Ol%, 2 w
.Ol%, 2 w
.Ol%, 1 w
.Ol%, 1 w
.Ol%, 1 w
DCb 91637
DCb 91637
DCb
DCb
DCb
91637
71450
71450
DCb 71450
DCb 71450
DCb 71450
DCb 71450
DCb 03888
DCb 03888
DCb 03888
DCb 03888
ww 15909
ww 15909
ww 15909
ww 15909
ww 15909
ww 15909
ww 15909
DCF-l/2-94.5kn R12-94.5K
DCF-l/2-94.5kQ RlZ-94.5K
DCF-l/2-94.5kR R12-94.5K
45-10kn RPEl-1OK
45-1OkR RPEl-1OK
45-1okn
45-1Okn
45-10kiI
45-10kn
PT~OOO-2'JMR
PT2000-10Mn
PT2000-40MR
PT2000-40MQ
1179-2Mn
1179-lm
1179-4m
1179-4im
1252-200kc?
1252-100kn
1252-400kn
RPBI-1OK
RPEl-1OK
RP81-1OK
RPEl-1OK
R52-20M
R52-10M
RSZ-40M
R52-40M
RISS-2M
R155-1M
R155-4M
R155-4M
R154-200K
R154-100K
R154-400K

REPLACEABLE PARTS
MODEL 515A MEGOHM BRIDGE
RESISTORS (cont'd)
CirCuit
Lksig.
R336
R337
R338
R339
R340
P.341
R342
R343
R344
R345
R346
R347
400 kR
20 kR
10
40
40
2 kfi
1 k0
4 kfi
4 k0
200 n
100 n
400 n
R348 400 a
R349
R350
R351
R352
Circ”it
Desig.
S301
S302
40 n
100 MO
Rotary Switch,'FUNCTION
Rotary Switch, MULTIPLIER
Knob Assembly, MULTIPLIER
5303
S304
--S305
Safety Interlock
Rotary Switch, Xl00
Knob Assembly, Xl00
Rotary Switch, X10
Knob Assembly, X10
Rotary SWifCh, xi
Knob Assembly, Xl
s307
Rotary Switch, x.1
Knob Assembly, X.1
S308
Rotary Switch, X.01
Knob Assembly, X.01
5309
Ibtary Switch, X.001
Knob Assembly, X.001
5310
Rotary Switch, X.0001
Knob Assembly,X.OOOl
s311
Rotary Switch, BRIDGE VOLTS
Knob Assembly, BRIDGE VOLTS
S312
Slide Switch, 117-234V
Value Rating Type
k!?
kfi
k0
.Ol%. 1 w ww 15909
.Ol%, 1 W
.Ol%, 1 W
.Ol%. 1 w
.Ol%, 1 w
.04%. l/2 w
.04%, l/2 w
.04%, l/2 w
.04%, l/2 w
.l%, l/2 w
.I%, l/2 w
.l%, l/2 w
.l%, l/2 w
1%. l/2 w
l%, l/2 w
l%, l/2 W
l%, l/2 W
l%, 2
W R353
ww
ww
ww
ww
ww
ww
ww
ww
MCF
MtF
MfF
MtF
Me
MS
MtF
MtF
DCb
Mfr. Mfr. Keithley
Code Part NO. Part NO.
15909 1252-20kn R154-20K
15909 1252-lOk0
15909 1252-40kn R154-40K
15909 1252-40kR R154-40K
01686 1142-2kR R99-2K
01686 1142-1kR R99-1K
01686 1142-4kn R99-4K
Olb86
0771b
07:lb
07716
0771b
07716
07716
07716
07716
91637
SWITCHES
Mfr.
Code
80164
80164
801b4
80164
8Olb4
80164
80164
80164
801b4
80164
8Olb4
80164
ED164
80164
80164
80164
80164
80164
80164
80164
1252-400k0
R154-400K
R154-10K
1142-4k$i
CECTl-2OOn
CECTI-loon
CECTI-400n
CECTl-400R
R99-4K
R135-200
R135-100
R135-400
R135-400
CEC-20R R94-20
CEC-1on R94-10
CEC-400 R94-40
CEC-400 R94-40
DC2-100M0 R14-100M
Keithlry
Part
___
--_
--_
---
-._
___
--_
--_
--___
___
--_
___
___
___
---
-__
_-_
---
Part No.
SW-293
SW-335
SW-94
SW-295
148298
SW-295
14829A
SW-296
14829A
SW-296
148298
SW-296
14829A
SW-296
14829A
SW-296
14829A
SW-297
148388
SW-151
26
1072R


Signalice 1°C.
1933 Heck Ave.
Neptune, N.J. 07753
Johnson, E. F., co.
297 Tenth ‘be. S.W.
waseca, Mi”“. 56093

MODEL 515A
APPENDIX
RESISTANCE DIAL ACCURACY CHECK.
The following procedure should be wed fo verify the
accuracy of the various resistors of the decade dials.
The test jacks are identified in Figure 7.
APPENDIX
1. Set the Model
515A
controls as follows:
FUNCTION - OPERATE
MULTIPLIER - 105
DECADE DIALS - ALL 0
2. Connect ES1 Model 242 Besiscance Bridee between
test jack 5202 and GROUND.
3.
Measure
the resistance of the DECADE DIAL resis-
tors for dial positions 0, 1, 2, 4, and 8 as in
the table
4. Connect
ES1 ?+del 242 between test jacks
X.0001 through X10
3201
and 5203.
5. Measure the resistance Of r‘ne x100 DL4L :esisto25 for dial positions 1, 2,
4, and 8.
x.001
Xl
x 10 2 2M I 10.01%
2
4
8
1 I
2
4 4OOK 10.01%
8 8OOK 10.01%
1 1M : +o.ol%
4 4M / 20.01%
a
2
400
800
lOOK
200K iO.Ol%
8M / LO.Ol%
I 1 100
+o.l%
10.1%
+o.l%
10.1%
AO.Ol%
x 100 -S';-‘I
6. Measure the resis~.nce of the remaining resis-
tors by connecting ES1 Model 242 between the
test jacks specified in the table
1072
CONNECT TO 5205 AND 5201
R353
R312
R305
$4 MO2
** R301
CONNECT TO 5207 AND 5201
CONNECT 3208 AND CHASSIS
CONNECT 5209 AND CHASSIS
CONNECT TO 5210 AND 5209
"*Difference must be less than 50 ppm.
1 1OOM 1 +O.Ol% 1
I 1OOK I *o oi7
1M I +o.ol% I
I
I 1OOK I iO.Ol% I
1OK I 10.01% j
I
. a
29


TEFLON
IN-SW-ATED LEADS 0.h)
SECONDARY (LENGTH :w’f)
FRAME
,
SIMIL~,R TO TRANSFORMER Kl-148
PRiMARY:
4”
INSULATED LEADS.
SPPLIW
SUPPLIW PART NO.
E7PECIPICA~IONS~
f F~JTI?AI
PlmqumoY: so- 60 CPS (SINE WAVE)
nyI
PRIWARY
sec. t1
SOL-. +7 -.-"-.
sec. #3
sec. #b -
mm-
.-.
TR AMS
VE
*.
2s-o-a5v. _khs
FOR MEK rn.
c!!EB
-.
sec. if5
sec. #6

KEITHLEY INSTRUMENTS, INC.
REPAIR & CALIBRATION FORM
MODEL NO. DATE
SERIAL NO.
SHIP INSTRUMENT & FORM TO: FROM:
SALES SERVICE DEPT.
KEITHLEY INSTRUMENTS, INC.
USER'S NAME
RETURN ADDRESS
28775 AURORA ROAD
CLEVELAND, OHIO 44139
CITY
STATE
ZIP
TELEPHONE
REASON FOR RETURN. Check appropriate box.
1.
U Repair and Recalibration
cl Recalibration only. (If repairs atie required to meet specifications, an additional
repair charge will be added to recalibration cost.)
2.
CALIBRATION REPORT. Specify report desired.
(See reverse side of form for details.)
n Calibration Report (Certified Traceable to N.B.S.)
n Calibration Report (Production Calibration Equipment at the factory)
U Certificate of Compliance
DESCRIPTION OF PROBLEM.
3.
(Include a block diagram of instruments connected in system.
Recorder charts or other data would be helpful.)
Is problem constant or intermittent?
OPERATING CONDITIONS.
4.
Control setting (range, multiplier, etc.)
Line voltage used
Temperature
OF
Line frequency used
Temperature variation +
Humidity (high, medium, low)
Other (please specify, such as line transients, etc.)
5. EQUIPMENT USED.
Signal source
Readout device
Cables used
ADDITIONAL INFORMATION. Please indicate any other pertinent information which may help
6.
the Keithley Repair and Calibration Department.
Source impedance
(Recorder, oscilloscope, etc.)
Length
(If repairs or modifications have been
made to instrument by other than Keithley personnel, please specify below.)
OF
REV 0172

CALIBRATIONS AVAILABLE AT KEITHLEY INSTRUMENTS.
EFFECTIVE:
FEBRUARY 1, 1972
Listed and defined below are the four types of calibrations and their associated report
formats which are presently available
at
Keithley Instruments.
They fall into the follow-
ing categories:
Report of Calibration Certified Traceable to the National Bureau of
1.
Standards
2. Calibration Report
Certificate of Compliance
3.
Recalibration
4.
All calibration and certification performed by Keithley Instruments is in accord with
MIL-C-45662A.
Prices shown below are in addition to repair charges for any work necessary to place a
customer's unit into first class condition
prior
to the calibration.

CN515A-2 Sheet 1 of 1
0974
KEITHLEY INSTRU$L~ENTS. INC.
INSTRUCTION MANUAL
CHANGE NOTICE
MODEL 515A MEGOHM BRIDGE
INTRODUCTION: Since Keithley Instruments is continually improving pro-
duct performance and reliability, it'is often necessary to make changes
to Instruction Manuals to reflect these improvements. Also, errors in
Instruction Manuals occasionally occur that require changes. Sometimes,
due to printing lead time and shipping requirements, we can't get these
changes immediately into printed Manuals. The following new change information is supplied as a supplement to this Manual in order to provide
the user with the latest improvements and corrections in the shortest
possible time. Many users will transfer this change information directly to a Manual to minimize user error. All changes or additions are
underlined.
CHARGES:
Page 26, Replaceable Parts, Resistors, Add the following resis-
(1)
tor as follows:
8354.
Page 21, Replaceable Parts, Diodes, Change D105, D106, Dill, Dll2,
(2)
lOOn. la. 1/7W. Camp. 01121. EB-1000. R
0
zLiL!M.
D113. and D114 to read as follows:
(3) Page 22. Replaceable Parts, Resistors, Change R123, R124, R125, and
R126 to-read as follows:
R123, 845a, l%, 1/2W, MtF, 07716, CEC-845R, R94-645
R124, Not Used
R125, Not Used
R126,
Page 22, Replaceable Parts, Transistors, Change QlOl and 4102 to
(4)
read as follows:
QlOl, Not Used-
Q102, Not Used
28776 AVRORA ROAD
TELEX: 98.5489
. CLEVELANO. OHIO 4413s . ,2,8,24S-0400
. CASLE: KEITHLEY

.
qj
REPORT ON CHANGE IN SPECIFICATIONS
8/18/71
MODEL 5,15A
~..___--
Distribution:
All Officers Herron
Nichols
Sheridan
Streets
Kifer
Sutphin
Butler Kronenwetter
Kaplan
Allen Naylor
Cech Angelfne
Nowac
Bartos
Sarkisian
Peabody
Engrq. File
Seifertd
The following change has been approved by an executive committee and
will be implemented according to the.followinq schedule:
Chanqe: Model 515A ACCURACY specifications are,chanqed
from:
ACCURACY: (wxbridqe is operated as described below)
Range,
ohms
Standard
Deviation (lm)**
Bridge
Voltaqe
,. ~..~_. . '
Decade
105
lo7
108
1oq
lOlO
1011
;$
1o14
to lo7
to lo8
to lOlO
9
to loll
;z $2
to 1013
;z $:
.012%
.02 %
.03 %
.06 %
.08 %
.16 %
.25 %
.3 %
.5 %
* External supply required above 10
14
ohms.
10 v
10 v
10 v
10 v
10 v
10 v
10 v
100 v
500 v*
105 -106
107
108
109
1010
;"o::
** Based on theoretical analysis of bridge errors, see instruction
manual for details on obtaining specified performance.
to:
-
ACCURACY:
Range, Standard
ohms Deviation (lo)**
105
107 to 100
108
109
1010
1011
10'2
1013
1014
to 107
to 109
to 1010
to 1011
to 1012
to 1013
to 1014'
to 1015
.012%
.02 %
.03 %
.06 %
08 %
:16 %
25 %
.
3 %
1:5x
Bridge
Voltaqe
10
v 105 -106
1.0
" 10.7
10
v
10 v
10
v
10
v
100
" 1012
500 " *
500 v*
Decade
108
lo-9
1010
1011
Lb;;
* l,:sl:c~r-nnl. ::uppl.y rcquircd #Jl>OVC!
1013
ohms.
** Based on theoretical analysis of bridge errors, see instruction
manual for details on obtaining specified performance.

Page 2
8/18/71
Manufacturinq:
Engineering:
Sales:
Set up manufacturing procedures as necessary to
achieve the revised specification.
Give notice
of the change to applicable,personnel in tech
check-out and repair.
Note revision and change any applicable drawings
for instrument or its parts.
Issue notice of change to entire world-wide saLes
organization, applications engineers, etc.
Change 515A manual and any other applicable manuals
to reflect revision.
,

KEITHLEY INSTRUMENTS. INC.
PRELIMINARY INSTRUCTION MANUAL
MODEL 515A
MEGOHM BRIDGE
This Preliminary Instruction Manual is supplied to permit earliest
possible delivery of your instrument.
It contains Specifications, Operation Instructions, Circuit Description,
Replaceable Parts List and Schematics.
The Final Edition will contain
Servicing and Calibration information to maintain the instrument.
Please detach, fill out and return the Warranty Card attached to the
instrument so that the Final Edition Instruction Manual can be sent to
your attention.
If you have further questions, please contact your
Keithley Representative or the Sales Service Department.
Product Literature Department

m
FREEPRODUCT/UPGRADEINFORMATION
To receive future information on product upgrades and enhancements,
complete this card and mail, or FAX to 440/248-6168.
MODEL
NAME
CCMPANY MAIL STOP
ADDRESS
ClTY
PHONE
EMAlL
For FREE additional information, check below:
SERIAL NO.
TlTLIl
STATEmxxlNCt
FAX
Reference Publications
0 Low Level Handbook
0 Switching Handbook
0 Fes Sel,s”ls Handbook
Job Function (~hcelt One)
DATE
Product Interest(s)

%96-6EIPPHOCINVXIAKI3
09ZI6E
3NI S.LN3MllIJSNI h3?H.L13X
I. What other Keithley products do you currently use?
X03 Od
2.
What effects, devices or phenomena do you measure with this instrument?
4.
Do you hwe any design suggestions concerning this unit?
 Loading...