

Page 1

TEK
USERS
MANUAL
Part No. 061-3216-00
Product Group 07
4405
ARTIFICIAL
INTELLIGENCE
SYSTEM
First Printing APR 1986
Please
Rear
for
CHANGE INFORMATION
Check
of
this
NOTES
at
the
Manual
and
COMMITTED TO
EXCEU£NCE
Page 2
Copyright 1986
United States of America. All rights reserved. Contents of this publication
may not
be
by
Tektronix, Inc., Beaverton, Oregon. Printed
reproduced
in
any form without permission
of
Tektronix,
in
Inc.
the
This instrument,
foreign patents or patent applications. Information provided upon request by
Tektronix, Inc., P.O.
TEKTRONIX
UNIX
is
a trademark of Bell Laboratories.
TOPS-10, TOPS-20, VMS, and RSTS are trademarks of Digital Equipment
Corp.
Portions of this manual are reprinted with permission of the copyright
holder. Technical Systems Consultants, Inc.,
The operating system software copyright information
code.
It
Smalltalk-80
UniFLEX
in
whole or
Box
is
a registered trademark of Tektronix, Inc
can
be
read
is
a trademark
is
a registered trademark of Technical Systems Consultants,
in
part,
may
be
protected
500, Beaverton, Oregon 97007.
of
Chapel Hill, North Carolina.
via the "info" utility.
of
Xerox Corp.
by
one or more U.S. or
..
is
embedded
in
the
Inc.
WARRANTY FOR SOFTWARE PRODUCTS
Tektronix warrants that this software product will conform to the specifications set forth herein,
the specified operating environment, for a period of three
installed by Tektronix, for a period of three
not conform as warranted, Tektronix will provide the remedial services specified below. Tektronix does not
warrant that the functions contained
this software product will be uninterrupted or error-free or that
in
(3)
months from the date of installation.
this software product will meet Customer's requirements or that operation
(3)
months from the date of shipment, or
If
all
errors will be corrected.
when
used
properly
if
the program
this software product does
in
is
of
In
order to obtain service under this warranty, Customer must notify Tektronix of the defect before the expiration of the
warranty period and make suitable arrangements for such service
Tektronix.
specified below, Customer may terminate the license for the software product and return this software product
associated materials to Tektronix for credit or refund.
This warranty shall not apply to any software product that has been modified or altered by Customer. Tektronix shall
be
obligated to furnish service under this warranty with respect to any software product
environment other than that specified or
when the software product has been integrated with other software
time or difficulty of analyzing or servicing the software product or the problems ascribed to the software product.
TEKTRONIX DISCLAIMS ANY IMPLIED WARRANTIES OF MERCHANTABILITY OR FITNESS FOR A
PARTICULAR PURPOSE. TEKTRONIX' RESPONSIBILITY TO PROVIDE REMEDIAL SERVICE WHEN
SPECIFIED, REPLACE DEFECTIVE MEDIA OR REFUND CUSTOMER'S PAYMENT
EXCLUSIVE REMEDY PROVIDED TO CUSTOMER
BE
LIABLE
WHETHER
If
Tektronix
FOR
TEKTRONIX
is
unable, within a reasonable time after receipt of such notice,
in
a manner inconsistent with the Users Manual
FOR
BREACH
ANY INDIRECT, SPECIAL, INCIDENTAL OR CONSEQUENTIAL DAMAGES IRRESPECTIVE
HAS
ADVANCE
NOTICE
OF
THE
in
accordance with the instructions received
if
the result of such integration increases the
OF THIS
POSSIBILITY OF
to
provide the remedial services
a)
that
WARRANTY.
SUCH
DAMAGES.
is
used
in
and
documentation or
IS
THE SOLE
TEKTRONIX
and
an
operating
WILL
from
any
not
AND
NOT
OF
PLEASE FORWARD ALL MAIL TO:
Artificial Intelligence Machine
Tektronix, Inc.
P.O. Box 1000 M.S. 60-405
Wilsonville,
Oregon 97070
Attn: AIM Documentation
b)
Page 3
MANUAL REVISION STATUS
PRODUCT: 4405 ARTIFICIAL INTELLIGENCE SYSTEM
This
manual
REV
supports
DATE
the
following versions
of
this
product:
Serial
DESCRIPTION
Numbers
8010100
and
up.
APR 1986
Original Issue
4405
USERS
Page 4

Table of Contents
SECTION 1 INTRODUCTION
ABOUTPRELIMINARYMANUALS ...................................................................................
ABOUT THIS MANUAL ...... ............... ..... ........
YOUR QUALIFICATIONS ..................................................................................................
UNPACKINGTHE4405 ........................................................................................................ 1-2
OVERVIEWOFTHE4405
GENERALINFORMATION ................................................................................................ 1-2
4405HARDWAREOVERVIEW .........................................................................................
The 4405 Display/CPU ........................................................................................................
The 4405 Keyboard .............................................................................................................
The 4405 Mouse
THE 4405 STANDARD MASS STORAGE UNIT
4405 STANDARD AND OPTIONAL SOFTWARE ............................................................ 1-11
STANDARDSOFTWARE .................................................................................................
Smalltalk-80 .......................................................................................................................
The 4405 Operating System .............. ............. ........................ ........... ............. ...................
4405 OPI'IONS ..................................................................................................................... 1-12
Additional 2 MB Physical Memory . ........... ...... ....... ....
Additional 4 MB
ETHERNET® Interface ...................................................
LISP ........................................................................................................................... 1-12
Franz
Common
PROLOG ............................................................................................................................. 1-12
EMACS ................................................................................................................................ 1-13
Other Options .... ........... ........................ ........................ ............. ........... ............. ........... ........ 1-13
Mass
4405 DOCUMENTATION ................................................................................................... 1-13
STANDARD
The
An Introduction to the Smalltalk-80 System ..................................................................... 1-13
The
4400 Series Assembly Language Reference .............. .............
4400 Series 'c' Language Reference ............. ........................ ........... ................................ 1-14
OOCUMENTATIONOFOPI'IONS .................................................................................. 1-14
OPTIONAL DOCUMENTATION ..................................................................................... 1-14
Smalltalk-80 Documentation .............................................................................................. 1-14
Service Documentation ........... ........................................................................................... 1-15
The
The
LISP
Storage Expansion ........... ........... ..................................... ........... ............. ........... ........ 1-13
4405 User's Manual (This Book) ............................................................................... 1-13
4400 Series Operating System Reference
4405 Field Service Manual .................... ........................................................... ........ 1-15
4405 Component-Level Service Manual .................................................................. 1-15
..
.... ........... .... ....... ........... ......
Pllysical Memory ..... ..................................... ......... .................................. 1-12
..
...
........ ..... ........
DOCUMENTATION .................................................................................... 1-13
.................................................................................................... 1-2
...
........
...
...
........ ..... ........... .... .... ..... ........ ...........
...
........ ............. ..... .... ........... .... ... .... .... ..........
..
............. ..... ...... ..... ...... ........... .... ....... ...
...
..........
...
........ ............. ......... .......... 1-12
: .................................................. 1-12
........ ........... ....... ...... ..... ........ ..... ...... ........... .......... 1-12
Manual..
........ ..... .... ....... .... .... ..... .... .......... 1-14
...
...... ............... ........... ........ 1-14
...
.......
1-1
1-1
1-1
1-3
1-3
1-7
1-7
1-8
1-11
1-11
1-11
SECTION 2 THE FIRST TIME
INTRODUCTION ...................................................................................................................
COMMENTED TRANSCRIPT
TURN ON THE 4405
FII...ES
MOVING AROUND IN THE DIRECTORY ....................................................................... 2-4
SOME
AND DIRECTORIES ................................................................................................ 2-2
sheU
FEATURES ...................................................................................................... 2-5
history .................................................................................................................................. 2-5
Command Line Editing ....................................................................................................... 2-7
..
OF
SESSION
..... ........ ....... .... ........... ........... ......... ...... ....... .... ..... ...... ........... ............
..
........... ....... ...... ..... ...... ............. ........... ..........
Table
of
Contents-l
2-1
2-1
2-1
Page 5
The
shell Environment ............................................................................... .... ..................... 2-9
Environment Variables ...................................................................................................... 2-9
Aliases .............................................. ........................ ......... ................................. ..............
Saving
CONTROLLING
ANSI
Other
RS-232 Terminal Emulation ...................................... .......... ............ ....... ........... ........ ........ 2-12
ENDING
Definitions ................................ .................................. ...................... ............. ........ 2-11
THE
TERMINAL
Commands
Terminal Attributes ................................................................. ............. ................... 2-12
THE
............................................ ................................................................... 2-12
SESSION
. ................... ......... .................... ........... ........ ................ ................ 2-13
EMULATOR
........................................................... 2-12
2-10
SECTION 3 USING THE
INTRODUcrION
POWER
POWER-UP
BOOTING
THE
CHECKING
USER
SETTING
STOPPING
STOP
POWER
THE
OVERVIEW
COMMANDS
MANUAL
FILE
\VII...D
MULTI-TASKING
USER
FILE
FILE
ON
LOGIN
INITIALIZATION ................................................................................................... 3-2
PASSWORDS
THE
.................................................................................................................................... 3-3
OFF
OPERATING
Options .......................................................... ..................................................................... 3-4
Arguments
Options
Directory Contents
Moving Around
Adding
copy ....................................................................................................................................
create ..................................................................................................................................
edit
link
list ......................................................................................................................................
move
remove ...............................................................................................................................
rename ................................................................................................................................
compare ................................................................................. ........................ .....................
dump
filetype .......................................................................................................... .....................
find ............................ ~ ........................................................................................................
That
STRUCfURE
and Removing Files ............ ........... .......................... ......... ............... .............. .......
CARD
COMMANDS
MANIPULATION
.....................................................................................................................................
.....................................................................................................................................
..................................................................................................................................
PROCESSING
..................................................................................................................................
................................................................................................................... 3-1
AND
SYSTEM
SELF-TEST
THE
SYSTEM
PROCESS
THE
PASSWORD
SYSTEM
............................................................................... ................. ........... ....... ..... 3-3
SYSTEM
........................................................................................................................ 3-3
AND
and
Parameters .............. ............. ............................... ................. ......... ..... ....... 3-4
Take
SYNTAX
The
EXPANSION
4405
BOOT
AND
... ..... .... ......... ................... ....... ...... ..... ...................... .................. 3-1
........................................................................................................ 3-2
.................................................................................................... 3-2
................................................................................................... 3-2
AND
COMMAND
Arguments .......................................................................................... 3-5
CONVENTIONS
............................................................................................................ 3-5
;-;
dir
...
Directory Tree ..................................................................................
....... ........ .................. ...... .......................................... .............................
BY
FUNCfION
.....................................................................................................
...................................... ......... ............. ........... ........................ ............
........... ......................................................................... 3-1
BOOT
FILE
.............................................................................. 3-1
................................................................................ 3-2
UTILITIES .................................................................. 3-3
SYNTAX
..................................................................... 3-4
...... ..... ................... ......... ...................................... 3-5
....... ............. ............... ................ ........ .................... ..............
............................................................................................... 3-7
.................................................................................
3-6
3-6
3-7
3-7
3-7
3-7
3-7
3-8
3-8
3-8
3-8
3-8
3-8
3-8
3-8
3-8
3-8
3-8
3-8
Table
of
Contents-2
Page 6

info ..................................................................................................................................... 3-9
touch .................................................................................................................................. 3-9
tail ...................................................................................................................................... 3-9
...
DIRECTORY MANIPULATION . ............. .......................... ........................ ...........
....... 3-9
chd ...................................................................................................................................... 3-9
crdir .................................................................................................................................... 3-9
dir ....................................................................................................................................... 3-9
path .................................................................................................................................... 3-9
..
SYSTEM ACCESS AND STATUS
............. ......... ............. ............................................... 3-9
date ..................................................................................................................................... 3-9
dperm ................................................................................................................................. 3-9
exit ..................................................................................................................................... 3-9
help ..................................................................................................................................
3-10
login ................................................................................................................................. 3-10
owner ............................................................................................................................... 3-10
password .......................................................................................................................... 3-10
perms ................................................................................................................................ 3-10
status .................... ............... .......................... ......... ............... ........................................... 3-10
stop ................................................................................................................................... 3-10
DISK MANAGEMENT .................................................................................................... 3-10
backup .............................................................................................................................. 3-10
diskrepair ...... ........... ........................ ................................................................................ 3-10
format ............ ....... ........... ...................... ........ ................................................ .............. ..... 3-10
free ................................................................................................................................... 3-11
restore ....... ............. ............. ....... ...... ................................... ........... .................................. 3-11
COMMAND EXECUTION .............................................................................................. 3-11
echo .................................................................................................................................. 3-11
int ..................................................................................................................................... 3-11
jobs ................................................................................................................................... 3-11
script ............. ........... ...................... .............................................. .... ...................... .......... 3-11
shell .................................................................................................................................. 3-11
wait .................................................................................................................................. 3-11
COMMUNICATIONS ......... ............. ..... ........ ................ ................... ................................ 3-11
commset ................................................................... ........................................................ 3-11
conset .......... ........... ............... ......... ............... ...................... ................ .......... ................... 3-11
remote ... .... ....... ........... ........ ......... ........... ............................................ ............................. 3-12
PROORAM DEVELOPMENT ...................... ........... ................................. ............. ....... ... 3-12
asm ................................................................................................................................... 3-12
cc ...................................................................................................................................... 3-12
debug ................................................................................................................................ 3-12
headset ............................................................................................................................. 3-12
libgen ............ ................................................................................................................... 3-12
libinfo ...... ...... .................... ............... ....... ........... ...... ........................................................ 3-12
load .................................................................................................................................. 3-12
sma11talk
........ ....... ......... ...... ........... .................................................................................. 3-12
strip .................................................................................................................................. 3-12
relinfo ............ ..... ........................................... ................................................................... 3-12
update ............ ...................... ........... .................................................................................. 3-13
SECTION 4 SOFTWARE MAINTENANCE
Table
of
Contents-3
Page 7
INTRODUCTION ................................................................................................................... 4-1
THEFACTORYCONFIGURATION
.................................................................................. 4-1
USER public ... ........... ............. ........... ............. ......... ....... ...... ......... ......... ............................. 4-2
File Protection and
Ownership .......................................................................................... 4-2
Passwords ..... ........... ..................................... ..... .... ....... ...... ..... .... ....... ................... ............ 4-2
Backing up User Files ......... ..... .......................................................................................... 4-2
A Suggestion . ........... ..... ........ ........... ........... ........... ............................................................ 4-3
RESPONSIBILITIES
BACKING UP
Performing a
ADDING AND DELETING
INSTALLING
OF
USER system
THE
SYSTEM ............................................................................................ 4-5
............................................................................
4-4
system Backup .......................................................................................... 4-5
USERS .................................................................................. 4-5
SOFTWARE
ON
THE 4405 ....................................................................... 4-6
ERROR RECOVERY AND SYSTEM REBUILDING ...................................................... 4-7
SECTION 5 RECOVERY
AND
REBllLD
INTRODUCTION ................................................................................................................... 5-1
PROBLEMS . ............... .............
...
........ ........... ....... .... ............. ..... ...... ......... ...... ..... ........... ..... 5-1
REBUILDING ALTERNATIVES ........................................................................................ 5-1
YOUR BACKUP DISKETTES ............................................................................................. 5-1
SYSREFORMAT Disk .............................................................................................. 5-2
Your
of
Types
Virtual Memory And
Names
Hard Disk Reformatting Utilities ....................................................................... 5-2
Swap Space ..................................................................................... 5-3
Of
Reformatting Utilities ....................................................................................... 5-3
System Rebuilding Utilities ............................................................................................... 5-3
SYSINST
Your
DISKREPAIR Disk ....................................................
Your
ALL
Disk ................ ............. ....... ......... .... ...... ..... .... ............. ............. .......... 5-4
00
.............................................
5-4
Your Standard System Diskettes ......................................................................................... 5-5
SOFTWARE FIRST AID .................. ....... ........ ................ .......... ..... .............................. .......... 5-6
PREVENTIVE MEDICINE ... ..... ........... ........ ..... ...... ............... ......... ............................. ....... 5-6
AUTOMATIC SYSTEM REPAIRS ... .................. .... ..... .... ............. ......... ............................. 5-6
REMOVING A FORGOTTEN
system
PASSWORD ............. ....... ...................................... 5-6
RESTORING A USER'S FILES ........................................................................................... 5-6
RESTORING FILES
WHEN THE
SYSTEM WILL NOT BOOT ,,,"',, .................................................................. 5-7
ON
A BOOT ABLE SYSTEM ..... ....................................................... 5-7
RECOVERING AN UNBOOT ABLE SYSTEM .................................................................. 5-7
NON-DESTRUCTIVE SYSTEM REBUILD PROCEDURE ................................................ 5-9
OVERVIEW ..................... ............................................................................ ......................... 5-9
STEP 1 DISKREPAIR ..................................................................................................... 5-11
A - Boot the
B - Mount
C - Run
DISKREPAIR Diskette ............... ......... ...... .................... ...... .............. ..... 5-11
me Hard Disk .... ........................... ........ ............. ........................... ........... ..... 5-13
diskrepair ..................................................... ........... ............. .............. ........ ..... 5-13
D - Inspect Your Hard Disk Files ............ ................................... ........... .... .............. ..... 5-13
E -
Unmount the Hard Disk and Stop me System ........................................................ 5-15
STEP
2.
COpy
STEP 3. RESTORE THE SYSTEM FILES.
THE OPERATING SYSTEM FILE STRUCTURE .............................. 5-15
..
.................................................................. 5-15
STEP 4. RESTORE THE PASSWORD FILE ................ ................. ........... ..................... 5-18
COMPLETE SYSTEM REBUILD PROCEDURE ............. ...... ........................................... 5-19
OVERVIEW ...................................................................................................................... 5-19
STEP 1 - FORMAT THE WINCHESTER WITH SYSREFORMAT ........................... 5-20
A - Boot the SYSREFORMAT Diskette ...................................................................... 5-21
Table
of
Contents-4
Page 8

B - Fonnat
Logical Fonnat .............................................................................................................. 5-21
Physical Fonnat ............................................................................................................. 5-21
STEP 2 - RESTORE THE SYSTEM WITH THE SYSINSTALL DISK ...................... 5-22
A - Boot
B - Restore Files from Your
Stop me System and Reboot ................................................................................... 5-22
C -
STEP 3 - RESTORE USER'S FII.,ES ...................................................... ....................... 5-23
4405 SELFI'EST ........................................ ........................................................................... 5-23
OVERVIEW ........................................................................................................................ 5-23
RUNNING
f1
Key
f2 .............................................................................................................................. 5-24
Key
f3
Key
f9 .............................................................................................................................. 5-24
Key
flO ............................................................................................................................ 5-24
Key
f11
Key
Key f12 ............................................................................................................................ 5-25
FINDING INTERMITTENT
Invoking Continuous selftest ........................................................................................... 5-25
th.e
Hard Disk .............................................................................................. 5-21
th.e
SYSINSTALL Disk ................................................................................. 5-22
System Backups .............................................................. 5-22
SELF TEST ...................................................................................................... 5-23
.............................................................................................................................. 5-24
.............................................................................................................................. 5-24
............................................................................................................................ 5-24
ERRORS ............................................................................ 5-25
Appendix A UNPACKING
INSTALLATION ................................................................................................................... A-I
SELECTING A SITE ............................................................................................. ................
UNPACKING ......................................................................................................................... A-2
UNPACK THE
UNPACK THE DISPLAY/CPU ........................................................................................... A-2
CHECK THE
ASSEMBLE
CONNECT THE
READ
SECI'ION 1 ................................................................................................................. A-4
MSU ............................................................................................................ A-2
ACCESSORIES ............................................................................................ A-2
THE
MOUSE .................................................................................................. A-3
CABLES .................................................................................................. A-3
Appendix B CLEANING
GENERAL CLEANING ........ .......................... ........... ......... ........ ........................ ................... B-1
CLEANING THE
CLEANING
MOUSE ..................................................................................................... B-1
SPILLS ON THE KEYBOARD .................. ................ ........... ................. .... ...... B-1
AND
INSTALLATION
AND
MAINTENANCE
A-I
Appendix C Options
Appendix D CONNECTING PERIPHERALS
INTRODUCI'ION ..................................................................................................................
THE SCSI BUS ....................................................................................................................
LOCATION ... .......................... ......... ........... ............. ............. ............. ................................
SOFTWARE ACCESS .............................. ......... ........... ........................ .......... ...................
THE RS-232 COMMUNICATIONS PORT ........................................................................ D-2
LOCATION ........................................................................................................................ D-2
SOFTWARE CONTROL ................................................................................................... D-2
THE
PARALLEL PRINTER PORT ...................................................................................... D-2
LOCATION .......................................................................................................................... D-2
SOFTWARE ACCESS ......................................................................................................... D-2
D-1
D-l
D-l
D-l
Table
of
Contents-5
Page 9
THE
Ex:rERNAL
LOCATION .......................................................................................................................... D-2
SPECIFICATIONS ............................................................................................................... D-3
SOFfW
THE
ARE ACCESS ......................................................................................................... D-3
ETHERNET INTERFACE ............................................................................................ D-3
SPEAKER JACK ..................................................................................... D-2
Appendix E SPECIFICATIONS
Figures
1-1. 640 X 480 Window Into 1376 X 1024 Bit-Map. . ............................................................ 1-3
1-2. Display/CPU Front Panel Controls.. . ............................................................................... 1-5
1-3. Display/CPU Rear Panel. ................................................................................................. 1-5
1-4. The
1-5. The
1-6. Front
1-8.
5-1. Non-Destructive
5-2.
5-3.
4405 Keyboard.. . ...... .... ....... ........... ...... ......... ....... ............... ............... ....... ........... ..... 1-7
4405 Mouse.. . ............................................................................................................ 1-8
of
MSU.. . ................................................................................................................ 1-9
SCSI Terminator. . ............... ..... ................... ..... .... ..... .... .... ..... ........... ............................. 1-11
System Rebuild Procedure.. . ................................................................. 5-9
Step
1.
Using (BIDISKREPAIRP. . ............................................................................... 5-11
Step 3. Restore Files. . .................................................................................................... 5-15
Examples
5-1. Minimum Bootable System. . .......................................................................................... 5-14
Tables
2-1 Moving Commands ........ .... ......... ............. .... ..... ......
2-2 Deleting Commands ............. ..... ............... .... ..... ......
E-l
CPU/DISPLAY UNIT PHYSICAL DIMENSIONS ............ .... ............. .................. ......... E-1
MASS STORAGE UNIT PHYSICAL DIMENSIONS ................................................... E-1
E-2
CPU/DISPLAY ELECTRICAL SPECIFICATIONS ...................................................... E-2
E-3
MASS STORAGE UNIT ELECTRICAL SPECIFICAITONS ....................................... E-2
E-4
CPUiDISPLAY ENVIRONMENIAL SPECIFICATIONS ............................................ E-3
E-5
MASS STORAGE UNIT ENVIRONMENTAL SPECIFICATIONS ............................. E-4
E-6
INSTALLATION REQUIREMENTS ............................................................................. E-5
E-7
GRAPHICS CHARACTERISTICS ................................................................................. E-5
E-8
...
.... ......... ........... ........................ .... ... 2-8
...
.... ......
...
........................ ............... ... 2-9
Table
of Contents-6
Page 10
Section 1
INTRODUCTION
ABOUT PRELIMINARY MANUALS
Some
of
the 4400 Series manuals are preliminary. They are
be, given the lead time required for writing and printing.
preliminary manuals may be inaccurate
We
of
AIM Documentation want each customer to receive complete, final manuals as soon
possible.
fill out and return the enclosed, postage-free, card.
comments you can make to help us make the documentation for this system better. (We also like
praise, too,
to send at a later time, send them
In
order that you not be missed (sometimes addresses get lost
if
we've done something right.)
Tektronix, Inc.
P.O. Box 1000
Wilsonville, OR 97070
D.S.60-405
Attention: AIM Documentation
to:
or
missing.
If
the card is missing, or
as
complete and accurate as they can
Some
of
the information given in
or
are unavailable) please
Of
course, we would appreciate any
if
you have more comments
as
ABOUT THIS MANUAL
This is the introductory manual to the 4405 Artificial Intelligence System. (We call it the 4405
from here on.) You should read this manual before attempting
contains useful information that can help you get the most out
instructions on how to unpack and connect the system, a guided tour
on, a discussion on how to work with the system on a day-by-day basis, suggestions for working
with more than one user on the system, and some ways to recover from the inevitable errors to
which humans are prone.
YOUR QUALIFICATIONS
This manual is not a tutorial document. Although we've tried
simple, it assumes that you're an experienced computer user. You need not have systems
programming experience, or
computer operating system. You should be comfortable with a hierarchical or tree-structured
filing system, know how to issue commands and run applications, and, in general, be a
"knowledgeable user."
If
you're comfortable with an operating system such
or
any
of
the other multi-user operating systems that abound, you should have little trouble
adapting to the
of
the many tutorials,
search out tutorial information on your own, look for tutorials on the Unix operating system. The
4405 operating system is not Unix, but the structure and philosophy behind it
dissimilar, and tutorial information explaining the Unix operating system is readily available.
4405 operating system.
or
be
a "Wizard," but you should be past the neophyte stage on a large
as
Unix®, TOPS-IO/20®, VMS®, RSTS®,
If
you are not, you should take a course, read through one
find a knowledgeable person to help you adjust to the 4405.
to
use your new 4405 - it
of
the 4405. You'll find
of
the first time you tum
to
keep this manual clear and
If
you must
is
not too
it
4405
USERS
1-1
Page 11
INTRODUCTION
UNPACKING THE 4405
If
you've just purchased your 4405 - congratulations! You'l1 want to get
as
soon
as
running
4405 any distance, you should use these containers. Exercise patience, follow instructions,
your
and you should have
To save time and trouble, follow this sequence:
1.
Skim over this procedure
2.
Tum
to Appendix A and follow those instructions. This appendix shows you, in detail,
how to unpack and connect the pieces that form the
3.
Come back to this point and read the rest
overview
possible. First, don't discard your shipping cartons.
no
trouble bringing the system up for the first time.
to
get a feel for the sequence.
4405.
of
of
the 4405 before trying to use it.
Section
1,
the introduction. You need
it
put together and
If
you ever want to move
to
get an
4. Read Section
section takes you through an initial introduction to the
you a few
5. Next read through Section 3,
use
of
the 4405. You'll want to experiment with the system - you shouldn't have any
trouble at this point.
6.
Read Section
to deal with.
responsible for these tasks.
7.
Section 5, Recovery and Rebuild, is the section we all hope to avoid.
find system rebuilding procedures here.
2,
The First Time User next. Follow the examples on your 4405. This
of
its many features.
Using the 4405. This section talks about normal, day-to-day
4,
Software Maintenance, to get an idea
If
more than one user will be using the 4405, one person should be
4405 operating system and shows
of
the maintenance tasks you'll have
If
you must, you can
OVERVIEW OF THE 4405
GENERAL INFORMATION
The 4405 is a single-user computer system that has been designed for the efficient development
and use
can have many separate user accounts, it is not a time-sharing system; only one user may be
logged in at a time.) The
system and
of
artificial intelligence (AI) applications. (Single-user means that, although the 4405
4405 can be used both
as
a terminal connected to a host computer.
as
a stand-alone applications development
As an applications development system, the
Smalltalk-80 system, LISP, and PROLOG. These languages run under the 4405's multi-tasking
operating system. The
and mathematics libraries to assist with program development. In addition, the
'c'
programming environment that allows porting
As a terminal, the
AI community. The
to allow it to work with most popular screen-oriented editors.
1-2
4405 also has a hierarchical file system, complete with various graphics
4405 easily interfaces, via a RS-232-C line, to various computers in use by the
4405 functions as an ANSI X3.64 compatible terminal with some extensions
4405 provides a programming environment for the
4405 contains a
of
many applications programs to it.
Page 12
INTRODUCTION
4405
The 4405 consists
(MSU). These, in addition
discussion examines each component in detail.
HARDWARE
of
two major components, the Display/CPU module and mass storage unit
to a keyboard and mouse, make up the basic 4405. The following
OVERVIEW
The 4405 Display/CPU
The Display/CPU is the heart
of
cabinet
the central processing unit, one megabyte (standard, two
as
options)
communicate with the outside world.
Connected to the rear
and mouse. There, we also find a volume control for the internal speaker, an audio connector for
an external speaker, a parallel printer port, the RS-232 port, the ethernet connector, and a reset
button.
The
The
under control
Figure
a conventional terminal, it contains a monochrome 640 X 480 pixel bit-map display,
of
fast semiconductor memory, and the interface electronics that allow the 4405 to
of
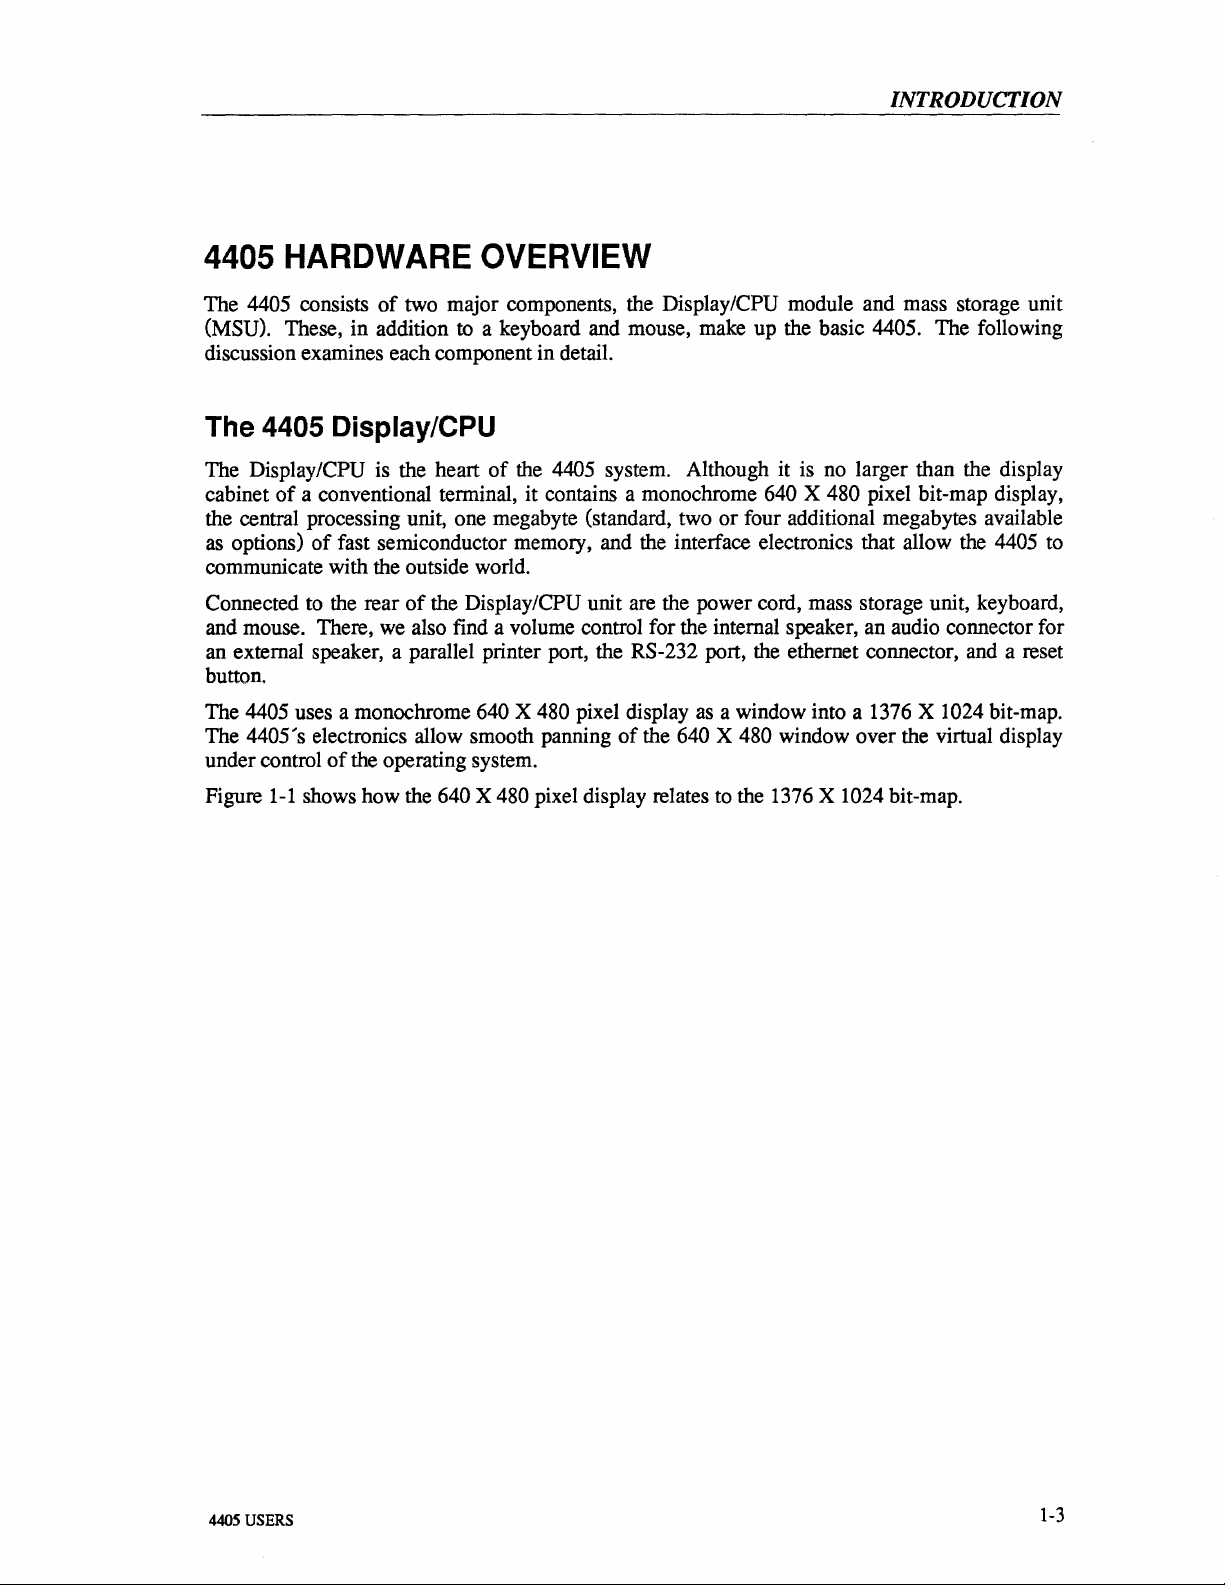
4405 uses a monochrome 640 X 480 pixel display
4405' s electronics allow smooth panning
of
the operating system.
1-1
shows how the 640 X 480 pixel display relates
of
the 4405 system. Although it is no larger than the display
or
four additional megabytes available
the Display/CPU unit are the power cord, mass storage unit, keyboard,
as
a window into a 1376 X 1024 bit-map.
of
the 640 X 480 window over the virtual display
to
the 1376 X 1024 bit-map.
4405
USERS
1-3
Page 13

INTRODUCTION
(0,0)
(0,479)
(0,1023)
(639,0)
~--------------~-----------------+~
This
is
screen
the default
position.
(1375,0)
...
------
1376x1024
VIRTUAL DISPLAY
BIT-MAP
t-+-+l~~~~~~
AREA
SEEN
BY
(PANNED
DEFAULT POSITION)
DISPLAY
FROM
1-4
Physical Display
640x480
j:==640
Figure 1-1.640 X 480 Window
480
Pixels
Pixel.~
5603-2A
Into
1376 X 1024 Bit-Map.
Page 14
iNTRODUCTION
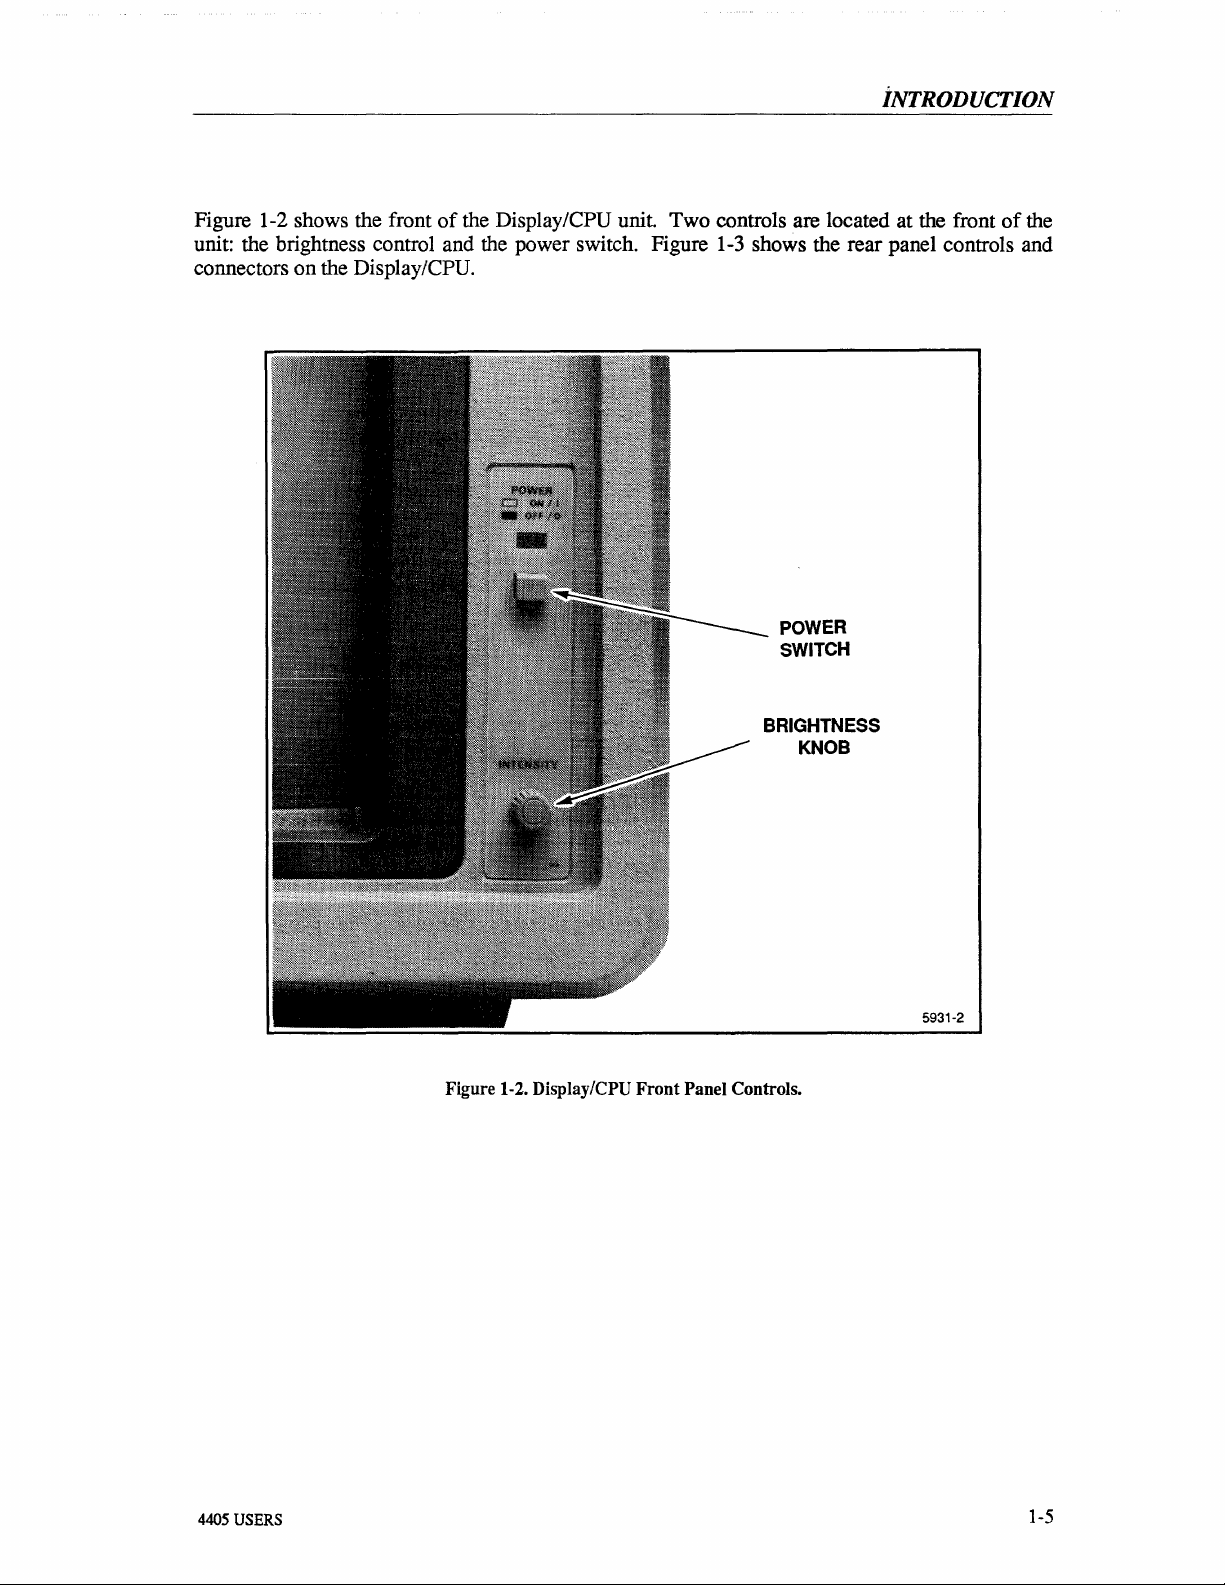
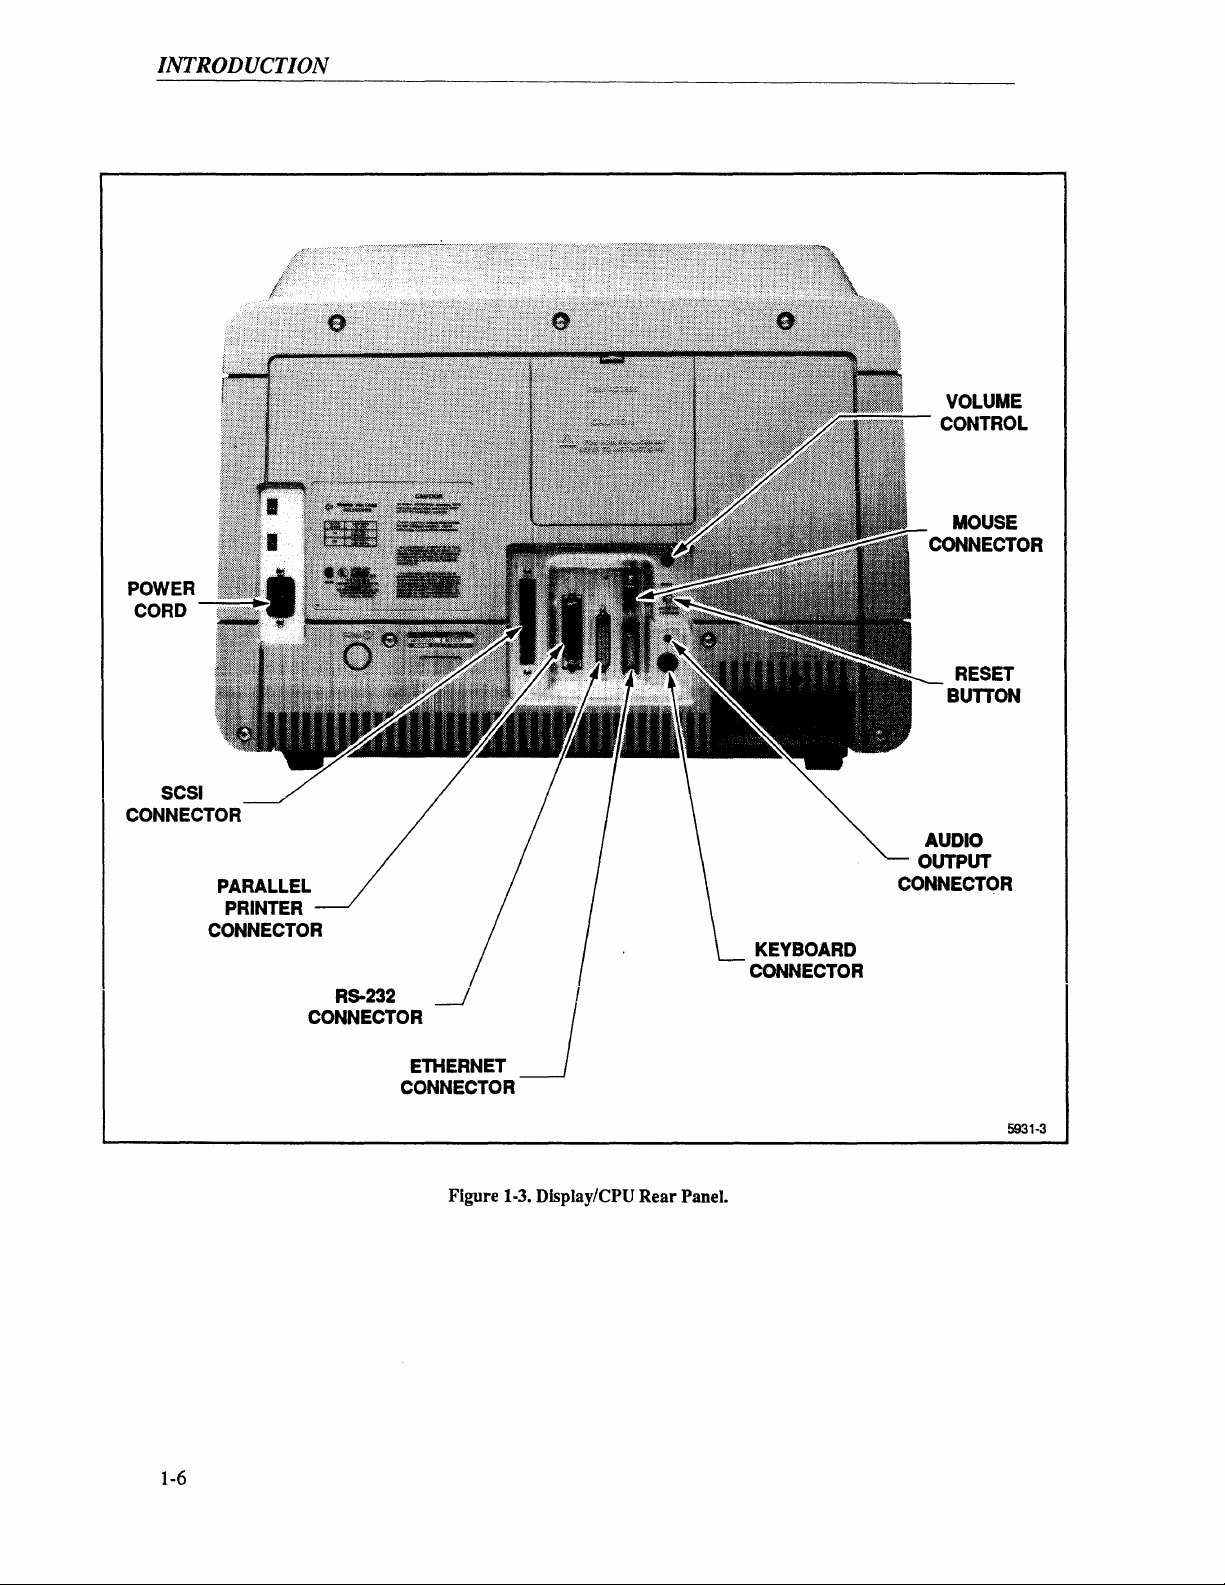
Figure 1-2 shows the front
of
the Display/CPU unit. Two controls are located at the front
unit: the brightness control and the power switch. Figure
connectors on the Display/CPU.
1-3
shows the rear panel controls and
POWER
SWITCH
BRIGHTNESS
KNOB
of
the
4405
USERS
Figure 1-2. Display/CPU
Front
Panel Controls.
5931-2
1-5
Page 15
INTRODUCTION
CORD
VOLUME
CONTROL
MOUSE
CONNECTOR
SCSI
CONNECTOR
PARALLEL
PRINTER
CONNECTOR
RS-232
CONNECTOR
ETHERNET
CONNECTOR
Figure 1-3. Display/CPU
Rear
RESET
BUTTON
AUDIO
OUTPUT
CONNECTOR
KEYBOARD
CONNECTOR
5931-3
Panel.
1-6
Page 16
The 4405 Keyboard
INTRODUCTION
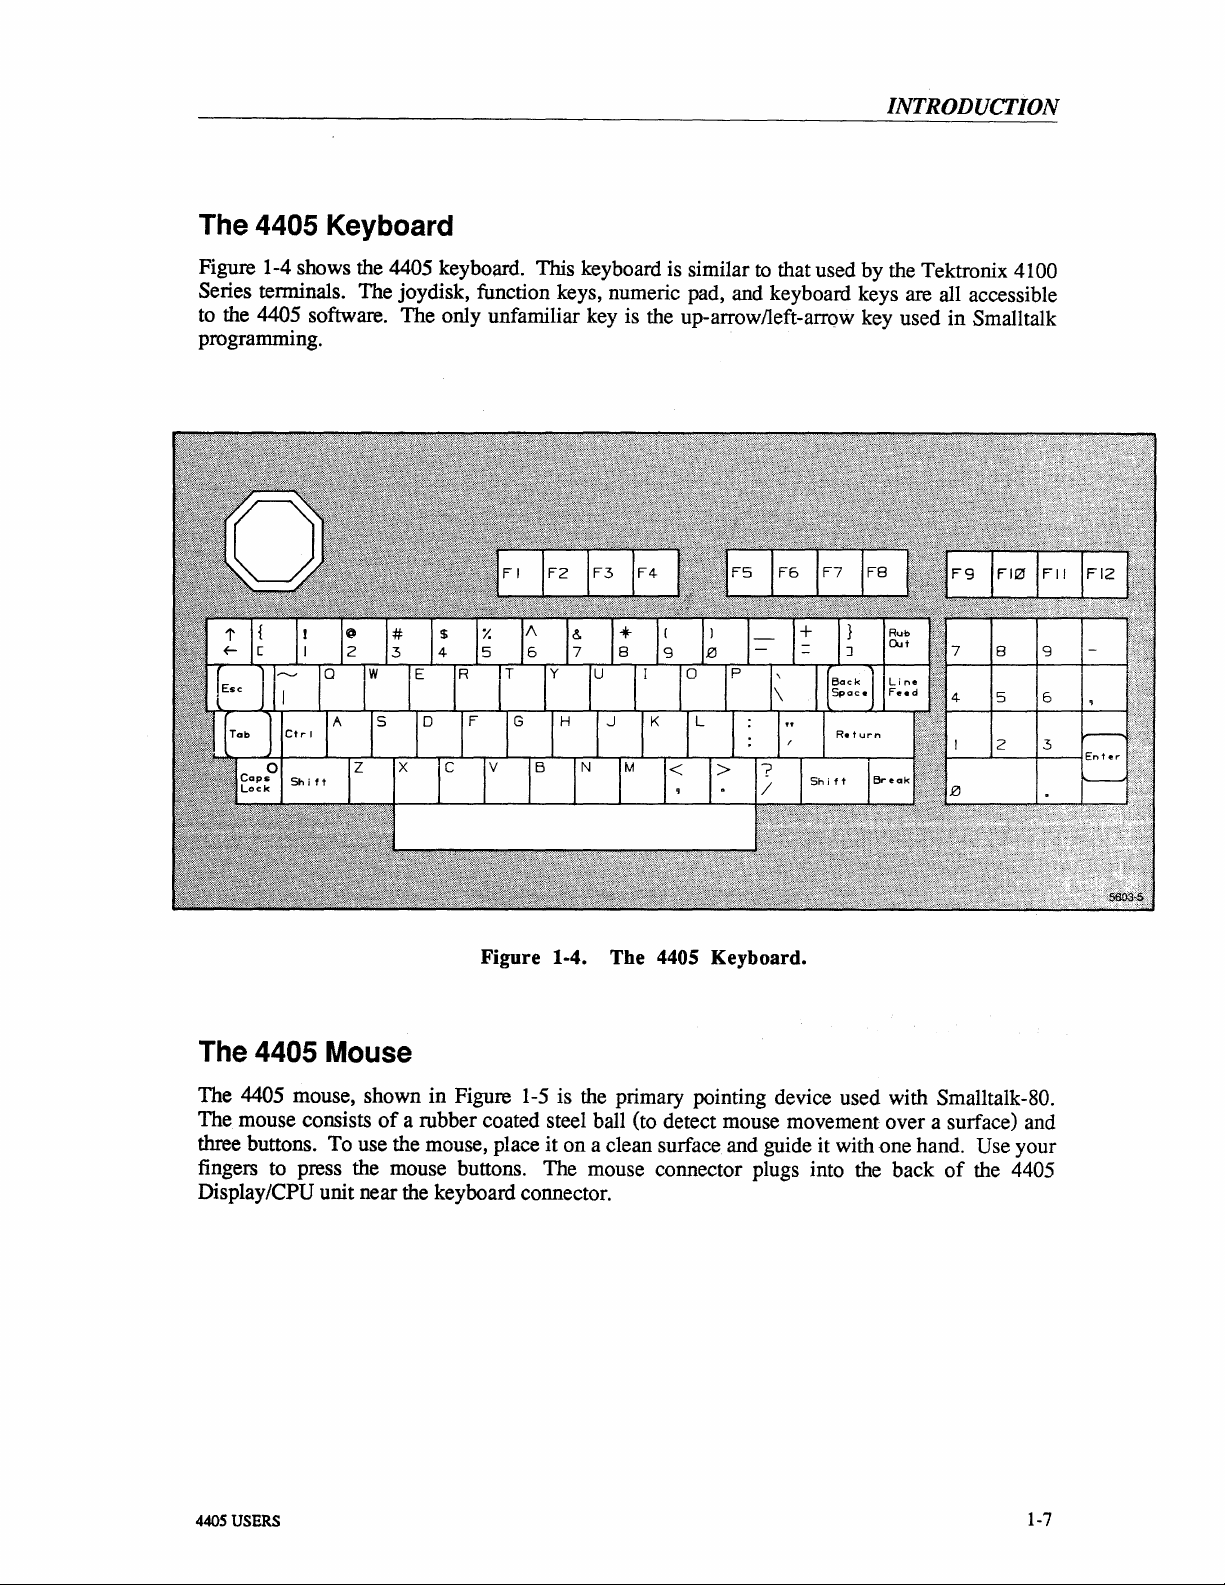
Figure 1-4 shows the 4405 keyboard. This keyboard is similar
to
that used by the Tektronix 4100
Series tenninals. The joydisk, function keys, numeric pad, and keyboard keys are all accessible
to the 4405 software. The only unfamiliar key is the up-arrowlleft-arrow key used in Smalltalk
programming.
Figure 1-4. The 4405 Keyboard.
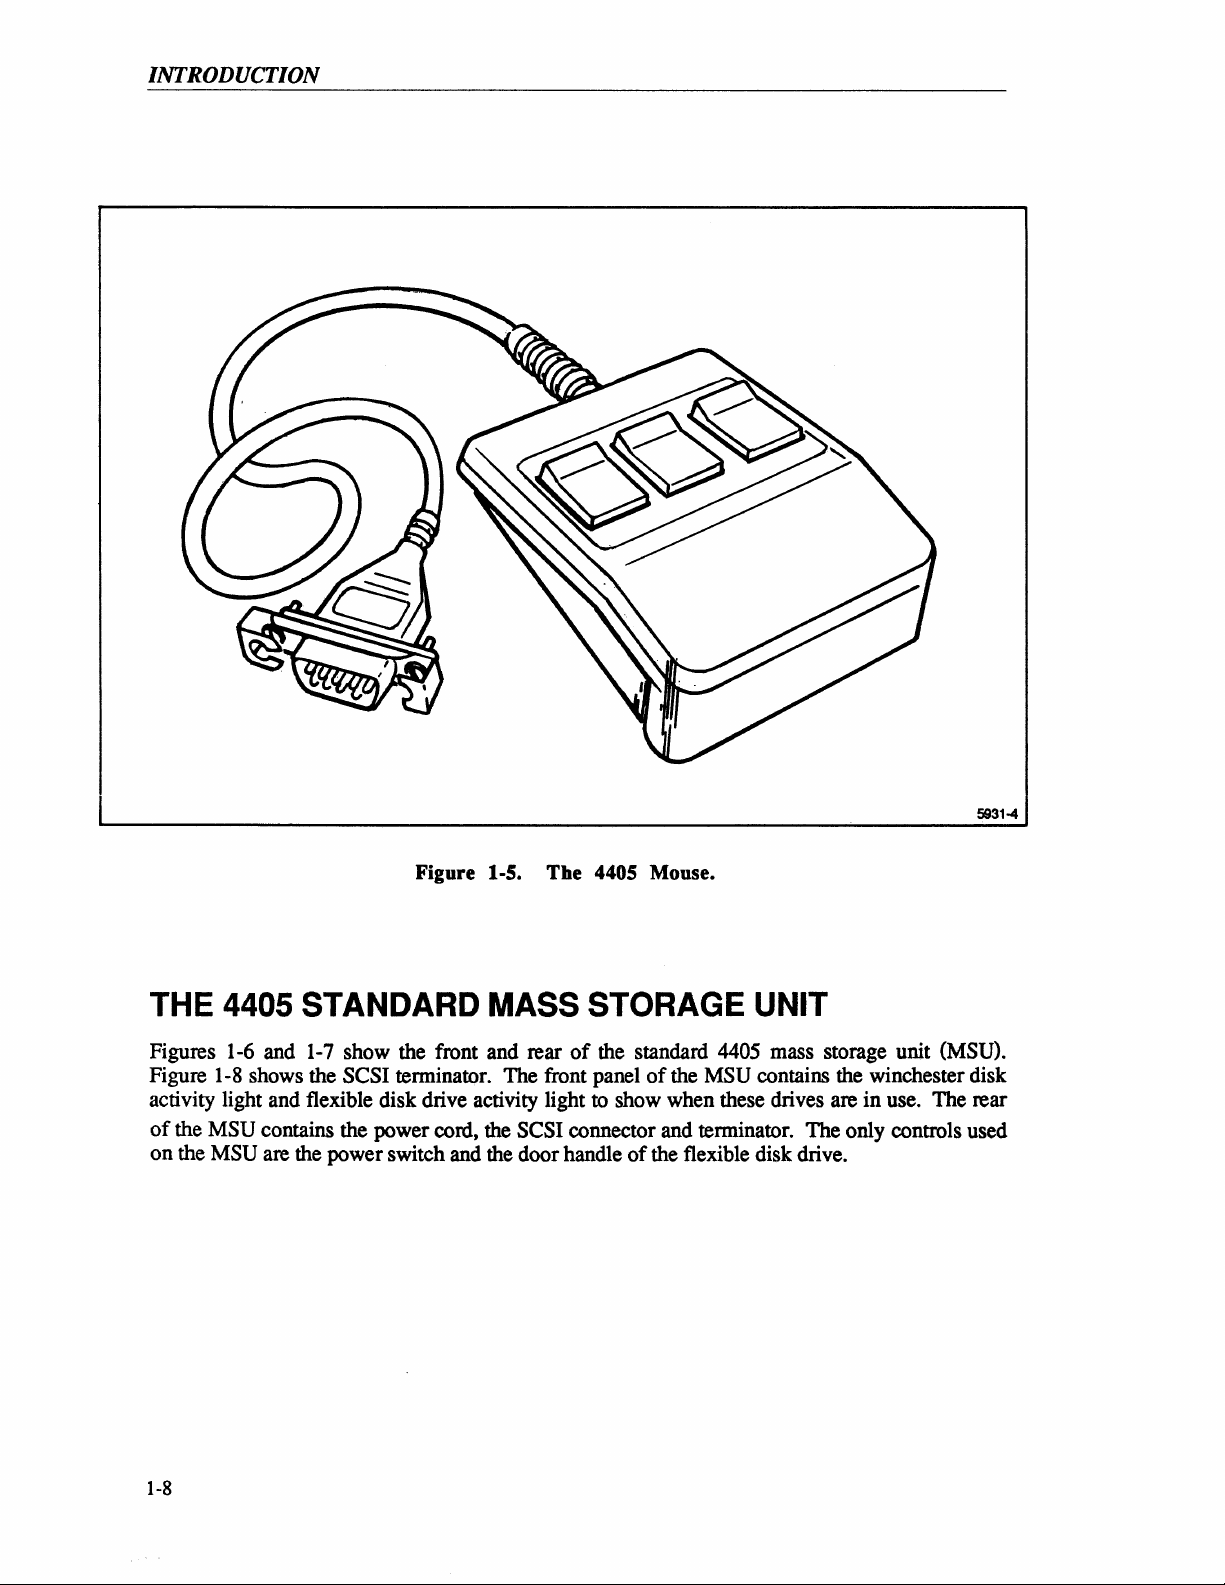
The 4405 Mouse
The 4405 mouse, shown in Figure
The mouse consists
of
a rubber coated steel ball (to detect mouse movement over a surface) and
three buttons. To use the mouse, place it on a clean surface and guide
fingers to press the mouse buttons. The mouse connector plugs into the back
Display/CPU unit near the keyboard connector.
4405
USERS
1-5
is the primary pointing device used with Smalltalk-80.
it
with one hand. Use your
of
the 4405
1-7
Page 17
INTRODUCTION
5931-4
Figure 1-5. The 4405 Mouse.
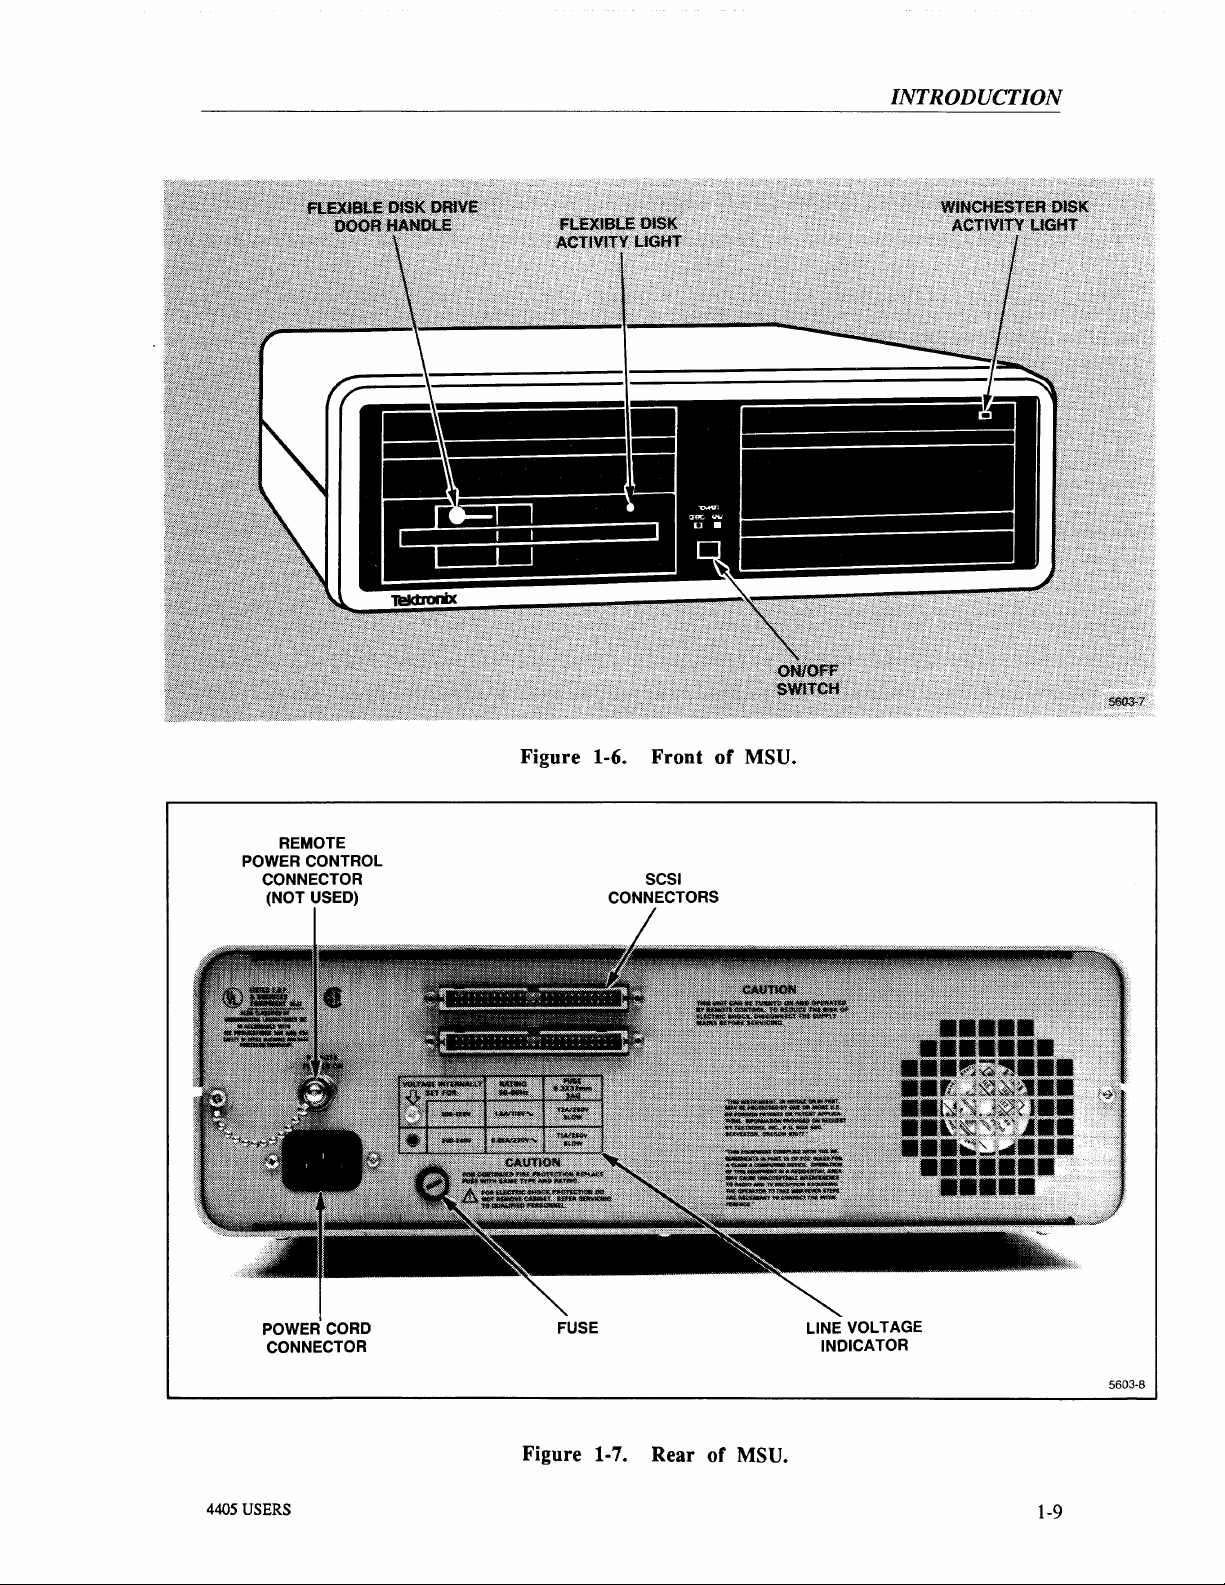
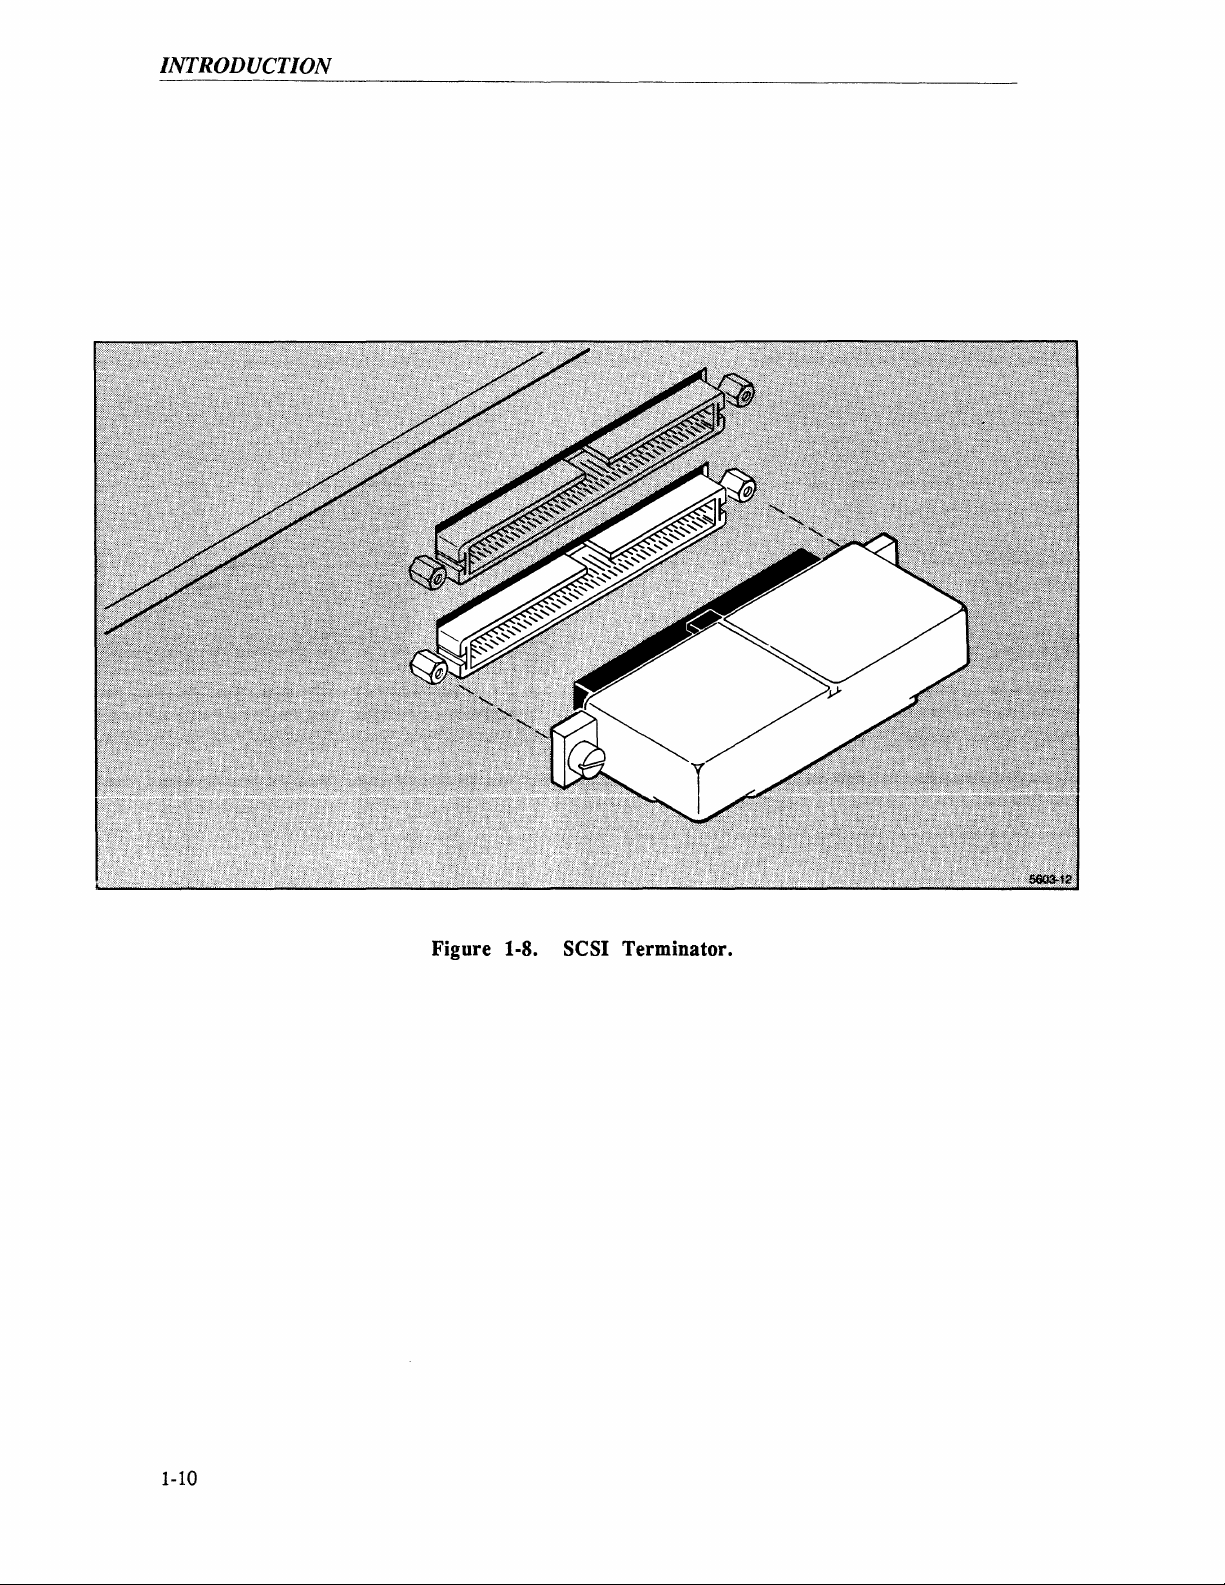
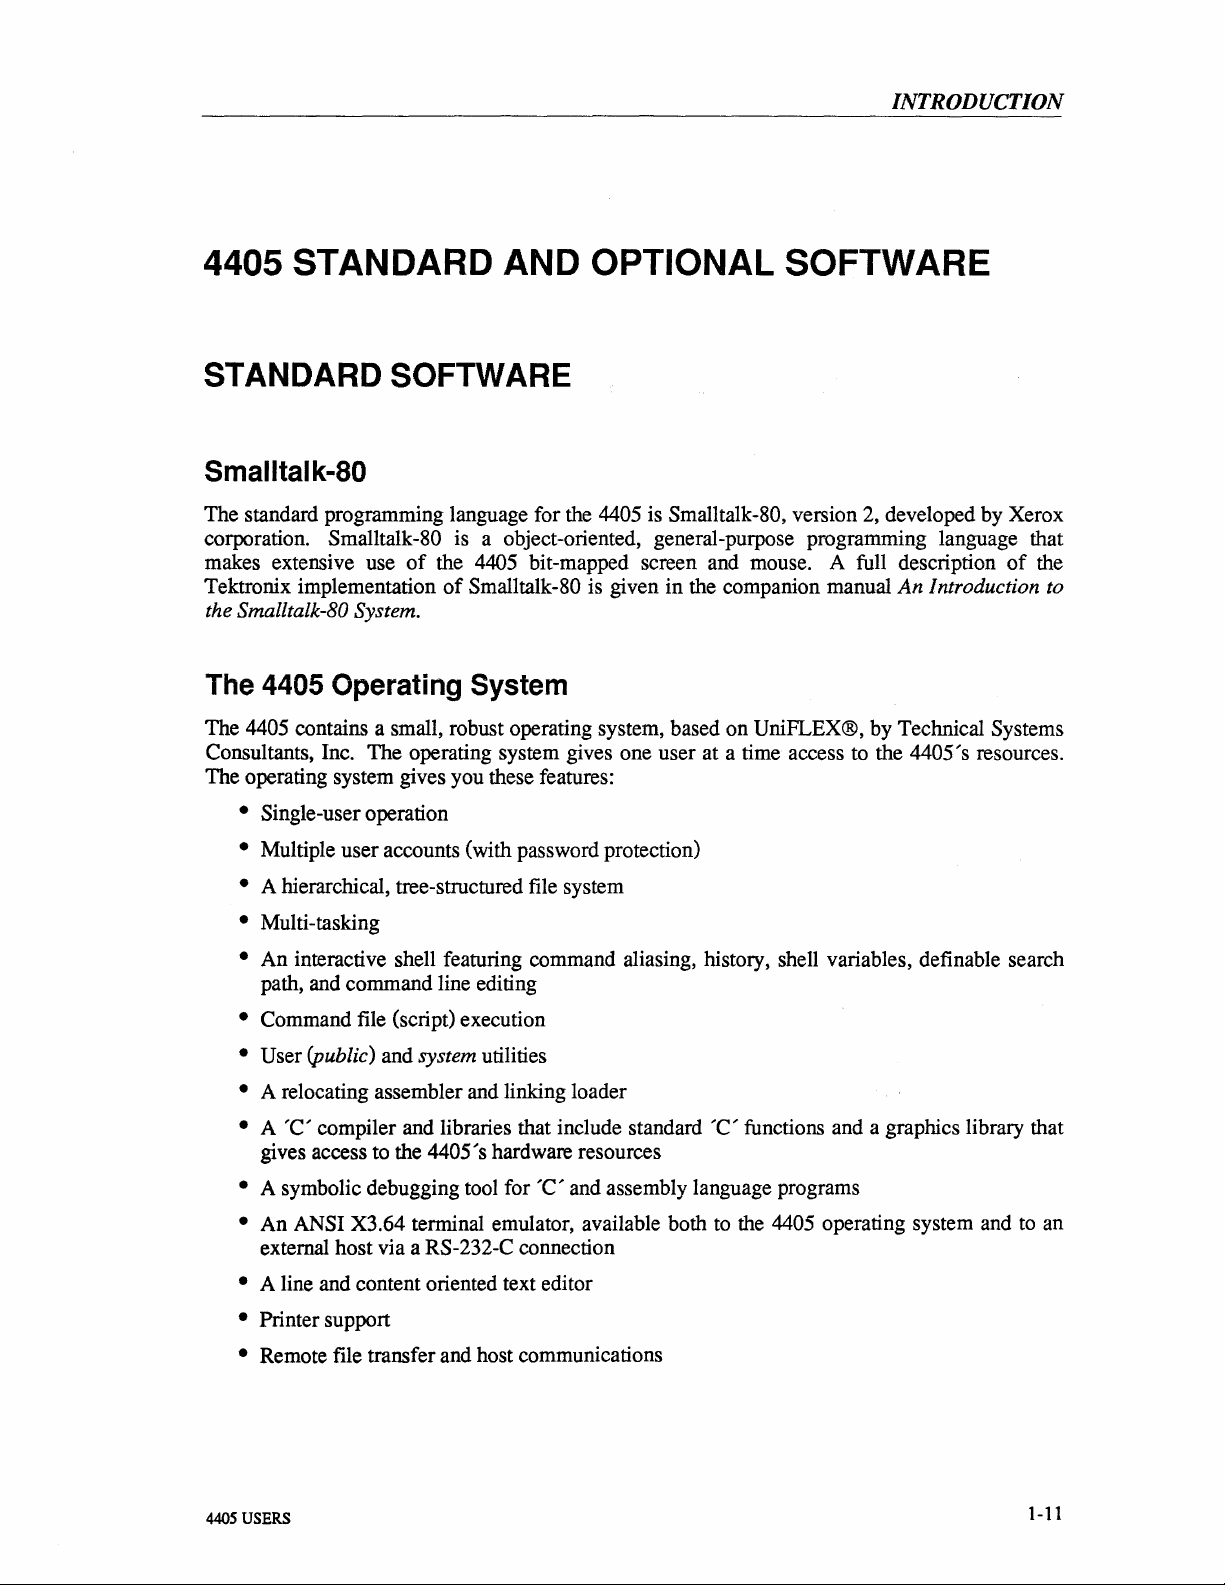
THE
Figures 1-6 and
Figure 1-8 shows the SCSI terminator. The front panel
activity light and flexible disk drive activity light to show when these drives are in use. The rear
of
on
4405
the MSU contains the power cord, the SCSI connector and terminator. The only controls used
the MSU are the power switch and the door handle
STANDARD
1-7
show the front and rear
MASS
of
STORAGE
the standard 4405 mass storage unit (MSU).
of
the MSU contains the winchester disk
of
the flexible disk drive.
UNIT
1-8
Page 18
INTRODUCTION
REMOTE
POWER CONTROL
CONNECTOR
(NOT USED)
POWER CORD
CONNECTOR
Figure 1-6.
CONNECTORS
FUSE
Front
SCSI
of
MSU.
LINE VOLTAGE
INDICATOR
4405
USERS
Figure 1-7. Rear
of
5603-8
MSU.
1-9
Page 19
INTRODUCTION
1-10
Figure 1-8. SCSI Terminator.
Page 20
INTRODUCTION
4405 STANDARD AND OPTIONAL SOFTWARE
STANDARD SOFTWARE
Smalltal
The standard programming language for the 4405 is Smalltalk-80, version 2, developed by Xerox
corporation.
makes extensive use
Tektronix implementation
Smalltalk-80 System.
the
The
The 4405 contains a small, robust operating system, based on UniFLEX@, by Technical Systems
Consultants, Inc. The operating system gives one user at a time access to the
The operating system gives you these features:
• Single-user operation
• Multiple user accounts (with password protection)
• A hierarchical, tree-structured file system
• Multi-tasking
• An interactive shell featuring command aliasing, history, shell variables, definable search
• Command file (script) execution
k-80
Smalltalk-80 is a object-oriented, general-purpose programming language that
of
the 4405 bit-mapped screen and mouse. A full description
of
Smalltalk-80 is given in the companion manual
4405 Operating
path, and command line editing
System
of
An
Introduction to
4405's resources.
the
• User (public) and system utilities
• A relocating assembler and linking loader
• A 'c' compiler and libraries that include standard 'c' functions and a graphics library that
gives access to the
• A symbolic debugging tool for 'c' and assembly language programs
• An ANSI X3.64 terminal emulator, available both to the 4405 operating system and
external host via a RS-232-C connection
• A line and content oriented text editor
• Printer support
• Remote file transfer and host communications
4405
USERS
4405's hardware resources
to
1-11
an
Page 21
INTRODUCTION
4405 OPTIONS
In addition to the standard 4405 hardware and software, many additional options are available.
Some
of
these are:
Additional 2
This option, an additional two Megabytes
Megabytes
of
physical memory for your 4405.
Additional 4
This option, an additional two Megabytes
Megabytes
of
physical memory for your 4405.
MB
Physical Memory
MB
Physical Memory
of
semiconductor memory gives you a total
of
semiconductor memory gives you a total
of
of
three
five
ETHERNET® Interface
This option adds the hardware and software necessary for the 4405 to function in an ETHERNET
network.
Franz LISP
An implementation
systems.
of
the LISP programming language that is widely available
on
UNIX
Common
This implementation
Interface,"
the Language.
as
LiSP
well
as
PROLOG
An implementation
1-12
of
Common LISP includes some extensions, such
the full language as documented in the book by Guy Steele, Common
of
this logic programming language.
as
a "Foreign Function
llSP,
Page 22
INTRODUCTION
EMACS
A widely used, extensible, screen-oriented editor with mouse extensions.
Other Options
Additional 4405 options may be available in the future. Please contact your local Tektronix Sales
Representative for currently available 4405 options.
Mass
If
you need more mass storage than is available on the standard internal 45 Mb Hard disk, use the
applicable configuration
available in a number
tape support. The 4400 Series operating system automatically senses the presence
expansion units and mounts them when the system boots up.
Storage Expansion
of
the 4944 Mass Storage Device to extend your storage. The 4944 is
of
configurations that add various sizes
of
hard disk storage and streaming
of
supported
4405 DOCUMENTATION
STANDARD DOCUMENTATION
With your 4405, you received five principal manuals. This standard set
includes:
The 4405 User's Manual (This Book)
This manual should be the first manual you read.
4405: unpacking and connection procedures, a first-time user's session, hints on daily use
system, discussions
contains the general "how-to-do-it" information that you'll need while getting acquainted with
your new 4405. You'll probably need
will probably need
of
software configuration, maintenance and data security. This manual
to
use this manual extensively for the first week
to
refer
to
it only in emergencies.
It
contains the introductory material
of
documentation
or
to
the
of
the
so, then
An Introduction to the Smalltalk-80 System
This manual is the introduction to Smalltalk-80 as implemented on the 4405. This manual is not
a "stand-alone" manual, it is meant
the Programming Environment and
published by Addison-Wesley. You will need both these books in order to use Smalltalk-80. The
manual An Introduction to
440SUSERS
Smalltalk-80 makes extensive references
to
be used in conjunction with two other texts, Smalltalk-80:
Smalltalk-80: The Language and Its Implementation
to
the Addison-Wesley
1-13
Page 23
INTRODUCTION
books and details the differences between the image in those books and the image on the 4405.
The Introduction does contain some tutorial information, and an excellent overview
language,
as
well
as
providing the intimate details that affect the language user.
of
the
The 4400 Series Operating System Reference Manual
The 4400 Series Operating System Reference Manual contains the detailed description
4400 Series hardware and software from the programmer's point
4400 Series reference, and contains information on the details
and the other operating system level concerns. Look in this manual for detailed information not
covered elsewhere.
of
view. This book is the basic
of
commands, syntax, extensions,
of
the
4400 Series Assembly Language Reference
The 4400 Series Assembly Language Programmer's Reference Manual contains details
supplied
manual to the syntax and details
manual also contains information on the operation
MC68000 (including MC68010 and MC68020) assembler. This manual is a reference
of
the 4400 Series assembler and system calls and libraries. This
of
the linking loader.
of
the
4400 Series 'e' Language Reference
The 4400 Series
'C'Language
Reference Manual contains details
of
the implementation
of
the
'c' language and libraries. This manual also contains some tutorial information on using the
"BitBlt" graphics facilities
of
the 4400 series machines.
DOCUMENTATION OF OPTIONS
Each software option has its own reference manual(s) that details its operation. Refer to these
manuals for details
Hardware options come with installation instructions
necessary manuals for operation
Some manuals for options are small and come without binders. Place these manuals in this
binder under
of
how
to
use these software packages.
of
Appendix C, Options.
(if the option is customer-installed) and the
that option.
OPTIONAL DOCUMENTATION
Smalltalk-80 Documentation
The two books on Smalltalk-80, the "red book" and the "blue book," can be ordered from
Tektronix. They are:
1-14
Page 24

INTRODUCTION
• Smalltalk-80 The Interactive Programming Environment by Adele Goldberg.
Tektronix part number
• Smalltalk-80 The Language
Tektronix part number
062-8859-00
and
Its Implementation by Adele Goldberg and David Robson.
062-8860-00
Service Documentation
Two service manuals are available for the 4405. These are:
The 4405 Field Service Manual
The 4405 Field Service Manual contains information useful for a technician troubleshooting a
4405 in the field. It contains commonly used adjustments, checks, and information that enables a
technician to repair a
repaired at the factory or other service location that has specialized diagnostic instrumentation.}
The 4405 Component-Level Service Manual
This manual is designed for the experienced electronic technician and gives the information
necessary to repair the
fixtures and specialized knowledge to use
4405 to the module level. {Modules are subassemblies that should be
4405 subassemblies. It is not intended for use in the field; it requires test
it.
4405
USERS
1-15
Page 25
Section 2
THE FIRST TIME
INTRODUCTION
You should now have your 4405 unpacked, connected, and ready for its first use. This section is
a commented transcript
of
a new user trying the 4405 for the first time.
Think
machine - feel free
and capabilities
In this transcript, the actual dialog between the user and the 4405 is indented and in a different
type style than the comments and explanations. The actual commands that you type are shown as
they appear
include the spaces). Remember, for commands to
line by pressing the
of
this section a guided tour
to
experiment as you go along. This section
of
the operating system, but
on
the screen; enter them exactly as shown (omit the system prompt, but be sure to
Return key - this manual doesn't show that as an explicit part
Your session should look very similar when you issue the same commands in the same order.
of
the 4405 operating system. Follow along on your own
won't
cover all
it
will show you enough to get you started.
be
executed, you must terminate the command
of
the features
of
this dialog.
COMMENTED TRANSCRIPT OF SESSION
CAUTION
If
you must leave the session early, type "stop" and wait
for the message
" .
..
System shutdown complete
before turning
off
the power. Any other method
shutting down the 4405 can seriously damage the
operating system disk software structure.
...
"
of
TURN
First, you
time. (Later on, you
power switch
upper right hand
Now, press the power switch on the Display/CPU unit. The LED in the key marked
comes on, flashes for a time, then goes out. When the display screen lights up, you see in the
upper left comer the display:
If
this message does not appear, try adjusting the brightness control.
The winchester disk activity light on the
message appears:
4405
USERS
ON
THE
11
want to see what happens to each unit
on
the MSU (mass storage unit). Notice that the winchester disk activity light on
of
Tektronix
4405
11
just want to
the MSU front panel comes on until the disk gets up to speed, then shuts off.
4405
tum
on
the power to both units and start working.) Press the
MSU then begins to flicker, the screen clears, and a new
of
the 4405 when you
tum
on one unit at a
Caps Lock
2-1
Page 26
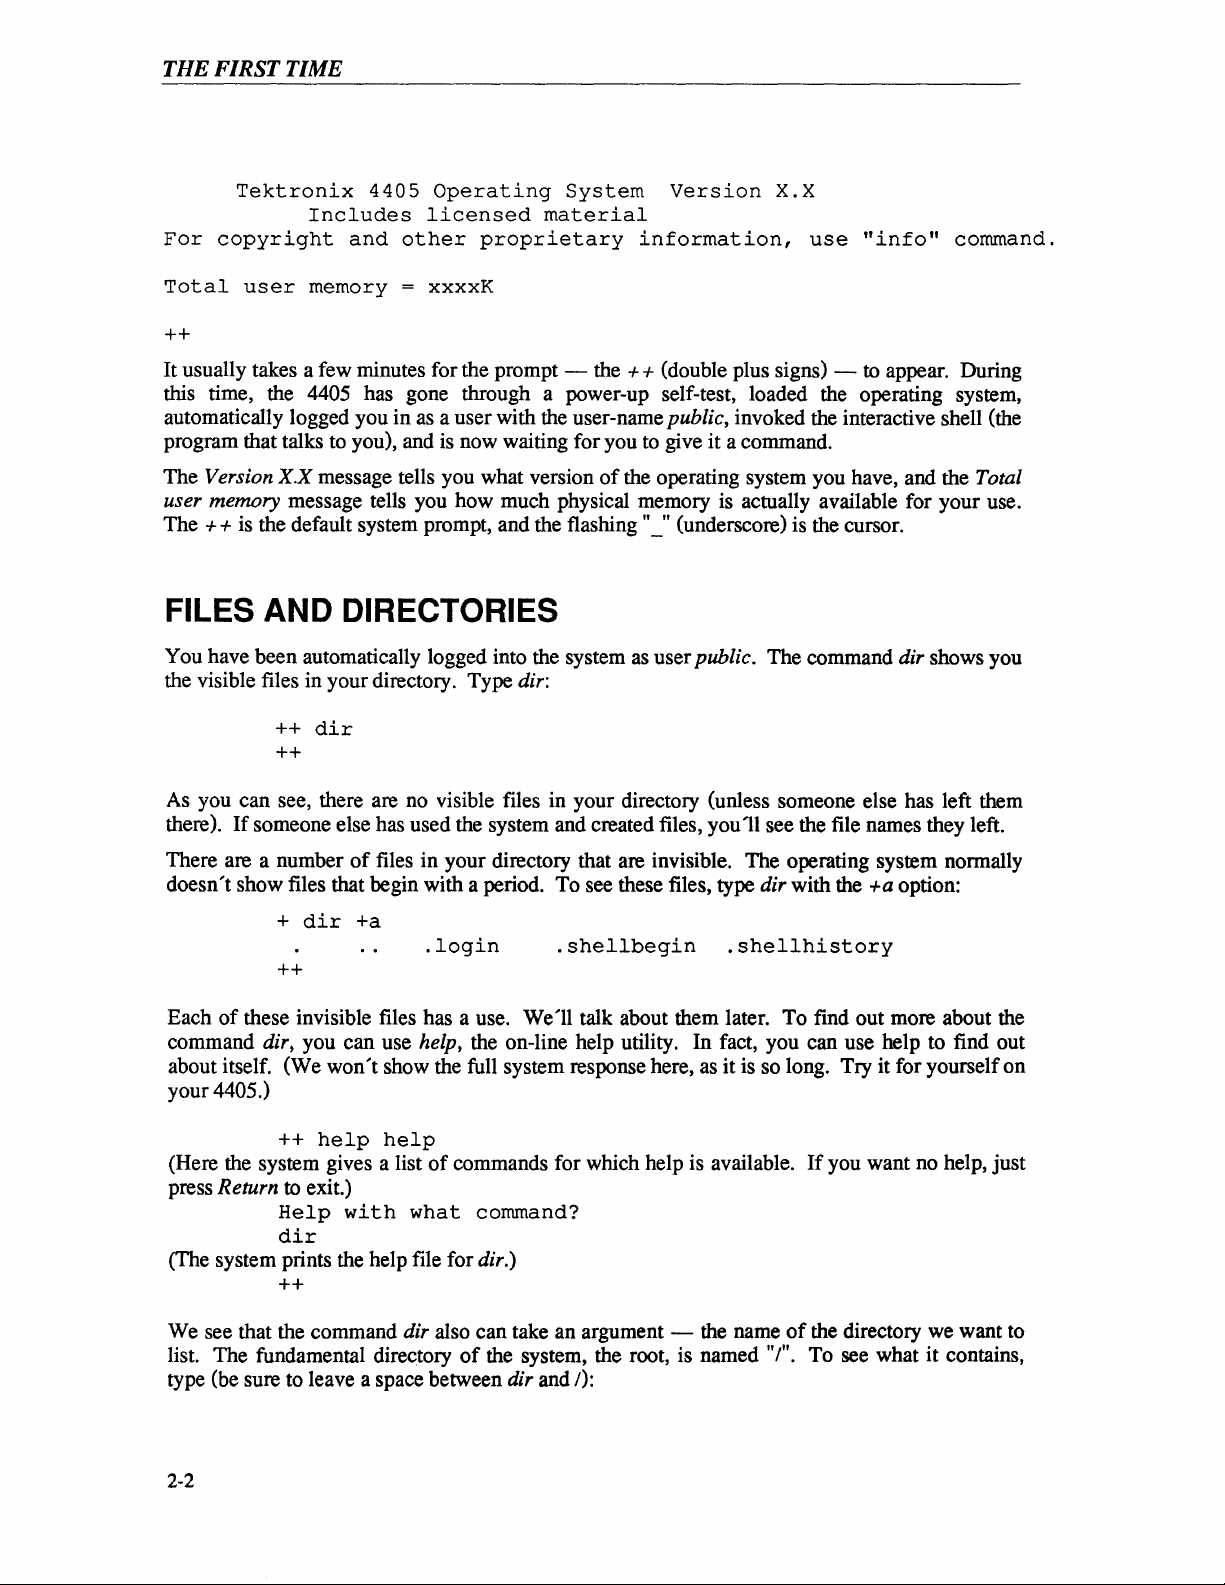
THE
FIRST
TIME
For
Total
Tektronix
copyright
user
Includes
memory = xxxxK
4405
and
Operating
licensed
other
System
material
proprietary
Version
information,
X.X
use
"info"
command.
++
It usually takes a few minutes for the prompt - the + + (double plus signs) - to appear. During
this time, the
automatically logged you in as a user with the user-name
program that talks to you), and is now waiting for you to give it a command.
The
Version X.X message tells you what version
user memory
The
+ + is the default system prompt, and the flashing "_" (underscore) is the cursor.
4405 has gone through a power-up self-test, loaded the operating system,
public, invoked the interactive shell (the
of
the operating system you have, and the Total
message tells you how much physical memory is actually available for your use.
FILES AND DIRECTORIES
You have been automatically logged into the system
the visible files in your directory. Type
++
dir
dir:
++
as
user public. The command dir shows you
As
you can see, there are no visible files in your directory (unless someone else has left them
If
there).
There are a number
doesn't show files that begin with a period. To see these files, type
Each
command
about itself. (We won't show the full system response here, as it is so long. Try it for yourself on
your
(Here the system gives a list
press
(The system prints the help file for dir.)
We see that the command
list. The fundamental directory
type (be sure to leave a space between
someone else has used the system and created files, you
of
files in your directory that are invisible. The operating system normally
+
dir
+a
.login
++
of
these invisible files has a use. We'll talk about them later. To find out more about the
dir, you can use help, the on-line help utility. In fact, you can use help to find out
4405.)
++
help
Return to exit.)
Help
dir
++
help
of
commands for which help is available.
with
what
dir also can take an argument - the name
command?
of
the system, the root, is named "!". To see what it contains,
.shellbegin
dir and
I):
11
see the file names they left.
dir with the
.shellhistory
If
of
+a
option:
you want no help, just
the directory we want to
2-2
Page 27
THE
++
dir
FIRST
/
TIME
(Here the system lists the files in "/".)
++
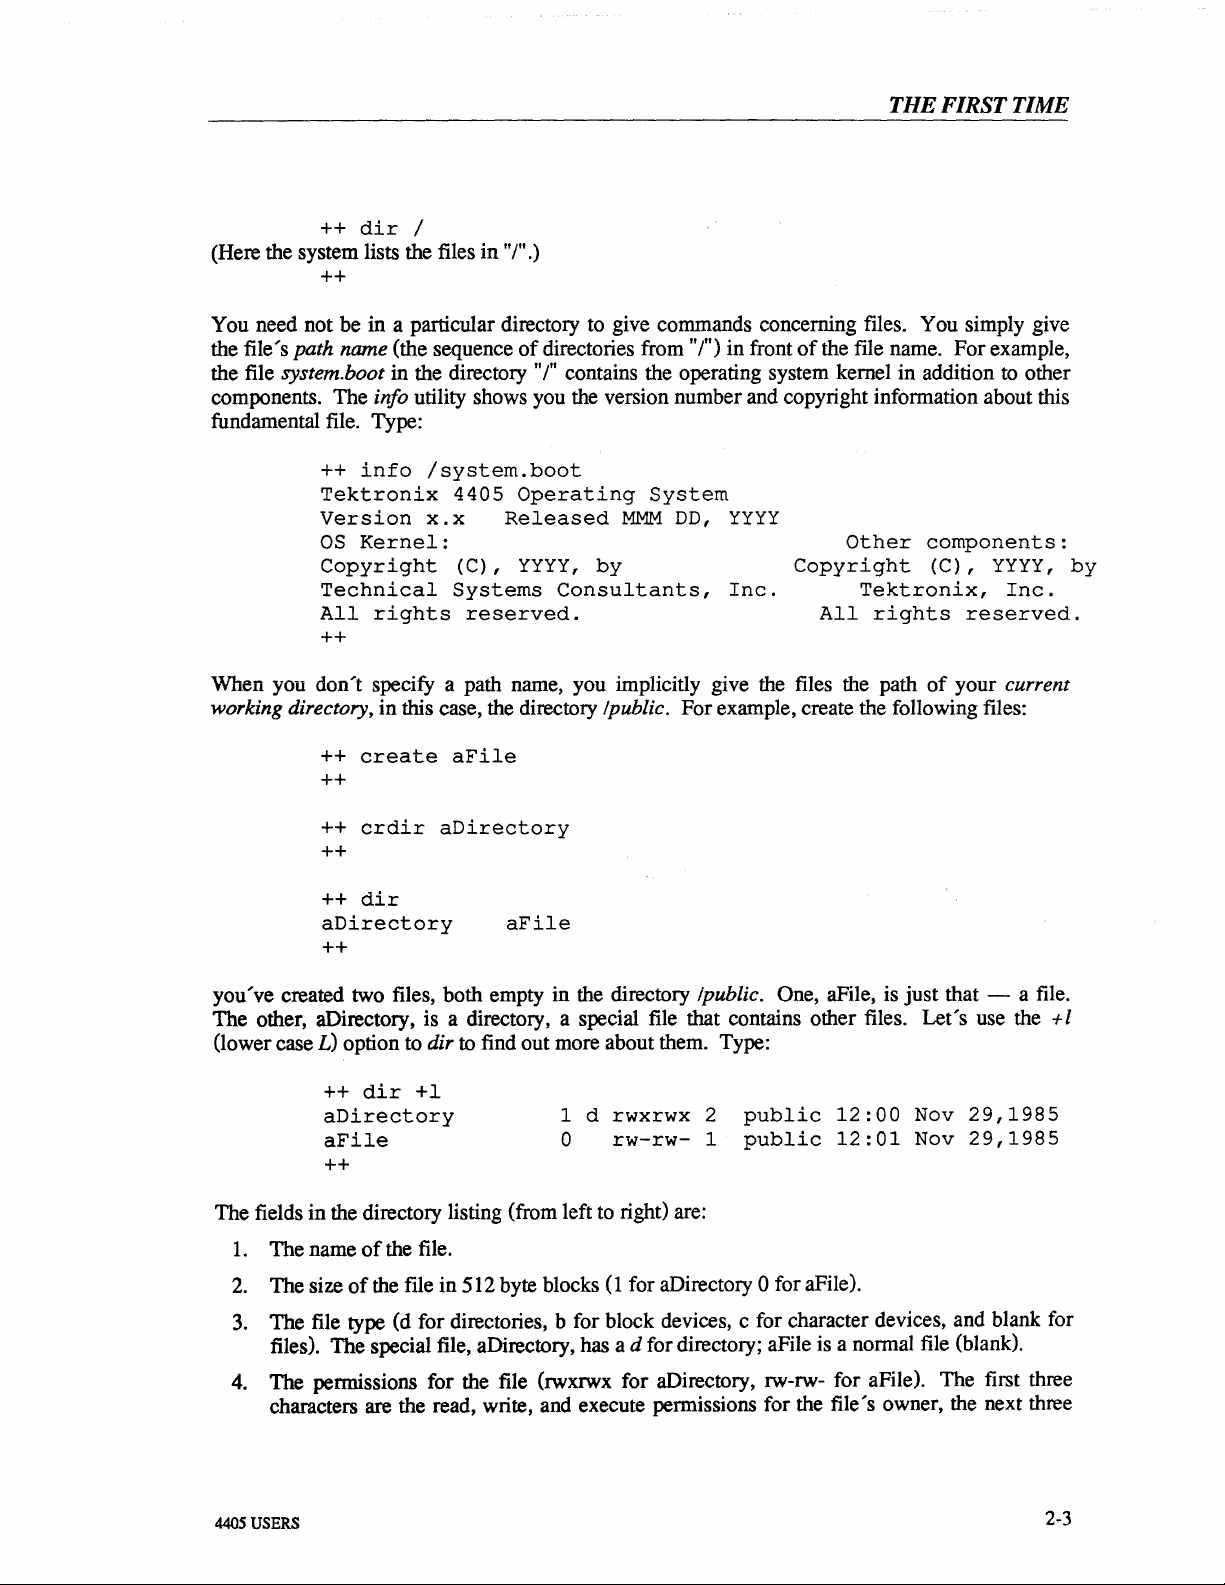
You need not be in a particular directory to give commands concerning files. You simply give
the file's path name (the sequence
the file
components. The
system. boot in the directory "/" contains the operating system kernel in addition
info utility shows you the version number and copyright information about this
of
directories from"
j")
in front
of
the file name. For example,
to
other
fundamental file. Type:
++
info
Tektronix
Version
as
Kernel:
Copyright
Technical
All
++
/system.boot
X.x
rights
4405
(C),
Systems
Operating
Released
YYYY,
reserved.
System
MMM
by
Consultants,
DD,
YYYY
Inc.
Other
Copyright
Tektronix,
All
rights
components:
(C),
YYYY,
Inc.
reserved.
by
When you don't specify a path name, you implicitly give the files the path
working directory,
in this case, the directory Ipublic. For example, create the following files:
++
create
++
++
crdir
++
++
dir
aDirectory
++
aFile
aDirectory
aFile
of
your current
you've created two files, both empty in the directory Ipublic. One, aFile, is just that - a file.
The other, aDirectory, is a directory, a special file that contains other files. Let's use the
(lower case L) option to dir
++
dir
aDirectory
aFile
++
The fields in the directory listing (from left
1.
The name
of
the file.
+1
to
find out more about them. Type:
1 d
o
rwxrwx
rw-rw-
to
right) are:
2
1
public
public
12:00
12:01
Nov
Nov
29,1985
29,1985
+ I
2.
The size
3.
The file type (d for directories, b for block devices, c for character devices, and blank for
files). The special file, aDirectory, has a
of
the file in 512 byte blocks
(1
for aDirectory 0 for aFile).
d for directory; aFile is a normal file (blank).
4. The pennissions for the file (rwxrwx for aDirectory, rw-rw- for aFile). The first three
characters are the read, write, and execute permissions for the file's owner, the next three
4405
USERS
2-3
Page 28
THE
FIRST
TIME
the pennissions for all others. See
Manual
5. A count
6.
The file's owner (user public).
7.
The time and date the file was created (or last modified).
for a complete explanation
of
how many other files are linked
perms
of
in the 4400 Series Operating System Reference
pennissions.
to
that file (2 for aDirectory and 1 for aFile).
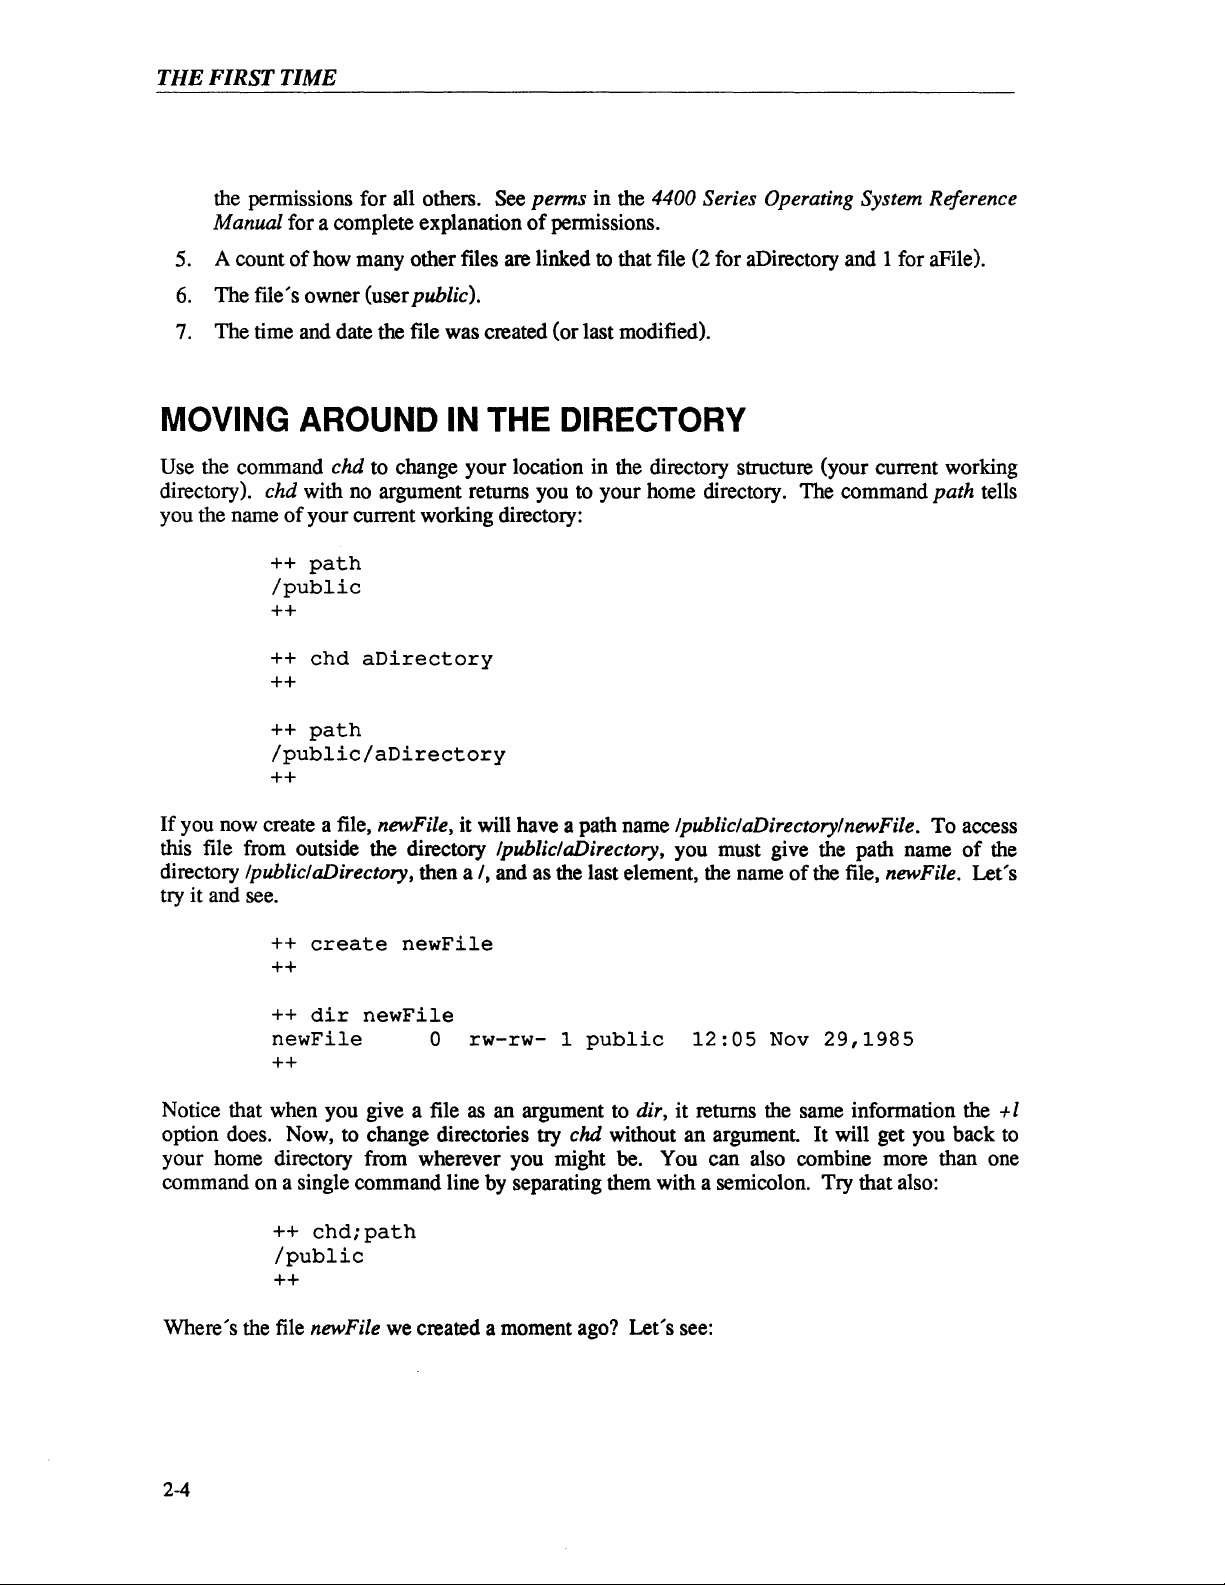
MOVING AROUND IN THE DIRECTORY
Use the command
directory).
chd with
you the name
++
++
++
++
++
++
chd
to change your location in the directory structure (your current working
no
argument returns you to your home directory. The command
of
your current working directory:
path
/public
chd
aDirectory
path
/public/aDirectory
path
tells
If
you now create a file, newFiIe, it will have a path name IpubliclaDirectorylnewFile. To access
this file from outside the directory
directory
IpubliclaDirectory, then a
IpubliclaDirectory, you must give the path name
I,
and as the last element, the name
of
the file, newFile. Let's
of
the
try it and see.
++
create
++
++
dir
newFile
++
Notice that when you give a file
option does. Now, to change directories
newFile
newFile
0
rw-rw-
as
an argument to dir, it returns the same information the
1
public
try
chd without an argument. It will get you back to
12:05
Nov
29,1985
+1
your home directory from wherever you might be. You can also combine more than one
command on a single command line by separating them with a semicolon. Try that also:
++
chdipath
/public
++
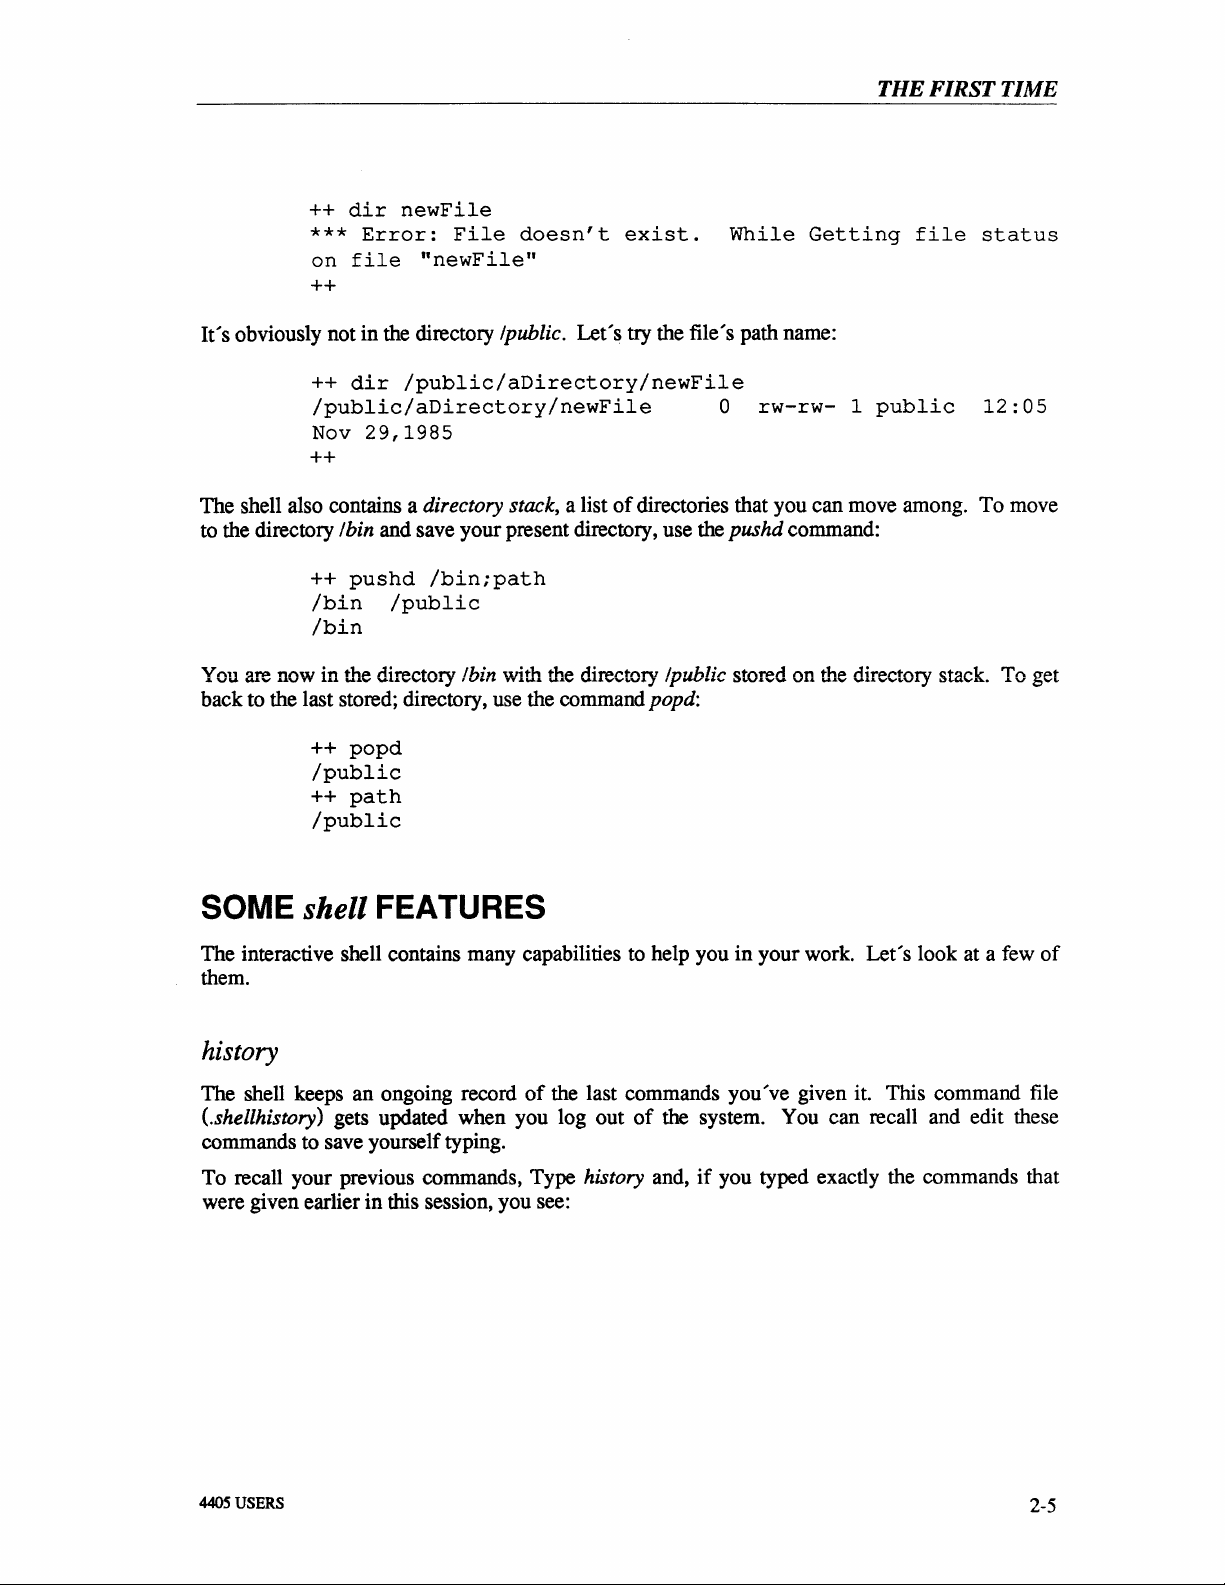
Where's the file newFile
we
created a moment ago? Let's see:
2-4
Page 29
++
dir
newFile
***
on
Error:
file
File
"newFile"
doesn't
++
It's
obviously not in the directory Ipublic. Let's
++
dir
/public/aDirectory/newFile
/public/aDirectory/newFile
Nov
29,1985
++
exist.
try
the file's path name:
While
0
rw-rw-
Getting
1
THE
file
public
FIRST
status
12:05
TIME
The shell also contains a directory stack, a list
to the directory
You are now in the directory
back to the last stored; directory, use the command
Ibin and save your present directory, use the pushd command:
++
pushd
/bin
/bin
++
popd
/public
++
path
/public
/bin;path
/public
Ibin
with the directory Ipublic stored on the directory stack. To get
of
directories that you can move among. To move
popd:
SOME shell FEATURES
The interactive shell contains many capabilities to help you in your work. Let's look at a few
them.
history
of
The shell keeps an ongoing record
(.
she llh is
commands to save yourself typing.
To recall your previous commands, Type
were given earlier in this session, you see:
4405
USERS
to
ry
) gets updated when you log out
of
the last commands you've given it. This command file
of
the system. You can recall and edit these
history and,
if
you typed exactly the commands that
2-5
Page 30

THE
FIRST
Obviously,
entered, press <Ctrl-P> (hold down the key marked
top
of
command. Each time you press <Ctrl-P> (or the top
TIME
++
history
1:
dir
2:
dir
+a
3:
help
4:
dir
5:
info
6:
create
7:
crdir
8:
dir
9:
dir
10:
11:
12:
13:
14:
15:
16:
17:
18:
19:
20:
++
if
you typed something else, your history will differ. To recall the last command you
help
/
/system.boot
aFile
aDirectory
+1
path
chd
aDirectory
path
create
dir
chd;path
dir
dir
pushd
popd
path
newFile
newFile
newFile
/public/aDirectory/newFile
/bin;path
Ctri and press the key marked P)
or
press the
the joydisk. The last command reappears with the cursor under the first character
of
the joydisk), the command line becomes
of
the
the previous history entry. To move the command line forward in your history, press <Ctrl-N>
of
(or the bottom
the joydisk). Move up and down in your history until the command line reads
path. Press Return, and the 4405 executes this command again:
++
path
/public
++
Try history again. You'll see an additional line:
++
history
1:
dir
18:
19:
20:
21:
pushd
popd
path
path
/bin;path
Notice that history doesn't get stored.
2-6
Page 31

Command Line Editing
THE
FIRST
TIME
You can edit commands, whether you are
Let's
old ones.
1.
Press the top
P»
2. Hold the top
command stored. (The beeping
history,)
3.
Step down through the commands with either <Ctrl-N>
(joydown).
4. Move
slight detour and look at some interesting features about recalling history:
a. Type the letters
b. Move
c. Move the cur&or one character to the left
d. Try moving through your history again. Now you
edit an old command.
of
the joydisk (we11 call that
several times. Notice how you step back through the commands.
of
the joydisk down (it automatically repeats) until you get to the earliest
down
until the command line is blank (at the bottom
cr
on
the command line, then stop.
up
and down through your recalled history with
can
that you
create aFile
You
can
just
on
under
cursor
is
begins with
only recall three commands: create newFile, crdir aDirectory, and
in
addition to the cr you entered.
recall only those commands that match the characters to the left
your
present line - those that begin with cr.
the r in cr.
c.
in
the process
actionjoyup -it
of
the bell tells you that
of
on
the command line (press <Ctrl-B>) so
entering new ones
Do
or
have retrieved
has the same effect as <Ctrl-
you've
or
of
can
exhausted
the bottom
your
history).
not press Return.
joyup
and joydown. Notice
retrieve any command that
your
of
the joydisk
Let's
stored
take a
of
the
it
5. Use joyup and joydown until the command line becomes:
++
crdir
6. Move the cursor around
or
Joyleft
Put
7.
8.
Press the Back Space key to delete the a and replace
key.
two types
several more ways to move the cursor
then press
key) moves the cursor left a word. <Ctrl-E> moves the cursor to the end and <Ctrl-A>
moves the cursor to the beginning
9.
Press <Ctrl-E>. The cursor moves to the end
10.
Type in B and press Return.
<Ctrl-B>.
the cursor
At
this point,
of
F to move the cursor right one word. <Esc-B> (the same sequence with the B
++
crdir
on
the character
single character deletion:
aDirectory
on
the command line
Din
you've
nearly finished editing the command line. Notice that we have
It
looks like this:
directoryB
by
using using <Ctrl-F>
or
aDirectory and press <Ctrl-D> to delete the D.
it
with a lower case d by pressing the d
Back
Space and <Ctrl-D>. In addition, you have
on
the command line. Press and release the Esc key
of
the command line.
of
the word directory in the command line.
Joyright and
++
4405
USERS
2-7
Page 32

THE
FIRST
TIME
You've
command, and then executed the new command. You
many cases,
it
command you
successfully retrieved a command, edited
it's
much faster to retrieve an old command and edit
than to type
in
a new command.
just
issued, type:
++
dir
aDirectory
To
aFile
it
see the results
directoryB
to make a new
11
find that,
of
the
in
++
Your
history is now:
++
history
1.
dir
When
22:
23:
you are editing a command line, should you want to enter a control character such as
crdir
dir
directoryB
<Ctrl-P> rather than executing it, enter the quote character, <Ctrl-Q>, followed by the control
character you want to insert. (We11 use this later with environment variables and
can
use
on
2-1 shows the moving commands you
the command line.
Table
2-1
alias.) Table
Moving Commands
Function
Move
up
Move
down
Move
right
Move
left
Move
to
Move
to
Move
right
Move
left
one
line
one
line
one
character
one
character
end
of
line
beginning
one
word
one
word
of
Control and Escape
<Ctrl-P>
<Ctrl-N>
<Ctrl-F>
<Ctrl-B>
<Ctrl-E>
line
<Ctrl-A>
<Esc-F>
<Esc-B>
Keys
Joydlsk Equivalent!
joyup
joydown
joyright
joyleft
Table 2-2 shows the commands for deleting characters, words, and the entire command line.
2-8
Page 33

Table 2-2
Deleting Commands
THE
FIRST
TIME
Function Control
Delete character left
Delete character right
Delete word left
Delete word right
Delete line to right
Delete entire line
(Restore it
This discussion has covered a lot
if
of
and remove the files and directories
BackSpace
<Ctrl-H>
<Ctrl-D>
<Esc-H>
<Esc-D>
of
cursor
deleted)
<Ctrl-K>
<Ctrl-U>
territory so far. You should probably clean up your directory
we've left there. To test your own understanding, remove
and
Escape Keys
the files and directories you created in /public. At this point, you should test your understanding
(and get some command line editing practice) by observing the following restrictions:
• Remove all files and directories in /public one by one.
• Type the word remove on the command line, then press Return.
the syntax
of
the remove command.
Yow
will see a prompt for
• Form the other commands by recalling remove from your history and edit the command
line. Don't just type in your commands.
Don't forget help and the options
Hint:
to
remove.
The shell Environment
Your shell environment is the way in which the shell responds to your commands. You can
change the environment in two ways: by setting environment variables and by aliasing
commands.
Environment
The shell maintains a list
variables)
values. To see what these bindings are, type
In response to set
are already set.
Control characters are shown in
stands for the carriage return.
the lower case versions are unshifted, while the upper case versions are shifted. Joydisk variables
that begin with C are the control versions
variables are obvious. The function keys are represented by
function keys are
4405
USERS
Variables
some
of
which are bound
or
env with no arguments, the 4405 displays a list
You've met some
FI
through F8. Defining these variables effectively programs these keys for
of
environment variables, (these are not the same
to
special keys
set
or
env.
or
functions and others that simply store
of
of
these earlier.
snoopy form; that is, the two-letter combination
as
Unix environment
environment variables that
of
You've seen the joydisk variables before. It should be obvious that
of
the variables. The ARROW and BREAK key
f1
through f12, while the shifted
C and R
2-9
Page 34

THE
FIRST
TIME
you while you are executing the shell.
PATH is the set
command, and
string, you have to enclose the string in single
the first word
of
directories that the shell searches before deciding that
PROMPT is the string that it displays for the system prompt. (To put spaces in a
or
double quotes - otherwise the shell just takes
of
the string.) Let's change a few variables and see what happens.
++
PROMPT="public++
public++
public++
public++
public++
pubIic++
f5=dir
F5='dir
"
+al'
it
cannot recognize a
Notice that we didn't have to put quotes around dir, the defining string for f5, but did around the
string for
if
you want to do the function, <Ctrl-C> or <Ctrl-U>
F5
(shifted f5) as it contained a space. Now press function key
if
you don't.) Now try pressing function
f5.
(Follow with Return
key F5 (hold the shift key down and press f5).
Notice that pressing the keys
bound to them, and that you have to press
It is also possible to put a
string, we
the quote character
can't
just press Return (that executes the command line). We use a pair
«Ctrl-Q»
f5
and F5 have the same effect
Return to execute the commands.
Return in the definition
of
key F5. Since we want the Return in the
as
typing in the commands you
of
characters,
followed by a lower-case n, to embed the character Return in the
defining string. It looks like this:
public++
pub
Ii
Type set to see the definition, then press F5 to
To change
or
remove a shell environment variable definition, you can define it to something else
(it will overwrite the old definition)
public++
public++
c++
F5='dir
unset
+al<Ctrl-Q>n'<Return>
try
the programmed function.
or
you can use unset:
f5
Alternately, you can define the environment vairable to be null (F 5=) to remove an environment
variable.
Aliases
In addition to environment variables, the shell maintains a list
command line, the shell checks the first command against its alias list, and
aliased, executes the underlying command. To see your list of aliases, type
Return.
Let's alias a command, then remove the alias.
of
aliases. When you enter a
if
the command is
alias followed by
2-10
Page 35

THE
FIRST
TIME
public++
alias
showMe
'dir
+as'
public++
public++
showMe
.home?
.login
.shellbegin
.shellhistory
public++
public++
unalias
showMe
public++
public++
showMe:
showMe
command
not
found
public++
Like unset, you can use unalias with the +a option to remove all aliases from your shell.
You can use argument designators
to
extract arguments from commands. With environment
commands, the designators apply to the last command executed, while with aliases, they apply to
the current command line. To pass all the arguments to the basic command, let's alias
II and
accept all arguments to it.
public++
alias
11
'dir
+a
$*'
public++
Now, to see the contents
public++
Watch carefully as the system displays the directories
of
three directories in long form, type:
11
jete
/bin
.
of
fetc, fbin, and ., your current directory.
Saving Definitions
You can define environment variables and aliases in a text file, then use the set command to pass
them
to the shell. To set your environment back to what you started with, type:
public++
++
If
you look at your environment with set, you
used
unalias +a, any aliases you made still exist since they aren't mentioned in .shellbegin. The
shell sets the environment automatically from
when it is subsequently invoked. You can edit
and aliases you want to have whenever you work on the 4405.
The file
In
.shellhistory also saves your history, aliases and variables from one login to the next.
addition,
if
you have any other tasks you want to do every time you login, create a script
(basically, just a list
put that script in the file
set
.shellbegin
11
find that PROMPT has been reset.
.shellbegin when the shell starts up at login time or
.shellbegin to define any environment variables
of
commands in a text file - see the
.login.
If
you haven't
OfS
reference manual under script) and
4405
USERS
2-11
Page 36

THE
FIRST
TIME
CONTROLLING THE TERMINAL EMULATOR
The 4405 communicates with you via a terminal emulator. This emulator is ANSI X3.61
of
compatible with some extensions. You can change some
ANSI command sequences
or
by ussing the conset command.
ANSI Commands
You can issue ANSI commands to the terminal emulator via the echo command. For example,
you can change the cursor from the default underline to a block by issuing the command:
++
echo
++
Where the <Ctrl-Q> tells the shell to accept the next character literally.
See the 4400 Series Operating System Reference Manual under "Terminal Emulation" for details
of
the supported ANSI commands.
'<Ctrl-Q><Esc>
[>31h'
the operating attributes via either
Other Terminal Attributes
In addition to the ANSI attributes, the 4405 terminal emulator has a number
or
non-ANSI. These include options that allow you to enable
echoing, expansion
and other attributes. To invoke these attributes, use the conset command. (Conset without any
options displays the current state
To see the full range
++
(the
++
To change from positive video (black letters on white
background)
background), type:
To change back
to
++
++
++
of
tabs, action
of
options, type:
help
negative video (white letters on black
conset
to
conset
con
set
help
message
-video
positive video, type:
+video
of
the
<Back Space> key, positive or negative video, fonts,
of
the terminal emulator.)
for
conset
appears)
disable raw mode, character
of
options that are
RS-232 Terminal Emulation
The 4405 supports an RS-232 port. To make the 4405 emulate an RS-232 terminal, connect the
RS-232 cable from the 4405 to a modem or computer port and give the command remote. The
remote command contains provisions for capturing text in a buffer, and a file transfer protocol
that can be invoked from a host computer. The source code for an example
software is given in the file
2-12
Isampleslxfer.c. This code is suitable for use on a computer using the
of
the host computer
Page 37

THE
FIRST
TIME
Unix operating system and is unsupported code.
The
RS-232 port options, such as baud rates, flagging, stop bits, parity, and crs flagging, are set
by using the
commset command. Commset without any options shows the current state
of
the
RS-232 port.
ENDING THE SESSION
Experiment with the operating system commands. Read the O/S reference manual to get an idea
of
the commands that are available and how they work, then
stop.
type
++
stop
Don't
forget to shut the power off on both the MSU and the Display/CPU units.
try
them. When you are finished,
4405
USERS
2-13
Page 38

USING THE 4405
INTRODUCTION
Section 3
At this point, you should have gone through the first-time user's exercise in Section
have not done so yet, you should do so before proceeding.
of
This section covers normal day-to-day use
takes a broader look at the operating system and how it operates than was covered in Section
This discussion assumes that you have not logged in
and are performing routine tasks.
the 4405 from a user's standpoint. This discussion
as
user system, are logged in under public,
2.
If
you
2.
POWER ON AND SYSTEM BOOT
To start using your 4405, turn on the power switches on both the Display/CPU unit and the Mass
Storage Unit. The system then goes through a power-up self-test and initialization procedure,
then logs in user
Although this procedure is fully automated, quite a lot happens during this short time.
want
to
reconfigure the system,
used in this procedure.
public
POWER-UP SELF-TEST AND BOOT
When you first turn the power
ROM (read-only memory) located on the processor board. This program executes the power-up
self test. It checks and initializes the main memory (RAM), the various interfaces, and then
attempts
to
boot the system.
if
its password has not been set.
or
customize your environment, you can do so by altering files
Let's follow the boot process and see what happens.
on
to the Display/CPU unit, control goes
to
If
you
a program located in
The boot
system _4405 .boot is present on the winchester, the boot ROM attempts to load and execute
(The system also checks in various other places for boot files,
discussion
of
the boot file.
You can also put the 4405 into an interactive
Section 5 in the discussion
ROM code looks for a file named system _4405 .boot on the winchester disk.
as
explained in Section
of
self-test.)
If
system _ 4405 .boot is not present, the 4405 asks you to enter the name
boot
from self-test. This option is also explained in
of
self-test.
If
the file
it.
5's
BOOTING THE SYSTEM
When system _4405 .boot executes,
diagnostics on the file structure. It looks for telltale signs that the system had not been shut down
cleanly, and
thorough analysis
executes in the verbose mode) prints messages on the screen to let you know what it is doing.
Diskrepair may shut down the system and ask you
substantial repairs.
If
the system had been shut down cleanly (or
needing to shut the system down) the
4405
USERS
if
it finds them, it executes a system utility called diskrepair. Diskrepair makes a
of
the disk file structure and repairs any defects it finds. It also (since it
it
loads the operating system kernel and performs some
to
reboot (press the Reset button)
if
diskrepair was able
4405 then begins the login process for user public.
to
repair the disk without
if
it makes
3-1
Page 39

USING
THE
4405
THE LOGIN PROCESS
CHECKING THE PASSWORD FILE
The 4405 begins the login process by first checking in the file /etC/log/password to see
user-name (public on power-up/reset
name is valid and the name has no password associated with it, the system logs the user in.
If
the user-name is not valid,
a password. (No password will be acceptable for an invalid user-name.)
password are valid, the
To login from another user name, issue the command login
followed by the user name to login under:
login
<user
or
4405 then logs in the user.
name>
or
the user-name from a login prompt) is valid.
if
the user has set a password, the 4405 then prompts the user for
If
the user-name and
If
the user
if
the
USER INITIALIZATION
On bootup,
/public/.login. The default version
you want
Next, the interactive shell reads its own initialization files,
your shell environment This file sets up environment variables, aliases, and restores your
history. Finally, the shell issues you a prompt and you are ready to begin.
If
you login under another user-name, the 4405 looks for the file .login, and the shell looks for the
.shellbegin in your home directory.
file
or
if
you login with the user-name public, the 4405 runs the shell script
of
this script is empty - you can enter whatever commands
script to execute every time you login.
.shellbegin and .shellhistory, to define
SETTING PASSWORDS
You can set the password
command followed by a <Return>, and the system will prompt you for a password. After you
type it, the system prompts you to type it again, then sets the password for your user-name.
the user logged in as system can set passwords for others.
person logged in
forgotten password can be removed with a utility on the DISKREPAIR diskette (see Section 5,
Recovery
and
as
Rebuild for information on this utility.)
of
your home directory with the password command. Simply type the
system can change your password.
If
you forget your password as a user, a
If
you forget the password for system, the
Only
STOPPING THE SYSTEM
3-2
Page 40

STOP
USING
THE
4405
Whenever possible,
of
backup strategy, see Section 3, Software Maintenance.
The
command to issue
the system gracefully;
background processes, and completes other housekeeping that is necessary to gracefully shut the
system down.
The
syntax
of
you
should back
when
you want to shut
it
flushes the contents
this command is simply:
up
your files before stopping the system.
down
the 4405 is stop. This
of
buffers to disks, closes
For
command
open
files, terminates
a discussion
terminates
stop
The
4405 maintains several files and buffers while it is running.
of
gracefully, some
not
contain correct information.
these files may exist after shut-down, and some
If
the system is
of
the files it maintains may
not
shut down
WARNING
In
extreme cases, simply turning
pressing the reset button
may
off
the power
or
damage the file
structure to the point that the system is no longer
usable. To l!revent this, it is essential to stop the
off
system gracefully before turning
the power. I
POWER OFF
After
you
issue the command stop, the system begins the shutdown process.
take a few moments.
Wait. After a few more moments (the time depends
of
background processes to shut down, and other housekeeping
jobs) the system gives
...
At
this point,
it
is safe to
you
the message:
System
tum
shutdown
off
the power to both the
complete
on
the
number
...
MSU
and the Display/CPU.
THE OPERATING SYSTEM AND UTILITIES
OVERVIEW
The
4400 Series Operating system consists
operations. Most commands and utilities are stored
kernel does not deal directly with the
user
input matches a file found
for commands), the kernel loads and executes that file
user
in
the search path (the sequence
of
- the
a small kernel that
in
the file system. As a point
user
interface is via a utility called shell.
of
directories the shell searches
if
it is
an
executable file,
This
procedure may
can
execute a number
or
executes it via
of
fact, the
If
of
the
4405
USERS
3-3
Page 41

USING
THE
4405
another utility called script
shell is stored in the environment variable PATH. You can view the shell's search path by
issuing the command:
++
env
The two utilities, shell and script, do not follow the same search path. The path in shell is set by
the string argument
command.
to learn more about its search path.
See the discussion in the 4400 Series Operating System Reference Manual on script
to the environment variable PATH, and that in script is set via a built-in
if
$PATH
it
is a text file with the proper permissions. The search path for
COMMANDS AND COMMAND SYNTAX
The general form
file containing the command followed by a carriage return. In addition, most commands take
options
action
4400 Series Operating System Reference Manual gives a full listing
and arguments to each
or
switches (sequences
of
the command, and some may require arguments or parameters to the command. The
Options
Most options are introduced by the plus (+) character immediately before the option character.
When a command has more than one single-character option, you can put multiple option
characters together on one line following the
of
a 4400 Series Operating system command
of
characters, usually preceded by a '
of
the operating system commands and utilities.
"+".
or
utility is just the name
+'
character) that modify the
of
the options, parameters,
of
the
For example (ignoring arguments for now), the command dir takes several extensions - a, b,
f,
1,
r, s, t, and
want to see a directory
extension
If
you want to do both (show all the files, including the
invisible files, one per line), the command
(or alternatively)
Arguments
Although there is a subtle difference between the terms "arguments" and "parameters," they are
often used interchangeably
Arguments usually take on a default value
supply parameters.
For example, the command
argument, and defaults
perms, on the other hand, prompts you with an abbreviated syntax line
parameters.
S.
These commands alter the format in which dir displays the directory.
of
normally invisible files (those that begin
+a.
If
you want the directory to print the files one per line, add the extension
is:
dir
+as
dir
+a
+s
and
Parameters
to refer to the additional information needed by a command.
if
you omit them, but the system will require you
chd (the command to change directories) takes a directory name
to
your home directory
if
you do not supply the argument. The command
with"."),
if
you add the
+s.
you omit the
If
you
as
d,
its
to
3-4
Page 42

USING
THE
4405
Options
Some options take arguments, such as the w option (wait) for the status command. When an
option takes argument (other than its default), the option that takes the argument must be the last
option in the option string (the sequence
argument must have a
commands can contain only one option string, while others may have multiple strings.
For example, to display the system status you can use the
status every 30 seconds, you can use the command:
To display more information, you could use:
(or one
...
That
status
of
the equivalents)
status
status
status
etc.
Take
status
+alsxw=30
+w=30
+al
+a
Arguments
of
characters following the "+"). The option taking an
"=" immediately behind it, followed by the argument value. Some
status command. To display the system
+w=30
+alsx
+sx
+w=30
+1 +sxw=30
MANUAL SYNTAX CONVENTIONS
Throughout this manual and the other manuals for the 4400 Series products, the following syntax
conventions apply:
• Words standing alone
by the system and should be typed exactly
on
the command line are keywords. They are the words recognized
as
shown.
• Words enclosed by angle brackets ("<" and ">") enclose descriptions that you must replace
with a specific argument.
essential part
of
the command line. For example, in the line:
adduser
you must specify the name
In addition, specific keyboard keys for you
example, <Return> means "press the key on the keyboard marked 'Return,' while <Ctrl-C>
means "hold down the key on the keyboard marked
both."
•
If
the word "list" appears
the type described in the term, separated by spaces. For example:
<file
consists
• Words
omit these words or expressions
of
a series (one
or
expressions surrounded by square brackets ("[" and "]") are optional. You may
<user
name
or
If
an expression is enclosed only in angle brackets,
name>
of
the
as
user in place
part
of
a term, that term consists
of
the expression <user_name>.
to
press are shown in angle brackets. For
'Ctrl', press 'c' and release them
of
one
or
list>
more)
of
file names separated by spaces.
if
you wish.
more elements
FILE STRUCTURE
The 4400 Series file system is a tree-structured hierarchy. Entries are files, some
of
directories. File identifiers consist
fundamental directory
of
the hierarchy, continuing through each subdirectory to the actual file
a path name, the sequence
of
files beginning at the root,
name.
of
which are
it
is
an
of
or
4405
USERS
3-5
Page 43

USING THE 4405
The file name is the identifier for a file in a particular directory. The path name is the chain
directories that enables you to find a particular file in the entire directory structure. The full
of
name
a file is the path name
of
its directory with the file name after a separating "!" character.
of
Directory Contents - dir
The dir command lists the contents
directory it takes
lists the contents
a directory, use the
For example, let's look at the directory
The system shows the directory entries, one per line. Following the name field is a number (the
file size in 512 byte blocks), then in some files a single character (when this character is a
file is a subdirectory), the
the date associated with the file.
Each directory contains two "relative" subdirectories. The first (.) refers to the directory itself.
The second (..) refers
invisible; to see these files, use the
You can use the "." and "
down a directory tree, you could see the contents
command:
dir
as
a default,
of
the directories you give as the arguments. To identify directory entries within
dir command with the option
f
+1
link count, permissions associated with the file, the file's owner, and
to
the parent
..
" designations from any working directory. For example,
of
a directory. Without an argument, it lists the contents
or
your current working directory; with one
+1.
of
"/", the root directory. Give the command:
of
that
+a
option.)
direct~ry.
(Files beginning with a period are normally
of
the grandparent
or
more arguments, it
if
you were
of
your directory with the
d,
of
the
dir
..
f
..
Moving Around The Directory Tree
When you login
your entry in the password file /
of
your current working directory
directory
Your current location is always available with the command path. For example
directory /neat/stuff, and type path, the system responds with /neat/stuff.
To change your position, type the command chd, with
argument,
specified directory.
In addition,
the current directory onto the stack and moving to a new directory with the command
You can view the contents
directory on the top
as
to
the system, the 4405 makes your home directory (this directory is defined in
etc! log/password) your current working directory . You can think
as
your location in the directory tree and changing the default
moving to different locations in that tree.
if
you are in the
or
without an argument. Without an
chd returns you to your home directory; with an argument, it moves you to the
shell maintains a directory stack. You can move about the directory stack by pushing
of
the directory stack with the command dirs, and change back
of
the stack with the command popd.
pushd.
to
the
3-6
Page 44

USING
THE
4405
Adding
You can create empty files with the utility create, and directory files with the utility crdir. In
addition, many applications programs (such
you. To remove files
directory you can use the
+koption.
and
Removing
Files
as
the text editor) will automatically create files for
or
directories, you should use the utility remove. To remove an empty
+d
option; to remove a directory and all the files in it, you can use the
WILD CARD EXPANSION
Both shell and script perform wild card expansion - they will match a series
against wild cards on the command line. The most commonly used wild card is
stands for any sequence
amazing_clox,
single characters with
and lower case letters as distinct.
See the 4400 Series Reference Manual entries under both shell and script for a more thorough
discussion
or
any other letter combination that begins with a and ends with
of
wild card expansion.
of
any characters. For example, the pattern a*x matches ax, a
n?n
as a wild card. (The operating system, and most utilities, treat upper
A is
""Bnot
the same as a.)
of
characters
n*n,
x.
You can match
which
Jox,
MULTI-TASKING
The 4400 Series operating system is capable
at a time.
enough to give the illusion that it is performing the tasks simultaneously.
In
reality,
of
course,
it
does one job, switches to another, then back - usually quickly
of
multi-tasking,
or
seeming to do more than one job
The interactive shell and script control multi-tasking. To run a job in the background, you can
or
start
processing, the n
end a shell command line with the character
&n
must be the last character on the command line.
n&n,
while for script
to
do background
USER COMMANDS BY FUNCTION
The following list summarizes the user commands by function. For details on the actual
or
command syntax, use the help utility
entry for each command.
FILE MANIPULATION
The following user commands and utilities are primarily used with individual files.
copy
Make copies
of
directories
or
individual files.
see the 4400 Series Reference Manual, which contains an
4405
USERS
3-7
Page 45

USING
THE
4405
create
Create new empty flIes.
edit
Line-oriented text editor.
link
Create a link to an existing file.
list
List the contents
of
text files.
move
Move files to another location
or
rename them.
remove
Remove files
or
directories.
rename
Rename a file.
FILE PROCESSING
The following commands are used for file processing.
compare
Compare and list the differences between two files.
dump
Formatted file dump in hexadecimal and ASCII.
filetype
Print out message about the type
of
a file.
find
Search for a pattern within a file.
3-8
Page 46

USING
THE
4405
info
List information about a binary file. This command usually lists copyright information and
of
revision numbers
the file given as an argument.
touch
Update the last-modified time on a file.
tail
Display the last 250 (or specified number of) characters
of
a file.
DIRECTORY MANIPULATION
The following commands and utilities are primarily used when working with directories.
chd
Change the current working directory.
crdir
Create new directories.
dir
List the names
of
files in a directory.
path
Display the path name
of
the current working directory.
SYSTEM ACCESS AND STATUS
date
Display date and time. User logged
dperm
Adjust the default permissions for newly created files.
exit
Terminate a subshell and return
4405
USERS
in
as
system may modify date and time.
to
the calling shell.
3-9
Page 47

USING
THE
4405
help
Obtain information about commands.
login
Access the file system as a user.
owner
Change the owner
of
a file.
password
Set
the password
of
a user for login.
perms
Set the permissions for files.
status
List the status
of
current tasks
or
stop
Gracefully shut down the system.
DISK MANAGEMENT
backup
processes. Useful to find background jobs that may
be
running.
Create archival backups
4400 Series machines.
of
files and directories. Also useful for interchanging programs between
diskrepair
Check and optionally repair the logical structure
Rebuild
for hints
on
using diskrepairJ
format
Format and write a file system
3-10
on
a floppy disk.
of
a disk system. (See Section 5, Recovery and
Page 48

free
USING
THE
4405
List the amount
of
free space
on
a disk.
restore
Restore files from a backup format floppy disk.
COMMAND EXECUTION
echo
Display arguments to this command.
int
Send an interrupt to a task. (Used to kill background jobs.)
jobs
List infonnation about the user's background tasks.
script
Command language used to execute commands from a text file.
shell
Interactive system command language.
wait
Wait for background jobs to complete.
COMMUNICATIONS
commset
Examine
conset
Examine
or
modify parameters for the communications
or
modify parameters for the console (display and keyboard).
port.
4405
USERS
3-11
Page 49

USING
THE
4405
remote
Connect through the communications port to a host computer.
PROGRAM DEVELOPMENT
asm
The relocating assembler.
CC
The 'c' compiler.
debug
General purpose debugger.
headset
Modify task parameters in an executable file.
libgen
Generate a library file.
libinfo
List information about a library file.
load
Linking loader to produce object files.
smalltalk
Run the Smalltalk-80 interpreter and environment.
strip
Remove symbols from an executable file.
relinfo
List relocation information in an object file.
3-12
Page 50

update
USING THE 4405
Execute commands based on dependencies
in
a makefile.
440SUSERS
3-13
Page 51

Section 4
SOFTWARE MAINTENANCE
INTRODUCTION
As in any other complex software system, the 4405 requires software maintenance.
of
sale user
by a system manager.
term might slip in here and there), but to think
as
simply the user system. The person who is logged in under system has more power and much
greater responsibility for keeping the system running than someone logged in under
This section discusses the responsibilities and privileges that the user logged in under system
must be aware of.
Many utilities will allow only the
f etc, are the maintenance tools that user system uses to repair the disk structure, add and delete
user accounts, and other system housekeeping chores. Most
or
inappropriate for indiscriminate use.
You should be confident
you log in under
safely.
your system, you must perform these tasks, which on a larger system are done for you
We
prefer not to use the term system manager with the 4405 (although the
of
the person
system user to invoke them. These utilities, kept in directory
of
your command
system. Many utilities and procedures require knowledge and skill to use them
of
the operating system
or
persons who perform these duties
of
these utilities are either dangerous
as
a user under public before
If
you are the
public.
CAUTION
system has very
User
As
system, in directory
operating system by simply typing
few
sa[e$uards against accidents.
'/',
you can destroy the
"remove * +k".
THE FACTORY CONFIGURATION
As
supplied from the factory, the 4405 is ready to plug in and run. Two user accounts, the
general user
password. Either user can set its own password, and
need not set passwords for either account unless you feel that protection is necessary.
The general user utilities are contained in directory
directory
accounts and
You can change the search path by changing the shell environment variable PATH. To see the
current search path, type:
To add or remove search paths, you can change the environment variable PATH via the set
command
4405 USERS
public and the housekeeping user system are predefined. Neither account has a
system can set a password for public. You
fbin and the system utilities are contained in
fetc. User public and any other general user accounts will search only their home
fbin for command names. User system will also search fetc for command names.
++
echo
(the
or
use addpath and rmpath. An example
$PATH
system
responds
with
the
of
current
using
search
set
is given later in this section.
path)
4-1
Page 52

SOFTWARE MAINTENANCE
USER public
If
you are the only person using the 4405, you should do most
public. This is the normal
wide devastation with a few accidental keystrokes. You have the full resources
available, and are protected only against destroying another's files
If
utilities.
using different
similar to those
several persons are using the system, each with
user
names to organize your work, each
of
user
user
public.
mode
of
operation -- you are protected against causing system-
of
these general users will have privileges
File Protection and Ownership
an
individual
of
your work logged into user
or
using potentially destructive
user
name,
of
the system
or
if
you
are
You are the
on
these files (and no others) with the
on
the system, each
allow
directory.
owner
or
deny access to
User system can override
of
all files that you create as a particular user.
user
can allow
perms
or
deny access to his
your
directories by allowing
or
change these permissions.
command.
Passwords
You can specify
inhibits anyone from logging into
change
does not warrant using passwords.
If
or
you forget your password, it can by changed by
delete
or
change a password for
your
your
password. You
your
user name by using the
account unless they know the password. User system can
can
leave the password
user
system using the pasSl-v'ord command.
Backing up User Files
You should (depending upon your system organization)
doing so, you reduce the possibility
entire file structure each time; by using the
new
or
changed since the last backup (incremental backup).
To
perform
1.
an
Move to
incremental backup:
your
home directory. Type:
of
losing large amounts
+t
option you
You
can change the permissions
If
more than one public level
or
her
owned files via perms. You can
or
denying x (execute) permission to a
password
off
your
account
back
up
your
own
files frequently. By
of
work. You need not
can
simply backup the files that are
user
command. This
if
your
situation
back
up
exists
your
chd
(The backup process is relative.
under
the directory in which you are currently working.)
2. Backup
(See the backup command in the 4400 Series Operating System Reference
explanation
3.
When
be quite large and consist
4-2
your
files. Type:
backup
of
the options.)
prompted, type the volume name
+dtA
of
If
you are not
of
more than one word.)
in
the first backup diskette. (The volume name can
your home directory, it will backup files
Manual
for an
Page 53

4.
Insert a fotmatted diskette
diskettes, you can type
diskette before using it.
5.
Insert subsequent diskettes until the backup set is complete.
previously used set
the last backup.
II
you are a smalltalk user,
changes file, be sure to back up the delalt changes file. To
type:
of
as
prompted by the system. (If you have not fotmatted your
1<
Return> instead
You may fotmat subsequent diskettes in the same way.)
diskettes, backup will only write those files newer than the date
NOTE
and
have not created your own personal
of
<Return>, and the system will fotmat the
SOFTWARE MAINTENANCE
If
you are backing up on a
of
do so,
backup
backup will use all the storage space on a diskette, breaking long files across diskettes. When
restore files from a backup set, they will be in the same relative position they were in when
you
they were saved.
alternately. In this way,
backup set.
You should label your backup diskettes in sequential order.
could lose some data.
It is your responsibility to back up your files.
own hands. Should the hard disk system be damaged, a current set
you recover your files up to the point
Series systems by backing up only the files you want to exchange, then restore the backups onto
the other system.
A
Suggestion
To prevent errors and reduce typing you might find it useful to put your backup procedure into a
file and keep it in a personal command directory. As an example, let's see how a user
script
called sams (who changed his prompt to
comments in parenthesis aren't to be typed in, they just explain what the commands do.)
First, user sams creates his personal command directory
personal utilities.
You should maintain at least two sets
if
you damage one set, you can restore some
+
dl
/smalltalk/system/*Changes*
of
backup diskettes, using them
of
your files from the older
If
you get them out
You have the safekeeping
of
backup. You can also exchange files with other 4400
Sams+ + in his .shellbegin file) would do so. (The
/sams/bin to contain this and any other
of
of
backup diskettes will let
of
order, you
your work in your
++login
Password:
Sams++
Now he creates a empty file and gives himself execute (u+x) permission.
4405
USERS
sams
crdir
bin
(Sam
(This
types
will
his
be
password
his
command
here)
directory)
4-3
Page 54

SOFTWARE MAINTENANCE
Sams++
Sams++
Sams++
directory
bin
directory
save
User sams now has two tasks left: editing his file Isamslbinlsave to put in the commands he will
use, and editing the Isamsl.shellbegin file to put the directory Isamslbin in the search path. He
can use the line editor
In I samsl .shellbegin the default line for his search path is:
PATH=
He edits this line to read:
PATH=".:/sams/bin:/bin"
Now to test
if
PATH is right, he types:
Sams++
Sams++
Sams++
.:/sams/bin:/bin
Sams++
create
perms
dir
edit, a Smalltalk-80 file list,
. :
/bin
set
save
echo
bin/save
bin/save
+dl
"
II.
1 d
"./bin":
o
.shellbegin
$PATH
rwxrwx
rwxrw-
u+x
(The
(Make save
(Let's
2
0
or
name
sams
sams
the optional editor, EMACS, to do so.
of
executable)
see
what
14:27
14:29
the
Dec
Dec
command
we've
19,
19,
file)
done)
1985
1985
When the prompt comes back after save it shows that the system recognized the command (which
did nothing). In response to
Finally, to make the command
of
two lines
When the file is saved, the command is ready for use. Sam put in two more options: I to list what
it is doing and
them out
To perfonn his personal backups,
files on today' s backup disk set. The next time he backs up his files, he perfonns the same task
using his alternate set
his command:
chd
isams
backup
B to not save files that end in .bak. You can include these
if
you prefer.
RESPONSIBILITIES
When more than one person uses a 4405, one person should be responsible for the system
maintenance tasks. This person should
public level account whenever possible) but use the system account only when necessary to
(use a
perfonn
system level tasks. These accounts include the following:
echo, the system prints the command search path it recognizes.
save perfonn his backups,
+dltAB
Sam now types save and follows the prompts to save his new
of
personal backup diskettes.
OF
USER
not
system
use the system account for his
in
the file Isamslbinlsave he puts the
if
or
you wish, or leave
her nonnal work,
4-4
Page 55

SOFTWARE MAINTENANCE
BACKING UP THE SYSTEM
One
of
the most important tasks for system is backing up the files on the hard disk.
responsible for their own files, you should do a complete system backup whenever you change
any
of
the system files.
and archived in a safe place, you should maintain at least two more system backup disk sets,
alternating between them as you perform backups.
backups, you should also do a frequent incremental backup similar to that recommended for the
users earlier in this section.
In
addition to the system backup diskettes you received with your 4405
If
users do not maintain their own file
If
users are
Performing a system
A system-level backup can take over an hour, depending on the number
system. To save time, you should have enough formatted diskettes, labeled in sequential order, to
contain the full system backup.
as
to add diskettes
diskettes. Each time, use the oldest set
backup to a safe place in case anything should happen to this backup set. The backup procedure
is:
1.
Login
as
2.
Type chd.
3.
Type:
4.
Insert the backup diskettes in sequential order and press <Return> when prompted to do so
by the system.
5.
Store the latest set
system rebuild.
6.
Logout from the system account. Don't use the system account for normal work - use a
public level account for that.
you add files.) As mentioned, you should have at least two sets
user system.
If
you had logged in as system previously, this gets you back to "/".
backup
Backup
of
files that exist on the
(35
- 40 diskettes will hold the system
of
diskettes for the newest backup, moving the last
+dl
of
backup diskettes in a safe place in case they may be needed for a
as
delivered; you
11
of
have
backup
ADDING AND DELETING USERS
Adding and deleting users on the 4405 is a simple matter. To add a user, simply type:
adduser
The user name should be 8 or less lower-case characters. This command creates a directory
"!"
under
and .shellhistory files in that account.
password command.
Deleting a user is nearly
directories when you delete the user.
Or,
4405
with the same name
deluser
if
you want to retain the user's files, type:
USERS
<user
as
<user
name>
as
the user name, and puts a default copy
simple. You need
name>
of
the .login .shellbegin,
If
you want to set a password for the new user, use the
to
decide whether to delete the user's files and
If
you want to delete the user's files, type:
4-5
Page 56

SOFTWARE MAINTENANCE
deluser
+x
<user
name>
CAUTION
Never delete user "system" (the user whose user number
is
0).
If
you do so, you will have
to
do
a complete system
rebuild as described in Section 5.
INSTALLING SOFTWARE ON THE 4405
The user system is also responsible for installing software on the 4405. Most software for the
4405 is distributed in backup format as this format makes most efficient use
of
space. To get a catalog
called catFile, issue the command:
++
restore
Then, insert the diskettes, in sequence, as the system calls for them. When finished, you can
examine the file, catFile, to see the organization
Backup format files are stored
relative to the current working directory (the files start
start with the root directory and give an absolute pathname for each directory.
If
you want to install a set
installation site for the software, then give the command:
files on a set
+C
>catFile
as
either relative or absolute named files. Relative files are stored
of
relative files on your system, chd to the directory you want to be the
of
backup format diskettes in a file you can examine,
of
the software.
at"." on your catalog), while absolute files
of
the floppy diskette
++
restore
Insert the diskettes and press <Return> as the system prompts, and the system then restores all
files and subdirectories in a subtree rooted at your current working directory.
If
you want to install a set
you must first be sure that each directory exists. Restore will not create directories in absolute
must
mode -- they
structure tI;at matches your catalog file, give the command:
++
The files will each be placed in the correct directory, regardless
directory.
If
your directory structure is not correct for a set
the directories that
Exactly how you organize your system is up to you. You can put files wherever you want, but
you should keep the following points in mind.
The User's Search Path
The user's default search path covers only two directories, his current working
directory (.) and the
exist
restore
don't
install it (or a link to it) in
in the search path for
+ld
of
absolute files on your system (each directory name starts with
for
the installation to succeed. When you have constructed a directory
+ld
of
your current working
of
absolute files, the system will complain. Note
exist, create them, then restore again.
/bin directory.
/bin.
system.
If
If
you are installing software for general use,
If
the software is for system use, the directory /etc is
you want to add another directory
to
the search path,
"1"),
4-6
Page 57

SOFTWARE MAINTENANCE
you (or the user) must modify the environment variable PATH via addpath
Keep Related Programs Together
You may wish to install a set
a directory apart from
create a link within either
Reference Manual
for an explanation.
Search Time
If
you have a very large number
the search time for each command might get quite long.
situation, you might wish
for less common shared commands).
must be edited to add that
assigns the environment variable
the order you want to search and separate the directories by colons, or, altemitavely
addpath for these users.
use
Software Requirements
Some software requires that it be placed in a specific position on the directory
structure. This limits your freedom where to place the software.
command which invokes the software to reside elsewhere, use
addressed by both names.
or
of
related programs, or programs that call each other, in
fbin
or
fete. To call these programs from fbin
fbin or fete. See link in the 4400 Series Operating System
of
files that are accessible by the public level users,
If
to
start a new command directory (for example fpublicbin
If
you do this, the .shellbegin file for each user
directory to his
lip ATH" to include your new command directory in
or
her search path. Change the line that
or
fete, you can
you have this type
If
you want the
link to allow it to be
set.
of
Permissions and The
User Bit
For a file to be executable by another user, you should set the permissions with the
o+x
option. In the discussion on perms in the 4400 Series Operating System
Reference Manual,
temporarily grants the user
allows you to grant temporary and limited
particular utility. You can set this bit on
mention is made
of
the file the permissions that the file's owner has. This
of
the user bit. This is a device which
system privileges to a user running a
or
off with the
s+
and s- options to perms.
ERROR RECOVERY AND SYSTEM REBUILDING
You should be knowledgeable about the 4405 operating system before attempting to recover lost
files
or
rebuild the system.
system and run
If
diskrepair found any unreferenced files, they are left in the directory Ilost+found. You should
examine these files
For other error
diskrepair before you attempt to recover data.
to
recovery and instructions how to rebuild the system, see Section 5
If
you are unsure as
see
if
they contain the missing data.
to
your abilities, make a separate backup
of
this manual.
of
the
4405
USERS
4-7
Page 58

Section 5
RECOVERY AND REBUILD
INTRODUCTION
PROBLEMS
If
you experience problems with your 4405, the trouble can arise from either the hardware
software. Luckily, the 4405 is an extremely reliable machine and rarely experiences any
hardware problems; users can do little to solve hardware problems beyond diagnosing them. The
in
final discussion
determine whether your 4405 has hardware problems.
Software,
problem
discussions
on
of
hyperactive fingers. Since software is more prone to damage than hardware, most
in
this section goes through how you can use your
the other hand, can be damaged by many things - from a runaway program to the
this section are
on
recovering from software errors.
4405'
s self-test facilities to
REBUILDING ALTERNATIVES
or
the
This section covers several ways
First
Aid
covers a few
addition, this discussion shows you how
The second discussion,
radical system repair procedures. It takes you through the use
diskrepair utilities. It shows a few
files (hopefully)
recovery methods.
The third discussion,
of
reformatting the hard disk - a procedure that completely destroys all the data on the disk.
Y
o~
should attempt this rebuild procedure only
the non-destructive recovery methods cannot recover the system.
These discussions do not depend on one another - information in one discussion may be
repeated in another.
of
the ways you can restore a partially damaged system that still boots. In
Non-Destructive System Rebuild Procedure, takes you through more
intact
Ingenuity and experience will show you additional ways to expand these
Complete System Rebuild Procedure, is the most radical. It covers methods
of
recovering a damaged system. The first discussion, Software
to remove a forgotten system password.
of
the DISKREP AIR diskette and
of
the ways you can attempt to recover a system with valuable
if
you do not have important files
on
your disk,
or
YOUR BACKUP DISKETTES
Your 4405 was delivered with the software installed
of
addition, you received a number
additional diskettes that contain utilities that can be used to rebuild a damaged system.
The three additional disks have a special format and contain a special version
system that will boot from the floppy disk drive. They provide you a minimal set
up
build
formatted differently than normal 4405 file diskettes, you must copy them with the utility
(To do so, format three blank diskettes with format, then use fdup for each
diskettes.)
a complete hard disk version
diskettes containing copies
of
the operating system. Since these diskettes are logically
on
the hard disk and ready to run. In
of
the system software, and three
of
the operating
of
of
your three special
tools to
fdup.
4405
USERS
5-1
Page 59

RECOVERY
AND
REBUILD
Let's look at each
Your
This disk contains the hard disk reformatting utilities. It contains a special (bootable from
floppy) version
of
SYSREFORMAT
the hard disk with which it is shipped.
of
the special diskettes.
Disk
of
the operating system, formatting utilities and a defect list
of
unusable portions
CAUTION
Each SYSREFORMAT diskette contains the defect
a particular hard disk. It should
NOT
be used to format
any other hard disk - it could mark good sections
listfor
of
the
hard disk unusable and attempt to use unusable sections
of
the hard disk.
In addition to the system reformatting utilities, your SYSREFORMAT diskette contains the
utilities that rebuild and restore the base operating system.
Types
of
Hard Disk Reformatting Utilities
CAUTION
All reformatting utilities destroy data on the hard disk.
Do not reformat unless it is absolutely necessary.
There are three types
are:
logical
physical
manual
of
hard disk reformatting utilities
A logical format simply erases data from the hard disk. It is
quick,
The tracie/sector address information on the hard disk is preserved.
A physical reformat erases the entire hard disk and rewrites the
track/sector information on the disk. When you use a physical
reformat on the hard disk, the defect list (stored
SYSREFORMAT diskette) locks out unusable areas on the disk.
Physical reformat is the most extreme reformatting method you
will use.
The manual reformat utility physically reformats the hard disk,
but the defect list must be manually entered.
normally use this utility, it is an emergency measure for use only
if
simple, and does not use
the defect list becomes damaged
on
your SYSREFORMAT diskette. They
tt'ie
hard disk defect information.
as
badbllcs
You will not
or
the hard disk is replaced.
on
the
5-2
Page 60

Virtual Memory And Swap Space
RECOVERY
AND
REBUILD
A section
portion
directly addressable by the processor, but not necessarily in physical memory.) Disk space used
for swap space is not available to the file system. Thus, a 90 Mb disk that has 32 Mb swap space
has
has 37 Mb available to the system.
of
the hard disk is reserved during formatting for swap space. (Swap space is that
of
the disk that is used to implement the virtual memory
58 Mb
of
space to be used by the file system, while a 45 Mb disk with 8 Mb
of
the system - memory that is
of
swap space
Names Of Reformatting Utilities
All reformatting utilities have names
aaaa - is the type
x - is the disk size in Mb (45
y - is the swap space in Mb (16
of
formatting utility - logical, physical,
of
the general format: aaaaFormat-x-y Where:
or
manual.
or
90).
or
32).
CAUTION
Before using "physicaIFormat", verify that the serial
number on your
number
of
SYSREFORMAT disk matches the serial
your MSU (located under the front cover).
''physicaIP ormat" uses information specific to the
to
winchester disk assigned
to
attempt
use this with any other winchester disk - it
it at the factory. Do not
could result in an extremely unreliable or even unusable
system.
"physicalF ormat" destroys all data on the
winchester disk.
CAUTION
Using "manuaIFonnat"
that is not available to the user.
requires hard disk information
If
you use
"manualF ormat" without this information, it can cause
unreliable system operation.
System Rebuilding Utilities
In addition to the hard disk reformatting utilities, your SYSREFORMAT diskette contains a utility
called
structore for a hard-disk based operating system and the
the scripts that restore the the standard system software partitions. These scripts are not useable
from the
the
440SUSERS
copyOS. This utility mounts the hard disk and copies the necessary skeletal directory
vital system files. CopyOS also copies to
SYSREFORMAT system - they must
SYSINSTALL system.
be
used from a hard-disk based system such as
5-3
Page 61

RECOVERY AND
REBUIW
Your
This disk is a bootable floppy that installs a hard-disk-based operating system that runs in the
structure created by the
by using CopyOS will support several special utilities (scripts) that restore partitions of,
whole, operating system. These utilities are:
SYSINSTALL
• jileRestore - a master utility to recover the six system partitions:
• restoreOS
• restoreK
• restoreC
• restoreSTI
• restoreSTS
• restoreSTD
• restoreOS - a utility
diskettes supplied with your system.
• restoreK - a utility to recover the operating system kernel from the standard system
diskettes supplied with your system.
• restoreC - a utility
diskettes.
• restoreSTI - a utility to recover the Smalltalk-80 interpreter from your standard system
diskettes.
Disk
SYSREFORMAT system. The structure created by formatting the disk
or
to
recover
to
recover the 'c' environment files from your standard system
the
operating system files from the standard system
or
the
• restoreSTS - a utility to recover the Smalltalk-80 standard image, sources, and other
system files from your standard system diskettes. RestoreSTS also overwrites the standard
changes file with an empty (length
the default changes file.
• restoreSTD - a utility to recover the Smalltalk-80 demo system from your standard
system diskettes.
of
Details
Your
This disk is a bootable minimum system that contains two useful utilities:
how to use these utilities are given in the Non-destructive System Rebuild Procedure.
DISKREPAIR Disk
• diskrepair - a copy
system. This utility can sometimes repair a system that will not
System Rebuild Procedure tells how to use diskrepair.
• rmpass - this utility removes the system password, should it
to use this utility are found in this section under
of
the system diskrepair utility that can run from a floppy-based
0) file and could potentially destroy any code stored in
boot The Non-destructive
be
forgotten. Details on how
Software First Aid.
5-4
Page 62

Your Standard System Diskettes
RECOVERY
AND
REBUILD
Your standard system diskettes contain archival copies
the factory . You should copy these diskettes using
Use the copies
to
rebuild your system should that become necessary.
Your standard system diskettes are partitioned into six groups
1.
The operating system files
2.
The operating system kernel
3.
The 'c' compiler and environment
4.
The Smallta1k-80 interpreter
of
the system software
fdup and store the originals in a safe place.
of
files:
as
delivered from
5. The Smallta1k-80 standard image and system files
6.
The Smallta1k-80 demolmage and a number
of
demonstration files and utilities.
These diskettes are in absolute, rather than relative backup fonnat. They cannot be restored to
other than their correct places in the system.
directories which will contain the restored files must
create directories in absolute
fonnal
If
If
you must restore files from these diskettes, the
be
present on the hard disk; restore will not
you get errors during an attempt to restore files from
these diskettes, follow the procedure under "Non-destructive System Rebuild."
440S
USERS
5-5
Page 63

RECOVERY
AND
REBUILD
Software First Aid
SOFTWARE FIRST AID
PREVENTIVE MEDICINE
The most effective insurance against disaster is a carefully followed plan
of
Without recent back ups, recovery
regular backup procedure, you can minimize data loss from even the most severe system crash.
Read the discussion on
schedule presented there, or a more rigorous backup schedule.
Backing
Up
lost files is nearly impossible. With a systematic and
the System in section 4
of
this manual and follow either the
of
backing up your files.
AUTOMATIC SYSTEM REPAIRS
Each time the 4405 boots, either from power-on or from a reset, it checks
down gracefully.
manner (someone pressed the reset button, or simply turned the power
diskrepair to diagnose and repair potential or actual problems.
If
you suspect that something has happened during normal operation that could damage the
system structure, log in as user
section).
the disk diagnostic utilities without attempting to repair
options. In some cases, this may help you to recover damaged files without doing a complete
system rebuild.
run
system rebuild.
If
diskrepair from it.
If
there is a possibility that the system was damaged or shut down in any other
system and run diskrepair (full details are given later in this
you use the + v option, it will report any potential problems it finds. You can also run
the
disk structure by using
If
your system cannot be booted, you can try booting the DISKREP AIR disk and
If
diskrepair cannot repair your system, you will need to do a complete
to
see that it was shut
ofo, it runs the utility
the
n,
b,
and f
REMOVING A FORGOTTEN system PASSWORD
If
you lose or forget the system password, you can recover use
utility on the DISKREPAIR disk. This utility removes the password from the user system.
To use the rmpass utility, boot the DISKREP AIR diskette (see the booting instructions under
Non-Destructive System Rebuild) and type:
of
the system by using the rmpass
rmpass
This utility
unmounts the hard disk.
mount) you may need to run
is
an executable script that mounts the hard disk, edits the password file, then
If
this script runs into trouble (for example
diskrepair
as
in the Non-Destructive System Rebuild Procedure.
if
the hard disk does not
RESTORING A USER'S FILES
If
the system-wide structure seems intact, and damage
you should restore only that portion
have followed the recommended procedure in section
5-6
of
the system from the user's incremental backups.
is
confined to one or two user accounts,
4,
you (or the user) can do so by following
If
you
Page 64

RECOVERY
this procedure:
1.
Login under the user's name.
2.
Have the latest set
3.
Be sure you are in the user's home directory.
4. Give the command: restore +bdln
5. Insert the incremental backup disks in order as the system prompts for them.
of
incremental backup disks available.
AND
REBUILD
Software First
Aid
RESTORING
If
the system
often restore it by:
1.
Login
2.
Have the most recent set
3.
Give the command: restore +dl
4.
Insert the disks
If
the lost files were not due to a known operator error, you should run diskrepair before restoring
the system files.
is
damaged but still bootable (some files deleted, but you are still running), you can
as
user system.
WHEN THE SYSTEM
When the system boots, it tries to locate a file in the root
called "system_
the message:
When you press the return key, the system finds and displays a menu
that it finds on the hard disk. Press the function key associated with the ".boot" file you wish
try.
If
you cannot boot the system from this menu, you should
Rebuild Procedure.
4405.boot."
Cannot
Enter
FilES
as
the program prompts you for them.
Locate
<Return>
ON
A BOOTABlE SYSTEM
of
system backup disks at hand.
Will
If
this file is lost or renamed, when you tum on the 4405 it displays
Boot
to
NOT BOOT
File
continue:
of
the winchester disk file structure
of
files ending in ".boot"
try
the Non-destructive System
to
RECOVERING
If
your system will not boot, you will see an error message indicating either a hardware or
software error. Hardware errors will
be
of
the type "Cannot locate boot file" or "Wrong file type." An "I/O error" can indicate either
hardware problems,
If
you have a hardware error, first check the following:
«OS
USERS
AN
UNBOOTABlE SYSTEM
be
such things
or
file system structural errors (run diskrepair).
as
"Device not ready." Software errors will
5-7
Page 65

RECOVERY AND
Software
First Aid
REBUIW
• Does the disk drive indicate activity?
the power switch is on, and that the fuse in the back panel
•
If
the MSU is running, check that the SCSI tenninator is installed and secured and that the
SCSI cable is securely seated.
•
If
you receive a "Device not ready" error,
Try
booting again by pressing the Display/CPU reset button.
If
you have software errors,
perfonn the following
or
suspect that the errors could be caused by software, you should
Non-destructive System Rebuild Procedure.
If
not, check that the power cord is connected, that
tty
of
the MSU is intact.
turning the power to the MSU off, then on.
5-8
Page 66

RECOVERY
Non-ikstructive System RebuUd Procedure
NON-DESTRUCTIVE SYSTEM REBUILD
PROCEDURE
OVERVIEW
If
you have important files on a non-bootable system, it is sometimes possible
of
portions
that the system hardware is running correctly, that the
seated.
described in the final discussion in this section.
the system and recover the lost data. Before attempting this task, you should verify
SCSI cable and terminator are completely
If
you doubt the system's hardware integrity, run it in Continuous Self-Test overnight,
AND
REBUILD
to
rebuild all or
as
Figure 5-1 shows the 4 steps involved in the Non-destructive
are:
1.
Boot the DISKREPAIR diskette, a floppy-based system, and repair the directory structure
of
the hard disk
2.
Boot the SYSREFORMAT diskette, another floppy-based System. Run the utility copyOS.
This constructs the proper operating system file structure and copies the necessary files to
the hard disk so that the
with which you can install the standard system software
3. Boot the
the standard system software partitions.
4. Boot the repaired system from the hard disk. The operating system files and any other files
you needed to restore are now in place, along with undamaged files from the previous
operating system.
The utility
fetcllogfpassword.bak. It then replaced the password file with the default password file
that contained only users
you can login and rename fetcllogfpassword.bak to fetcllogfpassword.
letcllogfpassword.bak was damaged, you can replace it from your incremental backup
disks
SYSINSTALL diskette. This hard disk system can now run the utilities that restore
or
rebuild it with the adduser utility.
if
necessary . (Your system may be bootable after this step).
SYSINST
copyOS attempted
system and public with no passwords.
ALL
system can run. This step also copies the utilities
to
copy the old password file
NOTE
System Rebuild Procedure. They
or
any
of
its partitions.
to
the file
If
this copy was sucessful,
If
the file
The remainder
4405
USERS
File ownership is determined
If
the fetclloglpassword file is
public will
theform:
the file.
user will then own the file in question.
of
this discussion deals with the details
own
"«nn»"
lfyou
files. The others will only
where nn is the user number who owns
add
a user who is assigned that number, that
by
user number,
not
not
by name.
restored, only system and
show
of
each
ownership
of
these steps.
of
5-9
Page 67

RECOVERY
AND
REBUILD
Non-destructive System Rebuild
Procedure
5-10
Figure 5-1. Non-Destructive System Rebuild Procedure.
Page 68

STEP 1 DISKREPAIR
RECOVERY
Non-destructive
System
AND
Rebuild
REBUILD
Procedure
The first step in rebuilding a non-bootable system
repair the directory structure
bootable diskette that contains utilities that will allow you to inspect the hard disk system and a
of
copy
the possible choices available when you have successfully booted aDISKREPAIR system.
The
primitive shell, and looks for its utilities on the floppy. Due to space limitations,
contain all the functionality
logged in
To boot your DISKREP AIR system:
the diskrepair utility to rebuild a damaged directory structure. Figure 5-2 shows some
DISKREP AIR system is a floppy-based system. It is based on the floppy, runs a more
as
user system.
if
it has become corrupted. Your DISKREP AIR diskette
of
the full system. When you boot the DISKREP AIR system, you are
is
to
detennine how badly
it
is damaged, and
it
does not
to
is
of
A - Boot the DISKREPAIR Diskette
1.
Insert the DISKREP AIR diskette into the floppy disk drive and power on the system.
2.
Invoke the Interactive Boot/Self-Test Menu. You can either:
A.
Press and release the Reset Button twice. Hold the Reset Button down briefly each
of
time. The Reset Button is located on the rear panel
B. Hold the left
screen clears and the machine
3. When the Interactive Boot/Self Test Menu appears, press function key
Menu).
Shift key down and press the Break key for several seconds after the
type (Tektronix 4405) appears.
the Display/CPU unit.
f1
(Interactive
a
4. When the
from Floppy).
5. Wait for the system to successfully boot from the floppy disk. (This takes about a minute.)
If
the DISKREPAIR diskette will not boot, it indicates that either the
damaged,
To isolate the problem further, attempt to boot your
will not boot, you have hardware problems. Recheck your cables and tenninator, and attempt
boot again.
If
your SYSREFORMAT diskette boots, this indicates that your DISKREPAIR diskette is
damaged. Contact your local Tektronix sales representative for assistance in replacing
Interactive
or
that you have hardware problems with your system.
If
the problem persists, contact your local Tektronix service representative.
Boot
Menu appears, press function key f2 (Boot system_ 4405.boot
DISK
SYSREFORMAT diskette.
REPAIR diskette is
If
this diskette
it.
to
4405
USERS
5-11
Page 69

RECOVERY
AND
Non-destructive
REBUILD
System
Rebuild
Procedure
restore
Operating
System Files
type:
restoreOS
restore
Operating restore
System Kernel 'C' Files
type: type:
restoreK restoreC
restore
Smalltalk-80
Interpreter
type:
restoreSTl
restore
Smalltalk-80
System Files
type:
restoreSTS
restore
Smalltalk-80
Demo Files
type:
restore STD
5-12
Figure 5-2.
Step
1.
Using DISKREPAIR.
Page 70

B -
When
Mount
the DISK
Non-destructive
the
Hard
REP
Disk
AIR system returns with the ++ prompt, type:
RECOVERY
System
Rebuild
AND
REBUILD
Procedure
mount
If
the hard disk mounts successfully, this indicates that the directory structure
intact.
marked
C -
If
repair it, type:
The
Operating
If
on
you should boot the system
diskrepair cannot repair
system rebuild.
o -
When
access to any undamaged
the DISKREP AIR diskette. You can use some
on
not inspect the hard disk files
You can inspect files
D
-Inspect
Run
dislcrepair
the hard disk does not mount, the directory structure
diskrepair
+v option to diskrepair causes the program to inform you
System Reference Manual for details).
diskrepair terminates nonnally (it returns you to the ++ prompt with no warning messages), go
to the next step.
Inspect
you have successfully mounted the hard disk, you are running as system and have full
absolute path names such as backup) to inspect the hard disk directories and files. You need
/dev/disk
on
Your Hard Disk Files.
/dev/disk
If
diskrepair exits with warning messages,
if
the
hard disk, your data is most likely lost. You must do a complete
Your
Hard
Disk
flIes and utilities that reside
if
you already know what file sets you will be restoring.
/disk
on
the hard disk is
the hard disk without attempting to repair it.
on
the hard disk has been damaged.
+v
of
its progress (see the 4400 Series
or
shuts the system down, then
necessary and run diskrepair again. If, after several tries,
Go
to the step
Files
on
the hard disk as well as
of
the hard disk utilities (but not those dependent
the
utilities
To
on
When
you are running from your DISKREPAIR system, the root
of
floppy drive, while the root
the full path name (starting from Idisk)
For
example,
Idisklbinl<utility>. Alternatively, you could change your working directory to Idisklbin (to put
the utility
reference.
The following examples show two ways to move files from one user
You can sometimes diagnose the hard disk booting problem
structure. Example 5-1 shows the files and permissions that must
boot
(Use dir +adl from I to find them).
440S
USERS
if
you want to use a utility found
in your search path), but must still remember to type the full name
/disk/bin/copy
chd
/disk/bin
copy
/disk/firstuser/filea
the hard disk is at Idisk.
of
the utility you want to use
in
/disk/firstuser/filea
To
!bin
on
/disk/seconduser/filea
of
the directory tree is
access hard disk files, you must type
or
file you want to reference.
the standard system, you must type
of
on
the hard disk to another.
/disk/seconduser/filea
by
inspecting the hard disk file
be
present for a disk system to
on
the
the files you
5-13
Page 71

RECOVERY AND
Non-destructil1e
System
REBUIW
Rebuild
Procedure
Directory
.badblocks
act
bin
dev
etc
gen
lost+found
system_440S.boot
tmp
Directory
utmp
Directory
remove
script
shell
stop
Directory
console
disk
diskc
floppy
floppyc
null
pmem
smem
swap
ttyOO
"/":
"/disk/act":
"/disk/bin":
"/disk/dev":
-
- -
d
rwxr-x
rwxr-x
d
d
rwxr-x
d
rwxr-x
d
rwxrwx
rwxr-x
d
rwx-rwxrwx
rw-rw-
rwxr-x
rwxr-x
rwxr-x
rwxr-x
c
rw-rwrw-rw-
b
rw-rw-
c
rw-rw-
b
rw-rw-
c
rw-rw-
c
rw-rw-
c
c
rw-rw-
rw-rw-
b
rw-rw-
c
Directory
-
.init.control
init
log
ttylist
Directory
password
Directory
errors
system
Directory
system
Directory
chkpass
Directory
Directory
Directory
.shellbegin
.shellhistory
"/disk/etc":
rw-rwx--
d
rwxrwx
rw-r-
"/disk/etc/log":
rw-r-
"/disk/gen":
d
rwxrwx
rwxrwx
"/disk/gen/errors":
rw-r-
"/disk/gen/system":
rwx-"/disk/lost+found":
"/disk/tmp":
"/disk/public"
rw-rrw-r-
5-14
Example
5-1.
Minimum Bootable System.
NOTE
In the directory ldiskldev, the files ldiskldev/console
Idiskldev/ttyOO
Idiskldevlswap. In addition, the file Idisklpublic/.shellhistory can
prevent booting
new file
of
are linked together, as are Idiskldevldisk and
if it is corrupted. (You can remove it and create a
0 length
if
you suspect this.)
and
Page 72

Non-destructive System Rebuild
E - Unmount the Hard Disk and Stop the System
To unmount the hard disk and stop the system, type:
RECOVERY
AND
REBUILD
Procedure
unmount
stop
If
you current working directory is on Idisk, the system will respond with the message
busy."
STEP 2.
Boot your "SYSREFORMA T" diskette with the same procedure you used with your
"DISKREPAIR" diskette.
When you get the
The executable script file copyOS creates the necessary skeletal directory structure needed on the
hard disk, then copies vital system files to the hard disk. These files can later
"SYSINST
restore the bootable hard disk system.
When copyOS is finished, the script shuts the system down and prompts you to perform the next
step.
Use chdto get back to "I", then stop.
COpy
copyOS
ALL"
/dev/disk
"device
THE OPERATING SYSTEM FILE STRUCTURE
++
system prompt, type:
be used with the
diskette to create a hybrid system that frees the floppy drive and allows you to
STEP 3. RESTORE THE SYSTEM FILES.
Following the same boot procedure, boot your" SYSINST ALL" diskette.
The SYSINST
memory. The actual scripts for restoring files
diskette - but could not run from the floppy based operating system,
in the drive. A system_4405.boot file on the hard disk would be an image
system on the
order to run.
The
SYSINSTALL diskette contains a backuplrestore program in case the hard disk version is
inoperable. The restoreOS script mounts the SYSINSTALL diskette and copies the backuplrestore
utility to the hard disk, then runs it in restore mode.
system and the partition restoring scripts fail, you should manually move this utility to the hard
disk. To do so, you must be logged in
drive, and type:
The operating system that this boot procedure brings up allows the use
you can restore the standard files to bring the system up
choices available when restoring files.
ALL
diskette loads a
SYSREFORMAT diskette, and would require a floppy in the drive at all times in
++
++
++
++
mount
copy
unmount
/dev/floppy
/floppy/gen/system/backup
/dev/floppy
hard
disk based operating system kernel into the system's
caine (via copyOS) from the SYSREFORMAT
as
it requires a floppy disk
of
the floppy based
If
you are trying
as
system, have the SYSINST
/floppy
to
full function. Figure 5-3 shows the
/gen/system
to
partially restore the
ALL
diskette in the floppy
+lop
of
Idev/floppy - thus
4405
USERS
5-15
Page 73

RECOVERY
AND
REBUILD
Non-destructive System Rebu':ld Procedure
5-16
Figure 5-3. Step 3. Restore Files.
Page 74

Non-destructive
NOTE
To use the "SYSINSTALL" scripts, you should be logged in as user
"system".
bootable hard disk system, login as
root directory.
When you get the system prompt, you have several choices:
1.
If
you want to restore the complete set
If
you want to try these scripts from a damaged, but
"system" and work from the
of
system files, type:
fileRestore
RECOVERY
System
Rebuild
AND
REBUILD
Procedure
The script, fileRestore, prompts you to insert each diskette
system files. Follow the prompts, and when the script is complete your system will
bootable from the hard disk.
2.
If
you want to restore only the operating system files, type:
of
the six sets
of
restoreOS
This script prompts you to insert the diskettes from the set
utilities diskettes. When this script completes, you can either copy another group
stop the system.
3.
If
you want to restore only the operating system kernel, type:
of
standard operating system
restoreK
This script prompts you to insert the standard operating system kernel diskette. When this
of
files
or
script completes, you can either copy another group
4.
If
you want to restore only the 'c' environment and graphics library, type:
stop the system.
restoreC
This script prompts you to insert the diskettes from the set
diskettes. When this script completes, you can either copy another group
the system.
If
you want to restore only the Smallta1k-80 interpreter, type:
5.
of
standard 'c' environment
of
files
restoreSTI
standard
of
files
or
stop
be
or
This script prompts you to insert the standard Smalltalk-80 interpreter diskette. When this
of
files
or
script completes, you can either copy another group
6.
If
you want to restore only the Smalltalk-80 standard system files, type:
stop the system.
restoreSTS
This script prompts you to insert the diskettes from the set
diskettes. When this script completes, you can either copy another group
the system.
4405
USERS
of
standard Smalltalk-80 system
of
files
or
stop
5-17
Page 75

RECOVERY
AND
REBUILD
Non-destructive System Rebuild
This script overwrites the default standard changes file. See
the discussion in Section
backing
7.
If
you want to restore only the Smalltalk-80 demo files, type:
up
the default changes file.
restoreSTD
Procedure
NOTE
4, Software Maintenance about
This script prompts you to insert the diskettes from the set
When this script completes, you can either copy another group
The partial file restore scripts leave copies
type:
remove
++
++
stop
(If you use the fileRestore script, it removes these files and stops the system for you.)
/restore*
of
the scripts on the hard disk. To remove them,
/fileRestore
of
Smalltalk-80 demo diskettes.
of
files
or
stop
th~
system.
STEP 4. RESTORE THE PASSWORD FILE
Your hard disk should now have a bootable system on it. Boot the system from the hard disk by
pressing the reset switch once. When the prompt appears, you are in a standard system logged in
as
user"
public" .
Login as
system.
not have an owner name associated with them. (The operating system obtains
for files from the password file, and this file has been replaced.)
The
or
damaged) to the name password.
only
Inspect the contents
"system" (you
If
you use the
won't
+1
need a password) and inspect the files remaining from the last
option to the dir command, you will notice that some retained files may
copyOS and restoreOS utilities copy the existing password file (assuming it
bale,
then copy in the distribution password file that contains
system and public. type:
sys++
sys++
password
sys++
list
(
...
sys++
chd
Jete/log
dir
password.bak
password.bak
contents
of
the backup password file.
of
old
password
If
everything is fine, type:
file)
the
owner name
has
not been lost
sys++
sys++
You should now have your original password file on the system.
If
the password.bak file is missing
file in your incremental system backup diskettes. To find the diskette containing this file, type:
restore
5-18
rename
+C
password.bak
or
damaged, you should have a copy
password
of
the current password
Page 76

The
system will display the files on each
will appear as:
RECOVERY
Non-destructive System Rebuild
of
the diskettes as you insert them.
AND
REBUILD
Procedure
The
password file
"Directory
password
When you locate the password file, you can abort from the restore utility by typing a <Ctrl-C>.
To
restore it, insert the disk and type:
restore
If
this diskette is not the first in your backup set, you will get a message from restore indicating
that this is the wrong volume
the password file will be restored.
/ete/log"
...
(permissions,
+1
jete/log/password
of
the backup set, asking
owner,
if
etc)
you want to proceed. Answer
"y"
and
CAUTION
Be sure you are restoring the file from / etc/ log/password
and not the utility from /bin/password.
file
is incorrect, the system will not boot.
Alternatively,
you can use the
were assigned. The utility
creates the user)
if
you know the order
adduser utility to rebuild the file by adding users
if
it finds one.
in
which the users appeared in the original password file,
adduser checks for files under that user name and complains (but
If
the password
in
the same order
in
which they
CAUTION
File ownership is determined by user number.
create users
originally created, you will have a case
in a different order than they were
of
If
you
massive file
ownership confusion to sort out.
A final alternative is to directly edit the password file (examine a working password file before
of
attempting this) and manually enter the fields. Either
of
contents
until either you set them while logged in as user
again.
the original password file, and that users' accounts remain unprotected by passwords
system,
these options requires that you know the
or
the user sets his
or
her
own password
COMPLETE SYSTEM REBUILD PROCEDURE
OVERVIEW
Rebuilding a complex software system from scratch is not a trivial task. However, the procedure
has been automated considerably .
system that perfonns two tasks, it fonnats the winchester disk, then installs a minimum system
(without the
OIS
kernel) on the hard disk. Next, you boot another simplified system that is a hard
You first boot a simplified system from a flexible disk - a
4405
USERS
5-19
Page 77

RECOVERY
Complete
disk resident system. It moves the backup/restore utility to the hard disk, then restores the entire
system from the system backups. The final rebuild step is
made after the last full system backup. These steps are treated in detail for the remainder
discussion.
AND
REBUILD
System Rebuild
Procedure
to
restore any user's files that were
of
this
STEP 1 - FORMAT THE WINCHESTER WITH SYSREFORMAT
CAUTION
Verify that the serial number on your SYSREFORMAT
diskette matches the serial number
under the front cover). Each
contains badblock formatting information for one and
only one hard disk. Using the wrong
disk can create an unreliable or unusable system.
verify that the serial number is correct:
1.
Be sure that the power is
of
the MSU (located
SYSREFORMAT disk
SYSREFORMAT
off
to the MSU.
To
2. Grasp the front bezel
and
pull
it
STRAIGHT
shaft
easy to break
3. Once clear
of
the power switch - it's very fragile and
off)
of
the switch shaft, look for the serial
number. Try not to remove the connector
LED.
just
4.
Compare the serial number on the
(If
you put it back wrong, it won't ruin it, it
won't glow.)
SYSREFORMAT diskette
of
the MSU in both hands
forward. (This exposes the
to
the
to
that
of
the MSU.
If
they don't match, don't use "physicalF ormat."
To format the hard disk, you must boot the minimal system contained on
SYSREFORMAT. This disk contains enough
ways:
• Logical format - a procedure that erases all the data and file structure information on the
disk, but does not physically reformat the disk.
• Physical format with defect list - a procedure that physically erases and reformats the
disk. Formatting information is taken from a file
winchester it was made for.
• Physical format from keyboard - a physical format that requires the user to manually
enter the formatting information. This information is marked on the body
disk and is not normally available
after replacing a winchester disk.
of
a system
to
the user. This procedure is used by a service person
to
format the winchester in one
on
the floppy disk that is specific
L'ie
disk marked
of
the winchester
of
three
to
the
When you must rebuild your system, first
the physical format does not work, the winchester disk may be defective.
contact your local Tektronix Field Service office for servicing.
5-20
try
a logical format, then a physical format from file.
If
this should happen,
If
Page 78

RECOVERY
Complete
System
AND
Rebuild
REBUILD
Procedure
A - Boot the
1.
Insert the SYSREFORMAT diskette into the floppy disk drive and power
2. Invoke the
A. Press and release the Reset Button twice.
B. Hold the left
3.
When
Menu).
4.
When
from Floppy).
Wait
5.
SYSREFORMAT
Interactive Boot/Self-Test Menu.
time.
The
Reset Button is located
Shift key down and press and hold the Break key for several seconds
after the screen clears and the machine type
the Interactive Boot/Self Test Menu appears, press function key
the Interactive Boot Menu appears, press function key f2 (Boot system_ 4405.boot
for the system to successfully boot from the floppy disk. (This takes about a minute.)
Diskette
on
You
can
either:
Hold
the Reset Button
the rear panel
(Tektronix 4405) appears.
of
B - Format the Hard Disk
Logical Format.
deterimine the disk size and
45
Mb
hard disk with a 8
++
++
If
this is your first attempt, logically format the hard disk.
swap
space you are using.
Mb
swap space, type:
logicalFormat-45-8
For
example,
on
the system.
down
briefly each
the Display/CPU unit.
f1
(Interactive
To
if
you are formatting a
do so,
Physical Format.
format the disk.
If
you have already attempted an unsuccessful logical format, physically
CAUTION
Be
sure that
one
for
your
SYSREFORMAT diskette is the correct
your
hard disk drive. Remove the diskette
and
check the serial number against the serial number on the
MSU.
Deterimine the size
of
swap space, type:
The
physical format will take five to ten minutes to complete. Do not disturb the system while it
is formatting.
Remove the
message appears.
If
they do not match, do
of
the disk and swap space you are using.
++
physicalFormat-45-8
++
SYSREFORMAT disk when the following
n
•••
System
shutdown
NOT
complete
proceed.
"
To
format a 45
Mb
disk with 8 Mb
4405
USERS
5-21
Page 79

RECOVERY
Complete
AND
System
REBUILD
Rebuild
Procedure
STEP 2 - RESTORE THE SYSTEM WITH THE SYSINSTALL DISK
A - Boot the
The
SYSINST
software. To boot this disk, simply:
1.
Insert the SYSINSTALL diskette into the floppy disk drive and power
2.
Press and release the Reset Button twice. Hold the Reset Button down briefly each time.
The Reset Button is located
3. When the Interactive Boot/Self Test Menu appears, press function key
Menu).
4. When the
from Floppy). -
5. Wait for the system to successfully boot from the floppy. (This takes about a minute.)
SYSINST
AIL
disk contains a minimal bootable operating system that can restore
Interactive Boot Menu appears, press function key f2 (Boot system 4405.boot
ALL
Disk
on
the rear panel
of
the Display/CPU
on
unit
your
the system.
f1
(Interactive
system
B - Restore Flies from Your System Backups
You
now have a system that was booted from the floppy disk and is running from the hard disk.
This system is capable
made (as advised
To
restore
your
system, type:
++
Now, relax and wait a few minutes. During this time, the backup program is moved to the hard
thenfileRestore invokes restore to install the first partition
disk,
of
reading the system software, either from a complete system backup you
in
Section 4)
fileRestore
or
from the set
of
backup diskettes you received with
of
the system.
your
system.
When
the
system prompts you with the message:
"Insert
Remove the SYSINST
diskettes. Press the
that diskette.
As each diskette is restored to the system, the system will
prompt you to insert the next disk with the message:
"Insert
After each group
diskettes.
effect
When
next
AIL
Return key, and
next
of
files has been restored, the system will prompt you to insert the next group
the
system restoration is complete, the system will return a message to that
volume
disk and insert the first disk
volume
--
Hit
C/R
if
everything is correct, the system will restore the files from
--
Hit
C/R
to
to
C - Stop the System and Reboot
The
JileRestore script automatically shuts down the system when
message:
"
...
System
appears, you can reboot by simply pressing the Reset Button.
go through a normal boot-up sequence, run
shutdown
complete
diskrepair (to verify the file structure), do a CRC
...
continue:"
of
your standard operating system
continue:"
it
has completed. When the
"
On
the first reboot, the system will
of
5-22
Page 80

RECOVERY
Complete
check, then shut down the system again. Reboot again, and the system will run diskrepair and do
as
a CRC check again, then log you in
user public.
System
AND
REBUILD
RebuUdProcedure
STEP 3 - RESTORE USER'S FILES
The last task
system backup. You can do this, or,
own files.
of
the system rebuild is to restore any user files that were not copied during the last
if
other users keep their own backups, they can restore their
4405 SELFTEST
OVERVIEW
Selftest is used primarily during manufacturing and servicing
of
functions that are not
found in the 4405
If
you have any question whether a problem is caused by a fault in the 4405's hardware, you can
run self test to either confirm
Reset button) it executes a
If
you saw no error messages
AIS
general interest
Field Service Manual.
or
deny that suspicion. Each time you tum
power-up selftest that is invisible to the user unless it detects an error.
the
probability
to
the user. A complete discussion
of
a hardware problem is low.
RUNNING SELF TEST
of
the 4405. It contains many
of
selftest may
on
the 4405 (or press the
be
If
you still suspect that you may have a hardware problem, you can invoke a more extended
selftest by the following procedure:
1.
If
the system is on, stop it gracefully by typing stop and waiting until the system shut-
down message appears. The shut-down message is:
n
•••
System
(If the system is already shut off, tum on the power to both the Display/CPU unit and the
MSU and perform step 2 before the system begins to
2.
Locate the Reset button (on the left rear
twice. Hold it in briefly for each press and wait a moment between pushes.
3.
The LED in the Caps Lock key will flash off and on until the keyboard test is done.
4. The 4405 initializes its display. Errors found at this point will
Upon 'completion
the screen.
5. The 4405 initializes the keyboard.
otherwise it will tum on. Errors are shown on the display.
4405
USERS
of
the Display initialization routine, the word "Tektronix " is printed on
Shutdown
If
complete
of
the Display/CPU unit
the keyboard is good, the LED will
...
boot)
n
as
you face it) and press it
be
shown on the display.
Upon completion, it prints
be
left off,
5-23
Page 81

RECOVERY
AND
REBUILD
"4405"
6.
The 4405 now prints the "Interactive BootlSelfTest Menu." This menu shows the function
key selections available at this point. These are:
on
the display.
•
f1
- Interactive menu (discussed under System Rebuild Procedure)
• f2 - Adjustment procedures (includes sound generator)
•
f3
- Adjustment menu (Disk load)
•
19
- Continuous selftest
• fI 0 - Enable/Disable cache
•
fIt
- Continue self test
• f12 - Exit selftest
If
you make no selection,
Self Test" option.
in
approximately 20 seconds the 4405 defaults to the "Continue
Keyf1
Key fI takes you into the interactive menu. This is the boot procedure discussed under System
Rebuild Procedure.
Keyf2
Key f2 invokes a set
of
little use to most users, with the exception
procedure is menu-driven, so feel
of
adjustment procedures used during manufacturing and repair. These are
of
the Sound Generation Menu. (This test
free
to experiment.)
Keyf3
Key f3 accesses the hard disk and loads the full selftest into RAM, then executes from there.
Keyf9
Key
19
invokes continuous selftest. In this mode, the 4405 repeatedly goes through its self test,
if
halting only
it encounters an error.
Key f10
Key fI 0 enables and disables
Key
f11
If
you select key
as
the display memory is tested, then the 4405 begins printing messages
its functions. When the selftest is complete, the 4405 will again display the "Interactive
BootiSelfTest Menu."
fIt,
or
the
use
of
the cache while executing selftest.
do nothing, the 4405 goes into "Continue Self Test". The display flashes
on
the screen
as
it
tests
5-24
Page 82

Key f12
If
you press key f12, the 4405 exits from selftest
attempts to boot from the hard disk.
FINDING INTERMITTENT ERRORS
RECOVERY
It
goes through its power-up initialization and
AND
REBUILD
Perhaps the most annoying problem
intermittent problem - a problem that disappears whenever a service person comes within a
of
mile
your 4405 hardware, put the machine into continuous selftest and leave
machine will run through its repertoire
error occurs, make a record
Invoking
To put your 4405
the afflicted machine.
of
Continuous
in
continuous selftest:
1.
Stop the system
2. Press the reset button twice, holding it briefly each time
3. When the "Interactive
will then cycle through its ROM-based selftest.
4.
To
exit from continuous selftest, you must wait until the menu appears once again, then
select an option from the menu before the selftest continues.
selftest
Boot/Self Test Menu" appears, press function key flO. The 4405
in
any mechanism, from a computer to a fishing pole, is an
If
you suspect that you have one
of
tests until it encounters an error, when it will halt.
it
and contact your local Tektronix service center for repairs.
of
these pernicious bugs living in
it
overnight. The
If
an
4405
USERS
5-25
Page 83

Appendix A
UNPACKING AND INSTALLATION
INSTALLATION
Before unpacking your 4405, you should select a site that will be suitable for comfortable
operation
and a small, flat-bladed screwdriver.
of
the 4405. You will also need a carton opener (a small stout-bladed knife will do)
Installing your
1.
Select an installation site.
2.
Unpack the Display/CPU unit and the MSU (mass storage unit). Keep all your packing
materials in case you later need
3. Assemble the mouse.
4. Connect the keyboard and mouse to the Display/CPU; connect the SCSI cable
units.
5. Connect a power cord to both units.
6.
Connect both units to a suitable power source.
7.
Tum
is working properly.
4405 consists
to Section 2 The First Time and go through the transcript there to verify that the 4405
of
these basic steps:
to
transport the 4405.
SELECTING A SITE
You should choose a site for your 4405 that meets the following requirements:
• Enough room for ventilation and cable routing. You should allow at least three inches
(75 mm) behind both the MSU and the Display/CPU for cable routing. You must also
allow at least two inches between the ventilation openings and anything that might obstruct
airflow.
to
both
CAUTION
Do not block the airflow or cover the 4405
"s
air
vents in any way. This could cause overheating and
result in circuit damage.
• Properly grounded power source. Be sure that a properly grounded source
available for your
•
A stable environment. Ambient temperature while the 4405 is operating should stay
within
should stay between
fluctuations.
4405
USERS
50 to 104 degrees Fahrenheit (+10 to +40 degrees Centigrade). Relative humidity
4405.
10
and 75%. The area should not be subject to rapid temperature
of
power is
A-I
Page 84

UNPACKING
AND
INSTALLATION
UNPACKING
If
your 4405 has been unpacked, move ahead to the appropriate
step.
NOTE
Before unpacking check both shipping cartons for signs
Report any damage to the carrier and your Tektronix sales
representative immediately.
Retain all packing materials in case the 4405 must be transported
in the future.
UNPACK THE MSU
1.
Open the MSU carton from the top using the carton opener.
2.
Remove the box containing
3.
Cautiously remove the MSU unit and place it where it will be installed.
4.
Remove the shipping card from the floppy drive.
the
software and instruction manuals.
UNPACK THE DISPLAY/CPU
1.
Open the carton from the top using the carton opener.
2.
Remove the keyboard and set it aside.
of
damage.
3. Remove the top packing pad.
4. Remove the package containing the accessories and set them aside.
5. Lift the Display/CPU unit from the packing and set it in the installation site.
6.
Remove the keyboard, mouse, and SCSI cable from the accessory packages and set them
next to the
4405.
CHECK THE ACCESSORIES
In addition to the keyboard, mouse, SCSI cable, and the MSU and Display/CPU units, you should
have the following accessories:
• 4405 User's Manual (this manual).
•
An
Introduction to Smalltalk-80.
• 4400 Series Operating System Reference Manual.
A-2
Page 85

• 4400 Series 'c' Programmer's Reference Manual.
• 4400 Series Assembly Language Reference Manual.
• RS-232 communications port cable.
• Two power cords; 1 for MSU, 1 for Display/CPU.
UNPACKING
AND
INSTALLATION
• Several
blank keyboard overlays (for the function keys).
ASSEMBLE THE MOUSE
1.
Remove the mouse and its rubber-coated steel ball from the shipping package.
2.
Tum
the mouse body
direction
3. Put the rubber-coated ball in the cavity.
4.
Replace the ball retainer and tum
The mouse is now ready for use.
of
the arrows.
on
its back and remove the circular retainer by turning
114
tum against the direction
of
CONNECT THE CABLES
CAUTION
Check that both voltage indicators on the rear
Display/CPU and the voltage indicator on the
indicate the proper voltage selection for your power
source.
of
the arrows.
the
MSU
114
tum in the
1.
Plug the keyboard cable into the rear
"KEYBOARD."
2.
Plug the mouse cable into the rear
"MOUSE" and secure the connector by pressing the retaining clip down.
3.
If
you will be using the 4405
connector marked "COMPUTER." Secure the cable with the two small screws in the
connector.
4. Plug the small end
"MASS STORAGE INTERFACE." Match the keyway on the two connectors and press
the male connector into the female connector without forcing it.
Plug the large end
two small screws in the connector.
Plug the SCSI tenninator into the lower connector.
4405
USERS
of
the SCSI cable into the connector
of
the SCSI cable into the upper connector (JI000) and secure it with the
as
of
the Display/CPU unit in the connector marked
of
the Display/CPU unit
a terminal, plug one end
in
the connector marked
of
the RS-232 cable into the
on
the Display/CPU marked
A-3
Page 86

UNPACKING
AND
INSTALLATION
CAUTION
Match the keyway on the connectors and the SCSI
terminator and SCSI cable plug before seating the
plugs. The terminator must be installed and the
cable must be secure to prevent noise and errors on
the SCSI bus.
5. Inspect the power switches on the MSU and Display/CPU units. Tum them
if
are not already. (A green flag shows
6. Attach the female ends
7. Insert the male end
correct power for the
of
the power cords to the MSU unit and the Display/CPU unit.
of
the power cords into a properly grounded outlet that supplies the
4405.
the power switch is ON.)
OFF
if
they
CAUTION
Attempting to operate the 4405 from an incorrect or
improperly grounded voltage source can seriously
damage the
4405'
s circuitry.
READ SECTION 1
Your 4405 is now ready for operation. Read through Section 1 Introduction to become familiar
of
with the controls and tenninology
that your system is working correctly . You should also read the rest
infonnation pertaining to the operation
the 4405, then
of
the 4405.
NOTE
go
through Section 2 The First Time to verify
of
this manual for general
A-4
The 4405 time
date to your local time, login as "system" and give the command:
date <mm>-<dd>-<yy> <hr>:<min>[:<sec>]
(see the "4400 Series Operating System Reference Manual" for
details
of
aru:1
date
ruzve
the "date" command.
been set to factory iime.
+s
10
set the
Page 87

AppendixB
CLEANING AND MAINTENANCE
GENERAL CLEANING
Your 4405 is a delicate instrument and has no user serviceable parts. You can clean the
screen and the external surface
keyboard with a soft cloth dampened with a solution
brush with natural (not synthetic) fibers to clean dust from crevices. Refer all other cleaning and
routine maintenance to a qualified technician. A yearly maintenance program is recommended in
4405 Field Service Guide.
the
of
the Display/CPU unit, the MSU unit, the mouse, and the
of
mild detergent and water. Use a soft
CRT
CAUTION
To
avoid damage
Module, the Mass Storage
to
the plastics used in the Display
Unit and Keyboard, do
NOT
use cleaning agents that contain benzene, acetone,
toluene, xylene, or similar chemicals.
CAUTION
Never use a dripping wet cloth that could allow liquid to
penetrate the case
of
the 4405. This could cause severe
circuit damage, and in some cases expose you to
hazardous voltages.
CLEANING THE MOUSE
If
the mouse cavity becomes dirty, clean it by removing the rubber-coated ball and
of
cavity with a gentle stream
compressed air. Do not use liquids
to
clean the ball
CLEANING SPILLS ON THE KEYBOARD
If
a container
1.
Immediately
causing further damage.
2. Call in a qualified service person to disassemble and clean the keyboard.
of
liquid such
tum
as
coffee, tea,
the keyboard upside down to keep the liquid from penetrating and
or
a soft drink should spill on the keyboard:
blowout
or
cavity.
the
4405
USERS
B-1
Page 88

Appendix C
Options
Use this section to hold documentation for 4405 options that do not have binders
of
their own.
4405
USERS
C-l
Page 89

AppendixD
CONNECTING PERIPHERALS
INTRODUCTION
The 4405 has several external connectors which can be used to connect peripherals. These are:
• The SCSI bus.
• The RS-232 Communications Port
• The parallel printer port.
• The speaker output.
• The (Optional) Ethernet interface.
THE SCSI BUS
LOCATION
The SCSI bus connection is located on the rear
STORAGE
INTERFACE."
of
the Display/MSU unit labeled "MASS
SOFTWARE ACCESS
SCSI bus devices, addressed through drivers built into the operating system, each have two Idev
files associated with them. Each has a descriptive name
or
the same name with c appended as a raw
devices recognized by the system are:
• Idev/disk - The standard winchester disk.
• Idev/diskc
• Idev/diskl
• Idev/disklc
• Idev/floppy - The standard flexible disk.
• Idev/floppyc - The raw (character-oriented) flexible disk.
• Idev/tapec - The raw optional (character-oriented) streaming tape drive.
In order to read
(See the
backup and restore the flexible disk drive should not be mounted. These commands take care
the I/O in a different manner.
4405 Reference Manual command entry for
- The raw (character-oriented) standard winchester disk.
...
diskn - Optional winchester disks.
...
disknc - Raw optional winchester disks.
or
write to any SCSI device during normal operation, you must
character-oriented device. The standard SCSI
as
the normally used block device, and
mount
mount
for more information.) During
the device.
of
4405 USERS
D-l
Page 90

CONNECTING PERIPHERALS
THE RS-232 COMMUNICATIONS PORT
LOCATION
The RS-232 Communications Port is located on the rear
"computer.
"
of
the Display/CPU unit marked
SOFTWARE CONTROL
The communications port is addressed as Idevlcomm.
and write permissions.
You can examine
"c"
programmers should check the files in IUh/includelsys (particularly sgtty.h and comm.h)
they will be working with the communications port.
or
set the communications port parameters via the commset utility.
It
is a character-oriented device with read
THE PARALLEL PRINTER PORT
LOCATION
The parallel printer port is located on the rear
of
the Display/CPU unit marked" copier."
if
SOFTWARE ACCESS
The printer port is identified by the special file Idev/printer. It is a character-oriented device and
has write permissions only.
'c"
Sample programs written in
are located in directory IsampZeslprinter.
THE EXTERNAL SPEAKER JACK
LOCATION
The external speaker jack is located on the rear panel
"SPEAKER."
D-2
of
the Display/CPU unit, marked
Page 91

CONNECTING
PERIPHERALS
SPECIFICA
The 4405 has a low power audio output jack capable
audio output is optimized for an eight-ohm speaker, but other common speakers can be driven (at
reduced volume) without damage to the audio circuitry.
The external speaker jack is a small, two-conductor, switching phone jack. (When you insert an
external speaker plug, the internal speaker is disabled.)
The output from either an internal
located directly above the external speaker jack.
SOFTWARE
You can drive the speaker via the device Idevlsound. The 4400 Series Operating System
Reference Manual
I devl sound.
TIONS
of
driving a small external speaker. The
or
external speaker can be varied with the volume control
ACCESS
contains a discussion under THE SOUND GENERATOR that discusses driving
THE ETHERNET INTERFACE
The ethernet interface is a separate option. It
can include in this manual in Appendix
C,
is
fully described in it's own manual, which you
OPTIONS.
4405
USERS
D-3
Page 92

AppendixE
SPECIFICATIONS
NOTE
In this preliminary manual, these specifications are taken from
of
early engineering models
the 4405. Production models
4405 may have different specifications.
Table
CPU/DISPLAY UNIT PHYSICAL DIMENSIONS
E-l
of
the
*These specifications
MASS STORAGE UNIT PHYSICAL DIMENSIONS
Characteristic
Weight
Length
Width
Height
Display Size
Display Area
do
not include the Keyboard or Mass Storage Unit.
Supplemental Information
44
lbs. (20
Kg)
19.5
in
(495
mm)
16.5
in
(419
mm)
13.89
in
(352
mm)
13
in
(330mm)
9.5
x 7.0 in (241x178
mm)
Table E-2
Characteristic Supplemental Information
WeIght
Length
Width
Height
14lbs
17
in
14.5
in
(128
5
(6.3~
(433
mm)
in
(368
mm)
Kg)
mm)
4405
USERS
E-I
Page 93

SPECIFICATIONS
MASS STORAGE UNIT ELECTRICAL SPECIFICAITONS
Table
E-3
CPU/DISPLAY ELECTRICAL SPECIFICATIONS
Characteristic Supplemental Information
Nommal Input Voltages:
115
V 87--128 V
230 V 174--250 V
Maximum Input
Frequency Range
Fuse 4 A Slow-blow
Characteristic Supplemental Information
Nonnnallnput
115
V 87-128 V
230 V 174-250 V
Maximum Input
Frequency
Crest Factor
Fuse
Power
Voltages:
Power 140W
200W
48-66
Table
E-4
50-60Hz
1.35
2 A Slow blow
1 A Slow blow (230 VQS)
Hz
minimum
(115
V)
E-2
Page 94

SPECIFICATIONS
Table
E-5
CPU/DISPLAY ENVIRONMENTAL SPECIFICATIONS
Characteristic Supplemental Information
Temperature:
Operating
Nonoperating
Altitude:
Operating
Nonoperating To 40,000 ft (12,200
Humidity:
Operating o to
Nonoperating
Vibration Withstands
Shock
Electrostatic
Operating
Nonoperating
Immunity:
+50
to
+104
degrees
F
( + 1
0 to
+40
degrees
C).
-40 to
+149
degrees
F
(-40 to
+65
degrees
C).
To
10,000 ft
75%
o to
95%
at
0 to
Main
to
all
No
interruption of operation, loss of
data, or change of operating
No
damage
(3,050
m)
m)
relative humidity (non-cond.).
relative humidity (non-cond.).
0 to
0.015
in
55
Hz
(all 3 major
cabinet withstands a 20 g shock
faces.
to unit
displacement,
from
20
axes).
mode
kV
shock.
from
15
kV shock.
4405
USERS
E-3
Page 95

SPECIFICATIONS
MASS STORAGE UNIT ENVIRONMENTAL SPECIFICATIONS
Table E-6
Characteristic
Temperature:
Operating
Nonoperating
Altitude:
Operating
Nonoperating -1000
Humidity
Vibration:
Operating 2
Nonoperating 2
Shock: nonoperating
Shock Main cabinet withstands a 20 g shock
Electromagnetic Compatibility Meets
Supplemental Information
+50
to
+104
degrees F
(+
1 0
to
+40 degrees
-40
to
+149
(-40
to
+65
degrees C).
To
10,000
ft
To
40,000 ft (12,200
80%,
Maximum wet bulb:
noncondensing
to
22
Hz:
0.01
displacement 22
to
22
Hz:
0.01
22
to
500
Hz:
20
g, halfsine,
shocks
in
all horizontal directions
15
g, half sine,
shocks
in
all vertical directions
to
all faces.
the
respect
following requirements, with
to
conducted
C).
degrees F
(3,050
m)
in
(0.254
to
500
Hz:
in
(1mm) displacement
1 g constant acceleration
11
ms
duration; Three
11
ms
duration; Three
and
m)
26
degrees
mm)
0.25 g constant acceleration
radiated emissions:
C,
E-4
l~
FCC
Rules, Part
VDE
0871n6 class B
15,
Subpart J, Class A
I
Page 96

Table
E-7
mSTALUTIONREQUmEMENTS
SPECIFICATIONS
Characteristics
Heat DissIpation
Surge Current Total System =
Clearance
Distance from Equipment
Generating Magnetic Fields
Supplemental Information
525 BTUlhour (nommalline voltage)
575 BTU/hour
Rear:
3 inches (for cabling)
Top:
3 inches (for cooling)
Sides: 2 inches (for cooling)
The
system's display should not
located near equipment containing
motors or other electro-magnetics
which
can distort
Table
E-8
GRAPHICS CHARACTERISTICS
Characteristic
Type of
dIsplay:
Crt size:
Phosphor:$P4 short-persistence
Usable display
Luminance:
Moire' pattern: A slight moire' effect
area:
Supplemental Information
Monochrome raster-scan
15
inches (diagonal measurement)
240
mm
5 mm
(9.4
25
foot-Iamberts for
visible under
(max.
at maximum power supply
34A
(nominal at 120vac)
be
the
display.
by
180
rom,
plus
or
in
by
7.1
in,
plus
"white"
some
may
conditions.
fans,
minus
or
color.
be
minus
0.2
load)
in)
4405
USERS
Anti-reflective
treatment:
Dark,
non-glare transmission
E-5
 Loading...