

Page 1
P H A S E R® 8 4 0
COLOR PRINTER
Setup Guide
www.tek.com/Color_Printers/
®
Page 2

Page 3

Phaser
®
840 Color Printer
Setup Guide
V3 April 1999
071-0389-00
Page 4

Copyright © Tektronix, Inc. Unpublished rights reserved under the copyright laws of the United States. Contents of
this publication may not be reproduced in any form without permission of Tektronix, Inc.
Tektronix
®
, Phaser
trademarks of Tektronix, Inc. PhaserLink™, PhaserPort™, PhaserPrint™, PhaserSym™, PhaserTools™, TekSMART™,
and the TekColor™ name are trademarks of Tektronix, Inc. TekColor Care
®
, PhaserShare
®
,ColorStix
®
, the TekColor
®
icon, and Made For Each Other
SM
and RealSUPPORT
®
are registered
SM
are service marks
of Tektronix, Inc.
®
Adobe
, Acrobat
Garamond
®
, Birch
®
, Acrobat
®
, Carta
®
Reader, Illustrator
®
, Mythos
®
, Quake
®
, PageMaker
®
, and Tekton
®
, Photoshop
®
are registered trademarks and Adobe Jenson™, Adobe
®
, and PostScript
®
, ATM
®
, Adobe
Brilliant Screens™ technology, and IntelliSelect™ are trademarks of Adobe Systems Incorporated or its subsidiaries
which may be registered in certain jurisdictions.
Apple
Geneva
®
, LaserWriter
®
, Monaco
®
, LocalTalk
®
, and New York
®
, Macintosh
®
are registered trademarks, and QuickDraw™ is a trademark of Apple Computer
®
, Mac
®
OS, AppleTalk
®
,
TrueType2
®
, Apple Chancery
®
, Chicago
®
,
Incorporated.
Marigold™ and Oxford™ are trademarks of AlphaOmega Typography.
Avery™ is a trademark of Avery Dennison Corporation.
®
Software is a registered trademark of FTP Software, Incorporated.
FTP
PCL
®
and HP-GL
®
are registered trademarks of Hewlett-Packard Corporation.
Hoefler Text was designed by the Hoefler Type Foundry.
ITC Avant Guard Gothic
and ITC Zapf Dingbats
®
, ITC Bookman
®
are registered trademarks of International Typeface Corporation.
®
, ITC Lubalin Graph
®
, ITC Mona Lisa
®
, ITC Symbol
®
, ITC Zapf Chancery
®
,
Bernhard Modern™, Clarendon™, Coronet™, Helvetica™, New Century Schoolbook™, Optima™, Palatino™,
Stempel Garamond™, Times™, and Univers™ are trademarks of Linotype-Hell AG and/or its subsidiaries.
®
MS-DOS
and Windows
Wingdings™ in TrueType
®
are registered trademarks of Microsoft Corporation.
®
format is a product of Microsoft Corporation. WingDings is a trademark of Microsoft
Corporation and TrueType is a registered trademark of Apple Computer, Inc.
Albertus™, Arial™, Gill Sans™, Joanna™, and Times New Roman™ are trademarks of Monotype Corporation.
®
Antique Olive
is a registered trademark of M. Olive.
Eurostile™ is a trademark of Nebiolo.
®
Novell
Sun
and NetWare
®
, Sun Microsystems
Microsystems, Incorporated.SPARC
®
are registered trademarks of Novell, Incorporated.
®
, and Sun Microsystems Computer Corporation
®
is a registered trademark of SPARC International, Incorporated.
®
are registered trademarks of Sun
SPARCstation™ is a trademark of SPARC International, Incorporated, licensed exclusively to Sun Microsystems,
Incorporated.
Ethernet
UNIX
®
is a registered trademark of Xerox Corporation.
®
is a registered trademark in the US and other countries, licensed exclusively through X/Open Company
Limited.
Other marks are trademarks or registered trademarks of the companies with which they are associated.
PANTONE
®
Colors generated by the Phaser 840 Color Printer are four- and/or three-color process simulations and
may not match PANTONE-identified solid color standards. Use current PANTONE Color Reference Manuals for
accurate colors.
PANTONE Color simulations are only obtainable on this product when driven by qualified Pantone-licensed software
packages. Contact Pantone, Inc. for a current list of qualified licensees.
All trademarks noted herein are either the property of Tektronix, Inc., Pantone, Inc., or their respective companies.
© Pantone, Inc., 1988.
Page 5

a.
b.
c.
d.
e.
f.
g.
Phaser
®
840 Printer Warranty
Tektronix warrants that the Phaser 840 Printer will be free from defects in materials and workmanship for a period of
one (1) year from the date of shipment. If this product proves defective during the warranty period, Tektronix, at its
option, will either repair the defective product on site or by means of telephone support, without charge for parts and
labor, or provide a replacement in exchange for the defective product.
Under this product warranty, Customer must notify Tektronix or its authorized representative of the defect before the
expiration of the warranty period and if instructed by Tektronix make suitable arrangements for repair. Tektronix or its
authorized representative will provide warranty repair during the warranty period at Customer’s site, if required,
without charge within the United States or outside the United States if the product is located in a customary on site
service area. Outside the United States, a description of the customary on-site service area may be obtained from the
local Tektronix Subsidiary or Authorized Tektronix Distributor.
The Maintenance Kit* in this product will be free from defects in materials and workmanship for a period of
(a) ninety (90) days from the date of installation, but not more than one (1) year from date of shipment; or
(b) six (6) months where longer periods are required by law. Under this warranty, Customer must notify Tektronix or
its authorized representative of the defect before the expiration of the warranty period. Tektronix or its representative
will ship a replacement kit, at Tektronix expense, to replace the defective kit. Customer shall be responsible for paying
any associated taxes or duties. Tektronix may require that the kit be returned to the designated Tektronix depot or the
Tektronix authorized representative from which the kit was originally purchased.
This warranty shall not apply to any defect, failure or damage caused by improper use or improper or inadequate
maintenance and care. Tektronix shall not be obligated to furnish service under this warranty:
to repair damage resulting from attempts by personnel other than Tektronix representatives to install, repair or
service the product;
to repair damage resulting from improper use or connection to incompatible equipment;
to repair any damage or malfunction caused by the use of non-Tektronix Phaser 840 printer supplies or
consumables;
to repair a product that has been modified or integrated with other products when the effect of such
modification or integration increases the time or difficulty of servicing the product;
to repair damage or malfunction resulting from failure to perform user maintenance and cleaning at the
frequency and as prescribed in the user manual; or
to repair this product after the limit of its duty cycle of 65,000 pages per month have been reached. All service
thereafter shall be billed on a time and material basis.
to repair or replace Maintenance Kits that have been used beyond their stated capacities.
THE
ABOVE
WARRANTIES
EXPRESS
FOR
EXCLUSIVE
BE
LIABLE
OR THE VENDOR HAS ADVANCE NOTICE OF THE POSSIBILITY OF SUCH DAMAGES.
OR
A
PARTICULAR
REMEDY
FOR
IMPLIED
ANY
ARE
TEKTRONIX
.
PURPOSE
PROVIDED
INDIRECT
GIVEN
BY
AND
THE
TEKTRONIX
ITS
VENDORS
RESPONSIBILITY
’
CUSTOMER
TEKTRONIX
.
TO
SPECIAL, INCIDENTAL OR CONSEQUENTIAL DAMAGES IRRESPECTIVE OF WHETHER TEKTRONIX
,
WITH
DISCLAIM
FOR
RESPECT
TO
BREACH
ANY
REPAIR
OF
TO
THIS
IMPLIED
OR
THIS
PRODUCT
WARRANTIES
REPLACE
WARRANTY
IN
LIEU
OF
DEFECTIVE
TEKTRONIX
.
OF
ANY
MERCHANTABILITY
PRODUCTS
AND
* Maintenance Kit in this product is, specifically, maintenance roller and maintenance counter.
OTHER
ITS
WARRANTIES
IS
THE
VENDORS
OR
SOLE
WILL
FITNESS
AND
NOT
,
Page 6

User safety summary
Terms in manual:
Power source:
conductor or ground. Use only the specified power cord and connector. Refer to a qualified service technician for
changes to the cord or connector.
Operation of product:
product. Do not operate without the covers and panels properly installed. Do not operate in an atmosphere of
explosive gases.
Safety instructions:
Terms on product:
Care of product:
cord or plug is frayed or otherwise damaged, if you spill anything into the case, if product is exposed to any excess
moisture, if product is dropped or damaged, if you suspect that the product needs servicing or repair, and whenever
you clean the product.
Ground the product:
necessary, contact a licensed electrician to install a properly grounded outlet.
CAUTION Conditions that can result in damage to the product.
WARNING Conditions that can result in personal injury or loss of life.
Do not apply more than 250 volts RMS between the supply conductors or between either supply
Avoid electric shock by contacting a qualified service technician to replace fuses inside the
Read all installation instructions carefully before you plug the product into a power source.
CAUTION A personal injury hazard exists that may not be apparent. For example, a
panel may cover the hazardous area. Also applies to a hazard to property
including the product itself.
DANGER A personal injury hazard exists in the area where you see the sign.
Disconnect the power plug by pulling the plug, not the cord. Disconnect the power plug if the power
Plug the three-wire power cord (with grounding prong) into grounded AC outlets only. If
Symbols as marked on product:
DANGER high voltage: Protective ground (earth) terminal:
Hot surface on or in the printer.
Use caution to avoid personal
injury:
WARNING:
WARNING:
If the product loses the ground connection, usage of knobs and controls (and other conductive
parts) can cause an electrical shock. Electrical product may be hazardous if misused.
For your protection, do not defeat any interlocks.
Use caution. Refer to the manual(s)
for information:
Page 7

At a glance
Getting Set Up
Page
Unpack the printer 2
■ Remove the packing material
■ What you get with your printer
2
3
An illustrated guide to your printer 4
Set up the printer 7
■ Select a location
■ Connect the printer
■ Turn on the printer
■ Add ink sticks
■ Load media
■ Select a front panel language
■ Print the Menu Map
■ Locate the User Guide
7
9
14
16
17
23
24
25
Install printer software 26
Register your printer 34
Where to go from here 35
Setup Guide
1
Page 8
Getting Set Up
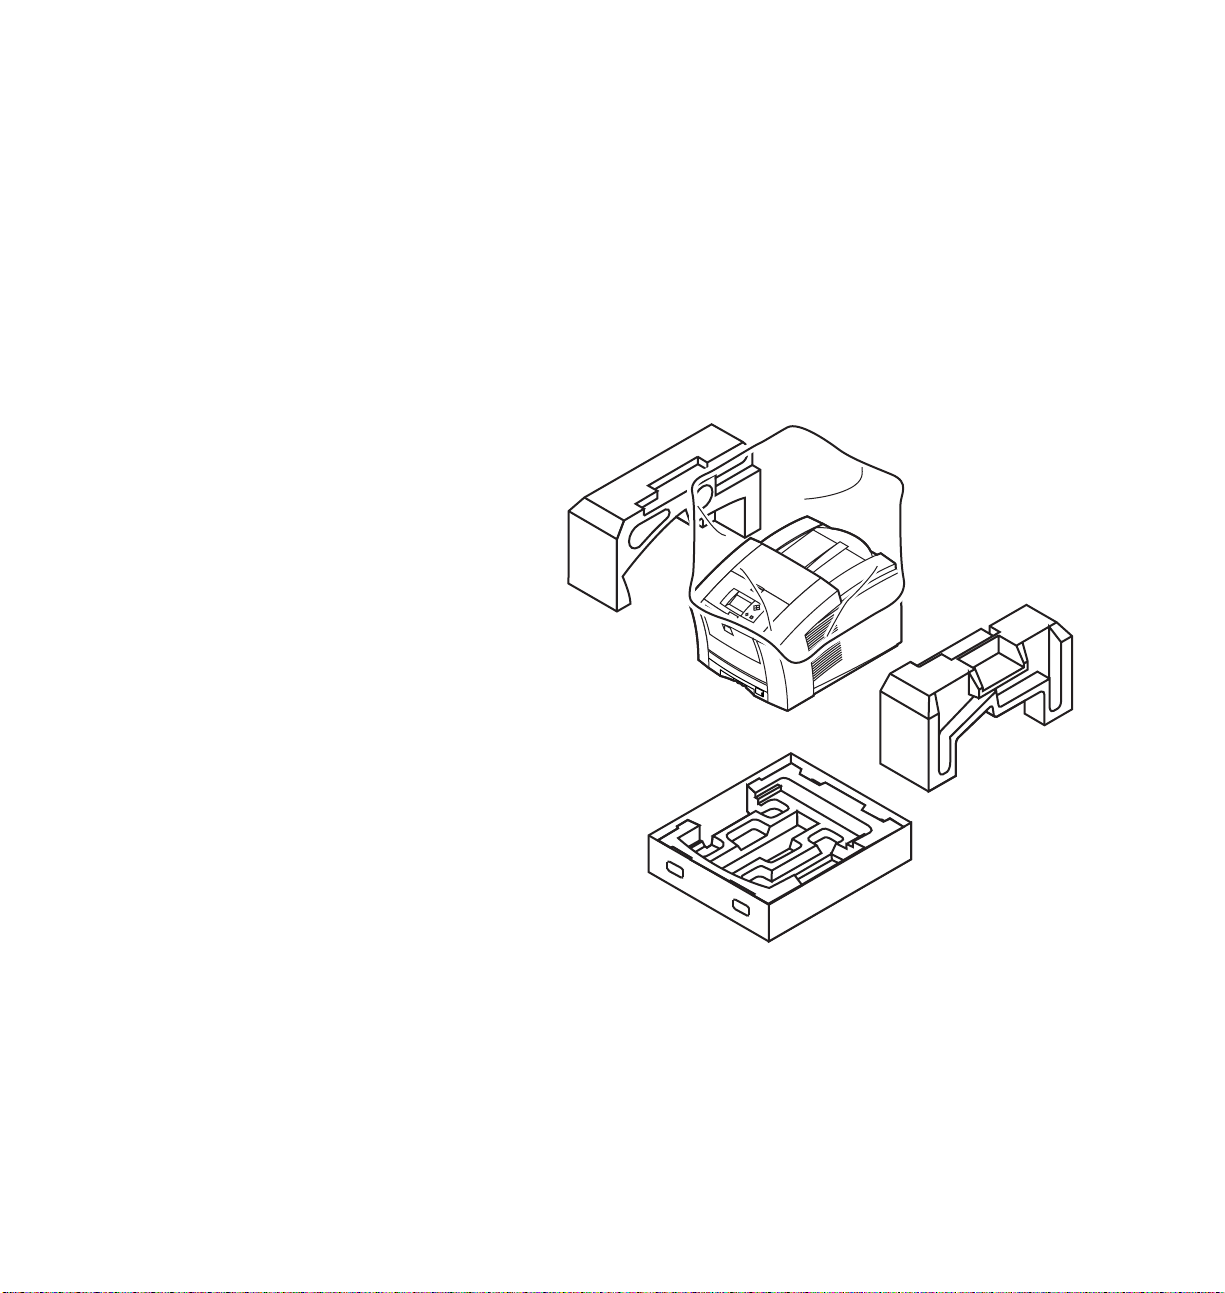
Unpack the printer
Remove the packing material
N O T
E
Save all packing material in case moving or subsequent shipment is necessary.
1.
Remove the packing materials and plastic bag surrounding the printer.
0389-04
2.
If you ordered one or two optional High-Capacity Paper Tray
Assemblies, unpack them now.
2
Phaser 840 Color Printer
Page 9

What you get with your printer
1.
Documentation
■ Overview poster
■ Setup Guide (this book)
■ Networking Setup Guide
■ Supplies information kit
■ User Guide
■ Registration Card
2.
Printer CD-ROMs (2)
3.
Power cord
4.
Parallel cable adapter
5.
ColorStix® ink stick sampler pack
Getting Set Up
6.
Media sampler
7.
Cleaning kit
8.
High-Capacity Paper Tray Assembly*. The High-Capacity Paper Tray
Assembly is standard with the Phaser 840 Extended printer and
optional with the Phaser 840 Base and the Phaser 840 Plus.
* May be shipped in a separate box
Setup Guide
3
Page 10
Getting Set Up
An illustrated guide to your printer
1
High-Capacity Transparency/Label T ra y (optional)
2
Standard Paper/Transparency tray
3
Manual-feed tray
4
Front Panel
5
6
7
Top Cover release
Top Cover
High-Capacity Paper T r ay Assembly
(optional)
5
4
3
2
1
6
7
0389-01
4
Phaser 840 Color Printer
Page 11
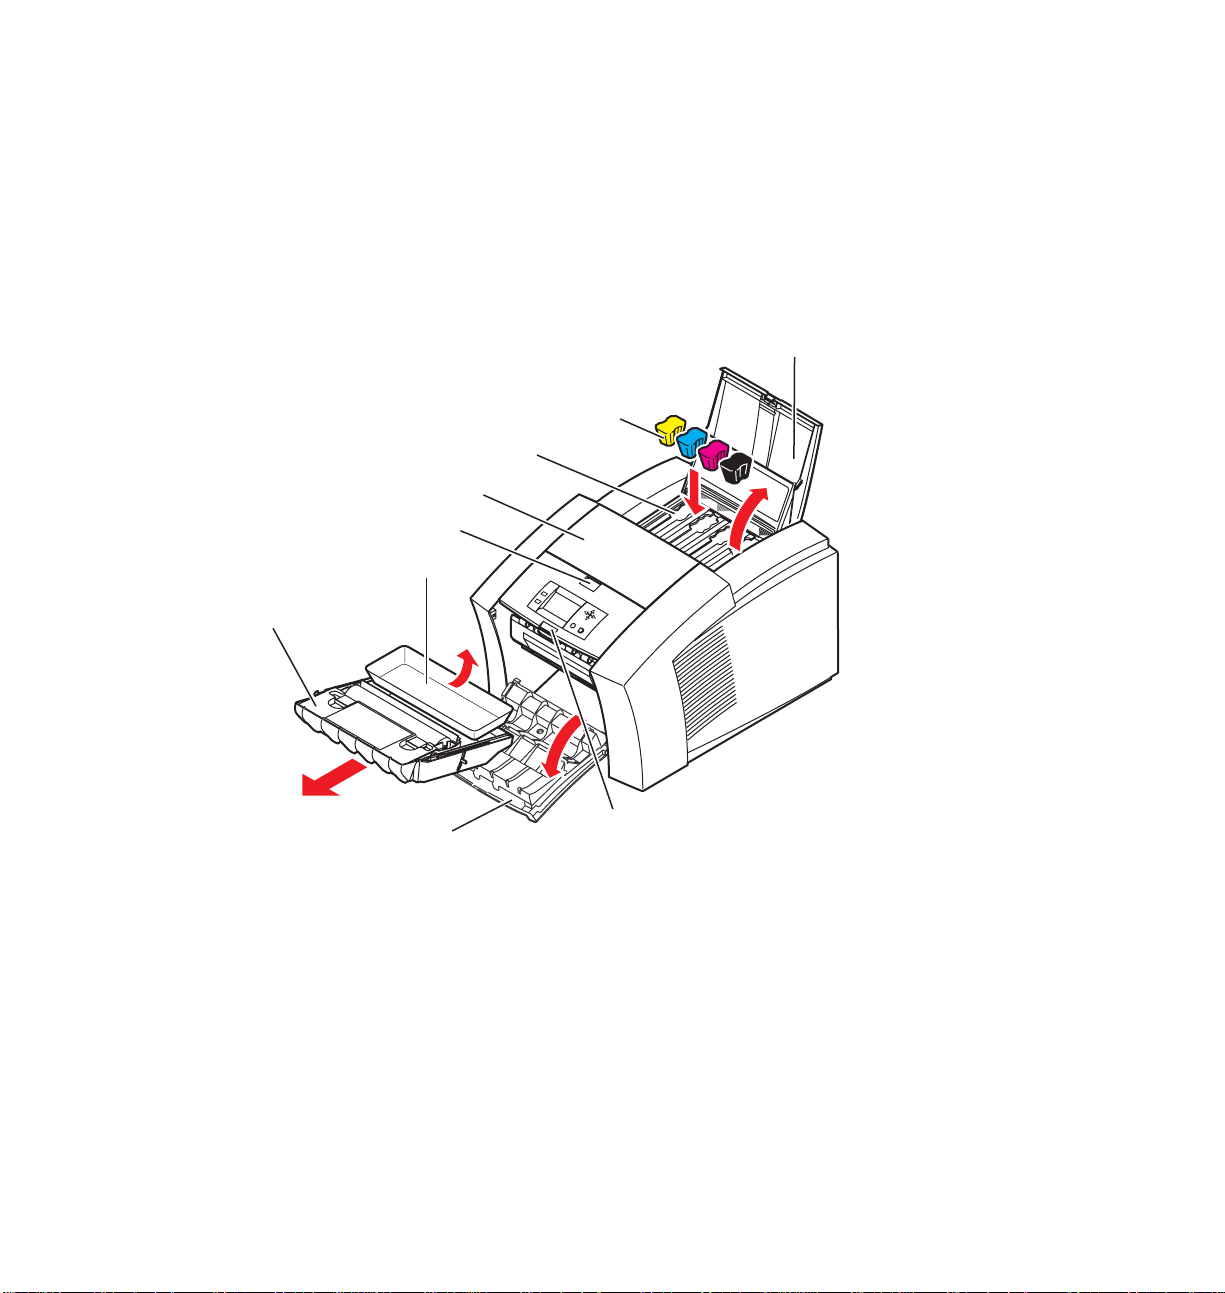
1
Front cover release
2
Front cover (open)
3
Maintenance drawer
4
Waste tray
5
Exit cover release
Getting Set Up
6
Exit cover
7
Ink loading bins
8
Ink sticks
9
Top cover (open)
9
8
7
6
5
4
3
2
1
0389-02
Setup Guide
5
Page 12
Getting Set Up
Printer’s back panel
1
Internal hard drive slot
2
PhaserShare network card slot
3
Interface ports panel
4
Power cord plug
5
On/Off switch
1
2
3
5
6
Phaser 840 Color Printer
0389-03
Page 13
Set up the printer
Select a location
1.
Select a location for the printer:
■ On a strong, level surface, capable of supporting 36 kg (79 lbs.). Do
not tilt more than 3 degrees (2 cm/.75 in.) in any direction.
■ On the optional cart.
Getting Set Up
2 cm/.75 in.
0389-05
■ On the optional High-Capacity Paper Tray Assembly. If you have
purchased the optional High-Capacity Paper Tray Assembly, set it
up now. Follow the instructions packed with the unit, then
complete the printer setup as outlined in this guide.
Setup Guide
7
Page 14

Getting Set Up
2.
Allow at least 10 cm (4 in.) clearance on the right and rear sides of the
printer for proper ventilation and to prevent the printer from
overheating.
C A U T I O N
If the printer isn’t adequately ventilated, some of the printer’s internal parts may
be damaged or the printer may not operate properly. Avoid leaving loose
papers or packing materials next to the vent on the right side of the printer; they
may cause the printer to overheat.
10 cm
(4 in.)
10 cm (4 in.)
0389-06
3.
Handle the printer carefully when moving it. Remove the media tray
for easier handling. Remove the printer from the box and place it in the
selected location.
36 kg
79 lb.
0389-37
8
Phaser 840 Color Printer
Page 15

Connect the printer
The printer can be connected to networks, single workstations, and optional
peripheral devices (scanners, hard drives).
Printer ports
The printer is shipped with three interface ports on the printer’s rear panel.
Optionally, it supports a SCSI port and one of three optional PhaserShare
network cards. All ports and network protocols are simultaneously active.
However, the Ethernet port is disabled when a 100BaseT Ethernet card or Token
Ring network card is installed.
Getting Set Up
1. Ethernet
Refer to the PhaserShare Networking Setup Guide.
2. Parallel
Refer to “Connecting to the parallel port” on page 10.
3. USB
Refer to “Connecting to the USB port” on page 13.
4. SCSI
Refer to “Connecting a SCSI peripheral device” on page 12.
5. PhaserShare
Refer to the PhaserShare Networking Setup Guide.
standard 10BaseT interface
standard Standard (bi-directional) parallel port
standard Universal Serial Bus port
optional For optional peripheral devices
optional 100BaseT, Token Ring, or LocalTalk
5
4
1
2
3
0389-09
Setup Guide
9
Page 16

Getting Set Up
Connecting to the parallel port
C A U T I O N
The maximum length for the parallel cable is 3 meters (10 ft.).
■ Use a high-density, bi-directional, parallel cable or a Tektronix 36-pin
high-density printer-to-25-pin DSUB PC cable (order number
012-1468-00). Otherwise, use a 36-pin to 36-pin parallel cable and the
parallel adapter supplied with the printer.
■ Connect a parallel interface cable to your computer and to the printer’s
parallel port.
10
0389-10
N O T E
If you are connecting a peripheral device (scanner or external hard drive),
follow the instructions “Connecting a SCSI peripheral device” on page 12.
Otherwise, refer to “Turn on the printer” on page 14.
Phaser 840 Color Printer
Page 17

Connect to a Macintosh: Ethernet-direct connection
N O T
E
For setting up the printer with a LocalTalk card, see the
Networking Setup Guide.
PhaserShare
Requirements
■ Two RJ-45 twisted-pair 10Base-T cables
■ An Ethernet-port hub
1.
Turn off your computer and the printer.
2.
Connect one end of an Ethernet cable to the Ethernet port on your
Macintosh computer. Connect the other end to the hub.
3.
Connect the other cable to the hub and the Ethernet port on the printer.
Getting Set Up
C A U T I O
4.
N
The printer is not a SCSI device. Do not connect the printer to your
computer through the SCSI ports.
If you are connecting any optional peripheral devices, such as a scanner, do
so now; refer to page 12 for guidelines. Otherwise, turn on your computer
and printer, refer to page 14.
2
3
5.
At your computer, from the Apple menu, select Control Panels, then
select AppleTalk; the AppleTalk dialog box opens.
6.
At the Connect via pull-down menu, select Ethernet built-in. Close the
dialog box.
0389-43
7.
Proceed to “Macintosh software” on page 30.
Setup Guide
11
Page 18

Getting Set Up
Connecting a SCSI peripheral device
N O T
E
The Plus and Extended configurations include a SCSI port. The Standard
configuration requires the Plus Feature Set (option Z840FP) for SCSI support.
The printer’s SCSI ID number is 7 and the optional IDE internal hard drive is 6;
available SCSI ID numbers for peripheral devices are 0 – 5. The SCSI port is
used for these peripherals:
■
Scanner
■
External SCSI hard disk
fonts, optional print collation, or expanded job accounting records.
Make sure that the printer and all SCSI devices are turned off before plugging or
unplugging any cables.
1.
Connect the cable to the SCSI port on your printer.
2.
Connect the cable to the device.
Allows you to use your printer as a color copier.
Provides additional storage for downloadable
3.
Terminate the final SCSI device on the SCSI chain.
1
2
SCSI
0389-11
N O T E
Refer to “Connecting peripheral devices” on the printer’s CD-ROM or web site
for detailed information on connecting a SCSI device to your printer.
3
12
Phaser 840 Color Printer
Page 19

Getting Set Up
Connecting to the USB port
N O T E
For Plug and Play instructions, refer to the README.TXT file located on the
printer’s CD-ROM.
■ Use a series A to B, full speed USB (Universal Serial Bus) cable.
■ Connect a USB cable to your computer and to the printer’s USB port.
■ When installing the printer driver, select Custom Install. Check
Phaser 840 USB in the list of Options to Install. Refer to “Install
printer software” on page 26 for software installation instructions.
Setup Guide
13
Page 20

Getting Set Up
Turn on the printer
C A U T I O
1.
2.
3.
N
To protect your printer from a power surge, make sure that the printer’s power
switch is in the
damage the printer.
off
position before plugging in the cord. Failure to do so may
Plug the power cord into the printer and into a grounded outlet.
Turn on the power to any peripherals you have connected.
Wait about 10 seconds, then turn on the printer.
0389-12
14
■ The printer goes through a series of self-tests and warm-up, taking
about 17 minutes. During the warm-up, a Cleaning Page will print.
■ As the printer warms up, you will hear a series of noises; these are
normal and are not an indication of problems with the printer.
Phaser 840 Color Printer
Page 21

■ The Startup Page prints. You can use the information on the
Startup Page when installing the printer software.
N O T
E
You can set the printer so that it does not print the Startup Page ev ery time it is
turned on. Refer to “Enabling and disabling the Startup Page” on the printer’s
CD-ROM or web site.
■ When the power-up sequence is complete, the green indicator is on
steady (not blinking), the red indicator is off, and the front panel
message reads Ready to Print.
N O T E
To ensure optimum printing performance and best ink economy, always leave
the printer turned on. The printer features Intelligent Ready software that
tracks when and how the printer is used; tracking these patterns over a rolling
3-week period, the printer automatically places itself in a standby power-saving
mode during periods of non-use. The printer will automatically return to its
Ready mode, just prior to a use period, avoiding any warm-up time.
Getting Set Up
Setup Guide
15
Page 22

Getting Set Up
Add ink sticks
Your printer is shipped with a sampler pack containing one each of the ColorStix
ink sticks (black, cyan, magenta, and yellow). Load the ink sticks before you
begin printing.
C A U T I O N
Use only Phaser 840 printer ColorStix® ink; other Phaser ColorStix ink will not
fit this printer and will damage it if used. K eep ink in its packaging until you are
ready to use it.
.
1.
Open the top cover. Note the color-coded label and the different
shapes of the ink-loading bins. Each ink stick color has a unique shape.
2.
Remove the ink stick from its packaging.
3.
Place the ink stick of the correct color and shape into each ink-loading
bin, with the narrow (tapered) edge down.
16
4.
After loading all four ink bins, close the top cover.
N O T E
The front panel may read Melting Ink until the printer is ready for printing.
Phaser 840 Color Printer
0389-13
Page 23

Load media
Getting Set Up
Your printer is shipped with a single media tray (letter- or A4-size) that accepts
common office paper, letterhead, transparencies, and labels. Set the media
indicator switch, located on the front, right corner of the paper tray, to match the
media type (paper or transparency) selected in the printer driver.
N O T E
If you frequently print on different types of media, you ma y w ant to obtain a tra y
for each type of media you use.
Refer to your User Guide for information on loading labels or preprinted paper,
such as letterhead.
1.
Remove the media tray from the printer.
2.
Remove the packing material from the tray.
0389-14
0389-38
Setup Guide
17
Page 24

Getting Set Up
Transparency
Paper
Loading paper
N O T E
Use 60-120 g/m2, 16-32 lb. bond or equivalent paper for printing.
1.
Fan the paper.
2.
Place the paper in the tray. Use the label on the inside of the tray as a
reference for loading the proper amount of paper.
Paper
Transparency
3.
Set the media indicator on the front of the media tray to paper. To
Paper
Transparency
change the indicator, slide the blue switch on the right side of the tray.
0389-39
18
4.
Insert the loaded media tray into the printer.
Phaser 840 Color Printer
0389-15
Page 25

Loading Phaser 840 printer transparencies
C A U T I O N
Handle transparencies by the edges and with both hands to avoid fingerprints
and creases, which can result in poor print quality.
1.
Fan the transparencies.
2.
Place the transparencies in the tray. Use the label on the inside of the
tray as a reference for loading the proper amount of transparencies.
Getting Set Up
Paper
Transparency
3.
Place Phaser 840 printer transparencies with the notch in the back, right
Paper
Transparency
corner of the tray. Make sure that the transparencies fit snugly against
the inside walls of the tray.
0389-39
0389-16
Setup Guide
19
Page 26

Getting Set Up
Transparency
Paper
a.
Set the media indicator on the front of the media tray to
transparency. To change the indicator, slide the blue switch on the
right side of the tray.
1
0389-17
20
4.
Insert the loaded media tray into the printer.
Phaser 840 Color Printer
Page 27

Getting Set Up
Loading the optional High-Capacity Paper Trays
Each High-Capacity Paper Tray holds up to 500 sheets (approximately one ream)
of 60-120 g/m2 (16-32 lb.) bond paper. A label on the inside of the tray provides
a fill line to indicate the tray’s maximum paper capacity.
C A U T I O N
The High-Capacity Paper Tray accepts paper media only; it should not be used
with transparencies or label stock.
1.
Remove the tray from the High-Capacity Paper Tray Assembly.
2.
Select up to 250 sheets at one time (if using a full ream, divide it into
two halves).
3.
Fan the paper to create a slanted edge.
23
1⁄2
Setup Guide
0389-18
21
Page 28

Getting Set Up
4.
Place one stack of paper snugly against the slanted back wall of
the tray.
5.
Fan the second stack of paper to create a slanted edge and place it
against the slanted back wall of the tray.
1
⁄2
+
1
⁄2
0389-19
6.
Insert the tray into the printer’s High-Capacity Paper Tray Assembly.
N O T E
When printing from your application and a supported driver, select Middle or
Lower as the paper source.
22
Phaser 840 Color Printer
Page 29

Select a front panel language
N O T E
If the front panel already displays the language you want, turn to the next topic ,
“Print the Menu Map” on page 24.
1.
On the printer’s front panel, hold down the Right arrow and press
Select at the same time; you are taken to the Language menu.
Getting Set Up
?
Help
Select
0389-20
2.
Using the up or down arrows, scroll to the language that you want.
Press Select to activate your selection.
Setup Guide
23
Page 30

Getting Set Up
Print the Menu Map
1.
2.
The Menu Map will print.
N O T E
On the printer’s front panel, scroll to Menu. Press Select.
Scroll to Print Menu Map; press Select.
If a scanner/copier is attached to the printer, a second page will print, showing
a map of the copier functions.
Menu Map
Print Menu Map
Troubleshooting
Demo Pages
Consumable Usage
Printer Configuration
Print Configuration Page
Print Startup Page
Printer Identification
Default Printer Settings
Network Settings
Advanced Printer Settings
Printer Identification
Menu
Scroll / Move Up
Move Cursor Left
Scroll / Move Down
Print Test Page
Eliminate Light Stripes
Print RGB Color Sampler
Print Usage Profile
Email Usage Profile Full Report
Email Usage Profile Job Report
Model
Printer Name
TekColor Correction
Print Quality Mode
Default Tray ★
Set Front Panel Intensity
EtherTalk
TokenTalk ★
PostScript Error Handler
Sys/Start Job
Intelligent Ready
Model
Printer Name
Select
Move Cursor Right
Remove Ink Smears
Fault History
Print CMYK Color Sampler Print Demonstration Page
Total Print Count
Maintenance Kit Remaining Life
Printer Server
IP Address
Startup Page
Check Print ★ ★
Check Print Timeout ★ ★
Image Smoothing
NetWare
TCP/IP
Cleaning Page Source ★
Energy Star Timeout
Set Front Panel Language
Printer Server
IP Address
Help
Press + Select for Language Options
Serial #
Duplex Settings ★★
Advanced Printer Settings
HTTP
Cool Down For Power Off
Serial #
24
Phaser 840 Color Printer
Help Topics
Using the ? Button
Improving Print Quality
Preventing Media Jams
Printing Second Side
Printing a Test Page
Changing the Default Tray
Usage Profile Information
Identifying the Printer
0389-36A
Page 31

Getting Set Up
Locate the
User Guide
Find the User Guide in the “Getting Started” box.
1.
Place the User Guide in a convenient location, such as the right panel of
the printer.
2.
To attach the User Guide to the right panel of the printer, use the
adhesive strip on the back cover of the guide. Do not cover the vent.
1
2
®
Setup Guide
0389-42
25
Page 32

Getting Set Up
Printer Name:
Page Count:
Serial Number:
Adode® PostScript®:
Firmware:
Feature set:
Installed RAM:
ROM Fonts Available:
IDE Disk:
SCSI Disk:
Print Quality:
TekColor® Correction:
Phaser Swift
504
Ip3-63
OS 1.14 / PS 8.23
Plus
128 MBytes
164 Fonts
2067 MB total,
20
Not Connected
Enhanced
Automatic
Install printer software
PC/Windows software
C A U T I O
N
As with all Windows applications, close all other prog rams bef ore beginning this
installation, including Microsoft Office, toolbars, and virus checkers. Failure to
do so could result in computer errors.
Before you begin
Make a note of the following information and refer to it during the on-screen
installation procedure.
1.
What is your printer’s configuration? Look on the printer’s Startup
Page under Feature Set:
Feature Set Select this driver:
Standard Tektronix Phaser 840
Plus Tektronix Phaser 840 Plus
Extended Tektronix Phaser 840 Extended
Startup
Printer Name:
Page Count:
Serial Number:
Adode® PostScript®:
Firmware:
Feature set:
Installed RAM:
ROM Fonts Available:
IDE Disk:
SCSI Disk:
Print Quality:
TekColor® Correction:
Parallel Port:
Ethernet®:
EtherTalk®:
NetWare®:
TCP/IP:
Phaser® 840 Color Printer
Phaser Swift
504
Ip3-63
OS 1.14 / PS 8.23 / Eng 8.51 / Net 5.55
Plus
128 MBytes
164 Fonts
2067 MB total, 2001 MB free
Not Connected
Enhanced
Automatic
Language:Postscript®
Protocol:Binary
Handshake: Bi-directional
PhaserShare® Series B Built-In Ethernet® Interface
10BASE-T, 08:00:11:08:59:53
LaserWriter@WV 60/61, Node ID: 5000.200
Operating Mode: Print Server (TEK085953)
Connection Mode:NDS (No Preferred DS Tree)
Networks: 0(802.2), 98 (802.3), 0 (Ethernet ll), 0 (SNAP)
Status Message: Can't find NDS tree, will retry in 60 sec
Address: 134:62:91:178
Network Mask: 255.255.255.0
Gateway: 134:62:91:1
Broadcast: 134:62.91.255
IPAddress Source: Front Panel
Adobe Systems Incorporated which may be
ANTONE® and PANTONE CALIBRATED are trademarks of Pantone, Inc.
0389-40
2.
To which port is your printer connected? See page 9 for details.
26
Phaser 840 Color Printer
Page 33

Install
1.
Insert the printer’s CD-ROM.
2.
Start the Installer. Use one of the following procedures:
■ If the Windows autorun feature is enabled, the Installer starts
automatically.
■ If the Windows autorun feature is disabled, double-click My
Computer, then double-click the CD-ROM icon to launch the
CD-ROM.
■ View the brief introductory information, then click Install Drivers
to launch the installer.
Getting Set Up
Setup Guide
27
Page 34

Getting Set Up
3.
View the license agreements, and click Yes to Accept and continue.
4.
Choose an installation option:
Easy Install
Custom Install
5.
Follow the on-screen prompts to complete the installation and
electronic registration.
6.
When the CD-ROM introduction screen reappears, click Exit or click
Explore CD to launch the web browser. You can view manuals and
QuickTime videos on the CD-ROM or connect to the Internet for
additional information about your printer.
to install a printer driver and support files.
to specify which files to install.
28
N O T E
For additional information about adding a printer and setting up printer
drivers, refer to Microsoft Windows Help, or the Textronix web site at
www.tektronix.com/Color_Printers/.
If you are setting up the printer on a network
Refer to the PhaserShare Networking Setup Guide provided with your printer for
detailed information about network configurations.
Phaser 840 Color Printer
Page 35

Getting Set Up
Configuring the driver
After the printer driver software installation is complete, the printer driver
needs to be configured for your printer’s installed options.
N O T E
If the printer driver is not configured properly, some printer options will not be
recognized.
Windows 95, Windows 98, Windows NT4
1.
From the Start menu, select Settings, then select Printers.
2.
Select your Tektronix printer driver. From the pop-up menu, choose
Properties.
3.
Click the Device Options (Windows 95/Windows 98) or Device
Settings (Windows NT4) tab.
4.
Under Installable Options, select the options that are installed in your
printer (for example, memory configuration, High-Capacity Paper Tray
Assembly, or internal hard drive); this information can be found on the
Startup page. Setting up the driver allows you to select all printer
options when printing.
N O T
E
Do not change the value for Available P ostScript Memory Setting; this v alue
is automatically set.
5.
Click OK.
Setup Guide
29
Page 36

Getting Set Up
Printer Name:
Page Count:
Serial Number:
Adode® PostScript®:
Firmware:
Feature set:
Installed RAM:
ROM Fonts Available:
IDE Disk:
SCSI Disk:
Print Quality:
TekColor® Correction:
Phaser Swift
504
Ip3-63
OS 1.14 / PS 8.23
Plus
128 MBytes
164 Fonts
2067 MB total,
20
Not Connected
Enhanced
Automatic
Macintosh software
Before you begin
Make a note of the following information and refer to it during the on-screen
installation procedure.
■ What is your printer’s configuration? Look on the printer’s Startup
Page under Feature Set:
Feature Set Select this driver:
Startup
Printer Name:
Page Count:
Serial Number:
Adode® PostScript®:
Firmware:
Feature set:
Installed RAM:
ROM Fonts Available:
IDE Disk:
SCSI Disk:
Print Quality:
TekColor® Correction:
Parallel Port:
Ethernet®:
EtherTalk®:
NetWare®:
TCP/IP:
Adobe Systems Incorporated which may be
ANTONE® and PANTONE CALIBRATED are trademarks of Pantone, Inc.
Phaser® 840 Color Printer
Phaser Swift
504
Ip3-63
OS 1.14 / PS 8.23 / Eng 8.51 / Net 5.55
Plus
128 MBytes
164 Fonts
2067 MB total, 2001 MB free
Not Connected
Enhanced
Automatic
Language:Postscript®
Protocol:Binary
Handshake: Bi-directional
PhaserShare® Series B Built-In Ethernet® Interface
10BASE-T, 08:00:11:08:59:53
LaserWriter@WV 60/61, Node ID: 5000.200
Operating Mode: Print Server (TEK085953)
Connection Mode:NDS (No Preferred DS Tree)
Networks: 0(802.2), 98 (802.3), 0 (Ethernet ll), 0 (SNAP)
Status Message: Can't find NDS tree, will retry in 60 sec
Address: 134:62:91:178
Network Mask: 255.255.255.0
Gateway: 134:62:91:1
Broadcast: 134:62.91.255
IPAddress Source: Front Panel
Standard Tektronix Phaser 840
Plus Tektronix Phaser 840 Plus
Extended Tektronix Phaser 840 Extended
0389-40
30
Phaser 840 Color Printer
Page 37

Getting Set Up
Install
1.
Insert the printer’s CD-ROM.
2.
Double-click Start Me First. View the brief introductory information,
then click Install Drivers to launch the installer.
Setup Guide
31
Page 38

Getting Set Up
3.
Click Continue.
4.
View the license agreements and click Accept to continue.
5.
From the pull-down menu, select Easy Install or Custom Install.
Easy Install
a.
Click Read Me for details on each item to be installed.
b.
Click Install.
Custom Install
a.
Select Custom Install.
b.
Select items to install.
c.
Click the I button for information on each item.
d.
Click Install.
6.
When the CD-ROM introduction screen reappears, click Exit or click
Explore CD to launch a web browser. You can view manuals and
QuickTime videos on the CD-ROM or connect to the Internet for
additional information about your printer.
to install a printer driver and support files.
to specify which files to install.
32
N O T E
For additional information about adding a printer and setting up printer drivers,
refer to the Textronix web site at www.tektronix.com/Color_Printers/.
Phaser 840 Color Printer
Page 39

Set up the driver
1.
From the Apple menu, select Chooser.
2.
Click the icon of the printer driver (LaserWriter 8) on the left side of the
window.
3.
Click the Zone for your printer, if applicable.
4.
From the list of printers on the right side of the window, select your
printer. If it is not in the list, check the hardware connections and
verify that you have selected the correct zone in the Chooser on the left
side of the window.
5.
Click Setup/Create to select the correct PPD (PostScript Printer
Description) file.
6.
After the automatic setup has completed, click Setup and click
Configure.
7.
Select the options that are installed in your printer (for example,
memory configuration, High-Capacity Paper Tray Assembly, or
internal hard drive); this information can be found on the Startup page.
Setting up the driver allows you to select all printer options when
printing.
Getting Set Up
8.
Click OK.
9.
Close the Chooser.
Setup Guide
33
Page 40

Getting Set Up
Register your printer
By registering your printer with Tektronix, you are validating the product
warranty and ensuring that you will be sent information about upgrades,
service, and accessories as they become available.
During the software installation, the online registration screen appears. Follow
the prompts.
34
You will need the printer’s serial number when registering the printer; it
appears on the Startup Page, which prints when you turn on the printer.
You can send your online registration to Tektronix in one of several ways:
■ Online via modem or direct Internet connection.
■ Print the registration and FAX the form to Tektronix.
■ Print the registration and mail the form to Tektronix.
■ Fill out the form in the Register Now envelope that was shipped with
your printer documentation and mail the form to Tektronix.
Phaser 840 Color Printer
Page 41

Where to go from here
Task / Information needed Resource Where
Set up your printer on a
network
Network services
■ Using a network
■ Printer management
PhaserShare Networking
Setup Guide
PhaserShare Networking
Manual
Getting Set Up
■ Printer’s box
■ Printer’s CD-ROM
■ Printer’s web site
■ For a printed copy,
order number 070-9789-00
Learn to use your printer
■ Loading media
■ Consumables information
■ Troubleshooting print
User Guide
quality
Learn more about color
■ Lessons
■ Templates and tools
■ Tips and techniques
■ Articles and reviews
■ Questions and answers
Learn more about printer
features
■ Advanced printer features
■ Advanced troubleshooting
■ Material Safety Data
Online color resource
Advanced Features and
Troubleshooting Manual
Sheets
Printer support
■ Reorder printer supplies
■ Contact local Tektronix
Tektronix web site
dealers
■ Update subscription
service
■ Contact customer support
Self-help troubleshooting TekSMART™
Knowledge Base
■ Printer’s box
www.colorize.com
■ Printer’s CD-ROM
■ Printer’s web site
■ For a printed copy,
order number 071-9103-00
www.tektronix.com/Color_Printers/
www2.tek.com/merlin/tko
Setup Guide
35
 Loading...