

Page 1

User Manual
764
Digital Audio Monitor
(Serial Number B020000 and Above)
070-8811-08
This document supports firmware version 2.1 and
above.
www.tektronix.com
Page 2

Copyright © Tektronix, Inc. All rights reserved.
Tektronix products are covered by U.S. and foreign patents, issued and
pending. Information in this publication supercedes that in all previously
published material. Specifications and price change privileges reserved.
Tektronix, Inc., P.O. Box 500, Beaverton, OR 97077
TEKTRONIX and TEK are registered trademarks of Tektronix, Inc.
Page 3

Warranty
Tektronix warrants that the 764 Digital Audio Monitor will be free
from defects in materials and workmanship for a period of one (1)
year from the date of shipment. If any such product proves defective
during this warranty period, Tektronix, at its option, either will repair
the defective product without charge for parts and labor , or will provide a replacement in exchange for the defective product.
In order to obtain service under this warranty, Customer must notify
Tektronix of the defect before the expiration of the warranty period
and make suitable arrangements for the performance of service. Customer shall be responsible for packaging and shipping the defective
product to the service center designated by Tektronix, with shipping
charges prepaid. Tektronix shall pay for the return of the product to
Customer if the shipment is to a location within the country in which
the Tektronix service center is located. Customer shall be responsible
for paying all shipping charges, duties, taxes, and any other charges
for products returned to any other locations.
This warranty shall not apply to any defect, failure or damage caused
by improper use or improper or inadequate maintenance and care.
Tektronix shall not be obligated to furnish service under this warranty a) to repair damage resulting from attempts by personnel other
than Tektronix representatives to install, repair or service the product; b) to repair damage resulting from improper use or connection to
incompatible equipment; c) to repair any damage or malfunction
caused by the use of non-Tektronix supplies; or d) to service a product that has been modified or integrated with other products when
the effect of such modification or integration increases the time or
difficulty of servicing the product.
This warranty is given by Tektronix with respect to this product
in lieu of any other warranties, expressed or implied. Tektronix
and its vendors disclaim any implied warranties of merchantability or fitness for a particular purpose. Tektronix’ responsibility to
repair or replace defective pr oducts is the sole and exclusive remedy provided to the customer for breach of this warranty. Tektronix and its vendors will not be liable for any indirect, special,
incidental, or consequential damages irrespective of whether
Tektronix or the vendor has advance notice of the possibility of
such damages.
Page 4

Table of Contents
General Safety Summary vii. . . . . . . . . . . . . . . . . . . . . . . . . . . . . .
Preface xi. . . . . . . . . . . . . . . . . . . . . . . . . . . . . . . . . . . . . . . . . . . . .
This Manual xi. . . . . . . . . . . . . . . . . . . . . . . . . . . . . . . . . . . . . .
Contacting Tektronix xii. . . . . . . . . . . . . . . . . . . . . . . . . . . . . . . .
Getting Started 1. . . . . . . . . . . . . . . . . . . . . . . . . . . . . . . . . . . . . .
Unpacking 1. . . . . . . . . . . . . . . . . . . . . . . . . . . . . . . . . . . . . . . .
Mechanical Installation 1. . . . . . . . . . . . . . . . . . . . . . . . . . . . . .
Connecting the 764 to Your System 2. . . . . . . . . . . . . . . . . . . .
(1) Digital Audio Inputs and Loop-Throughs 3. . . . . . . . .
(2) Time Code Inputs 5. . . . . . . . . . . . . . . . . . . . . . . . . . . . .
(3) Reference Inputs 5. . . . . . . . . . . . . . . . . . . . . . . . . . . . .
(4) VGA Video Output 5. . . . . . . . . . . . . . . . . . . . . . . . . . .
(5) RS-232 Communications Port 6. . . . . . . . . . . . . . . . . .
(6) Optional Serial Video Loop-Through 7. . . . . . . . . . . . .
Headphones 7. . . . . . . . . . . . . . . . . . . . . . . . . . . . . . . . . . . .
Supplying Power 8. . . . . . . . . . . . . . . . . . . . . . . . . . . . . . . . . . .
Initial Power Up and Configuration 9. . . . . . . . . . . . . . . . . . . .
Operating Basics 13. . . . . . . . . . . . . . . . . . . . . . . . . . . . . . . . . . . . .
Overview 13. . . . . . . . . . . . . . . . . . . . . . . . . . . . . . . . . . . . . . . . .
Monitoring an Audio Program with the Audio View 13. . . .
Session Reports 14. . . . . . . . . . . . . . . . . . . . . . . . . . . . . . . . .
Monitoring the Ancillary Data 15. . . . . . . . . . . . . . . . . . . . .
Other Features 16. . . . . . . . . . . . . . . . . . . . . . . . . . . . . . . . . .
Front-panel Controls 16. . . . . . . . . . . . . . . . . . . . . . . . . . . . . . . .
The Level Meters 18. . . . . . . . . . . . . . . . . . . . . . . . . . . . . . . . . .
Configuring the Level Meters 22. . . . . . . . . . . . . . . . . . . . . .
Sum and Difference Bars 25. . . . . . . . . . . . . . . . . . . . . . . . .
The Phase Display 26. . . . . . . . . . . . . . . . . . . . . . . . . . . . . . . . . .
The Lissajous Pattern 27. . . . . . . . . . . . . . . . . . . . . . . . . . . .
The Correlation Meter 27. . . . . . . . . . . . . . . . . . . . . . . . . . . .
AGC 28. . . . . . . . . . . . . . . . . . . . . . . . . . . . . . . . . . . . . . . . . .
The Session Display 29. . . . . . . . . . . . . . . . . . . . . . . . . . . . . . . .
764 Digital Audio Monitor User Manual
i
Page 5

Table of Contents
Features of the Session Display 29. . . . . . . . . . . . . . . . . . . . .
Session Statistics 30. . . . . . . . . . . . . . . . . . . . . . . . . . . . . . . .
Session Reports 34. . . . . . . . . . . . . . . . . . . . . . . . . . . . . . . . . . . .
The Channel Status View 37. . . . . . . . . . . . . . . . . . . . . . . . . . . .
The User Data View 39. . . . . . . . . . . . . . . . . . . . . . . . . . . . . . . .
Saving and Restoring Setups 40. . . . . . . . . . . . . . . . . . . . . . . . . .
Saving a Setup 40. . . . . . . . . . . . . . . . . . . . . . . . . . . . . . . . . .
Restoring a Setup 40. . . . . . . . . . . . . . . . . . . . . . . . . . . . . . . .
Editing a Setup 41. . . . . . . . . . . . . . . . . . . . . . . . . . . . . . . . .
Reference 43. . . . . . . . . . . . . . . . . . . . . . . . . . . . . . . . . . . . . . . . . . .
Level Meters 43. . . . . . . . . . . . . . . . . . . . . . . . . . . . . . . . . . . . . .
Meter Ballistics and Alignment Levels 43. . . . . . . . . . . . . . .
In-Bar Warning Messages 44. . . . . . . . . . . . . . . . . . . . . . . . .
Correlation Meter Algorithm 46. . . . . . . . . . . . . . . . . . . . . . . . .
Selecting Headphone Channels 48. . . . . . . . . . . . . . . . . . . . . . . .
Submenus 48. . . . . . . . . . . . . . . . . . . . . . . . . . . . . . . . . . . . . . . .
The Level Meters Submenu 48. . . . . . . . . . . . . . . . . . . . . . .
The De-emphasis Submenu 53. . . . . . . . . . . . . . . . . . . . . . . .
The Phase Display Submenu 54. . . . . . . . . . . . . . . . . . . . . . .
Headphones Submenu 56. . . . . . . . . . . . . . . . . . . . . . . . . . . .
Input Submenu 56. . . . . . . . . . . . . . . . . . . . . . . . . . . . . . . . .
Time Code Submenu 57. . . . . . . . . . . . . . . . . . . . . . . . . . . . .
Serial Port Submenu 58. . . . . . . . . . . . . . . . . . . . . . . . . . . . .
Save Setups Submenu 59. . . . . . . . . . . . . . . . . . . . . . . . . . . .
Restore Setups Submenu 60. . . . . . . . . . . . . . . . . . . . . . . . . .
Screen Saver Submenu 60. . . . . . . . . . . . . . . . . . . . . . . . . . .
Service Submenu 61. . . . . . . . . . . . . . . . . . . . . . . . . . . . . . . .
Using the RS-232 Port 62. . . . . . . . . . . . . . . . . . . . . . . . . . . . . .
Cable Requirements 62. . . . . . . . . . . . . . . . . . . . . . . . . . . . .
Communication Examples 64. . . . . . . . . . . . . . . . . . . . . . . .
Outputting a Session Report 66. . . . . . . . . . . . . . . . . . . . . . .
Remote Control Commands 66. . . . . . . . . . . . . . . . . . . . . . .
Appendix A: Specifications 75. . . . . . . . . . . . . . . . . . . . . . . . . . . .
Appendix B: Error/Warning Messages 83. . . . . . . . . . . . . . . . . . .
Appendix C: Options 89. . . . . . . . . . . . . . . . . . . . . . . . . . . . . . . . .
Embedded Audio Input (Option 01) 89. . . . . . . . . . . . . . . . . . . .
ii
764 Digital Audio Monitor User Manual
Page 6

Operating Information 90. . . . . . . . . . . . . . . . . . . . . . . . . . . .
Changes to the Session Statistics Display 92. . . . . . . . . . . . .
Additional Error/Warning Messages 92. . . . . . . . . . . . . . . . .
Analog Line Output (Option 02) 93. . . . . . . . . . . . . . . . . . . . . . .
Configuring the Output 95. . . . . . . . . . . . . . . . . . . . . . . . . . .
Connecting the Instrument 97. . . . . . . . . . . . . . . . . . . . . . . .
Power Cords 99. . . . . . . . . . . . . . . . . . . . . . . . . . . . . . . . . . . . . .
Glossary 101. . . . . . . . . . . . . . . . . . . . . . . . . . . . . . . . . . . . . . . . . . . .
Index 103. . . . . . . . . . . . . . . . . . . . . . . . . . . . . . . . . . . . . . . . . . . . . . .
List of Figures
Contents
Figure 1: The Tektronix 764 Digital Audio Monitor xi. . . . . . .
Figure 2: Rear view of the 764 in a Tektronix enclosure 2. . . .
Figure 3: The 764 rear panel and connectors 3. . . . . . . . . . . . .
Figure 4: Connecting the standard 764 to your system 4. . . . . .
Figure 5: Using an external color monitor 6. . . . . . . . . . . . . . .
Figure 6: Outputting a session report 7. . . . . . . . . . . . . . . . . . .
Figure 7: The headphone output (schematic) 8. . . . . . . . . . . . .
Figure 8: Controls for initial power up and configuration 9. . .
Figure 9: The top menu HELP message 10. . . . . . . . . . . . . . . . .
Figure 10: Selecting from the top menu 11. . . . . . . . . . . . . . . . .
Figure 11: The inputs submenu 12. . . . . . . . . . . . . . . . . . . . . . . .
Figure 12: The 764 AUDIO/SESSION view 14. . . . . . . . . . . . .
Figure 13: The 764 AUDIO/PHASE view 15. . . . . . . . . . . . . . .
Figure 14: 764 front-panel controls 17. . . . . . . . . . . . . . . . . . . .
Figure 15: The 764 Level Meters 19. . . . . . . . . . . . . . . . . . . . . .
Figure 16: The sum and difference display modes 20. . . . . . . . .
Figure 17: Creating a custom meter scale 23. . . . . . . . . . . . . . . .
Figure 18: The Level Meters submenu 24. . . . . . . . . . . . . . . . . .
Figure 19: Soft buttons and numeric settings 24. . . . . . . . . . . . .
Figure 20: Sum and difference bars and the session display 26.
764 Digital Audio Monitor User Manual
iii
Page 7

Table of Contents
Figure 21: The 764 phase display 27. . . . . . . . . . . . . . . . . . . . . .
Figure 22: The phase correlation meter 28. . . . . . . . . . . . . . . . .
Figure 23: The 764 AUDIO/SESSION view 29. . . . . . . . . . . . .
Figure 24: The SYNC ERR Flags 32. . . . . . . . . . . . . . . . . . . . . .
Figure 25: Sync Error Reporting in the Absence of a DAR 32. .
Figure 26: A short session report 34. . . . . . . . . . . . . . . . . . . . . .
Figure 27: Additional data on the long report 35. . . . . . . . . . . . .
Figure 28: The Channel Status view, text mode 37. . . . . . . . . . .
Figure 29: The Channel Status view, binary mode 38. . . . . . . . .
Figure 30: The User Data view, text mode 39. . . . . . . . . . . . . . .
Figure 31: The Restore Setups submenu 41. . . . . . . . . . . . . . . . .
Figure 32: An “in-bar” warning message 45. . . . . . . . . . . . . . . .
Figure 33: The “interpolation OFF” message 50. . . . . . . . . . . . .
Figure 34: The De-emphasis flags 54. . . . . . . . . . . . . . . . . . . . .
Figure 35: Connecting to a DTE device with a DB25
serial port 63. . . . . . . . . . . . . . . . . . . . . . . . . . . . . . . . . . . . . . . . .
Figure 36: Connecting to a DCE device with a DB25
serial port 64. . . . . . . . . . . . . . . . . . . . . . . . . . . . . . . . . . . . . . . . .
Figure 37: The Audio view with digital video input selected 91.
Figure 38: Option 02 connectors 93. . . . . . . . . . . . . . . . . . . . . . .
Figure 39: Standard balanced-output pin assignments 97. . . . . .
Figure 40: Connecting to an unbalanced input 98. . . . . . . . . . . .
List of Tables
Table 1: Correlation meter speed averaging intervals 47. . . . . .
Table 2: Level Meters submenu 49. . . . . . . . . . . . . . . . . . . . . . .
iv
Table 3: De-emphasis submenu 53. . . . . . . . . . . . . . . . . . . . . .
Table 4: Phase Display submenu 54. . . . . . . . . . . . . . . . . . . . . .
Table 5: Headphones submenu 56. . . . . . . . . . . . . . . . . . . . . . .
Table 6: Input submenu items (standard instrument) 56. . . . . .
Table 7: Option 01 input submenu, audio inputs selected 57. . .
764 Digital Audio Monitor User Manual
Page 8

Table 8: Option 01 input submenu, video inputs selected 57. . .
Table 9: Time Code submenu 57. . . . . . . . . . . . . . . . . . . . . . . .
Table 10: Serial Port submenu items 58. . . . . . . . . . . . . . . . . . .
Table 11: Save Setups submenu 59. . . . . . . . . . . . . . . . . . . . . .
Table 12: Restore Setups submenu 60. . . . . . . . . . . . . . . . . . . .
Table 13: Screen Saver submenu 60. . . . . . . . . . . . . . . . . . . . .
Table 14: Service submenu 61. . . . . . . . . . . . . . . . . . . . . . . . . .
Table 15: RS-232 pin assignments 62. . . . . . . . . . . . . . . . . . . . .
Table 16: General remote control commands 67. . . . . . . . . . . .
Table 17: Remote control GET commands 68. . . . . . . . . . . . . .
Table 18: Remote control PRESS commands 70. . . . . . . . . . . .
Table 19: Remote control MENU commands 71. . . . . . . . . . . .
Contents
Table 20: Digital audio inputs 75. . . . . . . . . . . . . . . . . . . . . . . .
Table 21: Level Meters and Phase Display 76. . . . . . . . . . . . . .
Table 22: SMPTE Time Code inputs 76. . . . . . . . . . . . . . . . . . .
Table 23: Interface parameter measurements 76. . . . . . . . . . . . .
Table 24: Headphone output 77. . . . . . . . . . . . . . . . . . . . . . . . .
Table 25: VGA output 77. . . . . . . . . . . . . . . . . . . . . . . . . . . . . .
Table 26: Physical characteristics 78. . . . . . . . . . . . . . . . . . . . .
Table 27: Power requirements 79. . . . . . . . . . . . . . . . . . . . . . . .
Table 28: Environmental characteristics 79. . . . . . . . . . . . . . . .
Table 29: Certifications and compliances 80. . . . . . . . . . . . . . .
Table 30: Option 01 characteristics 89. . . . . . . . . . . . . . . . . . . .
Table 31: Option 02 characteristics 94. . . . . . . . . . . . . . . . . . . .
Table 32: Output configuration jumper locations 95. . . . . . . . .
Table 33: Power cord identification 99. . . . . . . . . . . . . . . . . . . .
764 Digital Audio Monitor User Manual
v
Page 9

Table of Contents
vi
764 Digital Audio Monitor User Manual
Page 10

General Safety Summary
Review the following safety precautions to avoid injury and prevent
damage to this product or any products connected to it. To avoid
potential hazards, use this product only as specified.
Only qualified personnel should perform service procedures.
To Avoid Fire or Personal Injury
Use Proper Power Cord
Use only the power cord set provided with this product, or some
other properly rated and approved cord set configured for the local
mains supply outlets.
Use Proper Power Source
This product is designed to operate from a power source that will
apply no more than 250 V
between either supply conductor and ground.
between the supply conductors, or
RMS
Ground the Product
Before connecting the product’s input or output terminals, plug the
power cord into a properly wired receptacle. A protective ground
connection, through the grounding conductor in the power cord, is
essential for safe operation.
Use Proper Fuse
Use only the fuse type and rating specified for this product.
Operate Only Within a Suitable Enclosure
Operate this product only within an enclosure that prevents contact
with interior electrical components.
Provide Proper V entilation
Refer to the manual’s installation instructions for details on installing
the product so that it has adequate cooling ventilation.
764 Digital Audio Monitor User Manual
vii
Page 11
General Safety Summary
Use in a Proper Environment
Do not operate this product in wet/damp locations/conditions or in
explosive atmospheres.
Observe All Terminal Ratings
To avoid fire or shock hazard, observe all ratings and markings on
the product. Consult the product manual for further ratings
information before making connections to the product.
Safety Terms and Symbols
Terms in this Manual
These terms may appear in this manual:
WARNING. Warning statements identify conditions or practices that
could result in injury or loss of life.
CAUTION. Caution statements identify conditions or practices that
could result in damage to this product or other property.
Terms on the Product
These terms may appear on the product:
DANGER indicates an injury hazard immediately accessible as you
read the marking.
WARNING indicates an injury hazard not immediately accessible as
you read the marking.
CAUTION indicates a hazard to property including the product.
viii
764 Digital Audio Monitor User Manual
Page 12

General Safety Summary
Symbols on the Product
The following symbols may appear on the product:
DANGER
High Voltage
Protective Ground
(Earth) Terminal
ATTENTION
Refer to
Manual
Double
Insulated
764 Digital Audio Monitor User Manual
ix
Page 13

General Safety Summary
x
764 Digital Audio Monitor User Manual
Page 14
Preface
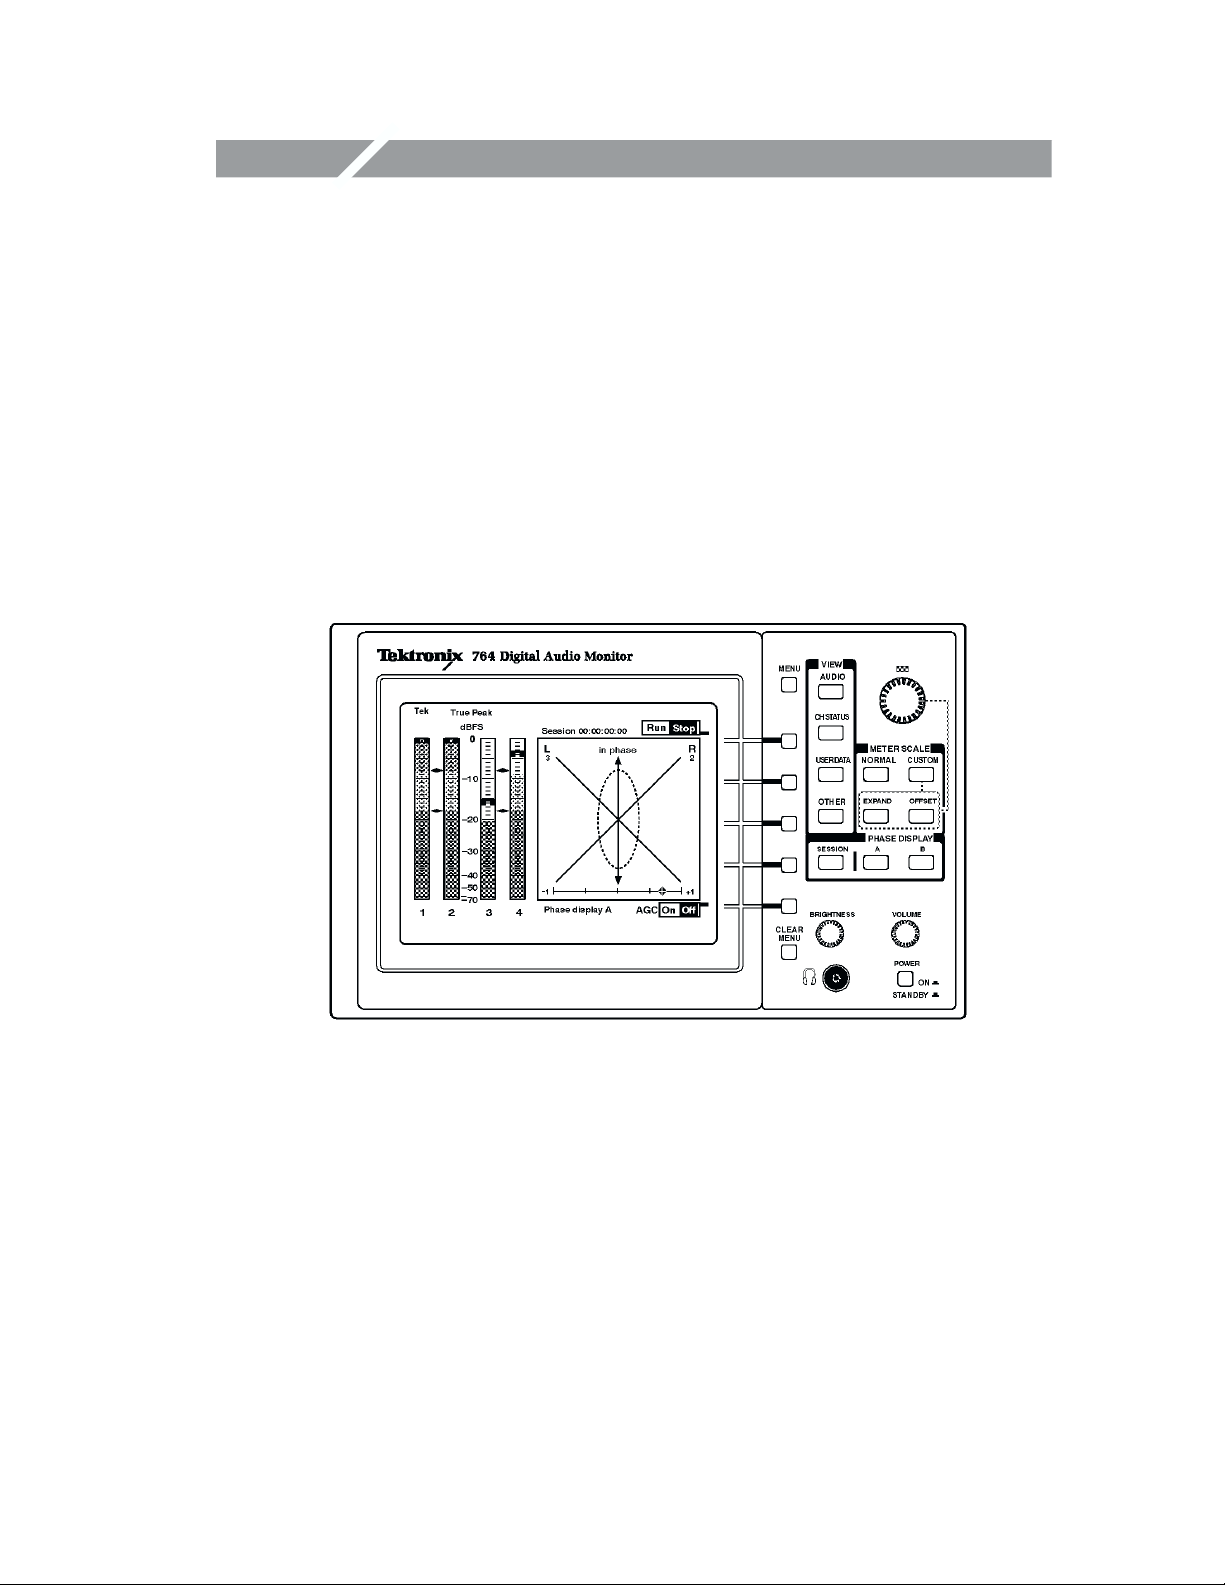
The Tektronix 764 Digital Audio Monitor shown in Figure 1 is a tool
for monitoring the signal levels and stereo phase of digitally-encoded
(AES/EBU and IEC 958 “consumer use”) audio in a production
environment. The instrument can simultaneously display the levels
of two two-channel inputs, and the stereo phase relationship of any
two of the four input channels. It can also display numerical data
about the audio program material as well as “Channel Status” and
“User Data” information encoded in the digital audio signal.
Figure 1: The Tektronix 764 Digital Audio Monitor
Through on-screen menus and front-panel controls, the user may
configure the response dynamics (ballistics), reference levels, offset,
and scale of the meters to suit the monitoring needs of the particular
installation or situation. The user may also choose among several
types of stereo phase display.
This Manual
This User Manual is divided into the following sections:
H Getting Started — All the information you’ll need to put your
new instrument in service. Begins on page 13.
764 Digital Audio Monitor User Manual
xi
Page 15

Preface
H Operating Basics — What you’ll need to know for day-to-day
operation of the 764. Begins on page 13.
H Reference — Begins on page 43.
H Appendices — Instrument characteristics; Options/Accessories;
User Service. Begin on page 75.
H Glossary — Begins on page 101.
H Index — Begins on page 103.
Contacting Tektronix
Phone 1-800-833-9200* Address Tektronix, Inc.
Department or name (if known)
14200 SW Karl Braun Drive
P.O. Box 500
Beaverton, OR 97077
USA
Web site www.tektronix.com Sales
support
Service
support
Technical
support
1-800-833-9200, select option 1*
1-800-833-9200, select option 2*
Email: techsupport@tektronix.com
1-800-833-9200, select option 3*
1-503-627-2400
6:00 a.m. – 5:00 p.m. Pacific time
xii
* This phone number is toll free in North America. After office
hours, please leave a voice mail message.
Outside North America, contact a T ektronix sales office or
distributor; see the Tektronix web site for a list of offices.
764 Digital Audio Monitor User Manual
Page 16

Getting Started
This section contains information you’ll need to put your 764 Digital
Audio Monitor into service. For a detailed description of instrument
capabilities, and instructions for its use, refer to the Operating Basics
section of this manual.
Unpacking
Please save the packaging material in case you must later ship the
instrument for calibration or service.
The following accessory items are included with the 764 Digital
Audio Monitor:
H This user manual
H A power cord
Any cabinet ordered with the instrument is shipped in a separate
carton.
Mechanical Installation
To accommodate the installation needs of users worldwide, Tektronix
provides the 764 without an enclosure (cabinet). To ensure proper
cooling, electromagnetic shielding, and protection against accidental
electrical shock, install the instrument in the Tektronix enclosure that
best suits your application.
NOTE. The Tektronix 764 meets EMI/EMC standards when shielded
interconnect cables are used, and when installed in one of the
following Tektronix enclosures:
H 1700F00, Plain cabinet for 1/2 rack width
H 1700F02, Portable cabinet including feet and handle
H 1700F05, Dual side-by-side rackmount adapter
764 Digital Audio Monitor User Manual
1
Page 17
Getting Started
Order the appropriate enclosure through your nearest Tektronix field
office or representative.
WARNING. Do not carry an instrument in one of the optional
enclosur es without first installing the cabinet mounting screws as
shown in Figure 2. Without the mounting screws, an instrument can
slip out of its cabinet if tipped forward. Property damage or injury
may result.
Figure 2: Rear view of the 764 in a Tektronix enclosure
Connecting the 764 to Your System
Except for the headphone jack, all connectors are on the rear panel of
the 764, shown in Figure 3. The connections you make will depend on
your particular installation and operating environment. See the
following paragraphs for explanations of the connectors and their
functions.
2
764 Digital Audio Monitor User Manual
Page 18
Getting Started
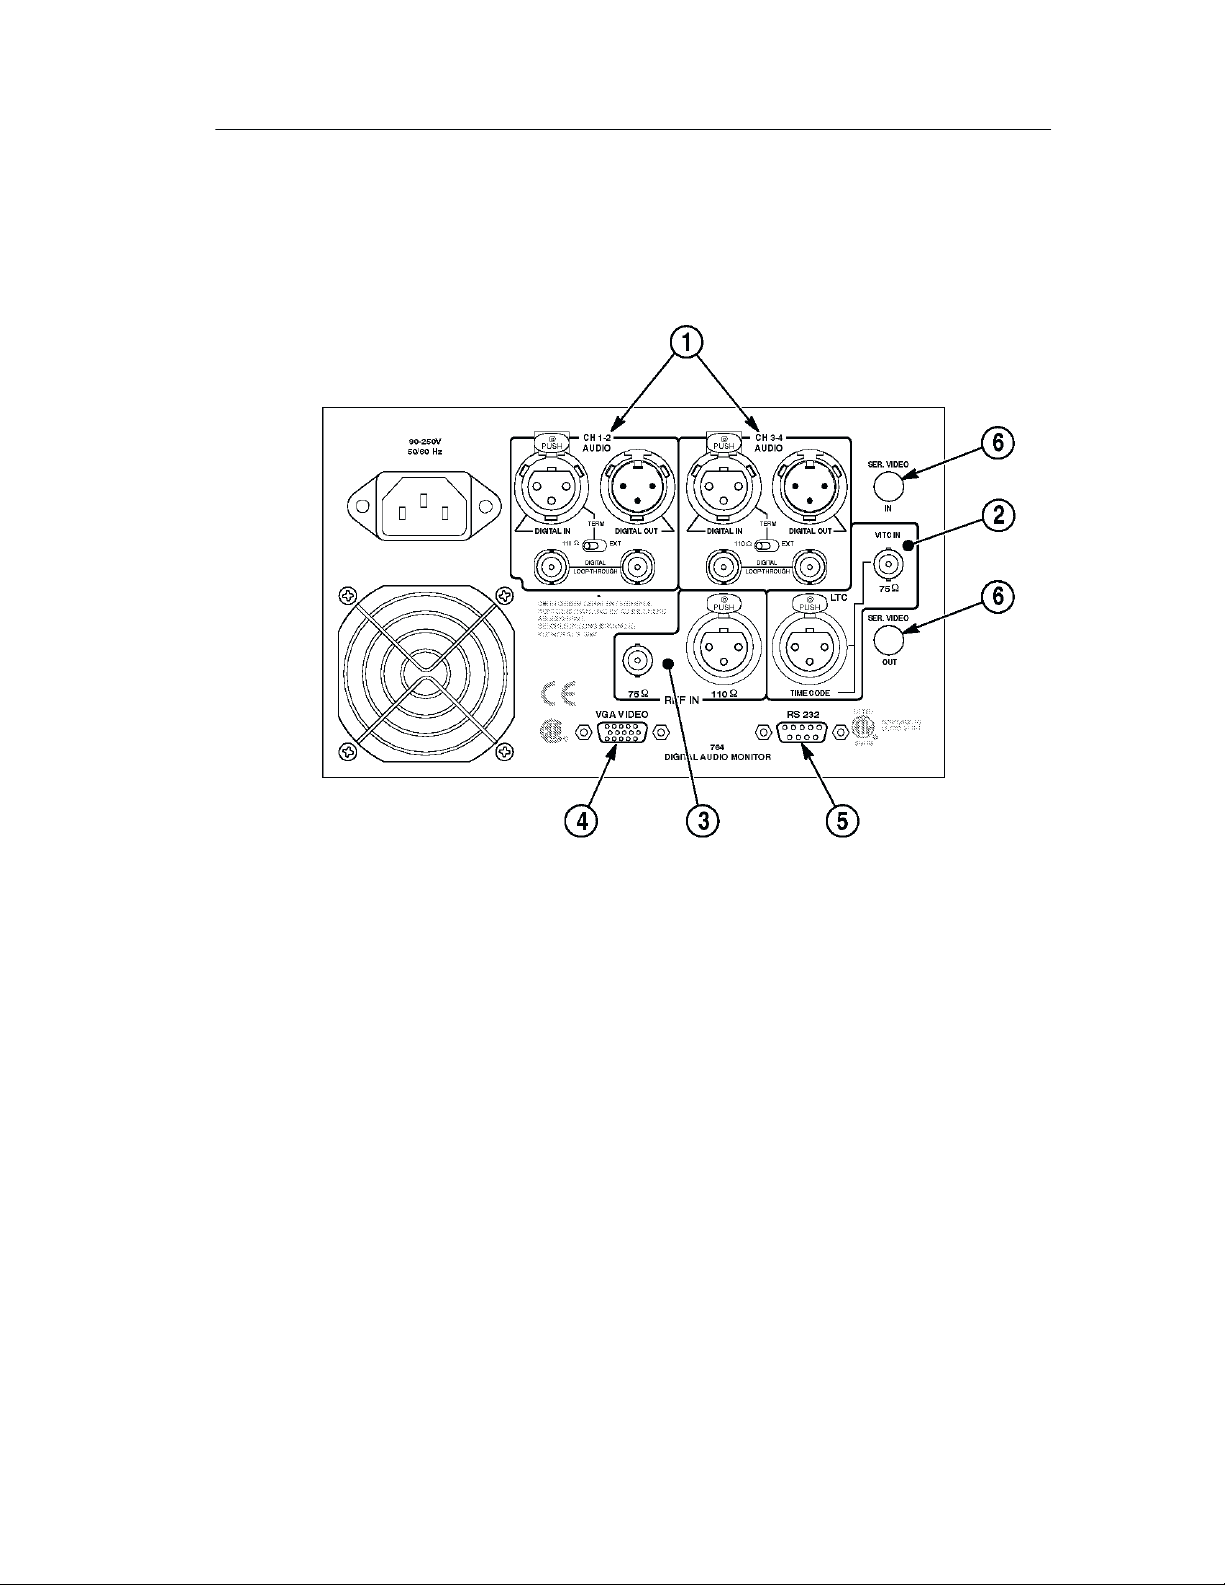
Figure 3: The 764 rear panel and connectors
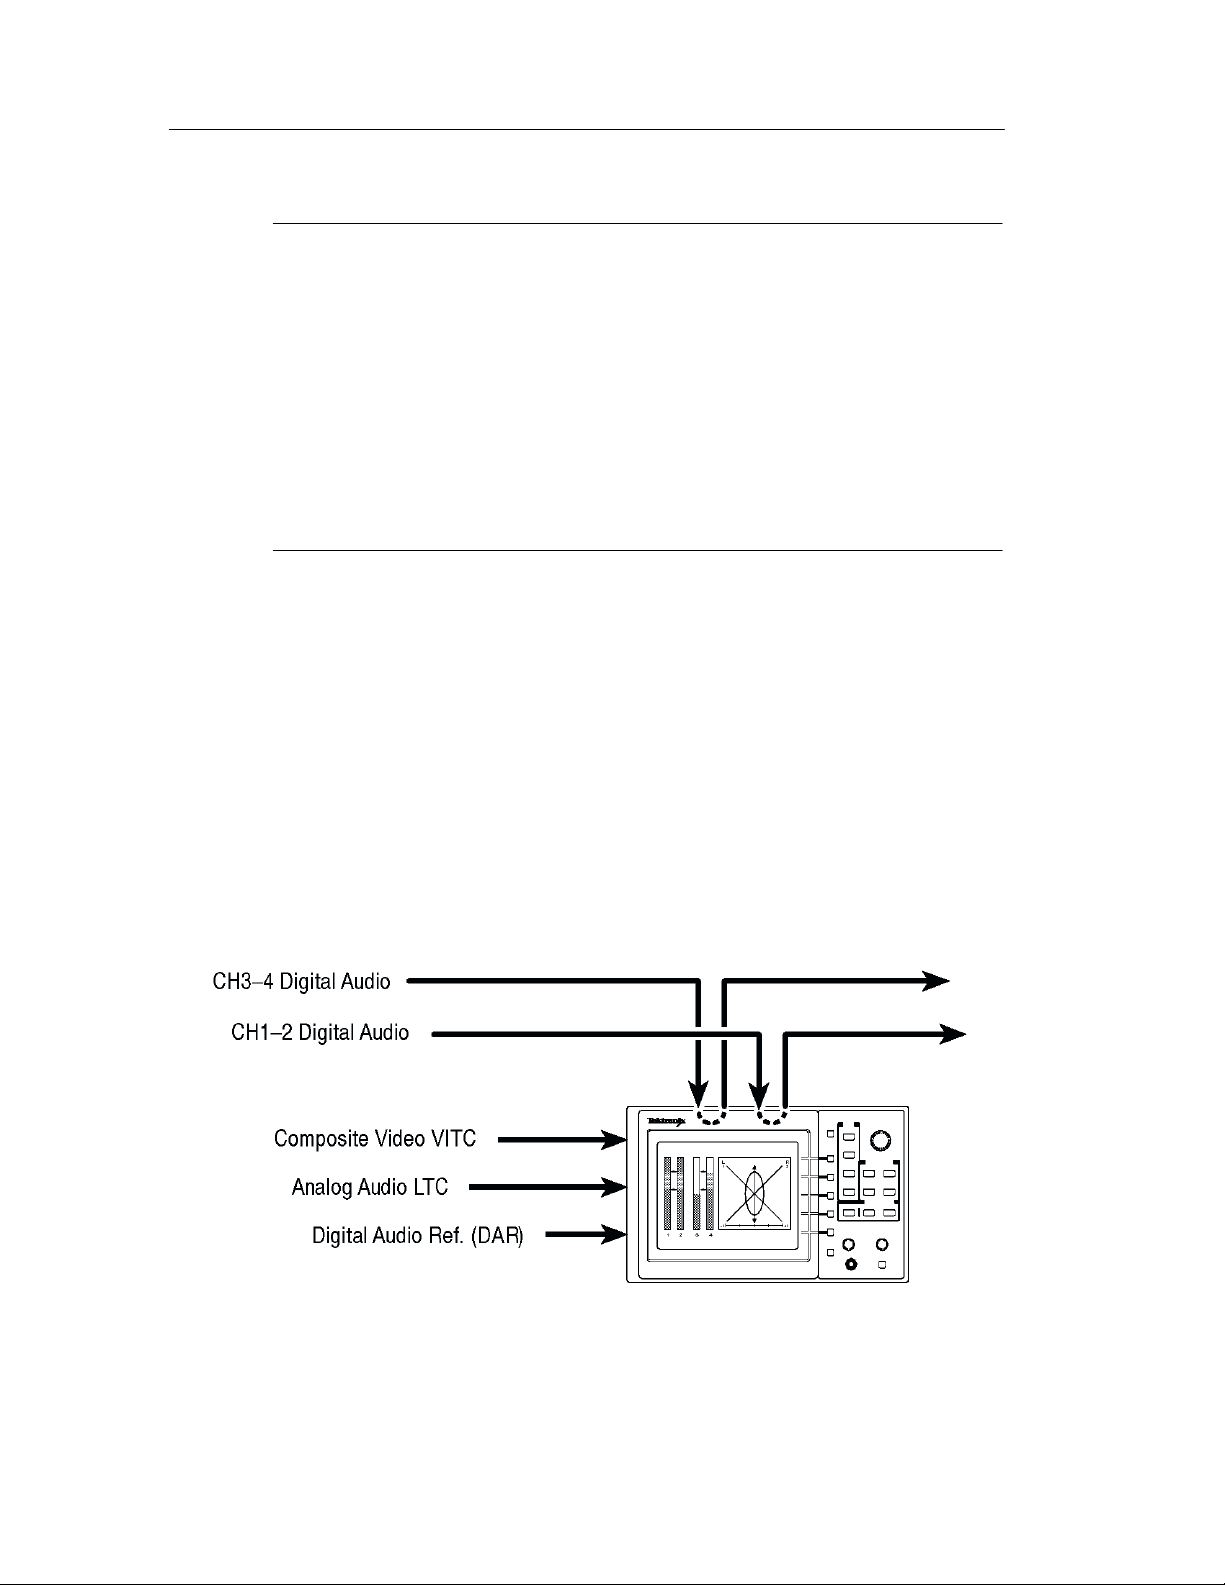
(1) Digital Audio Inputs and Loop-Throughs
The 764 has two, two-channel digital audio inputs, one labeled
CH 1–2, and the other labeled CH 3–4. Each input in the standard
instrument has two passive loop-throughs that allow you to switch the
instrument off with no effect on the through signal:
H Balanced XLR connectors for signals conforming to the AES/EBU
(AES3-1992) standard. Set the TERM switches immediately below
these connectors to EXT when the 764 is installed in-line; select
110 Ω (internal termination) when the instrument is at the end of
the signal path.
764 Digital Audio Monitor User Manual
3
Page 19
Getting Started
NOTE. The male XLR connectors of instruments equipped with
Option 02 (Analog Line Output) are labeled ANALOG OUT; these
instruments do not have pr ovision for loop-through on the balanced
XLR connectors.
The balanced XLR inputs of Option 02 instruments are unterminated
when the associated TERM switches are set to EXT. T o avoid signal
degradation, always leave the TERM switches of Option 02 instruments set to 110 Ω.
Refer to Appendix C: Options for more information about Option 02.
H 75 Ω BNC connectors that accept unbalanced, digital audio signals
in both professional (AES/EBU) and consumer (IEC958) formats.
These inputs have no provision for internal termination; if the 764
is placed at the end of a signal path, install a 75 Ω end-line
termination (Tektronix part number 011-0102-00) on the unused
loop-through connector .
An RCA phono plug-to-BNC male cable or adapter may be
required to input consumer digital audio. Plug is available in North
America through Markertek Video Supply,
telephone: 800-522-2025.
Figure 4: Connecting the standard 764 to your system
4
764 Digital Audio Monitor User Manual
Page 20

Getting Started
NOTE. The balanced (XLR) loop-throughs are the default 764 inputs.
To receive a signal thr ough the unbalanced (BNC) loop-throughs or
the optional serial video loop-through (Option 01), you must first
reconfigure the instrument through the on-scr een menus. Refer to
Initial Power Up and Configuration on page 9 for instructions.
(2) Time Code Inputs
VITC — Reads vertical interval time code from NTSC or PAL analog
video per IEC publication 461 specifications. The time code can be
shown on the SESSION display, and stamped on each error on a
printed Session Report. The format of the Session View time display is
Hours:Minutes:Seconds.
LTC — Reads linear time code that also conforms to IEC specifications. The time code can be shown on the Session display, and
stamped on each error on a printed Session Report. The format of the
time display is Hours:Minutes:Seconds:Frames.
(3) Reference Inputs
Connect your “house” digital audio reference (DAR) signal to one of
the REF IN connectors. These connectors (one BNC, one XLR) accept
the same formats as the Digital Audio Inputs. They are internally
terminated. As with the audio inputs, the default connector is XLR;
use the on-screen menus to select the BNC connector . The 764 can use
any AES signal as a DAR; it will use the reference input to detect and
measure frame synchronization of AES signals.
If you do not connect a house DAR to one of the reference inputs, the
764 will monitor synchronization of the CH 3–4 input signal with the
CH 1–2 input signal. For more information, refer to the explanation of
the Frame Synchronization Error session statistic on page 32.
(4) VGA Video Output
To see a larger, color image of the 764 display (as illustrated in
Figure 5), connect a VGA-compatible monitor to this standard 15-pin
output. Table 25 on page 77 lists the characteristics of the Video
Output signal.
764 Digital Audio Monitor User Manual
5
Page 21
Getting Started
VGA or SVGA
Monitor
Tektronix 764 Monitor
From VGA VIDEO Output
Figure 5: Using an external color monitor
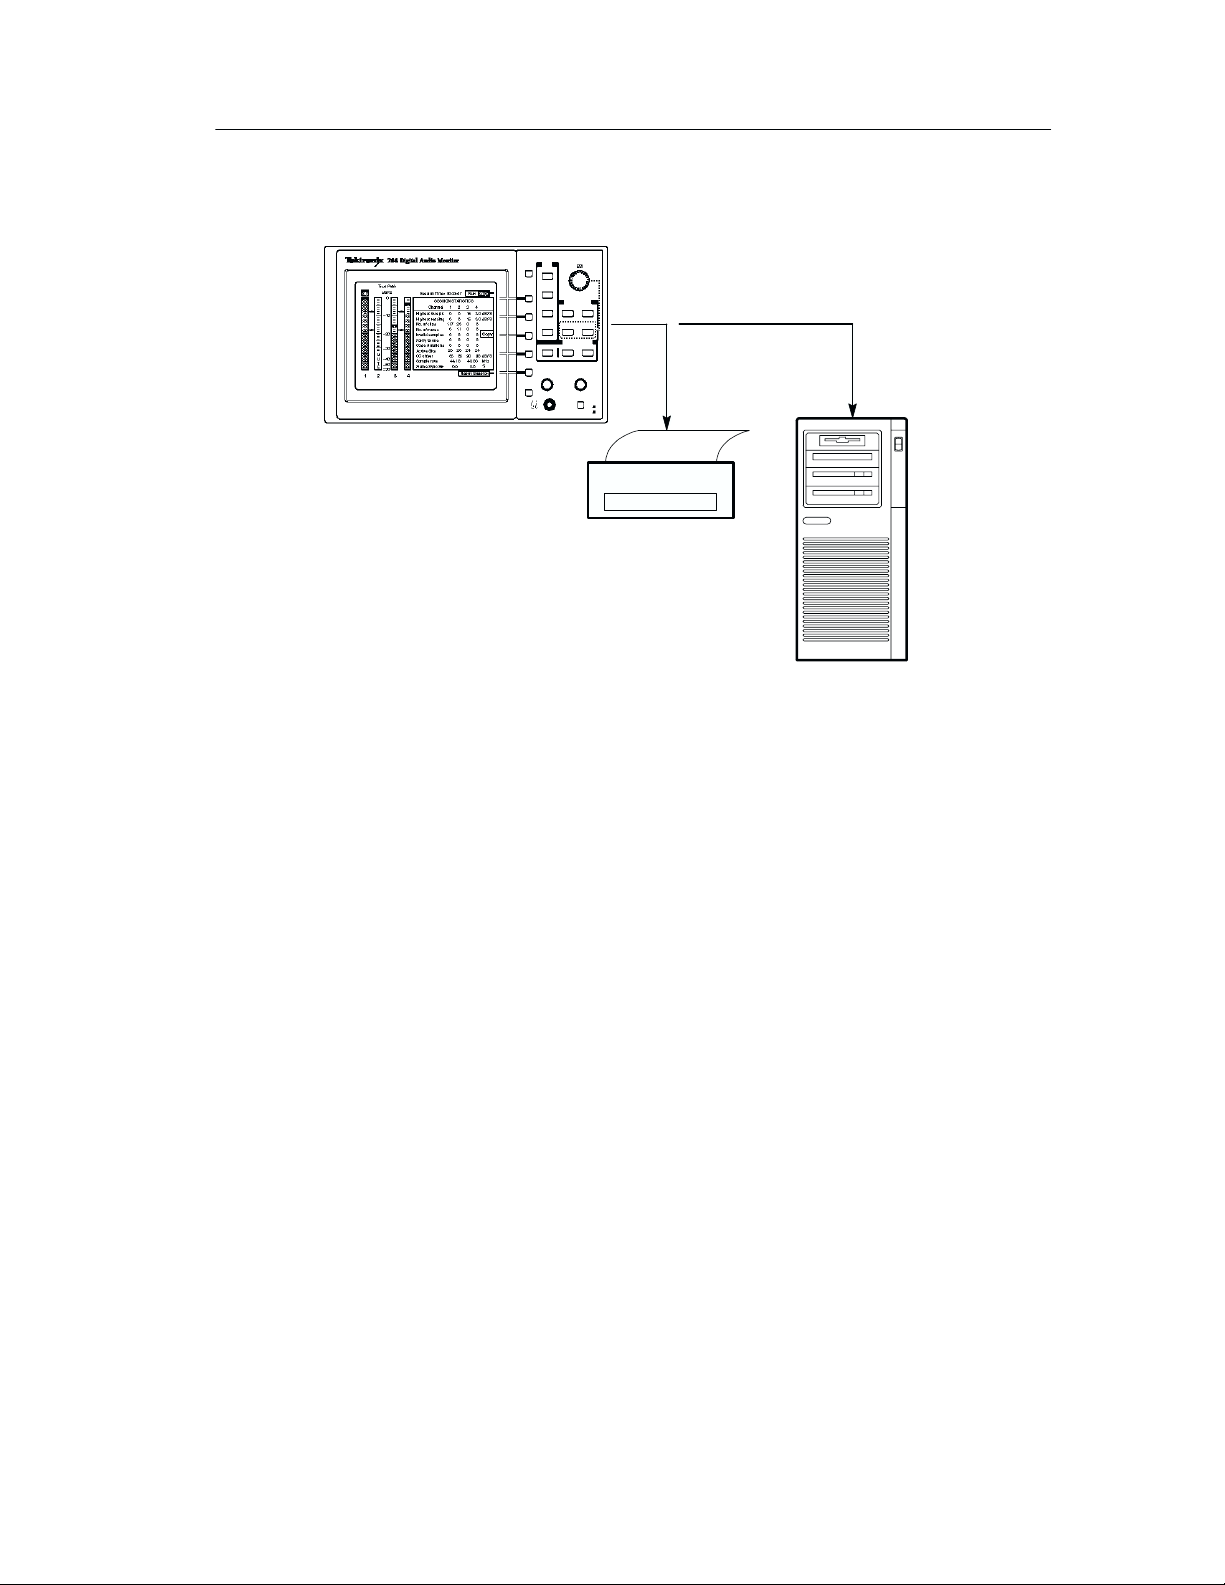
(5) RS-232 Communications Port
Through the RS-232 port, you can:
H Output a record of the input signal and program, either to an
ASCII printer or a personal computer (see Figure 6) running a
communications application, such as PROCOMM or the Terminal
accessory of Microsoft Windows. Refer to Session Reports
beginning on page 34.
H Operate the instrument (serial number B020000 and later) by
remote control. Refer to Remote Control Commands, beginning on
page 66, for more information.
H Download future 764 software upgrades through a personal
computer. Please contact your Tektronix representative, or the
nearest Tektronix office, for information about software upgrades.
Installation instructions are provided with each upgrade kit.
6
764 Digital Audio Monitor User Manual
Page 22
Tektronix 764 Monitor
Printer
Getting Started
Via RS-232
Print or Store
Computer
Figure 6: Outputting a session report
(6) Optional Serial Video Loop-Through
Instruments equipped with Option 01 (Embedded Audio Input) have
two additional 75 Ω BNC connectors, SER. VIDEO IN and SER.
VIDEO OUT. These connectors make up a loop-through that accepts
digital video with embedded digital audio.
Refer to Appendix C: Options, beginning on page 89, for more
information about Option 01.
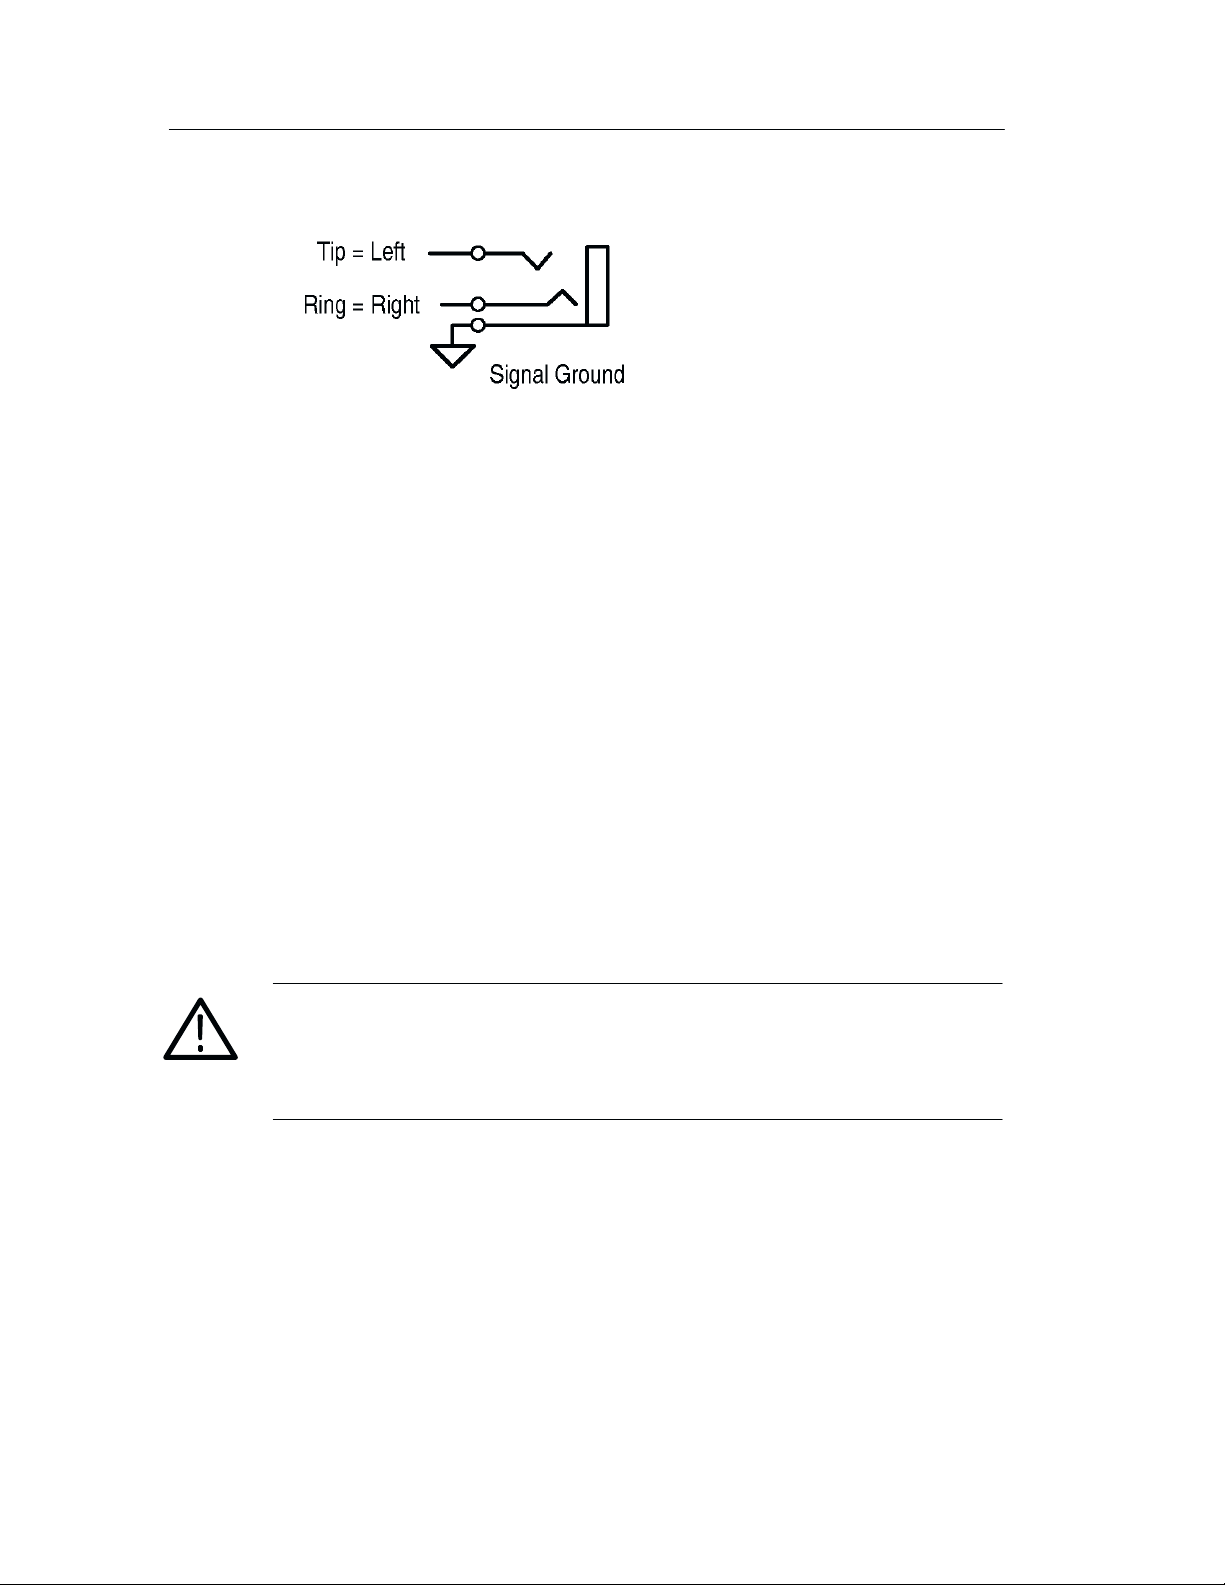
Headphones
The front-panel headphone output lets you listen to the audio
programs contained in the digital input signals. The connector accepts
1
ń
a standard
Figure 7. Adjust the output level with the
inch (6.35 mm) stereo plug and is wired as shown in
4
VOLUME knob.
764 Digital Audio Monitor User Manual
7
Page 23
Getting Started
Figure 7: The headphone output (schematic)
By factory default, the headphone output automatically follows the
phase display; that is, it contains the audio programs decoded from the
two channels that you are monitoring with the Lissajous pattern and
correlation meter. You may also choose to listen to any two of the
input channels, independent of the phase display choices; for
instructions, refer to Selecting Headphone Channels on page 48.
Supplying Power
You can operate the 764 on any AC power supply that provides 90 to
250 V at 50 to 60 Hz. If the power cord supplied with your instrument
is incorrect for your local AC supply, please contact your nearest
Tektronix representative or field office.
WARNING. Line voltage will be present in the instrument whenever
power is supplied even if the POWER switch is set to STANDBY
Always disconnect the power cord before removing the instrument
from its cabinet.
.
8
764 Digital Audio Monitor User Manual
Page 24
Initial Power Up and Configuration
Once you have connected a signal source to at least one of the 764
DIGITAL AUDIO inputs, switch the instrument On. When the start-up
diagnostics are completed, the instrument will begin operation in the
Audio View/Session display.
If a signal source is connected through one of the XLR inputs, the
program level should be shown in the corresponding meters. If the
input is through a BNC connector, you must reconfigure the input with
the following procedure before you can monitor the signal. In either
case, please take this opportunity to familiarize yourself with the 764
front panel controls (Figure 8), menu structure, and techniques.
Getting Started
Figure 8: Controls for initial power up and configuration
764 Digital Audio Monitor User Manual
9
Page 25
Getting Started
Perform the following steps to select the input types and familiarize
yourself with the 764 menu structure:
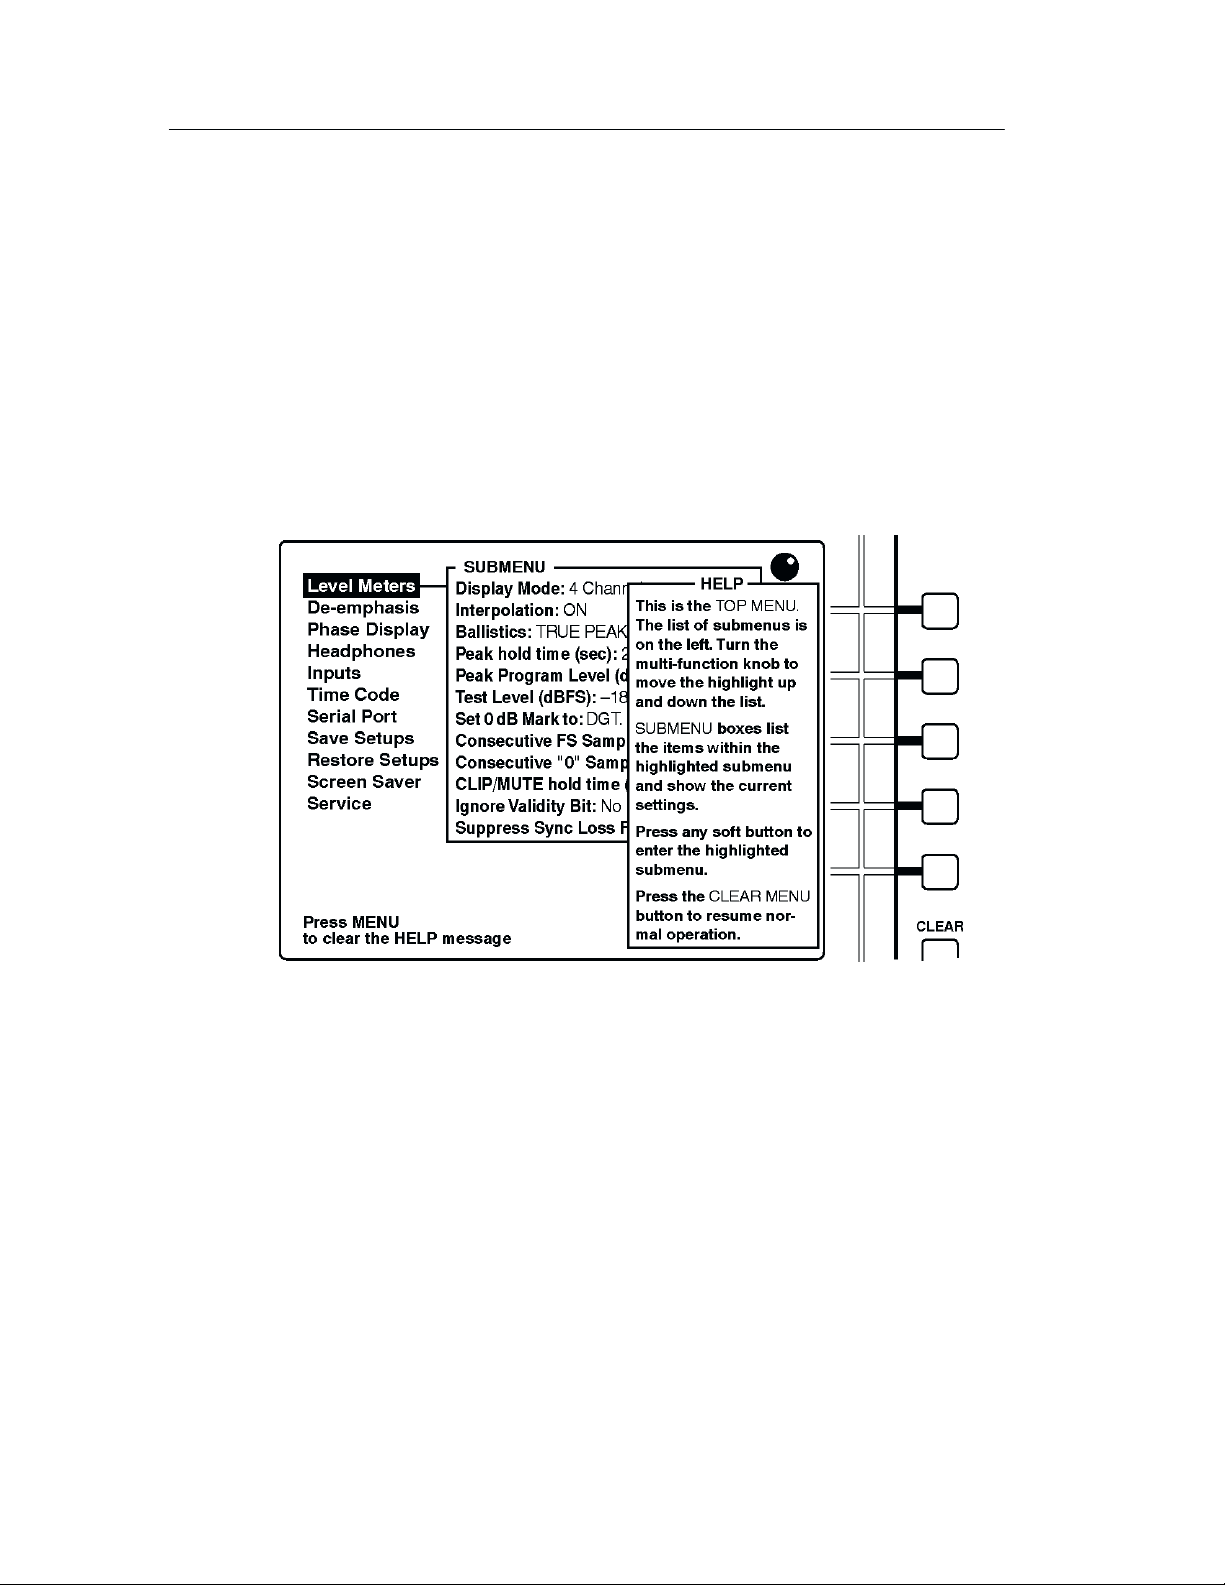
1. Press the
2. When the 764 is in menu mode,
context-sensitive HELP messages. Press
MENU button to enter the TOP MENU.
MENU provides access to
MENU now to see the TOP
MENU help message; the display resembles Figure 9. Press the
button again to clear the message.
10
Figure 9: The top menu HELP message
3. The knob icon appears in the upper-right corner of the display
when the multi-function knob is active. Here, you may turn the
knob to scroll among the TOP MENU choices. Turn the knob now
to scroll the menu highlight to the “Inputs” entry, as shown in
Figure 10.
764 Digital Audio Monitor User Manual
Page 26
Getting Started
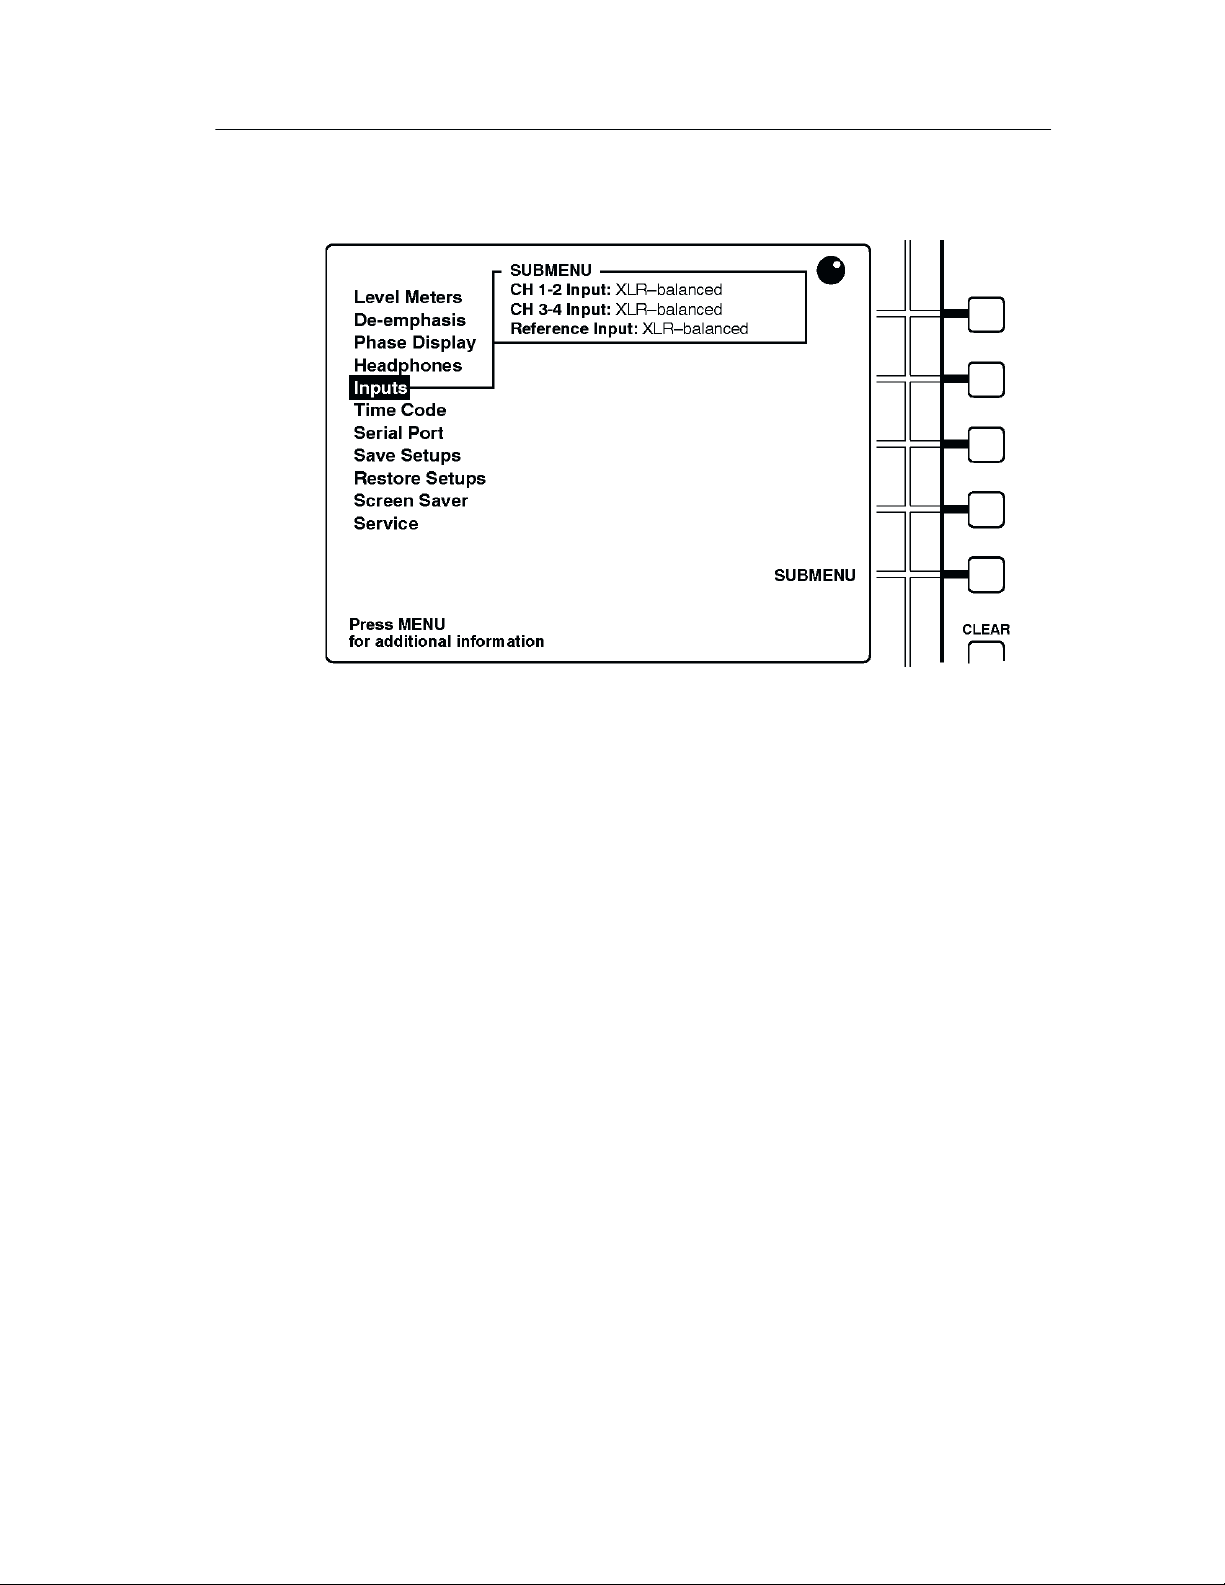
Figure 10: Selecting from the top menu
4. The five buttons immediately to the right of the display are called
soft buttons. The printed/molded lines to the left of these buttons
serve to associate the buttons with on-screen menu choices or
functions. In Figure 10, the bottom soft button is associated with
the SUBMENU function, but you can press any soft button to enter
the Inputs submenu.
1
After you do, the display resembles Figure
11.
5. To change the channel 1–2 input to the BNC connector, press the
soft button to the right of the “BNC-unbalanced” choice. The
change is in effect when you exit the menu and return to normal
operation.
1
Because there are no other soft button assignments in the top menu level,
the 764 is configured so that pressing any one of the five soft buttons will
select the highlighted submenu.
764 Digital Audio Monitor User Manual
11
Page 27

Getting Started
Figure 11: The inputs submenu
6. Turn the multi-function knob to move the menu highlight to the
“CH 3–4 input:” line.
7. If desired, change the channel 3–4 input to the BNC connector by
pressing the associated soft button.
8. Press the
CLEAR MENU button to exit the menus and resume normal
operation. If you have selected the appropriate input type, the
corresponding level meters should now respond to the input audio
program.
12
764 Digital Audio Monitor User Manual
Page 28

Operating Basics
This section contains the basic information needed to use your 764.
The subsections are: Overview, Front Panel Controls, The Level
Meters, The Phase Display, The Session Display, Session Reports,
The Channel Status View, The User Data View, and Other Features.
Please take a few minutes to familiarize yourself with this section
and the information contained in it. Consult the text whenever you
have a question regarding instrument operation. Because the
Tektronix 764 Digital Audio Monitor is intended as a tool for use in
a production environment, every effort has been made to keep
operation as simple and intuitive as possible. An attempt has also
been made to keep this section of the manual brief and easy to use.
You will find detailed information about the more technical aspects
of 764 operation in the Reference section of this manual.
Overview
The 764 permits in-line monitoring of the audio program contained
in a digital audio signal without first converting it to analog form. In
addition, it can report and interpret the ancillary data that is
transmitted through the Channel Status and User Data bits of the
digital data stream.
The 764 uses three display views to perform those functions—the
Audio view, the Channel Status view, and the User Data view—as
described in the following paragraphs. (To locate buttons mentioned
in the text, refer to Front Panel Controls beginning on page 16.)
Monitoring an Audio Program with the Audio View
The Audio view (with the Session Statistics displayed, as shown in
Figure 12) is the power-up default configuration of the 764.
Otherwise, the Audio View is never more than two button presses
away:
1. Press the CLEAR MENU button to exit any on-screen menu.
2. Press the VIEW:AUDIO button.
764 Digital Audio Monitor User Manual
13
Page 29
Operating Basics
The left portion of the Audio view display always contains four “bar
graph” level meters. The right portion contains either a numerical
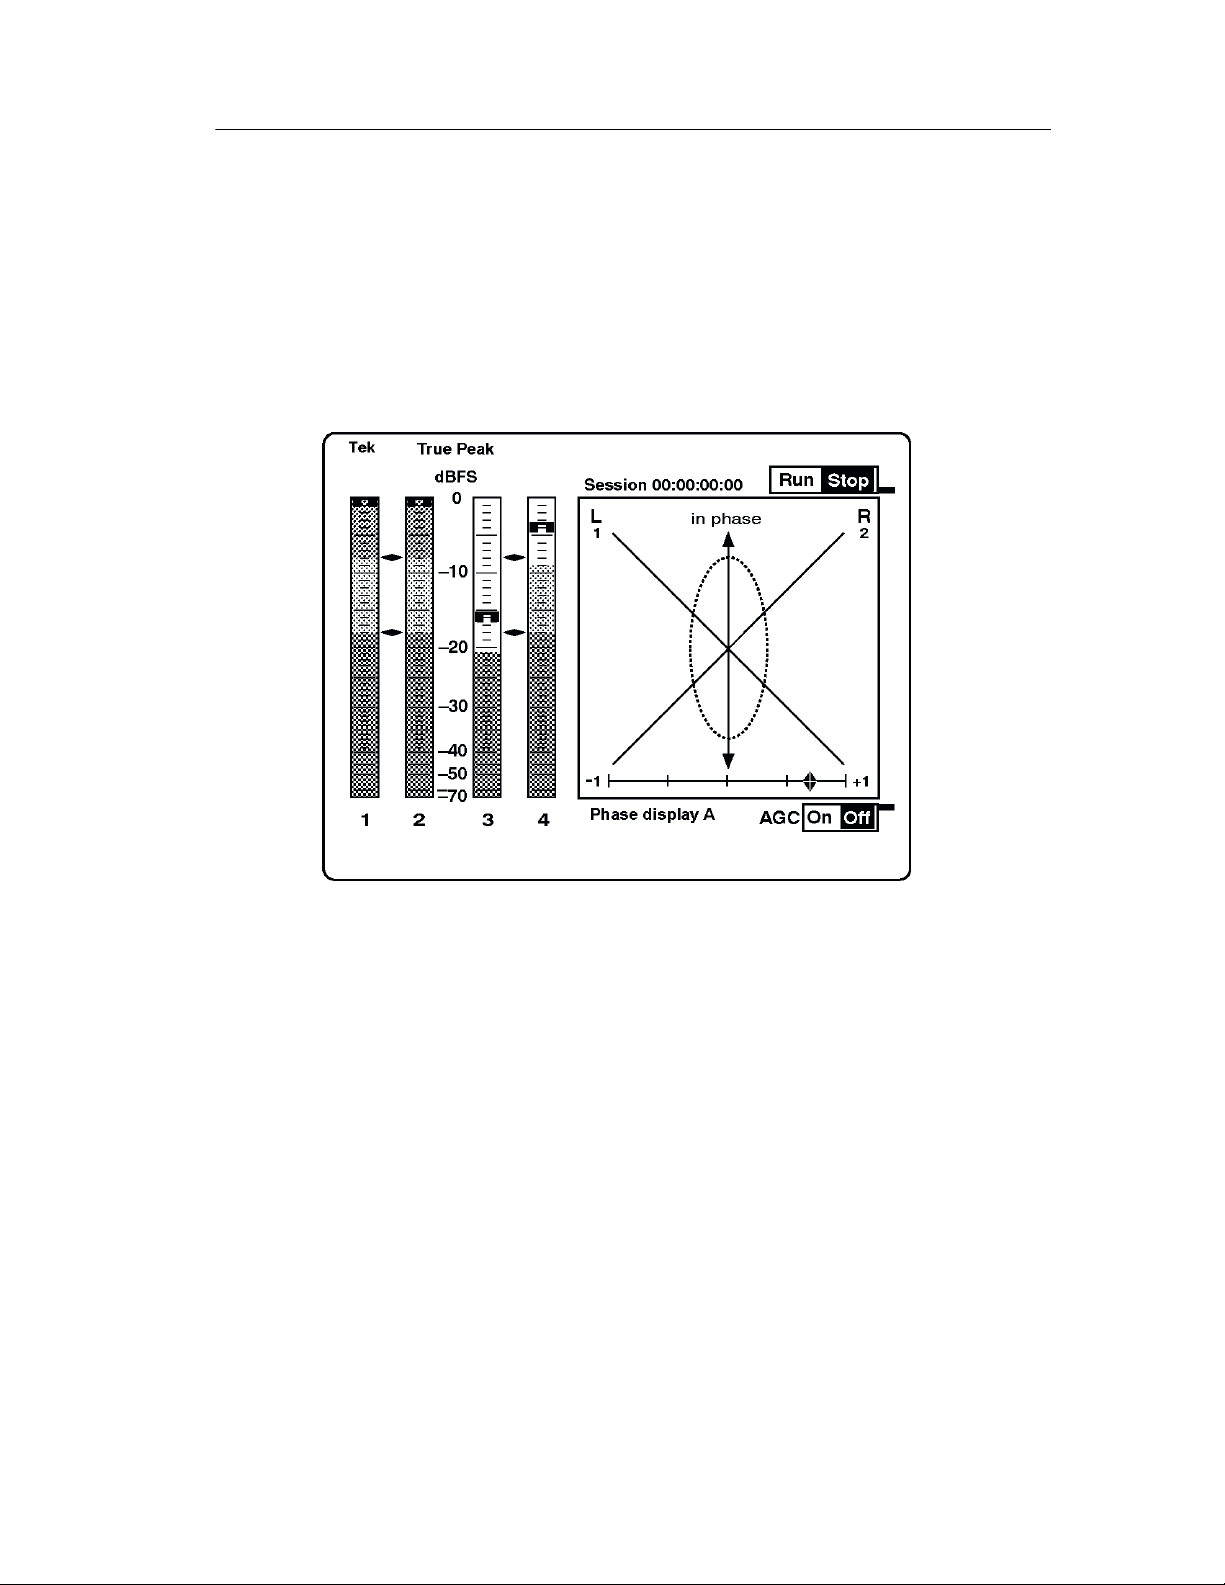
display of session statistics (see Figure 12), or the Phase display
(shown in Figure 13). Configure the right side of the Audio view
display with the three PHASE DISPLAY buttons: A, B, and
SESSION.
14
Figure 12: The 764 AUDIO/SESSION view
The 764 has many options that affect the appearance and behavior of
the Audio view features. For more information, refer to The Level
Meters beginning on page 18; Sum and Difference Bars on page 25;
The Phase Display on page 26; and The Session Display on page 29.
Session Reports
The 764 can also output session reports, which are permanent records
of session activity, through the rear-panel RS-232 port. The reports
can either be sent directly to a printer, or captured on a PC and saved
to disk.
This feature adds important utility to the 764 because it permits
screening of digital audio programs for errors and peak levels
764 Digital Audio Monitor User Manual
Page 30
Operating Basics
without requiring constant operator attention. When errors and peaks
are encountered, they are time-stamped with the active session time
code, which makes it easy to return to the part of the program that
contains the event of interest. See page 34 for more information.
Figure 13: The 764 AUDIO/PHASE view
Monitoring the Ancillary Data
You can monitor ancillary data contained in the digital audio signal
through two additional 764 view options.
Channel Status View. The Channel Status view reports the information
embedded in the channel status bytes of the incoming serial digital
signal. Select the Channel Status view by pressing CLEAR MENU
(if necessary, to exit the on-screen menus), then the VIEW:CH.
STATUS button. You may select a number of Channel Status view
options with the Soft buttons to the right of the display. Refer to The
Channel Status View beginning on page 37 for more information.
User Data View. The User Data view reports the information embedded
in the User bytes of the incoming signal. Select the User data view
by pressing CLEAR MENU (if necessary, to exit the on-screen
764 Digital Audio Monitor User Manual
15
Page 31

Operating Basics
menus), then the VIEW:USER DATA button. You may select a
number of User Data view options with the Soft buttons. Refer to
The User Data View beginning on page 39 for more information.
Other Features
With the 764, you can also save up to three instrument configurations
(setups) for later recall. Refer to page 40.
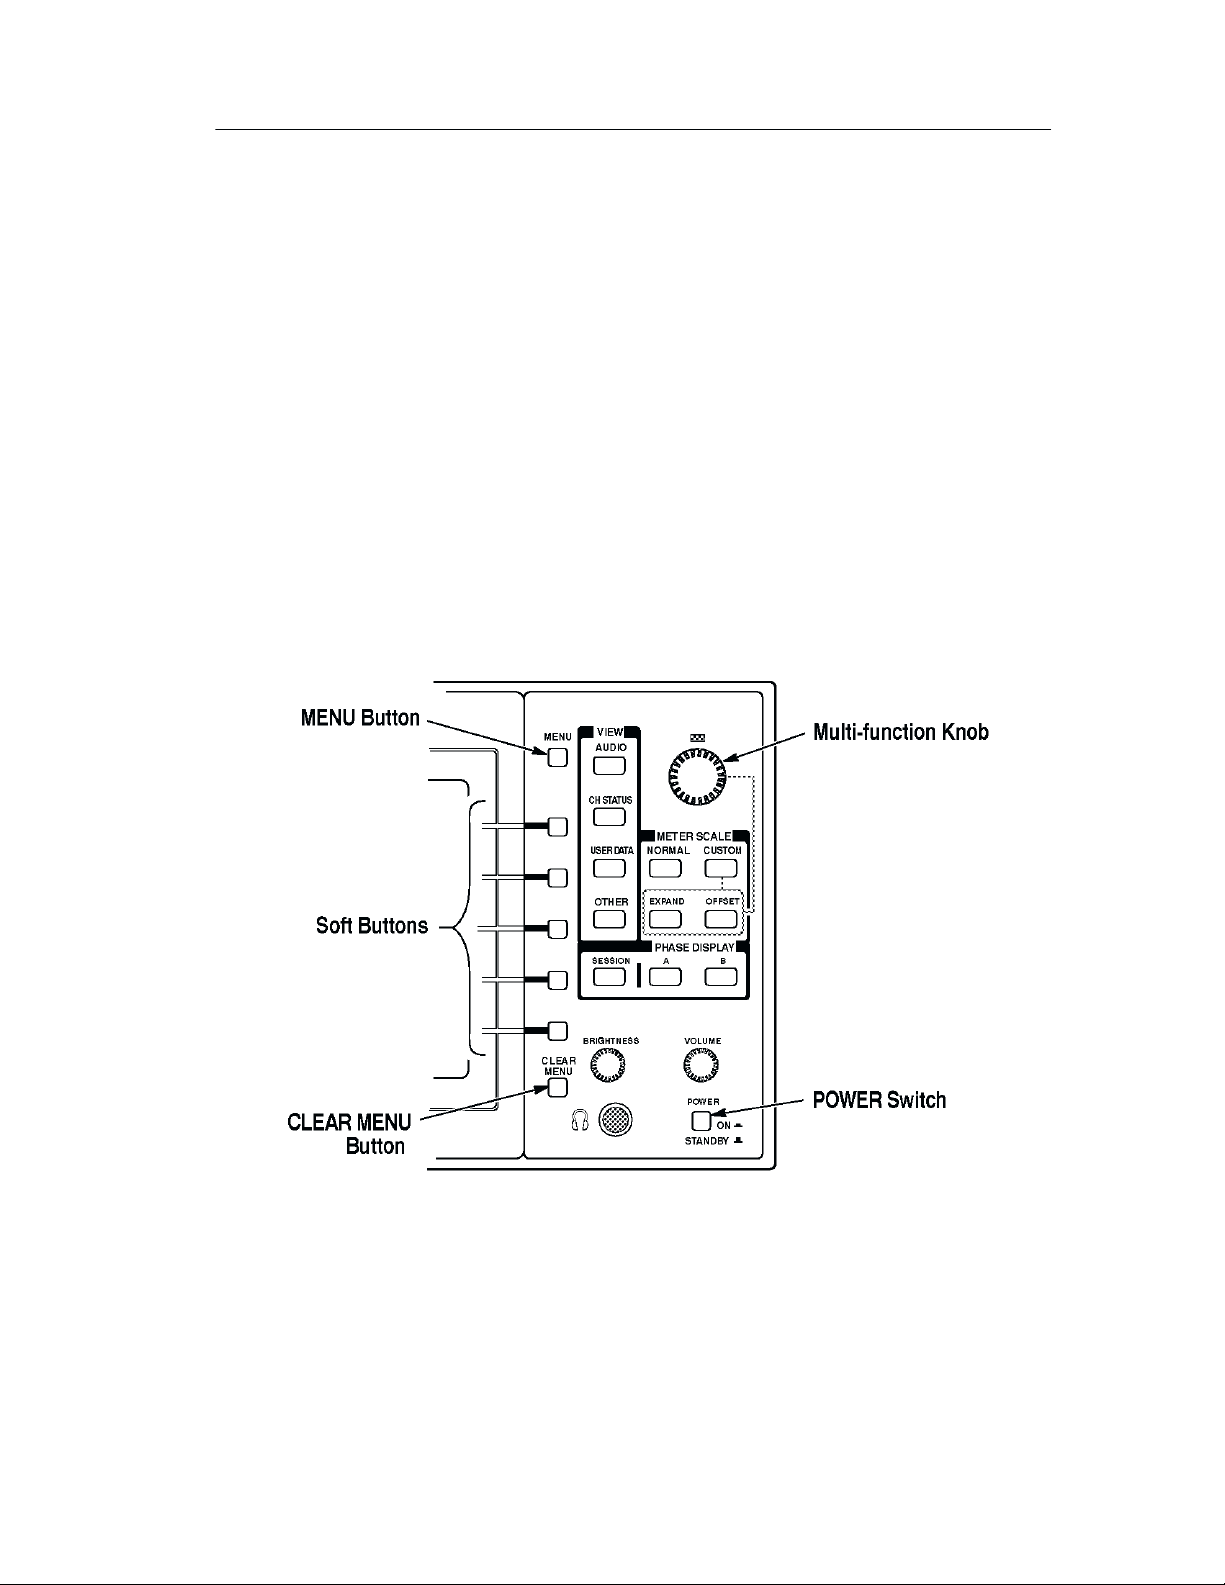
Front-panel Controls
Figure 14 shows the 764 front panel controls.
POWER switch. Press the POWER switch to toggle between ON
(1)
and STANDBY. A portion of the instrument power supply remains active when the switch is in the Standby position. Unplug
the 764 if it is necessary to isolate it completely from the main
power supply; instrument settings are preserved with internal battery back up.
(2)
VIEW Selection buttons. Use the VIEW buttons to select among the
AUDIO, CH(annel) STATUS, and USER DATA views. These
buttons are inactive when a menu is present on the 764 display.
The OTHER button is not used in this version of the instrument.
(3)
PHASE DISPLAY and SESSION buttons. Use the PHASE DISPLAY
buttons to configure the right portion of the Audio view.
The A
display with correlation meter, as illustrated in Figure 13. The A
and B phase pairings are, by default:
H Pair A, left = input channel 1; Pair A, right = input channel 2.
H Pair B, left = input channel 3; Pair B, right = input channel 4.
You can change the orientation of the Lissajous display (from
soundstage to X–Y) and the phase channel pairings through
on-screen menus. Refer to The Phase Display Submenu beginning
on page 54 for more information.
and B PHASE DISPLAY buttons select a Lissajous Phase
16
764 Digital Audio Monitor User Manual
Page 32

Operating Basics
The SESSION button selects a Session Statistics panel,
illustrated in Figure 12. Refer to The Session Display beginning
on page 29 for more information.
Figure 14: 764 front-panel controls
METER SCALE buttons. Use the METER SCALE buttons to change
(4)
the Audio view level meter scale. The default scale, selected with
NORMAL, is illustrated in Figure 12. Use EXPAND and OFFSET—with the multi-function knob—to configure the range and
offset of the custom scale. Refer to The Level Meters beginning
on page 18 for more information.
(5)
Multi-function knob. Turn the multi-function knob to expand and
offset the meter scale, and to scroll various on-screen menus. The
764 Digital Audio Monitor User Manual
17
Page 33

Operating Basics
LED immediately above the knob will light and a knob icon will
appear in the upper-right of the display when the knob is active.
(6)
MENU button. Press MENU to invoke the display menu and call up
context-sensitive help text when a menu is on screen.
(7)
Soft buttons. The five white soft buttons are used to select choices
or toggle settings that are indicated on the CRT display. In Figure 12, for example, the top soft button is used to toggle the Session between Run and Stop.
(8)
CLEAR MENU button. Press CLEAR MENU to exit the on-screen
menu and return to the most recent view (Audio, Channel Status,
or User Data).
(9)
Headphone VOLUME control. The VOLUME knob controls the ana-
log headphone output gain; on instruments equipped with Option
02, it also controls the gain of the rear-panel analog audio outputs.
(10)
Display BRIGHTNESS control. Turn the BRIGHTNESS knob to ad-
just the brightness of the 764 display. Does not affect the output
of the rear-panel VGA VIDEO connector.
The Level Meters
The 764 level meters are vertical bar graphs in which the height of
each bar indicates the amplitude of the audio program contained on
the corresponding input channel. The levels of all four input channels
are shown in the default meter configuration, illustrated in Figure 15.
You can also select—through on-screen menus—“two channel plus
sum and difference” mode, shown in Figure 16.
Indeed, almost every feature of the 764 level meters may be
customized to suite your particular needs. The features and your
options are explained briefly in the following numbered paragraphs.
Choose the options that are appropriate to your particular application
through the on-screen menus; refer to Configuring the Level Meters
beginning on page 22 for more information.
18
764 Digital Audio Monitor User Manual
Page 34

Operating Basics
Figure 15: The 764 Level Meters
Meter Ballistics (i.e., dynamic response, or attack/decay character-
(1)
istics of the meters). The meters can emulate the dynamic response of three common types of analog audio level meter .
Choices are VU with the scale extended to permit display of true
peaks on the same bar; PPM, a quasi-peak meter with 10 ms integration time and slow decay; and True Peak, with instantaneous
response and slow decay .
(2)
Scale Units (dBFS or dBr). By default, the zero dB mark is at digital
full scale, and units are in dB relative to full scale (dBFS). You
may also set the 0 dB mark to either the Peak Program level or
the Test level—see items (3) and (4) below. In either case, the
scale units are dB relative to the specified zero point (dBr).
764 Digital Audio Monitor User Manual
19
Page 35

Operating Basics
Figure 16: The sum and difference display modes
Peak Program level. The Peak Program level is usually the maxi-
(3)
mum permissible level for audio program material. The default
Peak Program level is –8 dBFS; you may set it to the integer value between 0 (FS) and –30 dBFS that is appropriate to your particular needs. The diamond-shaped Peak Program level scale
markers will be red on an (optional) external color display; if the
audio program exceeds this level, the portion of the meter bar
above the level will also be red.
(4)
Test Level. Test level is also known as Reference level or Line-up
level. The diamond-shaped Test level marker will be yellow on
an external color display, and the part of the meter bar between
this level and Peak Program level will also be yellow. The default
test level is –18 dBFS; it may be set to any integer between 0 and
–30 dBFS.
(5)
Variable scale. The scale range and offset may be adjusted through
the METER SCALE:EXP AND and :OFFSET buttons. This
feature lets you more closely monitor program levels in a selected
portion of the meter, such as immediately above and below the
Test level. To adjust either the range or offset, press the appropriate button, then turn the multi-function knob. Press METER
SCALE:NORMAL to restore the default meter scale.
20
H The normal range is 70 dB (0 dBFS to –70 dBFS); custom
range may be as little as 10 dB or as great as 90 dB.
764 Digital Audio Monitor User Manual
Page 36

Operating Basics
H Shape: The upper 20 dB of the scale is linear in dB; the scale
is progressively compressed below –20 dBFS.
H The upper limit of the meter scale is the anchor for expansion
and compression; that is, the top scale number remains the
same when you expand or compress the scale.
H The lower limit (bottom) of the scale cannot be adjusted
below –90 dBFS; the upper limit (top) cannot be higher than
0 dBFS, or lower than –20 dBFS.
Mute indicator (and other messages). The MUTE indicator is one of
(6)
seven messages that can appear in the lower half of each meter
bar. The remaining messages are intended to alert you to possible
errors in the input signal; they are explained in In-Bar Warning
Messages beginning on page 44.
You can specify the number of consecutive all-zero samples
required for a MUTE indication. The default is 10 samples; the
range is 0 to 100. The Mute indicator always reacts to unprocessed input data, regardless of Interpolation or de-emphasis
settings (refer to Interpolation on page 50 or The De-emphasis
Submenu on page 53).
You may also specify the persistence (hold time) for the in-bar
indicators between 1 and 30 seconds; the default is 2 seconds.
(7)
Meter bar labels. The meter bar labels depend on the display mode.
The channel numbers (1, 2, 3, and 4) correspond to the rear-panel
input labels; “Sum” indicates (L+R)/2, and “Diff” indicates
(L–R)/2.
(8)
True peak indicators. The true peak indicators always show true
peak values, regardless of the selected meter ballistics. These
indicators are particularly useful when you have selected PPM or
VU ballistics, which have rise times that may prevent you from
seeing peaks in program material containing steep transients. By
default, the peak indicators persist at the most recent program
peak for 2 seconds; you can set this “peak hold time” (through
the level meters submenu) between 0 and 10, in one-second increments.
764 Digital Audio Monitor User Manual
21
Page 37

Operating Basics
Please be aware that although the peak indicators may reveal
higher peaks than VU or PPM ballistics, the indicators do act on
the same, processed data as the meters. If interpolation is ON, the
peak indicators show peaks in the oversampled data, and these
peaks may be higher than those in the raw input data (see
“Interpolation,” on page 50). If de-emphasis (AUTO, CCITT
J.17, or 50/15) is selected, the peaks—particularly at higher
frequencies—may be lower than in the raw data (refer to The
De-emphasis Submenu on page 53).
(9)
Clipping flag. The clipping flag appears when the 764 detects clip-
ping and persists for the same hold time as chosen for the Mute
indicator. The user can specify the number of consecutive full
scale samples that constitute clipping. The range is from 1 to 100
samples. Like the Mute indicator, the clipping flag always reacts
to unprocessed input data, regardless of Interpolation or de-emphasis settings.
Configuring the Level Meters
You can configure the level meter scale with front-panel controls.
Other meter characteristics—such as ballistics, scale units, and
program/test levels—are configured through the on-screen Level
Meter submenu.
Variable scale. To adjust either the range or offset of the level meters,
press METER SCALE:EXP AND or METER SCALE:OFFSET,
then turn the multi-function knob. For best results (and least
confusion), expand the scale to the desired range first, then adjust the
offset to view the meter region of interest. For example, to change
normal scale to a custom scale showing only the –10 to –30 dBFS
range (see Figure 17):
1. Press METER SCALE:EXP AND , then turn the multi-function
knob clockwise [
] to expand the scale range to 20 dB, top to
bottom.
2. Press METER SCALE:OFFSET , and turn the multi-function
knob counterclockwise [ ] to shift the scale upwards by
10 dB.
22
764 Digital Audio Monitor User Manual
Page 38

Operating Basics
Press METER SCALE:NORMAL to restore the default meter
scale; to later restore the “custom” scale and offset, press METER
SCALE:CUSTOM.
Figure 17: Creating a custom meter scale
Level Meter Submenu selections. All remaining level meter configura-
tion selections are made through the Level Meter submenu. Follow
the steps below to make menu selections. As with meter scale, all
selections apply to all four input channels, and all four meter bars.
1. Press CLEAR MENU, if necessary, to exit any menu and resume
normal operation.
2. Press MENU to enter the root menu (the TOP MENU).
3. Turn the multi-function knob to scroll the menu highlight to the
Level meters entry.
4. Press any soft button to enter the level meters submenu. The
display will resemble Figure 18.
764 Digital Audio Monitor User Manual
23
Page 39

Operating Basics
Figure 18: The Level Meters submenu
5. Again, use the multi-function knob to scroll the menu highlight to
the parameter you wish to configure. The soft button assignments
will change to reflect your choice of settings. For menu items that
have numeric settings, the top two soft buttons become
increment/decrement controls designated with up and down arrow
icons, as represented in Figure 19.
Figure 19: Soft buttons and numeric settings
24
6. Press the soft button that corresponds to the desired setting, or
that increments or decrements the numeric value. (A numeric
value will continue to increase or decrease as long as you hold
764 Digital Audio Monitor User Manual
Page 40

Operating Basics
the button down—or until you reach an adjustment limit.)
Changes are confirmed by changed text after the parameter name
in the submenu column on the left side of the screen.
7. Repeat steps (5) and (6) until you have configured the meters to
suit your needs.
8. Press the TOP MENU soft button to return to the top menu, or
press CLEAR MENU to exit the menus and resume normal
operation.
Sum and Difference Bars
When Sum and Difference bars are selected, the two left-hand bars
show the levels of one input pair (either channels 1 and 2, or
channels 3 and 4), and the right-hand bars emulate the sum and
difference bars of an analog audio monitor , such the Tektronix 760.
Note that the “sum” is actually one-half of the sum of the left- and
right-channel data, while the “difference” is one-half of the
difference between the channels. That is:
Sum +
The Sum and Difference bars use the same scale and ballistics, and
all other settings, as the channel level meters. Session statistics—other than sum and difference peaks—are not accumulated for
the Sum and Difference bars, because they would be either
meaningless or redundant. See Figure 20 and The Session Display
beginning on page 29 for more information.
L ) R
2
Diff +
L * R
2
764 Digital Audio Monitor User Manual
25
Page 41

Operating Basics
Figure 20: Sum and difference bars and the session display
The Phase Display
The 764 Phase display is a Lissajous pattern display augmented with
a (phase) Correlation meter . It is designed for convenient, qualitative
monitoring of the phase relationship between any two input channels.
The Phase display always uses interpolated (4X “oversampled”) data,
even if interpolation is turned off in the level meters submenu. You
can set the instrument for either Soundstage or X–Y orientation of
the Lissajous pattern, as illustrated in Figure 21.
NOTE. The orientation of the Lissajous pattern, phase channel
pairings, and Correlation meter speed (see below) are selected
through the Phase Display submenu. Please see page 54, in the
Reference section of this manual, for details.
26
764 Digital Audio Monitor User Manual
Page 42

Operating Basics
Figure 21: The 764 phase display
The Lissajous Pattern
The Lissajous portion of the phase display is a plot of one channel
against another on an orthogonal pair of axes. The X–Y orientation—shown on the right in Figure 21—plots left channel data along
the vertical axis and right channel data on the horizontal axis,
emulating the conventional X–Y display of an oscilloscope. The
default “Soundstage” orientation, shown on the left in Figure 21,
rotates the X–Y pattern 45 degrees counterclockwise so that the
channel data are plotted along diagonal axes, and mono (or in-phase)
audio appears along the vertical (“straight ahead”) axis.
If you are unfamiliar with Lissajous phase patterns and their
interpretation, see Tektronix application note 21W-6244-2, “Stereo
Audio Measurements Using the 760A Audio Monitor .” The concepts
discussed apply to the Lissajous display of the 764 as well.
The Correlation Meter
The Correlation meter, illustrated in Figure 22, displays a true
mathematical phase correlation (mono compatibility) between the
two channels of the phase pair, independent of signal amplitude. You
may find it easier to interpret the correlation meter than the Lissajous
pattern. The position of the diamond-shaped pointer indicates the
correlation between the two selected channels. The meter will read
764 Digital Audio Monitor User Manual
27
Page 43

Operating Basics
+1 when the channels contain identical signals (frequency and
phase); it will measure –1 when the signals have the same frequency
(or frequencies), but are 180 degrees out of phase. A center-scale (0)
reading indicates uncorrelated—or random—signals.
Figure 22: The phase correlation meter
When you monitor audio programs (as opposed to simple test tones)
with the 764, the pointer will usually read between +0.5 and +1, and
will move as the correlation between the two channels changes.
Choose the time constant of the meter—and thus the speed of meter
response—through the Phase Display submenu.
AGC
AGC (automatic gain control) keeps the Lissajous pattern visible and
within the bounds of the phase display for signal levels between
0 dBFS and approximately –40 dBFS. When the AGC is Off, full
scale is equivalent to the Peak Program level (refer to page 20). AGC
does not affect the correlation meter Press the bottom soft button
(immediately above CLEAR MENU) to toggle AGC On/Off.
28
764 Digital Audio Monitor User Manual
Page 44

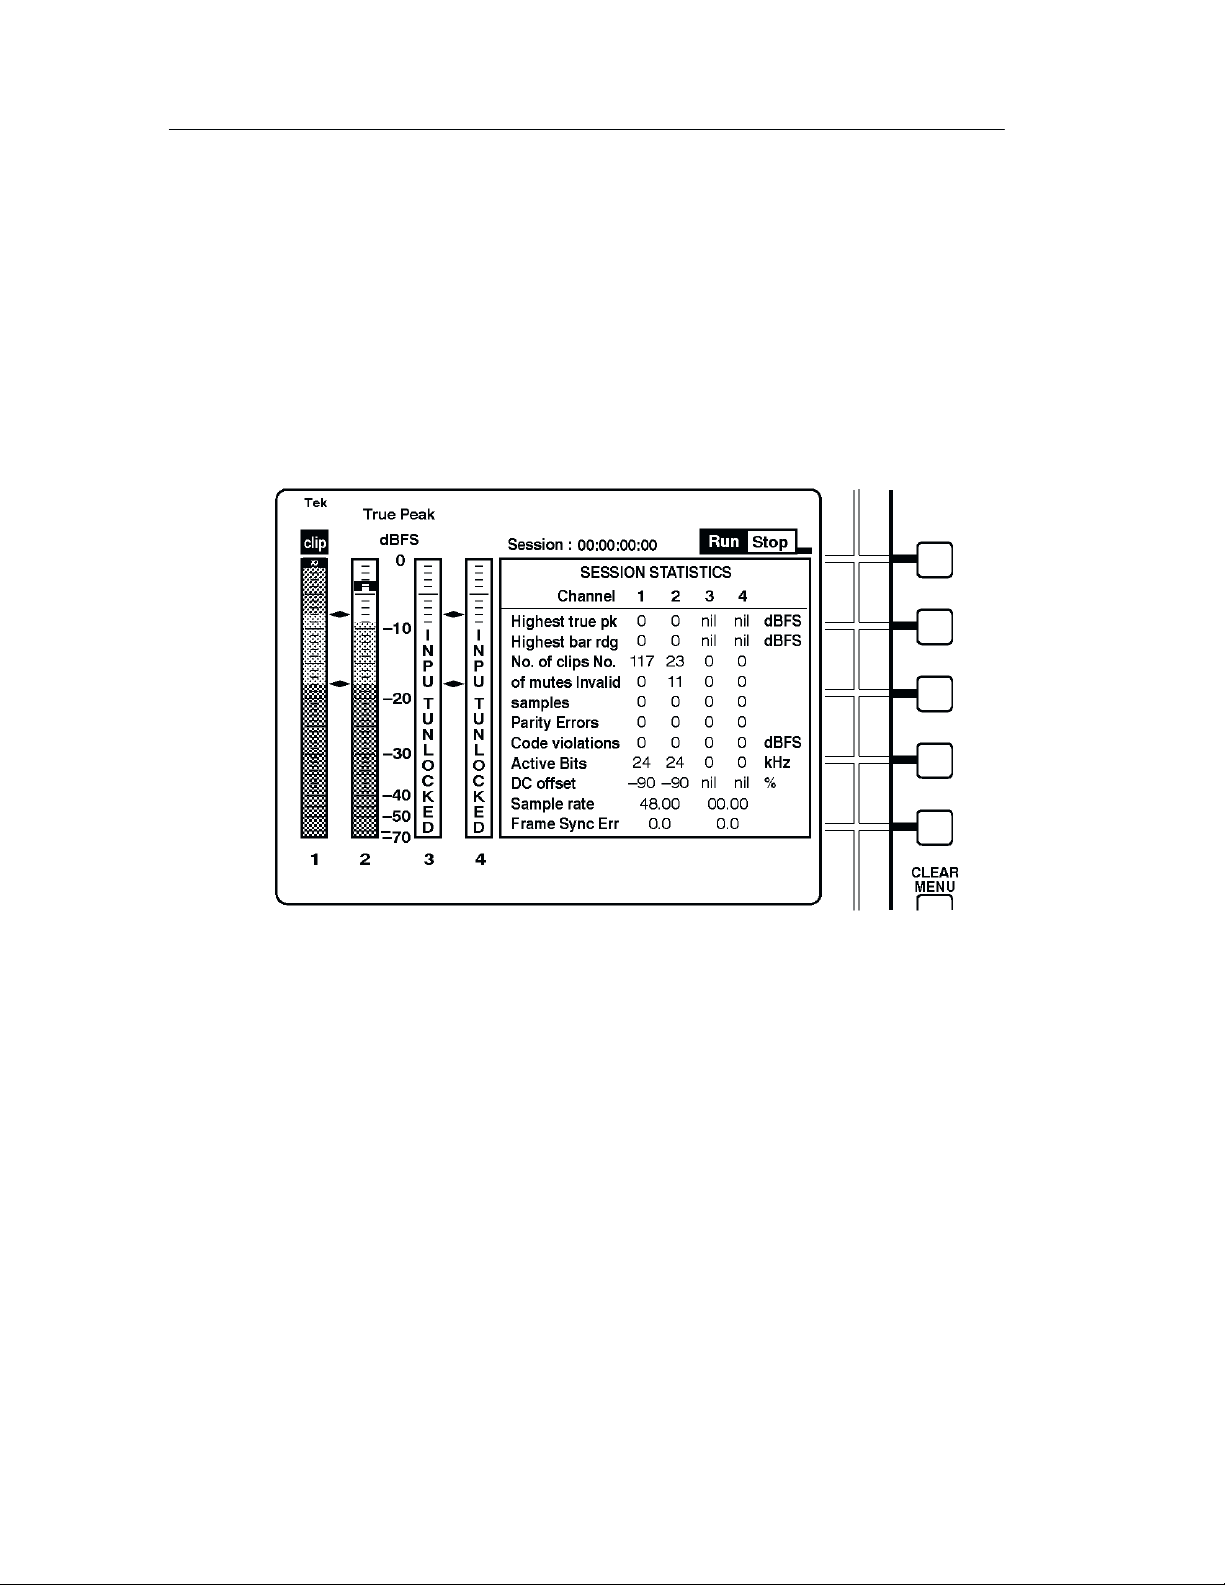
The Session Display
The session display is a dynamic readout of session history; it is
illustrated in Figure 23. When the 764 is in Audio view, press the
PHASE DISPLAY:SESSION
display and the Session display.
Operating Basics
button to toggle between the Phase
Figure 23: The 764 AUDIO/SESSION view
Features of the Session Display
The following numbered paragraphs correspond to the numbered
features visible in Figure 23.
(1) Time readout in hours:minutes:seconds:frames. By default, this is
“Session time.” Session time is the time elapsed since the session
was started, or since the most recent session reset.You can set the
764—through the Time Code submenu—to display VITC (Vertical Interval Time Code) or LTC (Linear Time Code) in place of
764 Digital Audio Monitor User Manual
29
Page 45

Operating Basics
Session time. The instrument time-stamps any errors encountered
during the Session with the chosen time code; the information is
saved in NVRAM for use when you output a Session report (refer
to page 34).
(2) Run(ning)/Stop(ped) indicator and soft button assignment. This
indicator is associated with the top soft button, immediately below the MENU button. The current state is highlighted. Run
means that the Session is running, and statistics are accumulating.
Stop means that the Session has been suspended, or stopped.
Press the soft button to toggle the Session between Run(ning) and
Stop(ped).
(3) Session Statistics, explained below .
(4) RESET Session indicator and soft button assignment. This indica-
tor is visible only when the Session is stopped. Press the
associated soft button (immediately above CLEAR MENU) to
reset all Session statistics to 0 or blank (unknown). Note that a
Session reset erases all Session statistics from memory; if you
plan to output a Session report, do so before you reset the Session.
(5) Copy soft button — is present when SHORT REPORT or LONG
REPORT has been selected through the Serial Port submenu and
the session has been stopped but not reset. Press the soft button to
output a session report to an attached printer or personal computer. Refer to Session Reports beginning on page 34 for more
information.
Session Statistics
The session display reports these values for the four input channels:
H Highest true peak in the session. It is equal to the highest peak
indicator reading on the corresponding level meter, and does not
depend on the meter Scale & Ballistics selected through the
Level Meters submenu.
H Highest meter bar reading (“bar rdg”) of the session. This
corresponds to the highest reading of the meter bar, which—for a
given audio program—may depend on the meter Scale &
Ballistics selected through the Level Meters submenu.
30
764 Digital Audio Monitor User Manual
Page 46

Operating Basics
H Number of CLIPs detected during the session. This is directly
affected by the “Consecutive FS Samples for CLIP” setting in the
Level Meters submenu.
H Number of MUTEs detected during the session. Affected by the
“Consecutive ‘0’ Samples for Mute” setting in the Level Meters
submenu.
H Number of invalid samples encountered during the session. The
764 counts a sample as invalid when its validity bit is set high.
All these fields will read “off” when the “Ignore Validity Bit”
item in the Level Meters submenu is set to YES.
H Number of parity errors detected during the session. This will
increment if the 764 detects incorrect parity in a received digital
audio word. Parity errors suggest problems with the digital signal
source or signal path.
H Code Violations — the number of “raw” serial data subframes
containing biphase coding errors that are encountered during the
session. Code Violations indicate an incorrect or unreliable serial
digital signal or transmission path.
H The digital audio word length, detected by monitoring bit activity
in the part of the digital signal reserved for audio sample data.
Although it is not likely, this number can differ from the sample
length information indicated in the Channel Status bits of the
digital input signal.
H DC Offset — reported in dBFS (dB relative the the full scale
amplitude of the input signal). Note that an offset of –60 dBFS is
only 0.001 of the full scale amplitude, while an offset of
–90 dBFS is approximately 3.16 10
–5
of full scale.
H The measured sample rate. This number is independent of the
sample rate indicated in the Channel Status bits of the digital
input data, but should be the same. Non-standard sample rates
can cause constantly changing frame synchronization errors and
764 Digital Audio Monitor User Manual
31
Page 47

Operating Basics
SYNC ERR flags as shown in Figure 24. Please see the following
paragraphs for more information.
Figure 24: The SYNC ERR Flags
H Frame Synchronization Error — for each input with respect to the
Digital Audio Reference (DAR), when one is present at the
REFERENCE input. Otherwise—when both inputs are active but
no DAR is present—the error of input 3–4 relative to input 1–2,
as depicted in Figure 25. Errors are expressed as the percentage
of a complete digital audio frame.
Notice the “No Reference Signal” message in Figure 25. It will
appear whenever a DAR is absent from the REFERENCE input.
32
Figure 25: Sync Error Reporting in the Absence of a DAR
The AES11 standard specifies that synchronization errors should
be no greater than 25% of the audio sample frame. When the
synchronization error exceeds this limit, a SYNC ERR flag
764 Digital Audio Monitor User Manual
Page 48

Operating Basics
displays under the meter bars of the unsynchronized input.
Figure 24 shows the flags as they would appear if each input
signal preceded or followed the DAR signal by more than 25% of
a frame.
The SYNC ERR flags also appear when the input signal sample
frequency varies from the reference frequency by 0.01 kHz or
more. Any such frequency mismatch will cause the input signal
to “slide” relative to the reference with constantly changing sync
error; the 764 detects this and displays the appropriate SYNC
ERR flag(s) at all times—not just when the error exceeds 25%.
Both the “No Reference Signal” message and the SYNC ERR
flags may be suppressed through the Level Meters submenu; refer
to page 52 for details.
764 Digital Audio Monitor User Manual
33
Page 49

Operating Basics
Session Reports
The 764 can output the data collected during a session—in the form
of ASCII text session Reports, through the rear-panel RS-232
connector. You can print reports on a serial printer, or save them to
files on an IBM-compatible Personal Computer (PC). The 764 can
generate two types of session report, short (Figure 26) and long
(Figure 27).
Tektronix 764 Session Screen Report (short report)
---------------------------------------------------------------------------Title____________________________________________________Date_______________
Time Code used: Session HH:MM:SS
Starting time 00:00:00
Ending time 00:00:41
Elapsed time 00:00:41
---------------------------------------------------------------------------Settings:
Display Mode: 4 Channels
Interpolation: ON
Ballistics: TRUE PEAK
Peak Program Level (dBFS): -8
Test Level (dBFS): -18
Consecutive full-scale samples for clip: 1
Consecutive zero samples for mute: 10
De-emphasis used on channel 1: NONE
De-emphasis used on channel 2: NONE
De-emphasis used on channel 3: NONE
De-emphasis used on channel 4: NONE
--------------------------------------------------------------------------- | Channel 1| Channel 2| Channel 3| Channel 4|
--------------------------+----------+----------+----------+----------+----Highest True Peak Reading | -0.7 | 0 | 0 | 0 | dBFS
--------------------------+----------+----------+----------+----------+
Highest Bar Reading | -0.7 | 0 | 0 | 0 | dBFS
--------------------------+----------+----------+----------+----------+
Clips Found | 0 | 0 | 234 | 234 |
--------------------------+----------+----------+----------+----------+
Mutes Found | 15 | 17 | 0 | 0 |
--------------------------+----------+----------+----------+----------+
Invalid Samples Found | 0 | 0 | 0 | 0 |
--------------------------+----------+----------+----------+----------+
Parity Errors Found | 0 | 0 | 0 | 0 |
--------------------------+----------+----------+----------+----------+
Code Violations Found | 11 | 12 | 27 | 33 |
--------------------------+----------+----------+----------+----------+
Number of Active Bits | 24 | 24 | 24 | 24 |
--------------------------+----------+----------+----------+----------+
DC Offset | -58.9 | -70.3 | -52.2 | -62.0 | dBFS
--------------------------+----------+----------+----------+----------+
Starting Sample Rate | 44.10 | 48.00 | kHZ
Ending Sample Rate | 48.00 | 48.00 | kHZ
Number of changes | 3 | 3 |
--------------------------+----------+----------+----------+----------+
Frame Sync Error | 3 | 0 | %
--------------------------+----------+----------+----------+----------+-----
34
Figure 26: A short session report
764 Digital Audio Monitor User Manual
Page 50

Operating Basics
The short report, shown in Figure 26, is a record of what happened
during the session. It contains a print-out of the statistics tabulated on
the 764 Session display, and lists several instrument settings that can
affect meter behavior.
In addition to all the information in the short report, the long report
contains time-stamped peak and error data and gives more detail
about active bits, DC offset, and sample rates. Figure 27 is an
example of the additional information contained in a long report.
---------------------------------------------------------------------------Time Stamped Information Follows:
---------------------------------------------------------------------------Highest True Peak Reading - within each 20 second interval
Channel 1 Channel 2 Channel 3 Channel 4
Session dBFS Session dBFS Session dBFS Session dBFS
00:00:09 -10.8 00:00:09 -8.1 00:00:11 -8.1 00:00:12 -8.1
00:00:31 -4.9 00:00:31 0 00:00:31 0 00:00:31 0
---------------------------------------------------------------------------Highest Bar Reading - within each 20 second interval
Channel 1 Channel 2 Channel 3 Channel 4
Session dBFS Session dBFS Session dBFS Session dBFS
00:00:10 -13.6 00:00:10 -12.1 00:00:12 -12.1 00:00:12 -12.1
00:00:31 -4.9 00:00:31 0 00:00:30 0 00:00:30 0
---------------------------------------------------------------------------Clips Found - NONE
---------------------------------------------------------------------------Mutes Found
Channel 1 Channel 2 Channel 3 Channel 4
Session Session Session Session
00:00:32 00:00:32
00:00:37 00:00:37
---------------------------------------------------------------------------Invalid Samples Found - NONE
---------------------------------------------------------------------------Parity Errors Found - NONE
---------------------------------------------------------------------------Code Violations Found
Channel 1 Channel 2 Channel 3 Channel 4
Session Session Session Session
00:00:17 00:00:17
00:00:36 00:00:36
---------------------------------------------------------------------------Number of Active Bits
Channel 1 Channel 2 Channel 3 Channel 4
Minimum Bits Minimum Bits Minimum Bits Minimum Bits
00:00:13 0 00:00:13 0 00:00:13 0 00:00:13 0
Maximum Bits Maximum Bits Maximum Bits Maximum Bits
00:00:00 24 00:00:00 24 00:00:00 24 00:00:00 24
---------------------------------------------------------------------------DC Offset
Channel 1 Channel 2 Channel 3 Channel 4
Minimum dBFS Minimum dBFS Minimum dBFS Minimum dBFS
00:00:00 nil 00:00:00 nil 00:00:00 nil 00:00:00 nil
Maximum dBFS Maximum dBFS Maximum dBFS Maximum dBFS
00:00:00 nil 00:00:00 nil 00:00:00 nil 00:00:00 nil
Average dBFS Average dBFS Average dBFS Average dBFS
nil nil nil nil
--------------------------------------------------------------------------- Sample Rate
Channels 1-2 Channels 3-4
Session kHZ Session kHz
00:00:12 48.00
00:00:26 00.00
----------------------------------------------------------------------------
Figure 27: Additional data on the long report
764 Digital Audio Monitor User Manual
35
Page 51

Operating Basics
There are two types of time-stamped information, peak readings and
error events. Peak readings are the highest true peak and the highest
meter reading encountered during each consecutive peak reading
interval in the session. An error event is a clip, mute, invalid sample,
parity error, or code violation episode, consisting of at least one such
error.
The time stamp is the hour:minute:second:frame when the peak or
error occurred, in the time format—Session, VITC, or LTC—se-
lected through the Time Code submenu.
Use the following procedure to output a session report:
1. Connect the 764 to the printer or PC. Cable requirements are
explained under Using the RS-232 Port beginning on page 62.
2. Select the appropriate communications and report options (flow
control, baud rate, type of report, and peak reading interval)
through the Serial Port submenu; for more information, refer to
Serial Port Submenu beginning on page 58. Be sure to set the
Copy selection to either SHORT REPORT or LONG REPORT.
3. Run a session.
4. Stop the session, but do not reset it. Press the Copy soft button
(feature
to the printer or PC, indicating the remaining number of lines on
the bottom of the display. Press the soft button a second time to
cancel the report.
➄ in Figure 23 on page 29). The 764 will send the report
36
764 Digital Audio Monitor User Manual
Page 52

The Channel Status View
The 764 Channel Status view displays the channel status information
that is embedded in AES3-1992 (professional) or IEC-958 (consumer) digital audio signals. Press CLEAR MENU (if necessary to exit a
menu), then the VIEW:CH. STATUS button to select the Channel
Status view .
You can choose to display the Channel Status in one of four formats:
fully decoded text (the default, illustrated in Figure 28), binary
(Figure 29), transmission-order binary, or hexidecimal. To change
display formats, press the soft button assigned to the desired format,
as listed on the right side of the Channel Status View.
H In Text mode, the Channel Status data is spelled out in “plain
English,” as shown in Figure 28. The 764 will decode embedded
channel status data per AES3-1992 or IEC-958 depending on the
state of the first-transmitted channel status bit (bit 0 of byte 0).
Press the top (CHAN) soft button to toggle between the two input
channel pairs (1&2 and 3&4).
Operating Basics
Figure 28: The Channel Status view, text mode
764 Digital Audio Monitor User Manual
37
Page 53

Operating Basics
H In binary display mode (illustrated in Figure 29), you may turn
the multi-function knob to highlight various bits or blocks of bits
for same-screen “plain English” decoding. For example, bits 3
through 5 of byte 0 indicate the (pre)emphasis, if any, that has
been applied to the audio program; when you move the screen
highlight to those bits, the type of emphasis will be displayed in
decoded text near the bottom of the screen. Only one channel at a
time is shown in binary mode; the selected channel is indicated
on the top line of the display. Press the CHAN soft button
repeatedly to cycle among the four input channels.
H The “Xmsn Order Binary” display reverses the bit order to
correspond to transmission order (LSB first) of the Channel
Status bits. Use the knob as in the binary display to highlight bits
or bit-blocks for decoding. Press the CHAN soft button
repeatedly to cycle among the four input channels.
H Hex format is included for compatibility with other instrumenta-
tion. All four input channels are shown on one display.
38
Figure 29: The Channel Status view, binary mode
764 Digital Audio Monitor User Manual
Page 54

The User Data View
The 764 User Data view is intended to display optional user
information that may be embedded in the “user bits” of digital audio
signals. As this is written, the 764 can only interpret and display data
that is block-aligned with the Channel status data; the 764 cannot
interpret IEC-908 (Compact Disk) user data. Press CLEAR MENU
(if necessary to exit a menu), then the VIEW:USER DATA button to
select the User Data view.
User data may be displayed either in Hexidecimal form or as the
equivalent ASCII text. The Text mode is shown in Figure 30. Select
the desired format by pressing the appropriate soft key. The
Hexidecimal display format has room for data from all four input
channels; the Text display shows two channels at a time. In the Text
display, press the top (CHAN) soft button to toggle between the two
input channel pairs (1&2 and 3&4).
Operating Basics
Figure 30: The User Data view, text mode
764 Digital Audio Monitor User Manual
39
Page 55

Operating Basics
Saving and Restoring Setups
The 764 automatically stores current front panel and menu settings in
non-volatile RAM. The instrument restarts every time in the Audio
View/Session Display, with the session stopped and session time (if it
is the current Time Code selection) reset to zero. All other settings
will be as when the 764 was switched off.
For added flexibility, you can also save up to three instrument
configurations, recall them later, or restore the factory default
settings with the techniques described next.
Saving a Setup
You can save up to three additional instrument configurations in
NVRAM for convenient later recall through the “Save Setups”
submenu. To do so:
1. Configure the instrument as desired with the front-panel controls
and through the various submenus.
2. Enter the top menu. (Press CLEAR MENU, then MENU to enter
the top menu anytime the 764 is operating.)
3. Use the multi-function knob to scroll the menu highlight to “Save
Setups.” Press any soft button to enter the submenu.
4. Press one of the three available soft buttons to save the
instrument settings. A highlighted message—“SETUP #N has
been saved”—will appear on screen when the operation is
complete.
5. Press CLEAR MENU to resume normal instrument operation.
Restoring a Setup
To recall a setup or restore factory default settings:
1. Enter the top menu.
2. Use the multi-function knob to scroll the menu highlight to
“Restore Setups.” Press any soft button to enter the submenu. It
will resemble the display illustrated in Figure 31.
40
3. Press one of the four soft buttons to recall/restore the associated
instrument settings. A highlighted message—“SETUP #N has
764 Digital Audio Monitor User Manual
Page 56

Operating Basics
been restored”—will appear on screen to signal that the
operation is complete.
4. Press CLEAR MENU to resume normal instrument operation
with the newly-recalled settings.
Figure 31: The Restore Setups submenu
Editing a Setup
To edit an existing, saved setup:
1. Recall the Setup through the Recall Setups submenu.
2. Change the instrument settings as desired.
3. Save the Setup as the same setup number through the Save Setups
submenu.
764 Digital Audio Monitor User Manual
41
Page 57

Operating Basics
42
764 Digital Audio Monitor User Manual
Page 58

Reference
This section contains detailed information about the more technical
aspects of 764 operation. The subsections are: Level Meters,
Correlation Meter Algorithm, Selecting Headphone Channels,
Submenus, and Using the RS-232 Port.
Level Meters
Also refer to The Level Meters Submenu beginning on page 48.
Meter Ballistics and Alignment Levels
The many level meter options in the 764 may leave the user
wondering which settings to use for a given installation or application. The short answer is to choose settings to emulate the meters
that you are accustomed to. However, you may not find the
translation between the analog and digital worlds completely
straightforward. Or, you may wish to modify your practice and adopt
certain standards to ease inter-platform and international program
exchange. In either case, the next few paragraphs may help you
decide on the Ballistics, Peak Program Level, Test Level, and “0dB
Mark” settings for your 764.
To ease signal exchange between equipment, EBU Recommendation
R68–1992 suggests that the alignment level be set at 18 dB below
maximum digital coding level (that is, –18 dBFS). This level
corresponds to the CCIR 645 [renamed ITU–R BS.645–2] analog
alignment level, and allows adequate headroom above the permitted
maximum level for (PPM) metering and meter-reading errors. The
permitted maximum level, as defined in CCIR 645, is 9 dB (or 8 dB,
in some organizations) above the alignment level.
A practical way of configuring the 764 to implement the above
recommendation with PPM ballistics is to set the Test Level to the
EBU-recommended alignment level of–18dBFS, and set the Peak
Program Level to the permitted maximum level of –9 dBFS (or
–10 dBFS). You may choose to set the 0 dB mark to either the Peak
Program Level or Digital Full Scale. With the 764, the true peaks are
764 Digital Audio Monitor User Manual
43
Page 59

Reference
always indicated by the peak segment, so actual headroom is always
visible.
With VU ballistics, the Test Level should correspond to the same
level as above (–18 dBFS) if program exchange is important. In
accordance with standard practice, the Test Level (“line–up level”)
corresponds to 0 VU, so you may set the 0 dB mark to the Test
Level. If program material is then peaked at 0 dB, you can expect
actual peaks to be 8 to 14 dB higher (which can be easily seen with
the true peak indicators of the 764). A good setting for the Peak
Program Level would be in the range of –8 to –10 dBFS. IEEE
152–1991 recommends that the VU meter readings of program
material be 8 dB below those of a PPM meter to get the same actual
program level. The above setup accomplishes that.
All of the above is for standardizing digital recordings or digital
transmissions for international program exchange. Individual
organizations may have their own internal standards. Some
experienced recording engineers prefer a higher alignment level than
–18dBFS to make fuller use of the available coding range for a better
S/N ratio. Others are more conservative. For example, SMPTE (in
RP 155–90) recommends a “reference” level of –20 dBFS.
And, of course, digital purists may always select True Peak ballistics.
In-Bar Warning Messages
The in-bar warning messages (for example, INPUT UNLOCKED, in
the Channel 3 and 4 meter bars in Figure 32) are listed below in
order of error condition priority. Higher priority errors preempt lower
priority ones. Messages—or “Flags”— are displayed for as long as
the error condition lasts plus n seconds, where n is the CLIP/MUTE
hold time set through the Level Meters submenu (see page 52). The
INPUT UNLOCKED and LOW CONFidence flags will always
appear in both bars of the affected input; all other messages can
appear in one or both bars, depending on channel content.
INPUT UNLOCKED —The 764 is not locked to an incoming signal on
the indicated input channel. Data cannot be decoded; all data and all
other errors are ignored. This message will appear when no input
signal is present.
44
764 Digital Audio Monitor User Manual
Page 60

Reference
CODE ERR — A bi-phase coding violation (ERRor) has occurred in
the digital data stream. All affected data samples are unreliable, and
are therefore ignored. The instrument treats affected samples as “zero
samples” for use by the meter bars and phase display. When Session
is running, the instrument counts code violations and displays the
total on the Session view.
Figure 32: An “in-bar” warning message
PARITY — The incoming subframe does not have even parity as
specified by the applicable digital audio standards. The data sample
is unreliable and is ignored. The meter bars and phase pattern treat
the sample as a zero sample. When Session is running, the
instrument counts parity errors and displays the total on the Session
view.
LOW CONF — (Low Confidence.) This warning message indicates a
marginal signal on the serial digital interface. Problems that can
trigger this message—such as significant jitter or low signal
amplitude—will usually result in a poor “eye” pattern when the
serial digital signal is displayed on appropriate equipment.
764 Digital Audio Monitor User Manual
45
Page 61

Reference
V BIT — Indicates that the Validity bit is set high for one or more data
samples. In the AES/EBU standard, a set validity bit indicates that
the sample is not suitable for conversion to audio. By default, The
meter bars and phase display treat the affected samples as a zero
samples. When Session is running, the instrument counts “invalid
samples” and displays the total on the Session view.
You can suppress the V BIT message by setting the “Ignore Validity
Bit” item in the Level Meters submenu to YES. If you do so, the 764
will treat all samples as valid, and the word “off” will appear in the
Invalid samples fields of the Session view. This feature is included
because the use of the Validity bit varies despite its official meaning
as specified in the AES/EBU standard, and you may find it desirable
to monitor audio from “invalid” samples.
Correlation Meter Algorithm
The correlation meter reading is calculated 60 times each second
1
from
input data. The formula used to drive the correlation meter is:
@
-second-long blocks of interpolated (“4x oversampled”)
60
C + (sign)
Ǹ
4fsń60
ȱ
ȍ
ȧ
Ȳ
Where
f
= the sampling frequency, in Hz (for example, 48000);
s
L
= the value of the nth left-channel sample; and
n
R
= the value of the nth right-channel sample
n
n+0
ȱ
ȧ
Ȳ
4fsń60
ȍ
n+0
(
L
2
ȳ
(
)
L
nRn
ȧ
ȴ
4fsń60
ȳ
ȱ
2
ȍ
)
n
ȧ
ȧ
n+0
ȴ
Ȳ
ȳ
2
(
)
R
n
ȧ
ȴ
46
764 Digital Audio Monitor User Manual
Page 62

Reference
Á
and
4fsń60
ȍ
(
)
(sign) +() 1)if
n +0
L
nRn
is u 0
or
4fsń60
ȍ
(
)
(sign) +(–1)if
n +0
L
nRn
is t 0
The actual correlation meter reading is the “rolling average” of the
last i sample blocks:
C
) C2),..., ) C
M +
1
i
i
where i is determined by the Correlation Meter Speed setting in the
Phase Display submenu. Table 1 lists i—and the corresponding
averaging interval—for each meter speed selection.
Table 1: Correlation meter speed averaging intervals
БББББББББББББББББ
Speed
setting
1
2
3
4
5
6
7
8
9
120
i
1
2
4
8
16
32
60
90
Equivalent
interval (s)
0.0167
0.0333
0.0667
0.1333
0.2667
0.5333
1.0
1.5
2.0
Speed
setting
11
12
13
14
15
16
17
18
19
i
180
210
240
270
300
330
360
390
420
Equivalent
interval (s)
3.0
3.5
4.0
4.5
5.0
5.5
6.0
6.5
7.0
10
150
2.5
764 Digital Audio Monitor User Manual
20
450
7.5
47
Page 63

Reference
Selecting Headphone Channels
By factory default, the headphone output follows the phase display.
That is, you can listen to the audio programs that are currently
driving the Lissajous pattern and Correlation meter (refer to The
Phase Display beginning on page 26). When you change the phase
display channels—either by selecting the other display pair (A or B),
or through the phase display menu—the headphone output will
contain the audio on the newly-selected input channels.
You can also configure the headphone output to listen to any two
input channels you wish, independent of the phase display selections.
Follow these steps to make “manual” headphone selections:
1. Enter the top menu (either by pressing MENU or the TOP MENU
soft button, if already in a submenu).
2. With the multi-function knob, move the menu item highlight to
3. Set the Audio Source to MANUAL.
4. Select the appropriate “Manual Left Channel” and “Manual Right
5. Press CLEAR
Submenus
The various 764 submenus are summarized below. See the Getting
Started section of this manual, starting on page 1, for an explanation
of general menu techniques.
The Level Meters Submenu
Use this Submenu to configure the appearance and behavior of the
Audio View level meters.
Headphones. Then press a soft button to enter the submenu.
Channel.”
MENU to exit the on-screen menus and resume
normal operation.
48
764 Digital Audio Monitor User Manual
Page 64

Table 2: Level Meters submenu
Á
Á
Á
Á
Á
Á
Á
Á
Á
Á
Á
Á
Á
Á
Á
Á
Á
Á
Á
Á
Á
Á
Á
Á
Á
Á
Á
Á
Á
Á
Item Choices Factory setting
Reference
Display Mode
БББББ
Interpolation
Ballistics
БББББ
БББББ
Peak Hold Time
Peak Program Level
(dBFS)
БББББ
Test Level (dBFS)
БББББ
БББББ
Set 0 dB Mark to
БББББ
Consecutive FS Samples for CLIP
БББББ
4 Channels
Ch 1–2 and Sum & Diff
БББББ
Ch 3–4 and Sum & Diff
OFF; ON
PPM
БББББ
True Peak
Extended VU
БББББ
0 to 10 seconds
0 to –30 dBFS
(cannot be set below
БББББ
Test level)
0 to –30 dBFS
(cannot be set above
БББББ
Peak Program level)
БББББ
DIGITAL FULL SCALE
PEAK PROGRAM
БББББ
TEST LEVEL
1 to 100
БББББ
4 Channels
ББББББ
ON
True Peak
ББББББ
ББББББ
2
–8 dBFS
ББББББ
–18 dBFS
ББББББ
ББББББ
DIGITAL FULL SCALE
ББББББ
1
ББББББ
Consecutive “0” Sam-
0 to 100
ples for MUTE
CLIP/MUTE Hold Time
БББББ
(sec)
Ignore Validity Bit
Suppress Sync Loss
БББББ
Flags
1 to 30
БББББ
NO; YES
NO; YES
БББББ
Display Mode. Use the Display Mode setting to configure the audio
view to contain four level meters (as shown in Figures 15 and 17 on
pages 19 and 23 respectively) or two level meters plus Sum and
Difference bars. When Sum and Difference bars are selected, the two
left-hand bars show the levels of one input pair (either channels 1–2
764 Digital Audio Monitor User Manual
10
2
ББББББ
NO
NO
ББББББ
49
Page 65

Reference
or channels 3–4); the right-hand bars show (L+R)/2 (Sum) and
(L–R)/2 (Diff) data derived from the two left-hand bars. The Sum
and Difference bars use the same scale and ballistics, and all other
settings, as the channel level meters.
Interpolation. When interpolation is OFF, the 764 level meters
measure the digital input data only. When interpolation is ON, the
instrument also measures interpolated data generated by a 4X
oversampling filter. Select OFF to see the levels encountered by the
digital equipment (such as recorders, processors, and transmitters) in
your system. Choose ON to see a more accurate representation of the
levels in the reconstructed analog audio program.
A display message—immediately below the level meters—reminds
you when Interpolation is set to OFF; see Figure 33.
50
Figure 33: The “interpolation OFF” message
Ballistics. Use the Ballistics item to configure the dynamic response
of the level meters to conform to one of three “standards”:
H PPM (peak program meter), which shows “quasi-peak” levels as
defined in IEEE Std. 152–1991 and IEC 268–10a. When PPM
ballistics are selected, the meters also contain true peak
indicators, and the display designation is “PPM + Peak.”
H True Peak, which shows actual signal peaks regardless of their
duration. Rise and Fall times are essentially instantaneous,
although the in-bar peak indicator will persist at program peaks
for the “peak hold time,” described below.
764 Digital Audio Monitor User Manual
Page 66

Reference
H Extended VU, a VU meter as defined in IEEE 152–1991, but
with an extended dB-linear scale. The 764 meter bars will also
contain true peak indicators when Extended VU is selected, and
the display designation of this setting is “vu + Peak.”
Note that this setting only affects meter performance when the input
is “live,” changing audio. A constant 1000 Hz, –10 dBFS tone, for
example, will drive the meters to a constant –10 dBFS reading
regardless of which Ballistics setting is selected.
Peak Hold Time. Peak Hold time is the number of seconds that the true
peak indicator (see Figure 15, item 8 on page 19) remains at the most
recent peak. Set the hold time to 0 to turn the peak indicator Off.
Peak Program Level (dBFS). Peak Program level is the level—relative
to digital full scale—that you choose as the maximum desired level
for monitored programs. The meter bars change to maximum
brightness (on the 764 display) or red (on an external VGA monitor)
above Peak Program level.
Test Level (dBFS). T est level is the level—relative to digital full
scale—that you choose as the test or “line up” level for your system.
The meter bars change to medium brightness (on the 764 display) or
yellow (on an external VGA monitor) between the Test and Peak
Program levels.
Set 0 dB Mark to. Use this item to number the meter scale relative to
Digital Full scale or to one of the two user-adjustable levels. When
the zero mark is set to either Peak Program or Test level, the scale
units are dBr, relative to the 0 dB level; units above the selected 0 dB
mark are positive, while units below it are negative.
Consecutive FS Samples for CLIP. Select the number of successive
full-scale samples that constitute a “Clip.” This setting determines
when a clip flag (see Figure 15, item 9 on page 19) appears above a
level meter, and it also af fects the number of clips detected during a
Session and included in a session report (refer to The Session Display
beginning on page 29). The range for this setting is 1 to 100; the
factory default is 1.
Consecutive “0” Samples for MUTE. Use this item to select the number
of successive full-scale samples that constitute a “Mute.” This setting
determines when a MUTE indicator (see Figure 15, item 6 on
764 Digital Audio Monitor User Manual
51
Page 67

Reference
page 19) appears in a level meter, and it also affects the number of
clips detected during a Session and included in a session report (refer
to The Session Display beginning on page 29). The range for this
setting is 0 to 100; a setting of 0 turns mute detection Off, in which
case no mutes will be reported on the session display or in a session
report. The factory default is 10.
CLIP/MUTE Hold Time (sec). CLIP/MUTE hold time is the number of
seconds that the Clip indicator and various In-bar warning messages
will persist after the end of the Clip, Mute, or error condition. For
more information, refer to In-Bar Warning Messages beginning on
page 44.
Ignore Validity Bit. Ignore Validity Bit determines how the instrument
will react to a high (value 1) validity bit in the input data. In
AES3-1992 digital audio, a high validity bit indicates that the sample
word is not suitable for conversion to audio. When this item is set to
the factory default of “No,” the 764 will ignore any sample
accompanied by a high validity bit, display a “V BIT” flag in the
level meter, and report invalid samples on the session display and
report. When set to Yes, invalid sample reporting will be turned Off,
and the instrument will treat all samples as valid.
Suppress Sync Loss Flags. Use this setting to suppress the SYNC ERR
flags and “No Reference Signal” message when no DAR (digital
audio reference) is connected to the REFERENCE input, or to
prevent “nuisance flashing” of the SYNC ERR message when the
input signals have differing sample rates.
52
764 Digital Audio Monitor User Manual
Page 68

Reference
Á
Á
Á
Á
Á
Á
The De-emphasis Submenu
The De-emphasis submenu, shown in Table 3, lets you select the
appropriate de-emphasis for each of the four input channels. Enter
the De-emphasis submenu from the TOP menu level by scrolling the
highlight to the De-emphasis item and pressing a soft button. Then
scroll the highlight to the desired channel. The four submenu items
are identical, except for the affected channel.
Table 3: De-emphasis submenu
Item Choices Factory setting
Channel #
(Where # = 1, 2, 3, or 4)
БББББ
БББББ
NONE
AUTO
БББББ
CCITT J.17
БББББ
50/15
NONE
ББББББ
ББББББ
Selecting either CCITT J.17 or 50/15 will force that type of
de-emphasis. When AUTO is selected, the 764 will apply the
appropriate de-emphasis if either CCITT J.17 or 50/15 emphasis is
indicated in the channel status data of the digital input signal.
If you choose de-emphasis, please be aware that—although the 764
will continue to use raw input data when reporting MUTEs and
CLIPs— the level meters and session statistics will measure and
report levels in the de-emphasized signal. Because de-emphasis
attenuates the higher frequencies of a signal, selecting de-emphasis
may result in meter readings and true peak statistics that understate
the actual signal levels.
When any type of de-emphasis has been selected, it is indicated by a
“flag” on the display above the meter pair, as shown in Figure 34. In
the configuration pictured, de-emphasis has been selected for input
channels 1, 2, and 3—but not for channel 4. (If de-emphasis was
also not selected for channel 3, the “De-emp” flag would not appear
above the right-hand meter pair .)
764 Digital Audio Monitor User Manual
53
Page 69

Reference
Á
Á
Á
Á
Á
Á
Á
Á
Á
Á
Á
Á
Figure 34: The De-emphasis flags
The Phase Display Submenu
Use the Phase Displaly submenu (Table 4) to configure the appearance and behavior of the Audio View Phase display.
Table 4: Phase Display submenu
Item Choices Factory setting
Format
БББББ
Correlation Meter Speed
Pair A Left channel as-
БББББ
signment
Pair A Right channel
assignment
БББББ
Pair B Left channel as-
LISSAJOUS-SOUNDSTAGE
БББББ
LISSAJOUS-X–Y
1 to 20
1; 2; 3; 4
БББББ
1; 2; 3; 4
БББББ
1; 2; 3; 4
LISSAJOUS-SOUNDSTAGE
БББББ
8
1
БББББ
2
БББББ
3
signment
Pair B Right channel
БББББ
assignment
1; 2; 3; 4
БББББ
4
БББББ
54
Format. To change the phase display format, scroll to this menu
choice and then press the soft button that corresponds to the desired
764 Digital Audio Monitor User Manual
Page 70

Reference
display orientation. Refer to page 26 for details on the phase display
formats.
Correlation Meter Speed. The Correlation Meter Speed setting
determines how quickly the meter reacts to changes in phase
relationship. The meter reading is actually an average of correlation
over time, and this setting determines how many samples are used to
calculate the average. The 764 uses the fewest samples when this
setting is 1, and the meter reacts almost instantaneously. The
instrument uses the most samples when the setting is 20, and the
meter reacts much more slowly. Experiment to find the setting that
best fits your application. For more information about this setting,
refer to Correlation Meter Algorithm on page 46.
Pair A [B] Left [Right] channel assignment. These four choices let you
pair any two of the four input channels on the phase display. By
default, channels 1 and 2 are phase pair A, and channels 3 and 4 are
pair B. You can, however, designate channels 1 and 3 or 1 and 4—or
channels 2 and 3 or 2 and 4—as either pair A or pair B.
Change the channels of the phase pairs using the following steps:
1. Press the MENU button.
2. Turn the multifunction knob until PHASE DISPLAY is
highlighted.
3. Push any of the inner group white soft key buttons to the right of
the display screen to bring up the Phase Display screen.
4. Rotate the multifunction knob to highlight Pair A left or right, or
Pair B left or right..
5. Push the appropriate white soft key buttons to set any channel 1
through 4 to left and right of either Pair A or Pair B.
6. Push CLEAR MENU button to return to the screen that was
displayed before you pushed the MENU button.
Note that if you pair channels from different inputs, the two data
streams must be synchronized. If data slippage is 1/2 frame or
greater, the 764 will not be able to unambiguously identify left-right
sample pairs and the phase display will not be reliable. If that
happens, a warning message appears on the display.
764 Digital Audio Monitor User Manual
55
Page 71

Reference
Á
Á
Á
Á
Á
Á
Á
Á
Á
Á
Á
Á
Headphones Submenu
Use the Headphonse submenu (Table 5) to determine the input
channels to be decoded and output through the headphone jack.
Table 5: Headphones submenu
Item Choices Factory setting
Audio Source
БББББ
Manual Left Channel
Manual Right Channel
AUTO (follows phase);
MANUAL
БББББ
1; 2; 3; 4
1; 2; 3; 4
AUTO (follows phase)
БББББ
1
2
Input Submenu
Select the active connectors for the digital audio and reference inputs
through this submenu.
Table 6: Input submenu items (standard instrument)
Item Choices Factory setting
CH 1–2 input
БББББ
CH 3–4 input
БББББ
XLR-balanced
БББББ
BNC-unbalanced
XLR-balanced
BNC-unbalanced
БББББ
XLR-balanced
БББББ
XLR-balanced
БББББ
56
Reference input
БББББ
XLR-balanced
BNC-unbalanced
БББББ
XLR-balanced
БББББ
In instruments equipped with Option 01 (embedded audio input), the
Input submenu is changed to accommodate the additional input
choice; the submenu also changes depending on the chosen input.
Table 7 describes the input submenu in Option 01 instruments when
the audio source selection is digital audio inputs. Table 8 describes
the submenu when digital video input is selected.
Please refer to Appendix C: Options, beginning on page 89, for more
information about Option 01.
764 Digital Audio Monitor User Manual
Page 72

Table 7: Option 01 input submenu, audio inputs selected
Á
Á
Á
Á
Á
Á
Á
Á
Á
Á
Á
Á
Á
Á
Á
Á
Á
Á
Á
Á
Á
Á
Á
Á
Item Choices Factory setting
Reference
Audio Source
Digital Audio Inputs
Digital Audio Inputs
Digital Video Input
CH 1–2 input
БББББ
CH 3–4 input
БББББ
Reference input
БББББ
XLR-balanced
БББББ
BNC-unbalanced
XLR-balanced
БББББ
BNC-unbalanced
XLR-balanced
BNC-unbalanced
БББББ
XLR-balanced
ББББББ
XLR-balanced
ББББББ
XLR-balanced
ББББББ
Table 8: Option 01 input submenu, video inputs selected
Item Choices Factory setting
Audio Source
БББББ
Channels
БББББ
БББББ
Digital Audio Inputs
Digital Video Input
БББББ
1 through 4
5 through 8
БББББ
9 through 12
БББББ
13 through 16
(see Table 7)
ББББББ
1 through 4
ББББББ
ББББББ
Time Code Submenu
Select the time code to be displayed on the Session Display and used
to time-stamp errors on Session reports.
Table 9: Time Code submenu
Item Choices Factory setting
Time code in use
БББББ
БББББ
SESSION
БББББ
VITC
LTC
БББББ
764 Digital Audio Monitor User Manual
SESSION
ББББББ
ББББББ
57
Page 73

Reference
Á
Á
Á
Á
Á
Á
Á
Á
Á
Serial Port Submenu
The Serial Port submenu contains items used for setting the serial
port parameters and controlling the content of the session report. The
items and choices are listed in Table 10 and explained in the
subsequent paragraphs.
Table 10: Serial Port submenu items
Item Choices Factory setting
Flow Control
SOFTWARE; HARD-
SOFTWARE
WARE; BOTH; NONE
Baud Rate
БББББ
Copy
БББББ
БББББ
Peak Reading Interval
38400; 19200; 9600;
БББББ
2400
NO REPORT; SHORT
REPORT; LONG RE-
БББББ
PORT
БББББ
0, 1, 2, ..., 300 (seconds)
38400
БББББ
NO REPORT
БББББ
БББББ
60
(sec)
Flow Control. Scroll to the “Flow Control:” menu choice (by turning
the multi-function know) and then press the soft button that
corresponds to the appropriate type of flow control. If you do not
know which flow control is correct for your application, first try
HARDWARE when outputting a report to a printer, and SOFTWARE
when downloading a report to a personal computer .
Baud Rate. Scroll to the “Baud Rate:” menu choice and press the soft
button that corresponds to rate that is used by the receiving printer or
PC. For fastest data transfer when outputting a session report to a PC,
select the highest baud rate available in both the 764 and the PC;
then, if you experience difficulty with flow control between the 764
and the PC, set both to the next lower baud rate available and try
again.
58
Copy. The Copy submenu item determines the type of report that is
output when you press the Copy soft button (see Figure 23). When
NO REPORT is selected, the “Copy” function is removed from the
third soft button, and you cannot output a Session Report.
764 Digital Audio Monitor User Manual
Page 74

Reference
Á
Á
Á
Peak Reading Interval (sec). Use this item to choose the duration of the
peak reading intervals. When a session is running, the 764 stores the
time and value of the highest true peak and meter bar readings
encountered during each interval. The time-stamped peaks are
included in a long report; see Figure 27 (on page 35).
H This setting does not apply to error events (clips, mutes, Invalid
samples, Parity Errors, and Code Violations).
H Program peaks are not stored when the setting is 0 (zero).
H Peaks are time-stamped with the time (Session, VITC, or LTC)
that has been selected through the Time Code submenu.
The length of time you may accumulate session statistics depends on
this setting and the number of error events that occur . Assuming few
clips, mutes, or other errors, the 764 has enough memory for at least
30 minutes of records when the interval is set to 1 second, and over
30 hours when the factory setting (60 seconds) is used. Choose an
interval that is appropriate to your situation; be aware that the 764
can store enough peak data to fill over 70 pages of text.
NOTE. To prevent unexpected results, change this setting immediately
after a session reset only, and not during a session.
Save Setups Submenu
Save the current instrument configuration through the Save Setups
submenu (Table 11). The current settings will overwrite any
configuration previously saved in the Setup.
Table 11: Save Setups submenu
Item Choices Factory setting
Selection
БББББ
SETUP #1
SETUP #2
БББББ
SETUP #3
(not applicable)
ББББББ
764 Digital Audio Monitor User Manual
59
Page 75

Reference
Á
Á
Á
Á
Á
Á
Restore Setups Submenu
Restore a previously saved instrument configuration through the
Restore Setups submenu (Table 12). The current instrument settings
will be replaced by those in the saved Setup.
Table 12: Restore Setups submenu
Item Choices Factory setting
Selection
БББББ
БББББ
SETUP #1
SETUP #2
БББББ
SETUP #3
БББББ
FACTORY SETUP
(not applicable)
БББББ
БББББ
Screen Saver Submenu
Select a suitable delay in the Screen Saver submenu (Table 13) to
help prevent display “burn in.” Choose an interval long enough to
prevent activation during program monitoring. When the screen
saver is active, press any button to restore the normal display.
Table 13: Screen Saver submenu
Item Choices Factory setting
Delay in Hours
OFF, 1, 2, ..., 23 (hours)
OFF
60
764 Digital Audio Monitor User Manual
Page 76

Reference
Á
Á
Á
Á
Á
Á
Service Submenu
Use the Service submenu (Table 14) to select patterns for use in
adjusting the display; find the version of software installed in the
instrument and the instrument’s firmware identification number; and
superimpose a numeric readout of signal levels on the Session
display. Refer to the 764 service manual for more information.
Table 14: Service submenu
Item Choices Factory setting
Adjustment
БББББ
Information
БББББ
Numeric Level Readout
MONITOR CROSS-
БББББ
HATCH
SOFTWARE VERSION
IDENTIFICATION NUM.
БББББ
OFF; ON
(not applicable)
ББББББ
(not applicable)
ББББББ
OFF
Adjustment. Once you choose this item, you can cycle through the
four available test patterns by repeatedly pressing the top soft button.
Patterns are used in adjusting the display during manufacture.
Information. Press the appropriate soft button to access the corre-
sponding information.
Numeric Level Readout. This readout is intended for use in manufac-
ture only; it obscures a large part of the Session display.
764 Digital Audio Monitor User Manual
61
Page 77

Reference
Using the RS-232 Port
The primary use of the 764 RS-232 port is to output session reports.
The reports can be sent directly to any ASCII printer with serial
input, or captured on a PC and saved to disk.
The RS-232 port also supports remote control of 764 Digital Audio
Monitors with serial number B020000 and higher . To control the
instrument from a personal computer or ASCII terminal, connect it
as discussed under Cable Requirements and confirm the connection
by downloading a session report to the computer or terminal. Then
refer to the Remote Control Commands section, which begins on
page 66.
Cable Requirements
The 764 is an RS-232 DCE device. Table 15 lists the pin assignments
of the connector . When communicating with a DTE device that has a
male 9-pin (DB9) connector, use a cable that connects pins 2, 3, 5, 7,
and 8 straight-through (example: Tektronix part number
012-1445-00). To communicate with another DCE device, use a null
modem cable (which swaps the lines between pins 2 and 3 and pins 7
and 8). Figure 35 and Figure 36 illustrate cable wiring for communicating with a device that has a 25-pin serial connector .
62
Table 15: RS-232 pin assignments
764 DB9 pin Signal name Signal direction
1 (optional) —
2 RXD (Received Data) From 764
3 TXD (Transmitted Data) To 764
4 (optional) —
5 Signal Ground —
6 (optional) —
7 RTS (Request to Send) To 764
8 CTS (Clear to Send) From 764
9 (optional) —
764 Digital Audio Monitor User Manual
Page 78

Reference
NOTE. RS-232 signals are named from the perspective of the DTE
device. Since the 764 is a DCE device, pin 2 (Received Data) is an
output from the instrument; that is, the data is received by the
connected DTE device.
The 764 supports both hardware (RTS/CTS) and software (Xon/Xoff)
handshaking; choose the appropriate handshaking protocol through
the Serial Port submenu. Set the serial communication parameters of
the connected device to 8 bits, 1 stop bit, and no parity. Be sure that
the same Baud rate is selected at the 764 and the connected device.
Figure 35: Connecting to a DTE device with a DB25 serial port
764 Digital Audio Monitor User Manual
63
Page 79

Reference
Figure 36: Connecting to a DCE device with a DB25 serial port
NOTE. Most Personal Computers are DTE devices; however, printers
may be either DTE or DCE, and the type may not be obvious from
the printer documentation or the gender of the RS-232 connector. If
you have trouble outputting a 764 Session report, first verify that
communication parameter and Baud rate settings are correct, then
try reversing the conductors at pins 2 and 3 and 7and 8 at the cable
end that is connected to the 764.
Communication Examples
The following hardware/software and 764 settings have been verified
effective for either printing a session report to a printer or downloading the report to a PC running Microsoft Windows 3.1. You may find
the examples helpful; please note, however, that mention of
third-party software or equipment does not constitute endorsement or
recommendation by Tektronix, Inc. The settings required for your
particular printer, PC, and communications software may vary.
Printing. You can use the hardware and software settings described
below to print a session report.
64
H Printer/port: QMS-PS 410/serial (DB25)
764 Digital Audio Monitor User Manual
Page 80

Reference
H Printer Communications Settings:
ESP (automatic protocol sensing)
9600 (baud)
8 (bits)
1 (stop bit)
DTR/DSR (flow control)
H 764 Serial Port settings:
Flow Control = HARDWARE
Baud Rate = 9600
Communicating with a PC. You can use the software and settings below
to establish communications with a personal computer .
H PC Software: Microsoft Windows 95 Hyperterminal Accessory
application. Many other communications or terminal applications
also work.
H Hyperterminal application File menu, Properties command,
Connect To tab settings:
Connect Using = COM
X (depends on computer configuration;
often COM2 when a serial mouse is installed)
Configure...
Baud Rate = 19200 (or 38400)
Bits = 8
Stop Bits = 1
Parity = none
Flow Control = Xon/Xoff
H 764 Serial Port settings:
Flow Control = SOFTWARE
Baud Rate = 19200 (or 38400)
Be sure to set compatible baud rates before attempting to establish
communications. At power-on of the 764, a command prompt (764>)
and product identification message will be displayed on the PC or
terminal screen when connected.
764 Digital Audio Monitor User Manual
65
Page 81

Reference
Outputting a Session Report
You can test your RS-232 connection by outputting a short session
report.
1. Confirm that the Copy selection of the 764 Serial Port submenu is
set to either SHORT REPORT or LONG REPORT.
2. Clear the on-screen menu and display the Audio Session view.
3. Run a session.
4. Stop the session, but do not reset it.
5. Press the on-screen Copy soft button (feature
page 29). The 764 will send the report to the printer or PC. As it
sends the report, the monitor indicates the number of remaining
lines on the bottom of the display. Press the soft button a second
time to cancel the report.
Remote Control Commands
Once you have established communications between the 764 and a
personal computer or ASCII terminal, you may use the remote
control commands to operate the audio monitor from the computer or
terminal.
Command Syntax. Use the colon (:) as the command argument
separator as in the following examples:
PRESS:SKEY4 (the command to press soft key number 4)
MENU:DISMODE:1 (the command to display the sum and
difference of Channel 1 and Channel 2)
You can string the remote commands together on a single command
line. Use a semicolon (;) to separate commands on the line as in the
following example:
➄ in Figure 23 on
66
PRESS:APH;GET:CURTP:2;GET:SHIGH:2; …
The commands are not case-sensitive although this section shows
them in all uppercase for clarity. You can also abbreviate the
commands. Only enough letters to make the command unique need
be used in a command as shown in the following example:
G:T;G:SA:1;P:AU
764 Digital Audio Monitor User Manual
Page 82

Reference
The example command gets the time, gets the sample rate from the
Channel 3 – Channel 4 input, and presses the View Audio button.
When you abbreviate a command, you cannot leave out letters in the
middle of a command argument. If the complete argument is needed
to make a command unique, all the argument alphanumerics must all
be used. For example:
PRESS:SKEY5 can be abbreviated as p:skey5, but the complete
argument is necessary. The unique letter or number is the last one
of the argument.
If you send an abbreviated argument that is not unique, the first
command in the list that is recognized is done. If you send a
command with unrecognized syntax, an error message is displayed
showing the incorrect command. If you are in doubt about an
abbreviation, use the entire argument.
General Commands. T able 16 lists and explains the general or
miscellaneous 764 remote control commands.
Table 16: General remote control commands
Command Effect
HELP Displays the list of remote commands
KNOB:UP:<1–10> Scrolls up a menu or data list by the specified
number of positions or turns the knob one increment “up.”
KNOB:DOWN:<1–10> Scrolls down a menu or data list by the specified
number of positions or turns the knob one incre-
ment “down.”
KNOB:? Displays the syntax for the KNOB command
ECHO:ON Turns command echo on; echo on is the default.
ECHO:OFF Turns command echo off; your command entry will
not appear on the computer or terminal display.
ECHO Displays the current state of ECHO, on or off.
ECHO:? Displays the syntax of the ECHO:ON/OFF
command
RESET Resets the instrument to a power-up state.
764 Digital Audio Monitor User Manual
67
Page 83

Reference
T able 16: General remote control commands (Cont.)
Command Effect
MSGON:<text> Displays a temporary message up to 58 charac-
ters on the top line of the 764 display. Excess text
does not wrap; it is truncated.
MSGOFF Removes the temporary message.
SYSTEM:ERROR Returns the last command error.
SYSTEM:ERROR:CLEAR Clears the last command error.
GET Commands. GET commands retrieve information from the 764;
Table 17 lists and explains the GET commands.
SYNTAX: GET:mnemonic:<number> (no number or
invalid number returns all selections for the mnemonic).
Table 17: Remote control GET commands
Command Value = selection Retrieves
GET:? none Lists all the GET commands
GET:mnemonic none All the values for the command
mnemonic
GET:TIME none Current (Session, LTC, or
VITC) time
GET:FRAME:<0–1> 0=Ch 1–2 input
1=Ch 3–4 input
GET:SAMPR:<0–1> 0=Ch 1–2 input
1=Ch 3–4 input
GET:RAWSR:<0–1> 0=Ch 1–2 input
1=Ch 3–4 input
GET:ERRFLAG:<0–1> 0=Ch 1–2 input
1=Ch 3–4 input
GET:BARFLAG:<0–3> 0=Meter bar #1
1=Meter bar #2
2=Meter bar #3
3=Meter bar #4
Frame Sync Errors
Sample rate
Raw sample rate
Error flags
Bar flags
68
764 Digital Audio Monitor User Manual
Page 84

T able 17: Remote control GET commands (Cont.)
Command RetrievesValue = selection
Reference
GET:WARFLAG:<0–3> 0=Meter bar #1
1=Meter bar #2
2=Meter bar #3
3=Meter bar #4
GET:CURTP:<0–3> 0=Meter bar #1
1=Meter bar #2
2=Meter bar #3
3=Meter bar #4
GET:SPEAK:<0–3> 0=Meter bar #1
1=Meter bar #2
2=Meter bar #3
3=Meter bar #4
GET:RAWTP:<0–3> 0=Meter bar #1
1=Meter bar #2
2=Meter bar #3
3=Meter bar #4
GET:CURHP:<0–3> 0=Meter bar #1
1=Meter bar #2
2=Meter bar #3
3=Meter bar #4
Warning flags
Current true peak
Session true peak
Raw true peak
Current high peak
GET:SHIGH:<0–3> 0=Meter bar #1
1=Meter bar #2
2=Meter bar #3
3=Meter bar #4
GET:RAWHP:<0–3> 0=Meter bar #1
1=Meter bar #2
2=Meter bar #3
3=Meter bar #4
GET:FILESPACE none File space free
GET:LREPORT none Long session report
GET:SREPORT none Short session report
764 Digital Audio Monitor User Manual
Session high peak
Raw high peak
69
Page 85

Reference
PRESS Commands. Each front-panel button (except the power switch)
has an equivalent PRESS:<button> command. Send the command to
perform the same action as pressing the button.
Table 18: Remote control PRESS commands
Command Equivalent button
PRESS:? Lists all the PRESS commands
PRESS:APH PHASE DISPLAY:A
PRESS:AUDIO VIEW:AUDIO
PRESS:BPH PHASE DISPLAY:B
PRESS:CHSTAT VIEW:CH STATUS
PRESS:CLEAR CLEAR MENU
PRESS:CUSTOM METER SCALE:CUSTOM
PRESS:EXPAND METER SCALE:EXPAND
PRESS:NORMAL METER SCALE:NORMAL
PRESS:MENU MENU
PRESS:OFFSET METER SCALE:OFFSET
PRESS:OTHER VIEW:OTHER
PRESS:SESSION PHASE DISPLAY: SESSION
PRESS:SKEY1 Soft Button #1 (top)
PRESS:SKEY2 Soft Button #2
PRESS:SKEY3 Soft Button #3
PRESS:SKEY4 Soft Button #4
PRESS:SKEY5 Soft Button #5 (bottom)
PRESS:USER VIEW:USER DATA
70
764 Digital Audio Monitor User Manual
Page 86

Reference
Á
Á
Á
Á
Á
Á
Á
Á
Á
Á
Á
Á
Á
Á
Á
Á
Á
Á
Á
Á
Á
Á
Á
Á
MENU Commands. Use the MENU commands listed in Table 19 to
make selections from the 764 on-screen menus. The menus need not
be visible on the display to change a setting with a MENU command.
SYNTAX: MENU:mnemonic:<number> (unrecognized
number returns "Out Of Range Error")
Table 19: Remote control MENU commands
Command Value = setting Submenu, item
MENU:? Lists the Menu commands
MENU:mnemonic:? Lists the command syntax for the
queried mnemonic and gives the
current setting
MENU:DISMODE:<0–2>
ББББББ
MENU:INTERP:<0–1>
ББББББ
MENU:BALLIST:<0–2>
ББББББ
MENU:PHTIME:<0–10>
MENU:PPGMLVL:<–30–0>
ББББББ
MENU:TESTLVL:<–30–0>
MENU:ZERODB:<0–2>
ББББББ
MENU:CLIP:<1–100>
ББББББ
MENU:MUTE:<0–100>
ББББББ
0=4 Channels
1=Ch 1–2 + Sum & Diff
ББББББ
2=Ch 3–4 + Sum & Diff
0=ON
ББББББ
1=OFF
0=True Peak
1=PPM
ББББББ
2=Extended VU
0 to 10 seconds
–30 to 0 dBFS
ББББББ
–30 to 0 dBFS
0=Dgt. Full Scale (dBFS)
1=Peak Program (dBr)
ББББББ
2=Test Level (dBr)
1 to 100 samples
ББББББ
0 to 100 samples
ББББББ
Level Meters, Display Mode
БББББББ
Level Meters, Interpolation
БББББББ
Level Meters, Ballistics
БББББББ
Level Meters, Peak Hold Time
Level Meters,
БББББББ
Peak Program Level
Level Meters, Test Level
Level Meters, Set 0 dB Mark to
БББББББ
Level Meters, Consecutive FS
БББББББ
Samples for CLIP
Level Meters, Consecutive “0”
БББББББ
Samples for MUTE
MENU:CMTIME:<1–30>
ББББББ
MENU:IGVBIT:<0–1>
1 to 30 seconds
ББББББ
0=NO
1=YES
764 Digital Audio Monitor User Manual
Level Meters,
CLIP/MUTE Hold Time(sec)
БББББББ
Level Meters, Ignore Validity Bit
71
Page 87

Reference
Á
Á
Á
Á
Á
Á
Á
Á
Á
Á
Á
Á
Á
Á
Á
Á
Á
Á
Á
Á
Á
Á
Á
Á
Á
Á
Á
Á
Á
Á
Á
Á
Á
Á
Á
Á
Á
Á
Á
Á
Á
Á
Á
Á
Á
Á
Á
Á
T able 19: Remote control MENU commands (Cont.)
Command Submenu, itemValue = setting
MENU:SYNCF:<0–1>
ББББББ
MENU:DEEMP1:<0–3>
ББББББ
ББББББ
MENU:DEEMP2:<0–3>
ББББББ
ББББББ
MENU:DEEMP3:<0–3>
ББББББ
ББББББ
MENU:DEEMP4:<0–3>
ББББББ
ББББББ
MENU:PDISP:<0–1>
0=NO
1=YES
БББББ
0=None
1=Auto
БББББ
2=CCITT J.17
3=50/15
БББББ
0=None
1=Auto
БББББ
2=CCITT J.17
3=50/15
БББББ
0=None
1=Auto
БББББ
2=CCITT J.17
3=50/15
БББББ
0=None
1=Auto
БББББ
2=CCITT J.17
3=50/15
БББББ
0=Lissajous–Soundstage
1=Lissajous–XY
Level Meters,
Suppress Sync Loss Flags
БББББББ
De-emphasis, Channel 1
БББББББ
БББББББ
De-emphasis, Channel 2
БББББББ
БББББББ
De-emphasis, Channel 3
БББББББ
БББББББ
De-emphasis, Channel 4
БББББББ
БББББББ
Phase Display, Format
MENU:CORR:<1–20>
ББББББ
MENU:PALEFT:<0–3>
ББББББ
ББББББ
MENU:PARIGHT:<0–3>
ББББББ
ББББББ
MENU:PBLEFT:<0–3>
ББББББ
ББББББ
72
1 to 20 (see page 46)
БББББ
0=channel #1
1=channel #2
БББББ
2=channel #3
БББББ
3=channel #4
0=channel #1
1=channel #2
БББББ
2=channel #3
БББББ
3=channel #4
0=channel #1
БББББ
1=channel #2
2=channel #3
БББББ
3=channel #4
764 Digital Audio Monitor User Manual
Phase Display,
БББББББ
Correlation Meter Speed
Phase Display,
Pair A: Left Channel Assignment
БББББББ
БББББББ
Phase Display, PairA: Right
Channel Assignment
БББББББ
БББББББ
Phase Display,
БББББББ
Pair B: Left Channel Assignment
БББББББ
Page 88

T able 19: Remote control MENU commands (Cont.)
Á
Á
Á
Á
Á
Á
Á
Á
Á
Á
Á
Á
Á
Á
Á
Á
Á
Á
Á
Á
Á
Á
Á
Á
Á
Á
Á
Á
Á
Á
Á
Á
Á
Á
Á
Á
Á
Á
Á
Á
Á
Á
Command Submenu, itemValue = setting
Reference
MENU:PBRIGHT:<0–3>
ББББББ
ББББББ
MENU:AUDSRC:<0–1>
ББББББ
MENU:MLEFT:<0–3>
ББББББ
ББББББ
MENU:MRIGHT:<0–3>
ББББББ
ББББББ
MENU:SOURCE:<0–1>
(Option 01 only)
MENU:CH1–2IN:<0–1>
ББББББ
MENU:CH3–4IN:<0–1>
ББББББ
0=channel #1
1=channel #2
ББББББ
2=channel #3
ББББББ
3=channel #4
0=Manual
1=Auto (follows phase)
ББББББ
0=channel #1
1=channel #2
ББББББ
2=channel #3
3=channel #4
ББББББ
0=channel #1
1=channel #2
ББББББ
2=channel #3
3=channel #4
ББББББ
0=Digital Audio Inputs
1=Digital Video Input
0=XLR–balanced
ББББББ
1=BNC–unbalanced
0=XLR–balanced
1=BNC–unbalanced
ББББББ
Phase Display, PairB: Right
Channel Assignment
БББББББ
БББББББ
Headphones, Audio Source
(also applies to Option 02)
БББББББ
Headphones,
Manual Left Channel
БББББББ
(also applies to Option 02)
БББББББ
Headphones,
Manual Right Channel
БББББББ
(also applies to Option 02)
БББББББ
Input, Audio source
Input, CH 1–2 Input
БББББББ
Input, CH 3–4 Input
БББББББ
MENU:REFINP:<0–1>
0=XLR–balanced
1=BNC–unbalanced
MENU:SD_GROUP:<0–3>
ББББББ
(Option 01 only)
ББББББ
0=1 through 4
ББББББ
1=5 through 8
2=9 through 12
ББББББ
3=13 through 16
MENU:TIME:<0–2>
ББББББ
ББББББ
MENU:FLOW:<0–3>
ББББББ
764 Digital Audio Monitor User Manual
0=SESSION
ББББББ
1=VITC
2=LTC
ББББББ
0=Software
1=Hardware
ББББББ
2=Both
Input, Reference Input
Input, Channels
БББББББ
БББББББ
Time Code, in use
БББББББ
БББББББ
Serial Port, Flow Control
БББББББ
73
Page 89

Reference
Á
Á
Á
Á
Á
Á
Á
Á
Á
Á
Á
Á
Á
Á
Á
Á
Á
Á
Á
Á
Á
Á
Á
Á
Á
Á
Á
T able 19: Remote control MENU commands (Cont.)
Command Submenu, itemValue = setting
MENU:BAUD:<0–3>
ББББББ
ББББББ
MENU:COPY:<0–2>
ББББББ
MENU:PR–INT:<0–300>
ББББББ
MENU:SAVE:<0–2>
ББББББ
MENU:RESTORE:<0–3>
ББББББ
ББББББ
MENU:SCRSVR:<0–23>
MENU:INFO:<0–1>
ББББББ
0=38400
1=19200
БББББ
2=9600
БББББ
3=2400
0=No Report
1=Short Report
БББББ
2=Long Report
0 to 300 seconds
БББББ
0=Setup #1
1=Setup #2
БББББ
2=Setup #3
0=Setup #1
БББББ
1=Setup #2
2=Setup #3
БББББ
3=Factory Setup
0=Software Version
БББББ
1=Identification Num.
Serial Port, Baud Rate
(Changing the Baud rate
БББББББ
interrupts the remote connection)
БББББББ
Serial Port, Copy
БББББББ
Serial Port,
БББББББ
Peak Reading Interval
Save Setups, Last Saved
(saves the current setup as
БББББББ
setup #n)
Save Setups, Last Restored
БББББББ
(restores setup #n)
БББББББ
Screen Saver, Delay in Hours
Service, Information
БББББББ
MENU:NUMERIC:<0–1>
ББББББ
MENU:HOME
74
0=OFF
1=ON
БББББ
764 Digital Audio Monitor User Manual
Service, Numeric Level Readout
БББББББ
Selects (highlights) the first item
of the current menu or submenu
Page 90

Appendix A: Specifications
Á
Á
Á
Á
Á
Á
Á
Á
Á
Á
Á
Table 20: Digital audio inputs
Characteristic
ББББББ
Impedance
Balanced inputs (XLR)
Term switched in
Term switched out
ББББББ
Unbalanced inputs
ББББББ
Input level
Balanced inputs
Unbalanced inputs
Reference input
Balanced input
Connector type
Performance require-
ББББББ
ments
110Ω ± 5%
Return loss >30dB
ББББББ
Return loss > 30dB
ББББББ
0.2 to 10 V
50 mV
p–p
p–p
to 2 V
p–p
Supplemental information
БББББББ
0.1 MHz to 6 MHz
0.1 MHz to 6 MHz. Relative to
110Ω load at loop-through
БББББББ
connector.
Relative to 75Ω load at
БББББББ
loop-through connector.
XLR, terminated, no loop-
through
Input impedance
Input level
110Ω ± 10%
0.6 to 10 V
p–p
Unbalanced input
Connector type
ББББББ
Input impedance
Input level
Sample rate locking range,
ББББББÁБББББББ
75Ω ± 10%
0.2 V
p–p
to 2 V
27 kHz to 52 kHz
all audio inputs
764 Digital Audio Monitor User Manual
0.1 to 6 MHz
BNC, terminated, no loop-
through
0.1 to 6 MHz
p–p
75
Page 91

Appendix A: Specifications
Á
Á
Á
Á
Á
Á
Á
Á
Á
Á
Á
Table 21: Level Meters and Phase Display
Characteristic
ББББББ
Performance require-
БББББ
ments
Attack and Decay
ББББББ
Characteristics:
True Peak
PPM
БББББ
PPM decay characteristics
per IEC 268-10A and
IEEE std. 152-1991
VU
Level Meter accuracy
ББББББ
AGC Control Range
per IEEE std. 152-1991
± 0.05 dB
БББББ
0 dBFS to –40 dBFS
Table 22: SMPTE Time Code inputs
Characteristic
VITC (Vertical Interval
Time Code)
Information
Reads NTSC and PAL VITC conforming to IEC publication
461; indicates time as Hours:Minutes:Seconds.
Supplemental information
БББББББ
Ballistics only: normal scale
БББББББ
does not comply with standards.
No attack delay
Steady 1 kHz tone, Full Scale to
БББББББ
–20 dBFS, no de-emphasis.
Lissajous pattern
Input connector
Input signal
LTC (Longitudinal Time
ББББББ
Code)
Input connector
Input signal
BNC, 75Ω termination, no loop-through
Video with VITC, 1 volt nominal
LTC conforming to IEC publication 461; indicates time as
БББББББББББББ
Hours:Minutes:Seconds.
XLR balanced, 600Ω termination, no loop-through
Range: 250 mV
to 10 V
p-p
T able 23: Interface parameter measurements
Characteristic
Performance requirements
Sample rate
Range
Resolution
27 kHz to 52 kHz
0.01 kHz
.
p-p
Supplemental information
76
764 Digital Audio Monitor User Manual
Page 92

T able 23: Interface parameter measurements (Cont.)
Á
Á
Á
Á
Á
Á
Á
Á
Á
Á
Á
Á
Á
Á
Á
Appendix A: Specifications
Characteristic
Accuracy
Synchronization
ББББББ
Range
ББББББ
Accuracy
ББББББ
Indication
ББББББ
Table 24: Headphone output
Characteristic
ББББББ
Output voltage
Frequency response
Balance
Distortion
Performance requirements
Within .01 kHz
ББББББ
± 40% of dig. audio frame
ББББББ
± 2% of digital audio frame
ББББББ
ББББББ
Performance require-
ББББББ
ments
u10 V
p-p
20 Hz to 20 kHz ± 2 dB
± 0.5 dB
THD+N t0.05%
Supplemental information
БББББББ
БББББББ
БББББББ
“Frame Sync Err” (session view)
БББББББ
Supplemental information
БББББББ
into 150 Ω load, 0 dBFS input
20 kHz measurement bandwidth
Table 25: VGA output
Characteristic Information
Resolution 640 X 480 VGA
Signal Level Voltage
White
Black
Blanking
Horizontal Sync
Vertical Sync
764 Digital Audio Monitor User Manual
0.7 V
0 V
0 V
TTL, low true
TTL, low true
77
Page 93

Appendix A: Specifications
Table 25: VGA output (Cont.)
Characteristic Information
Load Impedance
Red
Green
Blue
Horizontal Sync
Vertical Sync
Timing/Frequency
Dot Clock
Horizontal Rate
Vertical Rate
Pin Assignments
pin: 1
2
3
4
5
6
7
8
9
10
11
12
13
14
15
75 ohms
75 ohms
75 ohms
TTL compatible
TTL compatible
25.175 MHz
31.469 kHz
59.940 Hz
Red
Green
Blue
NC
Ground
Red Ground
Green Ground
Blue Ground
NC
Ground
NC
NC
Horizontal Sync
Vertical Sync
NC
T able 26: Physical characteristics
Characteristic
Height
Width
Information
1
5
/
inches (13.3 cm)
4
1
8
/
inches (21.6 cm)
2
78
764 Digital Audio Monitor User Manual
Page 94

T able 26: Physical characteristics (Cont.)
Á
Á
Á
Á
Á
Á
Á
Á
Á
Á
Á
Á
Á
Á
Á
Á
Á
Á
Á
Á
Á
Á
Appendix A: Specifications
Characteristic
Depth
Weight
ББББББ
Net
ББББББ
Shipping
Information
17 inches (43.2 cm)
ББББББББББББББ
10 lbs (4.54 kg)
ББББББББББББББ
17 lbs 5 oz (7.85 kg)
Table 27: Power requirements
Characteristic Information
Input voltage
Input frequency
Current rating
Power consumption
90–250 VAC
50 or 60 Hz
1.5 A Maximum
56 Watts typical
T able 28: Environmental characteristics
Characteristic Information
Temperature
ББББББ
Operating
Storage
ББББББ
Humidity
ББББББ
[NOTE: Safety certification compliance to +40 °C]
ББББББББББББББ
0 °C to +50 °C (32 to 122 °F)
–55 °C to +75 °C (–67 to +167 °F)
ББББББББББББББ
Will operate at 93% relative humidity for up to five days
Meets requirements of the five-day humidity cycling test
ББББББББББББББ
described in Tektronix standard 062-2847-00
Altitude
ББББББ
Operating
Storage
ББББББ
Vibration (Operating)
ББББББ
ББББББ
[NOTE: Safety certification compliance to 2000 m]
ББББББББББББББ
to 15,000 feet (4572 m)
to 50,000 feet (15420 m)
ББББББББББББББ
15 minutes each axis at 0.013 inch, frequency varied from 7 to
55 to 7 Hz in five-minute cycles with the instrument attached
ББББББББББББББ
to a vibration platform
ББББББББББББББ
Dwell for 10 minutes each axis at any resonant frequency, or
ББББББ
ББББББ
Shock (non-operating)c
ББББББББББББББ
33 Hz if no resonant frequency is found (Tektronix std.
062-2858-00).
ББББББББББББББ
30 Gs,
1
/
2
sine, 11 ms duration; 3 shocks per surface
764 Digital Audio Monitor User Manual
79
Page 95

Appendix A: Specifications
Á
Á
Á
Á
T able 28: Environmental characteristics (Cont.)
Characteristic Information
Transportation
Meets the requirements of NTSB Test Procedure 1A, category
II (24 inch drop)
Equipment Type
Equipment Class
ББББББ
Installation Category
Measurement
Class I (grounded product)
БББББББББББББ
(As defined in IEC 1010-1, Annex H.)
Installation Category II
(as defined in IEC 1010-1, Annex J)
Pollution Degree
ББББББ
Emissions
Pollution Degree 2
БББББББББББББ
(as defined in IEC 1010-1; indoor use only)
47 CFR, Part 15, Subpart B,Class A
T able 29: Certifications and compliances
EC Declaration of
Conformity – EMC
Meets intent of Directive 89/336/EEC for Electromagnetic
Compatibility. Compliance was demonstrated to the following
specifications as listed in the Official Journal of the European
Communities:
EN 50081-1 Emissions:
EN 55022Class B Radiated and Conducted Emissions
EN 50082-1 Immunity:
IEC 801-2 Electrostatic Discharge Immunity
IEC 801-3RF Electromagnetic Field Immunity
IEC 801-4Electrical Fast Transient/Burst Immunity
EMC Compliance Meets the intent of Directive 89/336/EEC for Electromagnetic
Compatibility when it is used with the product(s) stated in the
specifications table. Refer to the EMC specification published for
the stated products. May not meet the intent of the Directive if used
with other products.
FCC Compliance Emissions comply with FCC Code of Federal Regulations 47, Part
15, Subpart B, Class A Limits
80
764 Digital Audio Monitor User Manual
Page 96

T able 29: Certifications and compliances (Cont.)
Appendix A: Specifications
Australia/New
Zealand Declaration
Complies with EMC provision of Radiocommunications Act per
the following standard(s):
of Conformity –
EMC
AN/NZS 2064.1/2 Industrial, Scientific, and
Medical Equipment: 1992
EC Declaration of
Conformity – Low
Voltage
Approvals UL3111-1 – Standard for electrical measuring and test equipment
Installation Category
Descriptions
Compliance was demonstrated to the following specification as
listed in the Official Journal of the European Communities:
Low Voltage Directive 73/23/EEC, Amended by 93/68/EEC:
EN 61010-1:1993
Safety requirements for electrical equipment for
measurement, control, and laboratory use
CAN/CSA C22.2 No. 1010.1 – Safety requirements for electrical
equipment for measurement, control and laboratory use
Terminals on this product may have different installation category
designations. The installation categories are:
CAT III Distribution-level mains (usually permanently
connected). Equipment at this level is typically in a fixed
industrial location
CAT II Local-level mains (wall sockets). Equipment at this level
includes appliances, portable tools, and similar products.
Equipment is usually cord-connected
CAT I Secondary (signal level) or battery operated circuits of
electronic equipment
764 Digital Audio Monitor User Manual
81
Page 97

Appendix A: Specifications
82
764 Digital Audio Monitor User Manual
Page 98

Appendix B: Error/W arning Messages
This appendix lists and explains the various error and warning
messages that can appear on the 764 display. Figure 32 on page 45
shows the In-bar message location.
Channels not synchronized
Location: Audio View, phase display.
The left and right samples are not synchronized well enough to be
reliably paired. Only possible when left and right channels are
chosen from different inputs (for example, channel 1 paired with
channel 4).
CLIP
Location: Audio View, above the meter bar of the affected channel.
The CLIP indicator flashes when the digital audio data on the input
channel remains at full scale for n or more consecutive samples. The
factory default value of n is one (1); it may be changed through the
Level Meters submenu. “Full scale” means maximum coding level,
either positive or negative. Maximum coding level is determined by
the number of active bits detected in the digital input signal.
This indicator persists for the “CLIP/MUTE Hold Time,” also set
through the Level Meters submenu. When a Session is running, the
instrument counts CLIPs and displays the current total on the
Session display .
764 Digital Audio Monitor User Manual
83
Page 99

Appendix B: Error/Warning Messages
CODE ERR
Location: In-bar.
(Code error .) A bi-phase coding violation has occurred in the digital
data stream. All affected data samples are unreliable, and are
therefore ignored. The instrument treats affected samples as “zero
samples” for use by the meter bars and phase display.
The CODE ERRor indicator persists for the “CLIP/MUTE Hold
Time,” set through the Level Meters submenu. During a Session, the
instrument counts code violations and displays the current total on
the Session display .
CRC Error
Location: Channel Status View (lower-left corner).
The Cyclic Redundancy Code calculated by the 764 does not agree
with that calculated by the originating equipment and transmitted in
Channel Status byte 23 of the digital input signal. This discrepancy
usually results from errors in digital signal transmission.
De-emp
Location: Audio View, above meter bar of affected channel.
De-emphasis is in effect on the indicated channel. W ill appear above
the affected meter bar when CCITT J.17 or 50/15 ms de-emphasis is
selected through the De-emphasis submenu, or when AUTO is
selected and pre-emphasis is indicated in the channel status bits of
the input signal.
This message persists as long as the instrument is applying
de-emphasis to the input channel.
84
764 Digital Audio Monitor User Manual
Page 100

Appendix B: Error/Warning Messages
INPUT UNLOCKED
Location: In-bar.
The 764 is not locked to an incoming signal on the indicated input
channel. Data cannot be decoded; all data and all other errors are
ignored. Likely causes of this message include: missing input signal;
incorrect setting(s) in the Inputs submenu; or inadequate or
defective input signal(s).
The INPUT UNLOCKED indicator persists for the “CLIP/MUTE
Hold Time,” set through the Level Meters submenu.
Interpolation OFF
Location: Audio View, below meter bars (may be obscured by other
error messages).
Interpolation has been turned OFF through the Level Meters
submenu. This message will persist until Interpolation is returned to
the factory default setting of ON.
LOW CONF
Location: In-bar.
(Low Confidence.) This warning message Indicates a marginal
signal on the serial digital interface. Problems that can trigger this
message—such as significant jitter or low signal amplitude—will
usually result in a poor “eye” pattern when the serial digital signal is
displayed on appropriate equipment.
The LOW CONFidence indicator persists for the “CLIP/MUTE
Hold Time,” set through the Level Meters submenu.
764 Digital Audio Monitor User Manual
85
 Loading...