

Page 1

Instructions
013-0278-XX
Video Display Clamp
070-8762-01
www.tektronix.com
*P070876201*
070876201
Page 2

Copyright © Tektronix. All rights reserved. Licensed software products are owned by Tektronix or its subsidiaries or
suppliers, and are prot ected by national copyright laws and international treaty provisions.
Tektronix products are covered by U.S. and foreign patents, issued and pending. Information in this publication supercedes
that in all previously published material. Specifications a nd price c hange privileges reserved.
TEKTRONIX and TEK are registered trademarks of Tektronix, Inc.
Contacting Tektronix
Tektronix, Inc.
14200 SW Karl Braun Drive
P.O. Box 500
Beaverton, OR 97077
USA
For product information, sales, service, and technical support:
H In North America, call 1-800-833-9200.
H Worldwide, visit www.tektronix.com to find contacts in your area.
Page 3

Warranty 5
Tektronix warrants that this product will be free from defects in materials and workmanship for a period of three
(3) months from the date of shipment. If any such product proves defective during the warranty period, Tektronix,
at its option, either will repair the defective product without charge for part s and labor, or will provide a
replacement in exchange for the defective product. Parts, modules and replacement products used by Tektronix for
warranty work may be new or reconditioned to like new performance. All replaced parts, m odules and products
become the property of Tektronix.
In order to obtain service under this warranty, Customer must notify Tektronix of the defect before the expiration
of the respective warranty period and make suitable arrangements for the performance of service. Customer shall
be responsible for packa ging and shipping the defective product to the service center designated by Tektronix,
with shipping cha rges prepaid. Tektronix shall pay for the return of the product to Customer i f the shipment is to a
location within the country in which the Tektronix service center is located. Customer shall be responsible for
paying all shipping charges, duties, taxes, and any other charges for products returned to any other locations.
This warranty shal l not appl y to any defect , failure or damage caused by improper use or improper or inadequate
maintenance and care. Tektronix shall not be obligate d to furnish service under this warranty a) to repair dam age
resulting from attempts by personnel other than Tektronix representatives to install, repair or service the product;
b) to repair damage resulting from improper use or connection to incompatible equipment; c) to repair any
damage or malfunction caused by the use of non-Tektronix supplies; or d) to service a product that has been
modified or integrated with other products when the effect of such modification or integration increases the time
or difficulty of servicing the product .
THIS WARRANTY IS GIVEN BY TEKTRONIX WITH RESPECT TO THE PRODUCT IN LIEU OF ANY
OTHER WARRANTIES, EXPRESS OR IMPLIED. TEKTRONIX AND ITS VENDORS DISCLAIM ANY
IMPLIED WARRANTIES OF MERCHANTABILITY OR FITNESS FOR A P ARTICULAR PURPOSE
TEKTRONIX’ RESPONSIBILITY TO REPAIR OR REPLACE DEFECTIVE PRODUCTS IS THE SOLE AND
EXCLUSIVE REMEDY PROVIDED TO THE CUSTOMER FOR BREACH OF THIS WARRANTY .
TEKTRONIX AND ITS VENDORS WILL NOT BE LIABLE OR ANY INDIRECT, SPECIAL, INCIDENTAL,
OR CONSEQUENTIAL DAMAGES IRRESPECTIVE OF WHETHER TEKTRONIX OR THE VENDOR HAS
ADVANCE NOTICE OF THE POSSIBILITY OF SUCH DAMAGES.
Page 4

Page 5

Table of Contents
General Safety Summary iii...................................
Environmental Considerations v...............................
The Video Display Clamp 1...................................
Product Description 1..............................................
Features 2........................................................
Using the Video Display Clamp 2.....................................
Specifications 5...................................................
Performance Verification 7...................................
General Instructions 7..............................................
Conventions 7.................................................
Equipment Required 7..........................................
Procedures 8......................................................
Back Porch Correction Check 8...................................
Gain Error Check 11.............................................
Crosstalk and Timing Checks 13...................................
Bandwidth Check 16............................................
60 Hz Rejection Check 17........................................
Maintenance 21..............................................
Service Information 21..............................................
Replacing the Contact Pins 21.....................................
013-0278-XX Video Display Clamp
i
Page 6

Table of Contents
List of Figures
Figure 1: The video display clamp 1............................
Figure 2: Video waveform disrupted by 60 Hz hum 2.............
Figure 3: Viewing a video signal directly with the video display
clamp 3................................................
Figure 4: Monitoring a video signal with the video display clamp 3..
Figure 5: Probing circuits with the video display clamp 4..........
Figure 6: Back porch test setup 9..............................
Figure 7: Back porch correction check (negative) 10...............
Figure 8: Back porch correction test (positive) 11..................
Figure 9: Gain error test setup 12...............................
Figure 10: Gain check 13......................................
Figure 11: Crosstalk test setup 14...............................
Figure 12: Measuring interference 15............................
Figure 13: Measuring timing intervals 15........................
Figure 14: Bandwidth test setup 16..............................
Figure 15: 60 Hz rejection test setup 18..........................
Figure 16: 60 Hz rejection check (negative) 19....................
Figure 17: 60 Hz rejection check (positive) 19.....................
Figure 18: Replacing the contact pins 21.........................
List of Tables
ii
Table 1: Warranted Characteristics — Signal Pass Through
(Insertion Characteristics) 5...............................
Table 2: Warranted Characteristics — Signal Input Impedance
(Return Characteristics) 5....................................
Table 3: Warranted Characteristics — Video Display Clamp 5.....
T able 4: Warranted Characteristics — Environmental 6..........
Table 5: Typical Characteristics — Video Display Clamp 6........
T able 6: Nominal Traits — Mechanical 6.......................
Table 7: Test Equipment 7...................................
013-0278-XX Video Display Clamp
Page 7

General Safety Summary
Review the following safety precautions to avoid injury and prevent damage to
this product or any products connected to it.
To avoid potential hazards, use this product only as specified.
Only qualified personnel should perform service procedures.
While using this product, you may need to access other parts of a larger system.
Read the safety sections of the other component manuals for warnings and
cautions related to operating the system.
ToAvoidFireor
Personal Injury
Connect and Disconnect Properly. Do not connect or disconnect probes or test
leads while they are connected to a voltage source.
Ground the Product. This product is indirectly grounded through the grounding
conductor of the mainframe power cord. To avoid electric shock, the grounding
conductor must be connected to earth ground. Before making connections to the
input or output terminals of the product, ensure that the product is properly
grounded.
Observe All Terminal Ratings. To avoid fire or shock hazard, observe all ratings
and markings on the product. Consult the product manual for further ratings
information before making connections to the product.
Do not apply a potential to any terminal, including the common terminal, that
exceeds the maximum rating of that terminal.
Do Not Operate Without Covers. Do not operate this product with covers or panels
removed.
Do Not Operate With Suspected Failures. If you suspect there is damage to this
product, have it inspected by qualified service personnel.
Avoid Exposed Circuitry. Do not touch exposed connections and components
when power is present.
Do Not Operate in Wet/Damp Conditions.
Do Not Operate in an Explosive Atmosphere.
Keep Product Surfaces Clean and Dry.
013-0278-XX Video Display Clamp
iii
Page 8

General Safety Summary
Terms in this Manual
Symbols and Terms
on the Product
These terms may appear in this manual:
WARNING. Warning statements identify conditions or practices that could result
in injury or loss of life.
CAUTION. Caution statements identify conditions or practices that could result in
damage to this product or other property.
These terms may appear on the product:
H DANGER indicates an injury hazard immediately accessible as you read the
marking.
H WARNING indicates an injury hazard not immediately accessible as you
read the marking.
H CAUTION indicates a hazard to property including the product.
The following symbol(s) may appear on the product:
CAUTION
Refer to Manual
iv
013-0278-XX Video Display Clamp
Page 9

Environmental Considerations
This section provides information about the environmental impact of the
product.
Product End-of-Life
Handling
Restriction of Hazardous
Substances
Observe the following guidelines when recycling an instrument or component:
Equipment Recycling. Production of this equipment required the extraction and
use of natural resources. The equipment may contain substances that could be
harmful to the environment or human health if improperly handled at the
product’s end of life. In order to avoid release of such substances into the
environment and to reduce the use of natural resources, we encourage you to
recycle this product in an appropriate system that will ensure that most of the
materials are reused or recycled appropriately.
The symbol shown to the left indicates that this product
complies with the European Union’s requirements
according to Directive 2002/96/EC on waste electrical and
electronic equipment (WEEE). For information about
recycling options, check the Support/Service section of the
Tektronix Web site (www.tektronix.com).
This product has been classified as Monitoring and Control equipment, and is
outside the scope of the 2002/95/EC RoHS Directive.
013-0278-XX Video Display Clamp
v
Page 10

Environmental Considerations
vi
013-0278-XX Video Display Clamp
Page 11

The Video Display Clamp
Product Description
The Tektronix 013-0278-00 Video Display Clamp is an active signal processor
designed to increase your ability to monitor video signals.
Figure 1: The video display clamp
Video signals containing a 60 Hz ripple or a DC offset make it difficult to view
the video signal with an oscilloscope. The Video Display Clamp provides a
stable signal to the oscilloscope by clamping the back porch of the video signal
to ground reference. This does not affect the signal source.
Figure 2 gives an example of how a 60 Hz hum disrupts the capability to view
the video signal. Figure 2 also shows the same signal stabilized by using the
Video Display Clamp. You can see how this enhances your ability to take
measurements of the video signal.
013-0278-00 Video Display Clamp
1
Page 12

The Video Display Clamp
Video Signal Disrupted with 60 Hz Hum Video Signal Stabilized using the Video Display Clamp
Figure 2: Video waveform disrupted by 60 Hz hum
Features
The Video Display Clamp receives its power from the host instrument. The host
instrument must have a TEKPROBE
TDS400, TDS500, and TDS600 Series Oscilloscopes).
The video display clamp works with most popular signal formats including the
following:
H NTSC
H PAL
H HDTV (component and composite)
Features of the video display clamp (other than setting the back porch to ground
reference) include the following items.
CLAMP FILTER. When ON, the Video Display Clamp ignores the presence of a
color burst signal. This helps ensure a ground level for the back porch. The filter
does not remove the color burst signal from the video waveform.
SYNC POLARITY. Select + to match sync pulses having a positive leading edge.
Select -- to match sync pulses having a negative leading edge.
TM
Level 2 interface (such as the Tektronix
Using the video display clamp
Signals passing through cables often pick up stray 60 Hz hum (from the line
voltage) or a small DC offset might be generated by the video equipment.
Although these signals may not affect the quality of the information contained in
2
013-0278-00 Video Display Clamp
Page 13

The Video Display Clamp
the signal, it makes it nearly impossible to obtain a viewable display of the video
information.
Use the Video Display Clamp to reduce or eliminate this type of interference to
view the video signal.
Viewing the video signals can be accomplished with several methods.
H Connect a video signal directly to the video display clamp (see Figure 3).
H Tap into a video signal line with a T-connector to monitor the signal without
causing loading interference to the signal (see Figure 4).
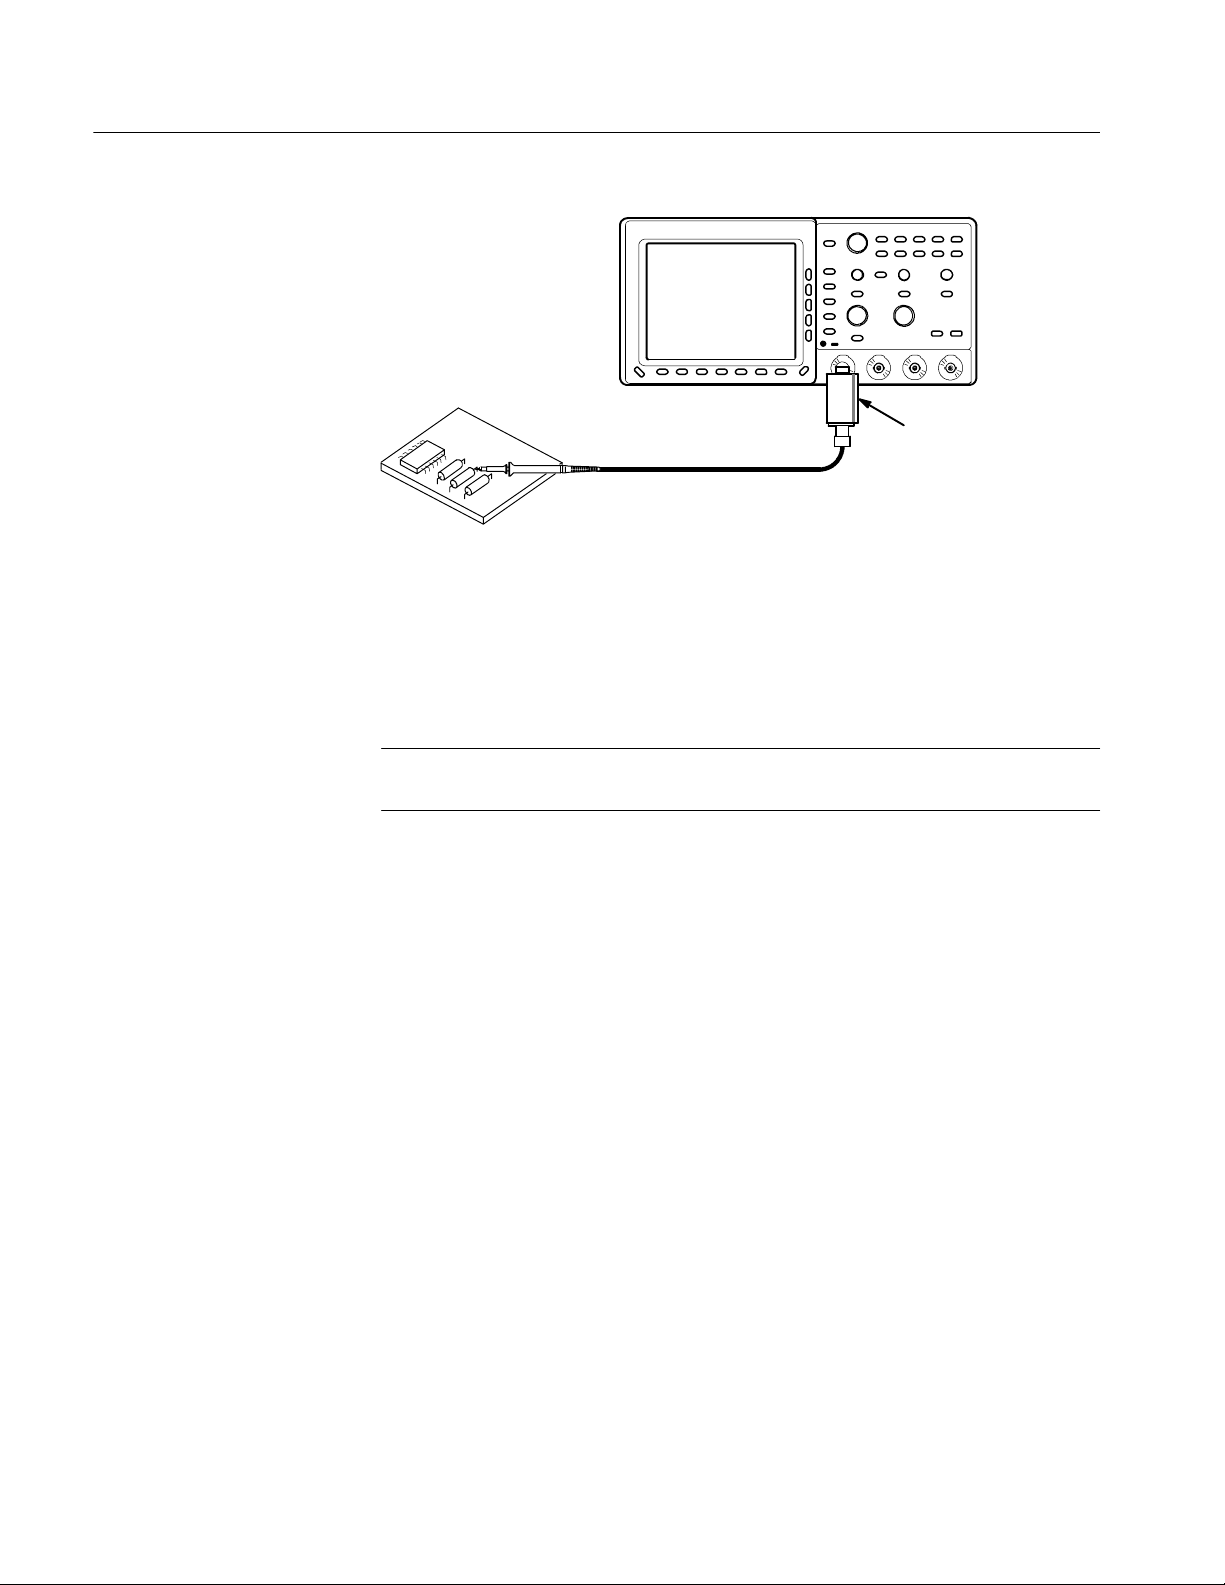
H Connect a 1X probe directly to the video display clamp to probe video
circuits (see Figure 5). The bandwidth of the video display clamp may be
compromised due to the probes characteristics.
Device
Under Test
Video display clamp
75 Ω coaxial cable75 Ω terminator
Figure 3: Viewing a video signal directly with the video display clamp
Signal
Load
Video display clamp
Coaxial cable
T-connector
Coaxial Cable
Signal
Source
Figure 4: Monitoring a video signal with the video display clamp
013-0278-00 Video Display Clamp
3
Page 14
The Video Display Clamp
Video display clamp
Figure 5: Probing circuits with the video display clamp
Procedure
Use the following short procedure to install and use the Video Display Clamp.
Attaching the video display clamp to an oscilloscope with a TEKPROBE
TM
Level 2 interface automatically turns on the video display clamp.
STOP. The use of this clamp requires that the test oscilloscope has a TEK-
TM
PROBE
Level 2 interface and the vertical input impedance is 1 MΩ.
1. Attach the video display clamp to the input of the oscilloscope and apply the
test signal to the input of the video display clamp. See the examples
provided in Figures 3 through 5.
2. Set the input impedance of the oscilloscope to 1 MΩ.
3. Set the S YNC POLARITY of the video display clamp to match the polarity
of the signal source.
H Set to -- for video signals with negative sync pulses.
H Set to + for video signals with positive sync pulses.
4. Set the CL AMP FILTER of the video display clamp.
H Set to OFF for video signals without a color burst signal.
H Set to ON for video signals with a color burst signal.
5. Set the controls of the test oscilloscope as you normally would to view the
signal.
4
013-0278-00 Video Display Clamp
Page 15

Specifications
The electrical characteristics found in these tables of warranted characteristics
apply when operating at an ambient temperature between 0 _C and +50 _C.
Table 1: Warranted Characteristics — Signal Pass Through (Insertion Characteristics)
Name Description
Bandwidth
The bandwidth of the video clamp signal path with the
oscilloscope input coupling set to 1 MΩ and the input of
the clamp is terminated into 75 Ω.
Gain Error
Error does not include the vertical error of the
oscilloscope or the error in the terminator.
--3 dB at 70 MHz (100 MHz typical), ±1 dB out to 30 MHz (60 MHz
typical)
±2.5%
The Video Display Clamp
Table 2: Warranted Characteristics — Signal Input Impedance (Return Characteristics)
Name Description
Input Resistance
Only applies when the video display clamp is operating. ≥15 kΩ
Table 3: Warranted Characteristics — Video Display Clamp
Name Description
60 Hz Rejection
Measured with 1 V
60 Hz interference signal.
60 Hz Modulation
The maximum amount of 60 Hz interference that the
clamp functions under.
Video Input Amplitude 240 mV to 570 mV sync tip height (measured from the top of the sync
NTSC video signal with 1 V
p-p
p-p
21 dB (NTSC or PAL, typical) worst case. Faster speed standards have
better rejection.
1V
(NTSC and PAL)
p-p
0.5 V
tip to the back porch).
If the video information does not extend below the back porch, these
limits translate to approximatel y 0.85 V
amplitude.
p-p
(HDTV)
p-p
to2V
of video signal
p-p
Back Porch Correction
The maximum voltage between the back porch and
ground the video clamp can correct.
013-0278-00 Video Display Clamp
±1V
5
Page 16

The Video Display Clamp
Table 3: Warranted Characteristics — Video Display Clamp (Cont.)
Name Description
Crosstalk
The maximum crosstalk interference created on the back
porch.
Line Rates/Standards
The video display clamp works with any bi-level sync
pulse standard that has a back porch at least 3 s long.
The clamp works with any tri-level sync pulse standard
as long as the sync tip is shorter than 1.8 s and the
back porch is at least 1 s long.
Offset Error ±16 mV
The difference between the back porch and ground. Offset error may increase up to 40 mV for certain standards (such as
10 mV
p-p
525/59.94/2:1 1050/59.94/2:1
525/59.94/1:1 1050/59.94/1:1
625/50/2:1 1250/50/2:1
625/50/1:1 1250/50/1:1
787/59.94/1:1
787/59.94/1:1) due to timing considerations of the vertical interval sync
pulses. This increase is resolved by the fourth line.
Table 4: Warranted Characteristics — Environmental
Name Description
Operating Temperature 0 _Cto+50_C
Nonoperating Temperature -- 5 5 _Cto+75_C
Humidity 90% +5% --0% humidity, 60 _C non-operating, 50 _C operating
Table 5: Typical Characteristics — Video Display Clamp
Name Description
Maximum Input Voltage
The maximum input voltage allowed for proper
operation.
±3V
Table 6: Nominal Traits — Mechanical
Name Description
Weight 500 grams
6
013-0278-00 Video Display Clamp
Page 17

Performance Verification
This Performance Verification subsection confirms the performance of the
013-0278-00 Video Display Clamp to its warranted specifications.
General Instructions
These General Instructions describe the conventions used in the test procedures
and provides a list of the required test equipment.
Conventions
The procedures in this section provide the following information:
H Title of test
H Equipment required (if applicable)
H Procedure
The procedures check all the characteristics designated as checked in the
Specifications subsection. (The checked characteristics appear in boldface type.)
Equipment Required
These procedures use external, traceable signal sources to directly check
warranted characteristics. Table 7 lists the required test equipment.
Table 7: Test Equipment
Item Number and Description Minimum Requirements Example Purpose
1. Oscilloscope TEKPROBETMLevel 2 interface,
100 MHz bandwidth
2. Cable, Precision Coaxial 50 Ω, 36 in, male to male BNC connectors
3. Termination, 50 Ω Impedance 50 Ω; connectors: female
BNC input, male BNC output
4. Attenuator, 2.5X Ratio: 2.5X; impedance 50 Ω; connectors: female BNC input, male BNC output
5. Coupler, Dual-input
(two required)
6. Generator, Leveled Sine
Wave
Female BNC to dual male BNC Tektronix part number
30 MHz; Variable amplitude from 5 mV to
4V
into 50 Ω.
p-p
Tektronix TDS460 Signal display
Tektronix part number
012-0482-00
Tektronix part number
011-0049-01
Tektronix part number
011-0076-02
067-0525-02
TEKTRONIX SG503 Leveled Sine Wave Genera-
1
tor
Signal interconnection
Signal interconnection
Signal attenuation
Signal interconnection
Bandwidth check
013-0278-00 Video Display Clamp
7
Page 18

Performance Verification
Table 7: Test Equipment (Cont.)
Item Number and Description PurposeExampleMinimum Requirements
7. Generator, Leveled Sine
Wave
8. Generator, Pulse 0 to 3 V, 15 kHz pulses with independent
1
Requires a TM500 or TM5000 Series Power Module Mainframe.
60 Hz; Variable amplitude from 5 mV to
4V
into 50 Ω
p-p
controls of the top and bottom pulse
levels; Variable pulse duration and pulse
period; Normal output and its complement
Procedures
These procedures check the characteristics of the Video Display Clamp listed as
checked under Warranted Characteristics in the Specifications section.
Back Porch Correction
Check
These procedures check those characteristics that relate to the back porch
correction capability of the Video Display Clamp listed as checked under
Warranted Characteristics in the Specifications section.
Equipment Required: One test oscilloscope (Item 1), one pulse generator
(Item 8), one 2.5X attenuator (Item 4), one 50 Ω terminator (Item 3), one
dual-input coupler (Item 5), and one precision coaxial cable (Item 2).
TEKTRONIX SG502 Leveled Sine Wave Genera-
1
tor
TEKTRONIX PG502 Pulse
Generator
1
60 Hz rejection check
Back porch correction and
gain accuracy checks
1. Set the test oscilloscope as follows:
H Set the sec/div scale to 10 s
H Set the channel 1 volts/div scale to 100 mV, DC coupled
H Set the channel 2 volts/div scale to 500 mV, DC coupled
H Position both channel 1 and 2 traces to center screen
H Display channel 2 (channel 1 off)
2. Connect the output of the pulse generator to the test oscilloscope as shown in
Figure 6.
NOTE. This test setup provides a display of the test signal on channel 2 and a
clamped test signal on channel 1.
8
013-0278-00 Video Display Clamp
Page 19

Pulse
Generator
Performance Verification
Video display clamp
Dual-input
coupler
50 Ω terminator
Coaxial cable
Figure 6: Back porch test setup
3. Set the pulse generator as follows (viewed with channel 2):
H Set the compliment to --
H Adjust the period to 15 kHz
H Adjust the pulse duration to 5 s
H Set the high level to 1.0 volts
H Set the low level to 0.75 volts
4. Set the Video Display Clamp as follows:
H Polarity to -- (negative)
H Filter to Off
5. Set the test oscilloscope to display channel 1 (channel 2 off).
2.5X attenuator
6. Verify that the positive portion of the pulse is within ±14 mV of the ground
013-0278-00 Video Display Clamp
reference (see Figure 7).
9
Page 20

Performance Verification
Test signal (channel 2) Corrected signal (channel 1)
Figure 7: Back porch correction check (negative)
7. Set the test oscilloscope to display channel 2 (channel 1 off).
8. Set the pulse generator as follows:
H Set the high level to --0.8 volts
H Set the low level to --1.0 volts
H Set the compliment to +
9. Set the Video Display Clamp Polarity to + (positive).
10. Set the test oscilloscope to display channel 1 (channel 2 off).
11. Verify that the negative portion of the pulse is within ±14 mV of the ground
reference (see Figure 8).
10
013-0278-00 Video Display Clamp
Page 21

Test signal (channel 2) Corrected signal (channel 1)
Figure 8: Back porch correction test (positive)
Performance Verification
Gain Error Check
These procedures check those characteristics that relate to the gain error of the
Video Display Clamp listed as checked under Warranted Characteristics in the
Specifications section.
Equipment Required: One test oscilloscope (Item 1), one pulse generator
(Item 8), one precision coaxial cable (Item 2), one 2.5X attenuator (Item 4), one
50 Ω terminator (Item 3), and one dual-input coupler (Item 5).
1. Set the test oscilloscope as follows:
H Set the sec/div scale to 10 s
H Set the channel 1 volts/div scale to 200 mV, DC coupled
H Set the channel 2 volts/div scale to 500 mV, DC coupled
H Position both channel 1 and 2 traces to center screen
H Display channel 2 (channel 1 off)
2. Connect the output of the pulse generator to the test oscilloscope as shown in
Figure 9.
NOTE. This test setup provides a display of the test signal on channel 2 and a
clamped test signal on channel 1.
013-0278-00 Video Display Clamp
11
Page 22

Performance Verification
Pulse
Generator
Video display clamp
Dual-input
coupler
50 Ω terminator
Coaxial cable
Figure 9: Gain er ror test setup
3. Set the pulse generator as follows:
H Set the compliment to --
H Adjust the period to 15 kHz
H Adjust the pulse duration to 5 s
H Set the high level to 500 mV
H Set the low level to --500 mV
4. Set the Video Display Clamp as follows:
H Polarity to -- (negative)
H Filter to Off
5. Set the test oscilloscope to display channel 1 (channel 2 off).
2.5X attenuator
12
6. Vertically position the channel 1 display to view the entire signal.
7. Verify that the pulse amplitude is between 975 mV
and 1.025 V
p-p
Figure 10).
013-0278-00 Video Display Clamp
p-p
(see
Page 23

Test signal (channel 2) Corrected signal (channel 1)
Figure 10: Gain check
Performance Verification
Crosstalk and Timing
Checks
These procedures check those characteristics that relate to crosstalk interference
and timing of the Video Display Clamp listed as checked under Warranted
Characteristics in the Specifications section.
Equipment Required: One test oscilloscope (Item 1), one pulse generator
(Item 8), one precision coaxial cable (Item 2), one 2.5X attenuator (Item 4), and
one 50 Ω terminator (Item 3), and one dual-input coupler (Item 5).
1. Set the test oscilloscope as follows:
H Set the sec/div scale to 10 s
H Set the channel 1 volts/div scale to 5 mV, DC coupled
H Set the channel 2 volts/div scale to 100 mV, DC coupled
H Position both channel 1 and channel 2 traces to center screen
H Display channel 2 (channel 1 off)
2. Connect the output of the pulse generator to the test oscilloscope as shown in
Figure 11.
013-0278-00 Video Display Clamp
13
Page 24

Performance Verification
Pulse
Generator
Video display clamp
Dual-input
coupler
50 Ω terminator
Coaxial Cable
Figure 11: Crosstalk test setup
3. Set the pulse generator as follows:
H Set the compliment to --
H Adjust the period to 15 kHz
H Adjust the pulse duration to 5 s
H Set the high level to 0 V
H Set the low level to --300 mV
4. Set the Video Display Clamp as follows:
H Polarity to -- (negative)
H Filter to Off
5. Set the test oscilloscope to display channel 1 (channel 2 off).
2.5X attenuator
14
6. Verify that any interference on the high level of the pulse is <10 mV
Figure 12).
013-0278-00 Video Display Clamp
p-p
(see
Page 25

Test signal (channel 2) Corrected signal (channel 1)
Figure 12: Measuring interference
Performance Verification
7. Switch the Video Display Clamp Polarity to + (positive) then back to --
(negative).
8. Verify that the pulse display returns to its original position within ±1mV.
9. Set the test oscilloscope sec/div scale to 500 ns.
10. Using Figure 13 as a reference, measure the time intervals marked A and B.
H Verify that interval A is between 2.08 s and 2.28 s.
H Verify that interval B is between 600 ns and 700 ns.
Interval A Interval B
Figure 13: Measuring timing intervals
013-0278-00 Video Display Clamp
15
Page 26

Performance Verification
Bandwidth Check
These procedures check those characteristics that relate to the bandwidth of the
Video Display Clamp listed as checked under Warranted Characteristics in the
Specifications section.
Equipment Required: One sinewave generator (Item 6), one precision coaxial
cable (Item 2), one 50 Ω terminator (Item 3), and one dual-input coupler
(Item 5).
1. Set the test oscilloscope as follows:
H Set the sec/div scale to 10 ns
H Set the channel 1 and channel 2 volts/div scales to 200 mV, AC coupled
H Position both the channel 1 and channel 2 traces to center screen
H Display channel 2 (channel 1 off)
2. Connect the output of the sinewave generator to the test oscilloscope as
shown in Figure 14.
NOTE. This test setup provides a display of the test signal on channel 2 and a
clamped test signal on channel 1.
Sinewave
Generator
Video display clamp
Coaxial cable
Figure 14: Bandwidth test setup
3. Set the sinewave generator as follows:
H Adjustthefrequencyto30MHz
H Adjust the amplitude for a 1 V
p-p
Dual-input
coupler
display.
50 Ω terminator
16
013-0278-00 Video Display Clamp
Page 27

Performance Verification
4. Set the Video Display Clamp as follows:
H Polarity to -- (negative)
H Filter to Off
5. Set the test oscilloscope to display channel 1 (channel 2 off).
60 Hz Rejection Check
6. Verify that the signal display amplitude is greater than 892 mV
p-p
.
These procedures check those characteristics that relate to the 60 Hz rejection
capability of the Video Display Clamp listed as checked under Warranted
Characteristics in the Specifications section.
Equipment Required: One test oscilloscope (Item 1), one pulse generator
(Item 8), one sinewave generator (Item 7), one 2.5X attenuator (Item 4), two
dual-input couplers (Item 5), and one precision coaxial cable (Item 2).
1. Set the test oscilloscope as follows:
H Set the sec/div scale to 10 s
H Set both channel 1 and channel 2 volts/div scales to 200 mV, DC
coupled.
H Position both channel 1 and 2 traces to center screen
H Display channel 2 (channel 1 off)
2. Connect the output of the pulse generator and the sinewave generator to the
test oscilloscope as shown in Figure 15.
NOTE. This test setup provides a display of the test signal on channel 2 and a
clamped test signal on channel 1.
013-0278-00 Video Display Clamp
17
Page 28

Performance Verification
Sinewave
Generator
Dual-input
coupler
Pulse
Generator
2.5X attenuator
Video display clamp
Coaxial cable
Figure 15: 60 Hz rejection test setup
3. Set the Video Display Clamp as follows:
H Polarity to -- (negative)
H Filter to Off
4. Set the sinewave generator as follows:
Dual-input
coupler
H Set the frequency to 60 Hz
H Adjust the amplitude to 0 V
5. Set the pulse generator as follows:
H Set the compliment to --
H Adjust the period to 15 kHz
H Adjust the pulse duration to 5 s
H Set the high level to 150 mV
H Set the low level to --420 mV
6. Set the test oscilloscope sec/div to 2 ms.
7. Set the sinewave generator amplitude to create a 1 V
display of the 60 Hz
p-p
sinewave.
8. Set the test oscilloscope to display channel 1 (channel 2 off).
9. Verify that the amplitude of the 60 Hz sinewave component of the waveform
is ≤70 mV
(see Figure 16).
p-p
18
013-0278-00 Video Display Clamp
Page 29

Test signal (channel 2) Corrected signal (channel 1)
Figure 16: 60 Hz rejection check (negative)
Performance Verification
10. Set the compliment of the pulse generator to +.
11. Set the Video Display Clamp Polarity to + (positive).
12. Verify that the amplitude of the 60 Hz sinewave component of the waveform
is ≤70 mV
(see Figure 17).
p-p
Figure 17: 60 Hz rejection check (positive)
013-0278-00 Video Display Clamp
19
Page 30

Performance Verification
20
013-0278-00 Video Display Clamp
Page 31

Maintenance
Service Information
This subsection provides you with the service information for the Video Display
Clamp.
Replacing the Contact
Pins
There are no user serviceable parts inside the case of the Video Display Clamp.
The TEKPROBE
Video Display Clamp.
If the contact pins become damaged, obtain replacement pins through your
nearest Tektronix Field Office or representative. Use the following procedure to
replace a damaged contact pin.
1. Using a pair of needle-nosed pliers, grasp the damaged pin and pull the pin
straight out of the assembly (see Figure 18). Note the location of the
removed pin.
2. Using the needle-nosed pliers, grasp the replacement pin and carefully insert
the pin into the assembly. Use care to avoid crushing or bending the new pin
during installation.
3. Verify that the new pin is installed to the same depth as the other pins.
TM
interface contact pins are the only replaceable part of the
Remove Pin
with Pliers
Figure 18: Replacing t he contact pins
013-0278-00 Video Display Clamp
21
Page 32

Maintenance
22
013-0278-00 Video Display Clamp
 Loading...